

Page 1
THERMADOR PRO GRAND® Range
Quick Reference Guide
IMPORTANT:
This reference guide is not a substitute for the Use & Care Guide. Before using this product, read the appliance Use & Care Guide
for important safety messages and additional information regarding the use of your new appliance.
NOTE: Not all items discussed will apply to all models.
The use of brand names is intended only to indicate a type of cleaner. This does not constitute an endorsement. The omission of any
brand name cleaner does not imply its adequacy or inadequacy. Many products are regional in distribution and can be found in the local
markets. It is imperative that all products be used in strict accordance with instructions.
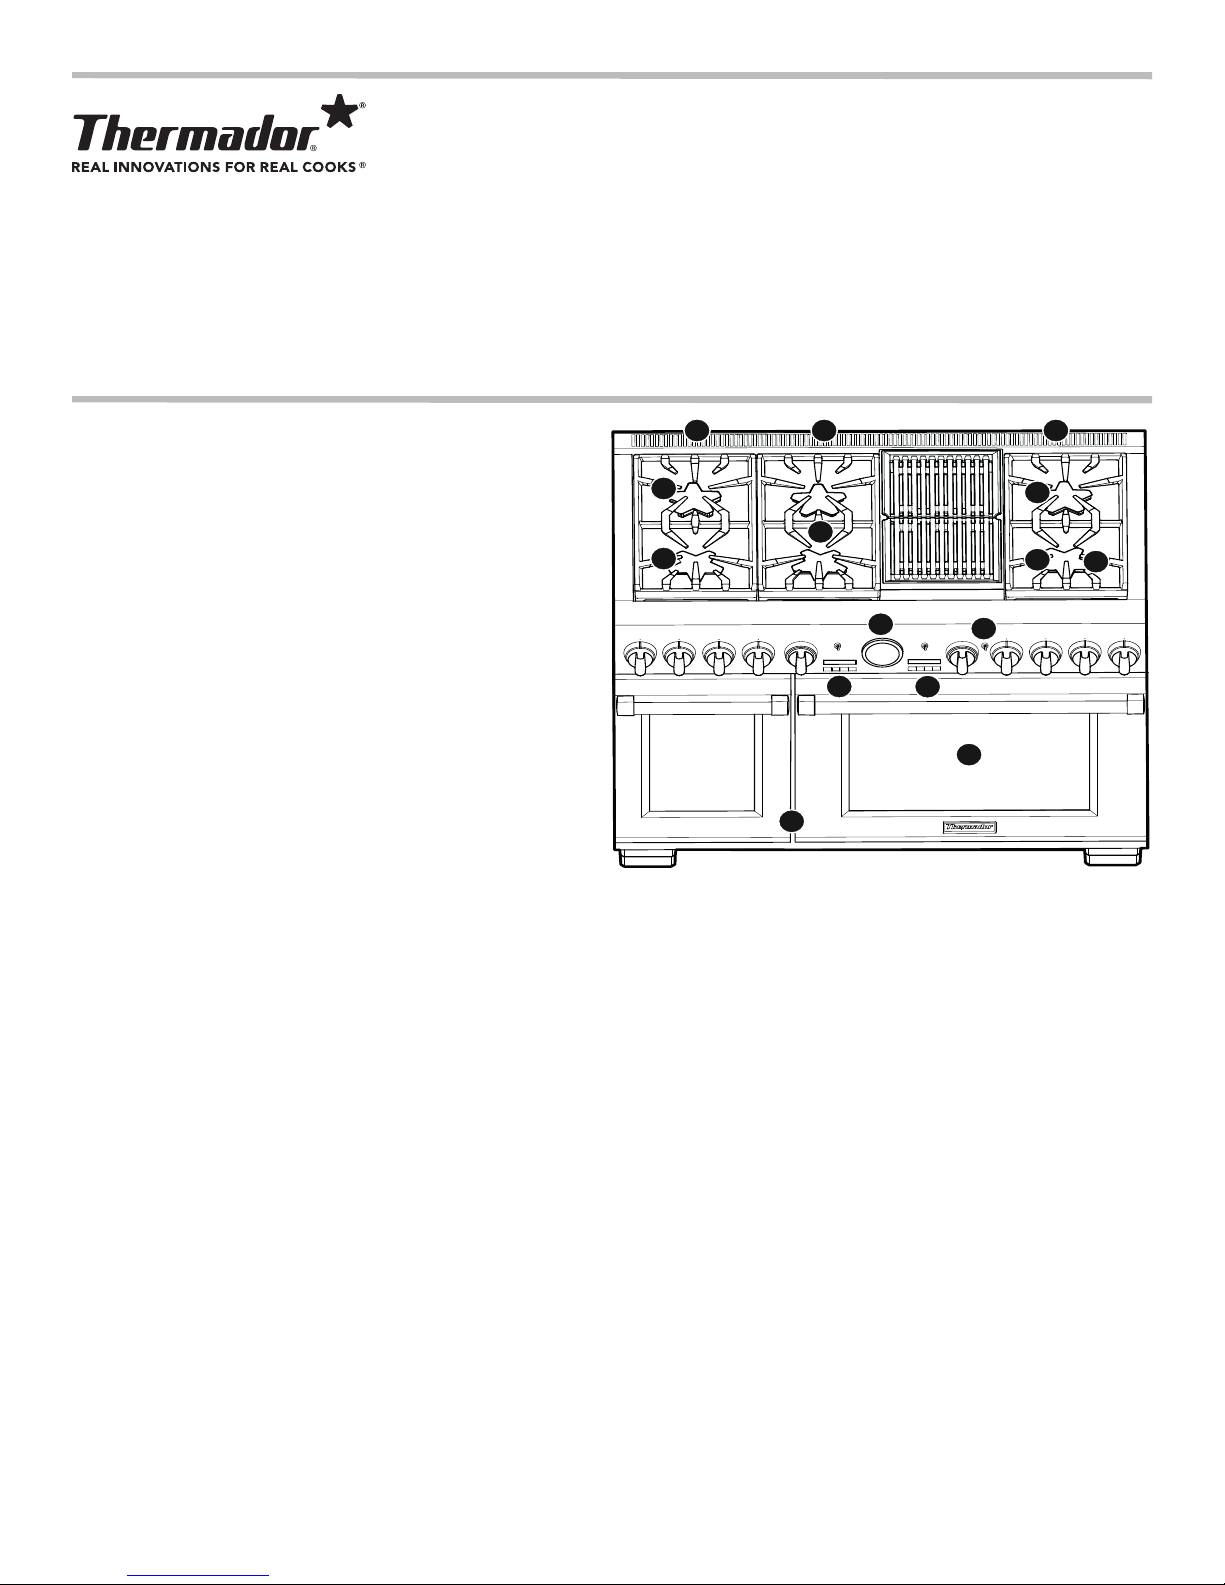
GETTING TO KNOW YOUR NEW
44 4444
RANGE
1. The ExtraLow® feature cycles on and off to maintain
temperatures as low as 100°F. XLO is perfect for simmering
delicate sauces or keeping food warm without scorching.
11
33
11
To access, turn the burner knob to XLO, the very lowest
setting.
off for 53 seconds. When the knob is rotated just beyond the
The burner will turn on for 7 seconds and then turn
55
SIM setting, the flame will cycle on for approximately 54
seconds and off for 6 seconds. This cycle repeats itself until
the burner is turned to a different setting or off.
2. The 22,000 BTU POWERBOOST
®
burner is 4,000 BTU
77
77
greater on its highest setting than any other burner. It offers
the convenience to quickly boil water, sear steaks, stir-fry
88
vegetables, etc.
To access, turn the front, right burner knob to XHI. Use of the
XLO remains the same as the other XLO Knobs.
3. The pedestal STAR
®
Burner with QuickClean® Base is
designed for easy surface cleaning and superior heat spread
for any size pan.
99
Model shown is a 48” with a large and small oven
If any one or more burners blow out, the electronic igniter automatically activates to re-light the flame.
4. The cooling blowers activate after the oven reaches 300°F. When the oven is turned off, the blowers remain on until the oven
temperature cools below 250°F
.
5. During a cook mode, the needle of the temperature gauge will move to the new selected temperature setting if the temperature
setting is increased or decreased.
As the oven cools down, the temperature gauge will reduce, to reflect the cooling oven
temperature.
6. Panel lighting provides function and stylish aesthetics.
7. Electronic oven display(s) includes a Kitchen Timer and a Cook Timer.
The Kitchen Timer functions like a conventional timer that will count down and beep when the desired time has ended. It can be
used despite whether the range is in operation and independently of all other functions. It does not af
fect how the oven operates.
The Cook Timer is intended to mechanically shut the oven off when the desired cooking time is complete. The Cook Timer function
is available for all of the primary cooking modes except for Self-Clean mode.
8. Full Access
®
telescopic gliding oven racks has an integrated easy-grip handle. Each gliding rack can be pulled out and pushed back
into the oven with minimal effort.
Always remove the oven racks before self-cleaning the oven. If the gliding racks remain in the oven during Self-Clean, lubricants in
the glide mechanisms of each rack will be lost and the finish will discolor
9. SoftClose
®
hinges for ultra smooth closing of the oven door(s).
.
11
11
22
66
English 1
Page 2
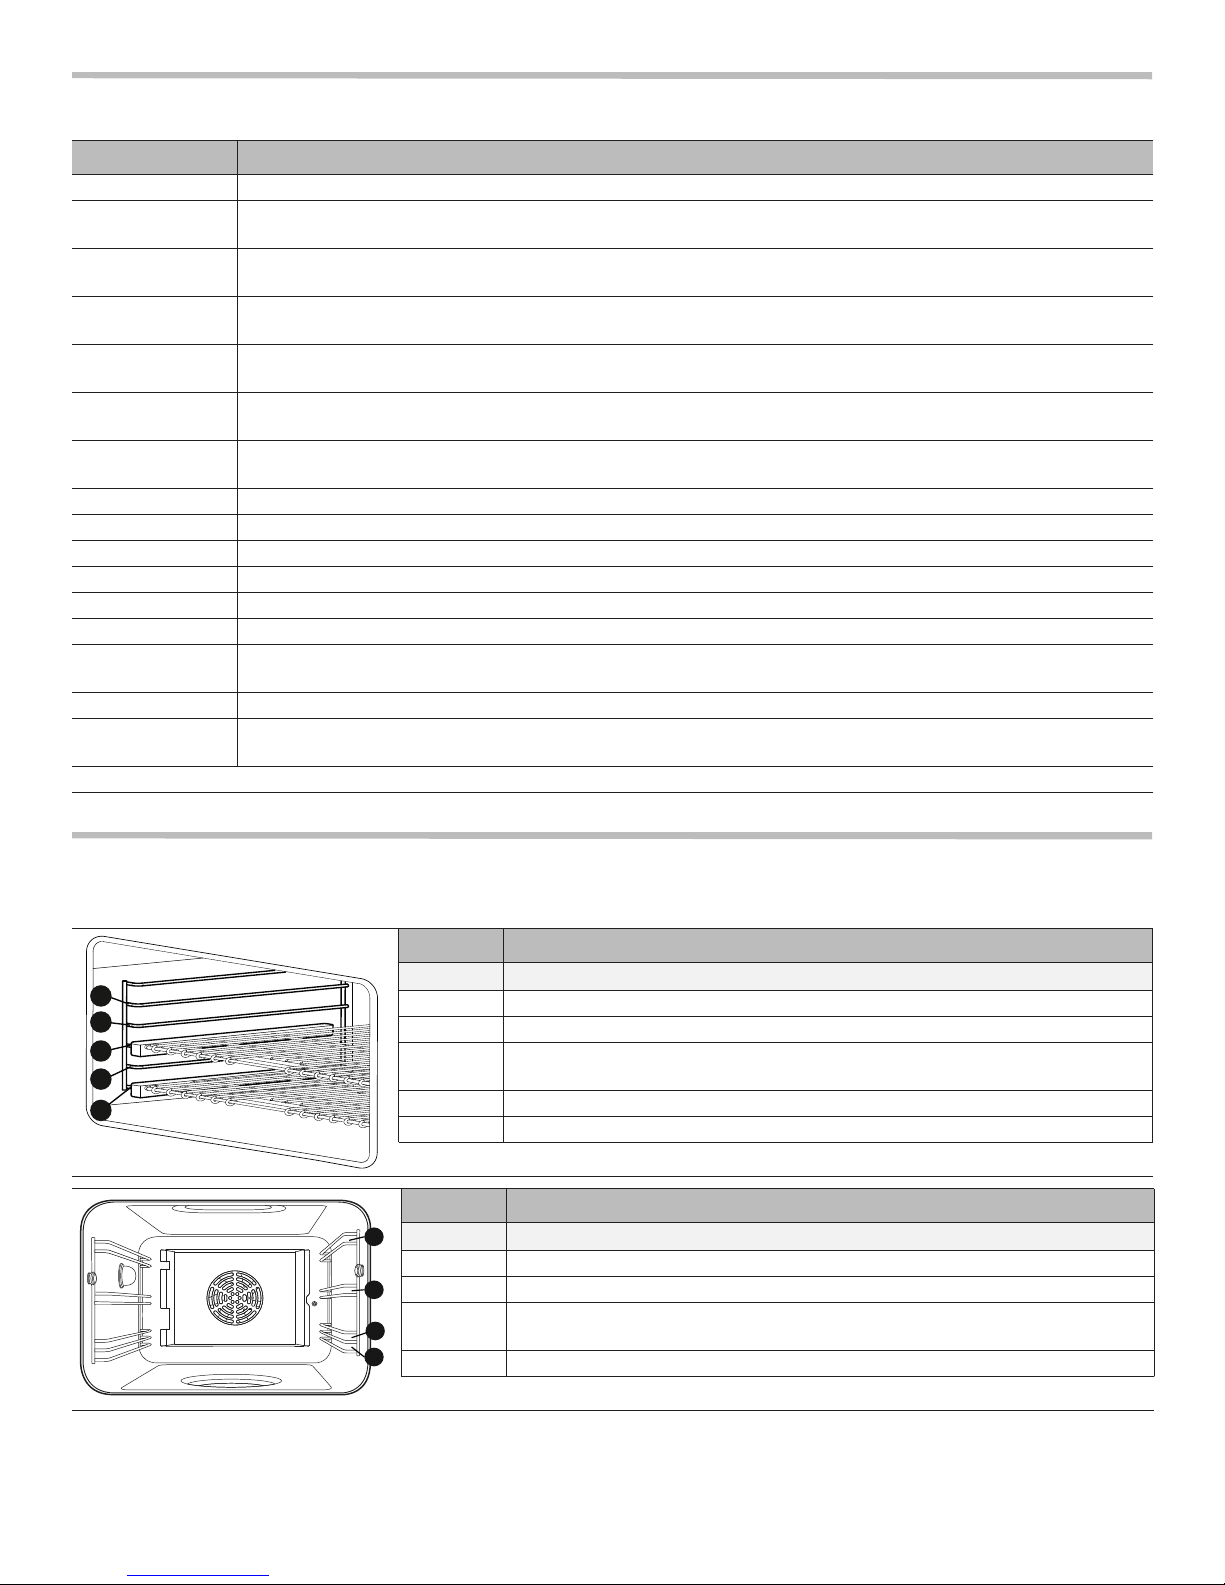
PRO GRAND OVEN MODES AND DESCRIPTION USAGE
MODE USE
BAKE Cooks with dry, heated air. Variety of foods, such as cakes, cookies, pastries, quick breads, quiche and casseroles
CONVEC BAKE Similar to Bake, but air is circulated by a fan at the back of the oven. Best for baked goods such as cakes,
cornbread, pies, quick breads, tarts, and yeast breads.
KEEP WARM Maintains a low temperature in order to keep food hot. Best for baked goods such as cakes, cornbread, pies, quick
breads, tarts, and yeast breads.
CONVEC ROAST Uses lower and more intense heat from upper element than Convection Bake with air circulated by a fan. Tender
cuts of meat and poultry. Roasting vegetables. Meats are more juicy and moist than results with Roast mode
ROAST Uses more intense heat from upper element, more browning of exterior. Best suited for meats, poultry, less tender
cuts of meats and roasting vegetables.
CONVEC BROIL Combines intense heat from upper element with fan circulation. Tender cuts of meat (more than 1"), poultry and
fish. Not for browning.
BROIL Uses intense heat radiated from the upper element. Tender cuts of meat (1" or less), poultry, browning bread &
casseroles.
STEAM* Steams vegetables, fish, and side dishes; extracts juices.
STEAM CONVEC* Combines steam and convection oven modes. Use for meat, soufflés and baked goods.
PROOF Proof (raises) yeast dough and sourdough.
SLOW COOK* Slowly roasts meats so they remain very tender. Place food in oven after PREHEAT.
DEFROST* Defrosts fruits, vegetables, meats and fish for cooking or serving.
REHEAT* Gently reheats cooked foods in plated dishes and baked dishes.
TRUE CONVEC* Operates as a convection oven, with no steam. Place food in oven after PREHEAT. Use for moist cakes, sponge
cakes and braised meat.
EASY COOK* Sets automatic programming.
SELF CLEAN or
STEAM CLEAN*
*Steam range models only
Self cleans the oven.
RACK LEVELS
Do not handle the rack when it is hot. Make sure the oven rack is in the desired position before preheating the oven
MAIN OVEN CAVITY
55
44
33
22
11
LEVELS BEST FOR
5 Hamburgers, steaks, toasting bread, broiling most meats, melting cheese
4 Best for two rack cooking. Broiling in Gas units.
3
Most baked goods on cookie sheet or baking pan, frozen foods, cakes,
casseroles, frozen pizza
2 Roasting most meats
1 Large roasts, turkey, angel food cake
STEAM OVEN CAVITY
44
LEVELS BEST FOR
4 Best for two rack cooking
33
22
11
3 Vegetables, fish, rice, reheat pizza
2
Most baked goods on cookie sheet or baking pan, roasting most meats, frozen
foods, cakes, casseroles, frozen pizza
1 Large roasts, turkey, angel food cake
.
English 2
Page 3

OPERATION
SETTING THE KITCHEN TIMERS
1. Press ENTER. With the +/– buttons, move the arrow (>) to KITCHEN TIMER and press ENTER again.
2. Using the +/– buttons, select the desired countdown time in 1 minute increments. Hold down +/– button to set by 5 minute
increments. Press ENTER to begin the timer countdown.
— When the timer reaches “0:00”, the display will emit a repeated beep to signal the end of the countdown.
3. Press CANCEL to disable the beep.
U
SING THE MEAT PROBE
1. Insert the plug end into the outlet and the probe end into the meat.
2. Close the oven door.
3. Select the desired COOKING MODE and OVEN TEMPERATURE using the knobs on the control panel. Press ENTER.
4. With the +/– buttons, set the desired PROBE TEMPERATURE. Press ENTER.
S
ETTING EASY COOK
1. Turn the Mode Selector Knob to EASY COOK.
2. Use the +/– buttons to scroll through the list of choices. Select the desired food grouping and press ENTER.
3. Use the +/– buttons to scroll through the sub-group choices under that food grouping. Press ENTER.
4. Use the +/– buttons to adjust the weight. Press ENTER.
5. The display will show the rack level and specific ovenware/accessories that should be used. Press ENTER.
S
TEAM-CLEANING THE OVEN
NOTE: Steam Cleaning requires 3 start/stop cycles to complete its operation. Steam Clean cannot be aborted once started. All
three cycles must be completed before the appliance will become operational again.
1. Let the oven cool down and remove any accessories. Using a cleaning sponge, clean the evaporator dish.
2. Fill the water tank to MAX.
3. Add a drop of dishwashing liquid to the evaporator dish.
4. On the display, under the SETTINGS menu, scroll with the +/– buttons to STEAM CLEAN and press ENTER.
5. The display will then show START STEAM CLEAN? YES. Press ENTER again.
Cleaning Phase (cycle 1)
At the end of the cleaning phase (about 30 minutes), the countdown will be suspended and a buzzer will sound. The display will show
CLEAN DISH on the first line and PRESS ENTER BUTTON on the second line. DO NOT press ENTER before following the instructions
below.
First Rinse (cycle 2)
1. Wipe out the food residues from the oven and the evaporator dish. Thoroughly rinse out the cleaning sponge.
2. Check the water tank, refill it, and slide it back in. Press ENTER to start the first rinse cycle. After a short time (about 20 seconds), a
beep will signal the end of the first rinse. The display will show CLEAN DISH on the first line and PRESS ENTER BUTTON on the
second line.
3. Using the cleaning sponge, wipe out the evaporator dish. Thoroughly rinse out the cleaning sponge.
Second Rinse (cycle 3)
1. Press ENTER to start the second rinse cycle. The countdown will resume, and after another 20 seconds a beep will signal the end of
STEAM CLEAN.
2. Using the cleaning sponge, wipe any remaining water from the evaporator dish, and wipe down the oven. Thoroughly rinse out the
cleaning sponge. Using a soft cloth, dry the oven cavity.
®
PROGRAMS
English 3
Page 4
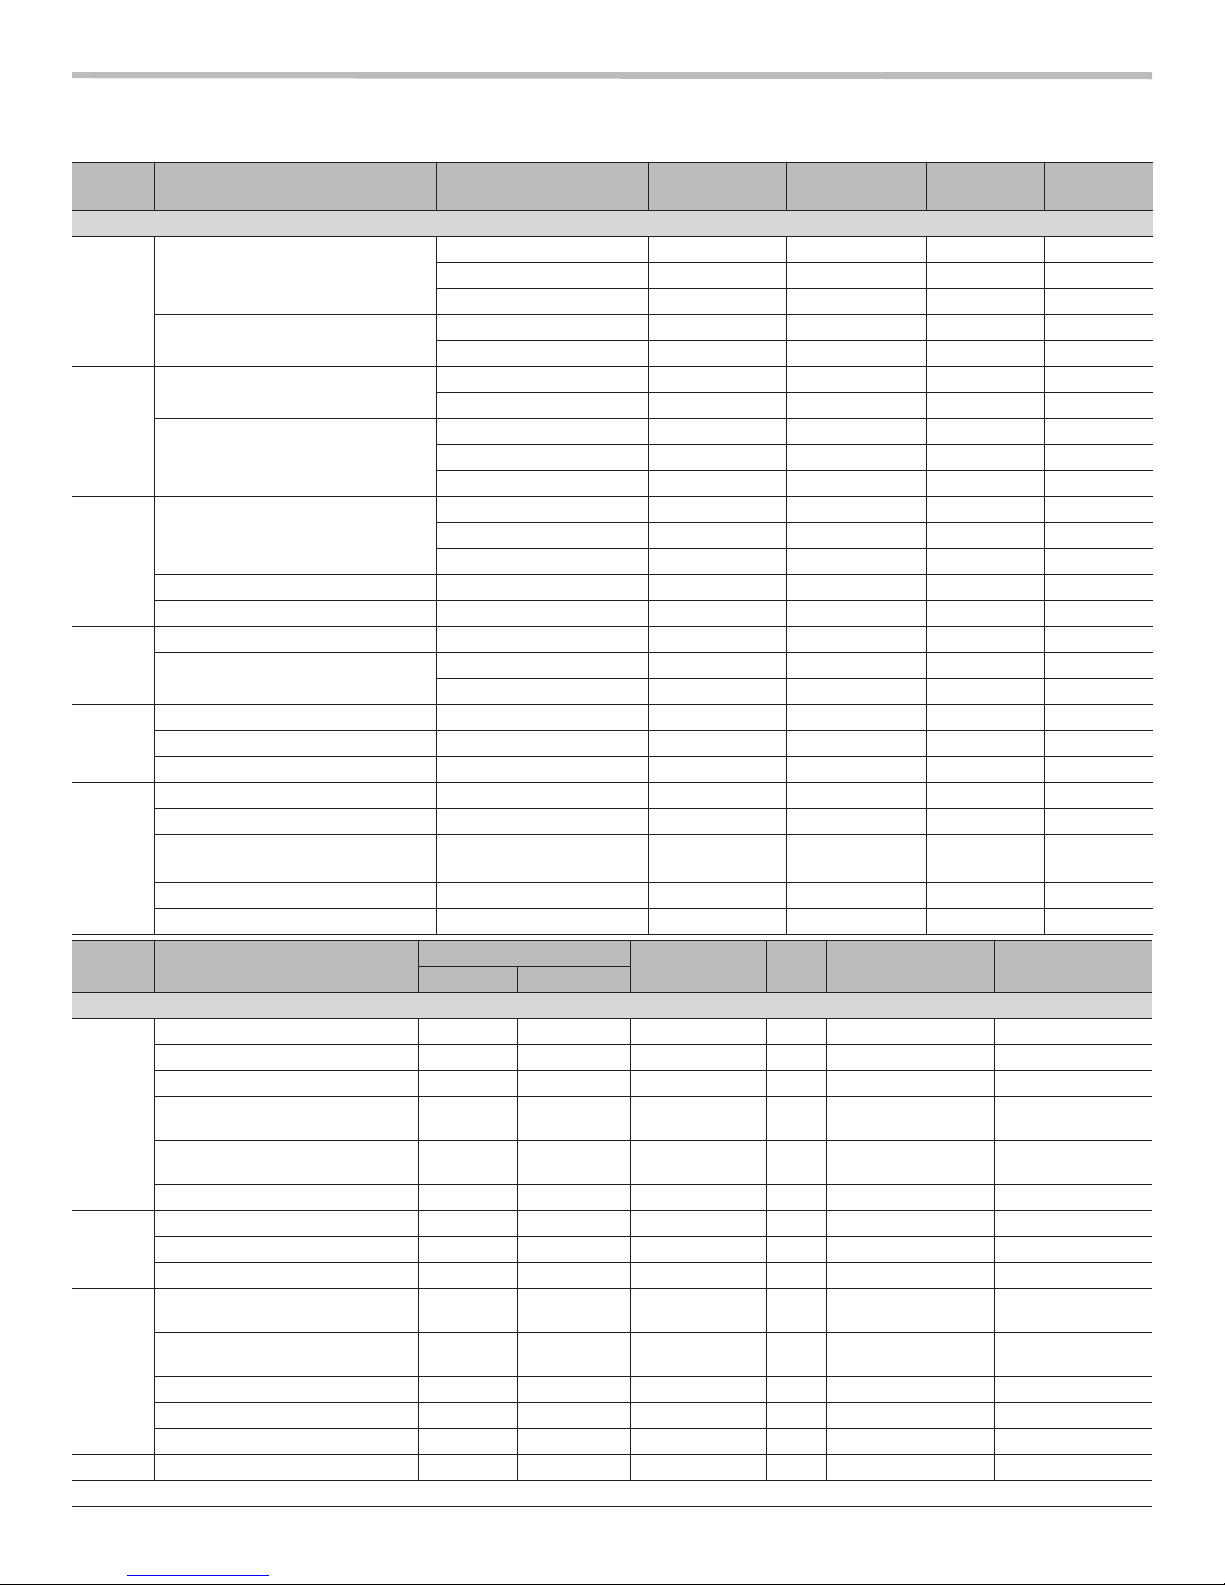
COOKING CHARTS
Note: Cook times are approximate and may vary depending on the food.
TYPE FOOD RECOMMENDED MODE OVEN TEMP. NO. OF RACKS RACK
POSITION(S)
BAKED GOODS
Cakes Cupcakes Bake 350°F 1 3 17 - 24
Convection Bake 325°F 2 2 & 4 17 - 23
Convection Bake 325°F 3 1, 3 & 5 17 - 23
Cakes Bake 350°F 1 3 23 - 31
Convection Bake 325°F 2 2 & 4 23 - 30
Cookies Brownies Bake 350°F 1 3 33 - 41
Convection Bake 325°F 1 3 33 - 40
Cookies Bake 350°F 1 3 8 - 17
Convection Bake 325°F 2 2 & 4 8 - 17
Convection Bake 325°F 3 1, 3 & 5 8 - 17
Breads Biscuits/Muffins Bake 350°F 1 3 12 - 20
Convection Bake 325°F 2 2 & 4 10 - 20
Convection Bake 325°F 3 1, 3 & 5 10 - 20
Quick Bread Convection Bake 350°F 1 2 48 - 60
Yeast Bread Convection Bake 400°F 1 2 22 - 35
Pie Fruit, Fresh Bake 400°F 1 2 35 - 50
Pumpkin Bake 425°F 1 2 15
Bake 350°F 1 2 35 - 45
Pizza Frozen, thin crust Bake 425°F 1 3 recipe time
Frozen, thick crust Bake 425°F 1 3 recipe time
Fresh Bake 425°F 1 3 recipe time
Entrees Casseroles Bake 350 - 400°F 1 3 per recipe
Frozen (nuggets, fish sticks, fries) Bake per package
Garlic Bread Broil Broil 5 – Dual Fuel
Quiche Bake 425°F 1 3 15 - 30
Vegetables, roasted Roast / Convection Roast 400 - 500°F 1 3 15 - 30
TYPE FOOD
MEAT, FISH, POULTRY
Beef Chuck Roast (2-3 lbs) Roast Roast 350°F 2 Well, 170°F 1 1/2 - 2 hr
Beef roast boneless 3 - 5.5 lbs Roast Conv Roast 325°F 2 Med-rare, 145°F 18-33 min/lb
Beef roast boneless 3 - 5.5 lbs Roast Conv Roast 325°F 2 Medium, 160°F 30-35 min/lb
Steaks, 1 inch thick Broil Broil Broil 4 Med-rare, 145°F side 1 - 5-8 min.
Steaks, 1 inch thick Broil Broil Broil 4 Medium, 160°F side 1 - 8-9 min.
Meatloaf, 1 - 2 lbs. Roast Roast 350°F 3 160°F 50 - 60 min.
Pork Pork Loin Roast, 1.5 - 3 lbs. Roast Conv. Roast 350°F 2 Medium, 160°F 19 - 36 min/lb
Pork Loin Roast, 3 - 6 lbs. Roast Conv. Roast 350°F 2 Medium, 160°F 19 - 36 min/lb
Tenderloin, 1.5 - 3 lbs. Roast Conv. Roast 425°F 2 Medium rare, 145°F 15 - 28 min/lb
Poultry Chicken breasts, bone-in Broil Conv. Broil Broil 2 170° F side 1 - 18-22 min.
Chicken thighs, bone-in Broil Broil Broil 3 180° F in thigh side 1 - 14-15 min.
Chicken, whole 3.5 - 8 lbs. Roast Conv. Roast 375° F 2 180° F in thigh 13 - 20 min/lb
Turkey, unstuffed, 12 - 19 lbs. Roast Conv. Roast 325° F 2 180° F in thigh 9 - 14 min/lb
Turkey, unstuffed, 20 - 25 lbs. Roast Conv. Roast 325° F 2 180° F in thigh 6 - 12 min/lb
Fish Fish Filets, 3/4” to 1” thick Broil Broil Broil 3 145° F 11 - 15 min.
* In models with convection. The convection temperatures have been reduced 25°F from the recipe’s or package’s directions.
RECOMMENDED MODE
Non-Conv Convection
OVEN TEMP. RACK
1 3 per package
4 – Gas
INTERNAL
TEMPERATURE
TIME (MINUTES)
side 2 - 14-6 min.
side 2 - 5-7 min.
side 2 - 12-13 min.
side 2 - 17-20 min.
TIME
(MINUTES)
15 - 30
English 4
Page 5
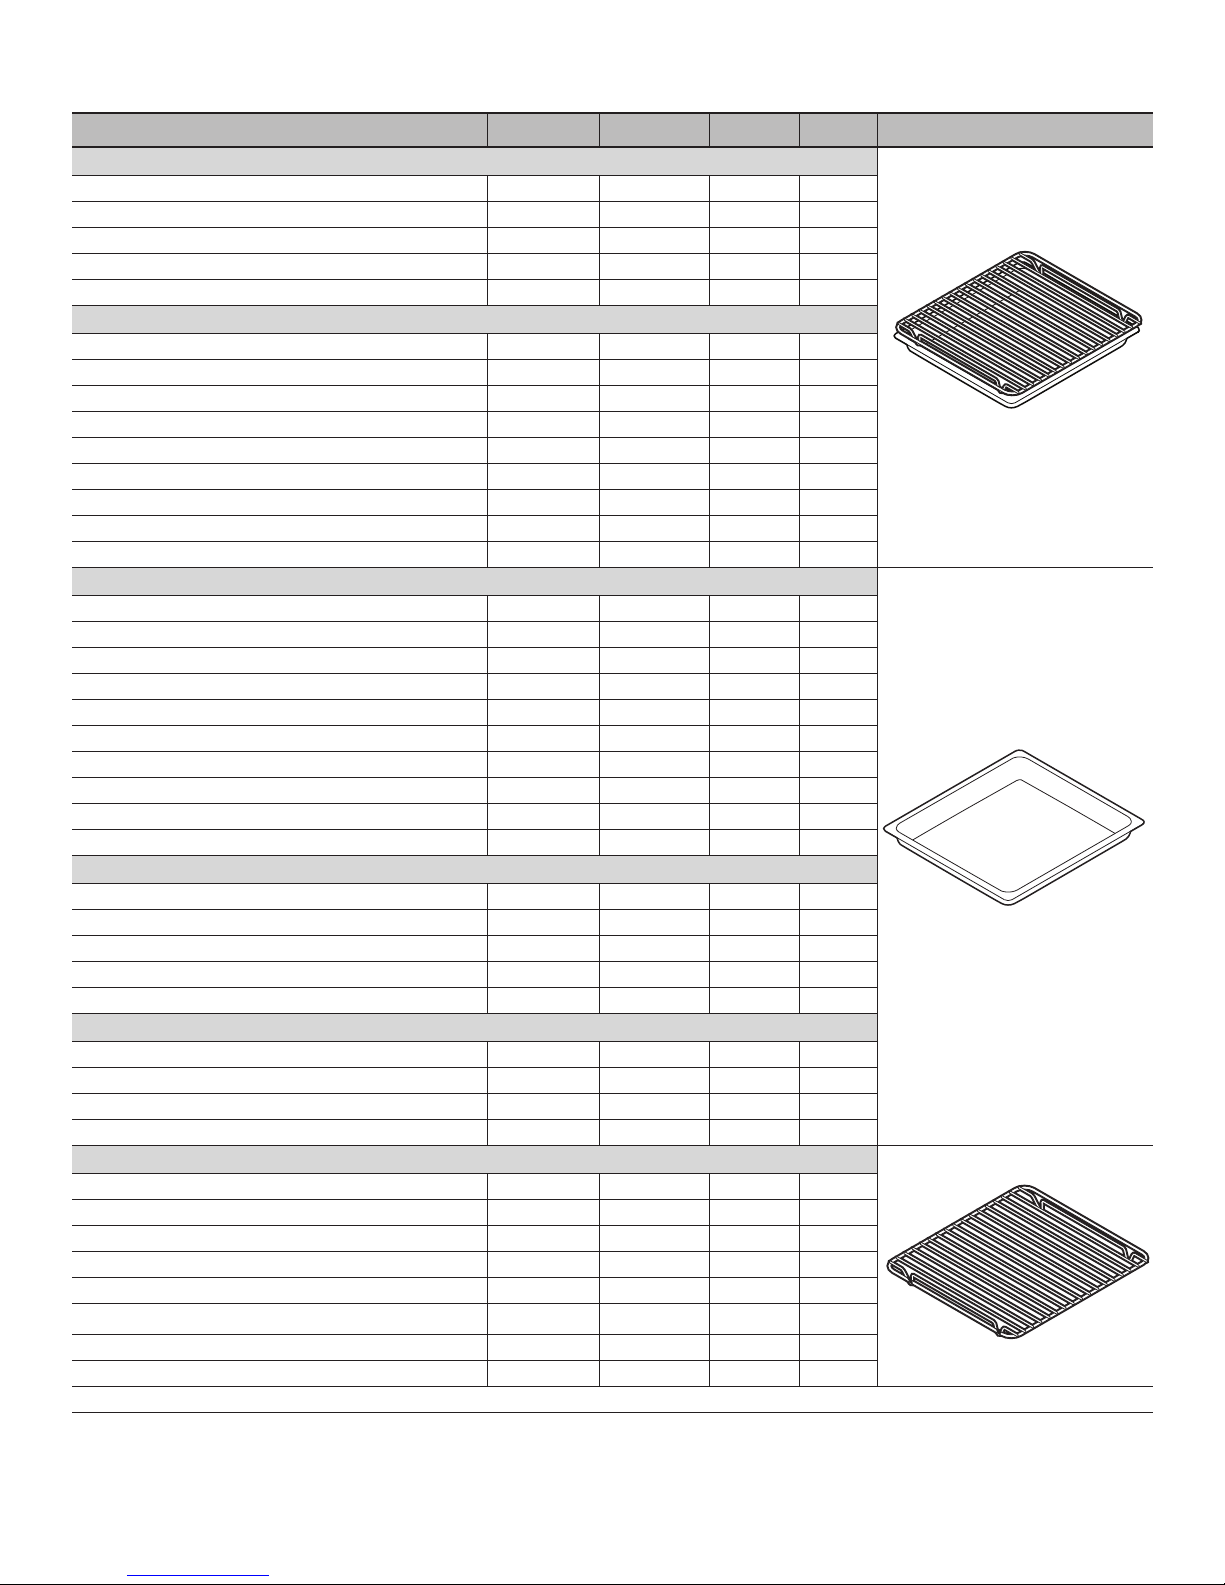
COMMONLY COOKED FOODS COOKED IN THE BUILT-IN STEAM AND CONVECTION OVEN
Baking pan
Wire rack
on
Baking pan
Wire rack
FOOD MODE TEMP MINUTES LEVELS ACCESSORIES
FROZEN PRODUCTS
French fries True Conv 375ÛF 25 – 35 2
Lasagna, frozen Steam Conv 375ÛF 35 – 55 2
Pizza, thin crust True Conv 375ÛF 15 – 23 2
Pizza, deep dish True Conv 375ÛF 18 – 25 2
Frozen fish fillets Steam Conv 375ÛF 35 – 50 2
POULTRY | MEATS | SEAFOOD
Chicken, whole 2.65 lbs. Steam Conv 375ÛF 50 – 60 2
Chicken pieces, per 2.65 lbs. Steam Conv 375ÛF 20 – 35 2
Turkey, whole, unstuffed Steam Conv 325ÛF 80 – 95 2
Pot-roasted beef, 3.5 lbs.* Reheat 300ÛF 100 – 140 2
Filet of beef, medium, 2 lbs.* Reheat 350ÛF 20 – 28 2
Thick sliced sirloin, med.; 2 lbs.* True Conv 350ÛF 45 – 60 2
Pork chop, boneless, 1.2 lbs. Steam Conv 300ÛF 75 – 120 2
Clams, oysters, 0.33 lbs. Steam 212ÛF 10 – 15 2
Meat loaf (ground meat), 1.2 lbs. Steam Conv 350ÛF 45 – 60 2
STARCHES | GRAINS | BREADS
Potato gratin Steam 212ÛF 35 – 45 2
Brown rice Steam 212ÛF 30 – 40 2
Long grain rice Steam 212ÛF 20 – 30 2
Lentils Steam 212ÛF 30 – 45 2
Couscous Steam 212ÛF 6 – 10 2
Canellini beans (pre-softened) Steam 212ÛF 65 – 75 2
White bread, 1.7 lbs. Steam Conv 400ÛF 15 – 20 2
Multi-grain bread, Steam Conv 400ÛF 15 – 20 2
Whole grain bread, 1.7 lbs. Steam Conv 400ÛF 20 – 30 2
Biscuits* True Conv 300ÛF 12 – 17 2
SLOW COOK
Boned leg of lamb, 2 – 3.5 lbs. Slow Cook 175ÛF 140 – 160 2
Roast beef, 3.5 – 5.5 lbs. Slow Cook 175ÛF 150 – 180 2
Pork fillets Slow Cook 175ÛF 50 – 70 2
Beef steaks, 1.2” thick Slow Cook 175ÛF 40 – 80 2
Duck breast Slow Cook 175ÛF 35 – 55 2
REHEATING FOODS
Pizza Reheat 350ÛF 12 – 15 3
Vegetables Reheat 250ÛF 12 – 18 2
Bread* Reheat 350ÛF 8 – 12 2
Noodles, potatoes, rice Reheat 210ÛF 5 – 10 3
CAKES | SMALL BAKED PRODUCTS
Muffins** True Conv 350ÛF 20 – 30 2
Sponge cake** True Conv 300ÛF 60 – 70 2
Chocolate chip cookies** True Conv 325ÛF 9 – 13 3
Sugar cookies** True Conv 325ÛF 7 – 10 3
Sheet cake** Steam Conv 325ÛF 35 – 45 2
®**
Bundt
Yeast dough, proofing** Proof 100ÛF 20 – 30 1
Sourdough, proofing** Proof 100ÛF 20 – 30 1
**Costumer should use their own bakeware.
True Conv 325ÛF 35 – 45 2
Wire rack
Baking pan
Baking pan
Wire rack
Wire rack
on
on
English 5
Page 6
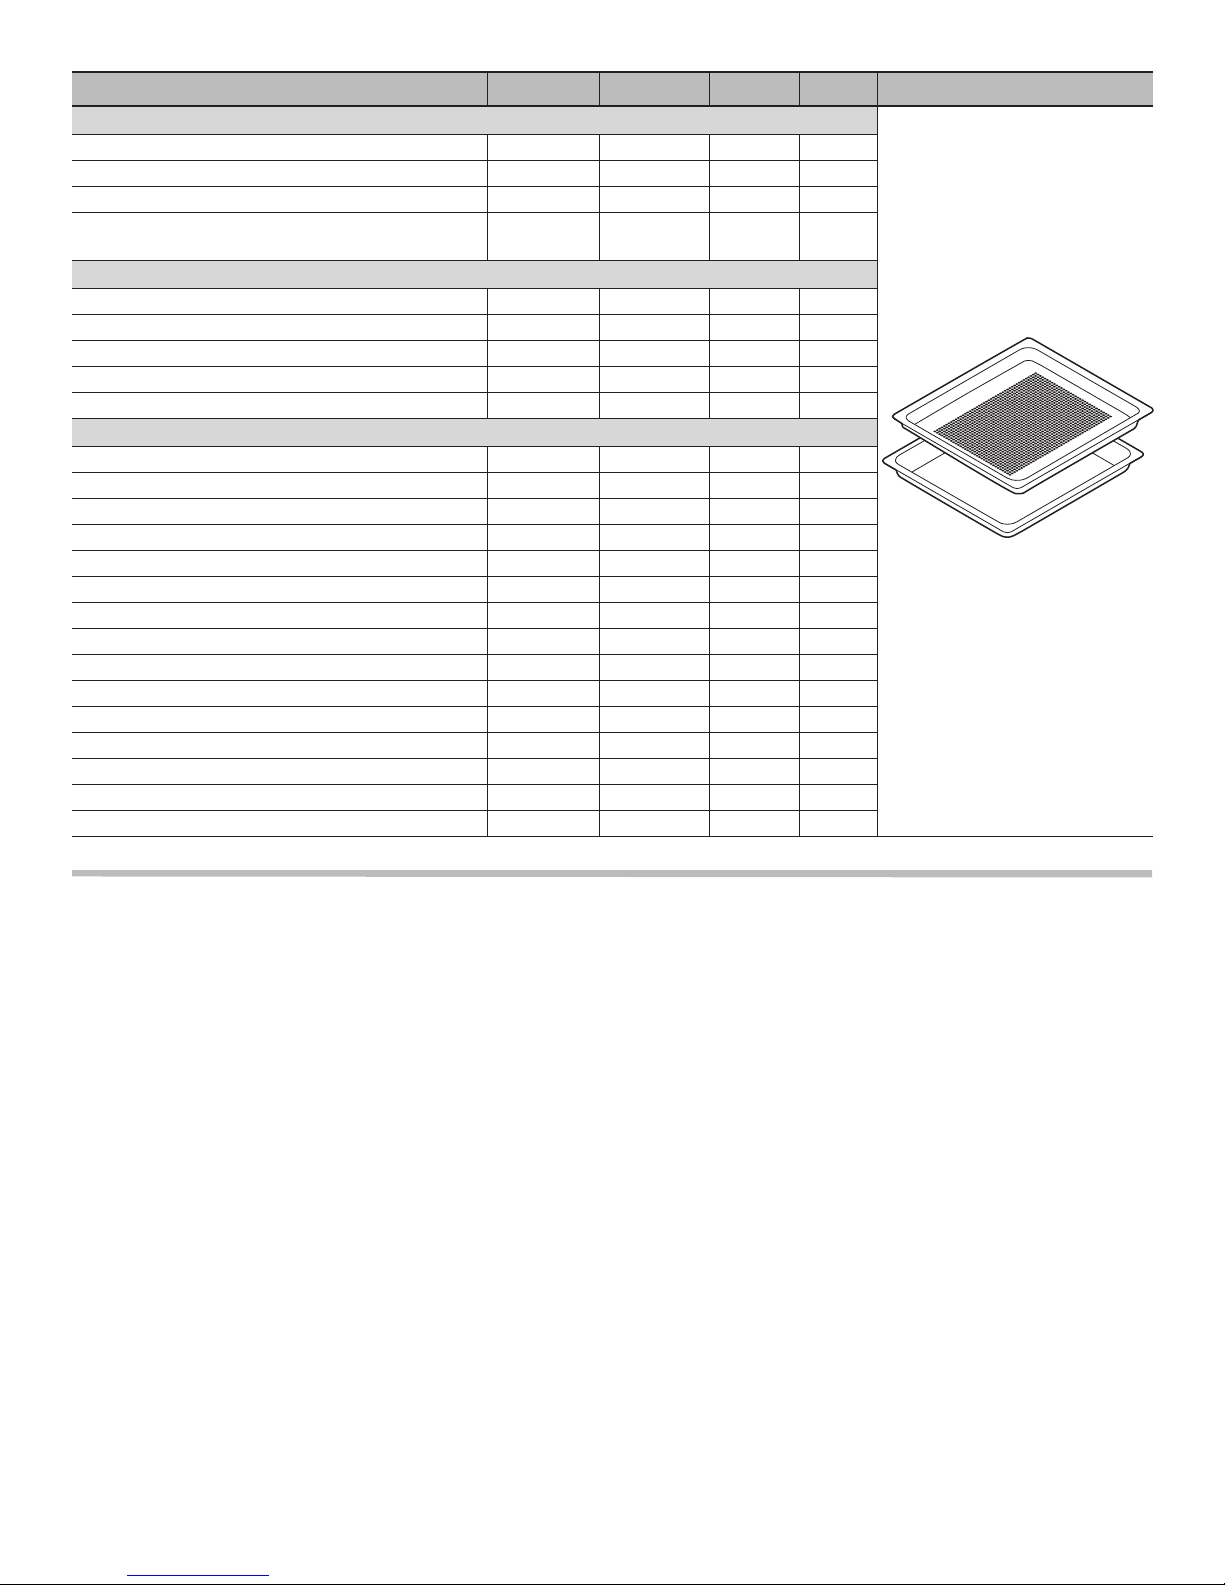
FOOD MODE TEMP MINUTES LEVELS ACCESSORIES
Baking pan
Perforated pan
above
POTATOES | FISH
Potatoes (unpeeled) Steam 212ÛF 35 – 45 1 + 3
Potatoes (peeled) Steam 212ÛF 20 – 25 1 + 3
Shrimp, medium, per 1 lb Steam 212ÛF 5 – 8 1 + 3
Fish Fillet, per 3.5 lbs. (baking pan only, or
customer dish on rack)
DEFROSTING FOODS
Chicken parts, bone-in Defrost 120ÛF 60 – 70 1 + 3
Chicken parts, boneless Defrost 120ÛF 30 – 35 1 + 3
Frozen vegetables
Fish fillets Defrost 120ÛF 15 – 20 1 + 3
Beef Defrost 120ÛF 70 – 80 1 + 3
VEGETABLES
Artichokes Steam 212ÛF 30 – 35 1 + 3
Asparagus* Steam 212ÛF 7 – 12 1 + 3
Beets Steam 212ÛF 40 – 50 1 + 3
Broccoli Steam 212ÛF 8 – 10 1 + 3
Brussels sprouts Steam 212ÛF 20 – 30 1 + 3
Cabbage Steam 212ÛF 25 – 35 1 + 3
Carrots Steam 212ÛF 10 – 20 1 + 3
Cauliflower Steam 212ÛF 10 – 15 1 + 3
Fennel Steam 212ÛF 10 – 14 1 + 3
Green beans Steam 212ÛF 15 – 20 1 + 3
Peas Steam 212ÛF 5 – 10 1 + 3
Pea pods Steam 212ÛF 8 – 12 1 + 3
Spinach* Steam 212ÛF 2 – 3 1 + 3
Stuffed vegetables (zucchini, eggplant, peppers) Steam Conv 320 – 360ÛF 15 – 30 1 + 3
Zucchini Steam 212ÛF 2 – 3 1 + 3
Steam 180ÛF 10 – 20 1 + 3
Defrost 120ÛF 20 – 30 1 + 3
Perforated pan
above
Baking pan
Baking pan
HANDY HINTS
Care
CLEANING BURNER CAPS AND BASES
Wash with hot soapy water, rinse and dry thoroughly. Mild abrasive cleaners such as Bon Ami® or other mild abrasive cleaners such as
Soft Scrub
on the base. Cleaners with chlorine should be avoided.
CLEANING THE SPILL TRAYS
Cooktop spill trays should be cleaned with warm soapy water, rinsed well, and then dried thoroughly after each use. Spill trays can be
soaked to soften the soil. An all-purpose cleaner such as Fantastik
other mild abrasive cleaners such as Soft Scrub
Apply all cleaners with care — soap-filled fiber or steel wool pads may scratch the spill trays. After cleaning, maintops can be wiped with
glass cleaners, such as Windex
LEANING THE GRIDDLE OR GRILL
C
Clean the griddle or grill surface with warm soapy water, rinse well, and wipe dry with a soft cloth. If food particles stick to the griddle
plate, remove with a mild abrasive cleaner such as Soft Scrub
the aluminum plate. Cleaners with chlorine should be avoided.
OVEN CLEANING
Before cleaning self-cleaning ovens, remove all racks and utensils from the oven and wipe up any puddles of grease and loose soil.
Remove any soil from outside the door seal area. Make sure the light bulbs and glass covers are in place. Turn on the ventilator hood
above the range and leave it on until the oven has completed the self-clean cycle. After setting the oven to self-clean, wait until the clean
light comes on then confirm that the oven door is locked. After the clean cycle is complete and the oven has cooled, wipe out the ash in
the bottom of the oven.
®
may be used. Use a stiff nylon bristle brush to clean port openings. When reassembling, make sure the burner cap is seated
®
®
.
®
, for a shiny finish. Cleaners with chlorine should be avoided.
may be used. Burned-on food can be removed with Bon Ami® or
®
. Never flood a hot griddle or grill with cold water as this can warp or crack
English 6
Page 7

Ovens can be washed with hot soapy water. Mild cleaners such as Bon Ami®, Bar Keepers Friend®, or Soft Scrub® can be used.
Cleaners with chlorine should not be used.
TEAM OVEN CLEANING
S
Steam oven models should have the water tank emptied after each use. Thoroughly dry the seal of the tank lid and the slot where the
tank resides. Prolonged dampness could lead to a musty odor in the tank. Using the sponge provided with your range (or a comparable
soft sponge or cloth), wipe out the oven and remove any remaining water so that the evaporator dish in the bottom of the oven is dry.
Remove any possible limescale deposits with vinegar. Cleaners with chlorine should not be used.
Use only fresh tap water, or if necessary, plain non-carbonated purchased water to fill water tank. Use the descaling tablets supplied with
the appliance or a commercial citric acid based descaling agent to descale the appliance. Follow the manufacturer's instructions on the
packaging.
Use
EXTRALOW® BURNERS
Several of the controls have flame settings even lower than the standard SIM setting. When the knob is set within this range, the flame
cycles on and off. These settings are suitable for simmering and poaching, melting chocolate, and holding cooked foods at temperatures
without scorching or burning.
S
ETTINGS AND COOKWARE TO USE
The type and quantity of food affects which setting to use. Higher settings may be needed for large quantities of food.
The cooking utensil affects the setting. Its size, type, material, and whether a lid is used, all affect the consistency of the cooking
temperature.
To maintain a low or simmer heat setting, bring food to a boil. Stir well then cover the pan and lower the heat to the desired setting.
Check periodically to determine if the control knob should be turned to another setting.
If an over-sized pan is used, the simmer action may occur mainly in the center of the pan. To equalize the temperature throughout the
food, stir the food around the outer edges of the pan into the food in the center.
It is normal to stir food occasionally while simmering. This is especially important when simmering for several hours.
When lowering the flame setting, adjust it in small steps. If the setting is too low to hold a simmer, bring the food back to a boil before resetting to a higher heat.
Use cookware that has good heat conductivity, good balance, a flat and correctly-sized base to fit the burner, and a properly fitting lid. A
5½” base size is generally the smallest pan recommended.
A properly fitting lid will shorten cooking time and make it possible to use a low heat setting.
When using two extra large stock pots at one time, do not use adjacent burners; use staggered burners to provide adequate air around
the burners.
SING THE OVEN
U
Preheat the oven to the desired setting when preparing baked products. The preheat time is calibrated to provide the best baking results,
so do not bake until the oven is preheated. The oven does not need to be preheated for roasting meats.
Use the proper bakeware for baking. Warped, lightweight pans or pans with tall sides do not yield high quality baked products. Cookies
should be baked on a flat sheet with a lip on one side. For better browning, baking pans should be placed crosswise on the rack with the
shorter sides on the right and the left. This allows the air to circulate freely.
For tender, golden crusts use light non-stick anodized or shiny metal pans. For crisp brown crusts, use dark non-stick/anodized or dark
dull metal utensils or glass bakeware. These may require lowering the temperatures 25°F when using convection bake. There is no need
to reduce the temperature when roasting meats.
It is recommended to reheat dishes or leftovers slowly between 230°F and 265°F until an internal thermometer reaches 165°F.
U
SING THE STEAM OVEN
Avoid opening the door during the steaming phase as this can significantly increase the cooking time. When using any steam mode place
food in oven before preheat.
English 7
Page 8
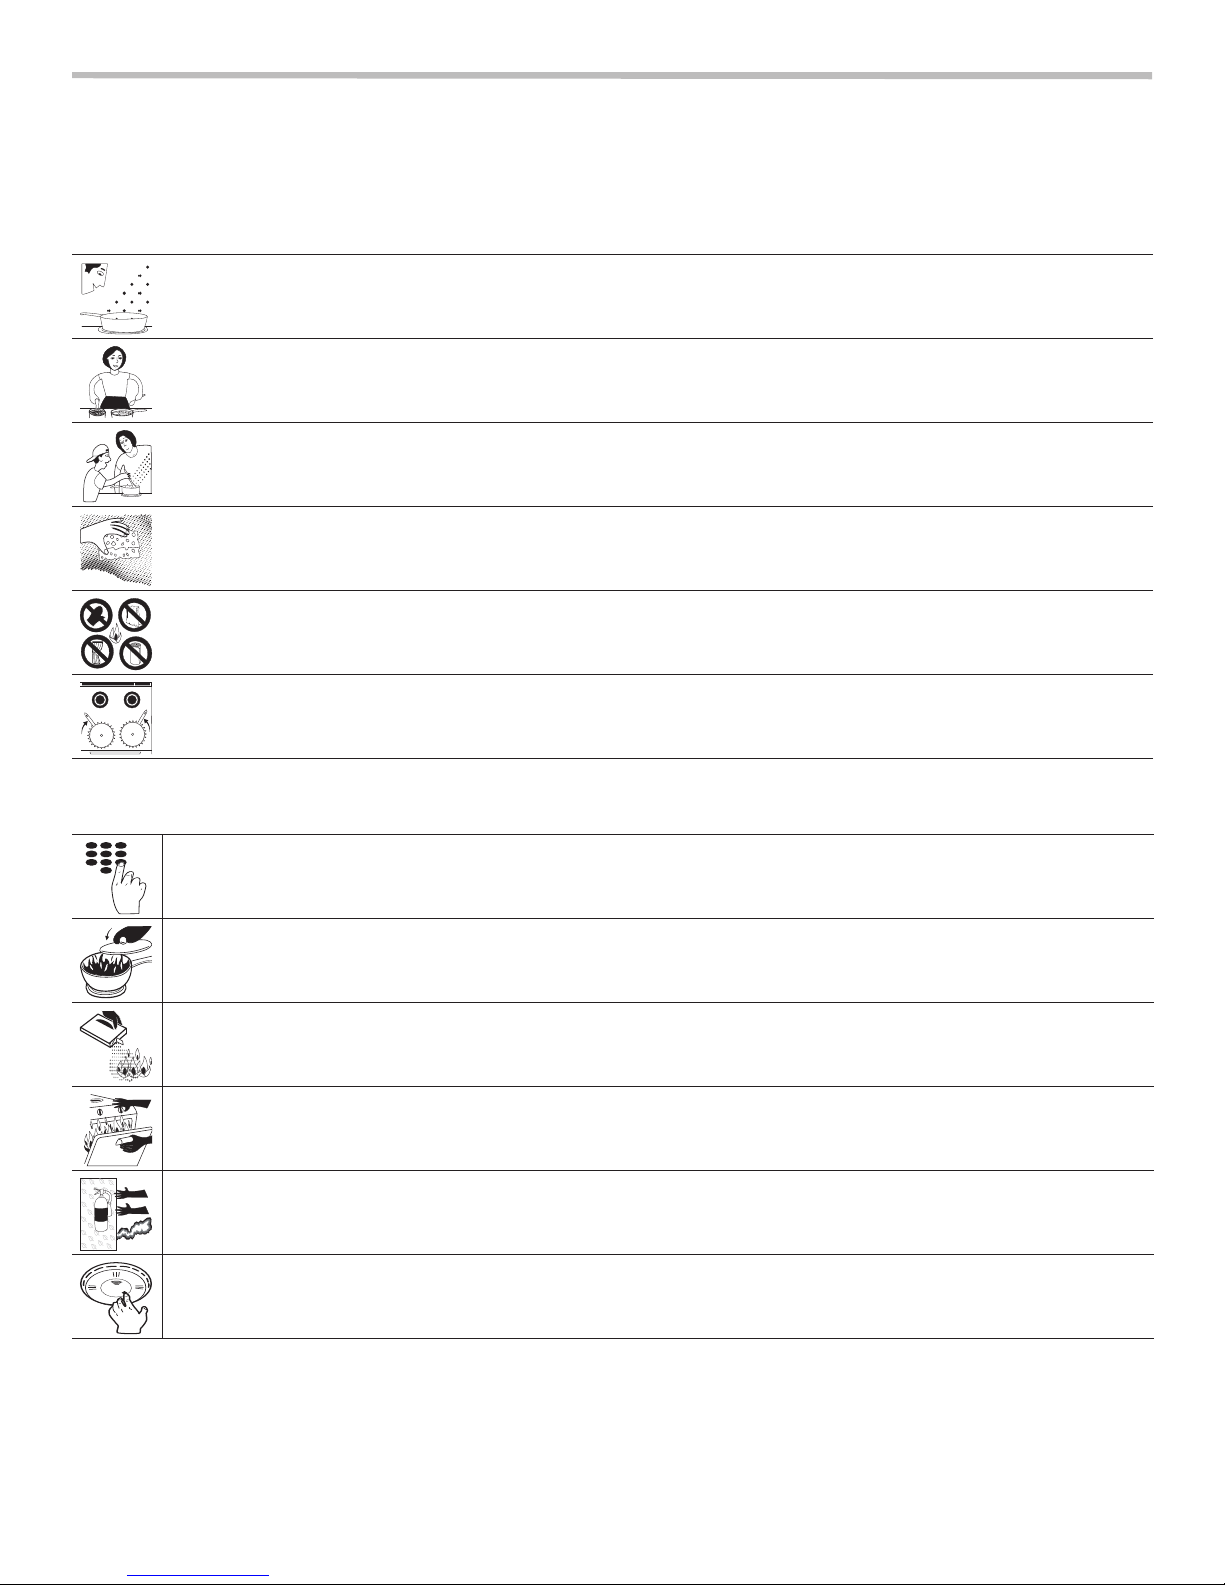
RECIPE FOR SAFER COOKING
Follow these tips to protect you and your family when in the kitchen. Whether stirring up a quick dinner or creating a masterpiece fourcourse meal, here’s a recipe for safer cooking you need to use daily.
To Prevent a Cooking Fire in Your Kitchen
Keep an eye on your cooking and stay in the kitchen. Unattended cooking is the #1 cause of cooking fires.
Wear short or close-fitting sleeves. Loose clothing can catch fire.
Watch children closely. When old enough, teach children to cook safely.
Clean cooking surfaces to prevent food and grease build-up.
Keep curtains, towels and pot holders away from hot surfaces, and store solvents and flammable cleaners away from heat
sources. Never keep gasoline in the house.
Turn pan handles inward to prevent food spills.
To Put Out a Cooking Fire in Your Kitchen
123
654
789
0
BA
KI
SOD
NG
A
OFF
Call the fire department immediately. In many cases dialing 911 will give you Emergency Services.
Slide a pan lid over flames to smother a grease or oil fire then turn off the heat and leave the lid in place until the pan cools.
Never carry the pan outside.
Extinguish other food fires with baking soda. Never use water or flour on cooking fires.
Keep the oven door shut and turn off the heat to smother an oven or broiler fire.
Keep a fire extinguisher in the kitchen. Make sure you have the right type and training.
Keep a working smoke detector in your home and test it monthly.
1901 Main Street, Suite 600, Irvine, CA 92614 • 800-735-4328 • www.thermador.com
9000986045 • Rev. A • 5U05T5 • © BSH Home Appliances Corporation, 07/14
English 8
 Loading...