

Page 1

CARE AND USE FOR
HS - HST - HSB WALL HOODS
(Turn Book Over for Installation
Instructions)
READ AND SAVE THESE INSTRUCTIONS
HSB
HS
HST
5551 McFadden Avenue, Huntington Beach, CA 92649 800/735-4328
© BSH Home Appliances Corp. 1997 Litho in Italy 10/03
LI164A
Page 2
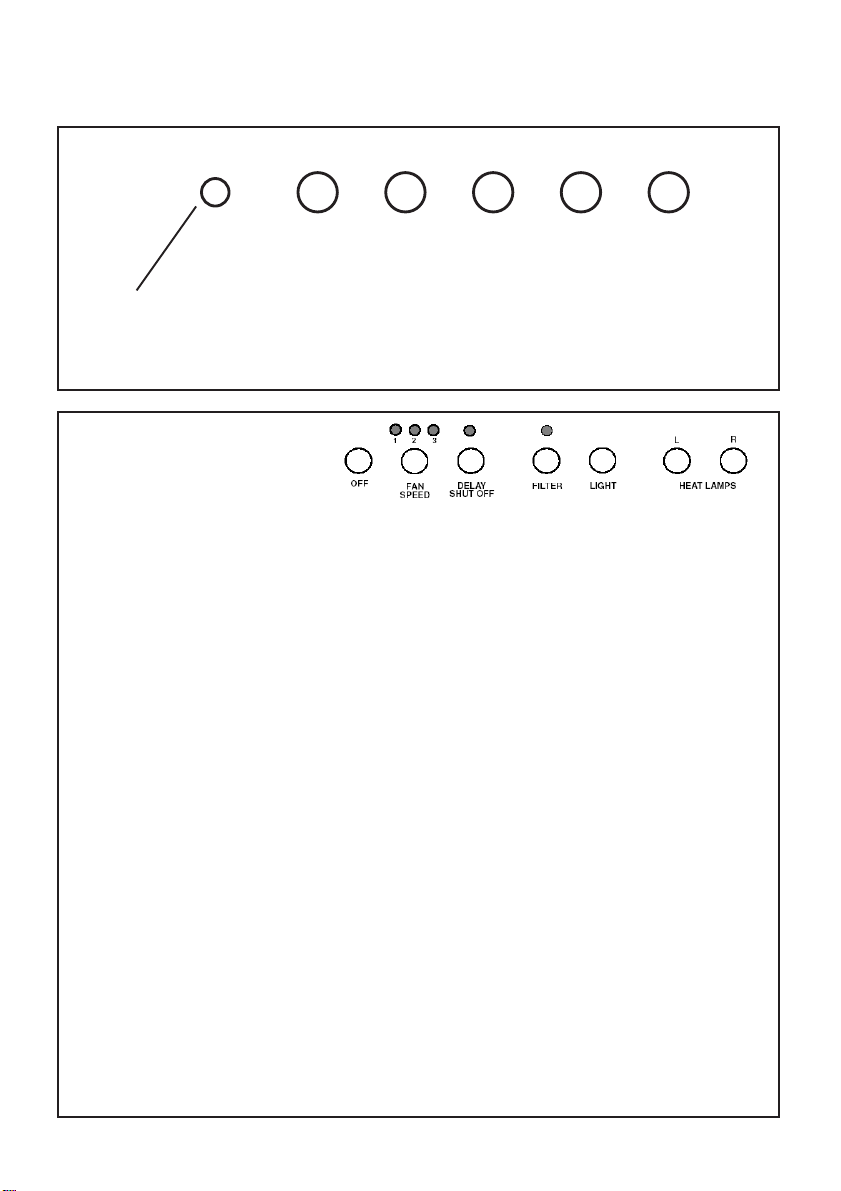
CONTROL PANEL
LIGHT OFF LO MED HI
HSB SERIES HOODS
Light: Light ON-OFF button
OFF: Blower OFF button
Blower ON
indicator light
button
HS SERIES HOODS
Off : Pressing button once turns blower off and resets control.
Fan Speed : Pressing button once, from an off state, turns the blower
on low. Each successive press of the button increases the fan speed
until high where the fan cycles back to the low speed. The LEDs
above this button indicate the current fan speed. When the blower
is on, the corresponding LED is illuminated. 1 – Low
Delay Shut Off : Press to turn fan on high for 15 minutes. If the
blower is off when the delay button is pressed, the ventilator will
turn on to the high speed setting for 15 minutes. At the end of the
cycle the blower will turn off.
If the blower is on when the delay button is pressed, the blower runs
for 15 minutes at the current speed then turns off.
During a timed period, the LED above the Delay Shut Off button is
illuminated.
To interrupt a timed period, press Fan Speed or Off button.
Filter: After 40 hours of operation, the clean filter reminder LED
above this button will illuminate indicating that the filters need to
be cleaned. After cleaning, press this button for 3 seconds to reset
the 40-hour period and turn the LED off.
Light: This button controls the halogen lighting. The first press
turns the lights on. A second press dims the lights. A third press
turns the lights off.
Heat Lamp: The buttons marked L and R independently control
the left and right infrared heating lamps, turning the lights on or off.
F
LO: Blower speed button 1 (low)
MED: Blower speed button 2 (med)
HI: Blower speed button 3 (high)
2 – Medium
3 – High
Page 2
Page 3

HST SERIES HOODS
Off : Pressing button once turns blower off and resets control.
Fan Speed : Pressing button once, from an off state, turns the blower on low. Each
successive press of the button increases the fan speed until high where the fan cycles back
to the low speed. The LEDs above this button indicate the current fan speed. When the
fan is on, the corresponding LED is illuminated.
1 – Low
2 – Medium
3 – High
Delay Shut Off : Press to turn fan on high for 5 minutes.
If the blower is off when the delay button is pressed, the ventilator will turn on to the high
speed setting for 5 minutes. At the end of the cycle the blower will turn off.
If the ventilator is on when the delay button is pressed, the blower runs for:
·15 minutes for low speed
·7 1/2 minutes for medium speed
·5 minutes for high speed
During a timed period, the LED above the Delay Shut Off button is illuminated.
To interrupt a timed period, press Fan Speed or Off button.
Filter: After 40 hours of operation, the clean filter reminder LED above this button will
illuminate indicating that the filters need to be cleaned. After cleaning, press this button
for 3 seconds to reset the 40-hour period and turn the LED off.
Light: This button controls the halogen lighting. The first press turns the lights on. A
second press dims the lights. A third press turns the lights off.
Heat Lamp: The buttons marked L and R independently control the left and right
infrared heating lamps, turning the lights on or off.
Heat Sensor: Your hood is equipped with a heat sensor that will turn the blower to Low speed
if excessive heat occurs above the cooking surfaces.
1. If the blower is off it turns the blower on to low speed.
2. If the blower is already on any speed selection, no speed change will occur.
When the temperature level on the hood drops to normal, the blower will return to its
original setting.
Overtemperature : The high temperature sensor protects the hood from high temperatures
which may damage components. The control is set to activate at 161º F (72º C) and reset
at 140ºF (60º C). When activated, the ventilator will turn on low and the corresponding
LED will blink, indicating an over temperature condition.
While the high temperature sensor is activated, the blower speed can be changed or turned
off. If the blower is turned off, the corresponding LED will blink. Light controls will remain
operational. When the control sensor reaches 140ºF (60º C), a reset will occur. During
reset, the control will revert back to the operational state prior to the high temperature
condition.
High Temperature Fault Condition: The circuit is equipped with an alarm indicating that
the heat sensor protection is not working, due to a damaged sensor. In the case of this
extreme condition, the three speed indicator LEDs will start blinking. All the controls will
be operational except for the speed indicators.
Page 3
Page 4

HOOD OPERATING
INSTRUCTIONS
The blower should be turned on for
a few minutes before cooking in
order to establish air currents upward through the hood. Thus when
heat, smoke, moisture, grease and
cooking odors are produced, they
will be carried outside instead of
drifting into other rooms.
Use the low speeds for normal use
and the higher speeds for strong
odors or fumes.
Drafts across the range or cooktop
will cause the escape of heat,
smoke, moisture, grease and
cooking odors from the hood. Such
drafts should be prevented in so far
as possible.
The best job of ventilation in the
kitchen is done where the only air
currents are those created by the
blower itself.
BLOWER
The motor is operated by a three
speed control switch. You may
change the speed of the motor
depending on the amount of grease
and smoke you are creating while
cooking.
ALWAYS USE THE HIGH SETTING
WHEN GRILLING.
FILTERS
The metal grease filters are made
of anodized aluminum and are long
lasting.
To Remove The Metal Grease
Filters
Turn the fan and lights off.
Push each handle towards the
back and pull downwards Fig. 1.
To Replace The Metal Grease
Filters
Reverse procedure.
Fig. 1
CLEANING INSTRUCTIONS
Be sure lights are cool before
cleaning the hood.
To Clean Filters
• It is recommended that the
filters be washed at least once a
month; they can be washed by
hand or in the dishwasher.
Drain water through edge holes
and let each filter dry thoroughly
before replacing it
.
To Clean Hood Surface
For general care, wipe the
outside of the stainless steel
with sudsy water or household
cleaners such as Fantastic® or
Formula 409®, rinse well and
dry with clean
water marks.
Wipe and dry brushed stainless
steel in the same direction as
the grain.
Do not use abrasive products.
To remove finger prints and give
added shine use spray cleaners
such as Stainless Steel Magic®
and Shimmer®
soft
cloth to avoid
Page 4
Page 5

LIGHTS
NOTE: Turn off the lights and
fan. Allow the lights to cool
before handling. If new lights do
not operate be sure lights are
inserted correctly before calling
service.
Replace Lights
(HS and HST series hoods only)
Using a flat edge from a
screwdriver or equivalent tool
pry loose the lens cover as shown
in Figure 2.
Remove the damaged light and
replace with a new 12 Volt, 20
Watt (maximum) halogen light
made for a G-4 base. Follow
package directions and do not
touch new light with bare
hands.
Reinstall the light cover.
WARMING LAMPS (INFRARED).
THESE ARE AVAILABLE ON “HS”
AND “HST” SERIES HOODS AS
OPTIONAL ACCESSORY TO BE
PURCHASED APART.
Purchase and use only lamps mod.
175R-PAR, 175W maximum
infrared bulbs.
Fig. 2
Replace Lights
(HSB series hoods only)
Turn the fan and lights off.
Remove the lamp cover (remove
the screw that fixes the lamp
cover) see Figure 3.
Remove the damaged light and
replace with a new 120 Volt, 40
Watt (maximum) bulb made for
an E27 base.
Reinstall the lamp cover and fix
in place with its screw.
Page 5
Fig. 3
Lamp
covers
Page 6

 Loading...