

ThermaCell ProFLEX User Manual

Welcome to ThermaCELL
Dear ThermaCELL Heated Insoles ProFLEX Purchaser:
Thank you for purchasing ThermaCELL Heated Insoles ProFLEX.
ThermaCELL Heated Insoles ProFLEX feature a wireless remote control
and removable, rechargeable state-of-the-art Lithium-Ion Polymer
batteries. With the touch of a button, you control the amount of
warmth under your feet while they stay protected inside your shoes or
boots.
ThermaCELL Heated Insoles ProFLEX keep your feet warm, not hot,
so they don’t sweat then freeze. Your Heated Insoles use an internal
thermostat to maintain a steady temperature inside of your shoes or
boots, keeping your feet around normal body temperature. They are
intended to be used in a cold setting; you are less likely to feel the heat
in a warm environment. These operating instructions provide clear and
concise directions on how to properly use your Heated Insoles.
ThermaCELL products, including the original ThermaCELL Heated
Insoles and ThermaCELL Mosquito Repellent, enable outdoor
enthusiasts to enjoy their favorite activities in comfort. We thank you
again for your purchase of ThermaCELL Heated Insoles ProFLEX and are
confident your cold weather activities will be more comfortable and
enjoyable than ever before.
®
Technology
Enjoy your purchase,
The ThermaCELL Product Group
ThermaCELL® Heated Insoles ProFLEX
Instructions
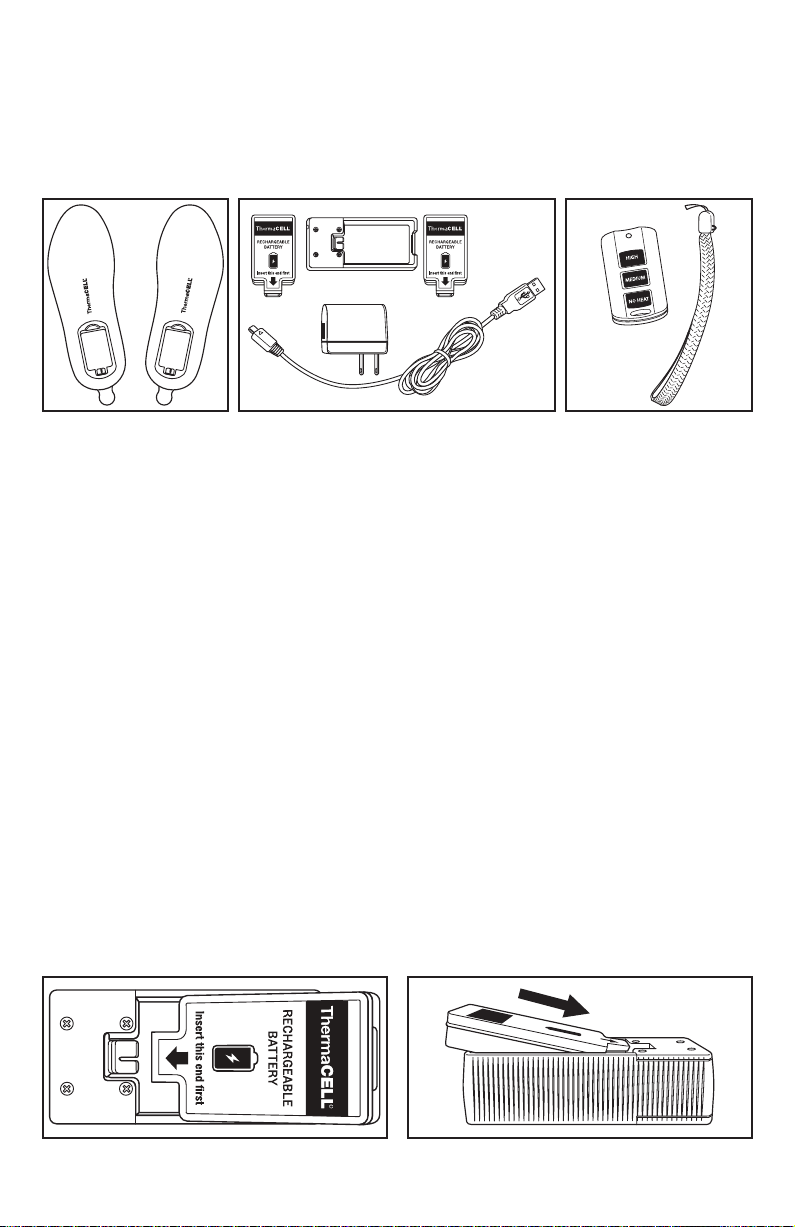
Package Contents
The ThermaCELL Heated Insoles ProFLEX box contains two Heated Insoles (Figure 1), two cushioned
battery packs, one Smart Charging Case, one wall charger, one USB cable (Figure 2), one Remote
Control, one Lanyard (Figure 3), one Drawstring Travel Bag (not shown) and this Instruction Booklet.
Figure 1 Figure 2 Figure 3
Trimming Insoles for Exact Fit
ThermaCELL Heated Insoles ProFLEX may be trimmed to t shoes or boots if needed. If your footwear has
a removable insole, take it out and use it as a cutting guide. Be sure to follow the WARNING statement
printed on the bottom of the Heated Insoles.
WARNING: Cutting beyond solid line may cause damage to heater and will void warranty.
Charging and Recharging Batteries
For best results, ThermaCELL Heated Insoles ProFLEX must be fully charged before use. Charge the batteries
at room temperature. Insoles do not need to be taken out of footwear to remove the batteries. It may take
up to 4 hours to charge. Before proceeding, ensure hands are dry.
Directions:
1. Plug the USB Cable into the Smart Charging Case by inserting the micro USB connector (smaller
end). Then, plug the USB connector (larger end) into the wall charger. Connect the wall charger to
a power outlet. When there are no batteries in the Smart Charging Case, the two LEDs on the side
of the case will glow green.
a. Alternatively, you can plug the USB connector into a powered USB port rather than the
wall charger.
2. Insert the battery into the Smart Charging Case by following these steps:
a. Lay the Smart Charging Case on a at dry surface.
b. Hold the battery with the foam side facing up above the Smart Charging Case.
c. Place the battery inside the Smart Charging Case with the foam side facing up, so the
battery connector is facing the red Smart Charging Case connector (Figure 4). The battery
will be at a slanted position at this point (Figure 5).
Figure 4 Figure 5
2
Charging and Recharging Batteries (continued)
3. With the connectors aligned, slide the battery connector on to the Smart Charging Case
connector; push battery down until it clicks and locks into place. The battery should be fully
nested inside the Smart Charging Case.
4. Insert the second battery into the opposite side of the Smart Charging Case by following
steps 2 and 3 above.
5. The Smart Charging Case LEDs should glow orange when the batteries are connected to indicate
that they are charging. If either LED turns green, the battery on the side of the green LED is fully
charged. LEDs will only glow green when the batteries are fully charged inside the Smart
Charging Case. When glowing green, the batteries are then ready to be used in your Insoles.
6. After batteries are charged, disconnect the wall charger from the outlet or the USB connector from
the powered USB port and then disconnect the micro USB connector from the Smart Charging
Case. This process can be done in any order without damaging the unit.
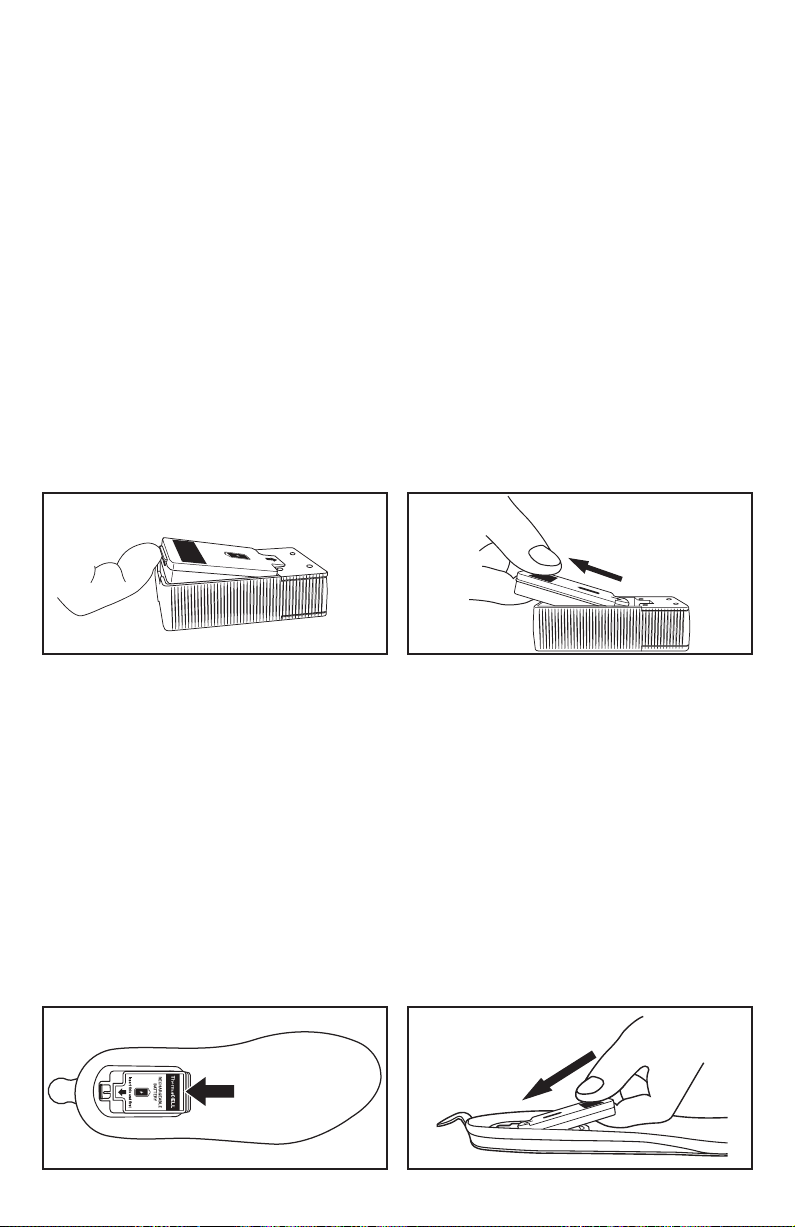
7. Remove the batteries from the Smart Charging Case by following these steps:
a. At the end of the battery opposite the connector, you will feel a thin protruding hard tab
on the battery (Figure 6). Lift the battery by inserting nger under the tab and gently
pulling up just enough so you can insert the tip if your nger under the battery. Do not
attempt to lift batteries by grasping the battery's foam cushion as it could tear. Do not lift
the battery more than is required to insert a nger underneath the battery to grasp it.
b. Pull the battery in a straight line away from the Smart Charging Case connector (Figure 7).
c. Repeat steps 7a and 7b to remove the other battery.
Figure 6 Figure 7
Inserting Batteries into Insoles
The batteries can be inserted into the Insoles whether the Insole is in footwear or not. Insert the batteries
into the Insoles by following these steps:
1. Ensure Insole's battery compartment is facing up.
2. Hold the battery with the foam side facing up above the Insole battery compartment with the
battery connector facing the heel of the Insole.
3. Align the battery on top of the Insole battery compartment with the foam side facing up so that the
battery connector is facing the red Insole connector (Figure 8).
4. With the connectors aligned, slide the battery towards the Insole connector. Then slide the
battery connector into the Insole connector (Figure 9) and press the battery all the way down in to
the battery compartment. The battery will be fully nested inside the Insole battery compartment.
5. Repeat steps 1-4 with the other battery and Insole.
Note: Insoles default to the No Heat setting upon insertion of batteries, waiting for you to set the heat level
from your Remote Control.
Figure 8 Figure 9
3
 Loading...