

Page 1
y
y
g
y
y
TherAdapt® Products Inc.
y
g
y
Winged Back Insert
Please read all of the following information before using this product.
TherAdapt® Products Inc. has designed and manufactured this product with the well being of the user
and caregiver(s) in mind. It is our endeavor to provide products which are attractive, comfortable,
useful, highly adjustable, long lasting and safe. As when using any product, precautions must be taken.
THE MANUFACTURER IS NOT RESPONSIBLE FOR INJURIES RESULTING
FROM ANY CUSTOMIZATION OR MODIFICATION OF THE EQUIPMENT THAT
WAS NOT COMPLETED BY THE MANUFACTURER.
USE: The Winged Back Insert is designed for a single purpose: as a positioning support attached to a TherAdapt®
Adjustable Positioning Chair or TherAdapt
CARE:
or loop fastener, knobs, nuts, bolts, and washers are properly positioned and secure. Contact the manufacturer for
replacement or repair of necessary items. All components may be cleaned with mild soap and water, or a gentle sanitizing
spray. Do not use abrasive cleaners. Wipe wood components dry after cleaning. Excess amounts of liquid on the wood may
damage the finish. Always store indoors.
Take care to inspect the ongoing condition of all parts of your Winged Back Insert. Verify that all pads, hook and /
WARRANTY: The manufacturer provides a full one (1) year warranty, beginning the date
shipped b
breaka
or modification beyond the normal capacity or range of adaptabilit
will void the warranty. The foregoing is TherAdapt’s sole liability for consequential damages.
the manufacturer. The warranty provides full replacement of all parts against
e when used in compliance with the manufacturer’s USE and CARE instructions. Use
WARNING: This product must only be used under the
recommendation of a ph
with adult supervision. Never leave user unattended.
It is
Win
instructions or ASSEMBLE the insert properl
result in bodily injury.
our responsibility to properly use and maintain your
ed Back Insert. Failure to follow USE and CARE
®
Bolster Chair only. No other use is permitted.
sician and / or licensed therapist and
as outlined ma
designed into the products
PLEASE COMPLETE AND RETAIN FOR YOUR RECORDS
Winged Back Insert WBI-_________ Serial Number: _____________________
Purchase date: __________________
Page 2
TherAdapt® Winged Back Insert (WBI-100/200/300) Instructions
Packing List: Tools Needed:
(1) Insert with (1) Head pad, and (1) Lumbosacral pad (1) 7/16” open end wrench
(1) Butterfly chest harness with (4) side release buckles and (2) straps
(1) Wooden “Yoke” *
(3) 6” ¼ -20 carriage bolts *
(3) 4” ¼ -20 carriage bolts *
(2) 1 ¾” ¼ -20 hex head bolts * * Included in Hardware Bag
(6) 7/16” ¼ -20 hex nuts *
(6) Metal washers *
(3) “Flower” knobs with ¼ -20 threaded inserts *
(2) Thru-knobs with ¼ -20 threaded inserts *
(2) Nylon washers *
The Winged Back Insert is designed to interface with the TherAdapt Adjustable Positioning
Chair and TherAdapt Bolster Chair only. Assemble, attach and adjusts as follows:
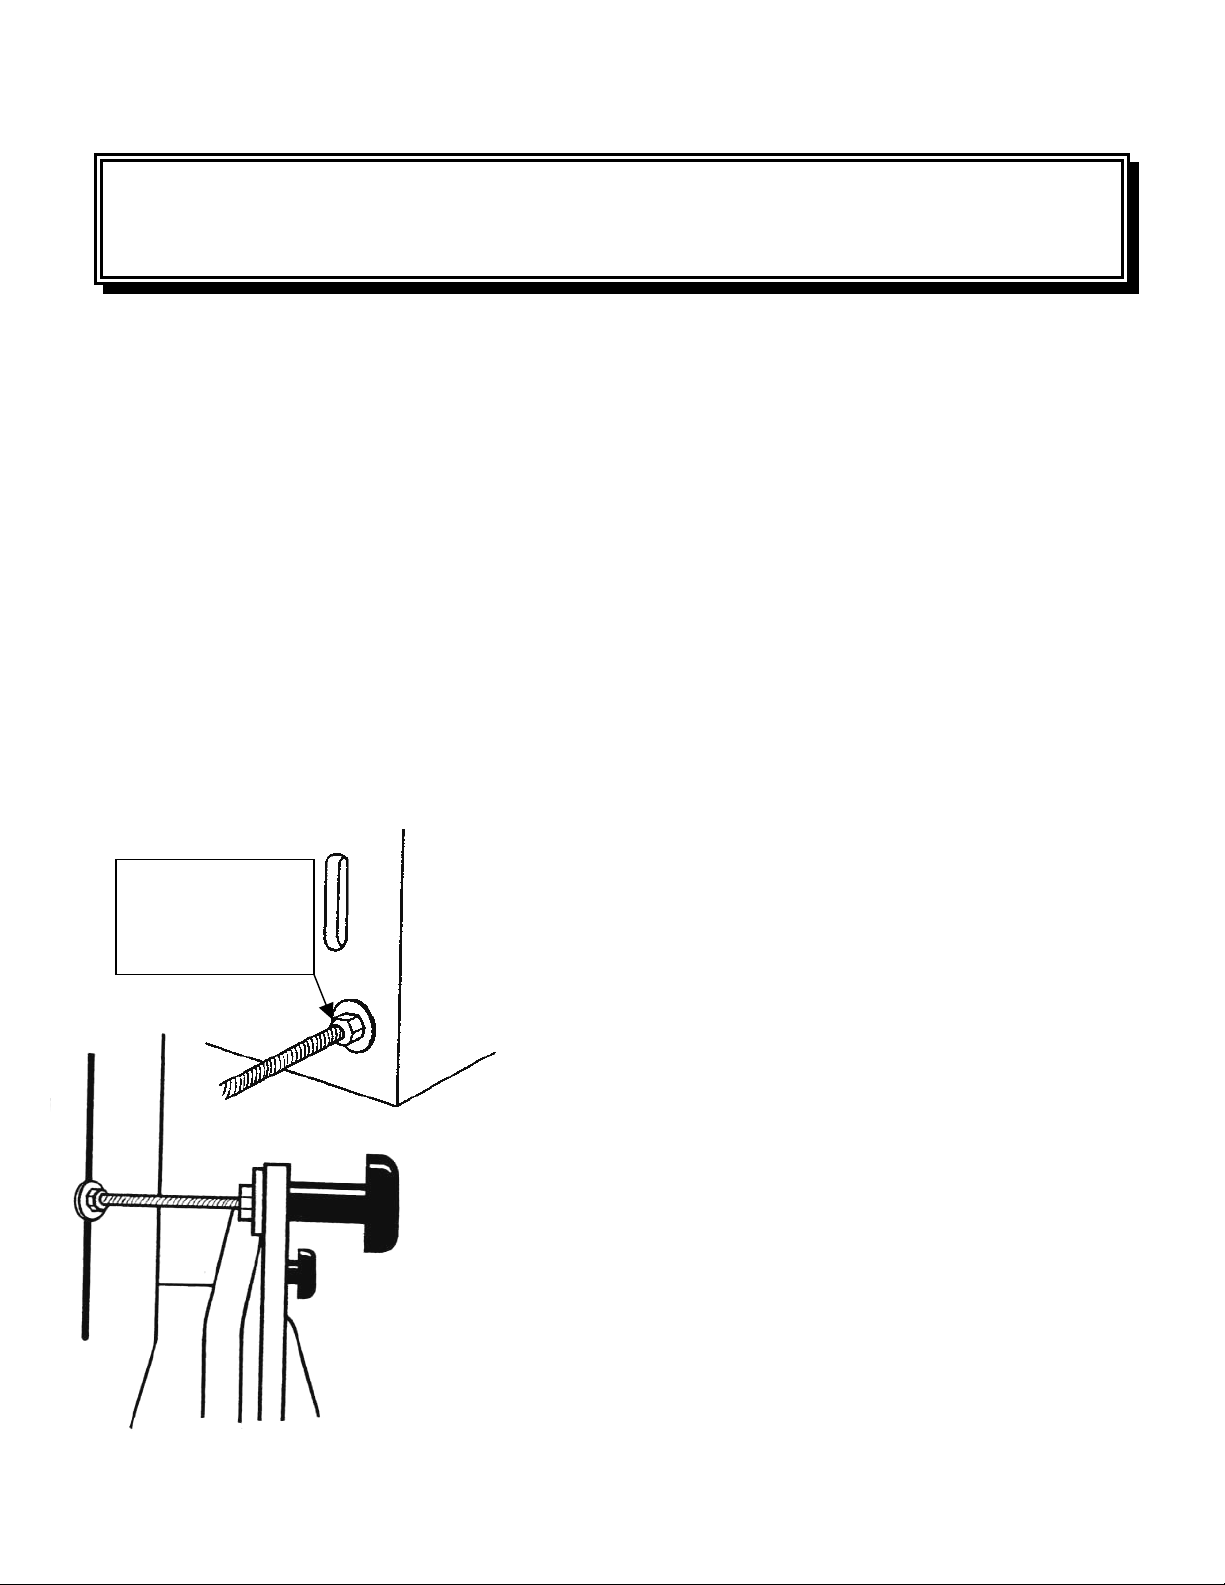
1. Assemble the Winged Back Insert:
A. Select either the 4” (for up to 3” of seat depth
Tighten the nut
securely, pulling the
square “neck” of the
bolt into the hole.
TherAdapt
®
Winged Back Insert (WBI-100/200/300) Instructions: Page 1 of 3
reduction) or the 6” (for up to 5” of seat depth
reduction) carriage bolts for use. (Keep the unused
set on hand.) Insert (2) of the bolts into the two
holes at the bottom of the insert. Place a metal
washer, followed by a nut, on each bolt and secure
it in place. Important: With a 7/16” wrench (not
included) tighten the nuts securely to “pull” the
square neck of the bolt into the wood on the front
side of the insert.
B. Insert (1) bolt through the center slot. Place a
metal washer, followed by a nut, on the bolt and
secure it in place loosely until final position is
determined. Tighten as above once height
adjustment is finalized.
nd
C. Place a 2
nut, followed by a metal washer, on the
bolt. Note: The greater the distance between the
nuts the shorter the seat depth on the Adjustable
Positioning Chair.
Page 3
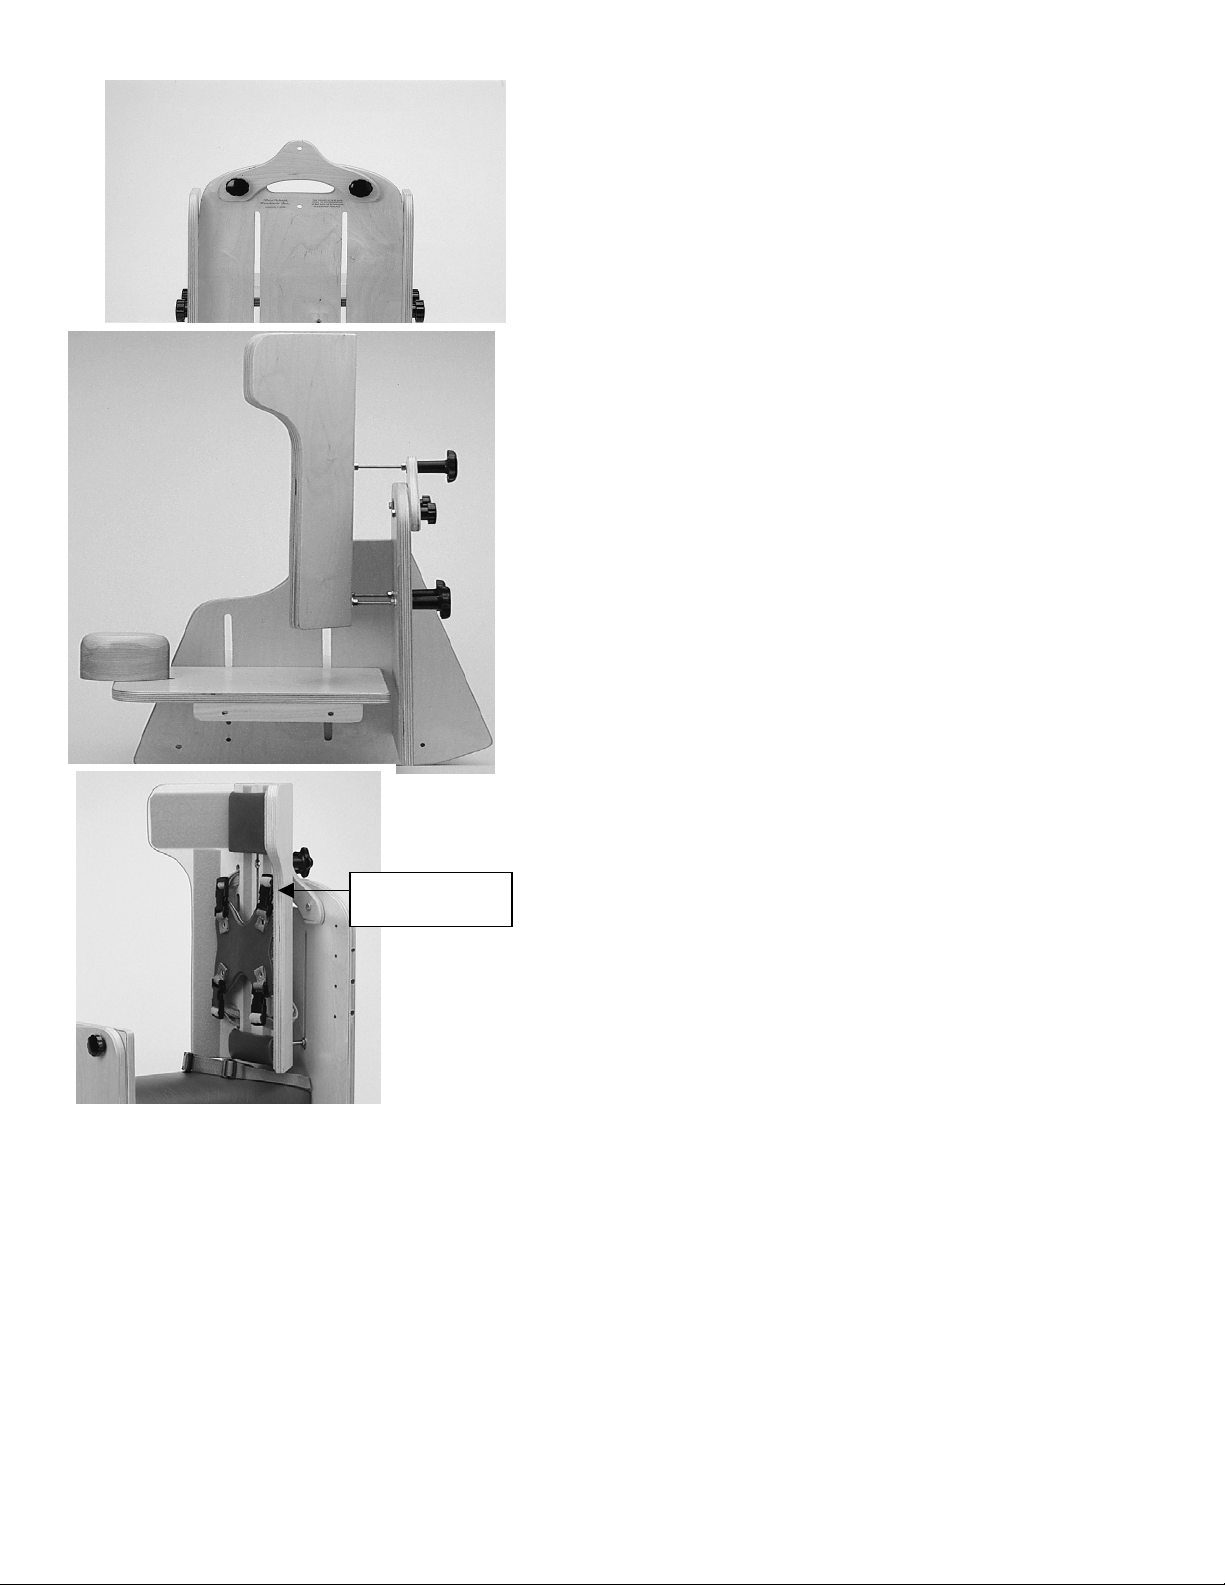
2. Attach the wooden “yoke” to the back of the chair.
This can be placed on the “inside” or the “outside” of
the chair back depending on the depth of the seat
needed. Place the (2) hex bolts through the pre-drilled
holes. Place a nylon washer between the wood and the
knob. Secure with small knobs. Tighten securely.
3. Attach the Insert to the chair.
A. Place the lower carriage bolts through the slots in
the back of the chair. Place the upper carriage bolt
through the hole in the top of the yoke. Note: The
washer-nut / nut-washer combination should be on
the “inside” of the chair. Secure by placing the
“flower” knobs (see illustration) on the ends of the
carriage bolts. Tighten all knobs securely.
B. The Insert is adjusted vertically by loosening the 1st
nut on the top bolt to allow the bolt to slide in the
insert slot. Loosening the lower pair of “flower”
knobs allows the bolts to slide in the chair slots.
Note: The insert should be positioned so that
the top of the “butterfly” straps are even with
the shoulders. Re-tighten the nut and knobs
securely once the appropriate height is obtained.
C. The seat depth (of the Adjustable Positioning
Chair) can be reduced by up to 3” (with the 4”
Shoulder height
bolts) or 5” (with the 6” bolts) by changing the
position of the 2
nd
nut in relation to the 1st nut.
Note: The greater the distance between the two (2)
nuts, the greater the seat depth reduction.
D. When attaching the Winged Back Insert to the
Bolster chair use the 4” bolts and place the insert
close to the back of the chair.
4. The Butterfly Kit comes attached but may need to be reconfigured for a custom fit. Place the top
strap through the one of the top two paired vertical slots, and the bottom strap through the bottom
two vertical slots in the insert. Note: The insert should be positioned on the chair so that the top
of the butterfly straps are even with the shoulders and the buckle is below the collarbone.
Adjust the length of the top straps to position the chest piece at the desired location on the chest (see
below). Provide a “snug” fit by pulling on the lower set of straps only.
Care should be taken not to position the harness higher than the notch felt at the
top of the sternum (breast bone) as strangulation could occur.
TherAdapt
®
Winged Back Insert (WBI-100/200/300) Instructions: Page 2 of 3
Page 4
TherAdapt® Winged Back Insert Options- Instructions
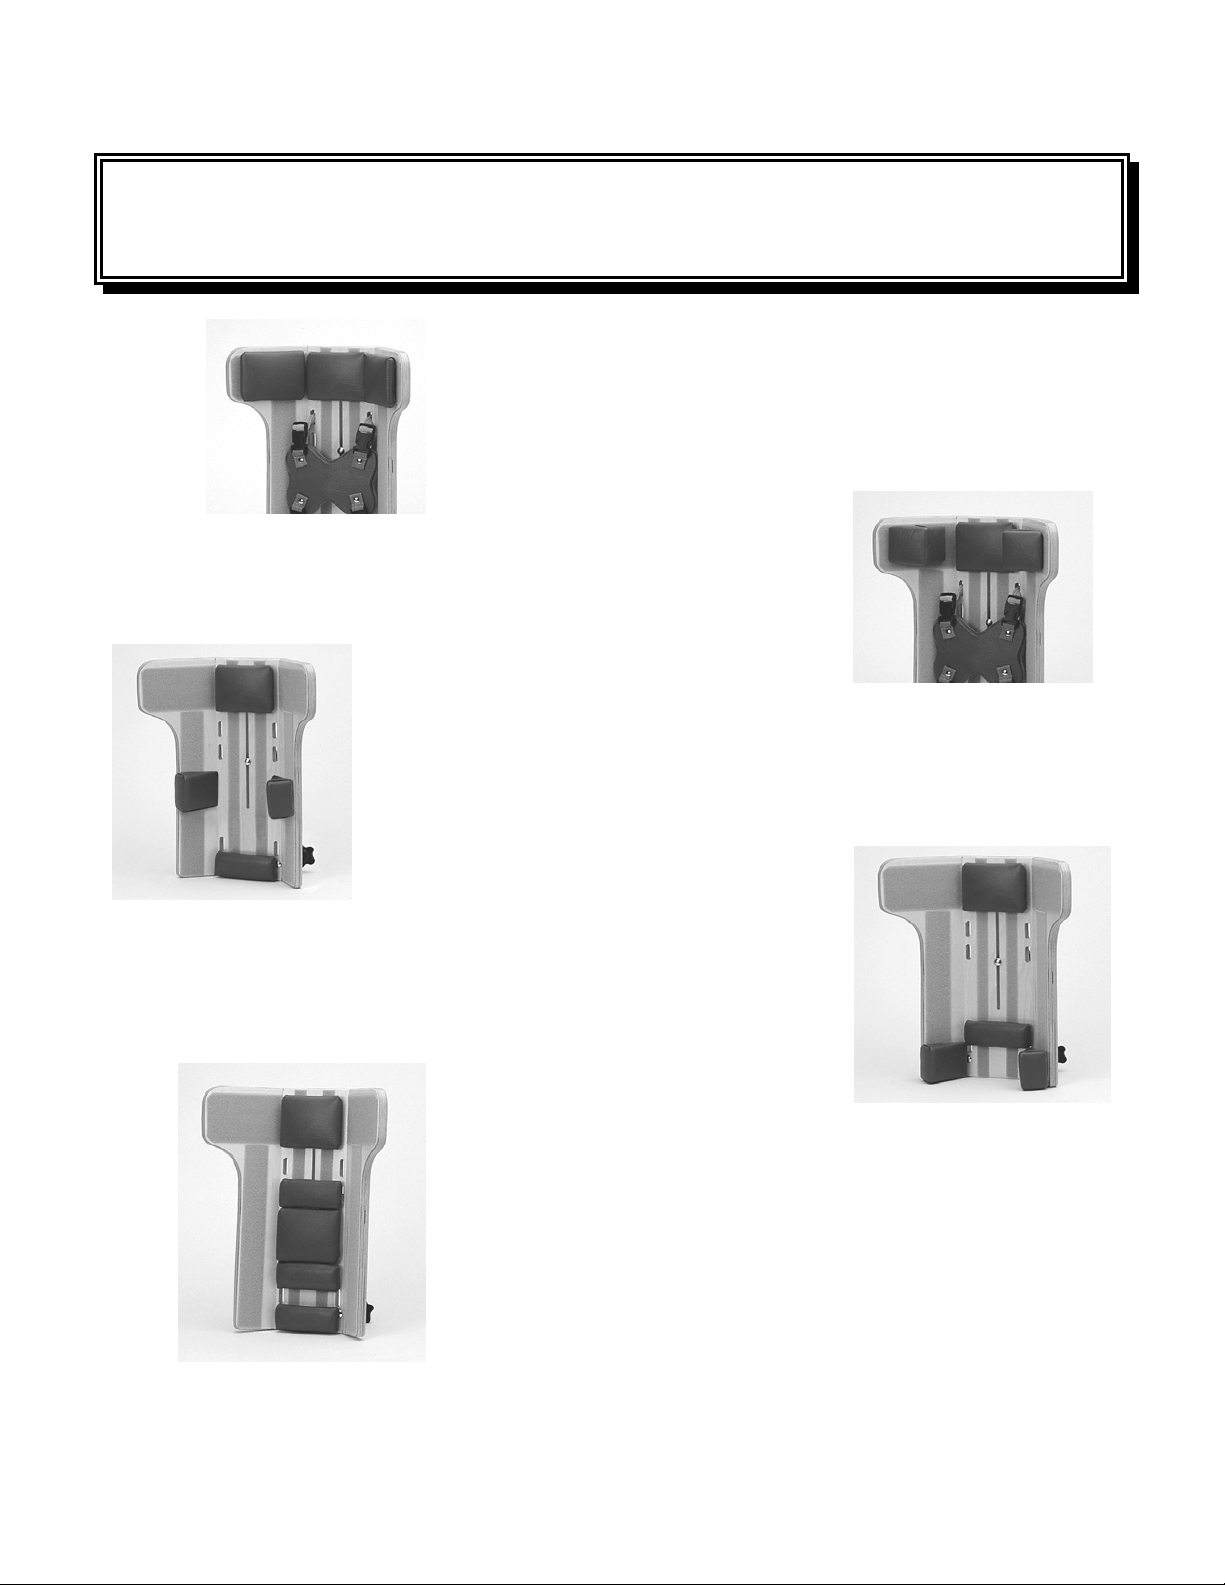
1. Flat Head Pads (WBI-100FH, WBI-200FH, WBI-300FH)
attach to the insert “wings” with hook fastener and can be used
to pad the head support.
2. Triangle Head Pads (WBI-100TH, WBI-200TH, WBI-300TH)
are triangle shaped with the hook fastener on the long side of the pad.
Attach to the insert “wings” for maximum lateral head support.
3. Triangular Trunk Pads (WBI-100TT, WBI-200TT, WBI-300TT)
are triangle shaped with the hook fastener on the short edge for deeper
trunk support.
4. Protraction/Pelvic pads (WBI-100PP, WBI-200PP, WBI-300PP)
are angled at 25º and can be used at the scapula or the pelvis
to position and stabilize the user. They attach to the insert with
hook fastener.
5. Back Liner Pads are 2” high and 4” high (for WBI-100 use
BLP-102 and BLP-104 and for WBI-200 use BLP-202 and
BLP-204) or 3” high and 5” high (for WBI-300 use BLP-303
and BLP-305) cushioned pads that are used to line the center
of the insert. They attach with hook fastener anywhere along
the pre-installed loop fastener on the insert. The pads may be
used to line the entire insert or an area may be “left open” to
relieve pressure.
TherAdapt
®
Winged Back Insert (WBI-100/200/300) Instructions: Page 3 of 3
 Loading...