

Page 1

Theracycle 200 & 300
User’s Manual
The Theracycle Company
31 Hayward Street, Franklin MA 02038
1-800-367-6712
www.theracycle.com
Page 2

1-800-367-6712
Table of Contents
Contents'
Important: For Your Safety ............................................................... 3!
Theracycle Parts and Components ...................................................... 5!
Unpacking and Assembling Your Theracycle ........................................... 6!
Adjusting Your Theracycle ............................................................... 8!
Seat Adjustment ......................................................................... 8!
Raising or lowering the seat ................................................................... 8!
Customizing the space between the seat and the back support ......................... 9!
Adjusting the seat backwards or forwards ................................................... 9!
Handlebar Adjustment ................................................................. 10!
Pedal Strap and Pedal Crank Adjustment ........................................... 10!
Theracycle Computer Display .......................................................... 11!
Quick Start Guide .......................................................................... 12!
Change of Speed /Time While Riding ................................................ 13!
The Value of Exercise .................................................................... 13!
Basic Guidelines for Theracyclists ...................................................... 14!
For Beginning Theracyclists ........................................................... 14!
For More Experienced Theracyclists ................................................. 15!
Cleveland Clinic Protocol ................................................................. 15!
Maintenance of your Theracycle ....................................................... 16!
Theracycle 200 & 300 Model Oil Change .............................................. 16!
Limited Warranty for the Theracycle .................................................... 22!
Theracyclist User’s Log ................................................................... 23!
Page 3

1-800-367-6712
PLEASE READ THIS MANUAL BEFORE YOU GET STARTED
Congratulations on your purchase of the Theracycle and your commitment to
making it part of your exercise routine! Whether you have been exercising
consistently over the years or are just getting started, the Theracycle is designed
to help you get exercise the easy way.
This Owner’s Manual includes all the information you will need to set up, operate,
and use the Theracycle.
If you have any questions, we are happy to help you. Call us at 1-800-367-6712.
Our office hours are 9:00am – 5:00pm, EST Monday – Friday.
Important: For Your Safety
Caution: Read all precautions and instructions in this manual before using this
equipment. Keep this manual for future reference.
Warning: To reduce the risk of serious injury, read the following important
precautions before using the Theracycle:
1. Plug the Theracycle power cord into a three-pronged, grounded outlet. We
recommend using a surge protector for additional safety. NEVER USE A
HOUSEHOLD EXTENSION CORD!
2. Do not locate your Theracycle where it could be exposed to inclement
weather, or on a wet or damp surface.
3. Do not allow anyone to operate the Theracycle when wet. The Theracycle is
not a toy and should not be left plugged in and unattended in the presence of
children.
4. Turn the unit on only when you are comfortably seated and both feet are
securely placed in the pedal straps.
5. To reduce the risk of electrical shock; clean, service or adjust only with the
Theracycle unplugged. Never attempt to move or service the Theracycle
without unplugging.
6. Do not allow anyone except a licensed electrician or fitness equipment
specialist make electrical repairs. This unit is equipped with a special motor
and no substitute should ever be used.
7. Never attempt to get off the Theracycle until it has come to a complete stop.
8. Use only genuine Theracycle parts when making repairs.
9. Never operate a Theracycle if it has a damaged cord or plug, if it is not
working properly, if it has been dropped or damaged or any of the electrical
components have been exposed to water or other fluids, or if it has been in
the presence of combustible gases such as oxygen or aerosol sprays.
Page 4

1-800-367-6712
10. Keep the cord away from heated or wet surfaces.
11. Never drop or insert any object or liquid into any opening, especially the
control box, gearbox, or moving handlebar area.
12. There is an external 5-amp time delay fuse incorporated into the control box
below the motor which protects the electronics in case of any electrical
malfunction. If the fuse blows, it can easily be replaced by turning the fuse
cap counterclockwise. Pull out the holder, remove the burnt-out fuse and
replace with a fuse of the same type.
13. DO NOT WEAR LOOSE FITTING PANTS WHEN RIDING THE
THERACYCLE.
14. Leave the On/Off switch located on the bottom of the unit in the ON position
at all times.
15. Do not keep the Theracycle at temperatures below 55 degrees Fahrenheit,
as cold temperature will affect the performance of the Theracycle’s
electronics.
16. Wear shoes when riding the Theracycle. Be certain laces are tied tightly. It is
not safe to ride barefoot or only in socks.
17. Always keep the safety magnet attached to your clothing while riding the
Theracycle. This is for your protection!
Page 5
1-800-367-6712
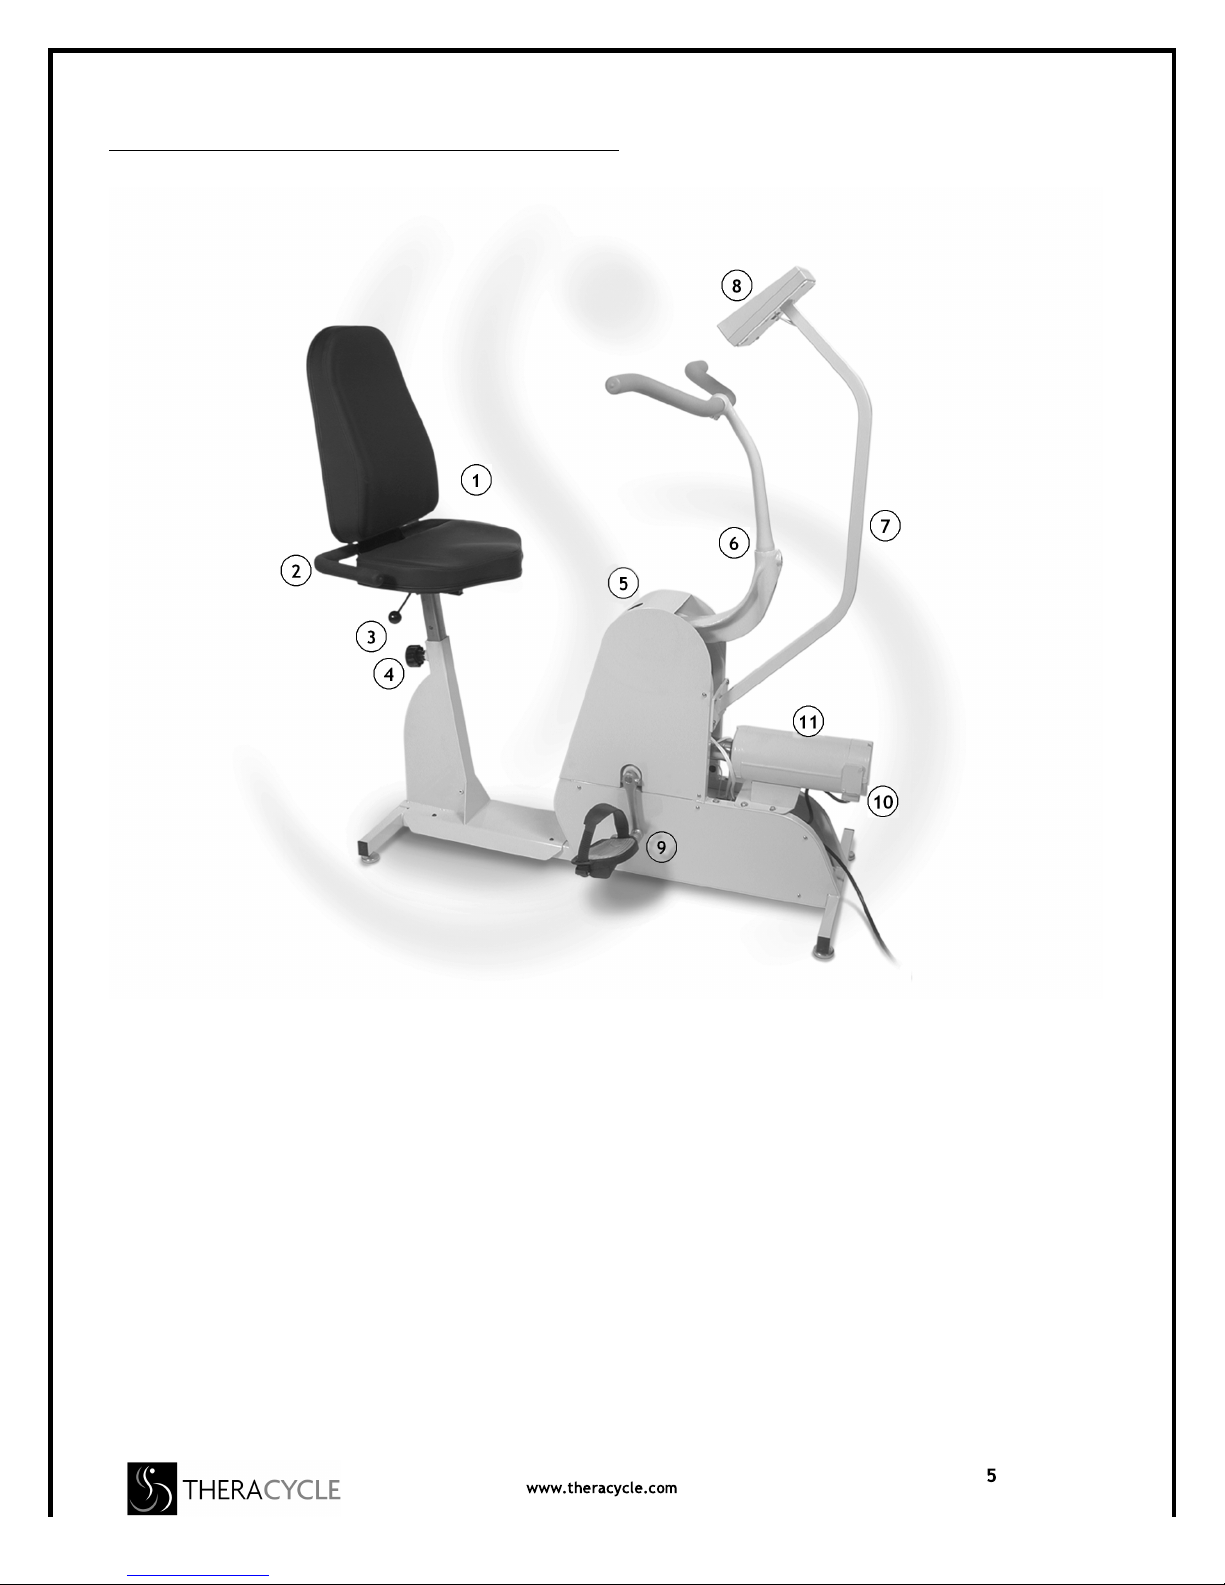
Theracycle Parts and Components
1. Seat and Back Support
2. Outrigger Handles
3. Seat Adjustment Latch for forward and backward settings
4. Seat Height Adjustment Knob
5. Top Shroud & Oil Filler Cap
6. Handlebar Assembly
7. Computer Display Arm
8. Computer Display Box
9. Pedals, Pedal Crank and Link
10. Power Switch (leave on, main on/off on control box)
11. Theracycle Motor
Page 6

1-800-367-6712
Unpacking and Assembling Your Theracycle
Tools needed:
• 5/16” allen wrench (provided)
• 3/16” allen wrench (provided)
• Metric 15mm pedal wrench (provided)
• Slotted head screwdriver
• 3/8” flat wrench (provided)
• Heavy-duty scissors or knife for cutting strapping and cable ties.
Decide where you will place the Theracycle. The unit is heavy and should not
be moved frequently. Plan which outlet you will use so the cord is not in the
way of people walking through the room or getting on and off the unit.
The Theracycle should never be tipped on its side.
1. Carefully cut the strapping and lift the lid off the shipping box. Put the lid
aside for final storage
2. Remove the cardboard parts tray. The parts included in this tray are:
• 3/16” Hex wrench, 6” long with a T handle
• 5/16” and 3/16” allen wrench
• 3/8” wrench
• Metric 15mm pedal wrench
• Computer display mounted to the display arm, with cables inserted
• Safety magnet attached to a lanyard
• Set of pedals (left and right)
• Handlebar assembly
• Touch-up paint
• Replacement fuses
• One quart of gear oil (85w/140)
• Funnel
3. Cut the cable ties and put all parts aside. Set the tray with the box lid for
final storage.
4. Place the sealed plastic bottle of oil in pan of warm water to make it easier
to pour when you get to step #8.
5. Lift off the two sides of the carton and fold flat. Put aside for final storage.
6. Remove the seat by cutting the plastic cable tie.
7. Lift the Theracycle out of the bottom tray carton by using the legs of the
frame. This will require two people. NEVER LIFT WITH THE MOTOR!
Doing so will take the unit out of alignment immediately.
8. Add the gear oil to the gearbox:
• Remove the 3/4” inch plastic cap on the top shroud, exposing the oil
filler plug.
• Using a flat head screwdriver, loosen the filler plug.
Page 7
1-800-367-6712
• Put your other hand into the opening of the top shroud to catch the filler
plug as you loosen and remove it.
• Next, insert the funnel through the opening on the top of the shroud,
bringing it all the way down through the hole in the top of the gearbox.
Make sure that the funnel is placed at least one inch inside the
gearbox.
• Hold the head of the funnel as you slowly pour in all the warmed oil.
This may take up to 30 minutes as the oil is thick. Make sure all the oil
has drained from the funnel before you pull it out. Clean and save the
funnel. Oil changes are needed every 5 years.
• Replace and tighten the filler plug.
• Replace the plastic cap on the top shroud.
9. Attach the handlebars to the Theracycle. Place the handlebar assembly
into the large hole in the handlebar fork so that the flat spot, located at the
bottom of the handlebar assembly is facing forward and is in line with the
locking screw on the handlebar fork. Tighten the locking screw using the
5/16” allen wrench.
10. Mount the computer display stand to the front frame of the Theracycle.
• Locate the four screws mounted on the frame above the motor.
• Remove the top two screws.
• Slide the computer display stand over the two bottom screws and
tighten with the 3/8” wrench.
• Reinsert the top two screws, which will attach the computer display
stand to the frame and tighten with the 3/8” wrench.
• At the bottom of the display stand, plug the two cables into their same
size ports in the motor control box, underneath the motor.
11. Attach the safety magnet and cord to the computer display on the safety
magnet sensor. The Theracycle will not operate without the safety magnet
in the proper position.
12. Attach the pedals. Identify the pedals by locating the “R” and “L” marked
on the end of the threaded shaft of each pedal. Screw the pedal marked “L”
into the left pedal crank. Using the pedal wrench, turn the left pedal
counter-clockwise to tighten. Screw the right pedal into the right pedal
crank by turning the right pedal clockwise to tighten. Make sure that both
pedals are securely tightened.
13. Attach the seat.
• Holding the seat (with the right hand grabbing both the seat and the
adjustment latch in the up position) with the rear of the back support
toward you, line up the channel on the bottom of the seat with the front
of the top flat plate of the seat post.
• Slide the seat into the channel until you reach the middle slot on the
flat plate.
• Lock the seat into one of the middle holes, by releasing the latch.
• Locate the safety screw underneath the seat plate. Tighten it. This is an
important safety step as this safety screw will limit the distance the seat
will travel forward and backward.
Page 8

1-800-367-6712
Now that you have assembled the Theracycle, you will need to adjust it for a
customized fit. In the section labeled, “Adjusting Your Theracycle,” you will find
the directions to do this.
Please contact our customer service department with questions about assembly
or about the use of your Theracycle, Monday-Friday, 9:00AM – 5:00PM. EST.
Call 508-528-3100.
Adjusting Your Theracycle
To get the greatest benefit and comfort from your new Theracycle, there are
a few custom adjustments that you should make.
Tools needed: 5/16” and 3/16” allen wrenches (provided)
• Seat adjustments
• Handlebar adjustments
• Pedal adjustments
Seat Adjustment
By properly aligning your Theracycle seat, you will ensure maximum comfort as
well as safety and efficiency.
There are three different seat adjustments for the Theracycle. The Theracycle
seat can be:
• Raised or lowered
• Moved forward or backwards.
• Increased or decreased the amount of empty space
between the seat base cushion and the back-support cushion.
Raising or lowering the seat
To determine the proper seat height, sit on the Theracycle, place one foot in
the pedal that is furthest away from you and center the ball of your foot on that
pedal. When your seat is adjusted correctly, your leg will be slightly bent and
relaxed. If it is not adjusted to your satisfaction, follow these directions:
1. (Note: you must be off the Theracycle to raise or lower the seat.) Locate
the seat height adjustment knob located below and behind the seat.
Unlock the pressure on the knob by turning it slightly counterclockwise.
Pull out the knob in order to raise or lower the seat.
2. While pulling out the knob, put one hand on the bottom seat cushion,
apply some downward pressure, then raise or lower the seat until you
have the correct height and the knob fits into the appropriate hole. You
will
Page 9

1-800-367-6712
hear a click once it is securely in the hole. IMPORTANT: The knob must
be tightened clockwise so that the seat is secured and doesn’t rock or
click.
3. Try several heights until you are sure that you have found what works for
best for you.
Customizing the space between the seat and the back support
For most people, the factory adjusted space between the seat cushion and
the back-cushion support is comfortable. If not, you can customize the fit.
There are two other possible positions, which allow more space or less space
between the seat cushion and the back-support cushion. You will need the
3/16” allen wrench for this adjustment.
The two positions are closer to the back-cushion or farther away from the
back-cushion. The instructions below are for either adjustment.
1. Remove the safety screw located underneath the seat by turning it
counterclockwise.
2. Remove the seat by pulling up on the latch knob while pulling the it away
from the Theracycle.
3. Turn the seat over and remove the four bolts on the bottom of the seat
with the allen wrench, reposition in the desired holes, and replace the
bolts. Then firmly tighten the screws by turning clockwise.
4. Re-install the seat.
• Refer to page 7, instruction #13.
5. IMPORTANT: Make sure that the seat is completely secure and all screws
are tight when finished.
Adjusting the seat backwards or forwards
1. To adjust the seat forward or backwards, pull up the seat adjustment latch
to disengage. The seat adjustment latch is located below the seat on the
right-hand side.
2. Slide the seat to the desired position and then release the latch. The latch
can be positioned in one of the seven possible slots. Again, be certain this
is locked in place so there is no rocking or sound.
3. The seat is properly adjusted so when you are holding onto the
handlebars, your shoulders are slightly forward from your hips.
Page 10

1-800-367-6712
Handlebar Adjustment
One of the Theracycle’s many unique features is its handlebars, which move
forward and back to give your upper body a workout.
1. With the 5/16” allen wrench, loosen the allen nut on the top of the
handlebar assembly by turning it counterclockwise.
2. Rotate the handlebar to desired position and tighten the bolt clockwise. Be
certain this bolt has been firmly tightened.
3. When the handlebars approach the user, they should be angled toward the
hip and above the knee.
Pedal Strap and Pedal Crank Adjustment
On the Theracycle you can adjust the size of the pedal arc by adjusting the angle
of the pedal link. You can also adjust the size of the pedal strap.
1. With the 5/16” allen wrench, loosen the allen bolt, which attaches the
pedal link to the pedal crank, counterclockwise. When it is loose, you
can rotate the pedal link to your desired angle. This angle changes the
size of the arc, or range of motion that your foot and therefore your leg will
travel.
2. Once you have determined the proper angle, secure by tightening the
allen bolt clockwise.
3. Once one pedal is adjusted, make sure to adjust the other pedal in
exactly the same way so that each pedal mirrors the other.
4. To adjust each pedal strap, push down with one hand on top of the clip
holding the pedal strap. With your other hand, push the strap to the
desired position, and release.
There are instructional videos on these adjustments. Go to
https://www.youtube.com/user/Theracycle.
Page 11
1-800-367-6712
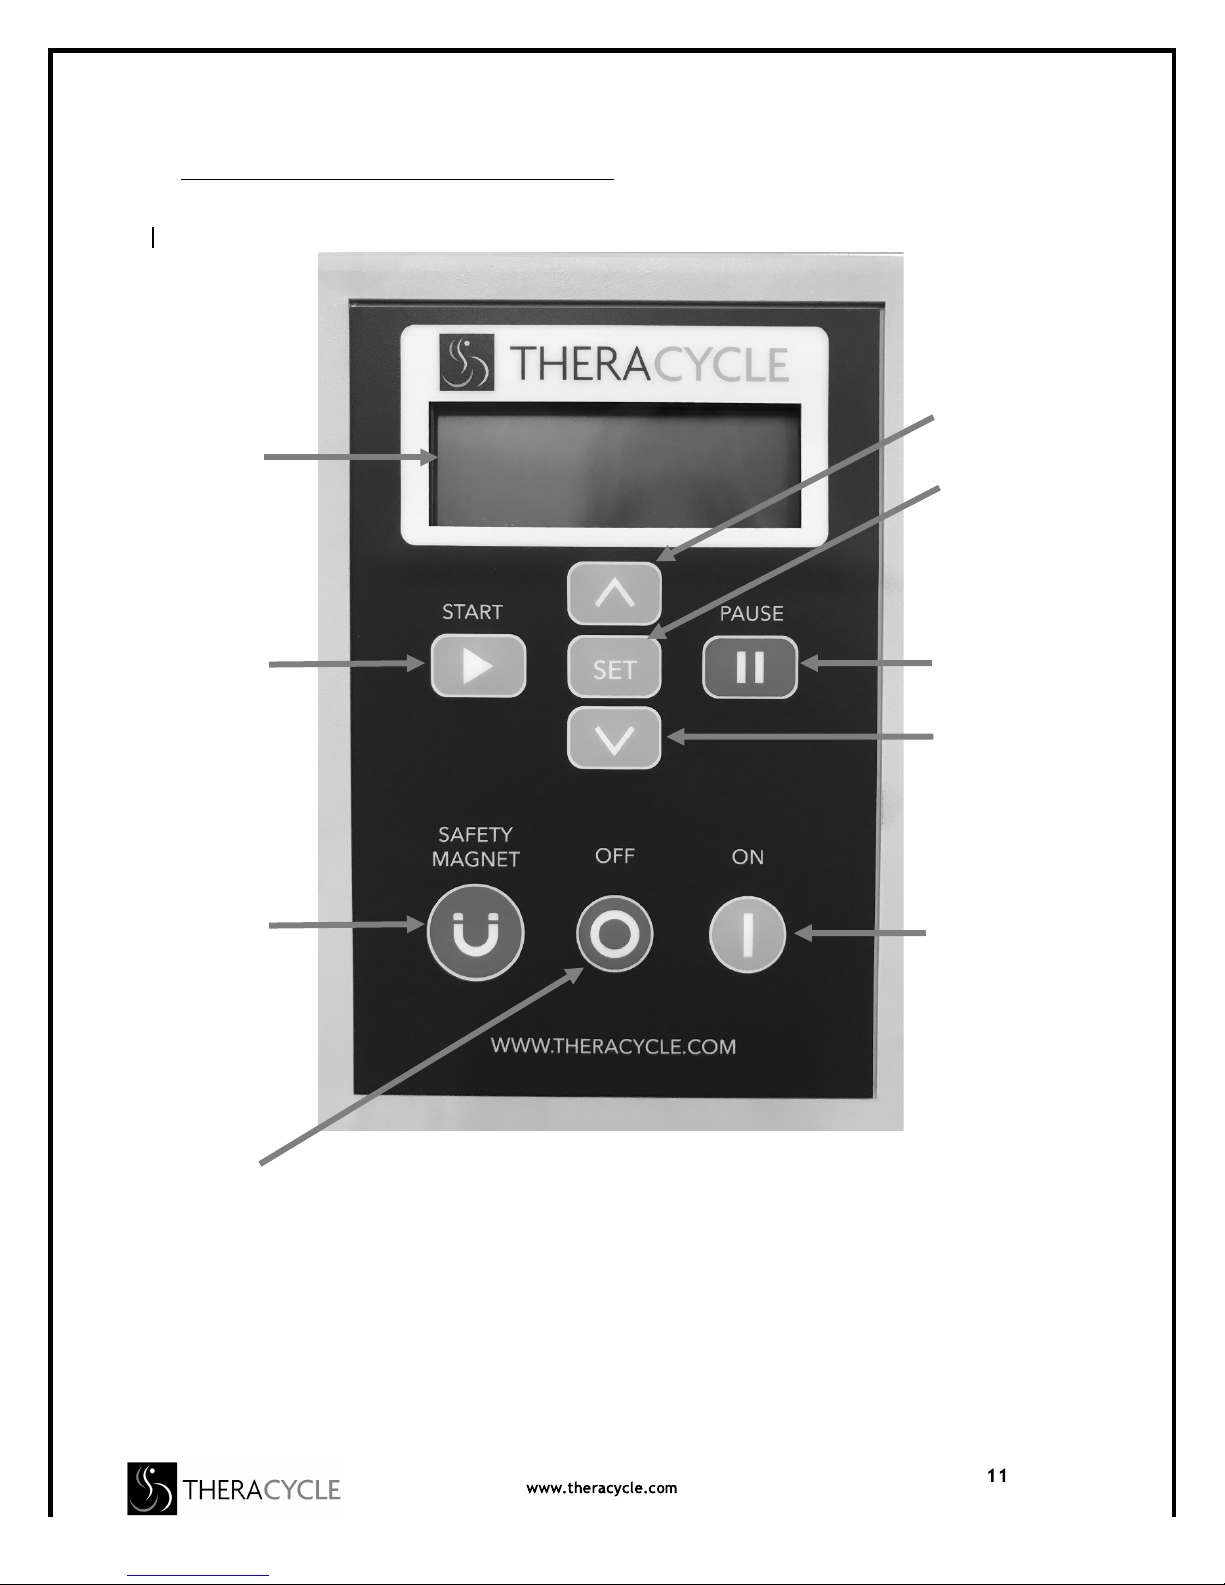
Theracycle Computer Display
Up Button
Set Button
Pause Button
Down Button
On Button
Off Button
Safety Magnet
Sensor
Start Button
Computer
Display Screen
Remove the plastic protective
covering before using.
Page 12

1-800-367-6712
Quick Start Guide
1. Plug the Theracycle power cord into a three prong, grounded outlet. We
recommend the use of a surge protector with the Theracycle.
2. Turn on the main power switch located underneath the front right bottom
of the Theracycle, underneath the motor. This can be left on
3. Get comfortably seated and make sure that both feet are placed
securely on the pedals in the pedal straps. Always wear shoes, no socks
or bare feet!
4. Clip the safety magnet to your shirt or belt.
5. Place the magnet on the display screen in the Safety Magnet position if it’s
not already there.
6. Press the “ON” button. You will see “Get ready to exercise the easy
way” message on the display.
7. The display screen will now say, “REMOVE MAGNET TO TEST.” The
safety magnet only needs to be removed about 2-3 inches away from the
display screen before reattaching it.
8. The display screen will now say, “ATTACH SAFETY STOP MAGNET.”
Reattach the magnet to the display panel in the designated area.
9. Settings
• The display screen will now allow you to set your custom
exercise program. Decide on the amount of time that you want
to spend exercising (from 1 minute to 99 minutes), and the
speed, in miles per hour (mph), which you want to go. You can
set the speed anywhere from 1 to 15 miles per hour. We
suggest you start at 6 MPH. Speeds lower than 5MPH are more
difficult due to the resistance of the motor.
• If you are satisfied with the settings as they appear on the
screen (time and speed), press “START”.
• If you want to change the settings, press “SET” on the display
panel. On the display screen, you will see a cursor pointing at
the line where you will select time. Set the desired length of
time with the “UP” or “DOWN” arrow keys on the computer
display panel.
• Press “SET” again and the cursor will move down to the line
where you will select speed in miles per hour with the “UP” or
“DOWN” arrow keys on the display panel. You do not need to
press, “SET” again before you begin your program.
10. Make sure that you are firmly grasping either the handlebars or the
outrigger handlebars located next to the seat. Then press “START” to
begin your workout. The Theracycle counts down 5 seconds before it
begins to move. Your workout will now begin!
Page 13

1-800-367-6712
11. If you need to stop or pause at any time during your workout, you can
press “PAUSE” (the Theracycle will stop, but you can resume your
program by pressing, “START.” If you stop the Theracycle by pressing,
“STOP” or using the safety magnet, you will have to start your workout
from the beginning. If you pull the safety magnet, you’ll need to press,
“START” again to begin your workout from the beginning.
12. While you are exercising, the display screen shows the amount of time
left in your exercise program at the top, your actual speed in miles per
hour, the RPM rate (revolutions per minute), and the distance traveled
in miles.
13. When the exercise time that you have chosen has elapsed, the
Theracycle will stop.
14. When you are finished, the display screen will say “Congratulations”,
show you how far you have biked in miles, how many minutes this took,
and your average speed. If you wish to keep track of your daily workout,
you’ll need to write this information down in your Theracycle Exercise
Log before the screen is terminated. Congratulations!
15. Shut off the Theracycle with the off button on your computer display.
Change of Speed /Time While Riding
The speed and/or the time can be changed during your ride.
Hit the “pause button” and then using the “set button”, make the change in speed
and/or time and then hit the “start” button again.
The Value of Exercise
If you are like many of our Theracycle owners, exercise is very important to you.
If it has been a while since you were able to get the kind of exercise you want,
you will need to start slowly and work up to longer sessions at a faster pace. The
key to success is to make exercise a regular and enjoyable part of your everyday
life. And research has shown that it is never too late to start exercising. There are
many benefits to regular exercise including:
• Increased joint flexibility
• Increased muscle strength
• Improved balance
• Increased endurance
• Increased cardiovascular conditioning
• Improved weight control
Page 14

1-800-367-6712
Before beginning this or any exercise program, consult your
doctor or health professional. Only he or she can establish the
exercise routine appropriate for your age and condition.
Basic Guidelines for Theracyclists
1. The Theracycle is designed so that you can choose to let the motor
move your legs and arms for you, and, when you choose, you can
push the pedals for resistance. The handlebars can be used by
resting your fingers on the handle and letting the movement work
your upper body. You can also push and pull against the
handlebars for upper body benefit.
2. Add time before you add speed to your workouts.
3. Warm up and cool down. It doesn’t matter whether you work out every
day or three times a week, it’s important to do a gentle warm-up before
you use your Theracycle. Stretching helps maintain flexibility and range of
motion and prevents injuries. Towards the end of your routine, you may
want to gradually decrease your speed. After you are done using your
Theracycle, gently stretch your legs, shoulders, and lower back.
4. Stick with a program and track your progress.
5. Set simple, flexible goals that fit your individual strengths.
6. Don’t overdo it. Keep cool. Pace yourself.
7. Pay attention and modulate your exercise as your symptoms fluctuate.
8. Do something that you enjoy while exercising. Listen to music,
podcasts or audio books , or watch TV. There is a brain benefit to
challenging your brain while exercising – try to learn something new!
For Beginning Theracyclists
• Start slowly. Beginning Theracyclists usually start slowly and work up to a
daily routine. For example, start by using the Theracycle for ten minutes
a day, three days a week. Set the speed somewhere between five to
seven miles per hour. For your first workouts let the motor move you.
• Make sure to listen to your body - do what’s comfortable, not what’s
painful. You will find that over time you will become stronger. As you use
the Theracycle, you will quickly learn how your body responds and how to
vary your workouts, using time and speed.
• Plan on at least one day of rest between workouts. After several weeks of
regular exercise, you may be able to complete up to five workouts each
week.
• Each week, add a few minutes of exercise. Add time before speed.
• Keep track of your workouts so that you have a record of how you are
progressing. Use the monthly Theracycle log sheets to help you.
Page 15

1-800-367-6712
• Many users like to go for short 5-10 minutes early in the day to help
them loosen up and decrease stiffness. Some users ride later in the
day for a short ride to get an energy boost.
For More Experienced Theracyclists
• Experiment with the two variables: time and speed, as you gain
experience with the Theracycle. Remember, you can program the
Theracycle for rides lasting up to 99 minutes and at speeds up to 15
miles per hour, which equals 90 rotations per minute. Each mile per
hour is equal to 6 RPM’s on the Theracycle.
• Gradually increase your time and speed. While there is a very wide
range among Theracycle users, many work up to using the Theracycle as
much as three times daily for 10 to 20 minutes, and from six to seven
miles per hour.
• There are some users who ride for even longer (30-45 minutes) at even
higher speeds (11-14 miles per hour), after an initial warm-up of 15
minutes at six or seven miles per hour.
• Gauge and change your level of effort. If you can push, pull, or pedal,
try to do so some of the time. Some Theracyclists try to work the whole
time they are on the bike, but many simply push, pull, and/or pedal
intermittently, and the rest of the time they let the Theracycle do the work.
Even if you can’t push/pull, or pedal, you will still benefit from a
Theracycle workout.
Everyone is different: As you gain experience on the Theracycle,
you will know what works best for you.
Recent research shows benefits come from increasing your heart rate during
exercise. The minimum time per week is 2.5 hours at an intense level – this means
you are sweating and your heart rate has increased.
We suggest you get a heart rate monitor to track your heart rate.
Please check with your doctor before starting!
Cleveland Clinic Protocol
The Cleveland Clinic protocol was as follows:
Three sessions per week.
One hour per session comprised of:
• 10 minutes warm up
• 30 minutes at 80-90 RPM (14-15miles per hour on the Theracycle.)
• 10 minutes cool down
Page 16
1-800-367-6712
Maintenance of your Theracycle
The Theracycle is designed to be nearly maintenance free for years of normal
use. All of the bearings in the machine have been sealed and permanently
lubricated.
Every year, clean the ports in the control box located at the bottom of the unit.
Unclip the three cables and blow out the ports with compressed air. Reclip the
cables securely. Do this twice a year if you live in a dusty or sandy part of the
country or have pets in the home.
Every five years, replace the oil in the gear box. This requires the gear box to be
completely drained and filled with a quart of gear oil, 85W/140. We can sell you
the oil or you can find it on Amazon.com. It may be available locally in a marine
or farm store. You should never “top off” the oil in the gearbox.
Moving? The oil should be drained and the Theracycle must never be tipped on
its side. Call us for directions on how to break down the unit for transport.
Save the shipping carton, all parts are low profile or fold flat.
Theracycle 200 & 300 Model Oil Change
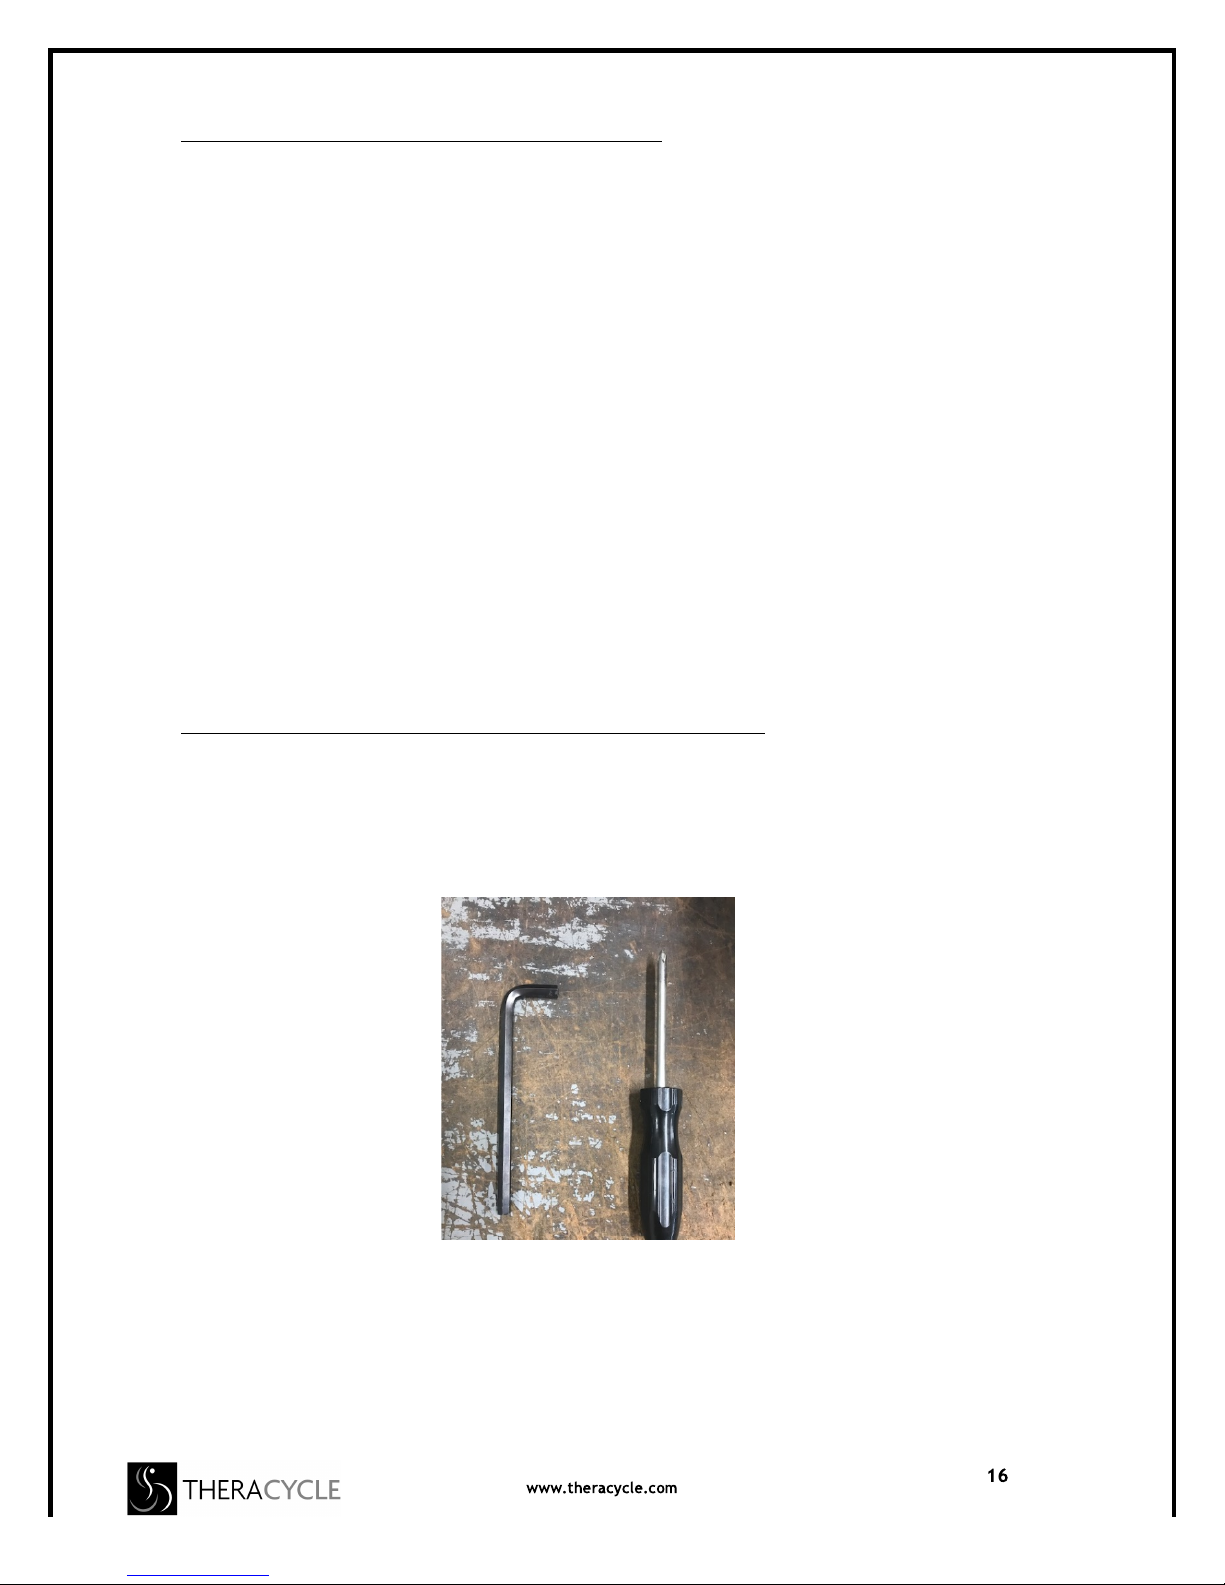
To drain the oil, you will need the 5/16 allen Wrench provided in the tool kit as well
as a Philips-Head screwdriver.
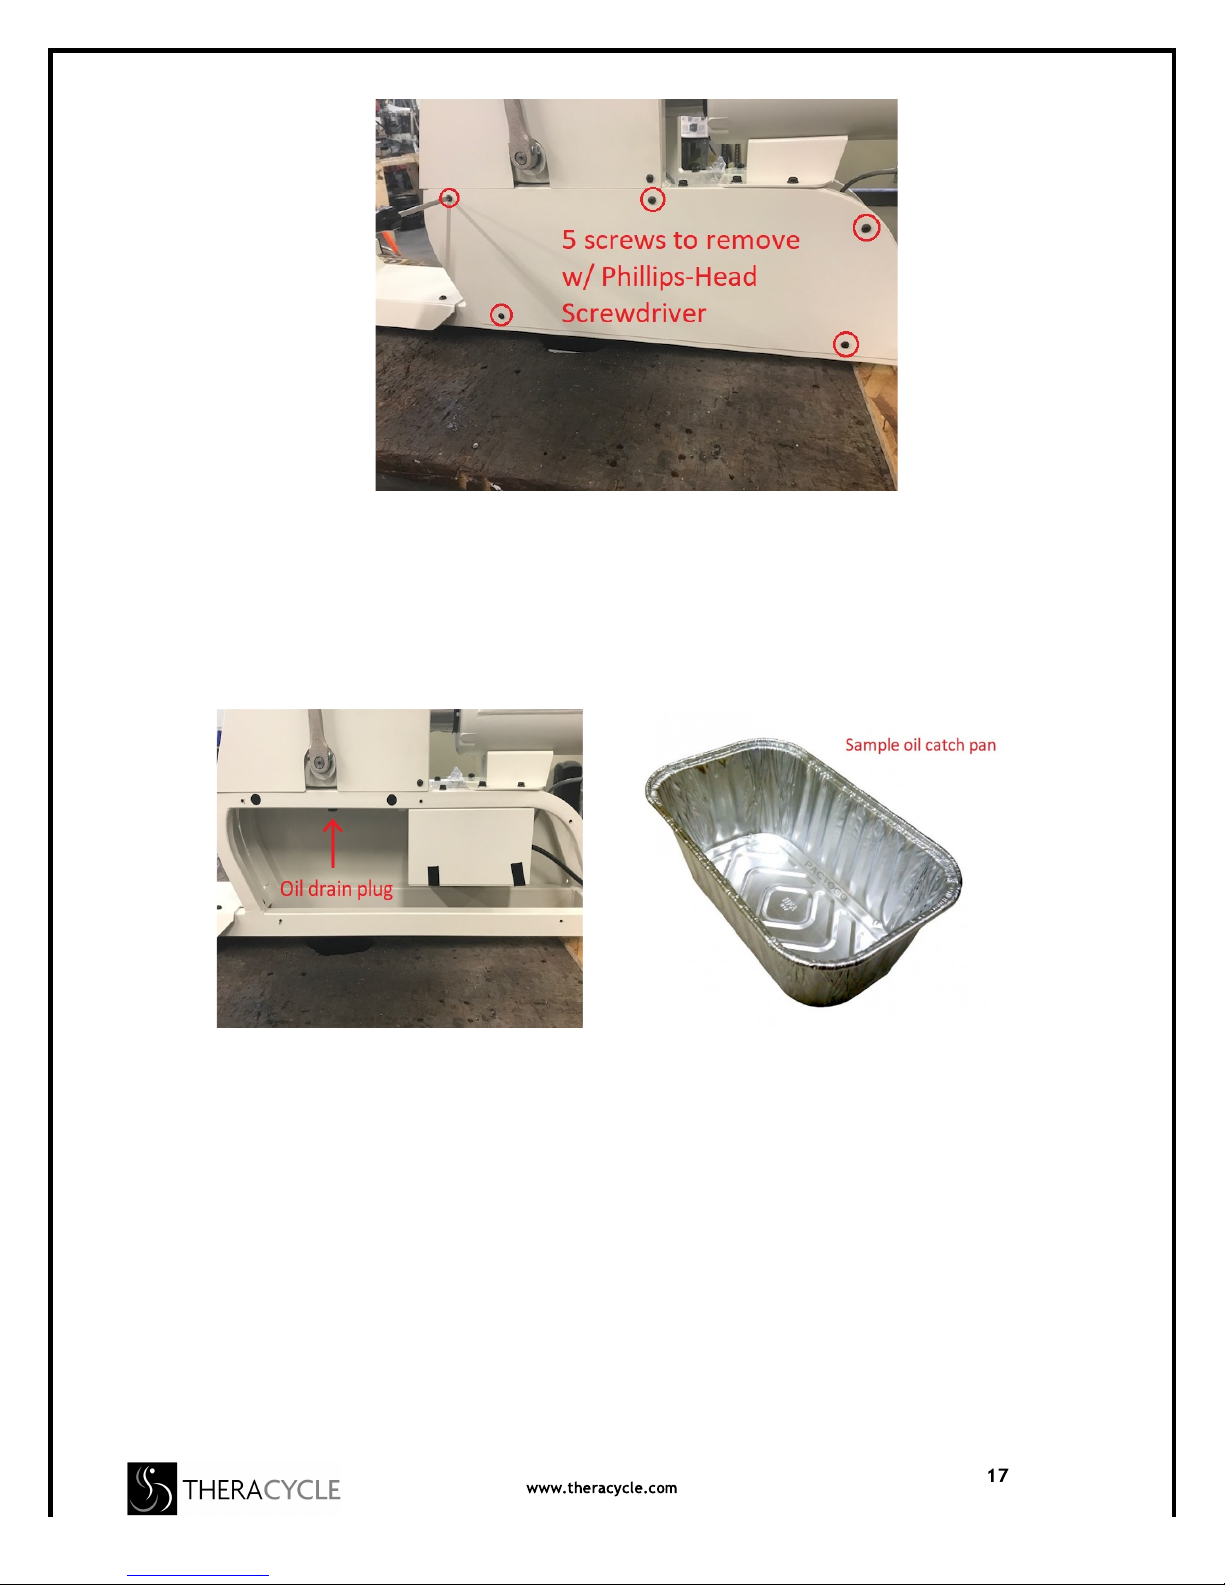
• Use the Phillips-Head Screwdriver to remove the 5 screws (per side) on the
lower shroud(s) of the bike. You may have to remove both the left and right
side depending on what you use as an oil catch pan.
Page 17
1-800-367-6712
• After removing the lower shroud(s), locate the oil drain plug at the bottom of
the gearbox. In the open area under the gearbox drain plug, place an oil
catch pan. You can even use a disposable foil loaf baking pan capable of
holding 1 quart of fluid.
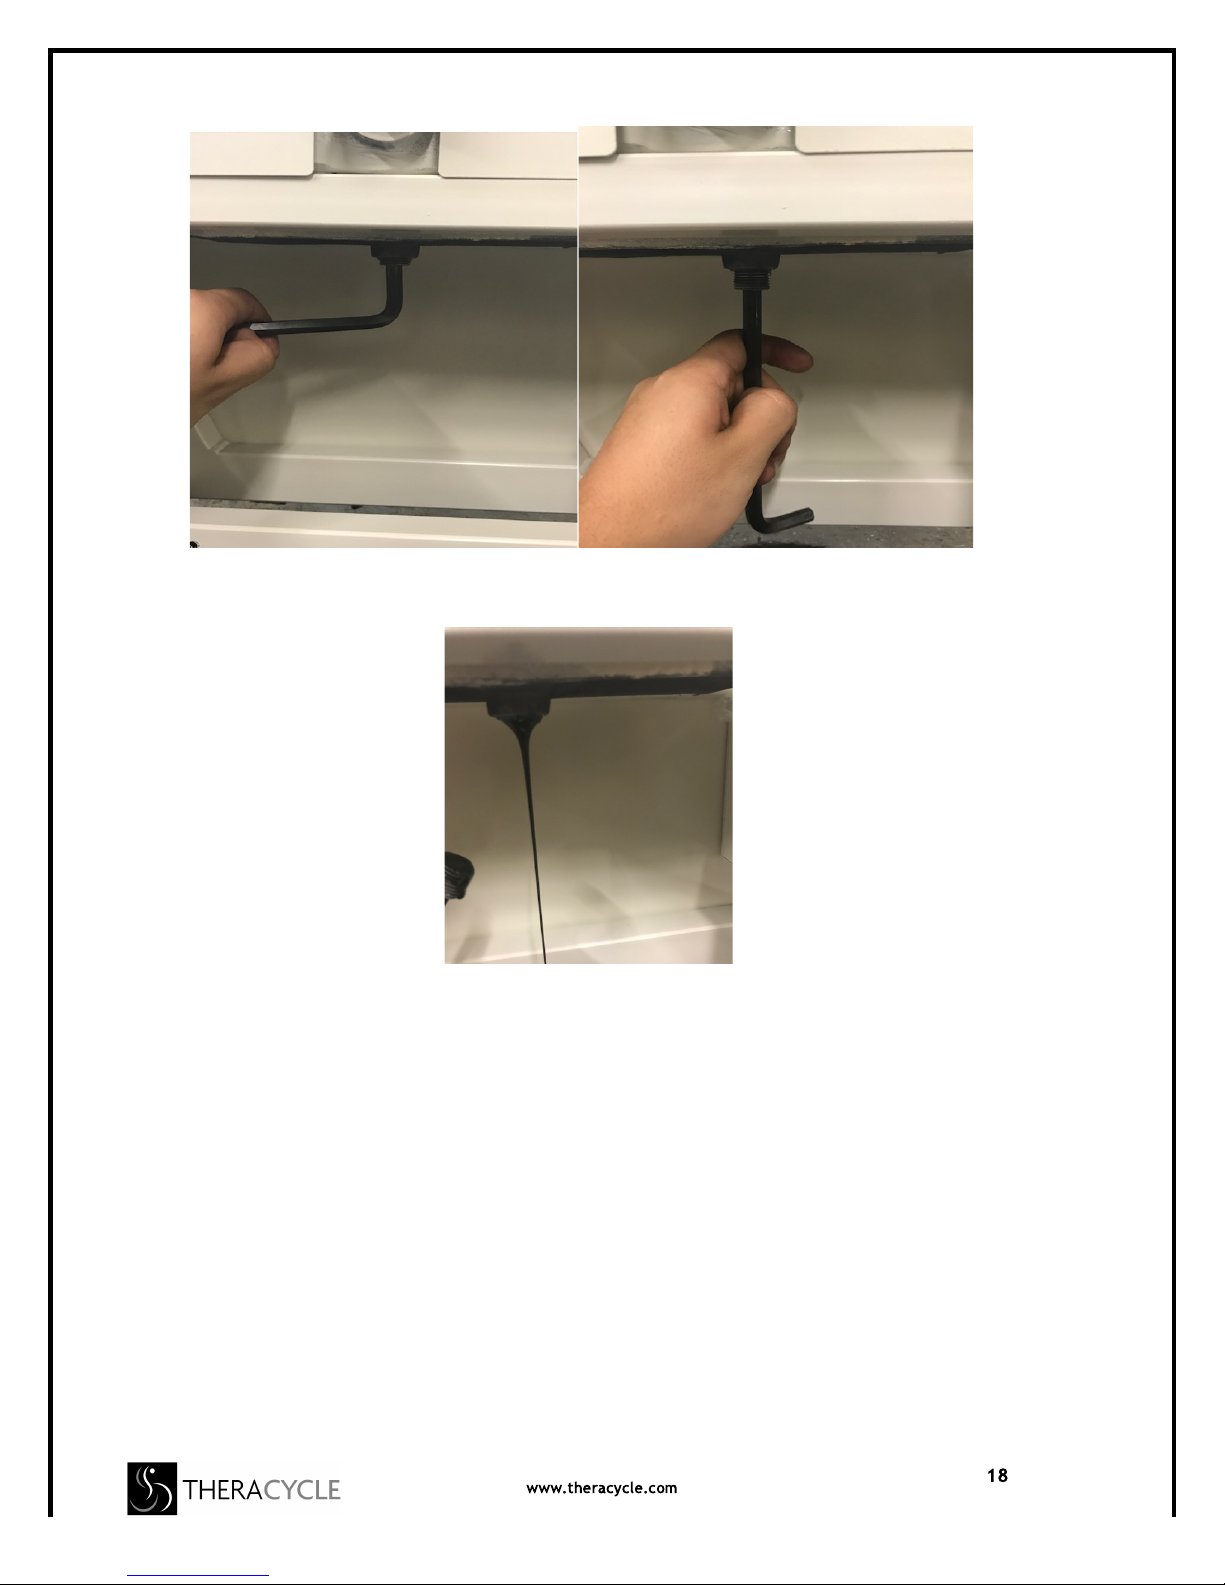
• Once the oil catch pan is in place; use the 5/16 allen Wrench to unscrew the
oil plug and the oil will then drain out into the pan.
Page 18
1-800-367-6712
• Let the gear box drain for about 15 – 20 minutes. After the gearbox has
been drained, re-insert the oil drain plug into the gear box and wipe any
excess oil with a paper towel or rag from the bottom of the gear box.
• Using the Phillips-Head Screwdriver re-attach the lower shroud(s). There
are 5 screws per side.
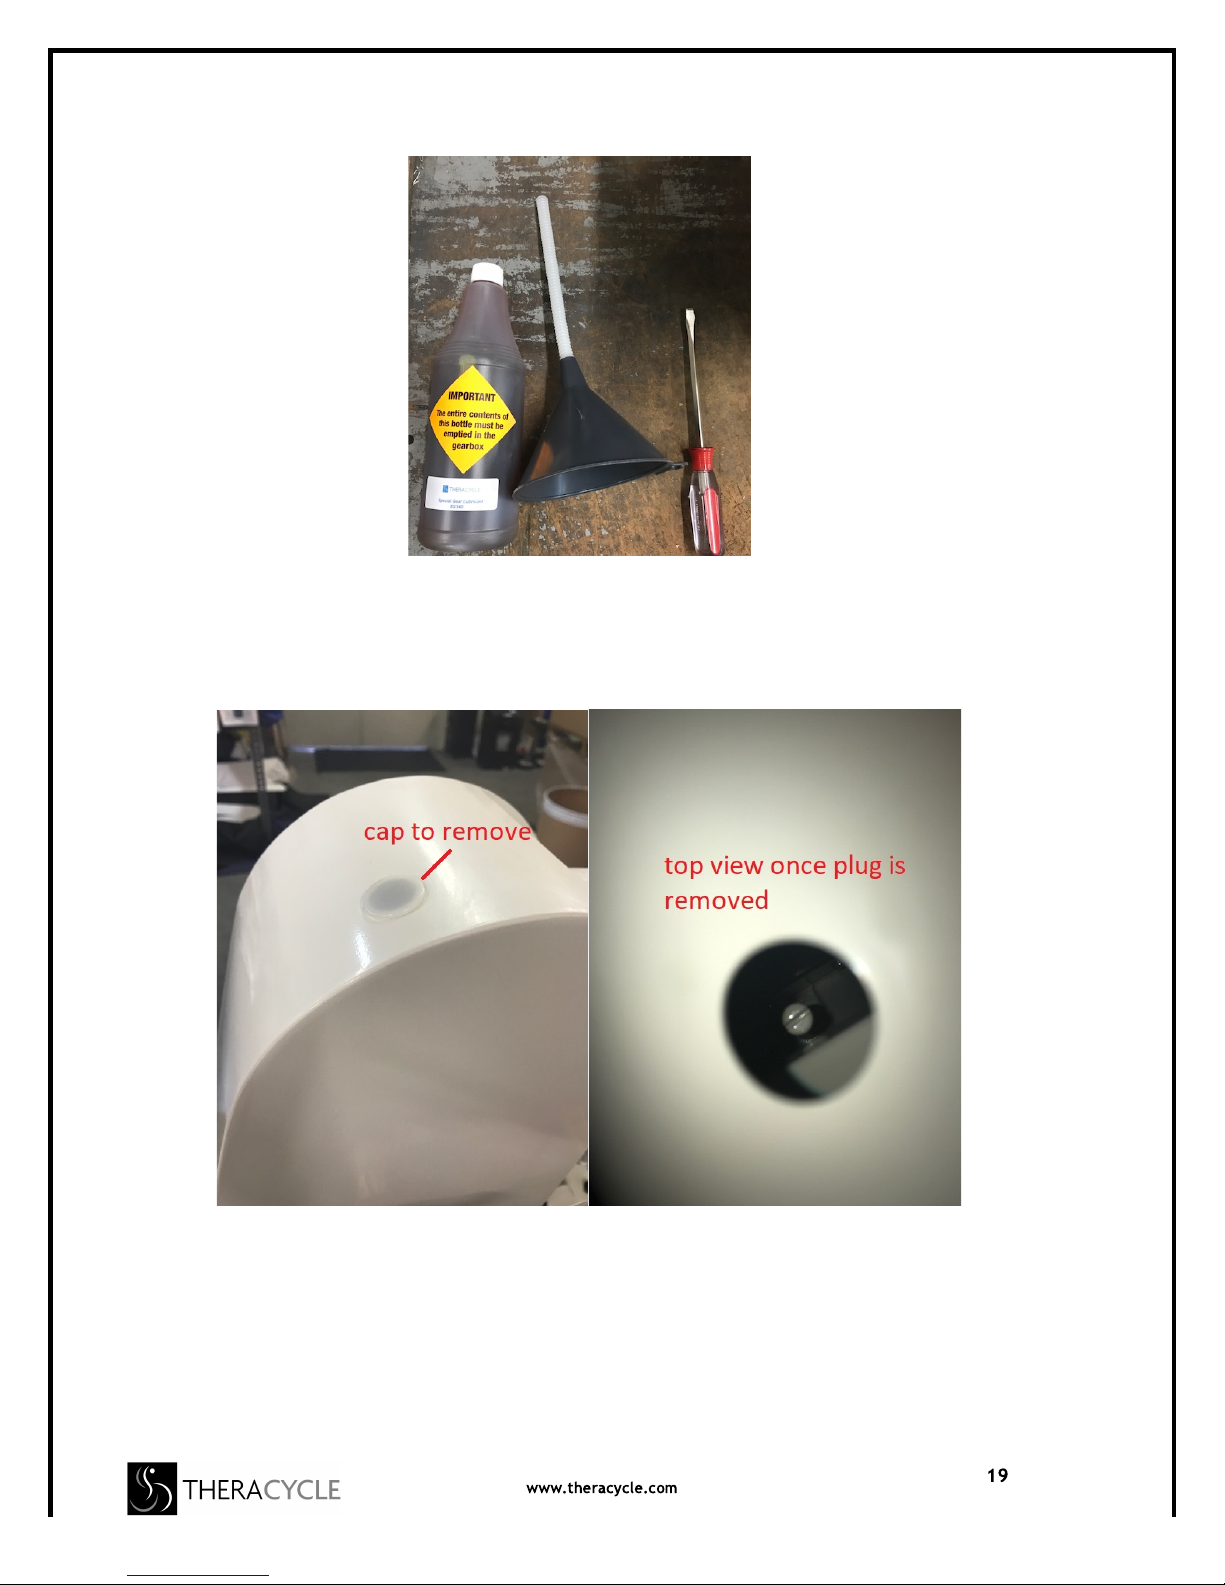
• For filling the gear box with new oil, you will first need a Flat-Head
Screwdriver, a funnel, and a new quart of 85w-140 gear oil (do NOT use any
other gear oil)
Page 19
1-800-367-6712
• Locate and remove the plastic press fit cap located on the top of the upper
bike shroud. Gently pry the cap out or push it out from under the cap.
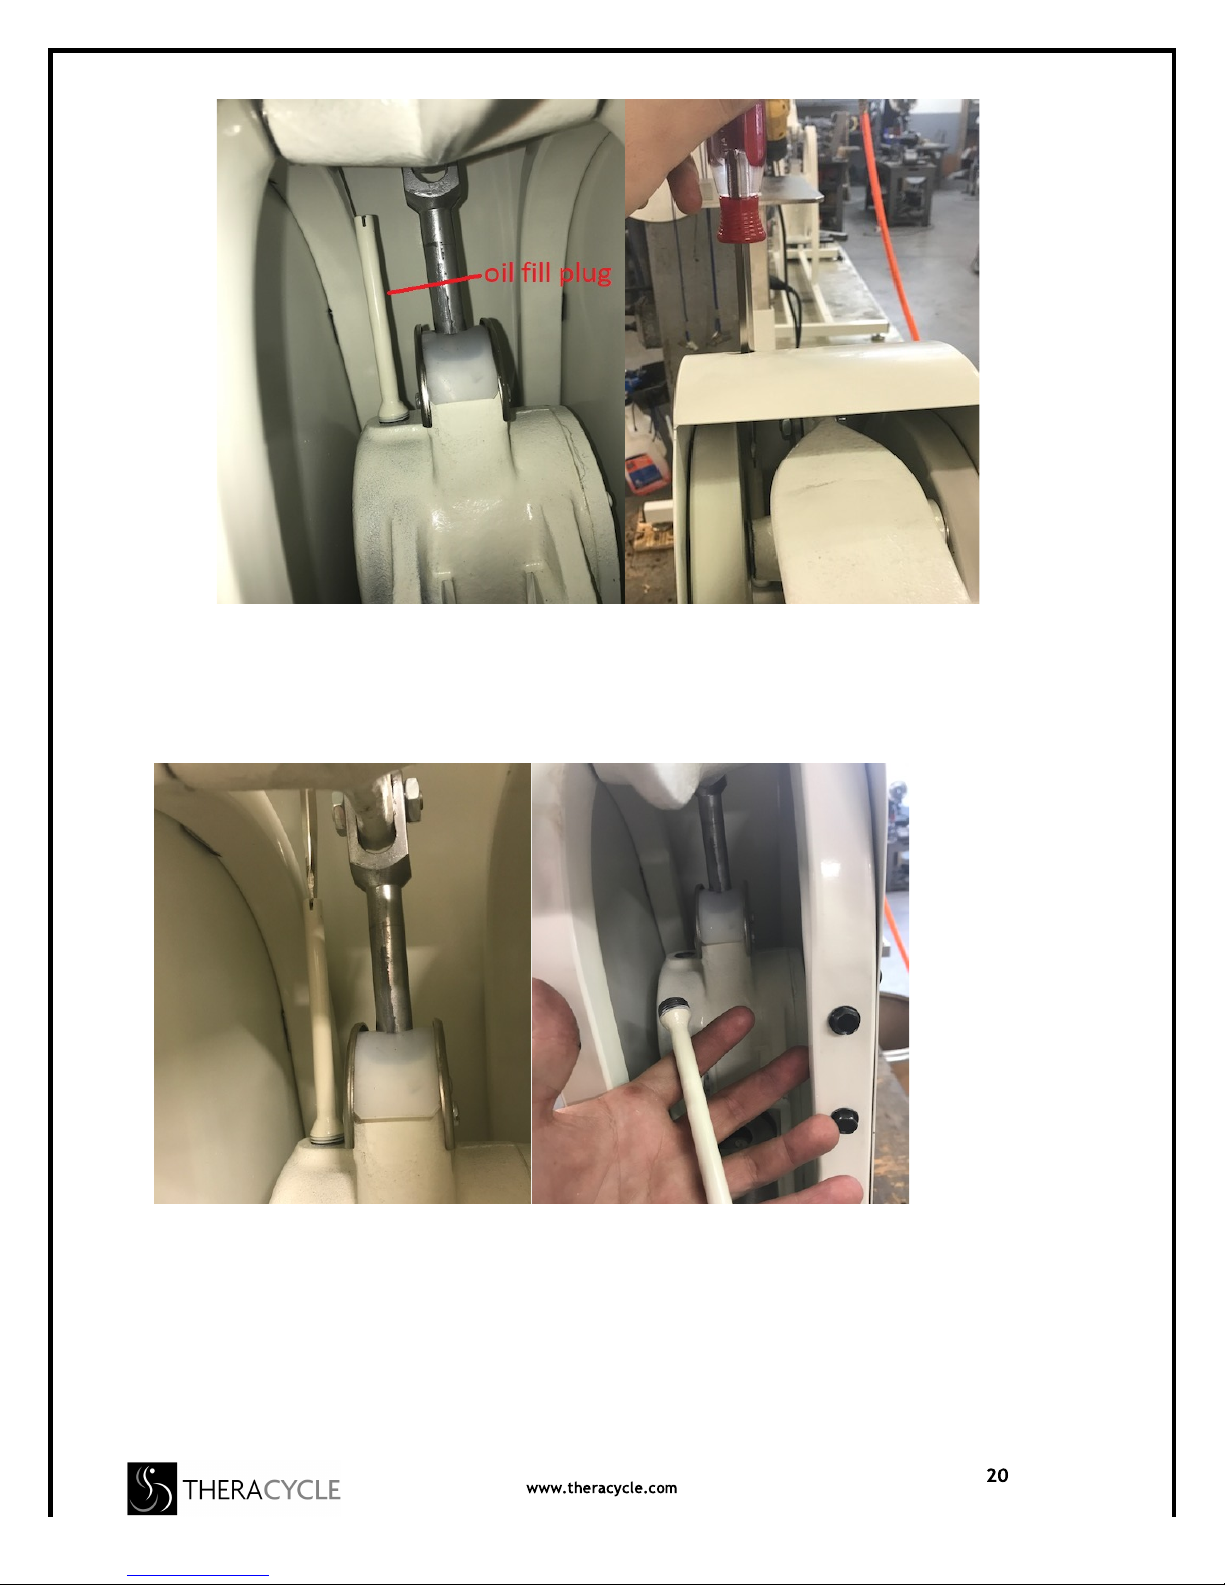
• Insert the Flat-Head Screwdriver into the hole and use it to remove the
gearbox fill plug.
Page 20
1-800-367-6712
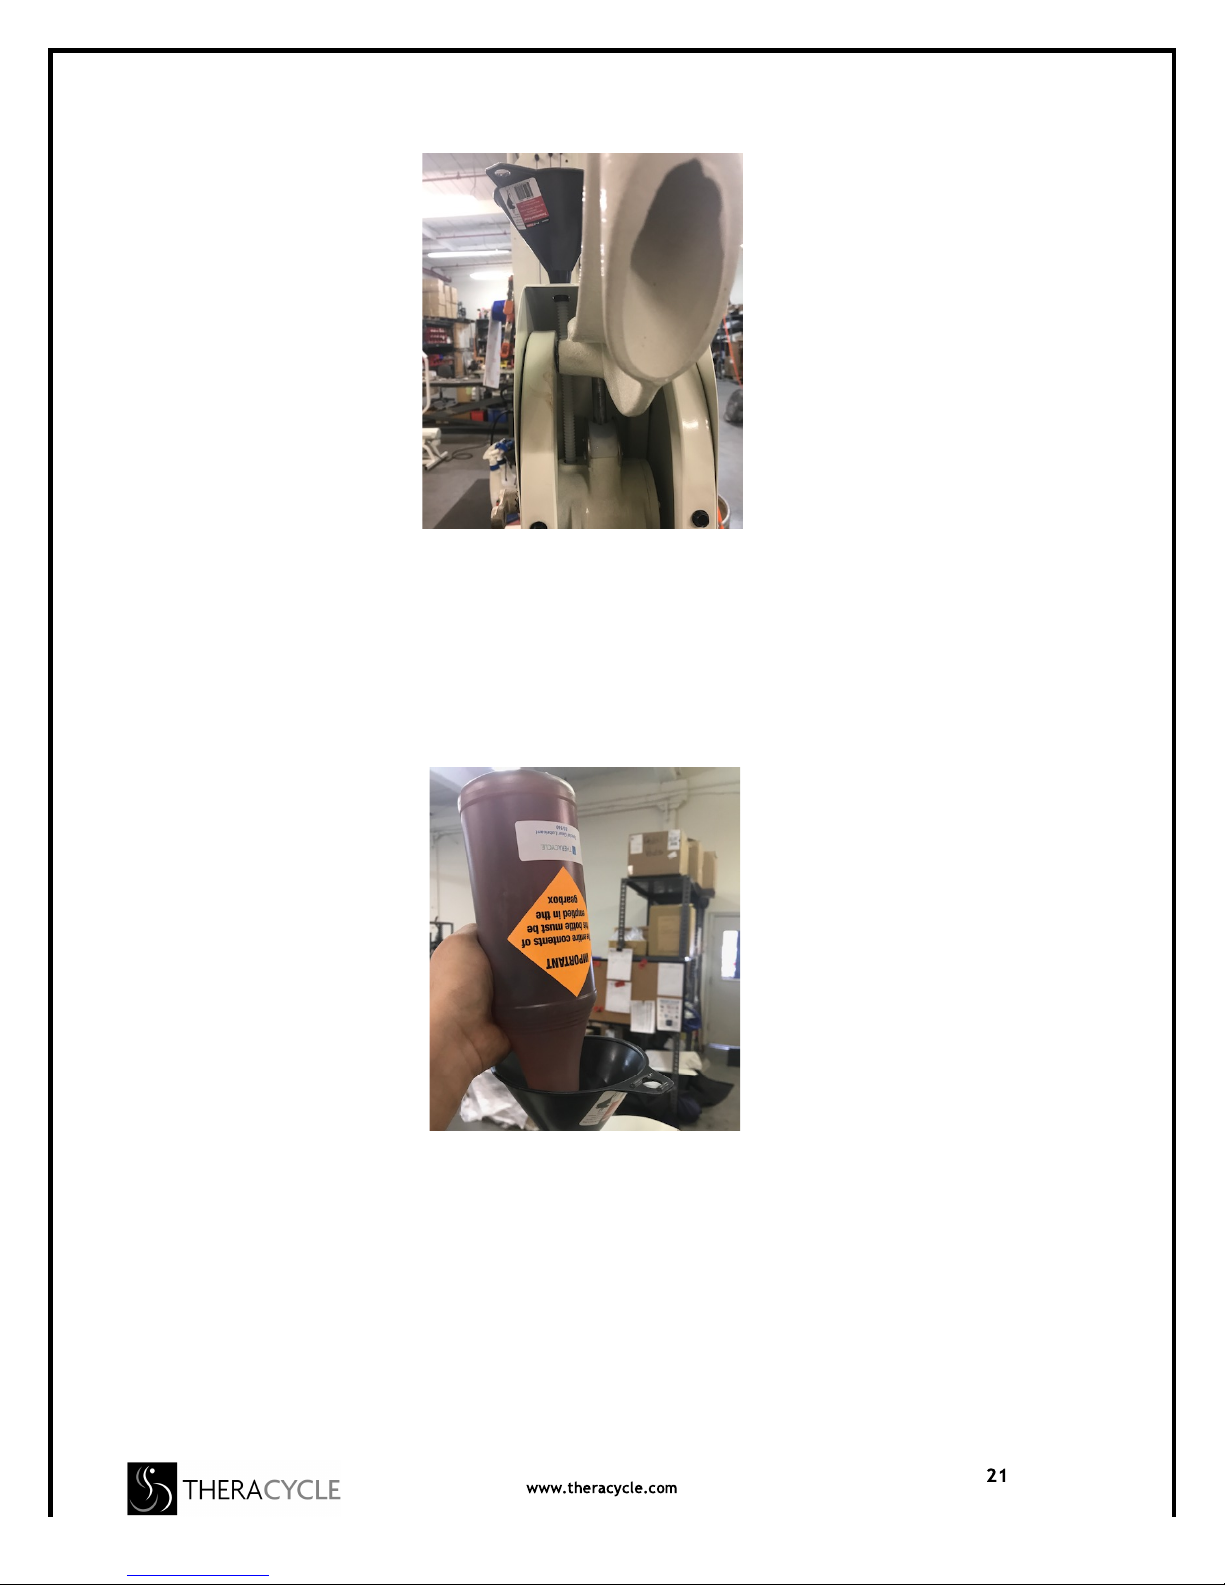
• Once the fill plug is removed, insert the funnel through the top hole of the
upper shroud and into the oil fill hole.
Page 21
1-800-367-6712
• Fill the gear box with the new quart of oil. Due to the oil being very thick it
will take up to 15-20 minutes to fill. Make sure you fill the gear box with the
entire bottle of oil. You will have to fill the funnel up several times and wait
as it drains into the gear box.
• Once you fill the gear box with the quart of oil, use the flat-head screwdriver
to re-install the oil fill plug to the gearbox. Lastly, re-install the plastic press
fit cap to the top shroud.
If your machine should ever require service, contact the Theracycle Division of
RSS Industries at 1-800-367-6712.
Page 22

1-800-367-6712
Limited Warranty for the Theracycle
The Theracycle is warranted to be free from defects in materials and workmanship.
The Theracycle is a mechanical device. The warranty does not cover regular
maintenance which might include tightening of hardware that can work loose with use.
Time Period
• Electronic components (sensor, cable assembly, computer display box
and control box), and the motor are covered for one year from the date of
original purchase.
• All other parts of the Theracycle are covered for three years from the date
of original purchase.
This warranty does not cover:
• Any damage, failure, or loss caused by accident, misuse, neglect, abuse,
improper assembly, improper maintenance, or failure to follow
instructions or warnings as outlined in the owner’s manual.
• Use of the product in a manner for which they were not designed.
RSS Industries will cover the cost of labor and materials to repair or replace
anything defective during the warranty period as outlined above.
Shipping and handling will be charged on all warranty parts shipments. We will
ship the most cost-effective way unless directly otherwise. A credit card will be
needed before parts will be shipped.
This warranty gives you specific legal rights and you may also have other rights,
which may vary from state to state.
Page 23
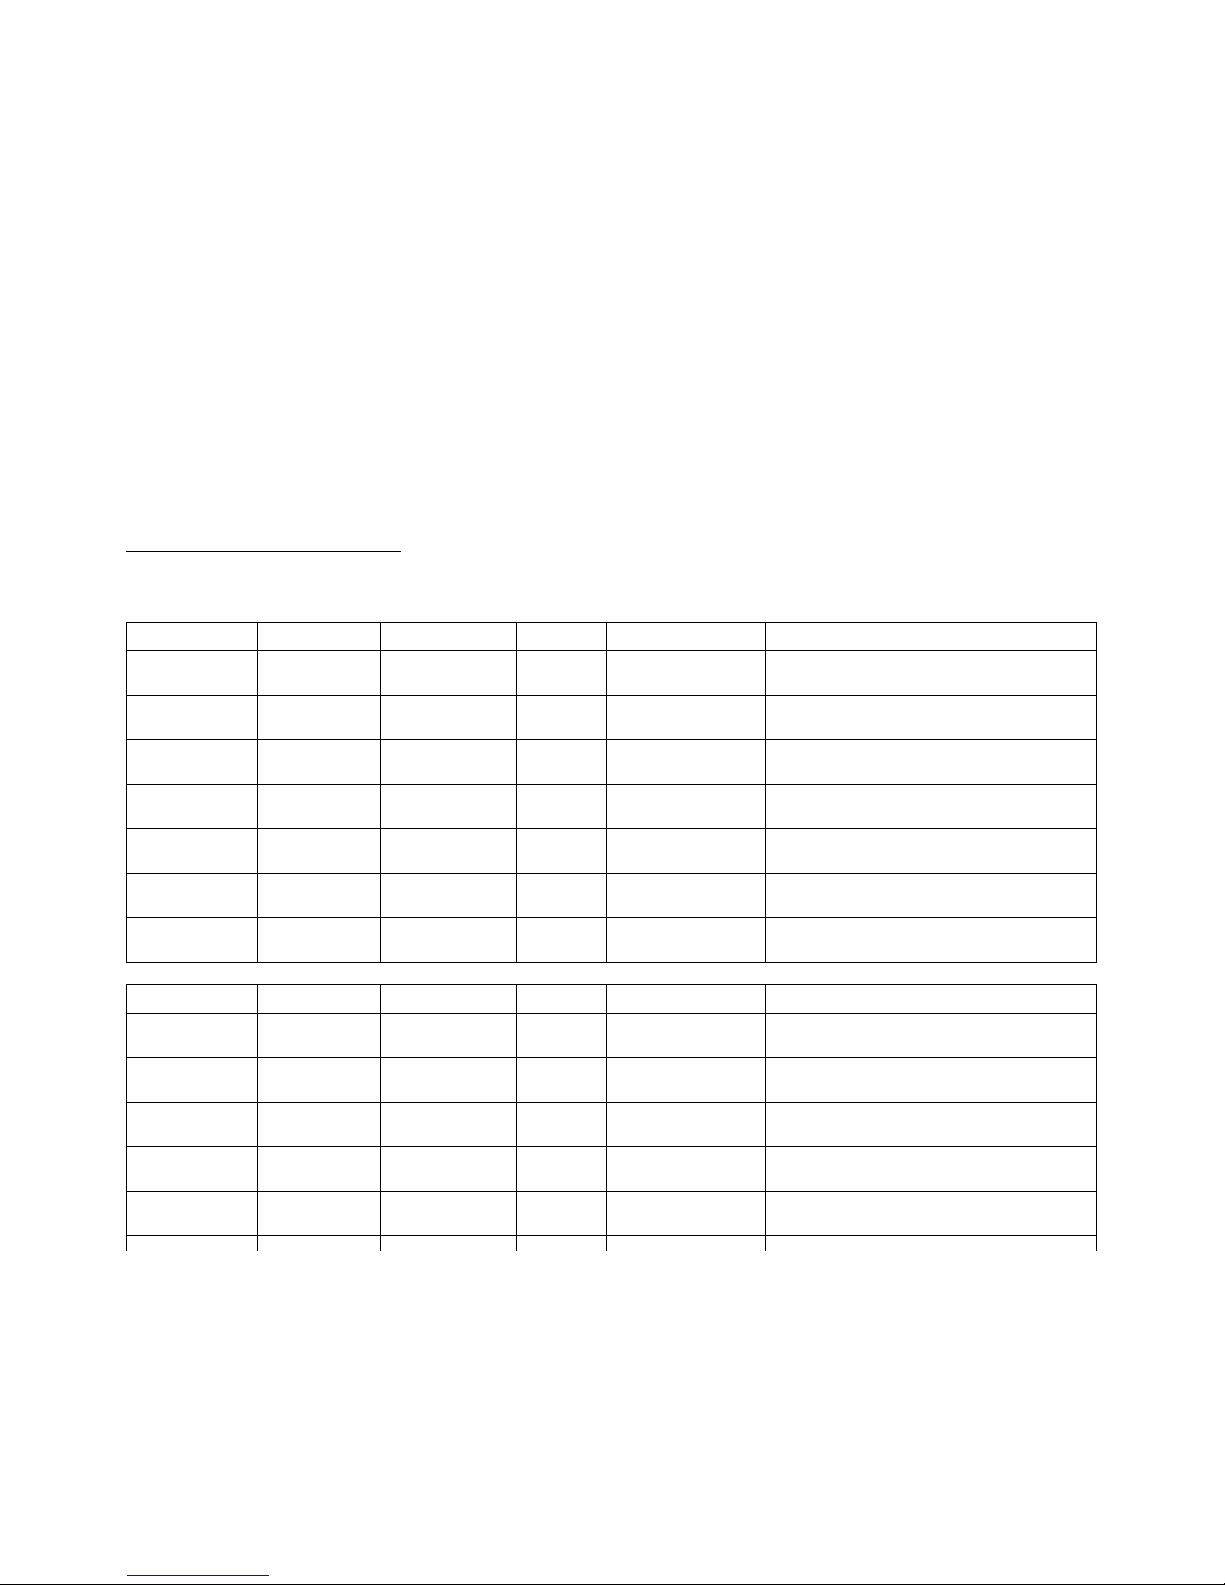
Theracyclist User’s Log
(note: we recommend that you make extra copies for your future use)
Day
Date
Time
Miles
Average Speed
Comments
Monday
Tuesday
Wednesday
Thursday
Friday
Saturday
Sunday
Day
Date
Time
Miles
Average Speed
Comments
Monday
Tuesday
Wednesday
Thursday
Friday
Page 24
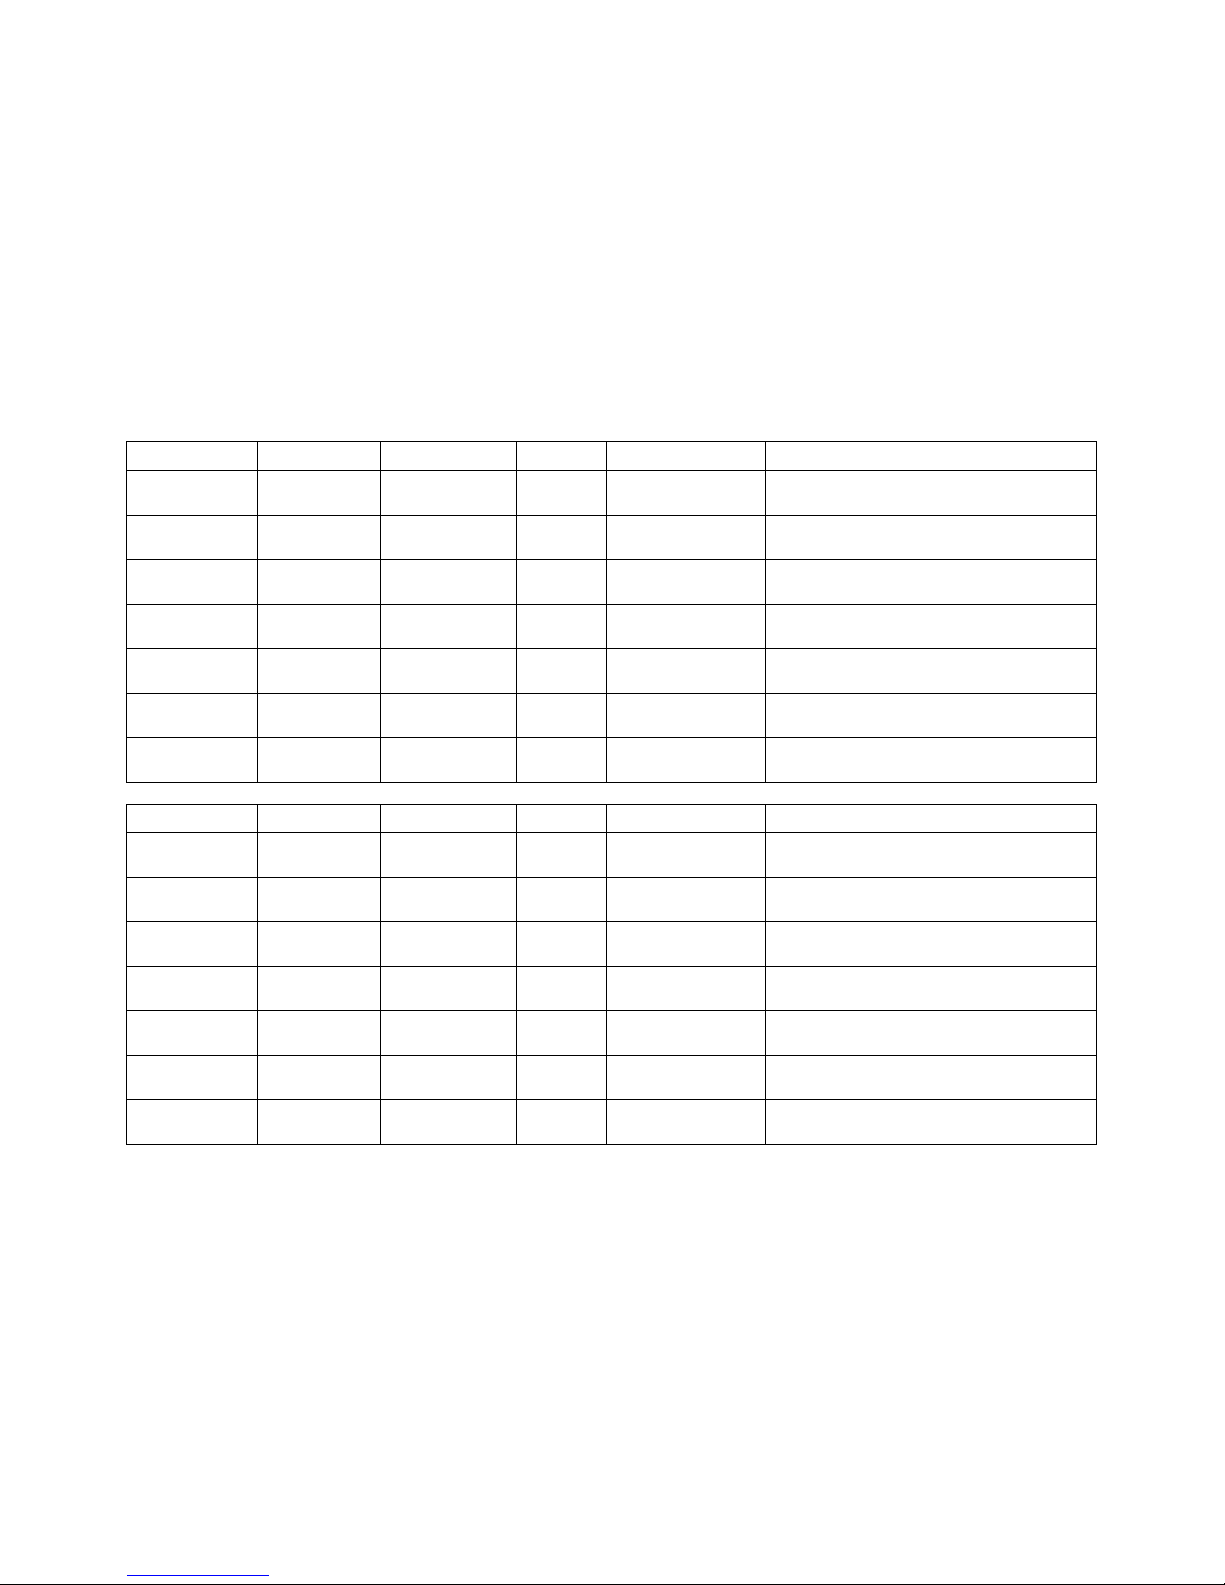
Theracyclist User’s Log
Day
Date
Time
Miles
Average Speed
Comments
Monday
Tuesday
Wednesday
Thursday
Friday
Saturday
Sunday
Day
Date
Time
Miles
Average Speed
Comments
Monday
Tuesday
Wednesday
Thursday
Friday
Saturday
Sunday
 Loading...