

Page 1
TM
Important Information........................2
Package Contents.............................3
Technical Specs ...............................3
How it Works . . . . . . . . . . . . . . . . . . . . . . . . . . . . . . . . . 4
Installing Your ClearSolution™ G2 Filter ....... 5-6
Maintaining Your ClearSolution™ G2 Filter.... 7-10
Troubleshooting............................. 11
Replacement Parts ........................12-13
Warranty Information........................16
Table of Contents:
For Model:
• ClearSolution™ G2 700
(Item #130060)
• ClearSolution™ G2 1250
(Item #130061)
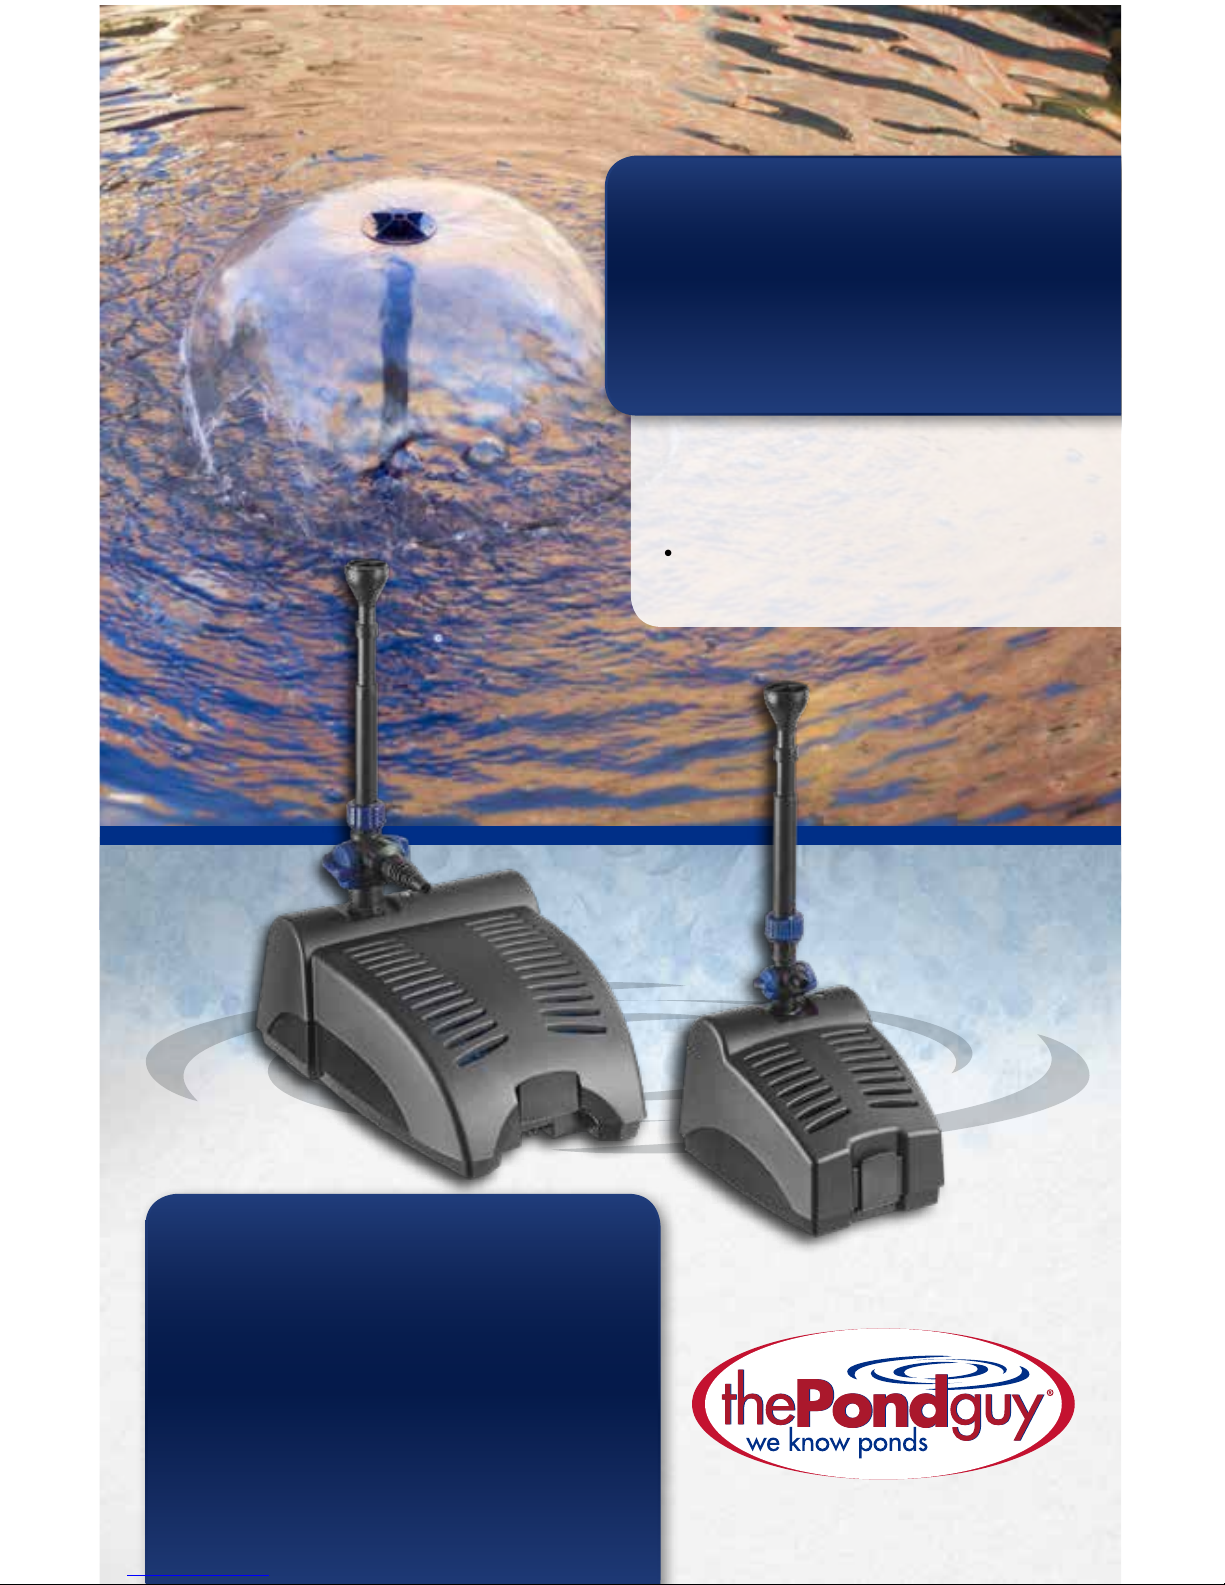
ClearSolution™ G2
Pond Filtration System
Product Manual
Page 2
IMPORTANT INFORMATION:
Please read these instructions thoroughly before use. Failure to follow instructions may
result in equipment damage or failure, losses, injury or death.
DANGER:
To avoid possible electric shock:
• If the power cord has been damaged, DO NOT operate, the ClearSolution™ G2 Filter should
be replaced.
• Prior to installation, inspect the quartz sleeve and UVC bulb to ensure there was no damage
during transportation.
• Close supervision is necessary when the unit is used by or near children.
WARNING:
To reduce the risk of electric shock:
• Connect only to a properly grounded receptacle, which is serviced by a Ground Fault Circuit
Interrupter and never remove the ground pin from the plug.
• Provide a “drip loop” for the power cord. This is a loop in the cord below the level of the
receptacle or plug that prevents water from traveling along the cord in the direction of
the receptacle.
• ALWAYS unplug the ClearSolution™ G2 Filter from power source when it is not in use, and
before installing, removing or servicing the ClearSolution™ G2 Filter components.
• If an extension cord is necessary, a cord with a proper rating should be used. A cord may
overheat if the cord is rated for less amperes or watts than the unit rating.
• DO NOT immerse the ClearSolution™ G2 Filter plug in water or attempt to use a wet plug.
• The ClearSolution™ G2 Filter is NOT suitable for use in swimming pools, swimming ponds, or
other situations where bodily contact is made with the water.
CAUTION:
To reduce the risk of equipment damage or failure:
• ALWAYS keep the ClearSolution™ G2 Filter completely submerged during operation for
proper cooling.
• DO NOT place ClearSolution™ G2 Filter near ammable or other dangerous materials or objects.
• DO NOT use the ClearSolution™ G2 Filter with uids other than water.
• ALWAYS unplug the unit if there is no water running through it to prevent over heating.
• DO NOT operate during freezing conditions. Drain the ClearSolution™ G2 Filter and store in a
protected location.
• DO NOT operate the ClearSolution™ G2 Filter with a pump larger than the pump indicated
by the unit specications. Operating with a pump larger than recommended can reduce the
UVC’s eectiveness or cause damage to the UVC and lter and will NOT be covered under
warranty.
IMPORTANT:
The Pond Guy® is not responsible for equipment damage or failure, losses, injury or death
resulting from failure to follow safety precautions, misuse or abuse of equipment.
thepondguy.com | 866-POND-HELP (766-3435)
2
Page 3
Package Contents
CLEARSOLUTION
™
G2 FILTER
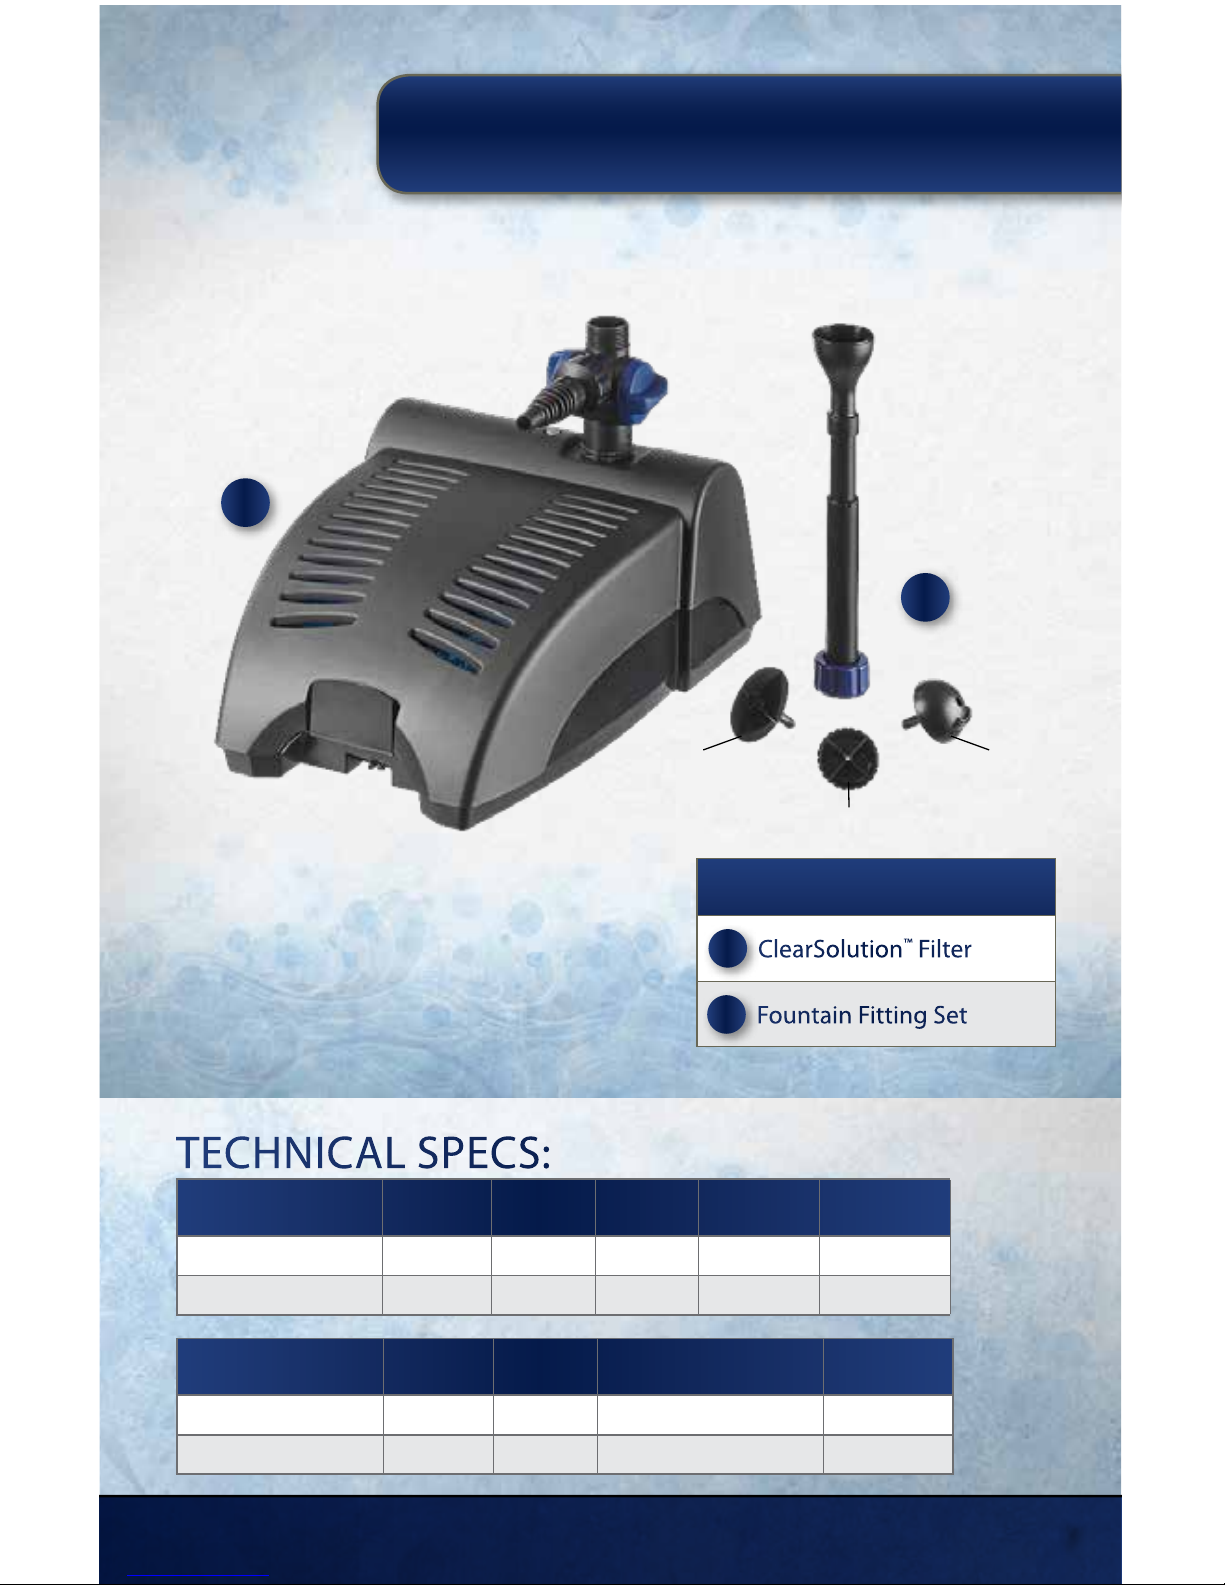
ClearSolution™ G2 Filter
A
ClearSolution™ Filter
B
Fountain Fitting Set
TECHNICAL SPECS :
MODEL POWER
UV
WAT TAGE
BARB
FITTING
MAX FLOW
RATE
MAX POND
SIZE
ClearSolution™ G2 700 120V / 60 Hz 7 Watts 1/2” 250 GPH 700 Gallons
ClearSolution
™
G2 1250 120V / 60 Hz 9 Watts 1/2”, 3/4” 580 GPH 1,250 Gallons
MODEL
Max Head
Height
Operating
Depth
DIMENSIONS
POWER CORD
LENGTH
ClearSolution™ G2 700 4’ 16”-21” 9.7”L X 7.2”W x 6.3”H 16’
ClearSolution
™
G2 1250 7.2’ 16”-21” 15”L x 11.4”W x 6.3”H 16’
A
B
Bell Pattern Fan Pattern
Classic Pattern
15425 Chets Way | Armada, MI 48005
3
Page 4
HERE’S HOW IT WORKS:
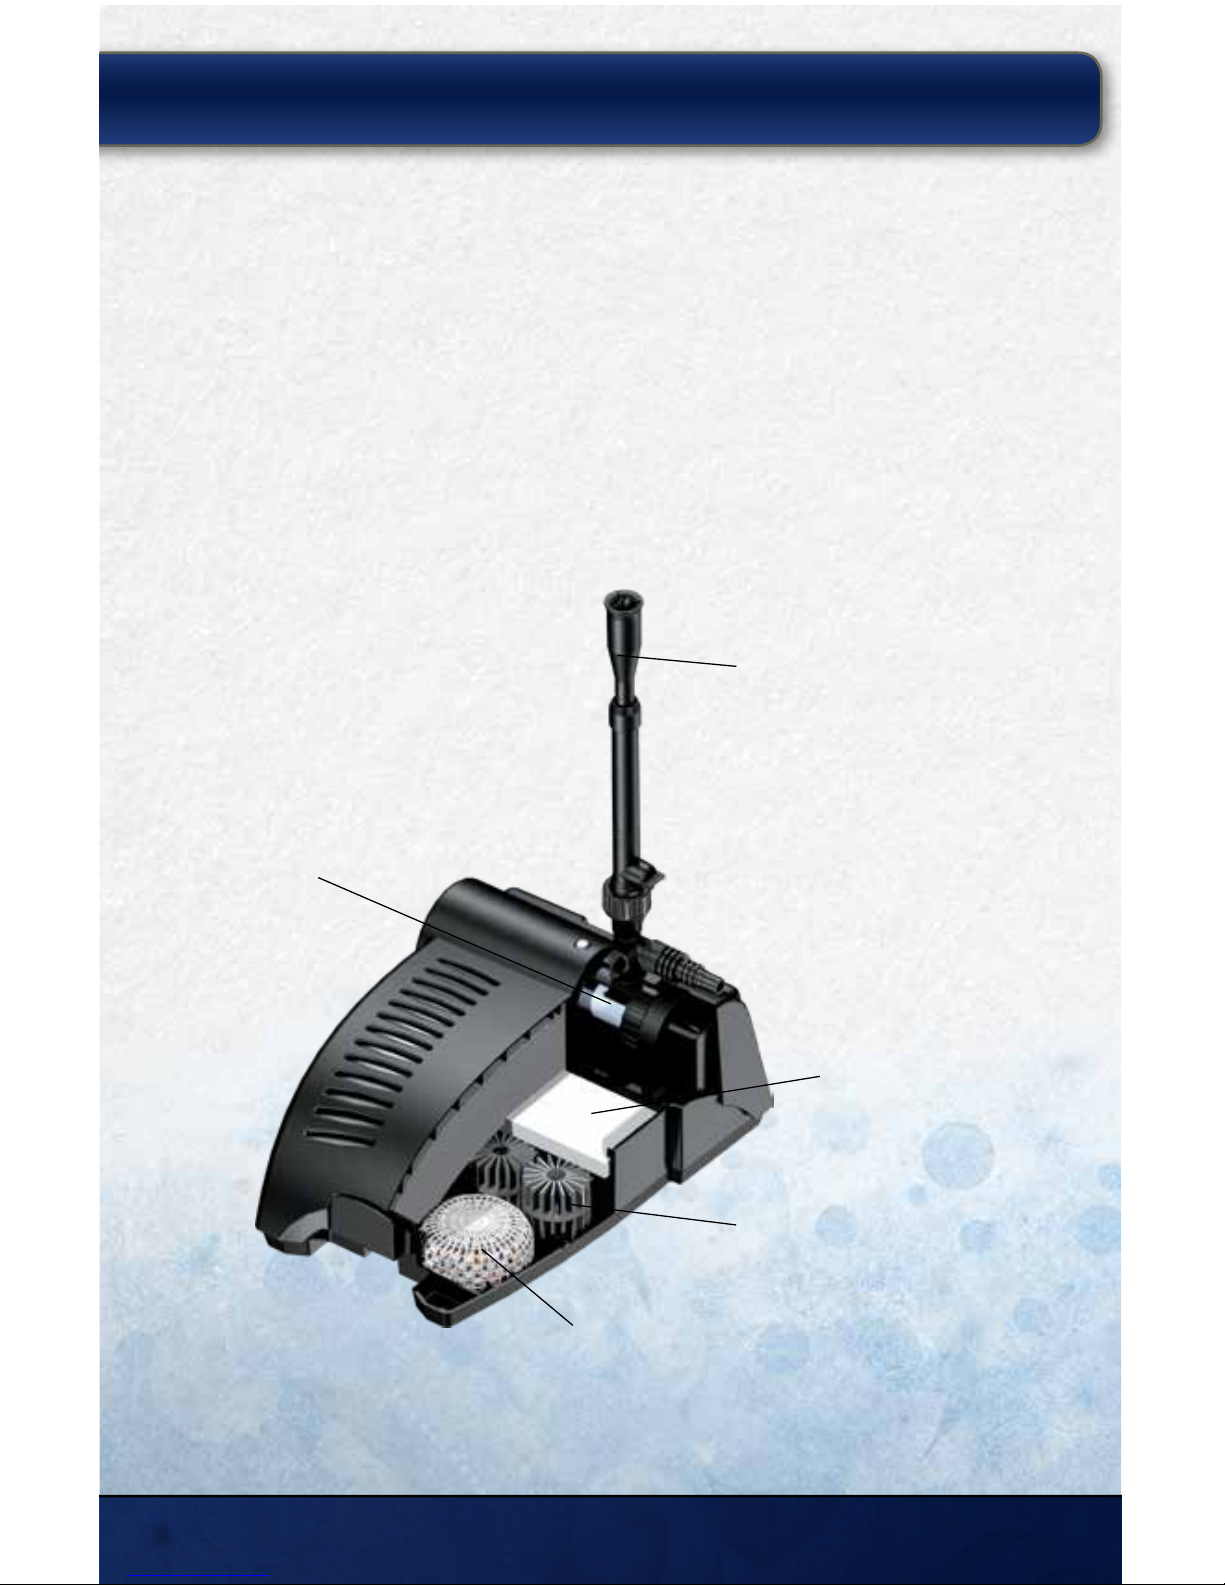
First, the water is pulled through the ClearSolution™ G2 Filter System by an energy ecient
pump. The intake cover and media pads prevent large debris from entering and clogging
the ltration system. Then, Bio media and Bio Media Rocks act as biological ltration and
provide an abundant amount of surface area for benecial bacteria to grow. This benecial
bacteria helps to break down ammonia and organic matter as it passes through the system.
The nal step is to pass water through the powerful UV Clarier. This ensures the pond
water stays crystal clear all season. The ltered water can now be routed back to your pond
using the fountain with either the classic, bell or fan pattern, or by diverting water to a
small waterfall or spitter.
Powerful UV
Clears water
Bio-Media
Provide biological filtration
Decorative Aerating
Fountain Head
3 separate nozzles included
Dual Filter Media Pads
Remove suspended debris
Bio-Media Rocks
Remove ammonia &
other water impurities
thepondguy.com | 866-POND-HELP (766-3435)
4
Page 5
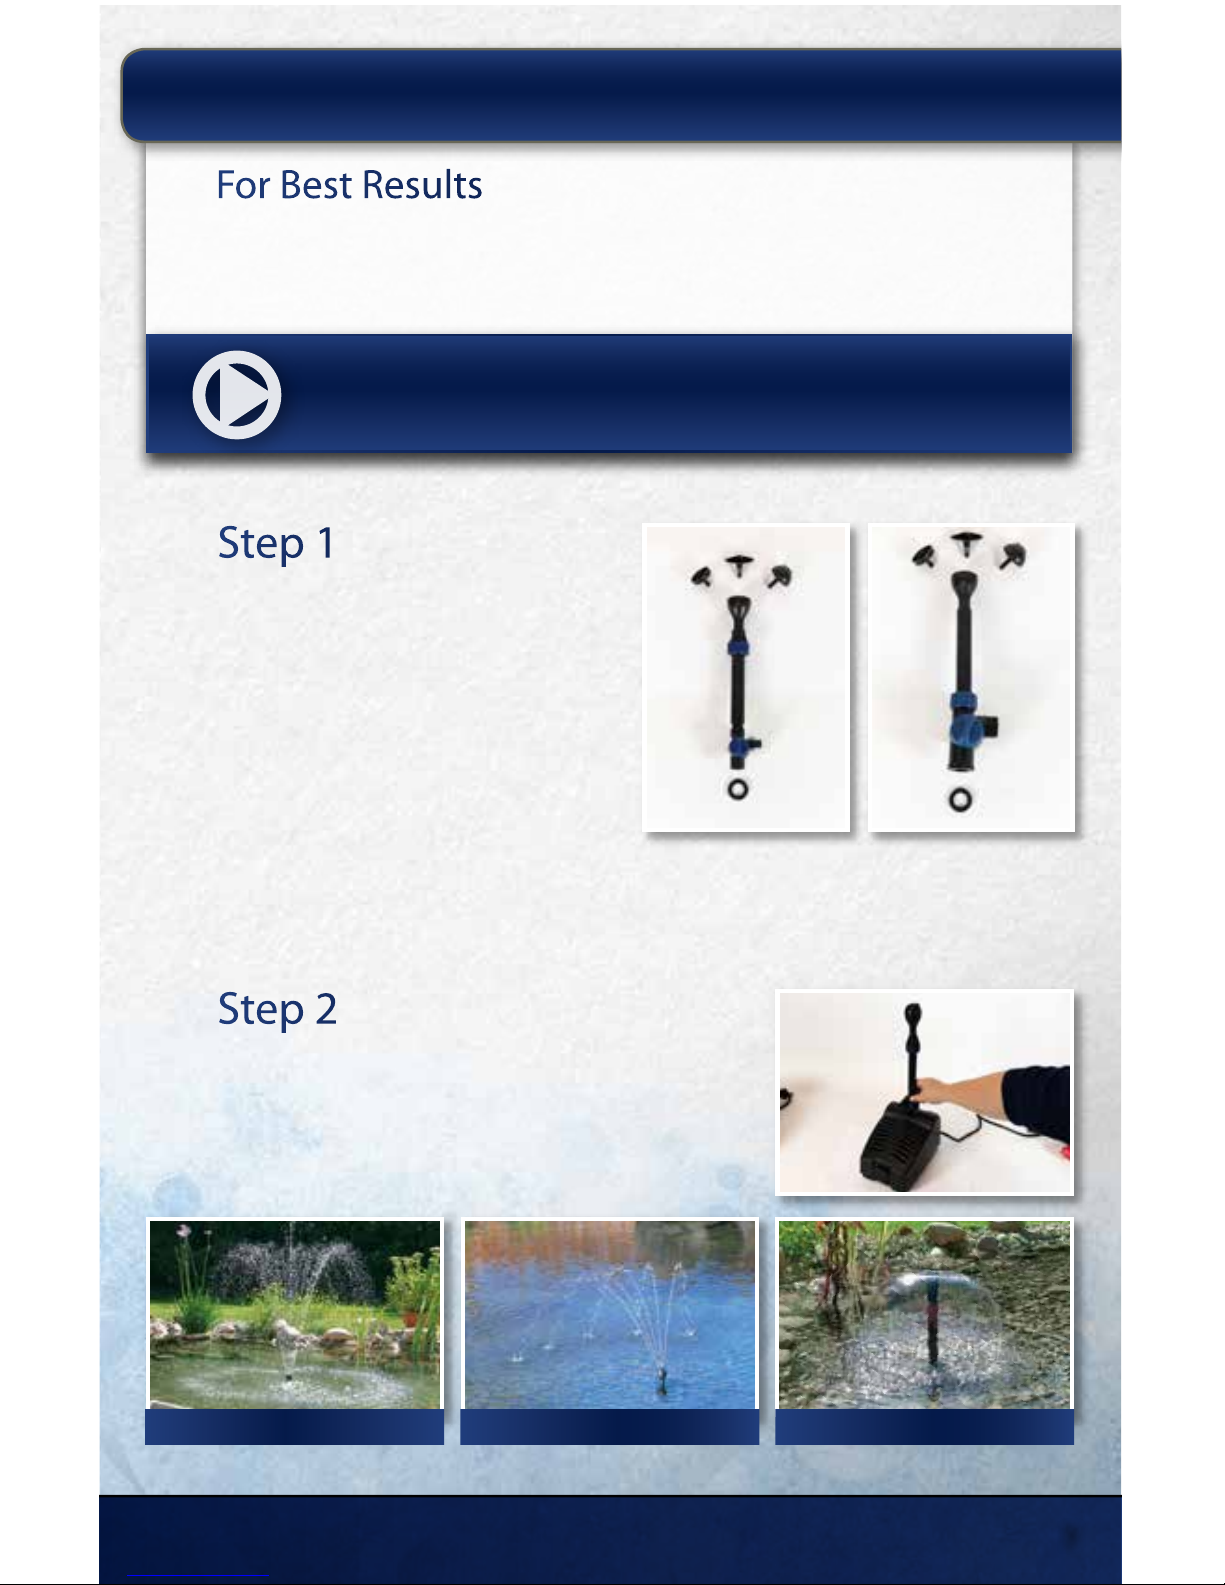
INSTALLING YOUR CLEARSOLUTION
™
FILTER:
For Best Results
• Run the ClearSolution™ G2 Filter 24 hours a day.
• DO NOT operate during freezing conditions. Drain the ClearSolution™ G2 Filter
and store in a protected area.
Classic Pattern
Model 700: 23”W x 20”H
Model 1250: 32”W x 30”H
Model 700: 24”W x 20”H
Model 1250: 52”W x 40”H
Model 700: 10”W
Model 1250: 20”W
Fan Pattern Bell Pattern
Watch a video of the ClearSolution™ G2 Filter installation
online @ www.thepondguy.com/clearsolutionG2
Step 2
Connect Fountain Assembly to
the Filter
Screw the assembly onto the ClearSolution™ G2 Filter.
Step 1
Assemble Fountain
Components
Assemble the components in order:
ClearSolution™ G2 700: O-ring, Diverter
Valve, Nozzle Tube and Compression Ring,
Nozzle Mount and Nozzle Insert.
ClearSolution™ G2 1250: O-ring, Diverter
Valve, Nozzle Tube and Compression Ring,
Nozzle Mount and Nozzle Insert.
Model 700 Model 1250
15425 Chets Way | Armada, MI 48005
5
Page 6
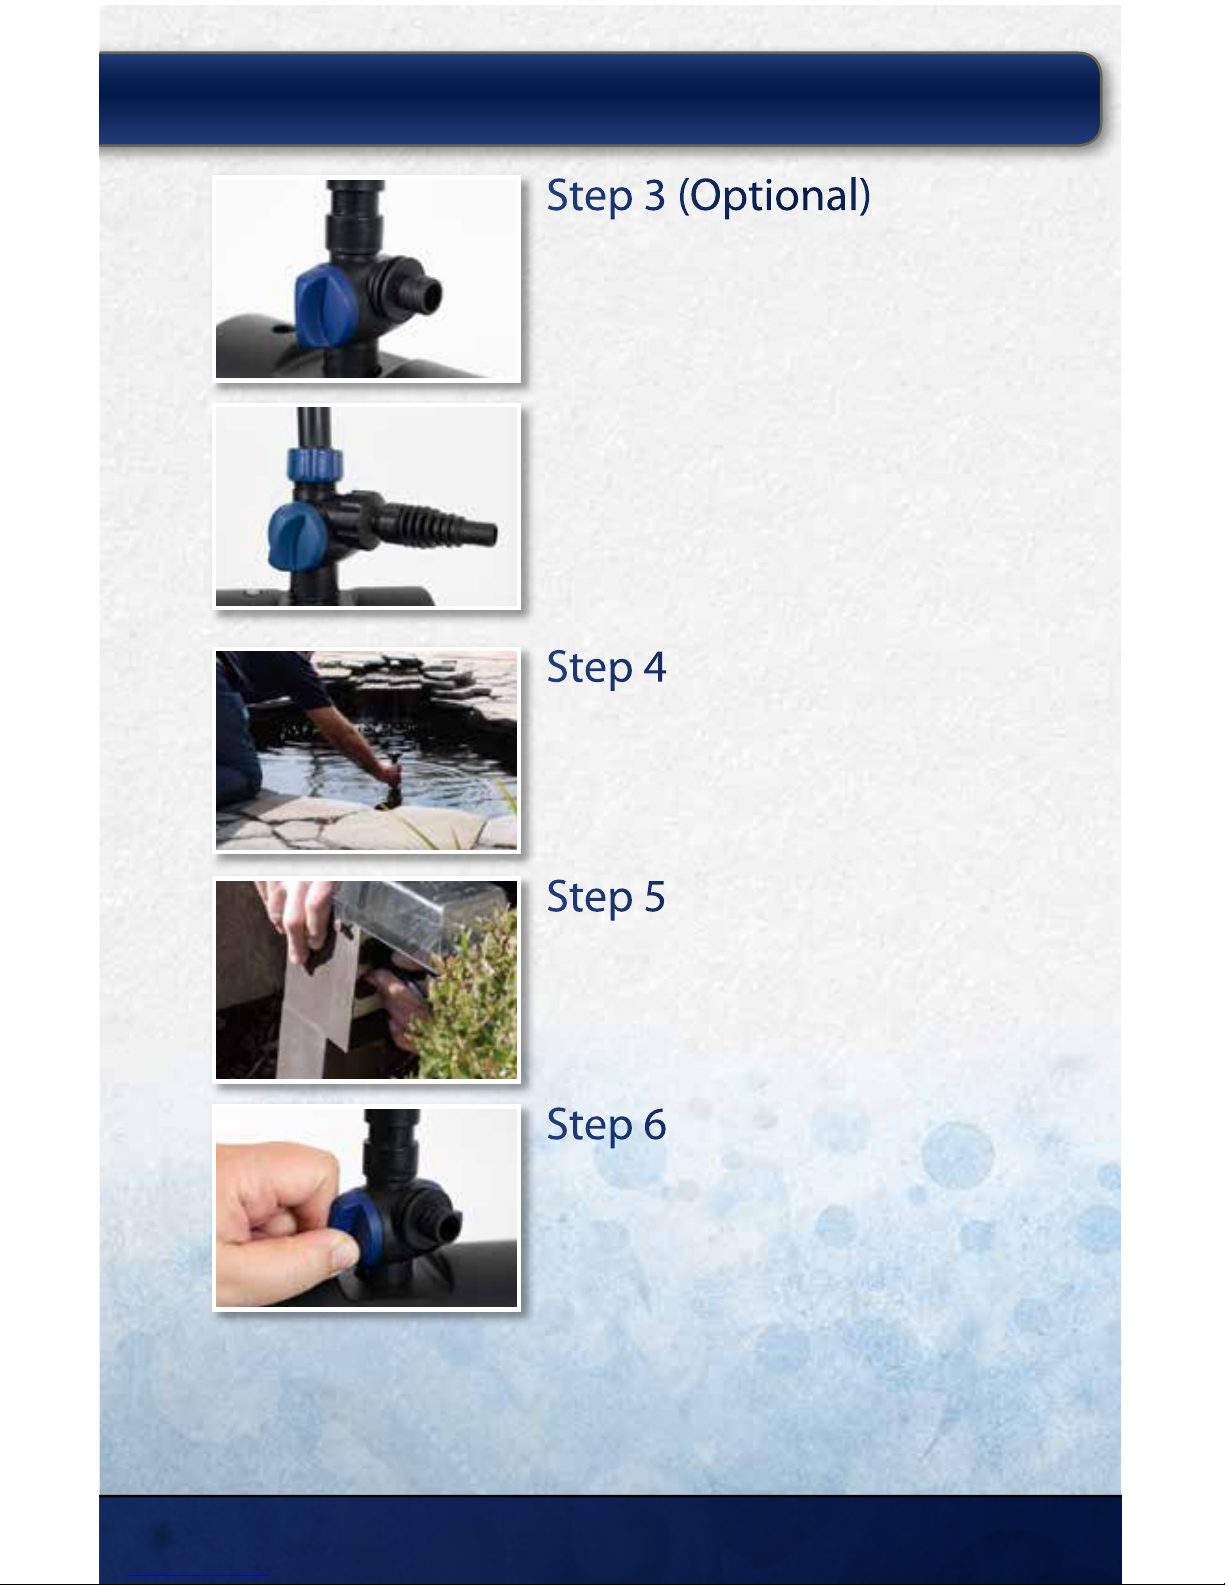
Step 3 (Optional)
Install Additional Water Feature
Using the diverter valve, a portion of the water ow
can be directed to an additional water feature if you
choose.
ClearSolution™ 700: Connect tubing directly to the
diverter valve to add a spitter or other decorative
feature or close the outlet using the cover cap.
ClearSolution™ 1250: Attach the threaded reducer
and the hose adaptor. Connect tubing to the hose
adaptor to add a spitter or other decorative feature or
turn the diverter valve to force all water to the fountain
nozzle.
Step 4
Place Filter in Pond
Place the lter on a at surface towards the middle of
your pond. The fountain head must remain above the
water’s surface.
Step 5
Plug in the Unit
Plug the power cord into a standard 120V GFCI outlet.
Step 6
Adjust the Water Flow
Adjust the spray height (left valve), or the water ow
to a waterfall or feature (right valve), by opening or
closing the diverter valves.
INSTALLING YOUR CLEARSOLUTION
™
FILTER:
Model 700
Model 1250
thepondguy.com | 866-POND-HELP (766-3435)
6
Page 7
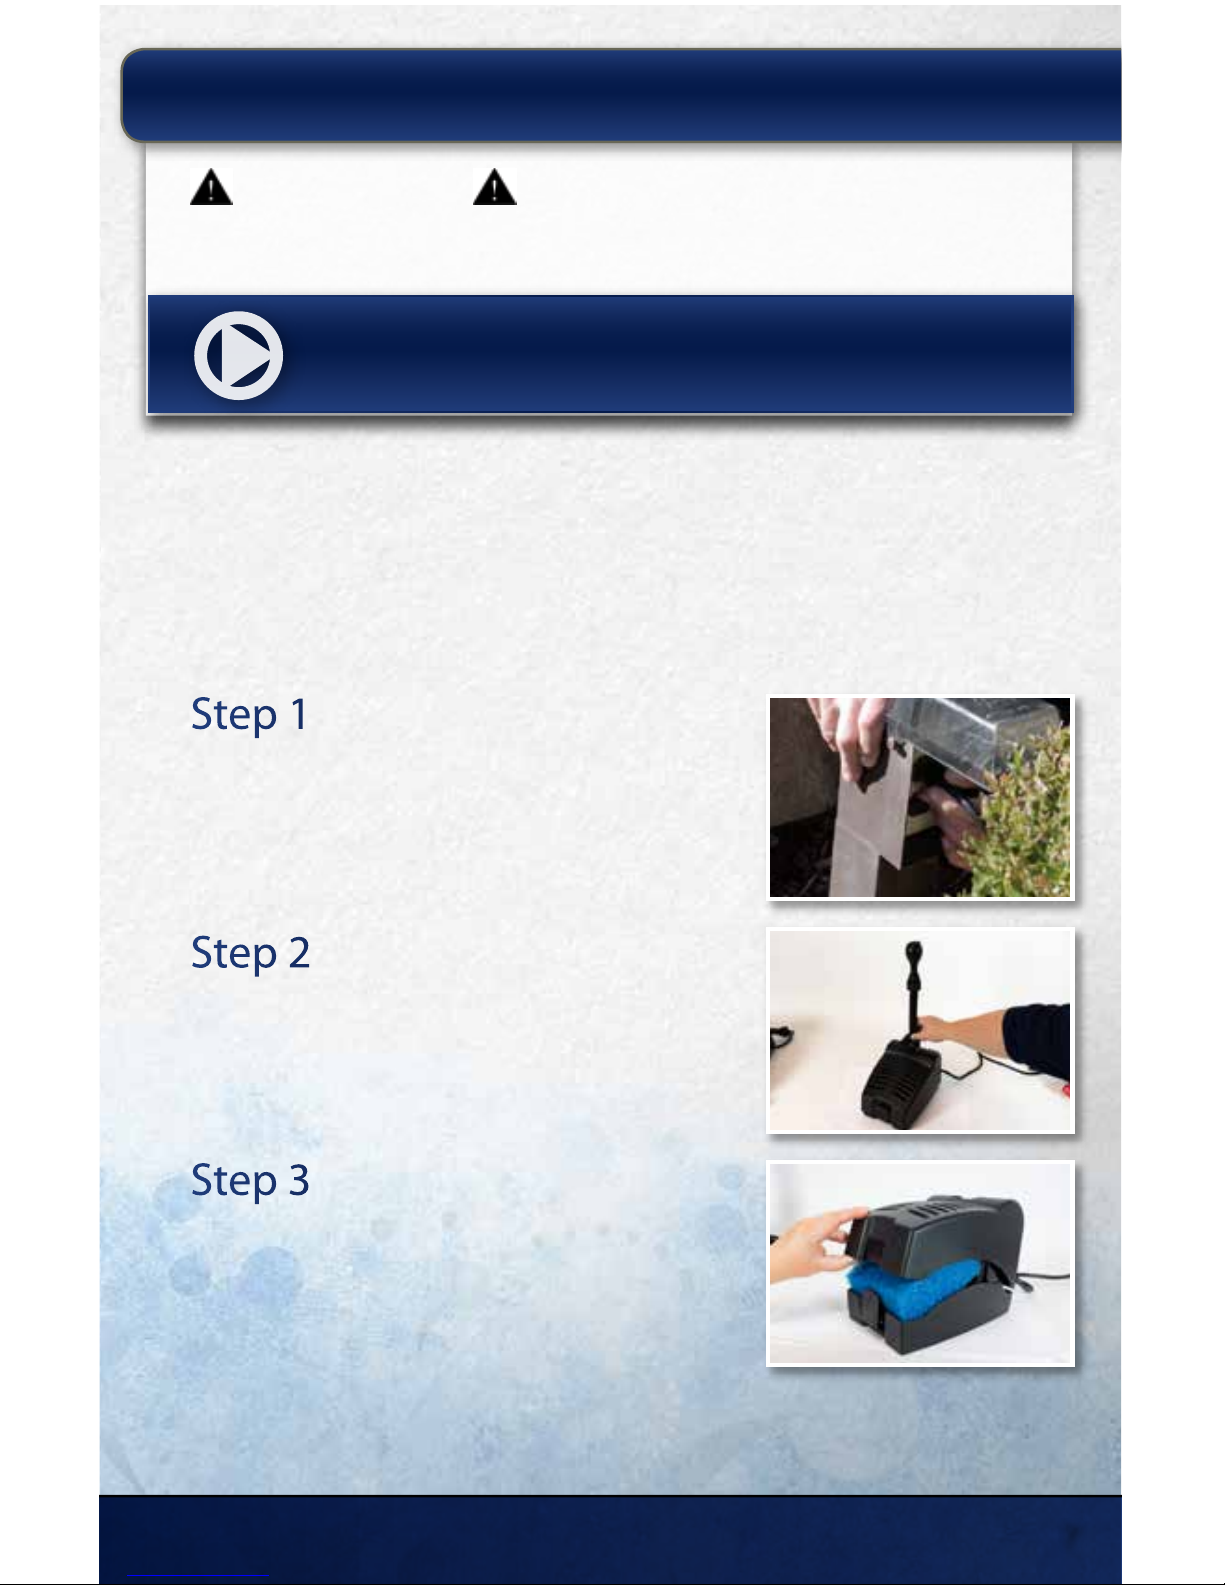
WARNING:
Before performing any maintenance, always unplug the ClearSolution™ G2 Filter
from the power source.
Watch a video of the ClearSolution™ G2 Filter maintenance
online @ www.thepondguy.com/clearsolutionG2
Tools Required:
• Soft, damp cloth
• #2 Phillips Screwdriver
• Replacement UV Bulb
• Replacement Filter Media Pads
• Replacement Quartz Sleeve if yours is cracked or damaged
Step 1
Unplug UV and Pump
Unplug the UV and pump, disconnect any plumbing
and remove the unit from the pond.
Step 2
Remove Fountain Assembly
Unscrew the diverter and fountain assembly from the
unit.
Step 3
Remove Intake Cover
Unlock and remove the intake cover to expose the
lter media.
MAINTAINING YOUR CLEARSOLUTION
™
FILTER:
15425 Chets Way | Armada, MI 48005
7
Page 8
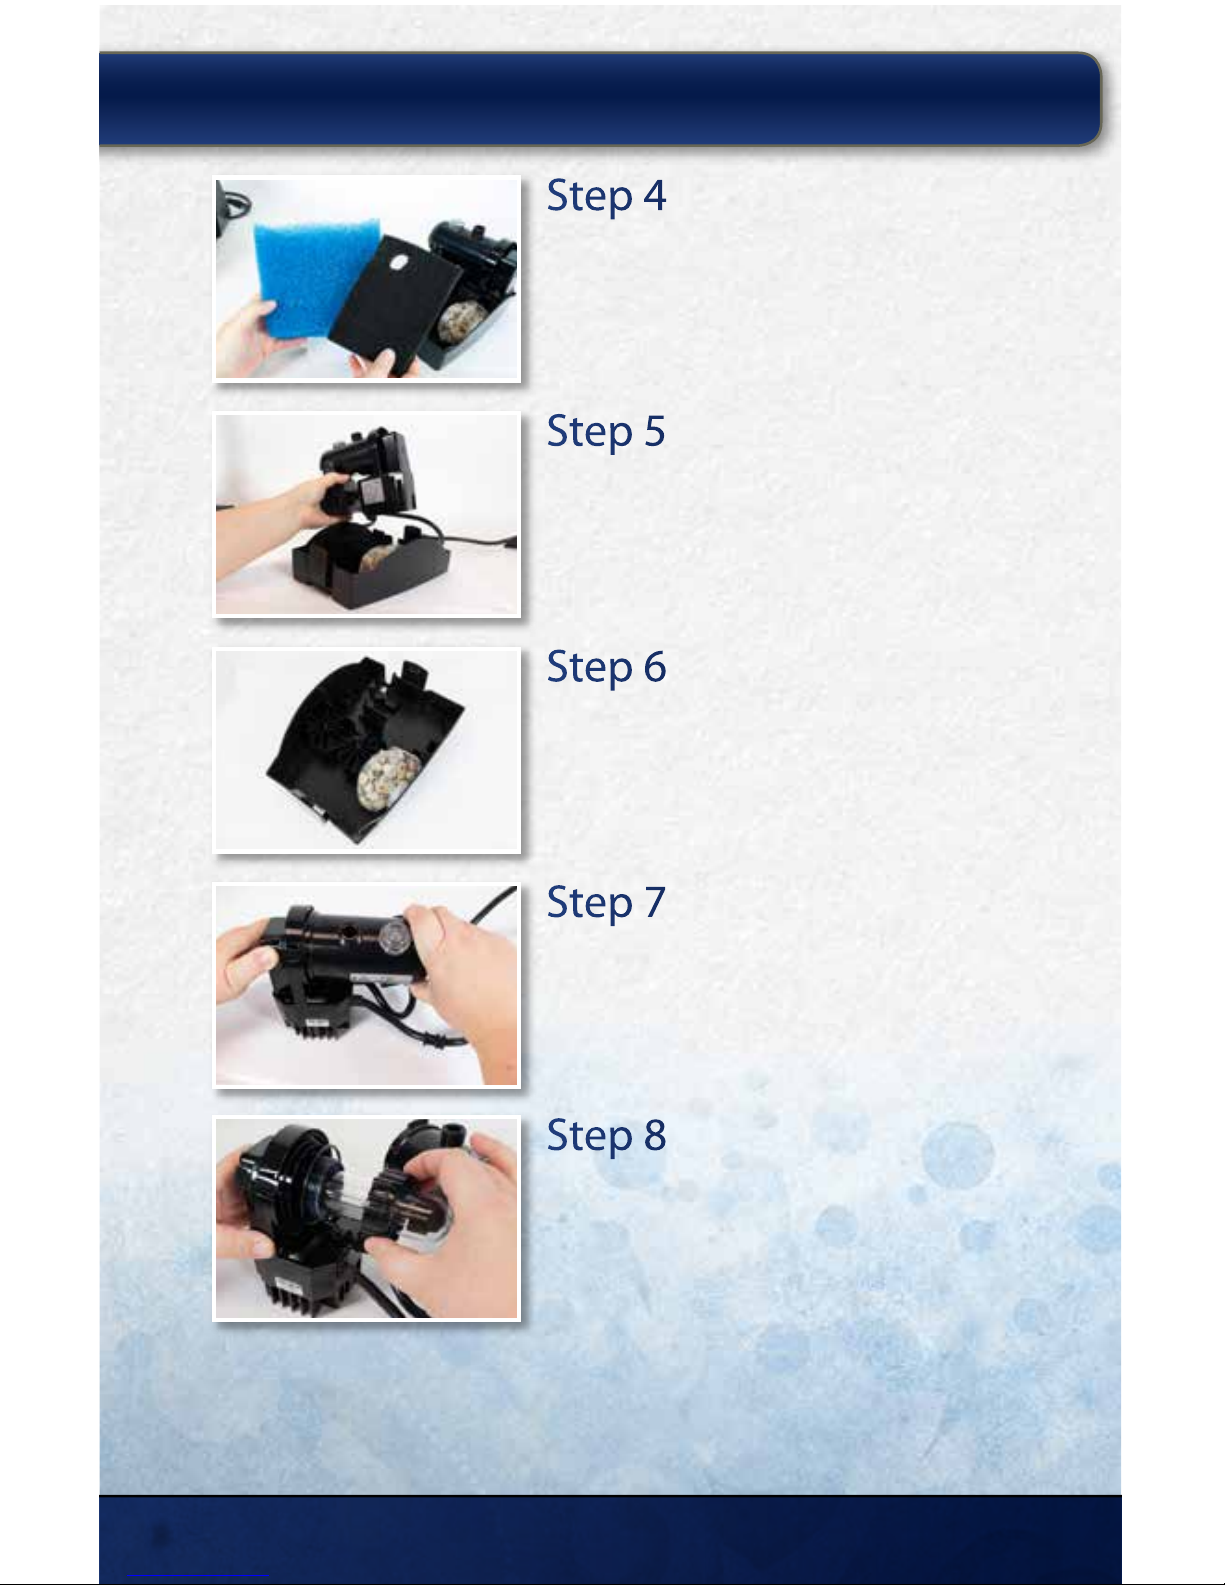
Step 4
Remove Media Pads
Remove and discard the old lter media pads.
Step 5
Remove UV and Pump
Remove the UV and pump assembly from the lter base.
Step 6
Clean Filter Base
Gently rinse any heavy debris from the lter base with
water.
Step 7
Remove UV Housing
Press and hold the clip on the UV and twist the UV
housing in the direction indicated to remove.
Step 8
Remove Compression Nut
Remove the screw in the compression nut using a #2
Phillips screwdriver and unscrew the compression nut
to remove the quartz sleeve.
MAINTAINING YOUR CLEARSOLUTION
™
FILTER:
thepondguy.com | 866-POND-HELP (766-3435)
8
Page 9
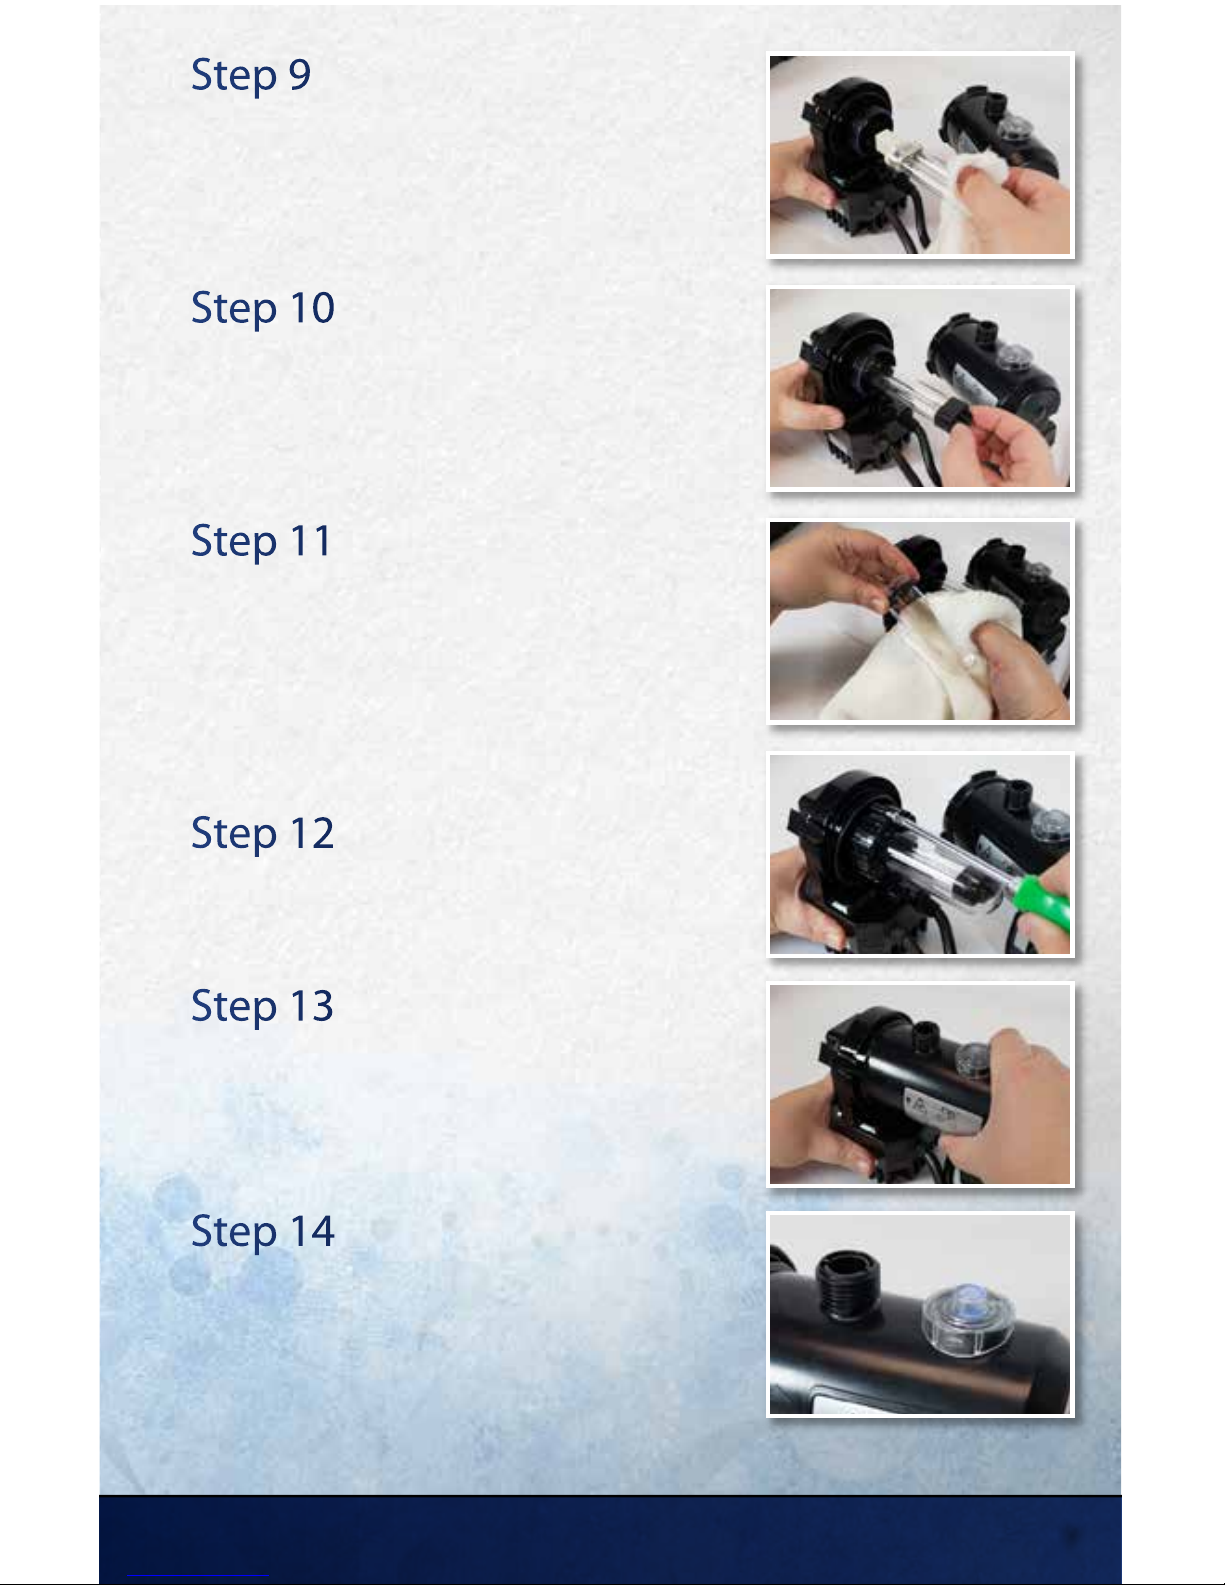
Step 9
Replace UV Bulb
Replace the UV bulb by gently removing the bulb
from the socket and replacing with a new one. Avoid
touching the new bulb with your hands as the oils
from your skin cause damage to the bulb.
Step 10
Transfer Rubber Cap
Be sure to remove the rubber cap from the old bulb
and place it on the new bulb.
Step 11
Clean Quartz Sleeve
Clean the quartz sleeve using a soft damp cloth. Any
debris buildup will greatly reduce the eectiveness
of the UV Clarier. If your quartz sleeve is cracked or
damaged, it must be replaced. Note: Condensation
may form on the quartz sleeve. This cannot be avoided
and does not impair the function or safety of the unit.
Step 12
Reassemble UV
Once cleaned, reassemble the o-ring and quartz sleeve
and lock into place with the tension nut and screw.
Step 13
Connect UV Housing
Place the UV housing back on to the UV and twist to
lock into place.
Step 14
Test UV
Temporarily plug in the UV Clarier to test. The view
window on the UV housing will tell you if the UV bulb
is working.
15425 Chets Way | Armada, MI 48005
9
Page 10
MAINTAINING YOUR CLEARSOLUTION
™
FILTER:
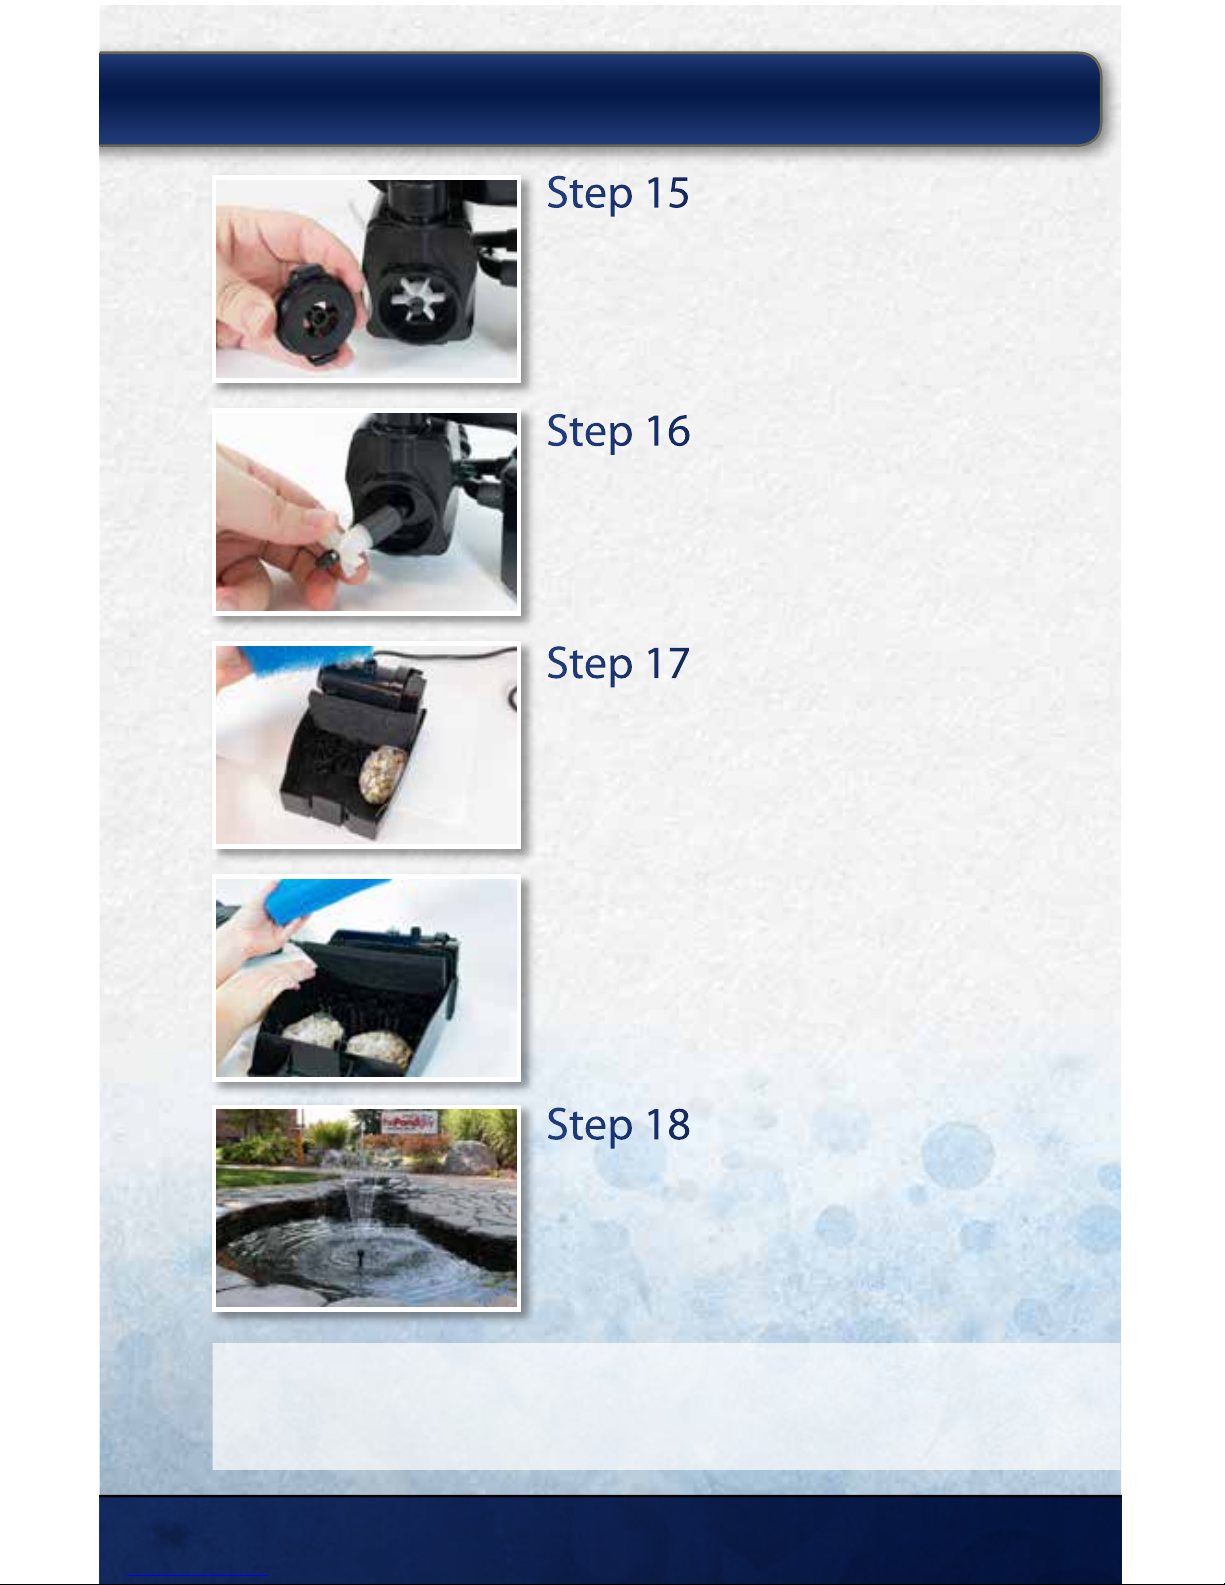
Step 15
Remove Impeller
Remove the pump cap to expose the impeller, then
pull gently to remove impeller.
Step 16
Reassemble
Wash all parts with clean water and check for any wear
or debris trapped inside the pump. Reassemble the
impeller and pump cap.
Step 17
Reassemble Filter
Place the pump and UV back into the lter housing.
Install lter media pads. Note: Media pads may be
rinsed throughout the season anytime water ow
is reduced. Avoid using chlorinated tap water or
detergents, which will strip the media of
benecial bacteria.
Step 18
Reinstall Filter
Reconnect the diverter and fountain assembly and any
additional water features. Place the lter unit back into
the pond. Plug in the pump and UV, and then adjust
the fountain spray and diverter ow.
Winter Storage
The ClearSolution™ G2 Filter should not be operated during freezing temperatures and
should be disconnected, drained, cleaned and stored for the winter.
Model 700
Model 1250
thepondguy.com | 866-POND-HELP (766-3435)
10
Page 11
MAINTAINING YOUR CLEARSOLUTION
™
FILTER:
TROUBLESHOOTING :
If water is not clear, check the following:
• Check the UVC Filter to ensure it is operating. If the lamp is overheating it will turn
o automatically. Allow the lamp to cool, UVC will automatically turn
back on.
• Replace UVC bulb if it has not been replaced in the past year, even if it is operational.
• Check that the quartz sleeve is clean.
• Verify that the proper amount of water is owing through the lter. See
recommendation for proper water ow under Techical Specs.
Loss of water ow, check the following:
• Verify pump and lter intake is not plugged with debris.
• Verify the lter sponges, bio media rocks, bio balls or UVC are not plugged
with debris.
15425 Chets Way | Armada, MI 48005
11
Page 12
A
E
F
N
G
J
K
L
M
H
I
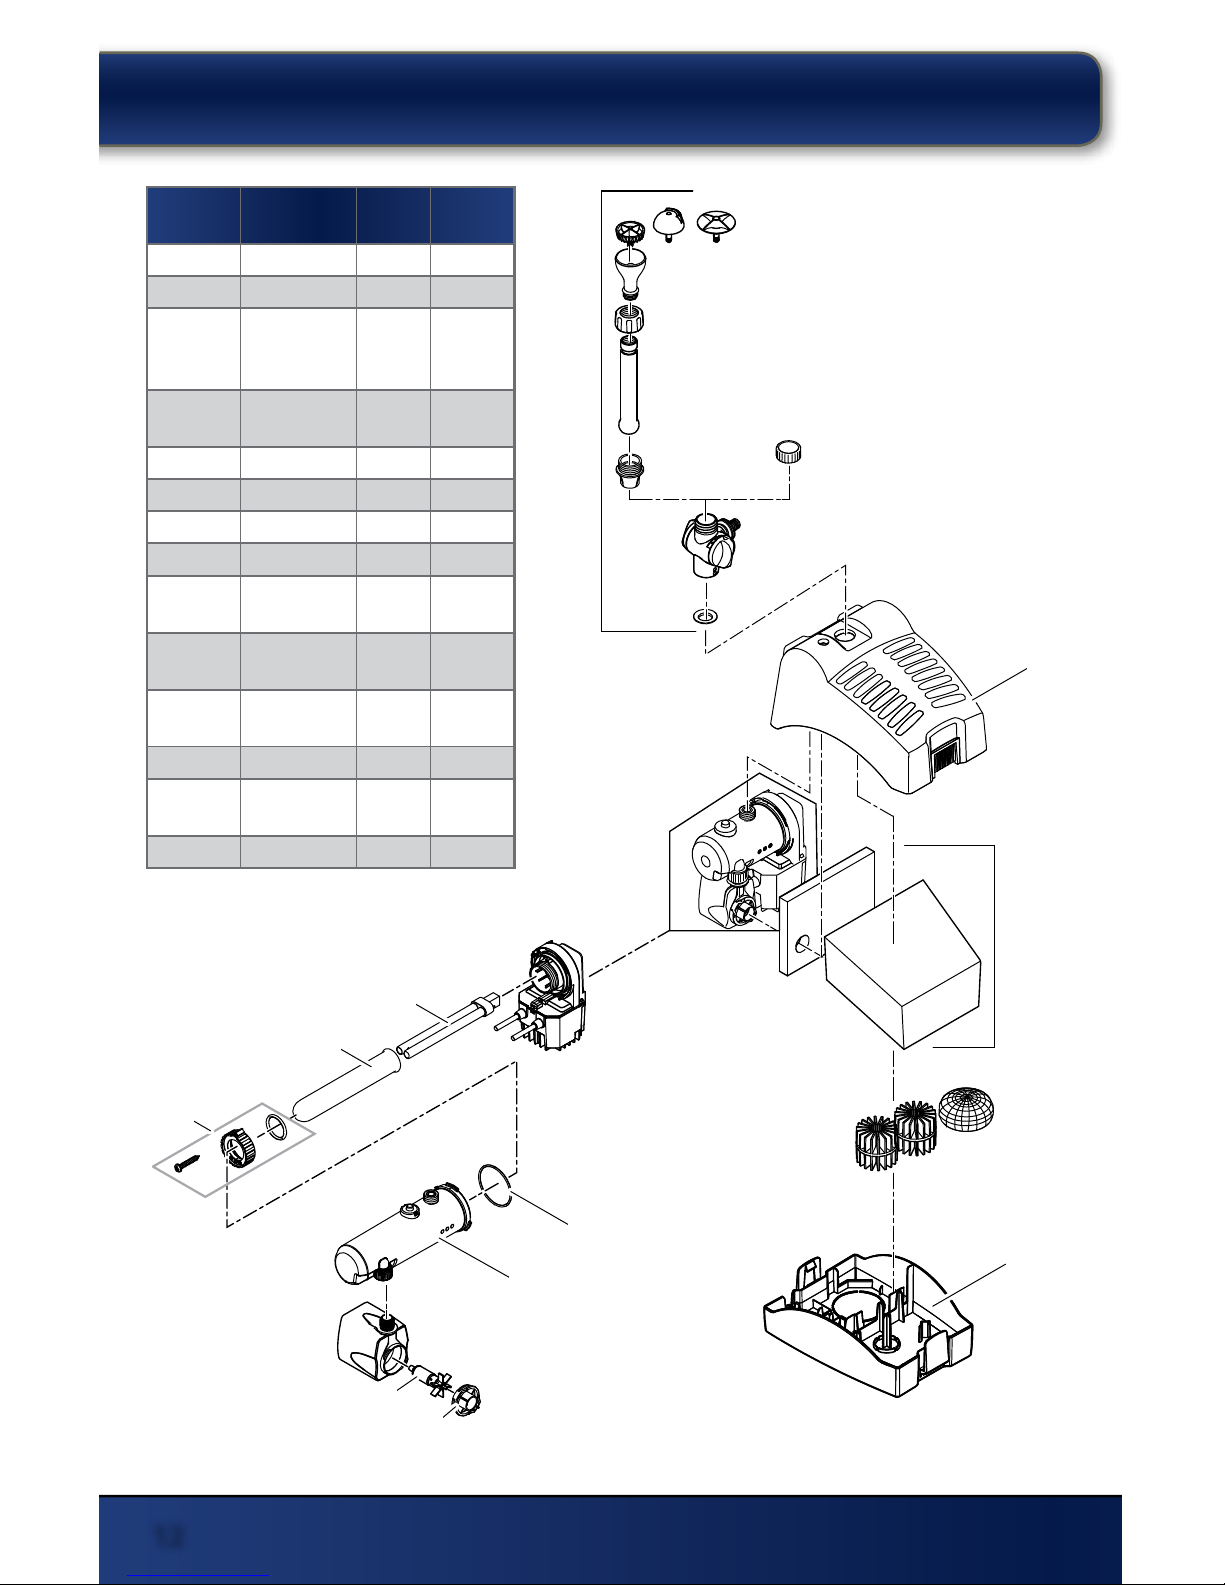
DIAGRAM DESCRIPTION
Model
700
Model
1250
A Fountain Kit 130062 130073
B Diverter Valve N/A 130079
C
Diverter
Threaded
Bushing
N/A 130080
D
Diverter
Bushing
N/A 130081
E Top Cover 130064 130075
F Filter Pad Set 130065 130066
G UV Bulb 110408 110306
H Quartz Sleeve 130063 130074
I
Quartz Sleeve
Hardware Kit
130043 130043
J
Quartz Sleeve
O-Ring
130069 130069
K
UV Housing
Cover
130072 130078
L Pump Impeller 130070 130076
M
Pump Impeller
Cover
130071 130077
N Base Housing 130067 130068
REPLACEMENT PARTS: MODEL 700
thepondguy.com | 866-POND-HELP (766-3435)
12
Page 13
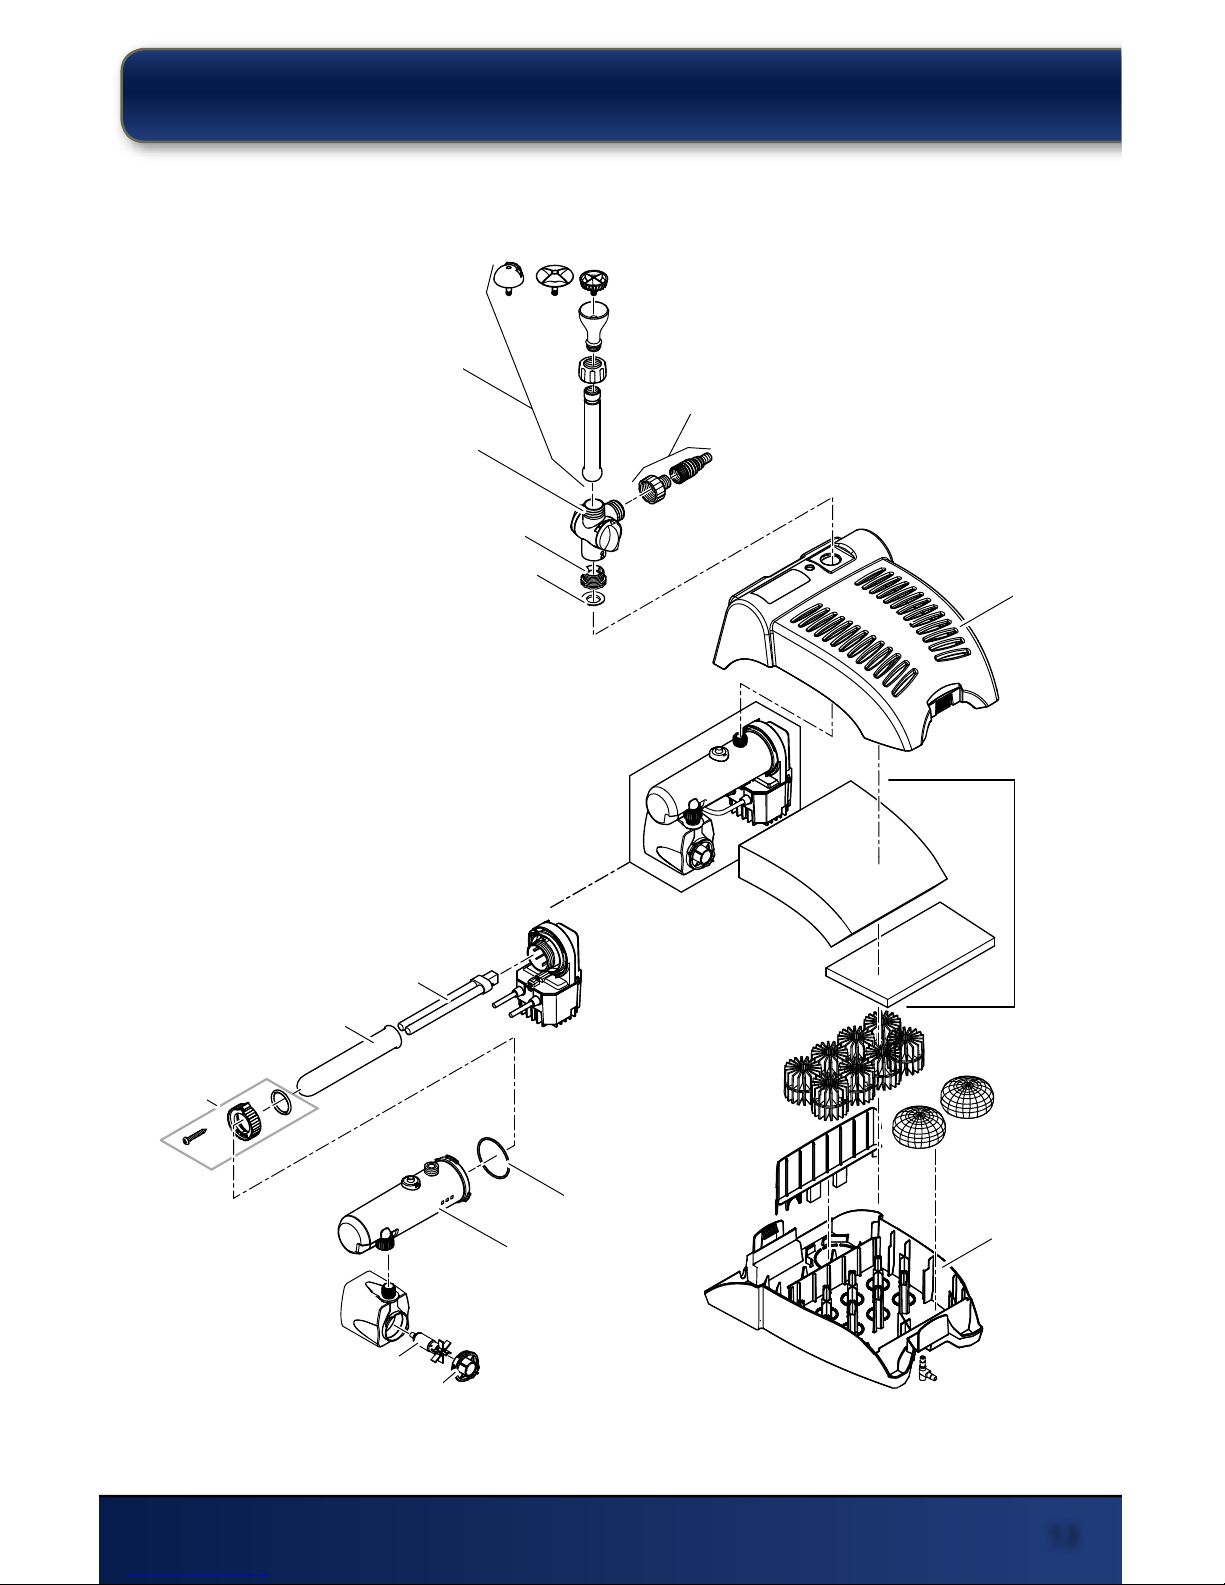
A
B
C
D
A
E
F
N
J
K
M
L
I
H
G
REPLACEMENT PARTS: MODEL 1250
15425 Chets Way | Armada, MI 48005
13
Page 14
NOTES:
thepondguy.com | 866-POND-HELP (766-3435)
14
Page 15
NOTES:
15425 Chets Way | Armada, MI 48005
15
Page 16
View other great products on-line at www.thepondguy.com
PRODUCT WARRANTY:
ClearSolution™ G2 Filters carry a 3-year warranty. The Pond Guy® will repair or replace any
units found to be defective. This limited warranty is extended exclusively to the original
purchaser and begins from the date of original purchase receipt. The UVC bulb, lter
media, o-rings and tting set are wearable items and are not covered by this warranty.
Abuse or misuse of this product or power cord alterations void all warranty. Please call for
a Return Authorization Number prior to returning product by calling our Customer Care
Department at 866-766-3435. Failure to request an RMA number may result in delay or
dismissal of your warranty claim.
THANK YOU FOR CHOOSING:
The Pond Guy® Inc.
We Know Ponds
™
15425 Chets Way
Armada, MI 48005
866-POND-HELP (766-3435)
thepondguy.com
 Loading...