

Page 1
Page 2
Page 3
ASSEMBLY INSTRUCTIONS-
SORTER (ADJUSTABLE SHELVES)
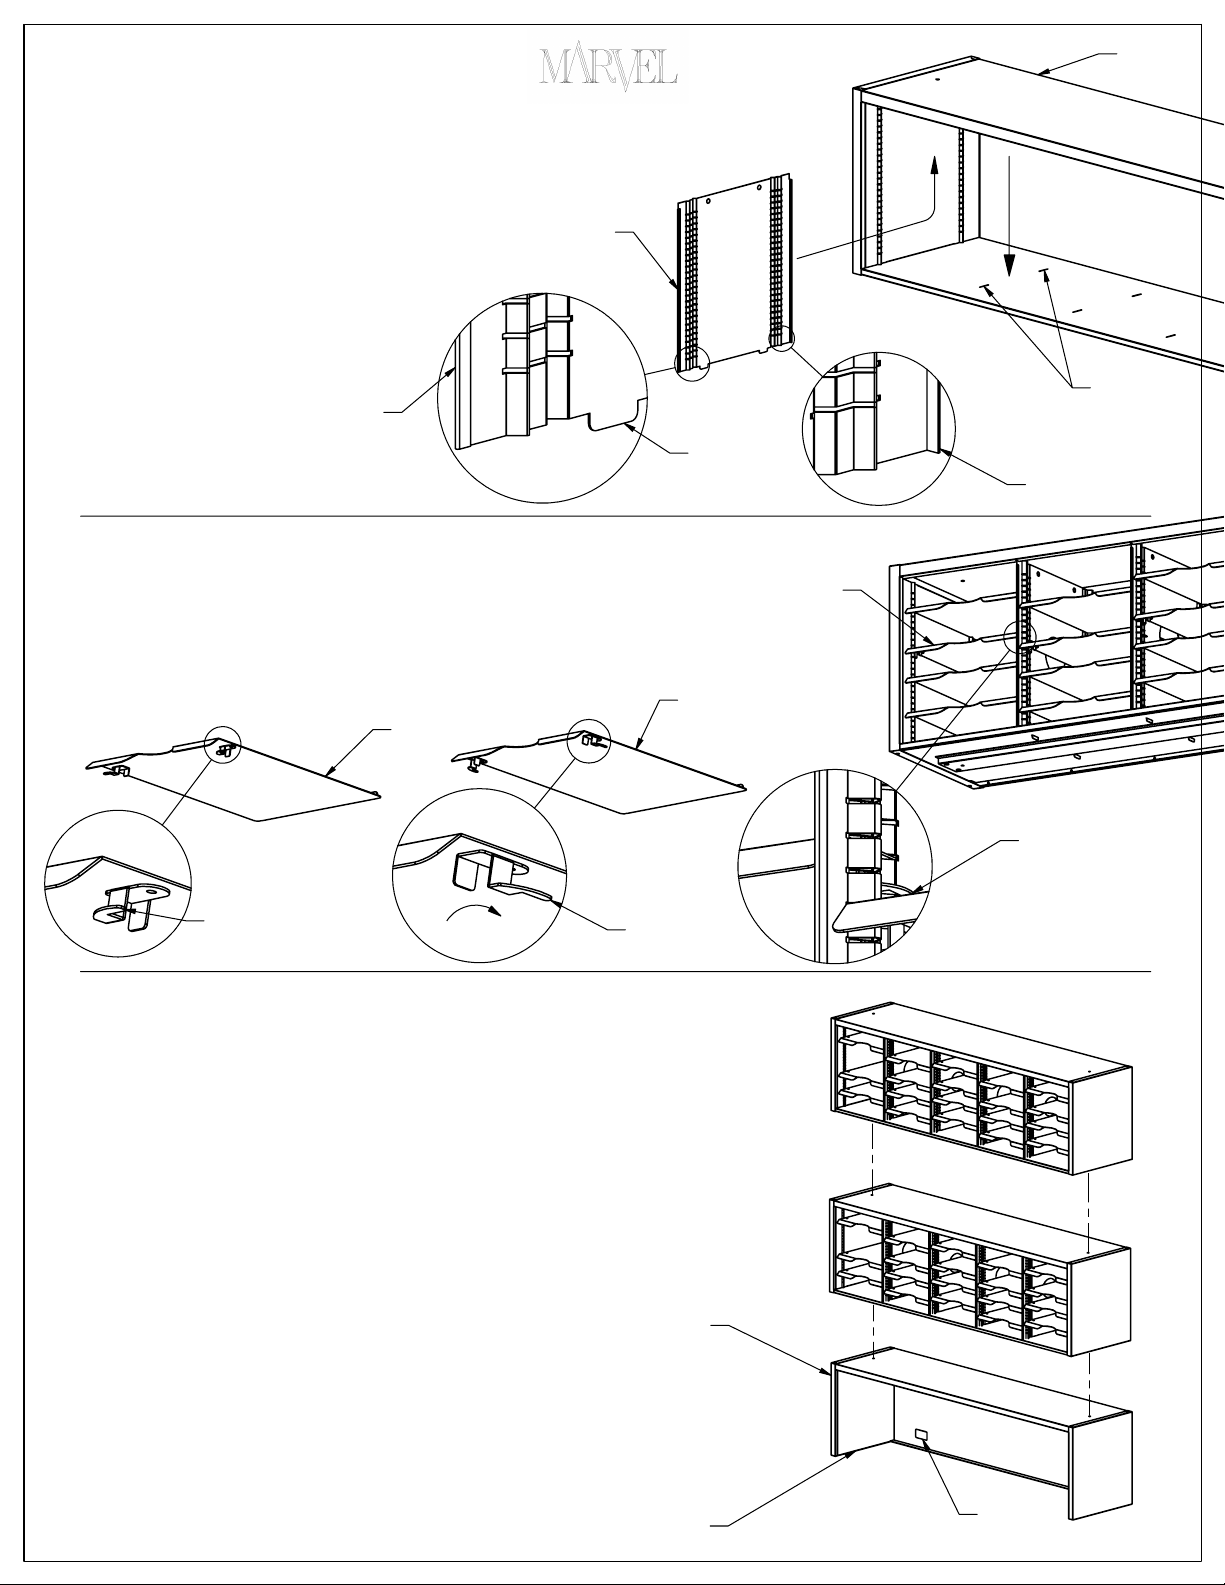
These drawings show the assembly of a 60" wide sorter;
the other sorters are assembled the same way.
Sorter
Cabinet
AND RISER
Start assembly by locating the (4)
first
Partition
as shown, with the flange in back and the
hem in front (see details). Tilt the
into the upper slots. Straighten the
the lower tabs into the slots in the bottom of the
Cabinet
Partitions
Find the (5)
. Do the same thing with the other (3)
.
Locking Shelves
opening. First, make sure that the Locking Tabs on each
Partitions
Partition
Partition
. Orient the
, and slide it
, and insert
Sorter
Hem towards
front
(see detail). Use (1)
Partition
Locking Shelf
Locking Shelf
for each
are
turned inward. (We made the tabs stiff to move- so the shelves do not unlock
themselves.) Slide the
shelf
is about half-way up in the opening, not at the bottom or the top. Slide the
Locking Shelf
into an opening- it is best if the
Locking
Locking Tabs into place as shown in the detail.
Slide as many of the other (15)
Adjustable shelves
into the openings, wherever
you wish.
Locking
Shelf
(Unlocked)
Slots
Lower tab
flange towards
back
Locking
Shelf
(Installed)
Locking
Shelf
(Locked)
Lock Tab
(Unlocked)
This Sorter Module can be stacked with other Sorters or the Riser (a
separate end model). Modules can be stacket up to three high- using
three Sorters, or two Sorters and one Riser. To fasten the Modules
together, use the (2) Screws enclosed with each Sorter. Fasten as
shown, screwing up from the Lower Module into the upper Module.
Tighten both screws.
The back of the Sorter Cabinet may be removed to allow additional light
into the shelves.
Note the double-faced tape on the bottom of the Riser. to secure
theRiser, remove the backer from the tape, and position the Sorter on a
worksurface. BE CAREFUL! You cannot move the Riser once the tape
adheres to the worksurface!
The Riser will take a Task light, model # MOTL49. The wires can be
threaded though the knockouts (see drawing), ot through the corener
grommets in the Utility Tables.
Your Sorter is now complete.
The Sorter and riser may be cleaned with
a soft cloth and mile detergent.
Lock Tab
(Locked)
Lock Tab
(Locked)
Riser
R05084 04/09/07
Tape
Knockout
Page 4

Page 5
Page 6
Page 7
Page 8
Page 9
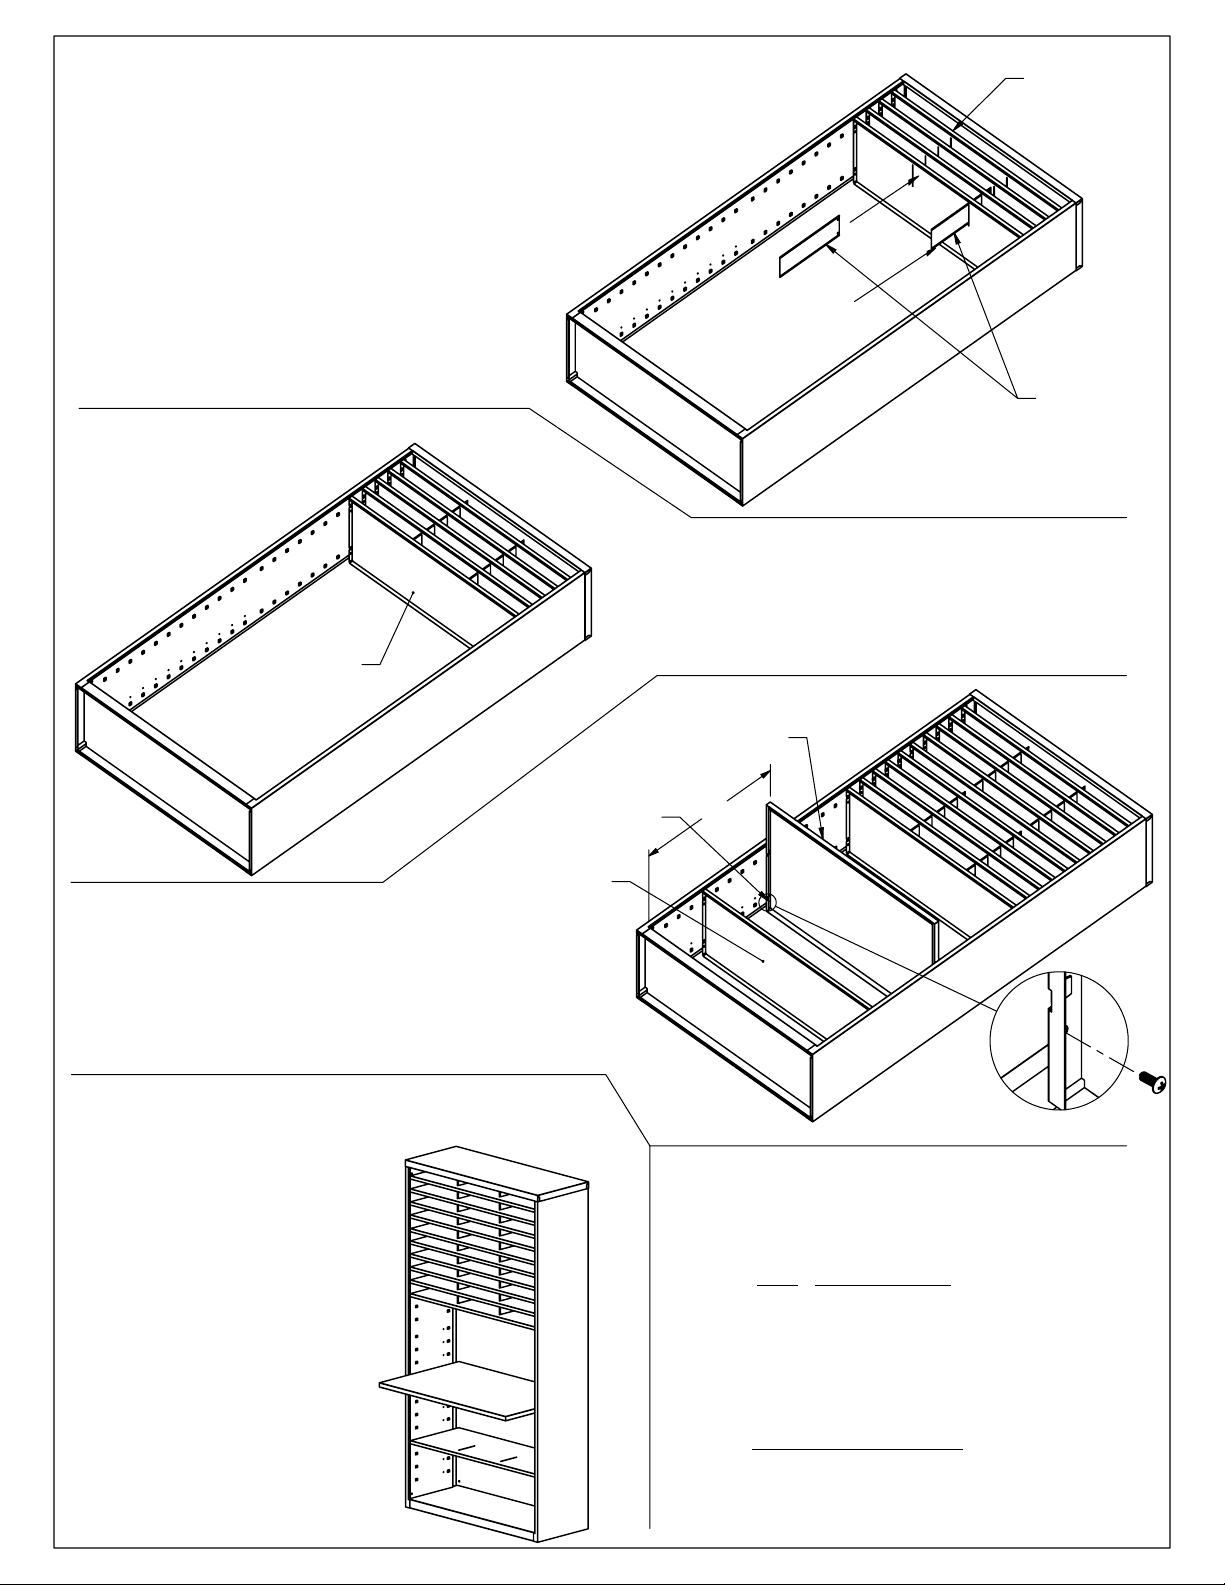
Before assembly, make sure that you
have everything you need- check your
parts against the parts list at the bottom
of the page.
Lay the CABINET on its back as shown.
Insert (4) SORTER SHELVES (the ones
with the slots in them) into the cabinet,
hooking them over the top four tabs as
shown.
Carefully insert (2) DIVIDERS up
through the slots in the SORTER
SHELVES as shown.
SHELF
(NO SLOTS)
MAIL SORTER ASSEMBLY
Insert (1) SHELF (with NO slots) into the next set of
tabs, as shown. This will hold the dividers in place.
Repeat these two steps for the remaining SORTER
SHELVES, the remaining DIVIDERS, and one more
SHELF.
SORTER
SHELVES
(WITH SLOTS)
DIVIDERS
Insert the WORK SURFACE into the tabs, about 30.5 inches
from the bottom of the cabinet (or however high you want the
WORK SURFACE to be).
NOTE- IMPORTANT!! MAKE SURE TO SECURE THE
WORK SURFACE WITH (2) SCREWS PROVIDED.
Insert the remaining SHELF into any of the remaining stirrups.
Place the cabinet upright.
Your cabinet is now ready for use.
WARNING- USE TOGGLE
BOLTS (NOT INCLUDED)
TO FASTEN CABINET TO
WALL OR GANG
CABINETS TOGETHER
TO PREVENT TIPPING
ACCIDENTS!!
Your cabinet can be cleaned with a soft
cloth and gentle cleaner.
SCREW SHELF
TO CABINET
(BOTH SIDES)
SHELF
WORK
SURFACE
30.5
QTY
PARTS LIST
DESCRIPTION
(1) CABINET
(8) SORTER SHELF
(4) DIVIDER
(3) SHELF
(1) WORK SURFACE
HARDWARE BAG:
R05166 08/15/11
(2) BLACK SCREW (#10-24 X 1/2)
Page 10
Flange faces
in and down
RIGHT SIDE
SCREW TOP
TO BOTH SIDES
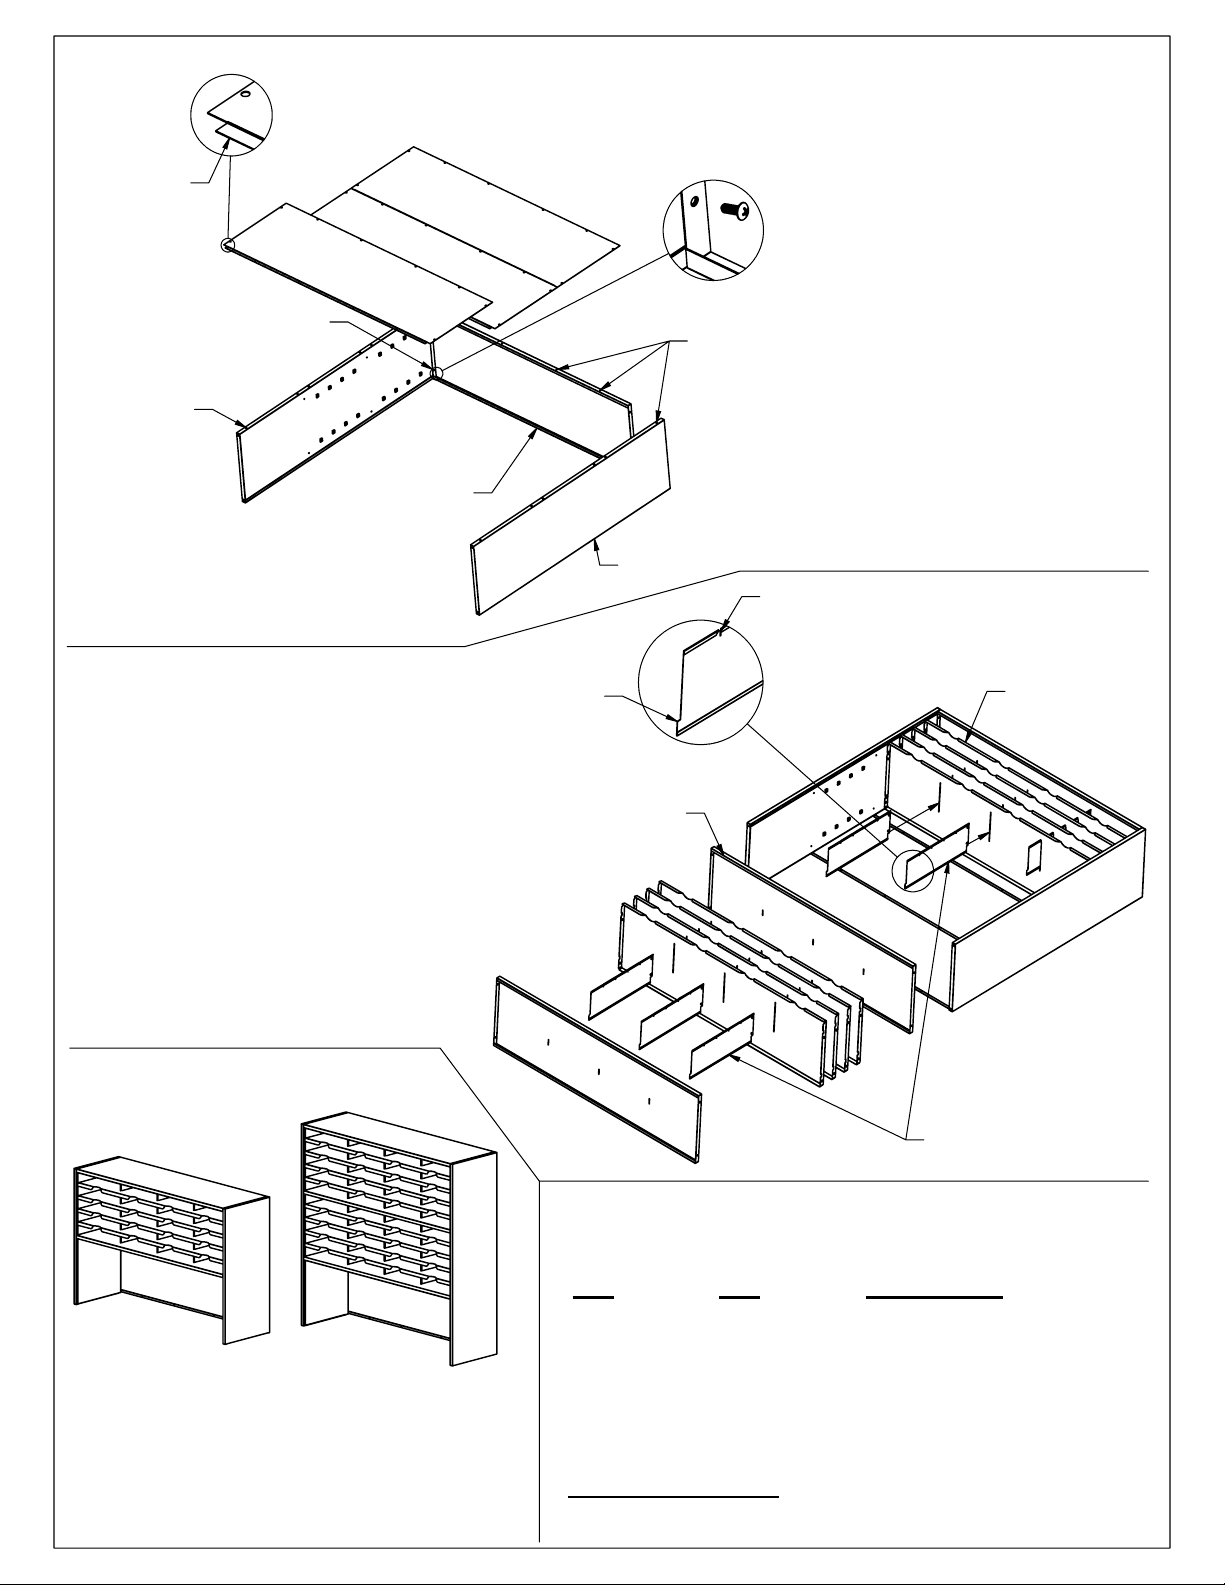
MAIL SORTER WITH RISER ASSEMBLY
TOP
(NO SLOTS)
Before assembly, make sure that you
have everything you need- check your
parts against the parts list at the bottom
of the page.
EDGE HOLES
Start assembly by locating the LEFT SIDE and RIGHT
SIDE and (1) TOP. Place Sides and Top face down
with all edge holes shown on top. Using (4) screws
fasten the Top to the Sides.
Position (3) BACKS with the flange facing downward
and inward as shown. Start at the top, screwing the
screws into the SHELF and SIDES. The second BACK
screws into the holes in the flange of the top BACK.
Finally, screw in the third BACK.
LEFT SIDE
SLOTS FORWARD
AS SHOWN
Turn the Assembly over on its back as
shown. Insert (4) SORTER SHELVES (the
ones with the wide slots in them) into the
cabinet, hooking them over the top four
tabs as shown.
Carefully insert (3) DIVIDERS up through
the slots in the SORTER SHELVES as
shown. (See Detail)
Insert (1) SHELF (with small slots) into the
next set of tabs, as shown. This will hold
the dividers in place.
Repeat these two steps for the remaining
SORTER SHELVES, the remaining
DIVIDERS, and one more SHELF.
Place the cabinet upright. Make sure to pull
the DIVIDERS forward so the tabs at the
bottoms go into the small slots and the
divider notches engage the shelves. This
will support the centers of the shelves.
40 POCKET
SORTER WITH RISER
20 POCKET
SORTER WITH RISER
TAB FACES DOWN
AND BACKWARD
AS SHOWN
SHELF/BOTTOM
(WITH SMALL SLOTS)
20 POCKET 40 POCKET
QTY
PARTS LIST
QTY
DIVIDERS
DESCRIPTION
SORTER SHELVES
(WITH WIDE SLOTS)
Remove the Backer from the tape
and position the Sorter on a
worksurface.
Your Sorter is now complete.
The Sorter may be cleaned with a
soft cloth and mild detergent.
R05199
01/31/2014
(1) (1) LEFT SIDE
(1) (1) RIGHT SIDE
(2) (3) BACK
(1) (1) TOP
(1) (2) SHELF/BOTTOM
(3) (6) DIVIDER
(4) (8) SORTER SHELF
HARDWARE BAG:
(24) (36) BLACK SCREW (#10-24 X 1/2)
Page 11
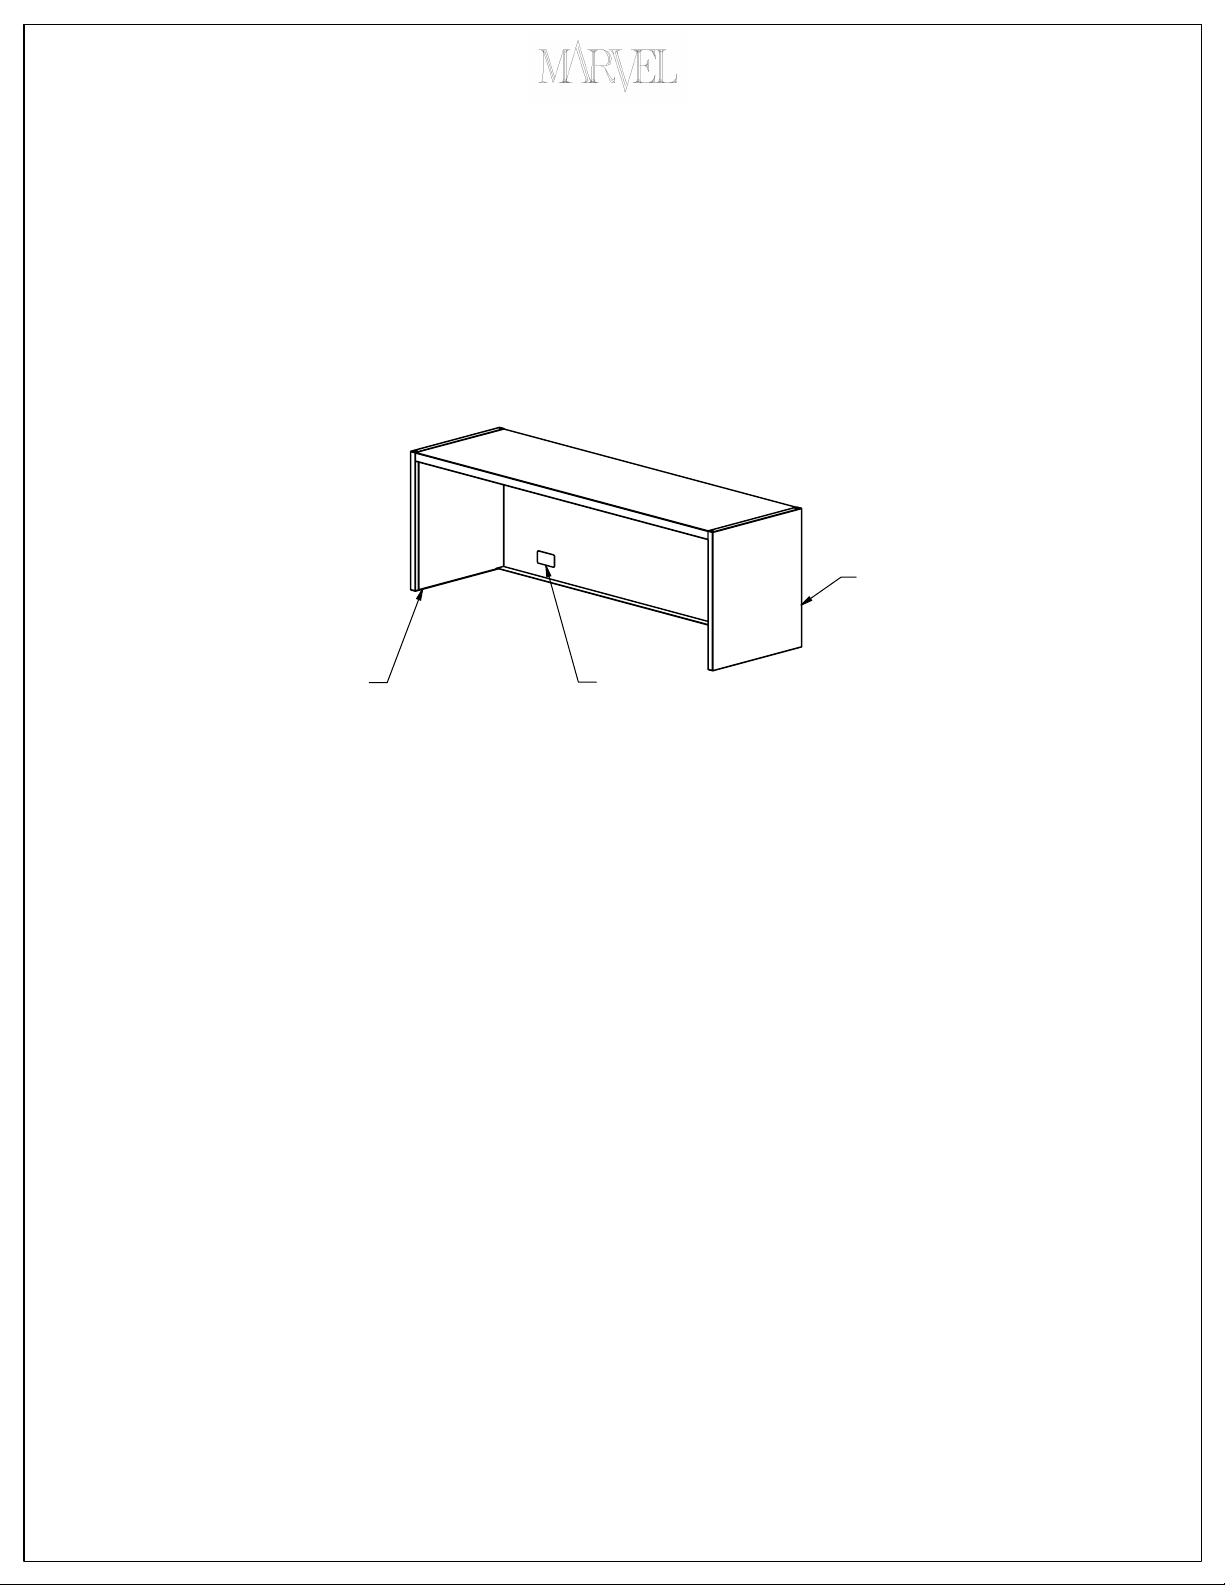
ASSEMBLY INSTRUCTIONS-
48" RISER UTBRF4816
Riser
Tape
Note the double-faced tape on the bottom of the Riser. To secure the
Riser, remove the backer from the tape, and position the Riser on a
worksurface. BE CAREFUL! You cannot move the Riser once the tape
adheres to the worksurface!
The Riser will take a Task light, model # MOTL37. The wires can be
threaded though the knockouts (see drawing), ot through the corener
grommets in the Utility Tables.
The Riser may be cleaned with
a soft cloth and mile detergent.
Knockout
R05201 02/10/2014
 Loading...