

Page 1
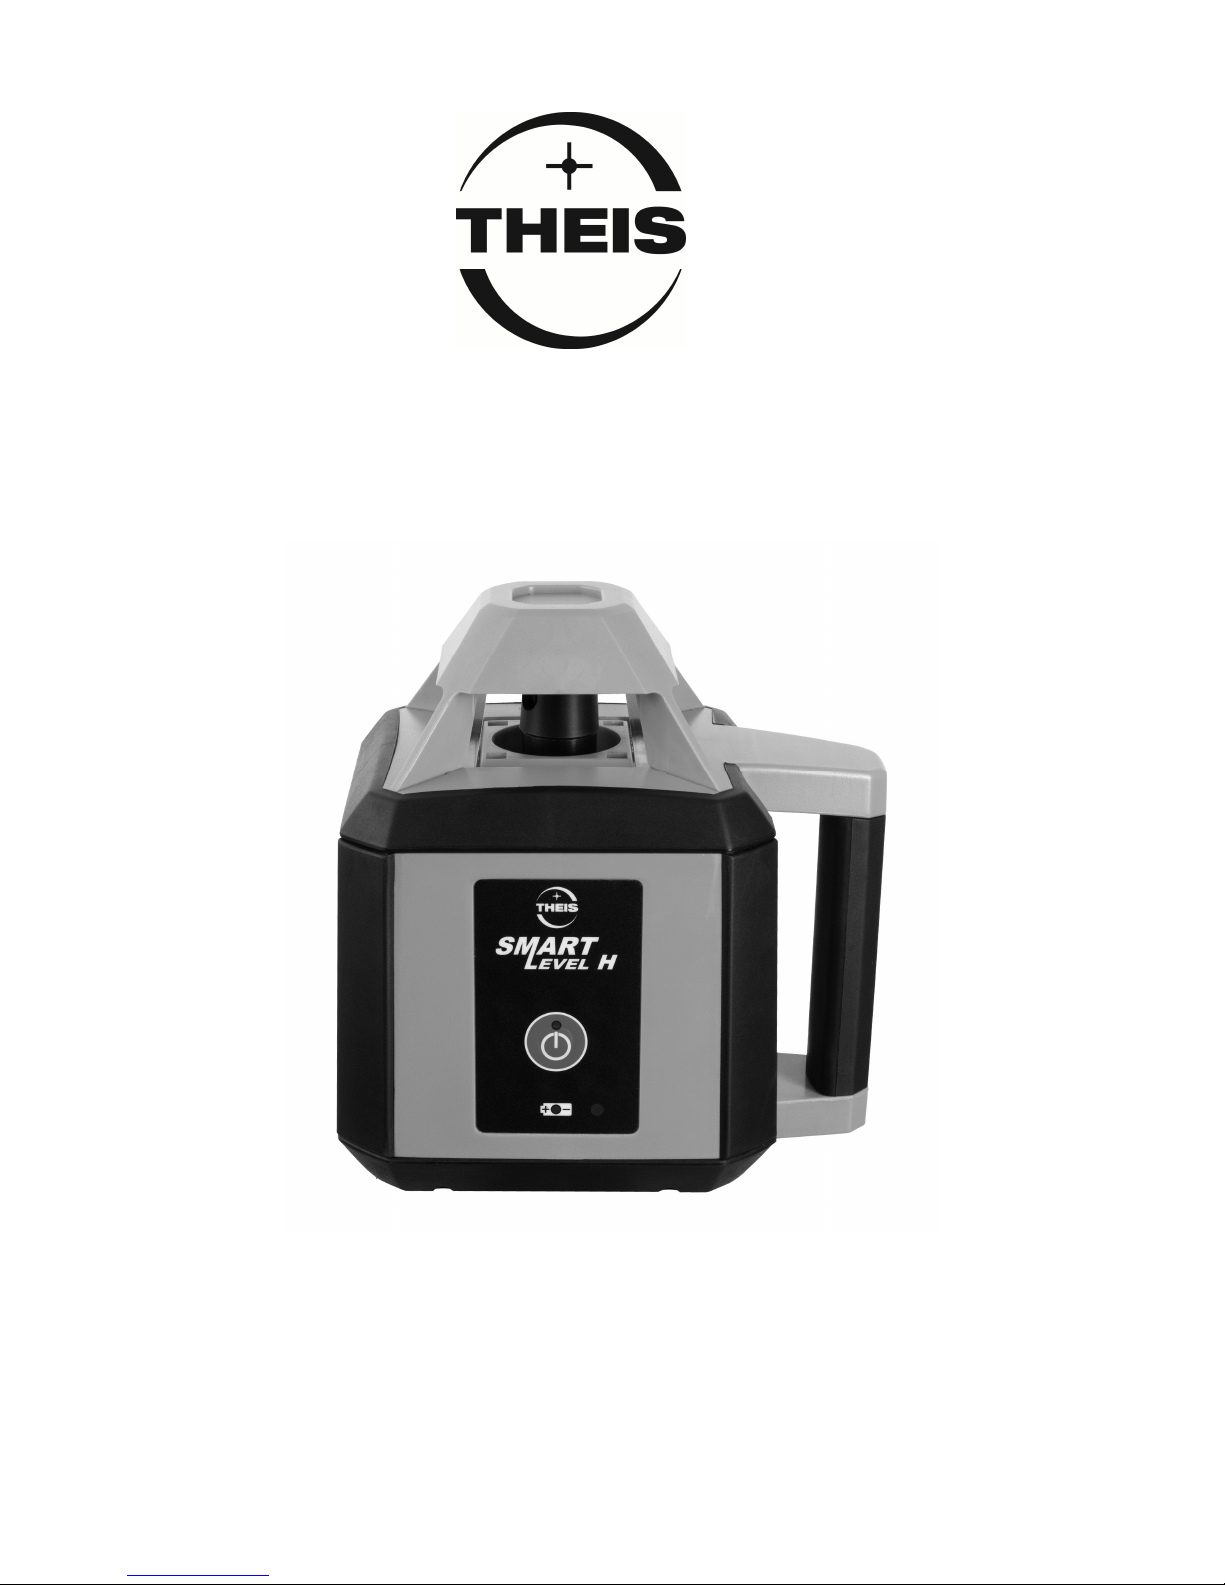
SMART LEVEL H
Gebrauchsanleitung
D
Instruction manual
UK
Instructions de se
r
vice
F
Page 2

2
Inhaltsverzeichnis / Contents / Table des matière
s
Vorwort
3
Introduction
13
Avant-propos 23
1 Bedienungselemente / Infos
4
Operating Elements / Info
14
Eléments de commande / Affichage 24
2 Vorbereitung zur Messung
5
Preparations for measurement
15
Préparatifs de mesure 25
3 Tilt
- Funktion
5
Tilt
- function
15
Fonction Tilt 25
4 Stromversorgung
6
Power supply
16
Alimentation électrique 26
5 Empfänger
7
Receiver
17
Récepteur 27
6 Überprüfung der Justierung
9
Calibration check
19
Vérification de l‘ajustage 29
7 Lieferantenerklärung / Sicherheit
s
hinwe
ise
9
Supplier’s / Safety informtion
19
Déclaration du fournisseur / consignes de sécurité 29
8 Garantie
10
Warranty
20
Garantie 30
9 Entsorgung
11
Disposal
21
Elimination 31
10 Zubehör
11
Accessories
21
Accessoires 31
11 Technische Dat
en 12
Technical Data
22
Caractéristiques 31
Page 3

3
Gebrauchsanleitung
DE
Vorwort
Vielen Dank, dass Sie sich für unseren vollautomatische Rotationslaser SMART LEVEL H entschieden
haben.
Der SMART LEVEL H ist durch die Ein - Tastenbedienung außergewöhnlich einfach in der Handhabung und eignet sich für alle horizontalen Standardanwendungen im Innen - oder Außenbereich.
Alle Instrumente werden vor Auslieferung sorgfältig
geprüft.
Vor dem ersten Gebrauch lesen Sie bitte die Bedienungsanleitung, einschließlich der technischen Daten
und Sicherheitshinweise.
Damit Sie stets ein einsatzbereites Gerät haben, sollten folgende Hinweise beachtet werden:
1.
Gerät niemals nass im Behälter aufbewahren.
2.
Genauigkeit vor jedem Einsatz überprüfen, da wir
keine Haftung für Dejustierung übernehmen können.
3.
Hinweise zur Behandlung des Akkus beachten.
4.
Laser-Austritt-Fenster und Sensor-Fenster des
Empfängers schonend behandeln.
Page 4
4
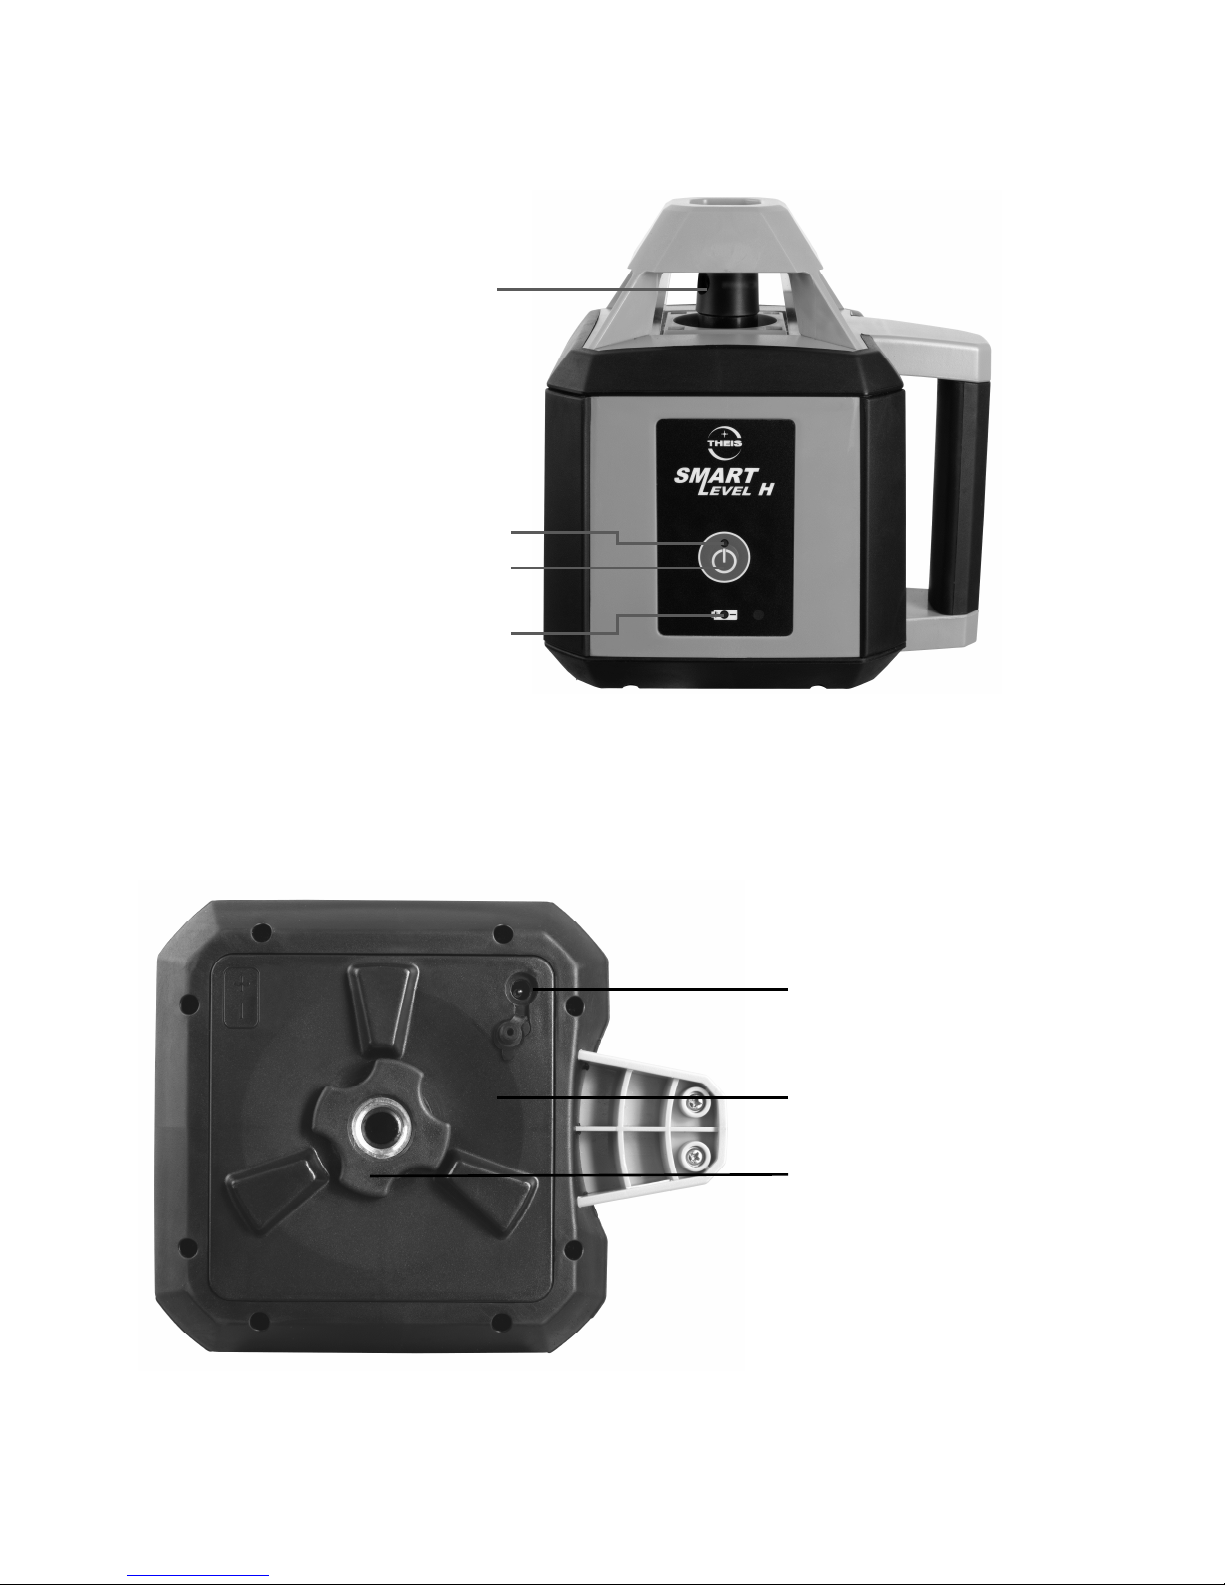
1. Bedienungselemente / Infos
Laseraustritt
Horizontierungsanzeige
Ein/Aus Schalter
Akkufach
Batterieanzeige
Ladebuchse
Drehknopf
Page 5

5
2. Vorbereitung zur Messung
Smart Level auf einen stabilen, flachen Untergrund
aufstellen oder auf ein Stativ fest aufschrauben. Sta-
tiv im Bereich < 5° ausrichten und Lasernivellier mit
Taste einschalten. Die Horizontierungsanzeige
blinkt.
Falls der Stativkopf stärker als 5° geneigt war, wird
dies nach kurzer Zeit durch schnelles Blinken des
Laserstrahls und der Horizontierungsanzeige angezeigt. In diesem Fall Gerät ausschalten und Stativ
sorgfältiger ausrichten.
Nachdem der Horizontiervorgang beendet ist, beginnt
der Laserstrahl zu rotieren und die Horizontierungsanzeige erlischt.
3. TILT Funktion
Eine so genannte Tilt-Funktion sorgt generell dafür,
dass sich bei größeren Veränderungen in der Höhe
(z.B. versehentliches Verstellen eines Stativbeins)
das Gerät abschaltet und dies durch schnelles Blinken des Laserstrahls und der Horizontierungsanzeige
meldet.
Anschließend muss das Gerät neu ausgerichtet und
gestartet werden.
Page 6

6
4. Stromversorgung
Sobald die Batterieanzeige blinkt ist die Kapazität
des Akkus erschöpft und der Akku muss dringend geladen werden. Wird dies nicht beachtet, schaltet das
Gerät nach kurzer Zeit automatisch ab.
Nachladen des Akkus nur mit THEIS StandardLadegerät über Ladebuchse am Akkufach des Lasernivelliers. Der Akku kann auch geladen werden,
wenn das Akkufach vom Laser getrennt ist.
Dazu den Drehknopf entgegen dem Uhrzeigersinn
schrauben.
Ein Überladen ist nicht möglich, sofern nicht mehrfach hintereinander geladen wird. Ein Überladen verkürzt die Lebensdauer des Akkus.
Der Akku soll bei Raumtemperatur geladen werden.
Das Laden unter +5°C kann zu einem Defekt des Akkus führen.
Ladegerät nur in trockenen Räumen einsetzen!
Auch bei Nichtbenutzung des Gerätes, Akku spä-
testens alle 6 Wochen aufladen!!!
Page 7

7
5. Empfänger
Empfänger durch Drücken der Ein/Aus-Taste einschalten und gewünschte Funktion vorwählen: Feinoder Grobeinstellung (Grundeinstellung ist Grob) und
akustisches Signal. Gewählte Funktion erscheint in
der LCD-Anzeige.
Darüber hinaus informiert die Anzeige beim Vermessen darüber, in welche Richtung der Empfänger bewegt werden muss (Pfeile).
Sensorfenster zum SMART LEVEL hinwenden und
durch den rotierenden Laserstrahl fahren, bis in der
LCD eine Anzeige erfolgt. Den Empfänger dann solange zum Zentrum bewegen, bis ständig nur der
Zentrums-Balken angezeigt wird.
Bei eingeschalteter Akustik ertönt bei Balkenanzeige
ein Dauerton. Bei Pfeilanzeige erkennt man an einem
unterschiedlich pulsierenden Ton, ob der Empfänger
zu hoch oder zu tief gehalten wird.
Trifft ca. 7 Minuten lang kein Laserstrahl auf das
Sensorfenster, schaltet der Empfänger ab.
Stromversorgung Empfänger
Wenn Batteriesymbol in der LCD-Anzeige erscheint,
sollte die Batterie (9 V, E-Block) gewechselt werden,
da sonst die Reichweite eingeschränkt sein kann.
Batteriedeckel öffnen, alte Batterien sachgemäß entsorgen (siehe Pkt. 9)und bei neuer Batterie auf richtige Polung achten (siehe Symbole).
Page 8
8
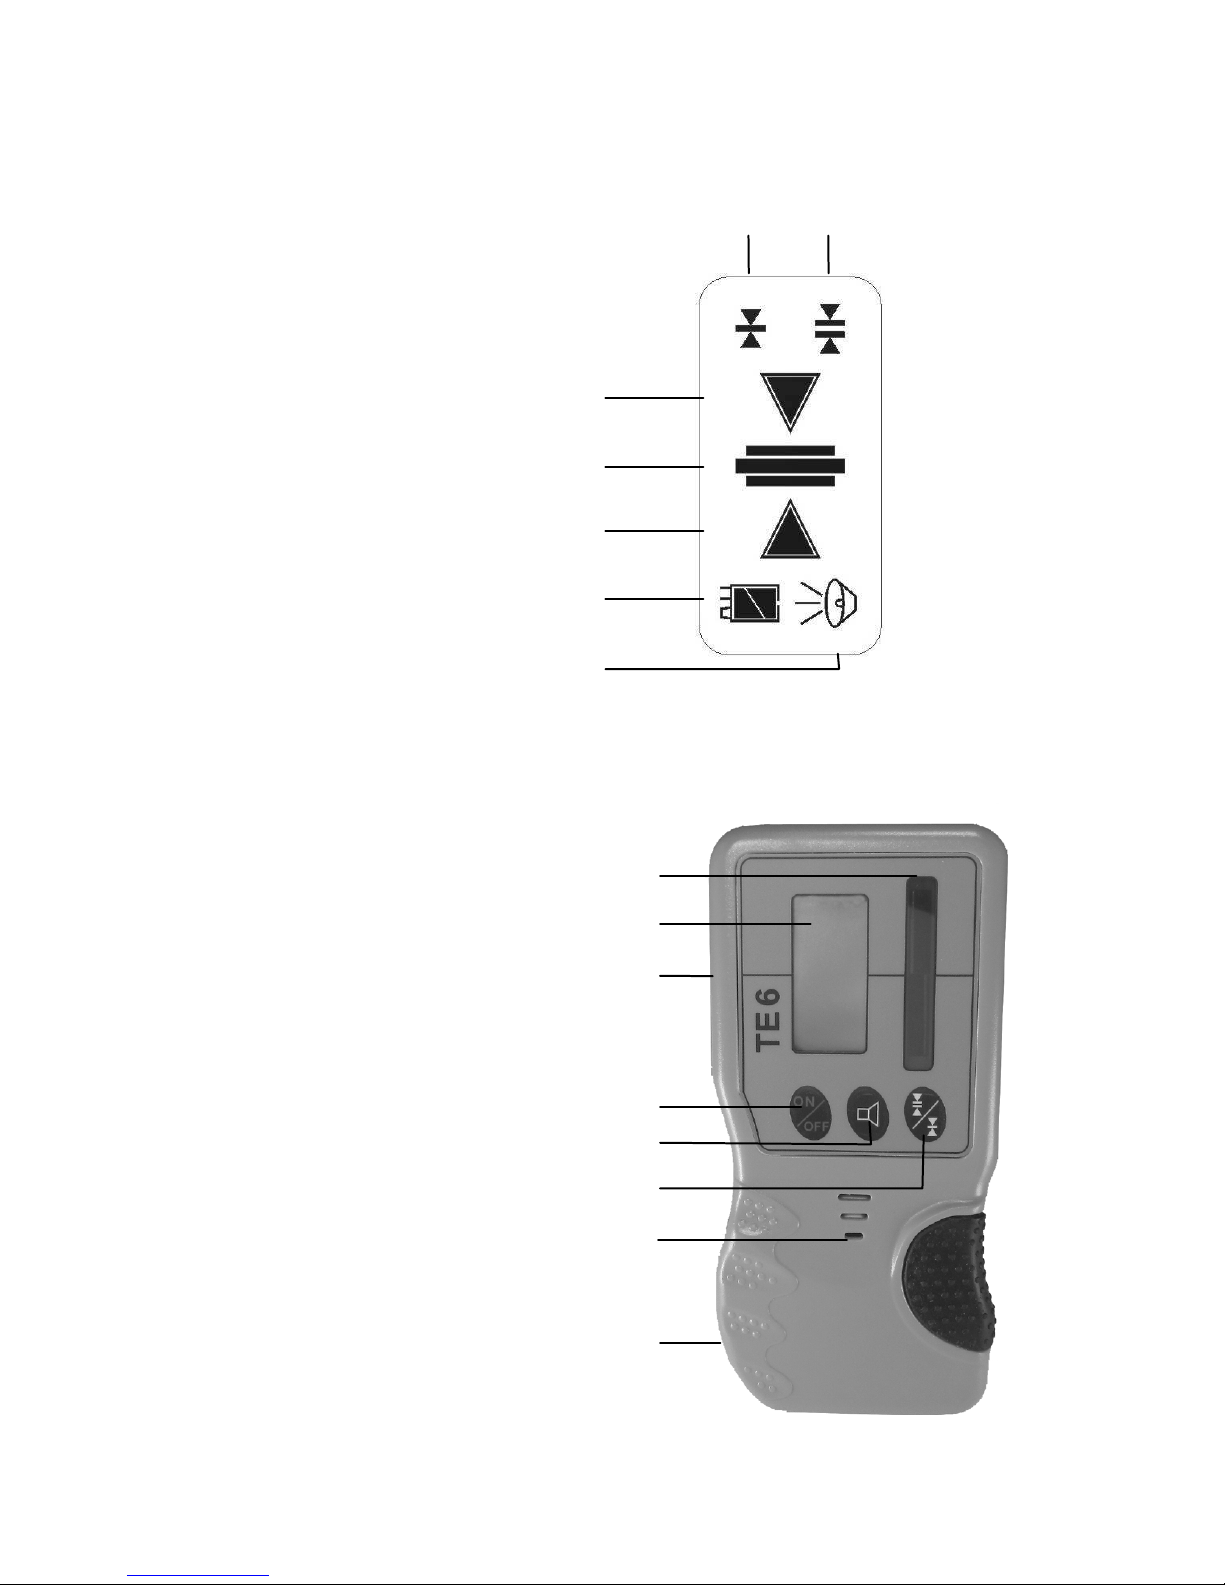
TE 6
Anzeige
Fein Grob
Pfeil für Bewegungsrichtung
Zentrum Balken
Pfeil für Bewegungsrichtung
Batterieanzeige
Anzeige akustisches Signal
Sensorfenster
LCD – Anzeige (auch Rückseite)
Kerbe Zentrum (links und rechts)
Taste Ein / Aus
Taste akustisches Signal
Taste Fein / Grob
Austritt akustisches Signal
Batteriefach (Rückseite)
Page 9

9
6. Überprüfung der Justierung
Lasernivellier wie unter 2. beschrieben, allerdings auf
einem sehr gut ausgerichteten Stativ, aufbauen und
entlang einer etwa 30 m langen
Messstrecke - beispielsweise in X-Achse - ausrichten
und einschalten.
Am Ende der Messstrecke in Höhe des Laserstrahls
eine Markierung vornehmen. Anschließend LaserGerät um 180° drehen und erneut eine Markierung
setzen. Danach die gleichen Prüfungen auch in der
Y-Achse vornehmen. Falls alle Markierungen übereinander liegen oder nur unwesentlich (max. 3 mm)
voneinander abweichen, ist die Justierung in Ordnung. Falls größere Abweichungen vorliegen, muss
das Gerät von einem Fachbetrieb überprüft und neu
kalibriert werden.
7. Lieferantenerklärung /
Sicherheitshinweise
Das Vermessungsgerät erfüllt bestimmungsgemäß
die Forderungen der Europäischen Richtlinien. Eine
Konformitätserklärung ist bei Theis Feinwerktechnik
verfügbar.
Sicherheitshinweisschild befindet sich auf der
linken Seite des Gerätes.
Page 10

10
Eingebaut ist ein gekapselter Laser Klasse 3R.
Beim Öffnen des Gerätes besteht deshalb die
Möglichkeit, in den Bereich höherer Leistungswerte als der Klasse 2 zu gelangen. Laser nach
Möglichkeit nicht auf Personen ausrichten. Nicht
in den Laserstrahl blicken, auch nicht mit optischen Instrumenten.
Es befinden sich keine zu wartenden oder justierenden Teile im Inneren des Gerätes.
Service darf nur von autorisierten Stellen ausgeführt werden.
8. Garantie
Wir gewährleisten für unsere Erzeugnisse eine dem
heutigen Stand der Technik entsprechende Fehlerfreiheit in Material und Werkarbeit. Sollten sich derartige Mängel beim praktischen Gebrauch zeigen, so
werden diese kostenlos behoben. Die Garantiezeit
beträgt 24 Monate (Ausnahme Akku 12 Monate) ab
dem Verkaufsdatum (Rechnungsdatum). Für die Reparatur oder Umtausch sind Gerät und/oder betroffene Teile unverzüglich nach Feststellung des Mangels
an THEIS zu senden.
Keine Garantieansprüche bestehen auf kostenlose
Behebung von Fehlern, die durch unsachgemäße
Behandlung oder Aufbewahrung entstanden sind sowie jegliche Schadensersatzansprüche, insbesondere auch solche auf mittelbare Schäden. Ferner erlischt jeder Garantieanspruch, wenn technische Eingriffe von fremder Seite – also nicht durch die Firma
THEIS – vorgenommen werden.
Page 11

11
9. Entsorgung
Elektrowerkzeug, Zubehör und Verpackung sollten
einer umweltgerechten Wiederverwertung zugeführt
werden und dürfen nicht im Hausmüll entsorgt werden.
Bei der Entsorgung sind die nationalen, länderspezifischen Entsorgungsvorschriften zu
beachten. Informationen dazu erhalten Sie bei
Theis Feinwerktechnik GmbH.
(WEEE - Reg.-Nr. DE 10598800)
Batterien/Akkus:
Batterien und Akkus sind Sondermüll und dürfen
nicht in den Hausmüll, ins Feuer oder Wasser gelangen.
10. Zubehör
Ladegerät
Gebrauchsanleitung
Empfänger TE 6
Page 12

12
11. Technische Daten
Laser
Laserklasse 2
Betriebsdauer ≈ 25h
Ausgangsleistung < 1mW
Stromversorgung Akku
4,8V; 4,0Ah
Wellenlänge 635nm
Ladezeit ≈ 6h
Selbstnivellierbereich ± 5°
Arbeitstemperatur
-10 bis +50°C
Drehzahl 600 U/min Schutzart IP 65
Genauigkeit ± 1mm/10m Gewicht ≈ 2 kg
Empfänger (Option)
TE 6
Empfangsfeld 45 mm
Reichweite bis 250 m
Genauigkeit - fein/ grob
± 2 mm/± 4 mm
Betriebsdauer
≈ 36 h
Stromversorgung 9 V, E- Block
Betriebstemperatur -10 bis +50 °C
Schutzart IP 65
Größe 153x73x28mm
Gewicht
≈ 195 g
Page 13

13
Operating Instructions
UK
Introduction
Thank you very much for your decision to by our
SMART LEVEL H.
The SMART LEVEL H has a ONE touch keyboard
and is very easy to handle. You can use it for all horizontal standard surveying tasks in - and outdoor.
Prior to shipment all instruments are carefully
checked.
Read the complete Operating Instructions including
the Technical Data and the Safety Requirements prior to using the equipment the first time.
We recommend you to observe the following items so
that your laser is ready for use at all times:
1.
Never
place the instrument in its case when
wet
.
2. Check the accuracy each time before using the instrument, as we cannot assume any responsibility
for adjustment errors.
3. Follow the instructions for handling the accu.
4. Treat the laser beam window and sensor window
of the receiver with care.
Page 14
14
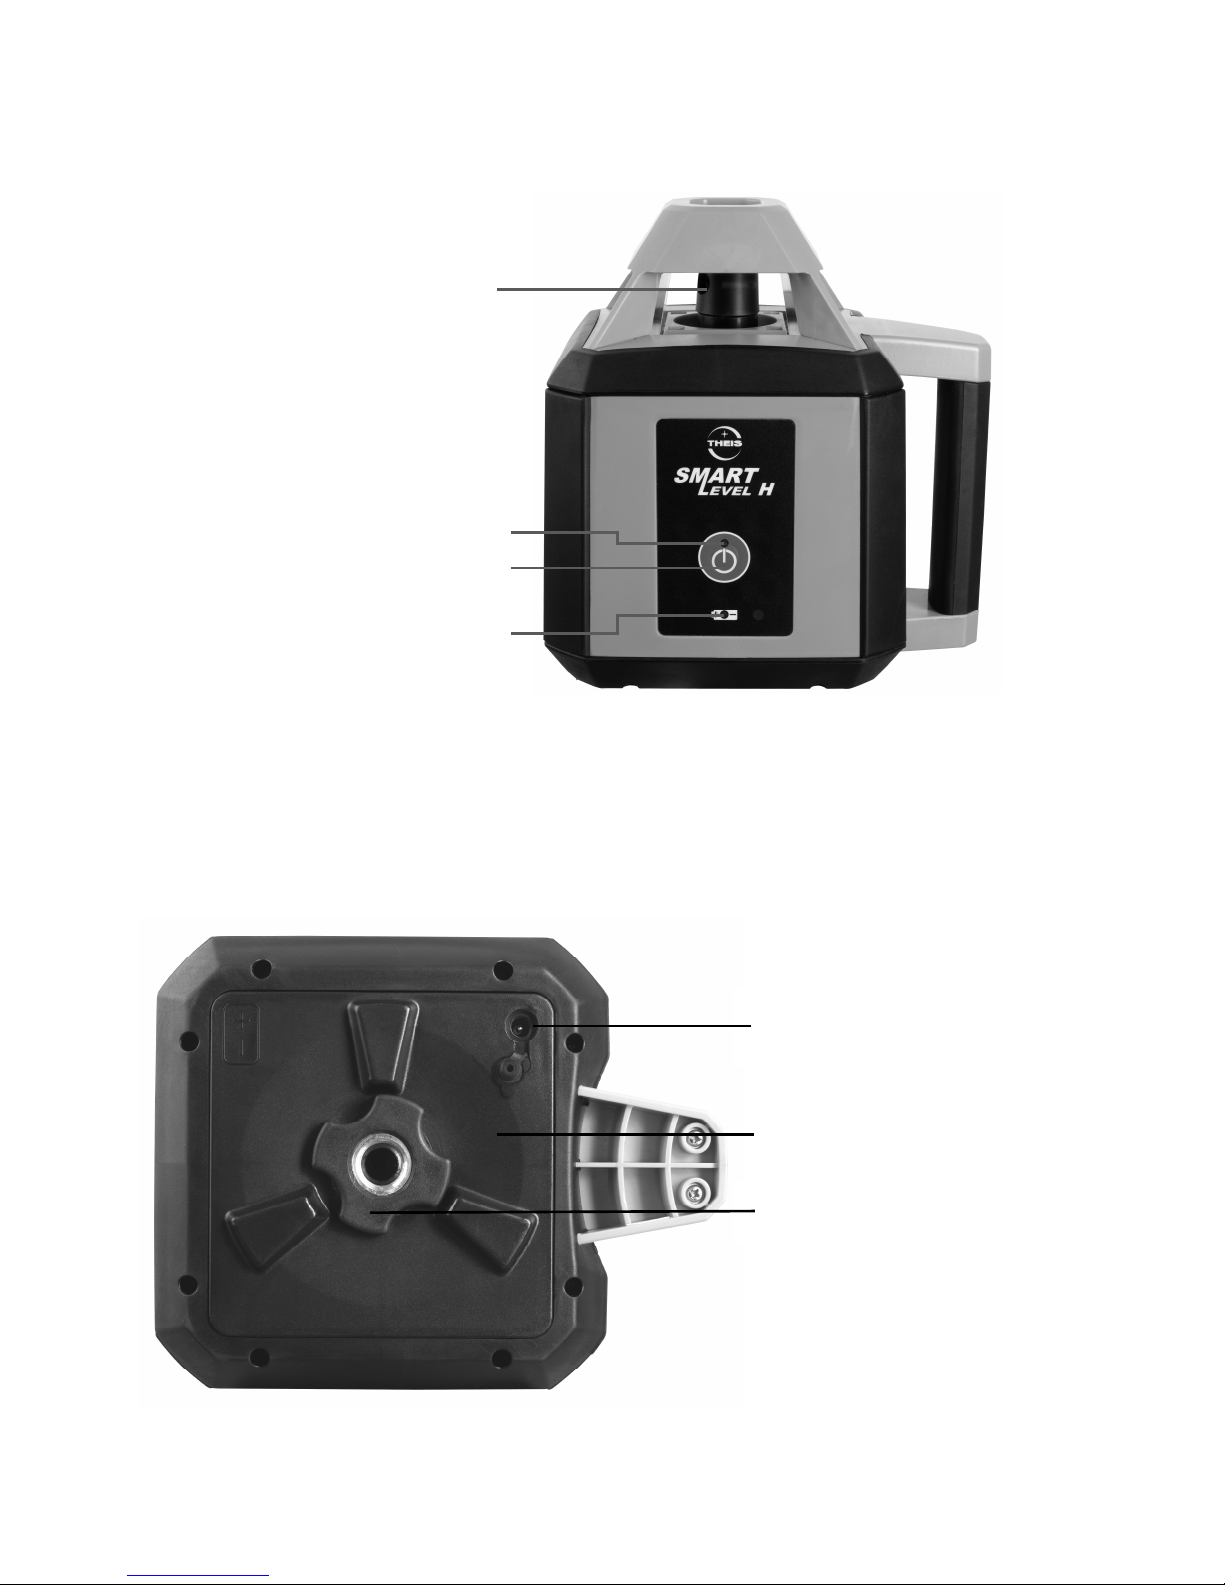
1. Operating Elements / Info
Laser exit
Out-of-level indicator
Button On/Off
Battery compartment
Battery indicator
Charging socket
Knob
Page 15

15
2. Preparations for measurement
Set up the Smart Level on a solid, even ground or
screw it on tight on a tripod.
Align the tripod within the range of < 5° and press the
On/Off button to activate the instrument. The out of
level indicator is blinking.
If the tripod head was tilted more than 5°, this will be
indicated after a brief period of time by rapid flashing
of the laser beam and the out of level indicator.
Should this occur, shut off the instrument and align
the tripod more carefully.
As soon as the laser levelling process has been finished, the laser beam starts rotating and the out of
level indicator expires.
3. TILT function
Should major height changes occur (e.g. an inadvertent jerk of the tripod leg), a so called Tilt function effects a shutdown of the laser beam even within the
automatic levelling range, and this occurrence is signalled by rapid flashing of the laser beam and the out
of level indicator.
The instrument has to be readjusted and switched on.
Page 16

16
4. Power supply
As soon as the battery indicator blinks, the capacity
of the accumulator is exhausted and it has to be recharged immediately. If the indicator is ignored, the
instrument switches off automatically a short time later.
Recharging of the accumulator only with THEIS
standard-charger via charging socket at the battery
compartment of the laser level. The accu can also be
charged, if the compartment is separated from the laser level.
Overloading is not possible, if charging is not repeated successive several times.
If possible the battery should be charged at room
temperature. Charging under +5°C can cause the
damage of the battery.
Never operate charger in damp rooms!
Please charge the instrument at least every 6
weeks, even it is not used!!!
Page 17

17
5. Receiver
Turn on the receiver by pushing the On/Off button
and select requested function: Fine- or coarse setting
with button (basic setting is coarse) and acoustic signal with button. Selected function is shown on the
LCD display. In addition to this, the arrow symbols on
the display inform, in which direction the receiver has
to be moved, while measuring.
Turn the sensor window into the direction of the
Smart Level and move up and down through the rotating laser beam, until the LCD display shows the arrow symbols. Move the receiver in the direction of the
arrow and stop, when the centre bar is shown constantly.
If the buzzer is activated, there will be a permanent
sound, when the centre bar is shown. When the arrows are displayed, there will be a pulsating sound,
which will be different, dependent on the position of
the receiver over or under the centre height.
If the laser beam does not hit the sensor window for
more then 7 minutes, the receiver will shut off.
Power supply Receiver
When the battery symbol appears on the LCDdisplay, change the battery (9V, E-Block), otherwise
the range may be reduced.
Open the battery cover and dispose old batteries
properly (see point 9). Watch for the right polarity
when inserting the new batteries. (Pay attention to
symbols at the receiver case).
Page 18
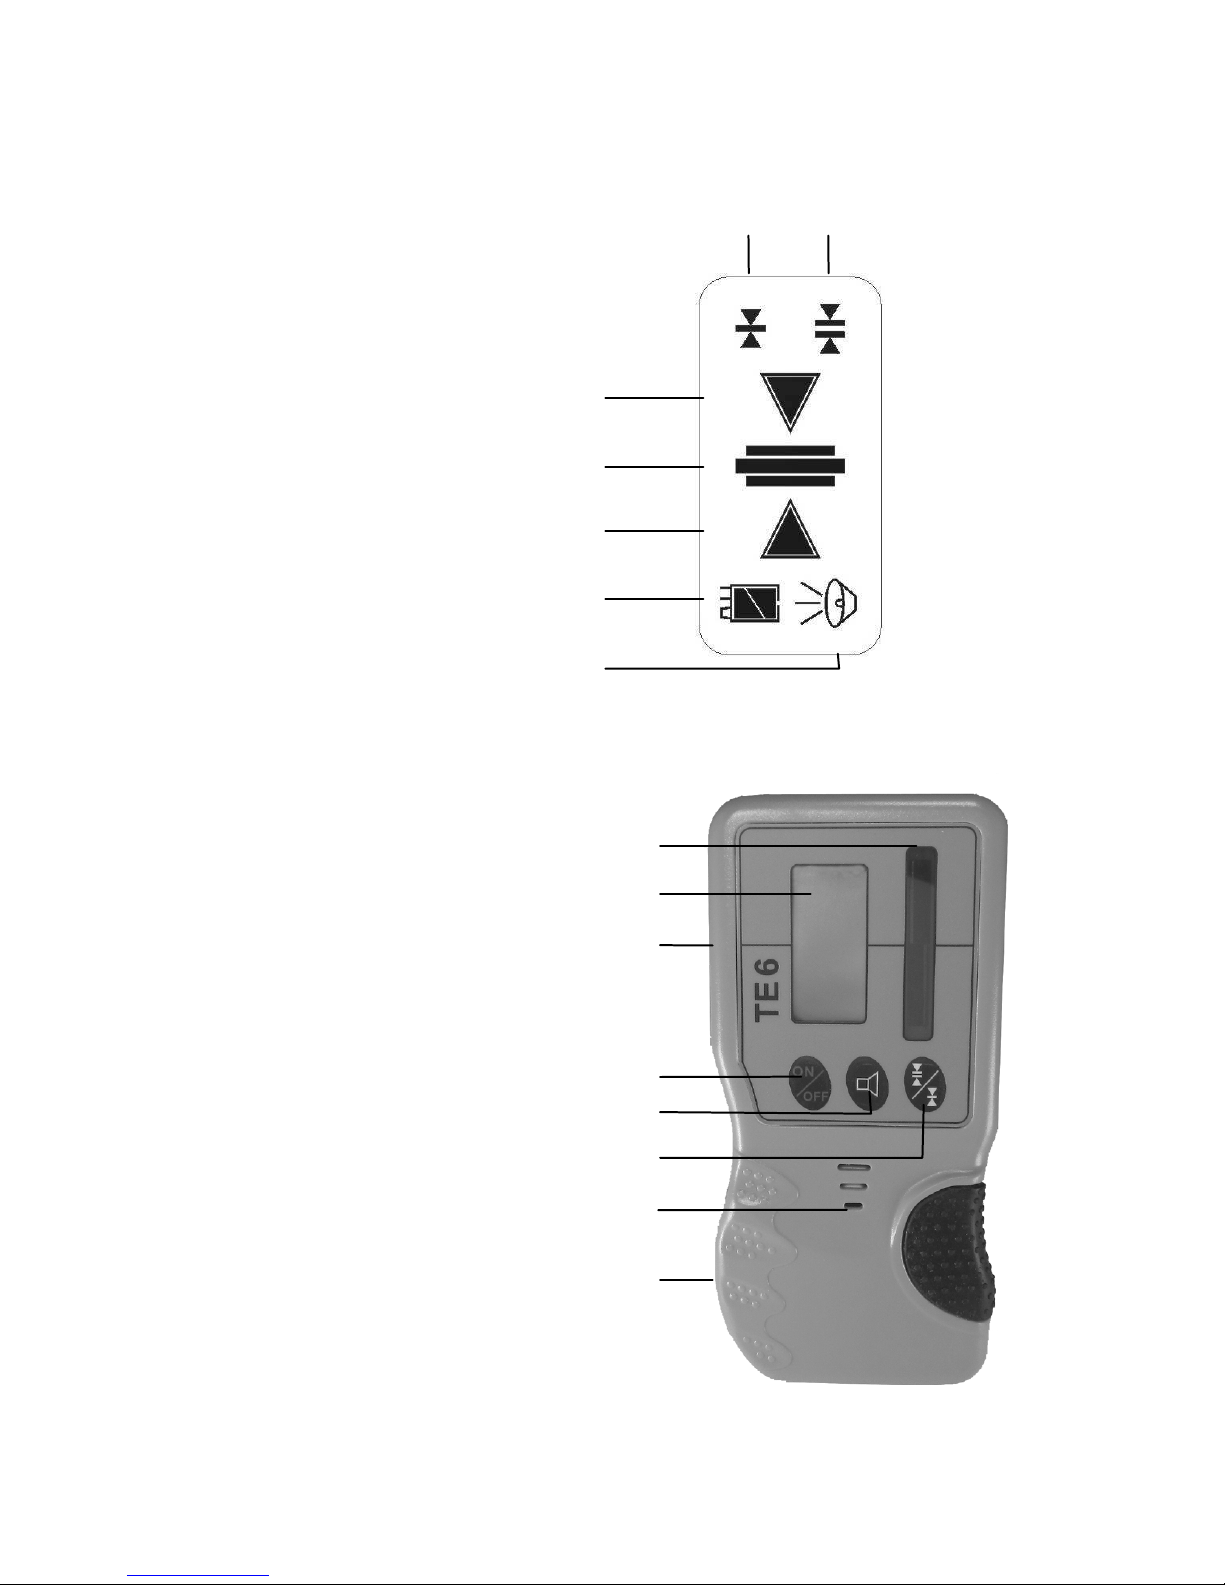
18
TE 6
Figure
Fine Rough
Arrows for moving direction
Centre bar
Arrows for moving direction
Battery display
Display of audible signal
Sensor window
LCD – display (on reverse too)
Centre notch (left and right)
Button On/Off
Button of audible signal
Button Fine / Rough
Holes for buzzer
Battery case backside
Page 19

19
6. Calibration check
Set up levelling instrument as described in section 2.
onto an extremely well levelled tripod, and along a
measuring range of approx. 30 metres – for example
in the X-axis direction – level and turn on.
Place a mark at the end of the measuring range at
the height of the laser beam. Subsequently, turn the
laser 180° and place a second mark. Afterwards, carry out the same test along the Y-axis If all marks are
at equal height or hardly deviate (max. 3 mm), the
calibration is correct. If larger deviations are found,
the unit must be re-calibrated by an authorised workshop.
7. Supplier’s / Safety information
The unit is designed in accordance with European
Standards.
An EC Declaration of Conformity is available at
Theis company.
Safety information is placed on the left side of the
unit.
A Class 3R embedded laser has been installed.
On opening the unit, one must be aware of the
fact that higher energy levels than Class 2 are
present.
Page 20

20
Avoid pointing the laser in the direction of persons. Do not look into the laser beam.
There are no parts requiring adjustment or
maintenance inside the unit. Service operations
may only be carried out by authorised workshops.
8. Warranty
We guarantee our products to be free from faults in
material and workmanship according to the current
state of the art. Should defects of this type arise in
practical use, they will be eliminated free of charge.
The warranty period is 24 months (apart from the
rechargeable battery, which is 12 month) from the
date of sale (date of invoice). You must return the
device or its affected components for repair or
replacement to THEIS immediately after you
establish the defect.
No guarantee claim or claim free elimination of faults
due to incorrect handling or storage can be accepted;
in addition, no claims for damages can be accepted,
including claims for damages in particular claims for
indirect damages. Furthermore, any and all claims for
damages will be void in the case of any technical intervention by third parties, i.e. not by THEIS.
Page 21

21
9. Disposal
The measuring tool, its accessories and packaging
should be recycled in an environmentally friendly
way. Do not dispose into household waste!
When disposing, country specific disposal
regulations must be observed. Information’s
you get at Theis - company.
(WEEE - Reg.-Nr. DE 10598800)
Batteries:
Never put batteries into household waste, fire or water.
10. Accessories
Charger
Operating instructions
Detector TE 6
Page 22

22
11. Technical data
Laser
Laser Class 2
Running time ≈ 25h
Output Power < 1mW Power supply NiMH
4,8V; 4,0Ah
Wavelength 635nm
Charging time ≈ 6h
Self-levelling range ± 5°
Operating temperature
-10 to +50°C
Speed 600 RPM System of protection IP 65
Accuracy ± 1mm/10m Weight ≈ 2 kg
Detector
(Option)
TE 6
Detectorfield 45 mm
Range bis 250 m
Precision - fine/ rough
± 2 mm/± 4 mm
Running time
≈ 36 h
Power supply 9 V, E- battery
Operating temperature -10 to +50 °C
System of protection IP 65
Size 153x73x28mm
Weight
≈ 195 g
Page 23

23
Instructions de service
F
Avant-propos
Merci d'avoir choisi notre Smart Level Laser de rotation automatique.
Le Smart Level H est très facile à utiliser, avec une
seul bouton de contrôle unique et adapté à toutes les
applications horizontales standards à l'intérieur - ou à
l'extérieur.
Tous les instruments sont contrôlés soigneux avant
leur livraison.
Avant la première utilisation, lire les instructions de
service
Pour assurer durablement le bon fonctionnement de
votre appareil, nous vous prions de lire attentivement
les instructions suivantes:
1.
Ne jamais ranger un appareil dans son coffret
lorsqu'il est mouillé.
2.
Vérifier la précision avant chaque utilisation ; nous
déclinons toute responsabilité en cas de déréglage
de l'appareil.
3.
Tenir compte des instructions concernant le traitement de l'accu.
4.
La fenêtre de sortie du rayon laser ainsi que la fenêtre de la sonde du récepteur sont à manipuler
avec le plus grand soin.
Page 24
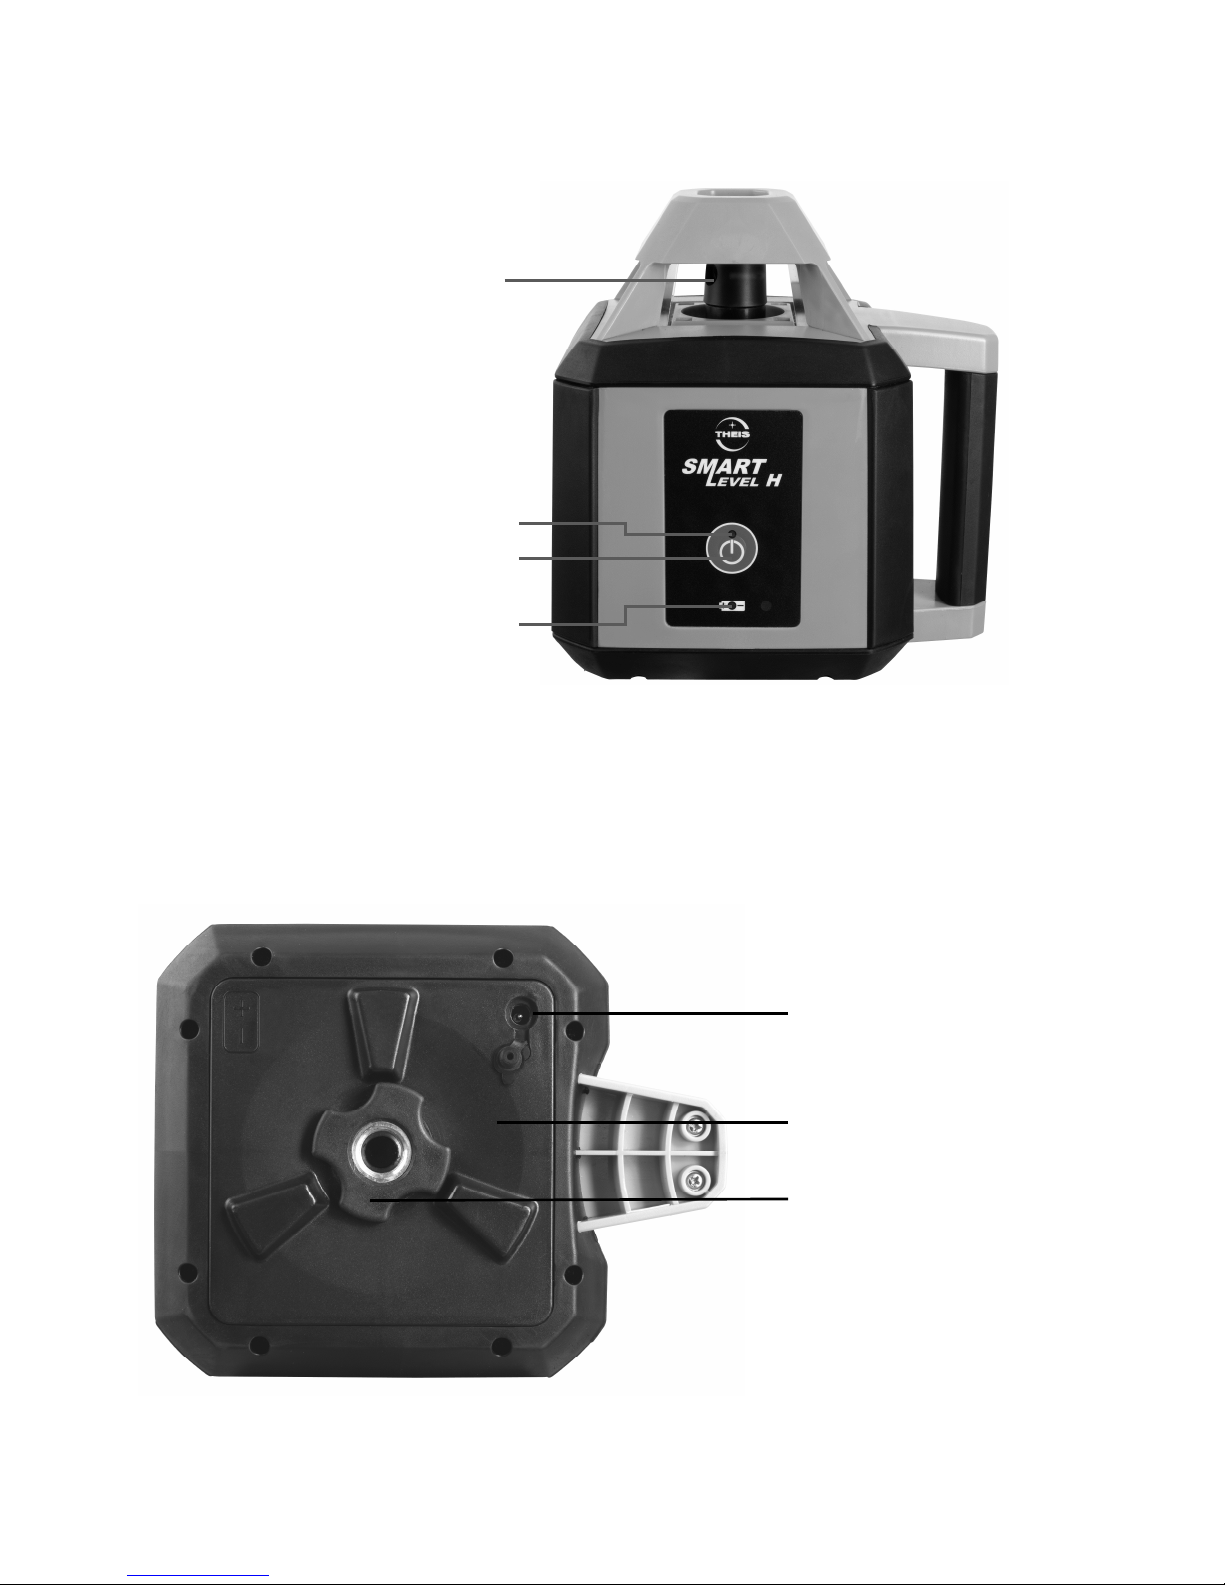
24
1. Eléments de commande / Affichage
Sortie du rayon laser
Indicateur d’horizontalité
Interrupteur Marche/Arrêt
Compartiment
de l’accu
Indicateur de charge
Prise de
chargement
Bouton
Page 25

25
2. Préparatifs de mesure
Placer le Smart Level sur une surface plane et stable
ou le visser sur un trépied. Ajuster le trépied dans
une plage < 5° et allumer le niveau laser avec la
touche. L’indicateur d’horizontalité clignote.
Une inclinaison de la tête du trépied supérieure à 5°
est signalée après un court instant par un clignotement rapide du rayon laser et de l’indicateur
d’horizontalité. Dans ce cas, éteindre l’appareil et
ajuster soigneusement le trépied.
Lorsque l'opération de mise à l'horizontale est terminée, le rayon laser se met à tourner et l’indicateur
d’horizontalité s’éteint.
3. Fonction TILT
Dans le cas de modifications importantes sur la hauteur (occasionnées p. ex. par le déplacement involontaire d'une jambe du trépied), la fonction Tilt assure
la mise hors circuit de l'appareil et avertit par un clignotement rapide du rayon laser et de l'indicateur
d’horizontalité.
Il faut ensuite procéder au ré-ajustement de l'appareil
avant de le remettre en marche.
Page 26

26
4. Alimentation électrique
La capacité de l’accu est épuisée dès que le témoin
de contrôle de l’accu clignote; l’accu doit alors être
rechargé au plus vite. Si ce n’est pas le cas, l’appareil
s’arrête automatiquement après un court instant.
Seul le chargeur standard THEIS peut être utilisé
pour recharger l’accu au moyen de la prise de chargement du compartiment de l’accu du niveau laser.
L’accu peut également être chargé lorsque
le compartiment de l’accu est démonté du laser.
Pour ce faire, tournez le bouton dans le sens inverse.
Aucune surcharge n’est possible lorsque l'accu n'est
pas chargé plusieurs fois consécutivement. La durée
de vie de l’accu peut être réduite par les surcharges.
L’accu doit être chargé à température ambiante. Un
chargement sous +5 C peut entraîner des dommages
à l’accu.
Utiliser uniquement le chargeur dans des locaux
parfaitement secs!
Même si l’appareil n’est pas utilisé, l’accu doit
être rechargé au plus tard toutes les 6 semaines!!!
Page 27

27
5. Récepteur
Allumer le récepteur en appuyant sur la touche
Marche/Arrêt et sélectionner la fonction souhaitée:
Réglage fin ou grossier (le réglage de base du TE 6
est «grossier») et signal acoustique. La fonction
choisie apparaît dans l’affichage LCD.
Pendant la mesure, cet affichage indique également
le sens dans lequel le récepteur doit être déplacé
(flèche).
Tourner la fenêtre de la sonde vers le Smart Level et
la déplacer à travers le rayon laser en rotation jusqu'à
ce que quelque chose apparaisse dans l'écran LCD.
Déplacer alors le récepteur le long de la flèche
jusqu’à ce que seule la barre centrale s’affiche en
permanence.
Un signal continu retentit lorsque la barre s’affiche
lorsque l’avertisseur sonore est allumé. L’affichage
des flèches est signalé par différentes tonalités indiquant si le récepteur est placé trop haut ou trop bas.
Le récepteur s’éteint lorsqu’aucun rayon laser n’est
émis pendant env. 7 minutes dans le fenêtre de la
sonde de récepteur.
Alimentation en courant – Récepteur
La batterie (9 V, bloc électrique) doit être remplacée
lorsque le symbole de la batterie apparaît dans
l’écran LCD; dans le cas contraire, la portée de
l’appareil peut être limitée.
Ouvrez le couvercle de la batterie, jetez vôtre ancienne batterie vigueur (cf. point 9) et respecter la polarité lors de la mise en place des nouvelles batteries
(voir symboles).
Page 28
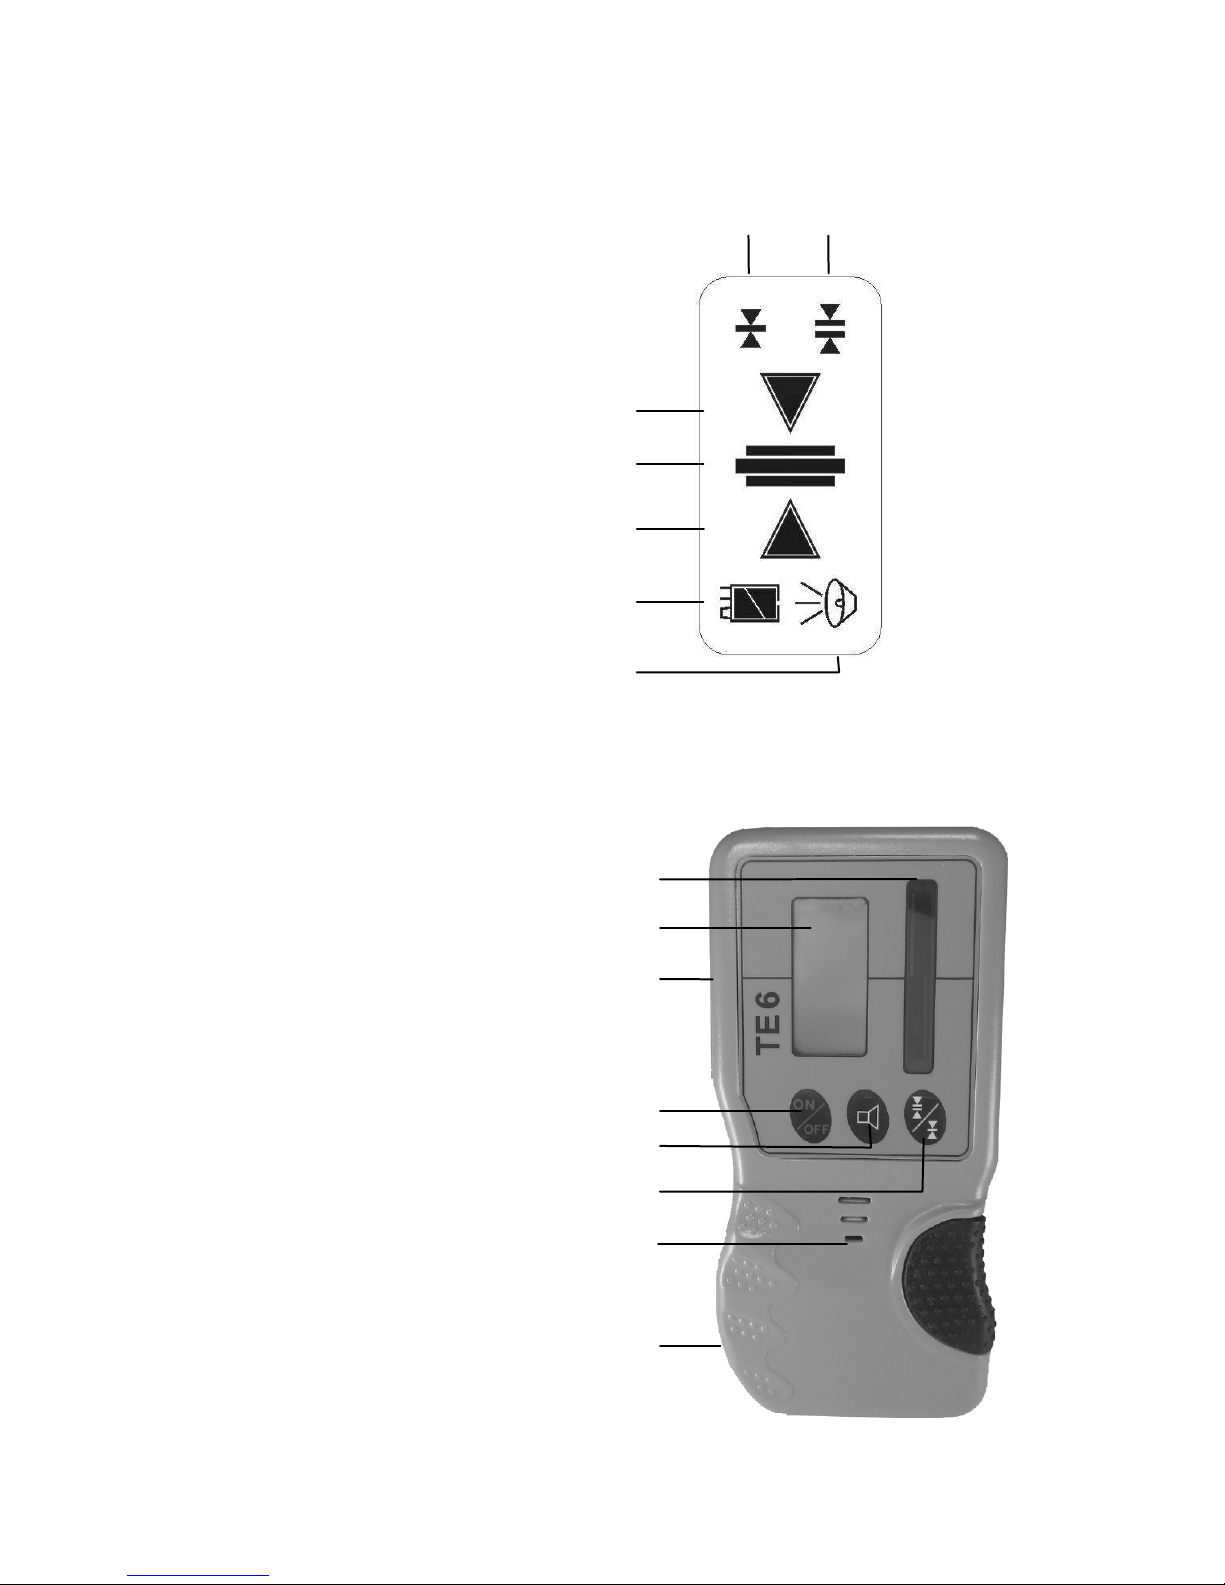
28
TE 6
Affichage
Fin Grossier
Flèche pour le sens
du mouvement
Barre centrale
Flèche pour le sens
du mouvement
Indicateur de batterie
Indicateur du signal acoustique
Fenêtre de la sonde
Affichage LCD (aussi l'arrière)
Centre de l‘encoche (droite et à
gauche)
Appuyer Marche/Arrêt
Appuyer signal acoustique
Appuyer Fin / Grossier
Sortie signal acoustique
Compartiment de piles (arrière)
Page 29

29
6. Vérification de l’ajustage
Installer le niveau laser conformément aux indications
du paragraphe 2 en veillant scrupuleusement au positionnement parfait du trépied. Ajuster le niveau laser sur une distance d'environ 30 m – par exemple
sur l'axe X – et le mettre en marche.
Effectuer un marquage à la fin de cette distance de
mesure, à la hauteur du rayon laser. Faire ensuite pivoter l'appareil laser de 180° et procéder à nouveau à
un marquage. Exécuter ensuite les mêmes opérations sur l'axe Y. Si tous les marquages se chevauchent ou s'ils ne divergent que d'une valeur négligeable (2 mm max.), cela signifie que l'ajustage est
correct. Si les divergences sont plus importantes,
l'appareil doit être confié à une entreprise habilité par
Theis qui le contrôlera et procèdera à son calibrage.
7. Déclaration du fournisseur / consignes
de sécurité
Cet appareil est conforme aux prescriptions européennes.
Une déclaration de conformité est disponible au sein
de Theis.
La plaquette portant les consignes de sécurité se
trouve sur la face gauche de l'appareil.
L'appareil est équipé d'un laser blindé de classe
3A. En ouvrant l'appareil, il est donc possible
d'accéder à une plage de valeurs de puissance
supérieures à celles de la classe 2. Eviter autant
Page 30

30
que possible d'orienter le laser vers des personnes. Ne jamais regarder dans le rayon laser,
même à travers un instrument optique quelconque.
Aucune pièce nécessitant réglage ou entretien
n'est intégrée à l'intérieur de l'appareil.
Seuls les services habilités compétents sont
autorisés à pratiquer les opérations de maintenance.
8. Garantie
Nous garantissons que les matériaux utilisés pour
nos produits, ainsi que les méthodes utilisées pour
leur fabrication sont exemptes de tout défaut et correspondent à l’état actuel des techniques. Si des
vices surviennent pendant l’utilisation pratique de
l’appareil, ceux-ci sont éliminés gratuitement. La durée de la garantie s'élève à 24 mois (12 mois seulement pour les accus) à dater de l'achat (date de la
facture). Pour la réparation ou le remplacement, l'appareil et/ou les pièces concernées doivent être renvoyées à THEIS immédiatement après avoir constaté
le vice.
Les défauts causés par une manipulation ou une
conservation inappropriées ne peuvent en aucun cas
donner lieu à une élimination gratuite de ceux-ci dans
le cadre de la garantie. Il en va de même pour toute
demande de dommages et intérêts, et plus particulièrement pour les dommages indirects. Toute intervention technique de tiers – c'est-à-dire de toute personne extérieure à la société THEIS – entraîne en
outre l'extinction de la garantie.
Page 31
31
9. Elimination
Les outils électriques, accessoires et emballages doivent être recyclés dans le respect de
l’environnement. Ne doivent pas êtres jetés dans les
ordures ménagères.
À la disposition de la réglementation nationale, d'élimination spécifiques à chaque pays
doivent être respectées. Informations pour se
rendre à Theis.
(WEEE - Reg.-Nr. DE 10598800)
Batteries / Accus:
Ne pas jeter les batteries et accus dans les ordures
ménagères, au feu ou à l'eau.
10. Accessoires
Standard:
Chargeur
Instructions de service
Récepteur TE 6
11. Caractéristiques techniques
Laser
Laser classe 2
Autonomie ≈ 25h
Puissance de sortie < 1mW
Alimentation électrique
NiMH 4,8V; 4,0Ah
Longueur d‘onde 635nm
Temps de charge ≈ 6h
Plage de nivellement ± 5°
Temp. de service
-10 a +50°C
Vitesse 600 t/min Indice de protection IP 65
Précision
± 1mm/10m Poids ≈ 2 kg
Page 32
32
Récepteur
TE 6
Fenêtre de la sonde 45 mm
Porteé ≈ 250 m
Précision Fin/Grossier
± 2 mm /± 4 mm
Autonomie
≈ 36 h
Alimentation électrique 9 V, E- bloc électrique
Témperature de service -10 à +50 °C
Indice de protection IP 65
Dimensions 153x73x28mm
Poids
≈ 195 g
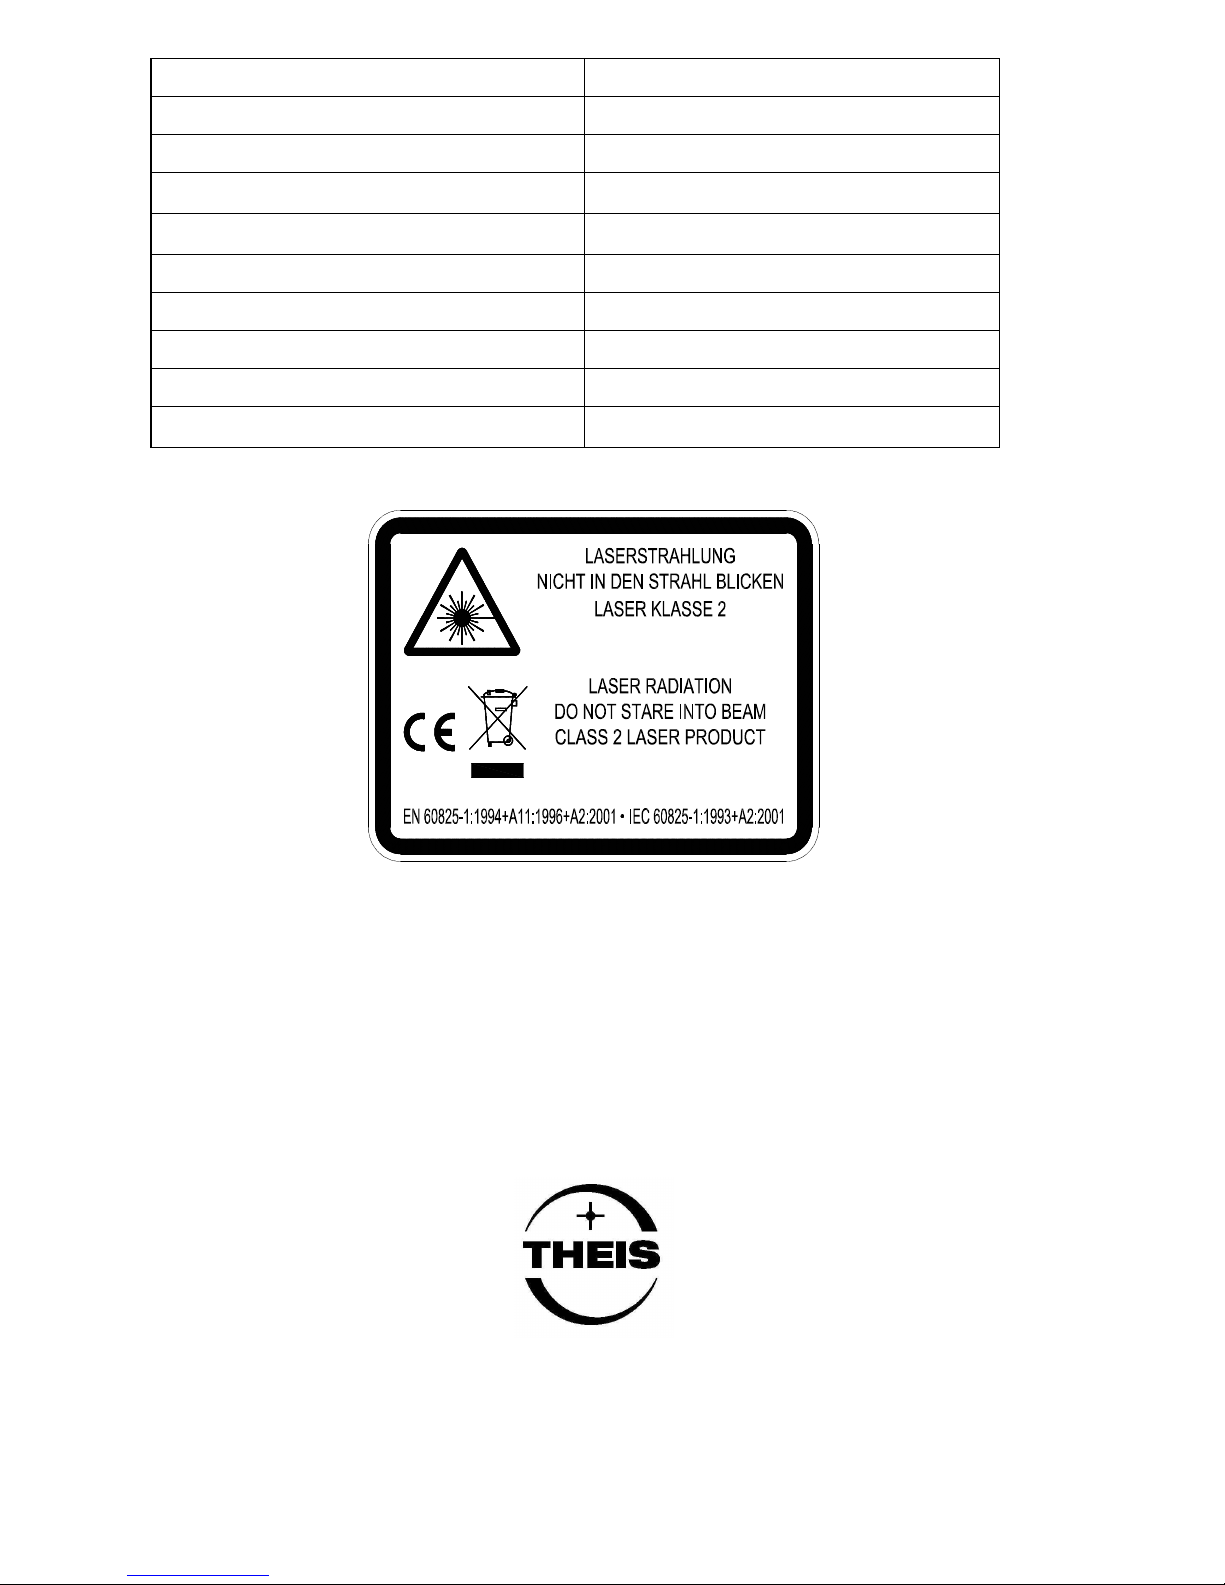
Max. Output 1 mW
Wavelength 635 nm
Max. Ausgangsleistung 1 mW
Wellenlänge 635 nm
Änderungen vorbehalten
Subject to changes
Sous réserve de modifications
THEIS FEINWERKTECHNIK GMBH
D-35236 Breidenbach-Wolzhausen
Deutschland·Germany·Allemagne
06.01.15
 Loading...