

Page 1

Ideal Workstations™, Workstations with DryDock™,
BarStations
and WashStations™ Installation Guide
®
Page 2
18” Finished cutout
1/2” Reveal front
and back
16”
Side view applies to all
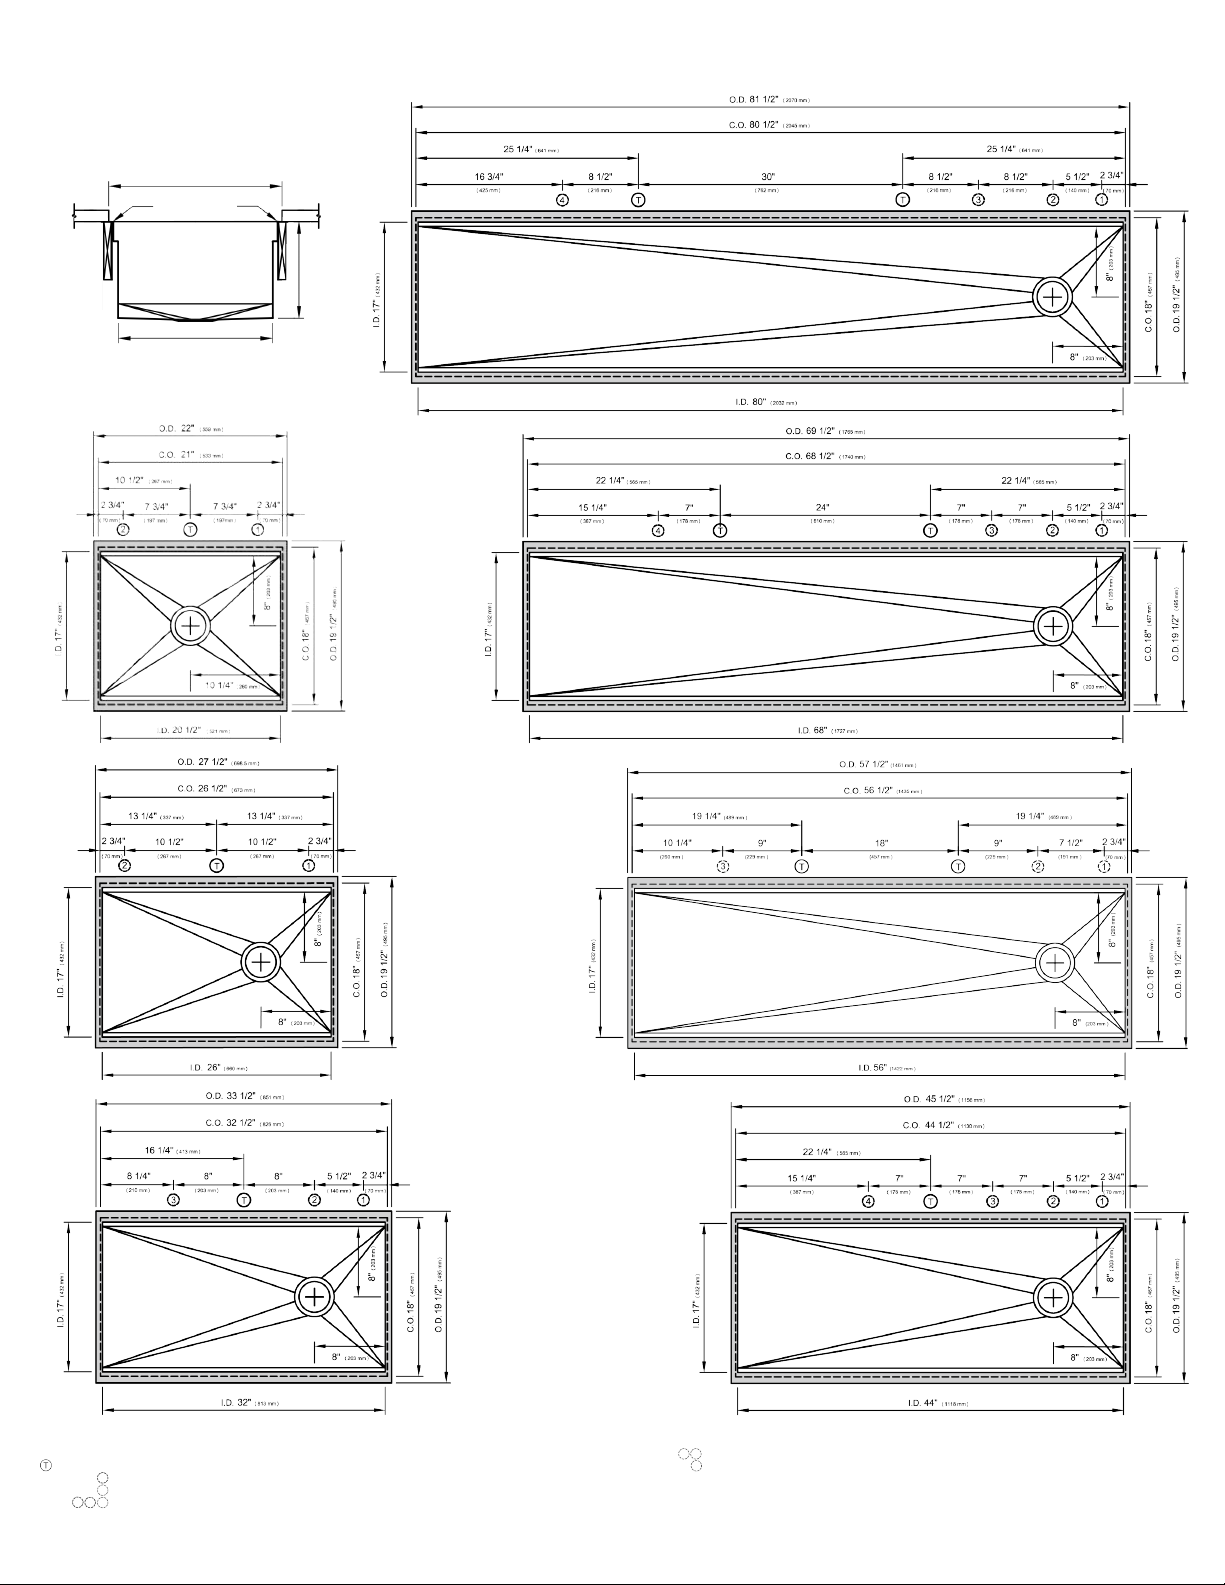
Single Bowl Workstations
Single Bowl Workstations
10”
IWS 7S
IWS 2C*
IWA 30S
IWS 6S
IWS 5S
IWS 3S
SUGGESTED GALLEY TAP AND TAP ACCESSORIES PLACEMENT GUIDE
(Recommendations are based on installing 3 or more Tap accessories)
Galley Tap 1 3/8" min hole diameter (1 1/2" min hole diameter for fast water jet cut)
Galley Deck Switch 1 3/8" min hole diameter or Galley Automatic Strainer Basket knob 1" min and 1 3/8" max hole diameter
Galley Hot and Cold Water Dispenser 1 3/8" min hole diameter (1 1/2" min hole diameter for fast water jet cut)
Galley Soap Dispenser 1" min hole diameter
Center hole diameters 2" behind cutout
Note: Galley Hot and Cold Water dispenser requires a minimum 8" clearance center to center if installed to the right of the Galley Tap
1
1
2
2
2
3
3 4
*IWS 2C SUGGESTED GALLEY TAP AND TAP ACCESSORIES PLACEMENT GUIDE
Galley Deck Switch 1 3/8" min hole diameter or Galley Soap Dispenser 1" min hole diameter
Galley Hot and Cold Water Dispenser 1 3/8" min hole diameter (1 1/2" min hole diameter for fast water jet cut)
1
IWS 4S
1 2
2
Note: For installation where the drain is on the left side, simply reverse placements of Tap and Tap Accessories
Page 3
18” Finished cutout
1/2” Reveal front
and back
16”
Side view applies to all
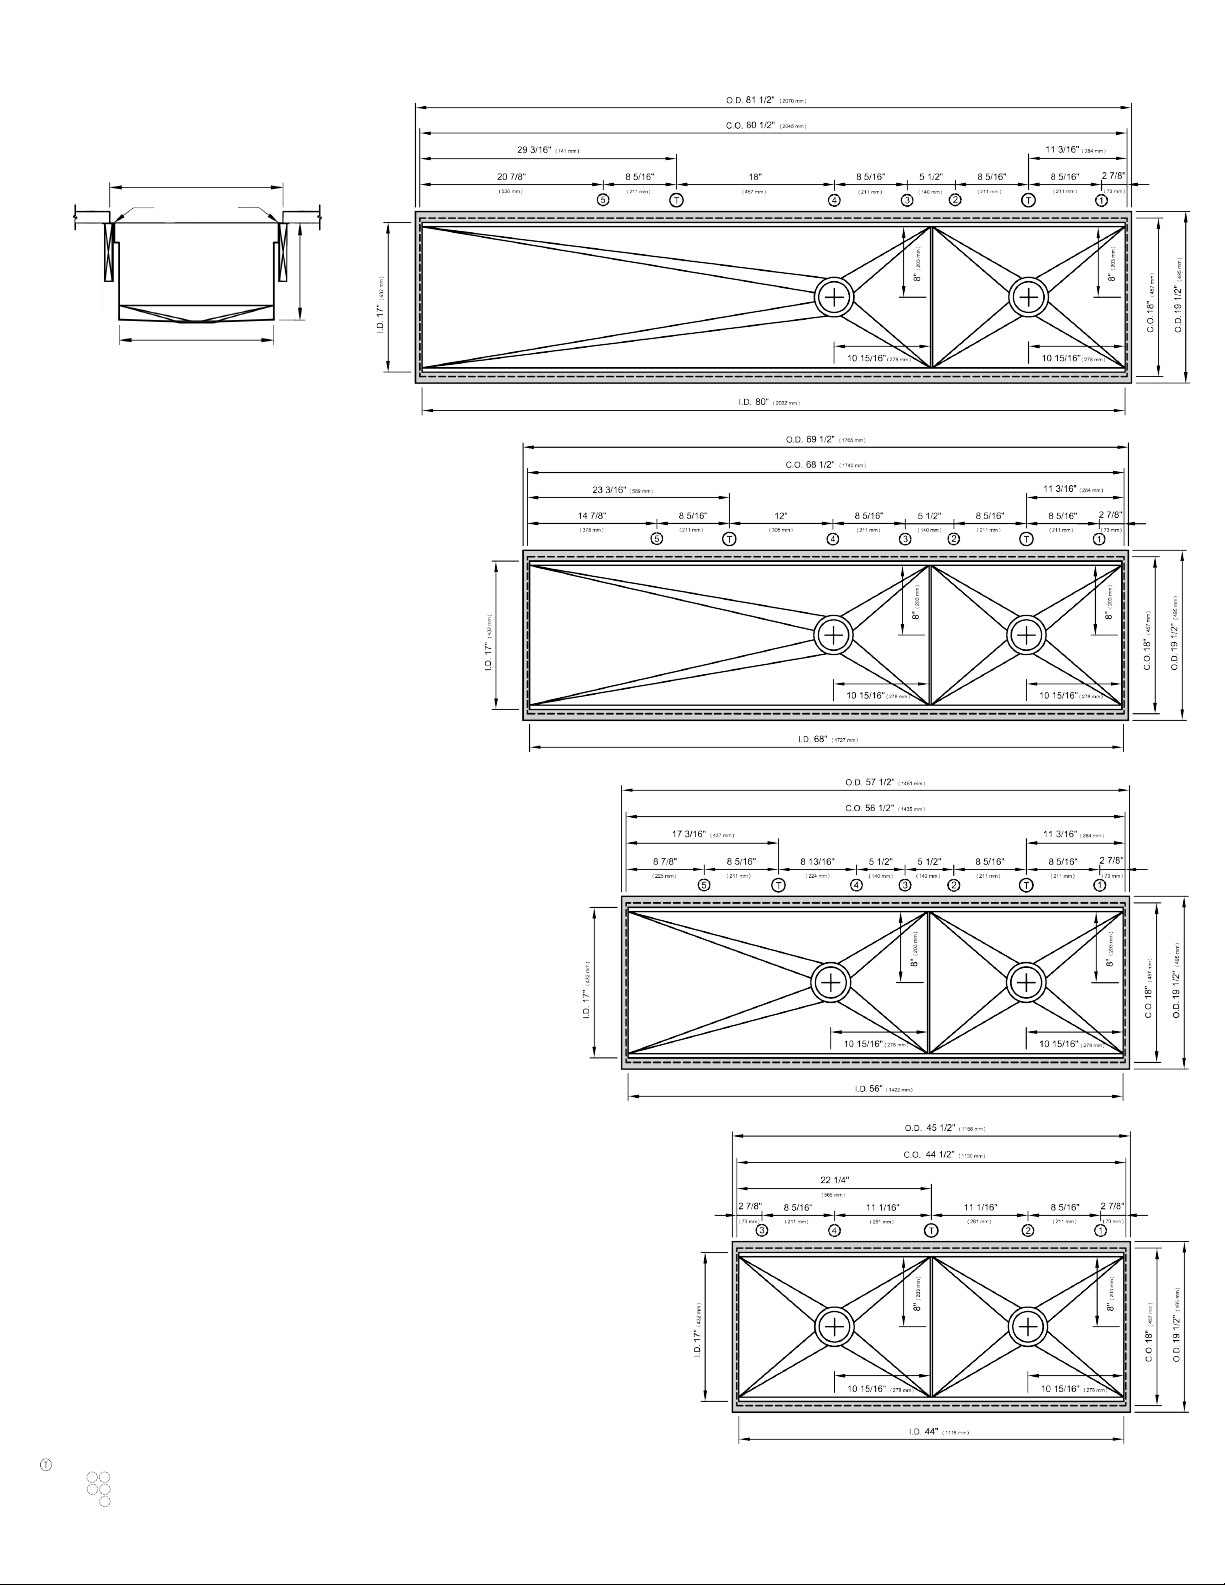
Double Bowl Workstations
Double Bowl Workstations
10”
IWS 7D
IWS 6D
IWS 5D
SUGGESTED GALLEY TAP AND TAP ACCESSORIES PLACEMENT GUIDE
(Recommendations are based on installing 3 or more Tap accessories)
Galley Tap 1 3/8" min hole diameter (1 1/2" min hole diameter for fast water jet cut)
Galley Soap Dispenser 1" min hole diameter
Galley Deck Switch 1 3/8" min hole diameter or Galley Automatic Strainer Basket knob 1" min and 1 3/8" max hole diameter
Galley Hot and Cold Water Dispenser 1 3/8" min hole diameter (1 1/2" min hole diameter for fast water jet cut)
Center hole diameters 2" behind cutout
Note: Galley Hot and Cold Water dispenser requires a minimum 8" clearance center to center if installed to the right of the Galley Tap
52
31
4
2
IWS 4D
Note: For installation where the drain is on the left side, simply reverse placements of Tap and Tap Accessories
Page 4
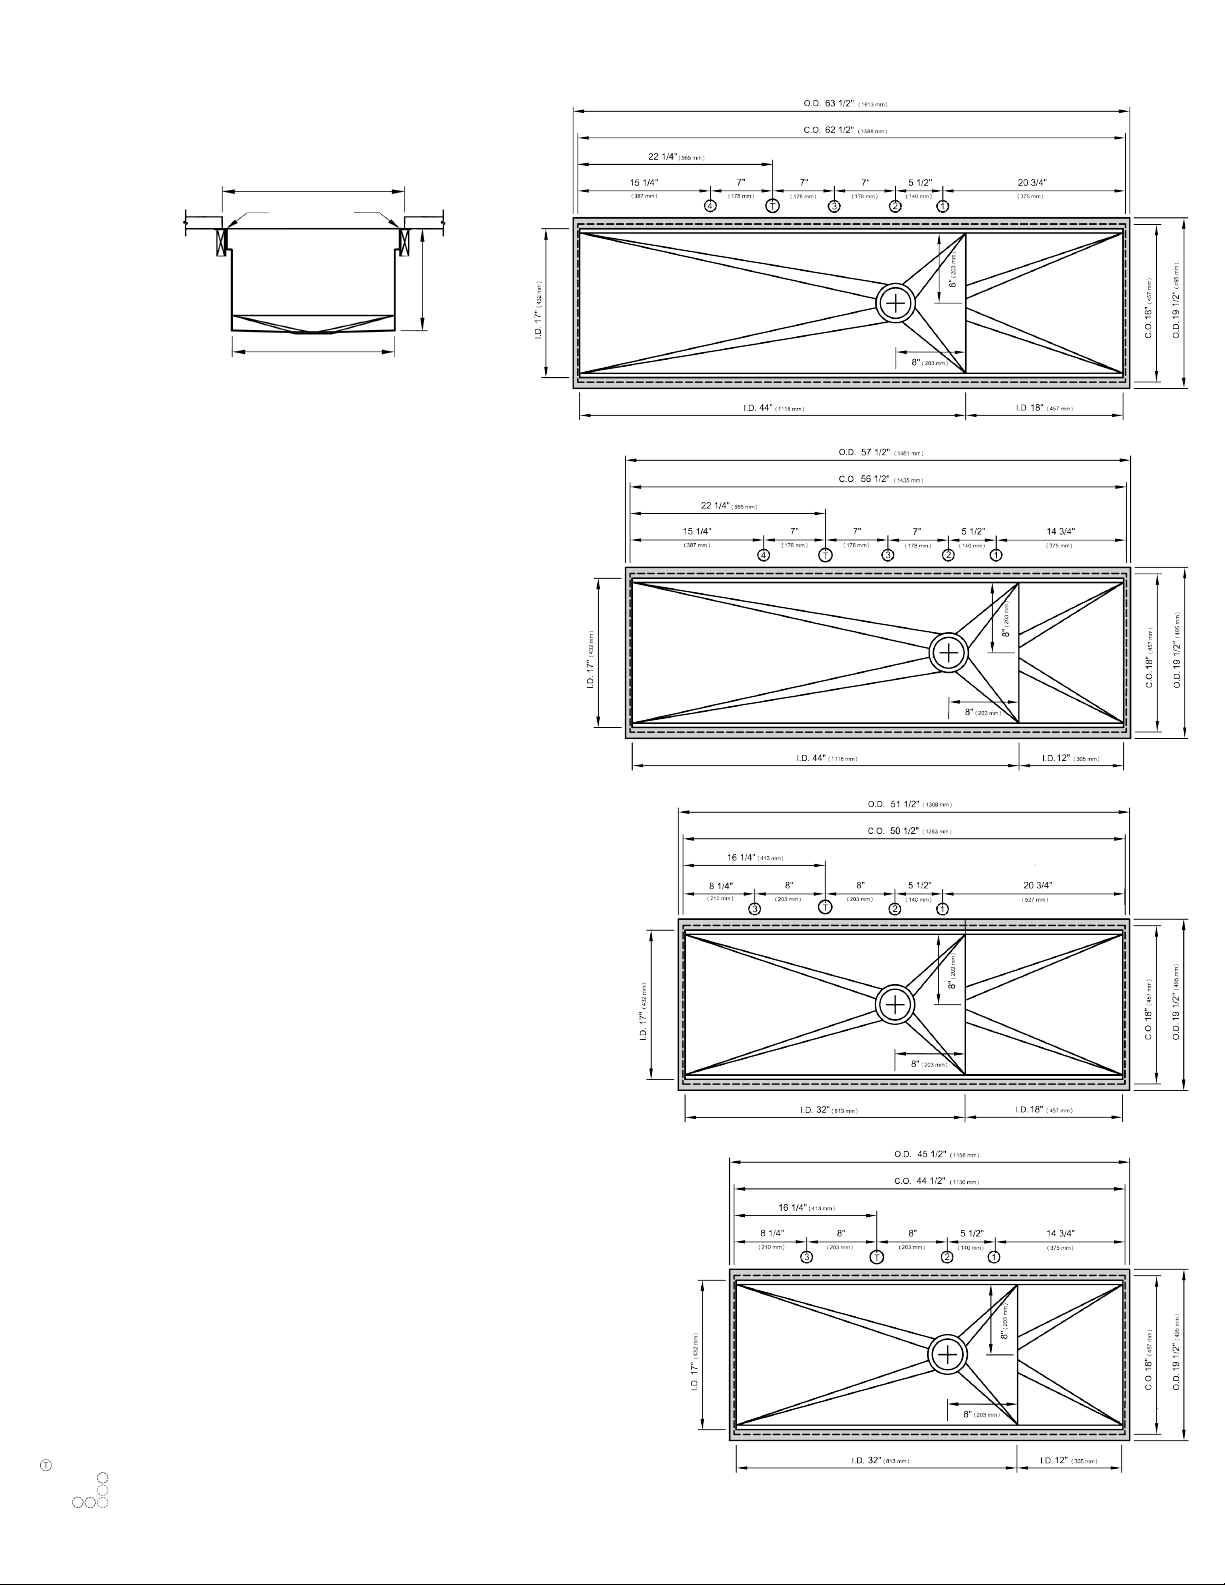
In Stock Workstations with DryDock™
18” Finished cutout
1/2” Reveal front
and back
10”
16”
Side view applies to all
DryDock™ Workstations shown
IWS 4S + DD18
IWS 4S + DD12
IWS 3S + DD18
SUGGESTED GALLEY TAP AND TAP ACCESSORIES PLACEMENT GUIDE
(Recommendations are based on installing 3 or more Tap accessories)
Galley Tap 1 3/8" min hole diameter (1 1/2" min hole diameter for fast water jet cut)
Galley Deck Switch 1 3/8" min hole diameter or Galley Automatic Strainer Basket knob 1" min and 1 3/8" max hole diameter
Galley Hot and Cold Water Dispenser 1 3/8" min hole diameter (1 1/2" min hole diameter for fast water jet cut)
Galley Soap Dispenser 1" min hole diameter
Center hole diameters 2" behind cutout
Note: Galley Hot and Cold Water dispenser requires a minimum 8" clearance center to center if installed to the right of the Galley Tap
1
1
2
2
2
3
3 4
3
IWS 3S + DD12
Note: For installation where the drain is on the left side, simply reverse placements of Tap and Tap Accessories
Page 5
18” Finished cutout
1/2” Reveal front
and back
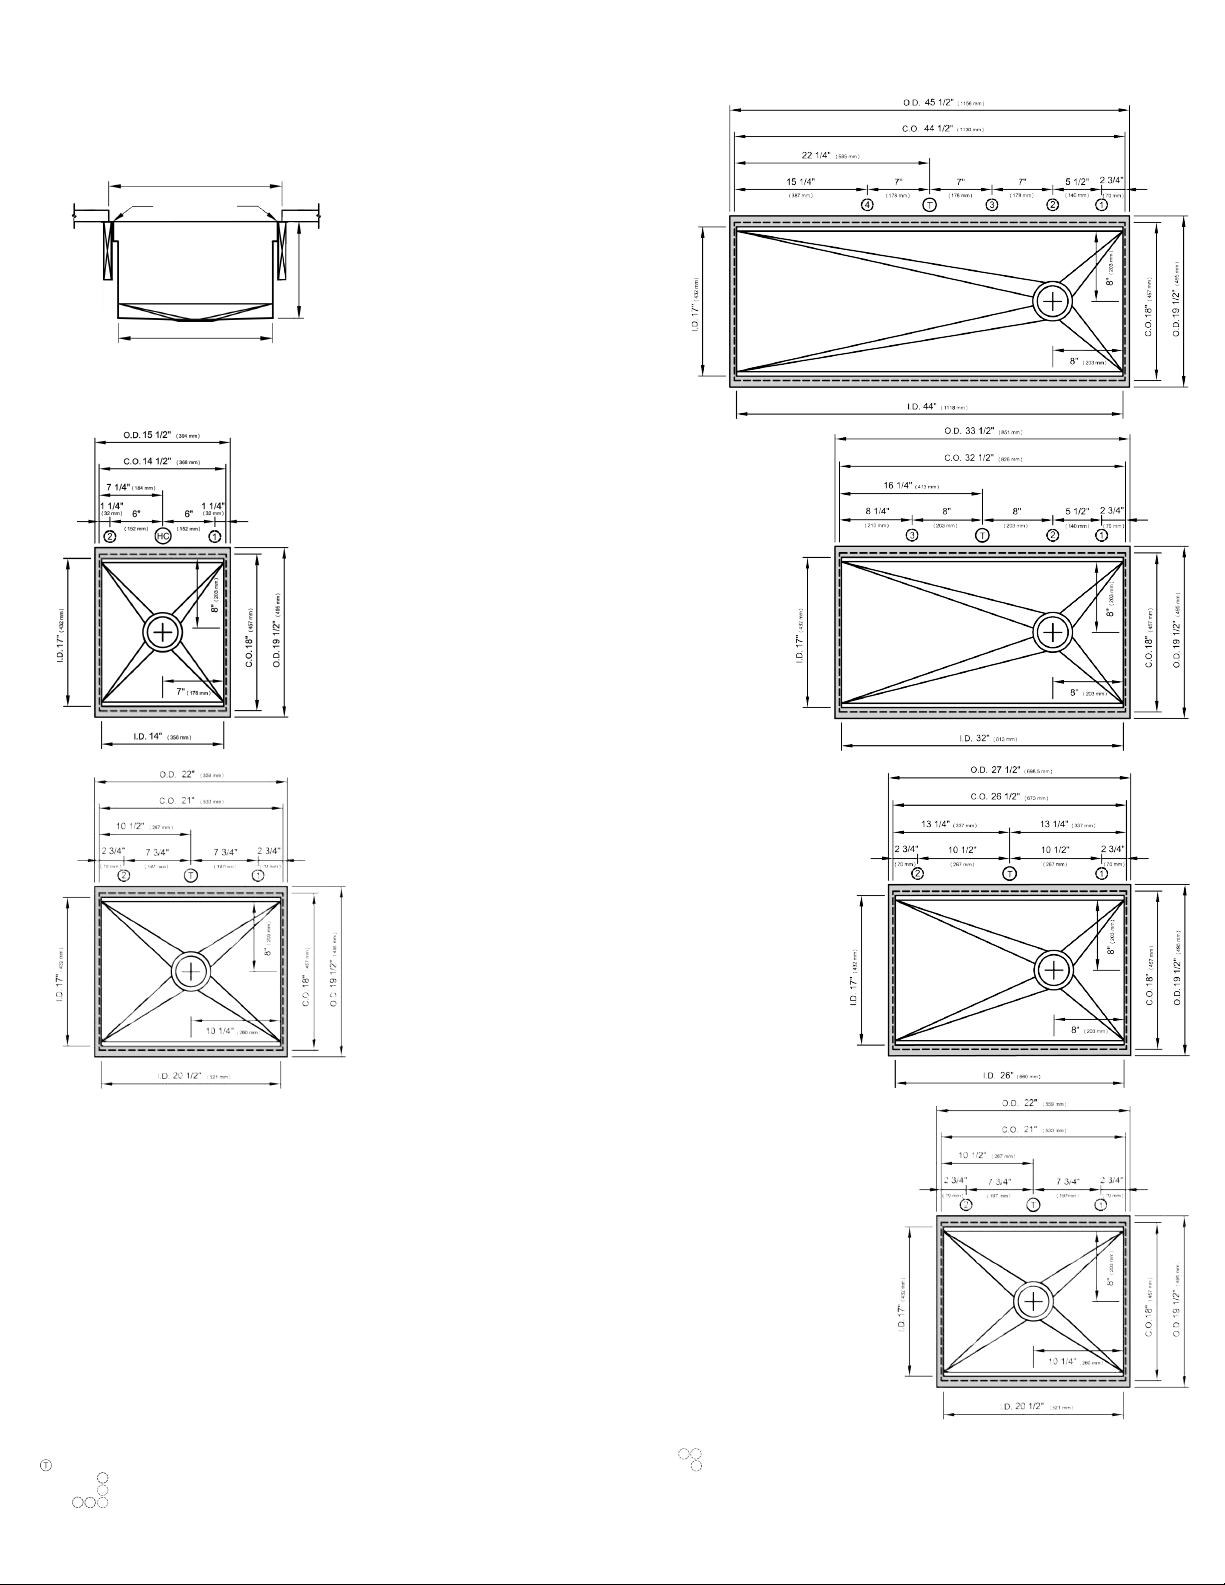
BarStations® & WashStations™
10”
IBS 18C
16”
Side view applies to all
Single Bowl Workstations
IWA 4S
IWA 3S
IBS 2C*
SUGGESTED GALLEY TAP AND TAP ACCESSORIES PLACEMENT GUIDE
(Recommendations are based on installing 3 or more Tap accessories)
Galley Tap 1 3/8" min hole diameter (1 1/2" min hole diameter for fast water jet cut)
Galley Deck Switch 1 3/8" min hole diameter or Galley Automatic Strainer Basket knob 1" min and 1 3/8" max hole diameter
Galley Hot and Cold Water Dispenser 1 3/8" min hole diameter (1 1/2" min hole diameter for fast water jet cut)
Galley Soap Dispenser 1" min hole diameter
Center hole diameters 2" behind cutout
Note: Galley Hot and Cold Water dispenser requires a minimum 8" clearance center to center if installed to the right of the Galley Tap
1
1
2
2
2
3
3 4
*IBS 2C, IWA 2C SUGGESTED GALLEY TAP AND TAP ACCESSORIES PLACEMENT GUIDE
Galley Deck Switch 1 3/8" min hole diameter or Galley Soap Dispenser 1" min hole diameter
Galley Hot and Cold Water Dispenser 1 3/8" min hole diameter (1 1/2" min hole diameter for fast water jet cut)
4
IWA 30S
IWA 2C*
1 2
2
Note: For installation where the drain is on the left side, simply reverse placements of Tap and Tap Accessories
Page 6
IMPORTANT
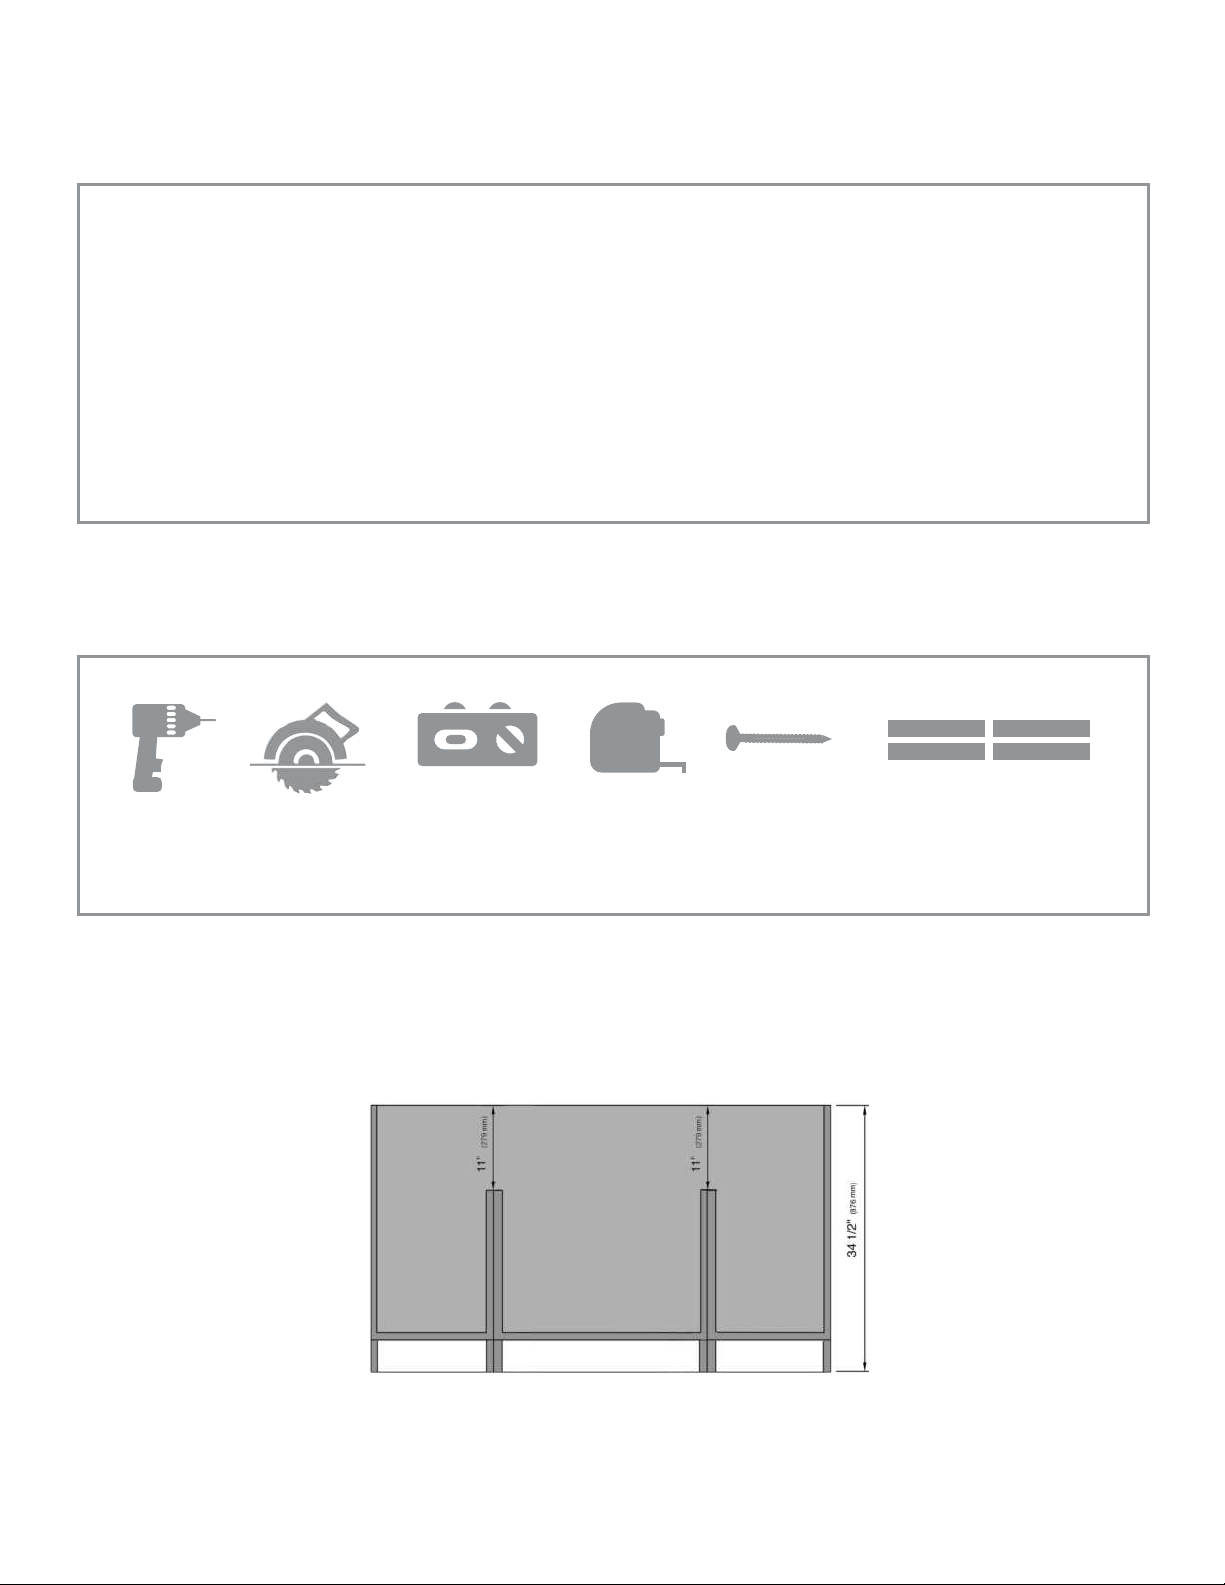
Unlike typical undermount kitchen sink installations, The Galley Workstation is installed in the cabinet prior to the counter being
templated. A support structure, (cleat system of wood frame), will need to be constructed and mounted inside the base
cabinet(s) and recessed 1/16" from the top.
The Workstation and Tap require a minimum of 22 1/2” inside the cabinet. For 24” deep inset cabinets installed against a wall the
cabinet must be pulled 1” away from the wall.
For counter tops with a laminated or built-up decorative front edge, construct the wood support frame to finish 1/16” below the
underside of the counter top cutout area.
Leave the installation instructions tray axed to the Workstation flanges until countertop has been installed.
Inspect The Galley Workstation for any damage prior to installation. For any questions or concerns please contact us immediately
at 800.375.4255 or [email protected].
Please refer to all local plumbing and building codes prior to installation.
Tools
DRILL
CIRCULAR SAW
If you are joining two or more cabinets together to house the
LEVEL
TAPE
MEASURE
SCREWS
Before You Begin
Galley Workstation, you will need to trim the
bulkheads to create an 11" clearance.
(4) 1" X 6"
HARDWOOD BOARDS
(OR ANY SIZE A CARPENTER DEEMS
TO BE MOST EFFECTIVE)
5
Page 7
1. CONSTRUCT SUPPORT STRUCTURE
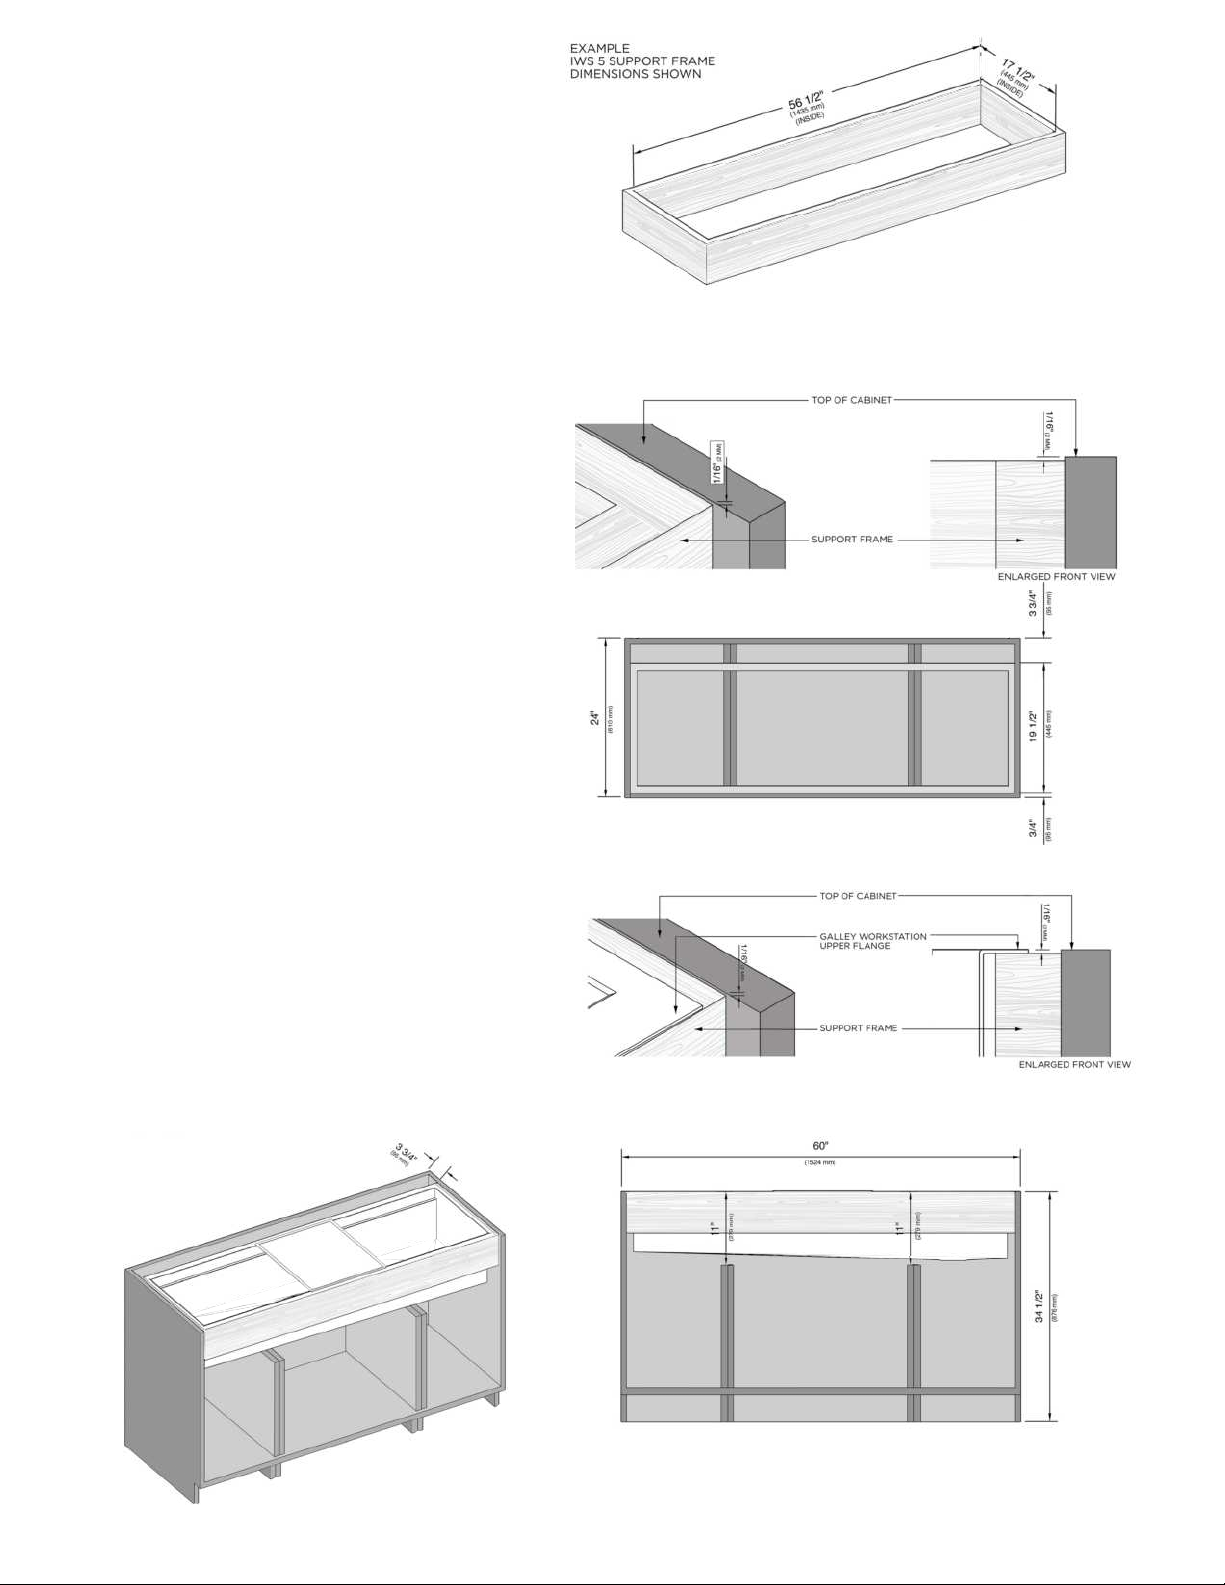
a) A support frame (cleat system) will need to be built
and installed into the cabinet(s). This frame will support
the weight of the Galley Workstation. Note: Clips are
NOT to be used.
b) Construct the support frame so that the inside
dimensions are 1/2" larger than the basin’s inside
dimensions. Please refer to pages 1-3 for your Galley
Workstation dimensions.
NOTE: For a Galley Workstation + DryDock™, the
support frame must be built with 1” x 2” boards.
2. ATTACH THE SUPPORT FRAME TO THE
INTERIOR WALLS OF THE CABINET
**IMPORTANT**
Support frame must be installed 1/16" lower than the
top of the cabinet. Use a level to ensure that the
support frame is installed level in the cabinet. Once
installed, the top of the Galley Workstation Flanges
will be flush with the top of the cabinet.
1” x 6” HARDWOOD BOARDS ARE RECOMMENDED
EXCEPT FOR WORKSTATION + DRYDOCK, FOR
WHICH 1” X 2” ARE RECOMMENDED.
3. INSTALL THE WORKSTATION BASIN
a) Carefully place the Galley Workstation into the
cabinet by resting the flanges on the support frame.
All four flanges should rest on the support frame.
b) Use a level to ensure that the flanges are level.
c) The top of the flanges should be flush with the top
of the cabinet.
OVERHEAD VIEW
6
Page 8
YOU ARE NOW READY
FOR THE COUNTERTOP
FABRICATOR
Counter Top Installation
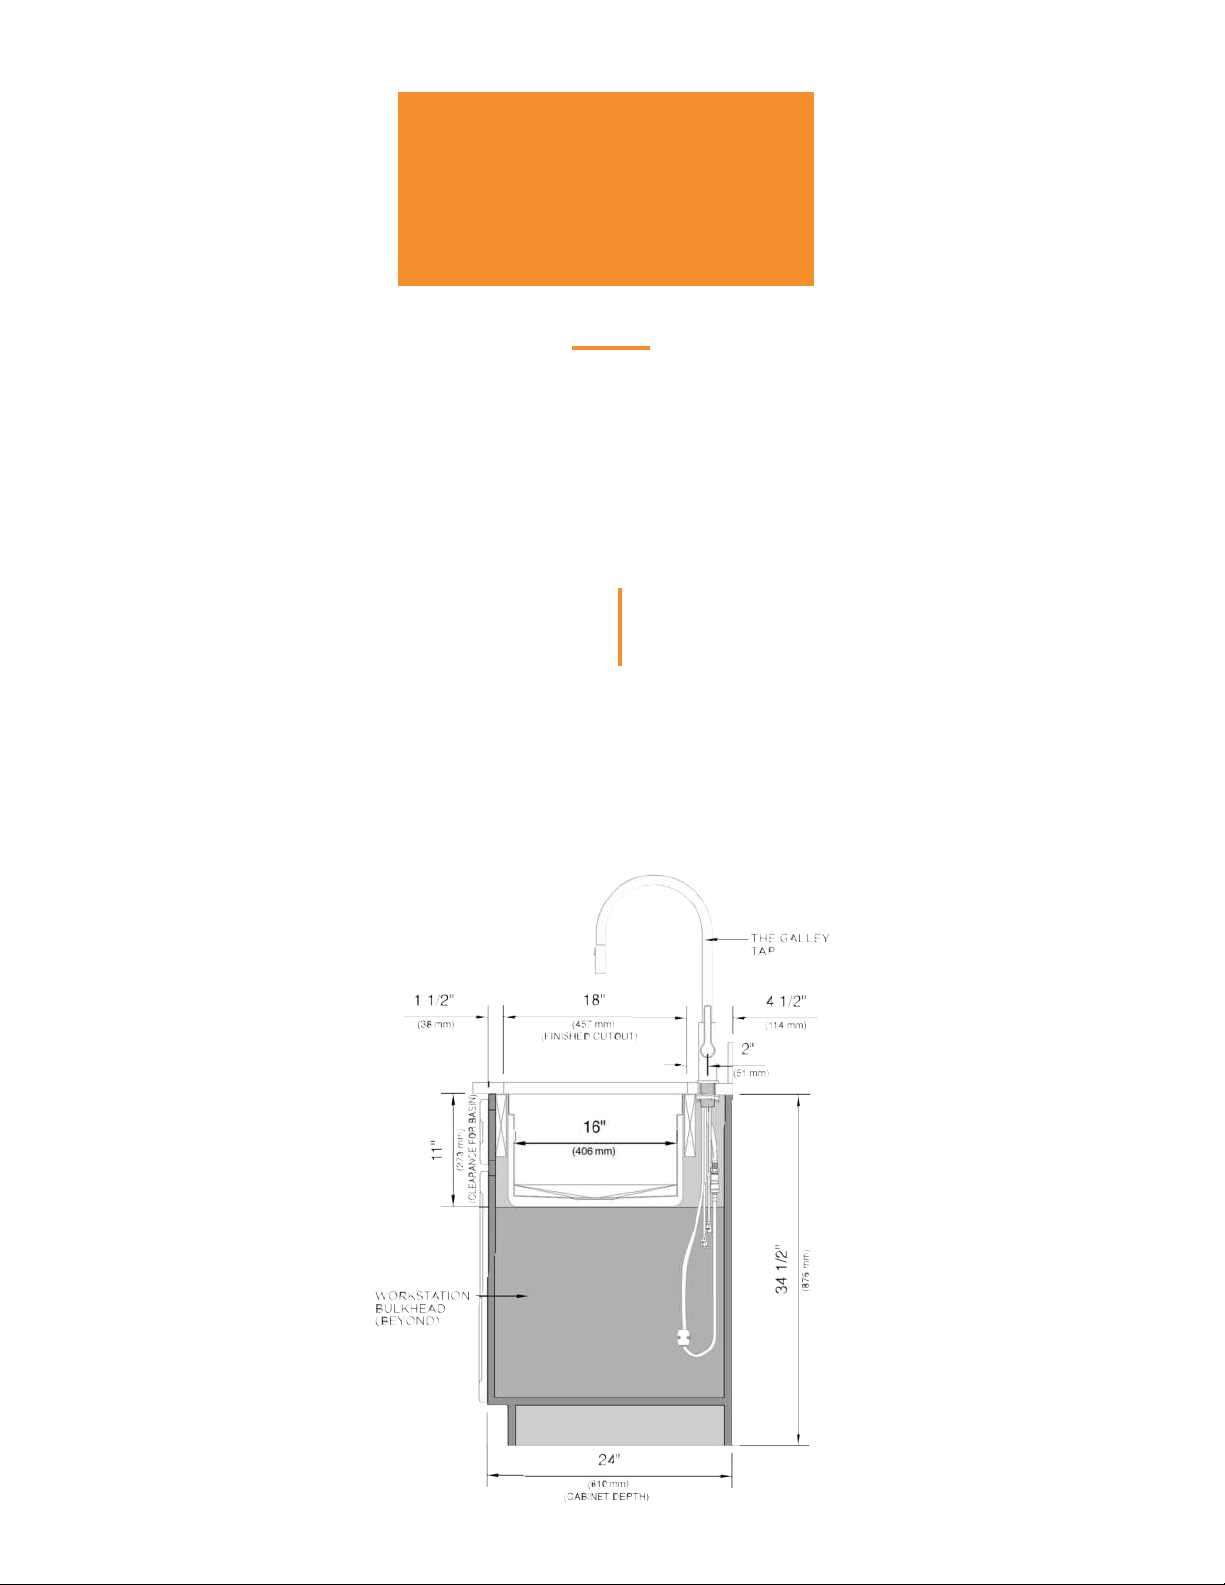
Use the white template tray axed to the Workstation
flanges as your guide for the front to back cut-out.
Refer to pages 1-3 for your overall cut-out dimensions
or refer to the drawing on the template tray. Note: The
front to back cutout dimension must be exactly 18”.
The suggested maximum corner radius is 3/8”.
*Please refer to countertop manufacture warranted
minimums*
The finished countertop will not completely cover the
Workstation flanges. 1/2” will be exposed on the front
and back flanges and 1/4” exposed on the left and right
flanges.
Creating this reveal allows for the Culinary Tools to slide
across the upper tier.
1. Cover what will be the exposed 1/2” of the front and
back flanges, and the 1/4“ of the side flanges with
painters tape for easy cleaning of excess silicone.
2. Apply a heavy bead of silicone to the un-taped part
of the flange.
3. Set the countertop and position it properly so there
is a 1/2” reveal on the front and back flanges and 1/4”
reveal on the left and right flanges. Press countertop
down onto the flange. The silicone should fill any
gaps.
4. Wipe excess silicone o of exposed flange.
5. Wait one hour and remove tape. This will ensure
there is a clean flange, free from silicone. Which will
enable the Culinary Tools to slide freely.
7
Page 9

The Galley Workstation
Limited Lifetime Warranty
1. GALLEY WORKSTATION LIMITED LIFETIME WARRANTY - Seller provides a Limited Lifetime Warranty. Seller warrants its
stainless steel sink, installed in a residential application, to be free from manufacturing defects in materials and workmanship
under normal residential usage. This Limited Lifetime Warranty is subject to the warranty conditions and limitations as set forth
below.
2. WARRANTY CONDITIONS AND LIMITATIONS - Seller’s warranty is non-transferable and is strictly limited to products correctly
installed using our installation instructions and used in a residential environment. This warranty is limited to defects or damages
resulting from normal residential use and does not cover surface corrosion, (chemical or natural, including exposure to salt air, sea
spray, acid rain, or environmental chemicals), scus or scratches, misuse, abnormal or abusive use, dents, deformations caused by
the impact of any object, improper installation, care and/or maintenance, commercial use, environmental factors causing damage,
shipping or freight damage, or commons signs of normal wear and tear, (scratching, staining and alkaline etching of the finish over
time due to use, cleaning practices or water or atmospheric conditions, are not manufacturing defects but are indicative of normal
wear and tear however, these symptoms are easy to remedy). This limited warranty is null and void if the Product has been
repaired, altered, or modified other than by Seller or under Seller’s supervision. The Seller is not responsible for labor charges,
installation or other incidental or consequential costs. In no event shall the liability of Seller exceed the purchase price of the
product. If the product is installed outside of North America, Seller warrants product to be free from defects in material and
workmanship for one (1) year from the date the product is installed, with all other terms of this warranty applying except duration.
If the product has not been purchased from Seller or from an Authorized Dealer or Distributor of the Seller, this warranty is null
and void.
3. ACCESSORY COMPONENTS - The accessory components, (cutting boards, bowls, colanders, platforms, dividers, drying racks,
and all other accessories), are not warranted. If a defect is found in normal residential use, Seller will, at its election, repair, replace
or make appropriate adjustment. Certain accessory materials are not recommended for prolonged exposure to direct sunlight
including Natural Golden Bamboo.
4. CARE AND MAINTENANCE - Please refer to thegalley.com Use and Care section for care and maintenance instructions.
5. WARRANTY CLAIMS - These warranties are in eect for Seller’s Products purchased on January 1st, 2015 and thereafter. For
warranty claims, please contact your Authorized Galley Dealer, or you may write to:
The Galley, LLC.
Attn: Warranty Claims
12626 South Memorial Drive
Bixby, OK 74008
Please include the original receipt with a description of the problem, model number, store, date of purchase, your name, address
and telephone number.
Corporate Headquarters
The Galley, LLC
12626 South Memorial Drive
Bixby, OK 74008
800.375.4255
thegalley.com
 Loading...