

Page 1
Before returning this product to the store for any reason, please
contact our Parent Service Center at
1-800-704-8697 or cs@learningcurve.com
Often, we can provide helpful tips and instructions to resolve your
problem quickly over the phone or by e-mail.
Y7294 04.05.11
get ready for thefirstyears.com
™
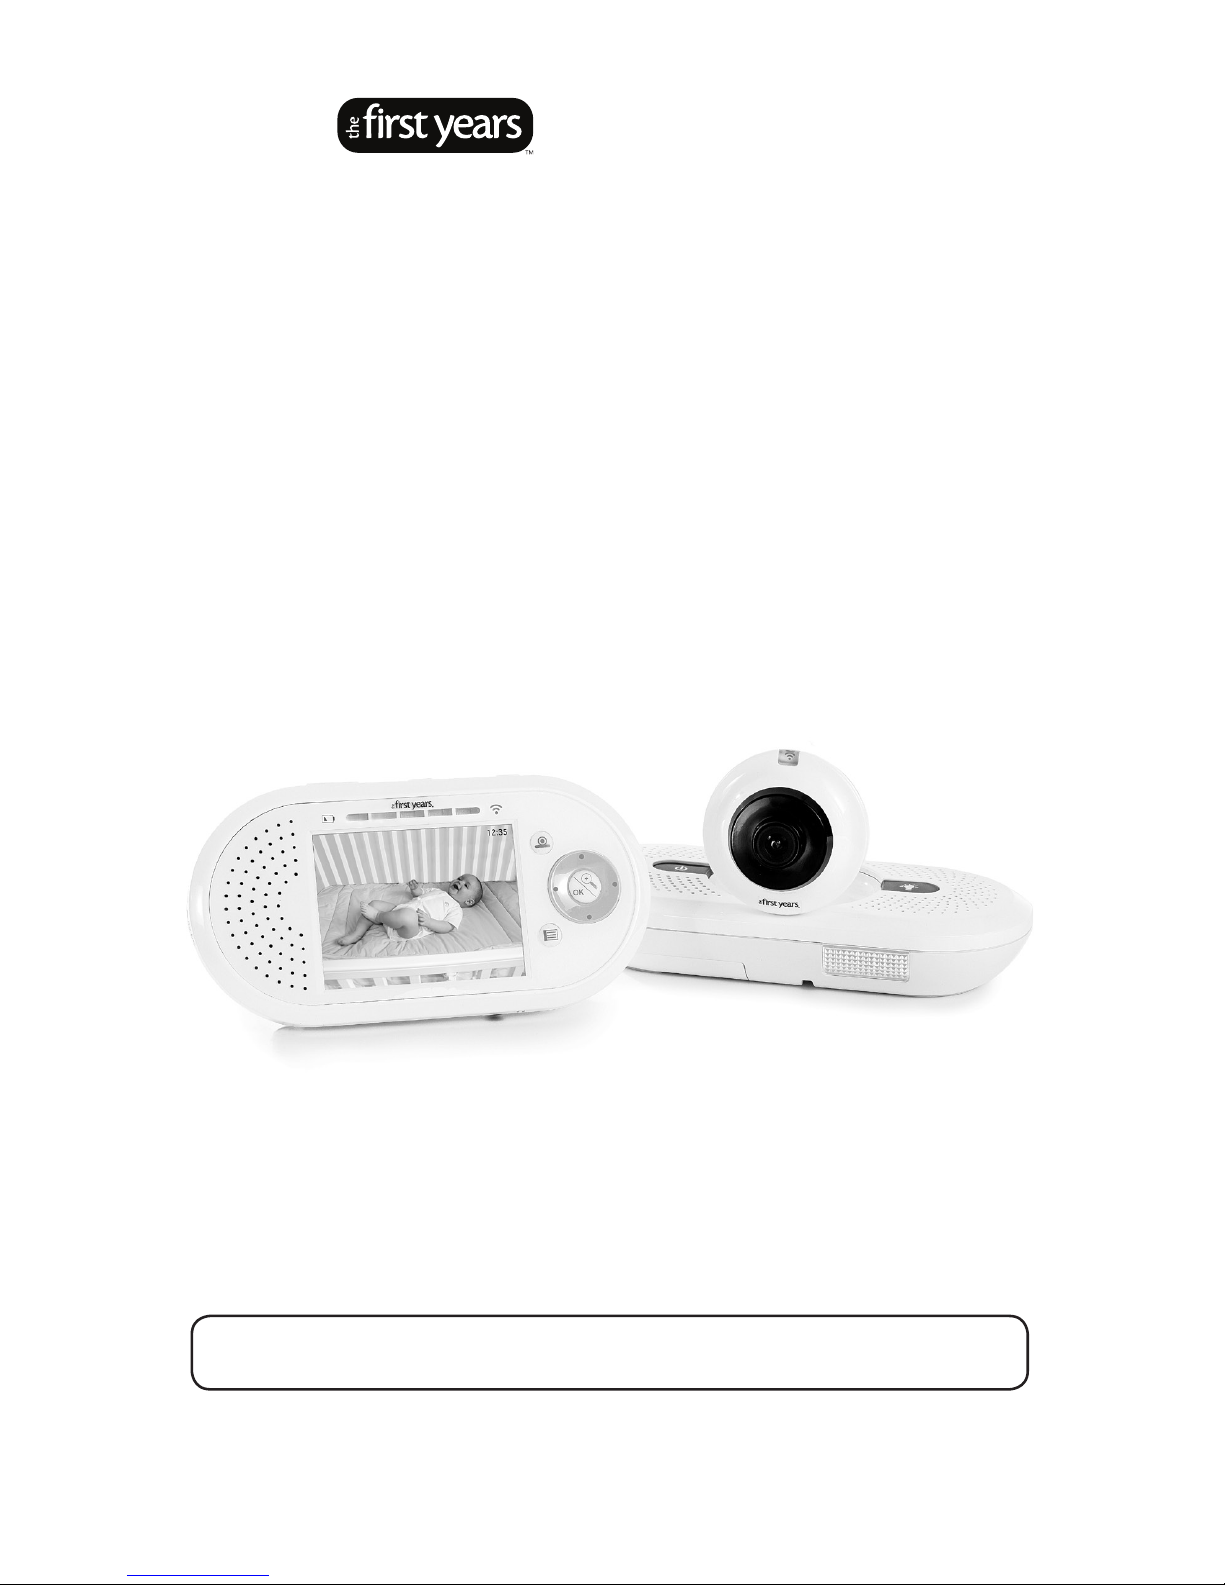
Home
& Away
Portable
™
Digital Video Monitor
Check our website: www.thefirstyears.com/homeandaway for the most
up-to-date instruction manual as well as tips and troubleshooting advice.
Page 2

2 get ready for thefirstyears.com
™
get ready for thefirstyears.com™ 3
Home & Away Portable™ Digital Video Monitor English
SAFETY INSTRUCTIONS
This symbol is intended to warn the user of potential safety hazards.
This symbol is intended to alert the user to a potential risk of
electric shock and other electrical safety issues.
WARNING:
• To prevent electric shock or strangling by the cord, KEEP OUT OF
CHILD’S REACH. Never place monitor or cord within 3 feet of child or
attach to a crib or playpen.
• Never place these units within a child’s reach.
• This product is not a toy; do not allow children to play with it.
• The product is designed to assist in the monitoring of children, not as a
prevention for injury to or loss of a child.
• This product is not a substitute for proper adult supervision. All children
should be supervised at all times by responsible adults.
WARNING
Toreducetheriskofreorelectricalshock,donotopenthisproductor
expose the product to:
• Water and Moisture: This product should not be used near water,
for example, near a bathtub or sink, in a wet basement or near a
swimming pool.
• Heat: This product should be situated away from heat sources such as
radiators, heat registers, stoves, or other appliances that produce heat.
IMP OR TAN T
• The user should not attempt to service this product. Read all safety and
operating instructions before operating this product.
• Retain these instructions for future reference.
• Observe all warnings.
• Follow all operating instructions.
• Do not tamper with the plug under any circumstances.
• Power Source – This product should be connected only to the power
supply provided.
• Cleaning —Before cleaning, be sure to unplug. Clean only as
recommended in these instructions.
• Object and Liquid Entry—Care should be taken so that objects do not
fall and liquids are not spilled into the enclosure through the openings.
• Damage or Malfunction—Please contact our Parent Service Center at
800-704-8697 or cs@learningcurve.com if:
a. The power supply cord or plug has been damaged
b. Objects have fallen or liquid has been spilled into it
c. The product has been exposed to rain
d. The product does not appear to operate normally or exhibits a
marked change in its performance
e. The product has been dropped or the enclosure damaged.
Wall Mounting—The Child Unit should be mounted to a wall only as
recommended in these instructions.
WARNING
Do not mount the Child Unit in a location where the unit or the adapter cord
is within the child’s reach. Never place monitor or cord within 3 feet of child
or attach to a crib or playpen.
To prevent injury, this apparatus must be securely attached to the wall in
accordance with the installation instructions.
Page 3
4 get ready for thefirstyears.com
™
get ready for thefirstyears.com™ 5
Home & Away Portable™ Digital Video Monitor English
The First Years Home and Away Portable™
Digital Video Monitor
The First Years® Home and Away Por table™
Digital Video Monitor enable s you to see and
hear your infant from just about any where in your
house. It is compact, lightweight, ea sy to set up,
and easy to use.
The wall-mountable Child Unit feature s a video
camera that can be tilted an d swiveled to give
you the view and angle you want. The Parent Unit
is compact and lightweight, with a convenient
belt-clip, so it’s easy to keep with you. Plus, the
Parent Unit has talkback capabilit y, s o you can
speak to your child from a dierent room, or a
dierent part of the hous e. Automatic nightvision technology means you can s till see a low-light image of your child at night
when the nursery is dark . Rechargeable batteries are supplied for the Parent
Unit, which has an automatic 30-se cond display shut-o to save energy and
extend batte ry life.
For expanded capa bility, you can add up to three more camera s to the system,
so you’ll be able to keep an eye on several locatio ns in your home at the same
time.
Plug the Parent Unit into your home computer using the USB cab le provided,
and open a whole new world of feature s and opportunities. With the soft ware
provided, you’ll be able to view your baby from the computer, and even take
pictures and video! You can also download S kype® or use an existing account
to access your Monitor from any where in the world. By using Skype on any
computer connected to the intern et you will be able to see, hear, and talk to your
baby just as you would with any Skype v ideo chat. This Monitor was designed to
truly maximize your ability to stay conn ected to your baby from home and away.
Contents
Safety Instructions
Parts Diagram
Parent Unit
Child Unit
Quick Start Instruction s
To Set Up—Child Unit
To Set Up—Parent Unit
To U se
Display Sleep Mode
Sound Activation
Range
Night Vision
Talkback Feature: Two Way Communication
Bel tclip/ Stand
Headphone C apability
Parent Unit Finder Feature
Parent Unit Indicators and Controls
Menu Choices – Your Preferences for Sel ected Features
Child Unit Indicators and Controls
Recharging/Replacing Batteries
Pairing of Parent and Child Units
Care (To Clean/Storage)
To Clean
Storage
Using Your Computer as Parent Unit
Baby Viewer Sof tware
Keyboard Shortcuts
Using your Home and Away Port able™
Digital Video Mon itor with Skype
®
Troubleshooting
FCC Statement
Warranty
2
6
6
7
8
9
11
12
13
13
14
14
14
14
15
15
16
16
23
24
26
27
27
27
28
28
32
34
36
38
39
Page 4
6 get ready for thefirstyears.com
™
get ready for thefirstyears.com™ 7
Home & Away Portable™ Digital Video Monitor English
1
2
3
4
5
6
7
8
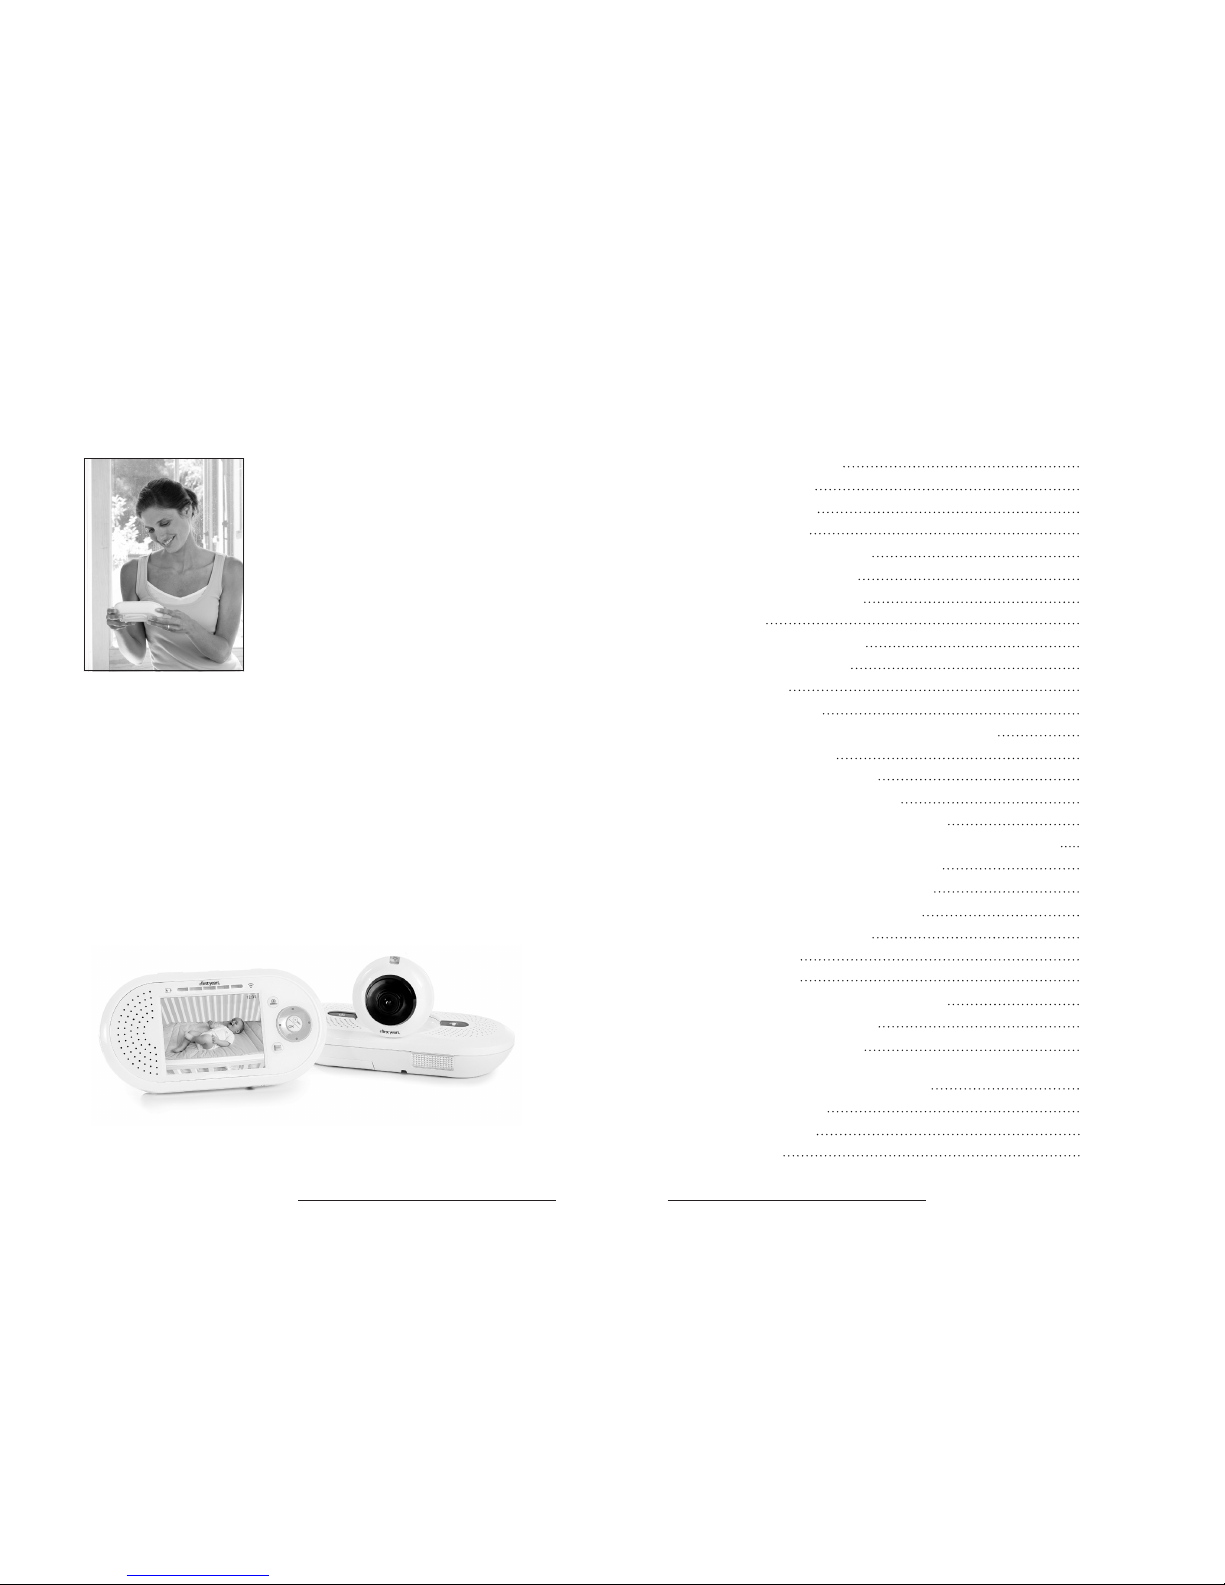
Parent Unit
Volume control button
Power button
Talkback button
Battery indic ator
Sound level indicator
Connection indicator
Camera scan but ton
OK/Zoom button
Directional pad
Menu button
Display screen
Speaker/microphone
Power jack
Headphone jack
PC connector (USB por t)
Battery cover (not picture d)
Belt clip/stand (not pictured)
1
2
3
4
5
6
7
8
9
10
11
13
12
14
15
1
2
3
4
5
6
7
8
9
10
11
12
13
14
15
1
2
3
4
5
6
7
8
Child Unit
Antenna
Microphone
Power button
Nightlight button
Talkback volume switch (not pictured)
Connection indicator
Camera
Adjustable-angle camera b ase
Wall mount slots (not pictured)
Cord channel (not pictured)
Nightlight
Battery cover (not picture d)
Power jack (not pictured)
Also Included
AC adapters (2) (not pictured)
USB cable (not pictured)
Softw are disk (not pictured)
Optional Stand
for child unit (not pictured)
Parts Diagram
Page 5

8 get ready for thefirstyears.com
™
get ready for thefirstyears.com™ 9
Home & Away Portable™ Digital Video Monitor English
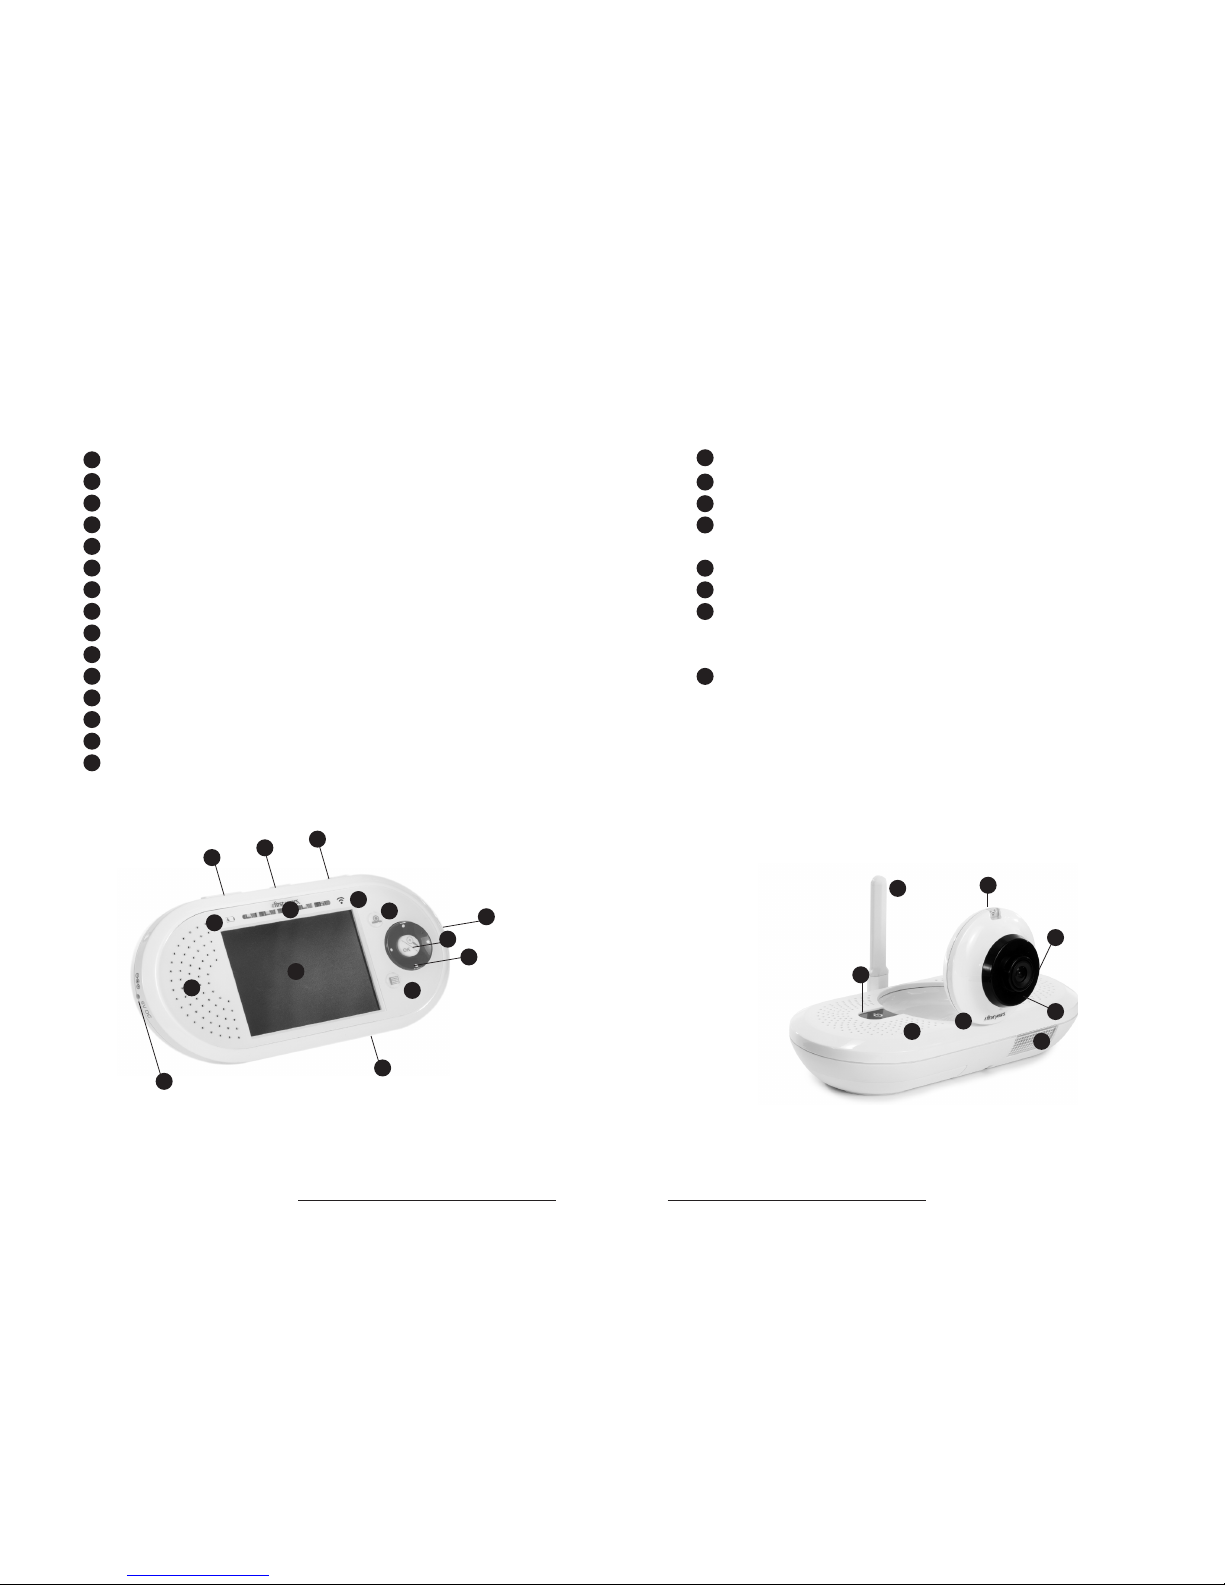
1. Position the Child unit 4 to 6 fe et from
your child’s crib or the area you wish to
vie w. NEVER position the unit within a
child’s reach.
2. Inser t the connector on the AC adapter
into the jack on the back of the unit,
then plug the adapter into an electr ical
outlet.
Note: Use attached hook & l oop strip to gather and secure any excess cord.
3. Lift the antenna to its f ull upright
position.
4. Rotate the camera out fro m the base
and swivel it to the angle you think will
give you your best view.
5. Use the Talkback Volume Switch on the
back of the Child Unit to choose your
preferred setting:
Low for quietest, or High for loud est.
Additional cameras
You can position up to three additional cameras in your home to m onitor
dierent locations. To find out where you can purchas e additional cameras for
your Monitor, please contact our Parent Ser vice Center at 800-704-8 697 or
purchase directly at thefirs tyears.com.
For wall mounting (recommended)
1. Press the adapter cord into the grooved channel
on the back of the unit, making cert ain to slide it
under the two holding clips.
2. Securely fasten t wo #8 “pan” head screws to the
wall, one above the other, exactly 1 inch apart,
leaving the screw heads protruding by at leas t ¼ inch.
For best results us e a 3/4-inch long screw; mount in
a solid wood panel, or use screw anchor s.
3. Fit the round openings on the wall mount slots over
the screw heads, then slide the unit down until it is
seated firmly.
4. To test that unit is securely mounted, press on its top
and side edges.
To Set Up —Child UnitQuick Start Instructions
You’ll find detailed instructions on the pages that follow. Please read
the Safety Instructions on pages 2–3.
Set up the Parent Unit
For portable us e Install the rechargeable battery p ack provided. Battery
compartment is on back of unit. Lo osen screw to release it, and slide cover o.
Insert plug on bat tery pack into connector inside compartme nt, then fit battery
into place. Replace cover and secure it by tightening the screw. Connec t one of
the AC adapters to power jack and plug cord into wall outlet .
IMP OR TAN T
CHARGE BATTERY FOR 8 HOURS BEFORE INITIAL USE.
For plug-in use: C onnect one of the AC adapters to power jack and plug cord into
wall outlet.
Set up the Child Unit
• Place unit 4 to 6 feet from child’s crib or play area.
• Connect remaining AC adapter to unit and plug into wall outlet .
To u se
1. Hold down power button on Child Unit until connection indicator lights up
and blinks to turn it on .
2. Move antenna to full upright position.
3. Lift camer a to upright position.
4. Hold down power button on Parent Unit until screen lights up to turn it on.
5. Connection indicator s on both units should glow blue indicating they are
connected.
6. Adjust camera po sition to ensure desired view is displayed.
7. Press + or – to adjust the volume of the Parent Unit.
Note: Display on the Parent Unit will go blank after 30 se conds if unit is powered
by batteries. This is a norma l power-saving feature. Pressing any but ton on
Parent Unit will reactivate the display. This feature can be tur ned o through
menu in Parent Unit.
Before returning this product to t he store for any reason, please contact our
Parent Service C enter at 800-704-8697 or c s@learningcurve.com.
Often, we can provide h elpful tips and instructions to resolve your problem
quickly over the phone or by email.
talkback vol ume switch on Child Uni t
cord in grooved channel
slots in unit s lide
over screws
Page 6
10 get ready for thefirst years.com
™
get ready for thefirstyears.com™ 11
Home & Away Portable™ Digital Video Monitor English
For temporary/battery-powered operation
Loosen the screw to releas e the battery
compartment cover, then slide and lift it
o. Insert three A A batteries (not included),
positioning them so the + and – symb ols on the
batteries are aligned with th e corresponding
symbols in the batter y compartment. Replace
the cover and secure it by tightening the screw.
IMP OR TAN T
USE OF BATTERIES TO POWER THE CHILD UNIT I S INTENDED
ONLY FOR TEMPORARY USE D URING A POWER OUTAGE
OR WHEN A PLUG-I N ELECTRICAL OUTLET IS UNAVAILA BLE.
CHECK THE LOW BATTERY IND ICATOR OFTEN, AND
REPLACE BATTER IES AS NECESSARY.
WARNING
• KEEP OUT OF CHILD’S REACH.
• Do not place Child Unit in crib or attach to crib or playpen.
• Never place monitor or cord within 3 feet of child or attach
to a crib or playpen.
• Do not mount the Child Unit in a location where the unit or
the adapter cord is within the child’s reach.
To Set Up – Parent Unit
To install and charge battery pack
1. Loosen the screw to release the
battery compa rtment cover. Then,
slide the cover o.
2. Insert the plug on the bat tery pack
into the connector inside the bat tery
compartment.
3. Fit the battery pac k into the
compartment.
4. Place the cover back onto the batter y compartment and secure it by tightening
the screw.
5. Charge the battery: Insert the conne ctor on the AC adapter into the
power jack on the side of the unit, and plug into an elec trical outlet. The
battery nee ds to be charged for 8 hours befo re the first portable use.
IM POR TA NT:
IF THE PARENT UNIT IS ON, THE POWER INDICATOR WILL GLOW PURPLE
WHILE THE BATTERY IS CHARGING. ONCE THE BATTERY IS FULLY
CHARGED, IT WILL GLOW BLUE.
For plug-in use/recharging
Reconnect the Parent Unit to the AC ad apter as for initial battery charging, and
plug the adapter into an electric al outlet. If desired, open the stand to support
unit in upright position for viewing and operating.
• You may use the Monitor while charging; however, it will take longer to charge
when in use.
• For best results, re charge daily. Keep plugged in overnight or for several hour s
a da y.
IM POR TA NT:
• USE ONLY THE AC ADAPTERS SU PPLIED WITH THIS PRO DUCT; USE OF
ANY OTHER ADAPTER(S) COULD DAM AGE MONITOR AND WOULD VOID
WA R R AN TY.
• AC ADAPTERS SH OULD BE REGUL ARLY EXAMINED FOR SIGNS OF
DAMAGE TO THE CORD, PLUG , ENCLOSURE OR OTHE R PARTS; IN THE
EVENT OF SUCH DAMAGE, IT MUST NOT BE USED .
• TO OBTAIN REPLACEMENT AC A DAPTER: PLEAS E CALL OUR PARENT
SERVICE CENT ER AT 800-704-8697.
WARNING:
• Batteries may explode or leak if not used correctly. Follow all
instructions for proper installation, use and storage.
install batteries in compartment
hold belt cli p open to install bat tery pack
Optional Stand For Child Unit
An optional stand has be en included with the Home and Away™ Digital Video
Monitor. This stand allows you to better view your baby f rom tough angles.
To Install:
Page 7

12 get ready for thefirs tyears.com
™
get ready for thefirstyears.com™ 13
Home & Away Portable™ Digital Video Monitor English
1. Hold down the power button on the Child Unit until connection indicator
lights up. The connection indicator will blink to indicate it is s earching for the
Parent Unit.
2. Hold down the power button on the Parent Unit until the screen lights up.
Connection indicator will blink, and start-up graphics will b e displayed on
the screen.
3. Once the two units are connec ted, live video will be displayed, you will hear
sounds from your child’s room (or wherever you have placed the Child Unit),
and connection indicator s, on both units will glow blue.
4. On the Parent Unit, press + and/or – on the volume button to adjust loudness
to the desired level.
5. Always keep the Parent Unit with you, or nearby.
To Use
To turn the Parent Unit o
Hold down the power button until the power light goes out.
This takes a few seconds.
To turn the Child Unit o
Hold down the power button until the power light goes out.
This takes a few seconds.
Tip: A loud screeching so und indicates the Parent Unit is too close to the Child
Unit. To avoid this noisy feedback (which is common with audio devices), lower
the volume on the Parent Unit (or turn it o) when entering your child’s room (or
any room where you have set up the Child Unit or an add- on camera).
IMP OR TAN T
THE POWER INDICATORS ON THE PARENT UNIT WILL GLOW R ED WHEN
BATTERY POWER IS LOW. BATTERIES IN THE PARENT UNIT SHOULD BE
RECHARGED AS SOON AS POSSIB LE.
THE POWER INDICATORS ON THE CHILD UNIT WIL L GLOW RED WHEN
BATTERY POWER IS LOW. BATTERIES IN THE CHILD UNIT SHOULD BE
REPLACED. (SEE “ RECHARGING /REPLACING BATTERIES.” ON P. 24)
Display Sleep Mode (Display Disappears after 30 seconds)
• When the Parent Unit is being operated on bat tery power, the display will go
into sleep mode automatically. This means the screen w ill go blank after 30
seconds. It will always turn back on whe never sounds picked up by Child Unit
indicate the baby is active or cr ying.
• To turn display back on at any time: Press any button.
• To return the display to sleep mode more quickly than 30 se conds (and save
even more batter y power): Press the power button . T he screen will go blank.
• Sound will always be transmitting e ven when the display is blank, unless unit is
turned o.
Note: The unit will not go into Display Sleep Mode when it is plugged into the AC
adapter. The Display Sleep Mode can be turned o during portable (battery) use
via the Menu.
Sound Activation
• The display will remain blank when sound level in the came ra location is low.
• Once sound level from the Child Unit indic ates child may be crying, or making
loud noises, the image will be displayed.
Child Unit
Parent Unit
Page 8

14 get ready for thefirs tyears.com
™
get ready for thefirstyears.com™ 15
Home & Away Portable™ Digital Video Monitor English
Range
The distance you can se parate the units and still maintain a connection will
vary based on t he layout and construction of your home. To test the Monitor’s
workable range, walk though your house and y ard to check for the volume of
sounds being transmitte d and the clarity of images being displayed. You can
try turning the position of the Pare nt unit to gain the best reception. Also, make
sure that the antenna on the Child Unit is in the upright position.
Interference
Other 2.4 GHz devices, such as C ordless phones and Wireless Routers, may
interfere with your Home & Away Por table Video Monitor. The result of this
interference may be buz zing and static on the audio and a fuzzy image for th e
video. If you find these symptoms, tr y the following:
1. Turn o all of the other 2.4 GHz devices in your house. Turn on your
vide o monitor and check its audio and video reception. It should be
improved. Now turn o n your 2.4 GHz devices. This process will give your
vide o monitor a chance to capture the signal with the best reception.
2. Also consider the loc ation of the video monitor. If possible, keep your video
monitor a dist ance away from the other 2.4 GHz wireless devices.
Microwave ovens can also cause inter ference while they are running. This
should go away when they are o.
Night Vision
The Home and Away Port able Digital Video Monitor is equipped with night
vision technology that enables th e transmission of video images even when
your child’s room is dark. In low light situations, the display will appear as a
black-and-white image.
Talkback Feature:
Two Way Communication
Press and hold the Talkback button on the
Parent Unit while speaking. Your child will be
able to hear your voice.
Use the Talkback Volume Switch on the back
of the Child Unit to choose your preferred
set ting:
Low for quietest, or High for loud est.
Note:
• While the Talkback button is depressed, you will not hear any soun ds being
transmitted by the Child Unit.
• When using more than one camera, th e talk feature will link to the camera in
the location you are currently viewing.
Belt Clip/Stand
Press on the top of the belt clip to open;
slide it onto waistband or belt and rele ase.
Or, lift the tip of the stand away from the unit
and set the unit on any flat surface.
Tip: Belt clip/stand can be removed from
the Parent Unit to make it even more compact.
To remove, unscrew the retention screw on
the top of the belt clip. Once unscrewed,
lift the assemb ly o.
Headphone Capability
Headphones are not supplied with the
Monitor. However, you can use any
headphone with a standard 3.5mm p lug;
simply insert plug in headphone jack . Sounds
will be transmitted through the hea dphone
only. No sounds will come out of the speaker.
Parent Unit Finder Feature
If you should misplace the Parent Unit,
turn o the Child Unit, and wait 5 seconds.
The Parent Unit will beep, and continue beeping until it is found an d turned o
(or the batteries are exhauste d). Turn Child Unit on before turning the Parent
Unit back on.
Note: This feature will not work if Parent Unit is turned o or has los t power due
to a dead batter y.
talkback vol ume switch on Child Uni t
belt clip/stand
headphone jack on Parent Unit
Page 9

16 get ready for thefirst years.com
™
get ready for thefirstyears.com™ 17
Home & Away Portable™ Digital Video Monitor English
Video Display
The display screen will show live images being
transmitted by the Child Unit.
Clock:
The current time of day is shown in the upper right
corner of the display. Time is set using the Menu
(see page 18 for full instructions).
Camera Scan But ton
This button allows you to scan through multiple
cameras if you have added c ameras to your video
monitoring system.
OK/Zoom Button
Zoom Function
Press the button once to zoo m in on the image.
Press the button again to rever t to original size.
OK Functio n
The button is also use d to select options when Parent Unit is in Menu mode.
Directional Pad
Pan Function
If you have already zoomed in on the display, use the directional pad to move
around to obtain the desired view.
Note If directional pad is pres sed and you have not pressed , image will
automatically zoom and move in direction pre ssed.
Menu Navigation
The directional pad is also u sed to navigate menu options when Parent Unit is in
Menu mode.
Menu Button
The Menu Button allows you to change c urrent settings for various preferences
(see section that follows fo r complete details).
Parent Unit Indicators and Controls
Power/Battery L evel Indicator
•Blue glow indicates full power.
•Red glow indicates batter y power is low. Recharge as soon as possible.
•Purple glow indicates battery is char ging.
•No light indicates no power. Unit will not work until turned on or recharged.
Connection Indicator
•Blue glow when connected to Child Unit.
•Blinking blue light means that connection has not been ma de or is lost.
Sound Level Lights
No lights indicates lowest volume.
All lights indicates highest volume.
Volume Control [ + , - ]
Press either side of the volume control but ton to make sounds louder (+) or sof ter (-).
Talkback Button
Press the button while spea king. Yo ur child will be able to hear your voice.
Note
• While using the Talkback button, you will not hear any sounds being transmit ted
by the Child Unit.
• When using more than one camera, th e talkback feature will link to the camera in
the location you are currently viewing.
OK
OK
sample video display
1
4
5
1
2
3
4
5
6
7
8
9
10
10
11
9
8
7
6
2
3
11
Page 10

18 get ready for thefirst years.com
™
get ready for thefirstyears.com™ 19
Home & Away Portable™ Digital Video Monitor English
Menu Choices—Your Preferences for Selected Features
You have the option of setting menu preferences f or the Monitor features listed
below. To review or change any preferences, press the Menu but ton. Use the
directional pad to scroll through the av ailable menu choices. Use the OK button
to make and accept changes.
Nightlight
To turn the nightlight (on the Child Unit) ON or OFF from the Parent Unit:
1. Press the Menu button.
2. Press the OK button to chan ge the setting for the Nightlight.
3. Press Menu button to return to t he display mode.
Note: When Child Unit is being powered by batte ries, Nightlight will turn o
automatically after 6 0 seconds. You can use this Menu feature to turn it back on
at any time.
Brightness
To set the brightness of the display on the Parent Unit:
1. Press the Menu button.
2. Use the top or bottom of the directio nal pad to scroll through the list of
preferences until “Brightnes s” is highlighted.
3. Press the OK button.
4. A Brightness Selector Scale will appear, displaying five possible set tings. The
current setting will be shown Use the dire ctional pad to move the box to the
right to make the display brighter, or to the left to make the display
da rke r.
5. Press the OK button to confirm your se lection.
Reminder: If you do not pre ss the OK button, no change will be ma de.
6. Press the Menu button to return to the disp lay mode.
Clock
To select a 24-hour clock or a 12-hour clock, and to set the current time:
1. Press the Menu button.
2. Use the top or bottom of the direc tional pad to scroll through the list of
preferences until “Clock” is highlighted.
3. Press the OK button.
4. A “12hr/24hr” Preference screen will appear. The current setting will be with a
highlighted. Use the sides of the directional pa d to move the box to the right to
choose a 24-hour clo ck , or to the lef t to choose a 12-hour clock
and press OK button to ac cept.
5. A digital clock display will now appear showing [t12:0 0u] the current time
setting.
6. To set the time:
a. Select the hour s in the display using the top or bottom of the directional pad.
b. Press the right side of the directional pa d to go to the first minute digit.
c. Use the top or bottom side s of the directional pad to select this digit.
d. Press the right side of the directional p ad to go to the second minute digit.
e. Use the top or bottom sides of th e directional pad to select this digit.
f. Once you are satisfied this is the corre ct time, press the OK button to accept it.
Reminder: If you do not pre ss the OK button, no change will be ma de.
7. Press the Menu button to return to the display mode.
Add/Remove Camera
To add or remove cameras for your video monitoring s ystem:
1. Press the Menu button.
2. Use the top or bottom of the directio nal pad to scroll through the list of
preferences until “Add/Remove Camera” is highlighted.
3. Press the OK button.
4. Select whether you want to Add or Remove a camera on n ext screen using the
sides of the directional pad to highlight your choice.
5. Press the OK button.
6. Follow the screen prompts to complete this operation.
24HR
12HR
Page 11

20 get ready for thefirstyears.com
™
get ready for thefirstyears.com™ 21
Home & Away Portable™ Digital Video Monitor English
Language
You can choose to view displays in English, Spanish or French. To change your
language selection:
1. Press the Menu button.
2. Use the top or bottom of the direc tional pad to scroll through the list of
preferences until “Language” is highlighted.
3. Press the OK button.
4. A Language List will appear. The current set ting will be highlighted. Use the
directional pad to highlight the language of your choice.
5. Press the OK button to con firm your selection.
Reminder: If you do not pre ss the OK button, no change will be ma de.
6. Press the Menu but ton to return to the display mode.
Display Sleep Mode
When the Parent Unit is in portab le use (not plugged into an electrical outlet via
the AC adapter), Display Sleep Mode helps conser ve battery power by turning
the display o automatically after 3 0 seconds. The display will come back on
any time sounds being transmitte d indicate the baby is crying or making loud
noises; you can also turn the display ba ck on by hitting any button. You can
choose to turn the Display Sleep M ode on or o. To d o so:
1. Press the Menu button.
2. Use the top or bottom of the direc tional pad to scroll through the list of
preferences until “Display Sleep M ode” is highlighted.
3. Press the OK button.
4. A “Display Sleep Mode Status” scre en will appear. The current setting will be
highlighted. Use the directional pad to highlight the set ting that you want.
5. Press the OK button to con firm your selection.
Reminder: If you do not pre ss the OK button, no change will be ma de.
6. Press the Menu but ton to return to the display mode.
Camera Scan Mode
When multiple cameras are conne cted to your video monitoring system, the
camera scan mod e can be used. Scan mode will display an image from each
camera for a shor t period of time and then advance to the next c amera. For
2 cameras the display time is 10 seconds each. F or more than 2 cameras the
display time is shortened to 6 se conds each. You have the option to turn on this
scan mode as follows:
1. Press the Menu button.
2. Use the top or bottom of the directio nal pad to scroll through the list of
preferences until “Camera Scan” is highlighted.
3. Press the OK button.
4. A “Camera Scan” screen will appear. The current setting will be highlighted.
Use the directional pad to highlight the setting that you want.
5. Press the OK button to confirm your se lection.
Reminder: If you do not pre ss the OK button, no change will be ma de.
6. Press the Menu but ton to return to the display mode.
Support
The Support menu se lection provides you with information on how to contact
our customer ser vice representatives, who will gladly assist you with any
problems that you may have with your video baby monitor sys tem. To access
the Support screen:
1. Press the Menu button.
2. Use the top or bottom of the direc tional pad to scroll through the list of
preferences until “Suppor t” is highlighted.
3. Press the OK button to display the S upport screen.
4. Press the Menu but ton to return to the display mode.
Default
Menu choices are preset to the f actory defaults liste d below. Once you have
made changes to menu selec tions, you have the option of returning all choices
to the Factory Preset s. To do so:
1. Press the Menu button.
2. Use the top or bottom of the direc tional pad to scroll through the list of
preferences until “Def ault” is highlighted.
3. Press the OK button.
Page 12

22 get ready for thefirstyears.com
™
get ready for thefirstyears.com™ 23
Home & Away Portable™ Digital Video Monitor English
4. The “Default” s creen will appear. Use the sides of the directional pad to
highlight either “NO” or “YES.” If you choose “YE S,” all Menu options will
revert to the Factor y Presets listed below. If you choose “NO,” all Menu
options will remain as you have most recently set th em.
5. Press the OK button to con firm your selection.
6. If you chose “YES” a s econd selection screen will appear. If you still want
to change to the Default set tings, highlight “YES” and press OK button to
confirm your selection.
Reminder: If you do not pre ss the OK button, no change will be ma de.
7. Display screen will now go blank and unit will restart with Default set tings.
Factory presets are as f ollows:
Brightness: 0
Clock: 12 hour
Language: English
Display Sleep Mode: ON
Camera Scan: OFF
* Multiple cameras are not changed wh en default is selected.
Power button
• Hold down to turn unit on or o.
• Blue glow indicates full power.
• Red glow indicates batter y power is low. Replace batteries as soon as pos sible.
• No light indicates no power. Unit will not work until turned on, connected to AC
adapter or powered by good bat teries.
Nightlight button
• Press to turn the nightlight on or o.
Note: When Child Unit is being powered by bat teries, nightlight will turn o
automatically after 6 0 seconds.
Connection Indicator
• Glows blue when connecte d to Parent Unit
• Blinks blue when not connecte d
Talkback Volume Switch
• Allows you to choose your preferre d setting for talkback volume to the Child
Unit. Three settings are provid ed: Low, Medium, and High.
Child Unit Indicators and Controls
Page 13

24 get ready for thefirstyears.com
™
get ready for thefirstyears.com™ 25
Home & Away Portable™ Digital Video Monitor English
Recharging/Replacing Batteries
Parent Unit:
If Power Indicator on the Parent Unit glows red when unit is turn ed on, batteries
are low. If indicator does not light at all, batteries may be dead. Re charge
batteries by connec ting AC adapter cord to power jack and plugging it into wall
outlet. When charging the unit for the firs t time, it should be kept plugged in
for at least 8 hours; when re charging, you should keep it plugged in until power
indicator glows blue indicating that batte ries are at full power.
Unit can be used while being recharg ed; however, it will take longe r for batteries
to charge fully.
To ensure that Parent Unit is always available when you need it, recharge daily.
For best results, conn ect adapter and keep unit plugged in overnight, or for
several hours each day.
IM POR TA NT:
EACH RECHARGEABLE BATTERY PACK IS DESIGNED TO LAST THROUGH
MANY RECHA RGE CYCLES. HOWEVER , LIKE ALL BATTERIES, IT WILL
WEAR OUT OVER TIME. IF YOU NOTICE THAT THE BATTERY IS RETAINING
ITS POWER FOR ONLY A SHORT TIM E AND REQUIRES CHARGING
FREQUENTLY, THE BATTERY PACK SHOULD BE REPLACED.
TO OBTAIN A REPLACEMENT B ATTERY PACK: PLEASE CALL OUR PARENT
SERVICE CENT ER AT 800-704-8697. USE ONLY THE BATTERY PACK
SUPPLIED.
Child Unit
IM POR TA NT:
REMEMBER THAT THE CHILD UNIT CAN BE OPER ATED ON BATTERIES FOR
ONLY A LIMITED TIME; ONCE TH E BATTERIES RUN DOWN , THE UNIT WILL
NOT WORK. BATTERY USE I S INTENDED ONLY DURING POWER OUTAGES
OR IN TEMPOR ARY SITUATIONS WHERE EL ECTRICIT Y IS NOT AVAILABLE.
IF YOU ARE OPERATING THE CHILD UNIT ON BATTER IES, CHECK THE
POWER LIGHT FREQUENTLY, AND REPLACE BATTERIES ONCE POWER
BUTTON GLOWS RED.
Tip: Use alkaline batteries fo r longer battery life.
WARNING
Keep batteries away from children. Parents are urged to exercise
care in the storage, use and disposal of all batteries. Do not dispose
ofbatteriesinare.Theymayexplode.
To avoid battery leakage:
• Do not use rechargeable bat teries;
• Batteries must b e removed and inserted under adult superv ision;
• Non-rechargeable bat teries are not to be recharged;
• Batteries are to be ins erted with the correct polarity ;
• Exhausted bat teries are to be removed from the unit and disposed prop erly;
• Supply terminals are not to be short-circuite d;
• Dierent type s of batteries (e.g. alkaline, standard carbon-zinc or
rechargeable) or new and used batter ies are not to be mixed;
• Do not dispose of batterie s in re, may explode or leak.
• Never use a screwdriver or any other tool to pr y batteries from the
compartment, as the supply te rminals could be short-circuited.
• Do not leave batteries in the M onitor for long periods of non-use.
Failure to follow these instructions m ay cause batteries to make popping sounds
and leak batter y acid, which could result in personal injury, as well as damage to
the Monitor. If battery leakage occ urs, avoid all contact with battery acid, being
especially careful to keep it aw ay from eyes and mouth. Should contact occur,
wash any aected sk in and clothing thoroughly.
IM POR TA NT:
• IF BATTERIES ARE INSTALLED IN CHILD UNIT, CHECK FOR SIG NS OF
BATTERY LEAK AGE AT LEAST EVERY SI X MONTHS.
• ALWAYS DISPOSE OF USED BATTERIES IN A N ENVIRONMEN TALLY
FRIENDLY MANNER.
Alkaline batteries and Nickel M etal Hydride batteries (Ni-Li or Ni-Hydrid e),
are classified as non- hazardous waste (except in California) and can be either
disposed of in the trash or e -recycled at a local recycling center. In order to
find a center near you, go to www.ehso.com; using the search func tion, type
in “Batteries” and sele ct the Battery Disposal Guide for Households. This will
provide a link to nearby centers based on zip co de.
Page 14

26 get ready for thefirstyears.com
™
get ready for thefirstyears.com™ 27
Home & Away Portable™ Digital Video Monitor English
Pairing of Parent and Child Units
The Parent Unit and Child Unit are digitally paired at the f actory. This means they
are digitally encrypted with the s ame electronic code so that they can securely
communicate with each other and not be confus ed by the signals sent out by
other electronic device s, such as cell phones or other monitors.
It is unlikely, but possible, that strong electronic interf erence, such as a power
surge, could erase this pairing. Should this occur, you can reset the pairing a s
described below.
1. Press the Menu button.
2. Use the up or down buttons on the direc tional pad to scroll through the
list of preferences until “Add/Remove Camera” is highlighted.
3. Press the OK button.
4. Use the sides of the direct ional pad to highlight ADD
5. Press the OK button
6. Follow the screen prompts to co mplete this operation. Please note that you
will be adding camera “1”.
Note: The above assumes that you only have one Child unit. If you have multiple
cameras connected to your video monitor system, you can use this same method
to re-connect cameras that have become unlinked.
Need Further Assistance?
If you follow these instruc tions, and your Monitor still does not function
properly, please contact our Parent Ser vice Center at 800-704 -8697.
Care
To Clean
Do not immerse the Parent and Child Unit s in water. D o not use cleaning spray
or liquid cleaners.
1. Disconnect units from adapters (if co nnected) and unplug adapters from
electrical outlet s if they are plugged in.
2. Wipe units and adapters with a damp cloth.
3. Make sure all components are dry bef ore reconnecting them.
Storage
When you are not going to use your Home and Away Por table Digital Video
Monitor for some time, remove the bat teries from the Child Unit and the battery
pack from the Parent Unit. Store in a clean, dr y place.
Page 15

28 get ready for thefirstyears.com
™
get ready for thefirstyears.com™ 29
Home & Away Portable™ Digital Video Monitor English
Windows 7 and Vista
1. Select “Control Panel” from the “Star t” menu.
2. Click on “Hardware and Sound”, Select “Sound.”
3. Select “Playback” t ab,
• From “Sp eakers”, s elect the desired speakers or sound device and s et as default.
This will change the “Default device” from “Wireles s Baby Monitor” to the
appropriate device for your computer.
4. Select “Recording” tab,
• From “Microph one”, sele ct desired microphone or sound device and set as
default. This will change the “Default device” from “ Wireless Baby Monitor” to the
appropriate device for your computer.
Windows XP:
1. Click on “Start”, then “Settings”, select “Control Panel.”
2. Double click on “Sounds and Audio Devic es.”
3. Select “Audio” tab,
• U nder “Sound playback”, change the “Default device” selection from “ Wireless
Baby Monitor” to the appropriate speakers or sound card f or your computer.
• U nder “Sound recording”, change the “Default device” sele ction from “Wireless
Baby Monitor” to the appropriate microphone or sound card f or your computer.
4. Select “Voice” tab,
• U nder “Voice playback”, change the “Default device” selection from “W ireless
Baby Monitor” to the appropriate speakers or sound card f or your computer.
• U nder “Voice recording”, change the “Default device” selec tion from “Wireless
Baby Monitor” to the appropriate microphone or sound card f or your computer.
5. After the set tings have all been selected, press OK to save your chang es.
Once you have reset these def aults, you should not need to do this again. Your
computer will remember these s ettings when using the Home & Away Portable vide o
monitor.
On Screen Display
The indicators, controls, and video display you’ll see on yo ur computer screen
will be quite similar to those on the Parent Unit itself, with two signific ant
additions. Home and Away Port able Digital Video Monitor softw are allows you
to capture and save both still images and re cord video.
Instant Help
Use your mouse to hover over any button; an explanation of that but ton’s
function will be displayed in a pop -up window.
Note: If this software is lo st, it can be downloaded from our Website:
www.thefirstyears.com/homeandaway
Installing Software
Insert the provided C D into the
CD drive on your computer and install the
software f ollowing on-screen directions.
Note: Software will se arch the Internet
every time it opens to look f or updates.
You can determine if you want the
softwar e to update.
Installation Requirements
Softw are is compatible with current Windows PC operating systems.
PC: Windows® XP (SP2 or higher), Vista® or Windows® 7 (32-bit or 64 -bit)
• 1 GHz (1.6 GHz re commended) • 512 MB RAM or more
• CD-ROM drive • 200 MB hard drive space
• OS-compatible sound card • 1.1 USB port (2.0 recommended)
and speakers
Setup & Usage
1. Turn on Child Unit, then Parent Unit. Verify connection by
checking image on screen of Parent Unit.
2. Connect the Parent Unit to your computer using the
supplied cable. Insert the larger end of th e supplied
USB cable in the USB port on your compute r.
Insert other end of the cable in the US B jack on Parent Unit.
Note: Attach cable direc tly to a USB jack on the computer not a USB hub.
Note: It is best to power your Parent Unit with the supplied AC a dapter while
using it with your home computer.
3. Open the on-screen display by double clicking o n the Icon located on
your desktop.
4. Once connected the scre en on the Parent Unit will go blank and all video and
audio will come from your computer using Baby Viewer sof tware.
5. You are now ready to use your computer as your video monitor. Please review
the following descriptions of the On Screen Di splay to understand all of the
features of this soft ware.
Note: Your computer may change its default settings for sp eakers and
microphone when Video Monitor is fir st used with it. In order to reset these
settings, you need to go into the comp uter’s “Control Panel”. Please follow the
directions below:
sample display on computer screen
USB jack on Pare nt Unit
Using Your Computer as Parent Unit
Page 16

30 get ready for thefirstyears.com
™
get ready for thefirstyears.com™ 31
Home & Away Portable™ Digital Video Monitor English
Still Image Capture
Click on t he camera icon . You will hear a shutter sound.
The image file will automatically be saved to the d efault location. File location
will be displayed in the lower left cor ner of the window. You c an click on this file
location to see the pic ture you took.
The file location can be cha nged in Preferences in File menu.
Video Capture
1. Click on the Video icon to start recording. You will hear a sound at the
start of the recording.
2. Video will be recorded until you click on the V ideo icon again.
A flashing on-screen display in red tells you t hat the image on your display is
being recorded.
Note: Maximum recording time is 20 minutes. Recording will stop automatically,
even if you have not clicked the Video button again.
The video file will automatically be s aved to the default location. File location
will be displayed in the lower left cor ner of the window. You c an click on this file
location to watch the video you jus t made.
This location can be change d in Preferences in File menu.
Mini Mode
Use the Mini Mode display screen to ma ximize space on your desktop: This
mini display screen will remain on top of any other active applicati on windows
on your computer screen, so you can watch your child while working on yo ur
computer.
Click on the to create the mini display screen. This screen can be move d to
any location on your computer desk top.
Note: When the mini display screen is being used, only the vi deo image being
captured by the Child Unit is displayed. You must restore the display to full size
for access to the control but tons.
To restore the Control Panel display to full size: Click on the .
Talkback Feature
1. Click on the Talkback Button, and hold your mouse button depres sed
while speaking.
2. Your child will be able to hear your voice. An on-screen display in red tells
you that you are transmitting your voice.
• While the Talkback button is depressed, you will not hear any soun ds being
transmitted by the Child Unit.
• When using more than one camera, th e talk feature will link to the camera in
the location you are currently viewing.
Note: For this feature to work, your computer must be e quipped with a
microphone.
Zoom Feature
• Click on the Zoom Button to zoom in and out.
• Click once to zoom t he display image.
• Press again to revert to original size.
Pan Feature
Use directional pad to view di erent areas of the image once it is zoomed.
Camera Identification/Selec tion
Add/Remove Cameras
(If you have linked additional cameras to your Monitor)
Select File fro m the menu and then choose “Add/Remove Camera.” Follow on
screen instructi ons to add or remove cameras.
The system identifie s cameras by number 1, 2, 3, 4 assigned when they were
added. If you have not added any camer as to your system, the camera icon will
be greyed out and the Camera S election button will not respond when you tr y to
click on it.
Click the camera button to s witch the display to the next camera in the
numerical sequence.Click through the cam eras in sequence until you reach the
one you want to view. The number of the camera currentl y transmitting will be
highlighted on the Control Panel.
If you have multiple cameras installe d and active, the software can display ea ch
of these cameras in a sc an mode, like the Parent Unit. This scanning feature can
be turned on by going into the Video t ab in the Preferences in the File menu.
Page 17

32 get ready for thefirstyears.com
™
get ready for thefirstyears.com™ 33
Home & Away Portable™ Digital Video Monitor English
Keyboard Shortcuts
S = Still photo
Z = Zoom
C = Camera Selec t
V = Video
M = Mini Display Screen - toggle
Spacebar = Talkback (hold while talking)
= Pan image up
= Pan image down
= Pan image left
= Pan image right
Note: Keyboard shortcuts can b e used in mini mode.
File Menu Options:
Change Language — allows you to chose bet ween English (default), Spanish
and French. Once selectio n is made the language used in the software will
change.
Preferences — opens the Preference s Screen with the following topics:
Still Image – allows you to change the location t hat your still images are
stored and the naming convention for the se images.
Video — allows you to change the location that your vi deo recordings are
stored and the naming convention for the se images.
Camera — allows you to turn on or disable the display sc an mode for multiple
cameras, as well as open a W izard to allow you to add & remove cameras from
your video monitor system.
Page 18

34 get ready for thefirstyears.com
™
get ready for thefirstyears.com™ 35
Home & Away Portable™ Digital Video Monitor English
8. Select “Tools” then “Options.” Go into “Video Set tings” and verify that
“Wireless Baby Mo nitor” is an option for “Webcam.” Select “USB Video
Device” and check for image.
9. Still under “Options,” go into “Audio s ettings” and verify that “Wireles s Baby
Monitor” is an option for “Microphone” and “Speaker s.”
10. Go into “Sounds” and click on the “mute all sounds” button. This will ensure
that Skype sounds do not get tr ansmitted to the child unit speaker.
You are now ready to use your Home & Away Portable Vi deo Monitor with
Skype. This will allow you to share video an d audio of your baby with relatives
and friends, as well as checking o n your child when away from home. For
specific Skyp e usage, please contact Skype.
Note: When connected to Sk ype your Home & Away Portable Video Monitor
operates like any other USB web camer a.
Using your Home and Away Portable™
Digital Video Monitor with Skype
®
Your Home and Away Portable Digital Vide o Monitor comes ready to use with
Skype. Sky pe is a free program that allows you to make video and voice calls
over the internet to anywhere in the world. W ith this feature you can check into
your nursery camer a and even talk to your baby from any computer with internet
access. Check out sk ype.com for more information and enjoy this innovative
way to keep your family even closer!
1. Turn on Child Unit, then Parent Unit.
• Verify connectio n by checking the image on the screen of the Parent Unit.
2. Connect the Parent Unit to your home compute r via the supplied USB cable.
• The mini USB cable end connec ts to the Parent Unit and the standard USB
cable e nd connects to the computer.
• IMPORTANT: Conn ect large end of cable to a USB jack on the computer,
not a USB hub.
3. Once connected the scre en on the Child Unit will go blank and all video and
audio will come from your computer.
4. Open the Baby Viewer sof tware by double clicking on the Icon located
on your computer desktop.
5. Verify that monitor is connec ted to computer by checking video and audio
in Baby Viewer software.
6. Close Baby Viewer sof tware.
7. Open Skype and sign into your account by entering your Skype name
and pas sword.
Note: For maintaining privacy for your Home an d Away Computer Portable
Digital Video Monitor, we recommend that you set up a new Sk ype account
for use with this system. Hav ing this new Skype account will allow you to only
include people that you trust to vie w your child as contacts. To setup your
Skype account, go to sk ype.com and follow instructions.
Page 19

36 get ready for thefirstyears.com
™
get ready for thefirstyears.com™ 37
Home & Away Portable™ Digital Video Monitor English
Troubleshooting
Problem Possible Cause Solution
No power
(No lights on unit)
No connection
Connection indicator on
parent unit is flashing and
unit is beeping
Noisy feedback
(High-pitched “screech”)
Parent Unit(s)
• Unit is not turned on.
• Batteries are dead.
Child Unit
• Unit is not turned on.
• Adapter not plugged in.
• Adapter is plugged into
outlet that is turned o.
• Parent Unit is too far
from Child Unit (out of
range).
• Child Unit is turned o.
• Parent Unit has
temporarily lost
connection to Child Unit.
• Units are no longer
digitally paired.
• Units too close together.
• Volume on
Parent unit is too high.
• Press and hold power
button.
• Recharge batteries or
plug in adapter.
• Move Parent Unit closer to
Child Unit.
• Turn on the Child Unit.
Connection indicator on
both units should stop
blinking and glow blue.
• Reset system by turning
o both units and turning
them back on again (Child
Unit fi rst).
• Follow add camera
instructions on page 9
and add as camera 1.
• Be sure Parent Unit
is at least 3 feet
from Child Unit.
• Lower volume.
• Press and hold power but ton.
• Plug in adapter.
• If outlet is controlled by
a wall switch, be sure
switch is turned on.
• Skype has updated th eir
softw are.
Troubleshooting
Problem Possible Cause Solution
No display image or sound,
or very weak reception
Nightlight on Child Unit
does not turn on or o
Nightlight on Child Unit
does not stay on
Skype instruc tions are
dierent than actual Sk ype
• Unit is getting little or no
po wer.
• Unit is not turned on.
• No power to unit.
• Setting on Parent Unit
was not saved.
• Unit is running on
battery powe r.
Parent Unit
• Recharge batteries or
plug in adapter.
Child Unit
• Make sure adapter is
plugged in and outlet is
receiving power.
• Press power button.
• Make sure adapter is
plugged in and outlet is
receiving power. If outlet
is controlled by a wall
switch, be sure switch
is turned on. If running
on battery powe r, the
batteries are dead.
Replace the batterie s.
• Follow steps on page 18
to turn nightlight on and
o remotely.
• While under batter y
power the nightlight will
shut o after 60 se conds.
• Refer to Skype.com for
setup instructions.
For latest troubleshooting info rmation, please check our website www.firstyears.com/
homeandaway
Page 20

38 get ready for thefirstyears.com
™
get ready for thefirstyears.com™ 39
Home & Away Portable™ Digital Video Monitor English
Note: This equipment has been teste d and found to comply with the limits
for a Class B digital device, pursuant to Par t 15 of the FCC Rules. These limits
are designed to provide reasonable p rotection against harmful interference
in a residential installation. This equipment gen erates, uses and can radiate
radio frequency e nergy and, if not installed and used in accordance with the
instructions, may cause har mful interference to radio communications.
However, there is no guarantee that interference will not occur in a par ticular
installation. If this equipment does c ause harmful interference to radio or television
reception, which can be determined by turning th e equipment o and on, the user
is encouraged to try to c orrect the interference by one or more of the followin g
measures:
• Reorient or relocate the rec eiving antenna.
• Increase the separation b etween the equipment and receiver.
• Connect the equipment into an outlet on a c ircuit dierent from that to which
the receiver is connecte d.
• Consult the dealer or an exper ienced radio/TV technician for help.
This device complies with Part 15 of the FCC Rules. Op eration is subject to the
following two conditions: (1) this device may not cause harmful interference, and
(2) this device must accept any interference re ceived, including interference that
may cause undesired operation.
These devices comply w ith FCC and Industry Canada RF radiation exp osure limits
set forth for the g eneral population. They must not be operated when c o-located
with any other antenna or transmitter.
Caution: To maintain the compliance with the FCC’s and Industry Canada’s RF
exposure guideline, place the child unit at least 20 cm (8 inches) from nearby
persons.
This Class B digital apparatus complie s with Canadian ICES-0 03.
This device complies with RSS -310 of Industry Canada. Oper ation is subject to the
condition that this device does not caus e harmful interference.
Warranty
Our Limited Warranty and Warranty Period
When we use the term s “we,” “us,” and “our,” we are referring to Le arning Curve Brands, Inc.,
and when we use the ter ms “you and “your,” we mean the original end-use r customer. Our
products are gu aranteed to be free from d efects in material and wor kmanship under normal
and intended use f or a period of 90 days from the dat e of your purchase.
Repair/Replacement
If your product f ails to meet our limited warrant y during the warranty peri od, we will, at our
option, repair or replac e the product free of charge.
What Our Limited Warra nty Does Not Cover
We oer this limited war ranty only when the produc t is used by the original end-us er
customer. We oer no other w arranty. Additionally, while our warranty i s excellent, there are
other limits to it. We oe r NO WARRANT Y in cases of damage in transit, ina dequate care,
abuse, abnormal use, mi suse, accident, normal wear and tear, damage due to e nvironmental
or natural element s, failure to follow product in structions, immersion in w ater (except for
products sp ecifically indentified by us in w riting as intended for water us e), battery l eakage
or improper stor age or maintenance of the product s.
Disclaimer of Other Warranties:
THE EXPRE SS WARRANTIE S IN THE PRECEDING SECT ION ARE EXCLUSIVE A ND IN LIEU OF
ALL OTHER WARR ANTIES. However, to the ex tent applicable law does not per mit disclaimers
of certain implie d warranties, such warranti es are limited to the warranty p eriod identified
above. Some stat es and countries do not allow limitatio ns on how long an implied warrant y
lasts, so the ab ove limitations may not apply to you.
Limitation on Damages:
IN NO EVENT SHALL WE BE LIABLE FOR INDICDENTAL, COMPENSATORY, PUNITIVE,
CONSEQUENITAL, INDIRECT, SPECIAL, OR OTHER DAMAGES. OUR AGGREGATE LIABILIT Y
WITH RESPEC T TO DEFECTIVE PRODUC TS IS LIMITED TO THE MO NIES PAID TO US FOR
THE DEFECTI VE GOOD. Some states and c ountries do not allow the exclusion or limit ation
of incidental, conse quential or other damages, so the ab ove limitations or exclusion may not
apply to you.
State Variations:
This warrant y gives you specific legal right s, and you may also have other rights which v ary
based on stat e, province, or country.
Contact Us:
If you have a warrant y claim or request, or any custom er care questions, pleas e contact us at
cs@learningcur ve.com or call us at 800 -704-8697.
© 2011 Learning Curve Bran ds, Inc.
Oak B rook, IL 60523, U.S. A.
All rights reserved.
Made in China.
Y7294
Skype is a re gistered tr ademark of Sk ype Limited.
Windows and W indows Vist a are a register ed trademar k of Microsof t Corporati on in the United St ates and other co untries.
Google is a tr ademark of Go ogle, Inc.
WARNING
ChangesormodicationstothisunitnotexpresslyapprovedbyLearning
Curve Brands, Inc. could void the user’s authority to operate the equipment.
 Loading...