

Page 1

F4User’s Manual for the
Caldera Del Fuego Tallboy
Knockdown Charcoal/Wood Cooker & Smoker
Featuring Precision Controlled Temperature Cooking
©
The BBG Guru, 2006 – all rights reserved
Page 2

The BBQ Guru
353 Ivyland Road
Warminster, PA 18974-2205 USA
Telephone: (800) 288-GURU (4878)
www.thebbqguru.com
Dear Customer,
I want to take this opportunity to thank you for purchasing a Caldera Del Fuego Tallboy and a
BBQ Guru controller. I am the president of the company that produces these products and I want
you to know that I appreciate the faith you have placed in us and that we will do our utmost to
justify that trust.
I have the good fortune to be surrounded and supported by good people; people who take pride
in producing high-quality American designed and made products; people who understand the
concept of dedication and allegiance to customers. As a group, we stand squarely behind
everything we build and sell. As leader, I stand behind my people and the actions they take.
If you have a problem with our products or services, I want to know about it. You have my
personal pledge that every effort will be expended from the top down to make certain you are
absolutely satisfied with our products and services.
Once again, my thanks for your purchase and welcome to our “BBQ Family”.
With best personal regards,
Shotgun Fred
‘Shotgun’ Fred Pirkle, President
Page 3

Contents
Introduction to the Caldera Del Fuego Tallboy
Overview 1
Safety Warnings and Cautions 2
Design Features 4
Available Options 6
Choosing the best BBQ Guru system for your needs 7
Getting Started
Unpacking, Inspection and Initial Setup 8
Installing your BBQ Guru temperature control system 10
Preparing to Cook or Smoke 11
Lighting a Fire 12
Shutting Down 13
Cooking Configurations
Barbequing Low & Slow 14
Smoking and Drying 15
Warming and Holding 16
Grilling on the Convertible Top 17
Grilling in the Cooker 18
Grilling directly on the Firebox 19
Deep Frying 20
Care of Your Equipment
Cleaning your Caldera Del Fuego 21
Care of your BBQ Guru 22
Tallboy Knockdown
Separating the Cooking Chamber from the Firebox 23
Cooking Chamber Knockdown 24
Outer Cooking Chamber Knockdown 25
Inner Cooking Chamber Knockdown 26
Door Assembly Knockdown 27
Shelf Assembly Knockdown 28
Firebox Knockdown 29
Firebox Housing Knockdown 30
Reference Information
Parts List 31
Dimensions and Capacities 33
Warrantee 34
Getting Factory Help 35
Page 4

Page 5

Introduction to the Caldera Del Fuego Tallboy
Overview
The Caldera Del Fuego Tallboy is a versatile
vertical cooker & smoker incorporating state
of the art charcoal cooking technology with
knockdown storage convenience. Designed
for cook-off teams, caterers, event vendors
and backyard barbeque enthusiasts, it is a
BBQ cook’s delight in every way.
Compatible with any BBQ Guru
temperature controller, the Tallboy can be
controlled from about 90° F to 400° F with
the turn of a dial or the press of a button.
Rugged double wall steel construction is
featured. This provides excellent insulation,
a cool exterior and even interior heating. 17
shelf positions support 13”x22” racks or all
depth, full size and half size steam table
pans for ultimate flexibility.
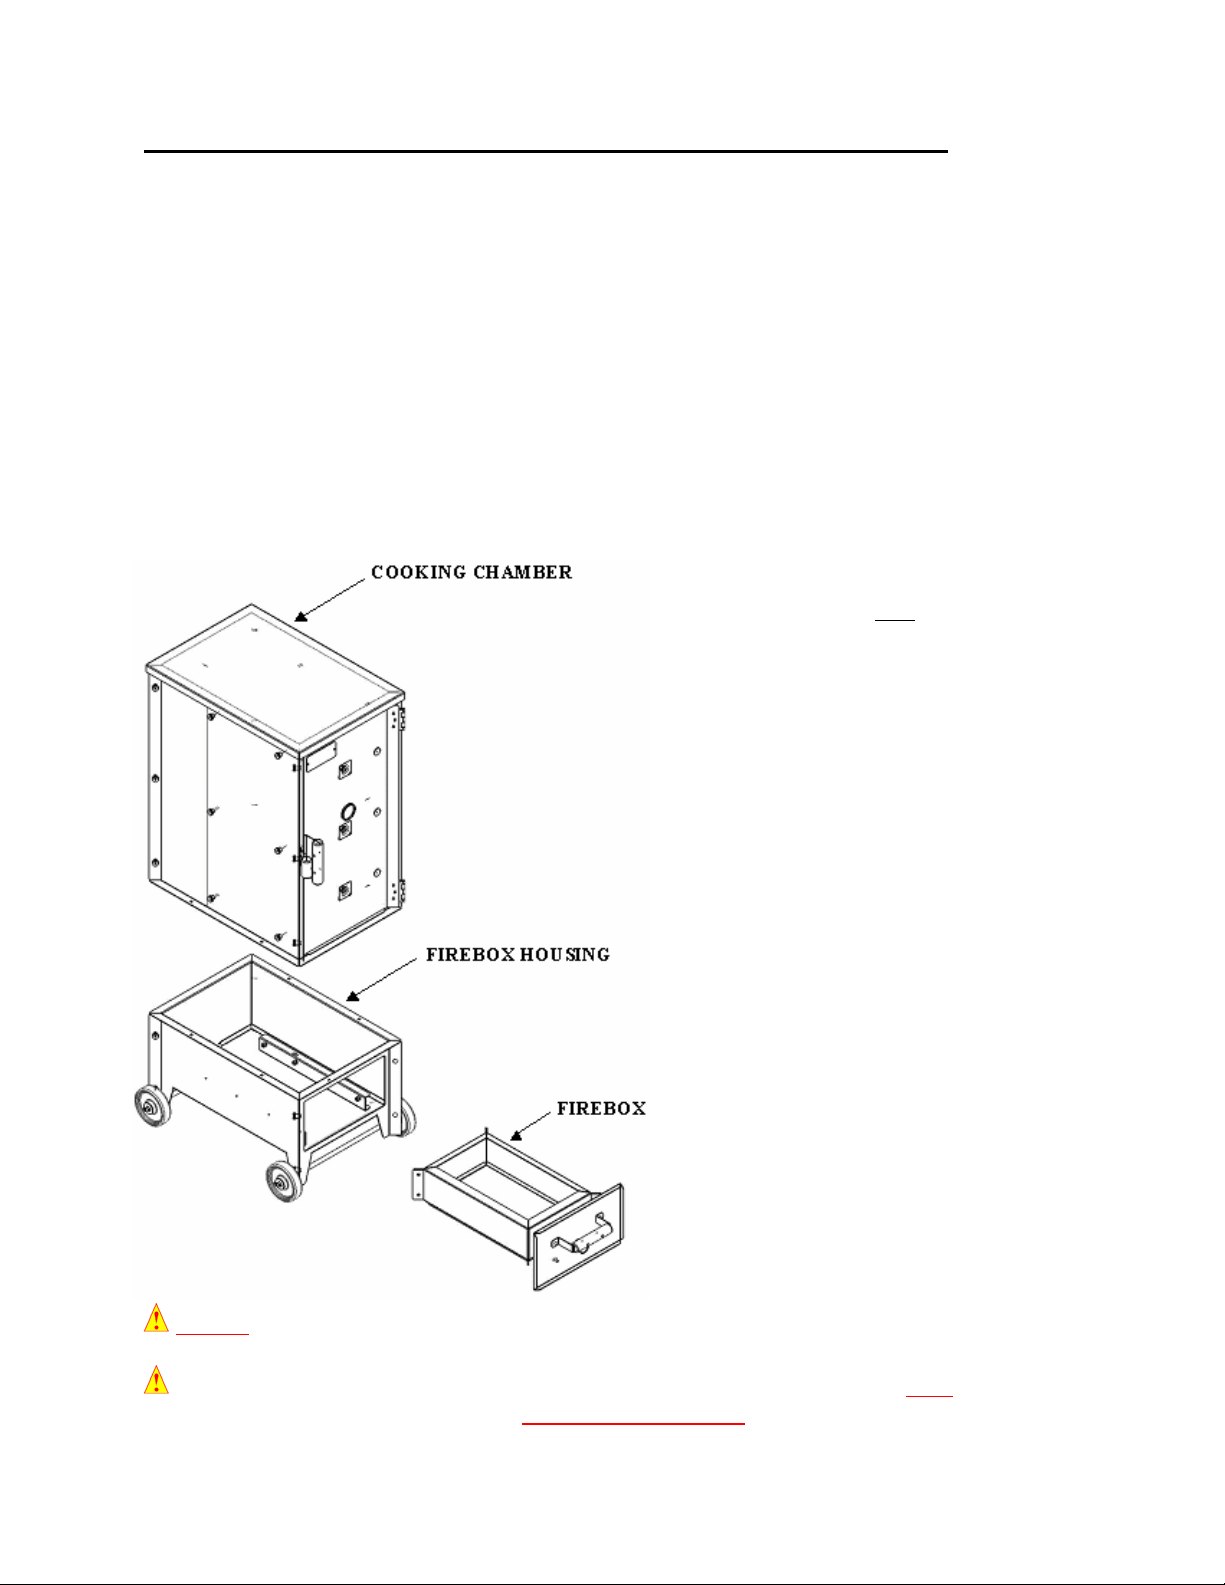
The Tallboy consists of three (separable) parts: an upper cooking section, a lower firebox
housing and a firebox drawer. The charcoal (or wood) fire is normally contained in the lower
pullout drawer for safety, flexibility and maximum convenience. Other configurations may also
be arranged to roast, bake, BBQ, grill, smoke, dry, deep-fry or warm.
1
Page 6

Introduction to the Caldera Del Fuego Tallboy
Safety Warnings and Cautions
Your Caldera Del Fuego Tallboy has been professionally designed and carefully fabricated to the
highest standards. It will give you years of trouble-free and enjoyable service. Nonetheless, the
Tallboy confines and controls a charcoal or wood fire and heats its surfaces and content; this
presents certain potential hazards to people and property. The use of common sense and
reasonable care can prevent fires, burns and other injuries. Operate your Tallboy responsibly.
Never leave this or any cooker unattended in an area where danger could exist.
Always be sure your cooker is closed up tight with its wheels chocked so that it cannot roll
away.
Always be aware of where solvents or other flammables are in relation to where you are
cooking.
Never place the cooker near a wall, especially if the wall is covered with wood, vinyl or any
combustion able material.
Never place the cooker near the fuel tank on a vehicle.
If the cooker is to be covered for insulation purposes, be sure that safe conditions exist.
Always have a fire extinguisher and water supply close by.
If the cooker is to be used on a wooden or combustible surface such as a wooden deck,
always place the cooker on a non-flammable pad intended for this purpose.
Be aware that an ember that has fallen or is ejected from the charcoal cooker can be blown by
a light wind into a garage or other structure, debris field, woods, or grass field and cause a
wildfire to start.
Always carry hot liquids in pitchers intended for this purpose. Carrying hot liquid in a pan or
tray is risky and can be dangerous. A suction pump or turkey baster, designed for the
purpose, should always be used to remove hot liquids from the cooker. Spills of fat juices are
dangerous and can cause serious personal injuries or can result in a pit fire.
Pit fires can occur when liquids are spilled or when cooking at temperatures that cause
surfaces inside the cooker to reach the ignition temperature of fats. Never pour or toss
water directly into a fat fire. Reduce the temperature by cooling the fire in the firebox
with a water spray. Close the cooking chamber door and the firebox while it is steaming
to smother the fire. This procedure may need to be repeated several times before the pit
fire is under control.
2
Page 7

Introduction to the Caldera Del Fuego Tallboy
NOTE: Pit fires can be avoided altogether if the cooker is kept clean and free from fat
buildup during or between cooks. Changing drip trays during a cook cycle will help keep
flammable fats in the cooker to a minimum. Cooking temperatures should be kept low
enough to avoid ignition. You are dealing with an open fire when you are cooking on
charcoal and wood.
There are hot surfaces on all parts of the cooker before during and after cooking.
Always wear protective clothing when tending the cooker or attempting to extinguish a fire or
dumping a firebox in the proper ash receptacle at the end of a cook.
Always be ready to call your local Fire Company in the case of an emergency before the
situation gets out of control.
CAUTION: fire danger is always present, even in the best of conditions. There is no
substitute for continuous safety scrutiny on the part of the user.
Never use the cooker inside of your home. Deadly carbon monoxide gas may be produced as
a byproduct of incomplete combustion of carbon (charcoal).
Under no circumstances should this cooker be used as a source of creature comfort or warmth
(even in an emergency). It should never be used or installed near where people will be
sleeping. Carbon monoxide is a serious poison and has caused death in many people when
someone failed to respect its lethal and present danger. Carbon monoxide combines with the
blood many times faster than the life sustaining oxygen from the air that we breathe.
Never operate a charcoal or wood burning appliance inside a tent or a building without proper
ventilation which will include a stove pipe connection from the cooker through a wall or roof
to the outside of the structure. Fresh air must always be present and plentiful, from open
windows and doors. Seek the help of a professional to insure safety.
NOTE: Carbon monoxide is an odorless, colorless and toxic gas. Because it is impossible to
see, taste or smell, CO can kill you before you are aware of its prescence. At lower levels of
exposure, CO causes mild effects that are often mistaken for the flu, including: headaches,
dizziness, disorientation, nausea and fatigue. Carbon monoxide burns with a violet flame and
is slightly lighter than air at room temperature and above. At 32° F it is heavier than air.
CAUTION: There is no substitute for safe operation. ALWAYS PROVIDE PROPER
VENTILATION. USE THIS APPLIANCE OUTSIDE SO THAT CARBON MONOXIDE
WILL NOT COLLECT WHERE PEOPLE OR ANIMIALS WILL BE IN DANGER.
3
Page 8
Introduction to the Caldera Del Fuego Tallboy
Design Features
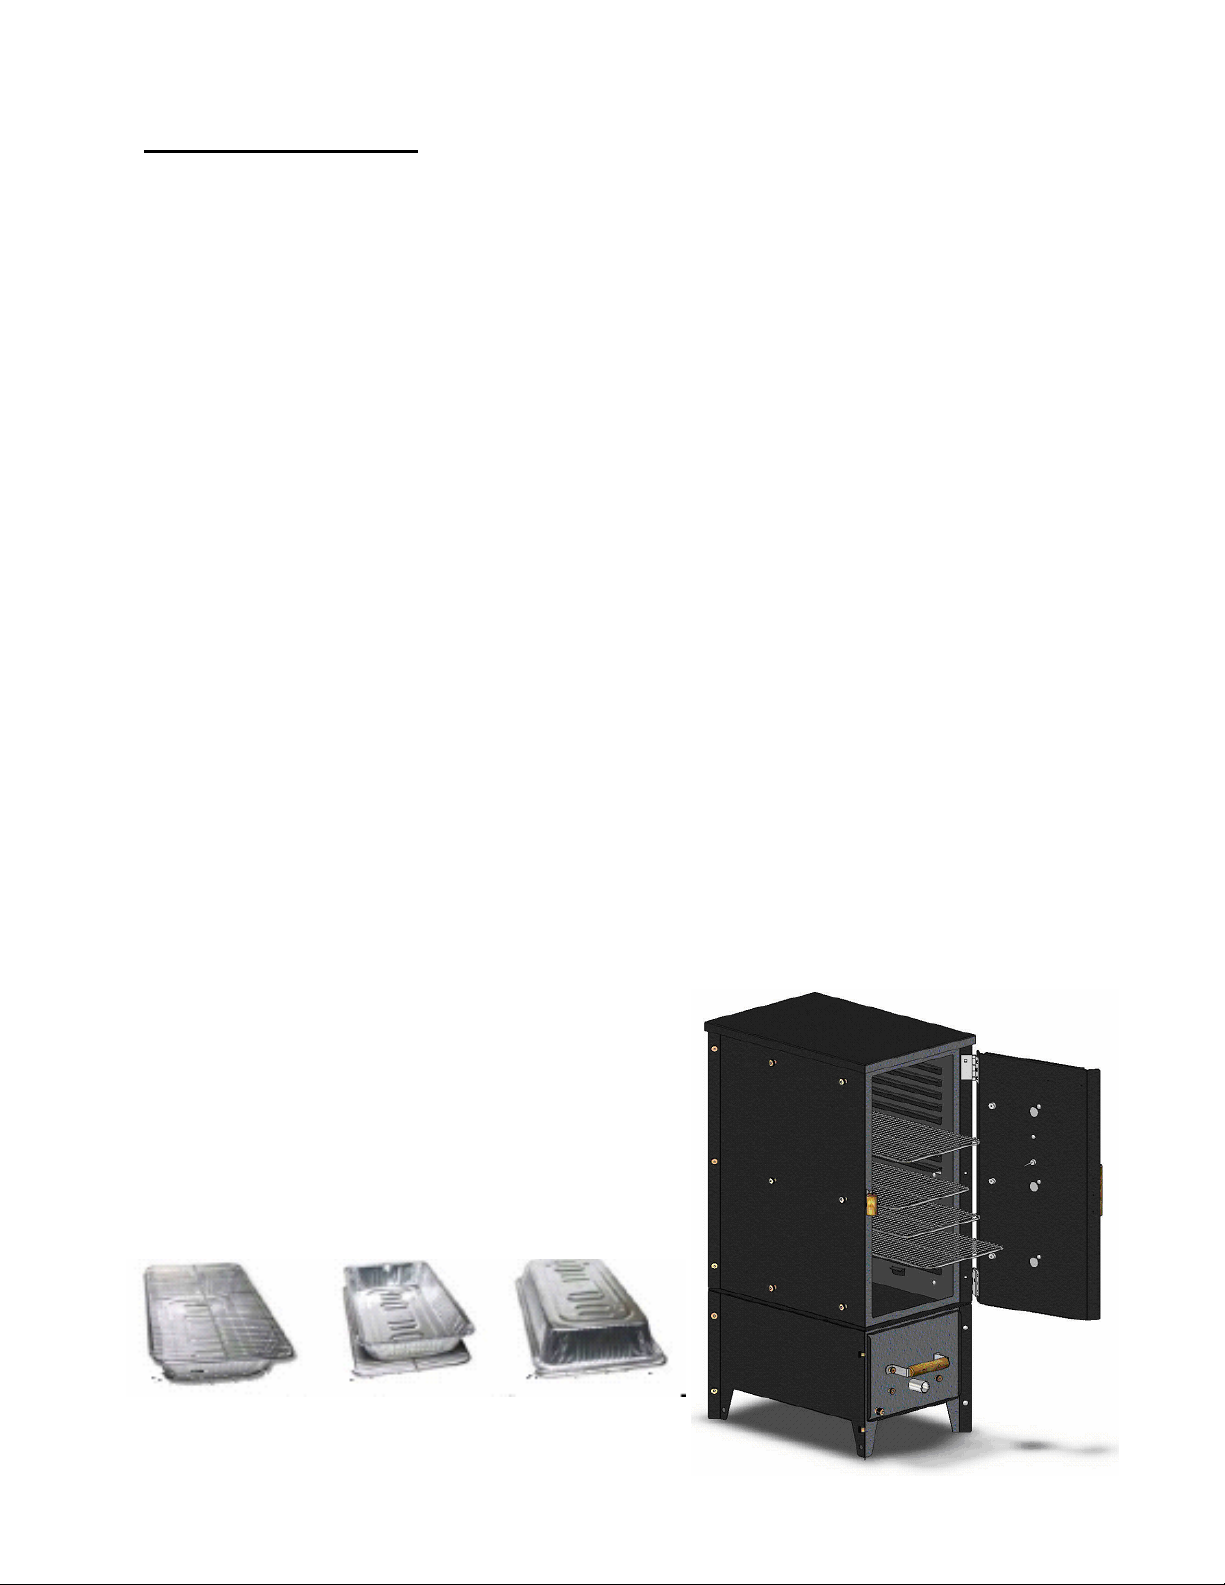
While BBQ Guru temperature control systems can be applied
to virtually any charcoal cooker or pit, the Caldera Del Fuego
Tallboy was design from day one to integrate with a Guru
controller. The rear panel features an inducer tube
attachment for the draft fan and a high temperature silicone
grommet for temperature probe insertion. This leaves the
cooking compartment door free, making loading and tending
a simpler task. Further, the firebox can be removed for
cleaning or charging without touching the draft fan.
The door of the cooker has four high temperature silicone
grommets, ready to accept thermometers. (One dial
thermometer is provided with the cooker.) These may also be
used as alternate places to pass a thermocouple probe into the
cooker. In like manner, a front-of-drawer inducer is provided
on the firebox, allowing alternate mounting of the Guru draft
fan. The door also provides three stainless steel smoke
dampers. These are adjustable vents that allow the control of
smoke and air egress. They can be used to balance or tailor
the temperature profile within the cooking chamber.
The Tallboy’s shelves are exactly the size of a standard
steam table tray: 13 X 22”. Either a rack shelf or a tray will
fit on any of the 17 levels of the cooker. Using a combination
of shelves and trays allows the user to set up the cooker in an
infinite number of possibilities. The shelves will
accommodate a large, full set of ribs, or a large brisket with
no trimming necessary. Disposable aluminum half and full
trays offer unlimited possibilities for both cooking and
holding any food
item. Your Tallboy
is a great holding
cabinet as well as
a cooker, dryer,
roasting oven, and
low and slow BBQ
oven.
4
Page 9
Introduction to the Caldera Del Fuego Tallboy
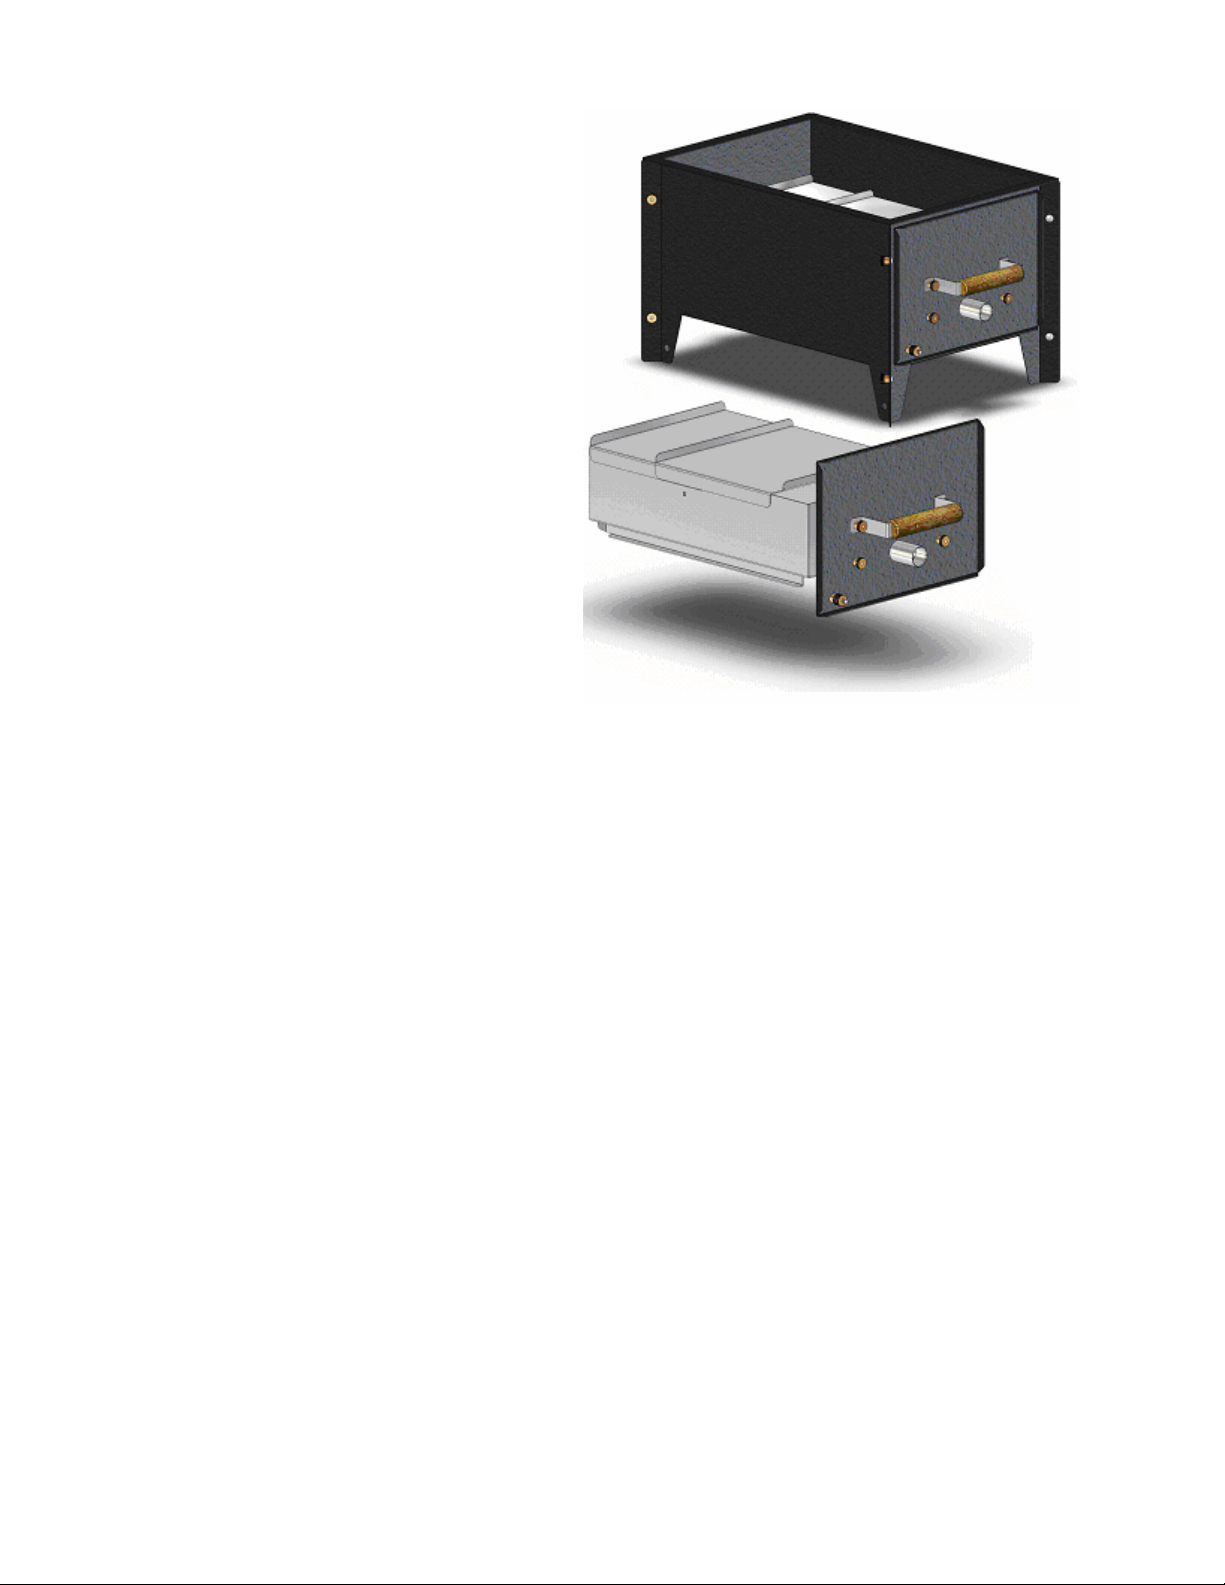
The firebox of the Caldera Del Fuego is a
practical marvel. Unlike ceramic cookers it
won’t crack or break. It is made from two
layers of mild steel that can knock down to
be maintained or transported. It is a very
versatile firebox that can be configured for
different types of cooking and different
heat outputs from roasting temperatures to
low and slow to drying temps. If your
firebox gets out of shape, any panel can
easily be hammered back into shape.
The sliding lids (tuning plates) for the
firebox are used for low temperatures and
can be adjusted so that only air from the
Guru’s blower is allowed into the firebox.
The lids also serve as a surface on which to
place smoke wood to generate “light
smoke” vapors without burning or
combusting the wood. This makes for a
better flavor in the final product. These
wood pieces can then later be used for
charcoal.
The Tallboy knocks down
without tools for easy
transport or cleaning.
Break it into two parts for
rapid and easy transport in
a van or SUV. Knock the
entire cooker down into its
component flat plates and
put it in a car trunk or give
it a thorough hosing. The
Caldera’s panels are
rugged cold-rolled carbon
steel. They are, protected
by a modern, high
temperature powder
coating. The fasteners are
made of stainless steel and
machined brass. All of the
rack shelves are made of
stainless steel.
In short, your Caldera Del Fuego Tallboy is not a “price item”; it was built as a “class act”. We
proudly use the finest materials and the most modern and precise fabrication methods available.
5
Page 10
Introduction to the Caldera Del Fuego Tallboy
Available Options
Weather and Cooking Cover – a stylish and practical accessory
cover. Use it to insulate your Tallboy for long and slow cold
weather cooks. This heavy duty, coated material can withstand
1000° F temperatures.
Use it to protect your cooker from the elements when it is stored
outdoors. The rugged, tear resistant cover is easily cleaned and
readily folded for separate storage.
Thermometer and
Mount – a high-
quality 2” diameter
dial thermometer
made for us right here
in the good old USA
by Tel-Tru. Features
±1% of full span accuracy, hermetically sealed
stainless steel construction and a 50-500° F temperature range. The 2 ½” by .250” shaft mounts
easily in the silicone door bushing provided.
Side Shelf Bracket – use this accessory bracket
kit to mount an additional work surface. You can
never have too much cutting or plating space!
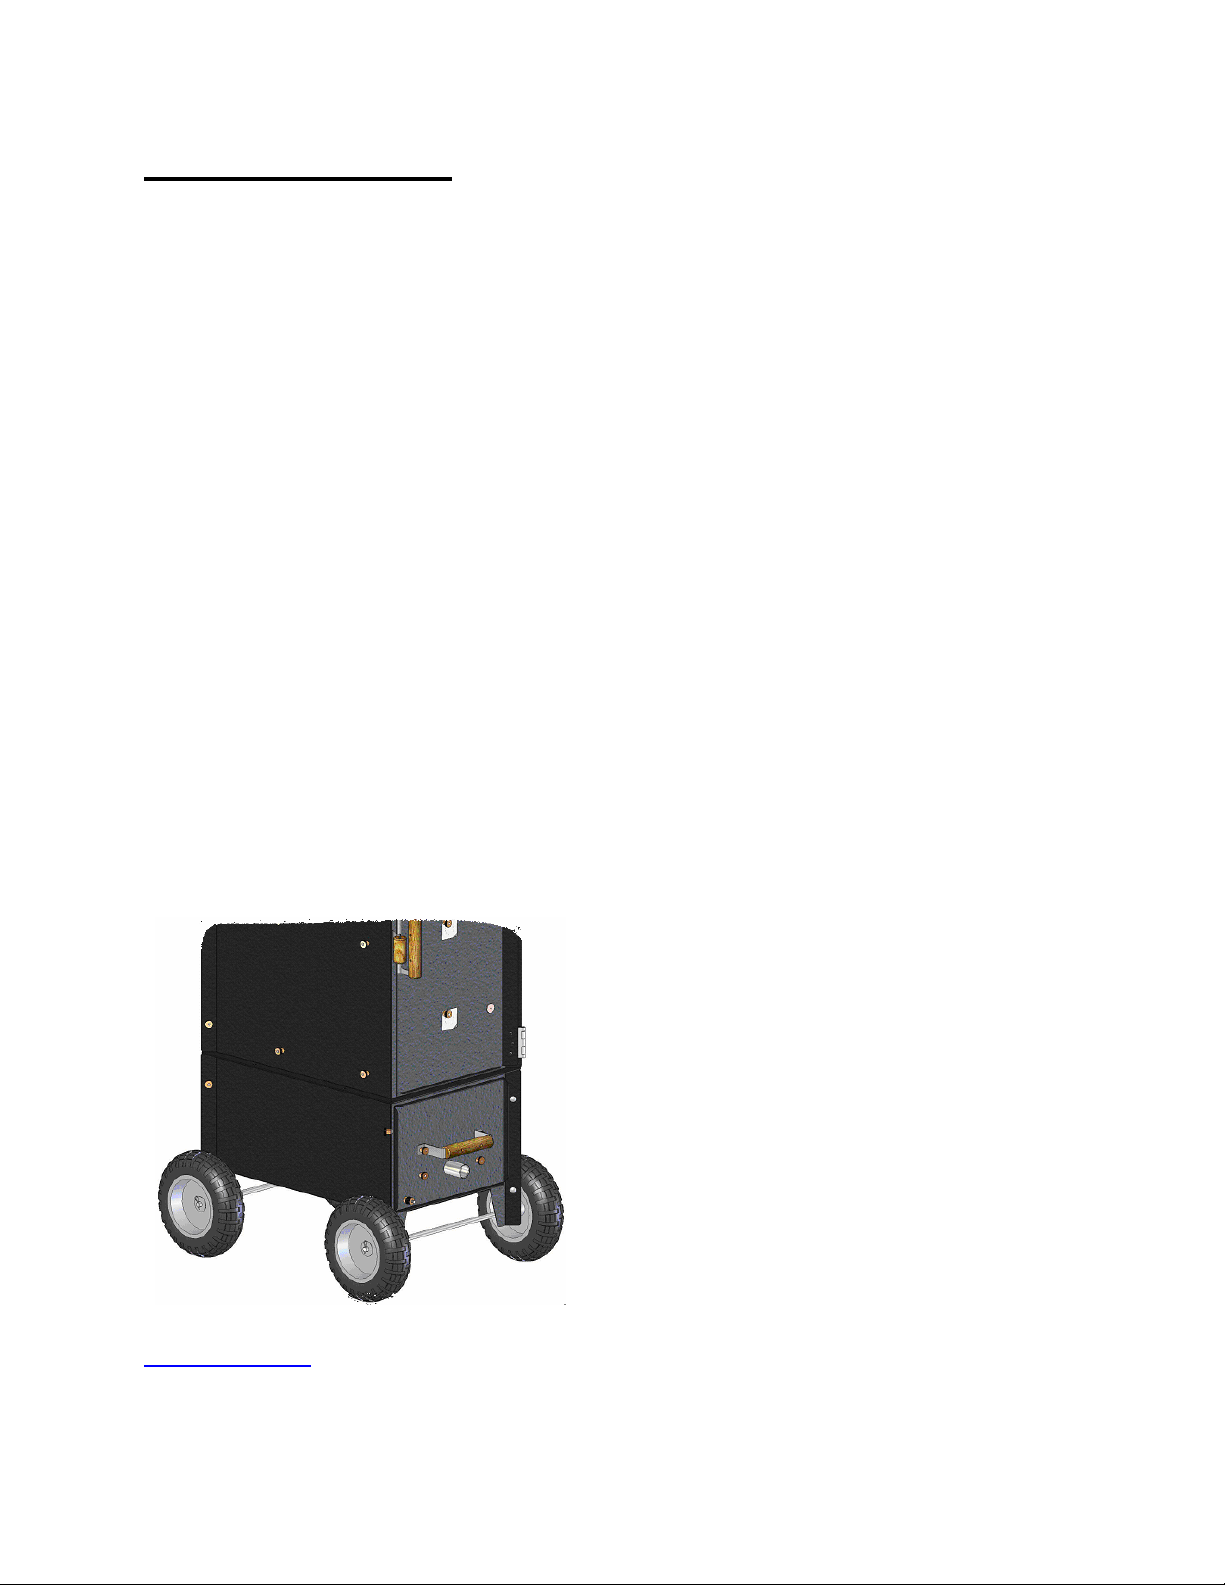
Off-Road Tires – when your cooking goes off the
pavement, you’ll need big soft wheels to get your
cooker there. This kit provides four heavy-duty 10”
diameter by 3” wide pneumatic tires on steel
wheels; it installs in minutes.
We have lots of other accessories available
including racks, pans, meat hooks, and all sorts of cooking and fire-management gadgetry. Visit
www.thebbqguru
cooking fun and productive.
often to keep up-to-date on new inventions and offerings to make outdoor
6
Page 11

Introduction to the Caldera Del Fuego Tallboy
Choosing the best BBQ Guru system for your needs
Select exactly the control system you need for your Caldera Del Fuego Tallboy. Choose from
three fine BBQ Guru controllers and three Turbo Draft Fans. Match your control system to
your cooking wants and needs.
ProCom4 – Our feature-laden wireless digital Guru controller
provides a remote hand-held readout of pit temperature, meat
temperature, two other monitored temperatures, cook timer, fan
operation and more. Set the pit and meat temperatures from 600’
away at the press of a button. Read temperatures in Fahrenheit (°
F) or Centigrade (° C). Set pit 32° - 400° F, meat from 32° to 210°
F. Choose ProCom4 if you want the ultimate in control flexibility
and ease of use.
Competitor – Our most popular Guru controller provides pit (175°
– 400° F) and meat temperature (110° – 210° F) control. Set the
desired temperature(s) on the dials and monitor their instantaneous
values and fan status on digital thermometer readouts. Unique
Guru Low & Slow Ramp mode reduces the pit temperature as
desired meat temperature is approached, providing more precise
cooking control. Select Competitor if you need a simple-tooperate, full-featured controller.
Pit Minder – The original (and many think the best) BBQ Guru
controller is our least expensive and simplest unit. It controls pit
temperature from 90° to 370° F. Choose Pit Minder if you do not
need meat temperature control for applications including drying,
smoking, deep frying and warming& holding.
Pit Runner - 4 CFM Pit Viper - 10 CFM Pit Bull - 25 CFM
BBQ Guru offers three Turbo Draft Fans differing in air-delivery capacity (cubic feet per minute
or ‘CFM’). The mid-range 10 CFM Pit Viper is the perfect match to the Caldera Del Fuego
Tallboy for all applications. The smaller Pit Runner is satisfactory for smoking and cooking
smaller loads. The 25 CFM Pit Bull may be used for all applications requiring high heat output
or rapid step temperature change. The Pit Bull can also be used for cookers and pits larger than
your Tallboy.
7
Page 12
Getting Started
Unpacking, Inspection and Initial Setup
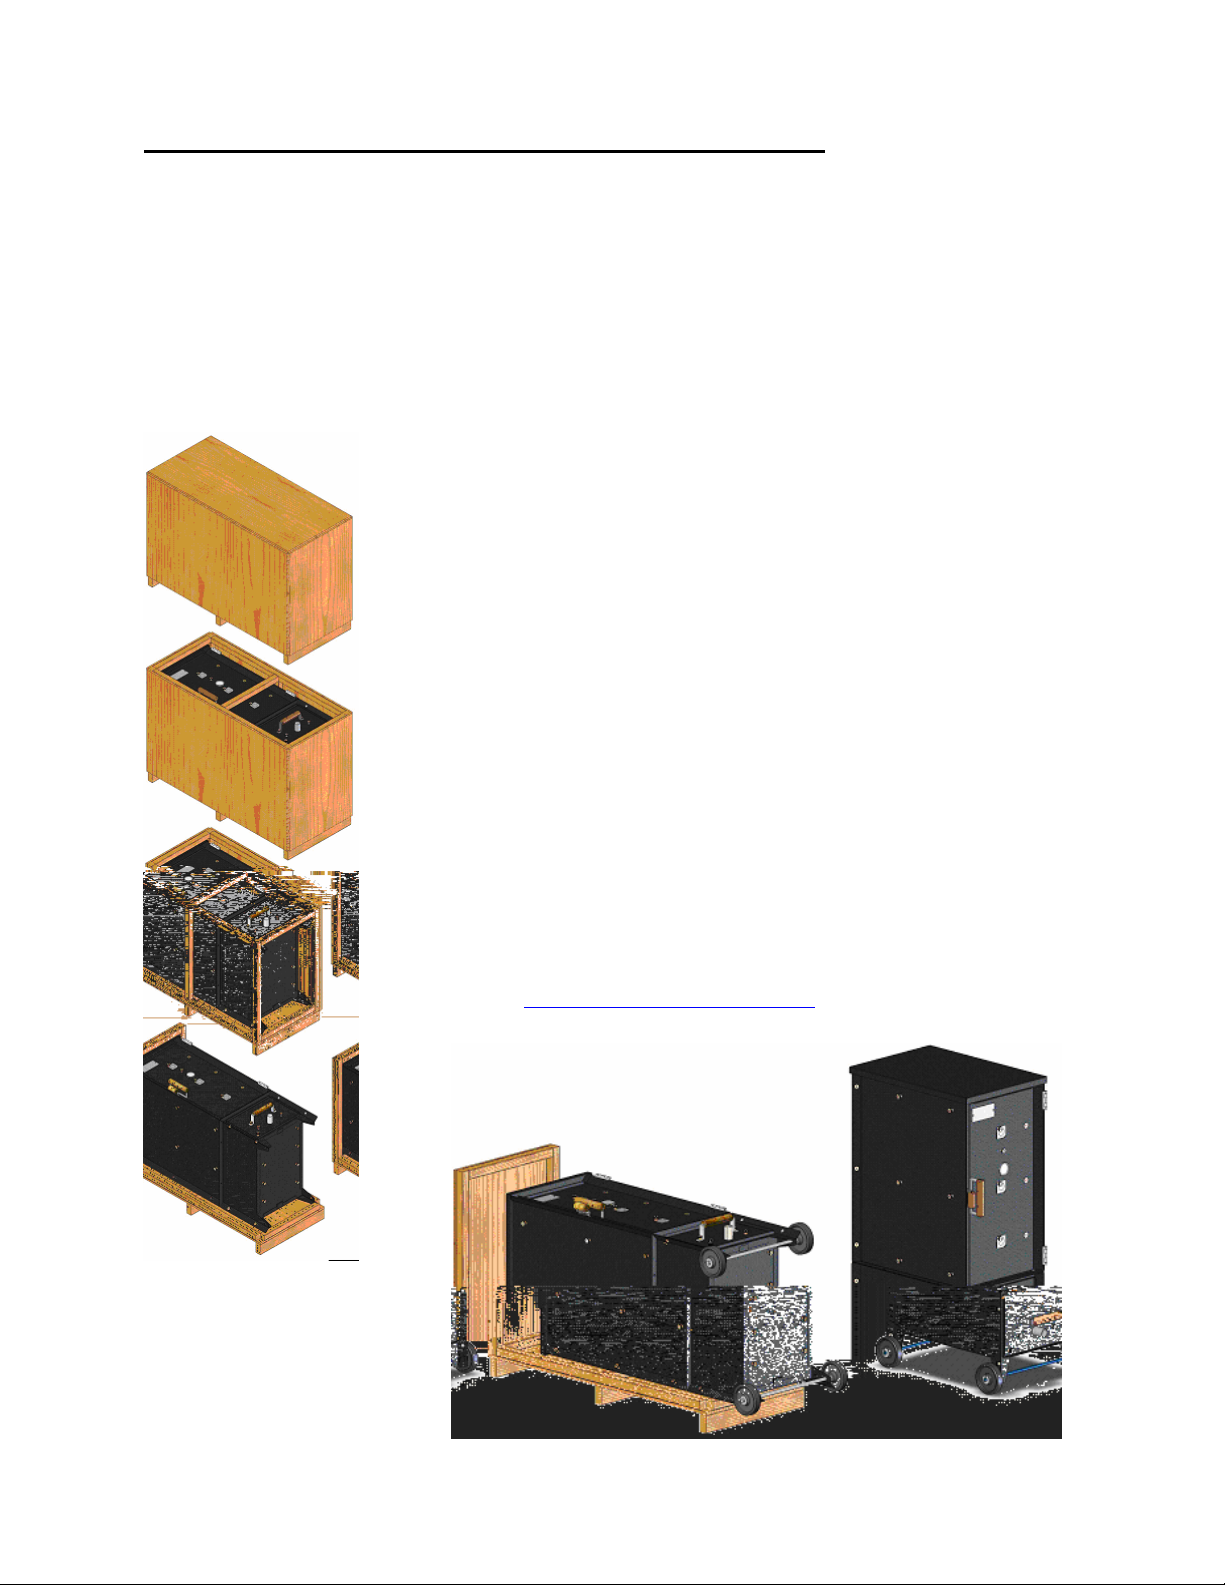
Your Caldera Del Fuego Tallboy will come crated upon a shipping pallet. The cooker is basically
assembled and lying on its back. Certain parts are packed within the upper Cooking Chamber.
Move the pallet to an appropriate area for assembly. Carefully remove the top and sides of the
crate, being careful not to scratch the contents. Open the door of the Cooking Chamber and
remove the racks, wheels and axles and small parts shipped within.
Lift and drag the Tallboy downward on the pallet, so that the legs
overhang it by about 6”. Referring to page 9 for details, assemble the
wheels and axles to the legs of the Firebox Housing.
Carefully stand the Tallboy up upon its wheels. Work carefully; the unit
weighs 170 lbs. Save the crate and pallet for possible reshipment.
Install the grill racks on the shelf brackets within the Cooking Chamber.
Gather up all of the accessory items packed within the cooking chamber.
Check all items received against the Parts List of page 31.
Inspect the unit carefully for shipping damage. If such damage is found:
1. Retain the packing materials.
2. If possible, photograph the damage.
3. Contact BBQ Guru for help.
telephone: 1 (800) 288-4878
e-mail: [email protected]
8
Page 13
Getting Started
Installing the Wheels
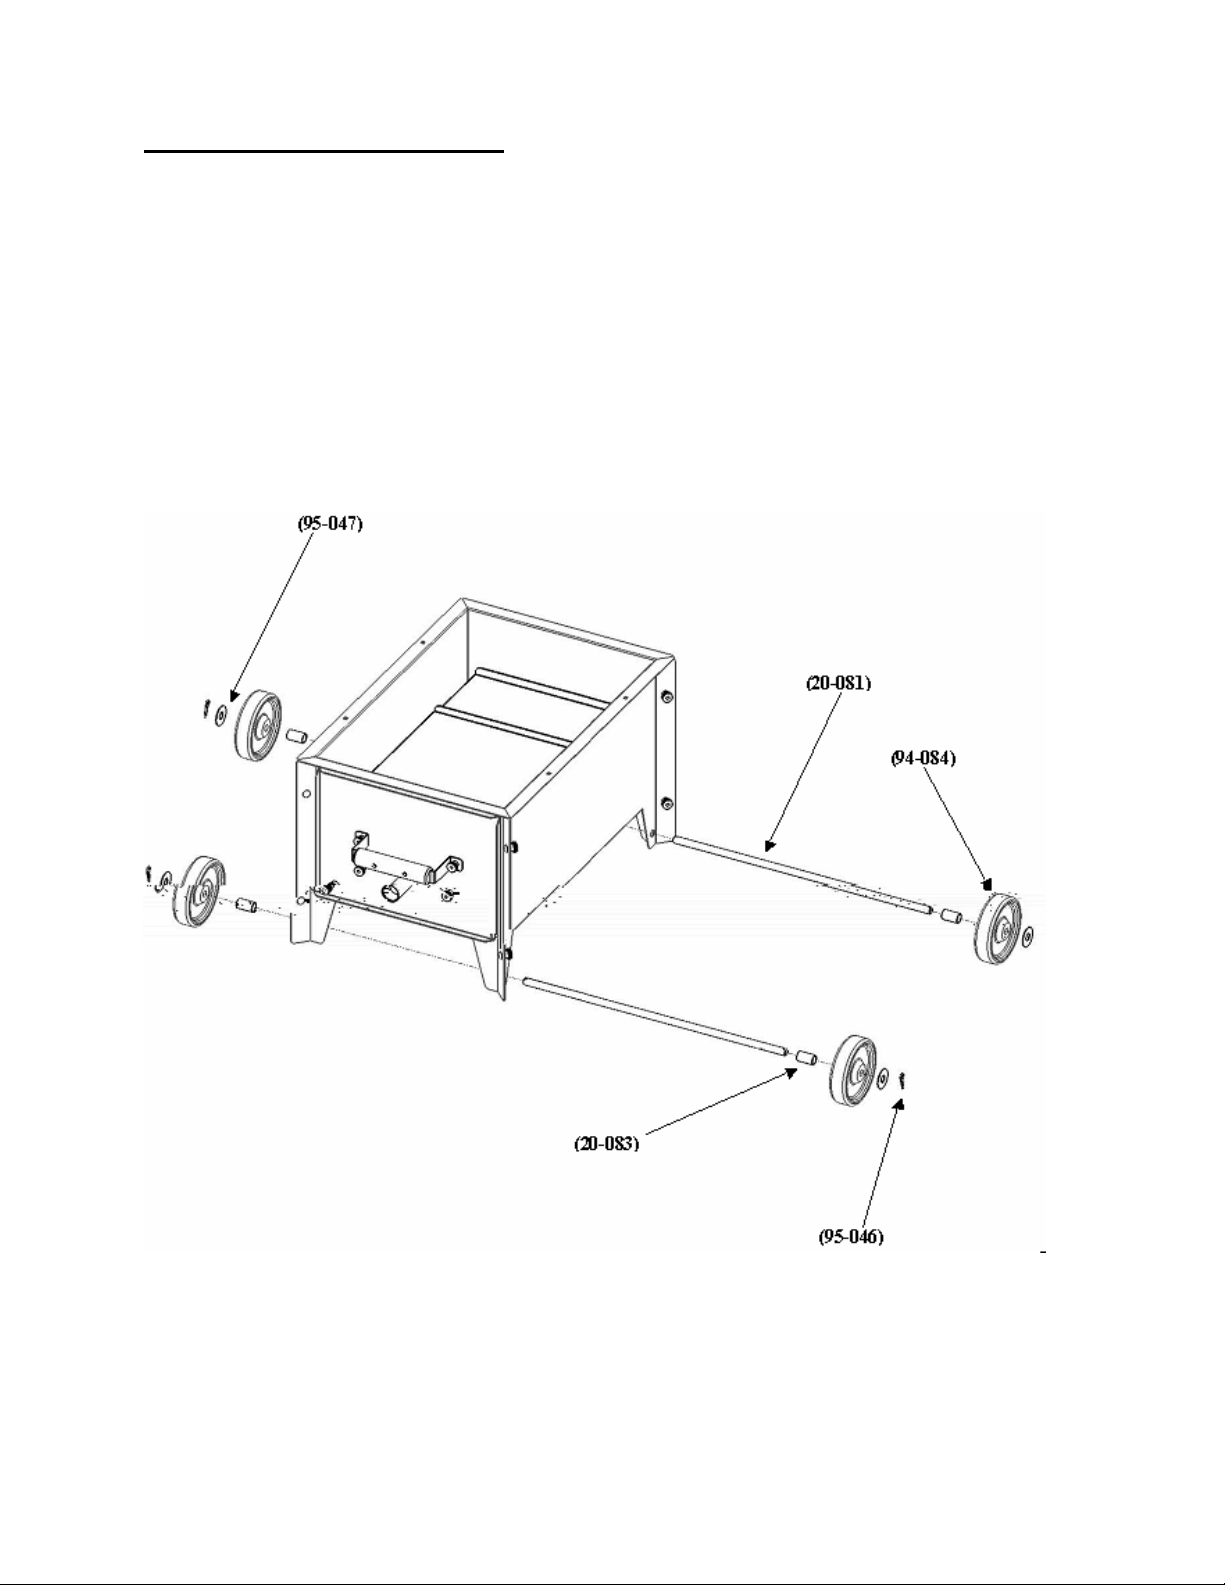
1. Slide the Axles (20-081) through the holes in the legs of the Firebox Enclosure.
2. Place a Wheel Spacer (20-083) on each axle and then a Wheel (94-084).
3. Place a Washer (95-047) over each axle on the outside of the wheel and secure it with a
Hairpin Cotter Pin (95-046).
4. Repeat these steps at the other end of the axles.
Note: When installing the Off-Road Tire Kit in lieu of the standard Patio wheels, substitute :
Large Wheel Axle (20-099), Knobby Tire Spacer (20-098) and Knobby Tire (94-600) for the
standard parts.
9
Page 14
Getting Started
Installing your BBQ Guru temperature control system
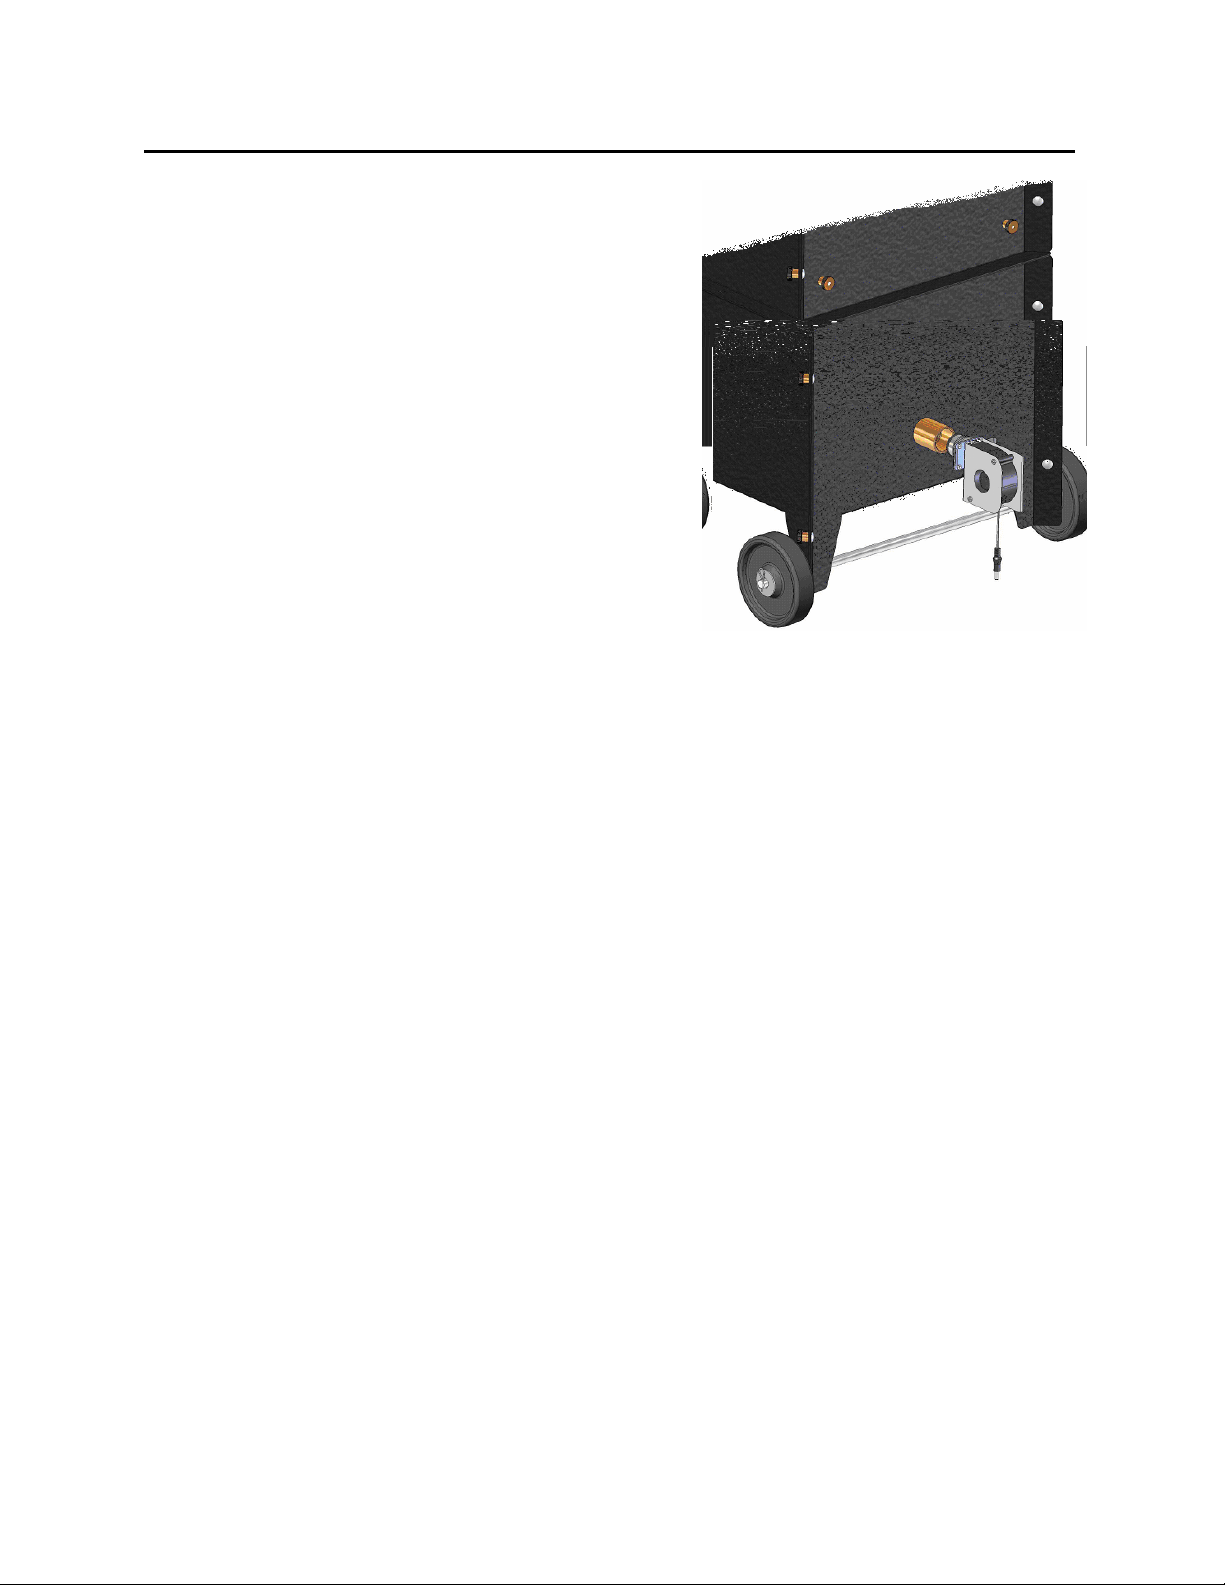
The BBQ Guru temperature control system is normally
installed on the rear surface of the Caldera Del Fuego
Tallboy. Start by inserting the nozzle of the Turbo
Draft Fan into the Inducer tube of the Firebox
Housing. Attach the Controller Mounting Bracket to
the Tallboy. Attach the BBQ Guru controller to its
bracket and connect the cables from the Turbo Draft
Fan and from the Temperature Probes.
Pass the Temperature Probes through the Silicone
Gasket from the outside into the Cooking Chamber.
Pierce the major cooking item with the Meat Probe and
clip the Pit Probe to it where it will not contact the
meat.
Other arrangements of the equipment are possible. This one is popular, practical and a good
starting point for a new user. You may elect to mount the provided bracket, with screws, to a
short wooden board as a base. Then place your control on top of the cooker at a convenient eye
level.
Some users prefer to rig the control equipment
using the Inducer tube on the front of the Firebox
and one of the three Silicone Grommet locations in
the Door of the Cooking Chamber.
Experiment with different setups and find the one
that works easiest for your mission. No two cooks
ever agreed upon the one ‘right’ way to arrange a
working kitchen! Arrange your BBQ Guru to make
use of your Caldera Del Fuego Tallboy
comfortable for you.
10
Page 15

Getting Started
Preparing to Cook or Smoke
Your Caldera Del Fuego Tallboy arrives basically assembled and ready to cook. The BBQ
Guru controller makes it fast and easy to get just the ‘right’ fire in minimum time. However,
there are some items of preparation for each cooking session.
Minimize the subsequent cleanup effort by preparing the surfaces of your
cooker. Spray or wipe all of the grills with a vegetable-based oil to prevent
sticking. Wipe or spray the interior surfaces of the Cooking Chamber to
minimize build-up from splatter and smoke deposits.
Set your Turbo Draft Fan for the cooking mission by setting its sliding damper to the proper
opening as shown in the following table. (This table is a general guide)
4 CFM 10 CFM 25 CFM
Mission Damper Position (fraction open)
Grilling
High Temperature Cooking
Low & Slow Cooking
Cold Smoking
Extinguish Fire
Wipe a little
of the Turbo Draft Fan and insert it into the Inducer tube.
vegetable-based oil or shortening on ‘nozzle’
Assemble all of your ingredients and tools. Have your fire
gloves, pot-holders, tongs, spatulas, knives and forks readily at
hand.
Turbo Draft Fan
Pit Runner Pit Viper Pit Bull
open open 1/2
open 3/4 1/4
3/4 1/2 1/8
1/2 1/4 1/16
closed closed closed
Have a fire extinguisher and/or a source of water at hand before lighting your fire.
11
Page 16

Getting Started
Lighting a Fire
The Caldera Del Fuego Tallboy is designed to run on
charcoal fuel. Some wood chunks or chips can be used but
too much smoke is not a good thing. When wood smolders it
makes smoke that is rich with creosote or tar that will be
deposited on what you are cooking. A little smoke goes a
long way.
The Tallboy will run on briquette or hard wood Lump. Hard
wood lump is definitely preferred. Good quality hard wood
Lump charcoal won’t smoke much because it has been well
carbonized. The type of wood the charcoal is made from will
have an influence on its smell when burning if not
completely carbonized.
Briquette is made from many sources of woody material,
fillers and binders. If briquette is used, it should be started
well in advance of putting on the food to be cooked. This
will let the strong smells dissipate.
The firebox can be lit in any number of
ways, but we think that the easiest way is
to use a propane torch and the Guru
Straight Club inserted into the front
Inducer sleeve. (This assumes the Turbo
Draft Fan used with the BBQ Guru
Temperature Control is inserted through
the rear Inducer.) After starting the fire,
cap off the front Inducer tube using a kill
plug or draft Regulator plug.
This will allow you to load your Tallboy before it is
lit, if you like. You can light just the front of the
charcoal and let it slowly burn to the back or you
can start a pile in the front then spread it out and
add more charcoal on top. When you are using the
BBQ Guru control, it is only necessary to start a
small fire; the Guru will bring the cooker up to
temperature quickly. Light with drawer closed.
The more you are cooking the more charcoal it will
take to do the job. When cooking a large quantity check your firebox more often. Charcoal
quality and density will also be a factor in how long you can run on a firebox full (12-24 hr.).
12
Page 17

Getting Started
Shutting Down
Remove all food products from the Tallboy. Set the damper on the Turbo Draft Fan fully closed
(or remove the Turbo Draft Fan and replace it with a kill plug or draft regulator plug.) Close
all or the dampers on the Tallboy’s door. Close the Firebox lids. The fire should die within 30 to
45 minutes. You can accelerate the process by spraying the charcoal with water. Do this a little at
a time using a spay bottle rather than a hose.
If you need to shut the cooker down more rapidly, remove the Firebox and dump its contents in
a proper ash receptacle.
You can also spray the charcoal with water a little at a time and then dry the charcoal in the sun
to save fuel for the next cook. Hint: you can always add damp charcoal to a firebox of fresh hot
burning charcoal.
Note: During cooking, you can use the above spray method to reduce temperature quickly.
Always empty the firebox before transporting your cooker.
Caution: If you are going to transport charcoal that you have “put out” you must put it in a
covered and sealed metal container other than the firebox, even though it is wet. For example
use the Guru Pit Tender Pale. See our web site for details.
13
Page 18
Cooking Configurations
Barbequing Low & Slow
The Caldera Del Fuego Tallboy fitted with a
BBQ Guru temperature control is a slow cooking
miracle. Load the firebox with charcoal, set the
desired temperature and cook for hours; the BBQ
Guru assures that the temperature remains
absolutely stable at your setting. Overnight cooks
are a breeze; no pit tending is required.
The Tallboy’s shelves are exactly the size of a
steam table tray 13 X 22”, so that either of them
will fit on any of the 17 levels of the cooker.
Combining shelves and trays lets you set up your
cooker in an almost infinite number of possibilities.
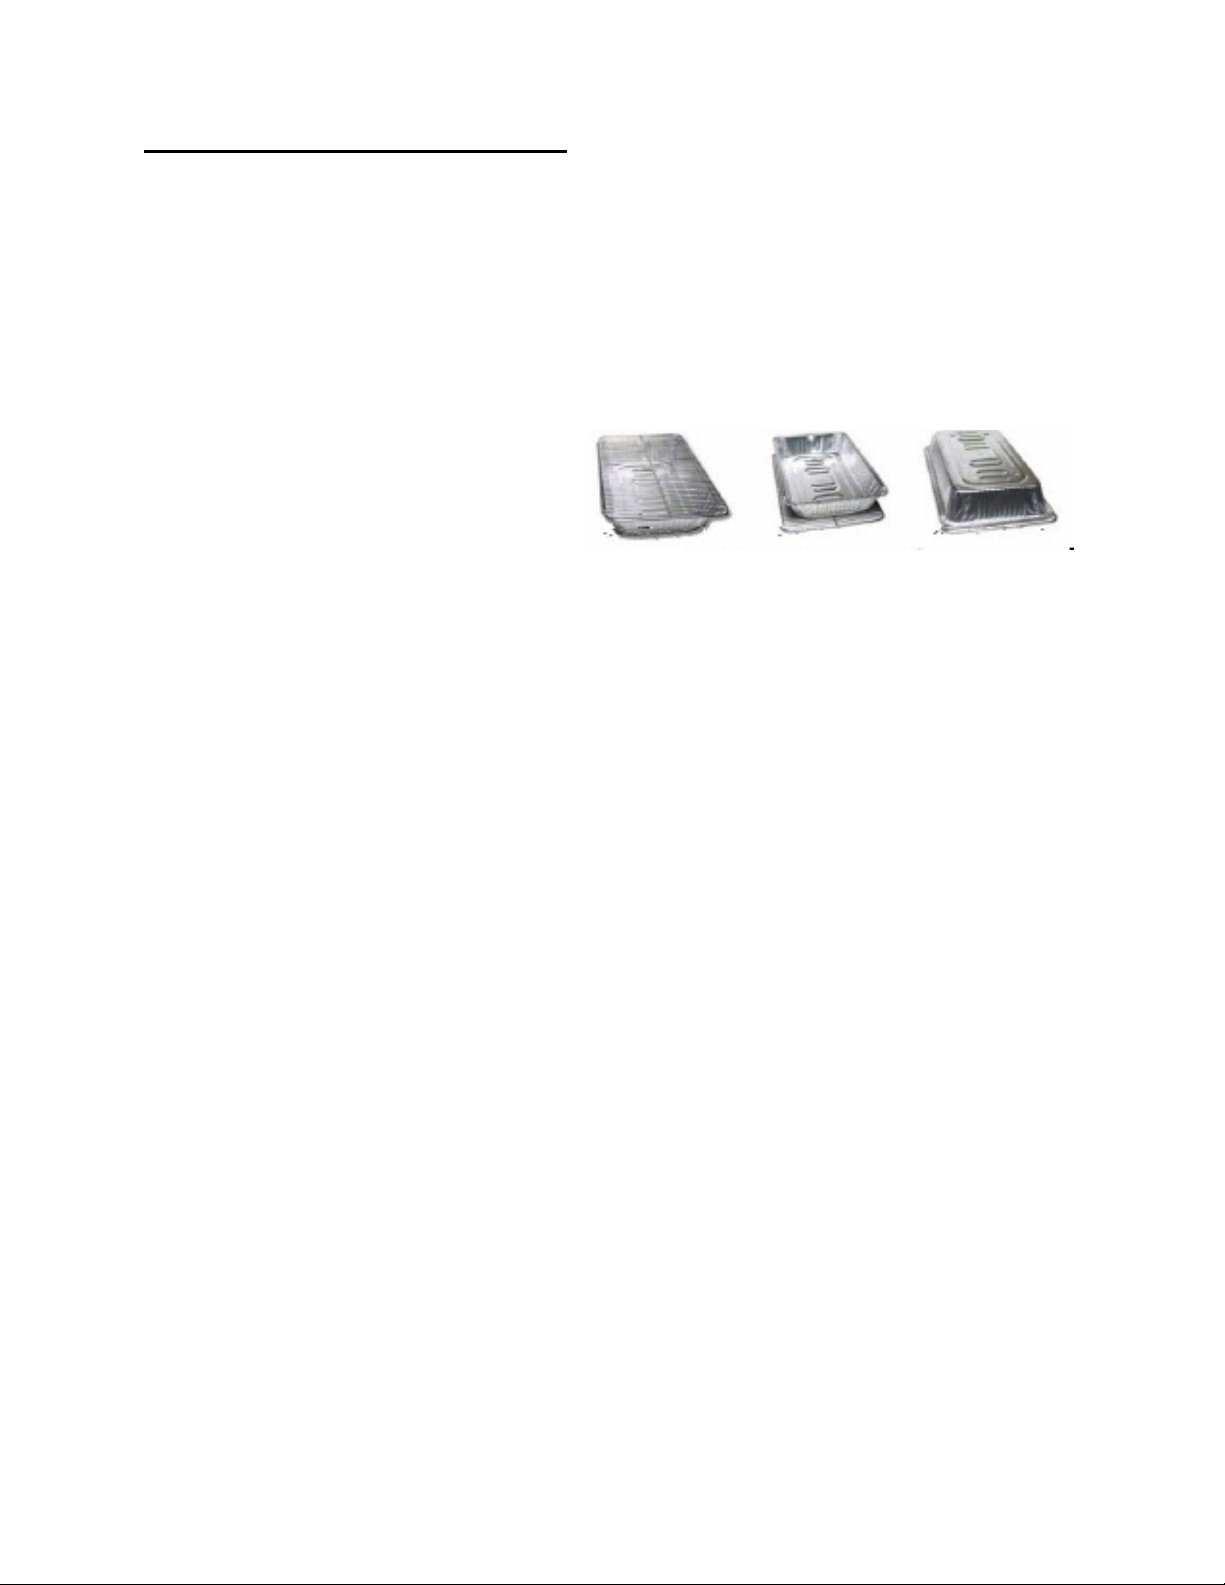
• Place a cooking rack over a steam table tray.
The tray becomes a drip pan.
• Place a steam table tray on a rack for support
when cooking beans, rice, casseroles or just
keeping food warm.
• Place a steam table tray upside down over
meat on a cooking rack to tent the food.
The generous shelves will accommodate a full set
of ribs, or a large brisket with no trimming
necessary. Disposable aluminum half and full trays
offer further possibilities for cooking and holding
any food item.
The Tallboy is designed so that smoke is allowed to escape around the lid and the door. A
conventional 3” stack pipe can be installed to allow the cooker to be used in a walled tent, BBQ
trailer etc.
When burning charcoal, not much air is needed to produce and maintain the necessary heat for
cooking. Good charcoal burns like embers, without much smoke.
When burning wood, it is necessary to provide more air to avoid creosote deposition. The smoke
damper should be substantially open to carry away the smoke and gasses. Even dry and seasoned
wood will give off creosote when it smolders. Using too small a damper opening can over-smoke
and impart an unpleasant taste. Only a small quantity of smoke wood is needed for flavor.
14
Page 19

Smoking and Drying
Cooking Configurations
There are the three square adjustable
stainless smoke dampers located at the center
of the cooker door. They are used to vent
smoke or heat and serve to enable visual
monitoring of the product being cooked, as
well as the amount of smoke being generated
when the Turbo Draft Fan is running.
When using the Tallboy for drying:
• All three dampers should be opened
wide to allow moisture to escape from
the cooking chamber.
• The lid of the cooker can also be cracked
open to allow moisture vapor to escape
from the cooking chamber.
• The firebox drawer should be cracked
open so that fresh air can enter the
Tallboy, be heated and then carry away
more moisture. (tuning plate lids closed)
Air can hold only so much moisture. Fresh
air, passing through the cooker, is necessary
if drying is to take place.
When the cooker is
closed up tight, and
combustion air is
supplied by the Turbo
Draft Fan, both heat
and moisture are
retained in the cooking
chamber. This is good
for low and slow
cooking, but not for
drying. Always open
the dampers and crack
the covers when
drying.
15
Page 20

Warming and Holding
Cooking Configurations
Your Caldera Del Fuego Tallboy is an ideal
warming and holding oven for outdoor events.
Simply close the firebox tuning plate lids and set
the BBQ Guru to a warming temperature in the
140°-165° F range.
Use either steam table pans or disposable
aluminum pans on a rack. Seal pans with
aluminum foil to retain moisture.
16
Page 21

Cooking Configurations
Grilling on the Convertible Top
There are several ways to grill with the Caldera Del Fuego Tallboy; the most convenient and
efficient is to remove the External Top Plate and the Internal Top Plate. This requires about
thirty seconds and no tools. Simply grasp the (fully cooled) External Top Plate and remove it,
revealing the Internal Top Plate. Remove this and the top of the Cooking Chamber is exposed
for grilling. Note: Never transport the Tallboy in an open vehicle with the top plates in place.
Position a grill in the top rack slot. Place charcoal in a stainless steel steamer pan on the second
shelf (or put it in an aluminum foil pan on a grill
17
Page 22

Grilling in the Cooker
Remove both lids from
the Firebox and you can
broil on the lowest shelf
of the Tallboy. You can
use the racks above it for
indirect cooking.
You may also want to
“tent” what you are
broiling by turning a tray
up side down over what
is being cooked. This
holds in heat and
moisture and will serve
to reduce cooking time.
Cooking Configurations
You can also broil on an upper shelf or
even broil in the Cooking Chamber
while it is detached from the Firebox
Housing. Simply place charcoal in a
foil tray supported by a grill or a
stainless steel tray to provide intense
heat for direct grilling of steaks or
chicken.
Another tray of charcoal can be used
over the food being cooked to broil the
top. The radiation from the bottom of
the top pan will crisp up chicken or
cook steak from both sides at once.
18
Page 23

Cooking Configurations
Grilling directly on the Firebox
Detach the Cooking Chamber
from the Firebox Housing and
you gain a second open-top grilling
surface. Place a grill directly on
top of the Firebox and enjoy a
high temperature pit for steaks,
chops or those special frying pan
creations.
You can use the Firebox Housing
simultaneously with grilling efforts
conducted in and on the Cooking
Chamber.
The cooker was designed so that you may also open the drawer, remove the tuning plate lids, and
place a cooking rack directly on the firebox top. Place the items to be grilled on the rack and
close the drawer. Cooking can continue up above in the cooking chamber while you are grilling.
19
Page 24

Deep Frying
Cooking Configurations
Break the Firebox Housing and the Cooking
Chamber apart and use lower component as a
temperature-controlled deep fryer. Place a
stainless steel steam table tray in to the lit Firebox and fill it to a safe level with oil. Place the Pit
Probe of your BBQ Guru control in the oil and enjoy the simplicity of “dialed temperature”
deep frying over charcoal. Caution: Never place wet or frozen items in hot oil. Large items can
cause overflow of oil into the fire causing
flare up. Allow ample space for rising oil.
20
Page 25

Care of Your Equipment
Care of your BBQ Guru
Your BBQ Guru is a robust solid-state system, requiring little maintenance. Still, there are a few things
you can do to insure its function for the long term. Always remove the BBQ Guru before washing your
Caldera Del Fuego Tallboy or disassembling it.
Probes
Our probes are made of high quality, high temperature
materials. The Pit Minder probes can safely take
temperatures of up to 370° F while the Competitor and
ProCom4 probes can withstand temperatures of up to
400° F.
We recommend that you use the rear panel grommet or the center door grommet for probe
installation. This keeps the probe wires away from the firebox. This will prevent the probes from
melting due to unforeseen flare up or excessive heat coming up from the fire box.
Your BBQ Guru comes with a small piece of brown Scotch-brite
cleaning the stainless steel probe between cooks. Do not put your probes in the dishwasher or
submerge them in water. Grease wipes easily off of the Teflon coated probe wires. Use alcohol
on a soft cloth to clean the probe leads when necessary.
Turbo Draft Fan
Clean the fan and its wires using spray glass cleaner or soap. Never
submerge the fan in water or beer.
Check the fan for obstructions before installing it in your cooker.
Lightly lubricate the nose of the fan with vegetable-based shortening
before inserting it in the Inducer tube. Use a non-stick spray for this
purpose by spraying your finger and then wiping the fan O-ring.
BBQ Guru Controller (and Optional Pendant)
Clean the controller by wiping it with a clean cloth. Stubborn dirt and
grease may be removed using spray glass cleaner; never wet or
submerge the unit.
Remove the batteries from the unit for storage.
TM
pad. This is to be used for
21
Page 26

Care of Your Equipment
Cleaning your Caldera Del Fuego
You’ll want to keep your Tallboy clean – it
makes it much more pleasant to work with and
far more attractive to your eating audience. It is
easiest to clean racks and panels that have been
sprayed with PAM or vegetable oil before
cooking!
Grills can be cleaned by spaying them with an
oven cleaner and placing them in a plastic bag
in the sun. Bagging dirty racks overnight with
a healthy dose of ammonia is also effective.
Remove the racks from the bag and wash
thoroughly using a strong detergent, such as
Simple Green or Spray 9 and a plastic brush.
The interior of the (completely cooled) Cooking
Chamber should also be cleaned with a strong
detergent. Rinse thoroughly. At least once a season, a
heavily used cooker should be broken down to its
component panels and be degreased, washed and
hosed. You can transport panels separated by sheets
of newspaper to prevent surface scratching.
22
Page 27
Tallboy Knockdown
Separating the Cooking Chamber and Firebox
All panels and subassemblies of the Caldera Del Fuego
Tallboy are held together by stainless steel carriage
bolts and machined brass thumbnuts. The square shank
of each carriage bolt mates with a square hole in the
Tallboy. The thumbnuts are knurled to ease hand
tightening. The nuts never need to be fitted more than
hand tight, so no tools are required to break down or
assemble the cooker.
The first time you break your Tallboy down; you may need to use pliers to loosen the thumbnuts.
Use a rubber jar-lid opening pad between the thumbnut and the pliers to avoid marring the nut.
The Cooking Chamber is secured to the
Firebox Housing by four mating carriage
bolts and thumbnuts. To break your
cooker into two pieces for easy transport:
• Unscrew two nuts joining the Cooking
Chamber to the Firebox Housing on
each side of the cooker.
• Lift the Cooking Chamber off of the
Firebox Housing.
Store the four nuts and bolts in a zip-top
plastic bag for reassembly.
Always empty the Firebox before transporting your cooker.
Caution: If you are going to transport charcoal that you have “put out” you must put it in a
covered and sealed metal container other than the Firebox , even though it may be wet.
23
Page 28
Tallboy Knockdown
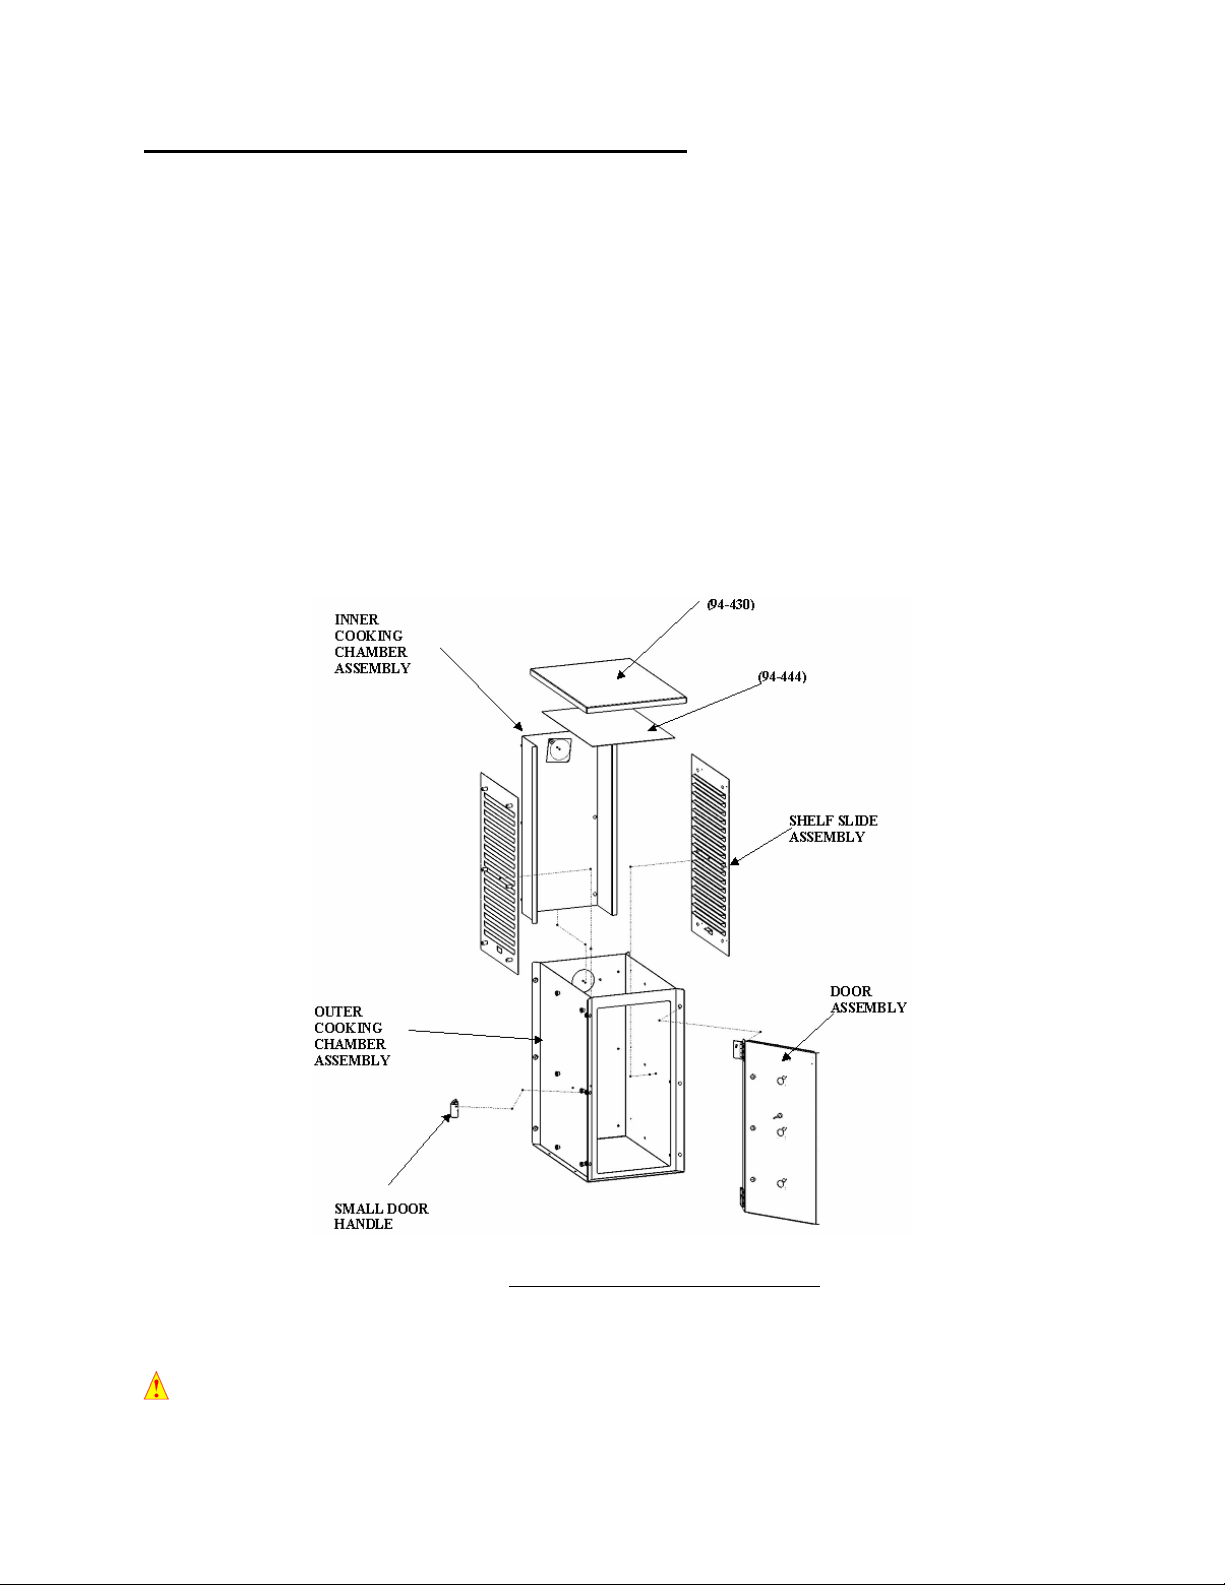
Cooking Chamber Knockdown
1. Lift off the Top Lid (94-430) and lift out the Internal Lid Plate (94-444).
2. Unscrew the two thumbnuts securing the hinges of the Door Assembly to the Cooking
Chamber and remove the door.
3. Remove the Small Door Handle from the Cooking Chamber by removing 1 thumbnut.
4. Detach the Inner Cooking Chamber Assembly by removing 6 thumbscrews on the rear
of the Cooking Chamber.
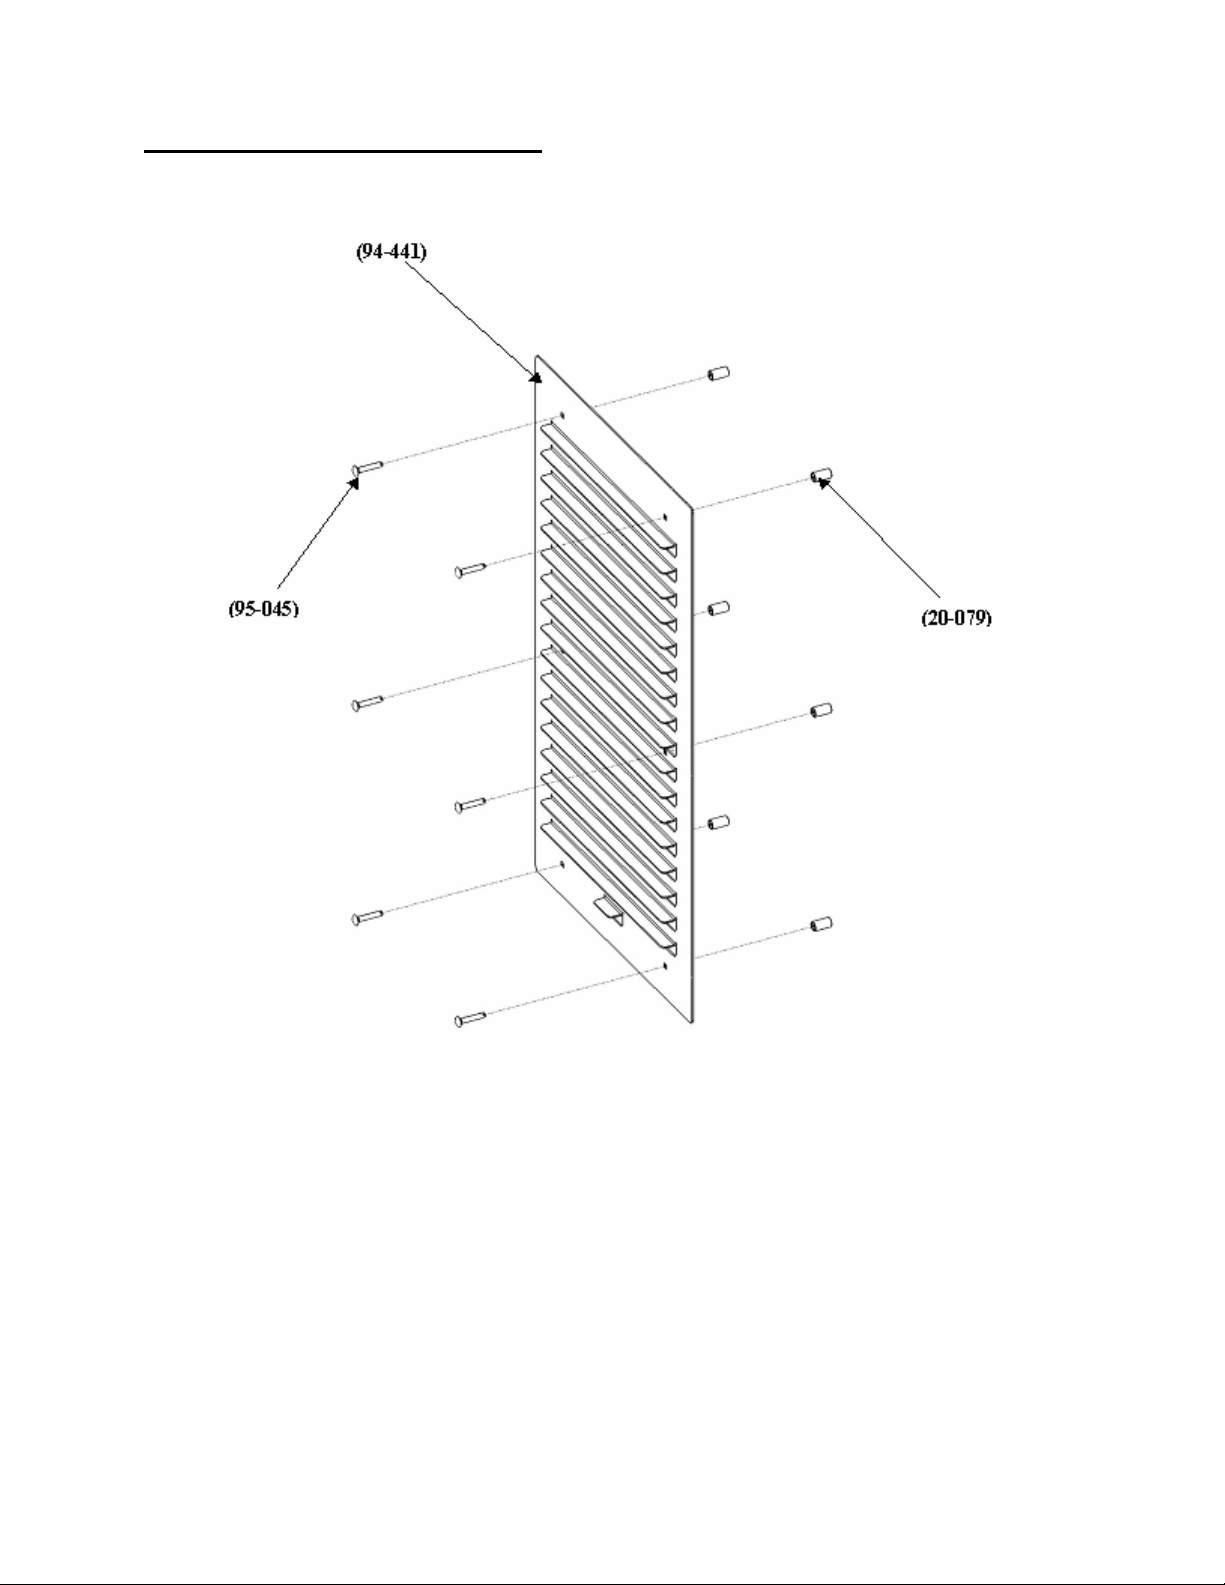
5. Remove the two Side Shelf Assemblies by removing 6 thumbnuts on each side of the
Cooking Chamber.
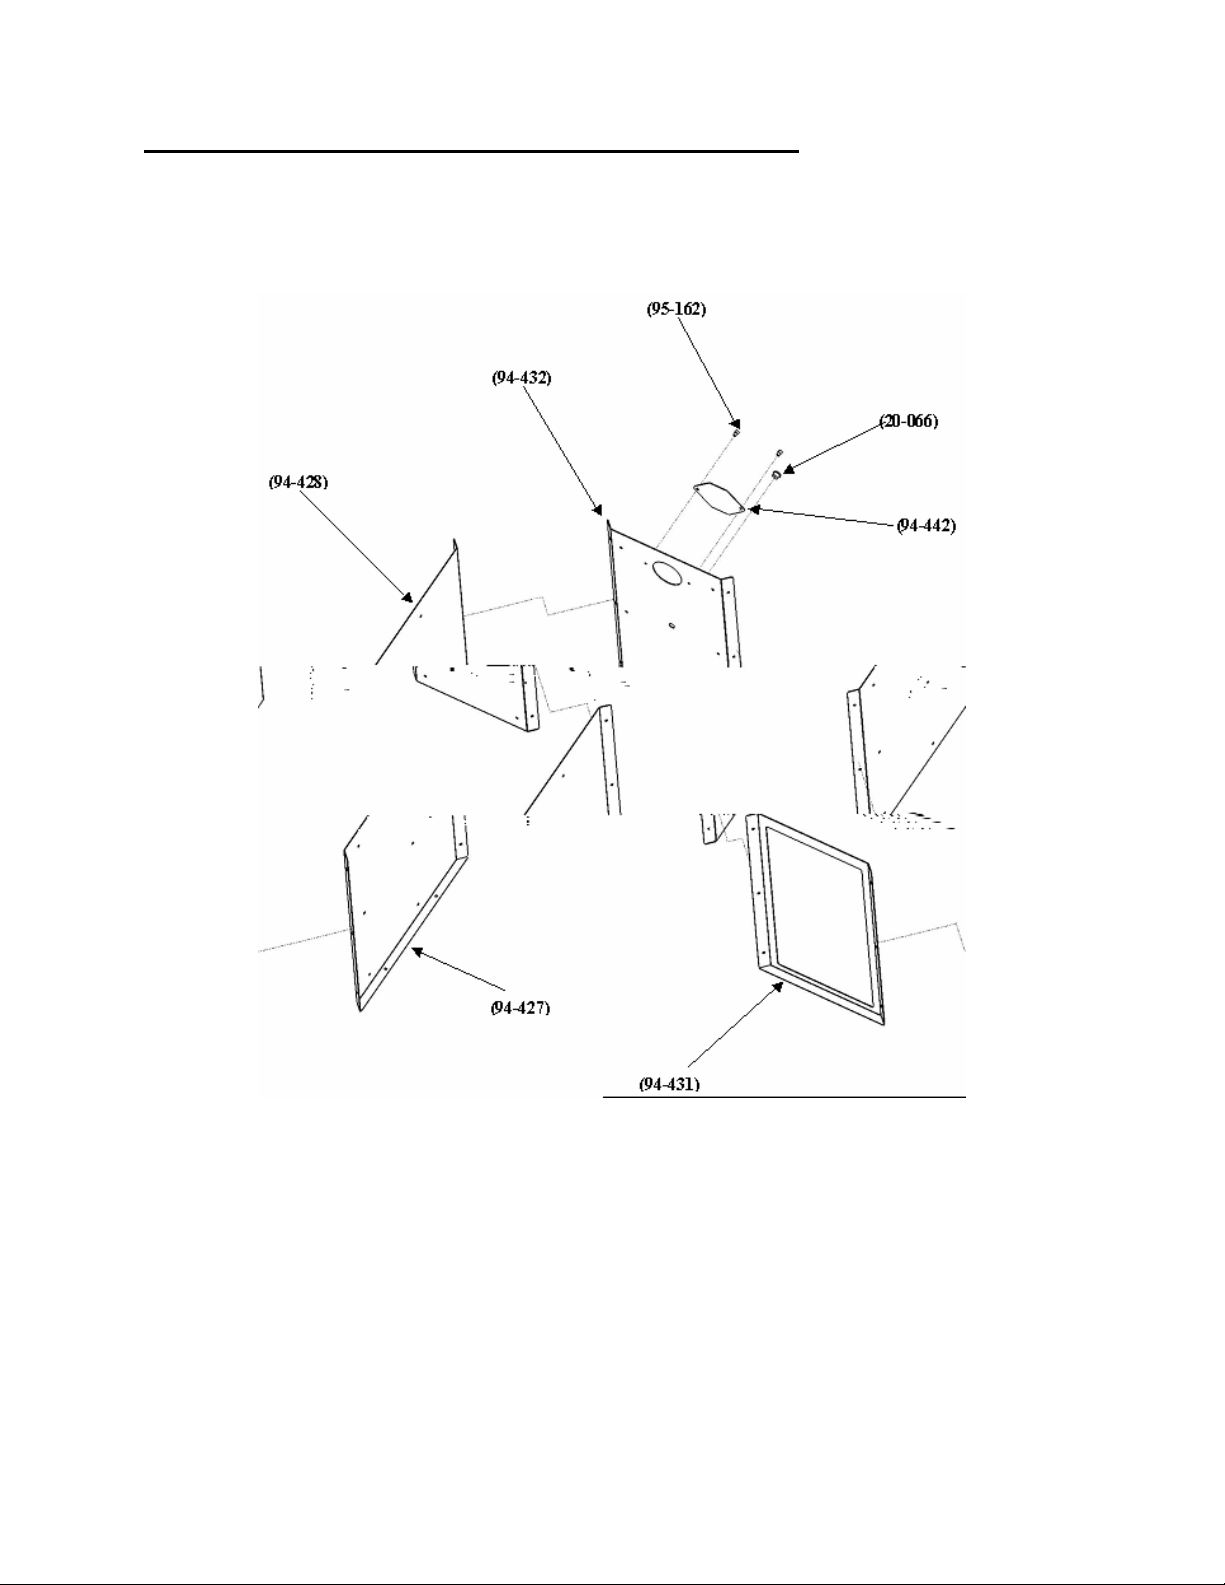
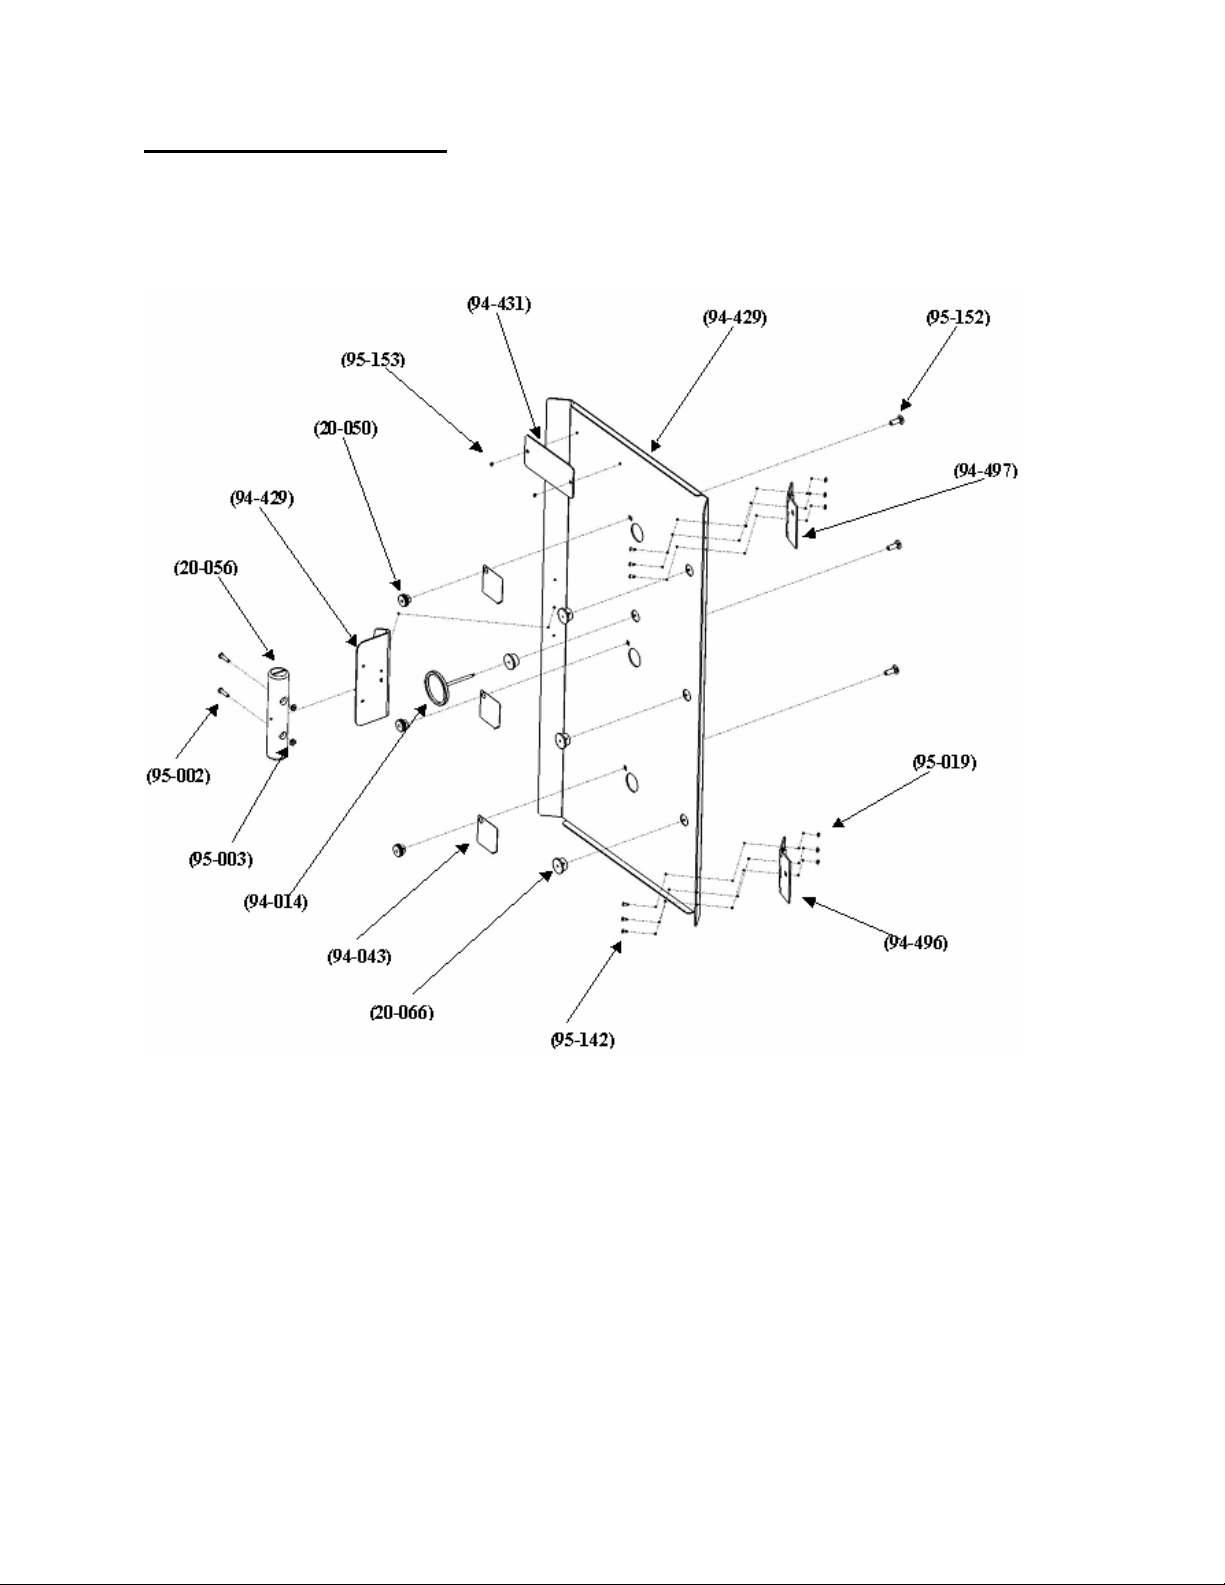
This level of disassembly is normally sufficient for a detailed cleaning. The following four pages
illustrate the build up of the Outer Cooking Chamber, Inner Cooking Chamber, Shelf Slide
and Door assemblies if you choose to break the unit down to its basic plates.
Note that further disassembly involves removing screws and bolts that are not captive. Be
careful not to lose these parts or to use them at an improper place during reassembly.
24
Page 29
Tallboy Knockdown
Outer Cooking Chamber Knockdown
25
Page 30

Tallboy Knockdown
Inner Cooking Chamber Knockdown
26
Page 31
Door Knockdown
Tallboy Knockdown
27
Page 32
Shelf Slide Knockdown
Tallboy Knockdown
28
Page 33
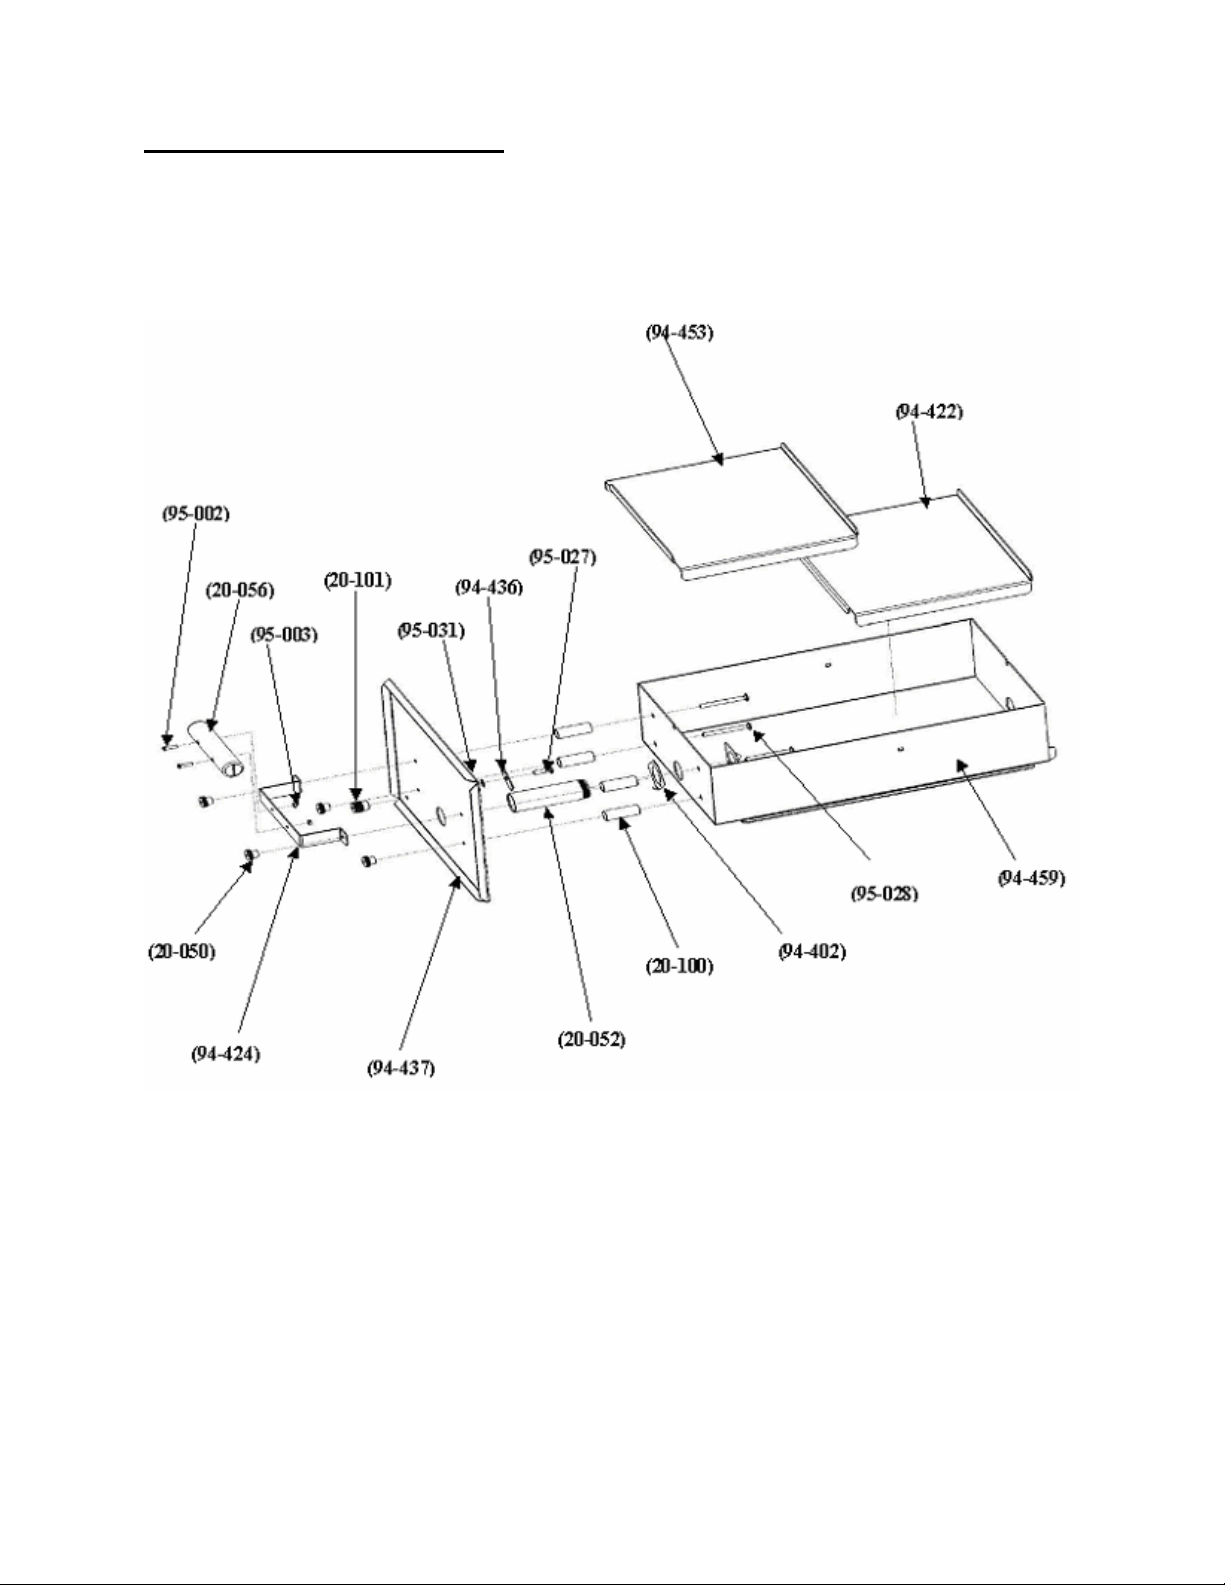
Firebox Knockdown
Tallboy Knockdown
29
Page 34
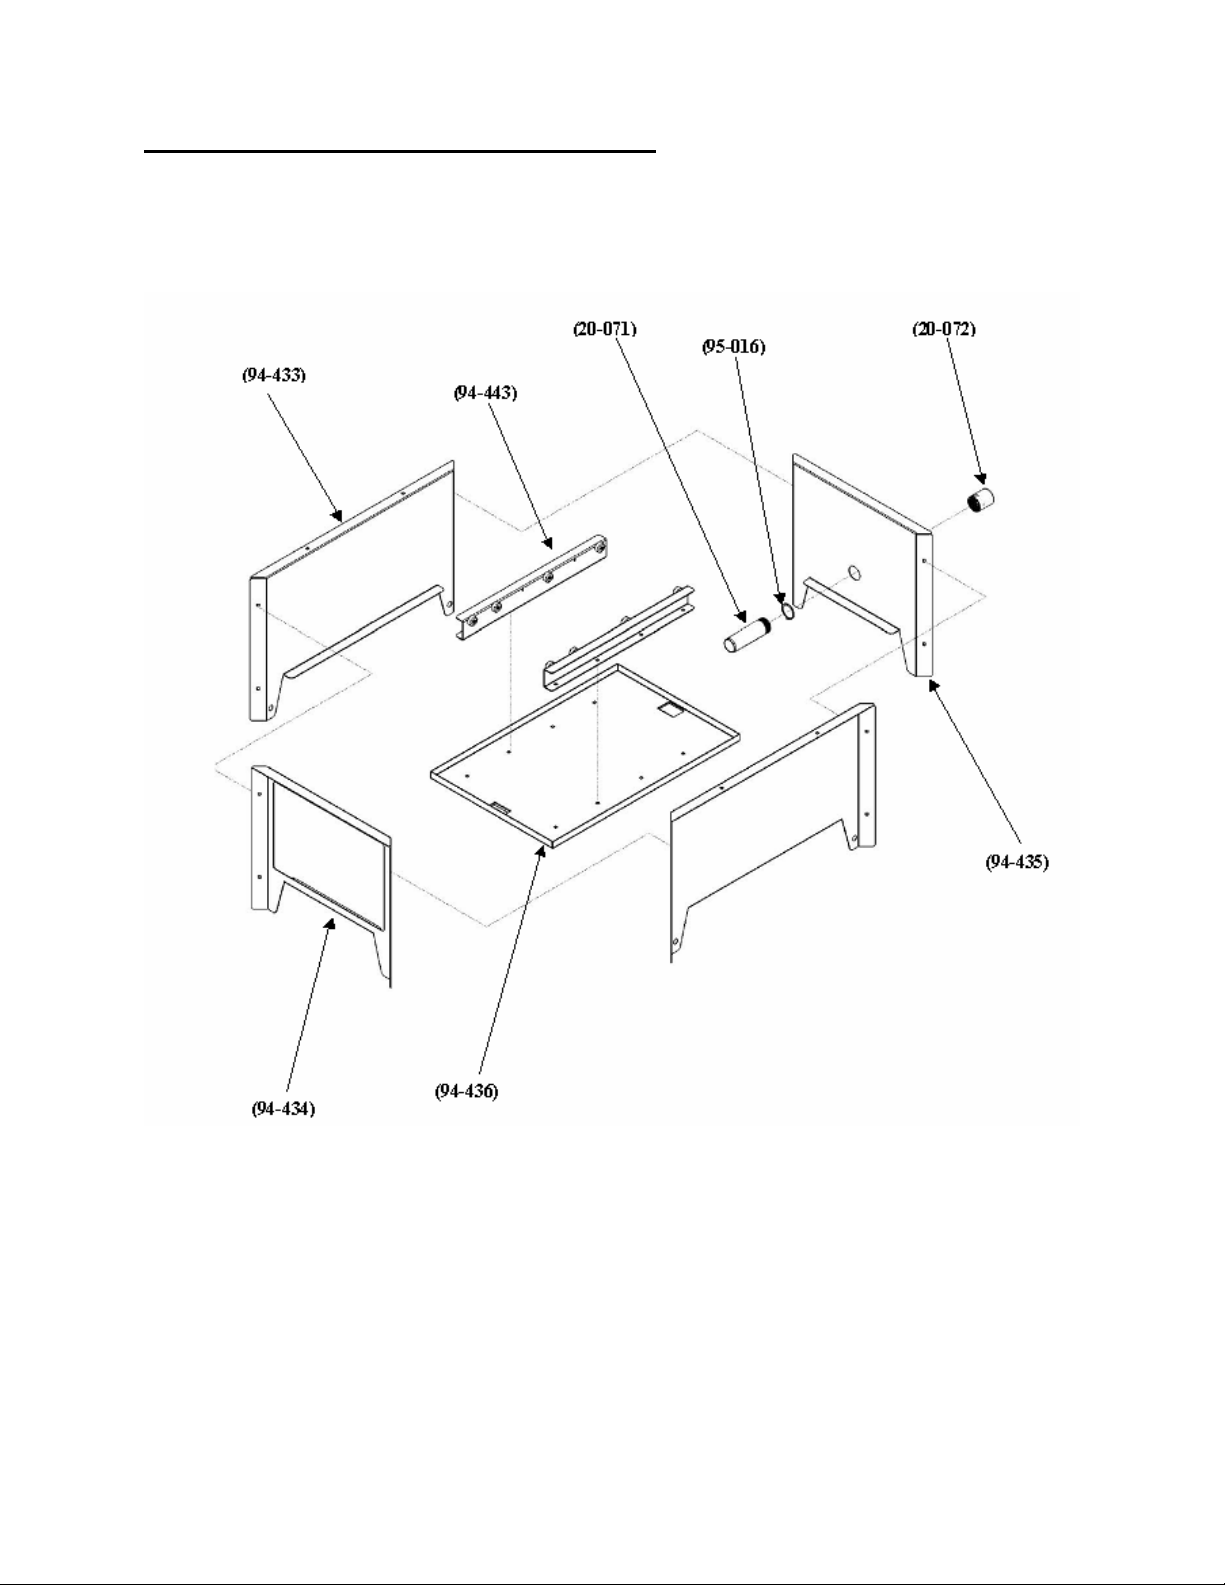
Firebox Housing Knockdown
Tallboy Knockdown
30
Page 35

Parts List
Accessories
Part # Quan Description
94-014 1 BBQ GURU THERMOMETER
94-501 1 ASH SHOVEL
93-002 1 COTTON GLOVES
20-051 1 BBQ STARTER SLEEVE
Major Panels and Large Components
Part # Quan Description
94-427 1 UPPER RIGHT SIDE PANEL
94-428 1 UPPER LEFT SIDE PANEL
94-429 1 FRONT DOOR PANEL
94-430 1 TOP LID (EXTERNAL)
94-431 1 UPPER FRONT PANEL
94-432 1 UPPER BACK PANEL (EXTERNAL)
94-433 1 LOWER SIDE PANEL
94-434 1 LOWER FRONT PANEL
94-435 1 LOWER BACK PANEL
94-436 1 LOWER BASE PAN
94-437 1 FIRE BOX DOOR
94-438 1 SMALL INTERNAL RIGHT SIDE PANEL
94-439 1 SMALL INTERNAL LEFT SIDE PANEL
94-440 1 BACK INTERNAL PANEL
94-441 2 SHELF SLIDE PANEL
94-442 1 OUTER BACK COVER
94-443 2 FIRE BOX SLIDE
94-444 1 INTERNAL LID PLATE
94-445 1 DOOR LATCH PLATE
94-446 1 DOOR HANDLE PLATE
94-459 1 FIRE BOX WELDED ASSEMBLY
94-422 1 FIRE BOX LOWER LID
94-453 1 FIRE BOX UPPER LID
94-424 1 FIRE BOX HANDLE STRAP
94-463 1 FIRE BOX DOOR LOCK PLATE
Reference Information
31
Page 36

Smaller Fabricated Parts
Part # Quan Description
94-415 1 INTERNAL LARGE DAMPER
94-448 1 NAME PLATE
94-043 3 CDF/TALLBOY DAMPER DOOR
94-496 1 LOWER DOOR HINGE
94-497 1 UPPER DOOR HINGE
20-085 1 DOOR LATCH HANDLE
20-056 2 DOOR HANDLE
20-080 8 FIRE BOX ROLLER
20-052 1 FRONT INDUCER TUBE
94-402 2 INDUCER TUBE NUT
20-071 1 TALLBOY BACK INDUCER
20-072 1 BACK INDUCER ADAPTER
20-100 4 MAGNUM FIREBOX SPACER
20-101 1 FIRE BOX LOCK KNOB
94-081 4 TALLBOY WIRE SHELF
20-040 2 BBQ REGULATOR PLUG
20-066 5 THERMOMETER MOUNT
Fasteners
Part # Quan Description
20-050 59 THUMB NUT
20-079 18 WALL SPACERS
95-152 40 1/4-20 X 3/4" CARRIAGE BOLT
95-045 18 1/4-20 X 1 1/2" CARRIAGE BOLT
95-028 4 1/4-20 X 2 3/4" CARRIAGE BOLT
95-002 5 8-32 X 3/4" MACHINE SCREW
95-003 21 8-32 HEX NUT
95-029 8 8-32 X 3/4 FLUSH FACE MACHINE SCREW
95-027 1 1/4-20 X 1" CARRIAGE BOLT
95-162 2 5/16-18 SOCKET HEAD CAP SCREW
95-153 2 4-40 X 1/8" FLUSH FACE MACHINE SCREW
95-142 6 4-40 X 1/4" PAN HEAD MACHINE SCREW
95-019 6 4-40 HEX NUT
Wheel and Axle Parts
Part # Quan Description
20-081 2 WHEEL AXLE
94-084 4 WHEEL 5" X 1 1/4" WD.
20-083 4 WHEEL SPACER
OFF-ROAD TIRE KIT
94-600 4 10" KNOBBY TIRES
20-099 2 LARGE WHEEL AXLE
20-098 4 KNOBBY TIRE SPACER
95-046 4 HAIRPIN COTTER PIN
95-047 4 1/2" I.D. FENDER WASHER
Reference Information
32
Page 37

Dimensions and Capacities
Dimensions
Overall Dimensions: 26"deep x 18.5"wide x 47"high
With patio wheels 48” high
With off road wheels 51” high
Total Weight of cooker: 175 lbs.
Shipping weight with crate: 225 lbs.
Internal Cooking Volume: 7.3 cu. ft.
Charcoal Capacity: 10-14 lbs.
Burn Time: 16-24 hrs @ 220° F
Light load condition
Fuel Consumption: .6 lbs. /hr.
Note: Fuel use and burn time
are cooking load dependant
Reference Information
Cooking Capacities
• 12 whole chickens
• or 20-25 chicken halves
• or hundreds of thigh/drumsticks
• or up to 900 wings
• or 4 large pork shoulders (68 lbs.)
• or 8 to 12 8-lb. pork butts (96 lbs.)
• or 32 racks of ribs (on end)
• or 16 racks of ribs (flat, untrimmed)
• or 125 lbs. of brisket flats
• or 450 pieces of jerky (1” by 7”)
33
Page 38

Reference Information
Door latch:
with. It is also bendable for increased spring load and precision closing and latching.
Door locks: located on the lower left corner of cooking chamber door and fire box drawer
are quarter turn knobs that are locked for security or transport of the cooker. They are a
great deterrent to “unauthorized cooker peaking” and will keep the cooking chamber door
or firebox from flying open during transport. Note: The inside of the cooker becomes a
great place for storage during transport.
Off Road Knobby Tires: Should be kept inflated to a low pressure so that they remain
spongy. This makes them “get flat” on the bottoms and helps the cooker to not want to roll
during use.
When moving: The cooker should be pushed from the back side. Turns can then be made
by tipping the cooker back (like a hand truck) or steering it by lifting slightly and pushing
opposite the direction of the turn. You will find it easy to control.
Is adjustable with the thumb nut and carriage bolt it is attached to the cooker
34
Page 39

Reference Information
Warrantee
The BBQ Guru hereby warrants to the original purchaser of this Caldera Del Fuego Tallboy
charcoal cooker/smoker that it will be free of defects in material and workmanship from the
date of purchase as follows:
Cooking Chamber steel panels against rust / burn-through 10 years
Firebox Housing steel panels against rust / burn-through 10 years
Firebox steel panels against rust / burn-through 2 years
Grill racks 2 years
Oak handles 1 year
All remaining parts 5 years
when assembled and operated in accordance with the printed instructions
accompanying it. The BBQ Guru may require reasonable proof of your date of purchase.
You should retain your sales receipt, invoice or credit card purchase receipt
Warranty shall be limited to the repair or replacement of parts that prove defective under normal
use and service and which on examination shall indicate, to The BBQ Guru’s satisfaction, they
are defective. Before returning any parts, contact the factory using the contact information in this
manual and on our website, www.thebbqguru.com. If we confirm the defect and approve the
claim, The BBQ Guru will elect to repair or replace such parts without charge. If you are
required to return defective parts, transportation charges must be prepaid. We will return parts
to the purchaser, freight or postage prepaid.
This Limited Warranty does not cover any failures or operating difficulties due to accident,
abuse, misuse, alteration, misapplication, vandalism, improper installation or improper
maintenance or service, or failure to perform normal and routine maintenance as set out in this
owner’s manual.
Deterioration or damage due to severe weather conditions such as hail, hurricanes,
earthquakes or tornadoes, discoloration due to exposure to chemicals either directly or in the
atmosphere, is not covered by this Limited Warranty.
There are no other express warrants except as set forth herein and any applicable implied
warranties of merchantability and fitness are limited in duration to the period of coverage of this
express written Limited Warranty. Some regions do not allow limitation on how long an implied
warranty lasts, so this limitation may not apply to you. The BBQ Guru is not liable for any
special, indirect or consequential damages. Some regions do not allow the exclusion or
limitation of incidental or consequential damages, so this limitation or exclusion may not apply to
you.
The BBQ Guru does not authorize any person or company to assume for it any other obligation
or liability in connection with the sale, installation, use, removal, return, or replacement of its
equipment; and no such representations are binding on The BBQ Guru. This Warranty applies
only to products sold at retail.
. This Limited
35
Page 40

Reference Information
Getting Factory Help
Reach us by toll-free telephone at: 1-800-288-GURU [(800) 288-4878]
Call our local telephone number: 215-674-9992
Visit our website for links and information: www.thebbqguru.com
Contact us by E-mail at: [email protected]
Write to us at: The BBQ Guru
353 Ivyland Road
Warminster, PA 18974-2205 USA
36
 Loading...