

Page 1
Features:
Quality 2.1 speaker system with built-in amplifier
Full audio spectrum performances, ideal for your favourite entertainment
from Mp3, Mp4, CD/DVD movies and digital playbacks
Specially designed woofer cabinet for bass and resolution
Comes with remote control and RCA stereo connection
Package contents:
subwoofer cabinet 1 pc
satellite speakers 2 pcs
User manual 1 pc
Operation explanation:
Audio input cord 1 pc
remote control 1 pc
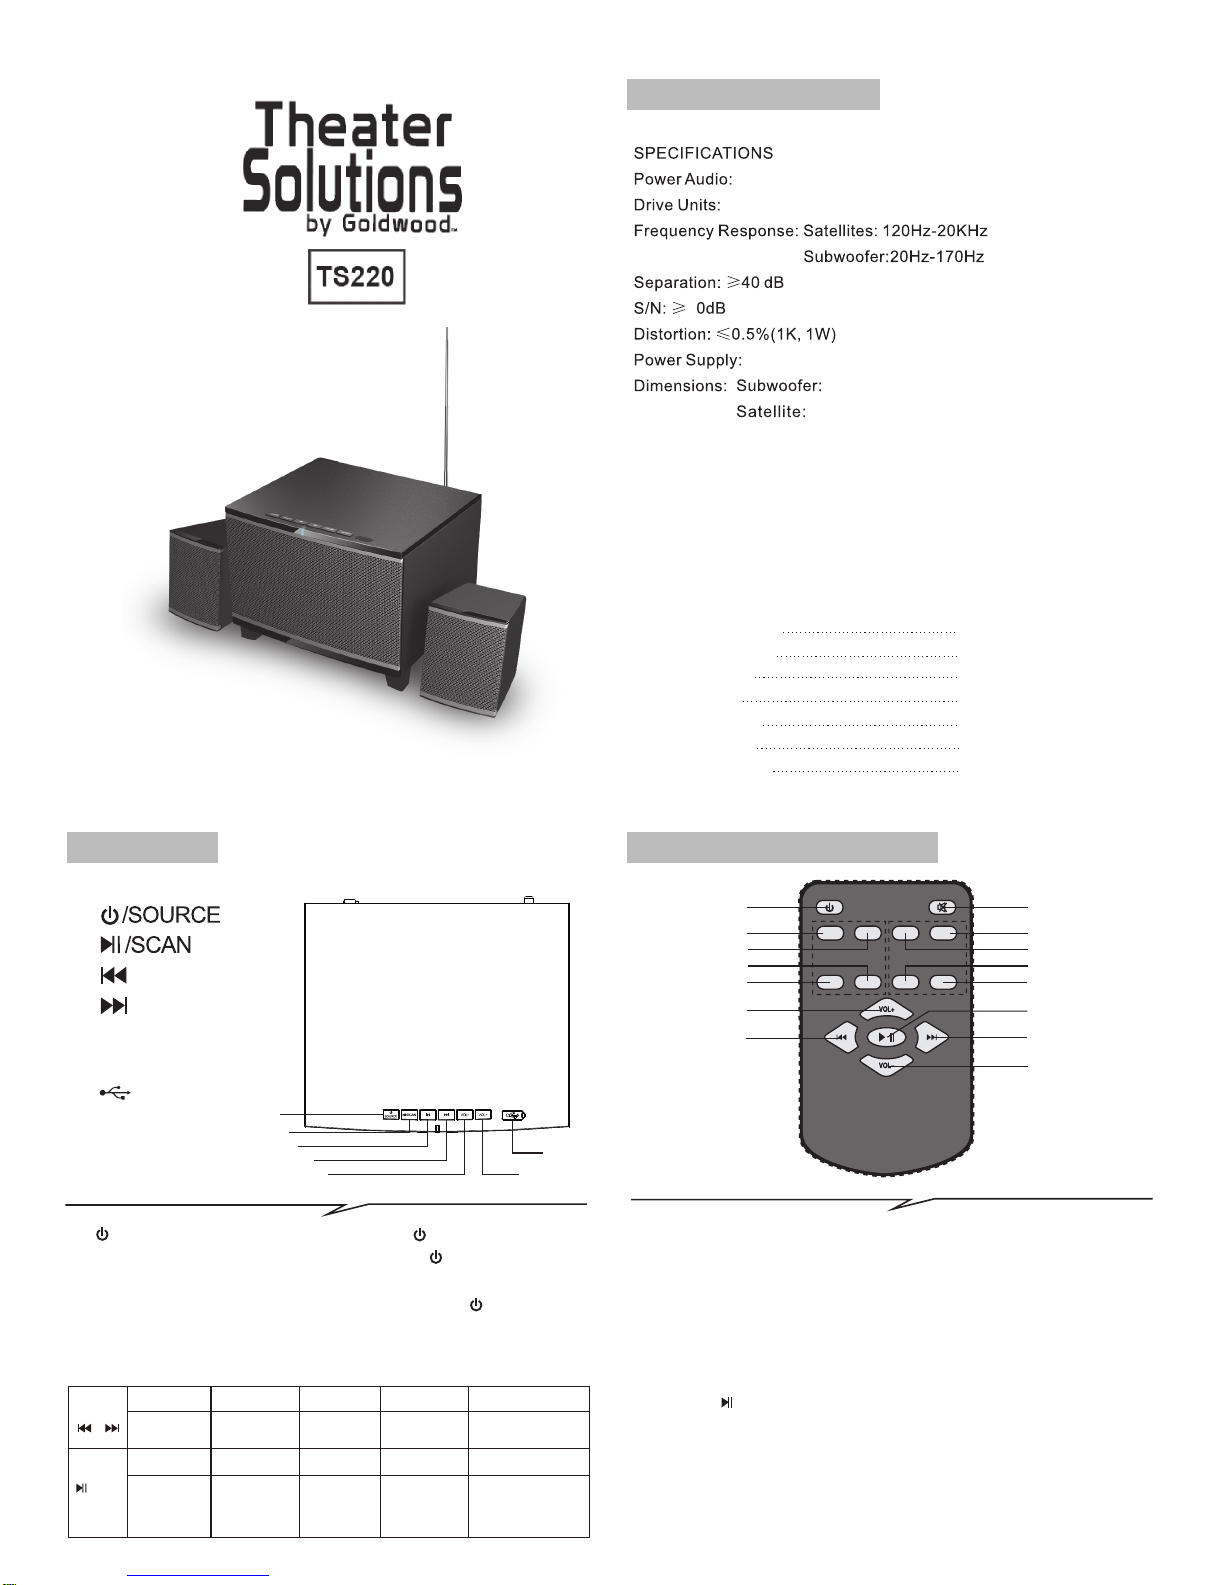
Front panel
~120V 60H z
W245xH1 87xD212 (m m)
W93xH118xD103 (mm)
3" x2 + 5" subw oofer
20W+12. 5Wx2(RM S)
How to use the remote control
Hanging screw
Screw Supporter
2 pcs
2 pcs
7
(2)
(1)
(3)
(4)
(5)
(6)
(7)
1.
2.
3.
4.
5. VOL-
6. VOL+
7.
USB socket
USB INPUT
BT INPUT AUX I NPUT FM TU NNE R
shor t press
shor t press
long time press
tra ck sele ction
pre vious /next
pla y/pau se
bluetooth
function can be
forcedisconnected
/SCA N
mut e
pla y/pau se
tra ck sele ction
pre vious /next
mut e
prev ious/ next
chan nel sel ectio n
auto matic s earch
fm rad io
stat ion/c hannel store d
auto matic ally
(1)
(7)
(11)
(13)
(15)
(12)
(14)
(3)
(9)
(2)
(4)
(8)
(6)
(10)
(5)
USB
BT
AUX
/
FM
NORMAL
POP
ROCK
JAZZ
1. ST-BY (Stand-by): Turns on the unit; default input mode is AUX. When in
ST-BY mode the LED will blink in Red colour; after turning on the unit, the
LED will glow in Red colour.
2. MUTE: Turn off volume. Press again to activate volume.
3. AUX: AUX input mode selection, red LED will be on.
4. POP: A kind of EQ mode, only workable at USB/BT mode.
5. FM: FM mode selection. When you enter FM mode, the purple LED will be on.
Long press to search and store FM stations/channels automatically.
6. NORMAL: A kind of EQ mode, only workable at USB/BT mode.
7. BT: Bluetooth reader mode selection. When you enter Bluetooth input mode,
Blue LED display right bottom start to flashing (2 seconds) to search the
Bluetooth device. Turn on your mobile Bluetooth device and search the
device name “BT SPEAKER ”, paired them well.When you have successfully
paired your mobile to the speaker system, the LED right bottom stop flashing.
1. /Source button
for input mode selection. Long pressing
/Source button
will put the unit in “Stand-by” mode.
/Source: After main power on, press
2. You can change the input modes by pressing
/Source
button. Color of LED in AUX mode is Red, Blue in USB/BT
and Purple in FM mode.
Page 2
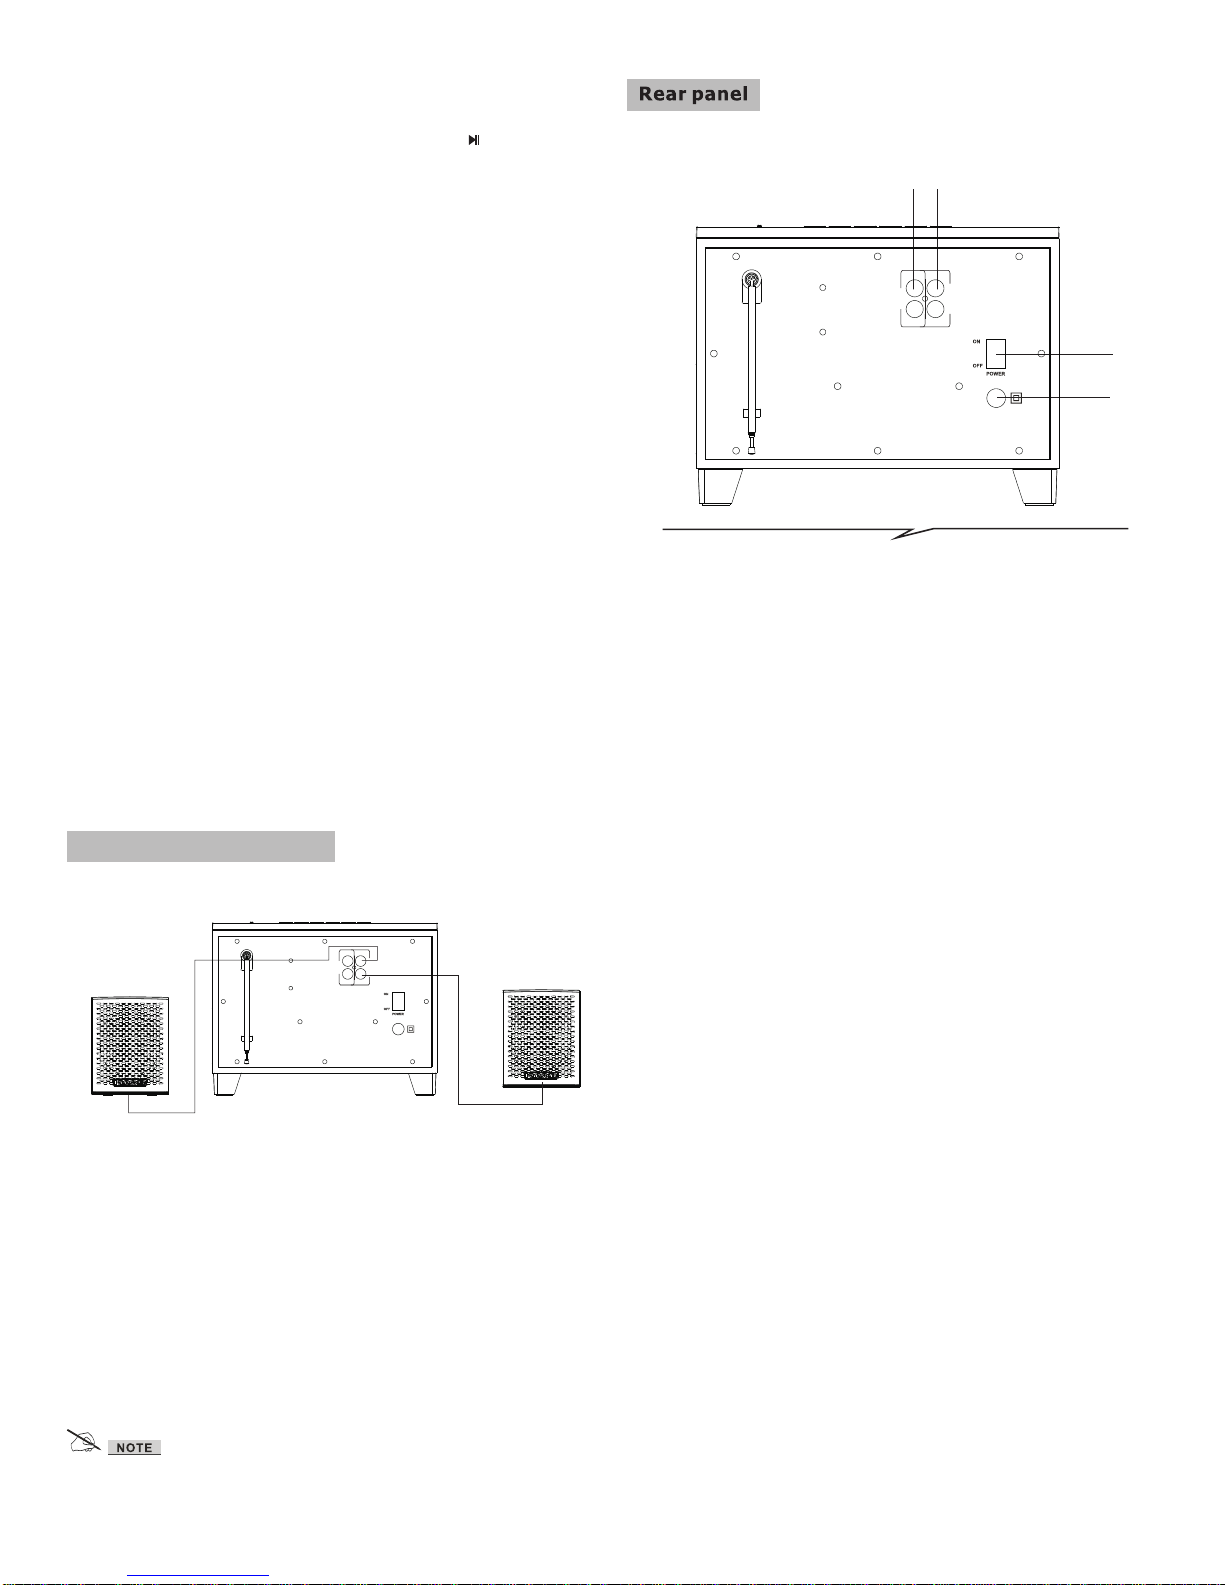
System connection diagram
1. Input:
Connect to sound sources
such as computer, CD
Player, Mp3, etc.
3. AC IN:
AC Power cord
2. Output:
Connect the satellite
speakers.
4. Power ON/OFF:
Switch for turning on/off
the power.
(3)
(4)
(2)
(1)
AC IN
INPUT
L
R
OUTPUT
L
R
* Do not leave objects generating magnetism near the speakers.
R
L
AC IN
INPUT
L
R
OUTPUT
L
R
1. Connect both satellite speakers to OUTPUT terminals of back panel.
2. Connect the power cord to the mains and power on the system.
3. To play AUX Mode, connect the 3.5 mm stereo input jack into the output of
the audio sources such as MP3, MP4, computer, etc. Connect other end
of RCA cables to “INPUT” terminal of Rear Panel.
4. For playing USB Mode, connect USB device to the socket shown on
page No.5.
5. For FM, please select FM mode using source key of front planel or FM
button on remote.
When start to play your mobile music, the LED flashed every one second. The
functions as "PREVIOUS/NEXT", "PLAY/PAUSE", can operate via the front
panel. On BT mode, when connecting with mobile, press “ ” for 3 seconds,
bluetooth function can be force-disconnected .
8. JAZZ: A kind of EQ mode, only workable at USB/BT mode.
9. USB: For USB mode selection. When enter into USB mode, blue LED will be
on. “NEXT” means next song; “PREV” means previous song; “PLAY/PAUSE”
means play/pause.
10. ROCK: A kind of EQ mode, only workable at USB/BT mode.
11. VOL+: Increase the volume by continuous or long press of VOL+.
12. PLAY/PAUSE: Play/Pause the song in USB/BT and FM.
13. PREVIOUS: For selection previous song in USB/BT and previous stored FM
station in FM.
14. NEXT: Play next song by pressing "Next".
15. VOL-: Decrease the volume by continuous or long press of VOL-.
Page 3

FCC Part 15.19 Warning Statement
THIS DEVICE COMPLIES WITH PART 15 OF THE FCC RULES. OPERATION
IS SUBJECT TO THE FOLLOWING TWO CONDITIONS: (1) THIS DEVICE MAY
NOT CAUSE HARMFUL INTERFERENCE, AND (2) THIS DEVICE MUST
ACCEPT ANY INTERFERENCE RECEIVED, INCLUDING INTERFERENCE THAT
MAY CAUSE UNDESIRED OPERATION.
FCC Part 15.21 Warning Statement
NOTE: THE GRANTEE IS NOT RESPONSIBLE FOR ANY CHANGES OR
MODIFICATIONS NOT EXPRESSLY APPROVED BY THE PARTY RESPONSIBLE FOR
COMPLIANCE. SUCH MODIFICATIONS COULD VOID THE USER’S AUTHORITY TO
OPERATE THE EQUIPMENT.
FCC Part 15.105 Warning Statement
Note: This equipment has been tested and found to comply with the limits for a Class B digital
device, pursuant to part 15 of the FCC Rules. These limits are designed to provide
reasonable protection against harmful interference in a residential installation. This
equipment generates, uses and can radiate radio frequency energy and, if not installed and
used in accordance with the instructions, may cause harmful interference to radio
communications. However, there is no guarantee that interference will not occur in a
particular installation. If this equipment does cause harmful interference to radio or television
reception, which can be determined by turning the equipment off and on, the user is
encouraged to try to correct the interference by one or more of the following measures:
—Reorient or relocate the receiving antenna.
—Increase the separation between the equipment and receiver.
—Connect the equipment into an outlet on a circuit different from that to which the receiver is
connected.
—Consult the dealer or an experienced radio/TV technician for help.
RF warning statement:
The device has been evaluated to meet general RF exposure requirement.
To maintain compliance with FCC's RF exposure guidelines, this equipment should be
installed and operated with a minimum distance of 20cm between the radiator and your body.
180mm
240
mm
 Loading...