

Thane Housewares Thunder Stick Pro Instructions Manual

PLEASE READ CAREFULLY
BEFORE USING THE APPLIANCE.
n Blends
n Chops
n Grinds
n Whips
n Mixes
n Purees
n Processes
n Juices
8
A p p l i a n c e s
in
O N E !
GRINDS coffee beans!
SALSA in seconds!
GREAT applesauce!

1
Your new blender system purees and blends foods
quickly and easily. Use it to make sauces, soups, salad
d ressings and mayonnaise, dietary and baby foods,
beverages (such as milkshakes, eggnog, cocktails,
etc.), batter for waffles, pancakes and Yo r k s h i re
puddings, and chopping nuts or grinding coffee beans.
The blender system is designed for use with its mixing
container; however it can be used in a saucepan, bowl
or other container.
Note: Always remember to leave enough space for
the movement of food to prevent spill-over from
the container.
When using electrical appliances, especially when
c h i l d ren are present, basic safety pre c a u t i o n s
should always be followed including the following:
READ ALL INSTRUCTIONS BEFORE USING.
DANGER – To reduce the risk of electrocution.
1 .
Read all instructions before using the appliance.
2 . To protect against risk of electric shock, do not
put motor end of the appliance in water or
other liquid.
3 . Do not place appliance where it can fall or be
pulled into water or other liquid.
4 . Do not reach for an appliance that has fallen
into water. Unplug immediately!
WARNING – To reduce the risk of burn s ,
e l e c t rocution, fire, or injury to person:
1 . This appliance should not be used by childre n .
Close supervision is necessary when this
p roduct is used near children or invalids.
2 .
Use this appliance for its intended use as
described in this bro c h u re. Do not use any other
accessories or attachments not re c o m m e n d e d
by the manufacture r. They may result in fire ,
electrical shock, or personal injury.
3 . Never operate this appliance if it has a
damaged cord or plug, if it is not working
properly, if it has been dropped or damaged,
or dropped into water. Return the appliance
to an authorized customer service center for
inspection, repair, or adjustment.
4 . Keep the cord away from heated surf a c e s .
5 . Always grab by the plug to remove from outlet.
DO NOT pull on cord .
6 . Never force the plug into an outlet.
7 . Do not use outdoors or operate where aerosol
(spray) products are being used or where
oxygen is being administere d .
8 . Do not let cord hang over edge of table or
c o u n t e r, or touch hot surf a c e .
9 . Do not place on or near a hot gas or electric
b u rner or in a heated oven.
1 0 . Unplug from outlet when not in use, before
putting or taking off parts, and before
cleaning.
1 1 . Keep hands and utensils out of the container
while blending to prevent the possibility of
s e v e re injury to persons or damage to the unit.
A scraper may be used but must be used only
when the unit is not ru n n i n g .
1 2 . Blades are sharp, handle care f u l l y.
1 3 . Do not use on stove.
1 4 . When mixing liquids, especially hot liquids,
use a tall container or make small quantities at
a time to reduce spillage.
1 5 . To reduce the risk of injury never place cutting
blade or discs on base without first putting
bowls properly in place.
1 6 . Save these instructions.
IMPORTANT SAFEGUARDS
PLEASE READ CAREFULLY
INTRODUCTION
The appliance has a polarized plug (one blade is wider than the other). To reduce the risk of electric shock,
this plug will fit in a polarized outlet only one way. If the plug does not fit fully in the outlet, reverse the
plug. If it still does not fit, contact a qualified electrician. Do not modify the plug in any way.
SAVE THESE INSTRUCTIONS
C a u t i o n: When using your blender in a saucepan, the saucepan must not be on or
over a heat sourc e .

2
Rinse all parts which come into contact with food (see cleaning and maintenance).
HOW TO USE YOUR BLENDER
BEFORE USE
1. Place food in the mixing bowl or other suitable
c o n t a i n e r. For the most consistent results, food
should be processed in small quantities.
2. Insert blender into container. Plug appliance
into the wall outlet.
3. Grasp unit in hand and press the control.
Guide the blender through the food, moving
it slowly up, down and from side to side.
N o t e: The unit should not be operated for more
than one minute without stopping.
When pureeing food, it is important to use
enough liquid (juice, milk or cream, broth, etc.) to
have a smooth mixture. Adjust the consistency of
the mixture by adding more liquids or soft solids.
C a u t i o n: Always unplug the blender after use.
Keep the blender out of the reach of childre n .
FOOD PROCESSOR ATTACHMENT
To use the food processor
attachment remove the
blender attachment fro m
the motor unit of the
Thunderstick Pro by
grasping it firmly and
twisting in a clockwise
d i rection. To attach the
motor unit to the top of the
food processor, line up the
a rrows and twist in a
clockwise direction. See
the pictures on the right.
To remove the motor unit
f rom the food pro c e s s o r,
twist in a counter- c l o c k w i s e
d i rection and lift the motor
unit off.
To reattach the motor unit
with the blender attachment,
line up the arrows and twist
in an counter- c l o c k w i s e
d i rection. See the pictures to
the right.
For best results when using the food attachment
cut up larger pieces of food before processing and
only fill to the line shown. Pulse the motor until
the desired result is achieved. You should not
operate for longer than 30 seconds at a time
without stopping. The food attachment is not
suitable for hot food.
3
For initial cleaning of the detachable parts, fill
the beaker with warm water and a few drops
of detergent and switch on the appliance for a
few seconds.
To clean after use, unplug the unit and hold the
blade portion of the blender under running
water to rinse clean. If food particles are not
easily rinsed off, place a drop of detergent in the
mixing beaker with one cup of warm water and
operate the unit for about 60 seconds, or until
clean. Unplug, rinse and dry.
Caution: Never immerse the motorized
power unit in water; simply wipe the
outside with a damp cloth. Do not use
abrasive or scouring agents.
Pay attention that no water penetrates the lid of
the food processor attachment. The other parts
are dishwasher safe.
HOW TO CLEAN YOUR BLENDER SYSTEM
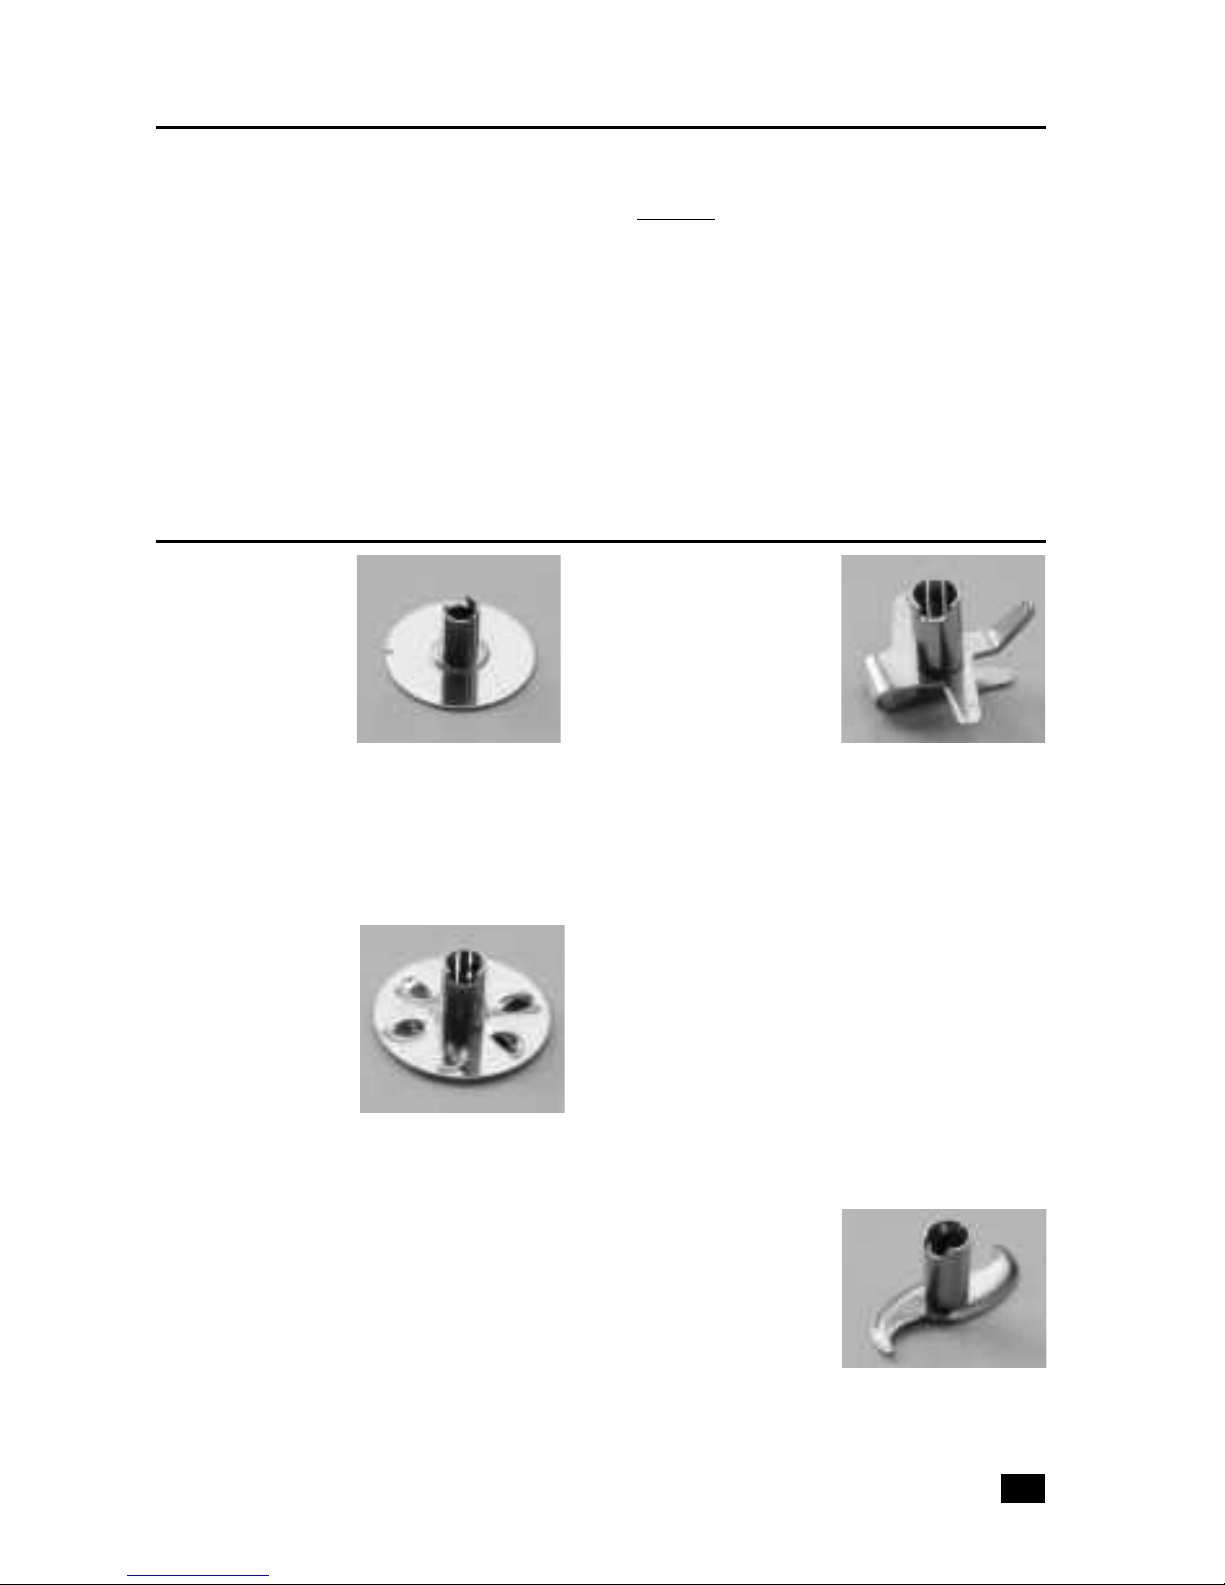
Blade A
This is the blade you
would use in place
of your mixer. Move
in an up and down
motion to draw the air
in. Whips egg whites,
f rostings, puddings, chiffon recipes, cream, skim
milk, non-fat dry milk, and anything you want
f l u ff y. Move in a flowing, up and down motion to
draw the air in. Skim milk, cream, egg whites,
etc. work much faster in a cylinder container.
Blade B
This blade will take
lumps out in seconds,
for gravies, mashed
potatoes, sauces and
all wet batters, like
cake mixes, pancakes,
etc. Makes regular malts and shakes right in the
cup. Mayonnaise and salad dressings from raw
i n g redients are fast and easy. • Blade B will be
moved around in the container depending on the
size and shape of the food to be processed. For
gravies and sauces use the low setting and move
the blender from one side of the container to the
o t h e r, covering the entire container. To mash
potatoes move the blender in an up and down
motion like a plunger and blend out the lumps.
Blade C
This blade is for
working heavy doughs
like bread, cookies,
pastries, and noodles.
Chop or puree fru i t s ,
vegetables and cooked
meat for baby food. • Chop cooked meats for ham
salad, turkey salad, tuna or egg salad. • Bre a d
c rumbs, cracker crumbs, graham cracker cru m b s
for crusts, may be processed in stiff Ziploc
baggies. Grate carrots for carrot cake and raisin
salad, potatoes for potato cakes and hash
browns, apples for applesauce, cheese for tacos
and pizzas, and cabbage for coleslaw, etc. This
blade will always be moved in a chopping
motion. Use a light touch especially in the
baggie. Remember, you have a lot of power, let
the machine do the work, you do the moving.
With ice, add some water to mix. If you flood
the ice you will get large chunks. Water to the
level of the ice will give you shaved.
Raw Meat
Grinder Blade
All meats can be
chopped: chicken,
beef, turkey, pork,
veal, etc. As you chop,
in an up and down motion, you will notice the
fats and veins all wrap around the wand, leaving
you with the pure protein.
INDIVIDUAL BLADE INSTRUCTION
4
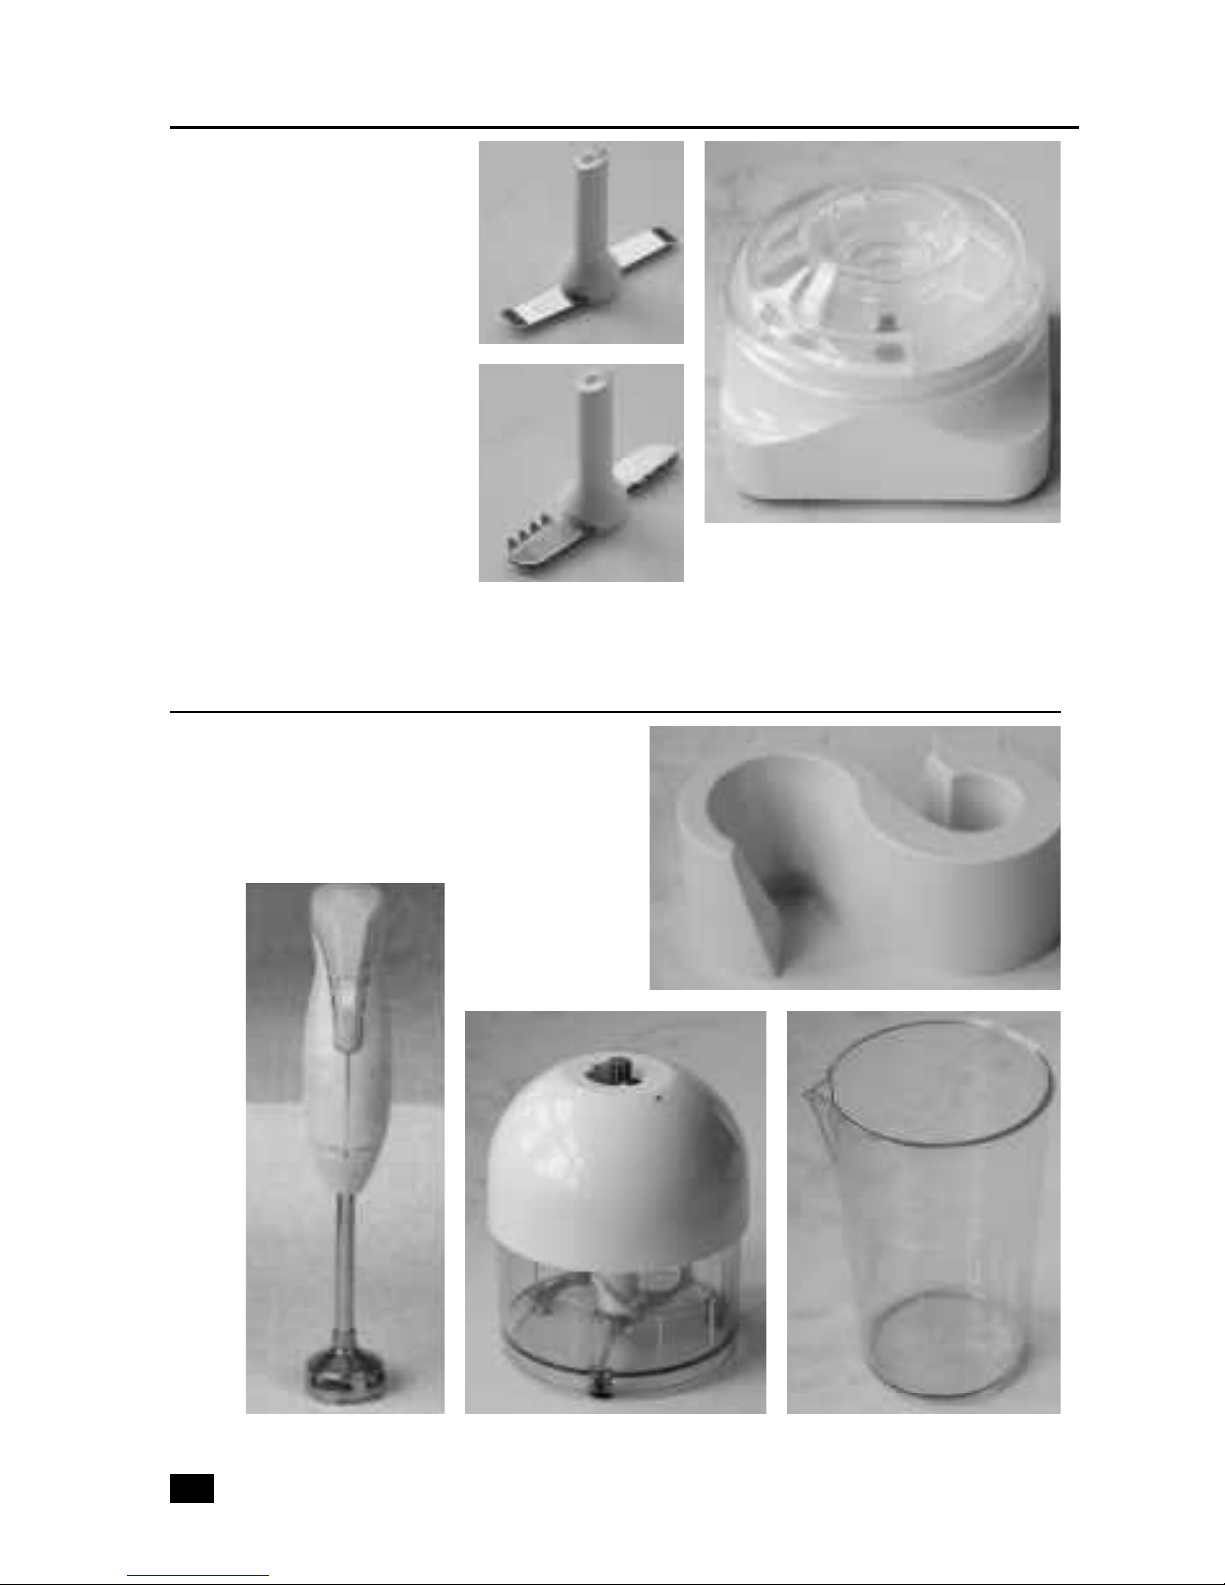
Dry Grinder Attachment
Straight blade – Blade D
Use for grinding coffee beans,
spices, orange, lemon and lime
peels, corn, wheat, barley, oats,
chocolate, and coconut.
Grating blade – Blade E
Use for slightly softer ingredients
such as cheese, chocolate, cereals,
beans etc.
Note: Better results are obtained
by cutting the ingredients into
small pieces before grating.
INDIVIDUAL BLADE INSTRUCTION(cont.)
The stand unit can be wall mounted, using the
s c rews and wall plugs provided. Leave one
quarter inch of the screw exposed; slide holder
over the screws. The stand should fit snugly to
the wall, tighten the screws if necessary.
STORING YOUR BLENDER
Stand
Mixing ContainerFood processor
attachment
Motor unit &
blender
attachment
Dry grinder attachment
The dry grinder attachment
works with blades D and E.

5
If an accessory does not fit snugly, you can
adjust it by gently squeezing with a pair of
pliers as shown.
HOW TO ADJUST BLADES
Insert the blade directly into the base of the
shaft ensuring that the groove on the blade
lines up with the notch on the blender shaft.
(See picture, right).
Caution: Always ensure that the appliance
is disconnected from the wall outlet when
changing a blade.
HOW TO INSERT THE BLADES
Hold the blade removal tool firmly and position
it above the stem of the blade and use as a lever
to release the blade. (See picture, right).
HOW TO REMOVE BLADES
Blade removal tool

6
With regular use you will quickly realize the
potential and versatility of your BLENDER
SYSTEM eventually creating your own re c i p e s
and finding new ones.
The correct use of the BLENDER SYSTEM is
based on two principles:
1. The way the appliance is held.
2. The way in which you operate
your appliance.
The shape of the appliance is designed to have a
p recise balance, allowing you to hold the unit
with minimum eff o rt, operating the safety switch
with forefinger or middle finger.
The choice of the container is very important in
achieving the best results. Remember that the
c h rome shaft of the mixer must be placed in the
container before you switch the appliance on.
When chopping fruits or vegetables, your
container should be tall and slim. When
chopping, partially cover the opening of the
container with your free hand.
After use unplug the appliance, remove any food
scrap particles and rinse clean.
Keep your appliance clean and in good
condition. Follow these simple cleaning
guidelines:
• After use always rinse the shaft and blade
in warm water and wipe clean
• Wipe the plastic housing unit with a
damp cloth.
NOTE: Do not immerse the plastic housing of
the unit in liquid or water.
NOTE: Some units may vary slightly in their
appearance.
This appliance is made for short term operation.
After one minute of operation, stop to allow the
unit to cool down.
Only switch on the Thunderstick Pro when the
blender is in the food. Wait for the mixer to stop
rotating before taking it out.
Let boiling liquids cool to 80ºF before using the
Thunderstick Pro. There is the danger of
scalding when dealing with hot liquids and care
should be taken.
HELPFUL HINTS:

7
Special Blend Salsa Dip
2 medium tomatoes, diced
1 large onion, diced
3 tbsp. green chilies, canned, diced
4 tsp. distilled white vinegar
1 tbsp. fresh cilantro (coriander), chopped
Sea salt, optional
Blades C & D
Chop tomatoes and cilantro.
Dice onion.
Mix all ingredients together.
Cover and refrigerate.
Guacamole Dip
2 small avocados, peeled, mashed
1 tomato, diced
1/4 onion, chopped
1 tbsp. lemon juice
1 clove garlic, minced
2 tsp. Wo rc e s t e r s h i re sauce
Dash cayenne pepper
Dash pepper
Dash sea salt
Blade C
Chop tomato, onion, and garlic.
Mash avocado and stir in lemon juice
immediately. This prevents discoloration. Add
remaining ingredients. Mix well. Cover
with thin layer of mayonnaise to pre v e n t
discoloration. Chill.
* You may add some crumbled bacon, if desire d .
RECIPES - APPETIZERS
Salsa
4 ripe tomatoes, quart e re d
1 medium onion, peeled and quart e re d
1 red pepper, seeded and chopped into pieces
1 clove garlic
2 tsp. lemon juice
jalapeno (1/3 for mild flavor, a whole for spicy)
dash of Wo rc e s t e r s h i re sauce
Blade C
Place all ingredients into the food processor and
pulse until the desired consistency is achieved.
S e rve with chips or use as a condiment.
Catalina Dip
1 cup peeled tomatoes
1 clove garlic
1/2 tsp. salt
1/4 tsp. pepper
1/4 tsp. dry mustard
2 tbsp. lemon juice
4 or 5 sprigs parsley
1 cup cottage cheese
1/4 cup dill pickles, finely chopped
1 cooked egg, finely chopped
Blade C
In a jar, combine 1st seven ingredients.
Mix well.
Blade B
Add remaining ingredients to jar and blend well.
 Loading...