

Page 1

INSTRUCTION MANUAL
SeWiNG
CIRCUITS
Franckh -Kosmos Verl ags-GmbH & Co . KG, Pfizer str. 5-7, 70184 Stutt gart, Germ any | +49 (0) 711 2191-0 | w ww.kosmos. de
Thame s & Kosmos, 301 Frie ndship St., P rovidence , RI, 02903, USA | 1-800- 587-2872 | w ww.thames andkosmos. com
Thame s & Kosmos UK Ltd, G oudhurst, K ent, TN17 2QZ , U nited Kingdom | 0 1580 212000 | www.tha mesandkos mos.co.uk
Page 2
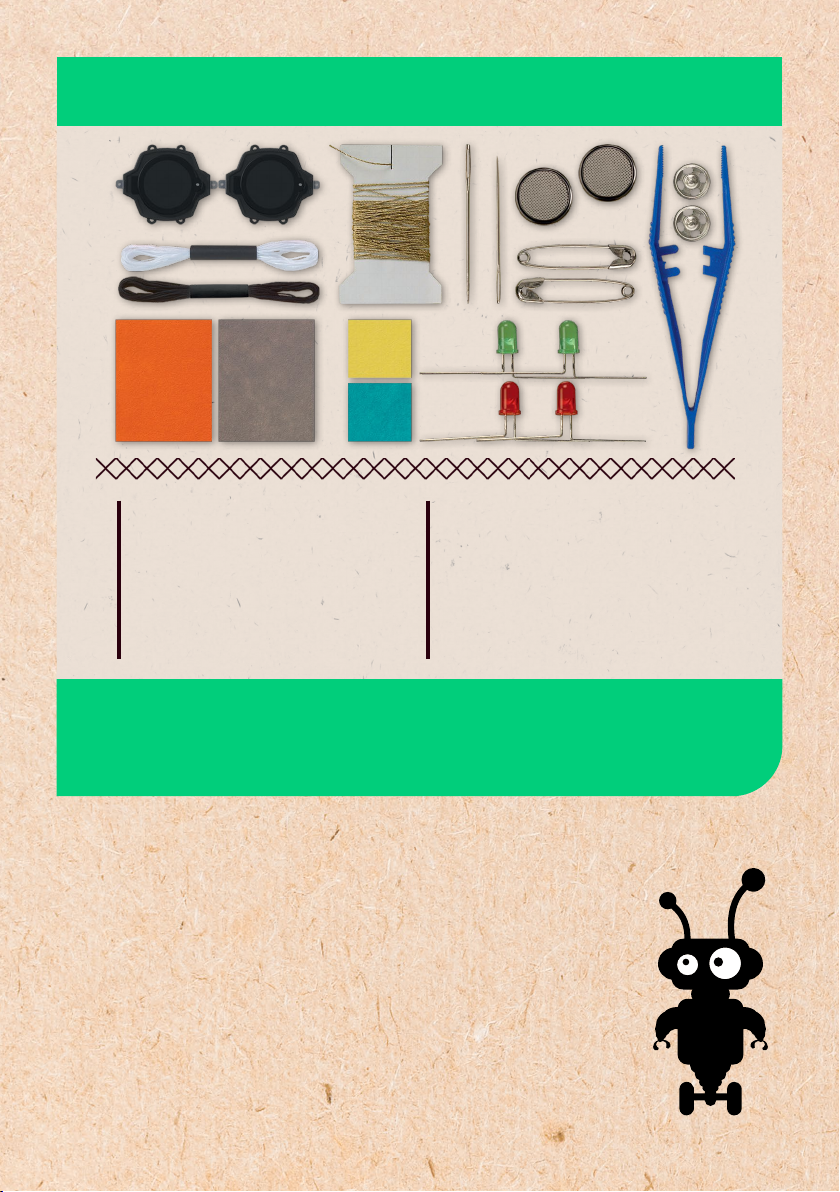
KIT CONTENTS
1
7
Battery holders (2)
1
Conductive thread, 5 m
2
Embroidery needle
Sewing needle
-volt button cell
batteries, type CR2032 (2)
Pushbuttons (2)
YOU WILL ALSO NEED: Paper, soft pencil, (pointed) scissors, pins, fabric
scraps, colored pencils, permanent marker, felt-tip pen, small Phillipshead screwdriver, fabric glue (optional)
2
10
11
12
Bundles of embroidery thread (2)
Safety pins (2)
8
Large felt pieces (2)
Small felt pieces (2)
10
Green LEDs (2)
11
Red LEDs (2)
12
Tweezers
13
5
8
6
13
Dear Friend of Robots,
Today’s robots can handle all kinds of tasks: assembling cars
or furniture, helping doctors, and even playing soccer. Usually,
they are made of hard materials and wired with metal cables.
But did you know that you can also make a soft and cuddly
robot without hard metal or wires? This kit will help you
invent your own glow-bot inspired by your own imagination.
And the best thing about it: You can give him glowing eyes,
warning lights, and buttons!
2
Page 3
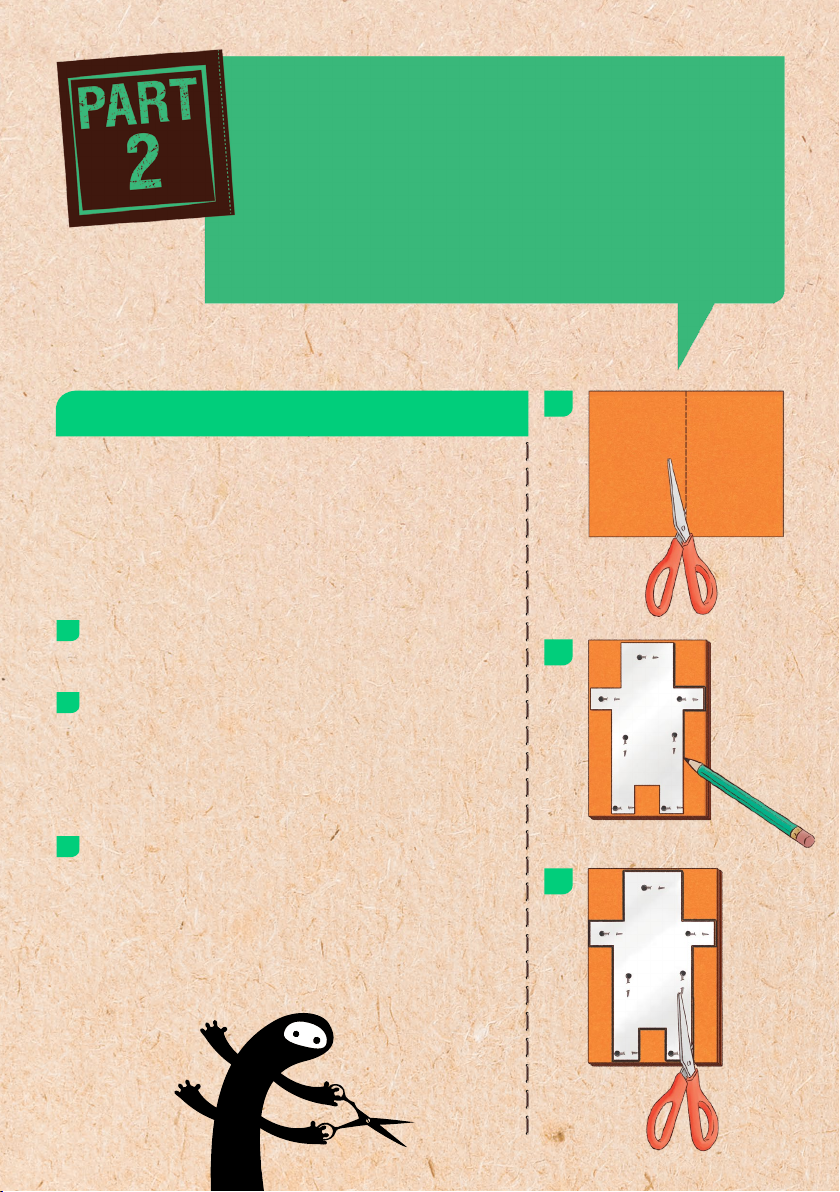
SEW THE ROBOT’S
BoDY
Cut the felt
You will need:
Your pattern, large piece of felt, ruler, pins, soft
pencil, scissors
HERE’S HOW:
Take the gray or orange piece of felt from the
box and cut it in half.
Place the two halves on top of one another,
position your pattern over them, and secure
all three layers together with pins. Take your
pencil and trace the outline of the pattern
onto the felt.
Cut the felt along the line you drew. Be
careful not to let the two pieces of felt slip!
Then remove the pattern and put it in a safe
place.
6
Page 4

Your little hand-stitch
dictionary
TIP!
When sewing, you will be using a variety of
stitches — the general term for the various
ways that you will be guiding needle and thread
through fabric. Practice the stitches on a scrap of
fabric before sewing your glow-bot.
You will need:
Embroidery needle, embroidery thread, scissors,
fabric scrap
Here’s how:
The perfect length of thread: Take the end of
the thread between your thumb and
forefinger and wrap the thread once around
your elbow and back to your thumb. Then cut
that section of thread.
The starting knot: Insert the end of your
thread into the eye of the needle. Tie a knot
in the longer end by winding the thread two
to three times around your index finger and
pulling the end of the thread through the
“ring.” Then cut off the thread right next to
the knot.
You will be sewing
in no time! When
selecting the thread, be
sure to pay attention to
the difference between
the non-conductive
thread (material no.
7) and the conductive
thread (material no. 2)!
Always use the type of
thread indicated under
the “You will need”
heading.
The running stitch: Insert the needle through
the fabric from the back toward the front.
Then, keep inserting the needle through the
fabric, alternating from the front and from
the back and keeping the stitches more or
less the same length, pulling the thread
through as you go.
7
Page 5

The backstitch: Here you will be sewing a
little bit backwards with each stitch,
creating a seam without gaps. In this
example, the stitch is going from right to left.
Start as you would for a running stitch: Begin
by inserting the needle and thread through
the fabric from the back to the front (1),
move the needle one stitch length to the left
(2), and then guide the thread from the front
to the back again (3). Now move the needle
one stitch length to the left again and guide
the thread from the back to the front again
(4). Now it’s time to go backwards! Move the
needle one stitch length to the right and
stitch from the front to the back (5), just to
the left of the first stitch. Guide the thread
on the back side two stitch lengths to the
left (6), one stitch length past your previous
back-to-front hole, and thread the needle
from the back to the front again. Now move
one stitch backwards (7), and thread the
needle from the front to the back just to the
left of the second stitch. Again, guide the
thread on the back side two stitch lengths to
the left, and thread the needle from the back
to the front again. Now go back to the right
again. Keep stitching in this way.
57
2
TIP!
Pull the thread tight
after each stitch, but
not too tight. The fabric
should always remain
smooth and not pucker.
If it puckers, it means
you have pulled the
thread too tight.
a
Backstitching
Thread lying
under the needle
3
The blanket stitch: Leave a space of about
half a centimeter from the edge of the piece
of fabric and stitch from the back to the
front. Now leave a small space to the right
and stitch from the front to the back. At this
point, you have to be sure that the thread is
lying under the needle (a). Pull the thread
through tightly. Now leave a small space
again to the right and stitch from the front
to the back, with the thread lying under the
needle (b). Continue like this.
>>> Continue reading on page !
4
6
8
1
b
c
 Loading...