

Page 1
MM CE GS Guide.book Page 1 Monday, June 20, 2005 11:04 AM
English
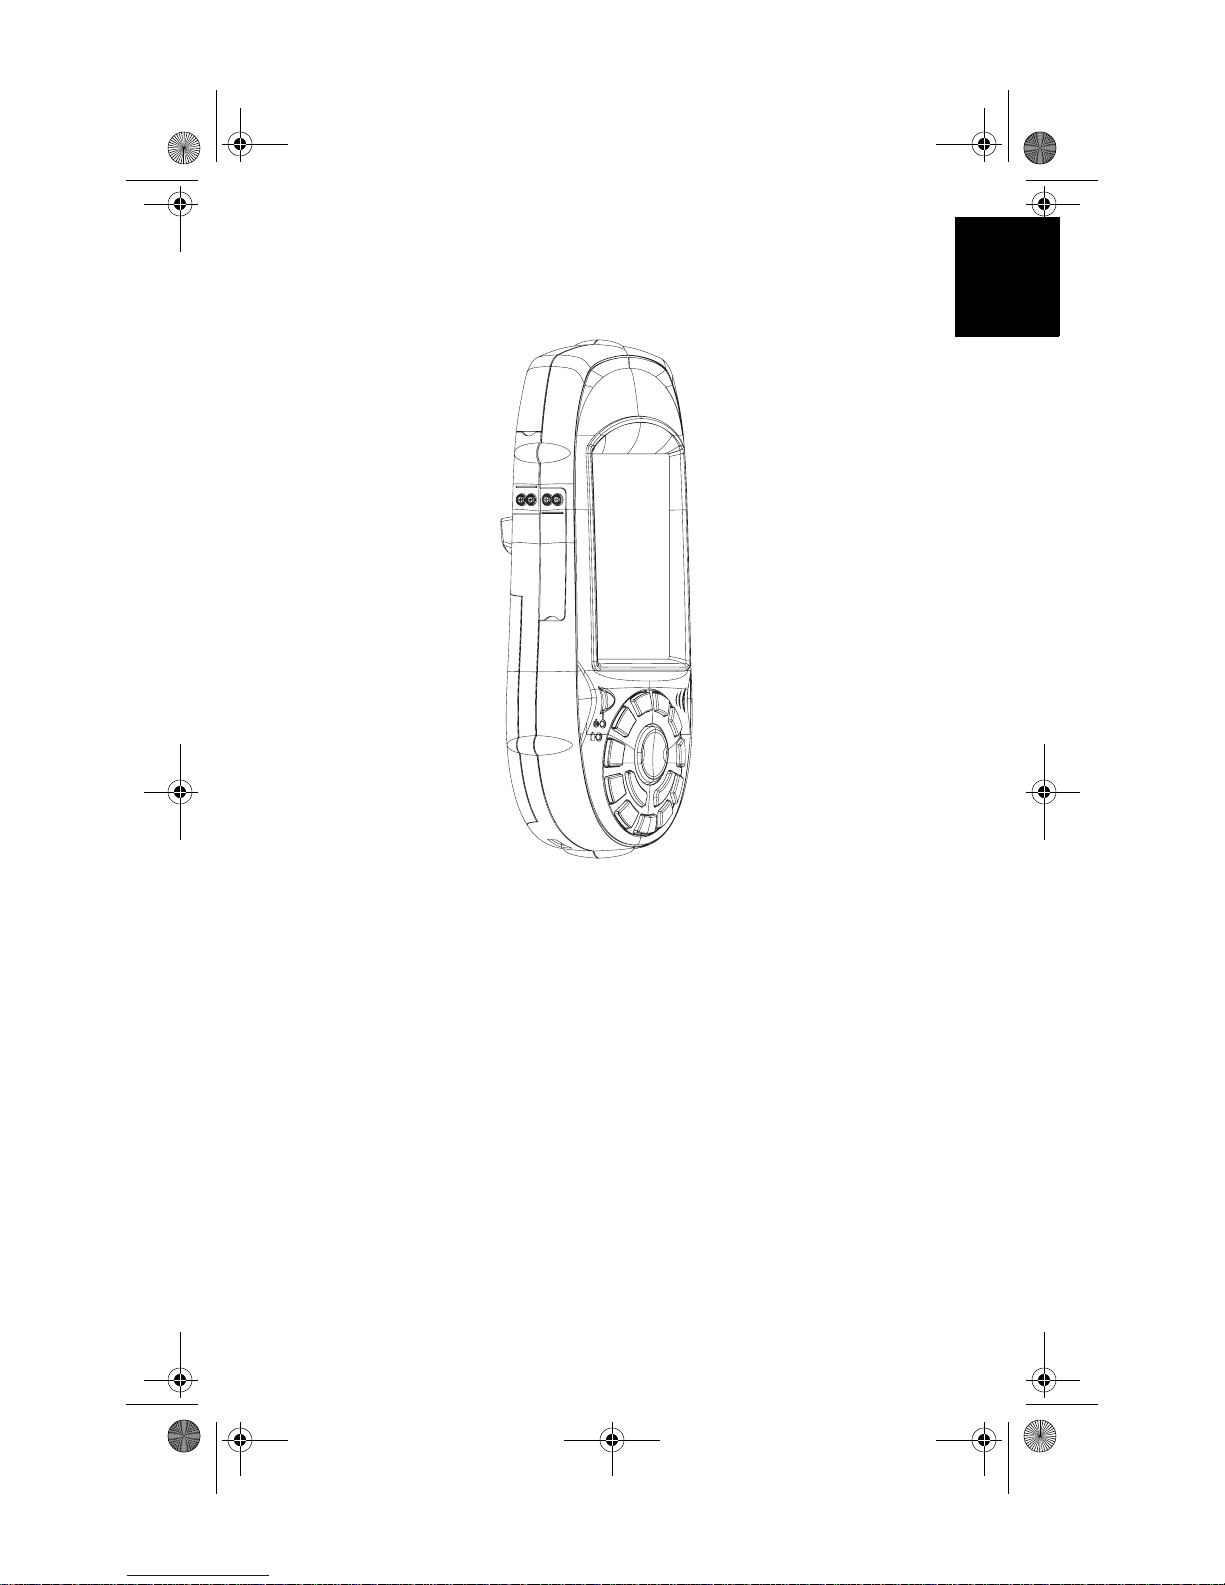
Getting Started Guide
MobileMapper CE
Page 2
CopyrightTrademarkNotices.fm Page i Thursday, July 7, 2005 2:14 PM
English
Copyright Notice
Copyright 2005 Thales Navigation. All rights reserved.
No part of this publication or the computer programs described in it may be reproduced,
translated, stored in a retrieval system, or transmitted in any form or by any means, electronic, mechanical photocopying, recording, or otherwise, without prior written permission
of Thales Navigation. Your rights with regard to this publication and the computer programs are subject to the restrictions and limitations imposed by the copyright laws and/or
the jurisdiction in which you are located
Trademarks
All product and brand names mentioned in this publication are trademarks of their respective holders.
FCC Notice
This equipment has been tested and found to comply with the limits for a class B digital
device, pursuant to part 15 of the FCC Rules. These limits are designed to provide reasonable protection against harmful interference in a residential installation. This equipment
generates, uses and can radiate radio frequency energy and if not installed and used in accordance with the instructions, may cause harmful interference to radio communications.
However, there is no guarantee that interference will not occur in a particular installation.
If this equipment does cause harmful interference to radio or television reception, which
can be determined by turning the equipment off and on, the user is encouraged to try to correct the interference by one or more of the following measures:
• Reorient or relocate the receiving antenna.
• Increase the separation between the equipment and receiver.
• Connect the equipment into an outlet on a circuit different from that to which the
receiver is connected.
• Consult the dealer or an experienced radio/TV technician for help.
Changes or modifications not expressly approved by Thales Navig a tion cou ld v oid the user's authority to operate this equipment.
CAUTION: To comply with FCC RF exposure compliance requirements, a separation distance of at least 20 cm must be maintained between the antenna of this device and all persons.
In the presence of RF field, the receiver's satellite signal strength may degrade. When removed from the RF field, the signal strength should return to normal.
This device has been found compliant with the Canadian RSS-210 specification, issue 5,
November 2001 which stipulates that operation is subject to the following two conditions:
(1) this device may not cause interference, and (2) this device must accept any interference,
including interference that may cause undesired operation of the device.
Page 3

MM CE GS Guide.book Page i Monday, June 20, 2005 11:04 AM
Table of Contents
Introduction................................................................................................1
Key Features.................................... ...................................... ... ........... 1
Software Provided as Standard............................................................ 2
About Windows CE .NET ................................................................... 2
Receiver Description..................................................................................3
Front Panel........................................................................................... 3
Back Panel ........................................................................................... 3
Side Panel ............................................................................................ 4
I/O Module........................................................................................... 4
Resetting MobileMapper CE handheld ............................................... 4
Preparing for First-Time Use.................................................................... 5
Charging the battery .................................... .... .................................... 5
Turning the Receiver On ..................................................................... 6
Calibrating the Screen.......................................................................... 7
Automatic System Time Update.......................................................... 7
Adjusting the Backlight ....................................................................... 7
Regional Settings................................................... ... ... ........................ 8
Establishing a Connection with your PC ............................................. 9
Installing Software............................................................................... 9
Initializing GPS ................................................................................. 10
Setting Up GPS.................................................................................. 11
Viewing Current GPS Status ............................................................. 13
Signal Quality/Navigation Window (Sig/Nav)............................ 13
Azimuth and Elevation Graph (Azmth/Elvn) .............................. 13
Panel Window (Panel) ................................................................. 14
Statistics Window (Stats)............................................................. 14
Working in Windows CE .NET Environment....................................... 15
User Interface For Text Input ............................................................ 15
Using the integrated alphanumeric keypad........................................ 15
Using the Stylus................................................................................. 16
Power Management..................................................................................17
Memory Management..............................................................................19
Using GPS .................................................................................................20
GPS initialization............................................................................... 20
Mission Planning ............................................................................... 20
GPS Settings...................................................................................... 21
GPS Status ......................................................................................... 21
GPS Port Configuration..................................................................... 21
Connecting to GPS in your application ............................................. 21
DGPS Real-Time Configuration........................................................ 22
Beacon Receiver Configuration......................................................... 22
Resetting GPS.................................................................................... 22
Using Bluetooth.........................................................................................23
Working with Bluetooth Manager ............................ ... ...................... 23
Turning On/Off Bluetooth ................................................................. 23
Supported Services ............................................................................ 23
English
Page 4
MM CE GS Guide.book Page ii Monday, June 20, 2005 11:04 AM
English
Configuring Services ......................................................................... 24
Transferring Files.......... ... ...................................... ... ......................... 24
Receiving a File from a Remote Device ...................................... 25
Sending a File to a Remote Device.............................................. 25
Establishing a Serial Connection ....................................................... 26
Using Dial-Up Networking................................................................ 26
Outputting GPS Data to Another Device via Bluetooth.................... 28
Using Bluetooth-Enabled Mo bileMapper Beacon................................. 30
Establishing Communication Between the Two Units ................ 30
Tuning the MobileMapper Beacon Receiver ................... ... ......... 33
Starting Using MobileMa pper CE..........................................................34
Index..........................................................................................................35
Page 5
MM CE GS Guide.book Page 1 Monday, June 20, 2005 11:04 AM
Introduction
Thank you for purchasing a MobileMapper CE from Thales
Navigation. This Getting Started guide will give you useful
information about your Windows CE GPS handheld computer. It will also guide you in your first steps using the system.
MobileMapper CE is a handheld device that integrates submeter GPS with Microsoft Windows CE .NET in a rugged
design suitable for mobile mapping applications.
Being an open-platform Windows CE device, MobileMapper CE allows you to choose the GIS software that is right
for you.
Key Features
- Integrated GPS with real-time, sub-meter accuracy using
WAAS/EGNOS or external real-time RTCM differential
corrections
- Integrated Bluetooth wireless technology
- Ready for RTCM real-time corrections
- Full color, daylight readable, transflective TFT display
with 320 x 240 resolution and touch screen
- Integrated Secure Digital memory card slot
- Rugged and waterproof design
- Built-in alphanumeric keyboard
- Built-in speaker and microphone
- Advanced power management
- All-day rechargeable, removable Li-ion battery
- Embedded Microsoft Windows CE .NET operating system
- Off-the-shelf industry standard Mobile GIS software
applications support
English
1
Page 6
MM CE GS Guide.book Page 2 Monday, June 20, 2005 11:04 AM
English
Software Provided as Standard
- GPS utilities - provide initialization and setup, current
GPS status view, mission planning and configuration of
optional beacon differential receiver
- Bluetooth Manager - full-featured Bluetooth connectivity configuration utility
- Microsoft WordPad, Internet Explorer®, Windows
Explorer, Terminal, ActiveSync®, Windows Media
Player and Inbox
- Microsoft File Viewers: Excel, Word and Image Viewers
- EZ Recorder - sound record and playback program
- Software Development Kit (SDK) and GPS Application
Programming Interface (API) delivered free of charge
when a Business Partner Agreement has been approved.
Please contact Thales Navigation to discuss your software development project.
About Windows CE .NET
Windows CE is a version of the Windows operating system
designed for small devices such as personal digital assistants
(PDAs) or handheld PCs. The Windows CE graphical user
interface (GUI) is very similar to desktop Windows operating systems. MobileMapper CE is embedded with the latest
version: Windows CE .NET 4.2 Professional version. Like
most Windows CE devices, the MobileMapper CE handheld
has a touch screen. To interact with the MobileMapper CE,
use the stylus to tap on the touch screen.
2
Page 7
MM CE GS Guide.book Page 3 Monday, June 20, 2005 11:04 AM
Receiver Description
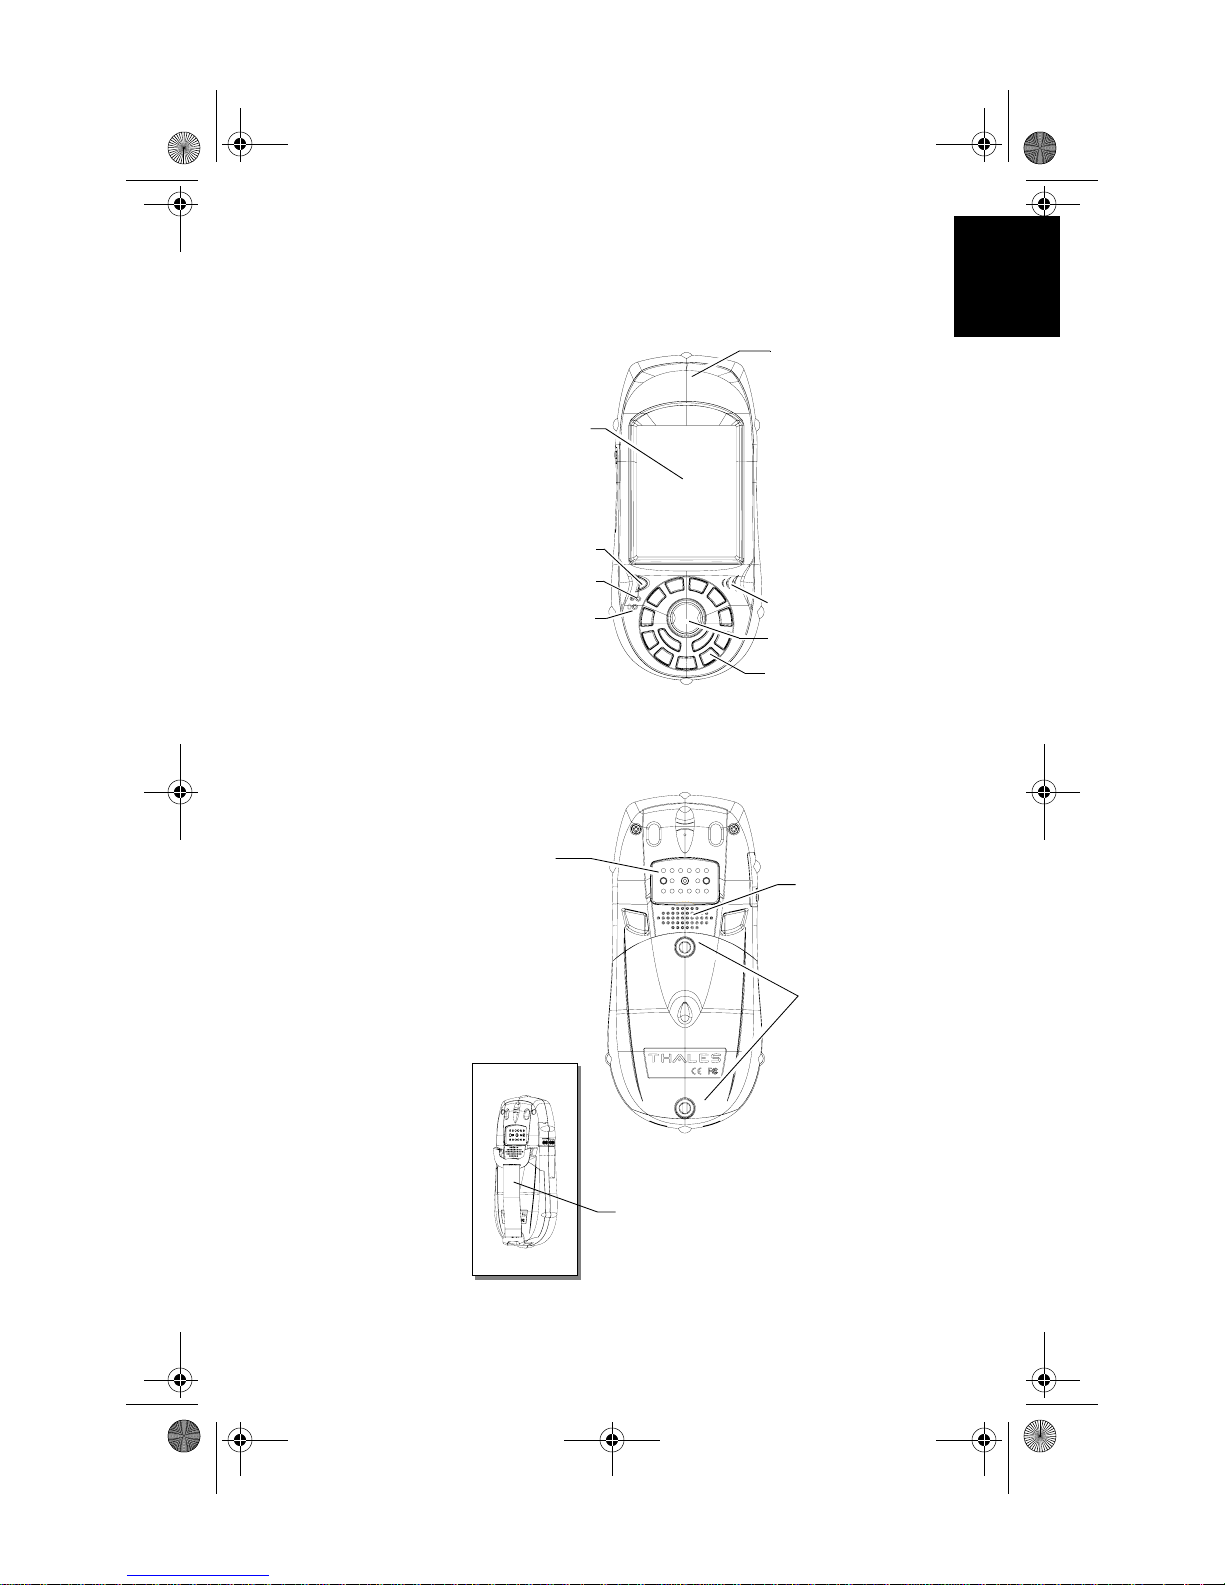
Front Panel
Touch screen Display:
• Full color transflective liquid crystal display (LCD)
•¼ VGA
Power button
Power indicator
Battery indicator
Back Panel
Power/Communication
connectors:
• Connects to the I/O
module with power
supply and communication ports
English
GPS Receiver includes:
• Int eg rated GPS accurate
to sub-meter with WAAS/
EGNOS
• Ready for RTCM real-time
corrections
Microphone
Scrolling button
Alphanumeric
keypad
Speaker
Battery door screws:
• Unscrew to open the
battery door
Handstrap
3
Page 8
MM CE GS Guide.book Page 4 Monday, June 20, 2005 11:04 AM
English
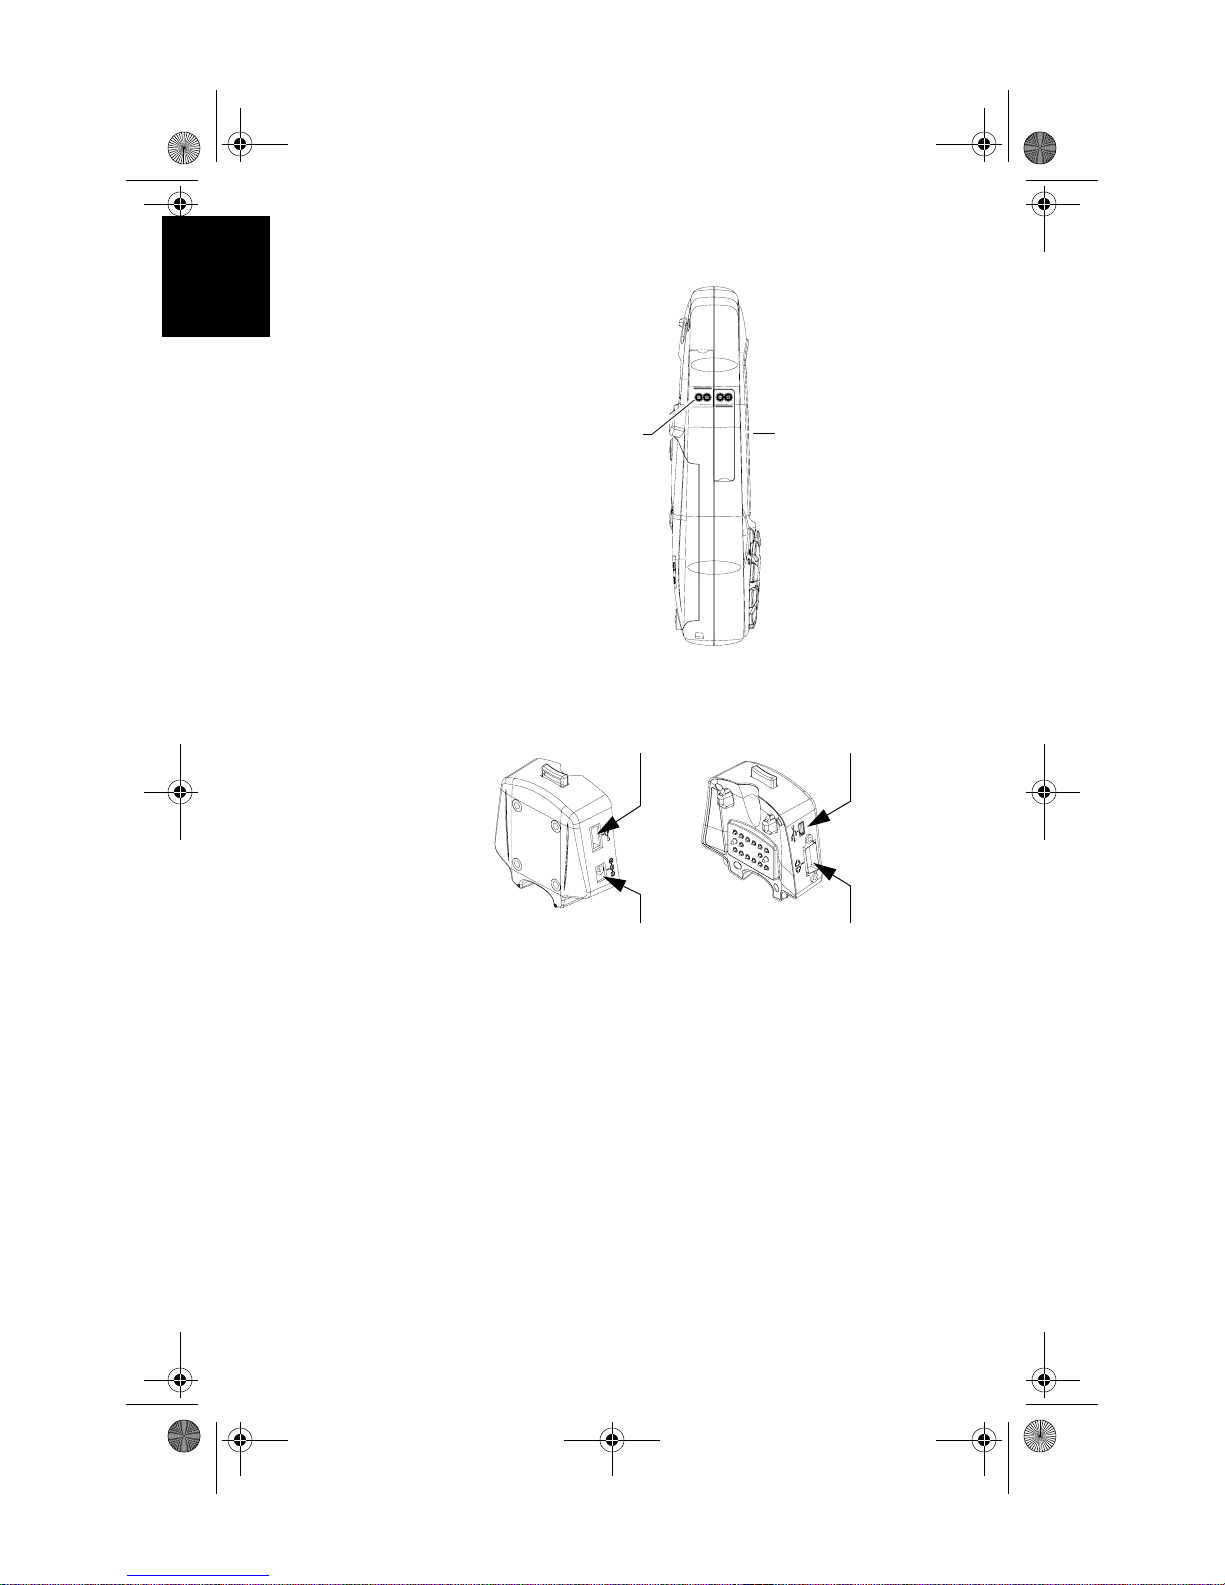
Side Panel
External Antenna
Connector
Secure Digital Card Slot
Door:
• Open the door to access the SD card slot
I/O Module
USB host port (Type A), connect to a
USB flash drive, card reader etc.
Mini USB (Type B) port
Serial port (COM1) DB-9 connectorDC Power Input connector
Resetting MobileMapper CE handheld
To reset MobileMapper CE, hold down the ESC, Enter and
Power keys simultaneously until the screen goes blank. The
MobileMapper CE switches off. You can then power on the
device by pressing the power button.
To reset only the GPS receiver, (see Resetting GPS on
page 22).
4
Page 9

MM CE GS Guide.book Page 5 Monday, June 20, 2005 11:04 AM
Preparing for First-Time Use
Charging the battery
Before using your MobileMapper CE handheld PC, you
must first charge the battery:
1. Locate the removable battery
2. Open the battery door
3. Insert the battery into the battery compartment in the
back of the MobileMapper CE handheld as shown
below:
4. Close the battery door and tighten the screws
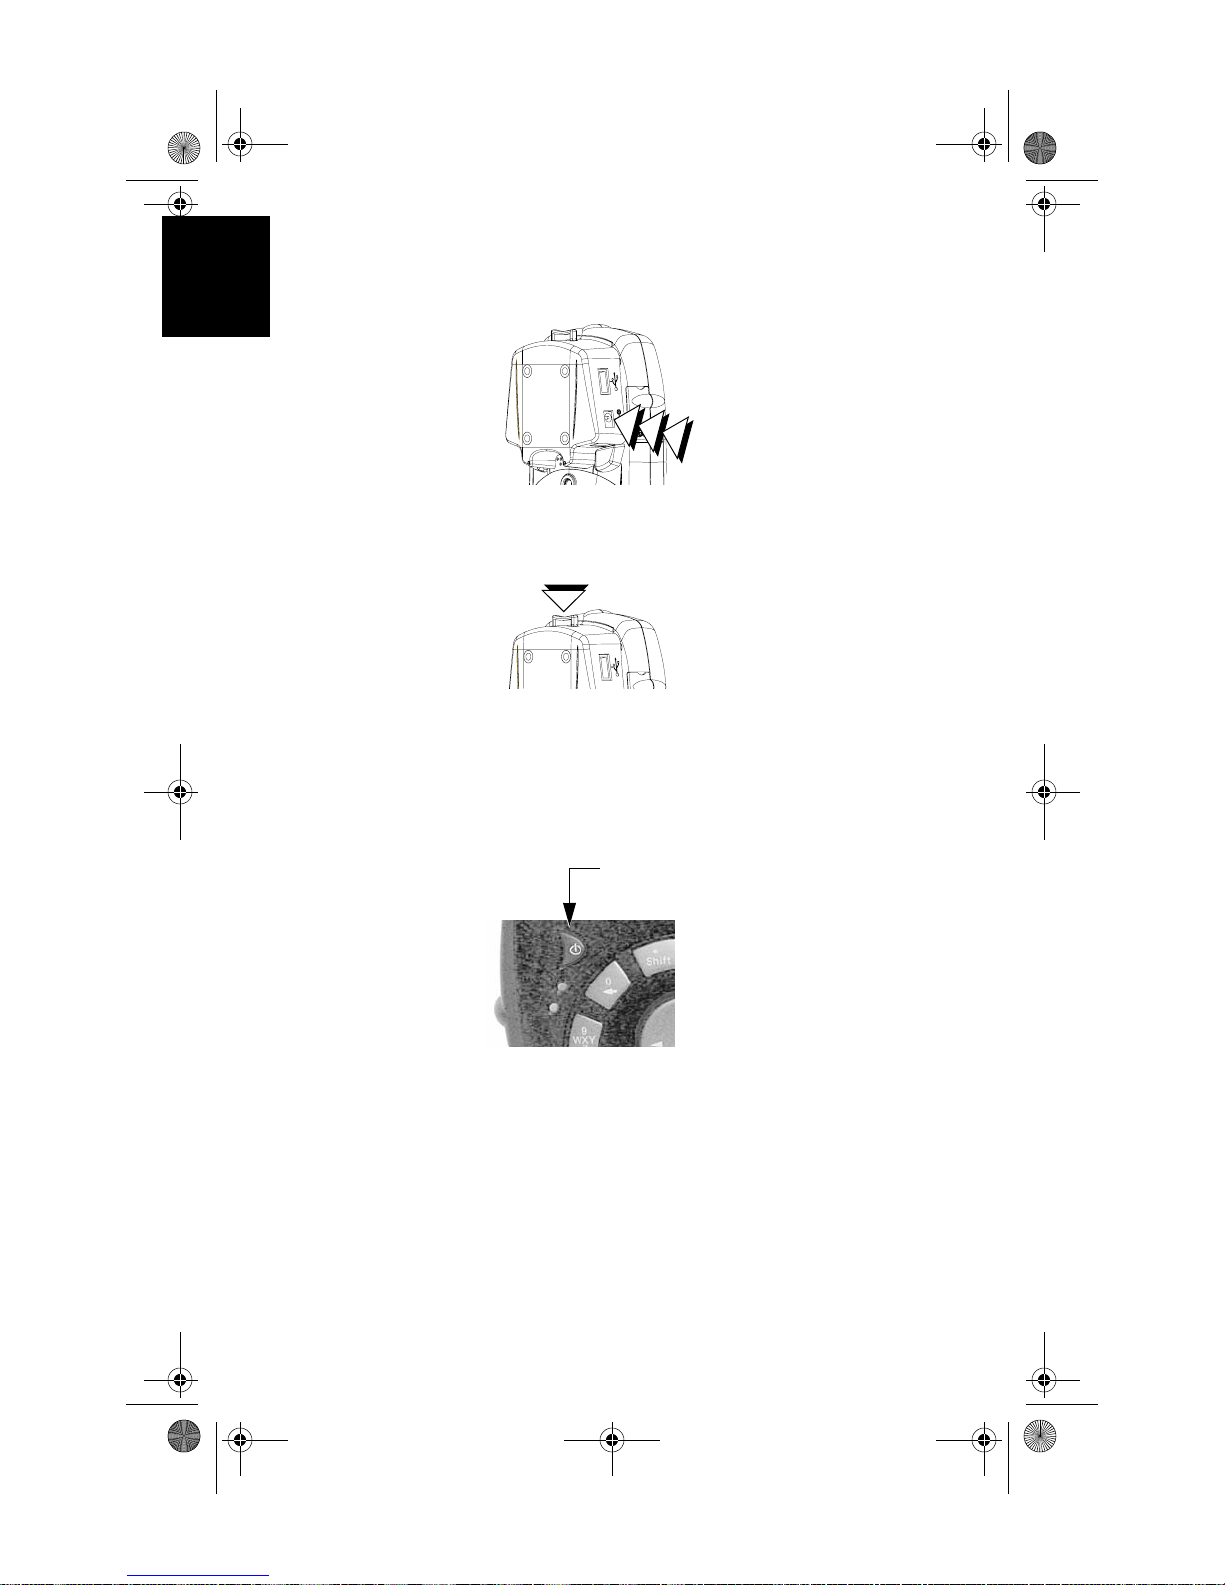
5. Attach the Clip-on I/O module to the MobileMapper CE
handheld as shown below:
English
5
Page 10
MM CE GS Guide.book Page 6 Monday, June 20, 2005 11:04 AM
English
6. Connect the AC adapter (see below) and then let it
charge the battery for up to six hours.
7. To detach the clip-on I/O module, press the release button on the module.
Connect cable from AC
adapter to this input
Turning the Receiver On
Once you have charged the battery in your MobileMapper
CE, press the red power button to turn it on.
Power button
6
Page 11
MM CE GS Guide.book Page 7 Monday, June 20, 2005 11:04 AM
Calibrating the Screen
For the first-time use, you need to align your display screen
so the cursor on the touch screen align with the tip of your
stylus. Use the stylus pen to tap the center of each target that
appears on the Calibration screen with the tip of the stylus.
Tap anywhere on the display when finished.
To re-calibrate your screen at anytime, select the tab, then
Settings>Control panel>Stylus>Calibration
tion screen.
Automatic System Time Update
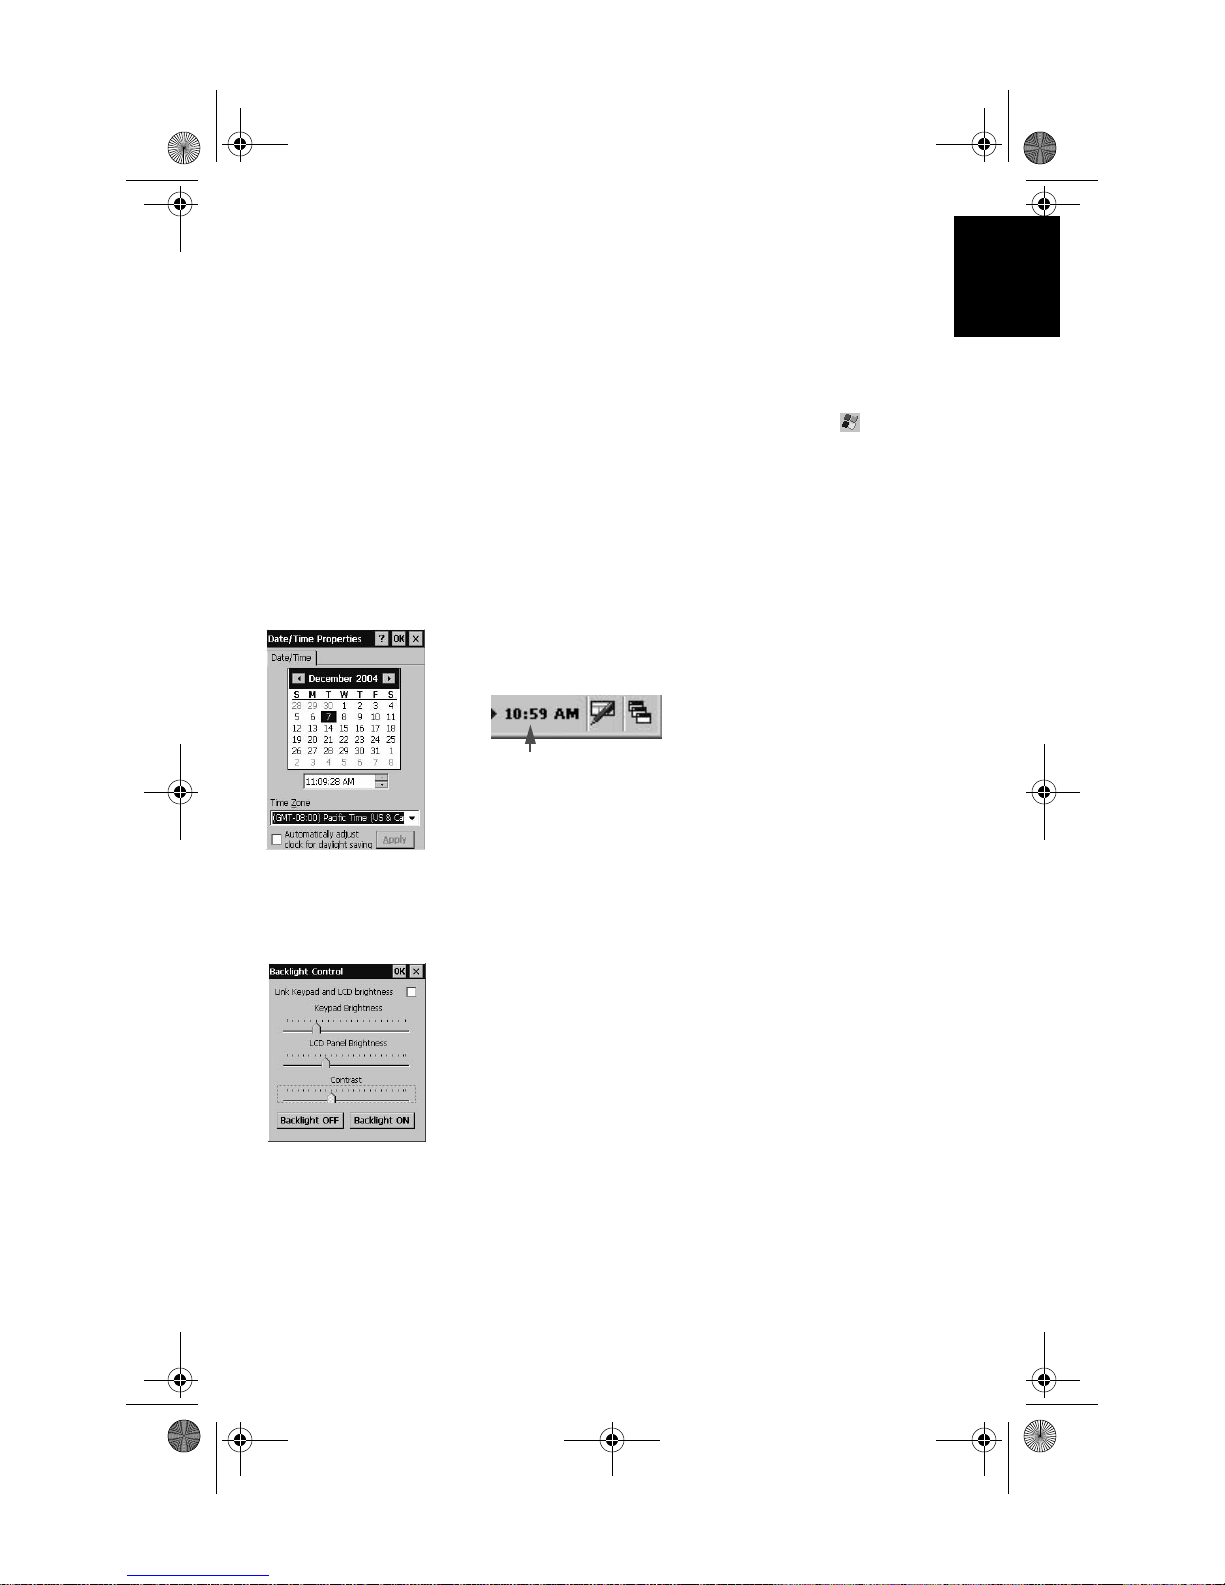
MobileMapper CE will automatically update the syst em date
& time using the GPS time determined by the integrated
GPS receiver and the time zone that you specify. To set the
time zone:
• In the task bar, double tap the clock icon:
English
to launch the calibra-
This opens the Date/Time Properties screen.
• Set the time zone field (see opposite) and then select
on top of the screen. Please note that you should wait for
a while, after turning on MobileMapper CE, before system time can effectively be updated.
OK
Adjusting the Backlight
To switch the backlight on/off for both the keypad and display, or to adjust the brightness and screen contrast, double
tap the
Backlight Control icon in the control panel.
To conserve battery power , we recommend you to switch the
backlight off whenever possible.
7
Page 12
MM CE GS Guide.book Page 8 Monday, June 20, 2005 11:04 AM
English
Regional Settings
MobileMapper CE supports code sets and languages supported by Windows CE operating system. These include European languages as well as multibyte languages such as
simplified Chinese, Korean (in a subsequent release) and
Japanese.
- From MobileMapper CE Companion CD, copy the
appropriate language install files (.CAB) to your
MobileMapper CE device. Use either an SD Card or
download the files to the unit using ActiveSync.
- On the device, double tap on the .CAB file.
- The default location for installation is "\MyDevice\Intl\####\" (where #### is the language number).
You must install to this default location when the dialog box appears asking where to install.
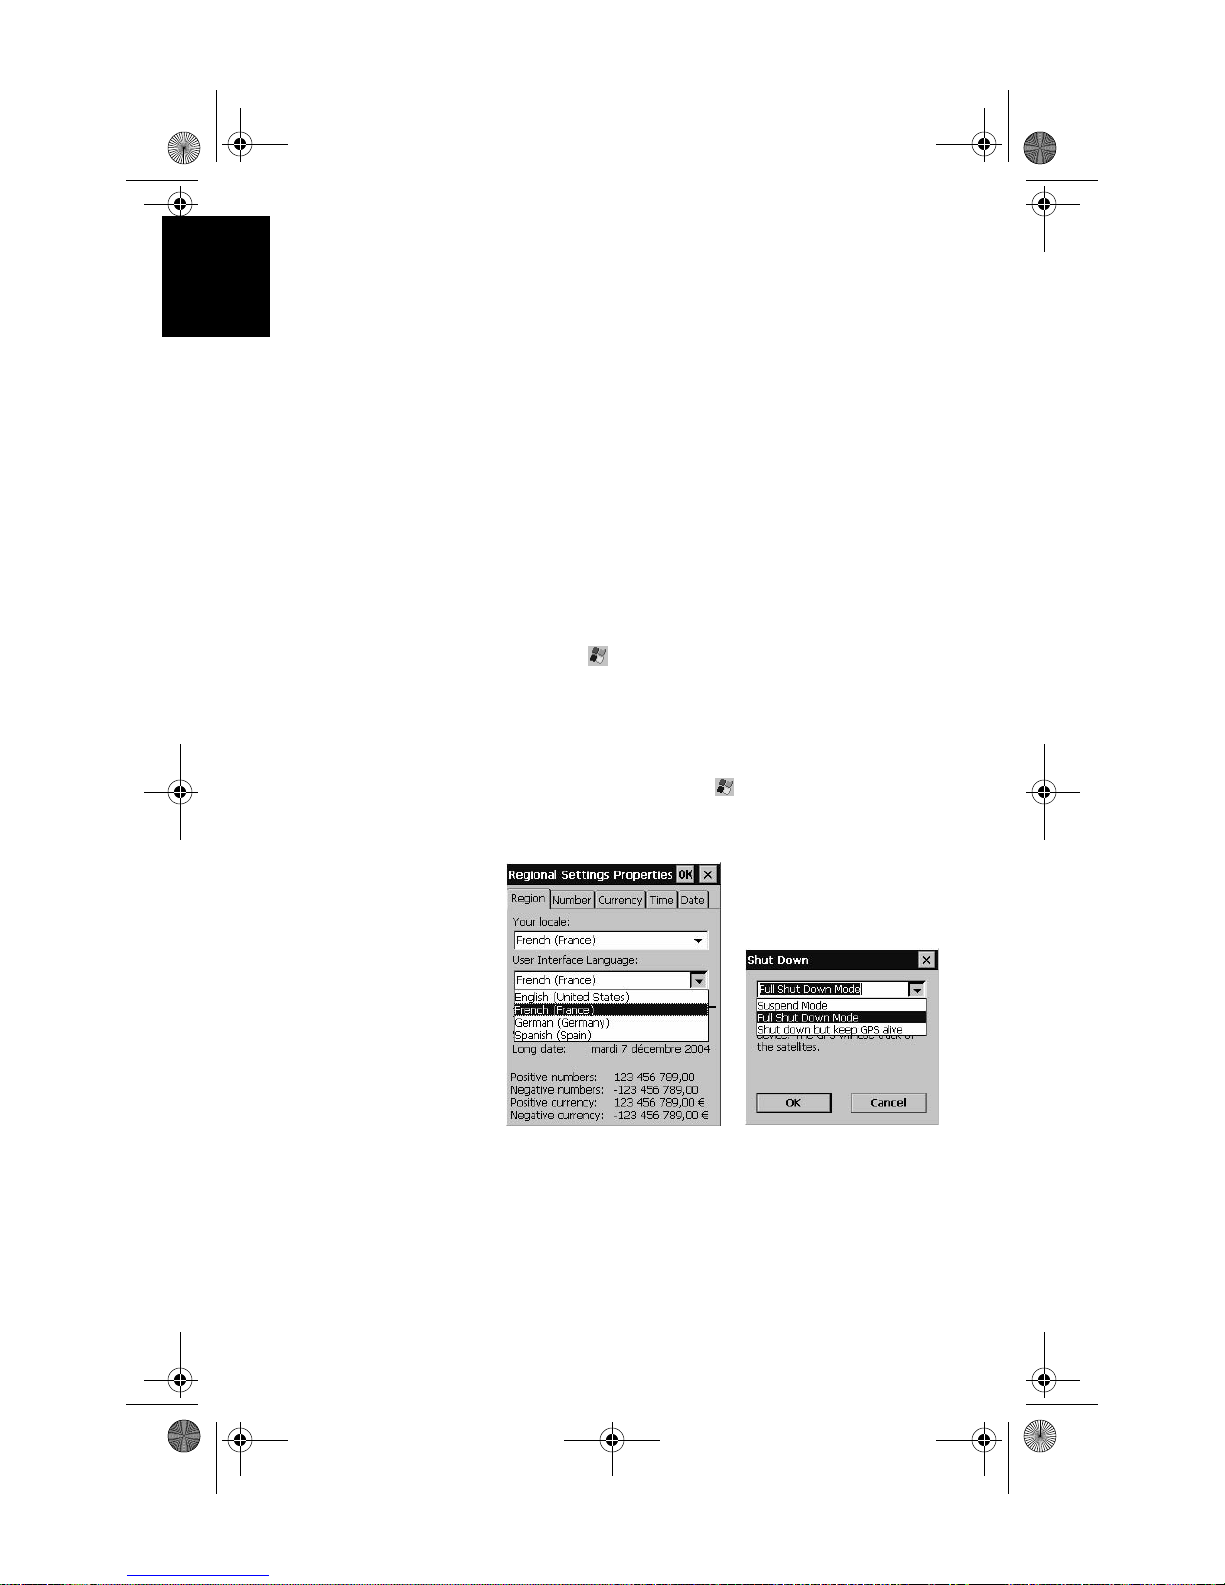
- Select the tab, then
tings
.
- Select your preferred locale and user interface language
as shown on the screen below (left).
- Once the language is installed, shutdown the unit by
selecting successively the tab, then
the Shut Down menu, then
screen below, right) and then the
Settings>Control panel>Regional Set-
Suspend to open
Full Shut Down Mode (see
OK button.
8
- Next time you boot the MobileMapper CE device, the
selected language will be used.
Page 13
MM CE GS Guide.book Page 9 Monday, June 20, 2005 11:04 AM
Establishing a Connection with your PC
Using Microsoft ActiveSync, you can connect a desktop
computer to your MobileMapper CE handheld via the USB
data cable. This allows you to install software and transfer
files to/from MobileMapper CE.
To connect to a PC:
1. Install ActiveSync on the desktop computer. (Microsoft
ActiveSync is included on the MobileMapper CE Companion CD. You may also download it from the
Microsoft website at www.microsoft.com/mobile/downloads/activesync.asp).
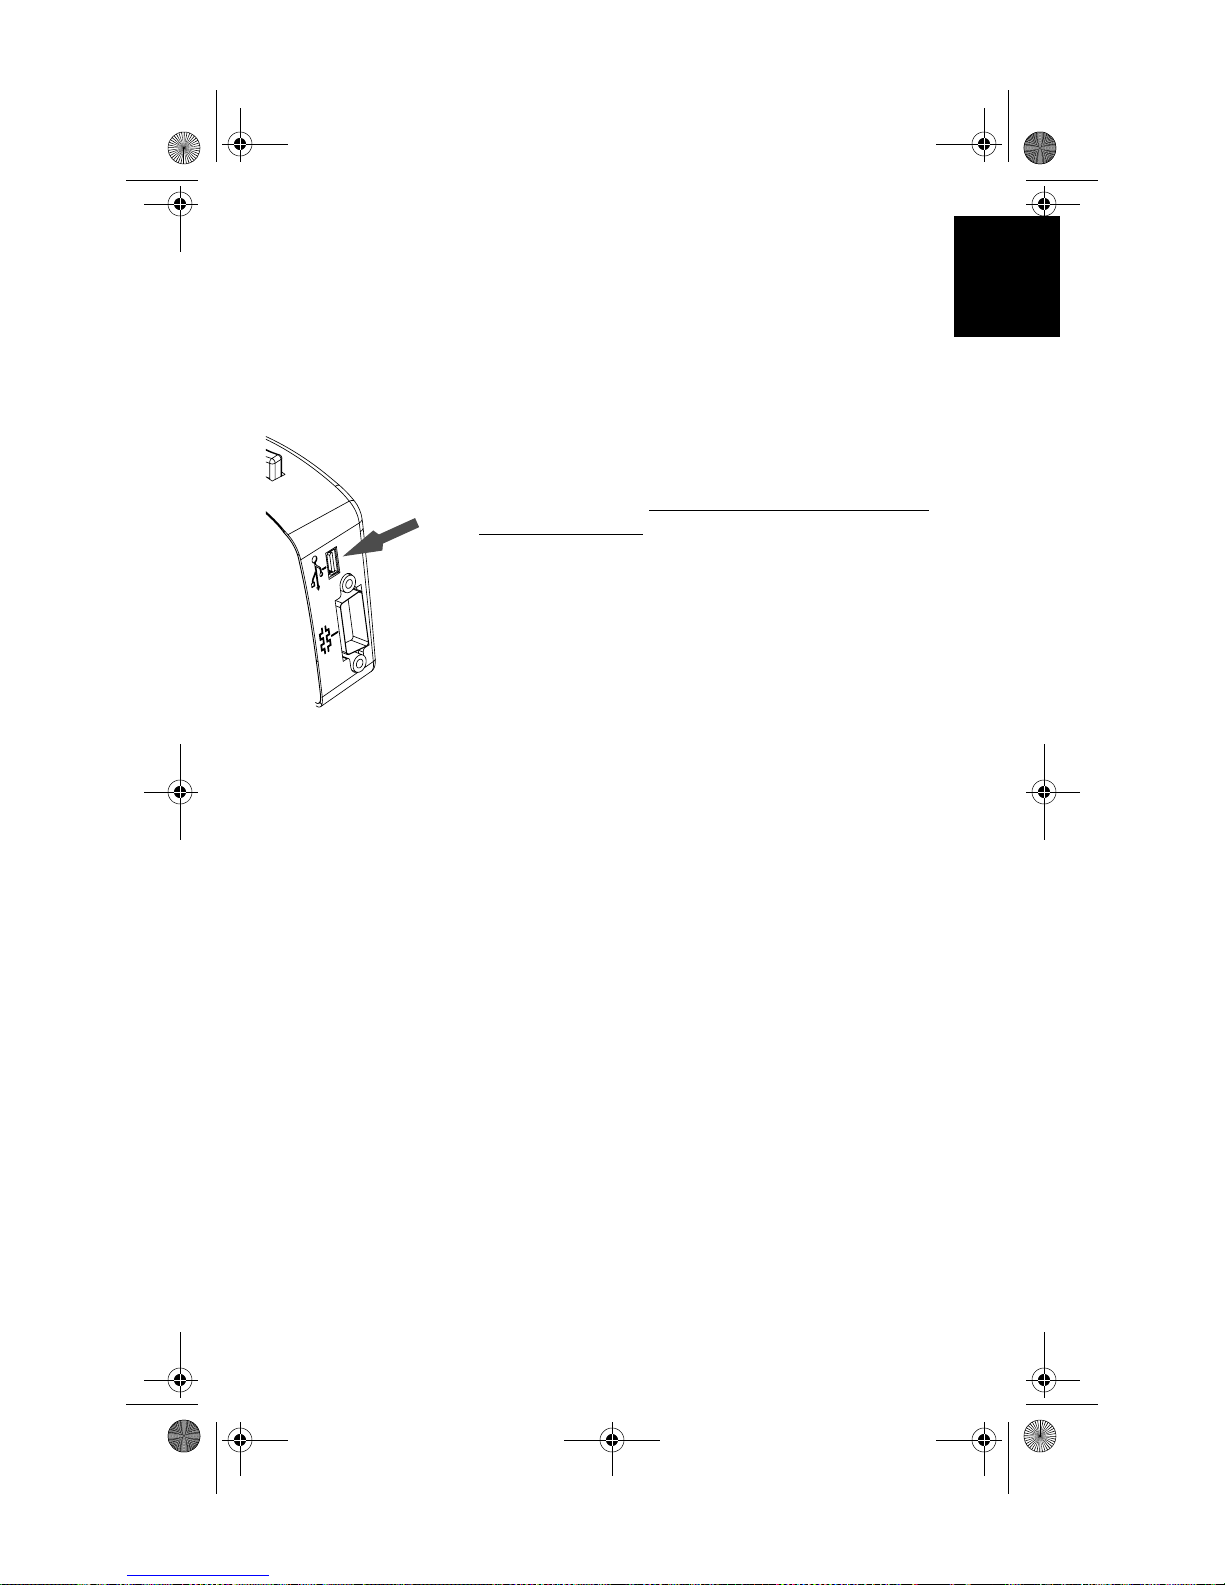
2. Attach the I/O module to the MobileMapper CE handheld. Connect the USB data cable to the USB port (the
mini-connector) on the I/O module (see opposite).
3. Connect the other end of the USB data cable to a USB
port on the desktop computer.
4. Follow the ActiveSync instructions to establish a connection.
Installing Software
Once the connection is established with a PC using ActiveSync, you may install any supported software you need. It is
very important to make sure you install your program in the
non-volatile memory, under “MyDevice” or on an SD card.
Installing off-the-shelf Windows CE software: Please refer
to the software documentation for more information and detailed instructions.
English
9
Page 14
MM CE GS Guide.book Page 10 Monday, June 20, 2005 11:04 AM
English
Initializing GPS
GPS satellites are 12,000 miles overhead. The first time a
new GPS receiver is turned on, it might have difficulty calculating its position. To help the receiver calculate its first
position, you should “initialize” it. Y ou have to do this when:
- The receiver is brand new
- You have moved more than 500 miles from the last place
you were using it
- GPS receiver has been reset
- Or the receiver has not been used for more than a few
months.
Take the MobileMapper CE to a location where there is a
clear view of the sky, then:
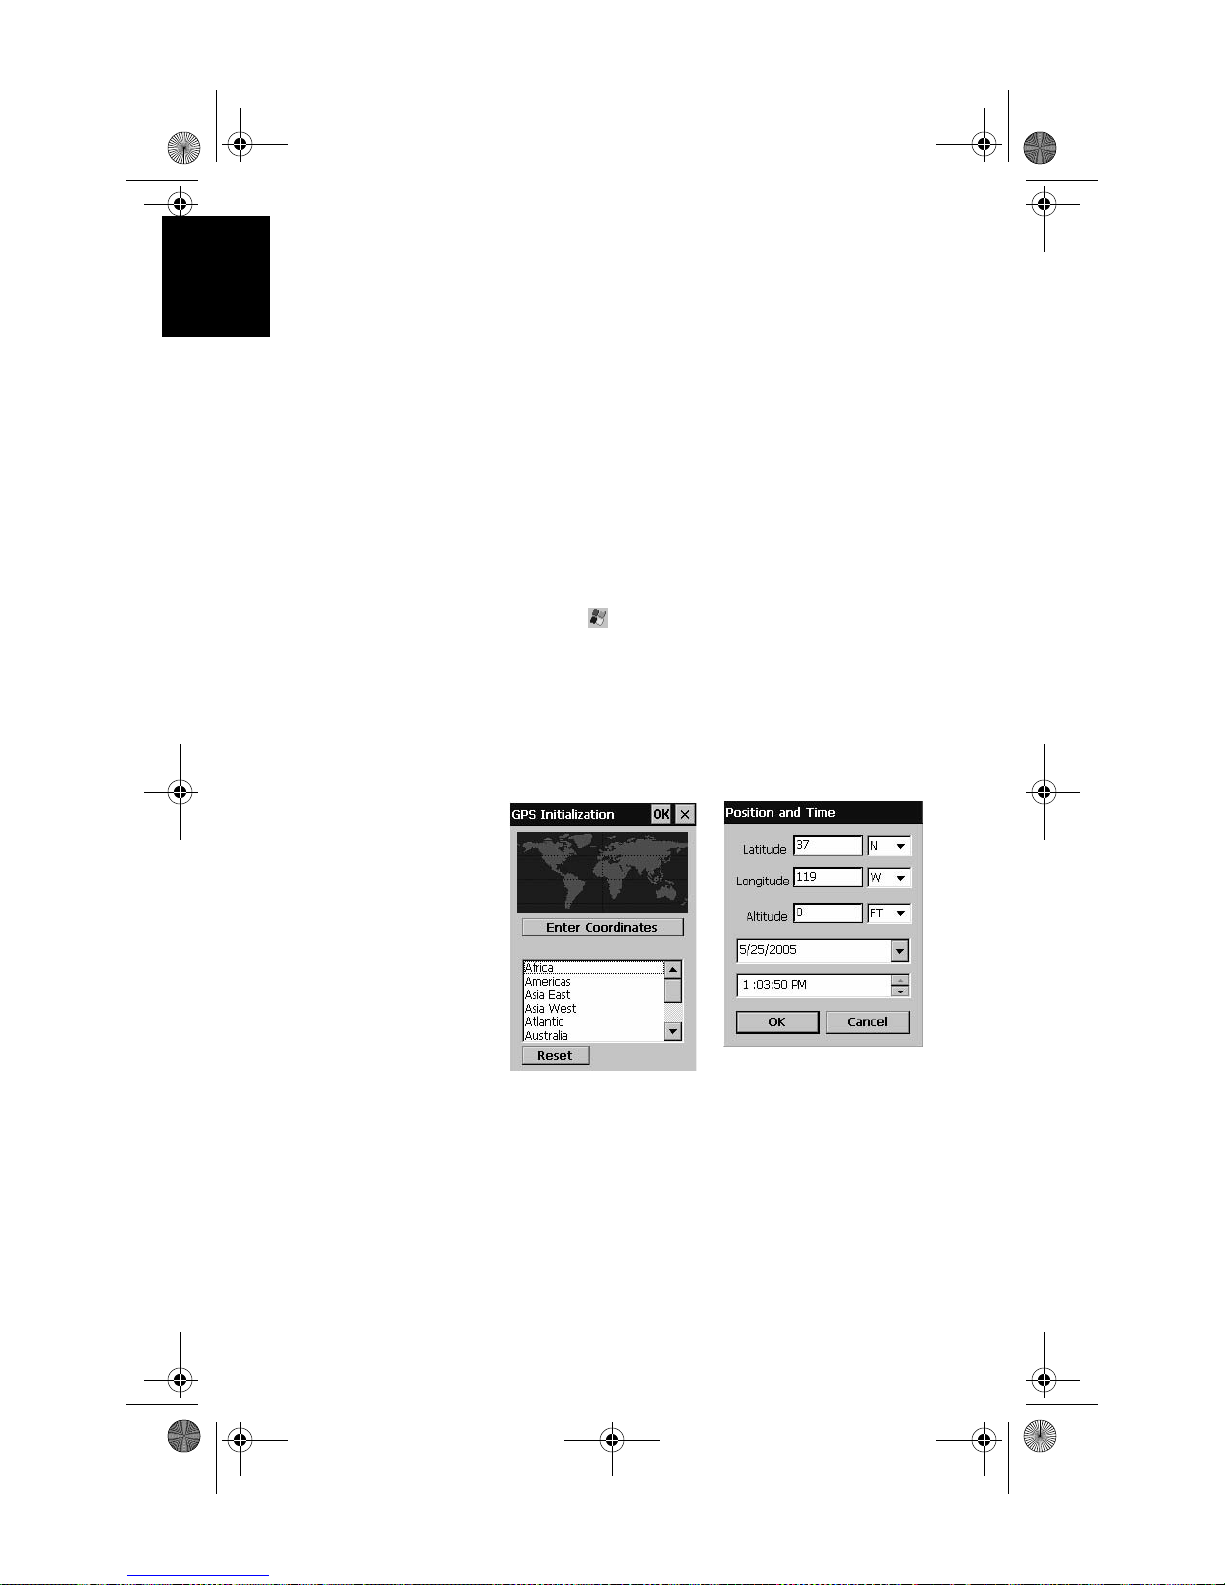
- Select the tab, then
tion
Programs>GPS Utilities>GPS Initializa-
- Scroll down the list of continents and double-tap the continent where you are located. Similarly double-tap the
country where you are located (see figure below, left.)
Finally indicate the current time and date (see figure
below, right.)
10
Page 15
MM CE GS Guide.book Page 11 Monday, June 20, 2005 11:04 AM
Setting Up GPS
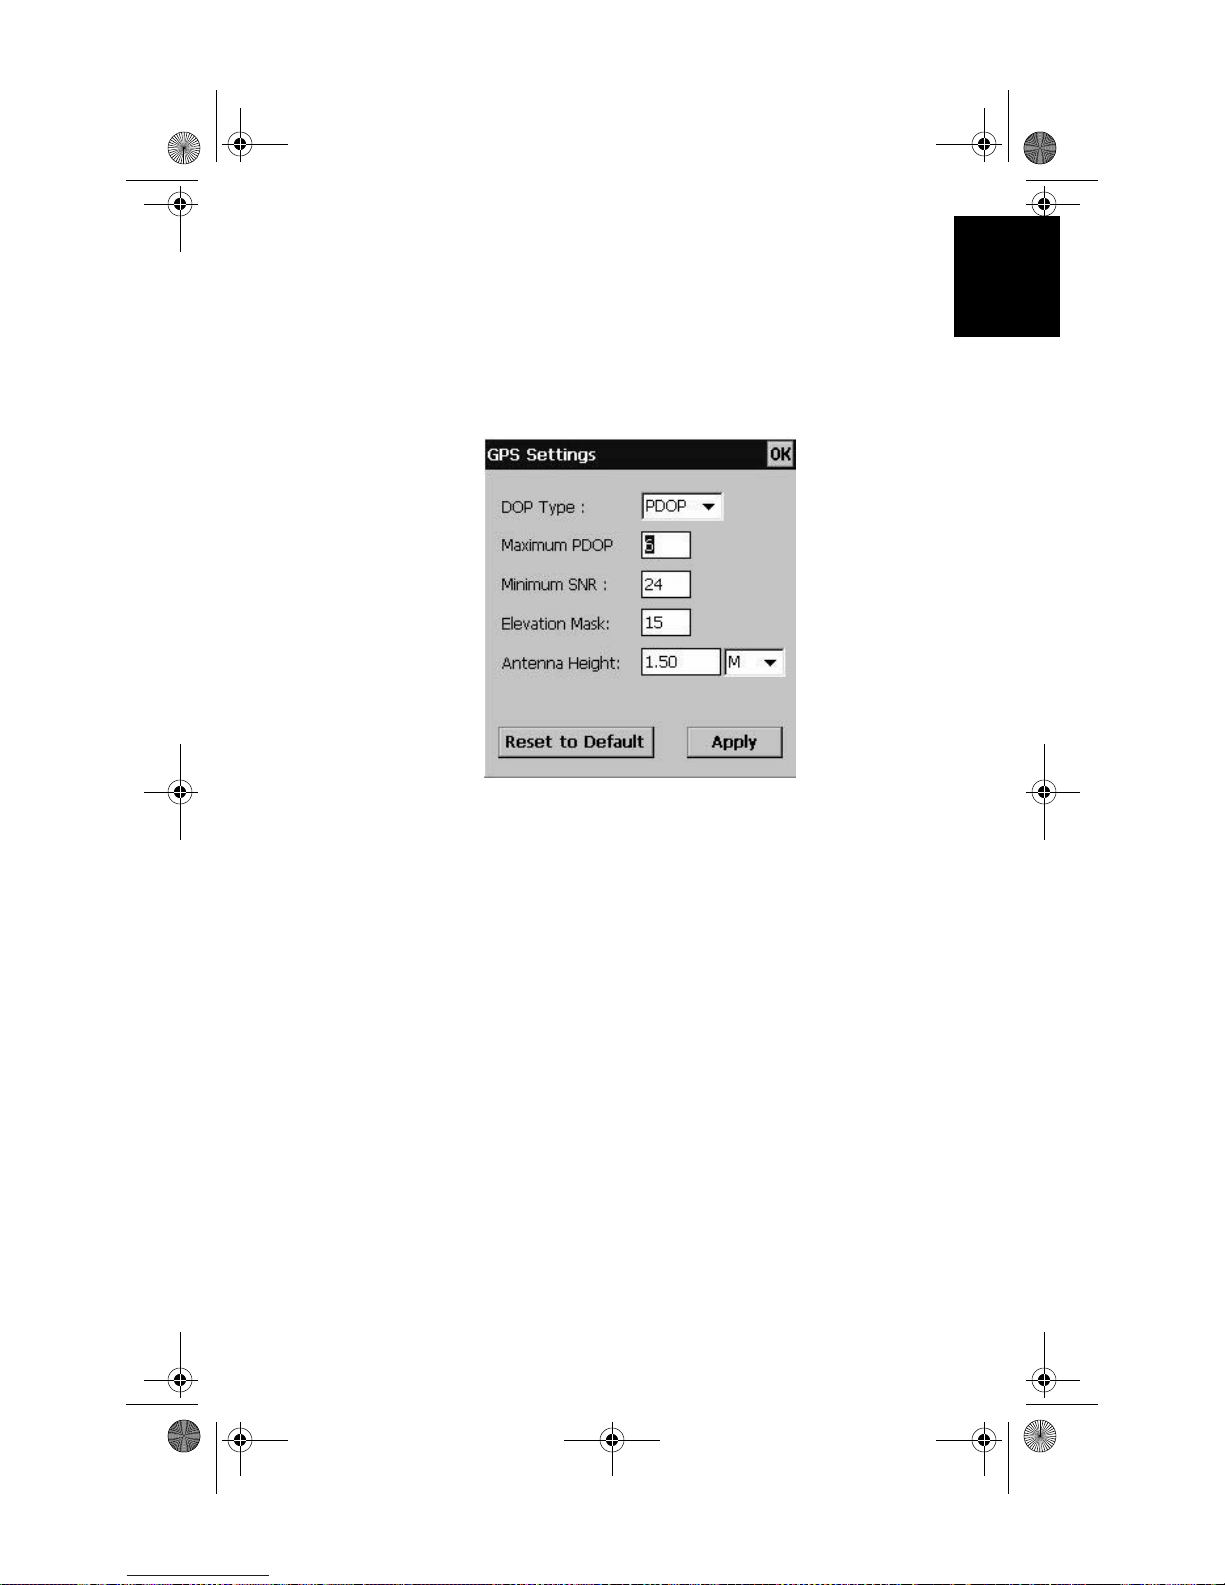
The GPS Settings tool is used to control the desired level of
precision in the computation of GPS positions. To check the
current GPS settings, or to configure the integrated GPS receiver, select
The following parameters are displayed:
GPS Settings from the GPS Utilities folder.
English
•
DOP type: Choose the DOP type on which to set an upper
limit (see next field).
The position of GPS satellites in orbit determine the
DOP values for a given site. The higher the DOP value,
the less accurate the position solution. PDOP (Position
Dilution of Precision) is the DOP value for the three
dimensional position solution. HDOP (Horizontal Dilution of Precision) is the DOP value for the two dimensional horizontal position.
•
Maximum DOP [PDOP or HDOP]: DOP values considered
“good” are less than 3. Values greater than 7 are considered poor. Thus, small DOP is associated with widely
separated satellites. No position will be computed when
the selected DOP type exceeds this limit.
11
Page 16
MM CE GS Guide.book Page 12 Monday, June 20, 2005 11:04 AM
English
• Minimum SNR: Unless you are very familiar with this
parameter, it is recommended to keep the default value.
SNR stands for Signal-to-Noise Ratio. Ensure your SNR
mask is not set too low (less than 20). GPS signals with
lower SNRs will be very noisy and contribute to accuracy degradation.
•
Elevation Mask: Angle that specifies that any satellite must
be at least a specified number of degrees above the horizon before the signals from the satellite are to be used.
Ensure that the elevation mask set in your receiver is
high enough (15 degrees or more) to avoid using satellites near the horizon as they are often noisier than satellites higher overhead.
•
Antenna Height: Enter the height of the MobileMapper CE
unit from the ground when it is being used in the field so
that the receiver can accurately project its computed
positions to the ground.
Tap
Apply after making your changes. To return to the default
settings, tap
By default, the GPS is configured to track satellites in normal conditions of reception.
Reset to Default. Then tap OK to close the window.
12
Page 17
MM CE GS Guide.book Page 13 Monday, June 20, 2005 11:04 AM
Viewing Current GPS Status
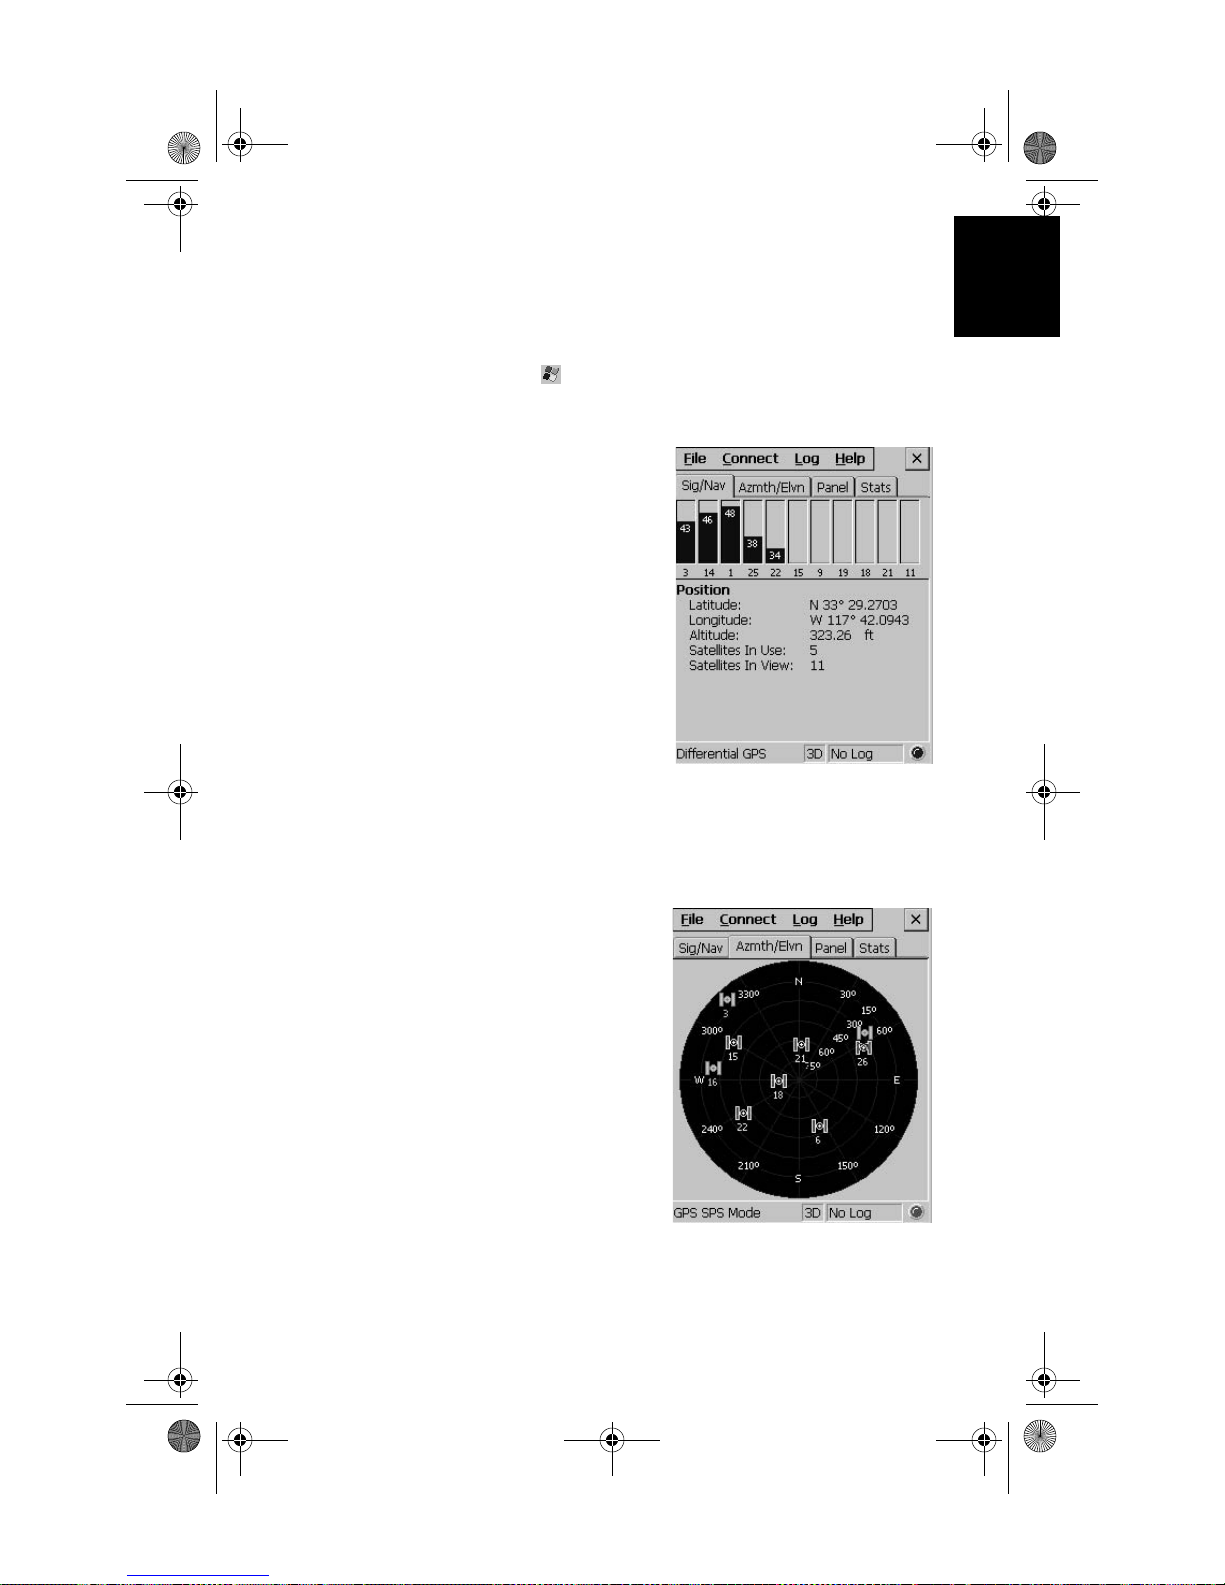
GPS Status is part of the GPS Utilities provided. It allows
you to quickly check the current status of the GPS constellation. It can also be used to log and playback NMEA data.
Select the tab, then
Signal Quality/Navigation Window (Sig/Nav)
This window allows you
to monitor Signal/Noise
ratios for received satellites. This information is
shown in graphical form.
The signal quality window
will grow or shrink to accommodate the number of
satellites in view. The Position pane provides the
coordinates of the current
GPS position, including
elevation. The “GPS
Mode” bar displays the
type of position being calculated by the GPS receiver. There
are three groups of GPS modes that can be displayed: NOFIX, 2D/3D, and differential modes.
Programs>GPS Utilities>GPS Status.
English
Azimuth and Elevation Graph (Azmth/Elvn)
This graph shows all the
satellites currently in
view . Each satellite is
identified by its pseudorandom number (PRN), its
azimuth and elevation angles.
13
Page 18
MM CE GS Guide.book Page 14 Monday, June 20, 2005 11:04 AM
English
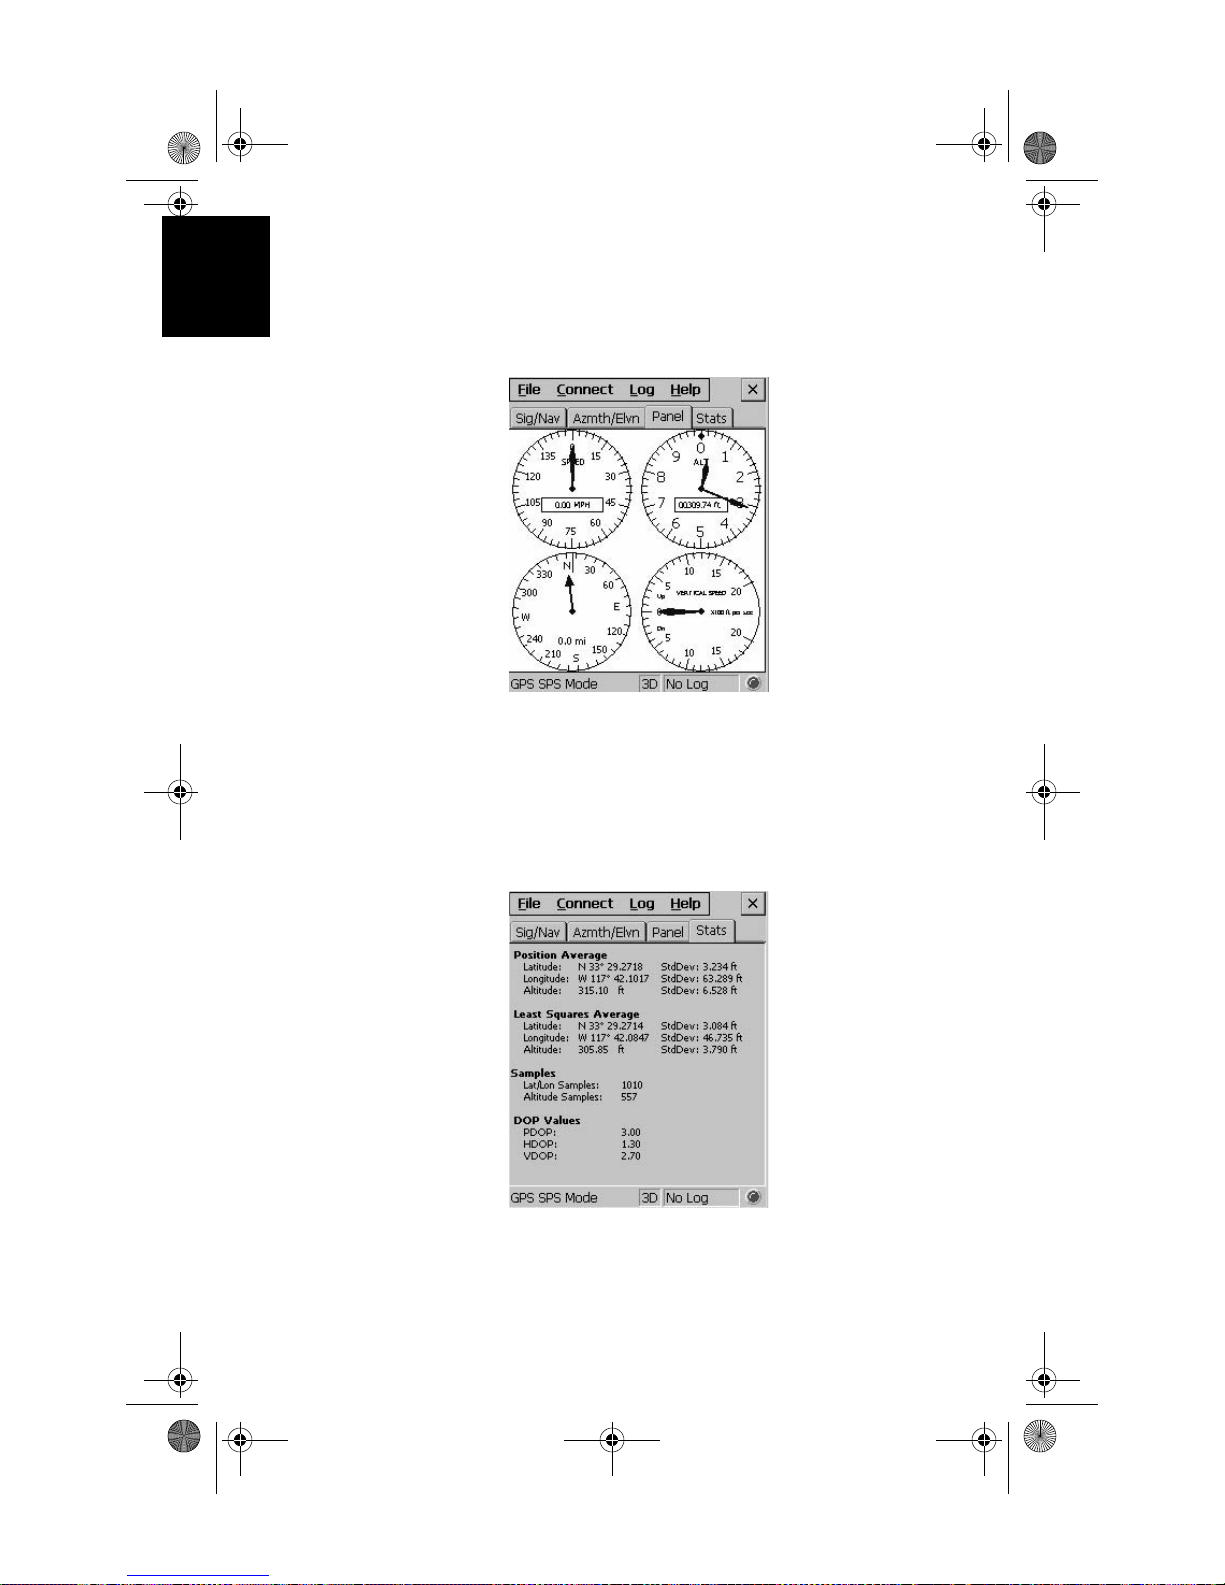
Panel Window (Panel)
This window displays the following parameters relevant to
the MobileMapper CE unit: speed, altitude, heading and vertical speed.
14
Statistics Window (Stats)
This window provides the averaged coordinates of the computed position and shows the accuracy figures corresponding to the GPS receiver used in static mode. The Dilution of
Precision (DOP) values are also displayed.
Page 19
MM CE GS Guide.book Page 15 Monday, June 20, 2005 11:04 AM
Working in Windows CE .NET
Environment
User Interface For Text Input
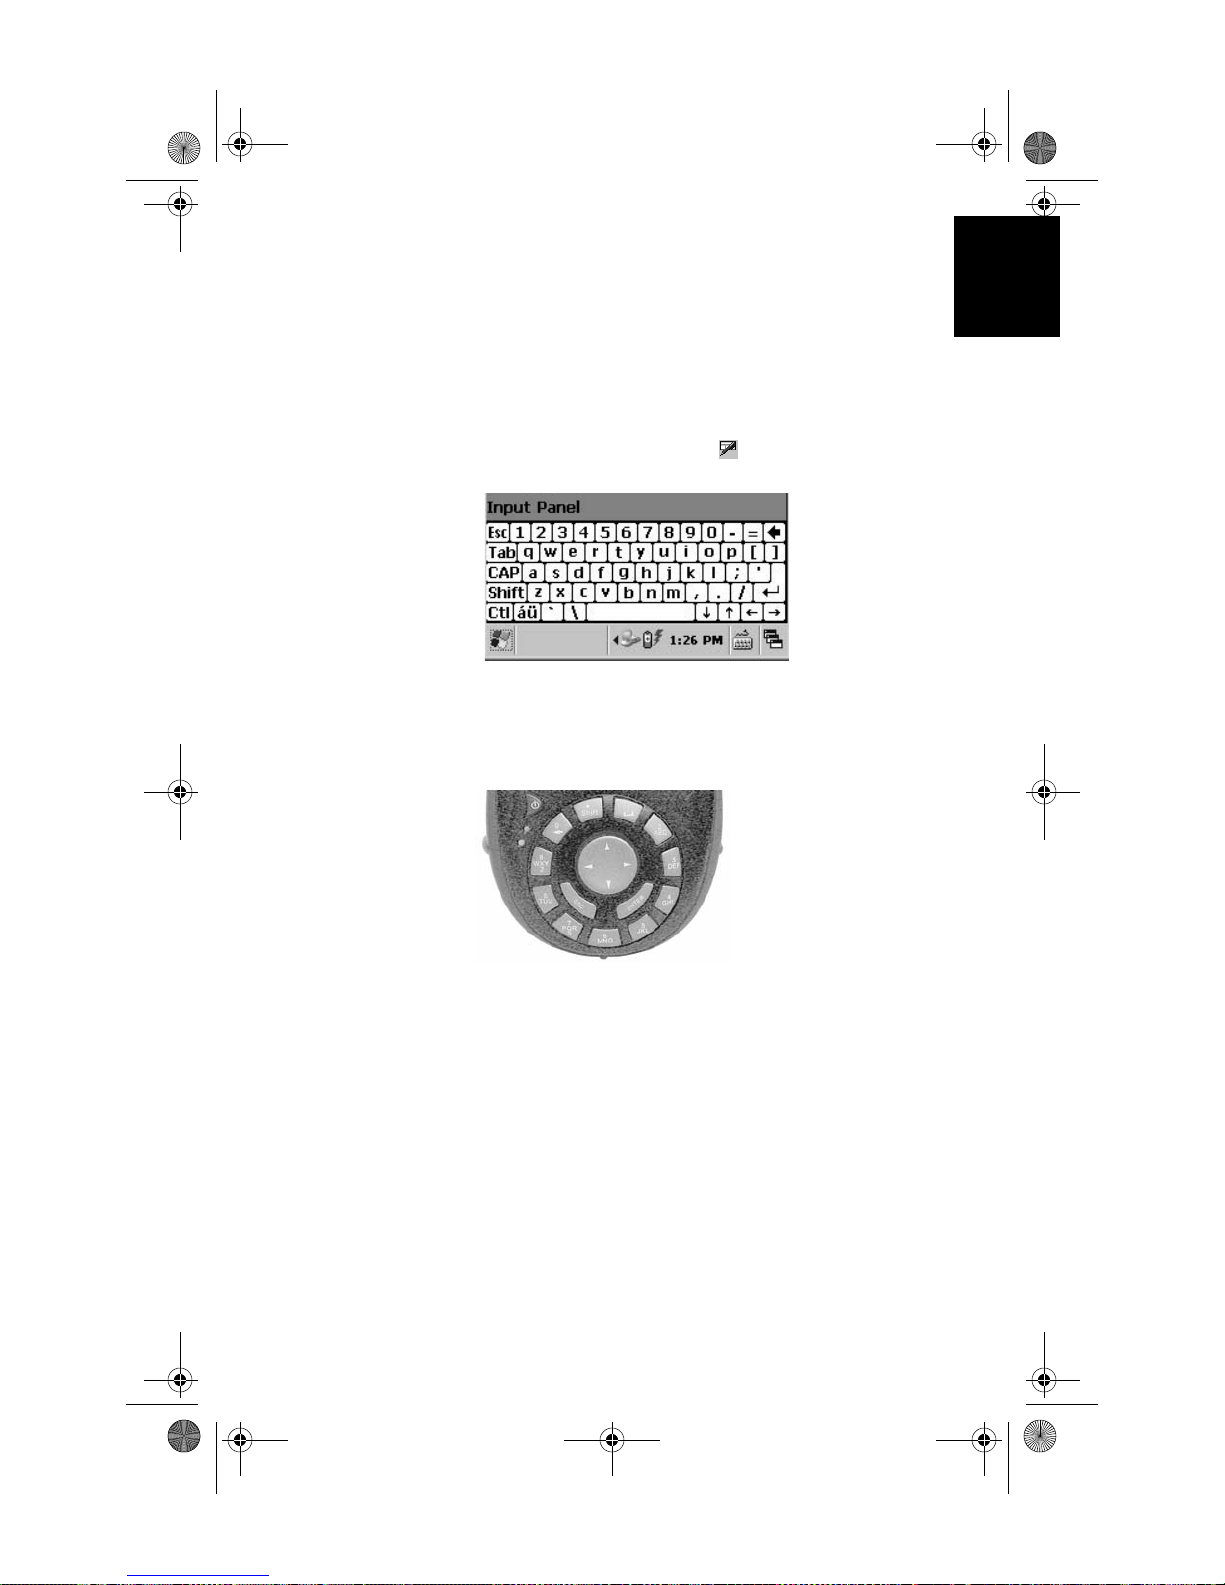
MobileMapper CE comes with an integrated physical keypad and like most Windows CE devices, you may also use an
on-screen keyboard to enter text. To activate the on-screen
keyboard, tap the keyboard icon in the taskbar.
Using the integrated alphanumeric keypad
English
MobileMapper CE uses a telephone-style alphanumeric keypad. The cursor keys are used to move the cursor left, right,
up and down on the screen. Buttons 2-9 contain alphanumeric characters. By pressing the key continuously, all characters on that key will be scrolled. For example, the letters a, b,
and c are associated with the “2” key. Tapping the key once
enters an “a,” twice enters a “b,” three times enters a “c” and
four times enters a “2.”
15
Page 20
MM CE GS Guide.book Page 16 Monday, June 20, 2005 11:04 AM
English
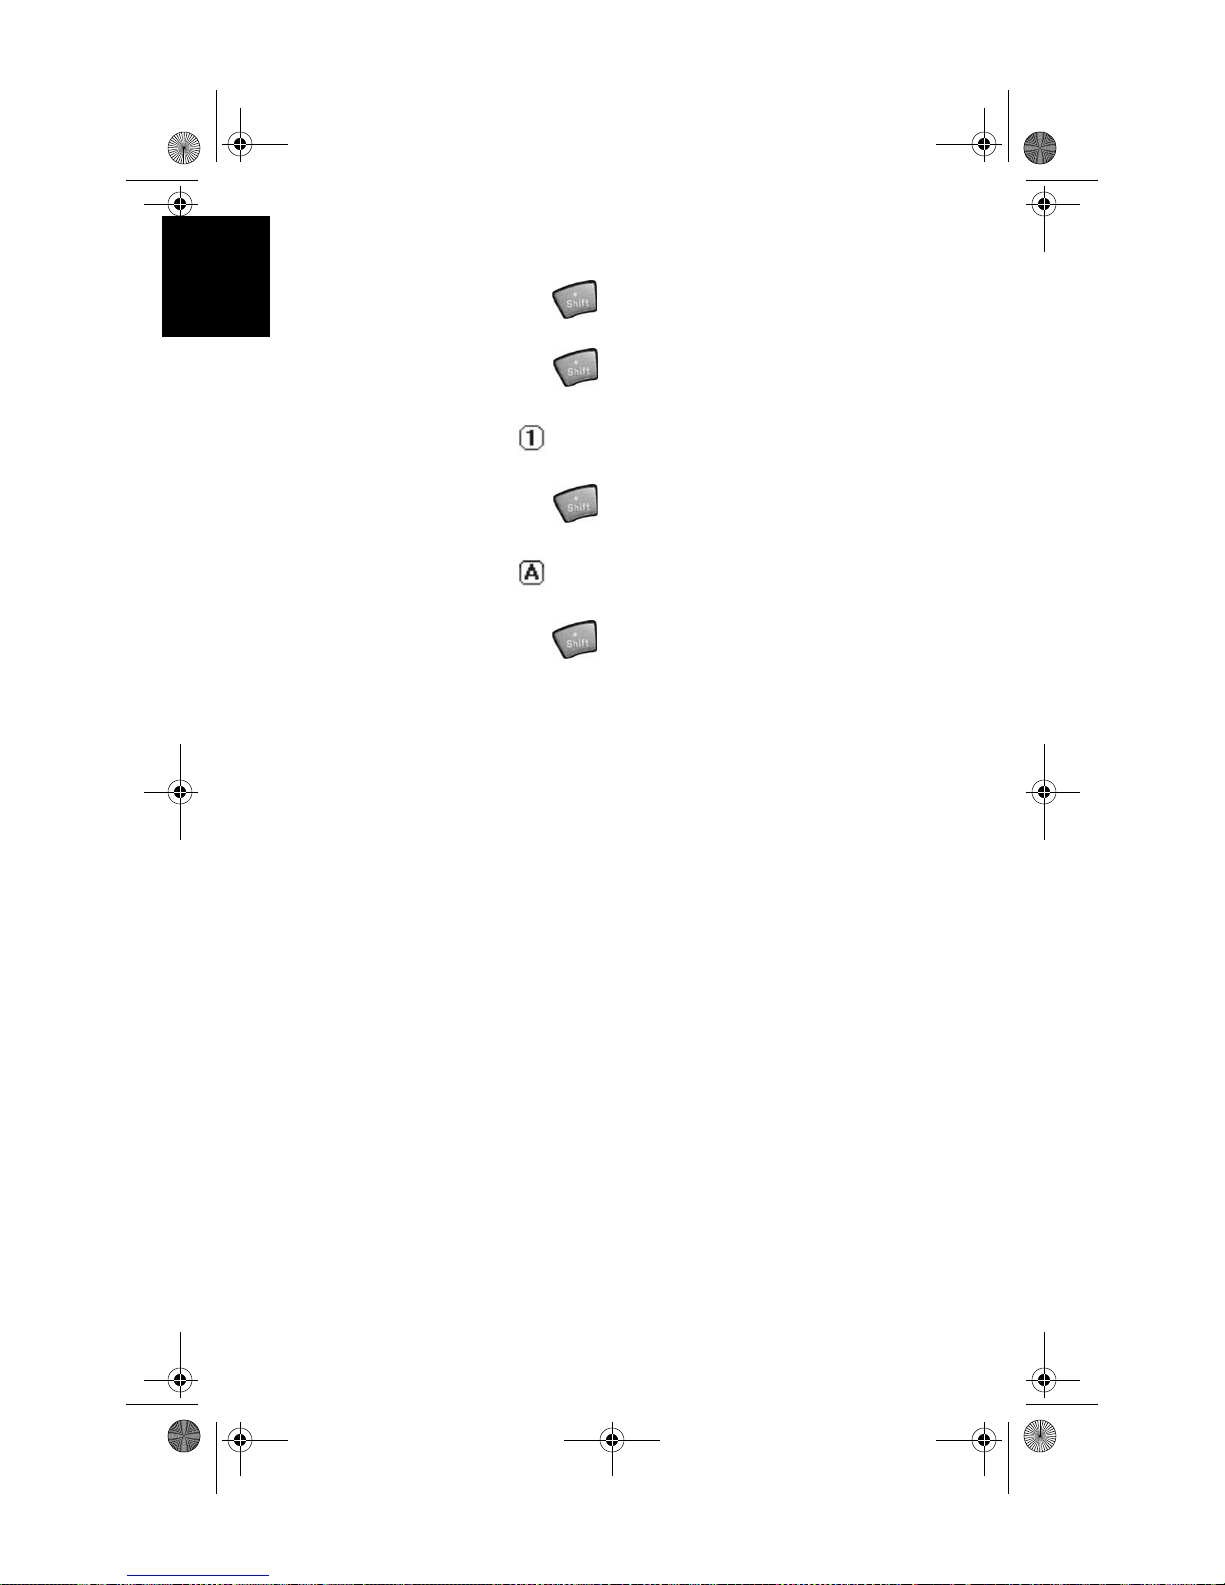
The keyboard default is lower-case alphanumeric letters.
Press the key to toggle from numeric lock to caps lock
and default mode.
Press the key twice to lock the keypad in numeric
mode.
The icon appears in the system tray indicating that the
numeric lock mode is enabled.
Press the key three times to activate the upper-case
lock.
The icon appears in the system tray indicating that the
caps lock mode is enabled.
Press the key four times to bring it back to the default
lower-case alphanumeric mode.
Using the Stylus
The stylus is used for menu selection or data input on the
touch-screen.
- Tap: Touch the screen once with the stylus to select the
item, tap twice to open the selected item.
- Drag: Hold the stylus on the screen and drag it across to
select text and images. Drag in a list to select multiple
items.
- T ap and hold: T ap and hold the stylus on an item to see a
list of actions available for that item. On the pop-up
menu that appears, tap the action you want to perform.
When you operate the touch screen of the MobileMapper
CE, use the supplied stylus.
If the tip of the stylus is damaged, do not use it. If you operate the touch screen with a damaged stylus or a ballpoint pen,
the touch screen may be damaged.
When the stylus is damaged, please use the extra stylus or
buy a new one.
16
Page 21
MM CE GS Guide.book Page 17 Monday, June 20, 2005 11:04 AM
Power Management
MobileMapper CE comes with a removable/rechargeable
battery, which provides enough energy for a full working
day –provided you start your day with a fully charged battery. In order to ensure a longer battery life, use the external
power whenever possible. When used, the external power
source also automatically recharges the internal battery.
The built-in advanced power saving features also help to optimize power consumption while the system is idle. The MobileMapper CE system has four power saving modes when
the battery power is used:
1. User Idle mode: Backlights for both the display and key-
pad are switched off. Press any key or tap on the screen
to switch on the backlights again.
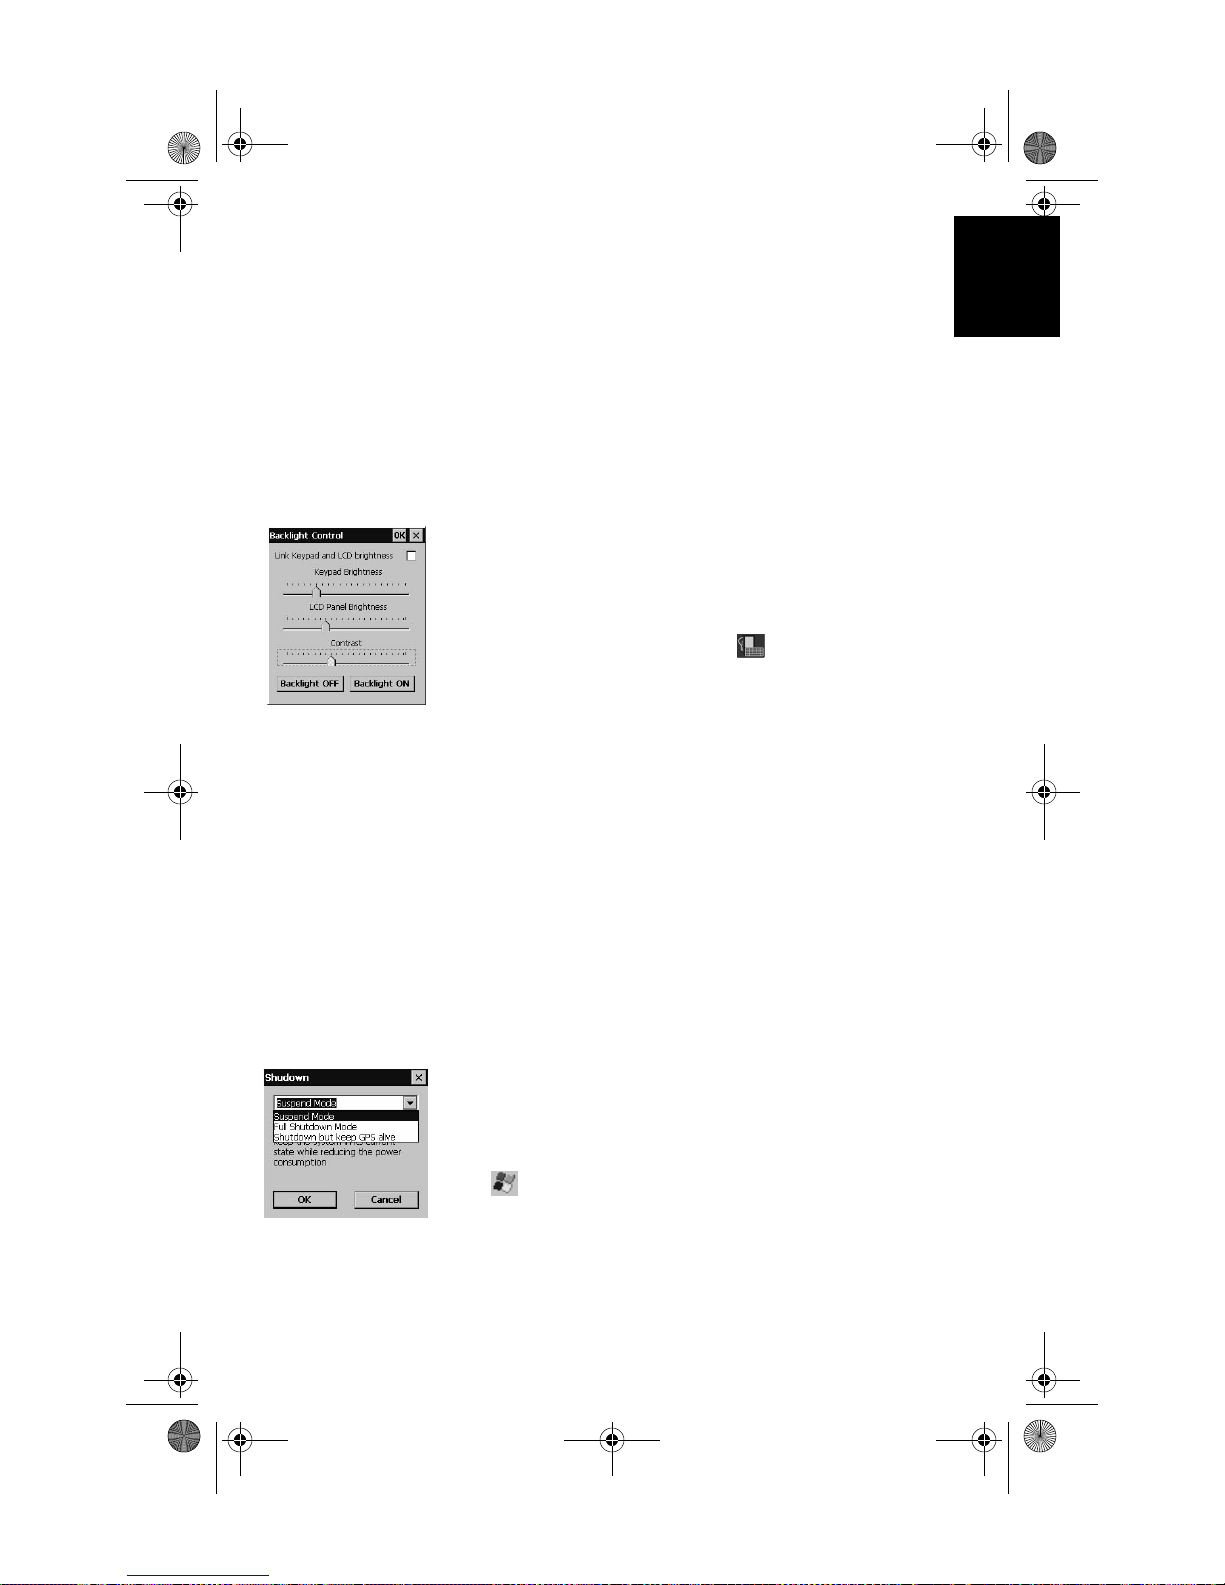
To switch of f the backlights, tap (backlight) in
Panel
. In the Backlight Control dialog that opens (see figure
opposite), tap the
Backlight OFF button.
Control
2. System Idle mode: The display as well as the backlights
are switched off, but all the processes are still running.
The power LED is on. Press any key or tap on the screen
to switch on the display again.
3. Suspend Mode: This is a low-power consumption mode.
The system goes to a sleep mode and appears to be
switched off. The power LED is blinking (long ON
period). Press the
Power key to switch the system back on
again.
4. Shut down but keep GPS alive mode: The power LED
blinks (short ON period). All receiver functions excluding the GPS module are shut down. Press the
for about 3 to 4 seconds to resume. Press the
Power key
Power key
for more than 3 to 4 seconds to fully shutdown the system.
5. Full Shut Down Mode: The system is shut down. The
MobileMapper CE is switched off. The Power LED is
off.
English
Tap
>Suspend or press the Power key. In the dropdown
list, select the appropriate mode (see figure opposite).
17
Page 22
MM CE GS Guide.book Page 18 Monday, June 20, 2005 11:04 AM
English
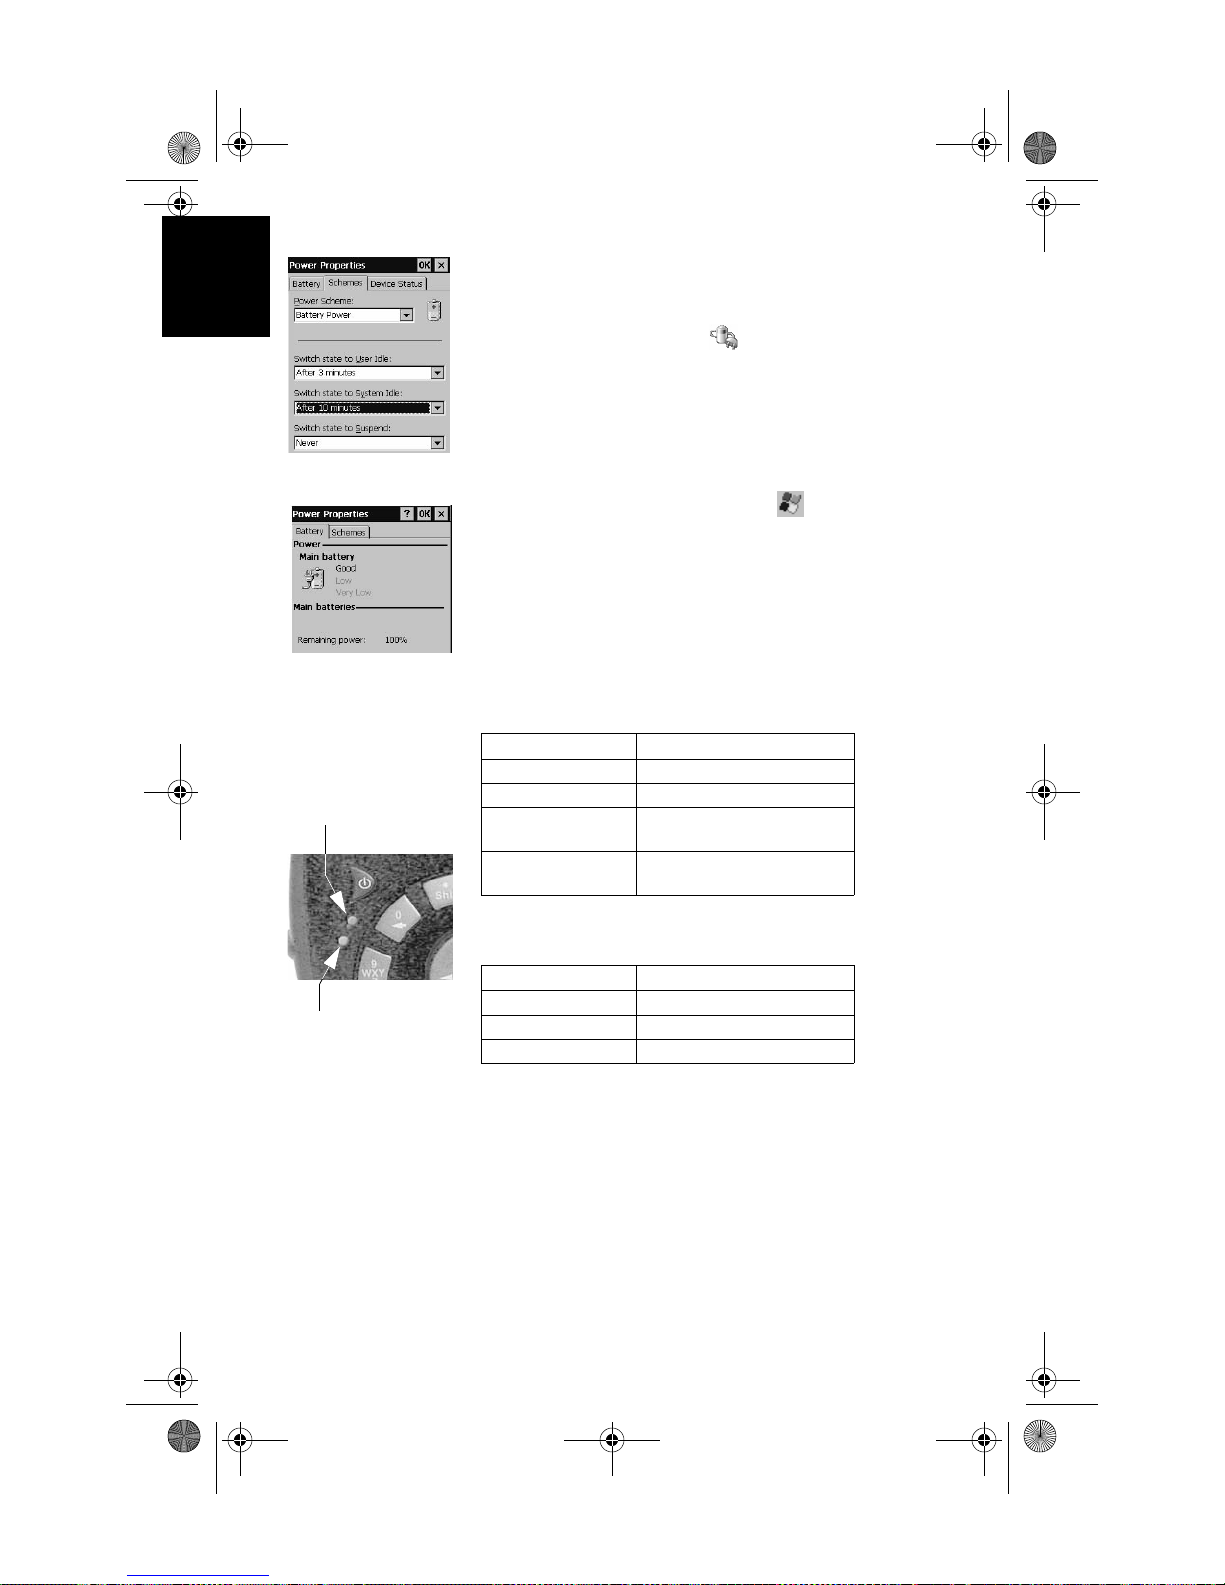
You can configure the MobileMapper CE handheld to automatically enter each mode when it has been idle for a specified time.
To change the idle time, tap
Then make the necessary changes in the
posite.)
Checking Battery Status
To check the battery level, select the tab, then
tings>Control panel>Power
LED Indicators
Power LED (Green) Indicates:
Off Device Switched Off
Solid Green Power On
Power
Blinking (long ON
period), Green
Blinking (short ON
period), Green
Power in the Control Panel.
Schemes tab (see op-
Set-
.
Suspend Mode
System is shut down with GPS alive
18
Charge
Charge LED (Amber) Indicates:
Off Not charging
Solid Amber Battery is fully ch arged
Blinking Amber Battery is charging
The charge LED will give charging information only if the
receiver is on.
Page 23
MM CE GS Guide.book Page 19 Monday, June 20, 2005 11:04 AM
Memory Management
The MobileMapper CE has three types of memory:
- The Nand Flash memory (“MyDevice”), a non volatile
memory
- The removable SD Card memory, a non-volatile memory
- The RAM (volatile memory), mainly used for running
programs.
Programs or data that are saved in the RAM will be erased
when the system is switched off!
We recommend that you install programs on “MyDevice” and store your data on SD card.
English
19
Page 24
MM CE GS Guide.book Page 20 Monday, June 20, 2005 11:04 AM
English
Using GPS
The GPS Utilities folder includes software for GPS initialization and setup, port configurations for applications to
connect to GPS, mission planning and configuration of optional beacon differential receiver.
GPS initialization
See Initializing GPS on page 10.
Mission Planning
The Mission Planning utility enables you to view the visibility and availability of the constellation of satellites and determine the dilution of precision (DOP) for the current
location. It allows you to plan the best time of the day for
data collection and maximize productivity.
T o be able to determine the configuration of satellites, an almanac file is used in Mission Planning. This file is generated
and loaded automatically when you get the first GPS fix.
-From the
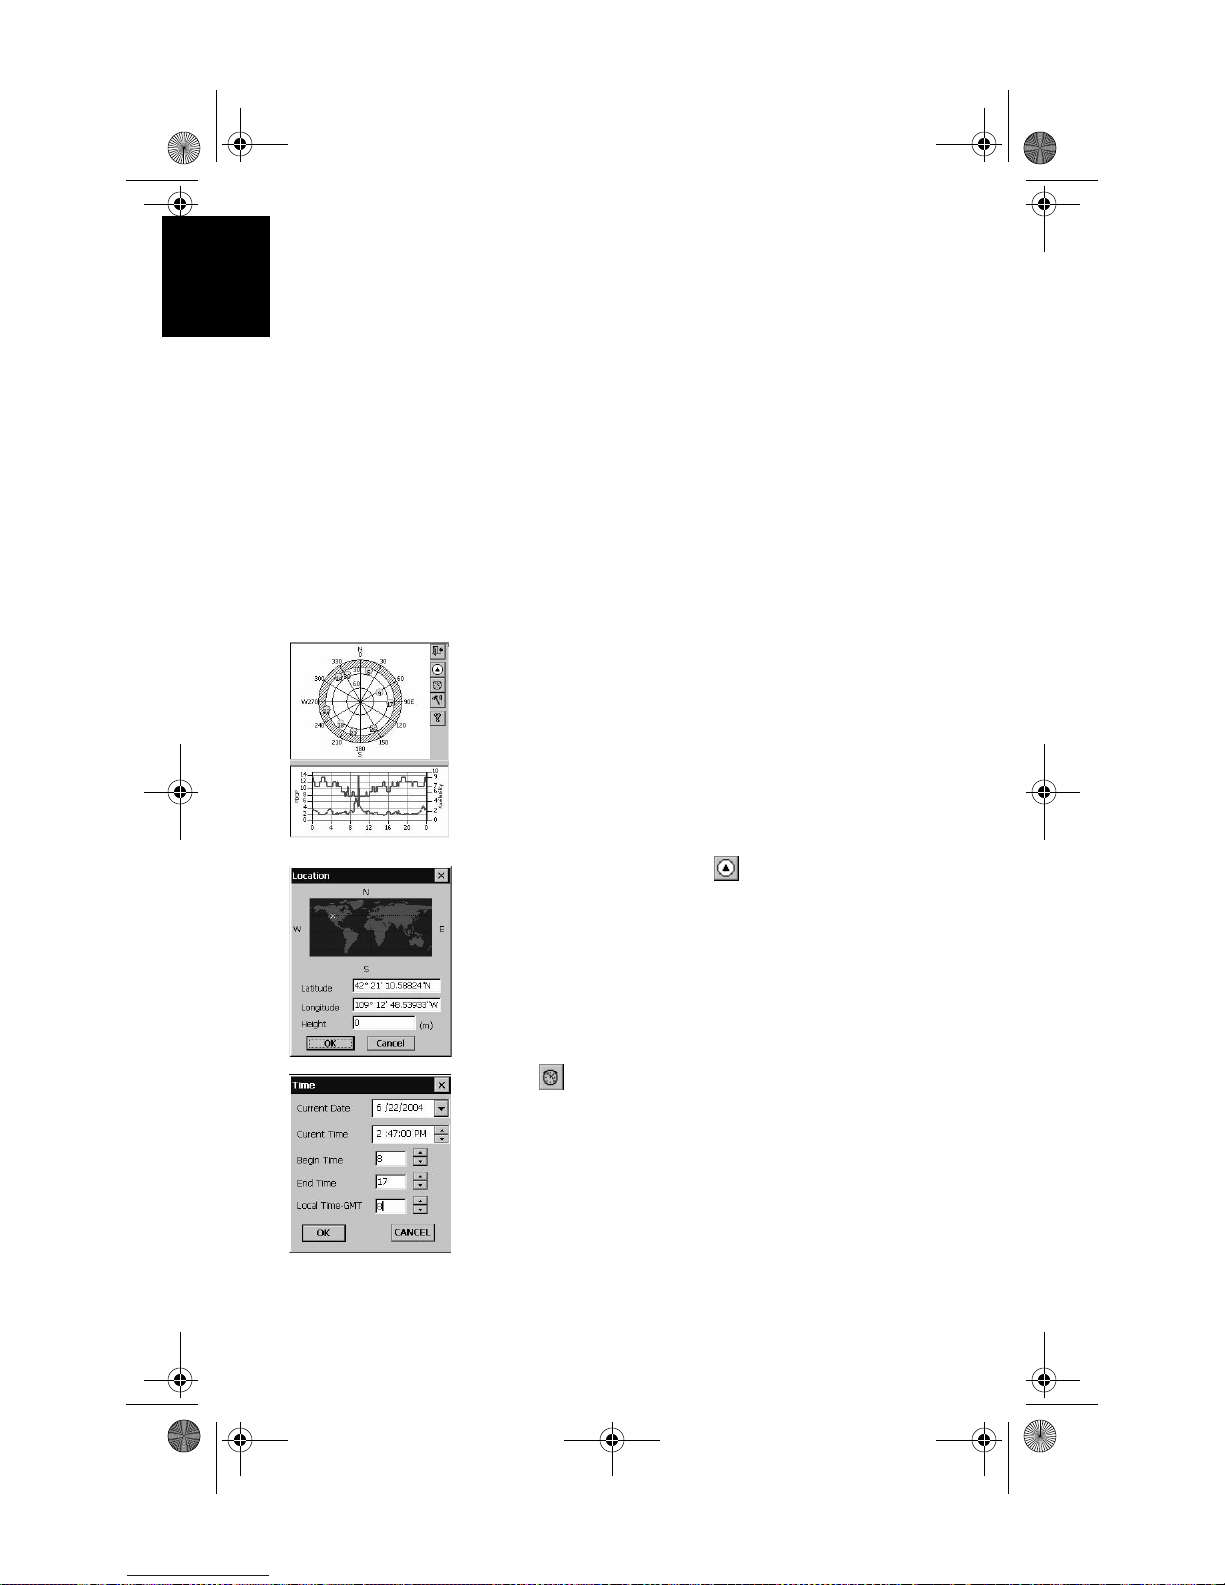
Mission Planning window appears (see opposite) with
the animated sky plot and PDOP (satellite geometry)
graph.
GPS Utilities menu, select Mission Planning. The
20
- To select the location, tap . You can key in the exact
coordinates of your sampling site or select it from the
map (see opposite)
- Tap to indicate the exact time for which you would
like the sky plot to view the constellation (see figure
opposite). The time you indicate will be marked on the
PDOP chart shown underneath.
Page 25
MM CE GS Guide.book Page 21 Monday, June 20, 2005 11:04 AM
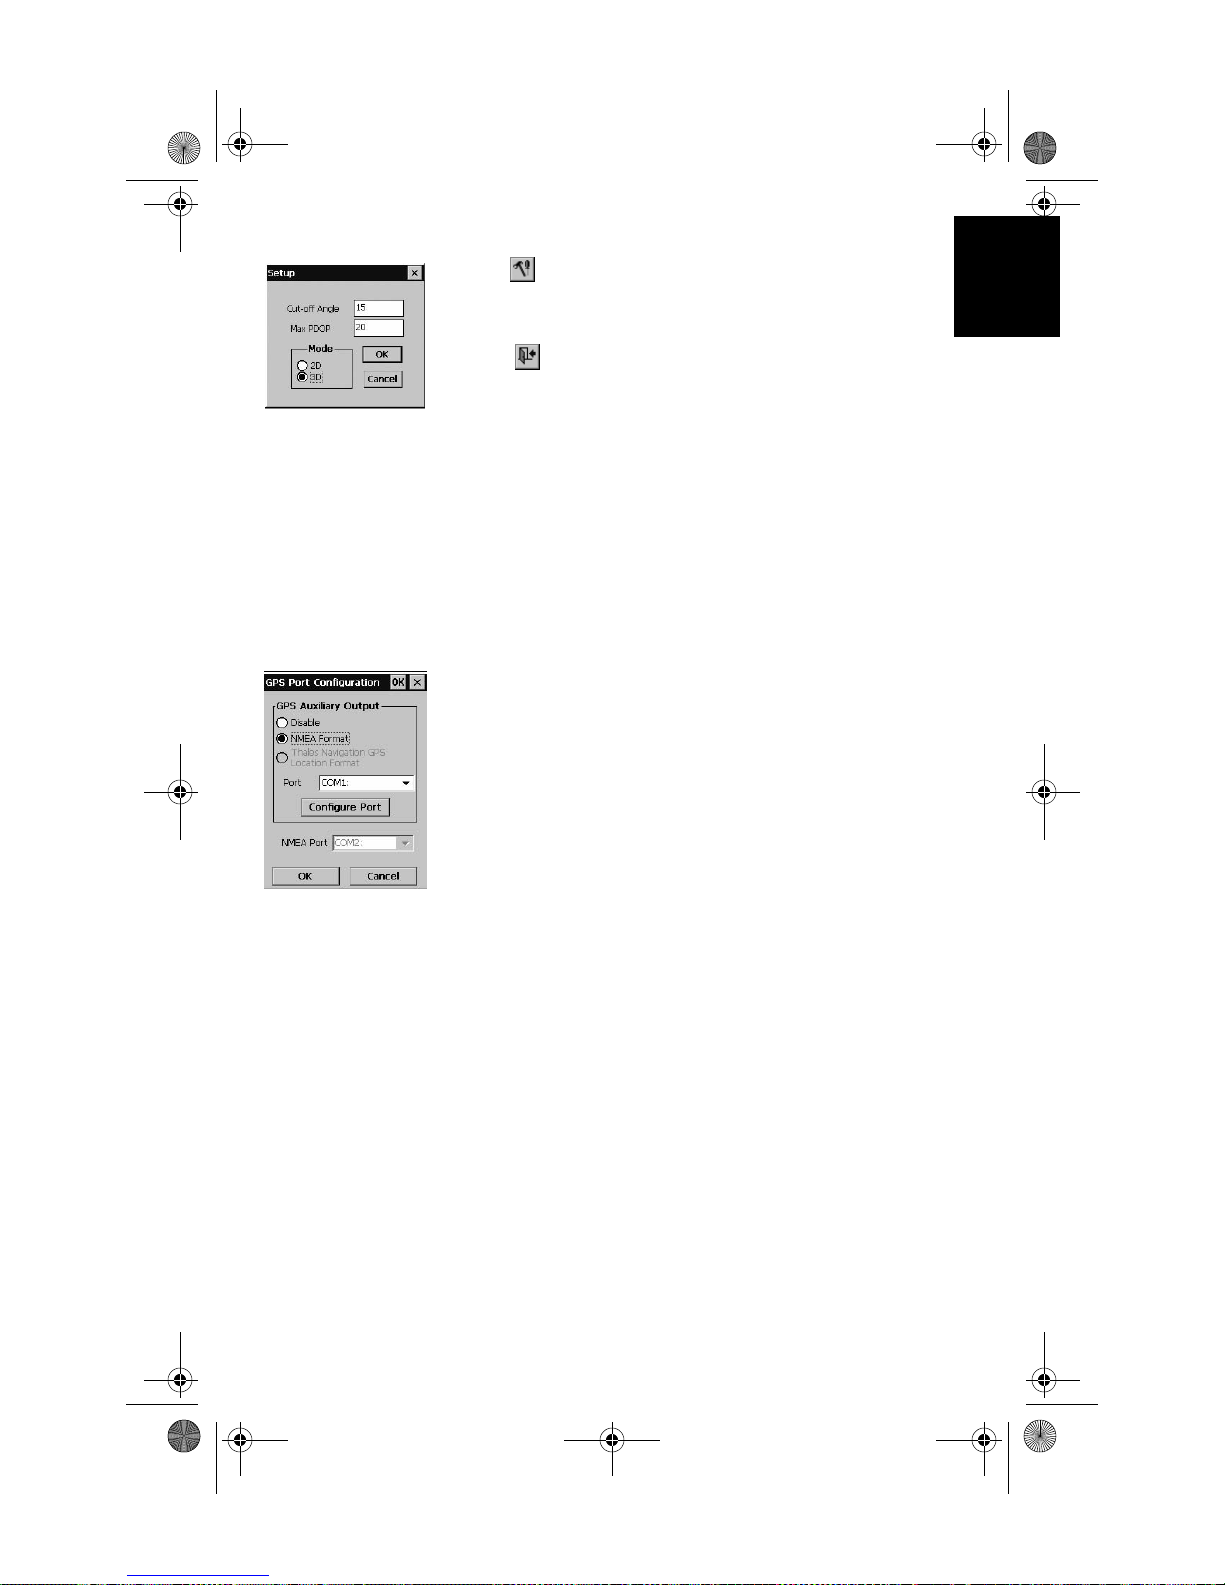
- Tap to open the setup form, which allows the setting
of max PDOP and satellite cut-off angle or whether or
not to include elevation for the GPS position (2D or 3D).
- Tap to close the Mission Planning application.
GPS Settings
See Setting Up GPS on page 11.
GPS Status
See Viewing Current GPS Status on page 13.
GPS Port Configuration
To output GPS positio ns from the Mob ileMapper CE integrated GPS to another device, you must configure the GPS
output port and specify the GPS data protocol using
Configuration
- From the
-Tap
rate.
To output GPS to another device via Bluetooth, see Output-
ting GPS Data to Another Device via Bluetooth on page 28.
To output GPS from MobileMapper CE to another computing device via serial port (RS232), you must connect the two
devices using a null modem cable.
.
GPS Utilities menu, select GPS Port Configuration.
Configure Port to configure port settings such as baud
English
GPS Port
Connecting to GPS in your application
The COM2 port -a virtual COM port- is setup at 57600
bauds, 8 data bits, 1 stop bit and no parity for off-the-shelf
Windows CE mobile mapping applications to connect to
GPS in NMEA format.
The following NMEA sentences are available through
COM2: GSA, GSV, GGA, GLL, ZDA, and RMC.
21
Page 26
MM CE GS Guide.book Page 22 Monday, June 20, 2005 11:04 AM
English
DGPS Real-Time Configuration
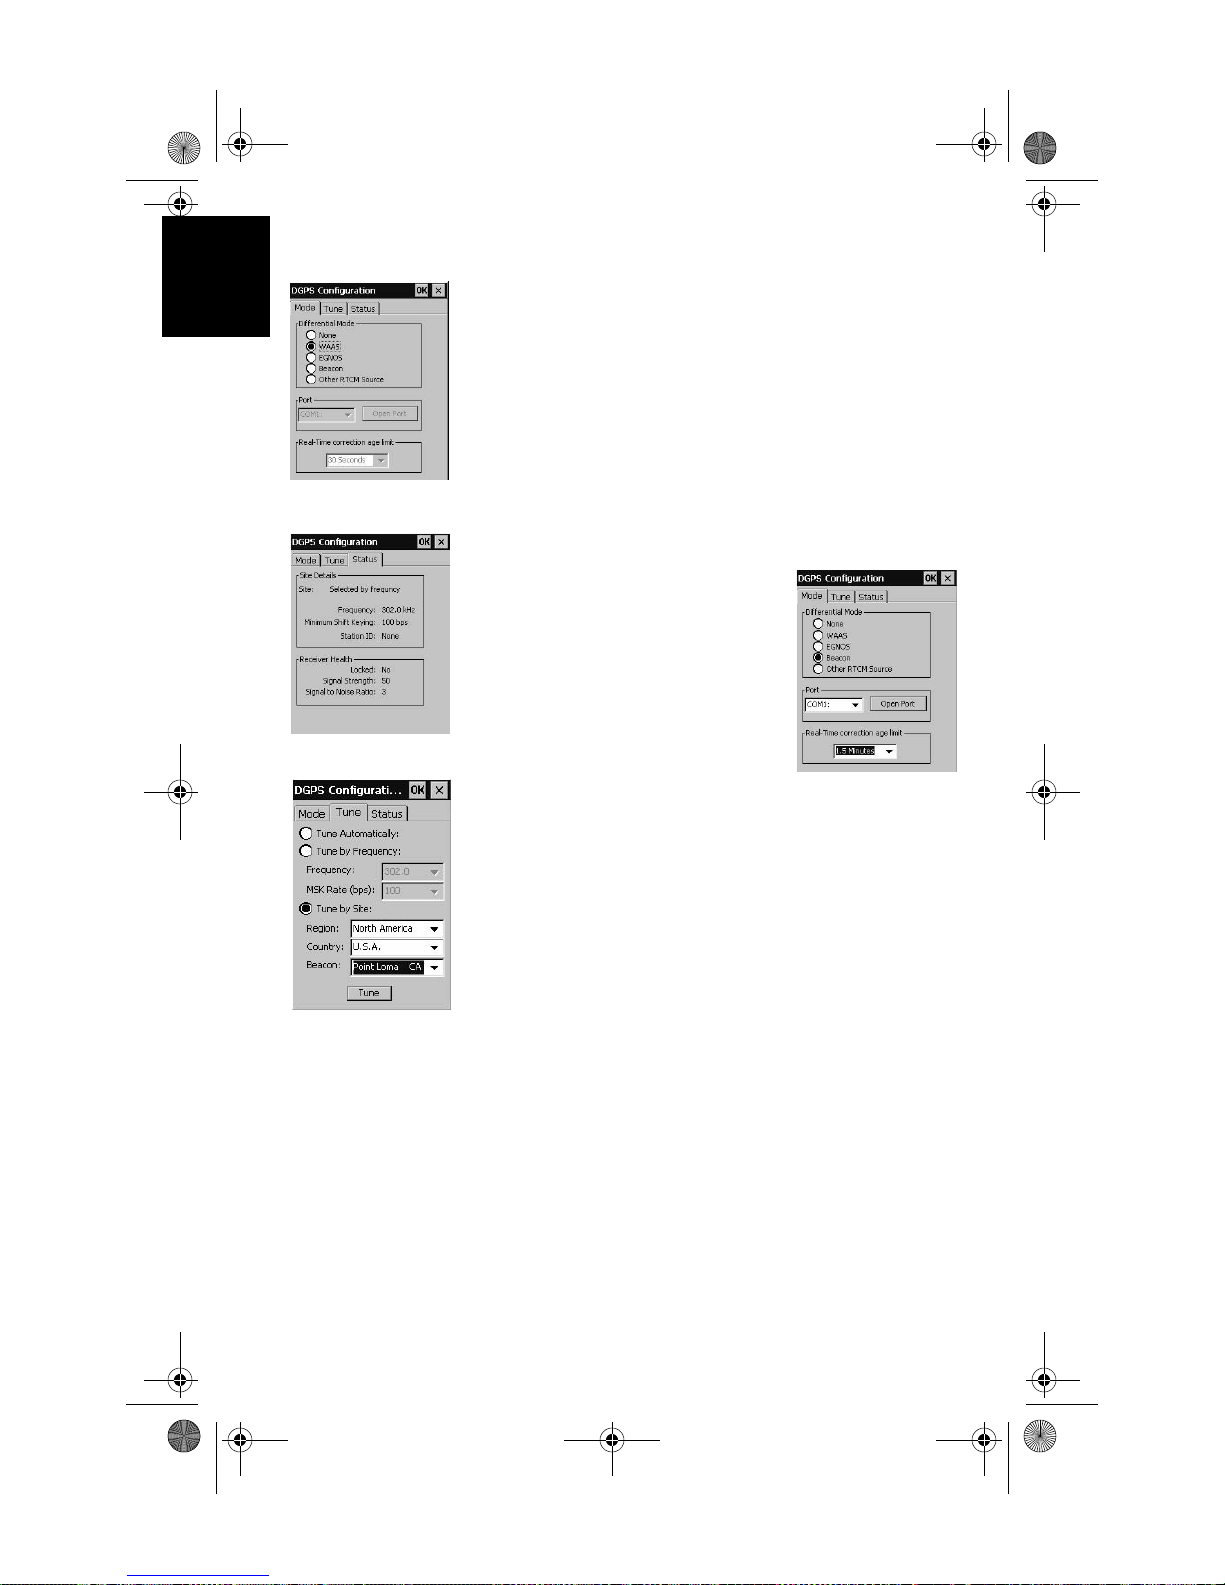
The MobileMapper CE GPS receiver integrates WAAS/EGNOS. W AAS is the functionality that the receiver uses by default. You can also use corrections from an external
correction source, such as MobileMapper Beacon, a beltmounted, Bluetooth-enabled beacon receiver connected to
serial port COM1 or via a Bluetooth port (see figure opposite).
For more information on using MobileMapper CE with MobileMapper Beacon, see page 30.
Beacon Receiver Configuration
You can use Programs>GPS Utili-
ties>DGPS Configuration
baud rate for the external beacon
source (see opposite right), and to set
automatic and manual tune modes for
operational versatility.
The
Status tab (see opposite left) gives
the name (if available), station ID, frequency and MSK rate of the beacon
station that is currently being used. It also displays the signal
strength, the signal-to-noise ratio and the lock status (Yes or
No).
The
Tune tab (see opposite left) gives you the option of auto-
matically tuning, manually tuning by frequency and MSK
rate or by beacon name. Automatic tuning is set by default.
For the DGPS settings to take effect, tap
Configuration window.
to set port and
OK on the DGPS
22
Resetting GPS
Tap Reset GPS in GPS Utilities to clear the GPS receiver’s
memory.
Page 27
MM CE GS Guide.book Page 23 Monday, June 20, 2005 11:04 AM
Using Bluetooth
The MobileMapper CE is equipped with built-in Bluetooth
technology that allows short-range connections to other
Bluetooth-enabled devices such as cellular phones, personal
digital assistants (PDA), and desktop or notebook computers, and provides fast, reliable, and secure wireless communication.
Working with Bluetooth Manager
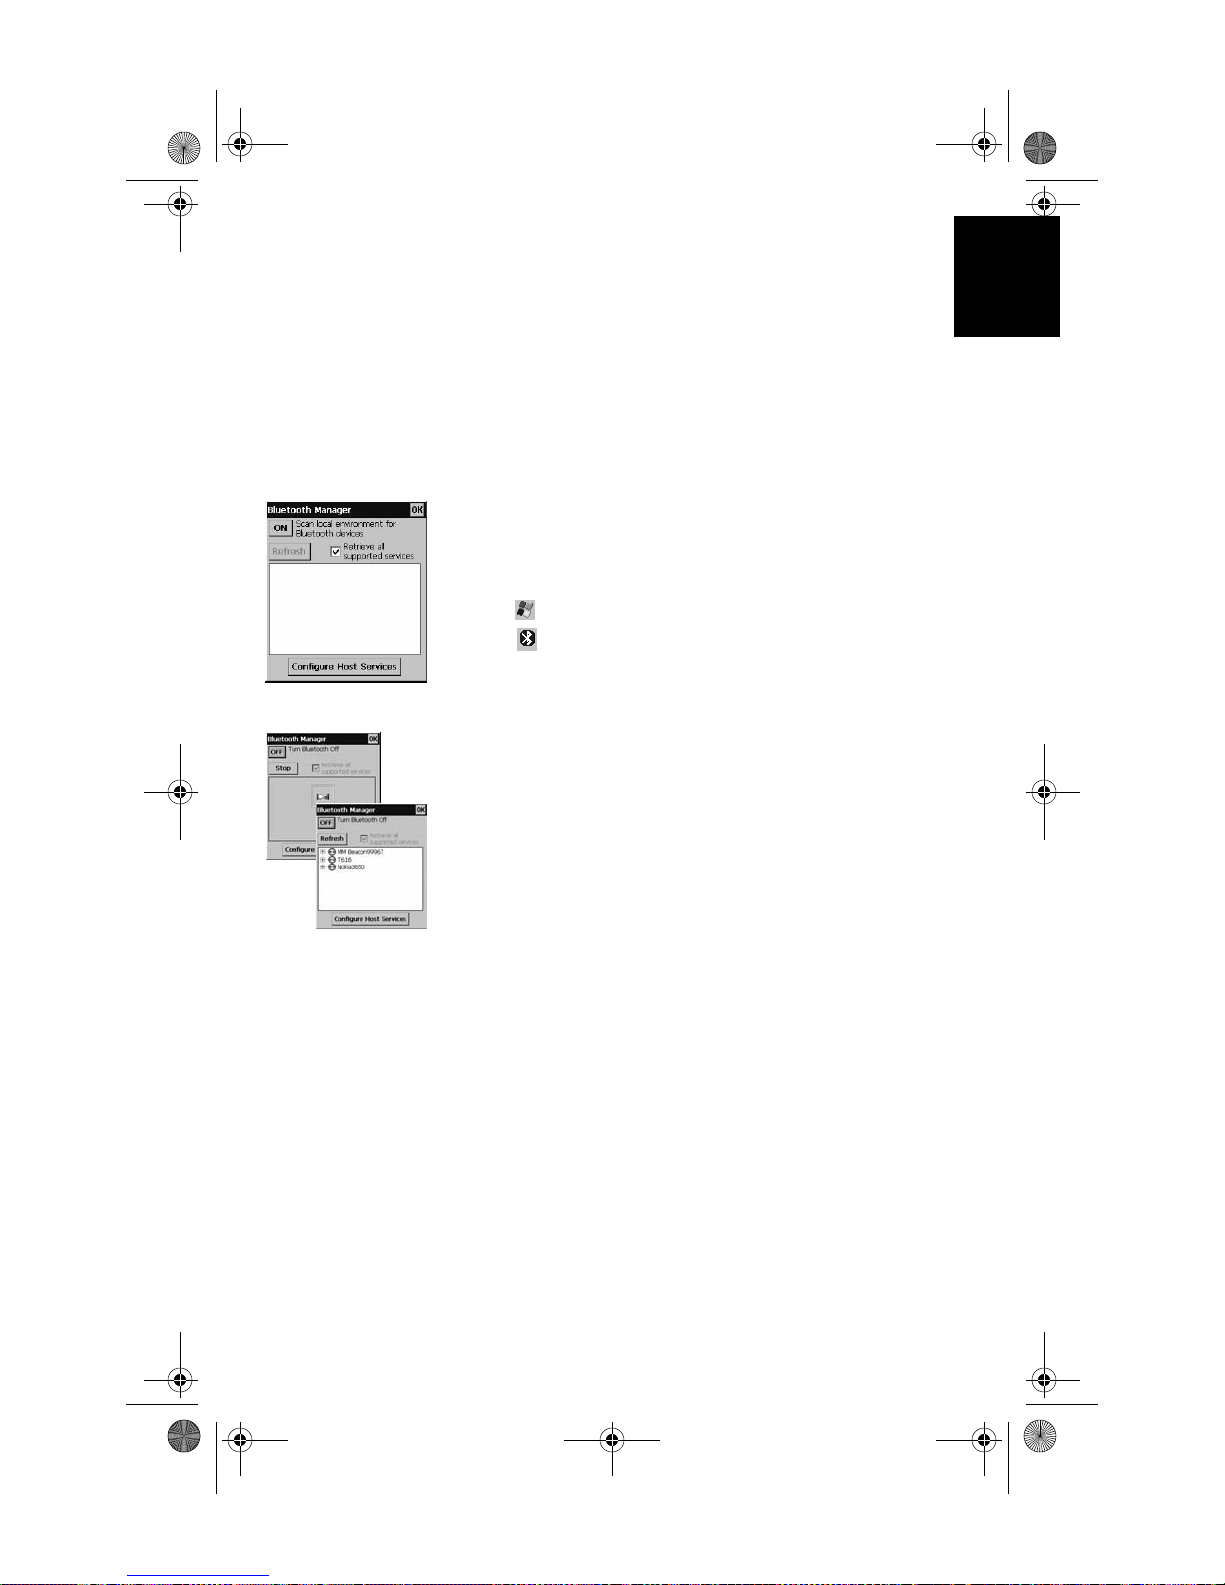
Use the Bluetooth Manager to find, configure and establish
connections to other Bluetooth devices. To start the Bluetooth Manager:
-Tap
>Settings>Control Panel and double-tap BTManager.
The icon now appears in the system tray.
Turning On/Off Bluetooth
-Tap the ON button on Bluetooth Manager. The
MobileMapper CE starts to search for other available
Bluetooth devices that are within range. The detected
devices are then listed.
- T o pr eserve battery power, we recommend that you
enable (turn on) Bluetooth only when using it: Tap the
OFF button on Bluetooth Manager to disable Bluetooth.
English
Supported Services
The functions that Bluetooth supports are called services.
MobileMapper CE can communicate with Bluetooth devices
that support the following services:
- Serial Port: A direct wireless connection to RS232 compatible devices.
23
Page 28
MM CE GS Guide.book Page 24 Monday, June 20, 2005 11:04 AM
English
- Dial-up Networking: Enables dial-up network to a cellular phone or modem via a Bluetooth-enabled modem.
- File Transfer: Supports the OBEX communication protocol which allows the MobileMapper CE to send and
receive files from other connected Bluetooth devices.
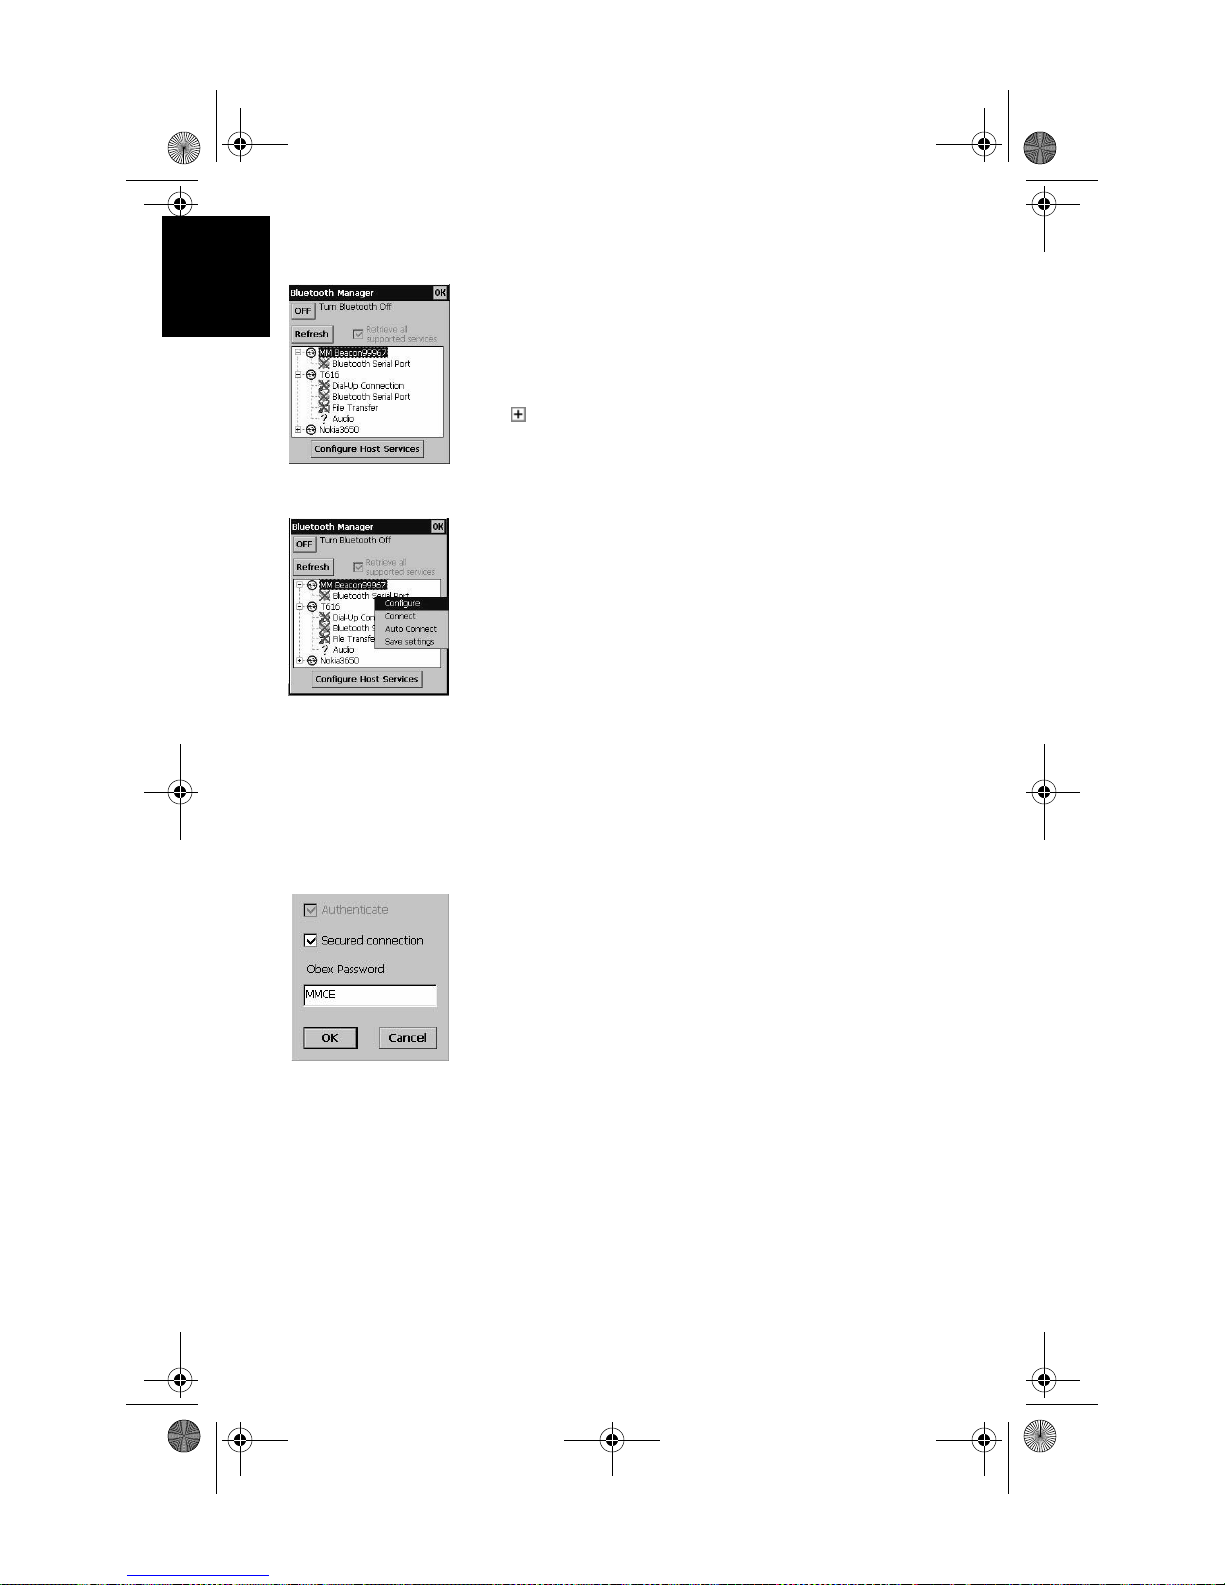
T o see a list of services offered by the detected device, click
the box next to the device name. If a check mark appears
over the service icon, the service has been activated (see figure opposite).
Configuring Services
- Tap and hold the service that you want to connect to, and
then tap
-Tap
Configure (see figure opposite)
Save settings to save the service configuration set-
tings.
Transferring Files
Y ou can exchange files with a connected device. You can use
the
File Transfer service to:
• Browse through the directories
• View files and folders
• Transfer files to / from a remote device.
Follow the instructions below:
- Tap and hold a File Transfer service, then tap
- To authenticate the client, check the
box and type in a password (see figure opposite). When
the other device connects to this service, it must enter a
passkey to establish the connection. Secured connection
is an encrypted connection, which requires an authentication. This step is optional.
- Tap and hold
check mark now appears over the service icon.
- Tap and hold
Configure.
Authenticate check
File Transfer service, then tap Connect. A
File Transfer service, then tap Browse.
24
Page 29
MM CE GS Guide.book Page 25 Monday, June 20, 2005 11:04 AM
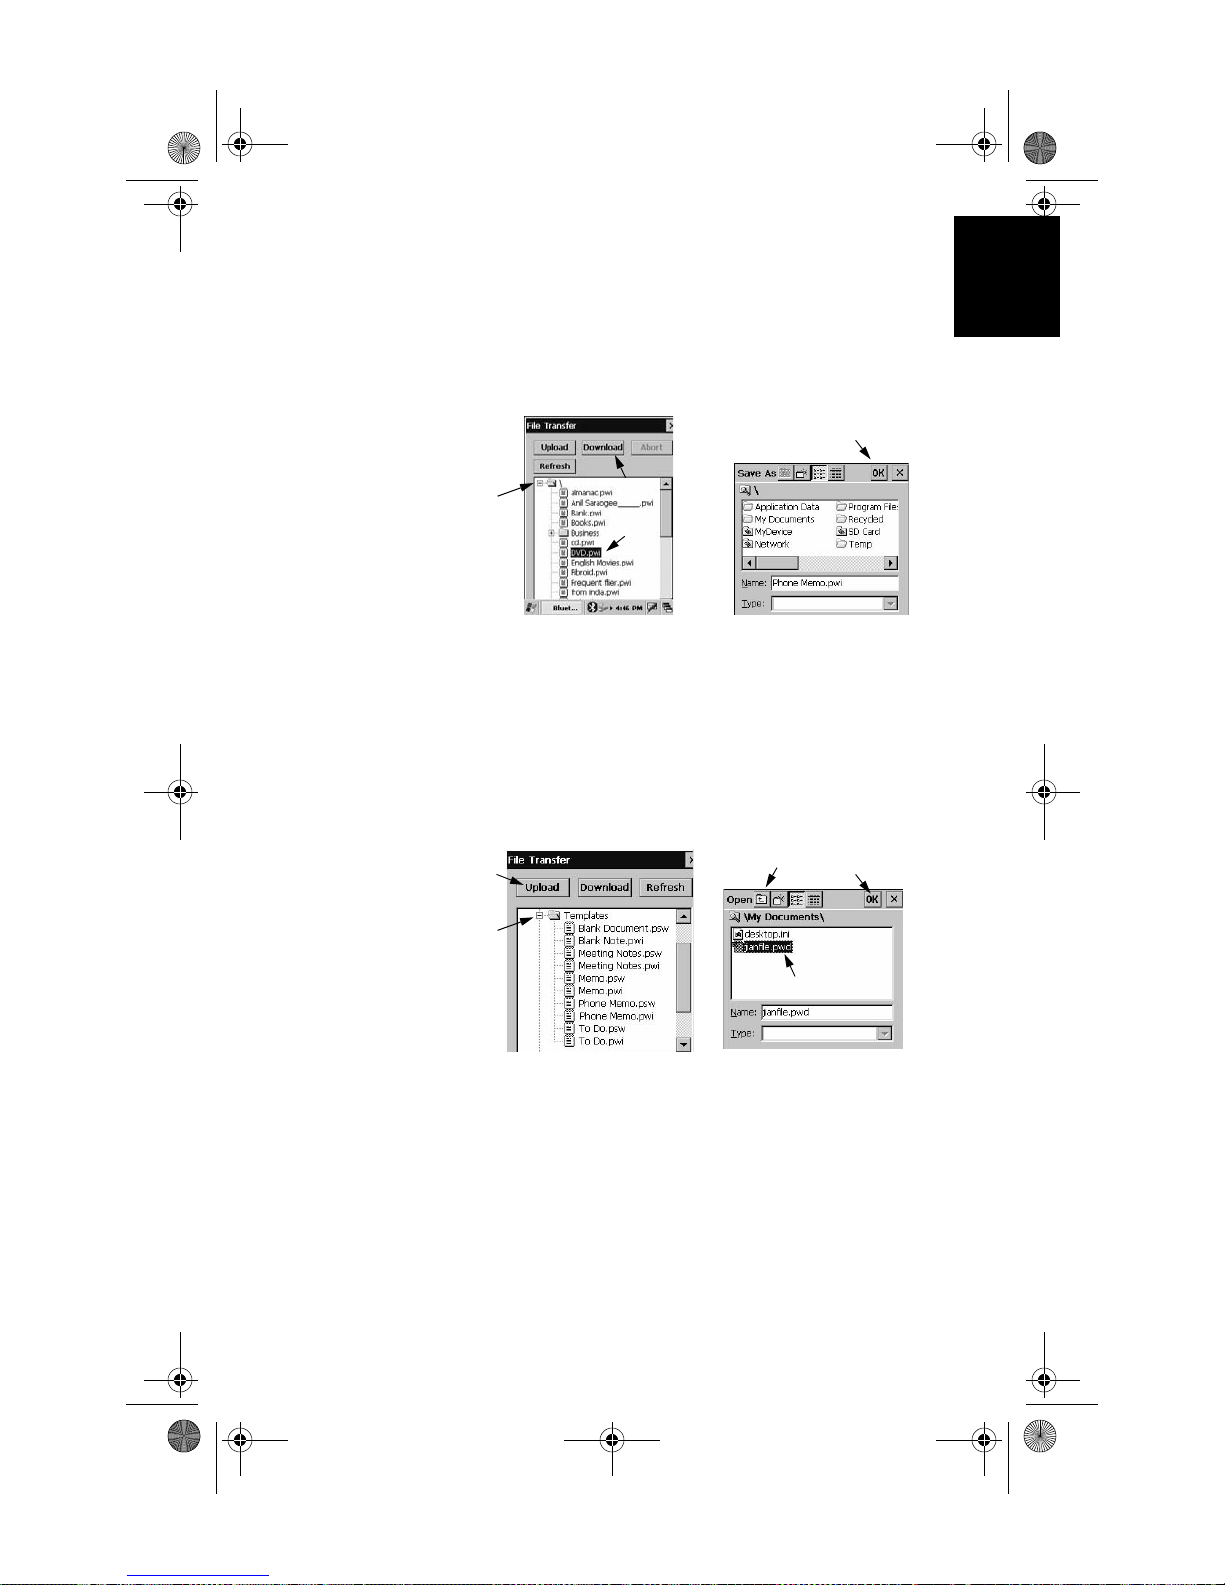
Receiving a File from a Remote Device
1. Navigate to the file location on the remote device
2. Tap the file
3. Tap
Download
4. Tap OK to download the file (see also figures below).
English
4
1
3
2
Sending a File to a Remote Device
1. Select a directory on the remote device
2. Tap
Upload
3. Navigate to the file location
4. Tap the file
5. Tap
OK to send the file (see also figures below).
2
1
3
5
4
25
Page 30
MM CE GS Guide.book Page 26 Monday, June 20, 2005 11:04 AM
English
Establishing a Serial Connection
You can use the wireless Bluetooth serial port connection
just like you would use a physical serial cable connection.
You must configure the application that will use the connection to the correct serial port.
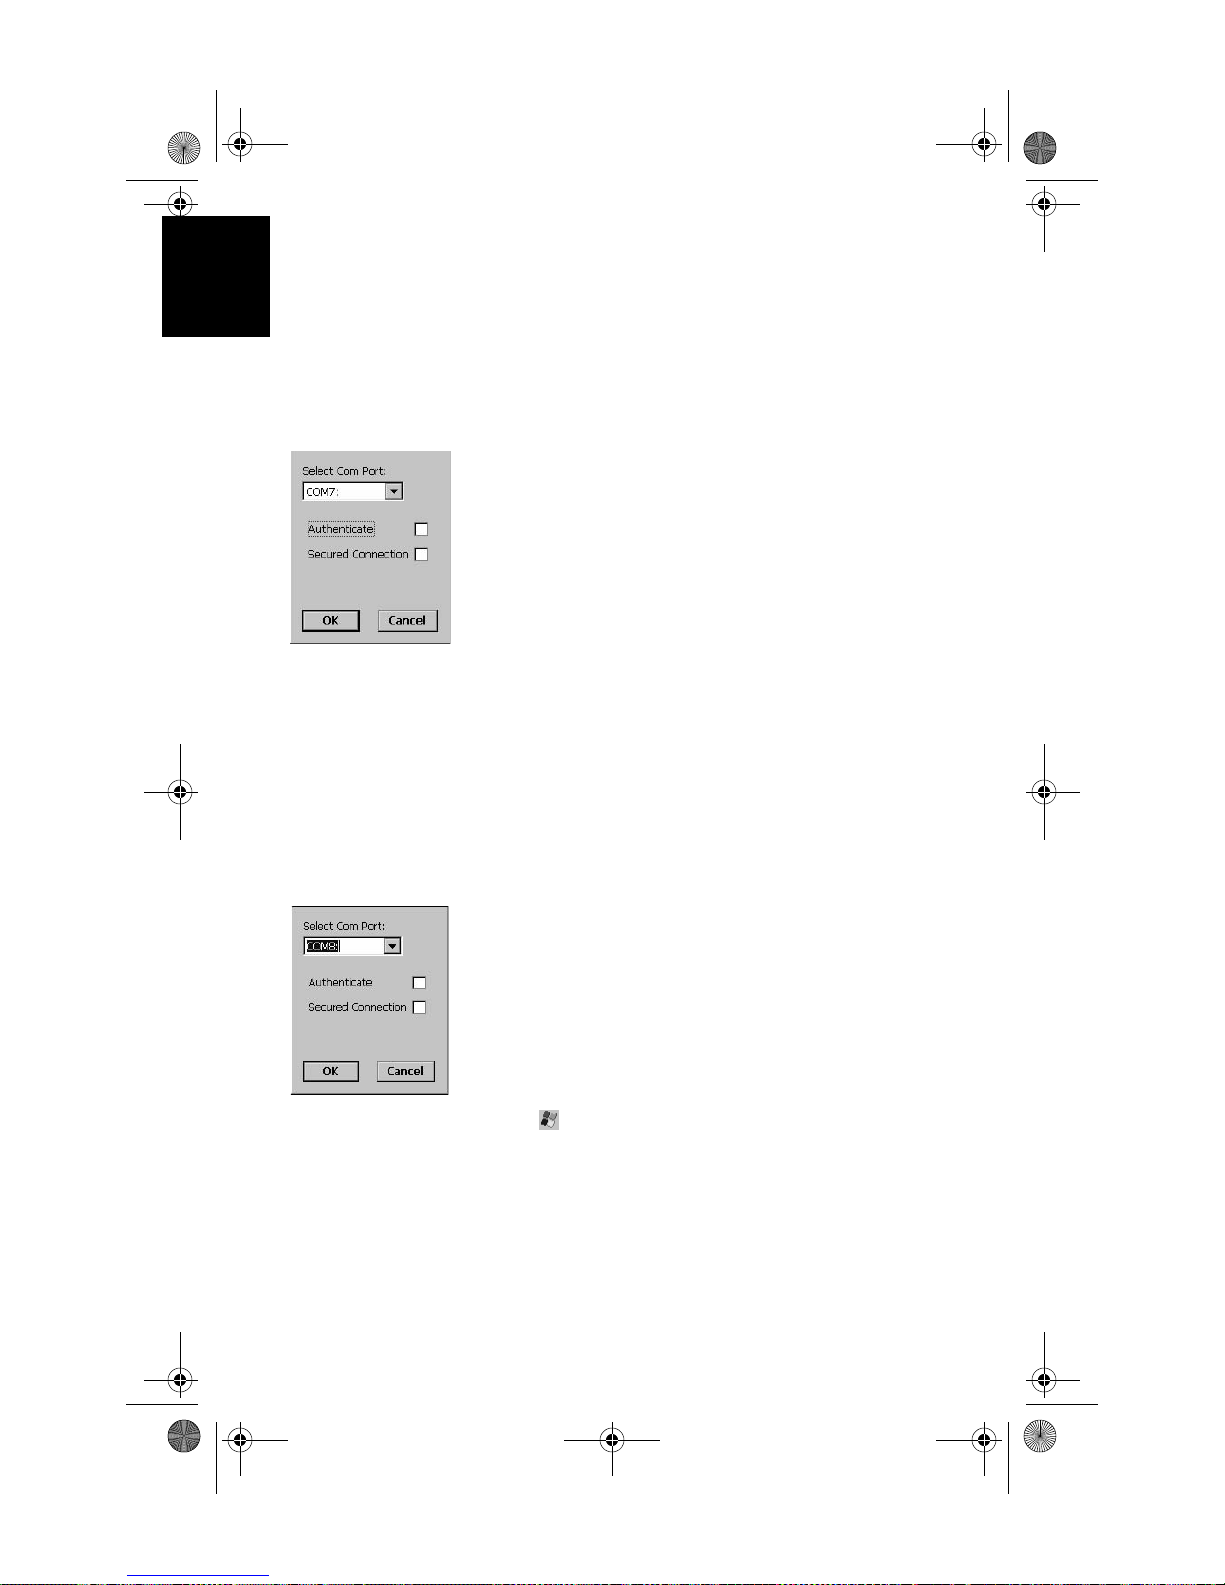
- Tap and hold a Bluetooth Serial Port service, then tap
Configure
- Select an available virtual serial port from COM Port list
(see figure opposite)
- To authenticate the client, check the
box. When the other device connects to this service, it
must enter a passkey to establish the connection. This
step is optional.
-Tap
OK to close the configuration dialog
- Tap and hold
-Tap Auto Connect to allow devices to connect automati-
cally when Bluetooth is on.
Authenticate check
Bluetooth Serial Port service, then tap Connect
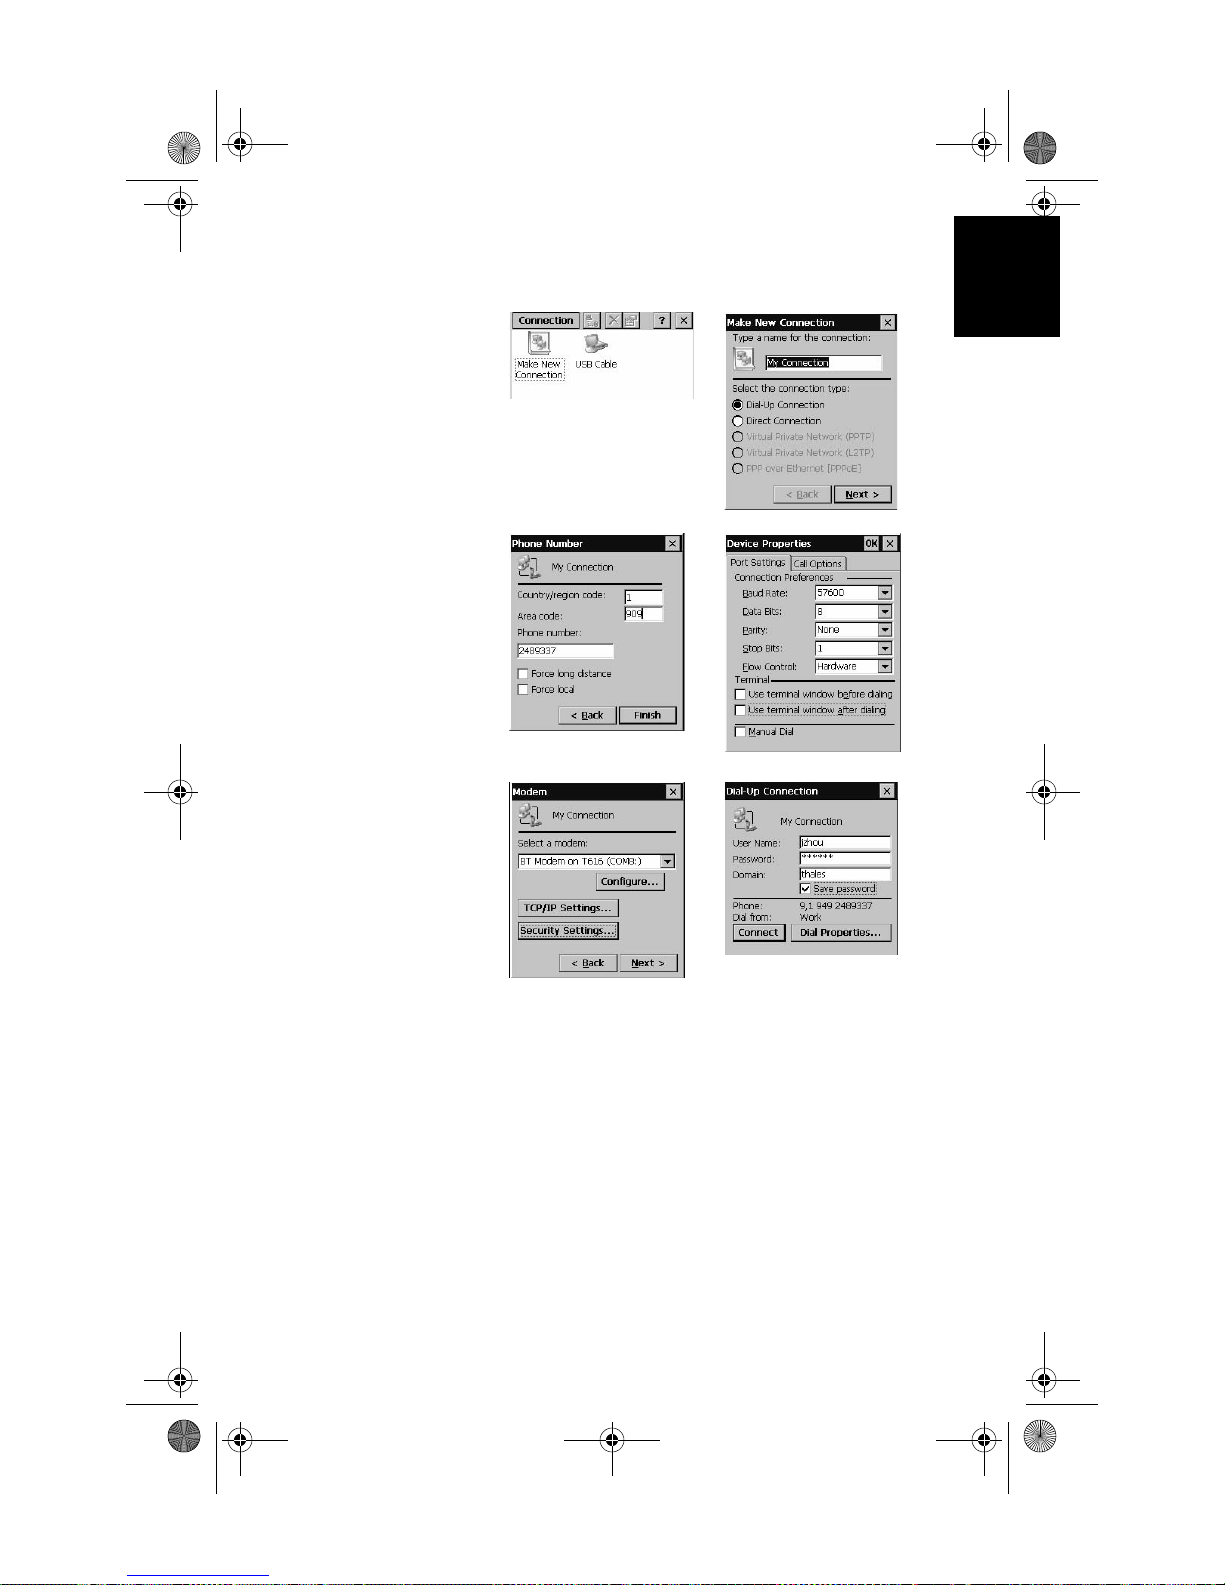
Using Dial-Up Networking
Y ou can use dial-up networking to connect to remote devices
that have telephone access. Such devices include cellular
phones, desktop computers or modems.
- Tap and hold a
ure
- Select a virtual communication port from the COM Port
list (see figure opposite)
- To authenticate the client, select the
box. When the other device connects to this service, it
must enter a passkey to establish the connection. This
step is optional.
-Tap
OK to close the configuration dialog
- Tap and hold
-Tap >Settings>Network and Dial-up Connections>Make New
Connection
Dial-up Connection service, then tap Config-
Authenticate check
Dial-up Connection service, then tap Connect
.
26
Page 31
MM CE GS Guide.book Page 27 Monday, June 20, 2005 11:04 AM
Follow the connection wizard instructions.
12
34
English
56
27
Page 32
MM CE GS Guide.book Page 28 Monday, June 20, 2005 11:04 AM
English
Outputting GPS Data to Another Device
via Bluetooth
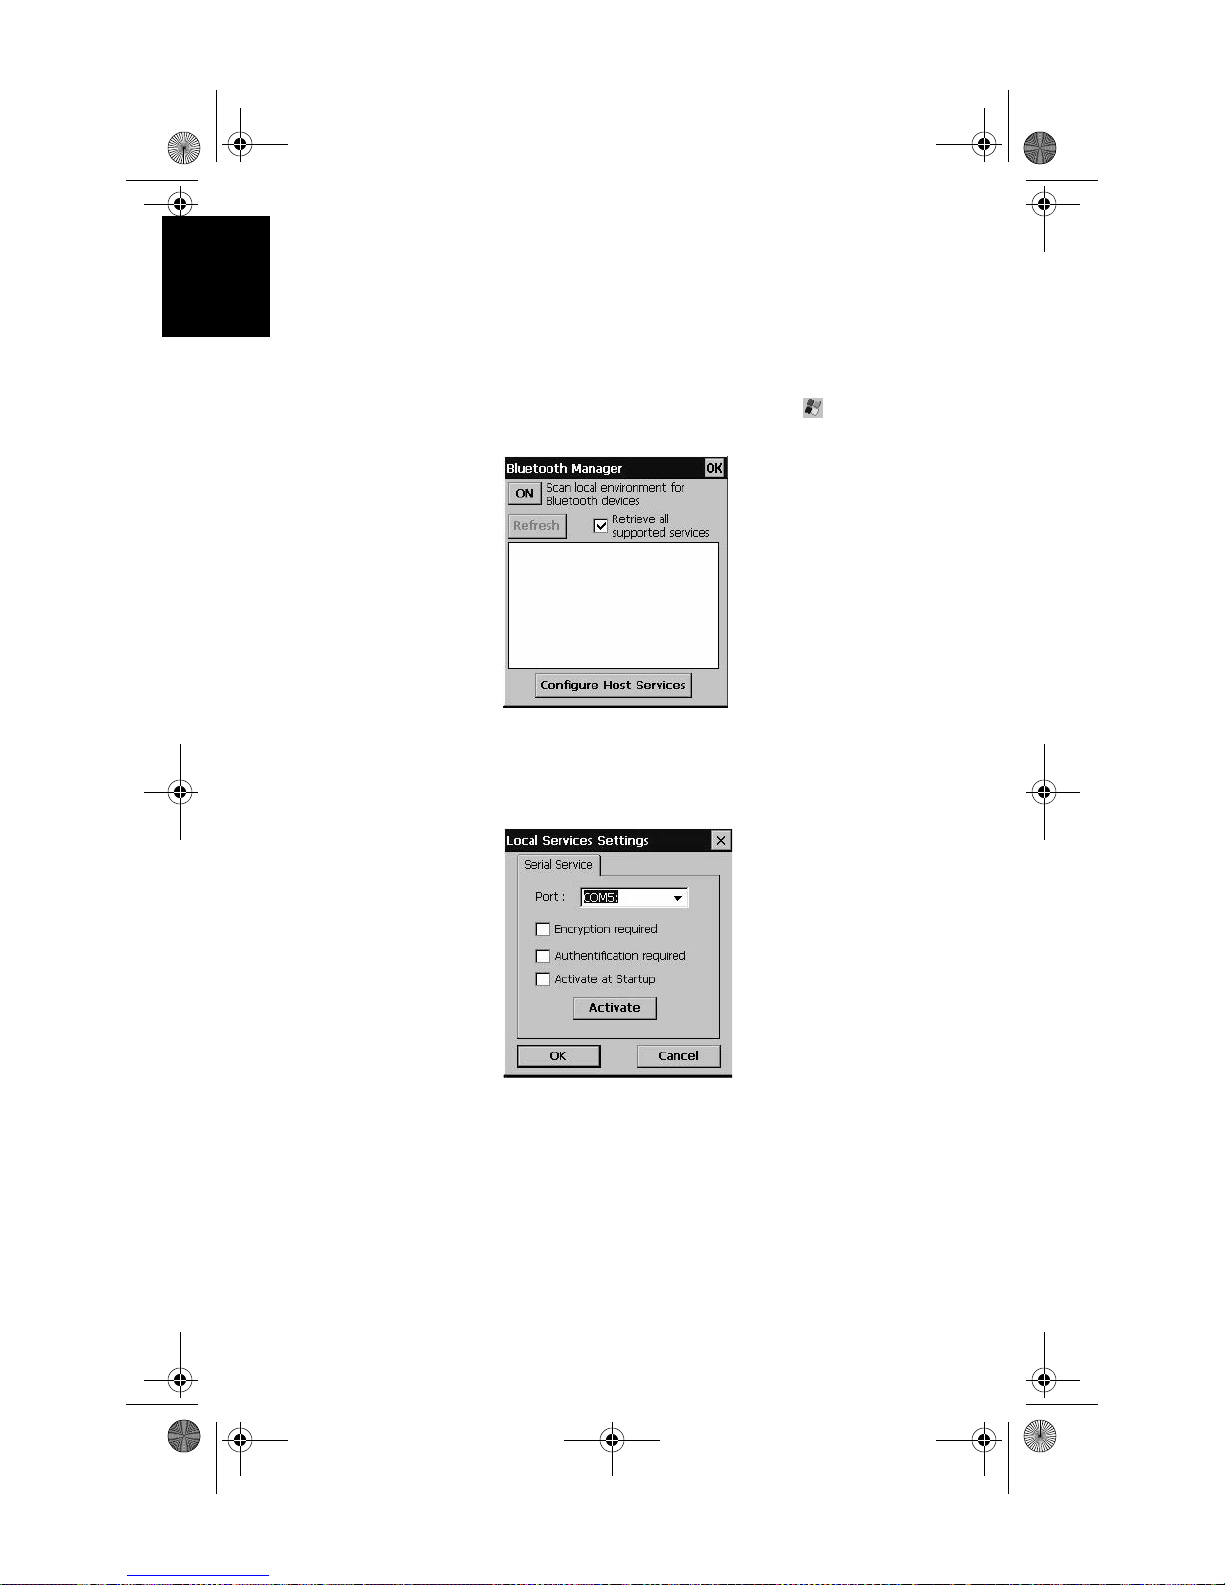
T o output GPS data from the MobileMapper CE handheld to
another device via Bluetooth, you must first create a virtual
serial port on MobileMapper CE.
1. Open Bluetooth Manager by tapping
Panel>Bluetooth Manager
>Settings>Control
2. Tap Configure Host Services. In the dialog box that opens,
select an available COM port and then tap the
Activate
button:
28
3. Tap
OK to close the Local Services Settings dialog.
Page 33
MM CE GS Guide.book Page 29 Monday, June 20, 2005 11:04 AM
4. Tap OK on Bluetooth Manager to minimize the Bluetooth
Manager window.
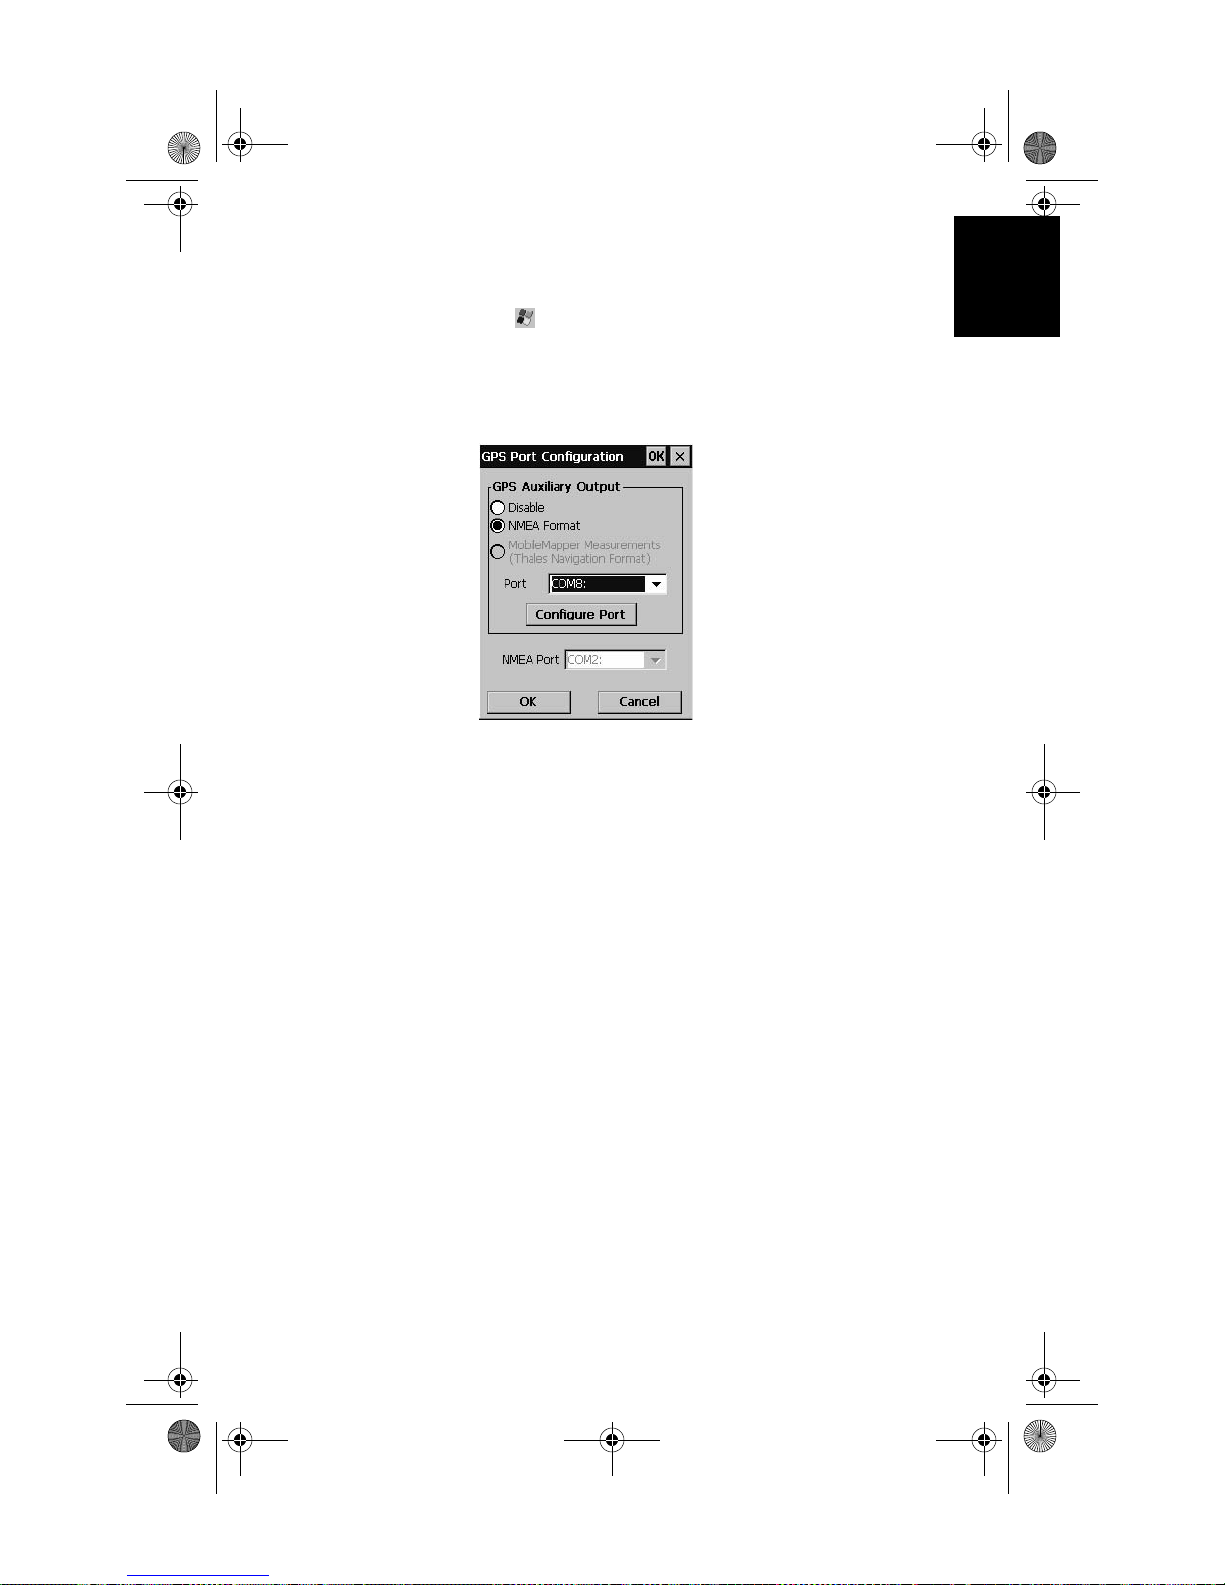
5. Tap
>Programs>GPS Utilities>GPS Ports Configuration.
This opens the GPS Ports Configuration window.
6. Select
NMEA Format for the GPS Auxiliary Output, choose
the Bluetooth virtual serial port that you set up in step 2.
and then tap
OK.
English
Now the MobileMapper CE handheld is set up to provide
NMEA messages to a Bluetooth client.
29
Page 34
MM CE GS Guide.book Page 30 Monday, June 20, 2005 11:04 AM
English
Using Bluetooth-Enabled
MobileMapper Beacon
MobileMapper Beacon is a MobileMapper CE accessory
providing real-time DGPS correction data from any beacon
networks that exist worldwide.
Using MobileMapper CE’s DGPS Configuration and Bluetooth Manager, tuning the beacon receiver and monitoring
its performance through wireless communication is a simple
process.
Establishing Communication Between the Two
Units
• Power on MobileMapper Beacon and make sure your
MobileMapper CE device is within range. (The distance
between both units should be less than 10 meters.)
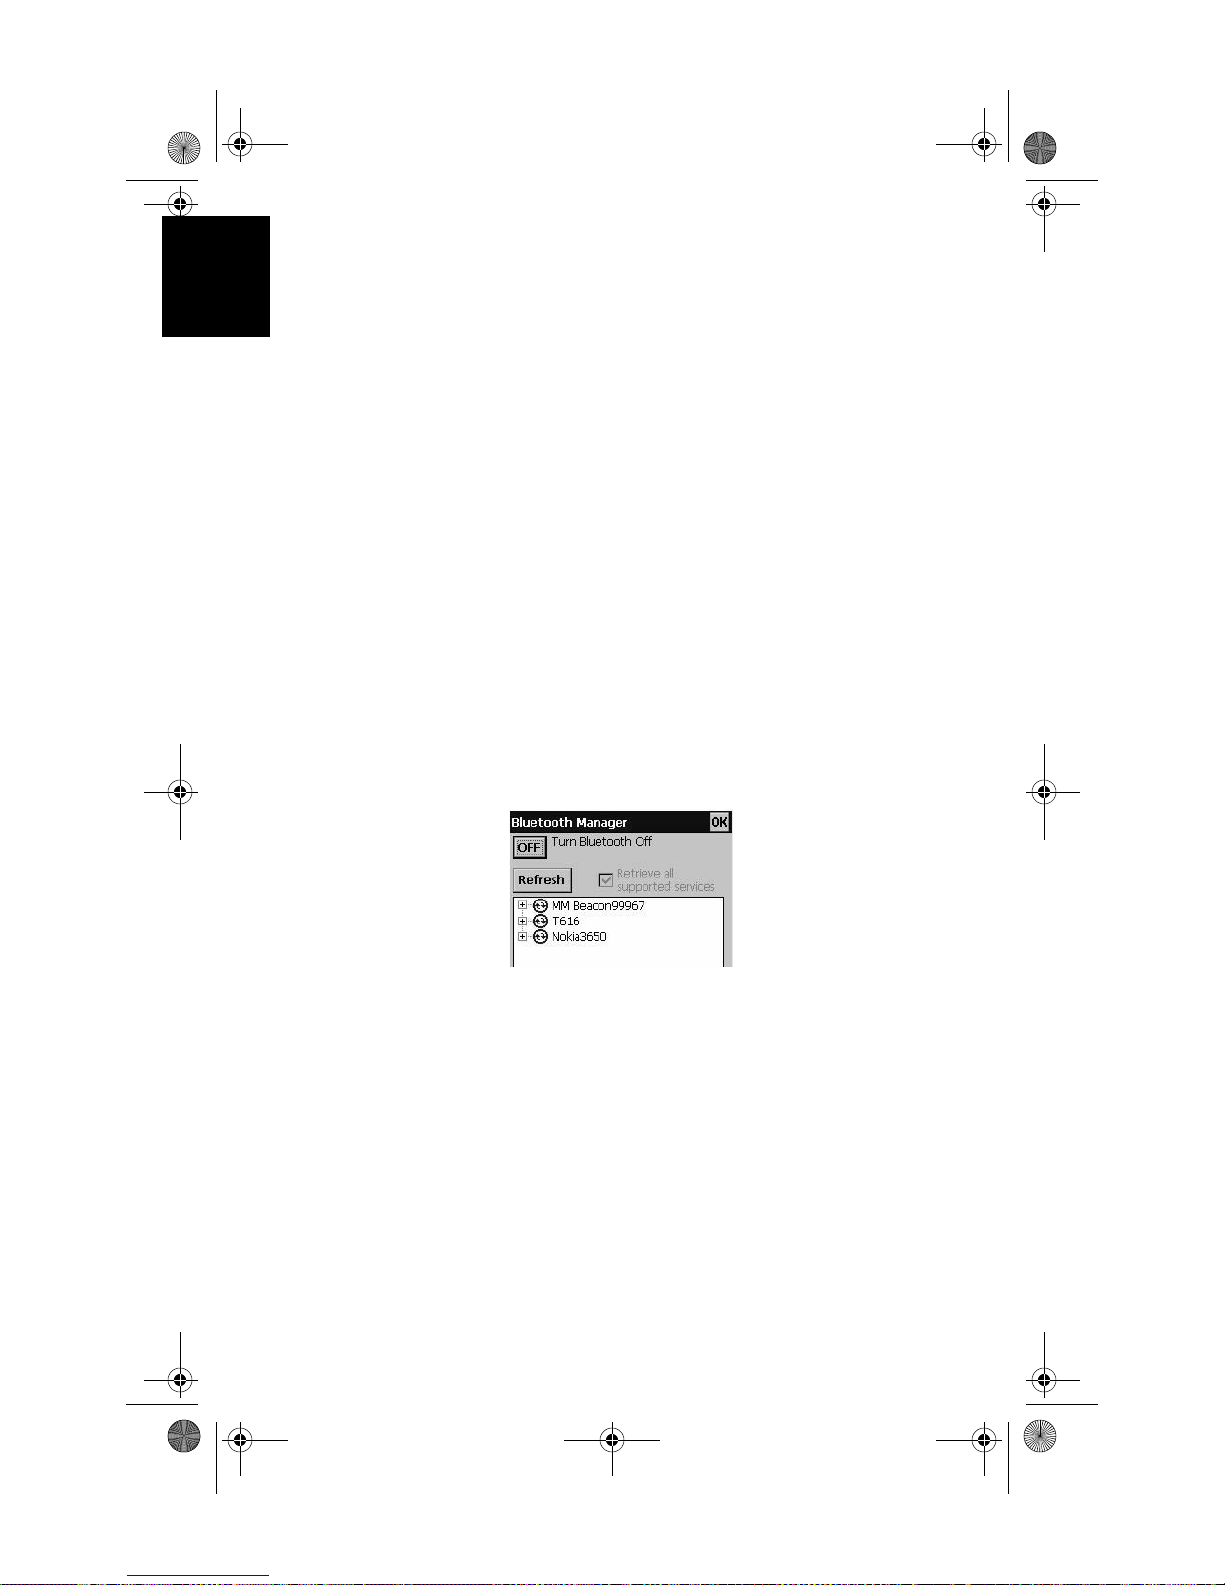
• On MobileMapper CE, open Bluetooth Manager, tap
and wait for it to detect the MobileMapper Beacon
device.
(This step is not necessary when the MobileMap-
per Beacon is connected to MobileMapper CE via serial
cable.)
ON
30
• Click the plus sign box next to the beacon device name.
Select “Bluetooth Serial Port”, hold the stylus to bring up
the context menu and select
Configure.
Page 35
MM CE GS Guide.book Page 31 Monday, June 20, 2005 11:04 AM
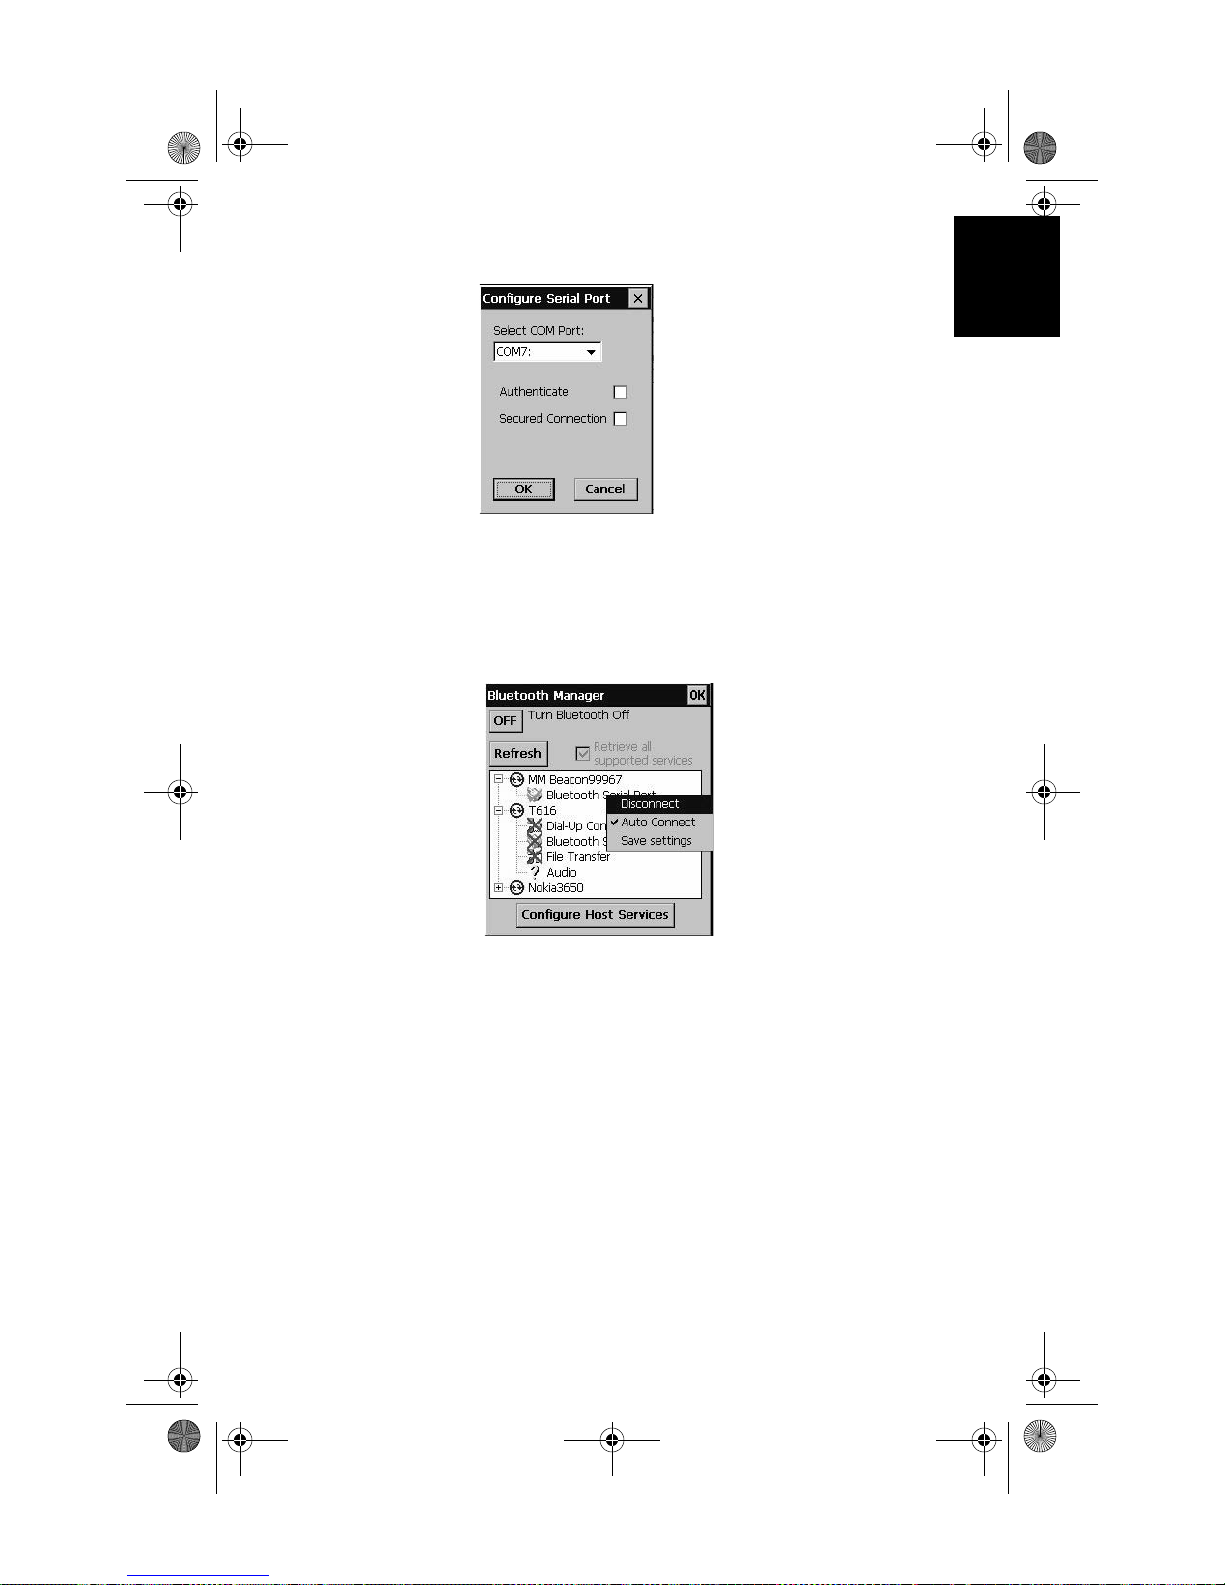
• Configure the Bluetooth Serial Port and tap OK:
• T o make sure that your MobileMapper CE handheld will
automatically connect to the same MobileMapper Beacon device each time you turn on the Bluetooth Manager,
in the context-sensitive menu tied to the chosen Bluetooth Serial Port, check
settings
:
English
Auto Connect and then select Save
• Tap
OK in the Bluetooth Manager window.
31
Page 36
MM CE GS Guide.book Page 32 Monday, June 20, 2005 11:04 AM
English
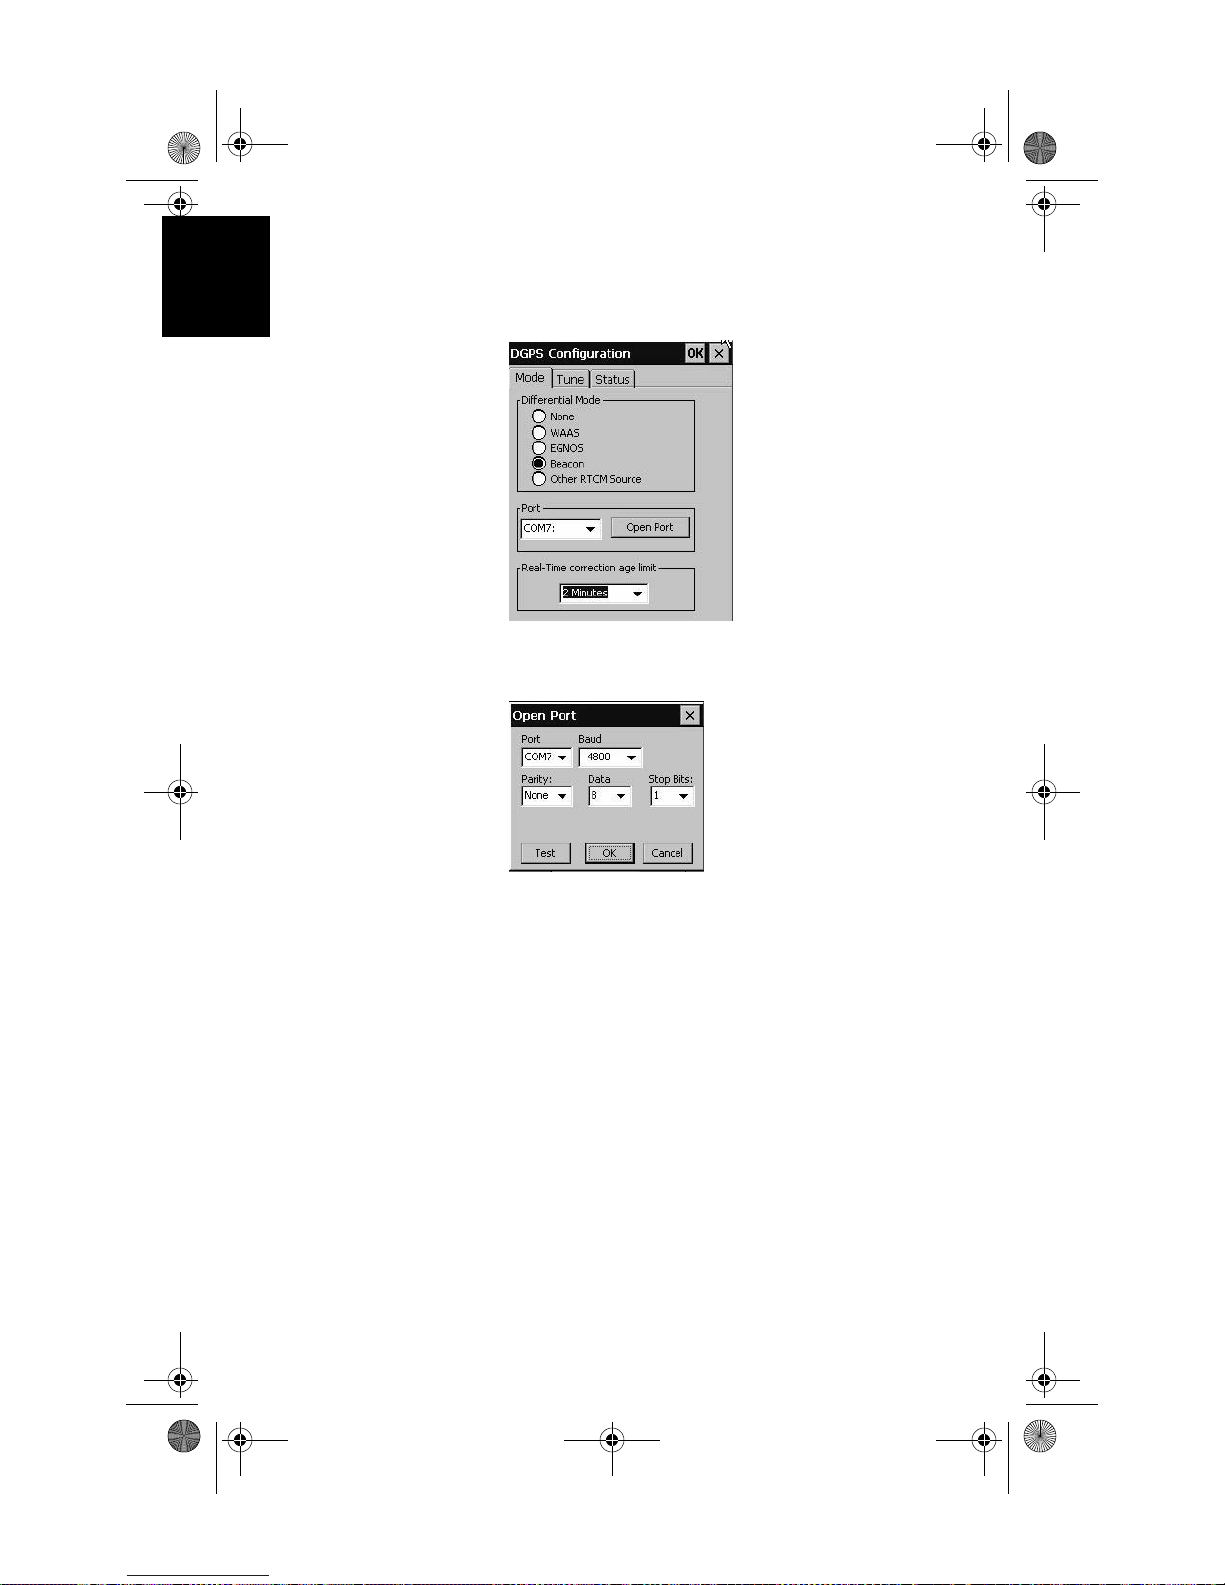
• Select DGPS Configuration from GPS Utilities, select Beacon
and assign the Bluetooth port. (Select
MobileMapper Beacon is connected via serial cable.):
COM1 when the
• Tap the
Open Port button and make sure the baud rate is
set to be 4800.
• Select
OK in the Open Port window to open the port and to
return to the DGPS configuration window. Note that the
Open Port button has been renamed “Close Port”.
32
Page 37
MM CE GS Guide.book Page 33 Monday, June 20, 2005 11:04 AM
Tuning the MobileMapper Beacon Receiver
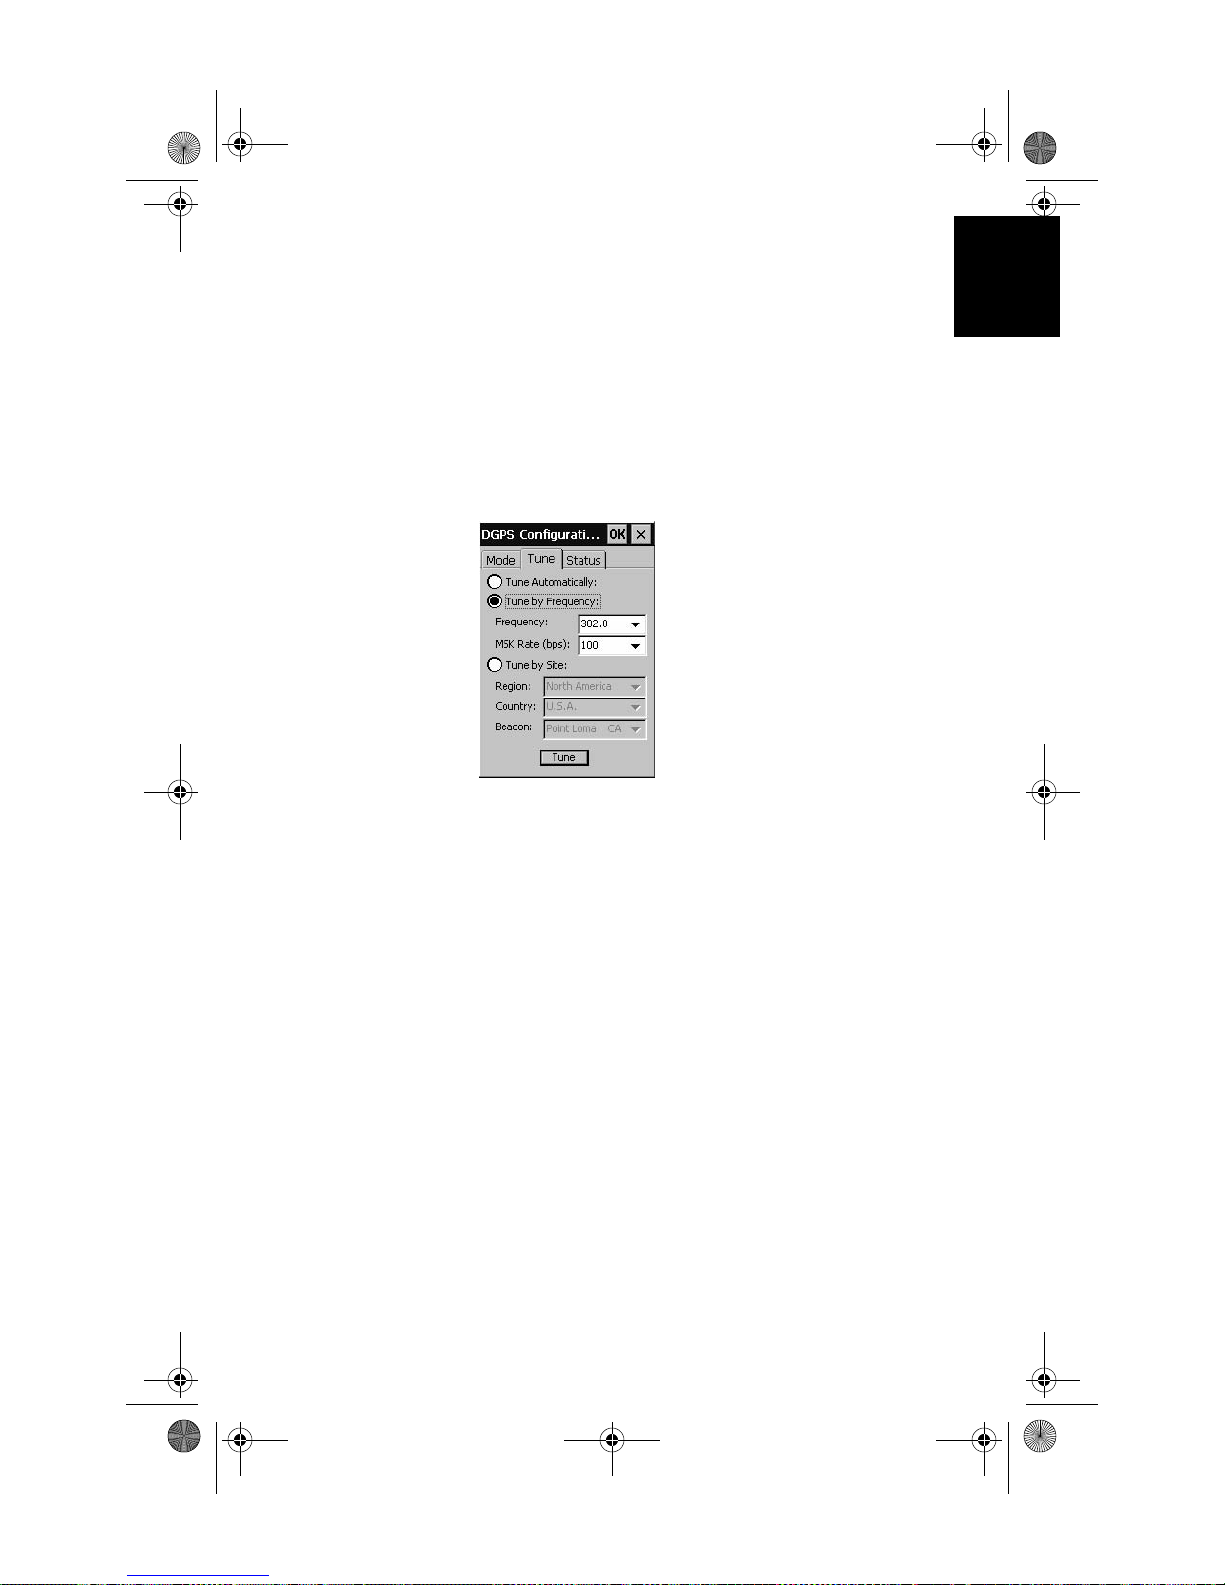
• Still in the DGPS Configuration window, select the Tune
pane
• Choose one of the following two options to tune the
MobileMapper Beacon receiver:
- Tune Automatically (automatic method; default
choice)
- Tune by frequency (manual method: you have to
specify the frequency to which you want the receiver
to tune.)
English
• Then click the
Tune button.
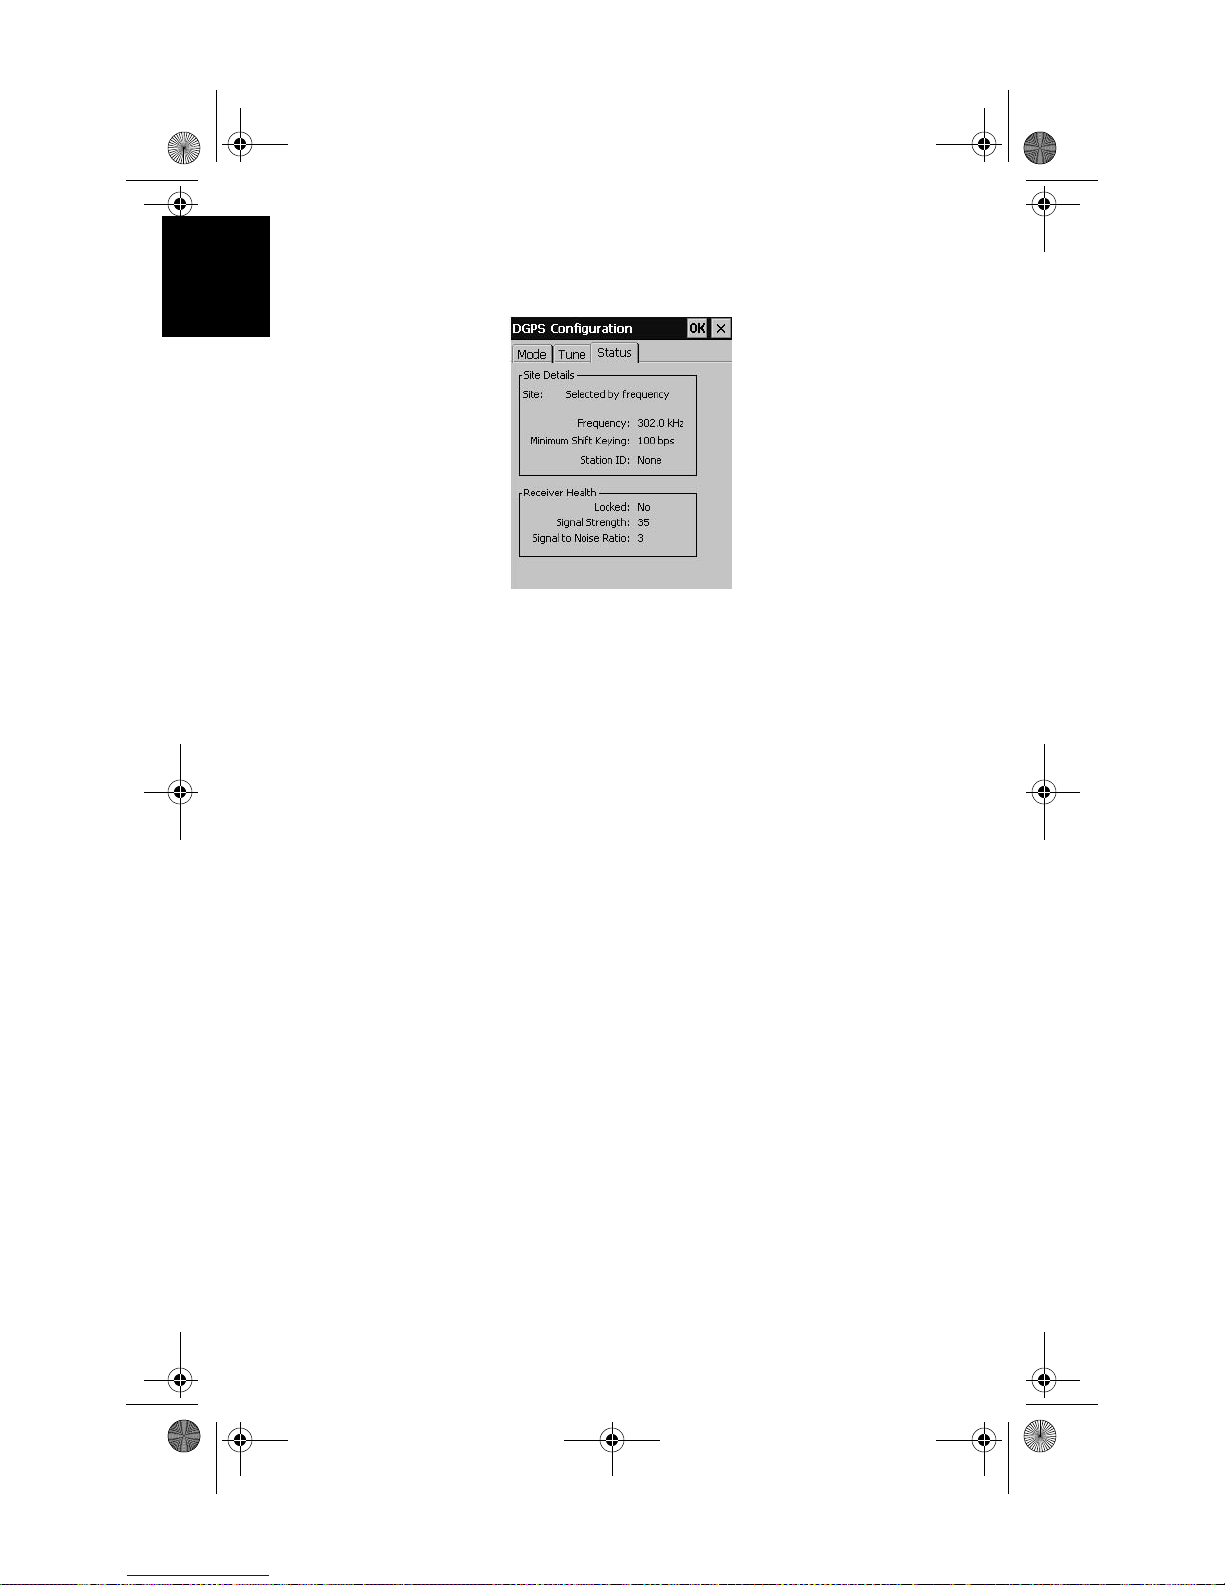
• While the Beacon is being tuned, you can check the current tuning settings, lock status, signal strength (SS)
measured in dBµV, and signal-to-noise ratio (SNR) in
dB.
33
Page 38
MM CE GS Guide.book Page 34 Monday, June 20, 2005 11:04 AM
English
To read this information, you just need to select the Status pane in the DGPS Configuration window:
• Finally, click
window for all the settings to take effect.
OK on top of the DGPS Configuration
Starting Using MobileMapper CE
Now that you know the fundamentals of MobileMapper CE,
time has come for you to go out and experiment for a while.
Y ou will be delighted to discover how robust and lightweight
the unit is. Associated with your favorite GIS application,
MobileMapper CE will help to ease your everyday work and
boost your productivity. Thales Navigation hopes you will
enjoy working with MobileMapper CE.
34
Page 39
MM CE GS Guide.book Page 35 Monday, June 20, 2005 11:04 AM
Index
A
AC adapter 6
ActiveSync 9
Authenticate 24, 26
Auto Connect
Automatic tuning 33
B
Backlight 7
Battery door
Beacon 30
Bluetooth 26
Bluetooth Manager
C
Calibrating the screen 7
CD 9
Charging
COM2 21
Cut-off angle 21
D
DC Power Input 4
Dial-up Networking 24
Dial-up networking 26
E
EGNOS 22
External Antenna 4
EZ Recorder 2
F
Full Shutdown mode 17
G
GGA 21
GLL 21
GPS Port Configuration
GPS Ports Configuration
window
21
GSA
GSV 21
H
Handstrap 3
I
I/O module 3, 5, 9
Initialize GPS
L
LED Indicators 18
Lock status 22, 33
31
3, 5
23
5
29
10
21
M
Manual tuning 33
Max PDOP 21
Microphone
Mini USB 4
Mission Planning 20
MSK rate
3
22
N
Nand Flash memory 19
O
On-screen keyboard 15
P
PDOP 20
Power button 6
R
RAM 19
Real-time corrections
Removable SD Card memory
19
4
Reset
Reset GPS 22
RMC 21
3
RTCM
3
S
Scrolling button 3
SD card slot 4
2
SDK
Serial port (COM1) 4
Shutdown but keep GPS
alive mode
Sky plot 20
Speaker 3
Station ID
Stylus
Suspend mode 17
System Idle mode
17
22
2, 7, 16
17
T
Text Input 15
U
USB 9
USB flash drive
USB host port
User Idle mode
4
4
17
V
Virtual serial port 28, 29
W
WAAS 3, 22
English
35
Page 40
MM CE GS Guide.book Page 36 Monday, June 20, 2005 11:04 AM
English
Windows CE .NET 15
Z
ZDA 21
36
 Loading...