

Page 1
P
P
S
S
I
I
O
O
N
N
W
W
O
O
R
R
K
K
A
A
B
B
O
O
U
U
T
T
P
P
R
R
O
O
I
I
N
N
S
S
T
T
R
R
U
U
C
C
T
T
I
I
O
O
N
N
M
M
A
A
N
N
U
U
A
A
L
L
U
U
S
S
I
I
N
N
G
G
Page 2

2
Contents
Page
The Psion WorkAbout Pro EID Reader
3
Psion WorkAbout Pro Buttons/Controls (G1/G3)
4/5
Turning Bluetooth On/Off
6
Setting Date and Time
5
Key Controller Program
7
Select Sheepware Pocket Edition Introduction
11
Animal Details
13
Breeding
15
Service, Scanning
15
Weaning
16
Flock Register
17
Add Animal/Retag
17
Births
19
Purchases, Sale/Death
20
Lost, Temporary Movement
21
Management
22
Comment, Condition Score, Hand Reared
22
Tick, Weighing
23
Health/Feeding
24
Health Treatment (single/multiple)
24
Drug Purchase, Feed Purchase
25
Group Events
26
Create/Edit Groups
26
Add/Remove from groups
27
View Groups Report
28
Record Group Events
29
Reports
30
Flock Report, Weights Report
30
Condition Score Report, Cull Report, Due to Report
31
Bluetooth Weighing
32
Setting up Psion for Bluetooth Weighing
33
Weighing in Select Sheepware with Bluetooth weigher
35
Synchronising with Select Sheepware
36
Guide to using TGM Remote Control Support – Team Viewer
38
Contact Us
40
Page 3
3
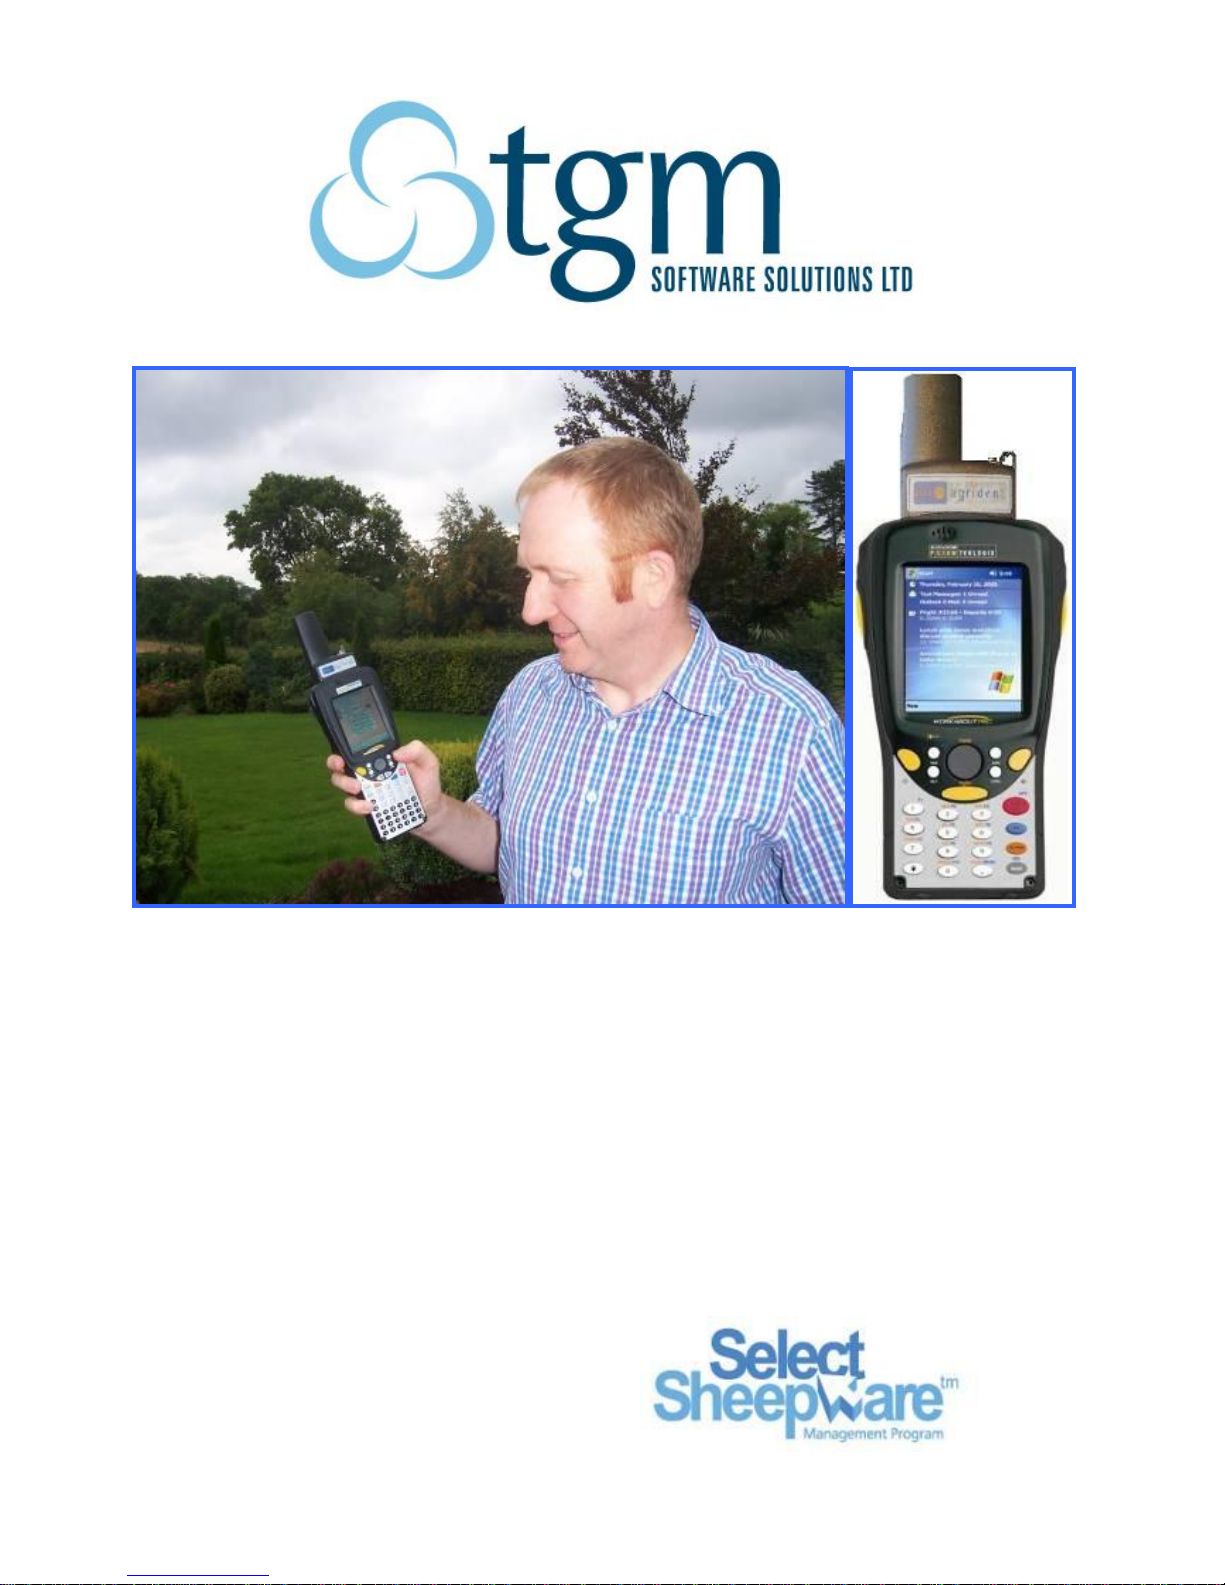
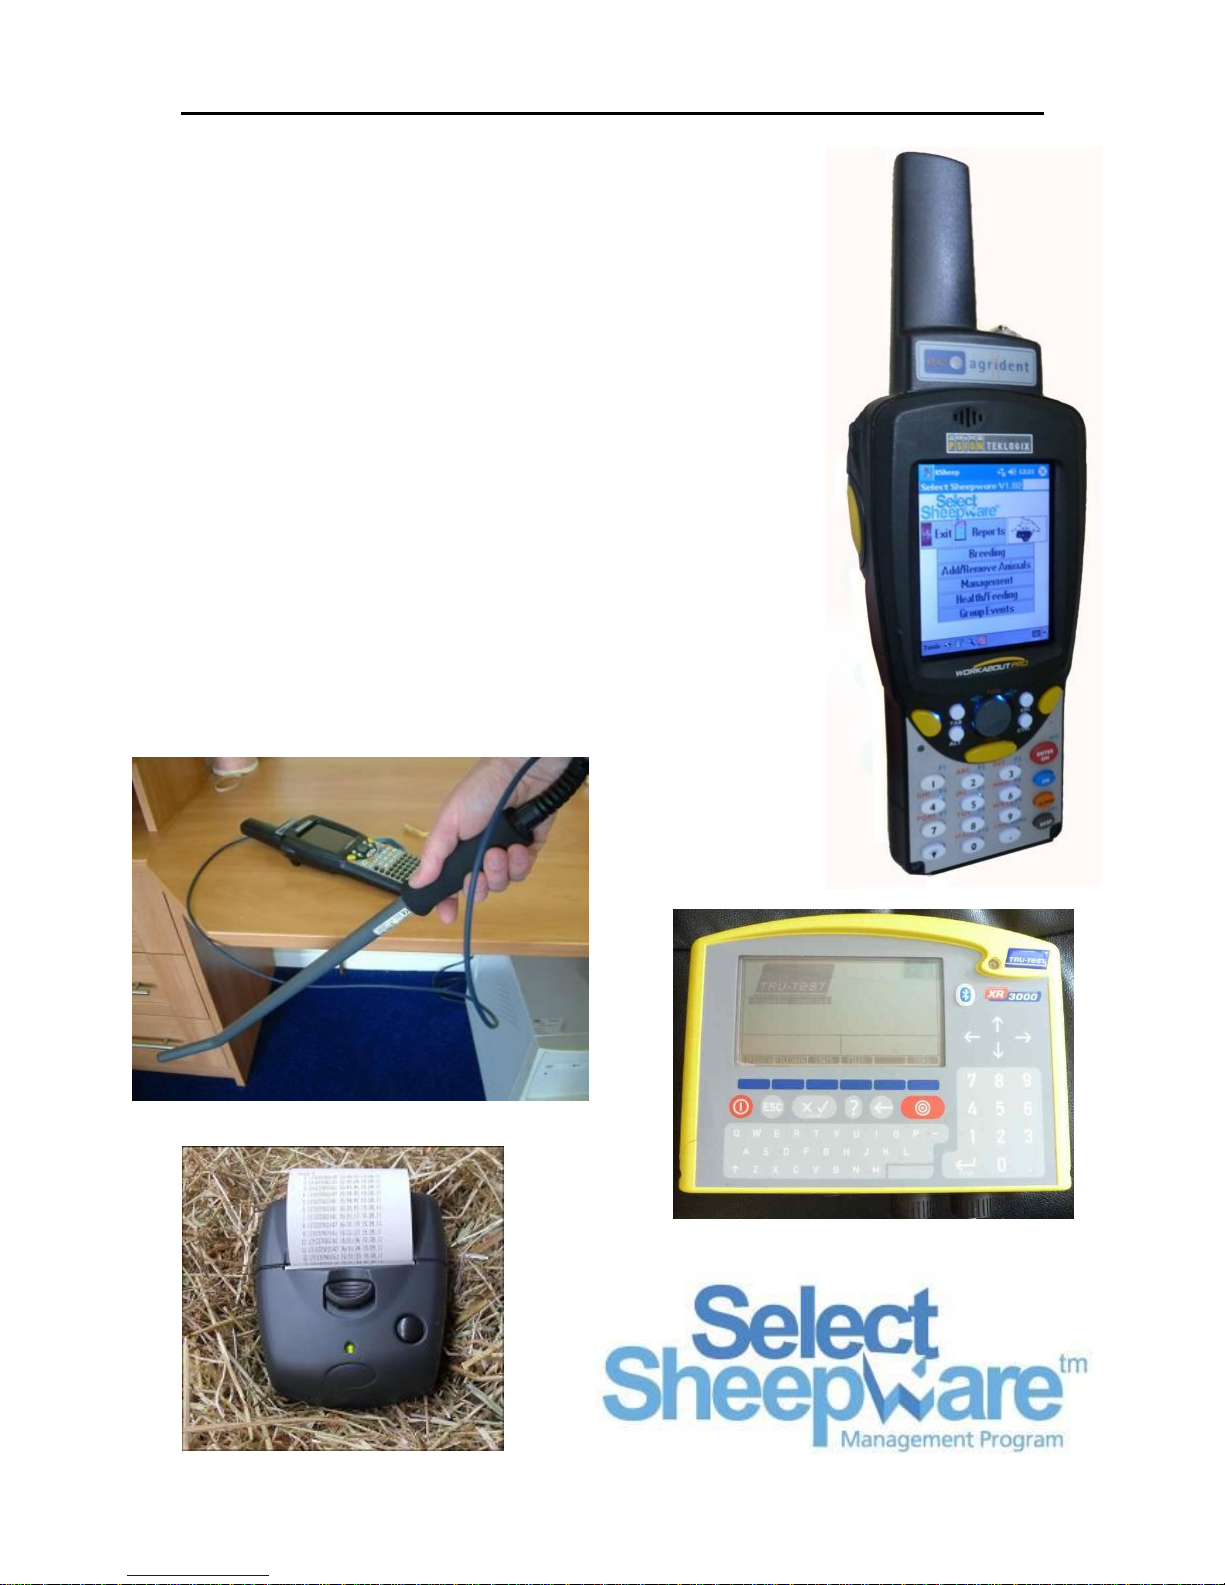
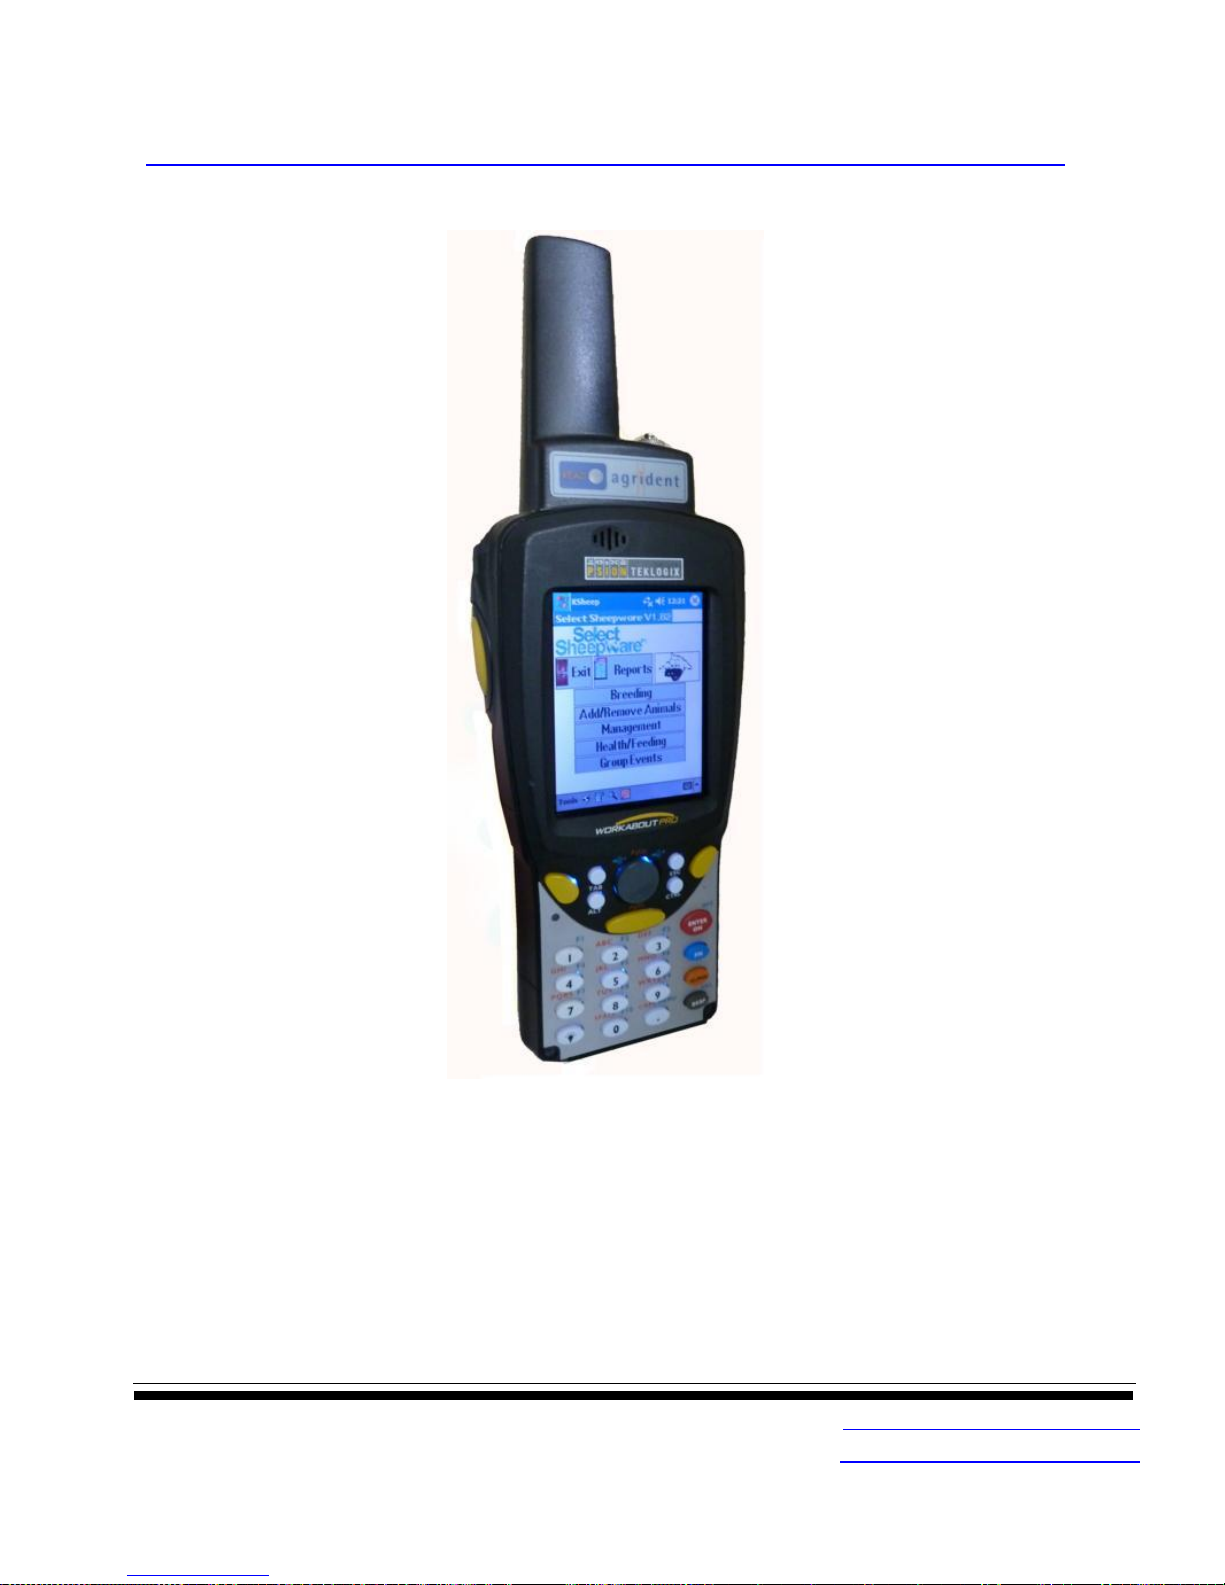
The Psion WorkAbout Pro Electronic Tag Reader and PDA
The Psion WorkAbout Pro is an easy to use handheld, robust,
Electronic Tag reader with Windows Mobile Operating System,
designed for use in harsh environments. It can withstand multiple
1.2m drops to concrete, dust and rain. As well as reading EID
Tags, it can also be simultaneously linked to a Weigh Scale using
Bluetooth for rapid weighing of groups of animals, or to a Portable
Printer for printing EID Tag lists. TGM Software Solutions Select
Sheepware program runs on the Psion, giving the user instant
access to animal records and the ability to record management
events.
There is an optional extension wand available for the Psion models
with a screw in connector on the top. This is useful for reading
tags out of arms length.
Select Sheepware Pocket Edition allows you easy access to your
information when you need it most, on the farm, in the field and on
the move!
The software features an intuitive interface with large clearly
labeled buttons and icons, coupled with a simple menu and
navigation system.
Page 4
4
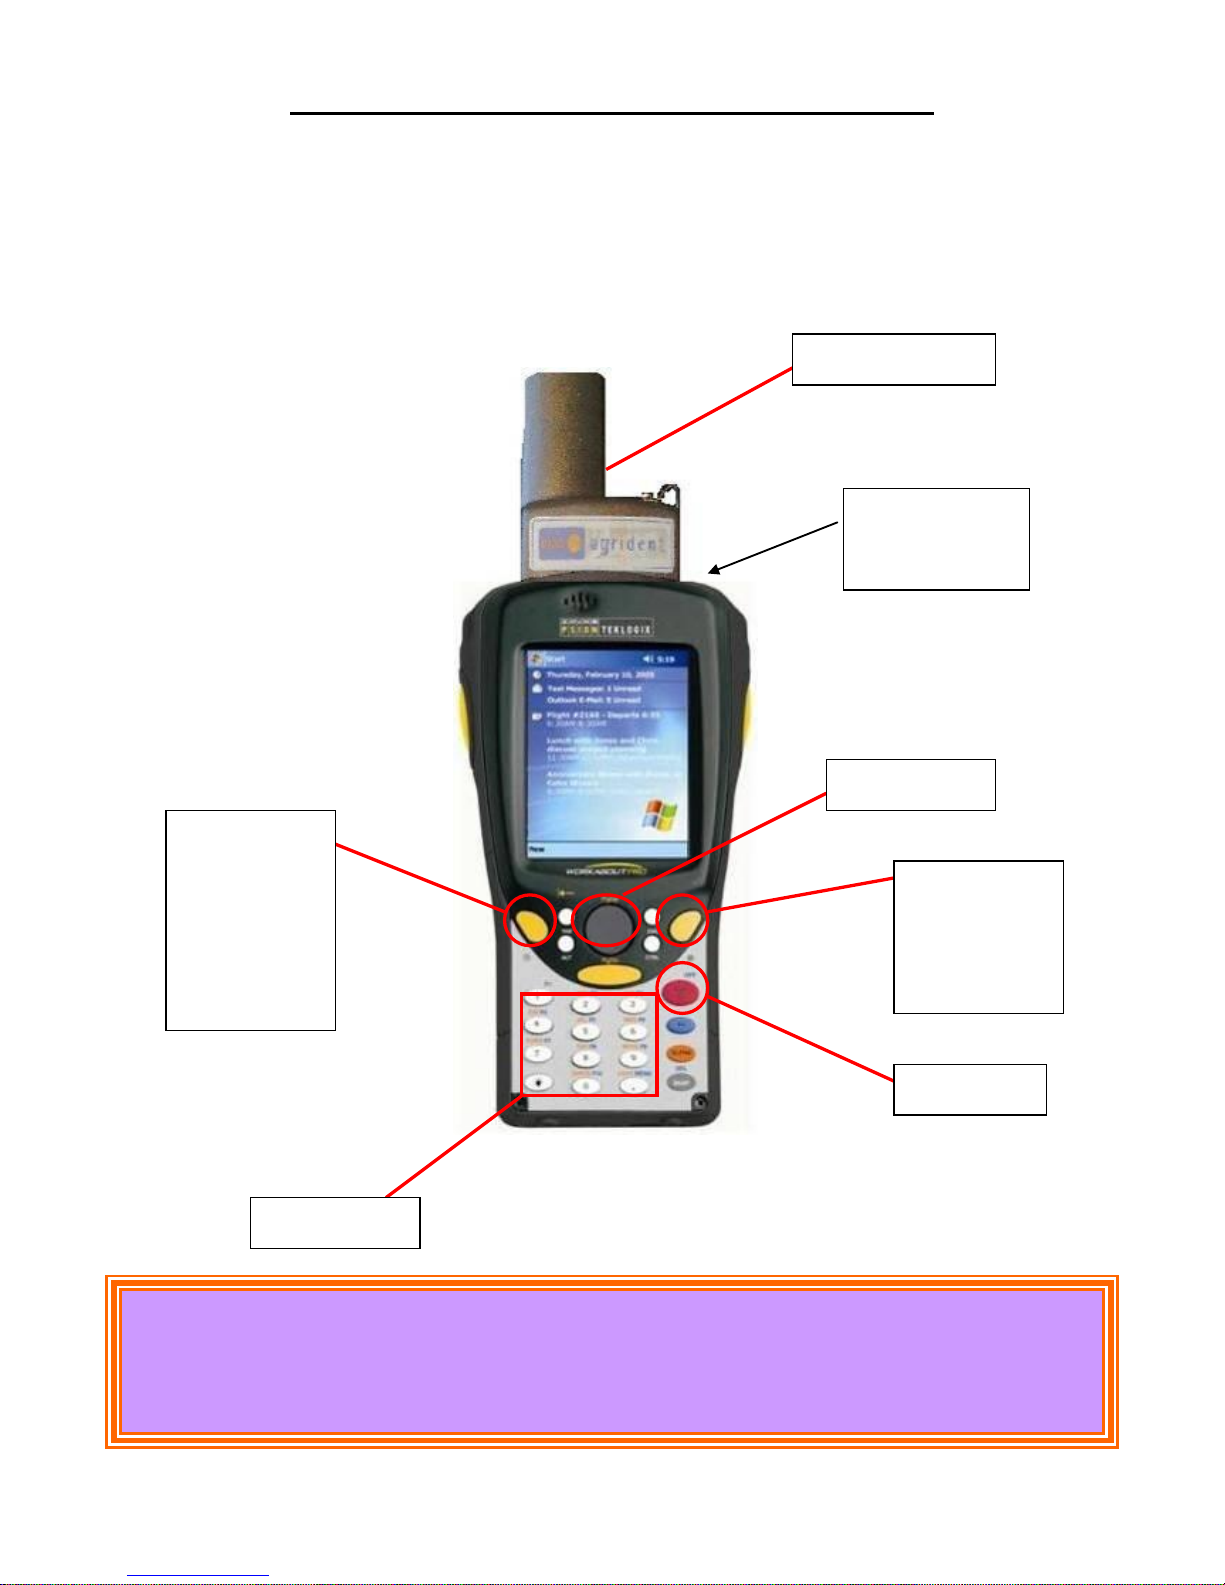
Psion WorkAbout G1 Pro Buttons/Controls
There are a few different versions of the Psion WorkAbout Pro. The one shown
below is the
G1 short model
. However operation of other models will be basically
the same. Some models may have a full keyboard and the newest G3 has the
two main buttons on the side rather than the front. The Main features you will
need are detailed below.
Turning off: Press the Blue button followed by the Red button
*** Warm Reset: If the Psion freezes, hold the Blue and Red
button for 10 seconds. ***
Number Pad
EID Read Head
Right trigger
Button –
normally used
to read an
EID Tag
Left trigger
Button –
normally used
to request a
weight from a
Bluetooth
Weigh Scale
Arrow Pad
On Button
Pen for tapping
Touch Screen
goes here
Page 5
5
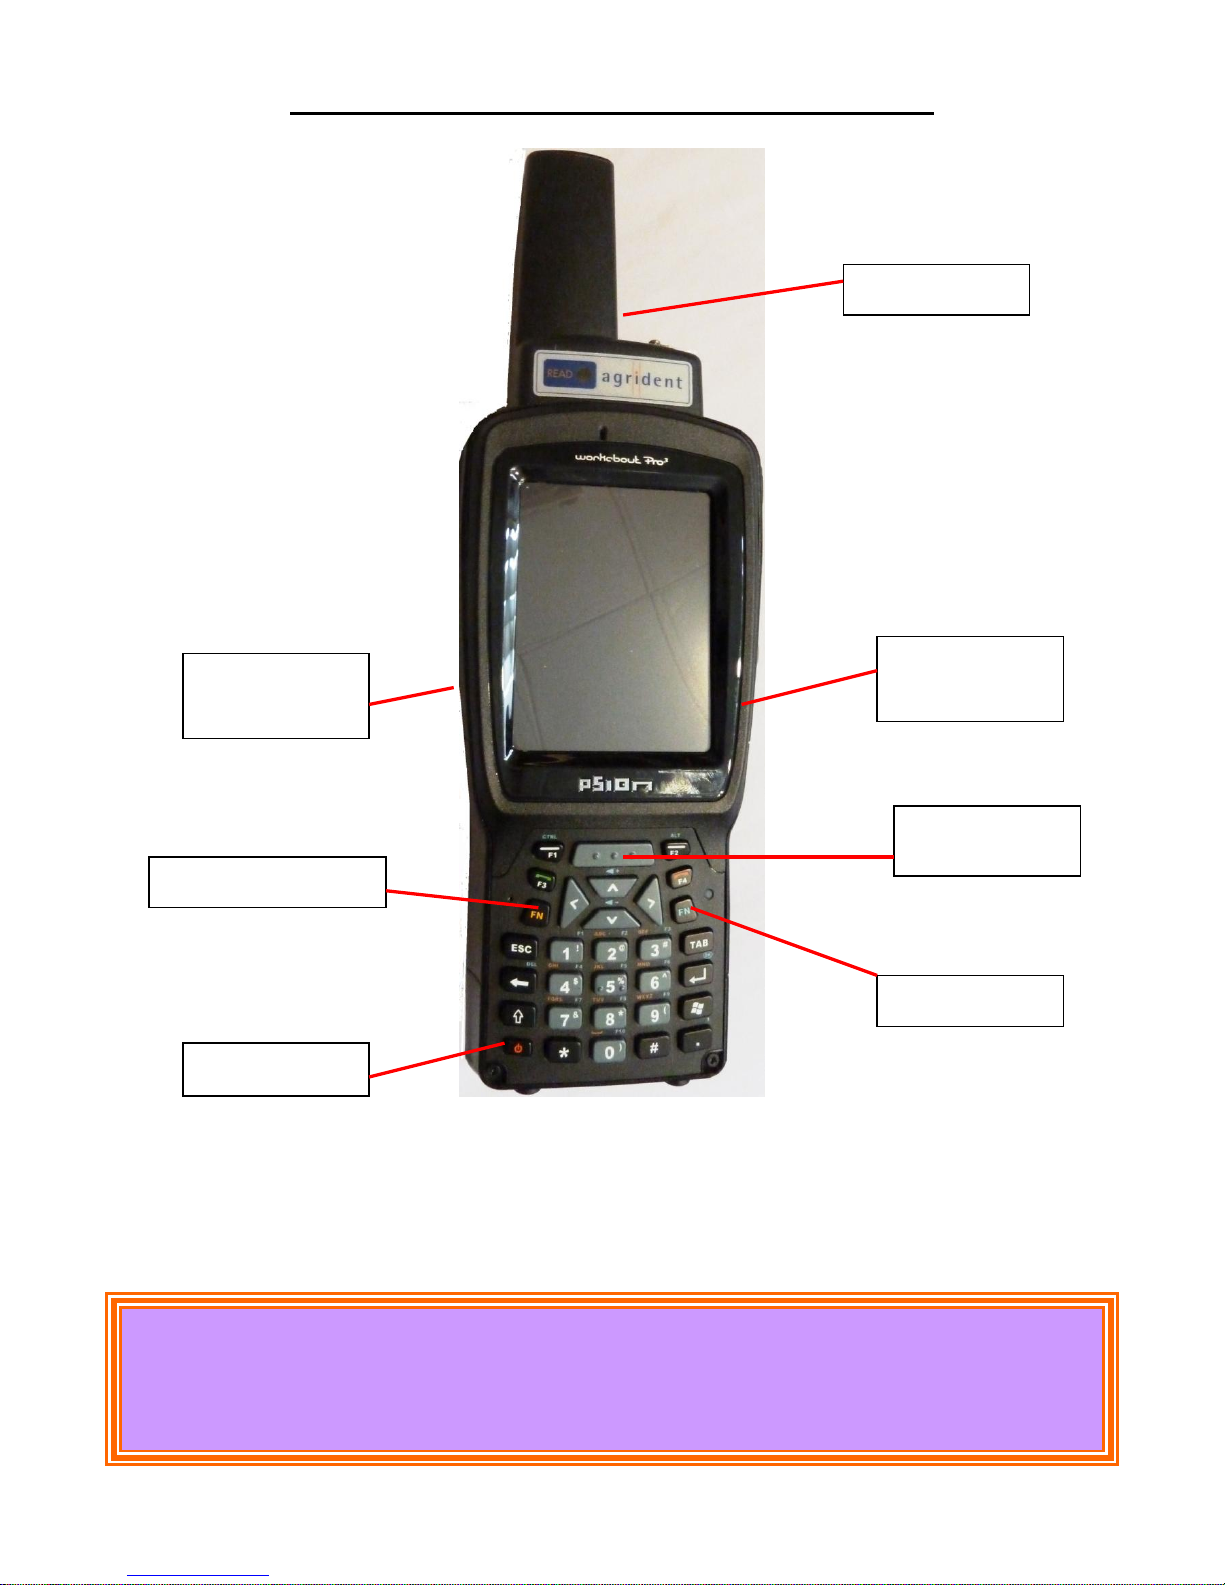
Psion WorkAbout Pro G3 Buttons/Controls
Turning off: Press the Ornage FN button followed by the Red
on/off button
*** Warm Reset: If the Psion freezes, hold the Blue FN, Orange FN
and Red on/off button for 10 seconds. ***
EID Read Head
Right Trigger
button
Left Trigger
button
Blue FN Button
Orange FN Button
On/Off Button
Center Trigger
button
Page 6
6
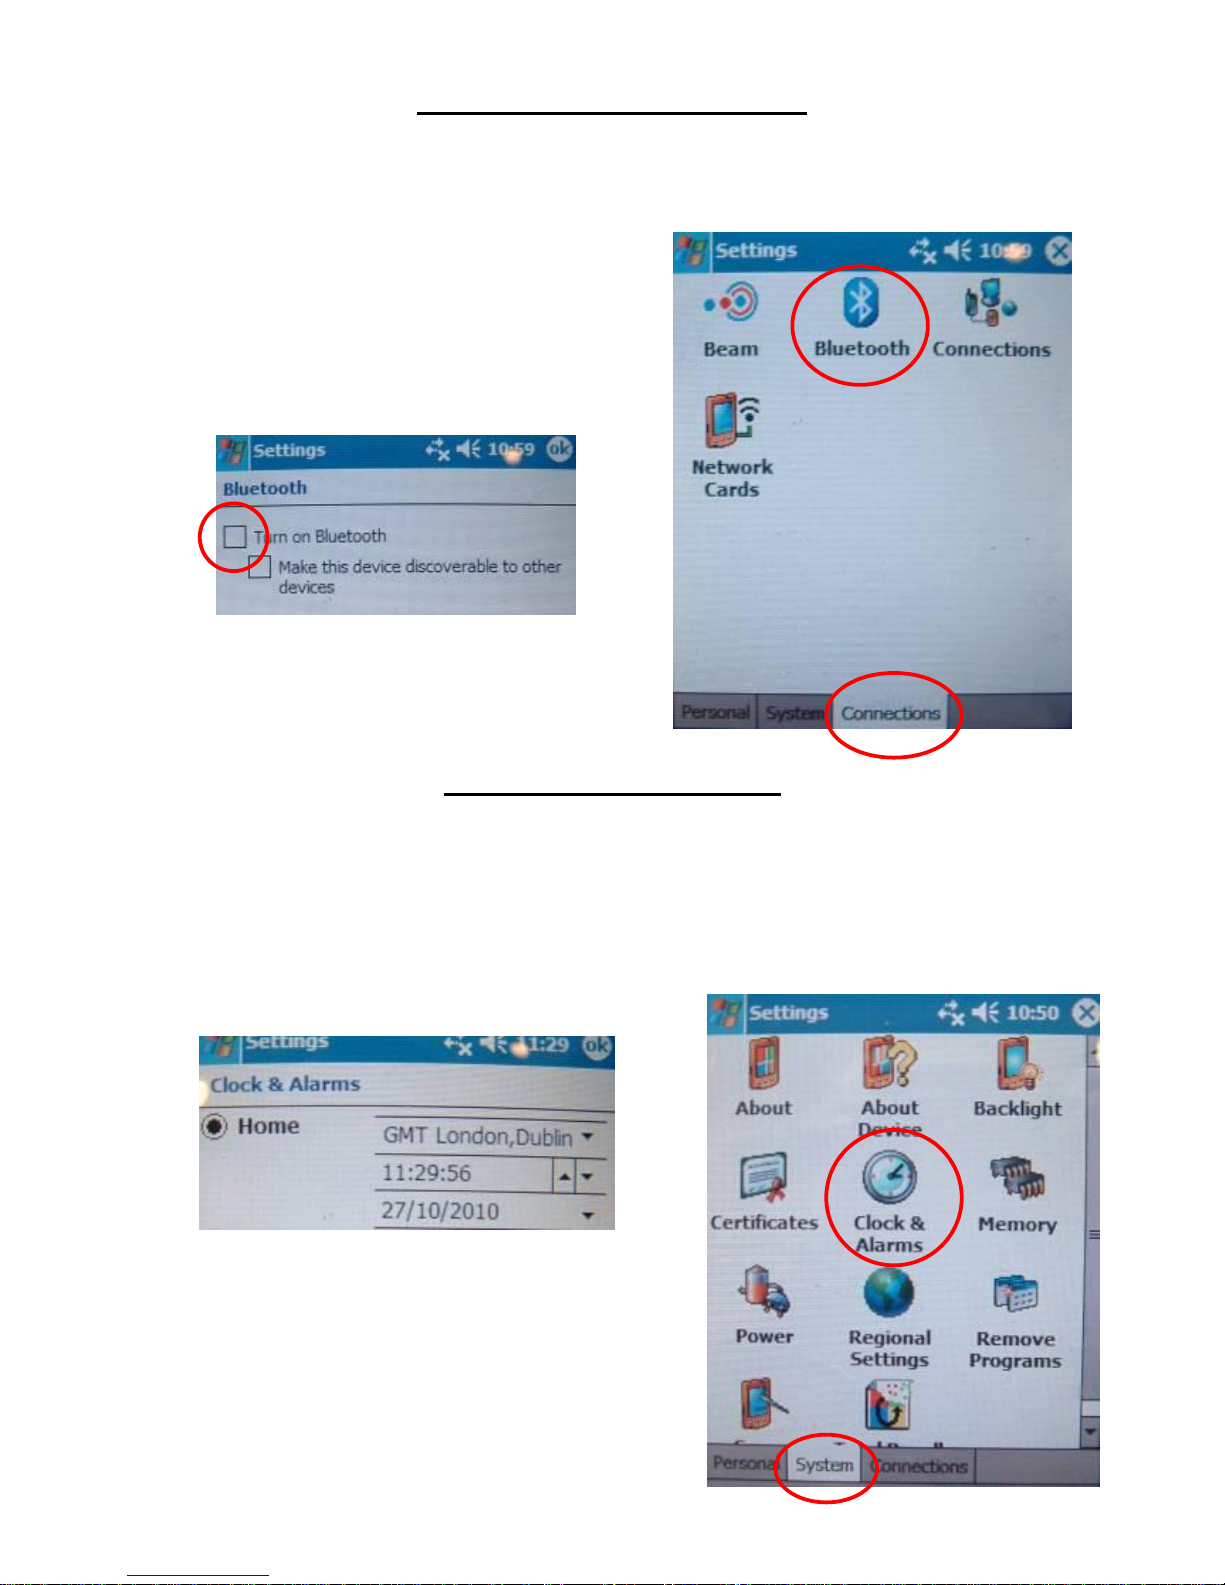
Turning Bluetooth On/Off
If you are not currently using a Bluetooth Weight Scale or Portable Bluetooth Printer linked to
your Psion, turning off the Bluetooth function will increase the battery life, allowing you to use
the Psion for longer periods before recharging is needed.
Tap Start then Settings.
Tap Connections then Tap the Bluetooth icon.
Tick the box to turn Bluetooth on/off
Setting Date and Time
Tap Start then Settings.
Tap System then Tap the Clock/Alarms icon
Set the Time zone, Time and Date as appropriate by tapping the up/down arrow buttons
Page 7
7
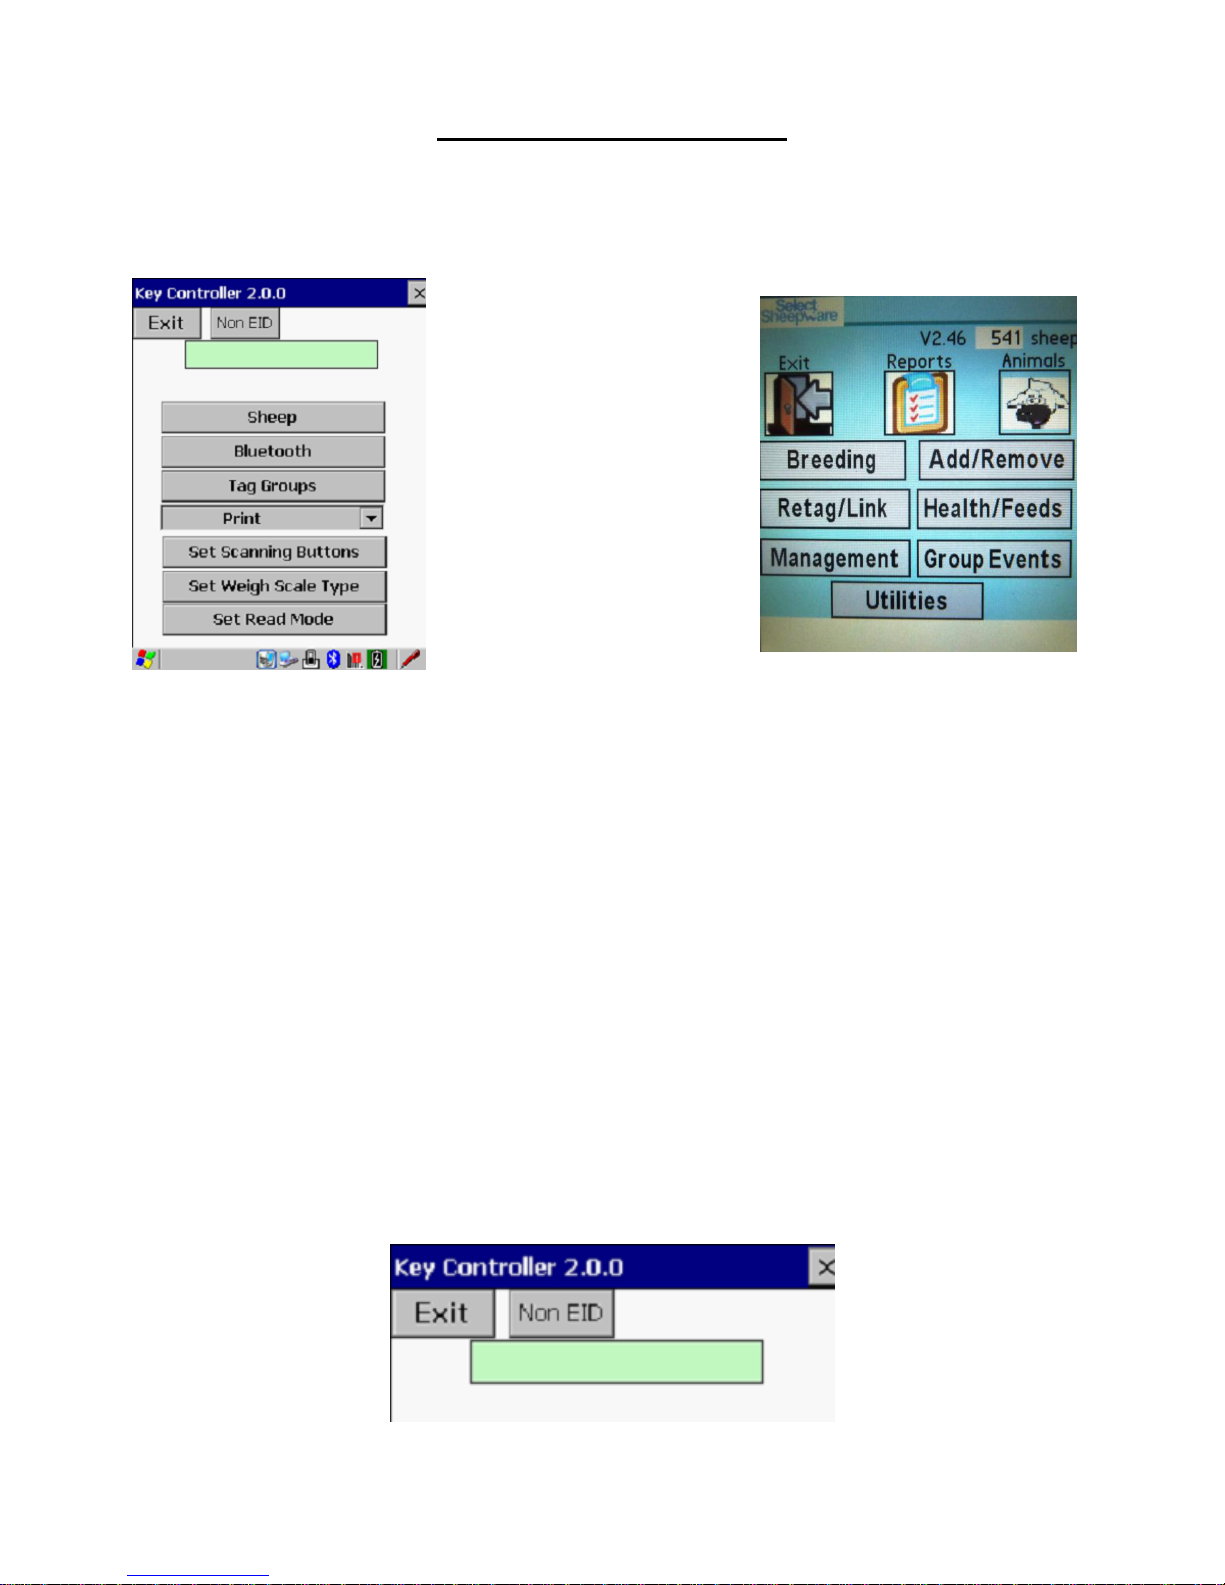
TGM Key Controller 2.0
At a basic level the Key Controller is used to select which button on the Psion reads an EID tag,
however it has much more functionality for the user.
Key Controller is also used to connect to Bluetooth devices, manage tag groups, print lists of
tags including sale lists, connect to weigh scales and set tag read mode.
Always remember to start Key Controller before you open the Sheep software, otherwise the
trigger buttons to read and EID tag will not work. Key Controller runs in the background, so it
is possible to switch back and forward between the Sheep software and Key Controller, if you
had to, for example, pause to print a list of tags or switch to a different Bluetooth device.
There are 7 options to choose from:
1. Sheep – Opens the Sheep Software
2. Bluetooth– Device search and connect options
3. Tag Groups – Manage lists of tag numbers
4. Print – Print a specific group, all tags or sale list
5. Set Scanning Buttons– Set which button is used to read a tag and request a weight from a weigh
scale
6. Set Weigh Scale Type – Choose which type of weigh scale you are using
7. Set Read Mode – Set how tags are read (button press, continuous or external source)
The current tag that has been read is displayed in the Green box at the top of each screen.
Page 8
8
Bluetooth
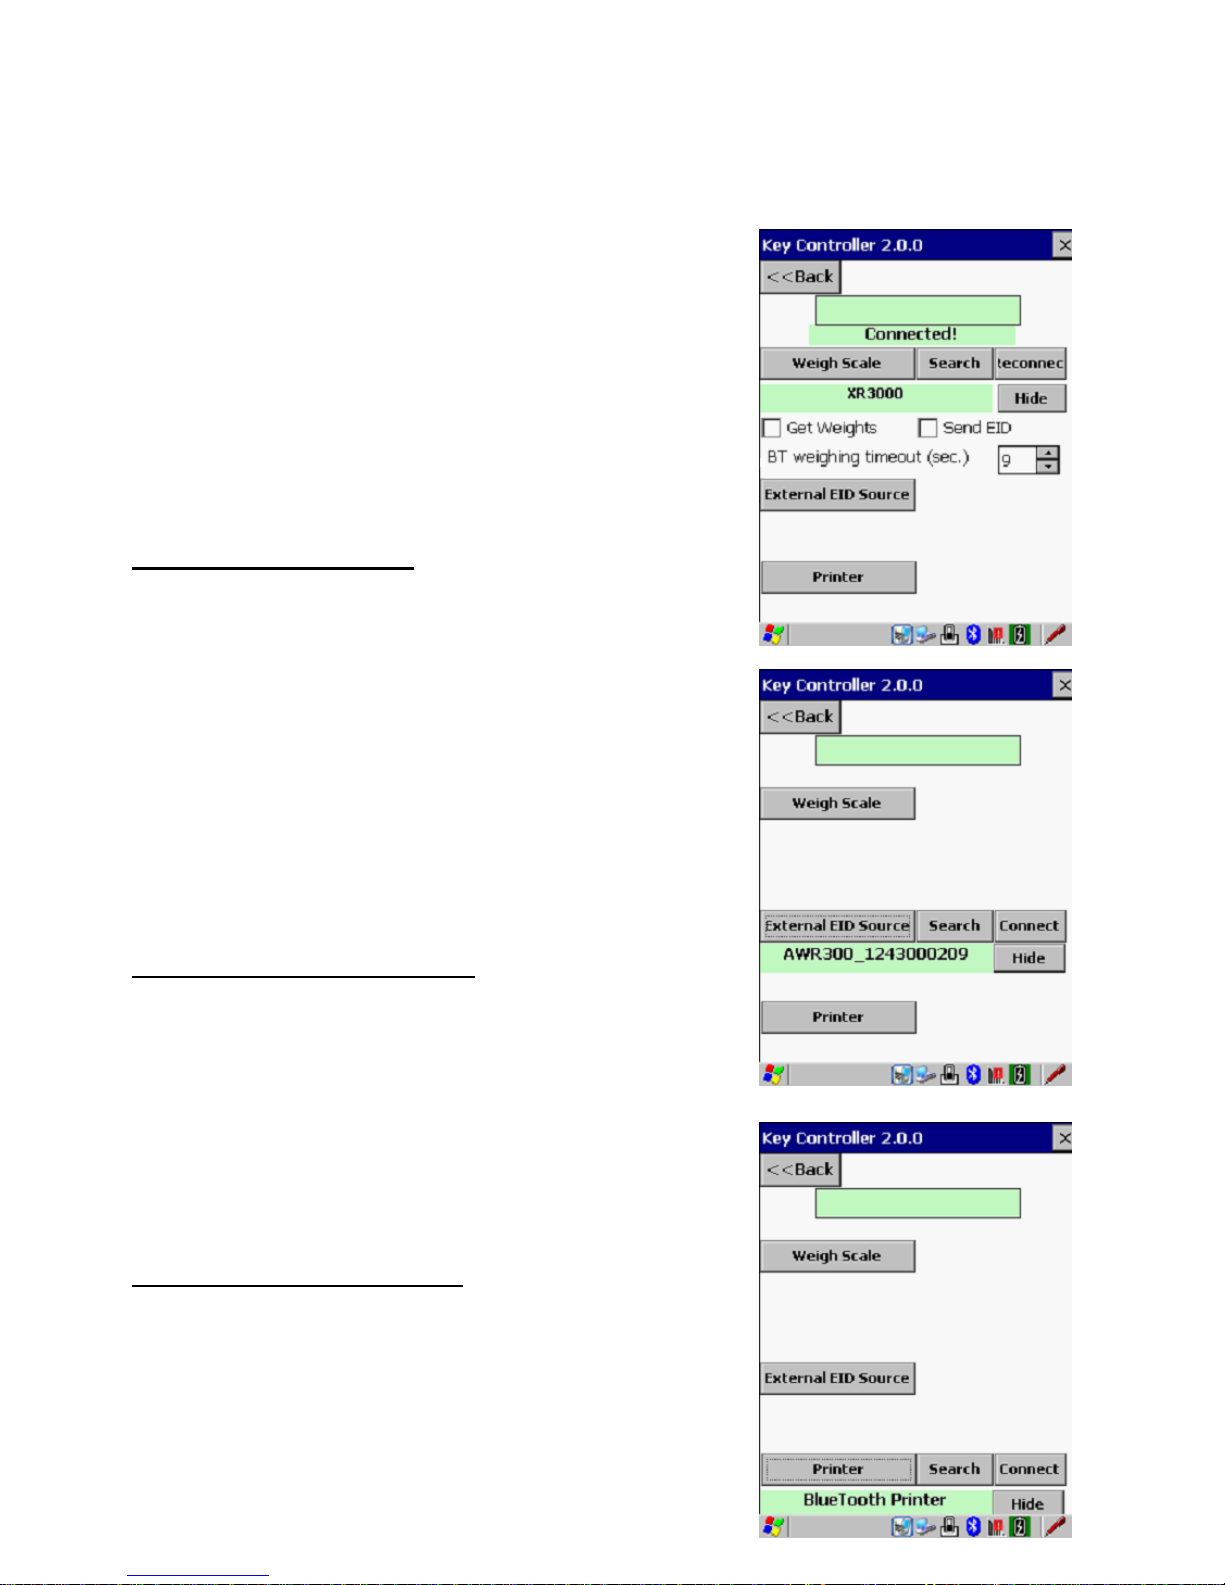
Key Controller now allows you to connect to more than one Bluetooth device.
These are: Weigh Scales,
External Sources (Fixed EID panel or Bluetooth wand) and
Portable Printers.
The last used device for each of the 3 is remembered so you
don’t have to search for and connect to the device each time
– just tap on Connect.
If the device has turned itself off to save battery – just tap
Reconnect.
Tap Hide for any of the 3 connections to make the settings
invisible.
Connect to a weigh scale
Tap > 'Weigh Scale'
> 'Search' ........
> Pick the correct device
> Tap 'Connect'
To receive weights back to the Psion, tick 'Get Weights'
To send the EID to the weigh scale, tick 'Send EID'
'Weighing Timeout' is the length of time to wait for a
stable weight to be received
Connect to an External Source
An external source can be a fixed panel reader or a
Bluetooth wand.
Tap > 'External EID Source'
> 'Search' ........
> Pick the correct device
> Tap 'Connect'
Connect to a Portable Printer
Tap > 'Printer'
> 'Search' ........
> Pick the correct device
> Tap 'Connect
Page 9
9
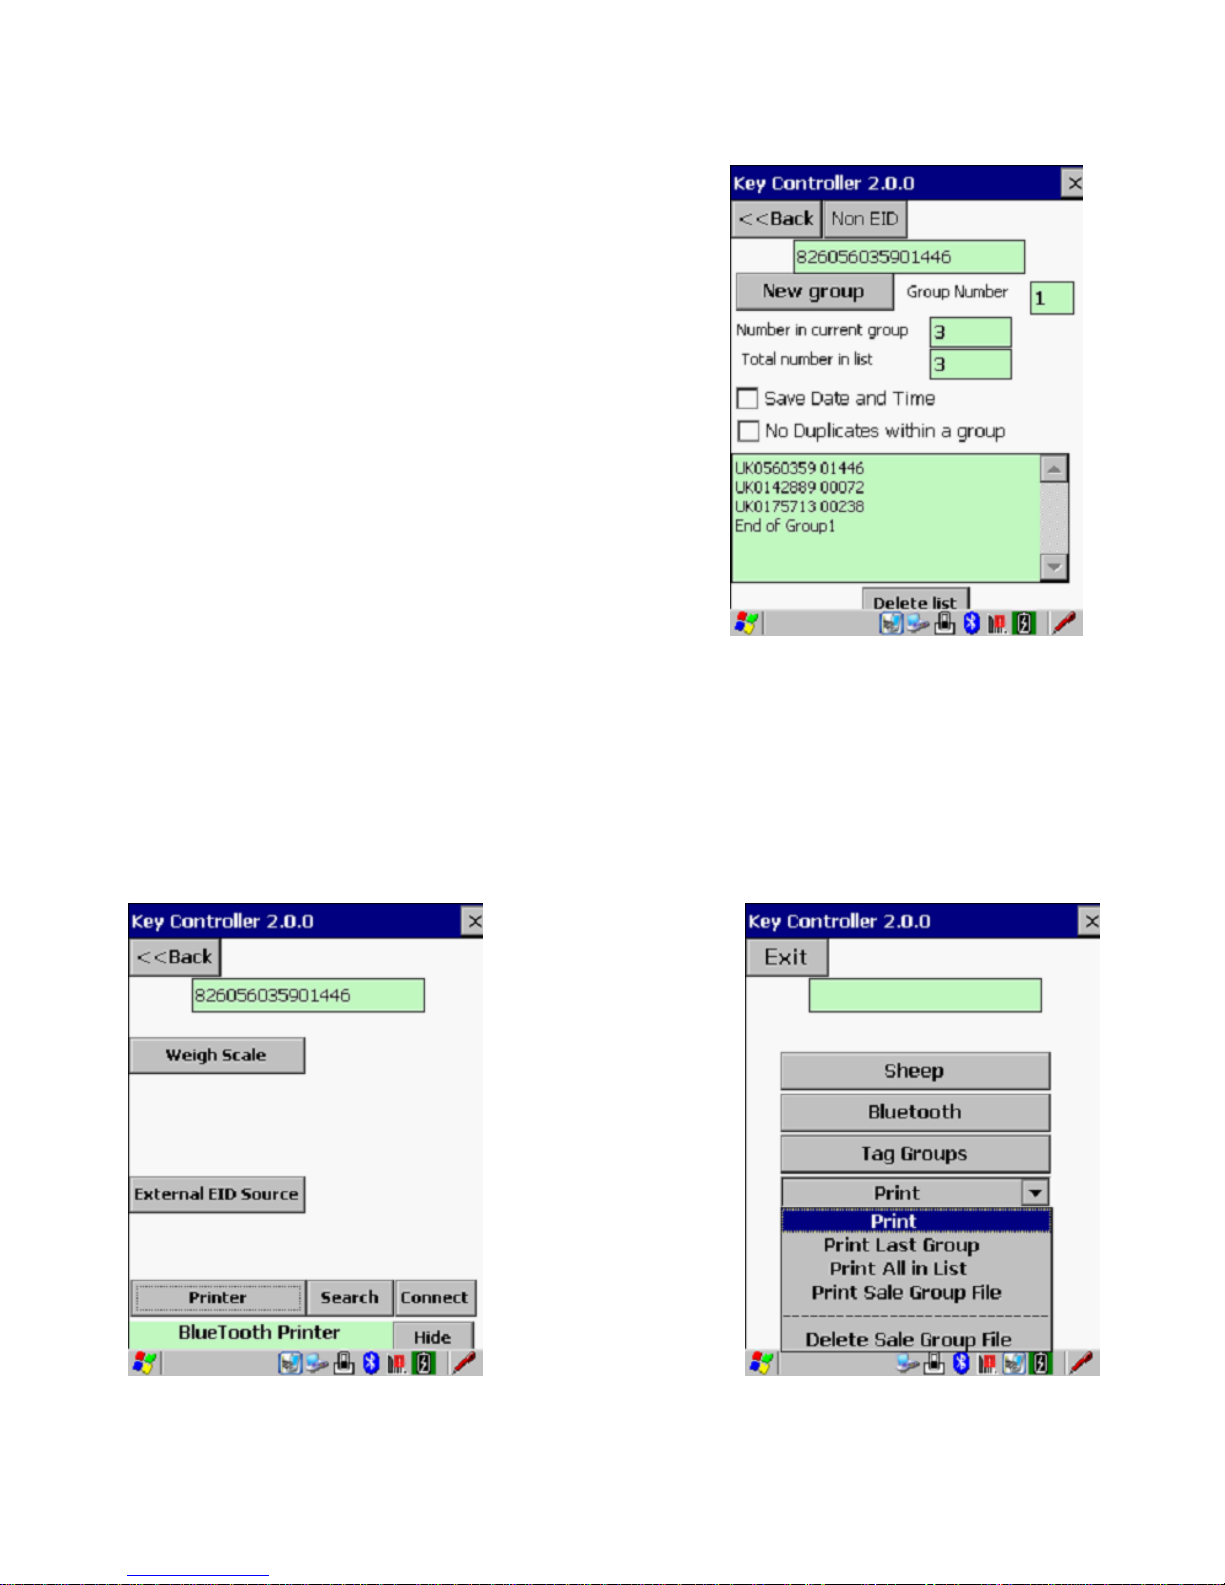
Tag Groups
The Green box at the top shows last tag read.
Tap 'New Group' to begin a new group of animals.
Counters shown.....
> Group number
> Number in current group
> Total number in list
Non-EID tagged animals can be entered manually by
tapping on the 'Non EID' button.
You can choose to Save the date and time and/or
Choose whether to allow duplicates within a group.
A list of tags read in each group is shown at the bottom.
Tap on 'Delete List' to clear all tags.
Print
First make sure you have made a connection to a Bluetooth Printer.
Tap on > 'Bluetooth' > 'Printer' > 'Search' > 'Connect' or
'Connect' if you have been connected previously.
Printing Tag Lists
Tap on 'Print'
You can either:
> 'Print Last Group'
> 'Print All in List'
> 'Print Sale Group
File'
(This is a list of any
sheep you have added
to the Sale list in the
Sheep Software)
> 'Delete Sale
Group File'
Page 10
10
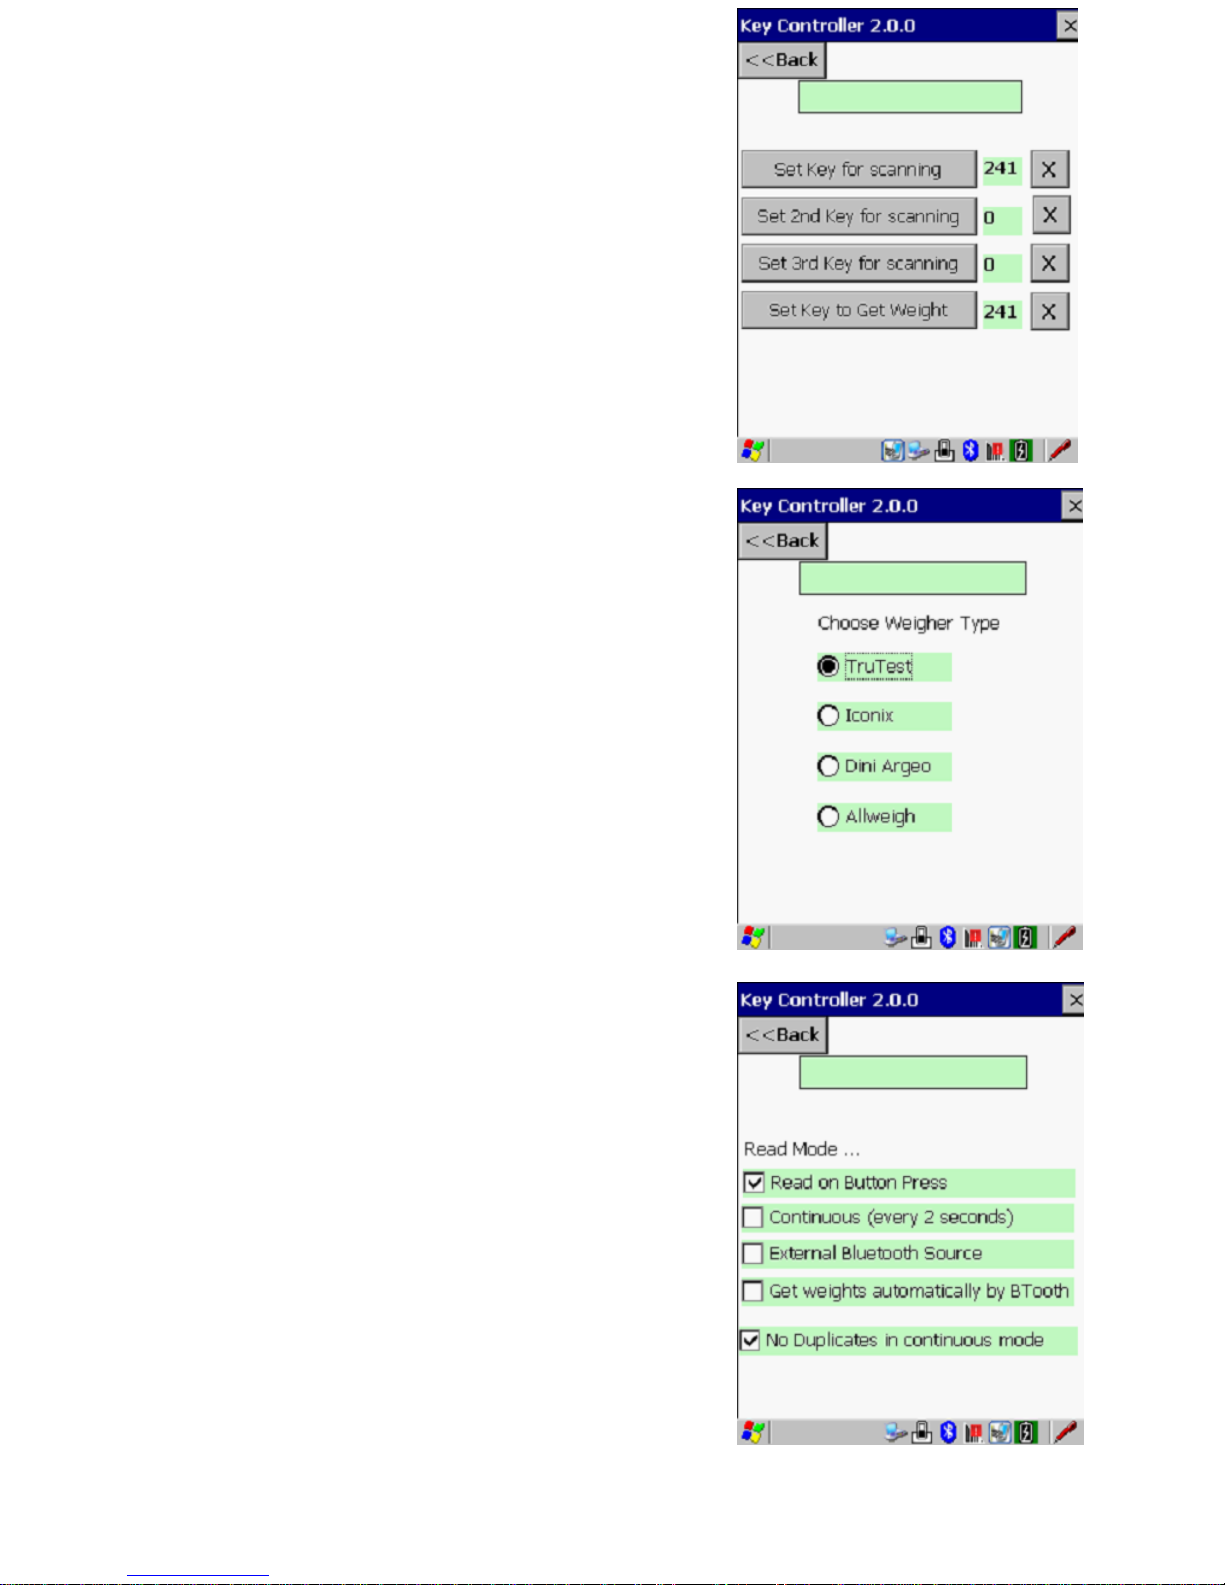
Set Scanning Buttons
Here you can set which button(s) you would like to use
when reading a tag or requesting a weight.
Tap 'Set Key for Scanning' and then press one of the 3
scanning buttons on the front/side of the Psion.
You can set more than one if you wish.
If you are connected to a Weigh Scale, the 'Set Key to Get
Weight' button can be the same or different
from the Scanning Key.
Set Weigh Scale Type
Choose the appropriate Weigher Type from the available
options.
Set Read Mode
The 4 options for read mode are:
1) Read on button press
2) Continuous - every 2 seconds (Tick duplicate tag choice
below)
3) External Bluetooth Source (If you are connected to a
fixed panel or Bluetooth wand reader)
4) Get weights automatically by Bluetooth (If you are
using an External Source and you want to receive weights
without pressing any buttons)
Page 11
11
Select Sheepware Pocket Edition
1. Introduction
Start TGM Key Controller, then tap on Sheep
Or
Tap on KSheep in the Start Menu
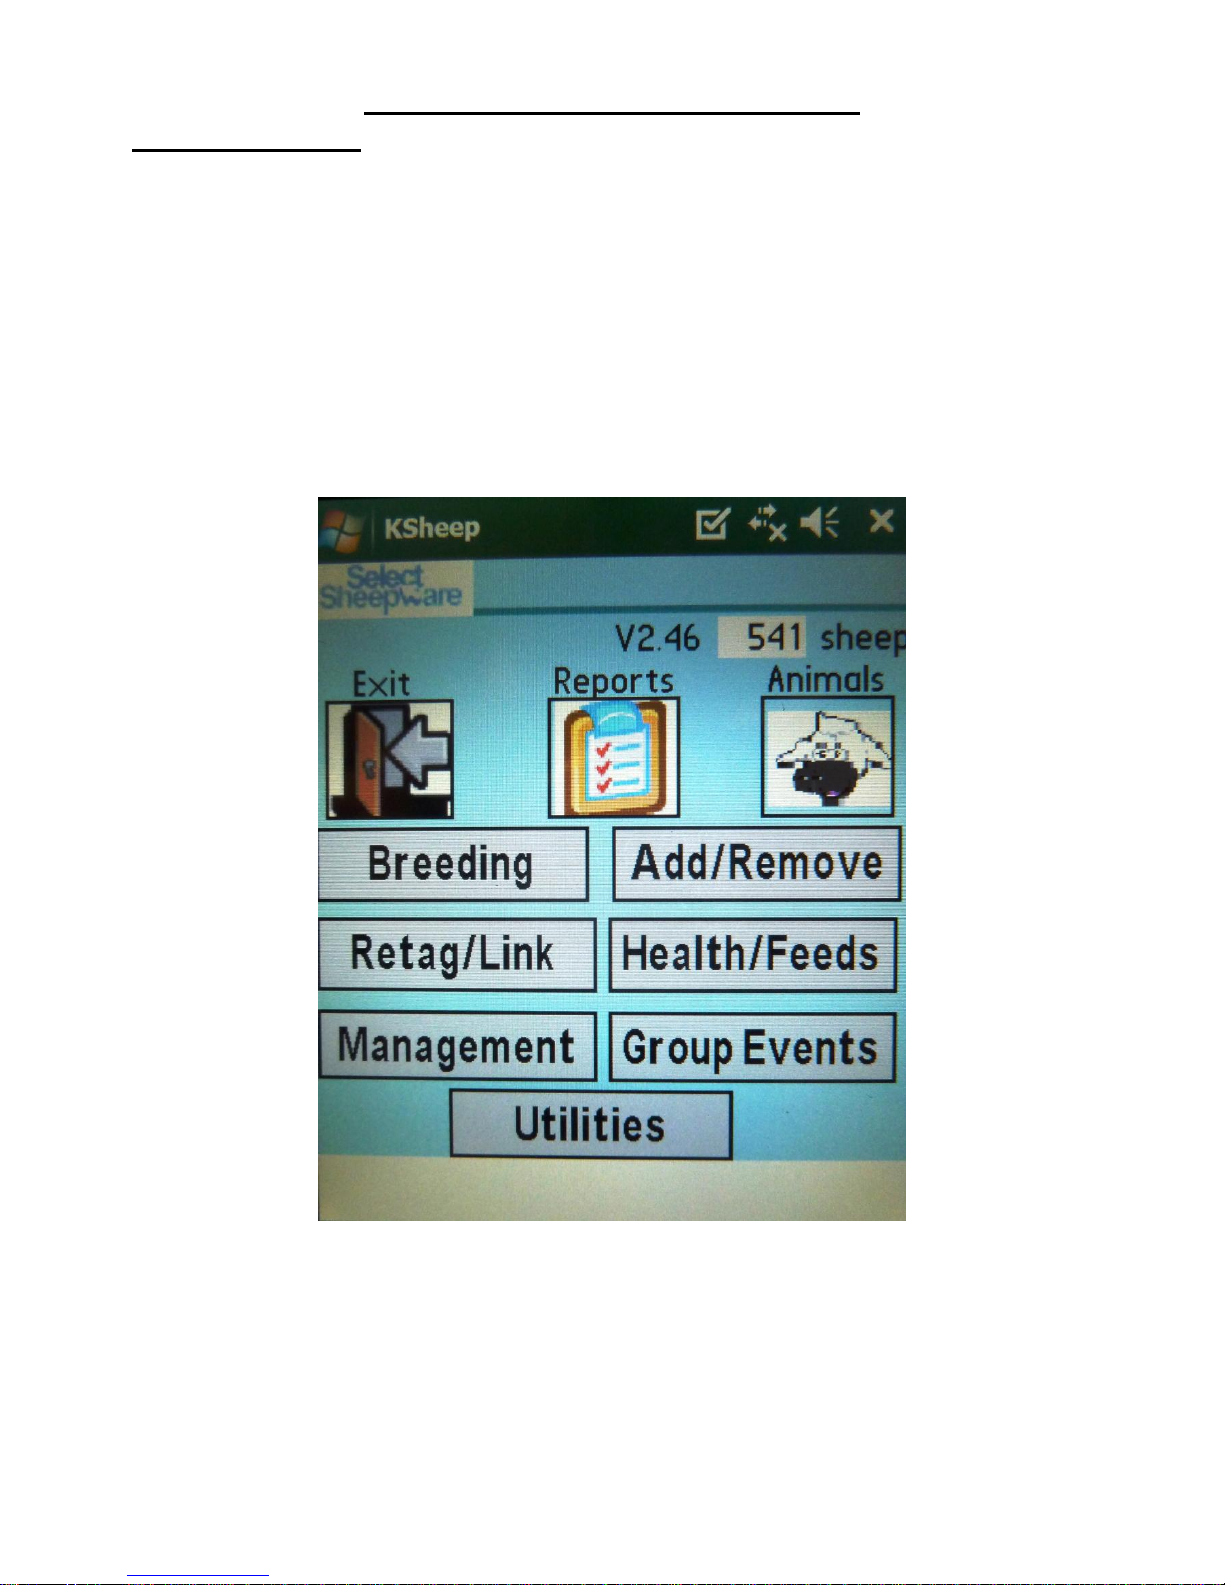
The program will open as below. If you have more than one flock, choose it from the drop
down menu.
Choose from the buttons on the screen which option you wish to enter.
The Reports option displays a list of available reports
Back Arrow(returns to main menu)
Alert Report
Flock Report
Weights Report
Condition Score
Due to Reports
Page 12

12
The Animal Details (Sheep picture) option is an animal browser which displays various items
of data.
The Breeding option displays a list of available events:
Cancel (returns to main menu)
Service (allows user to record Service Events, Ram used etc)
Scanning (allows user to record Scanning information, No. of Lambs etc)
Weaning (allows the user to record Weaning information, Weights, age etc)
The Flock Register option displays a list of available events:
Cancel (returns to main menu)
Add Animal/Retag
o Add Animal
o Add Animal (slaughter Tags)
o Retag – Both Tags Lost
o Retag/Update to EID correlate
Births
Purchase
Sales/Death
Lost
Temporary Movement
The Management option displays a list of available events:
Cancel (returns to main menu)
Comment (allows the user to enter a comment)
Condition Score (allows the user to record a condition score and comment)
Hand Reared (allows the user to record a hand reared event)
Tick (allows the user to tick an individual or group of animals)
Weighing (allows the user to record an animal weight)
Bluetooth Weighing (Palm Devices only)
The Health/Feeding option displays a list of available events:
Cancel (returns to main menu)
Health Treatments (allows the user to enter a Single/Multiple Treatment)
Drug Purchases (allows the user to enter a Medicine Purchase)
Feed Purchases (allows the user to enter a feed purchase)
Group Events option displays the Group Event Menu:
Create/Edit Groups (allows the user to Create/Edit a Batch or Feed group)
Add/Remove from Groups (allows the user to add/remove animals to groups)
View Group Report (allows the user to view Batch or feed group reports)
Record Group Events (allows the user to record events for set-up groups of animals)
(Note: The Back arrow in the top left of any screen returns to the main menu.)
Page 13
13
2. Animal Details
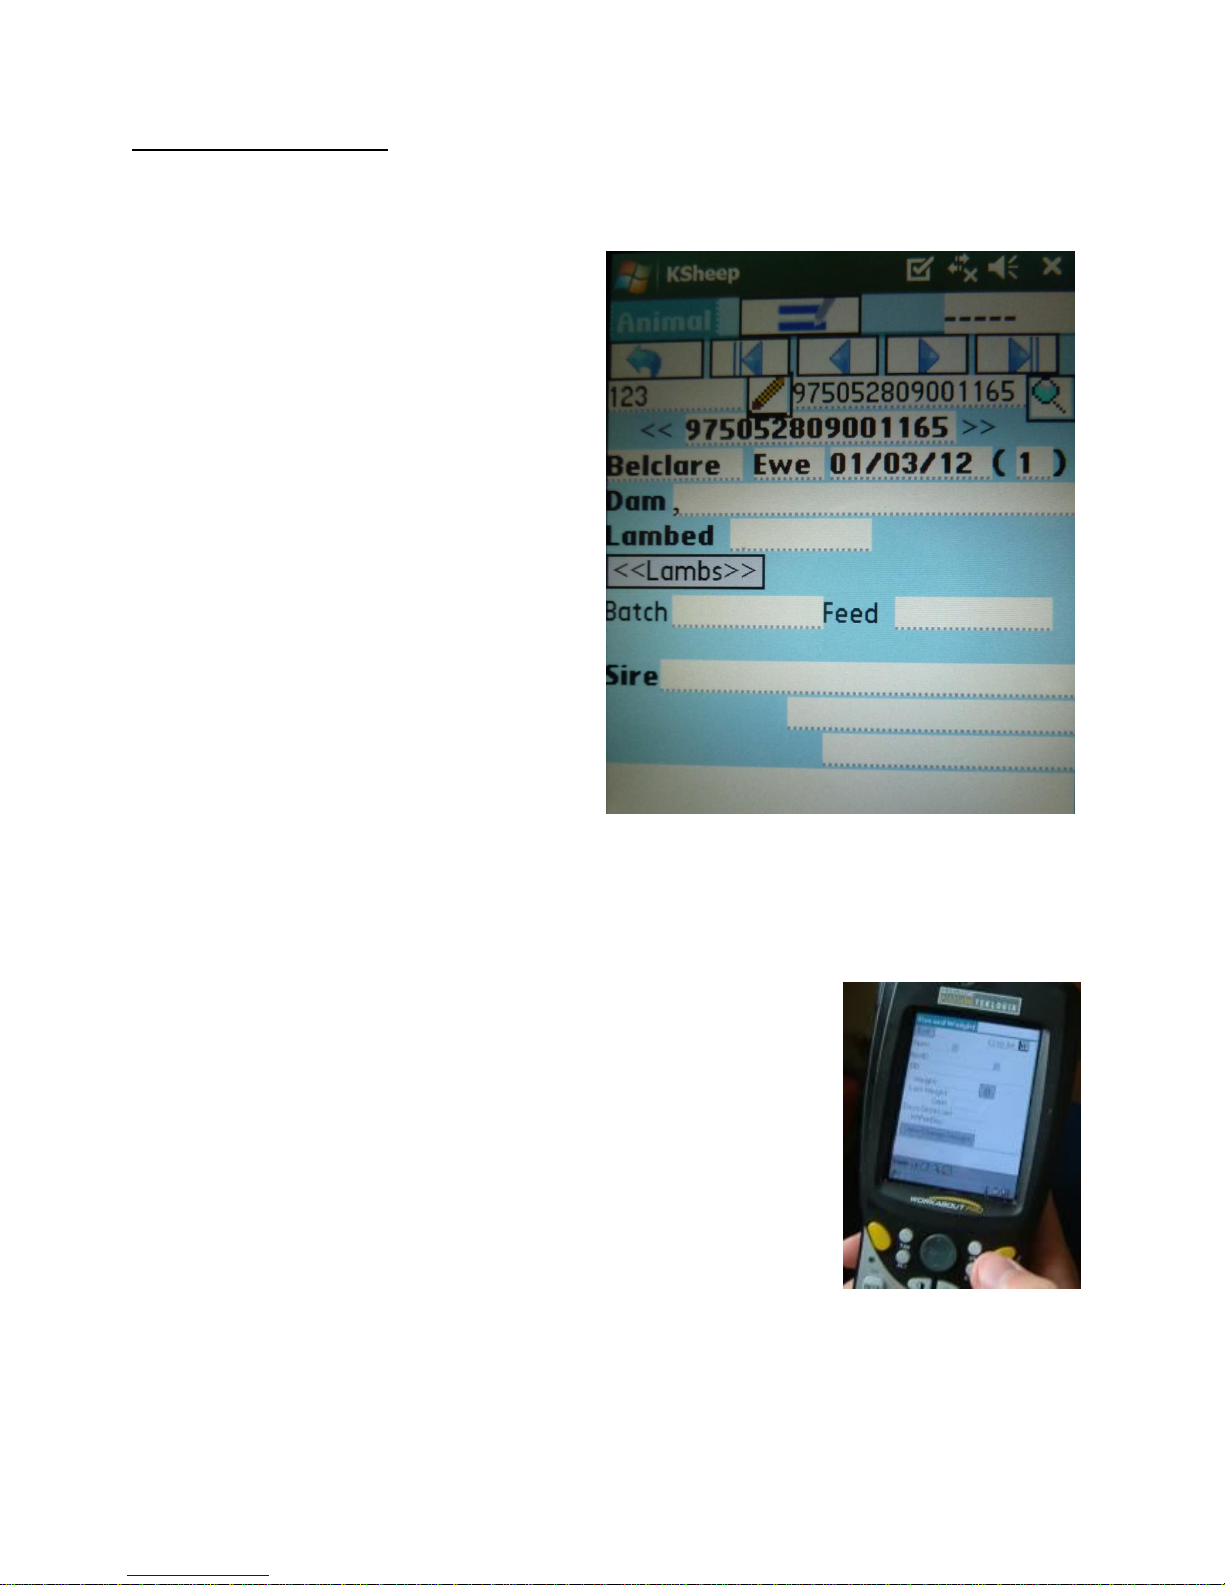
Choose Animal Details and the animal record browser will be shown (below):
2a. How to use the animal
browser:
¦<< button goes to the first record
<< button goes to the previous record
>> button goes to the next record
>>¦ button goes to the last record
EXIT button returns to main menu
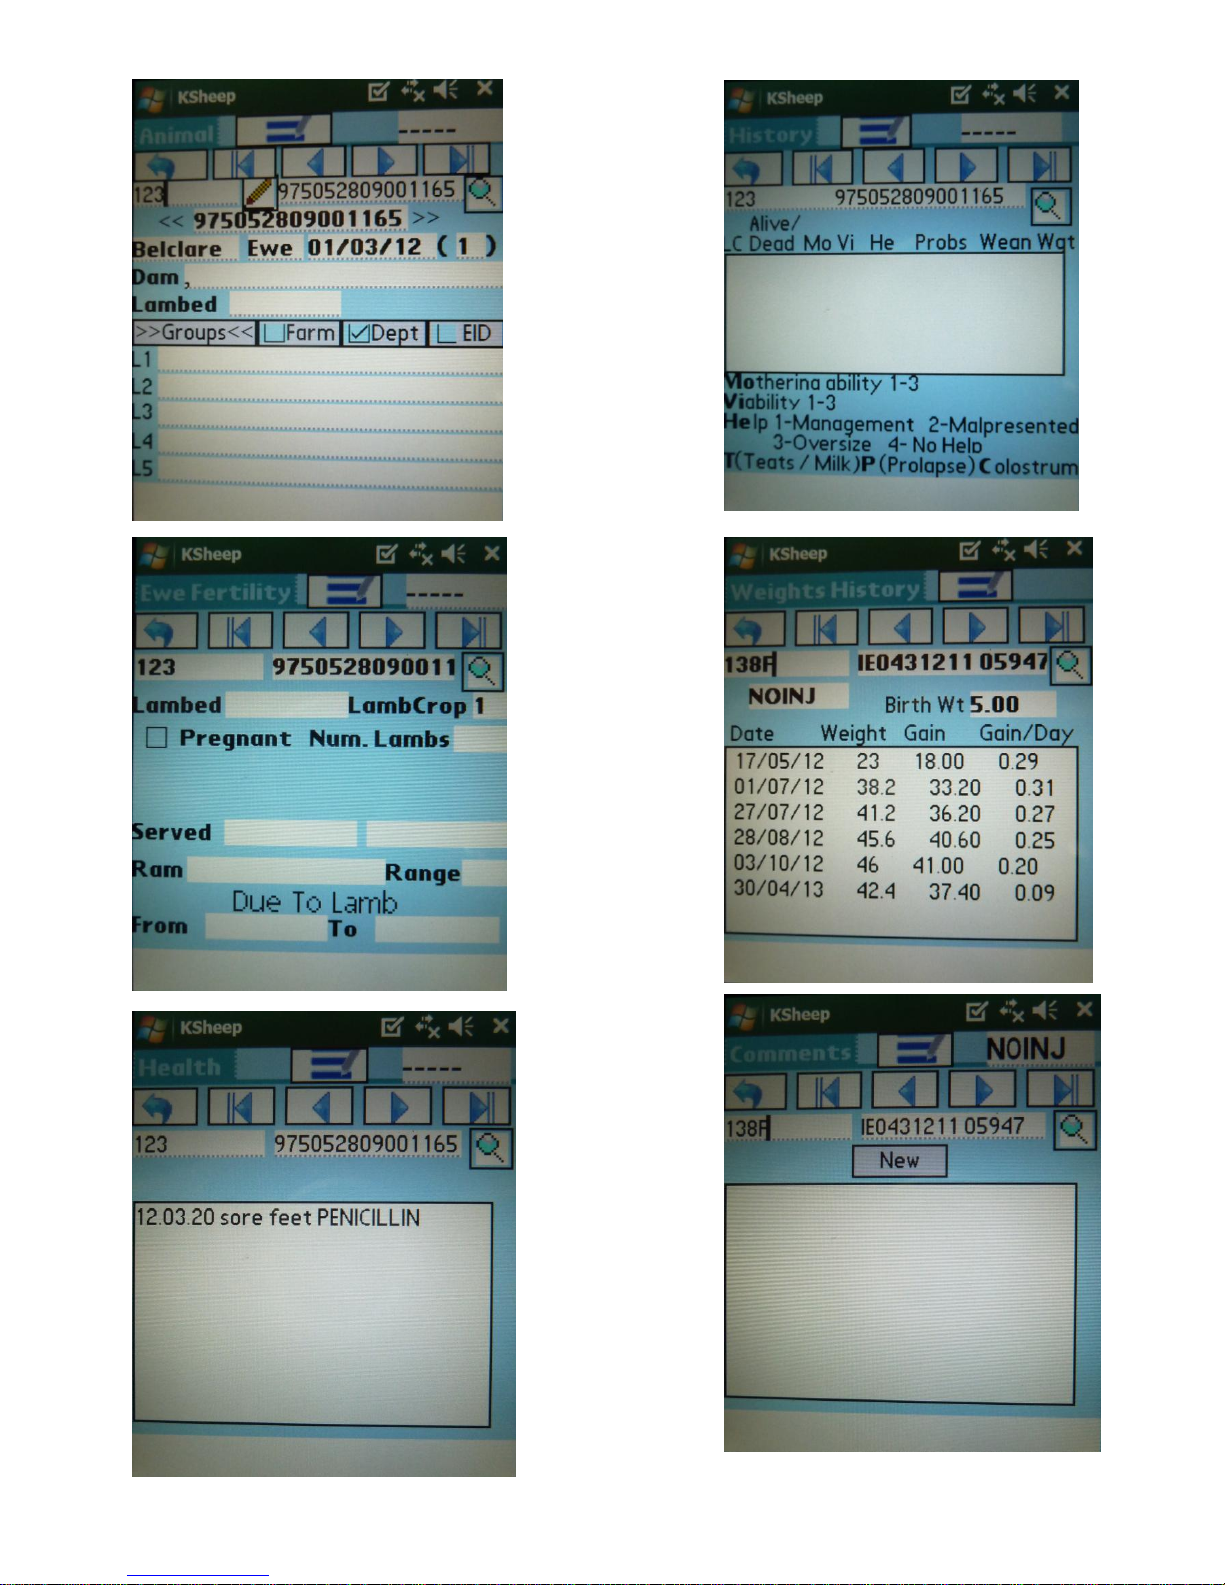
▼ button gives a drop down list. User can
choose to display:
o Record Card
o Lambing Performance
o Lambs History
o Fertility
o Weights
o Health
o Comments
(The lower portion of the screen changes)
(These are displayed on the next page.)
To search for an animal tap the Search button (magnifying glass). Enter the number and
then choose whether it’s the Farm tag, Left Ear Tag or Right Ear Tag.
The animals Dam Number is displayed by default, otherwise you can tap Dam and the EID
will be displayed.
You can display an animal’s details instantly if it is electronically
tagged by pressing the EID trigger button on the Psion. (Usually the
right trigger/yellow button)
Page 14
14
Page 15
15
3. Breeding
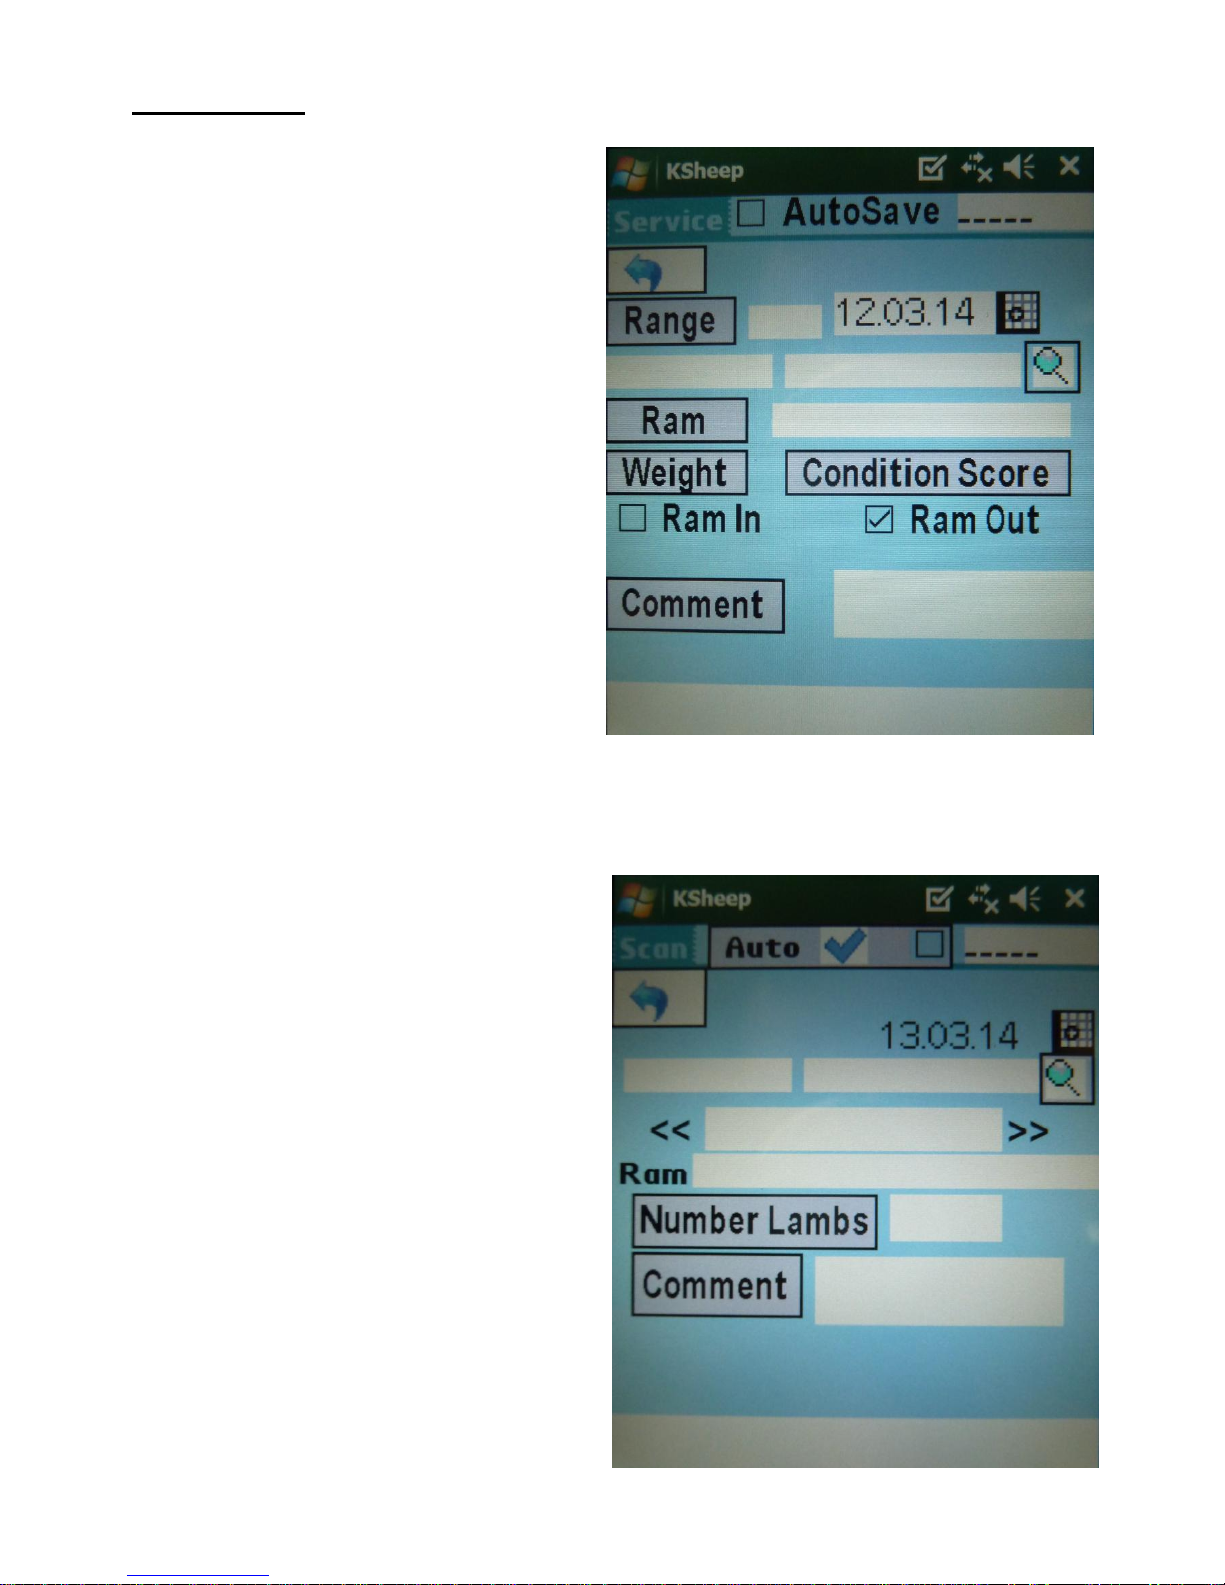
3a. Service – The Range is the number of
Days the ram was in with a group of ewes.
You must choose if the date is the date the
ram went in or the date the ram came out by
ticking the appropriate box.
Either use the EID trigger button to read a
tag or search for the tag (magnifying glass).
The Lamb Crop Number will be displayed.
Enter the Ram or Rams used by picking them
from the drop down list/s.
If you are only entering information for one
animal, at this stage you would usually tap
save and exit.
However it is more likely that you will be
entering the same information for a group of
ewes. This is where the Auto save function
is useful and efficient. After entering the range and date, tick the Auto Save box and read the
first tag of the ewe in that group. You will notice the Auto Save counter becomes 1. Now
simply read each EID tag of the remaining ewes in that group and the Auto Save counter will
increase by one each time, saving the information automatically.
3b. Scanning – Either search for an
animal or use the EID trigger button to read
the tag. Lamb crop number will be
displayed. Enter the number of lambs
using the drop down menu and enter a
comment if you wish.
You can also enter either a Cull event or a
Condition Score Event at this time by tapping
Cull/CS.
Tap Save and Exit.
Page 16
16
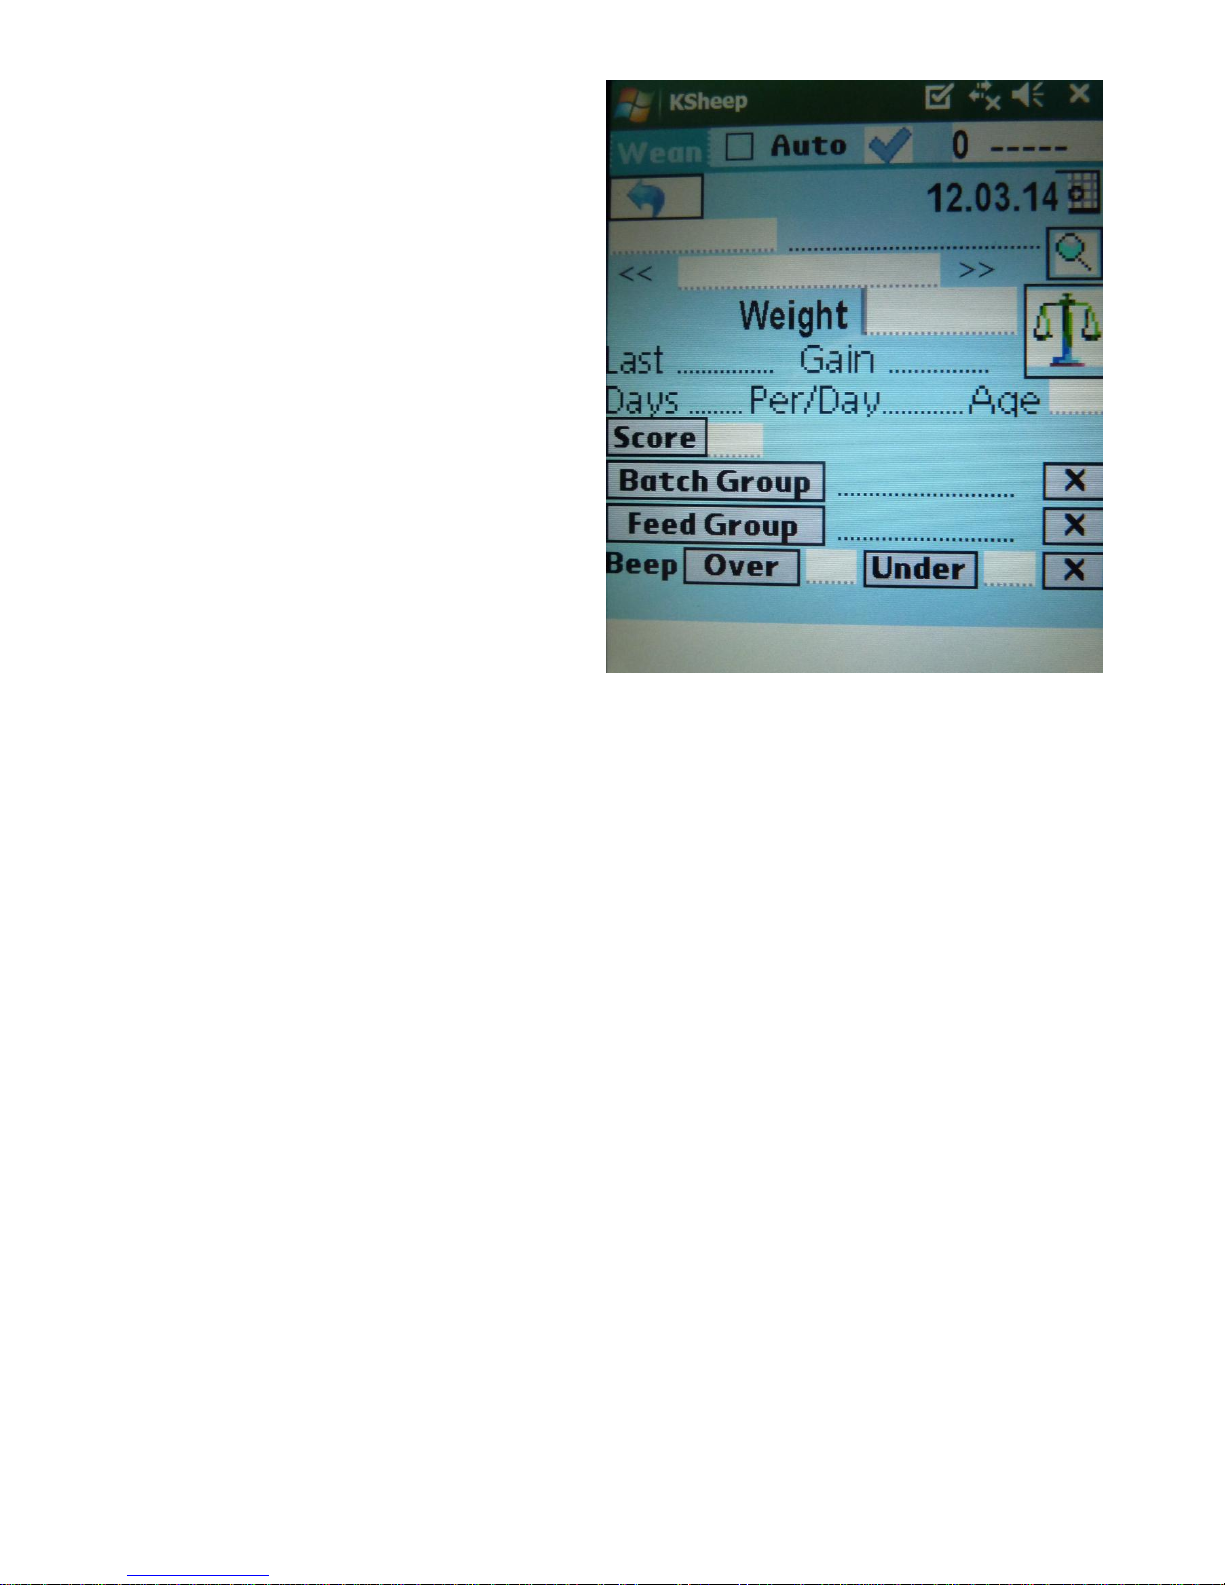
3c. Weaning - Either search for an
animal or use the EID trigger button to read
the tag.
To enter a weight tap the scales button,
enter the weaning weight and tap enter.
If the animal has a birth weight and date,
the weight gain, age and weight gain
per day will be calculated.
You can set a filter so that for example,
animals over 18 and under 21kg are
highlighted. If a weight is outside this range,
the message Invalid Weight is displayed
with an audible beep to alert the user.
If you have a Bluetooth enabled weigh scale
you can use the weight trigger button on the
Psion to request the weight rather than
typing the weight in. (see Bluetooth
Weighing towards the end of manual)
Tap Save and Exit
Page 17
17
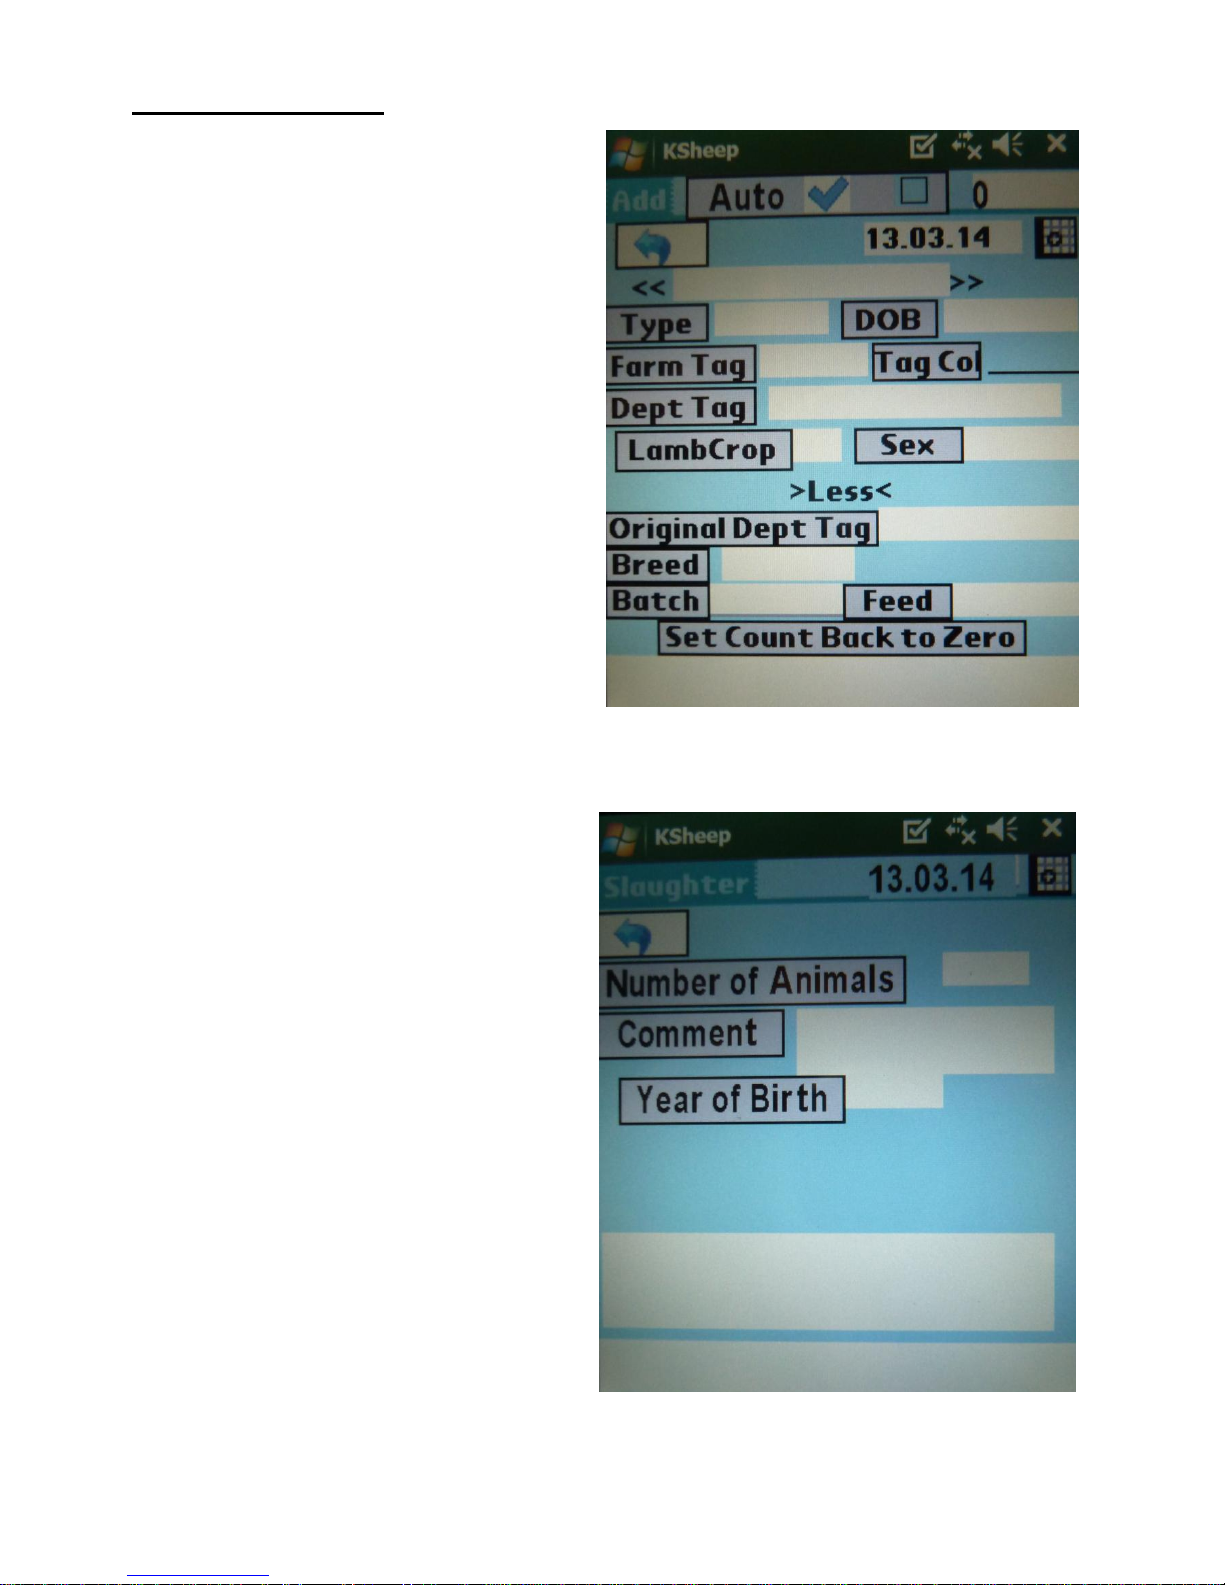
4. Flock Register
4a. Add Animal/Retag
4a (i) Add Animal
This option is to add an animal not already in
the PC software.
If it is a lamb, it will be automatically added
into the Flock Register as Add Homebred
Animal.
If it is a ewe/ram, it will be added to the
flock register. Upgrade to EID is entered as
the Flock Register comment.
Use the EID trigger to read the tag and fill in
the rest of the details as appropriate.
Tap Save and Exit
4a (ii) Add Animal (slaughter
Tags)
This option is for tagging lambs immediately
before slaughter. Tags are not unique,
individual animals are not created and there
are no EIDs associated.
An entry in the flock register is created with
the Number of Lambs.
Enter the number of animals, a comment
and the year of birth.
Tap Save and Exit
Page 18
18
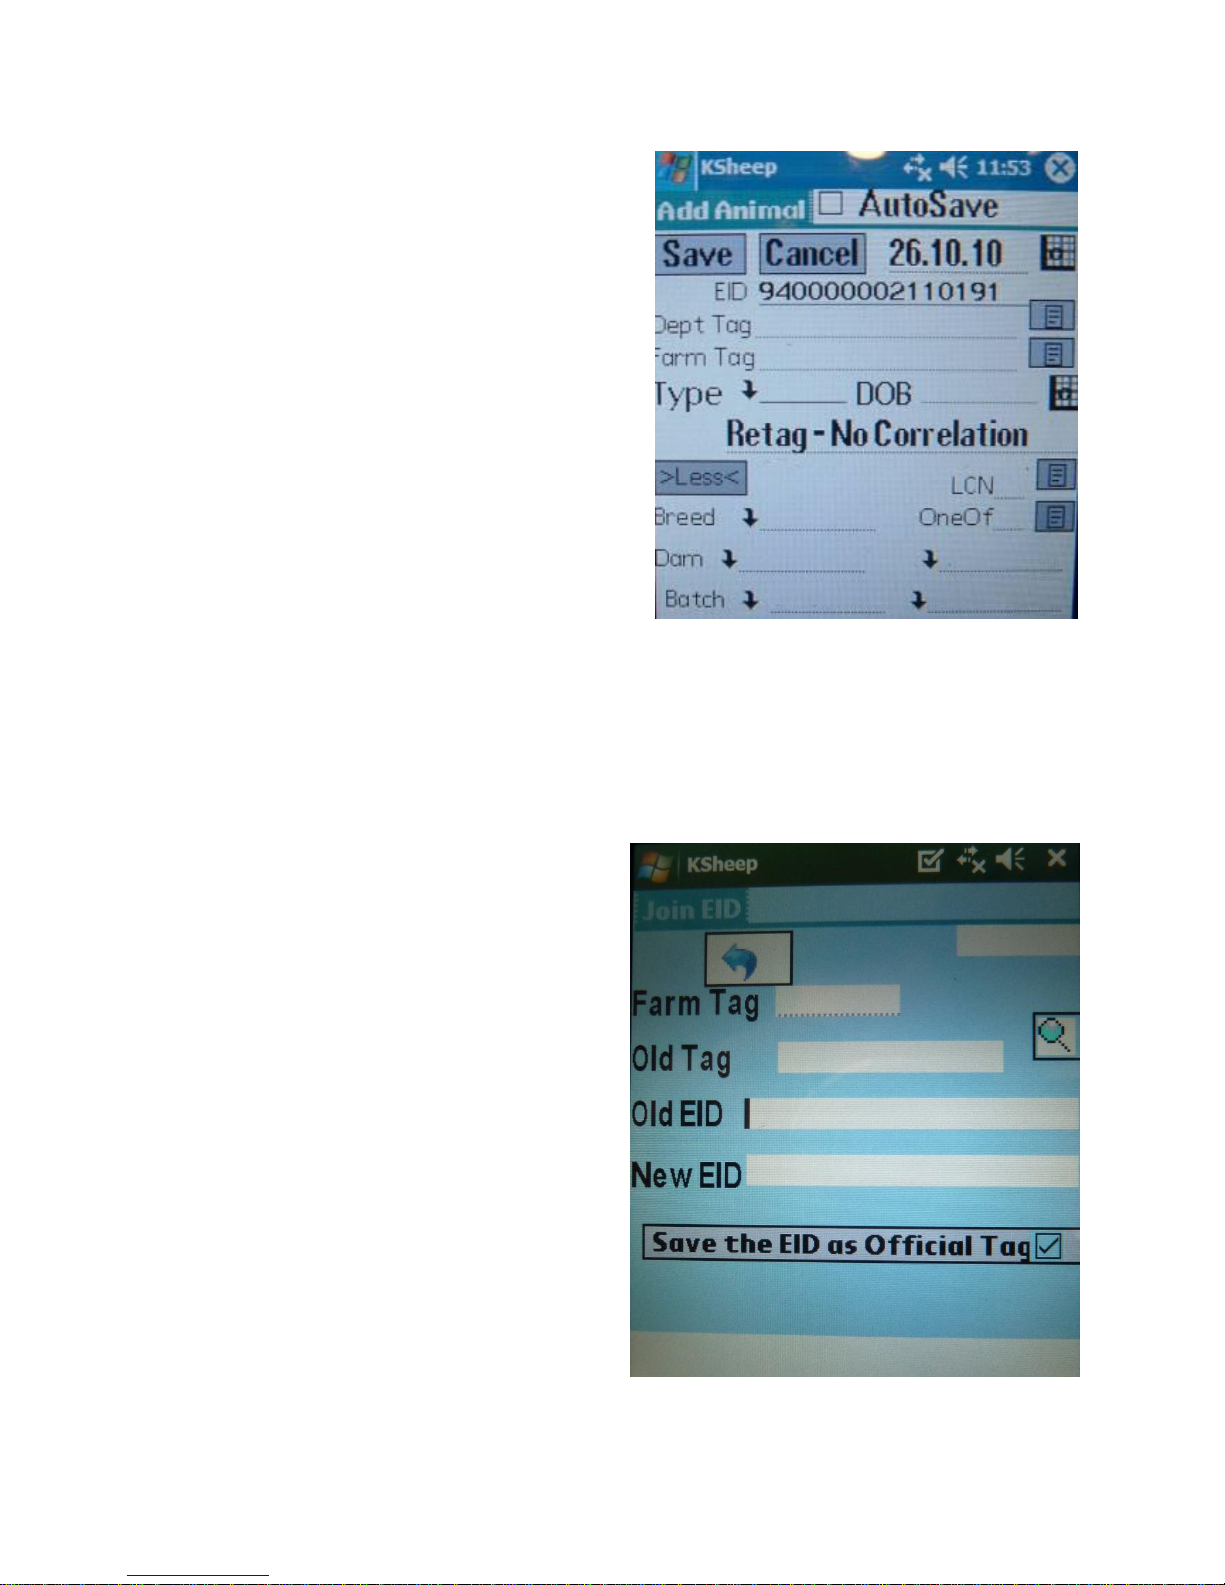
4a (iii) Retag – Both Tags Lost
This is the same screen as Add Animal, however
when saved, both Tags lost is entered as the
Flock Register Comment.
4a (iv) Retag/Update to EID
correlate
This option is for when the EID is lost but one
tag remains so the animal can be identified.
If joining a lamb which only had a farm tag,
then entry in register is Birth (B or T).
If joining anything which already has an old
Dept Tag, then Flock Register entry is Update
to EID (R or RT depending on country)
If joining anything which already has an EID
tag, then Flock Register entry is Retag (R or
RT depending on country
Page 19
19
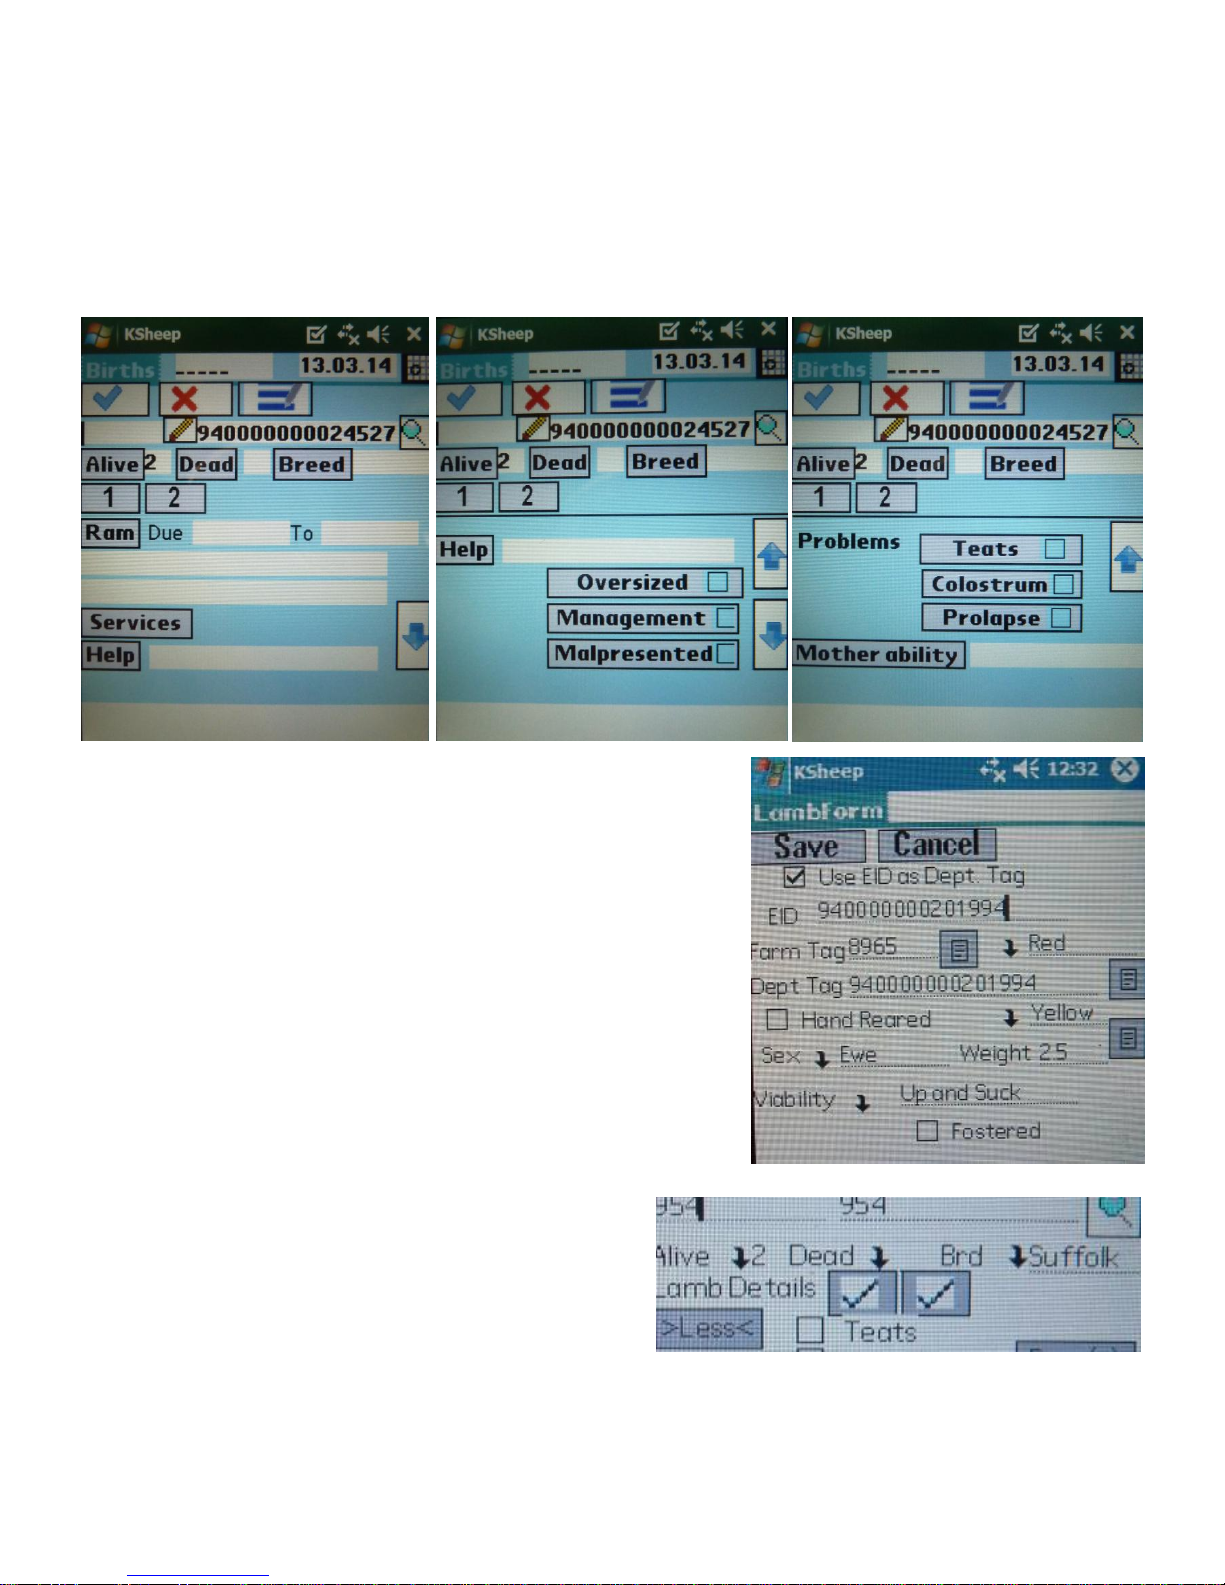
4b. Births
Firstly, either search for a ewe or read its EID tag. Pick the number of alive lambs and
number of dead lambs. Choose the breed from the drop down list. You can also enter
More details such as Problems (Teats, Colostrum or Prolapse), the Ram’s details if known,
Helped status and reason why helped (Management, oversized, malpresented), enter a
comment and choose its mothering ability. Use the arrows to move up or down this screen
or swipe your finger/stylus as you would with a smartphone.
To enter the lamb’s details, tap 1 to open the lamb form.
Enter the tagging information and choose to use EID as
Dept tag if you wish. Choose the colour of each tag from
the down list.
If the lamb is Hand Reared tick the box.
Enter its sex and weight if known.
Choose its viability from the drop down list.
If it has been fostered tick the box and choose its foster
mother.
Tap Save and Exit.
If there was more than one lamb, do the same for
the second lamb by tapping 2.
Once the lambing details have been saved, you
will notice the 1 and 2 become ticked.
You can enter a Cull or condition score at this time if you wish.
Finally, tap Save on the main Births screen.
Page 20
20
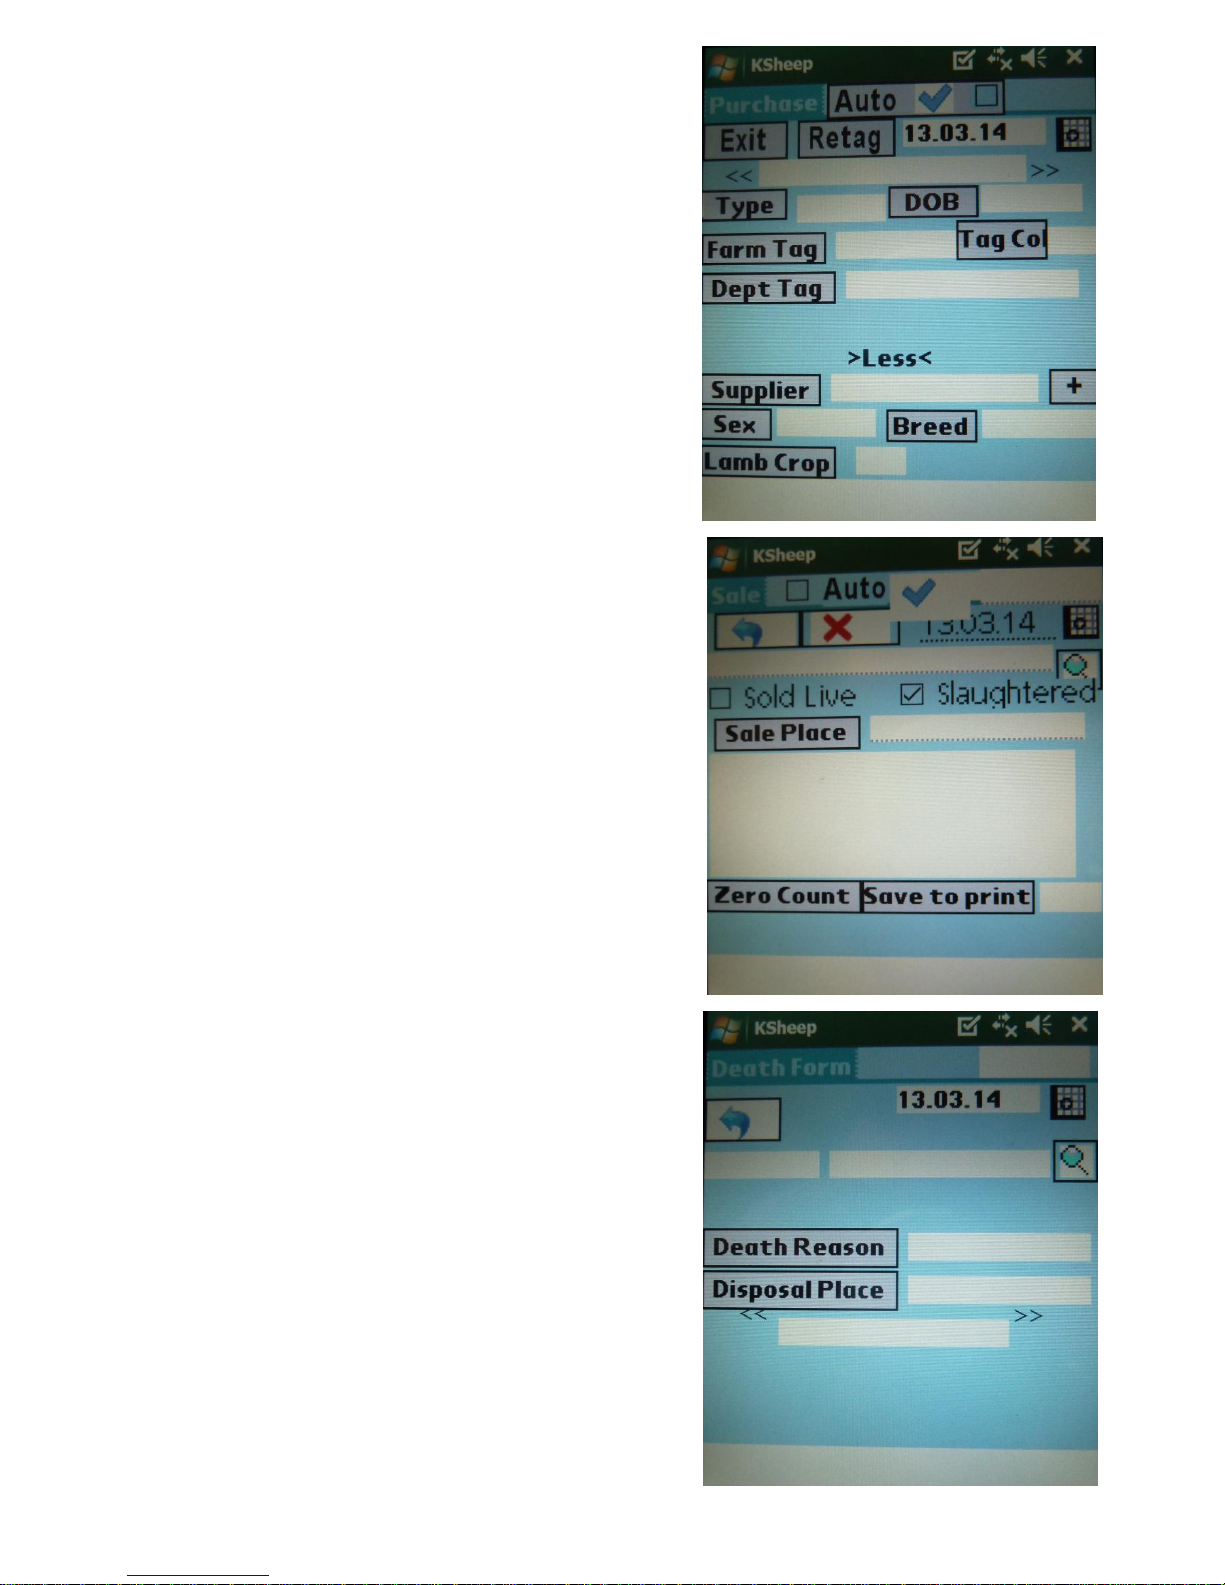
4c. Purchases
Fill in the details as appropriate.
Let’s say you buy 20 Blackface ewe lambs from the
same supplier. Using Auto Save, leave Farm tag
blank (this can be filled in afterwards in the PC
software). Each animal can be added with one press
of the EID trigger button which makes the process
much faster.
*Note – Suppliers will have to be added in the PC
Software then synchronised so that they are available
in the PDA.
4d (i). Sale
Use the calendar button to enter the date of sale.
Either search for an animal or use the EID trigger
button to read the tag.
Tick either Sold Live or Slaughtered
Choose a Sale Place from the drop down list
*Note – Sale Places will have to be added in the PC
Software then synchronised so that they are available
in the PDA.
Enter further sale information if known
Tap Save and Exit
4d (ii) Death
Use the calendar button to enter the date of death.
Either search for an animal or use the EID trigger
button to read the tag.
Choose a Death Reason and Disposal Place from
the drop down lists
*Note – Disposal Places will have to be added in the
PC Software then synchronised so that they are
available in the PDA.
Tap Save and Exit
Page 21
21
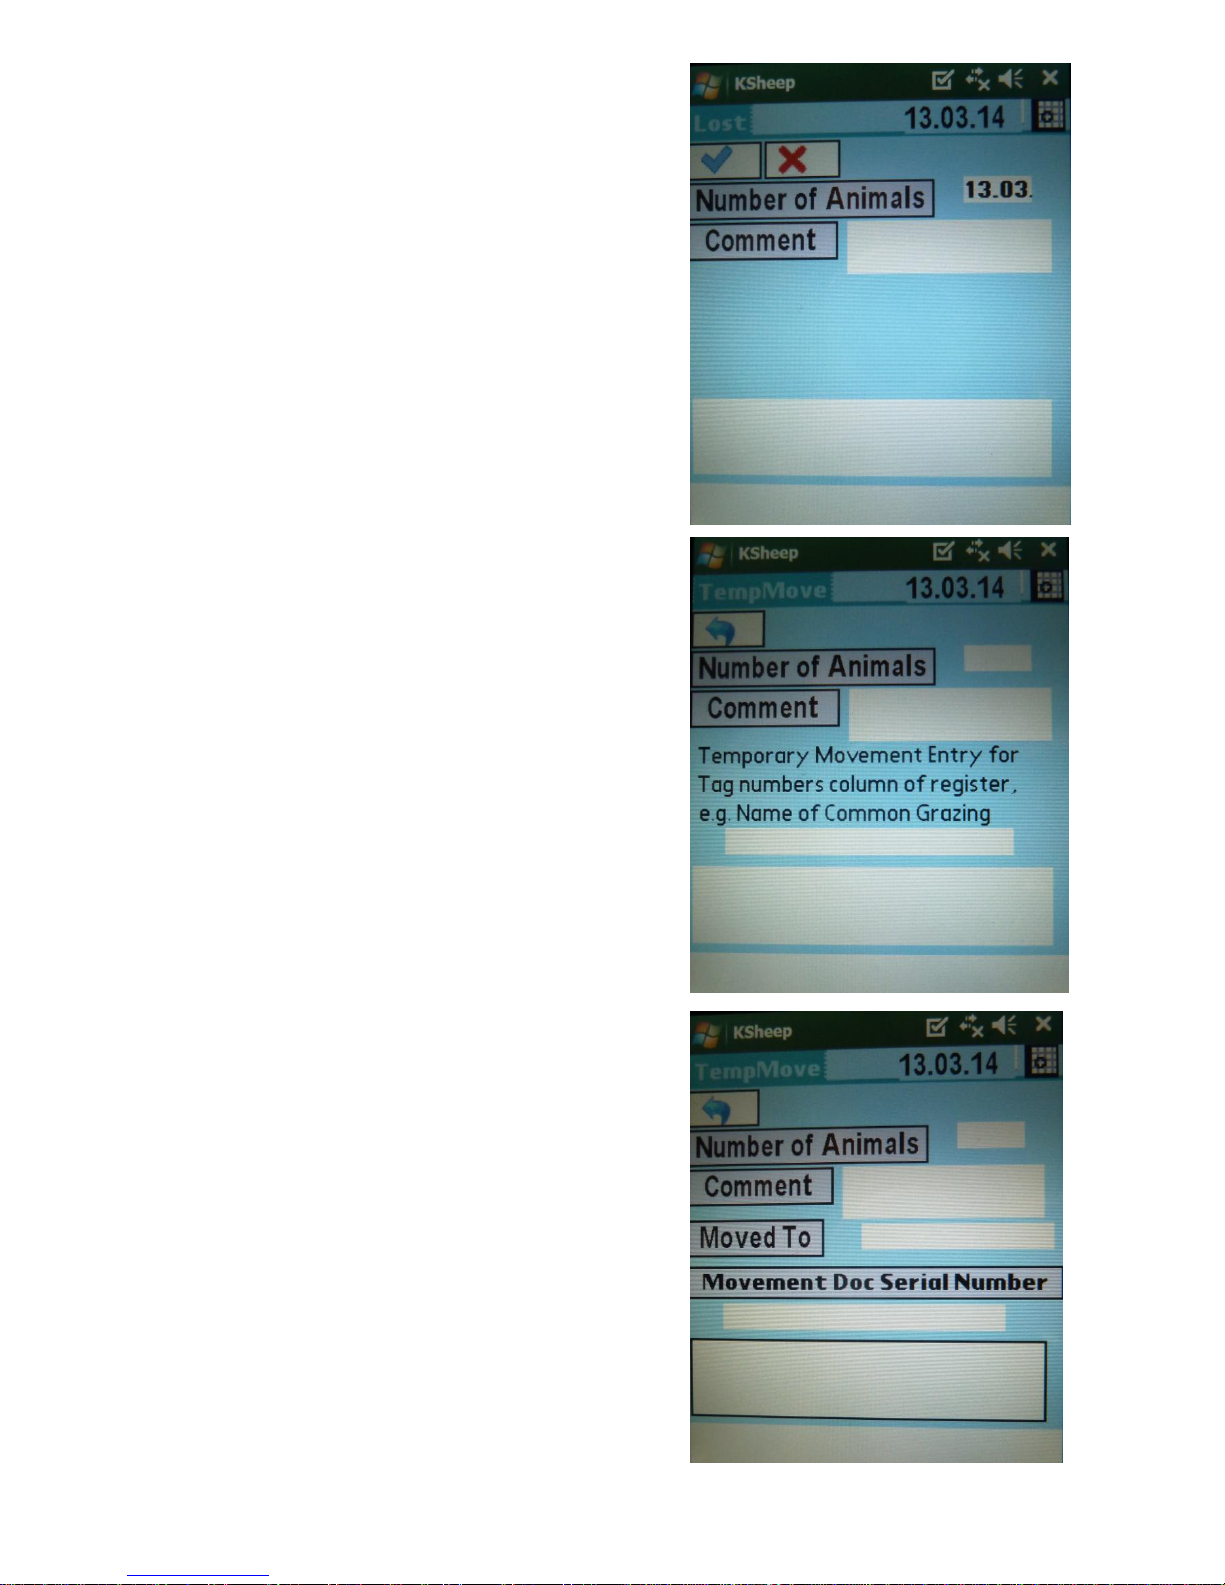
4e. Lost
Use the calendar button to enter the date animal/s
was/were lost
Enter a comment
Tap Save and Exit
4f (i) Temporary Movement
Off with No Movement Document
Enter the date, number of animals and a comment
Enter an entry which will go into the flock register
e.g. Name of common grazing
4f (ii) Temporary Movement
On with No Movement Document
Same as above
4f (iii) Temporary Movement
Off with Movement Document
Enter the date, number of animals and a comment
Choose where moved to from the drop down list
*Note – Customers will have to be added in the PC
Software then synchronised so that they are available
in the PDA.
Enter the Serial Number of Movement Doc
4f (iv) Temporary Movement
On with Movement Document
Same as above
Page 22
22
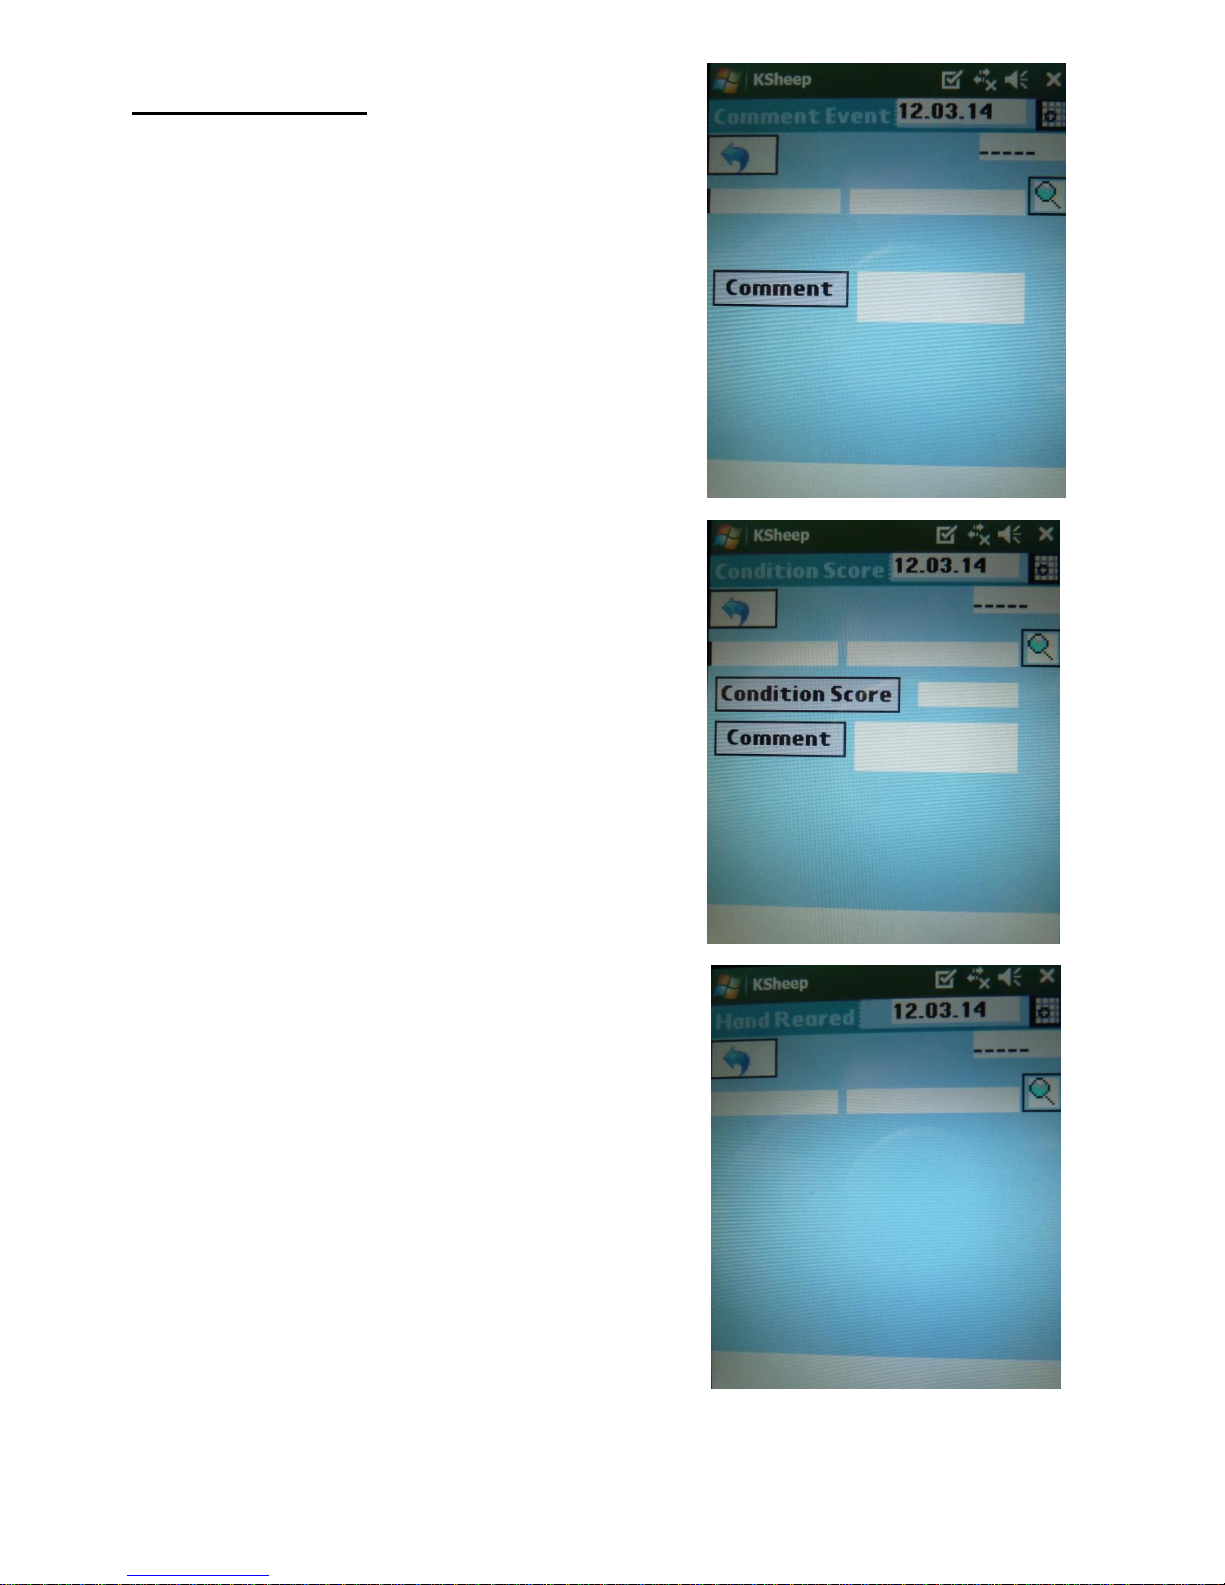
5. Management
5a. Comment
Either search for an animal or use the EID trigger
button to read the tag.
Enter a date and comment
You can also enter either a Cull event or a Condition
Score Event at this time by tapping Cull/CS.
Tap Save and Exit
5b. Condition Score
Either search for an animal or use the EID trigger
button to read the tag.
Enter a date, condition score and comment
You can also enter either a Cull event or a Condition
Score Event at this time by tapping Cull/CS.
Tap Save and Exit
5c. Hand Reared
Either search for an animal or use the EID trigger
button to read the tag.
You can also enter either a Cull event or a Condition
Score Event at this time by tapping Cull/CS.
Tap Save and Exit
Page 23
23
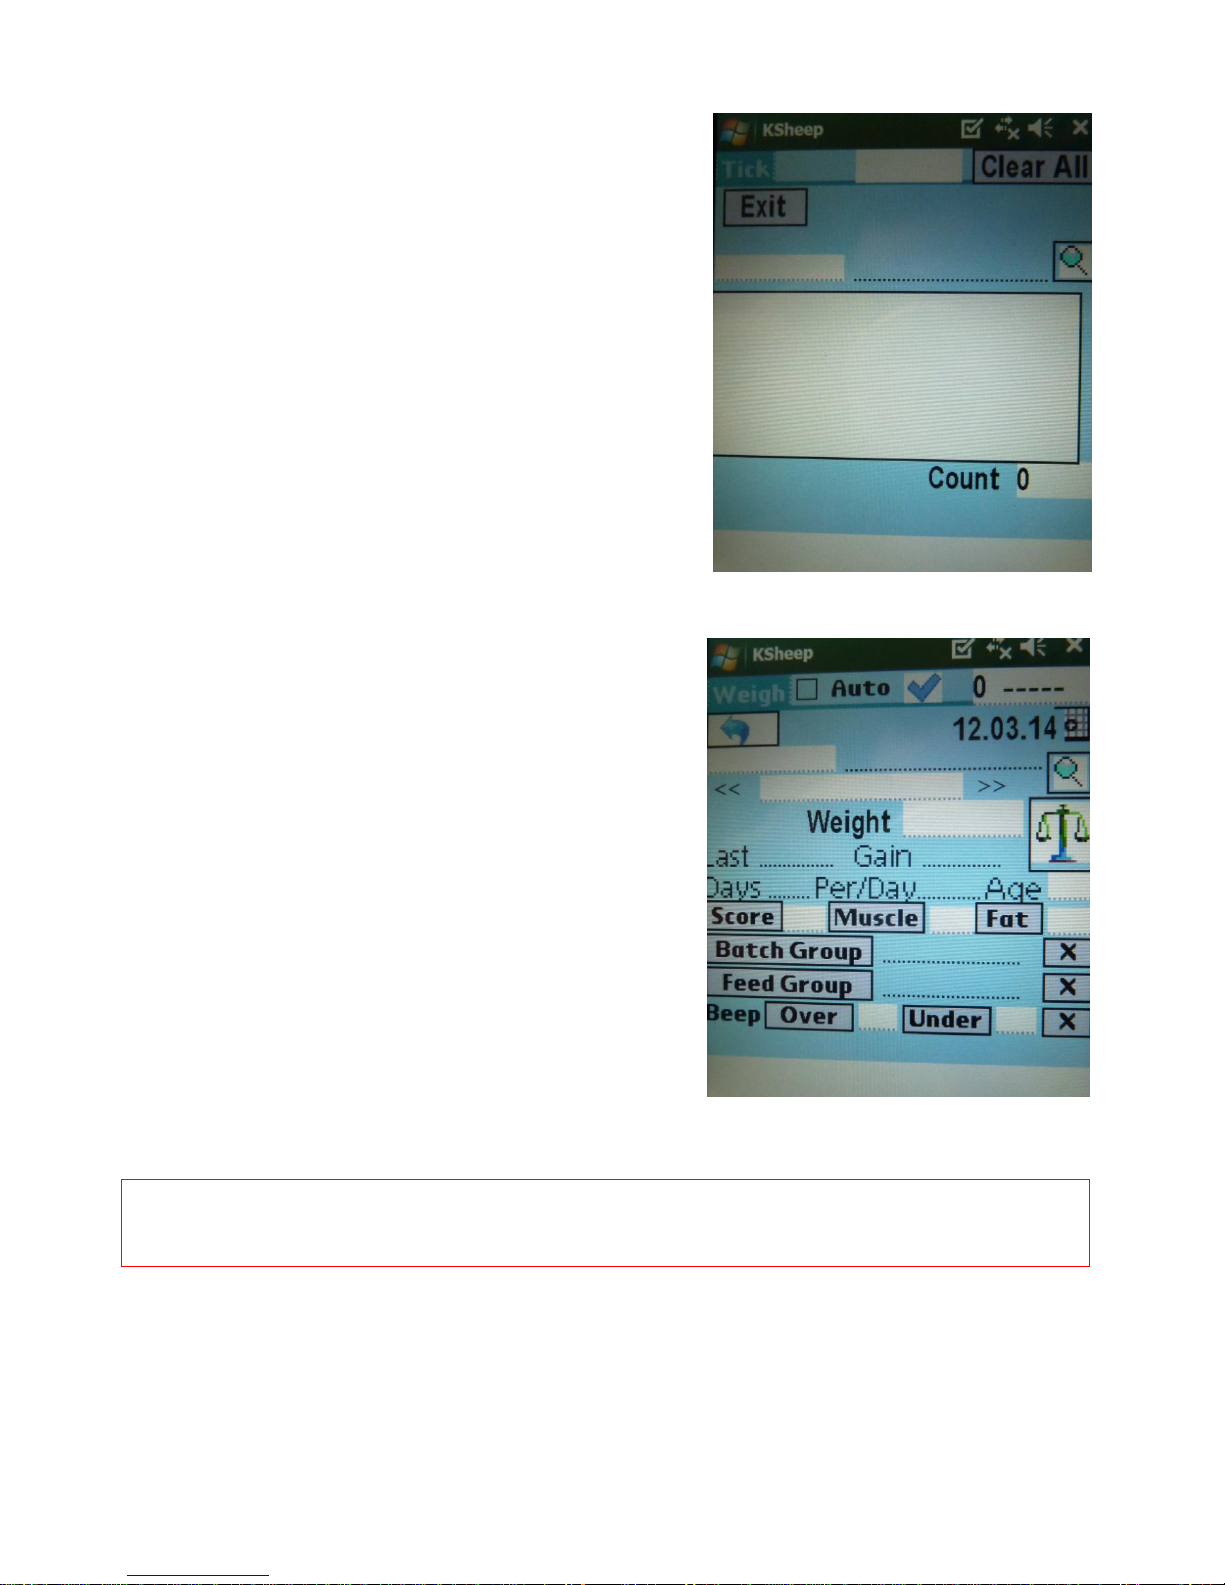
5d. Tick
This function is used when you want to apply a
management event or treatment to a group of animals.
When you synchronise with the PC, the animals will be
ticked and you can for example add a comment, a
condition score or health treatment to that group of
ticked animals.
Either search for an animal or use the EID trigger
button to read the tag
You will be asked if you want to tick this animal. Tap
yes and then read the next tag, tap yes and so on.
To un-tick and animal read the tag again and the tick
will be removed.
5e. Weighing
Either search for an animal or use the EID trigger
button to read the tag
Enter the date of weighing
Tap the scales icon to add the weight. If the animal
has a previous weight and date recorded, the gain,
days since last weighing and weight gain per day
will be calculated.
You can set a filter so that for example, animals over
18 and under 21kg are highlighted. If a weight is
outside this range, the message Invalid Weight is
displayed with an audible beep to alert the user.
You can also enter either a Cull event or a Condition Score Event at this time by tapping
Cull/CS.
If you have a Bluetooth enabled weigh scale you can use the weight trigger button on the
Psion to request the weight rather than typing the weight in. (see Bluetooth weighing page
31).
Tap Save and Exit.
Page 24
24
6. Health/Feeding
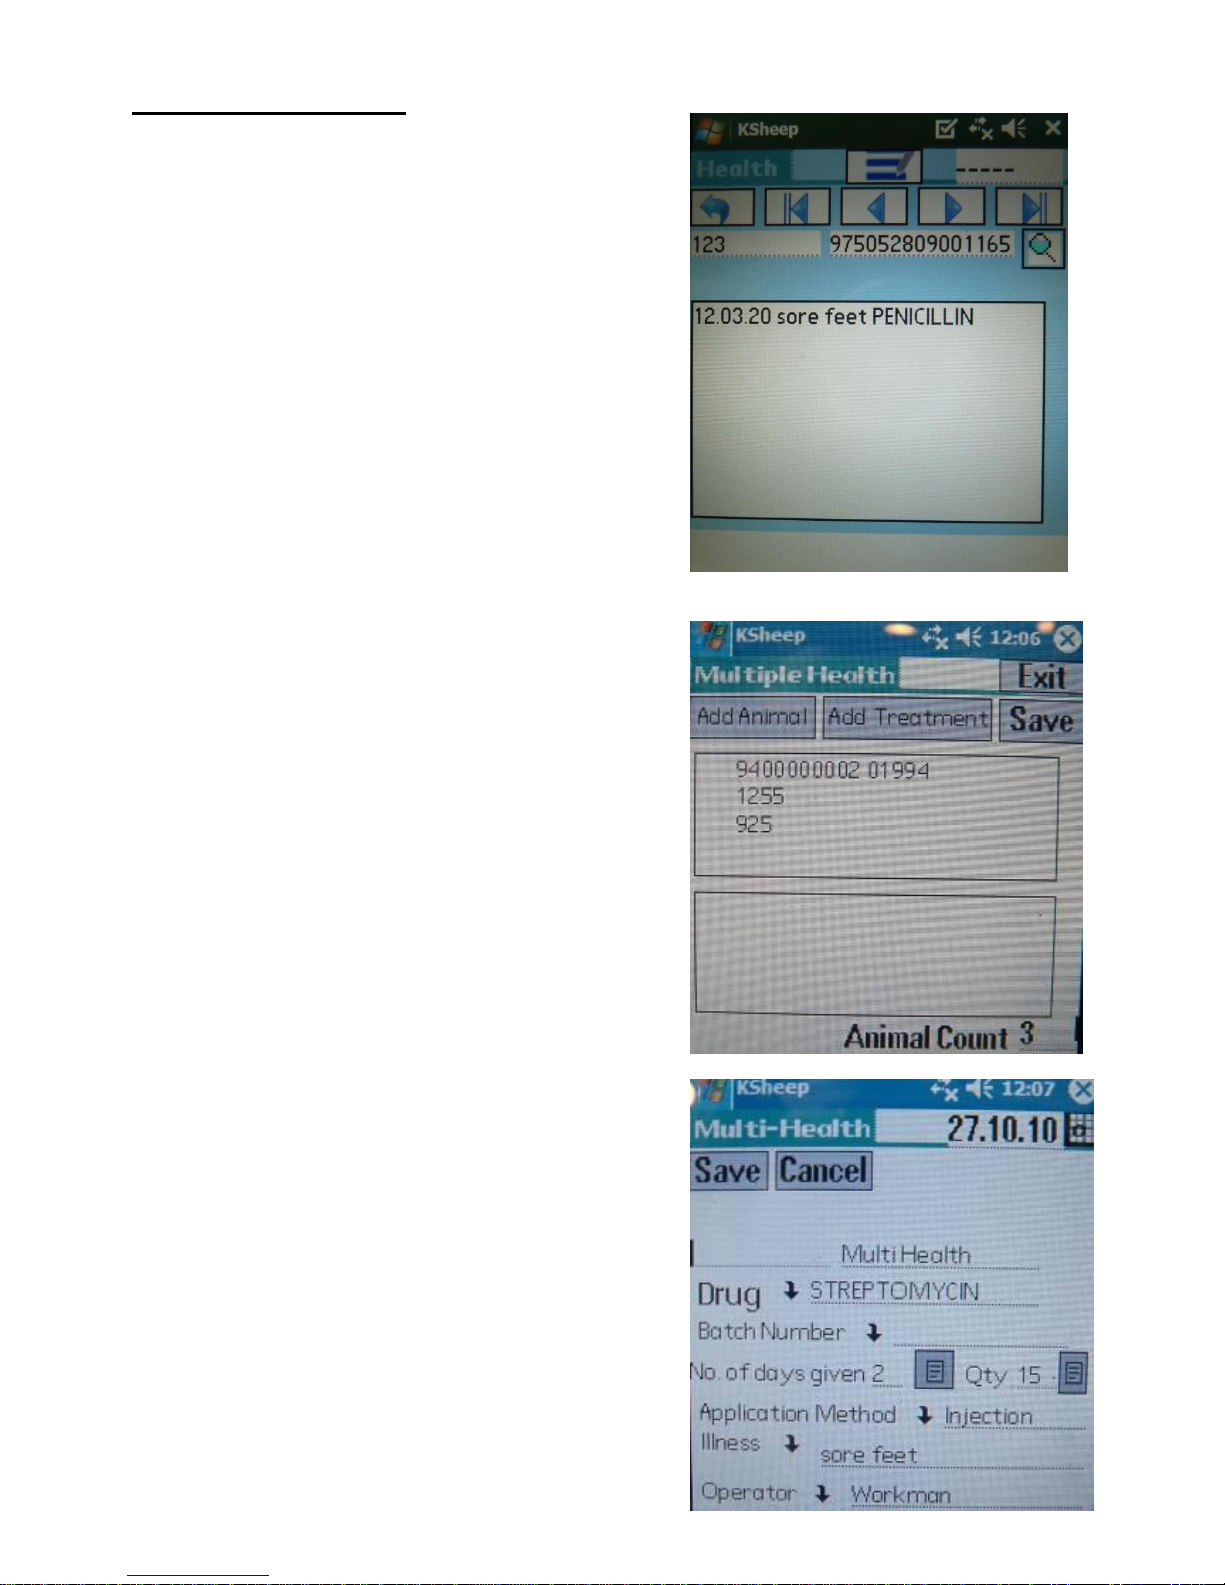
6a (i) Health Treatments – Single
Treatment
Either search for an animal or use the EID trigger
button to read the tag
If you wish to apply the same treatment for a batch
of animals, tick the box
Fill in the details as appropriate including date
Tap Save.
For a batch, simply read each tag and the treatment
will be saved automatically.
Tap Exit when finished.
6a (ii) Health Treatments – Multiple
Treatment
Either search for an animal using the Add Animal
Button or use the EID trigger button to read the tag.
Each animal is added to the list and the Animal
count gives the total animals in that treatment group
When all animals are added, tap Add treatment
Enter the details as appropriate including date
Tap Save and you are returned to the first screen
with the drug you chose in the bottom box.
You can add a second treatment or more if you wish
by tapping Add treatment again.
Tap Save and Exit
*Note – Batches of medicine will have to be added in
either the PC Software and then synchronised or
added in the PDA (see 6b) so that they are available
for selection.
Page 25
25
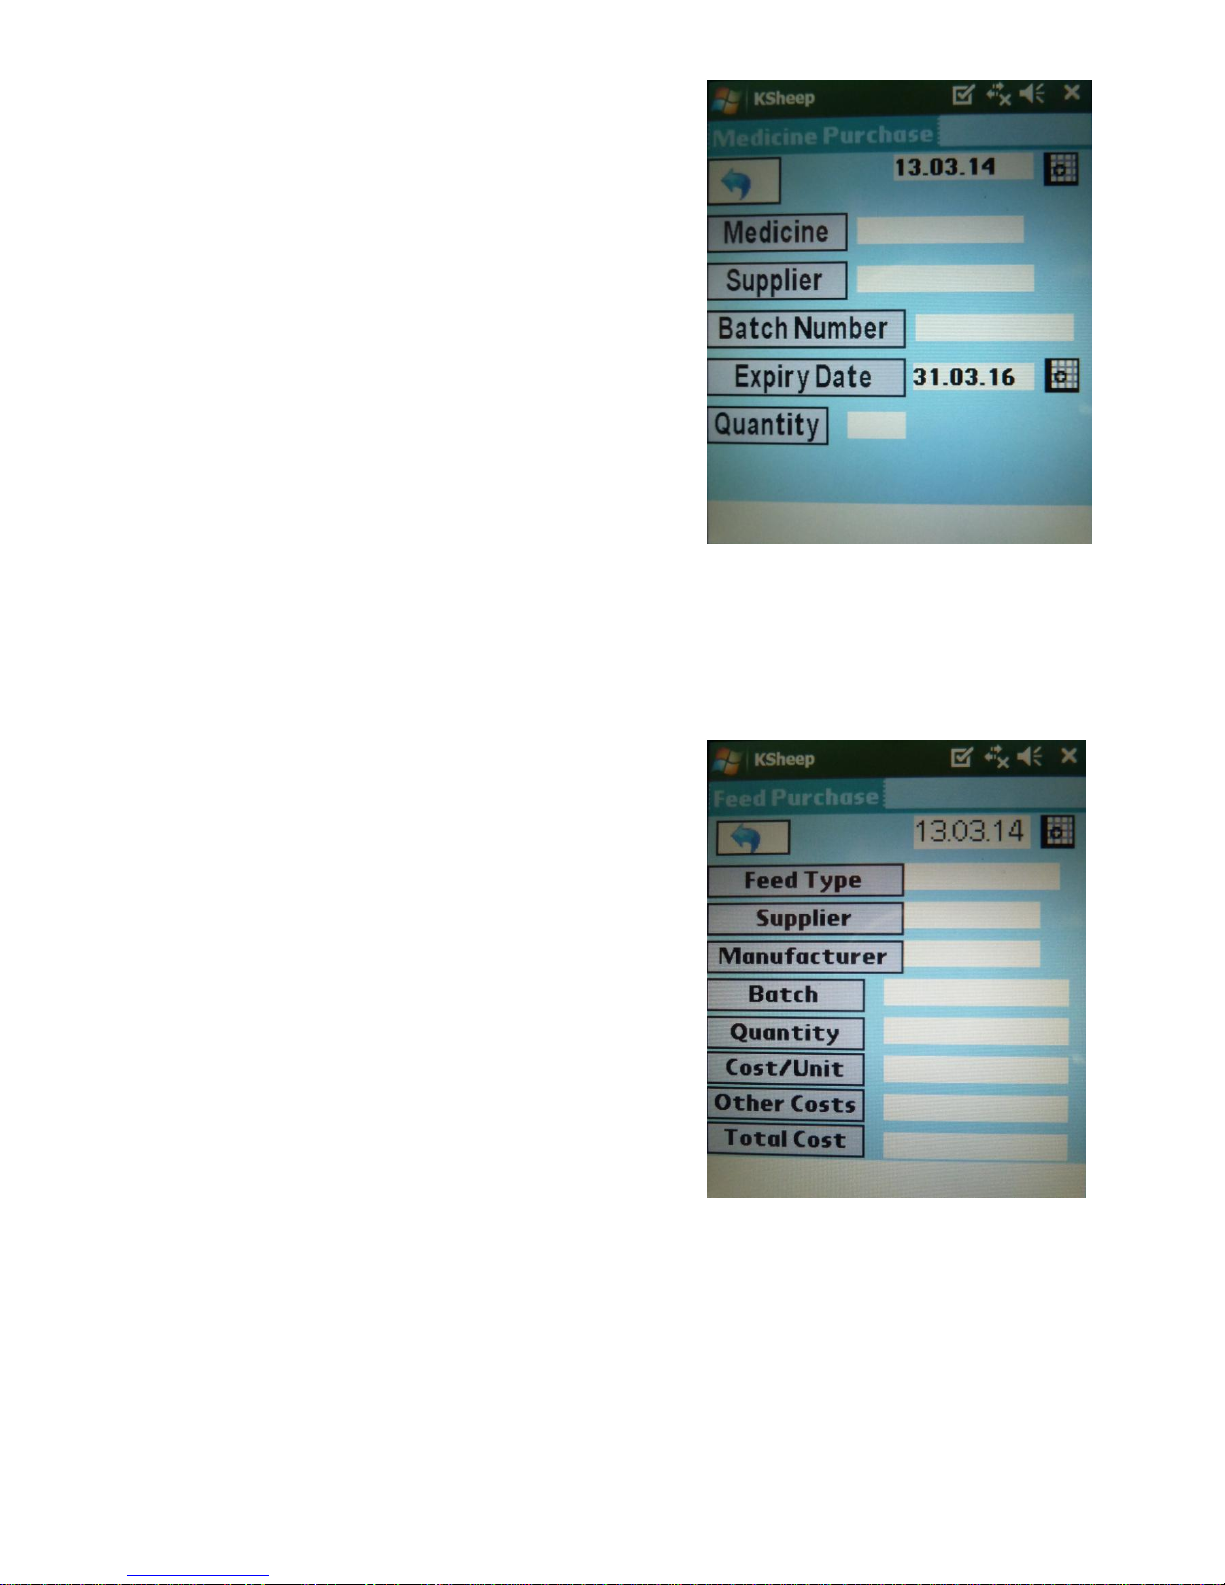
6b. Drug Purchase
Enter the date of the drug purchase and add the rest
of the details as appropriate
Tap Save and Exit
*Note – Suppliers will have to be added in the PC
Software then synchronised so that they are available
in the PDA.
6c. Feed Purchase
Enter the date of the feed purchase and add the rest
of the details as appropriate
Tap Save and Exit
*Note – Feed Types, Suppliers and Manufacturers will
have to be added in the PC Software then synchronised
so that they are available in the PDA.
Page 26
26
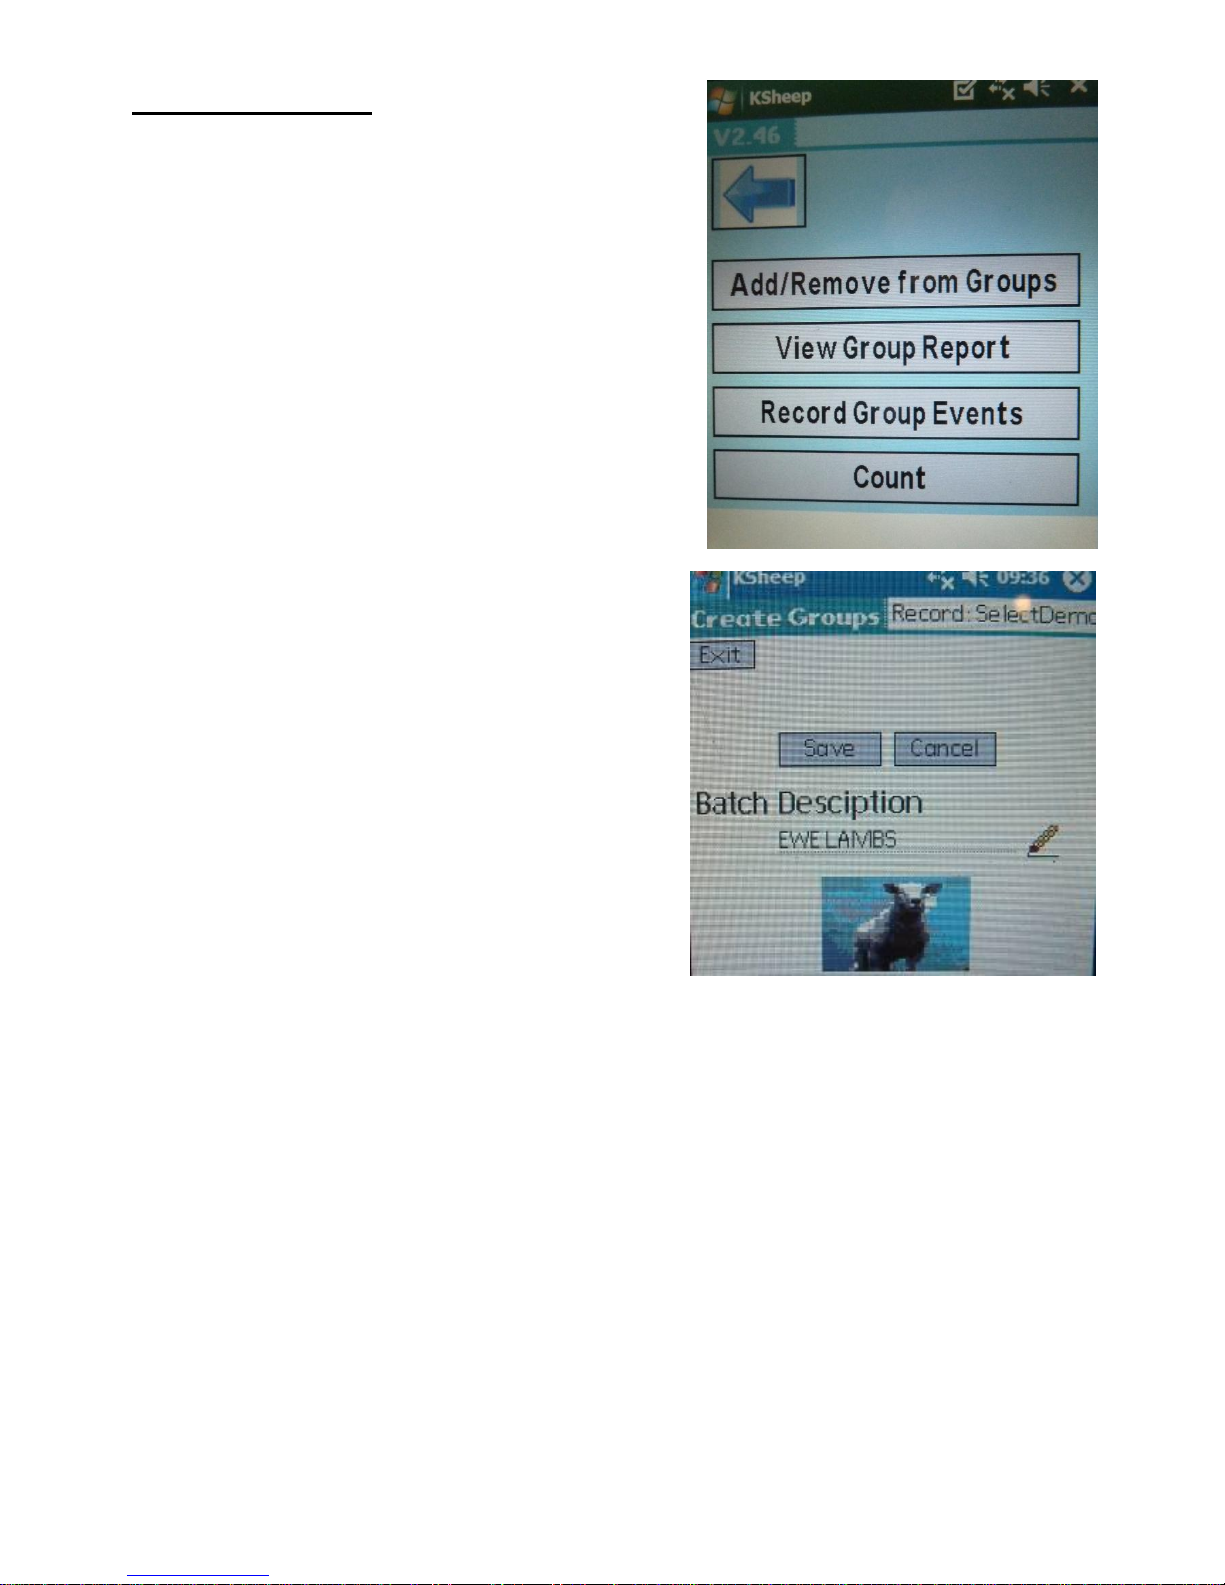
7. Group Events
It is possible to create groups, add animals or
remove animals from a group, view a group report
and record an event for a whole group of animals
within the PDA program. The main group events
screen looks like this.
7a (i). Create/edit Groups - Batch
To create a batch group simply tap Create/Edit
groups and choose batch. Then tap the Add
button, followed by the pencil icon to enter a name
for the group and tap Save. You can change the
name of a group by tapping Edit or Remove a group
by tapping Delete. Use the Arrow buttons at the
top of the screen to scroll through each group you
have created.
7a (ii). Create/edit Groups – Feed Groups
To create a batch group simply tap Create/Edit groups and choose Feed groups. Follow
the instructions as above for Batch groups.
Page 27
27
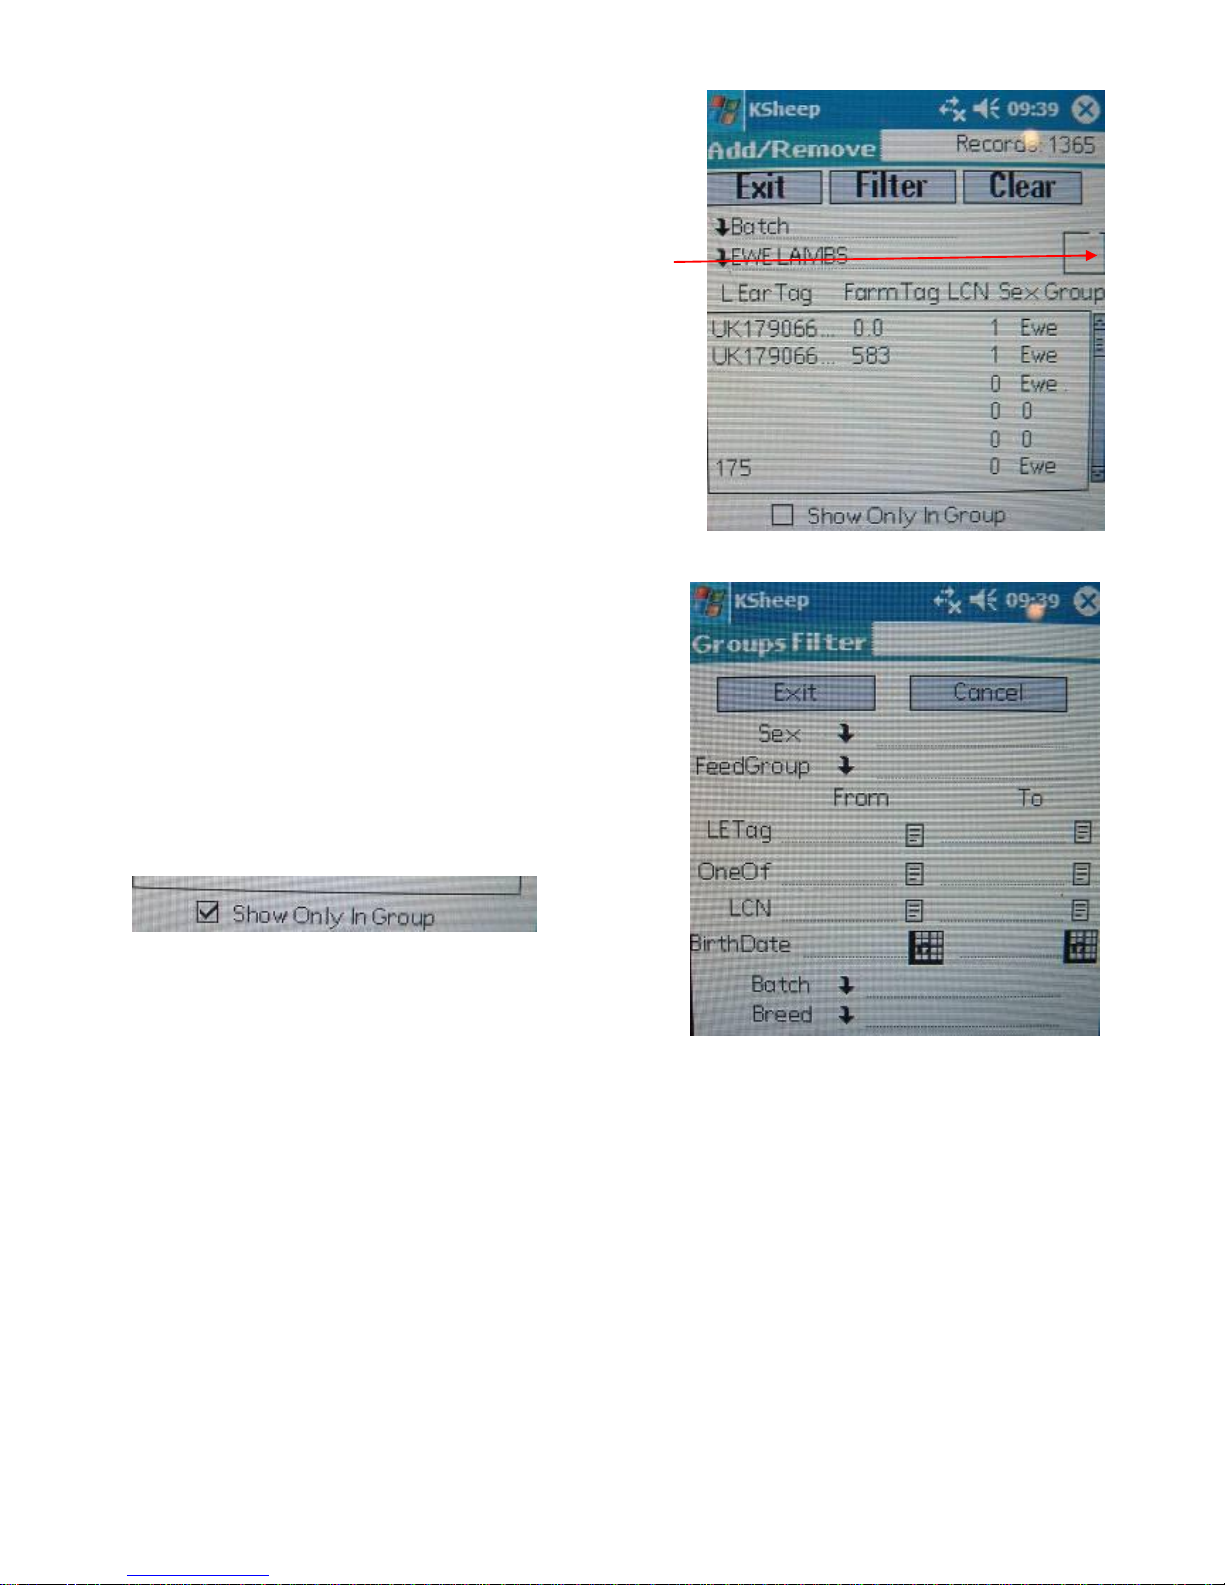
7b. (i) Add Remove from Groups – Batch
To add animals to a batch group tap Add/Remove
from groups, then tap Batch and choose which batch
you wish to add animals to e.g. Ewe Lambs.
Now search for animals by tapping the search button,
locating the animal, tapping it once and a Y will
appear beside it in the group column.
Alternatively read each tag with the trigger/yellow
button and the animals will be added to the group.
You can also narrow your search by using the filter
option which allows you to filter by sex, feed group,
Left Ear Tag (from, to), one of (from, to), Lamb
Crop Number (from, to), Birth Date (from, to)
Batch and Breed.
Tap Apply Filter when you have made your choices.
To see the animals you have added to the group, tick
the box shown below
If you have added an animal into a group by
mistake, either tap it or read its tag again and
you will be asked if you want to remove it from the
group and the Y will be removed.
Tap the Exit Button when you have added all the animals you wish (any with a Y in the group
column)
7b. (ii) Add Remove from Groups – Feed Groups
To add animals to a feed group tap Add/Remove from groups, then tap Feed groups and
choose which batch you wish to add animals to e.g. Rams. Follow the instructions as above
for Batch groups.
Page 28
28
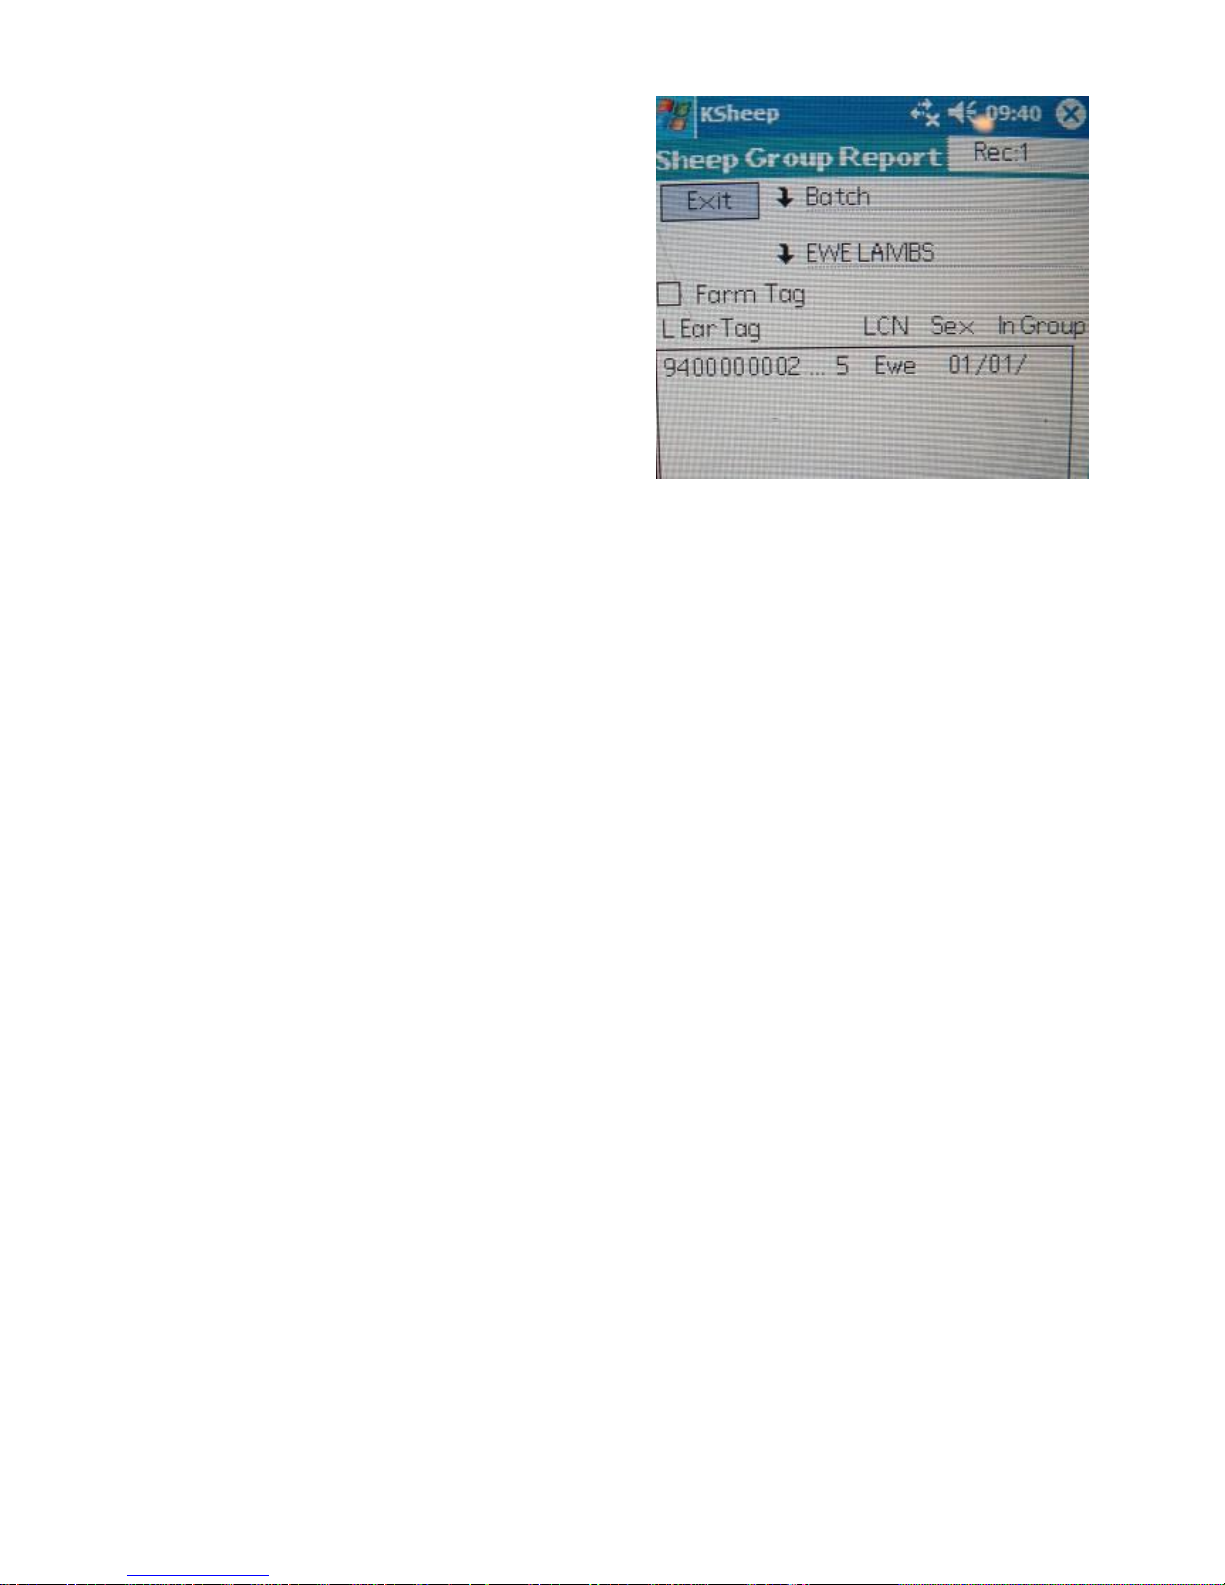
7c. (i) View Group Report – Batch
To view a report of any batches you have
created tap View group report then Batch and
choose the batch to view. You can display either
the animals Farm tag or Left ear tag by ticking
the appropriate box. A list of the animals with
their tag number, Lamb Crop Number, Sex,
and Date added to group is displayed.
A record count is displayed at the top right (i.e.
the number of animals in the group)
7c. (ii) View Group Report – Feed Groups
To view a report of any feed groups you have created tap View group report then Feed
Group and choose the group to view. You can display either the animals Farm tag or Left
ear tag by ticking the appropriate box. A list of the animals with their tag number, Lamb
Crop Number, Sex, and Date added to group is displayed.
A record count is displayed at the top right (i.e. the number of animals in the group)
Page 29
29
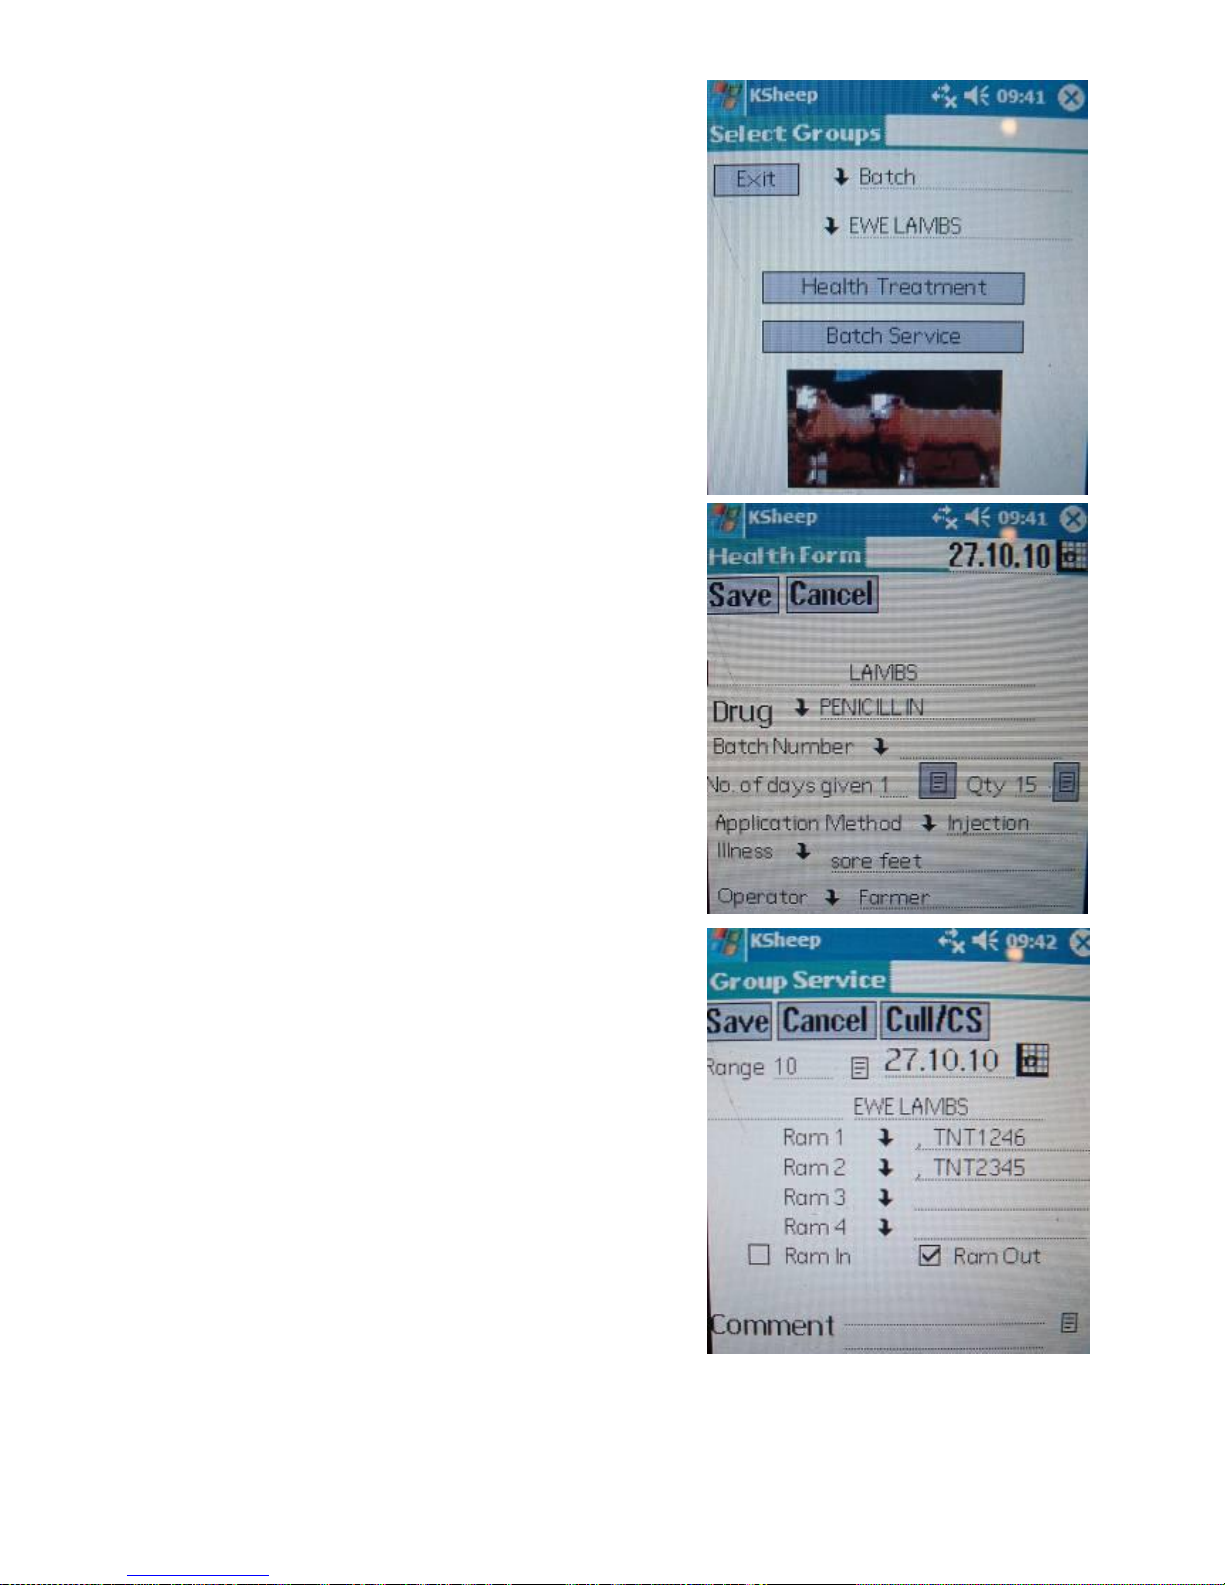
7d. (i) Record Group Events – Batch
You have the option to apply an event such as a Health
Treatment or a Batch service to a group of animals.
Tap record group events and choose batch. Pick which
batch to apply the event to.
Health Treatment – Choose the Drug and its batch
number from the drop down lists. Enter the number
of days given and quantity given. Choose the
Application method, illness and operator from the
drop down lists as appropriate.
Tap Save and Exit.
Batch Service - The Range is the number of Days
the ram was in with a group of ewes.
You must choose if the date is the date the ram went
in or the date the ram came out by ticking the
appropriate box.
Enter the Ram or Rams used by picking them from
the drop down list/s.
You can enter a Cull/CS at this time if you wish.
Enter a comment if you wish. Tap Save.
7d. (ii) Record Group Events – Feed
Groups
You have the option to apply an event such as a Health Treatment or a Batch service to a
group of animals.
Tap record group events and choose feed groups. Pick which feed group to apply the event
to. Follow the instructions as above for Batch groups.
Page 30
30
8. Reports
Choose Reports and a list of reports will be
shown
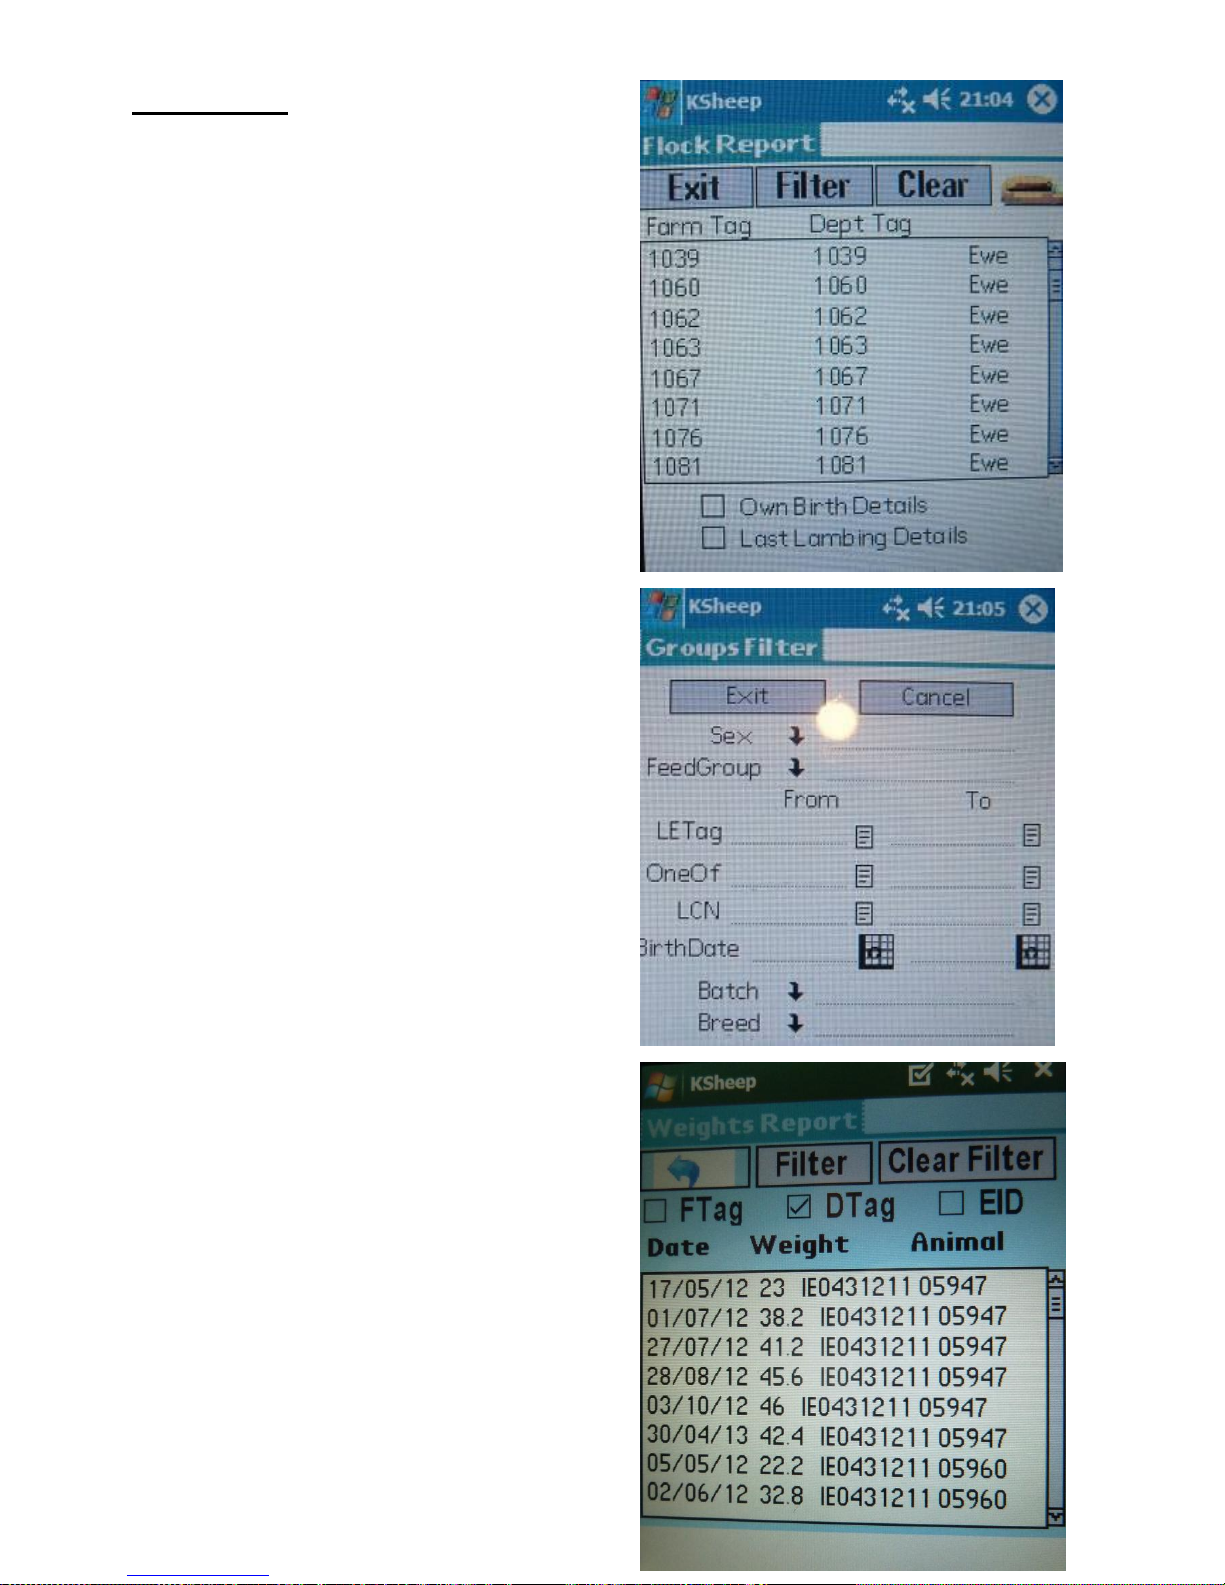
8a. Flock Report – displays a list of animals
currently in the flock with Farm Tag, Dept Tag
and Type. Use the scroll bar to move up or
down the list. To view Own Birth Details or
Last Lambing Details tick the relevant box.
You can filter the flock report by tapping the
Filter button.
This allows you to filter by sex, feed group, Left
Ear Tag Number (from, to), One of (from, to),
Lamb Crop Number (from, to), Birth Date (from,
to), Batch and Breed.
Once you have made your selection tap Apply
Filter.
To clear the filter Tap Clear.
8b. Weights Report – displays the date,
weight and Tag Number of any weight
recording events.
You can also filter weights in a similar way to the
flock report (see above)
Page 31
31
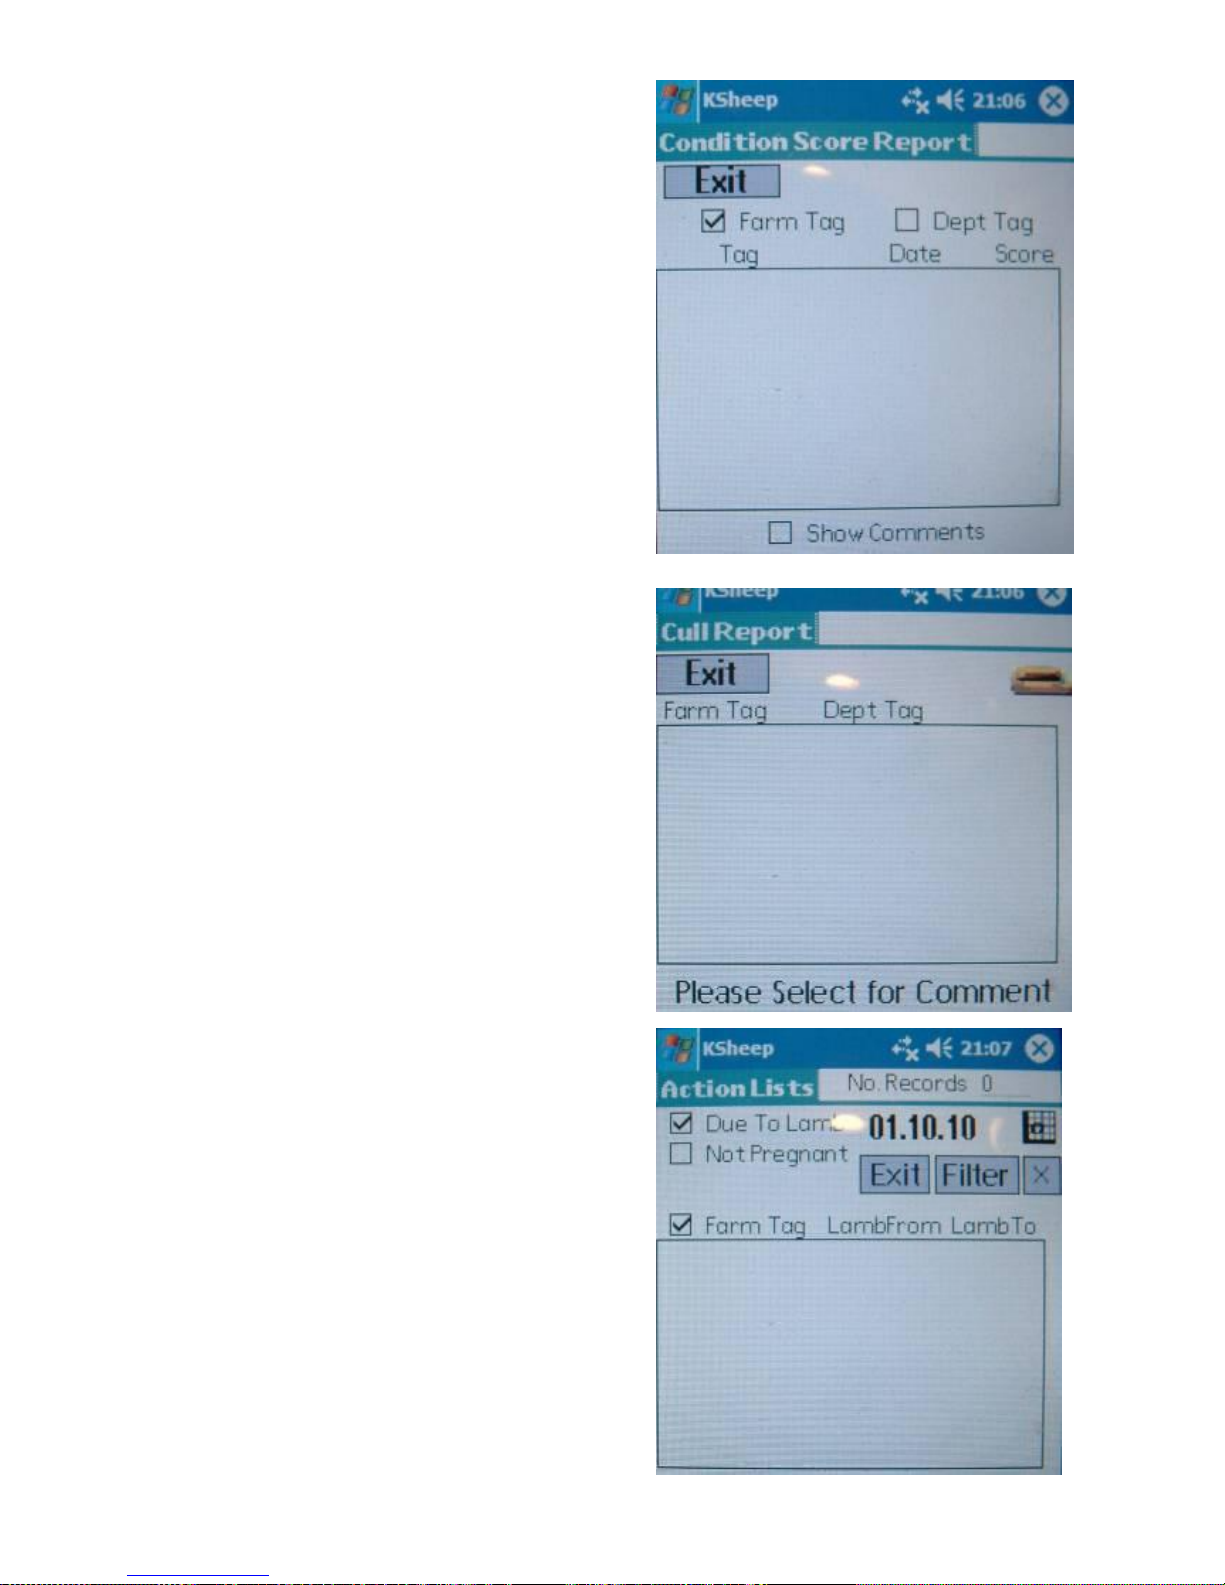
8c. Condition Score Report – displays the
Tag, Date and Score of any condition score
recordings, sorted either by Farm tag or Dept
Tag.
If a comment has been recorded tick the Show
Comments box to display.
8d. Cull Report – displays the Farm Tag
and Dept Tag of any animals which have been
culled. Tap each animal to see the comment
entered.
8e. Due to Report – displays the Farm Tag,
Lamb From and Lamb to for Due to Lamb ewes
or the Farm Tag for ewes not pregnant.
Tap the calendar button to change the date
ewes are due to lamb before.
You can also filter action lists in a similar way to
the flock report (see above).
Page 32
32
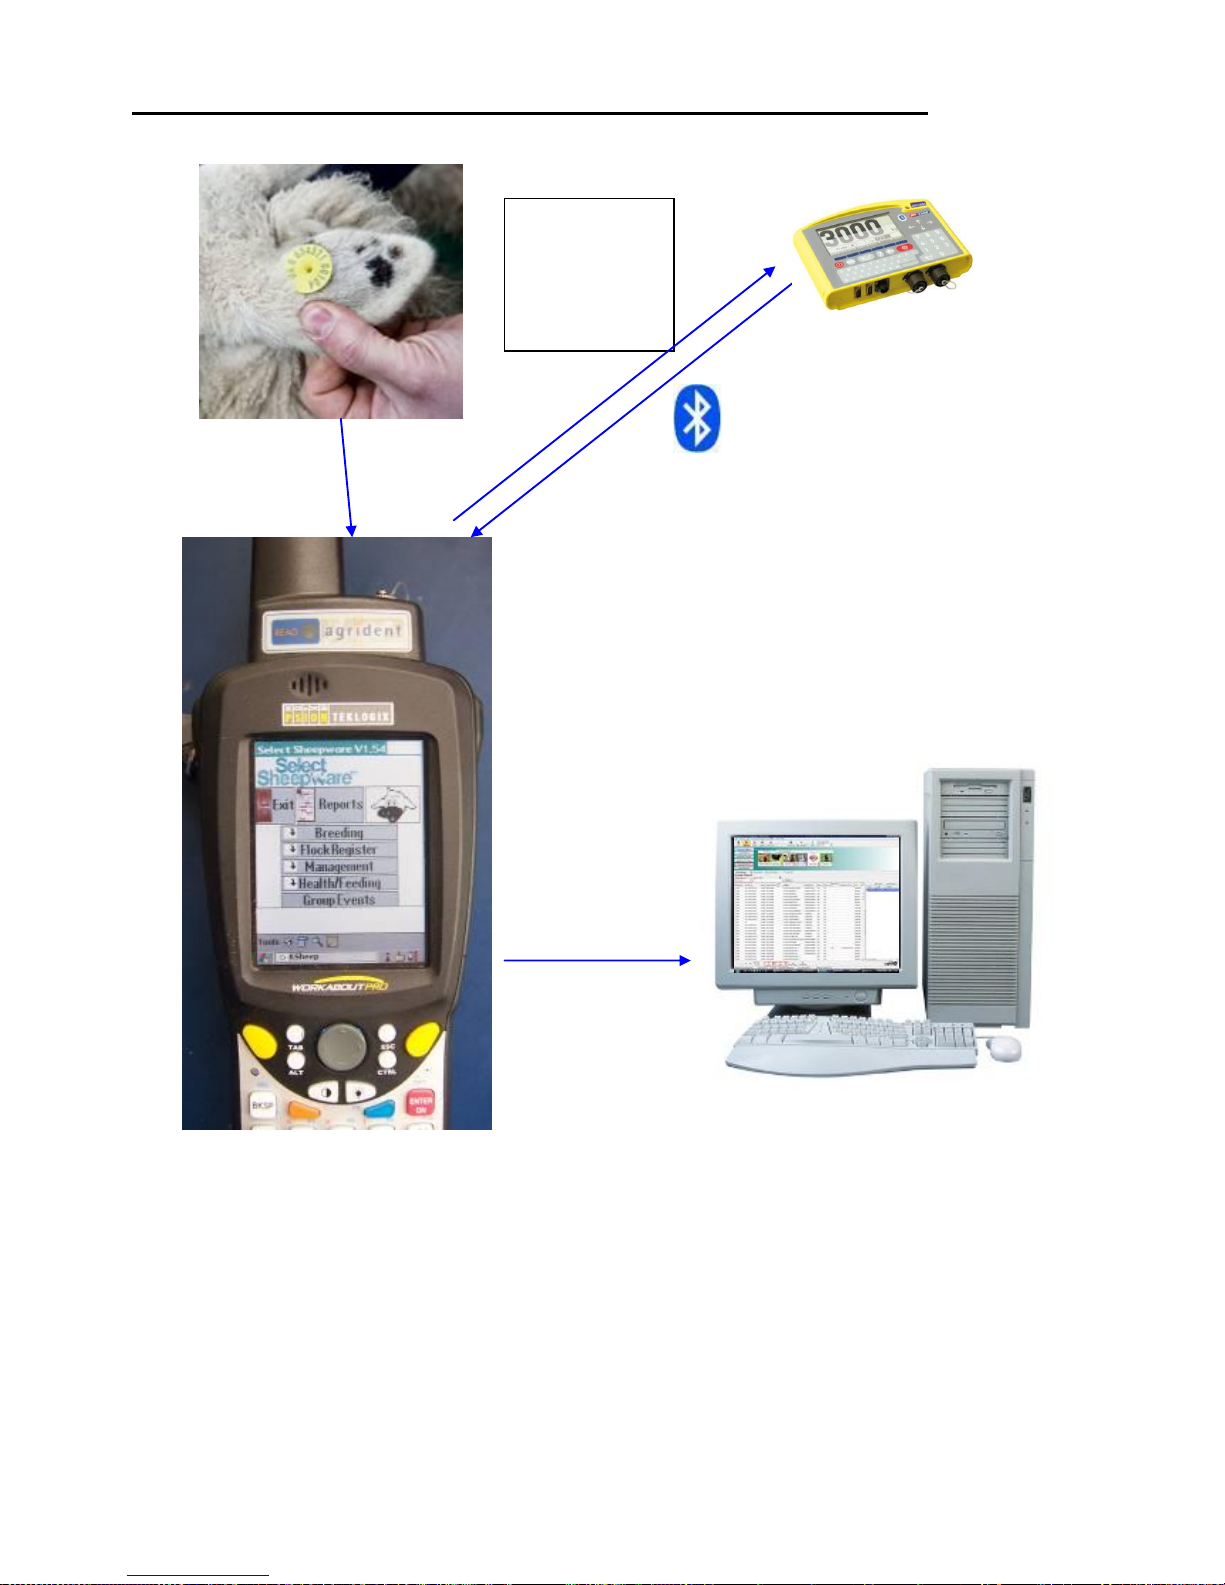
9. Bluetooth Weighing - Basic Principle of Operation
2
1
3
1. Agrident read head reads EID Tag into Psion
2. a: Weigh Scale sends weight to Psion via Bluetooth
b: Psion has option to send EID numbers to Weigher (see Key Controller p8)
3. All saved weights can then be sent to the main PC software for analysis
You can now
send EID
numbers to
the weigher
via Bluetooth
Page 33
33
10a. Setting up Psion for Bluetooth Weighing
You will need 2 items of software running on your Psion
1. Key Controller Application (see start)
2. Select Sheepware PDA Program
The Key Controller Application must be running in the background in order that
the trigger/yellow buttons on the reader will scan a tag and/or send a weight
properly.
The Key Controller Application uses Bluetooth to connect the Weigh Scale to the
Psion. (Make sure Bluetooth is turned on, on both the weigher and the Psion).
Animal Weights can then be sent to the Psion without having to type any
information.
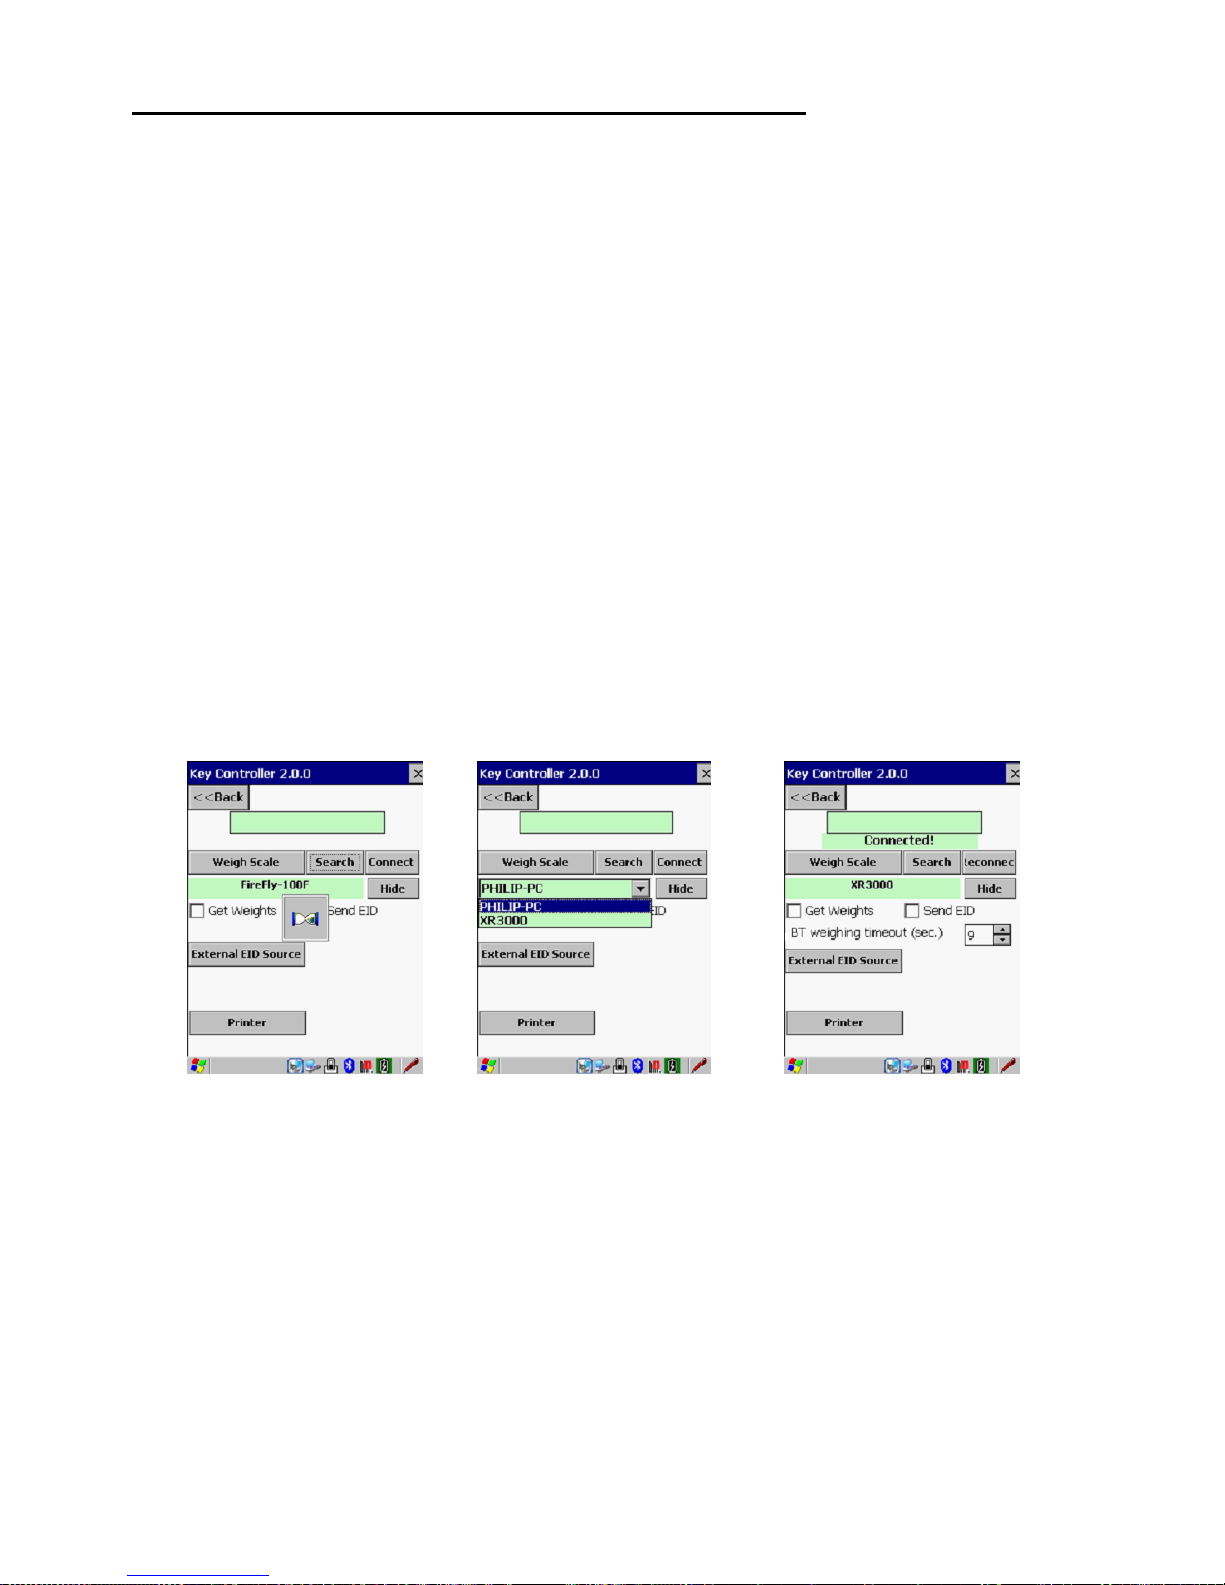
In the Weigh Scale Type screen of Key Controller, firstly choose your Type of
Weigher and then in the Set Scanning Buttons screen set a key you wish to
use to request a weight. Next, in the Bluetooth tab, Tap Search to find nearby
devices, choose the appropriate weigher from the drop down list and tap
Connect.
Searching for a device....
Found devices...
Connected to a device
Now rather than having to type in weights manually, pressing the button you
have chosen on the Psion to request a weight, will automatically bring the weight
into the animals record card, making the process very fast and error free. More
advanced users may wish to use the weigher’s auto-drafting option to move
animals in a specific weight category into a separate pen e.g. lambs heavy
enough to be sold.
Kingswood Sheep PDA Program, running on any Windows Mobile Device, saves all
the weights recorded, which can then be synchronised with the main PC software
with one mouse click. Flock analysis can then be carried out using the extensive
reports section.
Page 34
34
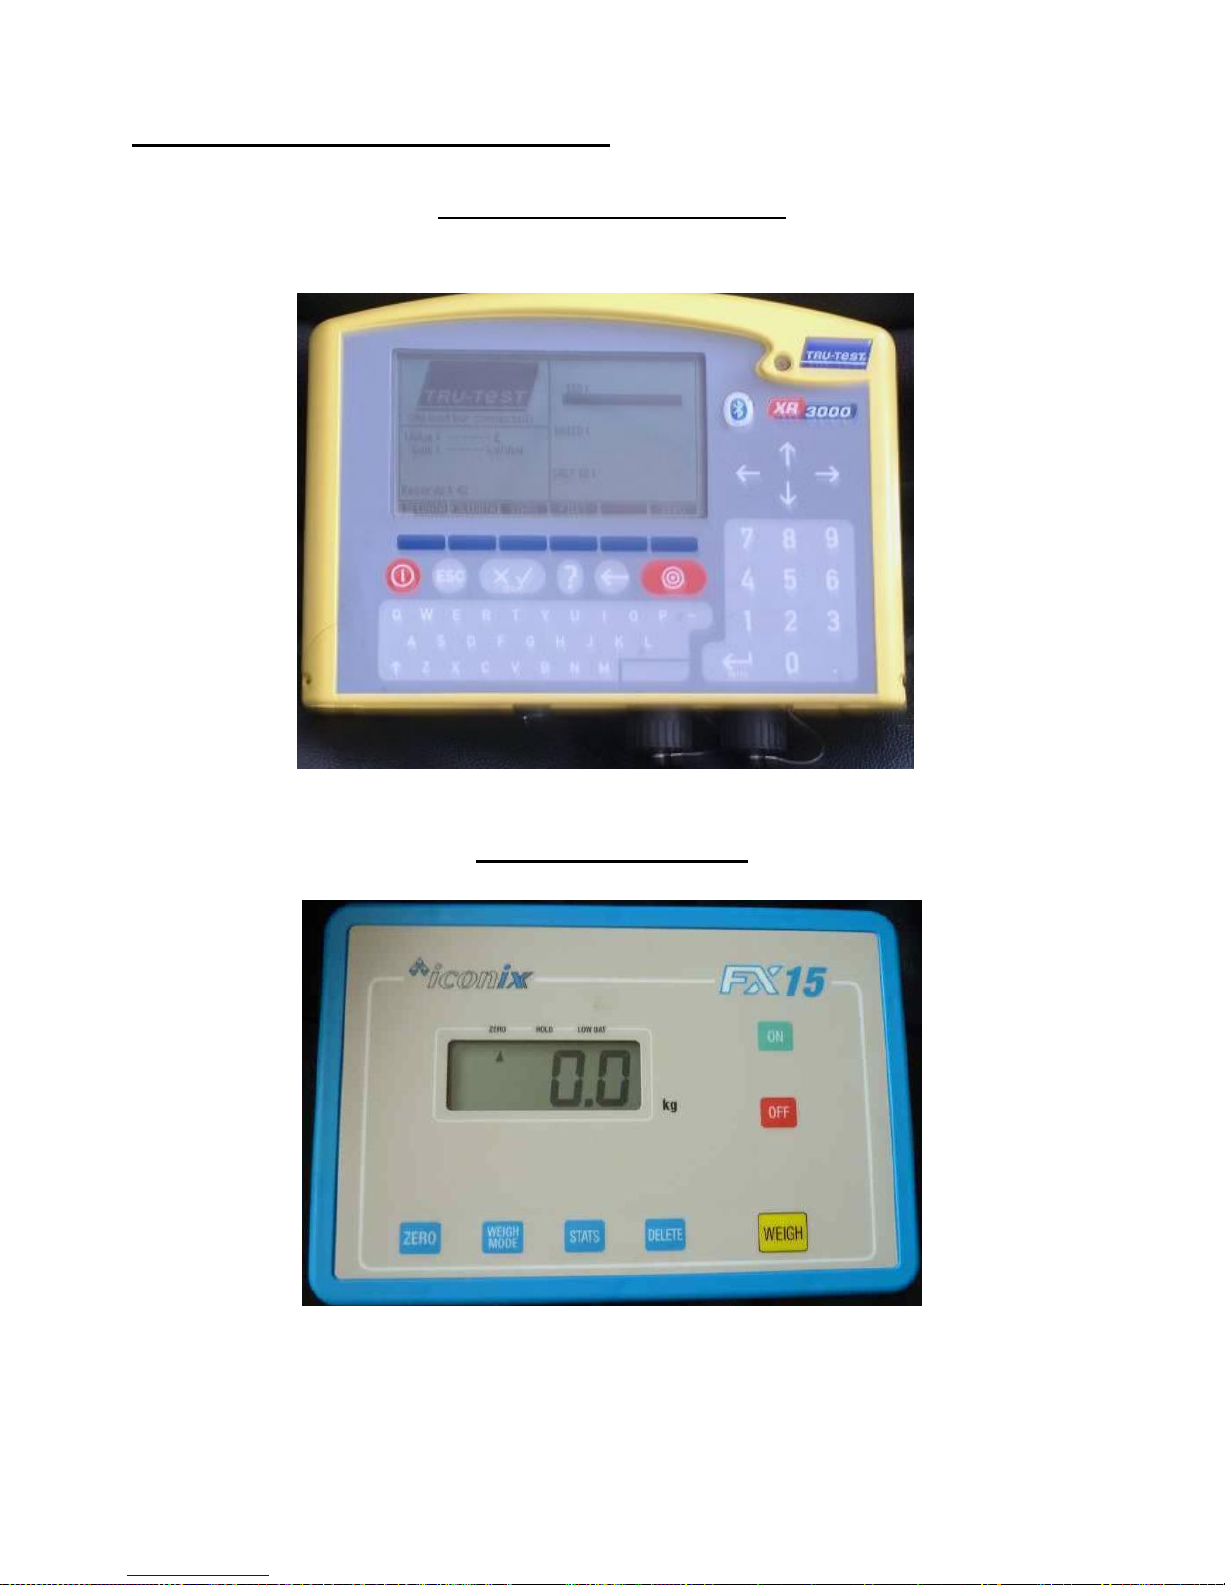
10b. Examples of Weigh Scales
(e.g. Tru-Test XR3000)
(e.g. Iconix FX15)
Page 35

35
Weighing in Select Sheepware with Bluetooth weigher
1. Tap Management, Tap Weighing
2. Press the Right Trigger Button (or whatever button you use to read
tags) on the Psion
3. The EID will pop into the Psion and the animal it is linked to will be
located
4. Press the Left Trigger Button (or Right if you have set it up to use
the same button)
5. The Weight from the weigh scale will pop into the Psion
6. Tap Save
Page 36
36
11. Synchronizing with Kingswood Select Sheep Software
Select Sheepware.exe
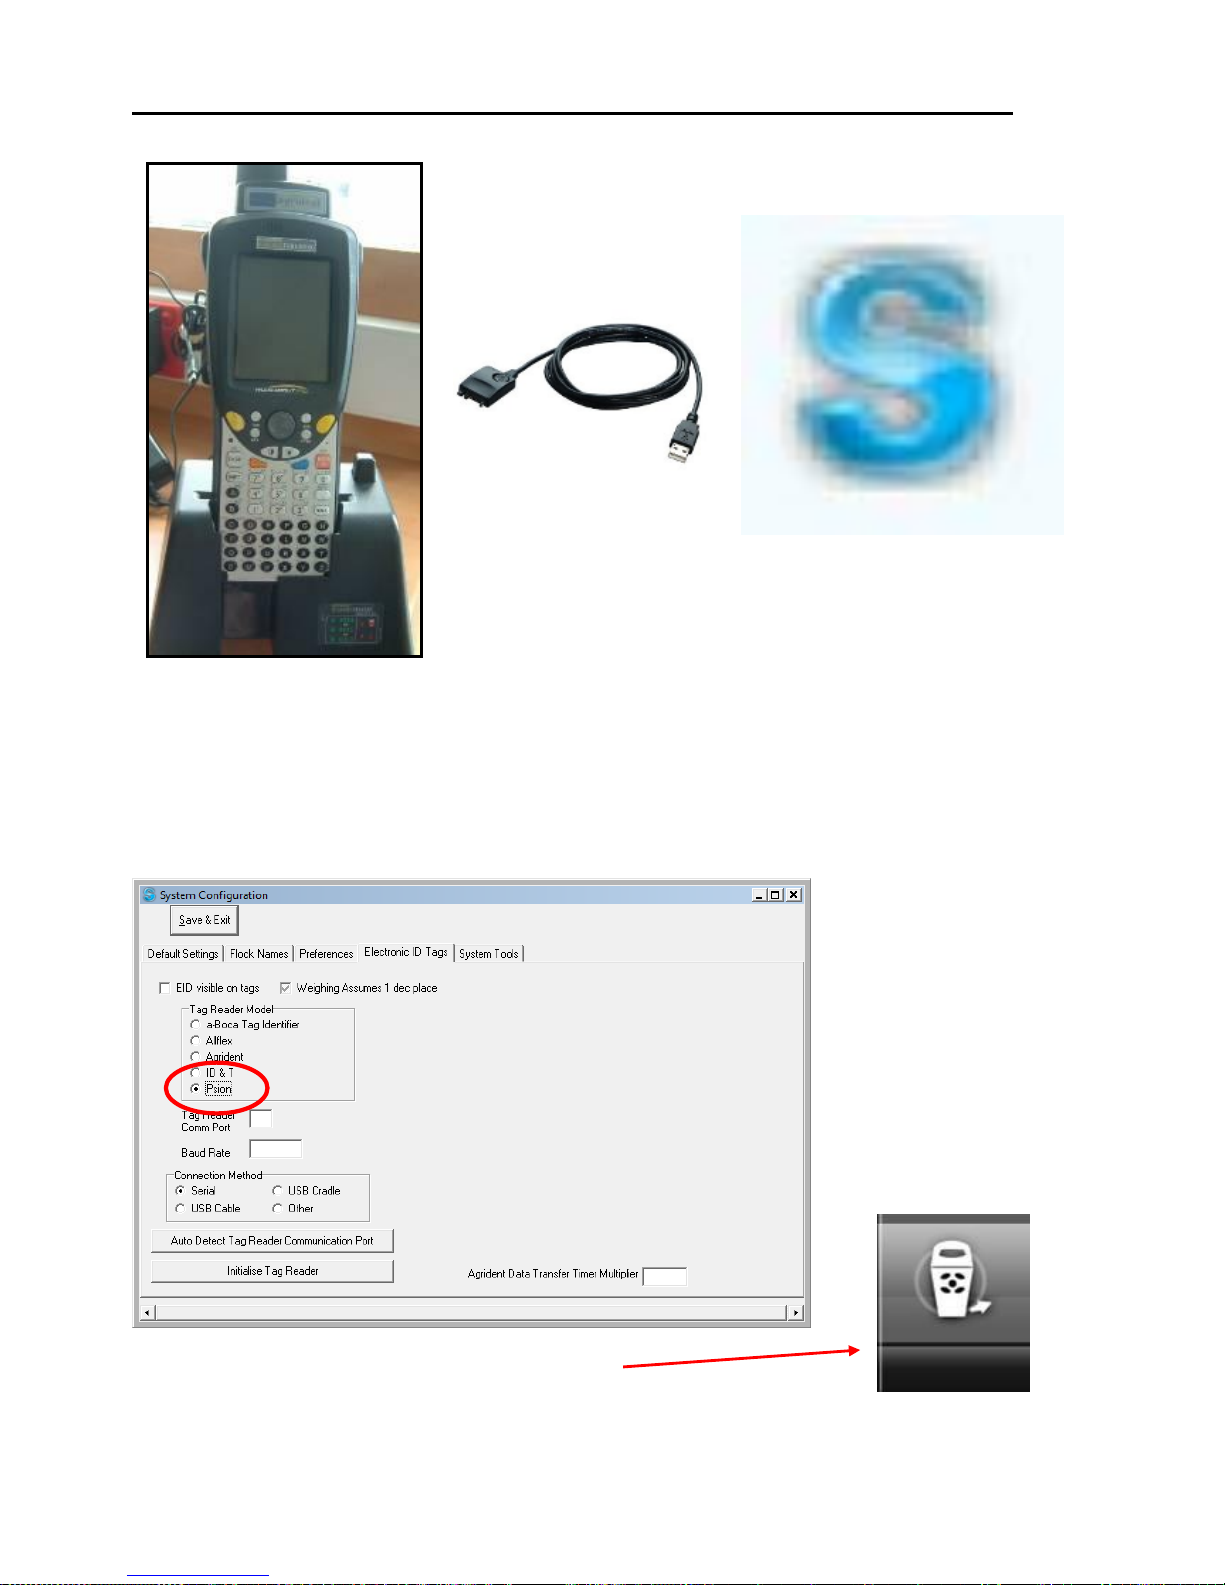
Connect the Psion to the computer using the docking station and cable
Click the Select Sheepware icon on your Desktop, click Start program. Click
on System, Default Settings, Electronic ID Tags and set Tag Reader Model
to Psion.
Click on EID Tab, then Sync Handheld
When you see “Synchronizing data, please wait” and it appears for more than 5
seconds you can be sure that the process is working correctly.
Page 37
37
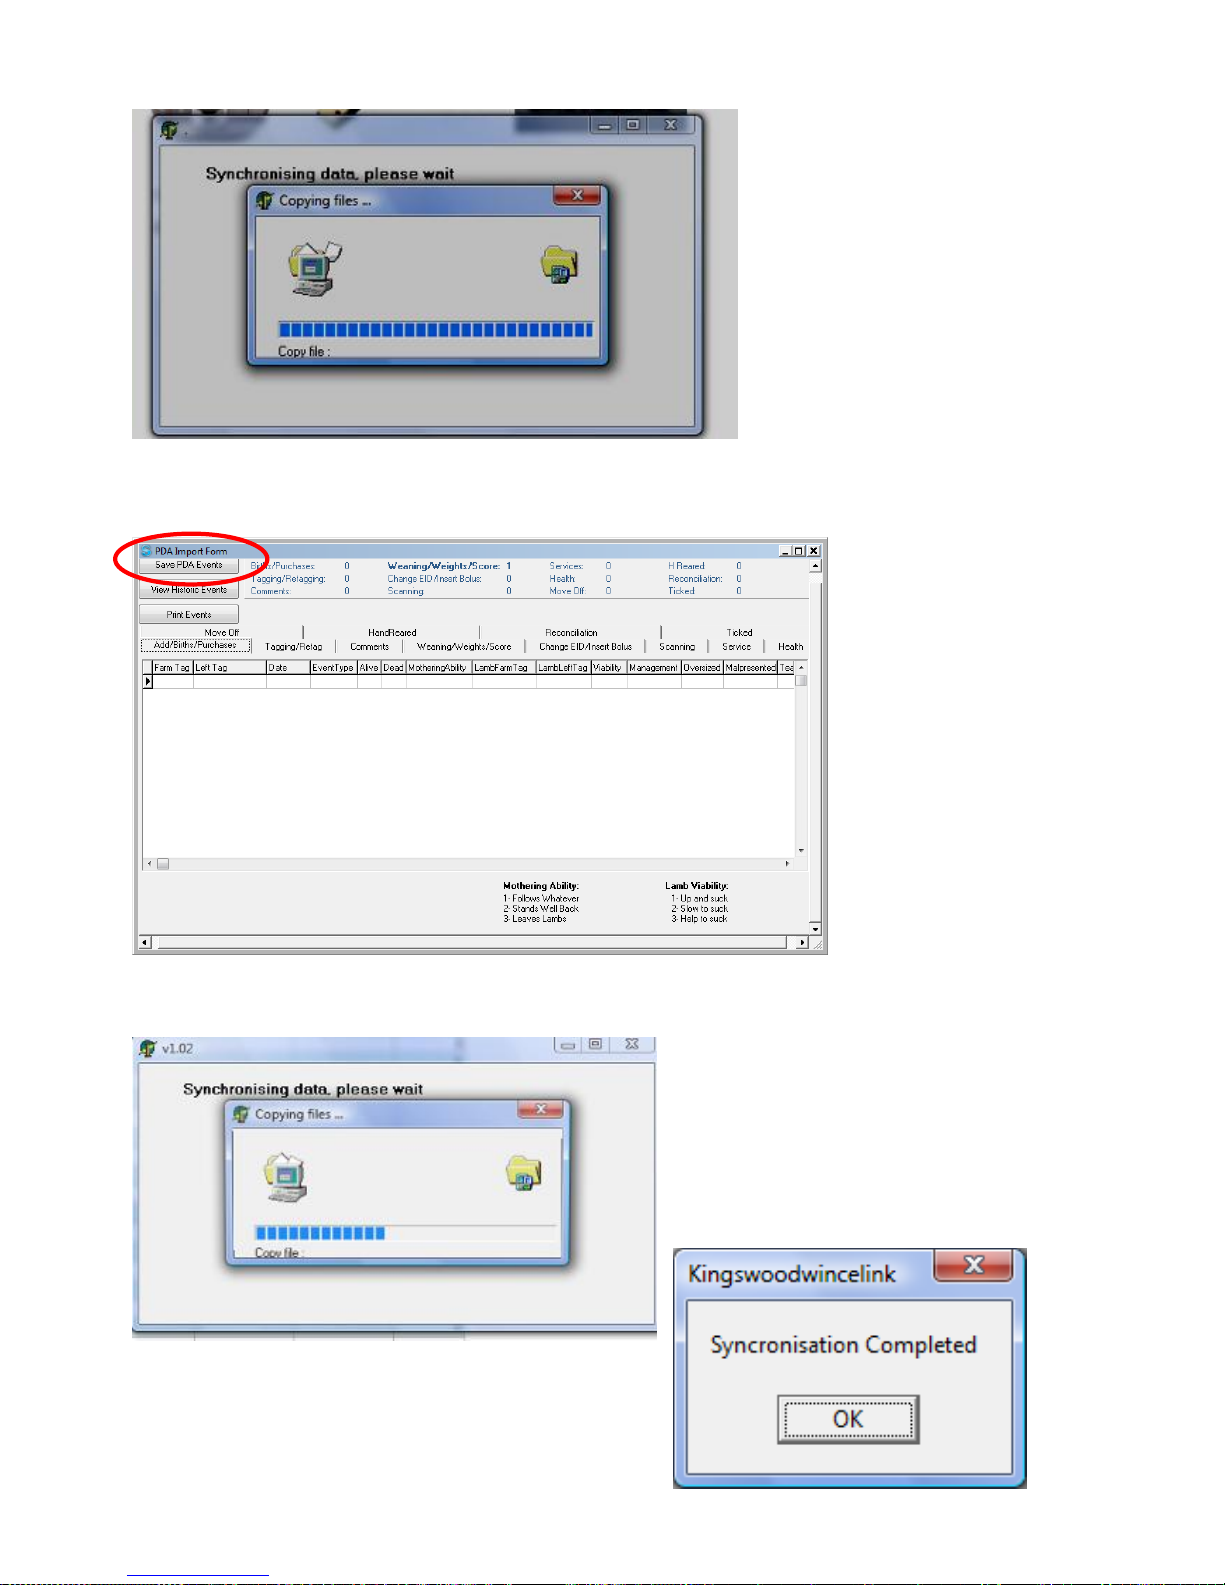
Click Save PDA Events
Wait until synchronizing completes…..
When complete you will get a confirmation
Changes have now been saved.
Page 38
38
12. Guide to using TGM Remote Control Support
Many computer problems are easily repaired by adjusting the software settings.
This could sometimes be done over the phone, or it sometimes required an onsite
visit by a TGM technician.
Since 2005, TGM Software Solutions has been able to offer customers an
alternative service! We now have the option of utilising Remote Desktop, a tool
which can allow us to operate our customers’ computer systems over the internet
from our office.
Please note: this system is secure, we can gain access only when a customer
permits us and, whenever remote control is established, the customer can
disconnect us at any time. To allow us to connect to your PC to resolve technical
issues:
This system is called Team Viewer, and is free for Personal Use. You are best
to install Team Viewer onto your PC the first time, which will make subsequent
support sessions much faster.
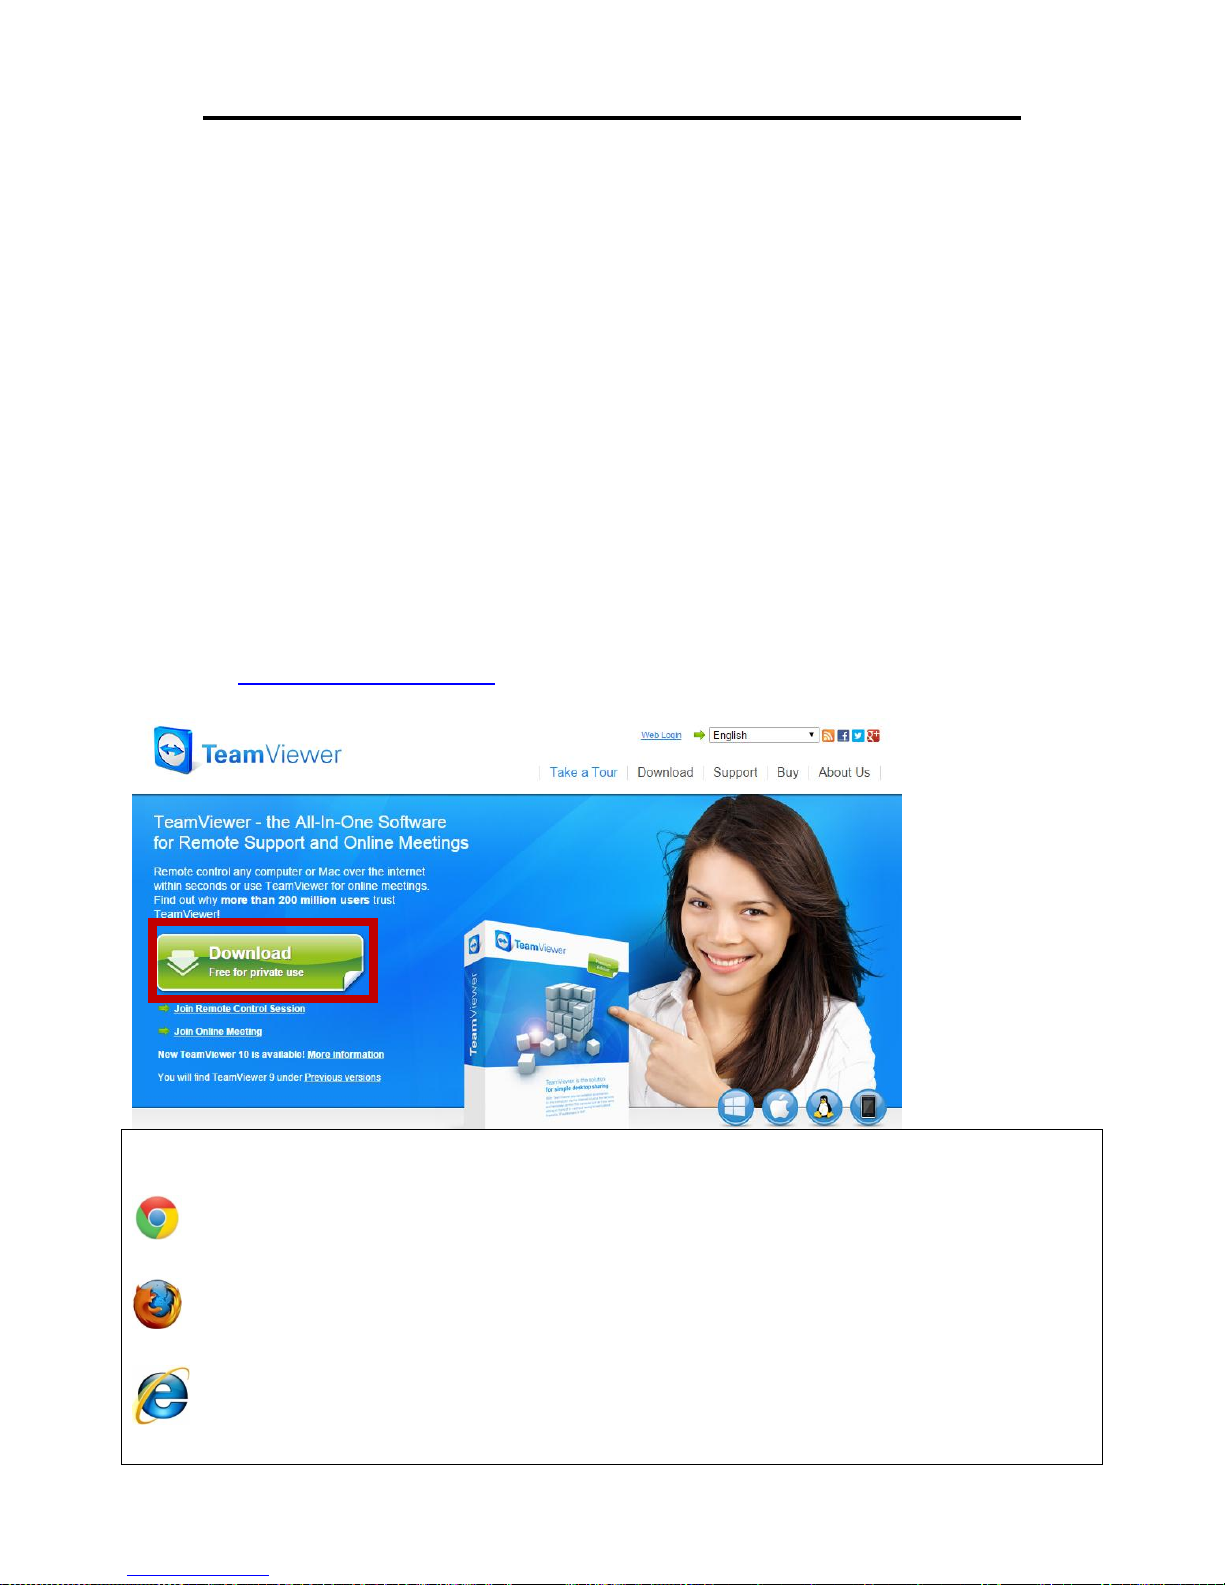
Go to www.teamviewer.com and click the big green button which says
‘Download – Free for private use’, then click Save.
Depending on what Internet Browser you are using, the saving procedure is
slightly different.
Google Chrome shows the saved file across the bottom left of the screen.
Click on it to run the file.
Mozilla Firefox default saves to the Downloads folder. Double click the file
inside this folder to run it.
Internet Explorer also saves to the Downloads folder. Double click the file
inside this folder to run it.
Page 39
39
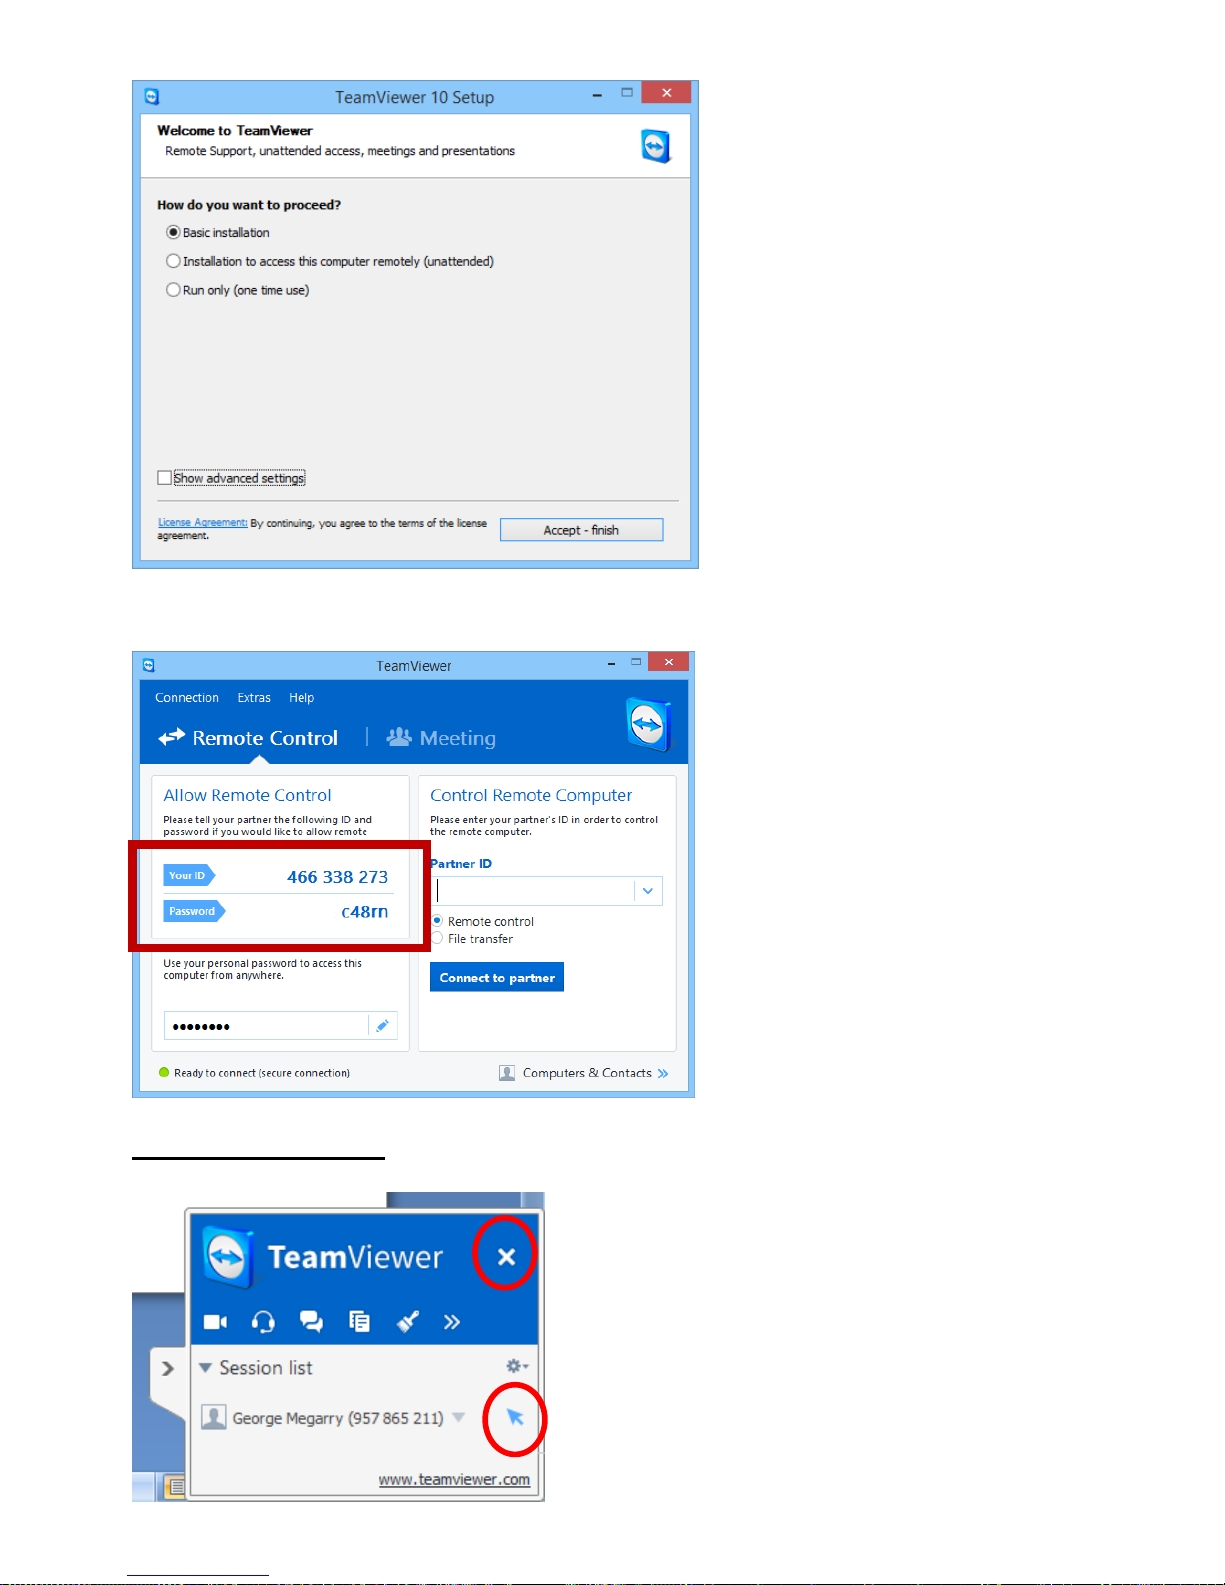
Choose ‘Basic Installation’
and below (if asked) choose for
‘Personal – non commercial
use’, then click ‘Accept and
Finish’.
When Team Viewer has installed,
this screen will show your
unique ID number and
password which you must give
to the TGM Technician and
within a matter of seconds we
will be able to see your screen
and control your mouse and
keyboard.
To Disconnect TGM
To stop the connection, Click on the Close
Connections button (white X) at the bottom
right of the dialogue box, or you can Pause
the Remote Control by clicking the
Alloy/Deny button (blue arrow).
Page 40
40
You can read and save this manual online at:
www.tgmsoftware.com/pdfs/PsionWorkAboutProInstructionManualSheepWithEIDController.pdf
TGM Software Solutions Ltd
31 St John’s Road
Hillsborough
Co Down
BT26 6ED
 Loading...