

TGB X-MOTION 250 User Manual

DEAR USERS :
WE WOULD LIKE TO INFORM YOU THAT UNDER OUR STRICT QUALITY CONTROL
SYSTEM FOR THE PRODUCTION OF OUR SCOOTERS, WE OFFER A COMPLETE
GUARANTEE AS INDICATED IN THE GUARANTEE BOOKLET ISSUED BY OUR TGB
DEALER. OUR SCOOTER MUST UNDERGO ALL PERIODIC MAINTENANC E AND
SERVICES BESIDES, ORIGINAL SPARE PARTS MUST BE USED. IN CASE OF DEFECTS IN
STRUCTURE OR PART MATERIALS PRODUCED, ASSISTANCE IS OFFERED AT FREE OF
CHARGE UNDER VALID WARRANTY. THE ABOVE-MENTIONED GUARANTEE IS NOT
VALID UNDER THE FOLLOWING CONDITIONS:
THE DESIGNATED LUBRICATING OIL IS NOT USED.
MAINTENANCE OR REPAIR IS NOT CARRIED OUT IN THE APPROPRIATE MANNER.
UNGUARANTEED PARTS ARE UTILIZED AND MODIFICATIONS TO THE ORIGINAL
DESIGN ARE CARRIED OUT.
INSTRUCTIONS IN THE OW NER‘S MANUAL ARE NOT PROPERLY FOLLOWED.
PARTS SUBJECT TO NORMAL WEAR SUCH AS THE SEAT, SPARK PLUGS, ELECTRIC
BULBS AND CABLES.... ETC.,ARE NOT COVERED BY GUARANTEE.
THIS MANUAL IS A GUIDE FOR THE OPERATION INSPECTION AND BASIC MAINTENANCE
OF THIS SCOOTER. IF YOU HAVE ANY FURTHER QUERIES PLEASE CONTACT THE TGB
DEALER, WHO WILL BE READY TO HELP YOU OUT AT ALL TIMES.
WARNING:
PLEASE USE SAE 10W -40 API SH/CE OR SG/CC GRADE LUBRICANT OIL TO REFILL
THE ENGINE, OTHERW ISE, THE ABOVE MENTIONED GUARANT EE IS NOT VALID.

1. CONTENTS
1. Contents ....................................................................................................................... 1
2. Control Location ........................................................................................................... 3
3. Before Riding ............................................................................................................... 4
4. Safe Riding .................................................................................................................... 4
5. Driving ........................................................................................................................... 5
6. Use Genuine Spare Parts ............................................................................................. 5
7. Use of Each Component ............................................................................................... 6
Gauges
.................................................................................................................…......... 6
Operation of Ignition Switch
.......................................................................................…...…..8
Use of Buttons
...........................................................................................................….... 9
Saddle Lock
....................................................................................................................….. 12
Storage Box
....................................................................................................................….. 12
Pillion Step
.....................................................................................................................…... 12
Fuel Tank Cap
.............................................................................................................…. 13
Frame Number
............................................................................................................….. 13
Brake
.........................................................................................................................….…14
8. Important Points and Cautions for Starting Engine .................................................… 15
9. The Best Way to Drive off ........................................................................................ 16
The Control of Throttle Valve Handle
............................................................................… 16
Parking Method
...........................................................................................................… 16
10. Inspection and Maintenance before Riding .............................................................… 17
Routine Inspection
.......................................................................................................… 17
Engine Oil Inspection and Change
.................................................................................… 17
Fuel Inspection
..........................................................................................................…. 18
Transmission Oil Inspection and Change
........................................................................… 18
Inspection and Adjust ment of Brake Free Play
................................................................... 19
Disc Brake Inspection
..................................................................................................... 19
Throttle Valve Handle Clearan ce Adjust ment
..................................................................... 20
Inspection and Mainten ance of Battery
.............................................................................. 21
Tire Inspection
............................................................................................................... 22
Steering Handle Front Shock Absorbers Inspection
............................................................. 22
Rear Cushion Hardness Setting
....................................................................................... 23
Checking and Changing Fuses
......................................................................................... 23
Checking the Turn Signal Lights and Horn
......................................................................... 23
1

1. CONTENTS
Checking the Front and Rear Lights
.................................................................................. 24
Checking the Brake Light
................................................................................................. 24
Checking for Fuel Leakage
.............................................................................................. 24
Checking the Lubrication of Body’s Various Mechanisms
..................................................... 24
Checking the Spark Plug
................................................................................................. 24
Cooling system inspection
............................................................................................... 25
Replenishment of coolant
................................................................................................ 25
A reference table for anti-fr eeze concentratio n percentages under different temperatures
........ 26
Crankcase Blow-By Ventilation
......................................................................................... 26
Checking the Air Cleaner
................................................................................................. 27
Checking The Left Crankcase Cover Air Cleaner
................................................................ 27
11. When there is an Abnormal Condition or a Trouble .................................................... 28
Diagnosis when Engine does not Start
.............................................................................. 28
12. C.D.I. Electrical Ignition System .................................................................................. 28
13. Suggestions on Engine Fuel ....................................................................................... 28
14. Transmission Oil ......................................................................................................... 28
15. Cautions for Riding Scooter ........................................................................................ 29
16. Periodical Maintenance Schedule ............................................................................... 30
17. Specification ................................................................................................................ 31
2
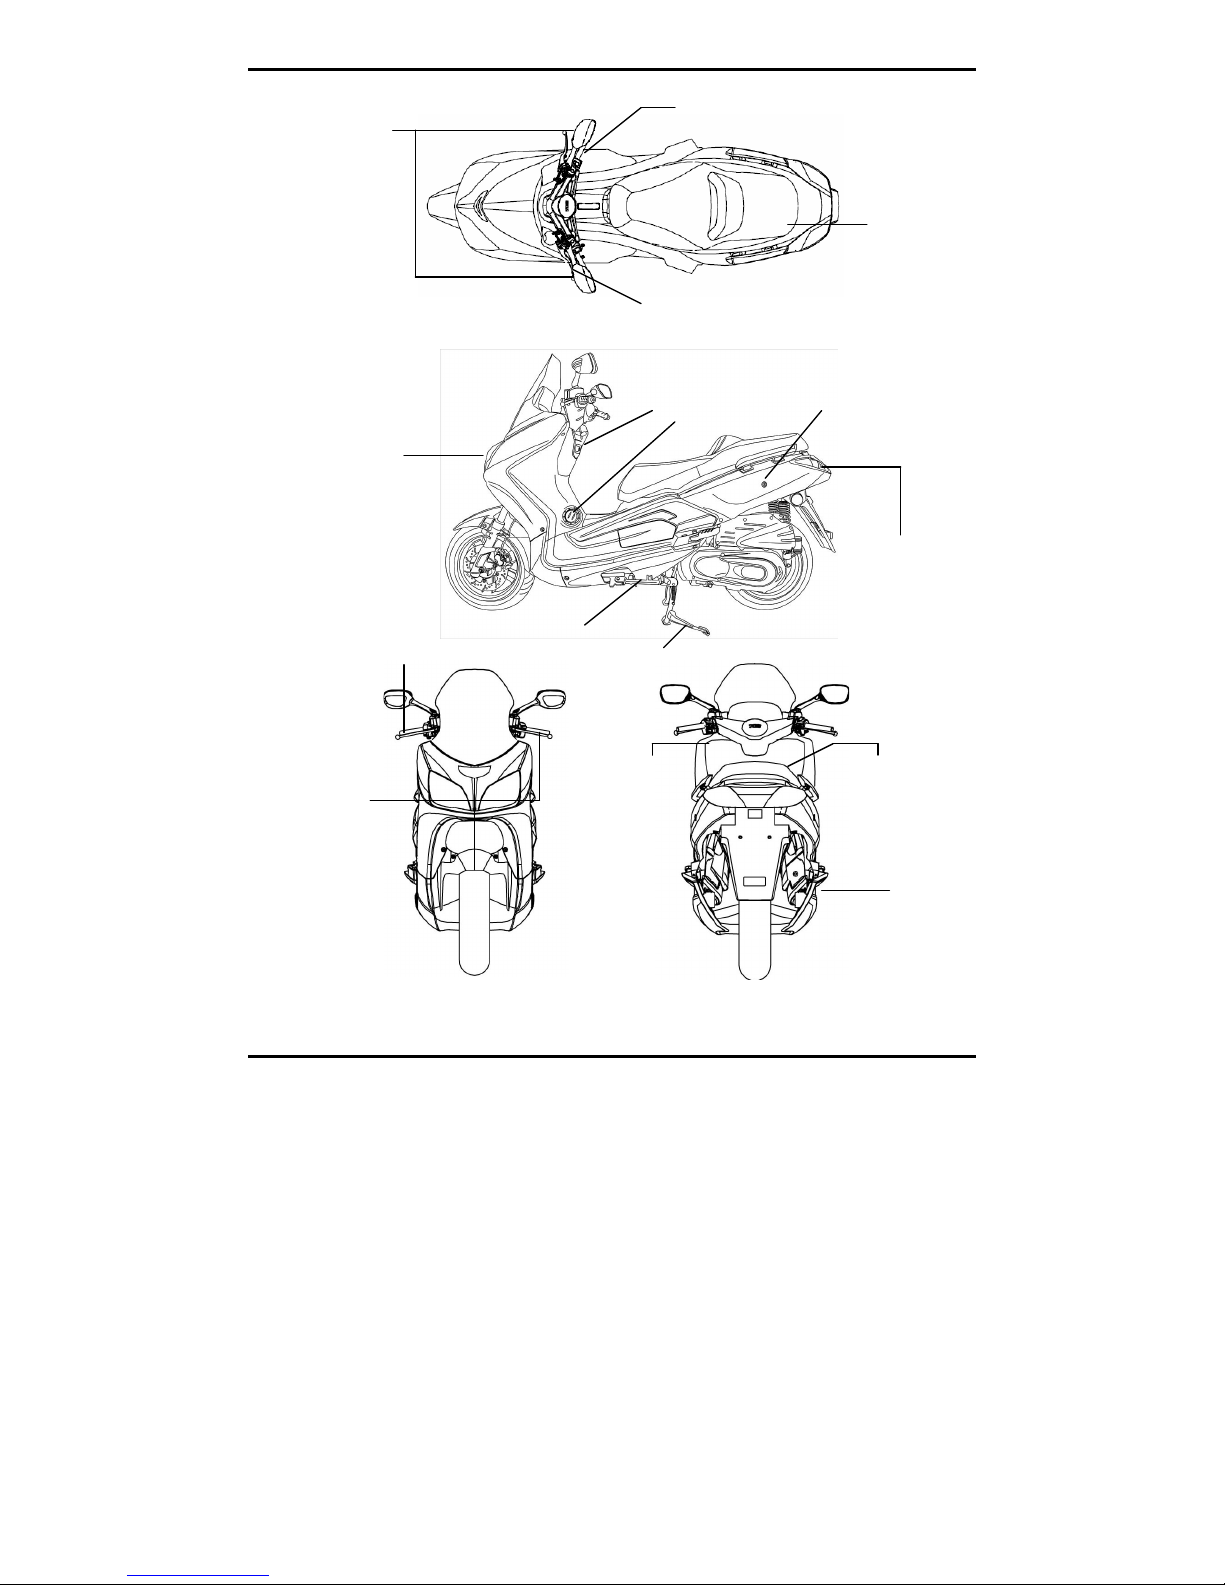
2. CONTROL LOCATION
Hazard /
Light / Starter switch
Turn signal light
Storage box
Pass / High & Low beam /
Turn signal / Horn switch
Fuses.
Fuel tank cap
Seat lock.
Head light
Tail light/
Turn
signal light
Front brake lever
Side stand
Main stand
Rear brake
lever
Coolant
filler cap
Ignition
switch
Muffler
3
3. BEFORE RIDING
This manual describes the correct usage of this scooter including safety riding, simple inspection methods
and so on.
For a more comfor table and safety riding, please read this manual carefully.
For your benefit, please ask your
dealer the operating manual and careful ly read the
following:
Correct use of the scooter.
Pre-del ivery inspection and maintenance.
Thank you very much for your patronage
In order to maximize your scooter ’s performance, a periodical inspection and maintenance should be
complet ely carried out.
We recommend that after riding your new scooter for the first 300 kilometers, you should take your
scooter to the original dealer for an initial inspection, and to have your scooter inspected periodically
every 1000 kilometers thereafter.
In case the scooter’s specifications and construction are modifie d and different from the photos and
diagrams on the owner’s manual / catalogu es, the specifications and construction of the actual scooter
shall prevail.
4. SAFE RIDING
It is very import ant to be relax and clothe proper ly when driving, observe traffic regulat ions, do not rush,
always drive careful ly and relaxed.
Usually, most people would ride their newly bought scooter very carefully, but after they became familiar
with their scooters, they tended to become reckless which may result in an accident.
To remi nd you:
Please wear a safety helmet, and proper ly tighten the chin belt when riding a scooter.
Clothes with open or loose cuffs may be blown by wind and cause the cuffs to get caught on the
steering handle and thus affects riding safety.
So, put on clothes with tight sleeves.
Hold the steering handle by both hands when riding.
Never ride with only one hand.
Observe the speed limit.
Wear suitable low-heel shoes.
Perform periodical maintenance and inspection in accordan ce with the sched ule.
WARNIN G!!
To avoid getting burned by exhaust pipe when taking a passenger.
Make sure your passenger has
put his/her feet on the pedals.
After runnin g, the exhaust pipe is very hot, be careful not to get burned when conducting an
inspection or maintenance.
After runnin g, the exhaust pipe is very hot, select a suitable location to park your scooter to avoid
others getting burned by the exhaust pipe.
CAUTION:
Modified scooter will affect its structure or perfor mance, and cause poor engine operation or exhaust
noise, which will result in shorte ning the scooter’s service life.
Besides, modification is illegal and does not confor m to the original design and specifications.
A modifie d scooter will not be covered by warranty, therefore, do not modify your scooter at will.
4
5. DRIVING
Keep the related parts of your body such as arms, palms, lumbar, and toes relax and ride with the most
comfortable posture in order to be able to react quick ly whenever it is necessary.
Rider’s posture will great ly affect riding safety.
Always keep your body’s gravity in the center of the
saddle, if your body’s gravity is on the rear part of saddle, the front wheel load will be reduced, and this
will cause the steering handle shaking.
It is
dangerous to ride a scooter with an unstable handle.
It will be much easier to make a turn if rider inclines his body inward when turning .
On
the other hand,
the rider will feel unstable if his body and the scooter do not incline.
The scooter is hard to control on a bumpy, unleveled, unpaved road, try to know the road conditions in
advance , slow down and use your shoulder’s force to control the handle.
Suggestion: Do not load objects on the front pedals unnecessarily, to avoid affecting the riding safety
and the operation of steerin g handle.
CAUTION :
The rider’s feeling on the handle is slightly different with a load or without a load.
Overloa d may cause the handle to swing and affects the riding safety.
Therefore, do not overloa d your scooter.
CAUTION :
Do not place flammable materials such as rags between the body side cover and engine to avoid
components damag ing by fire.
Do not load objects on areas not specified for loading to avoid damage.
SUGGEST ION
To maximize the scooter’s perfor mance and prolon g its service life:
The first month or first 1000km is the wear- in period for the engine and compo nents.
Avoid rapid acceleration, and keep the speed smoothly.
6. USE GENUINE SPARE PARTS
In order to maintain the scooter ’s best perfor mance, each part’s quality, material, and machined precision
must confor m with the design requir ements.
“
Genuine Spare Parts” were made from the same
high quality materials used for the original scooter.
No
parts would be sold to the market until they could
meet the designed specifications throug h sophisticated engineering and stringent quality control.
Therefore, it is necessary to purchase “
Genuine Spare Parts” from “
Authoriz ed Deal ers or
Franchised Dealers” when replacing spare parts.
If
you buy cheap, or fake substitute parts from the
market, no guara ntee can be provided either for the quality or durability.
Also, it may result in unexpe cted
troubles and lower the scooter ’s perfor mance.
Always use TGB Genuine Spare Parts to keep your scooter s pure blood and to ensure its long service life.
5
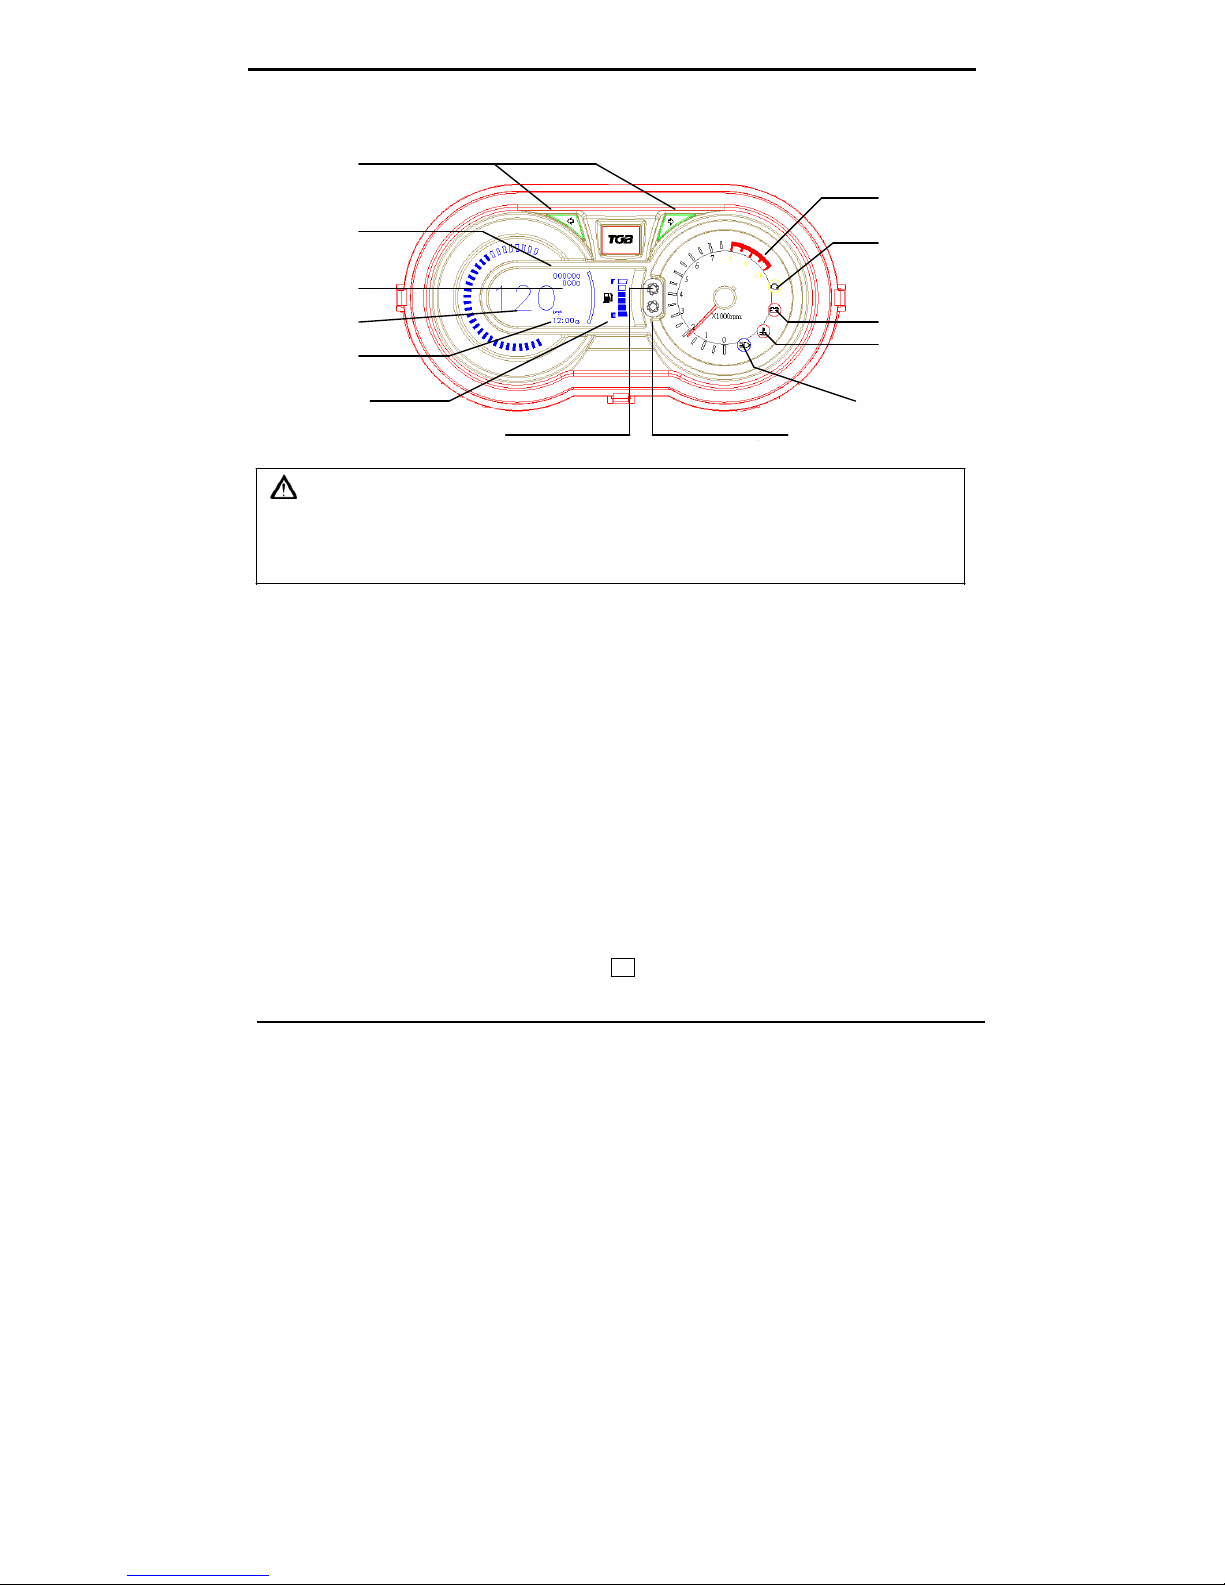
7. USE OF EACH COMPONENT
(The following is TGB 4 stroke liquid cooling scooter’s basic operation, and they could vary from differe nt
individual models. Please consult the end of this manual.)
Turn Signal Indicator
Tachometer
Total Kilometer
EFI Indicator
(250cc only)
Trip Kilometer
Speedometer Battery Charge
Alarm
Time Engine Coolant
Temperature
Fuel Indicator High Beam Indicator
Menu Button Select Button
CAUTION :
Before batter y installation, please do not use the kick starter to start the engine, in prevention
Not to have trouble on electrical meter working, or damag e the electrical meter.
Do not wipe plastic compo nents, e.g. instrument panel, headlight, with organi c solvents such
As gasoline…etc. to avoid damag ing these compon ents.
THE BUTTON OPERATIONS
■ Digital Clock:
1. Display shows Hour: Minute.
2. Press Select Button 0.5~3sec., convert display Hour:Minute into Month:Day.
3. Display shows Month: Day>6 sec., it will back to Hour:Minute automatically.
■ Time Setting:
1. Press Select Button>3sec., convert display into time setting.
2. Setting Step:Month→Day→Hour→Minute, flashing by step.
3. Press Menu Button to adjust date and time.
4. Terminate operation>3sec., display will back to show Hour:Minute automatically.
■ Reset Trip Odometer:
1. Press Menu Button>3sec. to reset trip odometer.
2. Only trip odometer can be reset. Odometer data was stored and can’t be reset.
■ Convert km/h←→mph:
1. Press both Menu Button & Select Button>6sec., km/h & mph converted.
2. When km/h & mph converted, unit of odometer and trip odometer converted (km←→ mile)
at the same time automatically.
※ All operations above are under main switch at ON position.
6
7. USE OF EACH COMPONENT
High Beam Indicator( blue):This indicator comes on with high bea m headlight is turned on.
Turn Signal Indicator(green):The left or right Indicator will be flashing according to the opera ted
direction s of turn signal light switch when it is turned on.
Fuel Gauge:
The fuel gauge doesn’t come on when the main switch is at “OFF” position.
When key switch is turned to “ON”, and the “pointe r” indicates above “E” position, it shows how much fuel
in the tank, and also the fuel indicator light keeps coming on. When the “pointer” is below “E” position, the fuel
indicator flashes, and the fuel warning indicator(orange) will come on. It means there is only appro ximate ly 1.2
liter of fuel left in the tank. Refuel octane 92/95/ 98 unleaded gasoline immed iately.
Odometer:
This odometer shows the total kilometers this scooter has been driven.
Total kilometer : This shows the total kilometers of this scooter. It shows six digits; 5 in kilometers and 1 in
hundred meter. (The total kilometer will return to zero if it runs over 100,000 kilometers.)
Trip kilometer : The rider can measure the trip kilometers. It shows four digits; 3 in kilometers and 1 in
hundred meter. (The trip kilometer will return to zero if its measurement is over 1,000 kilometers.)
Engine Coolant Temperature(red):
To indicate engine coolant temperature.
When the main switch turns to “ON”, the water temperature warning light will illu minate at once, then stop. If
the warning light still “ON”. Please check the coolant level of spare coolant tank and check cooling fan for
proper operation.
CAUTION:
The indicator will stay above (H) position when engine is run under high temper ature for a long period of
time. In this case, the only way to cool the engine is to stop the engine .
7
7. USE OF EACH COMPONENT
OPERATION OF IGNITION SWITCH
IGNITION SWITCH KEY
"Start" position
Engine can be started in this position.
Ignition switch key can not be remo ved.
"Sto p" position
Engine is shut off and can not be started in
this position .
Ignition switch key can be remo ved.
"Steering handle lock" position
Turn the steerin g handle to left and press
ignition switch key down and then lightly turn it
to left to the “LOCK” position.
The steering handle is locked in this position.
Ignition switch key can be remo ved.
When unlocking, simply turn the key from
“LOCK” to “OFF.”
"OPE N" position (fuel tank cap open):
How to open:Insert your key into the ignition switch, and turn it to the left.
How to lock:Push the fuel tank cap and it locks automatically.
CAUTION :
Never operate the ignition switch key when the scooter is runnin g.
To
turn the ignition switch to
“OFF” and “LOCK,” will shut off the electrical system and that may result in a danger ous
accident. Therefore, the ignition switch can only be turned off after the scooter has been
complet ely stopped .
Always remov e the key and be sure to take the key away with you after locking the steerin g
handle before leaving your scooter.
If ignition switch remain s in the “ON” position for a prolong ed period after the engine has been
stopped, the battery’s capacity will be reduce d and this may affect the engine’s start ability.
8
7. USE OF EACH COMPONENT
USE OF BUTTONS
Passing switch
High/Low Beam
Switch
Turn Signal Switch
Hazard
Switch
Light Switches
Electrical
Starter Button
Horn Switch
Light Swi tches
When the switch is turned to this position as the engine is being started, headlight, rear light,
instrument panel light, and position light will come on.
Note:
Position Light Function:
This light can indicate the scooter position when the scooter is running in dim, rainy, or foggy weathe r.
When the switch is turned to this position as the engine is being started, rear light, instrument
panel light, and position light will come on.
When the switch is turned to this position, all lights will go off.
.
9
7. USE OF EACH COMPONENT
Electrical Starter Button
This is a starting motor button (swit ch) for engine starting.
With the main switch "ON", press this button while holding the front or rear brake lever will
start the engine.
CAUTION :
Release this button immed iately after engine has been started , and never press the button again
to avoid damag ing the engine.
This mechanism is a safety design. The engine can only be started after the front or rear brake
lever (pedal) has been applied.
Do not use light system. Turn headlight and turn signal lights to the “OFF” position when the
engine is being started .
High/Low Beam Swi tch
This is the high and low beam of headlight switching switch.
Press this switch to switch between high
and low beams.
This is for high beam.
This is for low beam. (Please turn to low beam when riding in city)
Passi ng Switch
Turn ignition switch “ON” and press this button down. Then, the high beam of headlight will
come on immediately to warn the driver of the vehicle ahead that you intend to overta ke him/her .
(For overta king, high beam indicator will come on at this time) This button will return to original
position after releasing
Horn Swi tch
Press this button down when ignition switch is in the “ON” position, the horn will sound.
CAUTION :
Do not press this button when you are in the area where there’s no honking.
Hazard Swi tch
The main switch in the〝 ON 〞
position, cuts accordin g to this switch, four directions lantern
festivals dodge extinguish do move, also can simultaneous ly dodge on the
display board direction indicating lamp extingu ishes does moves. If stops the vehicle has when the
transportation frequent danger ous position or the vehicle the breakdown, may use the dangerous
police to show the switch. The main switch in the〝 ON 〞
position, hazard switch only then
may close.
10
 Loading...