

Page 1
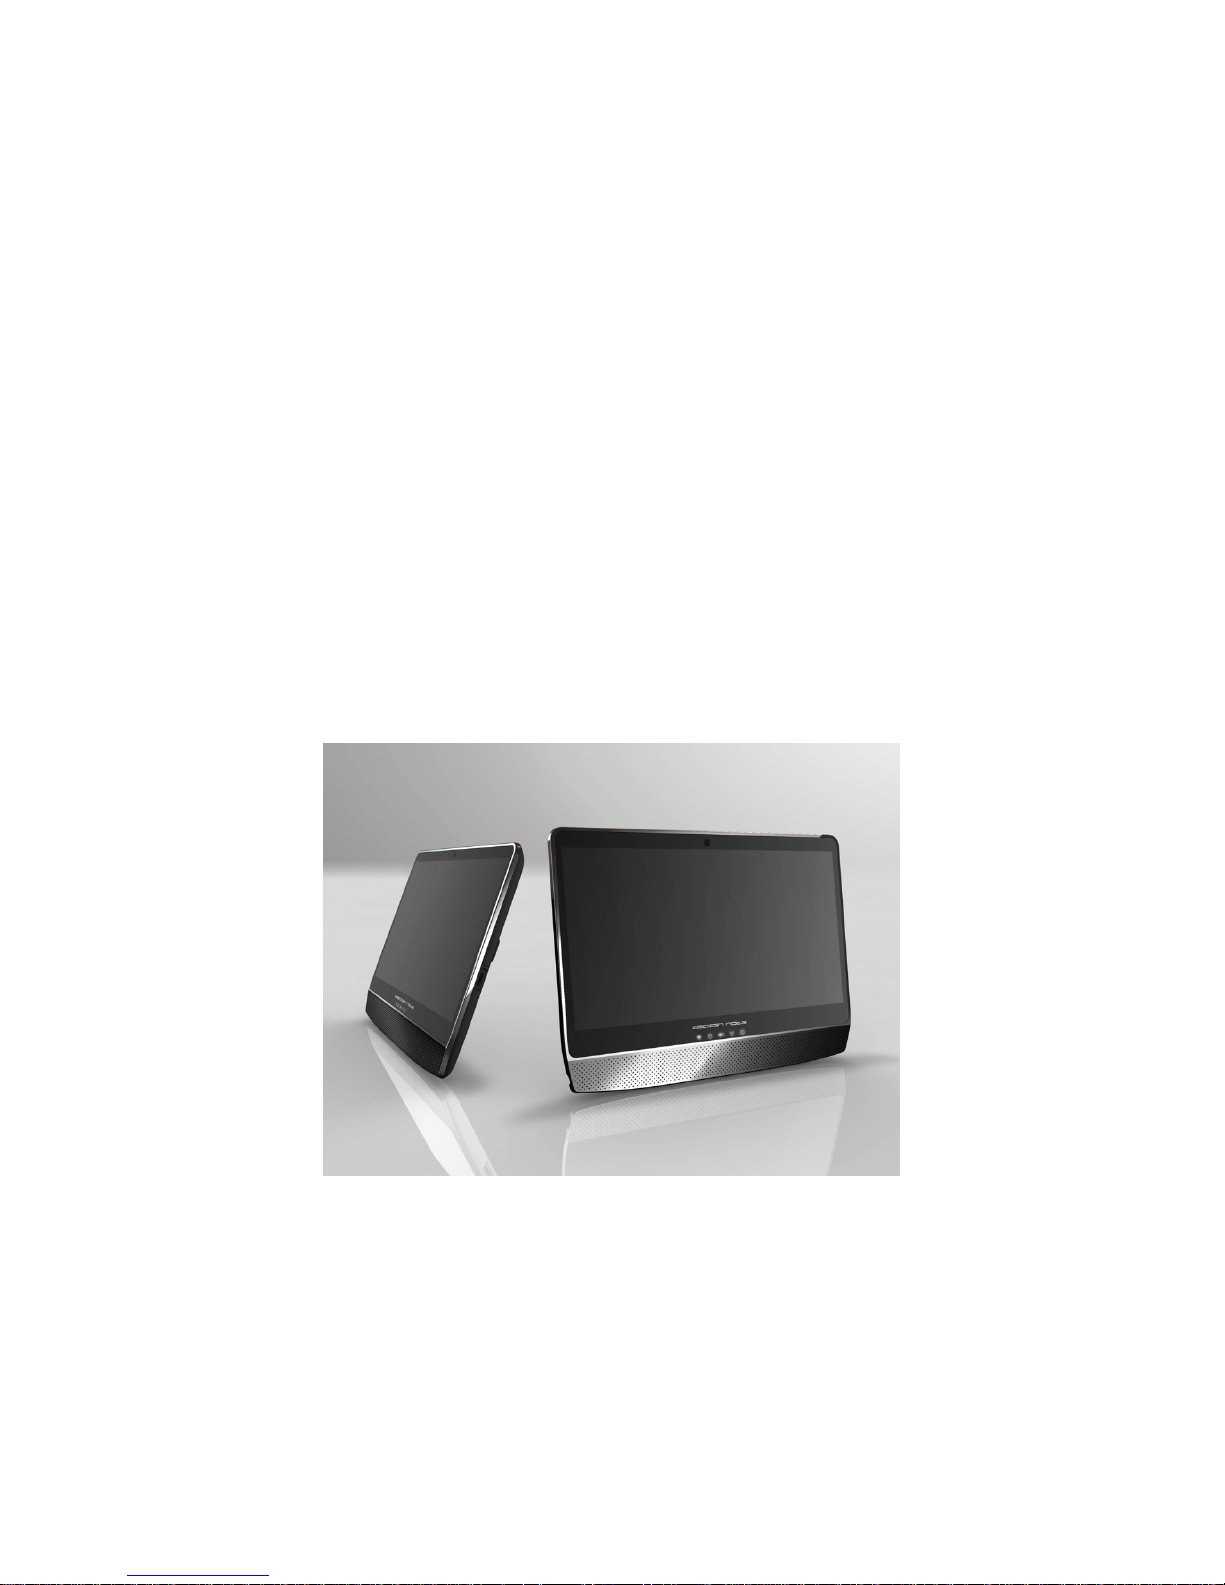
TVB01
User Guide
Page 2

Tablet PC User Guide
2
Copyright©2010
All Rights Reserved - Printed in Taiwan
Tablet PC User Guide
Original Issue: 2010/10
This manual guides you in setting up and using your new Tablet PC.
Information in this manual has been carefully checked for accuracy and is
subject to change without notice.
No part of this manual may be reproduced, stored in a retrieval system, or
transmitted, in any form or by any means, electronic, mechanical, photocopy,
recording, or otherwise, without prior written permission.
Trademarks
Product names used herein are for identification purposes only and may be the
trademarks of their respective companies.
Windows 7 home premium, and Windows Sound System are trademarks of
Microsoft Corporation.
Intel ® and Intel ® ATOM
TM
are registered trademark of Intel Corporation.
Sound Blaster, Sound Blaster Pro are trademarks of Creative Technology.
All other brands or product names mentioned in this manual are trademarks or
registered trademarks of their respective companies.
Page 3

Tablet User Guide
3
FCC Information to User
Safety and Care Instructions
No matter what your level of experience with computers, please make sure you
read the safety and care instructions. This information can help protect you
and your computer from possible harm.
Important Safety Instructions
This section gives you detailed information about how to maintain a safe
working environment while using the Tablet PC. You can maintain its
condition and performance by following these guidelines. Please read it
carefully to ensure maximum safety.
1. Please read these safety instructions carefully.
2. Please keep this manual for later reference.
3. Glass Parts The outside cover of the Tablet PC’s screen is made of glass.
This glass could break if Tablet PC is dropped on a hard surface or receives
a substantial impact. If the glass chips or cracks, do not touch or attempt to
remove the broken glass and stop using Tablet PC. Glass cracked due to
misuse or abuse is not covered under the warranty.
4. Please keep this equipment from humidity.
5. Do not use this product near water, for example, near a bathtub, wash bowl
kitchen sink or laundry tub, in a wet basement or near a swimming pool.
6. Lay this equipment on a reliable surface when install. A drop or fall could
cause injury.
7. All cautions and warnings on the equipment should be noted.
8. Do not operate the Tablet PC with the case removed. For safety reason,
the equipment should only be opened by qualified service personnel.
9. Always disconnect all telephone lines & all power cords from the wall outlet
before servicing or disassembling this product. To reduce the risk of
Page 4

Tablet PC User Guide
4
personal injury from electrical shock or hot surfaces, disconnect the power
cord from the wall outlet, and allow the internal system components to
cool before touching.
10. Refer your system for servicing to qualified service personal under the
following conditions:
z When the power cord or plug is damaged or frayed.
z If liquid has been spilled into the product.
z If the product has been exposed to rain or water.
z If the product does not operate normally when the operating
instructions are followed. Adjust only those controls that are covered
by the operating instructions, since improper adjustment of other
controls may result in damage and will often require extensive work by
a qualified technician to restore the product to normal condition.
z If the product has been dropped or the cabinet has been damaged.
z If the product displays a distinct change in performance, it indicates a
need for service.
z If the equipment has obvious sign of breakage.
11. The unit can be operated at maximum ambient temperature of 40ºC.
12. Polymer battery is vulnerable, do not charge it with other power adapter, or
it may cause fire or explosion
13. This product should be operated from the type of power indicated on the
marking label. If you are not sure of the type of power available, consult
your dealer or local power company.
14. Use only a power adapter approved for use with this Tablet PC.
15. Do not install near any heat sources such as radiators, heat registers, stoves,
or other apparatus (including amplifiers) that produce heat.
16. If the Tablet PC is not in use for a long time, disconnect it from mains to
avoid possible damage by transient over-voltage.
17. The risk of ignition caused by small metallic objects, such as paper clips or
staples, moving around inside TRANSPORTABLE EQUIPMENT during
Page 5

Tablet User Guide
5
transportation shall be reduced objects entering the equipment, please do
not remove dummy card from the product.
Installation Restrictions
1. If an extension cord is used with this product, make sure that the total
ampere rating of the equipment plugged into the extension cord does not
exceed the extension cord ampere rating. Also, make sure that the total
rating of all products plugged into the wall outlet does not exceed the fuse
rating.
2. Never push objects of any kind into this product through cabinet slots as
they may touch dangerous voltage points or short out parts that could
result in a fire or electronic shock. Never spill liquid of any kind on the
product.
3. Unplug this product from the wall outlet before cleaning. Do not use liquid
cleaners or aerosol cleaners. Use a dry cloth for cleaning. Ensure that no
liquid enters the system.
Battery (Polymer)
Battery Pack
"Do not incinerate, (or) disassemble; may explode or release toxic
materials. Do not short circuit; may cause burns."
Note:
1. The following caution statement is located in the service and operating
manual or on the label adjacent to the battery.
2. Battery Replacement. The rechargeable battery in Tablet PC should be
replaced only by FIC. For more information about battery replacement
service, go to: www.fic.com.tw/tycoon
Risk of explosion if battery is
replaced by an incorrect type.
3. Do not dispose of batteries in a fire.
Page 6

Tablet PC User Guide
6
English
CAUTION: DANGER OF EXPLOSION IF BATTERY IS INCORRECTLY
REPLACED. REPLACE ONLY WITH SAME OR EQUIVALENT TYPE
RECOMMENDED BY THE MANUFACTURER. DISCARD USED
BATTERIES ACCORDING TO THE MANUFACTURER'S
INSTRUCTIONS.
French
IL Y A DANGER D'EXPLOSION S'IL Y A REMPLACEMENT
INCORRECT DE LA BATTERIE. REMPLACER UNIQUEMENT AVEC
UNE BATTERIE DU MÊME TYPE OU D'UN TYPE RECOMMANDÉ
PAR LE CONSTRUCTEUR. METTER AU RÉBUT LES BATTERIES
USAGÉES CONFORMÉMENT AUX INSTRUCTIONS DU FABRICANT.
German
VORSICHT ! Explisionsgefahr bei unsachgemäßen Austausch der
Batterie.Ersatz nur durch denselben oder einem vom Hersteller empfohlenem
ähnlichen Typ.Entsorgung gebrauchter Batterien nach Angaben des Herstellers.
Swedish
Explosionsfara vid felaktigt batteribyte. Använd samma batterityp eller en
ekvivalent typ som rekommenderas av apparattillverkaren. Kassera använt
batteri enligt fabrikantens instruktion.
Danish
Lithiumbatteri- Eksplosionsfare ved fejlagtig håndtering. Udskiftning må kum
ske med batteri af samme fabrikat og type. Lever det brugte batteri tilbage til
leverandoren.
Norwegian
Ekspolsjonsafe ved feilaktig skifte av batteri. Benytt samme batteritype eller en
Page 7
Tablet User Guide
7
tilsvarende type anbefalt av apparatfabriknten. Brukte batterier kasseres i
henhold til fabrikantens instruksjoner.
Finnish
Paristo voi räjähtää, jos se on virheellisesti asennettu. Vaihda paristo ainostaan
laitevalmistajan suosittelemaan tyyppiin. Hävitä käyteet paristo valmistajan
ohjeiden mukaisesti.
Power Adapter
For indoor use only.
For use with information technology equipment.
Risk of electric shock do not open.
Power Cord Set Requirements
z An approved power cord has to be used.
z Make sure the socket and any extension cord(s) you use can
support the total current load of all the connected devices.
z Before cleaning the computer, make sure it is disconnected from
any external power supplies (i.e. AC adapter).
z The power cord set (appliance coupler, flexible cord, and wall
plug) you received with the Tablet meets the requirements for
use in the country where you purchased the equipment.
z Power cord sets for use in other counties must meet the
requirements of the country where you use the computer. For
more information on power cord set requirement, contact your
local authorized dealer, reseller, or service provider.
Page 8

Tablet PC User Guide
8
z Protect the power cord form being walked on or pinched
particularly at plugs, convenience receptacles, and the point
where they exit from the apparatus.
Federal Communications Commission (FCC) Requirements, Part 15
This equipment has been tested and found to comply with the limits for a class
B digital device, pursuant to part 15 of the FCC Rules. These limits are
designed to provide reasonable protection against harmful interference in a
residential installation.
This equipment generates, uses and can radiate radio frequency energy and, if
not installed and used in accordance with the instructions, may cause harmful
interference to radio communications. However, there is no guarantee that
interference will not occur in a particular installation. If this equipment does
cause harmful interference to radio or television reception, which can be
determined by turning the equipment off and on, the user is encouraged to try
to correct the interference by one or more of the following measures:
---Reorient or relocate the receiving antenna.
---Increase the separation between the equipment and receiver.
---Connect the equipment into an outlet on a circuit different from that to
which the receiver is connected.
---Consult the dealer or an experienced radio/TV technician for help.
You may find helpful the following booklet, prepared by the Federal
Communications Commission: Interference Handbook (stock number 004000-00345-4). This booklet is available from the U.S. Government Printing
Office, Washington, DC20402
Warning: The user must not modify or change this computer without
approval. Modification could void authority to this equipment.
Page 9

Tablet User Guide
9
This device complies with Part 15 of the FCC Rules. Operation is subject to
the following two conditions:
(1) This device may not cause harmful interference.
(2) This device must accept any interference received, including interference
that may cause undesired operation.
FCC RF Exposure
FCC RF Radiation Exposure Statement:
Warning: Use the specified shielded power cord and shielded signal cables
with this computer, so as not to interfere with radio and television reception. If
you use other cables, it may cause interference with radio and television
reception.
1. This transmitter has been demonstrated co-location compliance
requirements. This transmitter must not be co-location or operating in
conjunction with any other antenna or transmitter.
2. This equipment complies with FCC RF radiation exposure limits set forth
for an uncontrolled environment. This device was tested for typical lap
held operations with the device contacted directly to the human body to
the back side of the notebook computer. To maintain compliance with
FCC RF exposure compliance requirements, avoid direct contact to the
transmitting antenna during transmitting.
Page 10

Tablet PC User Guide
10
15.247 (b)(4), the EUT meets the requirement that it be operated in a manner
that ensures the public is not exposed to radio frequency energy levels in
excess of the Commission’s guidelines (1.1307, 1.1310, 2.1091 and 2.1093)
5.21 Regulatory information/Disclaimers
Installation and use of this Wireless LAN device must be in strict accordance
with the instructions included in the user documentation provided with the
product. Any changes or modifications (including the antennas) made to this
device that are not expressly approved by the manufacturer may void the user’s
authority to operate the equipment. The manufacturer is not responsible for
any radio or television interference caused by unauthorized modification of
this device, or the substitution of the connecting cables and equipment other
than manufacturer specified. It is the responsibility of the user to correct any
interference caused by such unauthorized modification, substitution or
attachment. Manufacturer and its authorized resellers or distributors will
assume no liability for any damage or violation of government regulations
arising from failing to comply with these guidelines.
Shielded Cables Notice
All connections to other computing devices must be made using shielded
cables to maintain compliance with FCC regulations.
Peripheral Devices Notice
Only peripherals (input/output devices, terminals, printers, etc) certified to
comply with Class B limits may be attached to this equipment. Operation with
non-certified peripherals is likely to result in interference to radio and TV
reception.
European Notice
For the following equipment: Tablet PC
Page 11

Tablet User Guide
11
This device complies with the essential requirements of the R&TTE Directive
1999/5/EC and EMC directive 2004/108/EC. The following test methods
have been applied in order to prove presumption of conformity with the
essential requirements of the R&TTE Directive 1999/5/EC and EMC
directive 2004/108/EC:
The equipment was passed. The test was performed according to the
following European standards:
EN 300 328-2 V.1.7.1 (2006)
EN 301 489-17 V2.1.1: 2009 and EN 301 489-1 V1.8.1: 2008
EN 300 328 V1.7.1: 2006
EN 62311 : 2008
EN 60950-1: 2006
EN 55022: 2006 +A1: 2007
EN 61000-3-2 : 2006
EN 61000-3-3 : 1995 + A1 : 2001 + A2 : 2005
EN 55024: 1998 + A1: 2001 + A2: 2003
802.11b and 802.11g Restrictions:
- European standards dictate maximum radiated transmit power of 100mW
EIRP and frequency range 2.400-2.4835GHz;
- In France, the equipment must be restricted to the 2.4465-2.4835GHz
Page 12
Tablet PC User Guide
12
frequency range and must be restricted to indoor use."
VCCI instruction
Page 13
Tablet User Guide
13
About Your Tablet PC
Congratulation for having purchased your Tablet PC. This
tablet PC can go anywhere you go. Use it like a pad of paper.
You can write, sketch, and view material directly on the screen.
Page 14
Tablet PC User Guide
14
About Your User Guide
Welcome to your Tablet PC User Guide. This manual gives
you the information you need to maximize the use of your
Tablet PC. Read this guide to familiarize yourself with this
Tablet PC and its features.
This manual is divided into five chapters.
Chapter 1 Introduction
Chapter 2 Getting Started
Chapter 3 Using Your Tablet PC
Chapter 4 Connecting External devices
Chapter 5 Caring for Your Tablet PC
Page 15

Tablet User Guide
15
Table of Contents
ABOUT YOUR TABLET PC ................................................................. 13
ABOUT YOUR USER GUIDE............................................................... 14
1 INTRODUCTION ............................................................................. 17
1.1 FEATURE HIGHLIGHT..................................................................... 18
1.2 THE FRONT VIEW OF THE TABLET PC ........................................... 20
Tablet PC LED Status Indicator................................................... 21
1.3 THE RIGHT PANEL OF THE TABLET PC .......................................... 23
1.4 THE LEFT PANEL OF THE TABLET PC ............................................ 25
1.5 THE REAR SIDE OF THE TABLET PC............................................... 27
2 GETTING STARTED ...................................................................... 31
2.1 CONNECTING THE AC POWER SOURCE.......................................... 32
2.2 STARTING YOUR TABLET PC......................................................... 33
Turning on the Tablet PC ............................................................. 33
Using the touch screen ................................................................. 34
2.3 DEVICE DRIVERS INSTALLATION ................................................... 34
Installing Windows 7 from Optical Disk Drive............................... 35
Installing all the Device Driver.................................................... 35
3 USING YOUR TABLET PC ............................................................ 39
3.1 SCREEN HOTKEY UTILITY FOR FUNCTION CONTROLS .................... 40
Special Function Control ............................................................. 40
About Screen Rotation.................................................................. 42
3.2 CONFIGURING YOUR SCREEN DISPLAY ......................................... 43
Possible Display Configurations.................................................. 43
4 CONNECTING TO PERIPHERALS ............................................. 45
Page 16

Tablet PC User Guide
16
4.1 USING THE USB PORT ................................................................... 46
4.2 USING A SIM CARD SLOT .................................................................. 47
Inserting and Removing a SIM Card.............................................. 47
4.3 USING THE EXTERNAL AUDIO SYSTEM ......................................... 49
4.4 USING THE WIRELESS LAN........................................................... 50
5 CARING FOR YOUR TABLET PC............................................... 51
CLEANING YOUR TABLET PC.................................................................. 52
Page 17
Introduction1
17
1 Introduction
Your Tablet PC is a very thin light-weight designed
for mobility, it is a natural traveling companion. With
your Tablet PC, you can access office networks and
e-mails at anytime, from any location.
Your Tablet PC makes an ideal choice for use in the
schoolroom, at home, on the road and all other
occasions.
Page 18

Tablet PC User Guide
18
1.1 Feature Highlight
Before we go to identify each part of your Tablet PC, we will first introduce
you to other notable features of your Tablet PC.
Processing Unit
• Your tablet runs on Intel® AtomTM N455 and N550 Processor that is
integrated with 512KB L2 Cache.
• Fully compatible with an entire library of PC software based on operating
systems such as Windows 7 Home premium.
Memory
This tablet PC provides one memory slot for installing DDR3-667 SDRAM
204-pin SODIMM modules up to 2GB.
Touch-enabled Widescreen
Provides extraordinary 10.1" 1024 x 600 (16:9) wide screen display with
capacitor for your work field at your fingertips.
WiFi
IEEE 802.11 b/g/n, half size Mini Card with USB and PCI-E interface.
Bluetooth
Provides Bluetooth function with USB 2.0 Interface.
Webcam
Provides Webcam function with 2.0M pixels.
Page 19

Introduction1
19
Graphic System
Provides blazing graphics controller embedded with Intel NM10 PCH/Intel
Atom N455 Processor.
USB 2.0
Provides two USB2.0 ports for I/O data transmission.
Audio System
Compliant with Intel HD Audio (Azalia 2 channels)
Serial ATA (SATA) Controller
Supports data transfer rates of up to 3.0 GB/s (300MB/s)
Flash BIOS
Flash BIOS allows you to easily upgrade the System BIOS using the Phoenix
Flash utility program.
Power and System Management
• Integrated SMM (System Management Mode) on system chipset that shuts
down components not in use to reduce power consumption. To execute
power management, you can set up the parameter in Power Options
properties by pointing your mouse to Control Panel of Windows.
• System Password for User and Supervisor included on the BIOS SETUP
Program to protect unauthorized use of your computer.
Weight and Dimension
• 850g
• 250(W) x 183(D) x 17(H) mm
Page 20
Tablet PC User Guide
20
1.2 The Front View of the Tablet PC
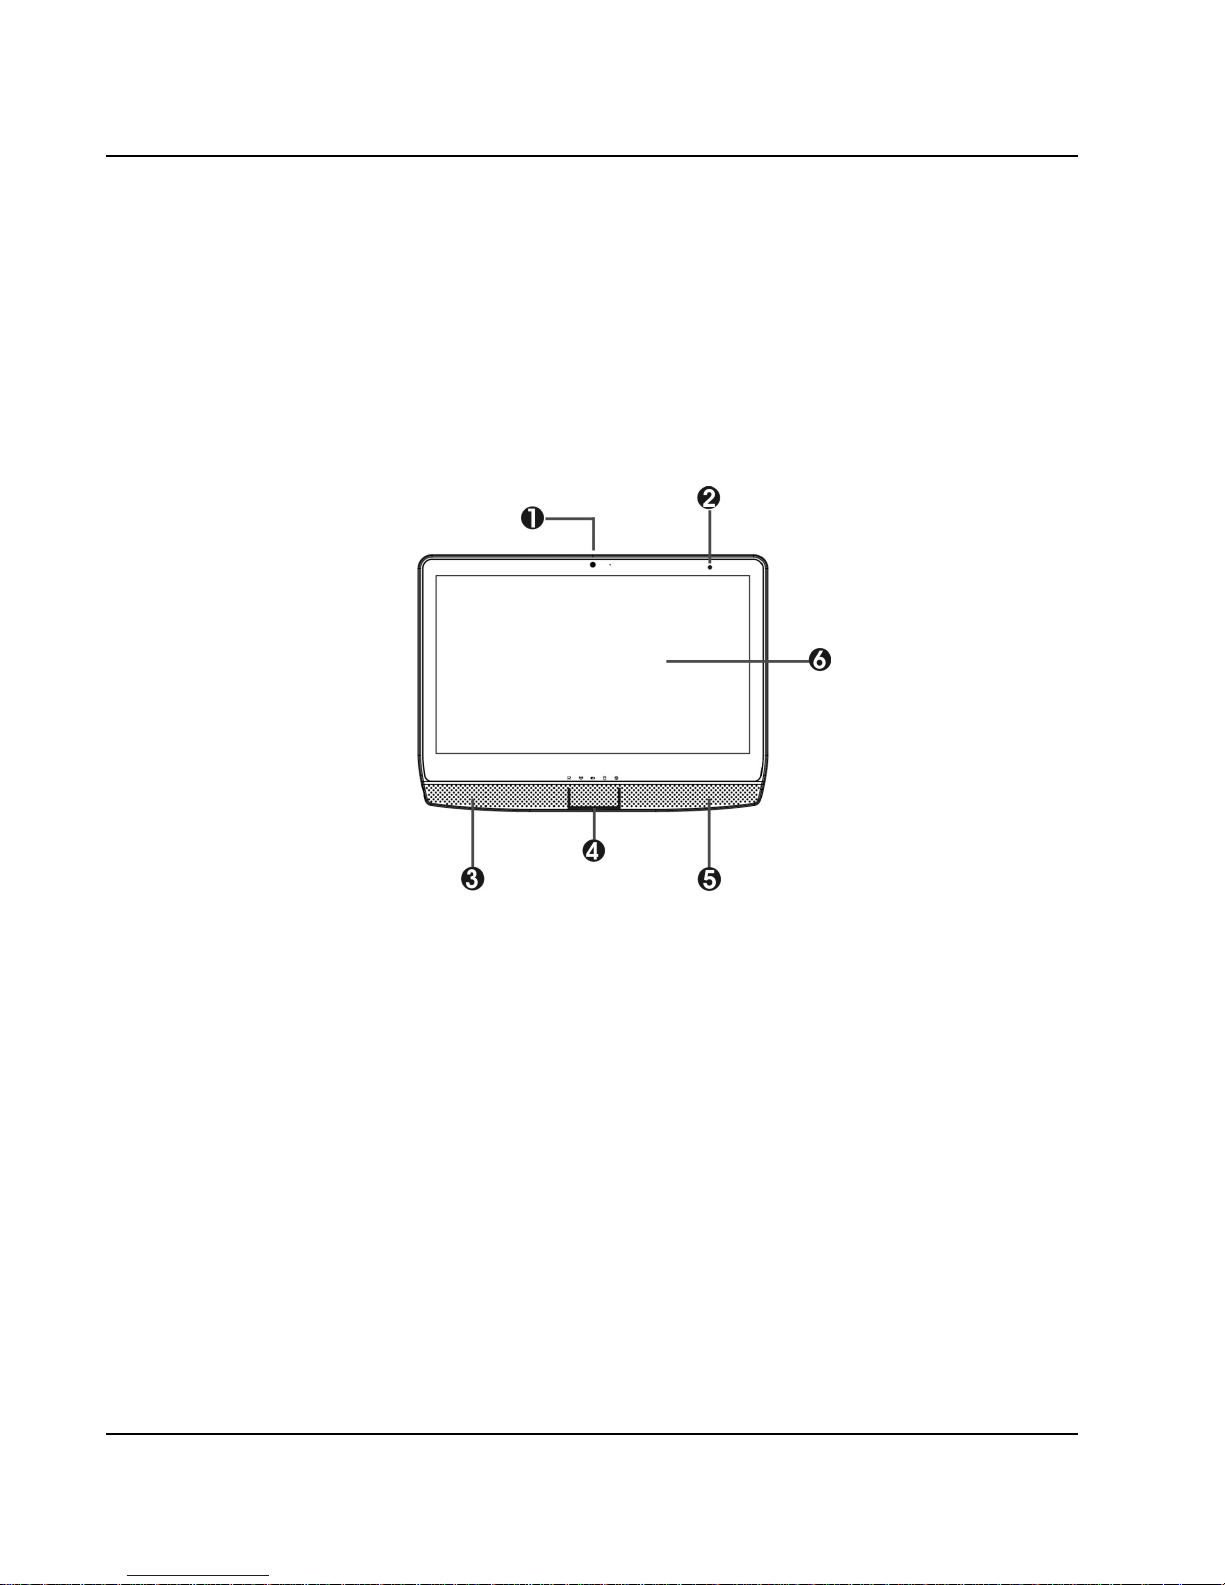
The Tablet PC is compact with features on every side. First, look at the
front view of the system. The following sections describe front view
features.
1. Webcam 2. Integrated Microphone
3. Built-in Stereo Speaker 4. LED Indicators
5. Built-in Stereo Speaker 6. Touch
-enabled Widescreen
• Webcam
The built-in camera can be used as a communication device for allowing
you to capture images, record videos, and have video chats. It is 2.0M
pixels and transmitting instant image through network for conference.
• Integrated Microphone
The built-in microphone receives sounds and voices when used with the
built-in webcam.
Page 21

Introduction1
21
• Built-in Stereo Speakers
Integrated left and right mini stereo speakers for sound and audio output
for your multimedia presentations or listening pleasure.
• LED Indicators
Keeps you informed of your Tablet PC’s current power status and
operating status. Description of the status icons appears in the latter part
of this section.
• Touch-enabled Widescreen
This device equipped with touch screen. You may make adjustments to
your work field at your fingertips. The touch screen will responsively react
with your fingertip commands.
< 10.1" 1024 x 600 (16:9) wide screen display with capacitor.
< Capable of displaying 16M colors (32-bit true color) on either size
panels.
< LCD display control allows you to adjust the brightness of the LCD.
< Simultaneous display capability for LCD and external desktop
computer monitor.
TABLET PC LED STATUS INDICATOR
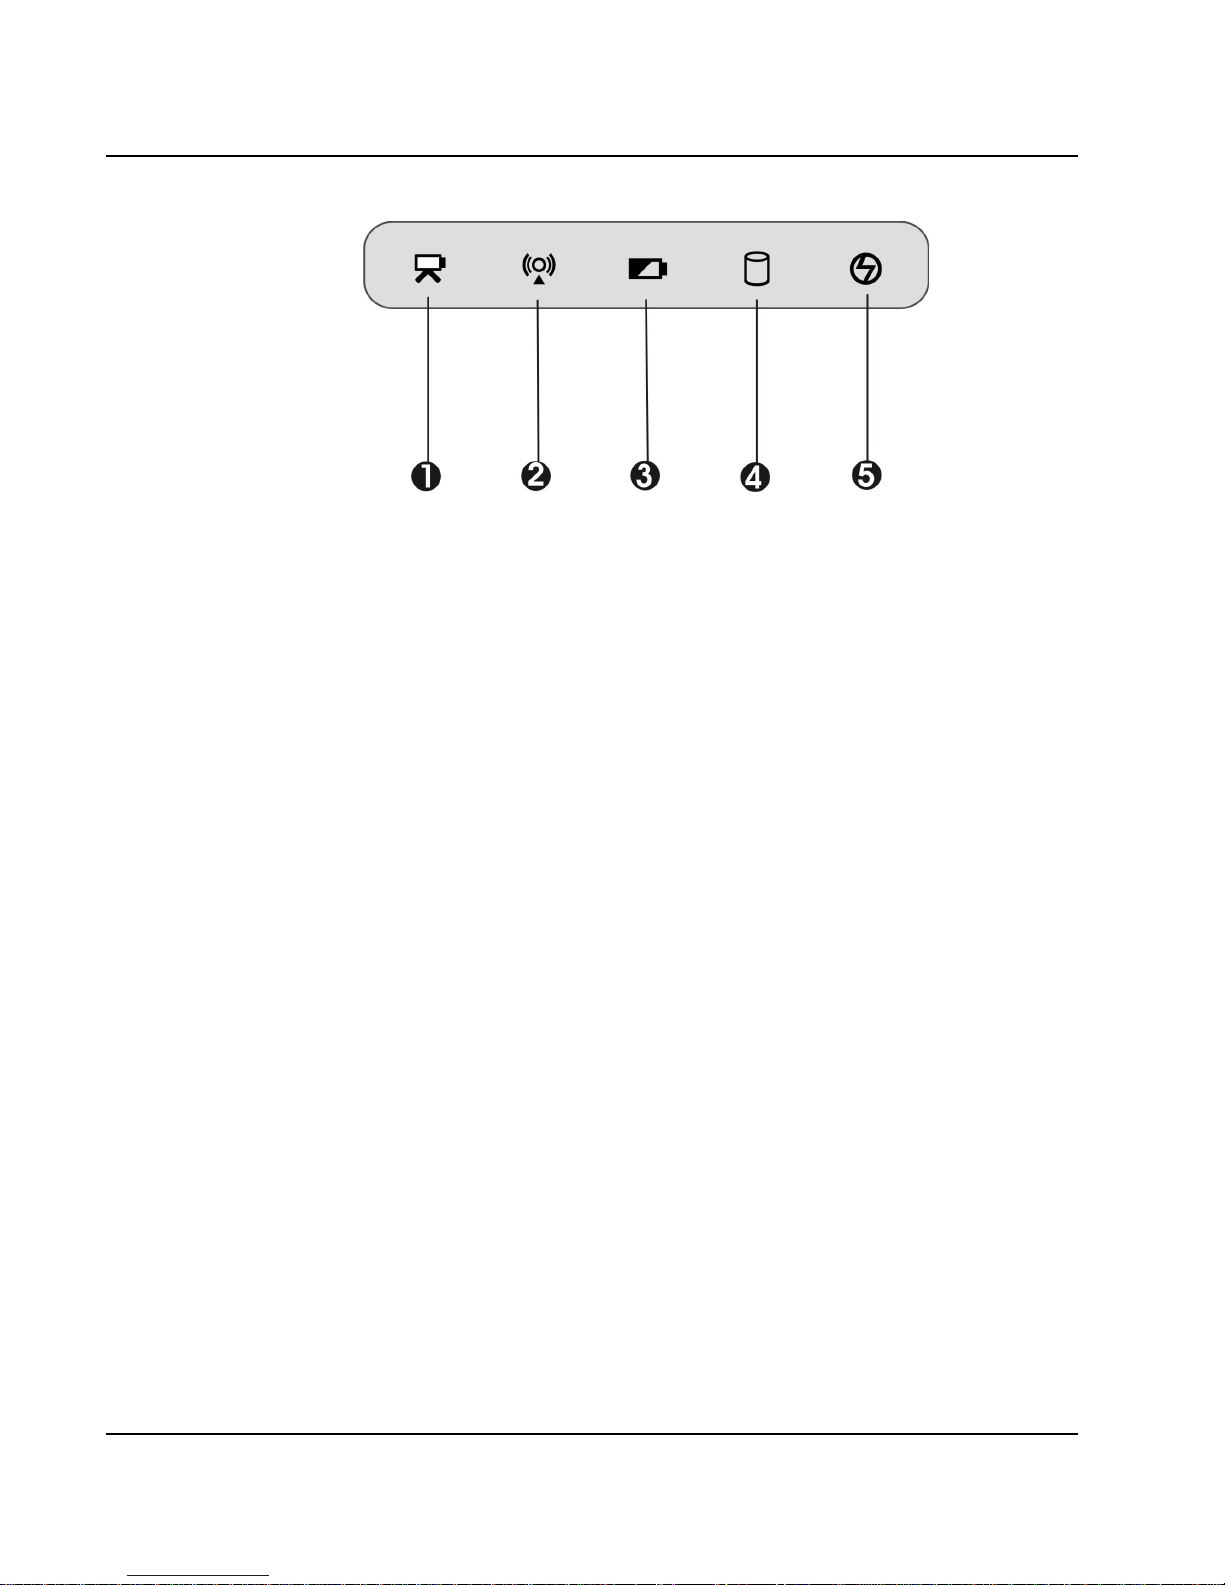
The Status LED Panel keeps you informed of the Tablet PC’s current power
and operating status. Each LED is marked with an icon to designate the
system status.
Page 22
Tablet PC User Guide
22
1.
Webcam Indicator 2. WiFi/Bluetooth/3G Access
3. Battery Charging LED 4. Drive Access
5. Power Indicator
• Webcam Indicator
When LED turns on in white light indicates that the Webcam module is
activated. When LED lights off, it indicates that the function is disabled.
• WiFi/Bluetooth/3G Access
When LED turns on in white light indicates that the WiFi/Bluetooth/3G
accessing is activated. When LED lights off, it indicates that the function
is disabled.
• Battery Charging LED
Lights to indicate battery charging status.
< Lights blinking white indicates that the battery is in charging.
< Lights amber when the battery is discharged.
< Lights blinking amber when the battery is low.
< Lights white indicates the battery is fully charged.
• Drive Access
When LED in white light indicates that the system is accessing the Hard
Disk Drive.
Page 23
Introduction1
23
• Power Indicator
Lets you know that system is turned on.
Lights on when the system is powered on.
Lights blinking when the system is in Standby mode.
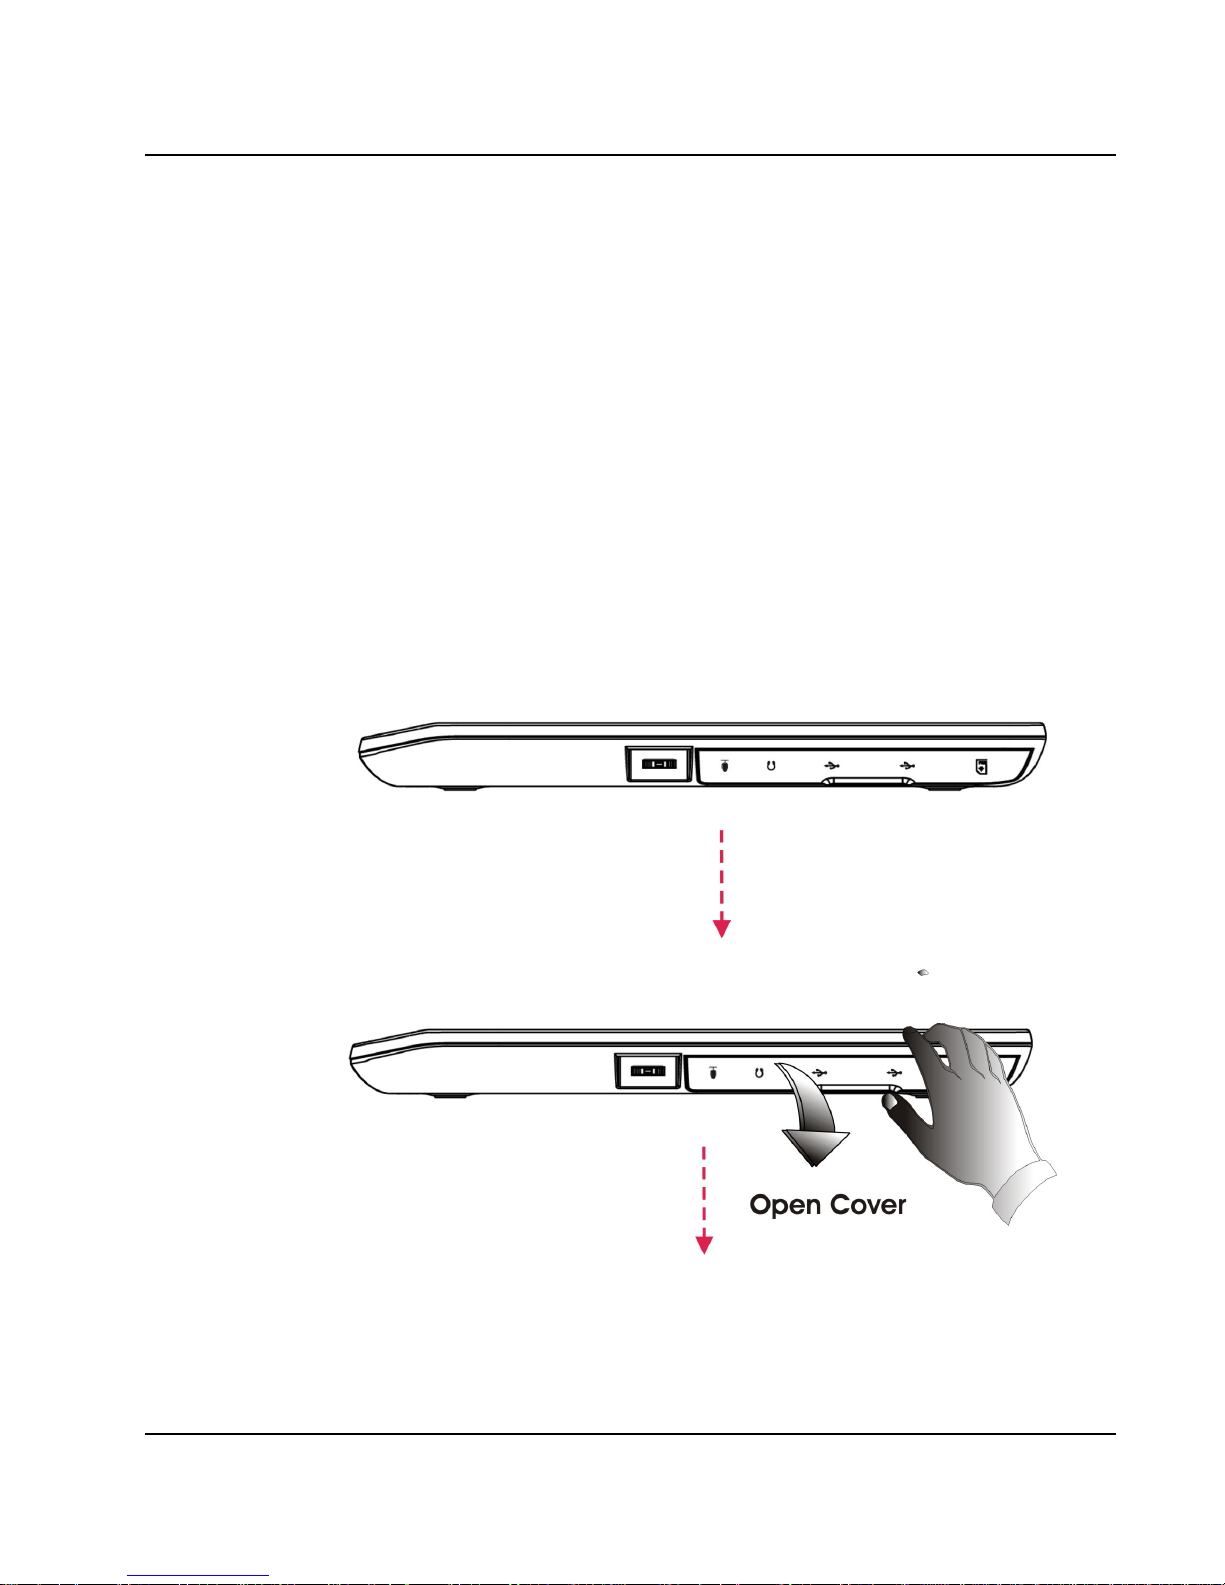
1.3 The Right Panel of the Tablet PC
The system ports at the right panel of your Tablet PC can connect various
devices. Each port is described as followings. Before using the IO port, please
open the cover first.
Page 24
Tablet PC User Guide
24
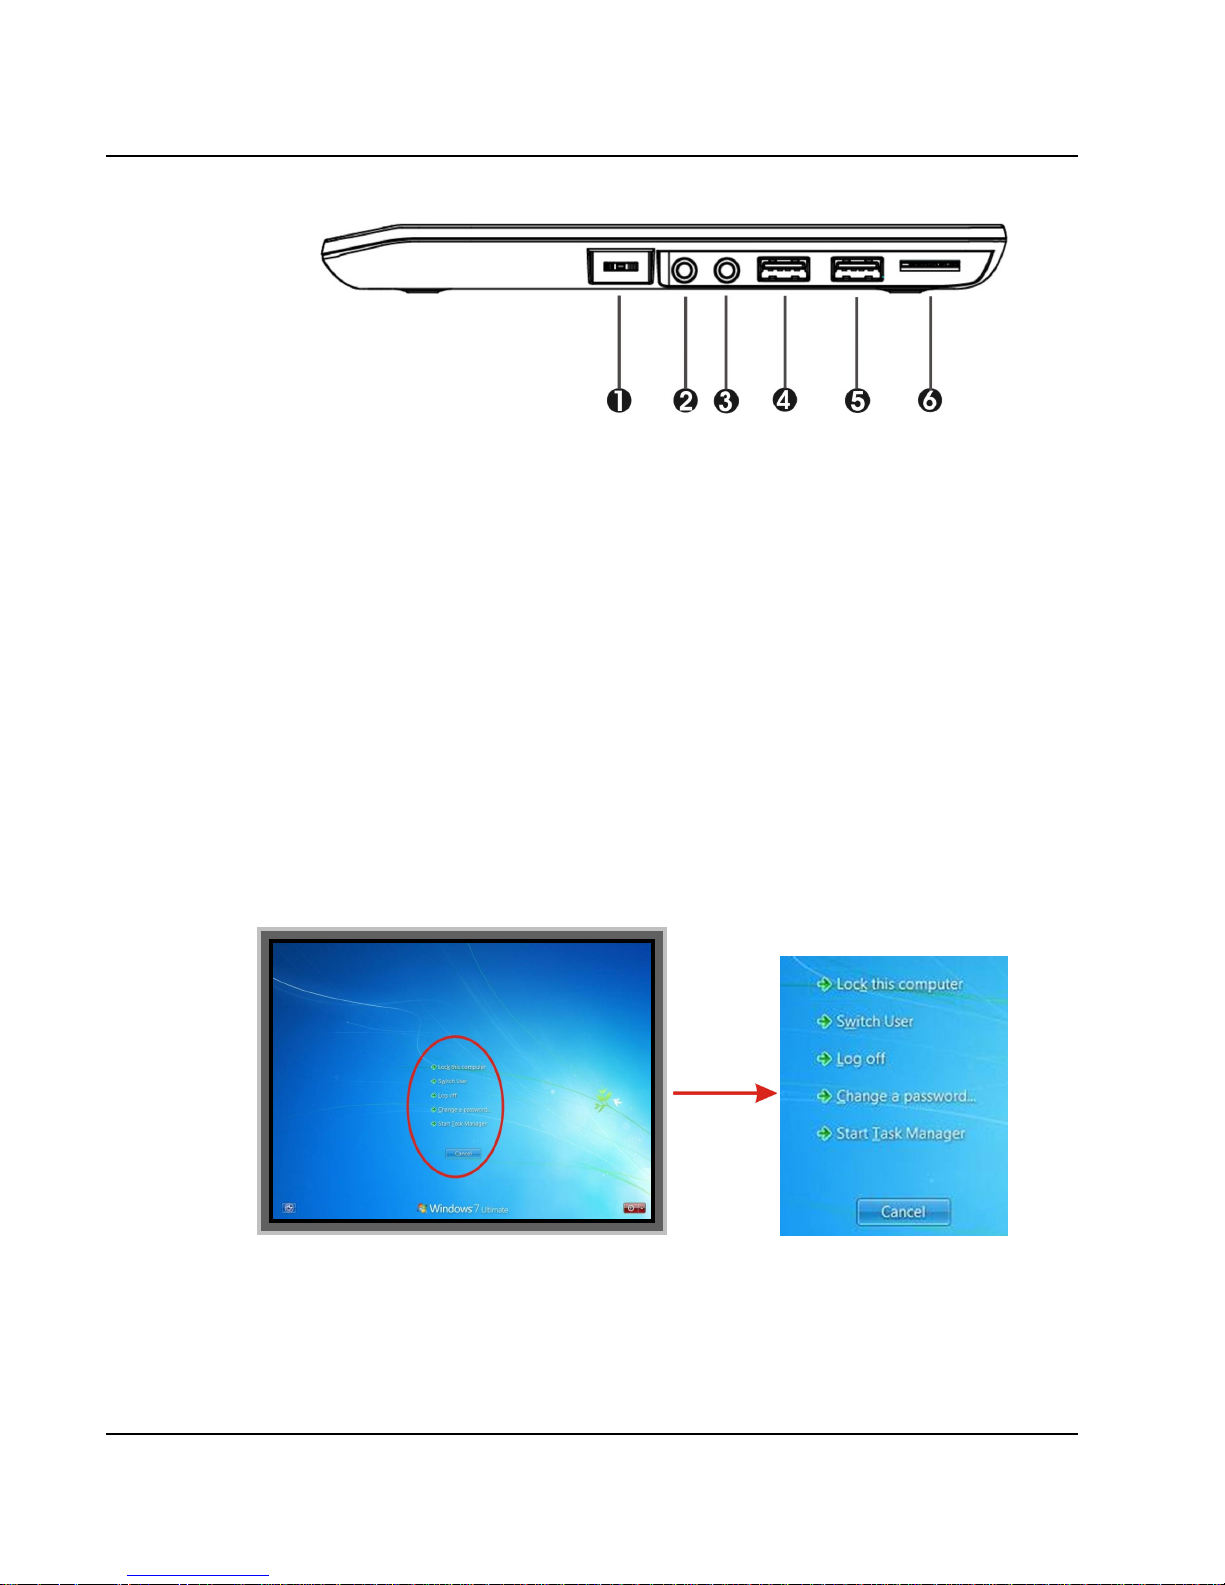
1. Three-direction Switch 2. Microphone Jack
3. Headphone Jack 4. USB 2.0 Port
5. USB 2.0 Port 6. SIM Card Slot
• Three-direction Switch
This switch can let you browse the contents with sliding this switch up or
down, then press switch for carriage.
Moreover, when you press Three-direction Switch over 4 seconds, the
function is as holding the <Ctrl>+<Alt>+<Del> Keys simultaneously
to appear secure logon as listed below for executing the program to
perform specific utility.
• Microphone Jack
Allows you to connect an external microphone for monophonic sound
recording directly into your Tablet PC.
Page 25
Introduction1
25
• Headphone Jack
Lets you plug in a stereo headphone, powered speakers, or earphone set
with 1/8 inch phone plug for personal listening.
• USB 2.0 Ports
The Universal Serial Bus (USB) port allows you to connect USB 2.0compliant devices (for example, printers, scanners and so on) to your
Tablet PC.
• SIM card slot
For SIM card installation, open this cover and insert the SIM Card into
the slot. (SIM card is always working with 3.5G HSDPA PCI-E Card)
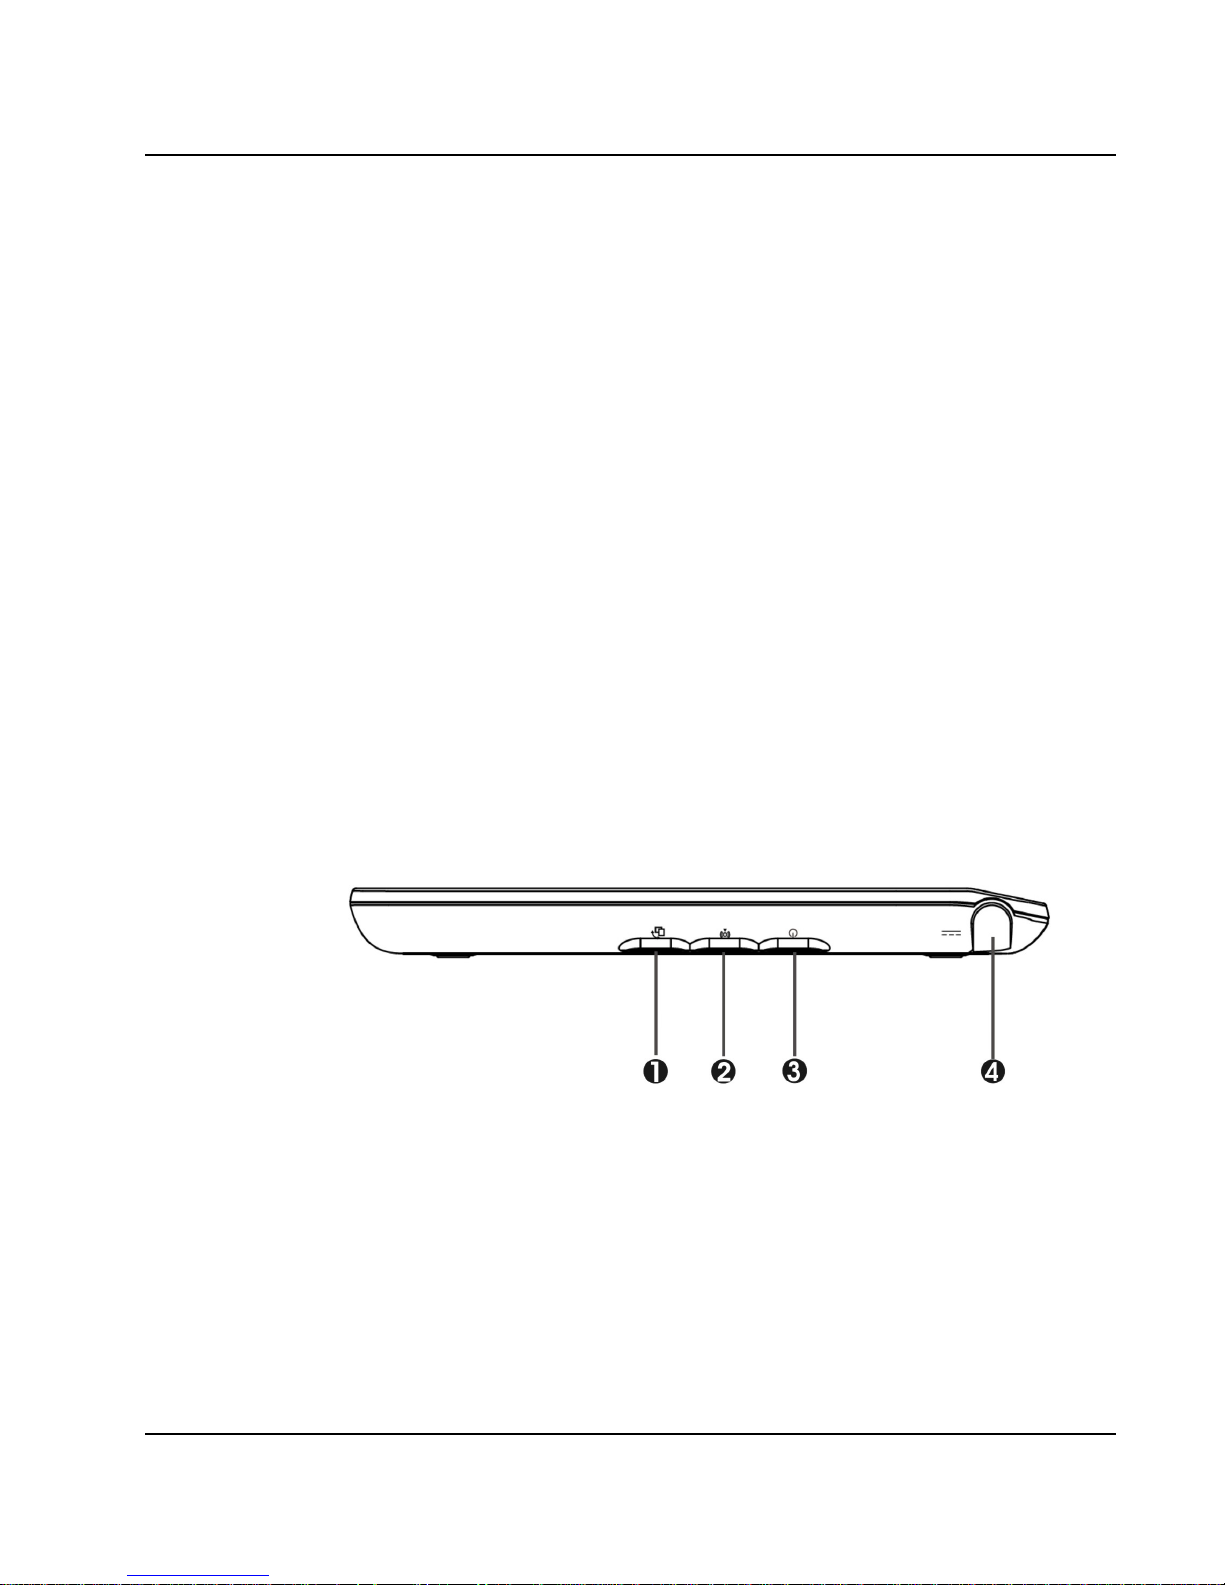
1.4 The Left Panel of the Tablet PC
The left panel of your Tablet PC provides the features shown in the following
figure.
1. G-Sensor On/Off 2. WiFi/3G/Bluetooth Button
3. Power On/Resume Button 4. DC Power Port
• G-Sensor On/Off
Press this button to enable or disable the screen rotates function.
Page 26
Tablet PC User Guide
26
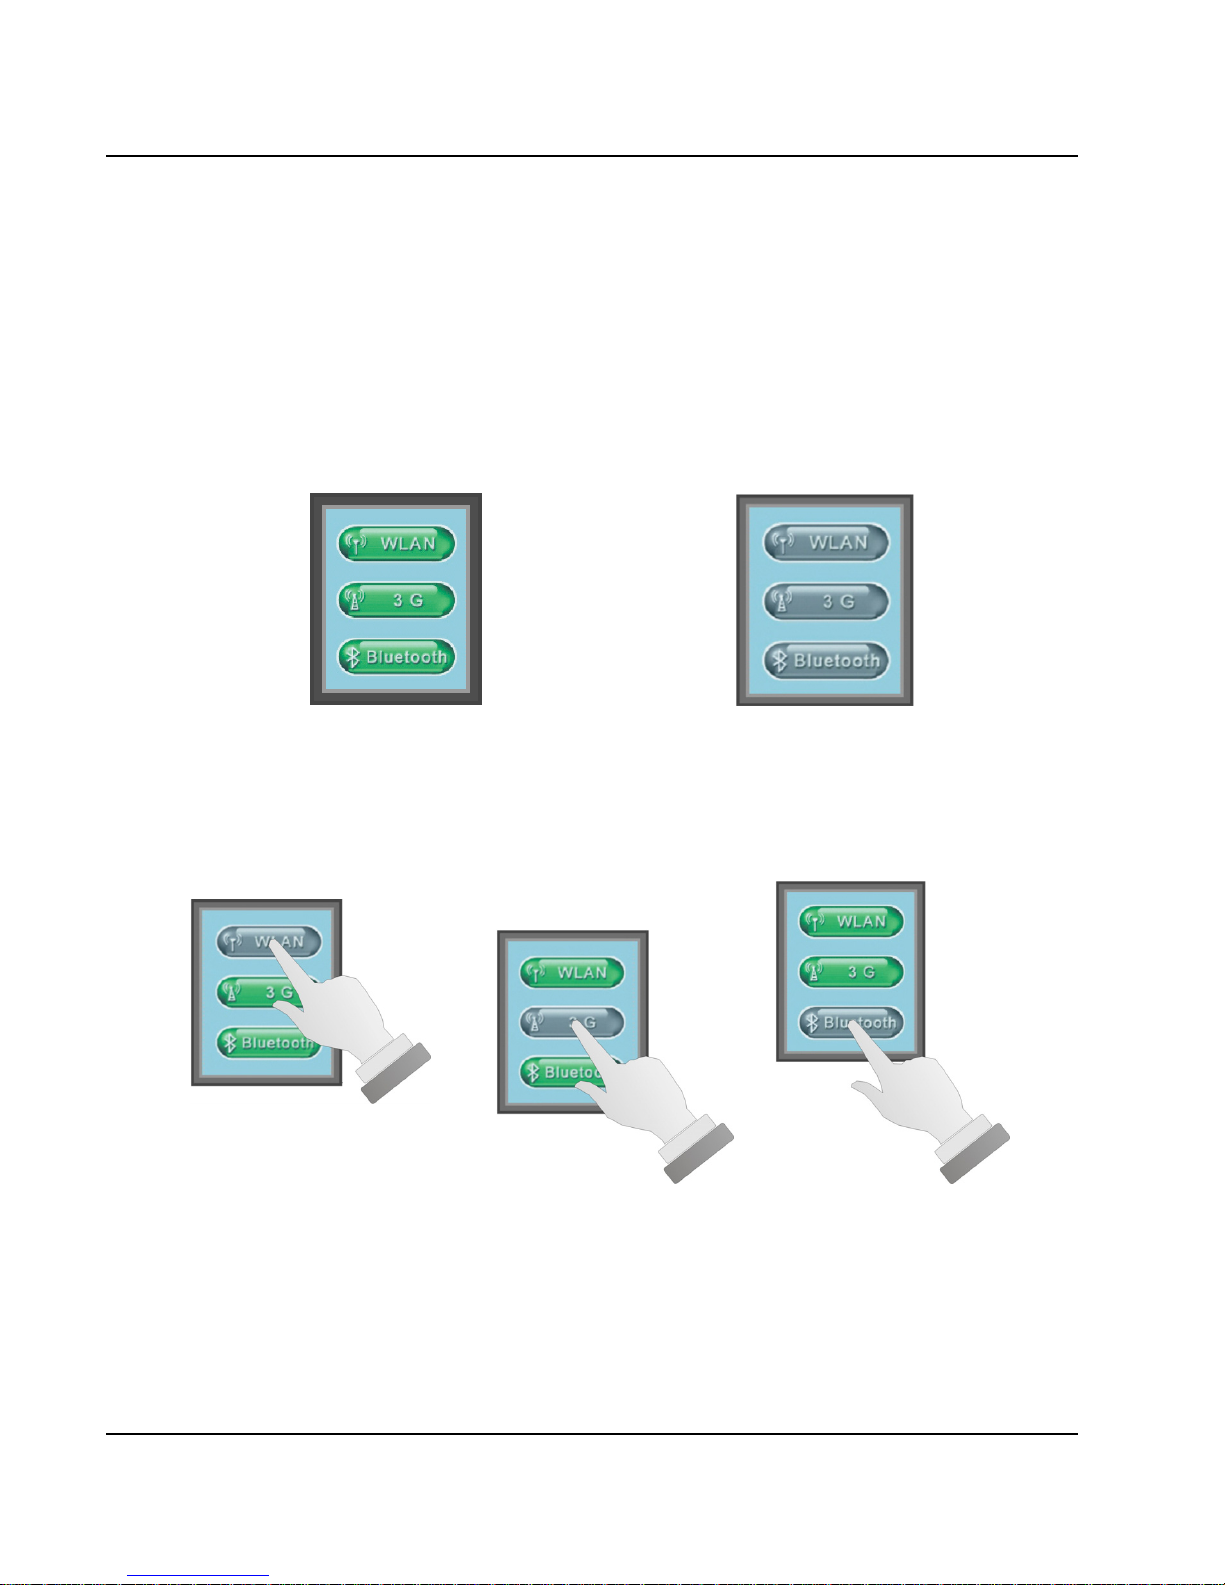
• WiFi/3G/Bluetooth Button
Press this button to enable or disable the WLAN/3G/Bluetooth utility.
When you press this button, the screen pop-up the WLAN, 3G and
Bluetooth icons for function selection. Press the WLAN, 3G or
Bluetooth, respectively, to light green or gray for activating or inactivating
the quick accessing function.
Activate the WLAN, 3G Close the WLAN, 3G and
and Bluetooth Functions. Bluetooth Functions.
Close the WLAN Function. Close the 3G Function. Close the Bluetooth Function.
Page 27
Introduction1
27
• Power On/Resume Button
Switches the computer power on and off, or resumes whenever it is in
Suspend mode.
• DC Power Port
Lets you connect the AC power adapter in supplying continuous power to
your Tablet PC and recharging the battery.
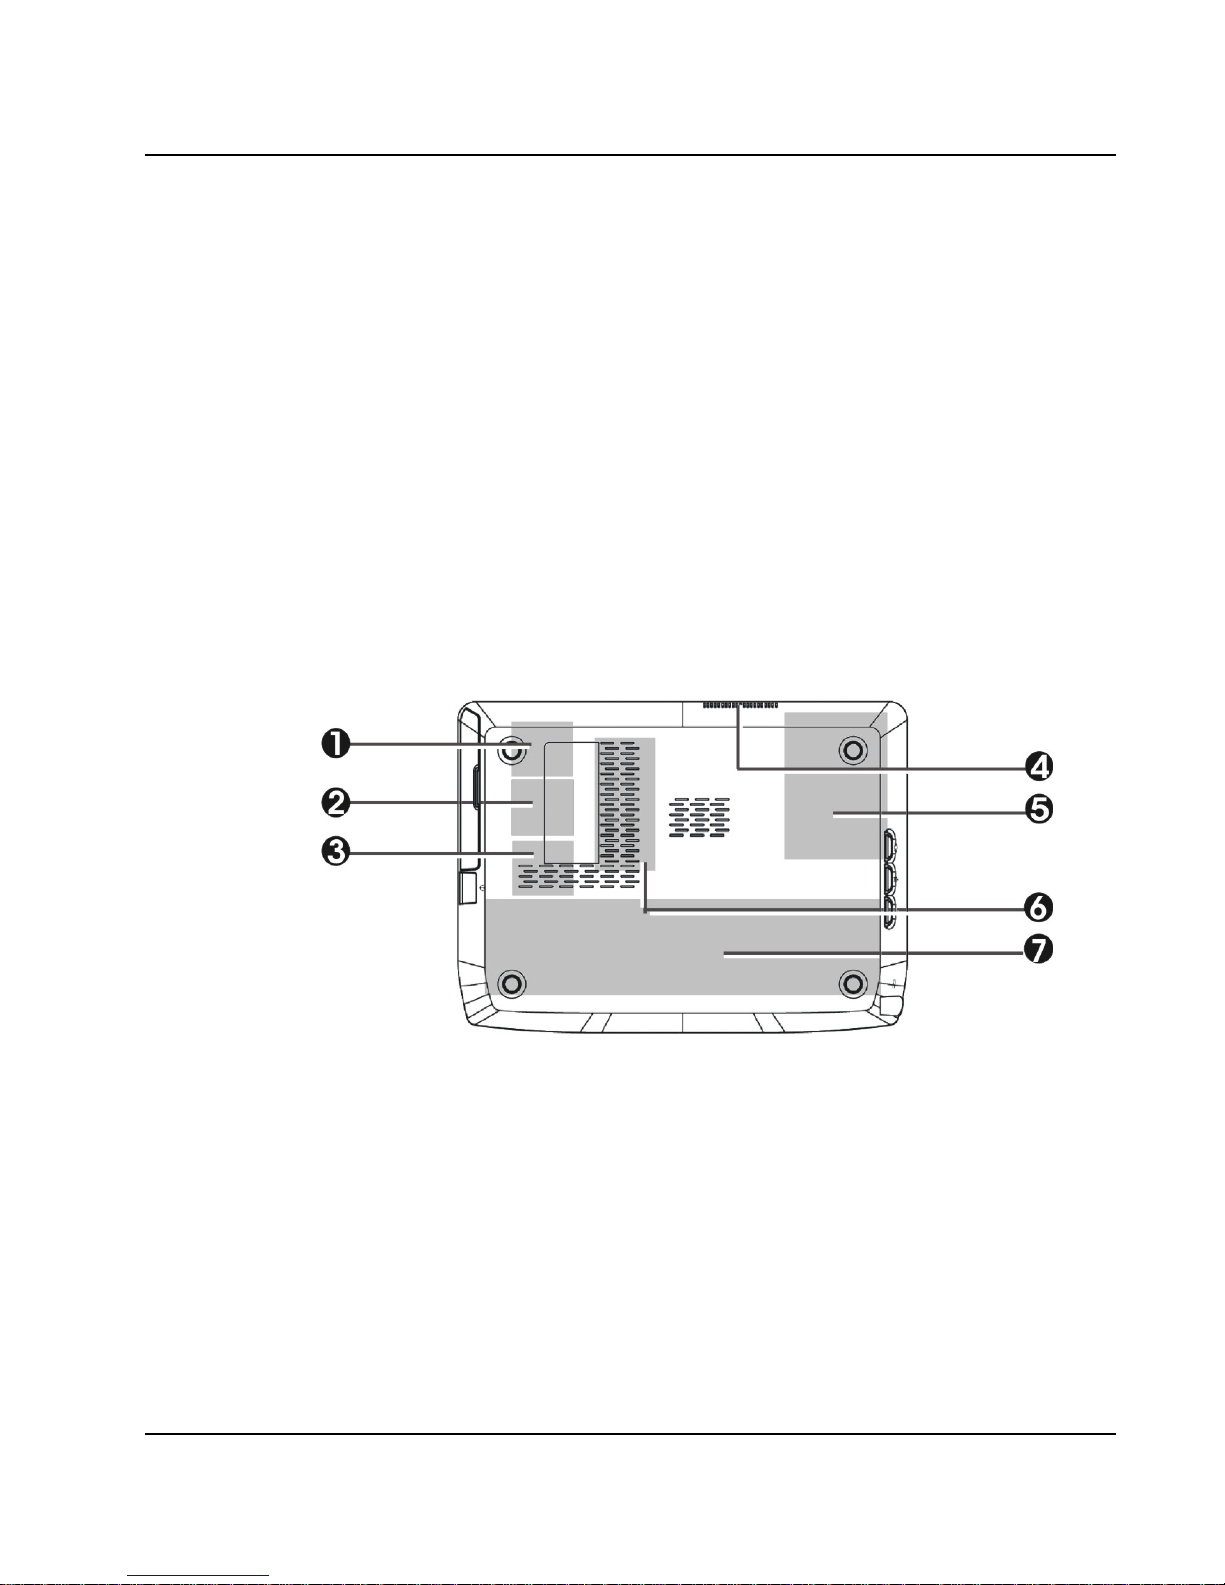
1.5 The Rear Side of the Tablet PC
The rear side of the Tablet PC offers the following features.
1. 3G Module (option) 2. VGA Card Compartment
3. WiFi/Bluetooth Combo Compartment 4. Air-Outlet Vent
5. Hard Disk Compartment 6. Memory Compartment
7. Battery Compartment
Rear Side of the System
Page 28

Tablet PC User Guide
28
• 3G Module (option)
This compartment lets you install 3.5G HSDPA. For 3.5G HSDPA
(High-Speed Downlink Packet Access), it is a 3.5G (third generation)
mobile telephony communications protocol in the High-Speed Packet
Access (HSPA) family, which allows networks based on Universal Mobile
Telecommunications System (UMTS) to have higher data transfer speeds
and capacity.
• VGA Card Compartment
This compartment is for installing VGA card.
• WiFi/Bluetooth Combo compartment
This compartment is for installing WiFi/Bluetooth Combo module to
enable the WiFi/Bluetooth function. We strongly suggest that
WiFi/Bluetooth Combo module should be installed only by certified
dealer.
• Air-Outlet Vent
Emits the heat out of your Tablet PC and keeps it within operating
temperature.
• Hard Disk compartment
Open this cover to replace with other Hard Disk Drive.
• Memory compartment
There is one SO-DIMM memory slot.
• Battery compartment
This compartment is equipped with a choice of Lithium-Ion (Li-Ion)
battery pack.
Page 29

Introduction1
29
This page is intended to be blank.
Page 30

Page 31
Getting Started 2
31
2 Getting Started
Your Tablet PC is designed and pre-configured for
easy setup and use. This chapter describes the
installation steps you should follow to get the Tablet
PC up and running as quickly as possible.
Page 32
Tablet PC User Guide
32
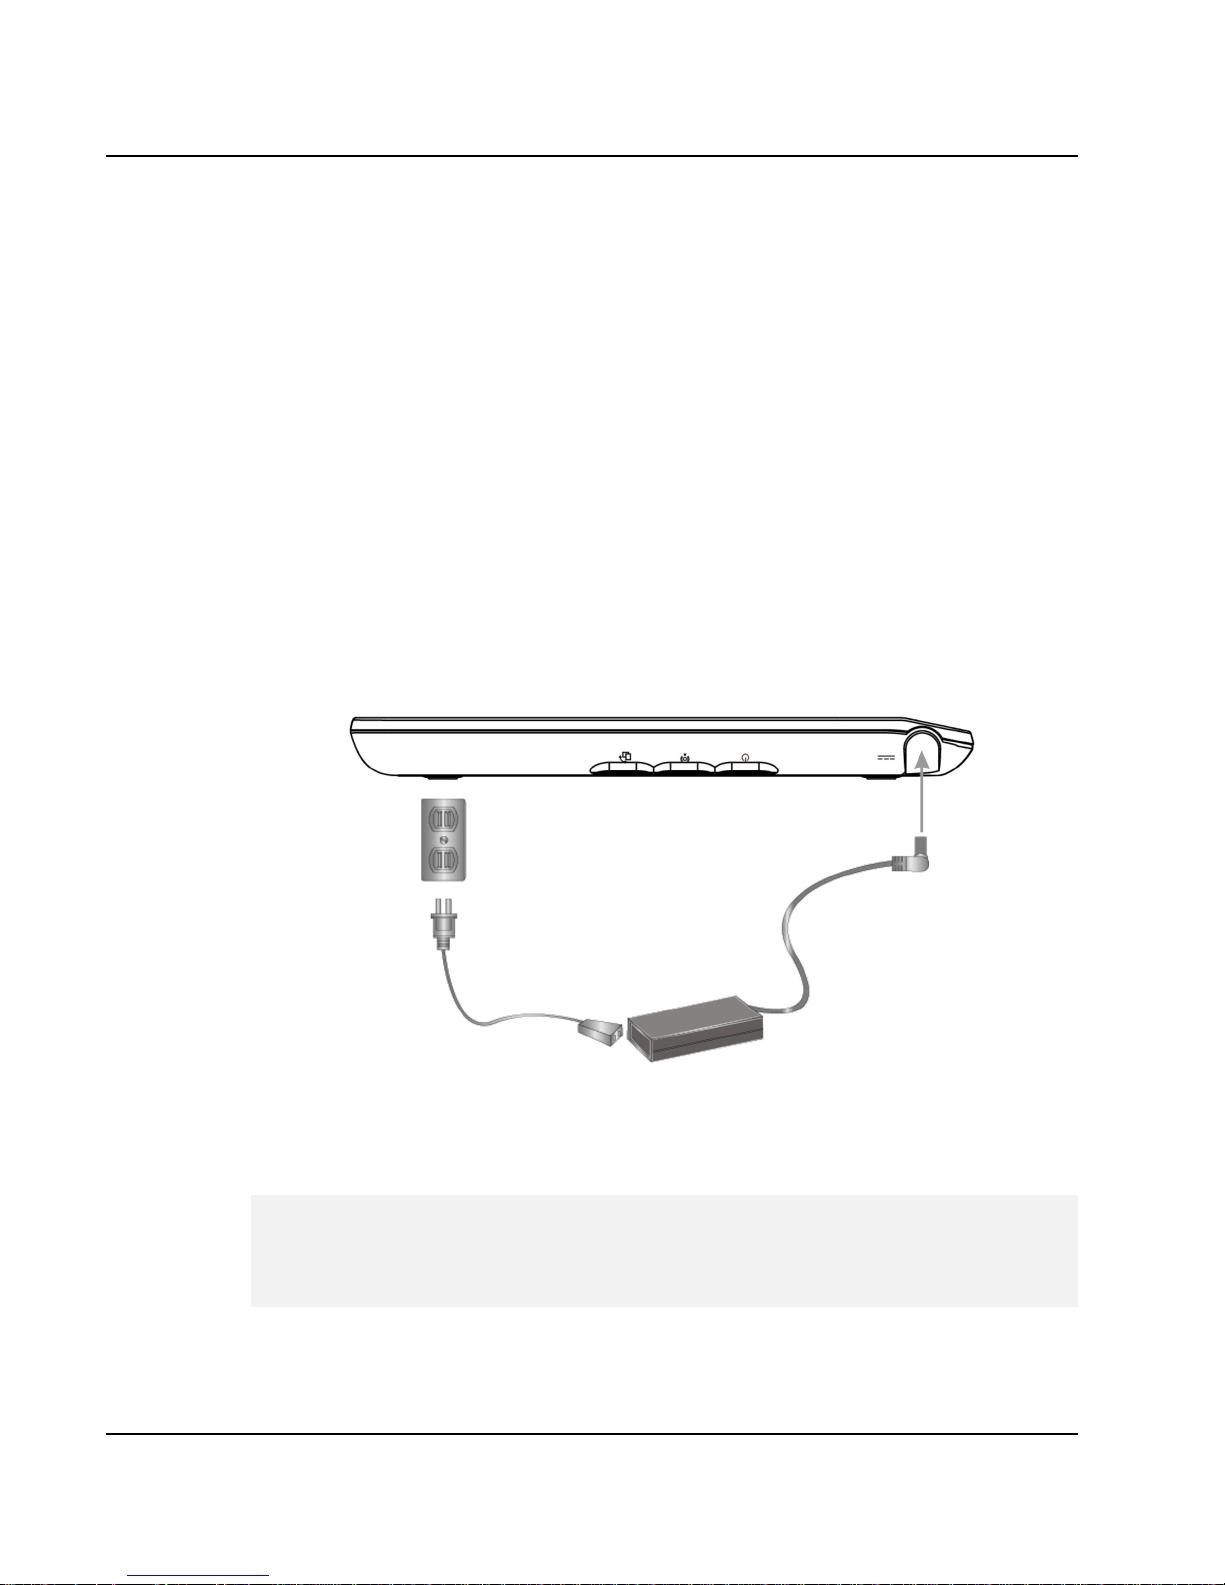
2.1 Connecting the AC Power Source
The AC adapter provides external power source to your Tablet PC and charges
the internal a Lithium-Ion (Li-Ion) battery pack at the same time. The AC
adapter also has an auto-switching design that can connect to any 100VAC ~
240VAC power outlets.
To connect the power adapter:
1. Plug the AC power cord into the power socket of the AC power adapter.
2. Plug the other end of the AC power cord to a live AC wall outlet.
3. Plug the connector of the AC adapter to the DC-IN port found at the left
side of the Tablet PC.
Whenever possible, it is advisable to always have the AC adapter connected
to the Tablet PC. This ensures continuous power supply and prevents any
data loss incurring from sudden power breakdown.
Page 33
Getting Started 2
33
y For the power supply of this equipment, an approved power cord has to
be used.
y Make sure the socket and any extension cord(s) you use can support
the total current load of all the connected devices.
y Before cleaning the computer, make sure it is disconnected from any
external power supplies (i.e. AC adapter).
2.2 Starting Your Tablet PC
TURNING ON THE TABLET PC
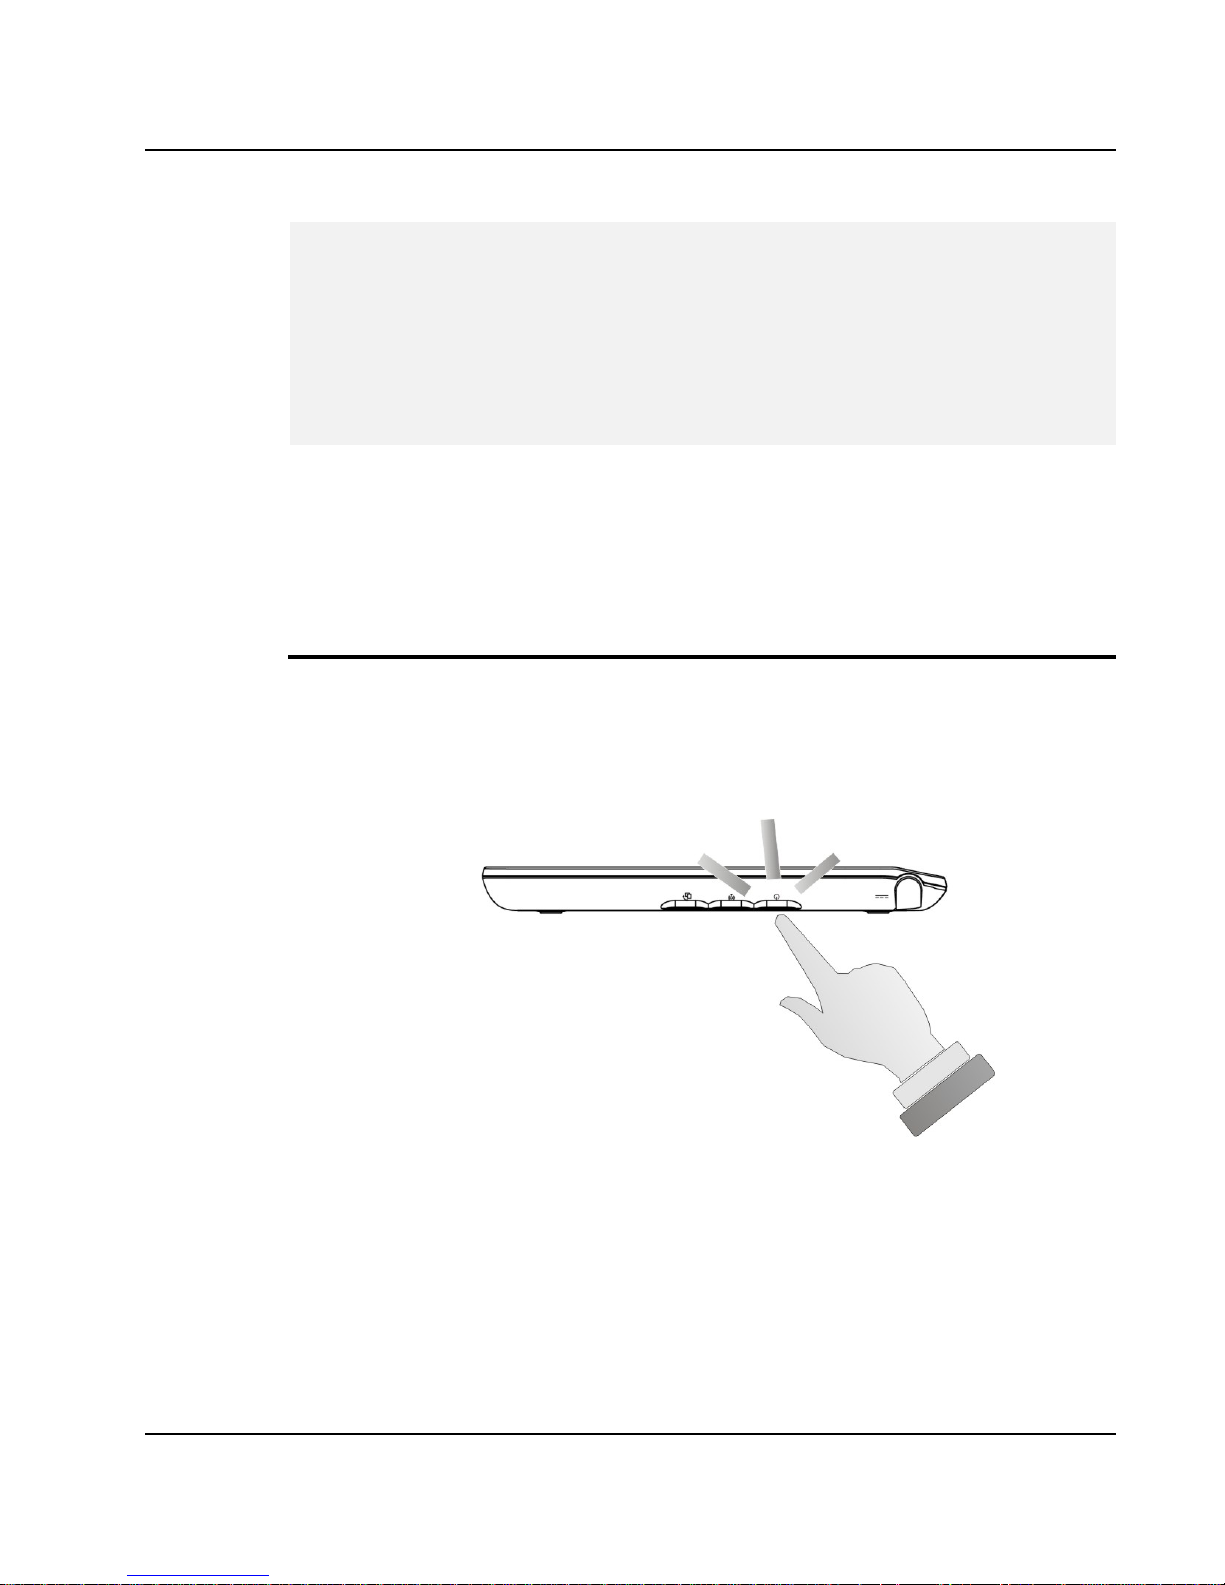
The Power/Resume button is found on the left panel of the Tablet PC. Press
the Power/Resume button to start your computer and check that if the Power
LED turns on.
After a few seconds, the computer’s display will turn on and your computer
will begin to execute the Power On Self Test or POST to check if all system
components are running properly. Any error found during the test will be
displayed on the screen.
Page 34

Tablet PC User Guide
34
After the test, the screen will also display a message "press <F2> to enter
SETUP". You don’t need to run this program at the moment as your dealer
already made the necessary settings for your computer optimal operation.
Refer to Chapter 5 on running the SETUP program later.
After the test has completed, your computer will start to search and boot up
the operating system from your hard drive. The computer normally comes
with a Windows operating system pre-installed in your hard drive. Consult the
Windows manual on how to use the program. If not, contact your dealer for
assistance.
USING THE TOUCH SCREEN
Your computer is equipped with a touch screen which has a high sensitivity
level. You can control your PC with the touch of your finger. Your fingertips
work as the hand-held mouse pointer. When you control the computer with
your fingertips on the screen, the hand-held mouse can work concurrently.
Do not apply pressure on the front of the display or around the screen
borders to avoid damaging the touch screen. For more details about
maintaining and cleaning the display screen, please see 6.3 Maintaining and
Cleaning the Display Screen.
2.3 Device Drivers Installation
If you already have an operating system installed into your tablet computer, it
is best to install the needed device drivers for using the built-in devices of your
computer. Before installing the drivers, check with your dealer first if they have
already installed all the drivers along with the operating system. If not, follow
the procedures below:
Page 35

Getting Started 2
35
INSTALLING WINDOWS 7 FROM OPTICAL DISK DRIVE
To install Windows 7 Home Premium directly from your USB - Slim Combo
Drive (optional), please go to Boot menu of BIOS setup menu. Use arrow key
to select "USB CDROM", then use "
Ç" or "È" to move it to the top. Go to
Exit menu and select "Exit Saving Changes". Accordingly, insert the
Windows 7 Home Premium installation DVD into USB - Slim Combo Drive
(optional) with following the instructions on the screen to finish the
installation.
Driver Installation Note:
Before installing driver & utility , please turn off "User Account Control
settings" item of User Accounts in Control Panel.
Please install chipset driver first.
Before installing utility , please install Utility Program Component driver
first .
INSTALLING ALL THE DEVICE DRIVER
1. Click the Start button, then point to Run. The Run dialog box appears.
2. Click the Browse button and specify the directory as listed table below,
follow the on-screen instructions to complete drivers installation.
Device Driver Driver Path
Chipset Device Driver
"E:\Win7\x86\Chipset\Setup.exe"
VGA Device Driver
Page 36
Tablet PC User Guide
36
"E:\Win7\x86\VGA\Setup.exe"
Audio Device Driver
"E:\Win7\x86\Audio\Setup.exe"
Utility Program Component Device Driver
"E:\Win7\x86\Utility Program
Component\Setup.exe"
G-Sensor Driver
"E:\Win7\x86\SensorDRV\Setup.exe"
Hotkey Utility
"E:\Win7\x86\Hotkey\setup.exe"
AzureWave WLAN/BT Device Driver
"E:\Win7\x86\WLAN+BT\setup.exe"
AzureWave Wireless LAN Device Driver
"E:\Win7\x86\Wireless Lan\setup.exe"
ETCom 3G Device Driver (Option)
"E:\Win7\x86\3G Module\Autorun.exe"
AzureWave HD Video Device Driver
"E:\Win7\x86\HD Video\setup.exe"
AzureWave Camera Device Utility
"E:\Win7\x86\CameraUtility\setup.exe"
HannStar Touch Panel Device Utility
"E:\Win7\x86\HID Calibration\
HID_GUI_V1.exe"
Page 37

Getting Started 2
37
Page 38

Page 39
Using Your Tablet PC 3
39
3 Using Your Tablet PC
This chapter describes how to operate the standard
built-in features of the Tablet PC that you normally would
use in your day-to-day computer work. If you are new to
computers and to your operating system, you also need to
read the manual for the operating system on how to work
with your Tablet PC. It is very important to familiarize
yourself well with the operating system. The succeeding
chapters not only guide you to go beyond the basics, but
also try other exciting features.
Page 40
Tablet PC User Guide
40
3.1 Screen Hotkey Utility for function
controls
Your Tablet PC has a number of function controls on the screen for
preprogrammed with special functions. Please just position your finger on the
screen where you want to execute a command.
SPECIAL FUNCTION CONTROL
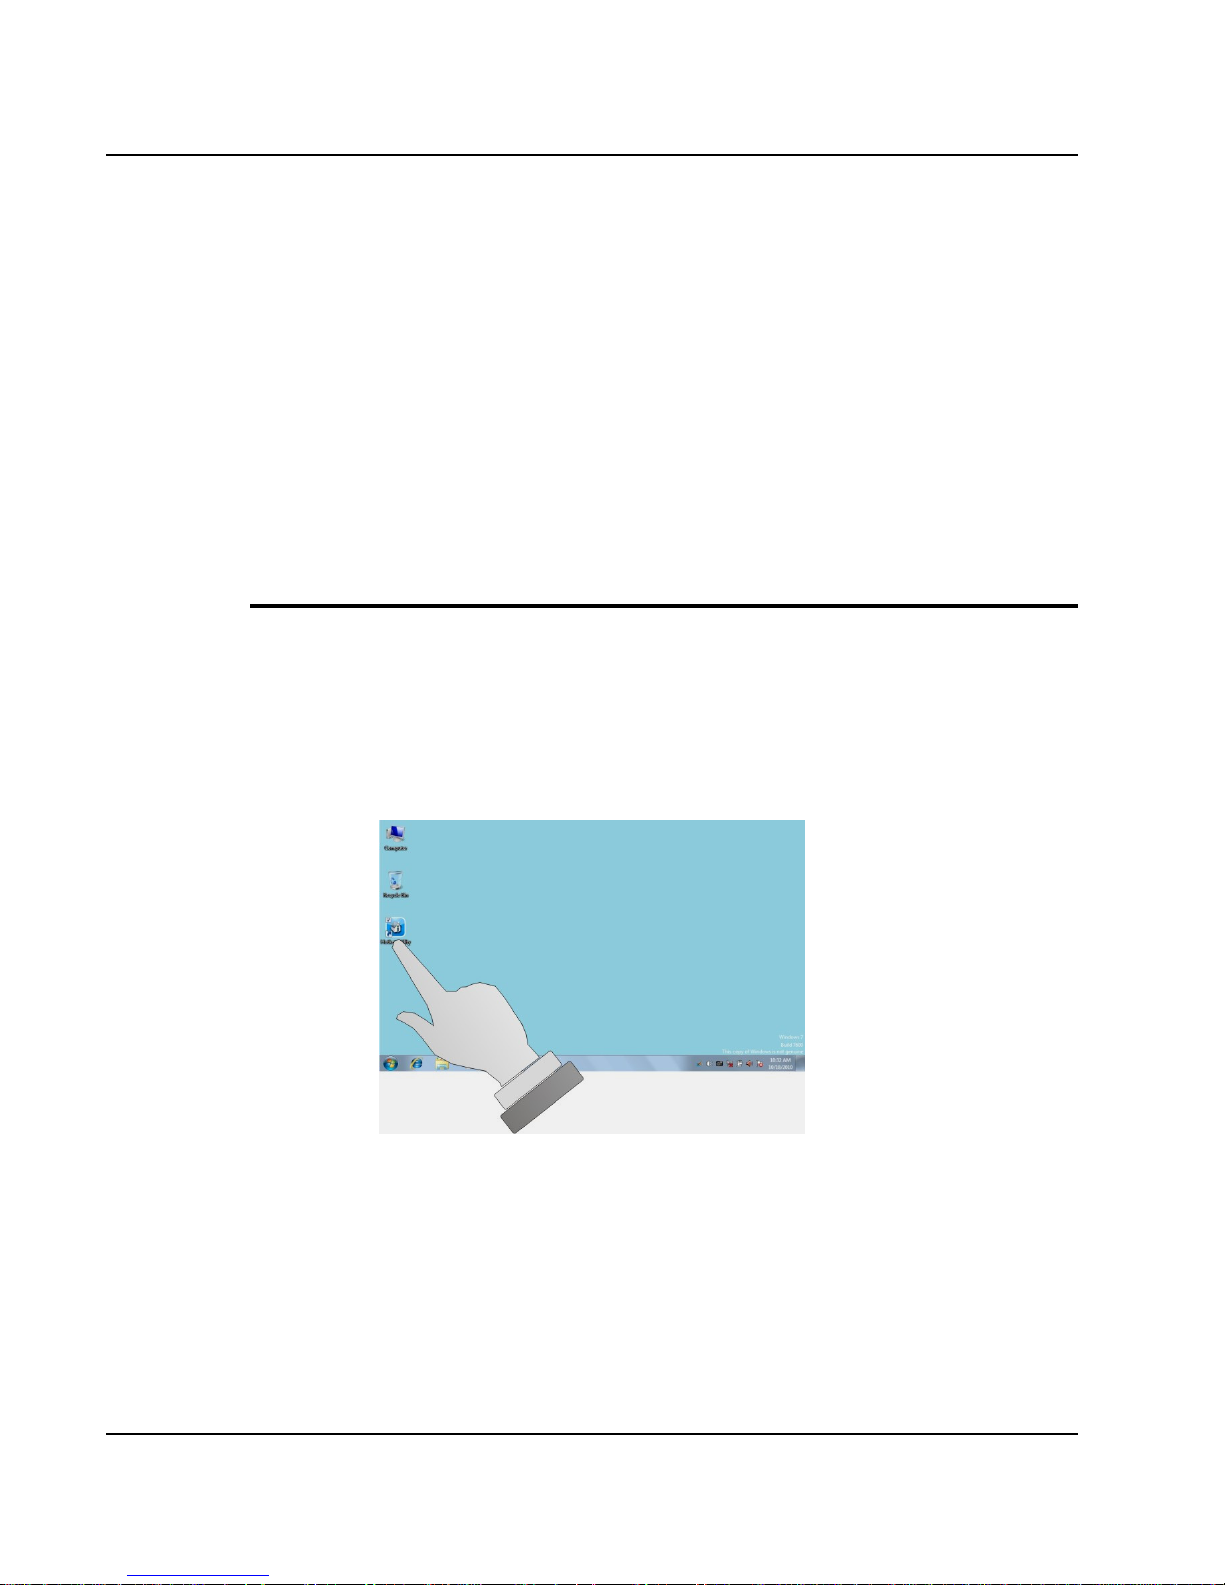
This Tablet PC provides you the hotkey utility on the screen for executing
special function as follows:
1. Double click the hotkey utility by finger to appear the function bar.
Page 41
Using Your Tablet PC 3
41
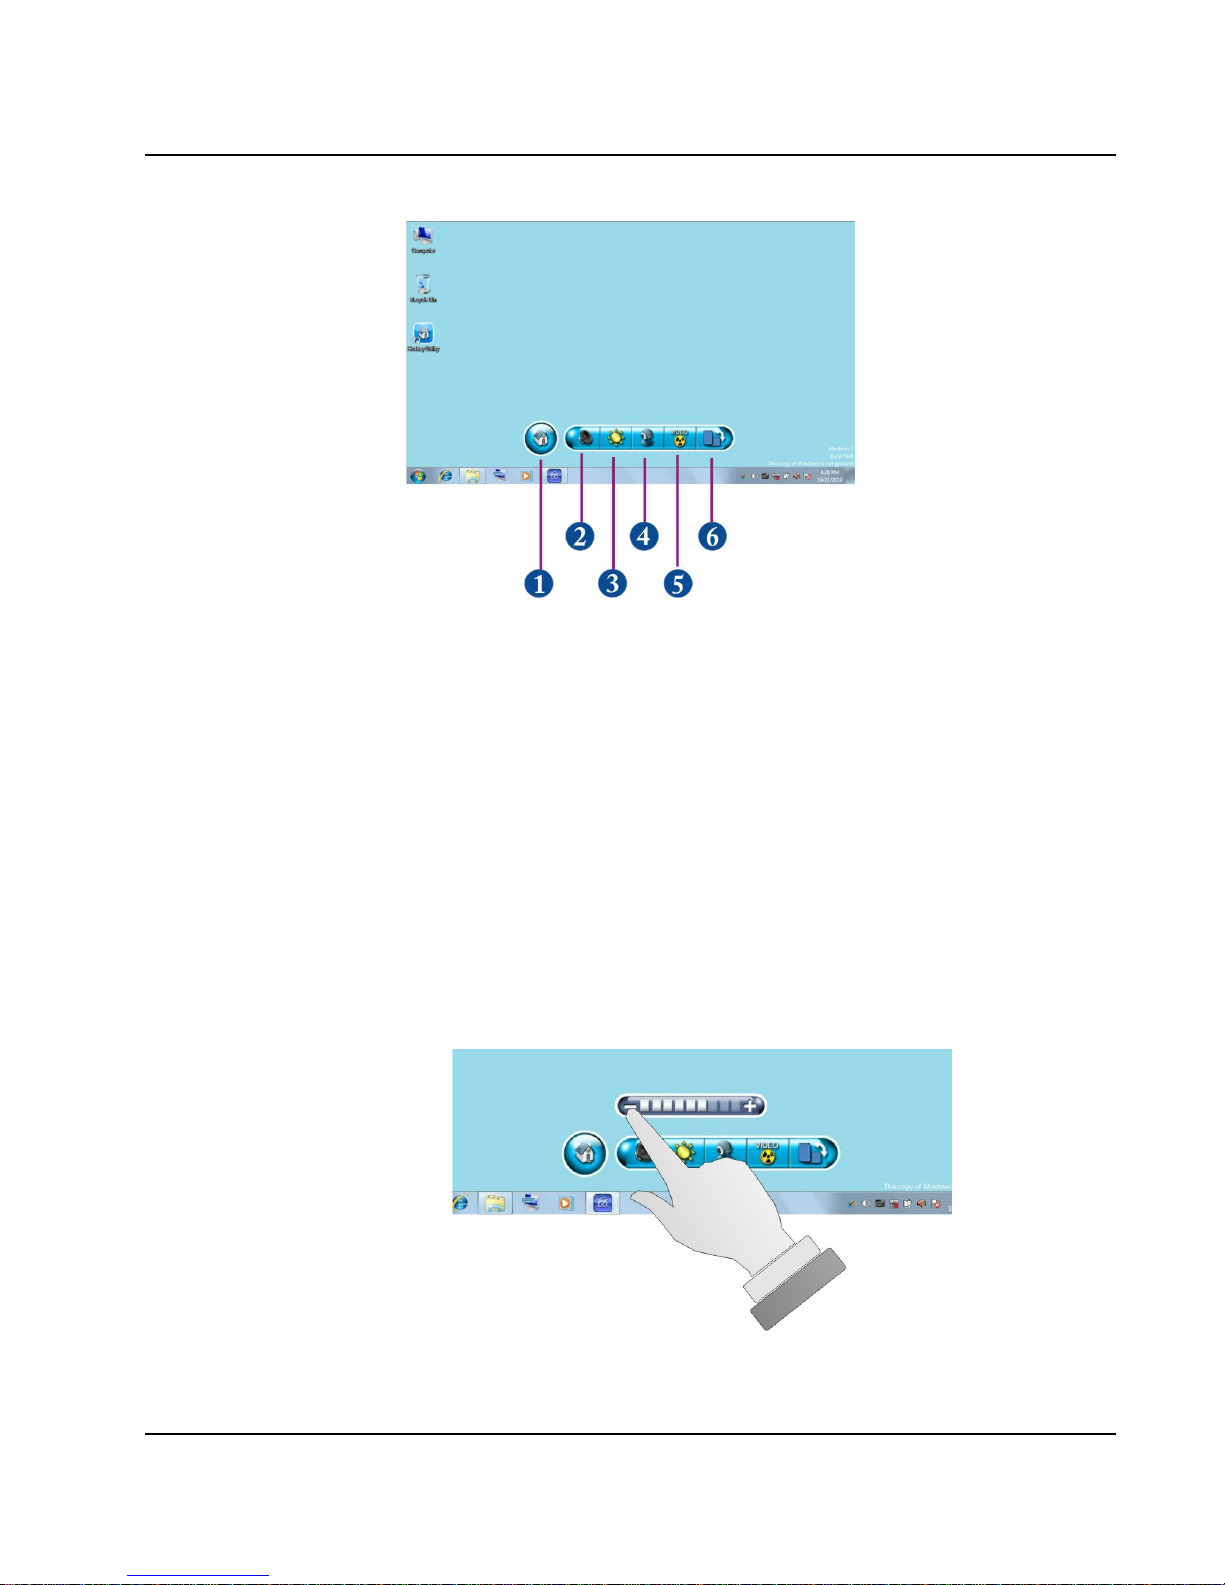
1. Show Desktop 2. Volume
3. Brightness 4. Webcam
5. Video Decoder 6. Screen Rotation
z Show Desktop
To hide the Wizard from view on the screen, press the button for
minimization the Wizard to the task bar.
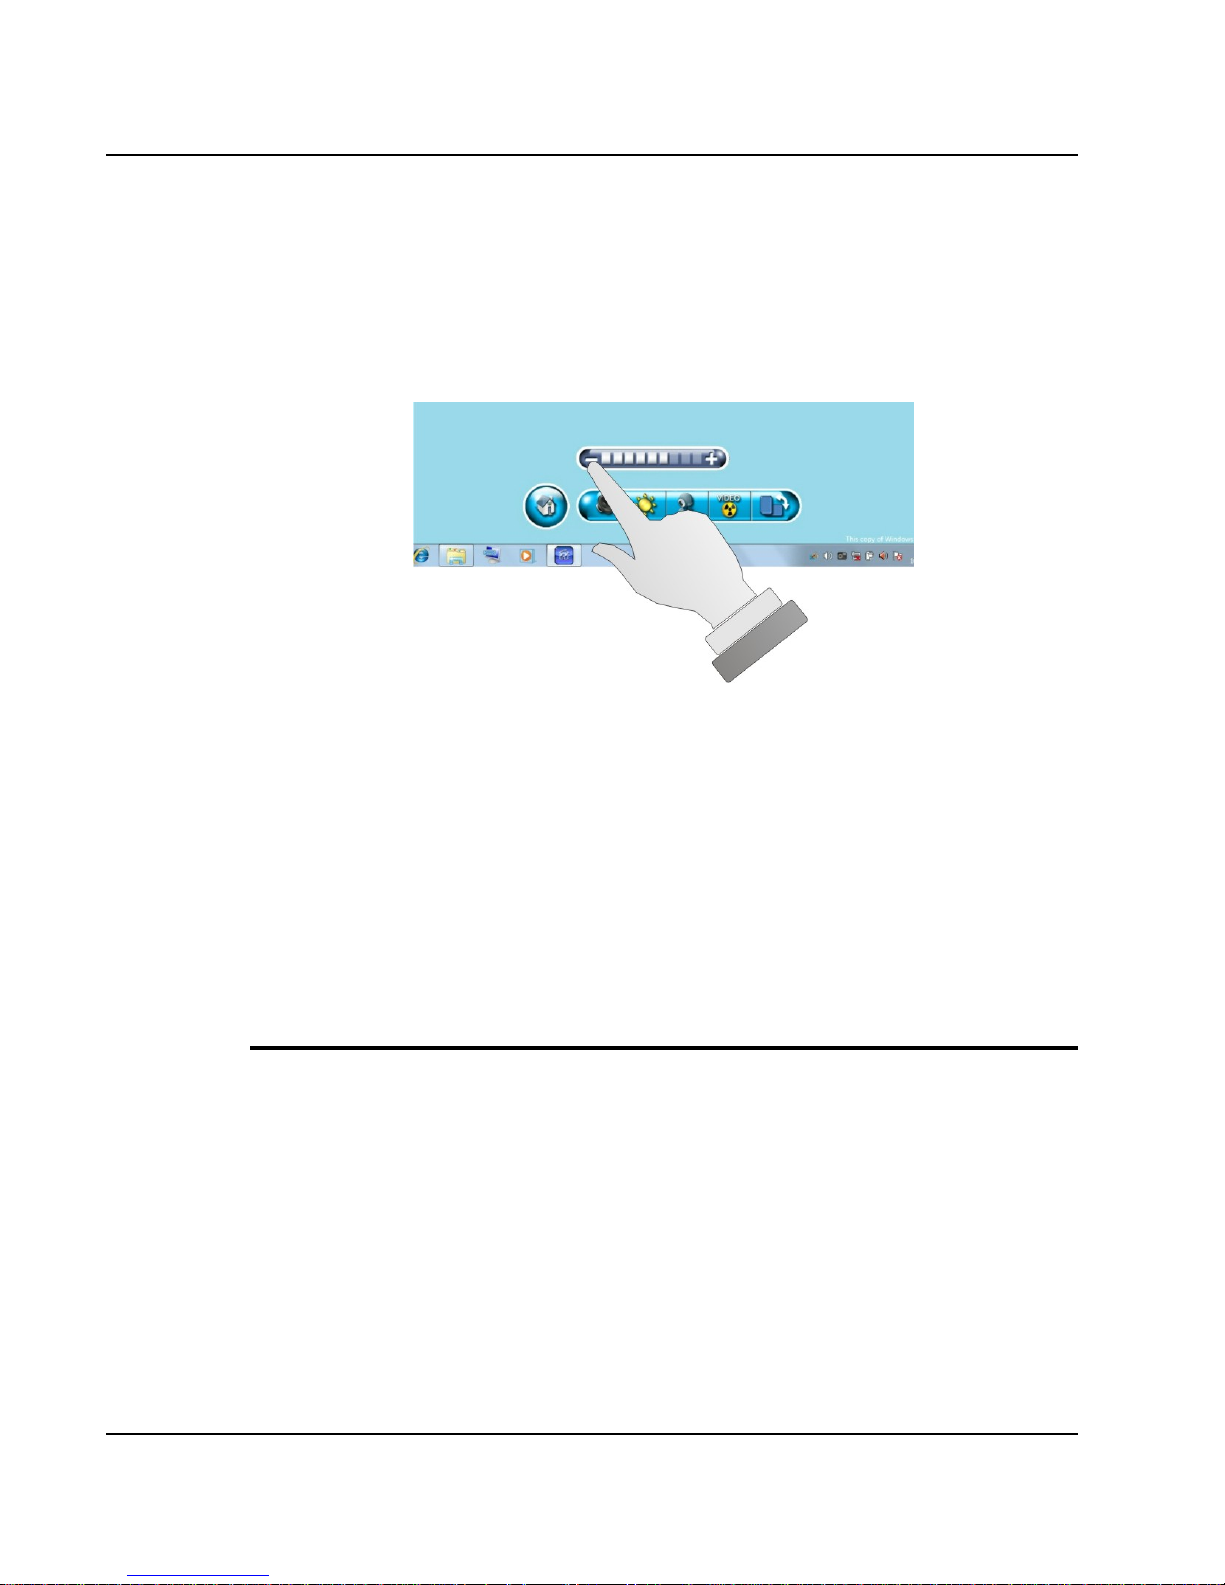
z Press the Volume command to adjust the audio volume, the Volume
adjustment bar appear for you to increase or decrease the audio volume
incrementally.
Page 42
Tablet PC User Guide
42
z Press the Brightness command to adjust the screen’s brightness, the
Brightness adjustment bar appear for you to increase or decrease the
display brightness incrementally.
z Press the Webcam command to enable or disable the Webcam function.
z Press the Video Decoder command to enable or disable the video
decoder function.
z Press the Screen Rotation command to activate or close the screen
rotation function.
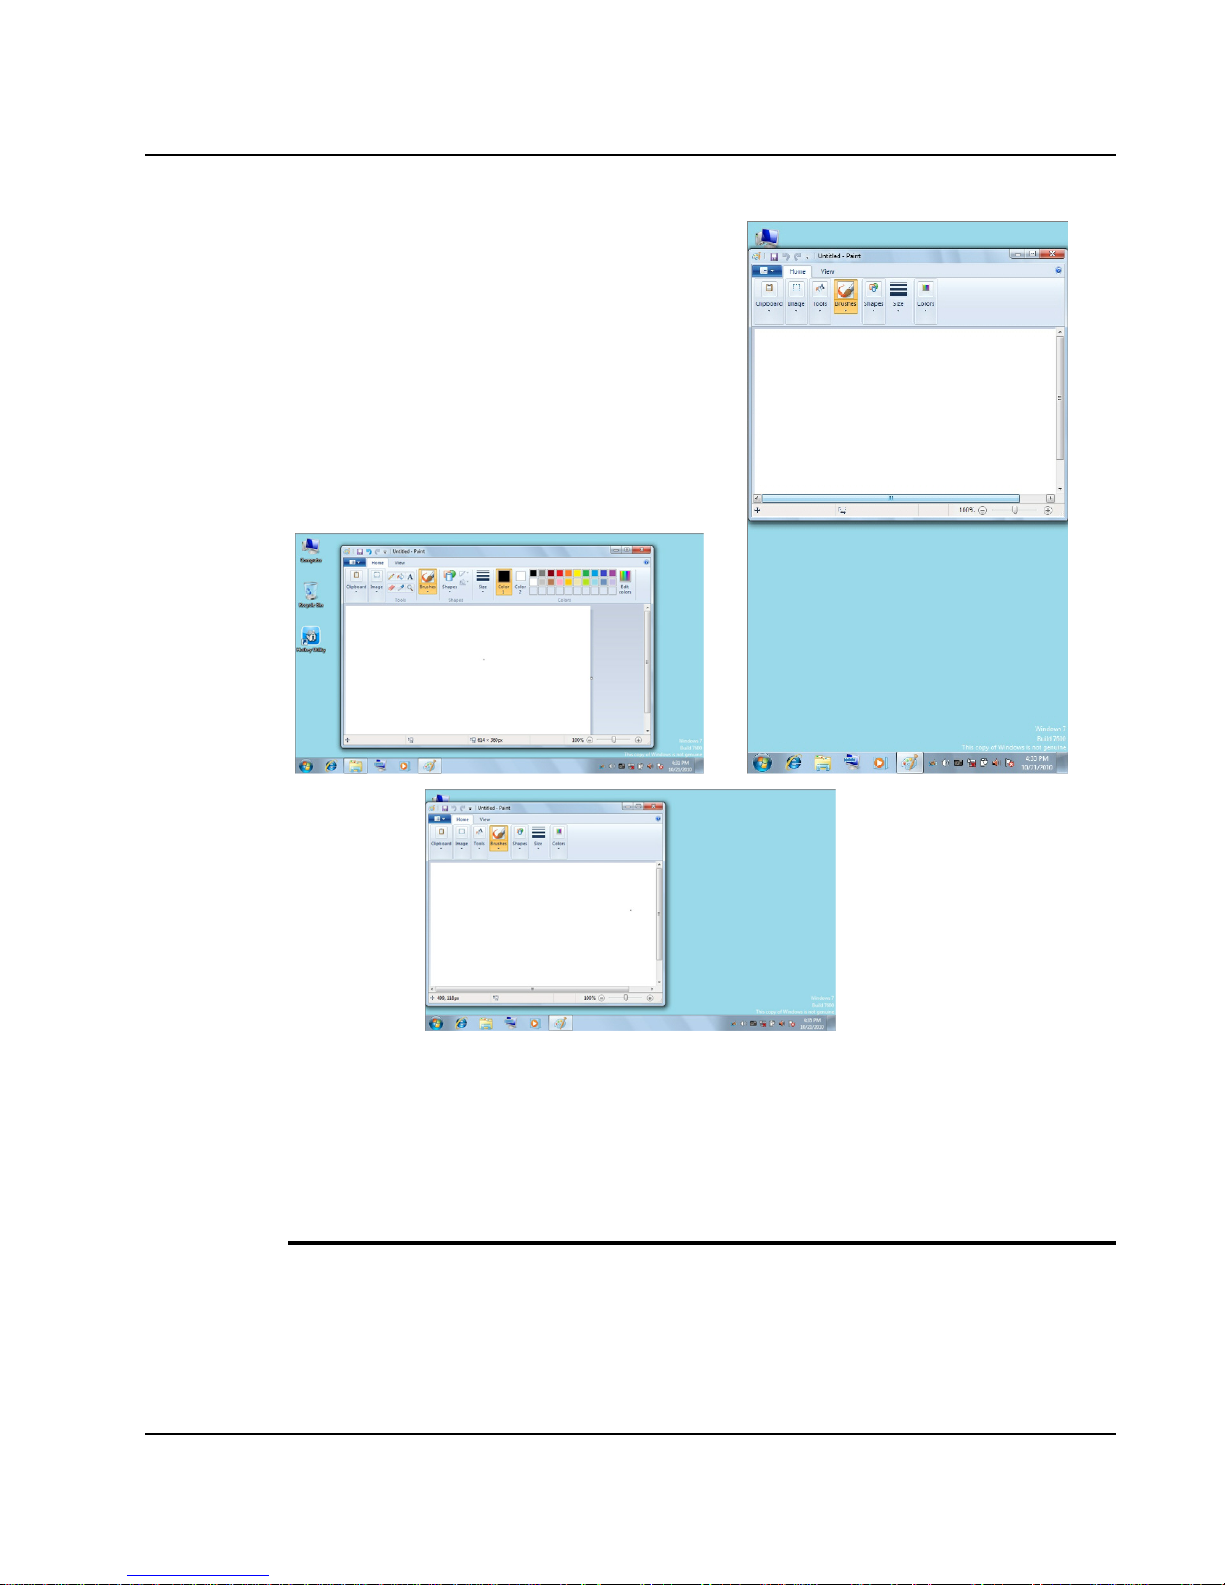
ABOUT SCREEN ROTATION
Tablet PC allows you to view the screen with different orientation but still
keep the screen face you. To do so, please position the Tablet PC vertically
and rotate it with clockwise 90º each time, the G sensor will recognize the
rotation and still keep the screen face you without being rotated accordingly.
Page 43
Using Your Tablet PC 3
43
3.2 Configuring Your Screen Display
POSSIBLE DISPLAY CONFIGURATIONS
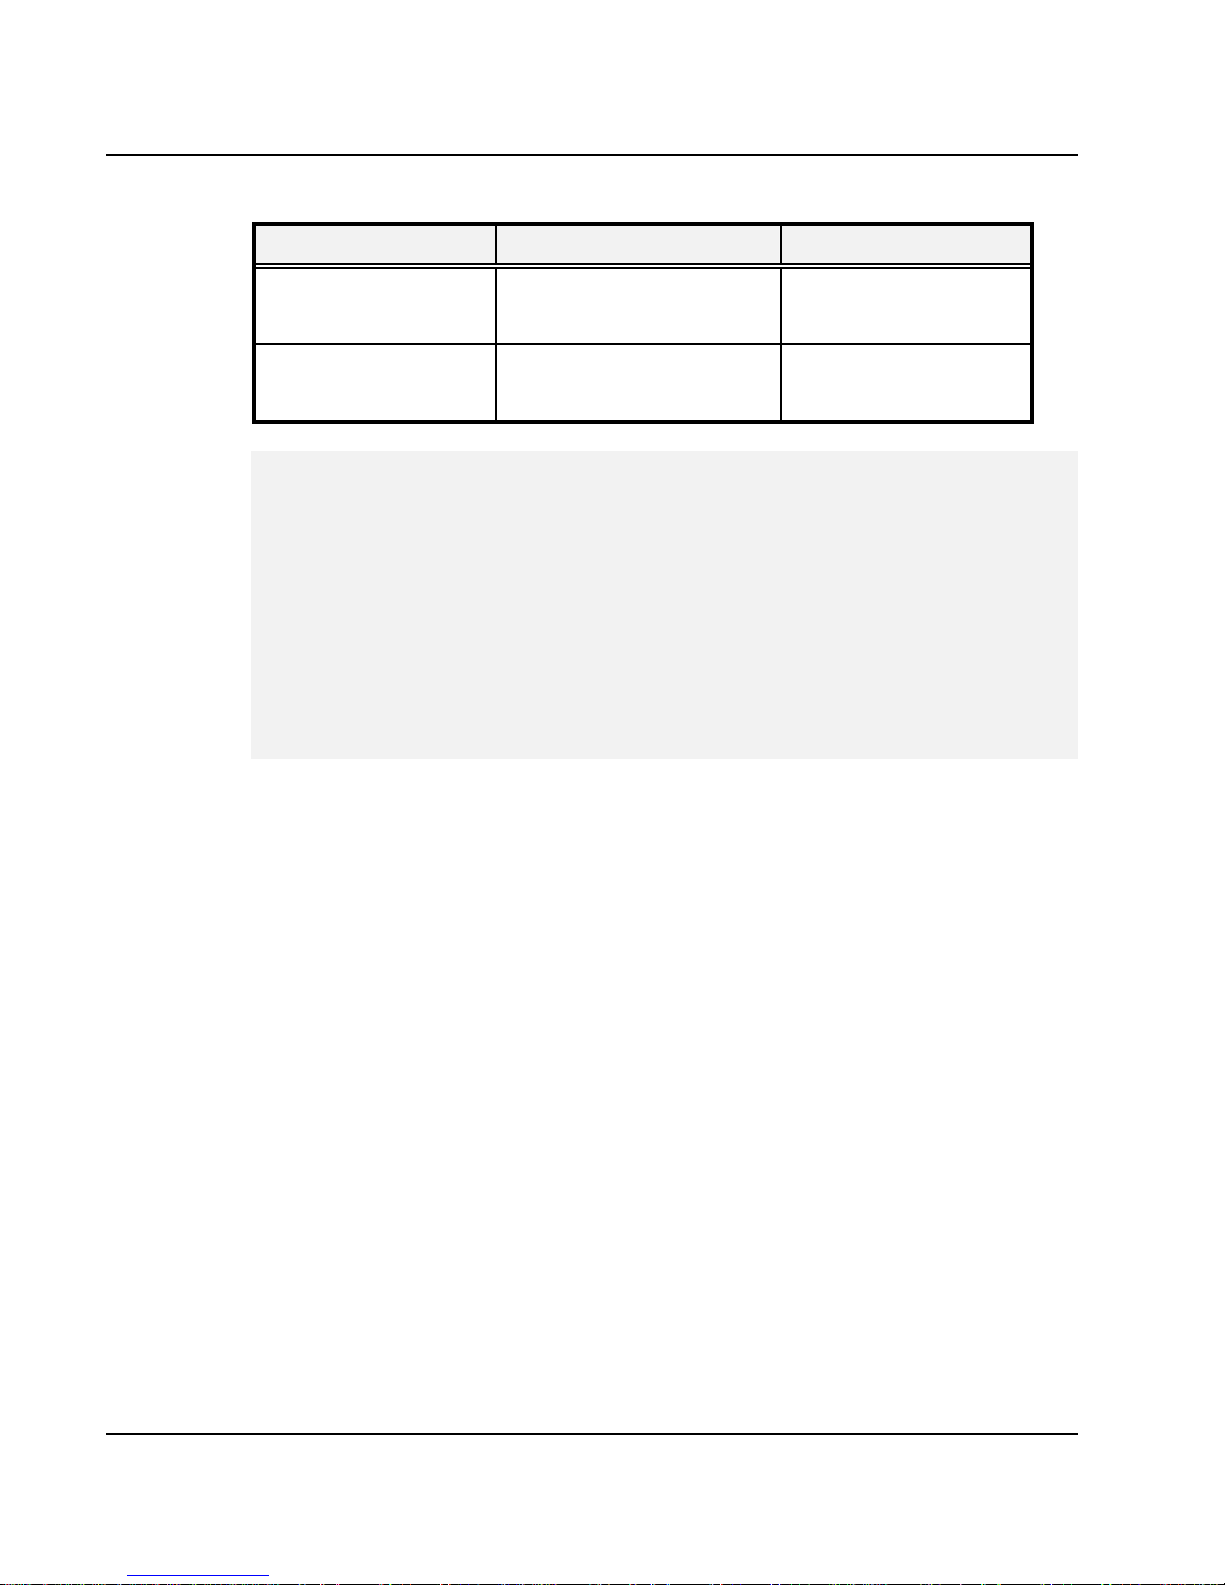
The table below shows you the possible display resolution you can set when
using either the display screen or the external monitor (CRT):
Page 44
Tablet PC User Guide
44
Display Possible Resolution Maximum Colors
Widescreen
10.1" WSVGA LCD
1024 x 600
16 million colors
CRT Only 1400 x1050
(Maximum resolution)
16 million colors
The Panel Resolution with 800x600 will not work with 90-degree. This is the
DirectX runtime library limitation from MS.
65,536 or 64K colors is also equivalent to 16-bit high color while 16 million or
16M colors is equivalent to 32-bit true color.
You can use the hotkey utility on the screen to switch the display within
LCD only, CRT only or both LCD and CRT display, simultaneously.
Page 45
Connecting to Peripherals 4
45
4 Connecting to Peripherals
This chapter describes how you attach peripheral
devices to your Tablet PC. You can attach a printer
or mouse; connect an external monitor and
keyboard, or other peripheral device. You will learn
how to use these peripheral devices with the step-bystep instructions depicted in this chapter.
Page 46
Tablet PC User Guide
46
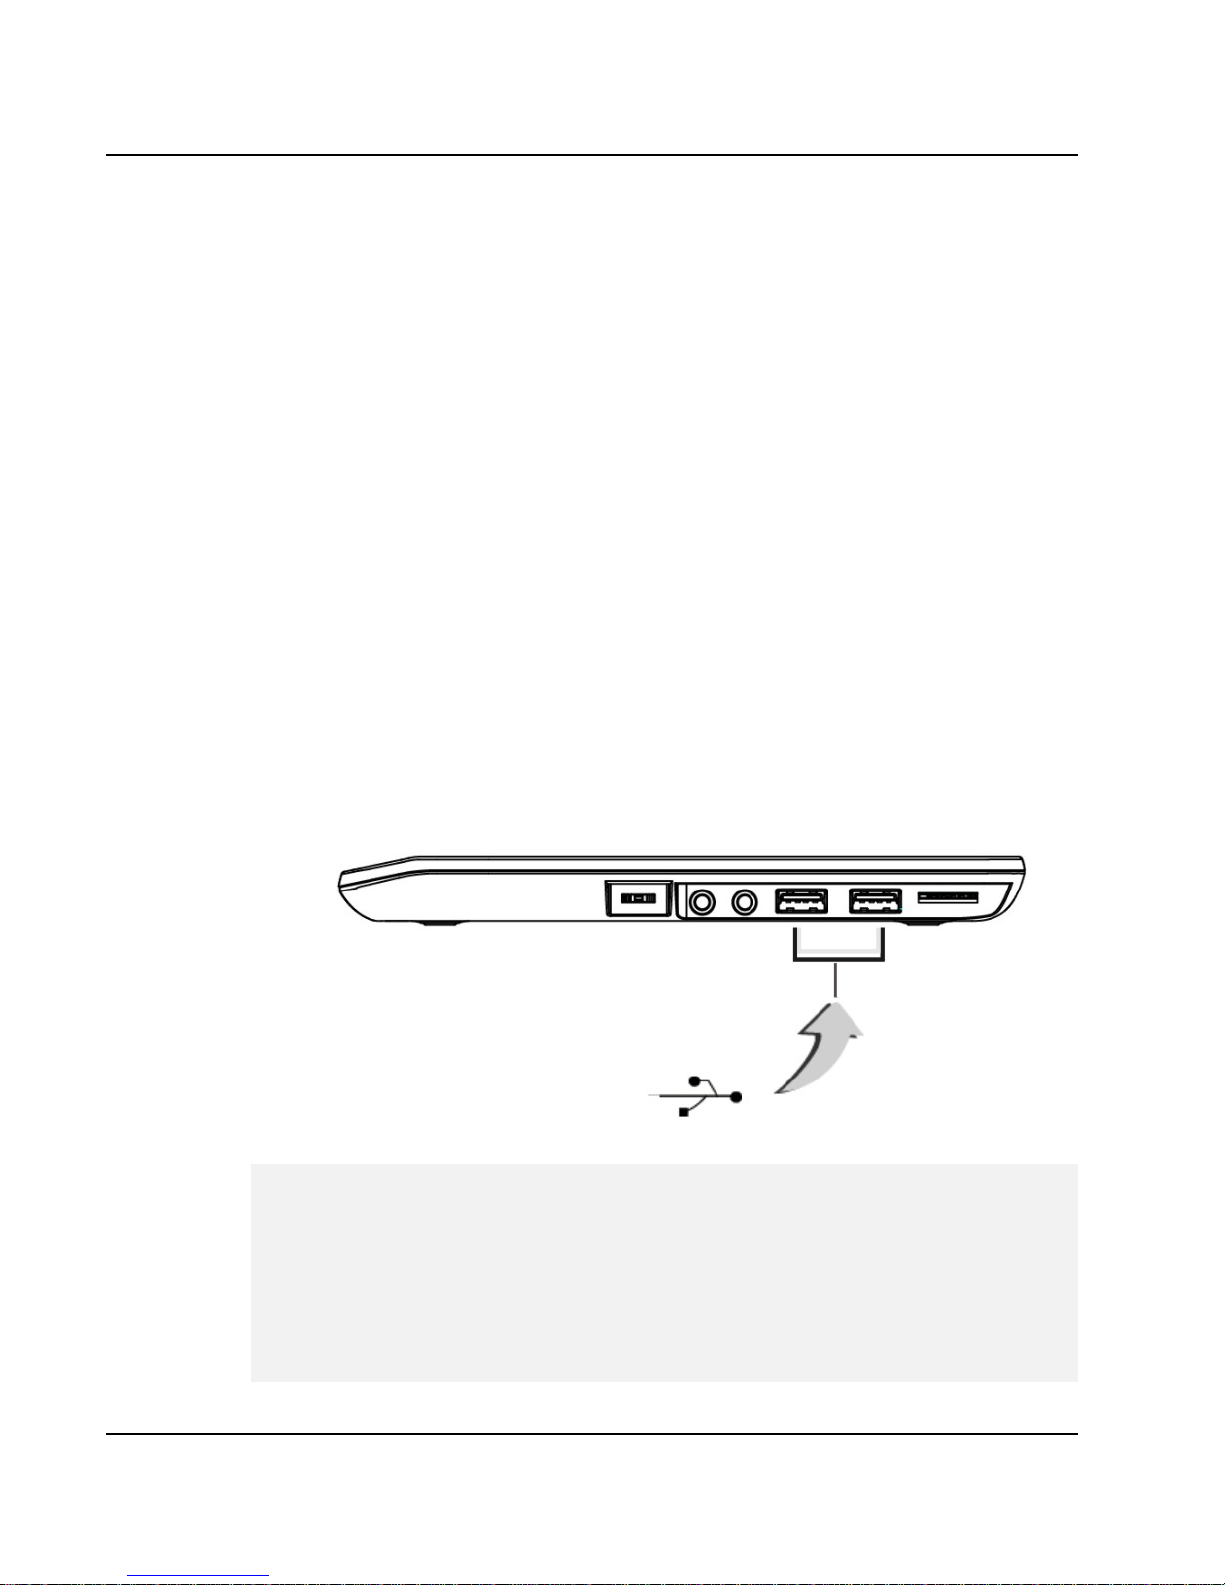
4.1 Using the USB Port
USB (Universal Serial Bus) is a hardware interface that enables you to connect
multiple devices (such as printers, mice, keyboards, storage devices, digital
cameras, and video conference cameras, etc.) to your Tablet PC, and up to 127
devices can be attached. Besides, USB’s hot swap capability allows everything
to be plugged in and unplugged without turning the system off.
Microsoft, HP, Compaq, Intel, Agere, NEC and Philip are seven core
members of USB-IF to have worked on USB 2.0 standardization. USB 2.0
offers data transfer rate up to 480Mbps (megabits per second) compared to
USB 1.1 devices, which transfer at speeds of 12Mbps. So, you could know that
USB 2.0 can transfer data between the computer and its peripherals 40 times
faster than USB 1.1. However, USB 2.0 is fully backward compatible, you will
be able to use a USB 1.1 device in a USB 2.0 compliant system.
Depending on your operational requirements, you may need to disable
other ports in order to release system resource for the USB port.
The USB bus distributes 0.5 amps (500 milliamps) of power through each
port. For the purpose of power saving, please disconnect your USB device
while not in use.
Page 47

Connecting to Peripherals 4
47
4.2 Using a SIM Card Slot
Your Tablet PC has a 3.5G HSDPA module that can work with SIM card.
INSERTING AND REMOVING A SIM CARD
Inserting a SIM Card
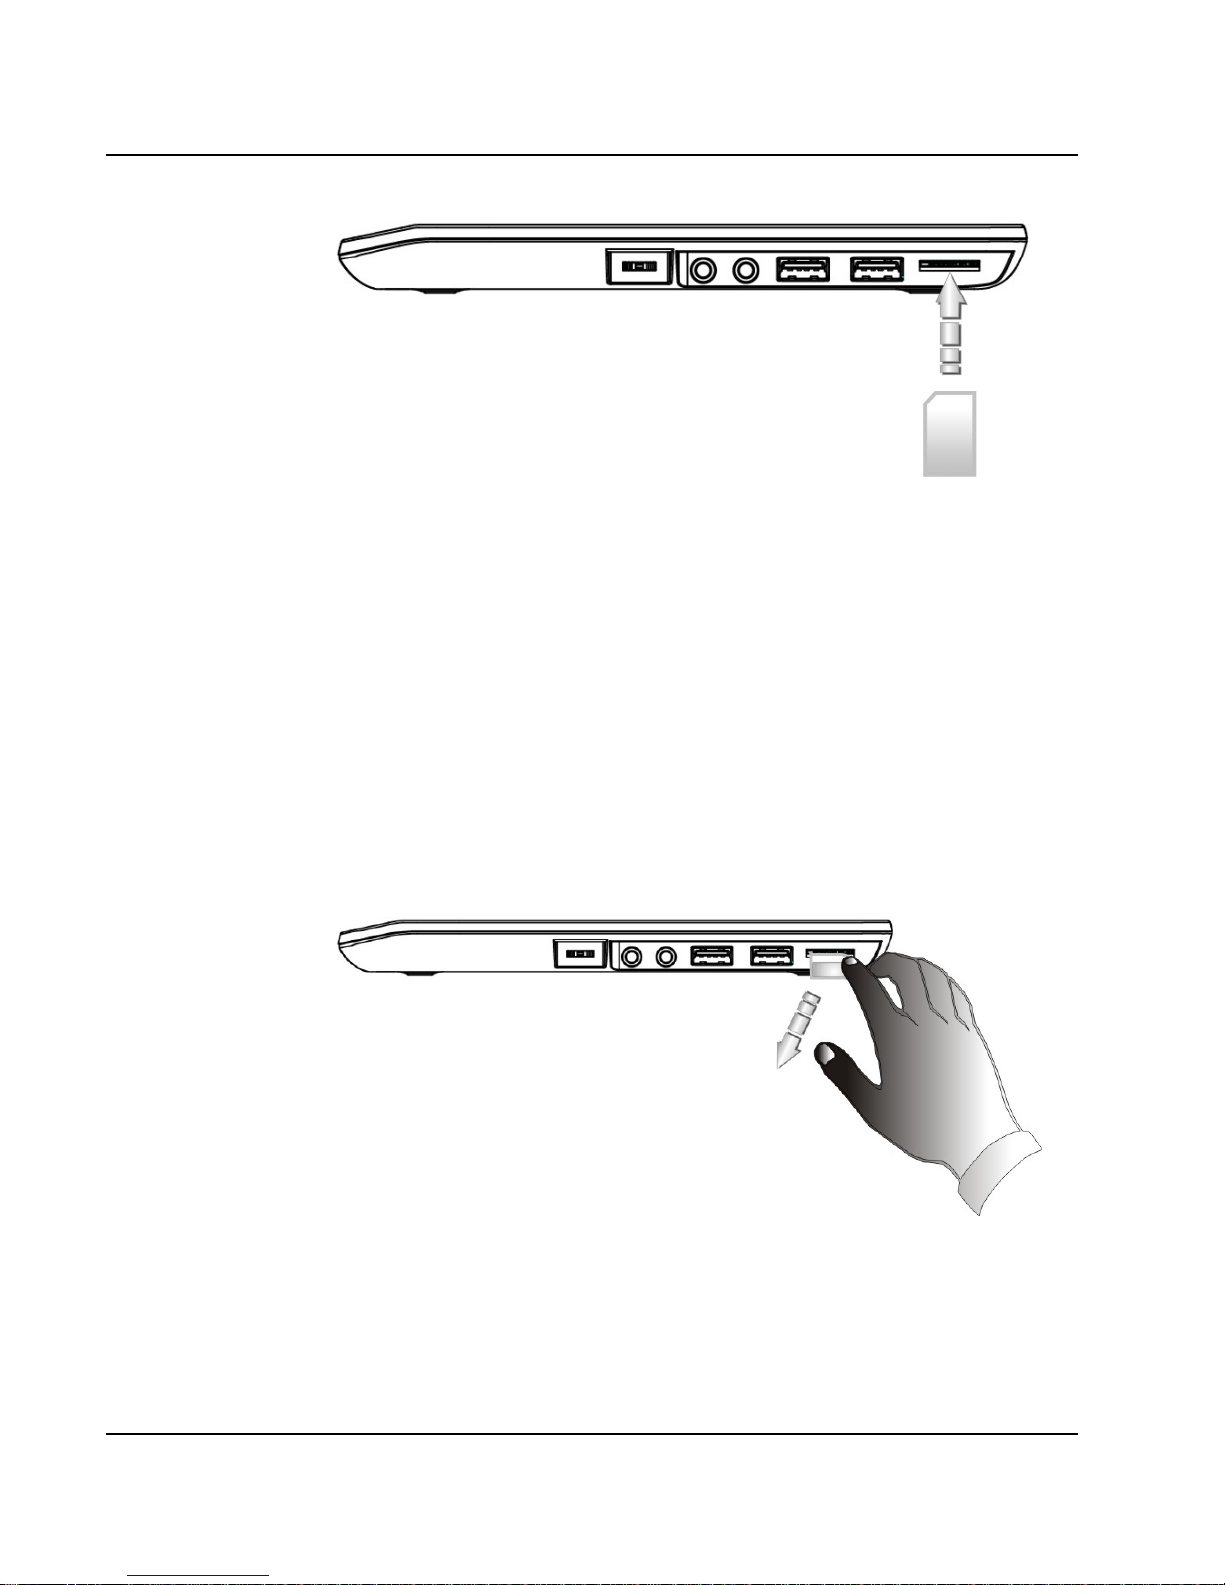
To insert a SIM card into the slot, please pay more attention whenever insert
the SIM card into the slot with the correct side. Only one correct side can be
accepted for the card slot. If you cannot insert the card into the slot or you had
inserted the card but it is not recognized by the Tablet PC, please remove the
card and insert it again. To prevent the damage made both on card and the
slot, never forced an entry into the slot with incorrect side.
To insert a SIM card into the SIMCard slot:
1. Turn off your Tablet PC.
The Tablet PC must be powered off while the SIM Card is being connected.
Otherwise, it is harmful to both devices and it shortens the life of these
devices.
2. Open the I/O cover on the right side of the Tablet PC.
3. Connect the SIM Card to the SIMCard slot at the right panel of your
Tablet PC. The face label of the card should also be facing up.
4. When the full length of the card is almost inside the slot, push firmly but
slowly, to ensure full connection with the Tablet PC. The SIMCard will be
automatically detected.
5. Turn on the power of the Tablet PC.
Page 48
Tablet PC User Guide
48
Removing a SIM Card
To remove the SIM card, you can pull out the card directly, there is no release
button for SIMCard slot.
To remove a SIM Card from the SIMCard slot:
1. Turn off your Tablet PC.
2. Pull out the card directly, when the SIM Card has moved out a space out
of the slot, hold the edges of the card and slowly slide it out.
Page 49
Connecting to Peripherals 4
49
4.3 Using the External Audio System
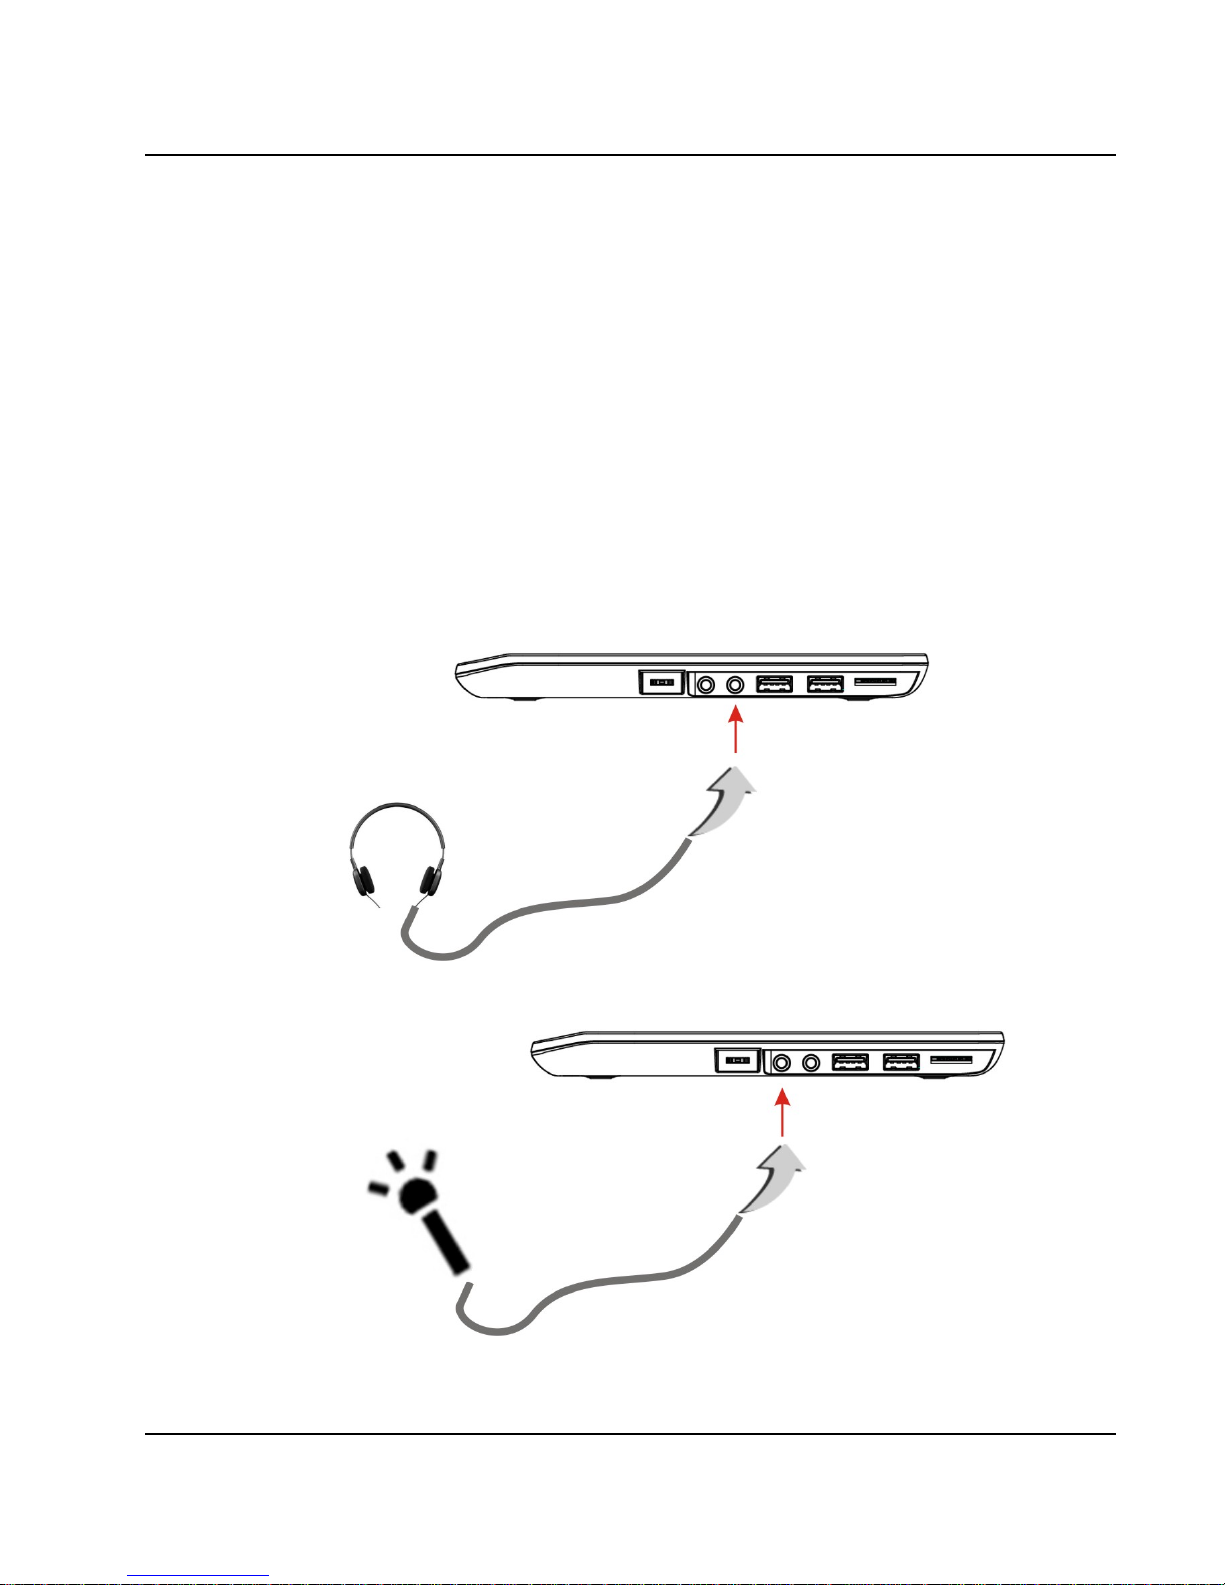
At the right panel of your Tablet PC, you will find the built-in audio ports. You
can connect Microphone jacks, earphone or powered speaker.
To connect to an audio jack:
1. Locate the audio port (Microphone, Headphone) that you want to use to
the target device.
2. Plug the jack into the port on the right panel of the system.
Page 50

Tablet PC User Guide
50
If you use external speakers and experience the sound distortion or
feedback, please lower the volume. Some factors is caused by too close
locating the microphone and speakers from each other, moving away the
external audio option from the unit may also help.
4.4 Using the Wireless LAN
This computer integrates built-in 802.11 b/g/n wireless LAN module. IEEE
802.11b standard supports 11 Mbps wireless connection speed. However,
IEEE 802.11g/802.11n supports 54Mbps and 150Mbps wireless connection
speed respectively, and is backward compatible with the slower 802.11b.
.
Page 51

Caring for Your Tablet PC 5
51
5 Caring for Your Tablet
PC
Your Tablet is equipped with the latest features in
mobile computing technology. If properly cared for
and maintained, the performance and reliability of the
computer can be greatly prolonged.
Page 52

Tablet PC User Guide
52
Cleaning Your Tablet PC
Your Tablet PC needs occasional cleaning to prolong their life. Please read this
section carefully to ensure proper care of Tablet PC. When it is necessary to
clean it, use a soft, lint-free cloth, slightly dampened with a mild detergent
solution or use the contents of any commercially available computer cleaning
kit.
Never use alcohol, petroleum-based solvents, or harsh detergents to clean the
tablet. Also never spray any liquids directly on the computer case or screen. If
the display screen has become smeared or dusty, clean the screen by first
applying a mild glass cleaner to a soft, clean, lint-free cloth, and gently wipe the
glass. Never apply liquids directly on the screen surface. Moreover, do not use
paper towels to clean the display screen. Paper can scratch the display screen
matte.
 Loading...