

Page 1

1
Gebrauchsanleitung
Operating manual
Page 2
2
V
VII
XII
X
VI
VIII
IX
XI
I
2
2
1
1
II
4
3
3
III
7
7
6
IV
5
8 9 10
11
12
13
14
15
16
17
18
19
Page 3
3
DE Gebrauchsanleitung und Garantiebestimmungen 4
GB operating manual and warranty conditions 8
Page 4

4
Gebrauchsanleitung und Garantiebestimmungen
Herzlich willkommen in der Welt von TFK.
Bitte nehmen Sie sich ein Paar Minuten Zeit und lesen Sie die folgenden
Hinweise vor der Benutzung sorgfältig durch. WICHTIG: Bewahren Sie die
Anleitung für spätere Rückfragen auf. Wenn Sie diese Hinweise nicht
beachten, kann die Sicherheit Ihres Kindes beeinträchtigt werden!
SICHERHEITSHINWEISE + WARNUNGEN
- WARNUNG: Lassen Sie ihr Kind nicht unbeaufsichtigt!
- WARNUNG: Befördern Sie immer nur ein Kind!
- WARNUNG: Dieses Produkt ist nur für ein Kind geeignet, das sich
noch nicht selbständig aufsetzen bzw. auf die Seite rollen oder sich
noch nicht auf Händen und Knie stützen kann.
- WARNUNG: Diese DuoX darf nicht auf einem Ständer verwendet
werden.
- WARNUNG: Stellen Sie die DuoX nur auf festen, waagrechten und
trockenen Untergrund ab.
- WARNUNG: Lassen Sie andere Kinder nicht unbeaufsichtigt neben
der DuoX spielen.
- WARNUNG: Verwenden Sie die Tragetasche nicht, wenn ein Teil
gebrochen oder eingerissen ist oder fehlt.
- Platzieren Sie die Wanne NICHT in der Nähe eines offenen Feuers
und anderer Hitzequellen.
- Bitte greifen Sie den Griff der DuoX so, dass der Kopf des Kindes in
der Tragetasche niemals niedriger als dessen Körper ist.
- Höchstgewicht des Kindes in Liegeposition: 9 kg.
- Höchstgewicht des Kindes in Sitzposition: 13 kg.
- WARNUNG: Verwenden Sie einen Sicherheitsgurt, sobald ihr Kind
selbständig sitzen kann.
- WARNUNG: Verwenden Sie den Schrittgurt immer in Verbindung mit
dem Beckengurt.
- Verwenden sie keine zusätzliche Matratze!
- Untersuchen Sie regelmäßig die Griffe und den Boden auf
Beschädigungen und Abnutzungserscheinungen.
Page 5

5
- Stellen Sie sicher, dass sich die Griffe in der richtigen
Nutzungsstellung befinden, wenn sie die Wanne tragen oder
anheben.
- Bitte überprüfen Sie in regelmäßigen Abständen die Verbindungen auf
ihre Funktion! Verwenden Sie im Reparaturfall nur originale Ersatzteile!
GEBRAUCHS- UND MONTAGEANLEITUNG
Aufbau der Tragewanne
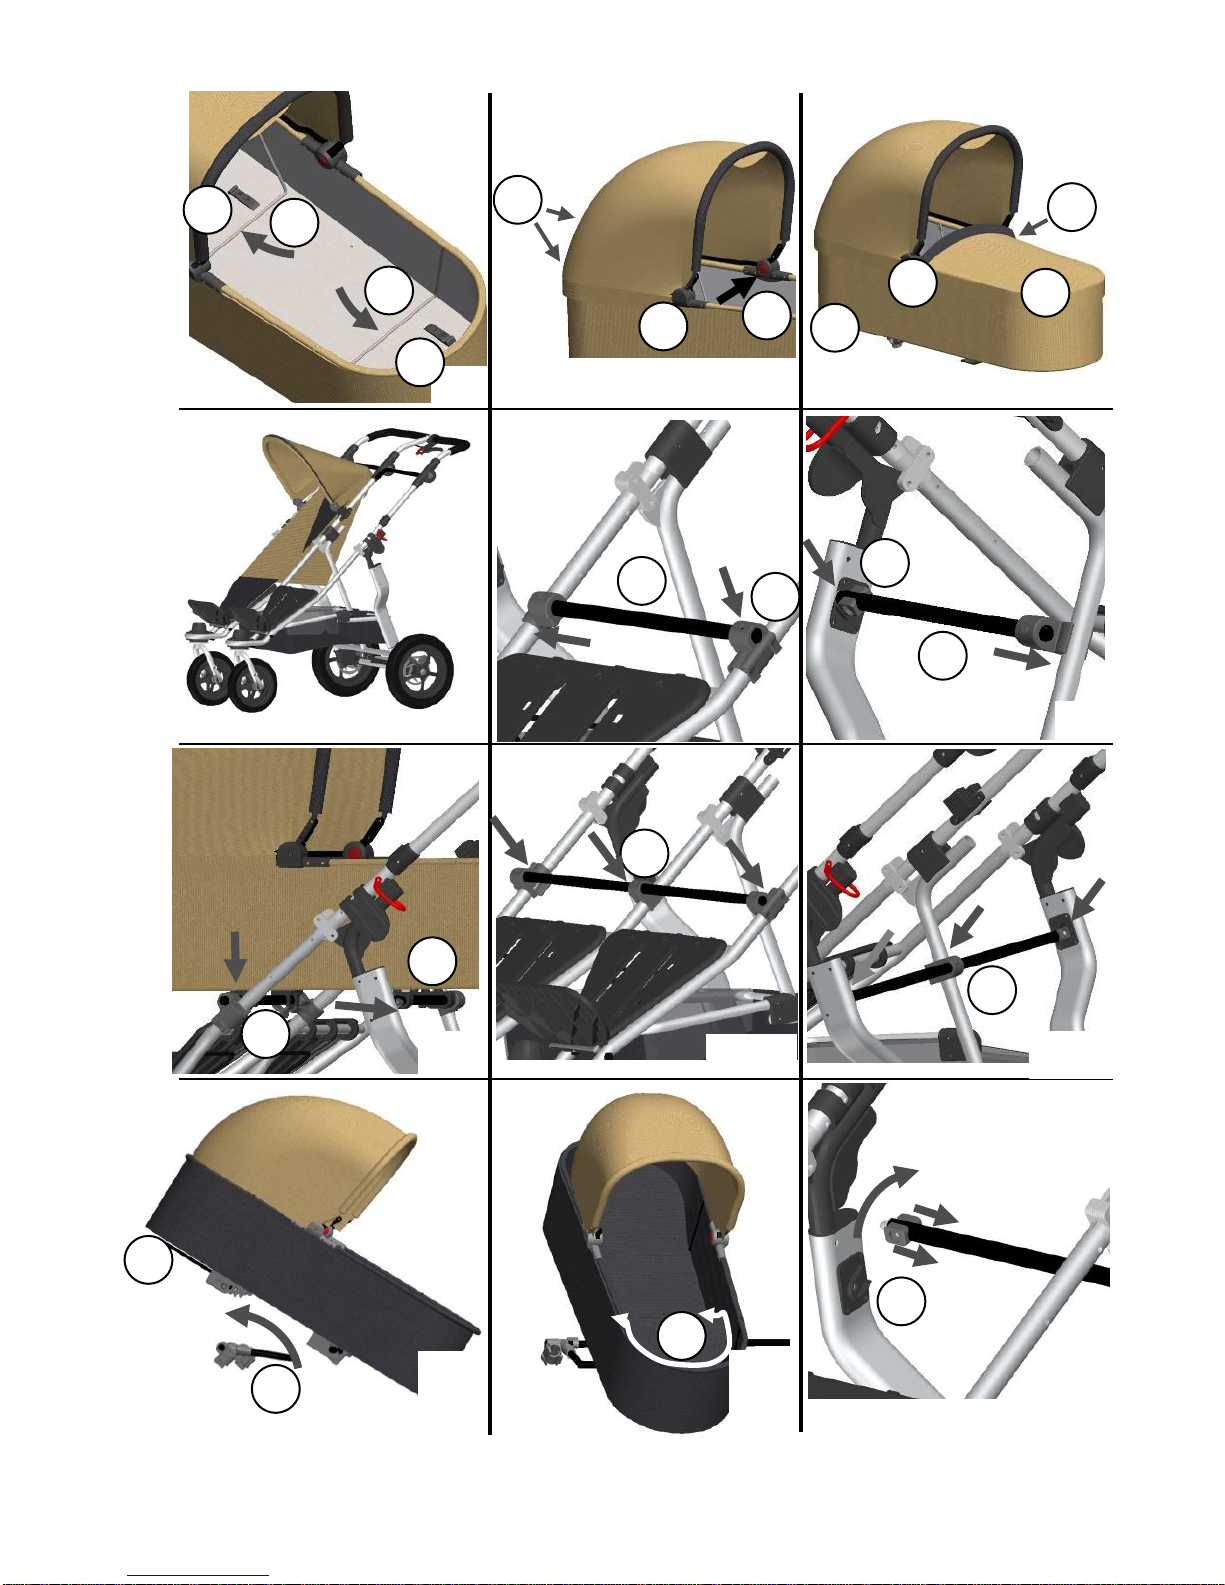
- (Abb.I) Entfernen Sie die Matratze und schwenken Sie die zwei
Spannbügel (1) bis zum Anschlag in die am Wannenboden
befestigten Aufnahmen (2).
- (Abb.II) Schließen Sie die Druckknöpfe (3) links und rechts außen
und hinten am Verdeck. Um das Verdeck zu schließen, drücken Sie
den roten Knopf (4) auf beiden Seiten und schwenken Sie es nach
hinten.
- (Abb.III) Legen Sie die Fußdecke (6) über die Tragewanne und
schließen Sie die Druckknöpfe (7) links und rechts.
Benutzung mit einer Tragewanne
- (Abb.IV) Wenn Sie den Twin mit einem Neugeborenen in der
Tragewanne und einem Kind ab ca. 9 Monaten, das bereits sitzen
kann, mit Sitzbezug nutzen möchten, können Sie die Tragewanne nur
in Fahrtrichtung links benutzen! Knöpfen Sie dafür bitte den Sitzbezug
links aus und entfernen Sie das Verdeck und den Bauchbügel (siehe
Gebrauchsanleitung des Wagens).
- (Abb.V) Stecken Sie das vordere Wannenrohr (8) kurz über dem
Druckknopf über das mittlere Rahmenrohr und schwenken Sie es
anschließend über das linke äußere Rahmenrohr (über dem dortigen
Druckknopf). Schließen Sie den Riegel (9), er spannt sich über das
Rahmenrohr.
- (Abb.VI) Stecken Sie das hintere Wannenrohr (10) über dem
Kunststoffteil über das mittlere Rahmenrohr. Schwenken Sie es dann
in die am äußeren linken Rahmenteil befestigte Aufnahme (11), bis es
hörbar einrastet.
Page 6

6
- (Abb.VII) Jetzt können Sie die Tragewanne von vorne über die zwei
Rohre (12 + 13) schieben. Halten Sie dabei den Metallbügel
(4, Abb III) und drücken Sie dann von oben die Tragewanne mit den
vorderen zwei Klemmen (12) in das vordere Wannenrohr. Die
Klemmen arretieren automatisch. Zum Entfernen der Wanne ziehen
Sie den vorderen Metallbügel (4, Abb III) unter der Wanne und
ziehen die Wanne nach vorne aus dem Gestell.
Benutzung mit zwei Tragewannen
- (Abb.VIII) Entfernen Sie beide Sitzbezüge und Verdecke, sowie den
Bauchbügel (siehe Gebrauchsanleitung des Wagens). Positionieren
sie das vordere Wannenrohr (14) über den Druckknöpfen links und
rechts am Rahmenrohr und sichern Sie es durch Umlegen der
Klemmhebel. Drücken Sie die Klemme am mittleren Rahmenrohr fest.
- (Abb.IX) Stecken Sie das hintere Wannenrohr (15) erst in die
Aufnahme links am Rahmen. Schwenken Sie es dann so, das die
Klemme am mittleren Rahmenrohr und die Aufnahme rechts am
Rahmen einrasten. Jetzt können Sie die Tragewannen wie unter
Abb. VII beschrieben sichern.
Verstellen der DuoX Wanne
- (Abb.X) Um die DuoX Wanne in Sitzposition zu bringen, öffnen Sie
die Verriegelung mit dem Metallbügel (5, Abb III). Klappen Sie den
Bügel des Adapters (16) nach oben und Befestigen sie die Wanne
wieder. Die Rückenlehen kann mit Hilfe der Bandverstellung (17)
verstellt werden.
- (Abb.XI) Den Fuß- und Sitzbereich der Wanne kann man mit Hilfe
des Reißverschlusses (18) umbauen.
Entfernen der Adapterrohre
- (Abb.XII) Zum Entfernen der vorderen Adapterrohre (8 + 14)
öffnen Sie die Klemmen an den äußeren Rahmenrohren und ziehen
sie ab. Um die hinteren Wannenrohre (10 + 15) abzunehmen, öffnen
Sie die Verriegelung (19) am äußeren Rahmenrohr in Pfeilrichtung
und ziehen es ab. Jetzt können Sie die Sitzbezüge, Verdecke und den
Bauchbügel wieder befestigen.
Page 7

7
PFLEGEHINWEISE
- Reinigen Sie alle Teile mit einem feuchten Tuch.
- Benutzen Sie keine aggressiven Reinigungs- oder Schmiermittel!
- Ölspray an den Faltgelenken und Radlagern stellt die Leichtgängigkeit sicher.
- Sie können den Sitzbezug mit der Hand bei 30° waschen. Nicht in die
Waschmaschine oder Trockner geben
- Die Bereifung kann unter Umständen zur Verfärbung des Bodenbelags führen.
Fremdkorper (z.B. Steinchen) in den Reifen müssen entfernt werden um eine
eventuelle Beschädigung von Bodenbelägen zu vermeiden.
GARANTIEBEDINGUNGEN
Bei berechtigten Beanstandungen gelten die gesetzlichen Bestimmungen. Zum
Nachweis des Erwerbes, bewahren Sie bitte den Kaufbeleg für die Dauer der
gesetzlichen Verjährungsfrist auf. Diese beträgt 2 Jahre *) und beginnt mit der
Übergabe des Produkts an Sie. Falls bei diesem Produkt Mängel bestehen, beziehen
sich diese auf sämtliche Material- und Herstellungsfehler, die zum Zeitpunkt der
Übergabe vorliegen. Keine Ansprüche bestehen für:
• Natürlicher Verschleiß und Schäden durch übermäßige Beanspruchung.
• Schäden durch ungeeignete oder unsachgemäße Verwendung.
• Schäden durch fehlerhafte Montage und Inbetriebnahme.
• Schäden durch nachlässige Behandlung oder Wartung.
• Schäden durch unsachgemäße Änderungen am Wagen.
Fehler müssen unverzüglich gemeldet werden, damit keine Folgeschäden entstehen!
Reklamationsfall oder nicht?
TFK Produkte sind meist zu einem hohen Teil aus Aluminium gefertigt und somit rostfrei.
Manche Teile sind jedoch auch lackiert, verzinkt oder haben eine sonstigen
Oberflächenschutz. Je nach Wartung oder Beanspruchung können diese Teile auch
rosten. Hierbei handelt es sich dann um keinen Mangel.
Kratzer sind normale Verschleißerscheinungen und kein Mangel.
Feuchte Textilien, die nicht getrocknet und ausreichend gelüftet werden, können
schimmeln und stellen keinen produktionsbedingten Mangel dar.
Durch Sonneneinstrahlung, Schweiß, Reinigungsmittel, Abrieb oder zu häufiges
Waschen ist ein Ausbleichen nicht auszuschließen und somit kein Mangel.
Bitte prüfen Sie beim Kauf genau, ob alle Stoffteile, Nähte, Druckknöpfe und
Reisverschlüsse ordnungsgemäß vernäht sind und funktionell in Ordnung sind.
Abgefahrene Räder sind natürliche Verschleißerscheinungen. Schäden durch
äußere Einwirkungen sind kein Mangel. Leichte Unwucht ist nicht vermeidbar und
stellt keinen Mangel dar.
Der Übergabe-Check soll immer durchgeführt werden, um Reklamationen schon im
Vorfeld zu vermeiden. Wenn Sie später einen Fehler feststellen, melden Sie diesen
unverzüglich bei Ihrem Händler. Dieser wird sich bei uns melden, um die weitere
Vorgehensweise zu besprechen. Unangemeldete oder unfreie Sendungen bei TFK
werden nicht akzeptiert.
*) gültig nur in der EU. In anderen Ländern sind die jeweils gesetzlichen Fristen gültig.
Page 8

8
Instructions for Use and Warranty Conditions
Welcome to the world of TFK.
Please take a few moments of your valuable time to read the
following instructions carefully before use and keep them in a safe
place. If you do not comply with the instructions, the safety of your
child could be compromised!
SAFETYINSTRUCTIONS + WARNINGS
WARNING: Do not leave your child unsupervised.
WARNING: Always carry one child only.
WARNING: Do not put the DuoX carrycot on raised surfaces.
WARNING: When carrying the DuoX carrycot assure that the carrycot
is in balanced horizontal position.
WARNING: This product is not usable as carrycot for children who can
independently sit, roll to the side or rest on hands and knees.
WARNING: Maximum weight of the child: 9kg.
WARNING: Maximum weight in sitting position: 13kg.
WARNING: Put the DuoX carrycot on fixed horizontal and dry surfaces
only.
WARNING: Do not allow other children to play without supervision
near the DuoX carrycot.
WARNING: Do not use the DuoX carrycot if parts are broken, torn or missing.
WARNING: Always secure your child with the 5-point harness. (When
used as a seat)
WARNING: Always use the crotch strap in connection with the lap
belt! (When used as a seat)
WARNING: Do not assemble non-TFK accessories.
WARNING: Check all locks if they are closed tightly before carrying
the pushchair over steps or other obstacles. Carry the pushchair on
the frame parts only.
WARNING: Please be aware of the risks which are can be caused by
open fire or other sources of heat like electrical heaters, gas flames
etc., if they are near the DuoX carrycot.
WARNING: Do not use an additional mattress.
Please check all grips, buttons and connectors for wear and tear
regularly!
Only use spare parts or accessories that are supplied or approved by
the manufacturer!
Page 9

9
Operating- and assembly instruction
Assembly of the carrycot
- (pic.I) Remove the mattress and swing the two clamps (1) till
the stop of the part (2) , which is fixed at the bottom of the
carrycot.
- (pic.II) Close the pushbuttons (3) left, right and at the head
end from the outside. To close the canopy, push the red
buttons (4) and swing it back.
- (pic.III) Place the foot cover (6) over the carrycot and close
the pushbuttons (7) left and right.
Use with one carrycot
- (pic.IV) If you want to use the Twin with a newborn baby and
a child from 9 months, which is already able to sit, you can fix a
single carrycot only on the left side of the frame (in driving
direction)! Remove the seat cover, belly frame and the
canopy on the left (Please have a look to the instruction of the
Twin stroller).
- (pic.V) First fix the small belly frame (8) on the right seat. Bring
it to the right position and lock the clip (9) around the frame
tube.
- (pic.VI) Stick the rear carrycot tube (13) next to the plastic
part over the vertical frame tube in the middle. Now swing it to
the fixation (14) at the left vertical frame tube, it will lock
automatically (audibly).
- (Fig. VII) Now you can push the carrycot onto the two tubes
(8 + 10) from the front. Keep the metal bar (Fig.III, 5) pulled
until the rear bar locks and then use the front two
clamps (12) to press the carrycot down onto the cot's front
tube from above. The clamps will lock automatically. To
remove the cot, pull on the front metal clip (5, Fig. III)
underneath the cot, then pull the cot towards you and off the
frame.
Page 10

10
Use with two carrycots
- (pic.VIII) Remove the seat covers, belly frame and the
canopies (Please have a look to the instruction of the Twin
stroller). Bring the front carrycot tube (14) in position next to the
pushbuttons left and right at the frame and push the clip at
the frame tube in the middle, till it is fixed. Close the bars at the
left and right end of the carrycot tube.
- (pic.IX) Plug the rear carrycot tube (15) first in the fixation at
the left vertical frame tube. After that place it with the clip
over the frame tube in the middle and the right end of the
tube to the fixation at the right vertical frame tube. Push it till it
is audiable secured. Now you can fix the carrycots like it is
described in pic.VII. Take off the carrycot tubes
Adjustment of DuoX carry cot
- (pic.X) To bring DuoX into sitting position, pull metal bar
(5, Fig.III) and lift carry cot. Then rotate the adapter bar (16)
and relock the carry cot. You can bring backrest intop sitting
position by pulling the belt (17).
- (pic.XI) Sitting and foot rest area of DuoX can be adjusted by
zipper (18).
Remove adapter tubes
- (pic.XII) To remove the carrycot tube in front (8 + 14) open
the locks at the tube ends and pull it off. To remove the rear
carrycot tube (10 + 15) , open the bar (19) at the tube end in
the direction of the arrow and pull it towards you. Now you
can fix the seat covers, canopies and the belly frame.
Page 11

11
CARE INSTRUCTIONS
- Clean all parts with a damp cloth.
- Do not use aggressive cleaning agents or lubricants!
- Use a spray lubricant to keep folding joints working smoothly.
- The covers can be hand-washed at 30°. Do not machine-wash or tumble-
dry!
WARRANTY CONDITIONS
In the event of legitimate complaints, the statutory provisions apply. Please
retain your receipt as proof of purchase for the duration of the statutory
period of limitation. This lasts for 2 years *) from the date the buggy is handed
over to you. Legitimate complaints are limited to material and
manufacturing defects present when the product was first handed over. No
claims will be accepted relating to:
• Natural wear and tear or damage caused by excessive load.
• Damage caused by inappropriate or improper use.
• Damage caused by incorrect assembly or commissioning.
• Damage caused by negligent handling or maintenance.
• Damage caused by improper modifications to the product.
Defects must be reported immediately in order to prevent consequential
damages!
Do I have justified grounds for complaint?
Most TFK products are predominantly made from aluminium and are
therefore rust-proof. However, some components may be painted or
galvanised or have some other protective coating. These parts may rust
depending on how they are maintained and how much use they are
subjected to. This does not constitute a defect.
Scratches are the result of normal wear and tear, and are not a defect.
Mildew may form if damp textiles are not dried or aired adequately, this
does not constitute a manufacturing fault.
Fading may result from sunlight, perspiration, cleaning agents, abrasion
and excessive washing and does not constitute a defect.
All products should be checked when they are handed over to avoid
future complaints.
If you do notice a defect later on, please contact your stockist immediately,
who will consult us regarding further procedures. TFK does not accept
unsolicited or freight collect deliveries.
*) Only applicable within the EU. In other countries, the respective statutory
periods apply."
Page 12
12
TFK Trends for Kids GmbH
Am Industriegleis 9 – D-84030 Ergolding
Tel.: +49 (0)871 – 973 5150 – [email protected]
20160912
 Loading...