

Page 1
Bedienungsanleitung
Instruction manual
Mode d’emploi
Istruzioni per l'uso
Gebruiksaanwijzing
Instrucciones de uso
Kat. Nr. 60.2024.10
RoHS
TFA_No. 60.2024_Anleitung 21.12.2018 12:13 Uhr Seite 1
Page 2

– 2 – – 3 –
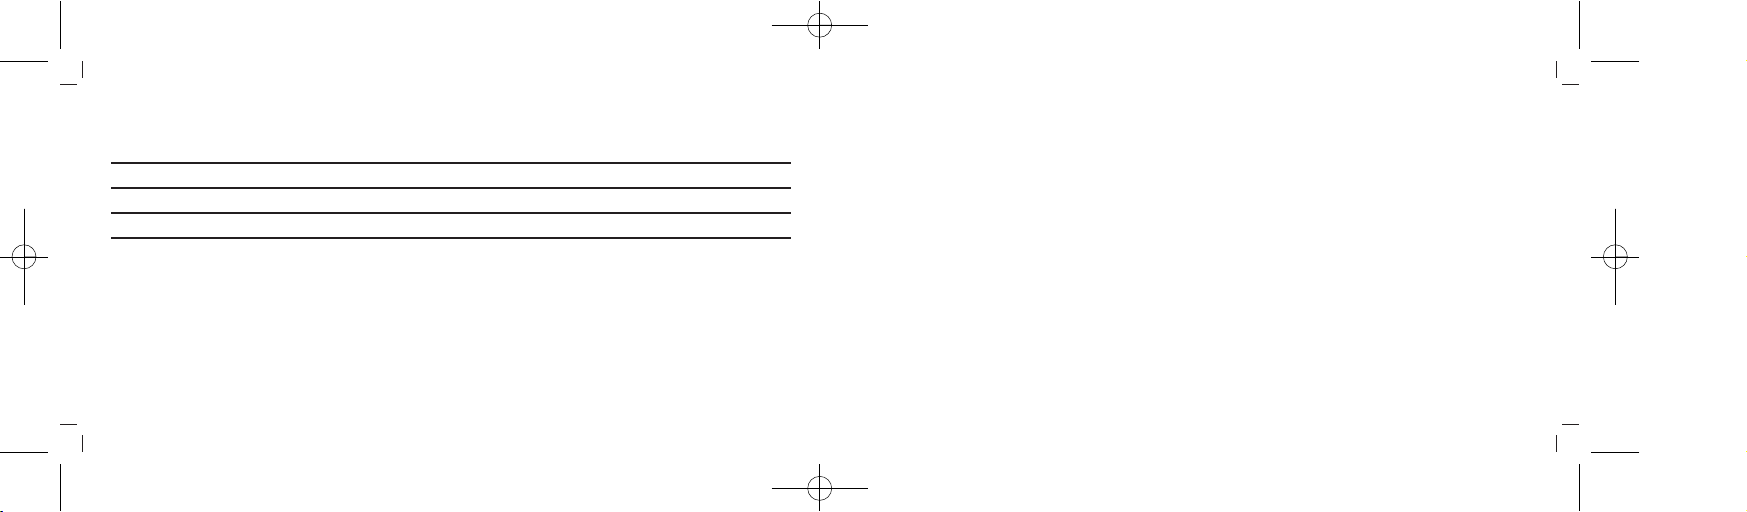
Fig. 1
Fig. 2
B 5
B 6
B 8
B 7
B 1 B 2 B 3 B 4
A 4
A 1
A 3
A 2
TFA_No. 60.2024_Anleitung 21.12.2018 12:13 Uhr Seite 2
Page 3

– 4 – – 5 –
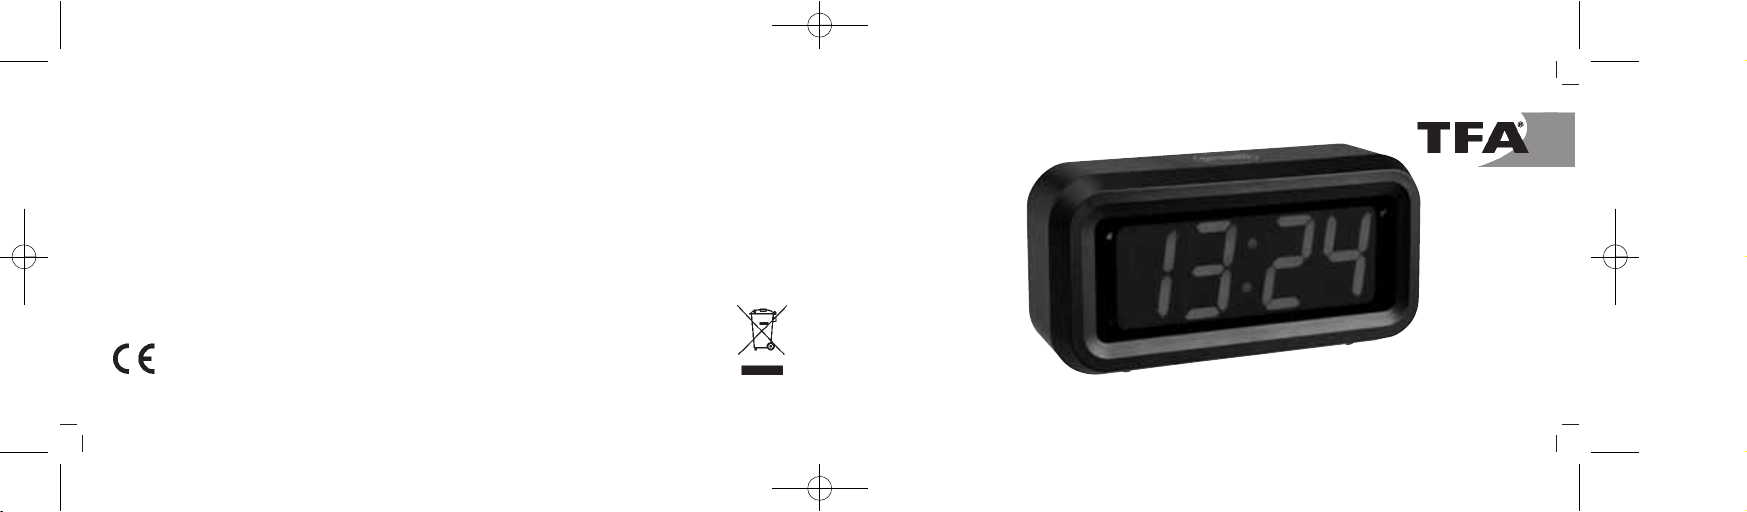
Digitalwecker
Vielen Dank, dass Sie sich für dieses Gerät aus dem Hause TFA entschieden haben.
1. Bevor Sie mit dem Gerät arbeiten
• Lesen Sie sich bitte die Bedienungsanleitung genau durch.
So werden Sie mit Ihrem neuen Gerät vertraut, lernen alle Funktionen und Bestandteile kennen, erfahren wichtige Details für die Inbetriebnahme und den Umgang mit dem Gerät und erhalten Tipps für den Störungsfall.
• Durch die Beachtung der Bedienungsanleitung vermeiden Sie auch Beschädigungen des Gerätes und die
Gefährdung Ihrer gesetzlichen Mängelrechte durch Fehlgebrauch.
• Ebenso haften wir nicht für inkorrekte Messwerte und Folgen, die sich aus solchen ergeben können.
• Für Schäden, die aus Nichtbeachtung dieser Bedienungsanleitung verursacht werden, übernehmen wir
keine Haftung.
• Beachten Sie besonders die Sicherheitshinweise!
• Bewahren Sie diese Bedienungsanleitung gut auf!
Digitalwecker
2. Lieferumfang
• Digitalwecker
• Bedienungsanleitung
3. Einsatzbereich und alle Vorteile Ihres neuen Gerätes auf einen Blick
• Große LED-Leuchtziffern
• 3 Helligkeitsstufen
• Weckalarm mit Snooze-Funktion
4. Zu Ihrer Sicherheit
• Das Produkt ist ausschließlich für den oben beschriebenen Einsatzbereich geeignet. Verwenden Sie das Produkt
nicht anders, als in dieser Anleitung dargestellt wird.
• Das eigenmächtige Reparieren, Umbauen oder Verändern des Gerätes ist nicht gestattet.
TFA_No. 60.2024_Anleitung 21.12.2018 12:13 Uhr Seite 3
Page 4
– 6 – – 7 –
Digitalwecker
Vorsicht!
Verletzungsgefahr:
• Bewahren Sie das Gerät und die Batterien außerhalb der Reichweite von Kindern auf.
• Batterien können bei Verschlucken lebensgefährlich sein. Wurde eine Batterie verschluckt, kann dies innerhalb
von 2 Stunden zu schweren inneren Verätzungen und zum Tode führen. Wenn Sie vermuten, eine Batterie könnte verschluckt oder anderweitig in den Körper gelangt sein, nehmen Sie sofort medizinische Hilfe in Anspruch.
• Batterien nicht ins Feuer werfen, kurzschließen, auseinander nehmen oder aufladen. Explosionsgefahr!
• Batterien enthalten gesundheitsschädliche Säuren. Um ein Auslaufen der Batterien zu vermeiden, sollten schwache Batterien möglichst schnell ausgetauscht werden. Verwenden Sie nie gleichzeitig alte und neue Batterien
oder Batterien unterschiedlichen Typs.
• Beim Hantieren mit ausgelaufenen Batterien chemikalienbeständige Schutzhandschuhe und Schutzbrille tragen!
Digitalwecker
Wichtige Hinweise zur Produktsicherheit!
• Setzen Sie das Gerät keinen extremen Temperaturen, Vibrationen und Erschütterungen aus.
• Vor Feuchtigkeit schützen.
5. Bestandteile
A: Display (Fig. 1):
A 1: Alarmsymbol A 2: Uhrzeit/Weckzeit
A 3: P bei 12-Stunden-System A 4: Snooze-Symbol
B: Rückseite (Fig. 2):
B 1: SNOOZE/AL STOP Sensortaste B 2: DIM Schiebeschalter
B 3: TIME SET Taste B 4: AL SET Taste
TFA_No. 60.2024_Anleitung 21.12.2018 12:13 Uhr Seite 4
Page 5

– 8 – – 9 –
Digitalwecker
B 5: RESET Knopf B 6: MIN/AL ON/OFF Taste
B 7: HOUR/12/24 Taste B 8: Batteriefach
6. Inbetriebnahme
• Öffnen Sie das Batteriefach und legen Sie vier neue Batterien 1,5 V AA polrichtig ein.
• Ein kurzer Signalton ertönt.
• Schließen Sie das Batteriefach wieder.
• 12:00 erscheint auf dem Display.
7. Einstellungen
7.1 12-Stunden oder 24-Stunden-Zeitsystem
• Im Normalmodus können Sie mit der HOUR/12/24 Taste zwischen dem 12 (P erscheint nach 12 h im Display)
und 24-Stunden-Format auswählen.
Digitalwecker
7.2 Einstellung der Uhrzeit
• Drücken Sie die TIME SET Taste.
• Im Display blinkt die Uhrzeit.
• Drücken Sie die HOUR/12/24 Taste, um die Stunden einzustellen.
• Drücken Sie die MIN/AL ON/OFF Taste, um die Minuten einzustellen.
• Bestätigen Sie die Eingabe mit der TIME SET Taste.
7.3 Einstellung der Alarmzeit
• Drücken Sie die AL SET Taste.
• Im Display blinkt die Alarmzeit (Voreinstellung 6:00).
• Drücken Sie die HOUR/12/24 Taste, um die Stunden einzustellen.
• Drücken Sie die MIN/AL ON/OFF Taste, um die Minuten einzustellen.
• Bestätigen Sie die Eingabe mit der AL SET Taste.
• Das Alarm-Symbol und das Snooze-Symbol erscheinen im Display. Beide Funktionen sind nun aktiviert.
TFA_No. 60.2024_Anleitung 21.12.2018 12:13 Uhr Seite 5
Page 6

– 10 – – 11 –
Digitalwecker
8. Alarmfunktionen
8.1 Weckalarm
• Drücken Sie die MIN/AL ON/OFF Taste im Normalmodus, um die Alarmfunktion zu aktivieren oder zu deaktivieren.
• Bei aktiviertem Alarm erscheint die Alarmzeit für 3 Sekunden. Das Alarmsymbol blinkt im Display und bleibt
dann stehen.
• Wenn die eingestellte Alarmzeit erreicht ist, beginnt der Wecker zu klingeln.
• Drücken Sie auf die SNOOZE/AL STOP Sensortaste, um den Alarmton auszuschalten.
• Wird der Alarm nicht unterbrochen, schaltet sich der ansteigende Alarmton automatisch nach einer Minute aus
und aktiviert sich erneut zur gleichen Weckzeit wieder.
• Das Alarm-Symbol bleibt im Display stehen.
• Drücken Sie die MIN/AL ON/OFF Taste im Normalmodus, um die Alarmfunktion zu deaktivieren. Das Alarmsymbol verschwindet.
Digitalwecker
8.2 Snooze-Funktion
• Zum Aktivieren der Snooze-Funktion drücken und halten Sie die HOUR/12/24 Taste für 2 Sekunden im Normal-
modus (bei aktiviertem Alarm). Das Snooze-Symbol erscheint.
• Wenn die eingestellte Alarmzeit erreicht ist, beginnt der Wecker zu klingeln.
• Drücken Sie auf die SNOOZE/AL STOP Sensortaste, um die Snooze-Funktion zu aktivieren.
• Das Snooze-Symbol blinkt im Display.
• Der Alarmton wird für 7 Minuten unterbrochen.
• Sie können die Snooze-Funktion bis zu 3 mal aktivieren.
• Drücken Sie eine beliebige Taste, um die Snooze-Funktion auszuschalten.
• Zum Deaktivieren der Snooze-Funktion drücken und halten Sie die HOUR/12/24 Taste für 2 Sekunden im Nor-
malmodus. Das Snooze-Symbol verschwindet.
TFA_No. 60.2024_Anleitung 21.12.2018 12:13 Uhr Seite 6
Page 7

– 12 – – 13 –
Digitalwecker
9. Displaybeleuchtung
• Mit dem DIM Schiebeschalter können Sie die Helligkeit der Displaybeleuchtung in drei Stufen verändern (HIGHMIDDLE-LOW).
• Automatische Nachtbeleuchtung: Es schaltet sich von 20:00 bis 06:00 Uhr eine schwächere Beleuchtung an.
10. Punkte zwischen Stunden- und Minutenanzeige
• Die beiden Punkte auf dem Display blinken im Sekundentakt.
• Drücken und halten Sie die MIN/AL ON/OFF Taste im Normalmodus für 2 Sekunden, um die Funktion zu deaktivieren oder zu aktivieren.
11. Pflege und Wartung
• Reinigen Sie das Gerät mit einem weichen, leicht feuchten Tuch. Keine Scheuer- oder Lösungsmittel verwenden!
Digitalwecker
• Entfernen Sie die Batterien, wenn Sie das Gerät längere Zeit nicht verwenden.
• Bewahren Sie Ihr Gerät an einem trockenen Platz auf.
11.1 Batteriewechsel
• Wenn die Funktionen schwächer werden, wechseln Sie bitte die Batterien.
• Öffnen Sie das Batteriefach und legen Sie vier neue Batterien 1,5 V AA polrichtig ein.
• Schließen Sie das Batteriefach wieder.
12. RESET Knopf
• Funktioniert der Wecker nicht einwandfrei, drücken Sie mit einem spitzen Gegenstand den RESET Knopf und der
Wecker kommt in den Inbetriebnahme-Modus. Ein kurzer Signalton ertönt.
TFA_No. 60.2024_Anleitung 21.12.2018 12:13 Uhr Seite 7
Page 8
– 14 – – 15 –
Digitalwecker
13. Fehlerbeseitigung
Problem Lösung
Keine Anzeige ➜ Batterien polrichtig einlegen
➜ Batterien wechseln
Schwache Anzeige ➜ Helligkeit der Umgebung reduzieren
➜ Helligkeit der Displaybeleuchtung verändern
Unkorrekte Anzeige ➜ Batterien wechseln
➜ Mit einem spitzen Gegenstand den RESET Knopf drücken
Wenn Ihr Gerät trotz dieser Maßnahmen immer noch nicht funktioniert, wenden Sie sich an den Händler, bei dem Sie
das Produkt gekauft haben.
Digitalwecker
14. Entsorgung
Dieses Produkt wurde unter Verwendung hochwertiger Materialien und Bestandteile hergestellt, die recycelt und
wiederverwendet werden können.
Batterien und Akkus dürfen keinesfalls in den Hausmüll!
Als Verbraucher sind Sie gesetzlich verpflichtet, gebrauchte Batterien und Akkus zur umweltgerechten
Entsorgung beim Handel oder entsprechenden Sammelstellen gemäß nationaler oder lokaler Bestimmungen abzugeben.
Die Bezeichnungen für enthaltene Schwermetalle sind: Cd=Cadmium, Hg=Quecksilber, Pb=Blei
Dieses Gerät ist entsprechend der EU-Richtlinie über die Entsorgung von Elektro- und Elektronik-Alt-
geräten (WEEE) gekennzeichnet.
Dieses Produkt darf nicht mit dem Hausmüll entsorgt werden. Der Nutzer ist verpflichtet, das Altge-
rät zur umweltgerechten Entsorgung bei einer ausgewiesenen Annahmestelle für die Entsorgung von
Elektro- und Elektronikgeräten abzugeben.
TFA_No. 60.2024_Anleitung 21.12.2018 12:13 Uhr Seite 8
Page 9
– 16 – – 17 –
Digitalwecker
15. Technische Daten
Spannungsversorgung Batterien 4 x 1,5 V AA (nicht inklusive)
Gehäusemaße 130 x 41 x 65 mm
Gewicht 104 g (nur das Gerät)
TFA Dostmann GmbH & Co.KG, Zum Ottersberg 12, D-97877 Wertheim, Deutschland
Diese Anleitung oder Auszüge daraus dürfen nur mit Zustimmung von TFA Dostmann veröffentlicht werden. Die techni-
schen Daten entsprechen dem Stand bei Drucklegung und können ohne vorherige Benachrichtigung geändert werden.
Die neuesten technischen Daten und Informationen zu Ihrem Produkt finden Sie auf unserer Homepage unter Eingabe der
Artikel-Nummer in das Suchfeld.
www.tfa-dostmann.de 12/18
Digital alarm clock
Thank you for choosing this instrument from TFA.
1. Before you use this product
• Please make sure you read the instruction manual carefully.
This information will help you to familiarize yourself with your new device, to learn all of its functions and parts,
to find out important details about its first use and how to operate it and to get advice in the event of a malfunction.
• Following and respecting the instructions in your manual will prevent damage to your instrument and loss
of your statutory rights arising from defects due to incorrect use.
• Likewise, we take no responsibility for any incorrect readings or for any consequences resulting from them.
• We shall not be liable for any damage occurring as a result of non following of these instructions.
• Please take particular note of the safety advice!
• Please keep this instruction manual safe for future reference.
TFA_No. 60.2024_Anleitung 21.12.2018 12:13 Uhr Seite 9
Page 10
– 18 – – 19 –
Digital alarm clock
2. Delivery contents
• Digital alarm clock
• Instruction manual
3. Range of application and all the benefits of your new instrument at a glance
• Large LED digits
• Three brightness levels
• Alarm with snooze function
4. For your safety
• This product is exclusively intended for the range of application described above. It should only be used as
described within these instructions.
• Unauthorized repairs, alterations or changes to the product are prohibited.
Digital alarm clock
Caution!
Risk of injury:
• Keep this instrument and the batteries out of reach of children.
• Batteries may be hazardous if swallowed. If a battery is swallowed, this can lead to serious internal burns and
death within two hours. If you suspect a battery could have been swallowed or otherwise caught in the body,
seek medical help immediately.
• Batteries must not be thrown into a fire, short-circuited, taken apart or recharged. Risk of explosion!
• Batteries contain harmful acids. Low batteries should be changed as soon as possible to prevent damage
caused by leaking. Never use a combination of old and new batteries together, nor batteries of different types.
• Wear chemical-resistant protective gloves and safety glasses when handling leaking batteries.
TFA_No. 60.2024_Anleitung 21.12.2018 12:13 Uhr Seite 10
Page 11
– 20 – – 21 –
Digital alarm clock
Important information on product safety!
• Do not expose the device to extreme temperatures, vibrations or shocks.
• Protect it from moisture.
5. Elements
A: Display (Fig. 1):
A 1: Alarm symbol A 2: Time / wake up time
A 3: P (12-hour system) A 4: Snooze symbol
B: Back (Fig. 2):
B 1: SNOOZE/AL STOP sensor button B 2: DIM switch
B 3: TIME SET button B 4: AL SET button
Digital alarm clock
B 5: RESET button B 6: MIN/AL ON/OFF button
B 7: HOUR/12/24 button B 8: Battery compartment
6. Getting started
• Open the battery compartment and insert four new AA 1.5 V batteries, polarity as illustrated.
• The device will alert you with a beep.
• Close the battery compartment again.
• 12:00 appears on the display.
7. Settings
7.1 12-HR or 24-HR system
• In normal mode, press HOUR/12/24 button to select 12 (P appears on the display after 12 h) or 24 hour mode.
TFA_No. 60.2024_Anleitung 21.12.2018 12:13 Uhr Seite 11
Page 12

– 22 – – 23 –
Digital alarm clock
7.2 Time setting
• Press the TIME SET button.
• The time flashes on the display.
• Press the HOUR/12/24 button to adjust the hours.
• Press the MIN/AL ON/OFF button to adjust the minutes.
• Confirm the setting with the TIME SET button.
7.3 Alarm time setting
• Press the AL SET button.
• The alarm time (default 6:00) flashes on the display.
• Press the HOUR/12/24 button to adjust the hours.
• Press the MIN/AL ON/OFF button to adjust the minutes.
• Confirm the setting with the AL SET button.
• The alarm symbol and the snooze symbol appear on the display. Both functions are now activated.
Digital alarm clock
8. Alarm functions
8.1 Alarm clock function
• Press the MIN/AL ON/OFF button in normal mode, to activate or deactivate the alarm function.
• When the alarm is activated, the alarm time appears for 3 seconds. The alarm symbol remains on the display.
• When the adjusted alarm time is reached, the alarm rings.
• Press the SNOOZE/AL STOP sensor button to turn off the alarm sound.
• If the alarm is not stopped manually, the ascending alarm tone automatically turns off after one minute and the
alarm will be reactivated at the same set time on the following day.
• The alarm symbol remains on the display.
• Press the MIN/AL ON/OFF button in normal mode, to deactivate the alarm function. The alarm symbol disappears.
8.2 Snooze function
• To activate the snooze function press and hold the HOUR/12/24 button for 2 seconds in normal mode. The
snooze symbol will appear on the display.
TFA_No. 60.2024_Anleitung 21.12.2018 12:13 Uhr Seite 12
Page 13

– 24 – – 25 –
Digital alarm clock
• When the adjusted alarm time is reached, the alarm rings.
• Press the SNOOZE/AL STOP sensor button to activate the snooze function.
• The snooze symbol flashes on the display.
• The alarm will be interrupted for 7 minutes.
• You can activate the snooze function up to 3 times.
• Press any button to turn off the snooze function.
• To deactivate the snooze function, press the HOUR/12/24 button for 2 seconds in normal mode. The snooze
symbol will disappear.
9. Display light
• Move the brightness adjusting switch DIM to change brightness in 3 steps (HIGH-MIDDLE-LOW).
• Automatic night backlight: the light is dimmed between 20:00 and 6:00.
Digital alarm clock
10. Dots between the hour and minute indicators
• The two dots between the hour and minute indicators flash every second on the display.
• To activate or deactivate the function press the MIN/AL ON/OFF button for 2 seconds in normal mode.
11. Care and maintenance
• Clean the device with a soft damp cloth. Do not use solvents or scouring agents.
• Remove the batteries if the device will not be used for an extended period of time.
• Keep the device in a dry place.
11.1 Battery replacement
• Change the batteries when the device functions become weak.
• Open the battery compartment and insert four new AA 1.5 V batteries, polarity as illustrated.
• Close the battery compartment again.
TFA_No. 60.2024_Anleitung 21.12.2018 12:13 Uhr Seite 13
Page 14

– 26 – – 27 –
Digital alarm clock
12. RESET button
• If the unit does not work properly use a pin to press RESET button, then the clock will return to the initial mode.
The device will alert you with a beep.
13. Troubleshooting
Problem Solution
No display ➜ Ensure the batteries' polarities are correct
➜ Change the batteries
Weak display ➜ Reduce the brightness of the environment
➜ Adjust the brightness of the display
Digital alarm clock
Incorrect indication ➜ Change the batteries
➜ Use a pin to press the RESET button
If your device fails to work despite these measures, contact the retailer where you purchased the product.
14. Waste disposal
This product has been manufactured using high-grade materials and components which can be recycled and
reused.
Never dispose of empty batteries and rechargeable batteries in ordinary household waste
As a consumer, you are required by law to take them to your retail store or to an appropriate collection
site depending on national or local regulations in order to protect the environment.
The symbols for the contained heavy metals are:
Cd = cadmium, Hg = mercury, Pb = lead
TFA_No. 60.2024_Anleitung 21.12.2018 12:13 Uhr Seite 14
Page 15

– 28 – – 29 –
Digital alarm clock
This product is labelled in accordance with the EU Waste Electrical and Electronic Equipment Directive (WEEE).
Please do not dispose of this product in ordinary household waste. As a consumer, you are required
to take end-of-life devices to a designated collection point for the disposal of electrical and electronic equipment, in order to ensure environmentally-compatible disposal.
15. Specifications
Power consumption Batteries 4 x AA 1,5 V (not included)
Housing dimension 130 x 41 x 65 mm
Weight 104 g (device only)
Digital alarm clock
TFA Dostmann GmbH & Co.KG, Zum Ottersberg 12, D-97877 Wertheim, Germany
No part of this manual may be reproduced without written consent of TFA Dostmann. The technical data are correct at the
time of going to print and may change without prior notice.
The latest technical data and information about this product can be found in our homepage by simply entering the product
number in the search box.
www.tfa-dostmann.de 12/18
TFA_No. 60.2024_Anleitung 21.12.2018 12:13 Uhr Seite 15
Page 16

– 30 – – 31 –
Réveil digital
Nous vous remercions d'avoir choisi l'appareil de la société TFA.
1. Avant d'utiliser votre appareil
• Veuillez lire attentivement le mode d'emploi.
Vous vous familiariserez ainsi avec votre nouvel appareil, vous découvrirez toutes les fonctions et tous les éléments qui le composent, vous noterez les détails importants relatifs à sa mise en service et vous lirez quelques
conseils en cas de dysfonctionnement.
• En respectant ce mode d'emploi, vous éviterez d'endommager votre appareil et de perdre vos droits légaux
en cas de défaut si celui-ci résulte d’une utilisation non-conforme.
• De même, nous n’assumons aucune responsabilité pour des relevés incorrects et les conséquences qu’ils
pourraient engendrer.
• Nous n'assumons aucune responsabilité pour des dommages qui auraient été causés par le non-respect du
présent mode d'emploi.
• Suivez bien toutes les consignes de sécurité !
• Conservez soigneusement le mode d'emploi !
Réveil digital
2. Contenu de la livraison
• Réveil digital
• Mode d'emploi
3. Aperçu du domaine d'utilisation et de tous les avantages de votre nouvel appareil
• Grands chiffres à LED
• 3 niveaux d’éclairage différents
• Réveil avec fonction de répétition snooze
4. Pour votre sécurité
• Le produit est destiné uniquement à l'utilisation décrite ci-dessus. N'utilisez jamais l’appareil à d'autres fins que
celles décrites dans le présent mode d'emploi.
• Vous ne devez en aucun cas réparer, démonter ou modifier l'appareil par vous-même.
TFA_No. 60.2024_Anleitung 21.12.2018 12:13 Uhr Seite 16
Page 17

– 32 – – 33 –
Réveil digital
Attention !
Danger de blessure :
• Gardez votre appareil et les piles hors de la portée des enfants.
• Les piles peuvent être mortelles dans le cas d’une ingestion. Si une pile a été avalée, elle peut entraîner des brûlures internes graves ainsi que la mort dans l’espace de 2 heures. Si vous craignez qu’une pile ait pu être avalée
ou ingérée d’une autre manière, quelle qu’elle soit, contactez immédiatement un médecin d’urgence.
• Ne jetez jamais de piles dans le feu, ne les court-circuitez pas, ne les démontez pas et ne les rechargez pas. Risque d'explosion !
• Les piles contiennent des acides nocifs pour la santé. Une pile faible doit être remplacée le plus rapidement possible afin d'éviter toute fuite. N'utilisez jamais simultanément de piles anciennes avec des piles neuves ou des
piles de types différents.
• Pour manipuler des piles qui ont coulé, utilisez des gants de protection chimique spécialement adaptés et portez des lunettes de protection !
Réveil digital
Conseils importants de sécurité du produit !
• Évitez d’exposer l’appareil à des températures extrêmes, à des vibrations ou à des chocs.
• Protégez-le contre l'humidité.
5. Composants
A : Affichage (Fig. 1) :
A 1 : Symbole de réveil A 2 : Indication de l’heure / heure de réveil
A 3 : P pour système horaire de 12 heures A 4 : Symbole de répétition snooze
B : Dos (Fig. 2) :
B 1 : Touche sensitive SNOOZE/AL STOP B 2 : Interrupteur DIM
B 3 : Touche TIME SET B 4 : Touche AL SET
TFA_No. 60.2024_Anleitung 21.12.2018 12:13 Uhr Seite 17
Page 18

– 34 – – 35 –
Réveil digital
B 5 : Bouton RESET B 6 : Touche MIN/AL ON/OFF
B 7 : Touche HOUR/12/24 B 8 : Compartiment à piles
6. Mise en service
• Ouvrez le compartiment à piles et insérez quatre nouvelles piles de type 1,5 V AA en respectant la polarité +/-.
• Un signal sonore se fait entendre.
• Refermez le compartiment à pile.
• 12:00 apparaît sur l'écran.
7. Réglages
7.1 Système horaire de 12 heures ou de 24 heures
• En mode normal, appuyez sur la touche HOUR/12/24 afin de sélectionner l'affichage 12 heures (après 12 h
apparaît le signe P sur l'écran ) ou 24 heures.
Réveil digital
7.2 Réglage de l'heure
• Appuyez sur la touche TIME SET.
• L'heure clignote sur l'écran.
• Appuyez sur la touche HOUR/12/24 pour régler les heures.
• Appuyez sur la touche MIN/AL ON/OFF pour régler les minutes.
• Validez au moyen de la touche TIME SET.
7.3 Réglage de l'heure de réveil
• Appuyez sur la touche AL SET.
• L'heure de réveil clignote sur l’écran (par défaut 6:00).
• Appuyez sur la touche HOUR/12/24 pour régler les heures.
• Appuyez sur la touche MIN/AL ON/OFF pour régler les minutes.
• Validez au moyen de la touche AL SET.
TFA_No. 60.2024_Anleitung 21.12.2018 12:13 Uhr Seite 18
Page 19

– 36 – – 37 –
Réveil digital
• Le symbole de réveil et le symbole de répétition snooze apparaissent sur l'écran. Les deux fonctions sont maintenant activées.
8. Fonctions de l’alarme
8.1 Alarme de réveil
• Appuyez sur la touche MIN/AL ON/OFF en mode normal pour activer ou désactiver la fonction de réveil.
• Lorsque la fonction de réveil est activée, l'heure de réveil est affichée pendant 3 secondes. Le symbole de réveil
reste à l'écran.
• Lorsque l'heure de réveil fixée est atteinte, le réveil se met à sonner.
• Lorsque le réveil sonne, appuyez sur la touche sensitive SNOOZE/AL STOP pour éteindre l'alarme.
• Si le réveil n'est pas coupé, il s'arrêtera automatiquement après une minute et sera de nouveau activé pour
l'heure de réveil suivante.
• Le symbole de réveil reste affiché.
Réveil digital
• Appuyez sur la touche MIN/AL ON/OFF en mode normal pour désactiver la fonction d'alarme. Le symbole de
réveil disparaît de l'affichage.
8.2 Fonction snooze
•Maintenez appuyée la touche HOUR/12/24 pour 2 secondes pour activer la fonction de répétition snooze en mode
normal (si la fonction de réveil est activée). Le symbole de répétition snooze apparaît sur l'écran.
• Lorsque l'heure de réveil fixée est atteinte, le réveil se met à sonner.
• Appuyez sur la touche sensitive SNOOZE/AL STOP pour activer la fonction de répétition snooze.
• Le symbole de répétition snooze clignote sur l'écran.
• L’alarme s'interrompt pendant 7 minutes.
• Vous pouvez activer la fonction snooze jusqu'à 3 fois.
• Appuyez sur une touche de votre choix pour éteindre la fonction de répétition.
• Maintenez appuyée la touche HOUR/12/24 pour 2 secondes pour désactiver la fonction de répétition snooze en
mode normal. Le symbole de répétition snooze disparaît sur l'écran.
TFA_No. 60.2024_Anleitung 21.12.2018 12:13 Uhr Seite 19
Page 20

– 38 – – 39 –
Réveil digital
9. Éclairage de l’écran
• Vous pouvez modifier la luminosité de l'écran sur trois niveaux à l'aide de l’interrupteur DIM (HIGH-MIDDLE-
LOW).
• Éclairage de nuit automatique : un éclairage faible s'éteindra entre 20 et 6:00 heures.
10. Deux points situés entre l’affichage des heures et des minutes
• Les deux points situés entre l’affichage des heures et des minutes clignotent sur l’écran au rythme des secondes.
• Appuyez sur la touche MIN/AL ON/OFF en mode normal pour 2 secondes pour activer ou désactiver la fonction.
11. Entretien et maintenance
• Pour le nettoyage de votre appareil, utilisez un chiffon doux et humide. N’utilisez pas de solvants ou d'agents
abrasifs !
Réveil digital
• Retirez les piles si vous n'utilisez pas votre appareil pendant une durée prolongée.
• Conservez votre appareil dans un endroit sec.
11.1 Remplacement des piles
• Remplacez les piles si les fonctions de l'appareil s'affaiblissent.
• Ouvrez le compartiment à piles et insérez quatre nouvelles piles de type 1,5 V AA en respectant la polarité +/-.
• Refermez le compartiment à piles.
12. Bouton RESET
• Appuyez sur le bouton RESET avec un objet pointu si le réveil ne fonctionne pas correctement. Un signal sonore
se fait entendre.
TFA_No. 60.2024_Anleitung 21.12.2018 12:13 Uhr Seite 20
Page 21

– 40 – – 41 –
Réveil digital
13. Dépannage
Problème Solution
Aucun affichage ➜ Contrôlez la bonne polarité des piles
➜ Changez les piles
Affichage faible ➜ Diminuer l’éclairage ambiant
➜ Ajuster l’éclairage de l’écran
Affichage incorrect ➜ Changez les piles
➜ Appuyez sur le bouton RESET à l'aide d'un objet pointu
Si votre appareil ne fonctionne toujours pas malgré ces mesures, adressez-vous au vendeur chez qui vous l'avez
acheté.
Réveil digital
14. Traitement des déchets
Ce produit a été fabriqué avec des matériaux de haute qualité qui peuvent être recyclés et réutilisés.
Les piles usagées ne doivent pas être jetées dans les détritus ménagers.
En tant qu'utilisateur, vous avez l'obligation légale de rapporter les piles et piles rechargeables usagées à votre revendeur ou de les déposer dans une déchetterie proche de votre domicile conformément à la réglementation nationale et locale.
Les métaux lourds sont désignés comme suit :
Cd=cadmium, Hg=mercure, Pb=plomb.
Cet appareil est conforme aux normes de l'UE relatives au traitement des déchets électriques et électroniques (WEEE).
L'appareil usagé ne doit pas être jeté dans les ordures ménagères. L’utilisateur s’engage, pour le respect de l’environnement, à déposer l’appareil usagé dans un centre de traitement agréé pour les
déchets électriques et électroniques.
TFA_No. 60.2024_Anleitung 21.12.2018 12:13 Uhr Seite 21
Page 22

– 42 – – 43 –
Réveil digital
15. Caractéristiques techniques
Alimentation Piles 4 x 1,5 V AA (non incluses)
Dimensions du boîtier 130 x 41 x 65 mm
Poids 104g (appareil seulement)
TFA Dostmann GmbH & Co.KG, Zum Ottersberg 12, D-97877 Wertheim, Allemagne
La reproduction, même partielle, du présent mode d'emploi est strictement interdite sans l'accord explicite de TFA Dost-
mann. Les caractéristiques techniques de ce produit ont été actualisées au moment de l'impression et peuvent être modifiées sans avis préalable. Les dernières données techniques et les informations concernant votre produit peuvent être
consultées en entrant le numéro de l'article sur notre site Internet.
www.tfa-dostmann.de 12/18
Orologio sveglia digitale
Vi ringraziamo per aver scelto l'apparecchio della TFA.
1. Prima di utilizzare l'apparecchio
• Leggete attentamente le istruzioni per l'uso.
Avrete così modo di familiarizzare con il vostro nuovo apparecchio, di scoprirne tutte le funzioni e le componenti, di apprendere importanti dettagli sulla sua messa in funzione, di acquisire dimestichezza nel suo utilizzo e di
usufruire di alcuni validi consigli da seguire in caso di guasti.
• Seguendo le istruzioni per l'uso, eviterete anche di danneggiare il prodotto e di pregiudicare, a causa di un
utilizzo scorretto, i diritti del consumatore che vi spettano per legge.
• Allo stesso modo, non siamo responsabili per eventuali misurazioni errate e per le conseguenze che ne
possono derivare.
• Decliniamo ogni responsabilità per i danni derivanti dal mancato rispetto delle presenti istruzioni per l'uso.
• Prestate particolare attenzione alle misure di sicurezza!
• Conservate con cura queste istruzioni per l'uso.
TFA_No. 60.2024_Anleitung 21.12.2018 12:13 Uhr Seite 22
Page 23

– 44 – – 45 –
Orologio sveglia digitale
2. La consegna include
• Orologio sveglia digitale
• Istruzioni per l'uso
3. Tutte le applicazioni e tutti i vantaggi del vostro nuovo apparecchio
• Grandi cifre a LED
• 3 livelli di luminosità
• Allarme con funzione snooze
4. Per la vostra sicurezza
• Il prodotto è adatto esclusivamente agli utilizzi di cui sopra. Non utilizzate il prodotto in maniera diversa da
quanto descritto in queste istruzioni.
• Non sono consentite riparazioni, alterazioni o modifiche non autorizzate del dispositivo.
Orologio sveglia digitale
Attenzione!
Pericolo di lesioni:
• Tenere il dispositivo e le batterie lontano dalla portata dei bambini.
• Se ingerite, le batterie possono essere mortali. Se una batteria venisse ingerita, potrebbe causare gravi ustioni e
portare alla morte nel giro di due ore. Se si sospetta che una batteria sia stata ingerita o inserita nel corpo in
altra maniera, consultare immediatamente un medico.
• Non gettare le batterie nel fuoco, non polarizzarle in maniera scorretta, non smontarle e non cercare di ricaricarle. Pericolo di esplosione!
• Le batterie contengono acidi nocivi per la salute. Sostituite quanto prima le batterie quasi scariche, in modo da
evitare che si scarichino completamente. Non utilizzate mai contemporaneamente batterie usate e batterie nuove
né batterie di tipi diversi.
• Quando si maneggiano batterie esaurite indossare sempre guanti resistenti alle sostanze chimiche e occhiali di
protezione.
TFA_No. 60.2024_Anleitung 21.12.2018 12:13 Uhr Seite 23
Page 24

– 46 – – 47 –
Orologio sveglia digitale
Avvertenze sulla sicurezza del prodotto!
• Non esporre l'apparecchio a temperature estreme, vibrazioni e urti.
• Proteggere dall’umidità.
5. Componenti
A: Display (Fig. 1):
A 1: Simbolo della sveglia A 2: Orologio/orario della sveglia
A 3: P nel formato 12 ore A 4: Simbolo snooze
B: Parte posteriore (Fig. 2):
B 1: Tasto sensore SNOOZE/AL STOP B 2: Commutatore DIM
B 3: Tasto TIME SET B 4: Tasto AL SET
Orologio sveglia digitale
B 5: Tasto RESET B 6: Tasto MIN/AL ON/OFF
B 7: Tasto HOUR/12/24 B 8: Vano batteria
6. Messa in funzione
• Aprire il vano batteria e inserire 4 batterie nuove tipo AA da 1,5 V, rispettando le corrette polarità.
• Viene emesso un breve segnale acustico.
• Richiudere il vano batteria.
• Sul display appare 12:00.
7. Impostazioni
7.1 Sistema orario di 12 o 24 ore
• È possibile selezionare con il tasto HOUR/12/24 in modalità normale fra il sistema orario di 24 o 12 ore (in
questo caso appare P sul display dopo mezzogiorno).
TFA_No. 60.2024_Anleitung 21.12.2018 12:13 Uhr Seite 24
Page 25

– 48 – – 49 –
Orologio sveglia digitale
7.2 Impostazione dell’ora
• Premere il tasto TIME SET.
• L’indicazione dell’ora lampeggia.
• Premere il tasto HOUR/12/24 per impostare le ore.
• Premere il tasto MIN/AL ON/OFF per impostare i minuti.
• Confermare con il tasto TIME SET.
7.3 Impostazione dell'ora della sveglia
• Premere il tasto AL SET.
• Sul display lampeggia l'ora della sveglia (predefinito 6:00).
• Premere il tasto HOUR/12/24 per impostare le ore.
• Premere il tasto MIN/AL ON/OFF per impostare i minuti.
Orologio sveglia digitale
• Confermare con il tasto AL SET.
• Sul display vengono visualizzati il simbolo della sveglia e il simbolo snooze. Entrambe le funzioni sono ora attivate.
8. Funzioni di allarme
8.1 Allarme sveglia
• Premere il tasto MIN/AL ON/OFF in modalità normale per disattivare o attivare la funzione sveglia.
• All'attivazione dell'allarme, sul display viene visualizzata l'ora della sveglia per 3 secondi. Il simbolo della sveglia
lampeggia e resta fisso sul display.
• Quando l'ora della sveglia inserita viene raggiunto, la sveglia comincia a suonare.
• Premere il tasto sensore SNOOZE/AL STOP per arrestare la sveglia.
• Se non viene interrotto, il suono della sveglia si disattiva automaticamente dopo uno minuto e si riattiva nuovamente alla stessa ora di sveglia.
TFA_No. 60.2024_Anleitung 21.12.2018 12:13 Uhr Seite 25
Page 26

– 50 – – 51 –
Orologio sveglia digitale
• Il simbolo della sveglia resta fisso sul display.
• Premere il tasto MIN/AL ON/OFF in modalità normale per disattivare la funzione sveglia. Sul display scompare il
simbolo della sveglia.
8.2 Funzione snooze
• Tenere premuto per 2 secondi il tasto HOUR/12/24 per attivare la funzione snooze nella modalità normale. Sul
display appare il simbolo snooze.
• Quando l'ora della sveglia inserita viene raggiunto, la sveglia comincia a suonare.
• Per attivare la funzione snooze, premere il tasto sensore SNOOZE/AL STOP.
• Il simbolo snooze lampeggia sul display.
• Il suono della sveglia verrà interrotto per 7 minuti.
• È possibile attivare la funzione snooze fino a 3 volte.
• Premere un tasto qualunque per spegnere la funzione snooze.
Orologio sveglia digitale
• Tenere premuto per 2 secondi il tasto HOUR/12/24 per disattivare la funzione snooze nella modalità normale. Il
simbolo snooze scompare.
9. Illuminazione del display
• Con l'interruttore DIM è possibile modificare in tre livelli la luminosità (HIGH-MIDDLE-LOW).
• Illuminazione notturna automatica: un'illuminazione più debole si accende automaticamente dalle ore 20:00 alle
ore 6:00.
10. Puntini tra la visualizzazione dell’ora e quella dei minuti
• I due puntini tra la visualizzazione dell’ora e quella dei minuti lampeggiano sul display al ritmo dei secondi.
• Tenere premuto il tasto MIN/AL ON/OFF nella modalità normale per 2 secondi per disattivare e attivare la funzione.
11. Cura e manutenzione
• Per pulire l'apparecchio utilizzare solo un panno morbido leggermente inumidito. Non usare solventi o abrasivi.
TFA_No. 60.2024_Anleitung 21.12.2018 12:13 Uhr Seite 26
Page 27

– 52 – – 53 –
Orologio sveglia digitale
• Rimuovere le batterie, se non si utilizza l'apparecchio per un periodo prolungato.
• Collocare il dispositivo in un luogo asciutto.
11.1 Sostituzione delle batterie
• Cambiare le batterie se le funzioni del dispositivo sono più deboli.
• Aprire il vano batteria e inserire 4 batterie nuove tipo AA da 1,5 V, rispettando le corrette polarità.
• Richiudere il vano batteria.
12. Tasto RESET
• Premere con un oggetto appuntito il tasto RESET quando l'orologio non funziona correttamente. Viene emesso
un breve segnale acustico.
Orologio sveglia digitale
13. Guasti
Problema Risoluzione del problema
Nessuna indicazione ➜ Inserire le batterie rispettando le corrette polarità
➜ Sostituire le batterie
Indicazione debole ➜ Ridurre la luminosità dell’ambiente.
➜ Modificare la luminosità del display
Indicazione non corretta ➜ Sostituire le batterie
➜ Premere con un oggetto appuntito il tasto RESET
Qualora il vostro apparecchio continui a non funzionare nonostante queste procedure, rivolgetevi al rivenditore presso
il quale lo avete acquistato.
TFA_No. 60.2024_Anleitung 21.12.2018 12:13 Uhr Seite 27
Page 28

– 54 – – 55 –
Orologio sveglia digitale
14. Smaltimento
Questo prodotto è stato realizzato utilizzando materiali e componenti di alta qualità che possono essere riciclati e
riutilizzati.
È assolutamente vietato gettate le batterie tra i rifiuti domestici.
In qualità di consumatori, siete tenuti per legge a consegnare le batterie usate al negoziante o ad
altri enti preposti al riciclaggio in conformità alle vigenti disposizioni nazionali o locali, ai fini di uno
smaltimento ecologico.
Le sigle dei metalli pesanti contenuti sono: Cd=cadmio, Hg=mercurio, Pb=piombo
Questo apparecchio è etichettato in conformità alla Direttiva UE sullo smaltimento delle apparecchia-
ture elettriche ed elettroniche (WEEE).
Questo prodotto non deve essere smaltito insieme ai rifiuti domestici. Il consumatore è tenuto a
consegnare il vecchio apparecchio presso un punto di raccolta per lo smaltimento di apparecchiature elettriche ed elettroniche ai fini di uno smaltimento ecologico.
Orologio sveglia digitale
15. Dati tecnici
Alimentazione Batterie: 4 x AA da 1,5 V (non incluse)
Dimensioni esterne 130 x 41 x 65 mm
Peso 104 g (solo apparecchio)
TFA Dostmann GmbH & Co.KG, Zum Ottersberg 12, D-97877 Wertheim, Germania
È vietata la pubblicazione delle presenti istruzioni o di parti di esse senza una precedente autorizzazione della TFA
Dostmann. I dati tecnici corrispondono allo stato del prodotto al momento della stampa e possono cambiare senza preavviso.
È possibile trovare dati tecnici e informazioni aggiornate sul prodotto inserendo il numero di articolo sul nostro sito.
www.tfa-dostmann.de 12/18
TFA_No. 60.2024_Anleitung 21.12.2018 12:13 Uhr Seite 28
Page 29

– 56 – – 57 –
Digitaal alarmklok
Hartelijk dank dat u voor dit apparaat van de firma TFA hebt gekozen.
1. Voordat u met het apparaat gaat werken
• Leest u a.u.b. de gebruiksaanwijzing aandachtig door.
Zo raakt u vertrouwd met uw nieuw apparaat en leert u alle functies en onderdelen kennen, komt u belangrijke
details te weten met het oog op het in bedrijf stellen van het apparaat en de omgang ermee en krijgt u tips voor
het geval van een storing.
• Door rekening te houden met wat er in de handleiding staat, vermijdt u ook beschadigingen van het product
en riskeert u niet dat uw wettelijke rechten door verkeerd gebruik niet meer gelden.
• Ook zijn wij niet verantwoordelijk voor verkeerde metingen en de mogelijke gevolgen die daaruit voortvloeien.
• Voor schade die wordt veroorzaakt doordat u geen rekening houdt met de handleiding aanvaarden wij geen
aansprakelijkheid.
• Volg in elk geval de veiligheidsinstructies op!
• Deze gebruiksaanwijzing goed bewaren a.u.b.!
Digitaal alarmklok
2. Levering
• Digitaal alarmklok
• Gebruiksaanwijzing
3. Hoe u uw nieuw apparaat kunt gebruiken en alle voordelen ervan in één oogopslag
• Grote LED cijfers
• Helderheid in drie stappen
• Wekalarm met snooze-functie
4. Voor uw veiligheid
• Het product is uitsluitend geschikt voor de hierboven beschreven doeleinden. Gebruik het product niet anders
dan in deze handleiding is aangegeven.
• Het eigenmachtig repareren, verbouwen of veranderen van het apparaat is niet toegestaan.
TFA_No. 60.2024_Anleitung 21.12.2018 12:13 Uhr Seite 29
Page 30

– 58 – – 59 –
Digitaal alarmklok
Voorzichtig!
Kans op letsel:
• Bewaar het apparaat en de batterijen buiten de reikwijdte van kinderen.
• Het inslikken van batterijen kan levensgevaarlijk zijn. Als een batterij wordt ingeslikt, kan dit binnen 2 uur tot
ernstige interne brandwonden en tot fataal letsel leiden. Als u denkt dat de batterijen zijn ingeslikt of in een willekeurig lichaamsdeel terecht zijn gekomen, dient u onmiddellijk medische hulp te zoeken.
• Batterijen niet in het vuur gooien, niet kortsluiten, niet uit elkaar halen of opladen. Kans op explosie!
• Batterijen bevatten zuren die de gezondheid schaden. Zwakke batterijen moeten zo snel mogelijk worden vervangen om lekkage van de batterijen te voorkomen. Gebruik nooit tegelijkertijd oude en nieuwe batterijen of batterijen van een verschillend type.
• Draag handschoenen die bestand zijn tegen chemicaliën en een beschermbril wanneer u met uitgelopen batterijen hanteert!
Digitaal alarmklok
Belangrijke informatie voor de productveiligheid!
• Stel het apparaat niet bloot aan extreme temperaturen, trillingen en schokken.
• Tegen vocht beschermen.
5. Onderdelen
A: Display (Fig. 1):
A 1: Alarmsymbool A 2: Tijd/alarmtijd
A 3: P (bij 12-uur-cyclus) A 4: Snoozesymbool
B: Achterkant (Fig. 2):
B 1: SNOOZE/AL STOP tiptoets B 2: DIM schuifschakelaar
B 3: TIME SET toets B 4: AL SET toets
TFA_No. 60.2024_Anleitung 21.12.2018 12:13 Uhr Seite 30
Page 31

– 60 – – 61 –
Digitaal alarmklok
B 5: RESET knop B 6: MIN/AL ON/OFF toets
B 7: HOUR/12/24 toets B 8: Batterijvak
6. Inbedrijfstelling
• Open het batterijvak en plaats er 4 nieuwe batterijen 1,5 V AA in.
• U hoort een kort signaal.
• Sluit het batterijvak weer.
• 12:00 verschijnt op het display.
7. Instellingen
7.1 12-uur-cyclus of 24 uur cyclus
• Met de HOUR/12/24 toets kunt u tussen het 24 uur- of 12-uurtijdsysteem (P verschijnt op het display na 12h)
kiezen in de normaalmodus.
Digitaal alarmklok
7.2 Tijdinstelling
• Druk op de TIME SET toets.
• Op het display knippert de tijd.
• Druk op de HOUR/12/24 toets en u kunt de uren instellen.
• Druk op de MIN/AL ON/OFF toets om de minuten in te stellen.
• Bevestig met de TIME SET toets.
7.3 Instelling van de alarmtijd
• Druk op de AL SET toets.
• Op het display knippert de alarmtijd (standaardinstelling 6:00).
• Druk op de HOUR/12/24 toets en u kunt de uren instellen.
• Druk op de MIN/AL ON/OFF toets om de minuten in te stellen.
• Bevestig met de AL SET toets.
• Het alarmsymbool en het snoozesymbool verschijnen op het display. Beide functies zijn nu geactiveerd.
TFA_No. 60.2024_Anleitung 21.12.2018 12:13 Uhr Seite 31
Page 32

– 62 – – 63 –
Digitaal alarmklok
8. Alarm functies
8.1 Wekalarm
• Voor activeren of deactiveren van het alarm drukt u op de MIN/AL ON/OFF toets in de normaalmodus.
• Bij actief alarm verschijnt de alarmtijd 2 seconden op het display. Het alarmsymbool knippert en blijft op het display.
• Wanneer de ingestelde wektijd is bereikt begint de wekker te rinkelen.
• Druk op de SNOOZE/AL STOP tiptoets en het alarmsignaal gaat uit.
• Als het alarm niet wordt beëindigd, zal de alarmtoon zich na één minuut automatisch uitschakelen en activeert
zich vanzelf weer op dezelfde wektijd.
• Het alarmsymbool blijft op het display.
• Voor deactiveren van het alarm drukt u op de MIN/AL ON/OFF toets in de normaalmodus. Het alarmsymbool verdwijnt.
Digitaal alarmklok
8.2 Snooze-functie
• Houdt de HOUR/12/24 toets 2 seconden ingedrukt in de normaalmodus, om de snoozefunctie te activeren (bij
actief alarm). Het snoozesymbool verschijnt op het display.
• Wanneer de ingestelde wektijd is bereikt begint de wekker te rinkelen.
• Om de snoozefunctie te activeren druk op de SNOOZE/AL STOP tiptoets.
• Het snoozesymbool knippert op het display.
• Het weksignaal wordt voor 7 minuten onderbroken.
• U kunt de snooze-functie tot 3 keer activeren.
• Druk op een willekeurige toets om de snoozefunctie uit te schakelen.
• Houdt de HOUR/12/24 toets 2 seconden ingedrukt in de normaalmodus, om de snoozefunctie te deactiveren. Het
snoozesymbool verdwijnt.
TFA_No. 60.2024_Anleitung 21.12.2018 12:13 Uhr Seite 32
Page 33

– 64 – – 65 –
Digitaal alarmklok
9. Displayverlichting
• Met de DIM schakelaar kunt u de helderheid van het display-verlichting in drie stappen veranderen (HIGHMIDDLE-LOW).
• Automatische nachtverlichting: de verlichting wordt automatisch zwakker van 20:00 tot 6:00 uur.
10. Punten tussen de uur- en minutenstand
• Beide punten tussen de uur- en minutenstand blinken in seconden takt op het display.
• Houdt de MIN/AL ON/OFF toets 2 seconden ingedrukt in de normaalmodus, om de functie te activeren of te
deactiveren.
11. Schoonmaken en onderhoud
• Maak het apparaat met een zachte, enigszins vochtige doek schoon. Geen schuur- of oplosmiddelen gebruiken!
Digitaal alarmklok
• Verwijder de batterijen, als u het apparaat langere tijd niet gebruikt.
• Bewaar het apparaat op een droge plaats.
11.1 Batterijwissel
• Vervang de batterijen zodra de functies zwakker worden.
• Open het batterijvak en plaats er 4 nieuwe batterijen 1,5 V AA in.
• Sluit het batterijvak weer.
12. RESET knop
• Druk met een puntig voorwerp op de RESET knop, wanneer de alarmklok niet goed werkt en de klok zal dan
terug gaan naar de beginmodus. U hoort een kort signaal.
TFA_No. 60.2024_Anleitung 21.12.2018 12:13 Uhr Seite 33
Page 34

– 66 – – 67 –
Digitaal alarmklok
13. Storingswijzer
Probleem Oplossing
Geen indicatie ➜ Batterijen met de juiste poolrichtingen plaatsen
➜ Vervang de batterijen
Zwake indicatie ➜ Helderheid van de omgeving verminderen
➜ Helderheid van de displayverlichting instellen
Geen correcte indicatie ➜ Vervang de batterijen
➜ Druk met een puntig voorwerp op de RESET knop
Neem contact op met de dealer bij wie u dit product gekocht heeft als uw apparaat ondanks deze maatregelen nog
steeds niet werkt.
Digitaal alarmklok
14. Verwijderen
Dit product is vervaardigd van hoogwaardige materialen en onderdelen, die kunnen worden gerecycled en hergebruikt.
Batterijen en accu's mogen niet met het huisvuil worden weggegooid.
Als consument bent u wettelijk verplicht om gebruikte batterijen en accu's bij uw dealer af te geven
of naar de daarvoor bestemde containers volgens de nationale of lokale bepalingen te brengen om
een milieuvriendelijk verwijderen te garanderen.
De benamingen van de zware metalen zijn: Cd=cadmium, Hg=kwikzilver, Pb=lood
Dit apparaat is gemarkeerd in overeenstemming met de EU-richtlijn (WEEE) over het verwijderen van
elektrisch en elektronisch afval.
Dit product mag niet met het huisvuil worden weggegooid. De gebruiker is verplicht om de appara-
tuur af te geven bij een als zodanig erkende plek van afgifte voor het verwijderen van elektrische en
elektronische apparatuur om een milieuvriendelijk verwijderen te garanderen.
TFA_No. 60.2024_Anleitung 21.12.2018 12:13 Uhr Seite 34
Page 35

– 68 – – 69 –
Digitaal alarmklok
15. Technische gegevens
Spanningsvoorziening Batterijen 4 x 1,5 V AA (niet inclusief)
Afmetingen behuizing 130 x 41 x 65 mm
Gewicht 104 g (alleen het apparaat)
TFA Dostmann GmbH & Co.KG, Zum Ottersberg 12, D-97877 Wertheim, Duitsland
Deze gebruiksaanwijzing of gedeelten eruit mogen alleen met toestemming van TFA Dostmann worden gepubliceerd. De
technische gegevens van dit apparaat zijn actueel bij het ter perse gaan en kunnen zonder voorafgaande informatie worden
gewijzigd. De nieuwste technische gegevens en informatie over uw product kunt u vinden door het invoeren van het artikelnummer op onze homepage.
www.tfa-dostmann.de 12/18
Reloj despertador digital
Muchas gracias por haber adquirido este dispositivo de TFA.
1. Antes de utilizar el dispositivo
• Lea detenidamente las instrucciones de uso.
De este modo se familiarizará con su nuevo dispositivo, conocerá todas las funciones y componentes, así como
información relevante para la puesta de funcionamiento el manejo del dispositivo y recibirá consejos sobre
cómo actuar en caso de avería.
• Si sigue las instrucciones de uso, evitará que se produzcan daños en el dispositivo y no comprometerá a
sus derechos por vicios, previstos legalmente debido a un uso incorrecto.
• Del mismo modo, no nos hacemos responsables por cualquier lectura incorrecta y de las consecuencias
que pueden derivarse de tales.
• No asumimos responsabilidad alguna por los daños originados por el incumplimiento de estas instrucciones de uso.
• Tenga en cuenta ante todo las advertencias de seguridad.
• Guarde estas instrucciones de uso en un sitio seguro.
TFA_No. 60.2024_Anleitung 21.12.2018 12:13 Uhr Seite 35
Page 36

– 70 – – 71 –
Reloj despertador digital
2. Entrega
• Reloj despertador digital • Instrucciones de uso
3. Ámbito de aplicación y ventajas de su nuevo dispositivo
• Grandes cifras LED
• Brillo de la pantalla en tres niveles
• Alarma con función snooze
4. Para su seguridad
• El producto solo es adecuado para el ámbito de aplicación descrito anteriormente. No emplee el dispositivo de
modo distinto al especificado en estas instrucciones.
• No está permitido realizar reparaciones, transformaciones o modificaciones por cuenta propia en el dispositivo.
Reloj despertador digital
¡Precaución!
Riesgo de lesiones:
• Mantenga el dispositivo y las pilas fuera del alcance de los niños.
• Las pilas pueden ser peligrosas si se ingieren. Si se ingiere una pila le puede causar dentro de 2 horas, quemaduras internas y llegar a la muerte. Si sospecha que se ha ingerido una pila o ha entrado en el cuerpo de otro
modo, busque inmediatamente ayuda médica.
• No tire las pilas al fuego, no las cortocircuite, desmonte ni recargue, ya que existe riesgo de explosión.
• Las pilas contienen ácidos nocivos para la salud. Las pilas con un estado de carga bajo deben cambiarse lo
antes posible para evitar fugas. No utilice simultáneamente pilas nuevas y usadas o pilas de diferente tipo.
• Utilice guantes protectores resistentes a productos químicos y gafas protectoras si manipula pilas con fugas de
líquido!
TFA_No. 60.2024_Anleitung 21.12.2018 12:13 Uhr Seite 36
Page 37

– 72 – – 73 –
Reloj despertador digital
¡Advertencias importantes sobre la seguridad del producto!
• No exponga el dispositivo a temperaturas extremas, vibraciones ni sacudidas extremas.
• Protegerlo de la humedad.
5. Componentes
A: Pantalla (Fig. 1):
A 1: Símbolo de la alarma A 2: Hora/hora de la alarma
A 3: P en el sistema 12 horas A 4: Símbolo de snooze
B: Parte posterior (Fig. 2):
B 1: Tecla táctil SNOOZE/AL STOP B 2: Interruptor DIM
B 3: Tecla TIME SET B 4: Tecla AL SET
Reloj despertador digital
B 5: Tecla RESET B 6: Tecla MIN/AL ON/OFF
B 7: Tecla HOUR/12/24 B 8: Compartimento de las pilas
6. Puesta en marcha
• Abra el compartimento de las pilas e introduzca 4 pilas nuevas 1,5 V AA. Asegúrese que las pilas estén colocadas con la polaridad correcta.
• Suena una señal acústica corta.
• Cierre de nuevo el compartimento de las pilas.
• En la pantalla aparece 12:00.
7. Ajustes
7.1 Sistema 12 horas o 24 horas
• Pulse la tecla HOUR/12/24 en el modo normal, para seleccionar el modo de 12 (P aparece en la pantalla a partir
del medio día) o 24 horas sistema.
TFA_No. 60.2024_Anleitung 21.12.2018 12:13 Uhr Seite 37
Page 38

– 74 – – 75 –
Reloj despertador digital
7.2 Ajuste de la hora
• Pulse la tecla TIME SET.
• En la pantalla parpadea la hora.
• Pulse la tecla HOUR/12/24 para ajustar las horas.
• Pulse la tecla MIN/AL ON/OFF para ajustar los minutos.
• Confirme la entrada con la tecla TIME SET.
7.3 Ajuste de la hora de alarma
• Pulse la tecla AL SET.
• En la pantalla parpadea la hora de la alarma (preseleccionado 6:00).
• Pulse la tecla HOUR/12/24 para ajustar las horas.
• Pulse la tecla MIN/AL ON/OFF para ajustar los minutos.
• Confirme la entrada con la tecla AL SET.
• El símbolo snooze y el símbolo de la alarma aparecen en la pantalla. Ambas funciones están ahora activadas.
Reloj despertador digital
8. Función de alarma
8.1 Alarma despertador
• Para activar o desactivar la función de la alarma, pulse la tecla MIN/AL ON/OFF en el modo normal.
• Con la alarma activada, en la pantalla aparece la hora de la alarma durante tres segundos. El símbolo de la alarma parpadea y se detiene en la pantalla.
• Cuando llegue la hora de la alarma, el despertador comienza a sonar.
• Pulse la tecla táctil SNOOZE/AL STOP para terminar la alarma.
• Si no se interrumpe la alarma, el tono creciente de alarma se apaga automáticamente después de un minuto y
se activa de nuevo a la misma hora de la alarma.
• El símbolo de la alarma se detiene en la pantalla.
• Para desactivar la función de la alarma, pulse la tecla MIN/AL ON/OFF en el modo normal. El símbolo de alarma
desaparece en la pantalla.
TFA_No. 60.2024_Anleitung 21.12.2018 12:13 Uhr Seite 38
Page 39

– 76 – – 77 –
Reloj despertador digital
8.2 Función snooze
• Para activar la función de snooze, mantenga pulsada la tecla HOUR/12/24 durante 2 segundos en el modo nor-
mal (cuando la alarma está activada). El símbolo snooze aparece en la pantalla.
• Cuando llegue la hora de la alarma, el despertador comienza a sonar.
• Pulse la tecla táctil SNOOZE/AL STOP para activar la función de snooze.
• El símbolo snooze parpadea en la pantalla.
• El sonido de la alarma se interrumpe durante 7 minutos.
• Puede activar la función snooze hasta 3 veces.
• Pulse cualquier tecla para terminar la función de snooze.
• Para desactivar la función de snooze, mantenga pulsada la tecla HOUR/12/24 durante 2 segundos en el modo
normal. El símbolo de snooze desaparece en la pantalla.
Reloj despertador digital
9. Iluminación de la pantalla
• Mediante el interruptor DIM puede ajustar el brillo de la pantalla en tres niveles (HIGH-MIDDLE-LOW).
• Iluminación de noche automática: un nivel de brillo débil se enciende automáticamente de 20:00 a 6:00 horas.
10. Puntos entre horas y minutos
• Los dos puntos en la pantalla parpadean cada segundo.
• Para activar y desactivar la función, mantenga pulsada la tecla MIN/AL ON/OFF durante 2 segundos en el modo
normal.
11. Cuidado y mantenimiento
• Limpie el dispositivo con un paño suave, ligeramente humedecido. No utilice productos abrasivos o disolventes!
• Extraiga las pilas si no va a usar el dispositivo por un largo período de tiempo.
• Mantenga el dispositivo en un lugar seco.
TFA_No. 60.2024_Anleitung 21.12.2018 12:13 Uhr Seite 39
Page 40

– 78 – – 79 –
Reloj despertador digital
11.1 Cambio de las pilas
• Una vez que las funciones estén débiles cambie las pilas.
• Abra el compartimento de las pilas e introduzca 4 pilas nuevas 1,5 V AA. Asegúrese que las pilas estén colocadas con la polaridad correcta.
• Cierre de nuevo el compartimento de las pilas.
12. Tecla RESET
• Pulse la tecla RESET con un objeto puntiagudo, si el dispositivo no funciona correctamente. Suena una señal
acústica corta.
13. Averías
Problema Solución
Ninguna indicación ➜ Asegúrese que las pilas estén colocadas con la polaridad correcta
Reloj despertador digital
➜ Cambiar las pilas
Indicación débil ➜ Reducir el brillo del ambiente
➜ Ajustar el brillo de la iluminación de la pantalla
Indicación incorrecta ➜ Cambiar las pilas
➜ Pulse la tecla RESET con un objeto puntiagudo
Si a pesar de haber seguido estos pasos, el dispositivo no funciona, diríjase al establecimiento donde adquirió el producto.
14. Eliminación
Este producto ha sido fabricado usando materiales y componentes que pueden ser reciclados y reusados.
TFA_No. 60.2024_Anleitung 21.12.2018 12:13 Uhr Seite 40
Page 41

– 80 – – 81 –
Reloj despertador digital
Las pilas y baterías no pueden desecharse en ningún caso junto con la basura doméstica.
Como consumidor, está obligado legalmente a depositar las pilas y baterías usadas de manera respetuosa con el medio ambiente en el comercio especializado o bien en los centros de recogida y
reciclaje previstos para ello según el reglamento nacional o local.
Las denominaciones de los metales pesados que contienen son:
Cd=cadmio, Hg=mercurio, Pb=plomo
Este dispositivo está identificado conforme a la Directiva de la UE sobre residuos de aparatos eléctricos y electrónicos (WEEE).
No deseche este producto junto con la basura doméstica. El usuario está obligado a llevar el dispositivo usado a un punto de recogida de aparatos eléctricos y electrónicos acreditado para que sea
eliminado de manera respetuosa con el medio ambiente.
Reloj despertador digital
15. Datos técnicos
Alimentación de tensión Pilas 4 x 1,5 V AA (no incluidas)
Dimensiónes de cuerpo 130 x 41 x 65 mm
Peso 104 g (solo dispositivo)
TFA Dostmann GmbH & Co.KG, Zum Ottersberg 12, D-97877 Wertheim, Alemania
Estas instrucciones o extractos de las mismas no pueden ser publicados sin la autorización de la TFA Dostmann. Los datos
técnicos de este producto corresponden al estado en el momento de la impresión y pueden ser modificados sin previo
aviso. Los actuales datos técnicos e informaciones sobre su producto los puede encontrar bajo el número de artículo en
nuestra página web.
www.tfa-dostmann.de 12/18
TFA_No. 60.2024_Anleitung 21.12.2018 12:13 Uhr Seite 41
Page 42

– 82 – – 83 –
Fig. 1
Fig. 2
B 5
B 6
B 8
B 7
B 1 B 2 B 3 B 4
A 4
A 1
A 3
A 2
TFA_No. 60.2024_Anleitung 21.12.2018 12:13 Uhr Seite 42
 Loading...