

Page 1
RoHS
Bedienungsanleitung
Instruction manual
Mode d’emploi
Instrucciones de uso
Gebruiksaanwijzing
Istruzioni per l'uso
Kat. Nr. 35.1150
92
SEASON – Estación meteorológica inalámbrica
Estas instrucciones o extractos de las mismas no pueden ser publicados sin la autorización de la TFA Dostmann. Los datos técnicos de este producto
corresponden al estado en el momento de la impresión y pueden ser modificados sin previo aviso.
Los actuales datos técnicos e informaciones sobre su producto los puede encontrar bajo el número de artículo en nuestra página web.
Declaración UE de conformidad
Por la presente, TFA Dostmann declara que el tipo de equipo radioeléctrico 35.1150 es conforme con la Directiva 2014/53/UE. El texto completo de la
declaración UE de conformidad está disponible en la dirección Internet siguiente:
www.tfa-dostmann.de
E-Mail: info@tfa-dostmann.de
TFA Dostmann GmbH & Co.KG, Zum Ottersberg 12, D-97877 Wertheim, Alemania 01/19
TFA_No. 35.1150_Anleitung 28.01.2019 12:01 Uhr Seite 1
Page 2
32
Fig. 1 Fig. 2
A 19
A 7
A 4
A 5
A 5
A 6
A 10
A 9
A 8
C 4
C 5
C 1
A 20A 2A 3 A 1
C 2A 16A 15A 14A 13A 12A 11
A 17
A 18
C 3
B 1B 2B 3B 4B 5B 6B 7
TFA_No. 35.1150_Anleitung 28.01.2019 12:01 Uhr Seite 2
Page 3
54
SEASON – Funk-Wetterstation
Vielen Dank, dass Sie sich für dieses Gerät aus dem Hause TFA entschieden haben.
1. Bevor Sie mit dem Gerät arbeiten
• Lesen Sie sich bitte die Bedienungsanleitung genau durch.
So werden Sie mit Ihrem neuen Gerät vertraut, lernen alle Funktionen und Bestandteile kennen, erfahren wichtige Details
für die Inbetriebnahme und den Umgang mit dem Gerät und erhalten Tipps für den Störungsfall.
• Durch die Beachtung der Bedienungsanleitung vermeiden Sie auch Beschädigungen des Gerätes und die Gefährdung
Ihrer gesetzlichen Mängelrechte durch Fehlgebrauch.
• Für Schäden, die aus Nichtbeachtung dieser Bedienungsanleitung verursacht werden, übernehmen wir keine Haftung.
Ebenso haften wir nicht für inkorrekte Messwerte und Folgen, die sich aus solchen ergeben können.
• Beachten Sie besonders die Sicherheitshinweise!
• Bewahren Sie diese Bedienungsanleitung gut auf!
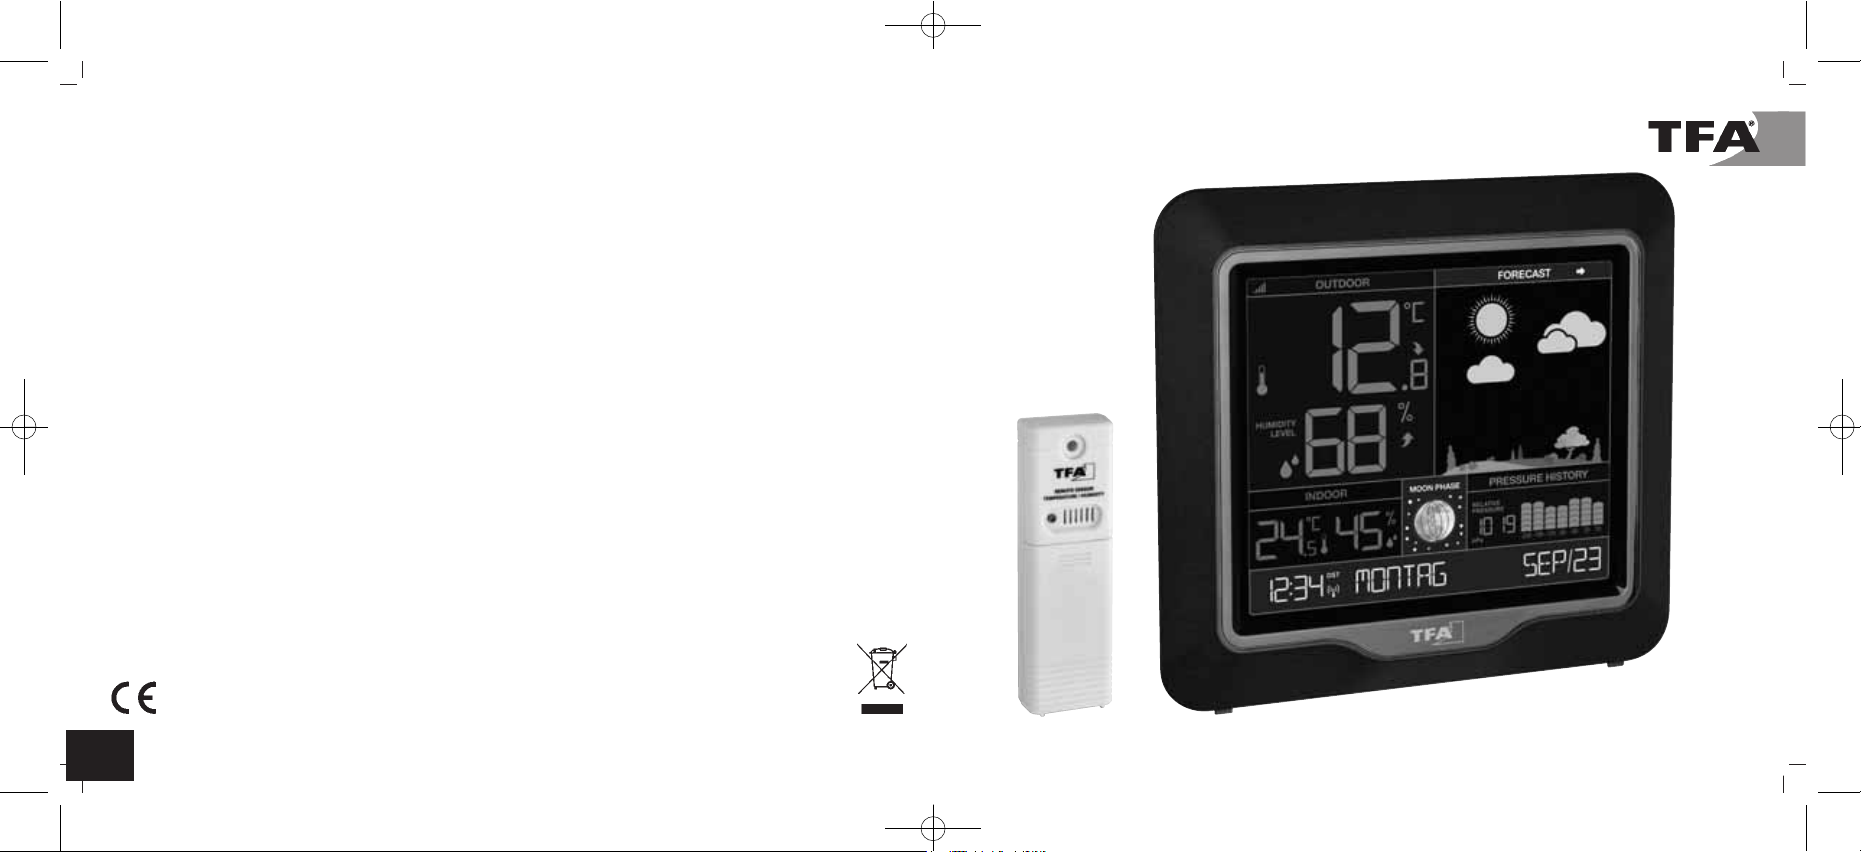
2. Lieferumfang
• Funk-Wetterstation (Basisstation)
• Netzstecker
• Außensender (Kat.-Nr.: 30.3206.02)
• Bedienungsanleitung
3. Einsatzbereich und alle Vorteile Ihres neuen Gerätes auf einen Blick
• Außentemperatur und Luftfeuchtigkeit über kabellosen Außensender (433 MHz) mit Reichweite bis 80 m (Freifeld)
• Innentemperatur und Luftfeuchtigkeit
• Vorhersage mit farbigem Wetterbild (verändert sich mit den Jahreszeiten)
• Relativer Luftdruck und graphische Darstellung des Luftdruckverlaufs der letzten 24 Std.
• Tendenzanzeigen
• Temperatur- und Luftfeuchtigkeitsalarm
• Max.-Min.-Funktion mit automatischer Rückstellung
• Taupunkt und Hitzeindex
• Funkuhr mit Datum und ausgeschriebenem Wochentag (6 Sprachen)
• Farbdisplay mit zwei Helligkeitsstufen (im Dauerbetrieb mit Netzadapter)
Fig. 3
D 1
D 3
D 2
D 4
TFA_No. 35.1150_Anleitung 28.01.2019 12:01 Uhr Seite 3
Page 4
76
SEASON – Funk-Wetterstation
4. Zu Ihrer Sicherheit
• Das Produkt ist ausschließlich für den oben beschriebenen Einsatzbereich geeignet. Verwenden Sie das Produkt nicht
anders, als in dieser Anleitung dargestellt wird.
• Das eigenmächtige Reparieren, Umbauen oder Verändern des Gerätes ist nicht gestattet.
Vorsicht!
Lebensgefahr durch Stromschlag!
• Schließen Sie das Basisgerät nur an eine vorschriftsmäßig installierte Steckdose mit einer Netzspannung von 230 V an!
• Die Steckdose muss nahe der Einrichtung angebracht und leicht zugänglich sein.
• Das Basisgerät und der Netzstecker dürfen nicht mit Wasser oder Feuchtigkeit in Kontakt kommen. Nur für den Betrieb in
trockenen Innenräumen geeignet.
• Benutzen Sie das Gerät nicht, wenn Gehäuse oder Netzstecker beschädigt sind.
• Betreiben Sie das Gerät außerhalb der Reichweite von Personen (auch Kindern), die mögliche Gefahren im Umgang mit
elektrischen Geräten nicht richtig einschätzen können.
• Ziehen Sie sofort den Stecker aus der Steckdose, wenn eine Störung auftritt oder das Gerät für längere Zeit nicht benutzt
wird.
• Verwenden Sie ausschließlich den mitgelieferten Netzstecker.
• Verbinden Sie erst das Kabel mit dem Basisgerät und stecken Sie dann den Netzstecker in die Steckdose.
• Ziehen Sie den Netzstecker nicht am Kabel aus der Steckdose.
• Verlegen Sie das Netzkabel so, dass es nicht mit scharfkantigen oder heißen Gegenständen in Berührung kommt.
Vorsicht!
Verletzungsgefahr:
• Bewahren Sie die Batterien und die Geräte außerhalb der Reichweite von Kindern auf.
• Batterien enthalten gesundheitsschädliche Säuren und können bei Verschlucken lebensgefährlich sein. Wurde eine Batterie
verschluckt, kann dies innerhalb von 2 Stunden zu schweren inneren Verätzungen und zum Tode führen. Wenn Sie vermuten, eine Batterie könnte verschluckt oder anderweitig in den Körper gelangt sein, nehmen Sie sofort medizinische Hilfe in
Anspruch.
• Batterien nicht ins Feuer werfen, kurzschließen, auseinander nehmen oder aufladen. Explosionsgefahr!
SEASON – Funk-Wetterstation
• Um ein Auslaufen der Batterien zu vermeiden, sollten schwache Batterien möglichst schnell ausgetauscht werden. Verwenden Sie nie gleichzeitig alte und neue Batterien oder Batterien unterschiedlichen Typs. Beim Hantieren mit ausgelaufenen
Batterien chemikalienbeständige Schutzhandschuhe und Schutzbrille tragen!
Wichtige Hinweise zur Produktsicherheit!
• Setzen Sie das Gerät keinen extremen Temperaturen, Vibrationen und Erschütterungen aus.
• Der Außensender ist spritzwassergeschützt, aber nicht wasserdicht. Suchen Sie einen niederschlagsgeschützten Platz für
den Sender aus.
5. Bestandteile
5.1 Wetterstation (Basisstation)
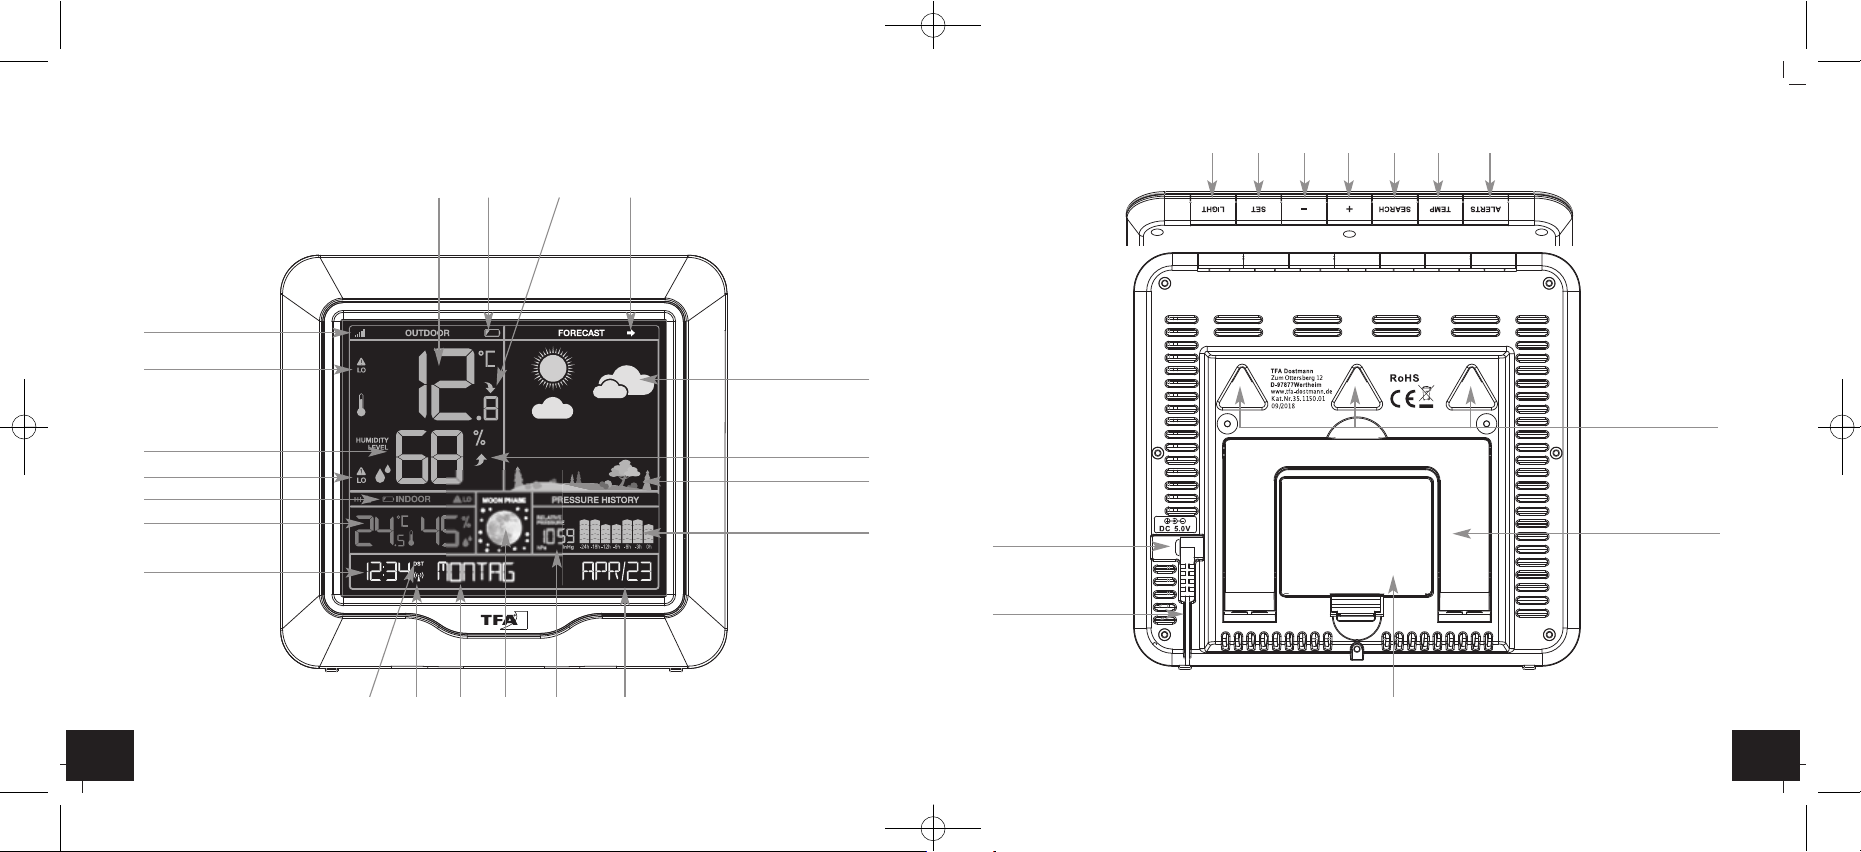
A: Display-Anzeige (Fig. 1):
A 1: Trendpfeil Außentemperatur A 2: Batteriesymbol für den Sender
A 3: Außentemperatur A 4: Funksymbol Außensender
A 5: Alarmsymbole HI/LO A 6: Außenluftfeuchtigkeit
A 7: Trendpfeil Außenluftfeuchtigkeit A 8: Batteriesymbol für die Basisstation
A 9: Innentemperatur und Innenluftfeuchtigkeit A 10: Uhrzeit
A 11: DST Symbol A 12: DCF Funkuhrsymbol
A 13: Wochentag A 14: Mondphase
A 15: Relativer Luftdruck A 16: Datum
A 17: Grafische Darstellung des Luftdrucks der letzten 24 Std. A 18: Jahreszeiten-Anzeige
A 19: Wettersymbole A 20: Tendenzanzeige
B: Tasten (Fig. 2):
B 1: ALERTS Taste B 2: TEMP Taste
B 3: SEARCH Taste B 4: + Taste
B 5: – Taste B 6: SET Taste
B 7: LIGHT Taste
TFA_No. 35.1150_Anleitung 28.01.2019 12:01 Uhr Seite 4
Page 5
98
SEASON – Funk-Wetterstation
C: Gehäuse (Fig. 2):
C 1: Wandaufhängungen C 2: Batteriefach
C 3: Ständer (3-stufig ausklappbar) C 4: Netzstecker-Anschluss
C 5: Kabelführung
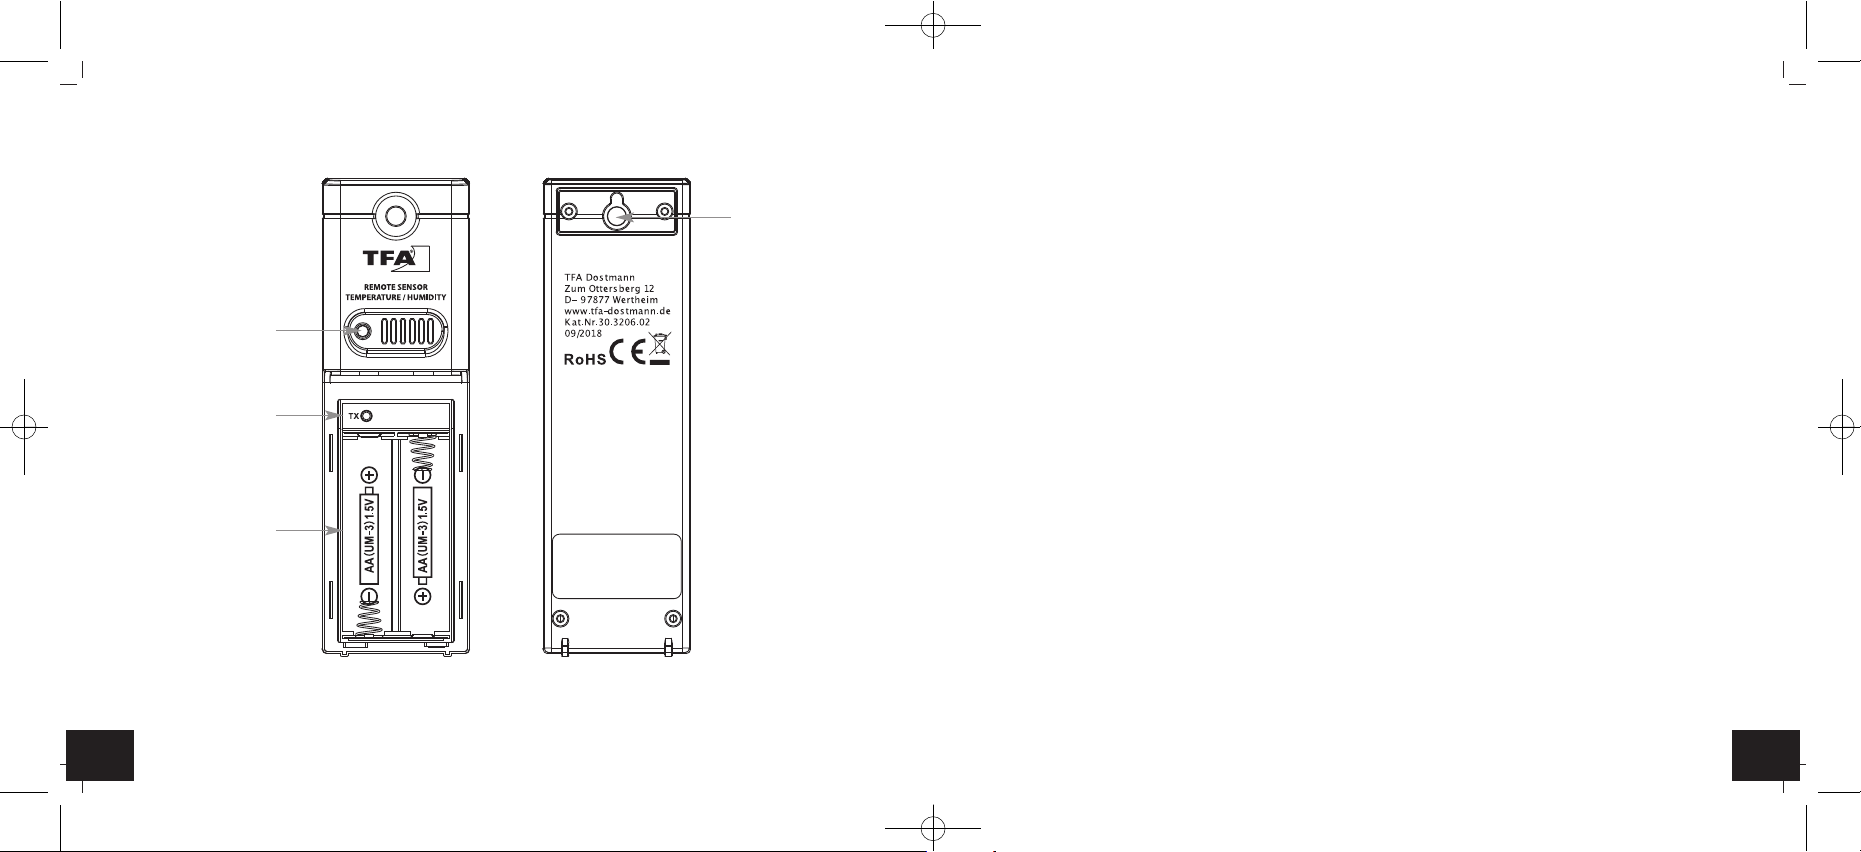
5.2 Außensender (Fig. 3):
D 1: LED-Kontrolllicht D 2: Batteriefach
D 3: TX Taste im Batteriefach D 4: Wandaufhängung
6. Inbetriebnahme
• Legen Sie die Basisstation und den Außensender in einem Abstand von ca. 1,5 Metern voneinander auf einen Tisch. Vermeiden Sie die Nähe zu möglichen Störquellen (elektronische Geräte und Funkanlagen).
• Schließen Sie die Basisstation mit dem beigefügtem Netzstecker an. Stecken Sie den Anschlussstecker in den Anschluss
der Basisstation und schließen Sie das Gerät mit dem Netzstecker am Stromnetz an. Wichtig! Stellen Sie sicher, dass Ihre
Netzspannung nicht mehr als 240 V beträgt! Andere Netzspannungen können zur Beschädigung des Gerätes führen.
• Ein kurzer Signalton ertönt und alle Segmente werden kurz angezeigt.
• Die Innentemperatur und Luftfeuchtigkeit erscheinen im Display.
6.1 Einlegen der Batterien in die Basisstation
• Die Batterien fungieren im Falle eines Stromausfalls als Backup-Batterien.
• Für eine dauerhafte Hintergrundbeleuchtung und um die Leistungsdauer der Batterien zu verlängern, benutzen Sie bitte den
mitgelieferten Netzstecker.
• Öffnen Sie das Batteriefach auf der Rückseite der Basisstation.
• Legen Sie drei neue Batterien 1,5 V AA in das Batteriefach. Achten Sie auf die richtige Polarität beim Einlegen der Batterien.
• Schließen Sie das Batteriefach wieder.
6.2 Einlegen der Batterien in den Außensender/ Empfang der Außenwerte
• Schieben Sie den Batteriefachdeckel des Außensenders nach unten.
• Legen Sie zwei neue Batterien 1,5 V AA in das Batteriefach des Außensenders. Achten Sie auf die richtige Polarität beim
Einlegen der Batterien.
SEASON – Funk-Wetterstation
• Nach dem Einlegen der Batterien werden die Messdaten des Außensenders an die Basisstation übertragen. Die LED-Kontrolllampe blinkt.
• Sobald die Basisstation die Außenwerte empfangen hat, werden die Außentemperatur und Luftfeuchtigkeit dauerhaft angezeigt.
• Werden die Außenwerte nicht innerhalb drei Minuten empfangen, erscheint „- -” auf dem Display. Prüfen Sie die Batterien
und starten Sie einen weiteren Versuch. Beseitigen Sie eventuelle Störquellen.
• Sobald die Basisstation die Funkzeit erhalten hat, können Sie die Initialisierung auch manuell starten. Halten Sie die
SEARCH Taste für drei Sekunden gedrückt. Die Basisstation versucht die Messwerte zu empfangen.
• Mit der TX Taste auf dem Sender können Sie die Messwerte manuell übertragen.
6.3 Empfang des Funkuhrsignals
• Nach dem Empfang der Außenwerte versucht die Uhr nun, das Funkuhrsignal zu empfangen und das DCF-Funkempfangszeichen blinkt.
• Wenn der Zeitcode nach 3-10 Minuten empfangen wurde, werden die funkgesteuerte Zeit und das DCF-Funkempfangszeichen ständig im Display angezeigt.
• Der DCF-Funkempfang findet täglich um 1:00 und 2.00 Uhr morgens statt. Ist auch der Funkempfang um 3:00 Uhr nicht
erfolgreich, so finden um 4:00 und 5:00 Uhr früh weitere Funkempfangsversuche statt.
• Sie können den DCF-Funkempfang auch manuell aktivieren.
• Drücken Sie die SEARCH Taste.
• Das DCF-Funkempfangssymbol blinkt.
• Es gibt drei verschiedene Empfangssymbole:
blinkt – Empfang aktiv
bleibt stehen – Empfang erfolgreich
kein Symbol – kein Empfang / Empfang deaktiviert
• Falls die Funkuhr kein DCF-Signal empfangen kann (z.B. wegen Störungen, Übertragungsdistanz, etc.), kann die Zeit auch
manuell eingestellt werden.
• Die Uhr arbeitet dann wie eine normale Quarz-Uhr (siehe Manuelle Einstellungen).
TFA_No. 35.1150_Anleitung 28.01.2019 12:01 Uhr Seite 5
Page 6

1110
SEASON – Funk-Wetterstation
6.4 Hinweis zum Empfang der Funkzeit
Die Zeitübertragung erfolgt von einer Cäsium Atom-Funkuhr, die von der Physikalisch Technischen Bundesanstalt in Braunschweig betrieben wird. Die Abweichung beträgt weniger als 1 Sekunde in einer Million Jahren. Die Zeit ist kodiert und wird
von Mainflingen in der Nähe von Frankfurt am Main durch ein DCF-77 (77.5 kHz) Frequenzsignal übertragen mit einer Reichweite von ca. 1.500 km. Ihre Funkuhr empfängt das Signal, wandelt es um und zeigt immer die exakte Zeit an. Auch die
Umstellung von Sommer- und Winterzeit erfolgt automatisch. Während der Sommerzeit erscheint DST auf dem Display. Der
Empfang hängt hauptsächlich von der geographischen Lage ab. Im Normalfall sollten innerhalb des Radius von 1.500 km
ausgehend von Frankfurt bei der Übertragung keine Probleme auftauchen.
Bitte beachten Sie folgende Hinweise:
• Es wird empfohlen, einen Abstand von mindestens 1,5 – 2 Metern zu eventuell störenden Geräten wie Computerbildschirmen
und Fernsehgeräten einzuhalten.
• In Stahlbetonbauten (Kellern, Aufbauten) ist das empfangene Signal natürlicherweise schwächer. In Extremfällen wird empfohlen, das Gerät in Fensternähe zu platzieren und/oder durch Drehen das Funksignal besser zu empfangen.
• Nachts sind die atmosphärischen Störungen meist geringer und ein Empfang ist in den meisten Fällen möglich. Ein einziger
Empfang pro Tag genügt, um die Genauigkeit zu gewährleisten und Abweichungen unter 1 Sekunde zu halten.
7. Hintergrundbeleuchtung
• Achtung: Die Hintergrundbeleuchtung im Dauerbetrieb funktioniert nur mit Netzstecker.
• Voreinstellung für die Hintergrundbeleuchtung ist HI.
• Drücken Sie die LIGHT (HI – LOW - OFF) Taste einmal (LOW), um die Hintergrundbeleuchtung zu dimmen.
• Drücken Sie die LIGHT (HI – LOW - OFF) Taste noch einmal (OFF), um die Hintergrundbeleuchtung auszuschalten.
• Zum kurzzeitigen Aktivieren der Hintergrundbeleuchtung drücken Sie eine beliebige Taste (nur im Batteriebetrieb).
8. Bedienung
• Drücken Sie die LIGHT Taste, um den Einstellmodus zu verlassen. Das Gerät verlässt automatisch den Einstellmodus, wenn
für längere Zeit keine Taste gedrückt wird.
• Halten Sie die + oder – Taste im Einstellmodus gedrückt, gelangen Sie in den Schnelllauf.
SEASON – Funk-Wetterstation
8.1 Manuelle Einstellungen
• Halten Sie die SET Taste im Normalmodus für drei Sekunden gedrückt, um in den Einstellmodus zu gelangen:
• DEUTSCH (Voreinstellung) blinkt im Display.
• Mit der + oder – Taste können Sie die Spracheinstellung für die Wochentage auswählen.
• Haben Sie Deutsch ausgewählt, erscheint die Anzeige nun auf Deutsch.
• Drücken Sie die SET Taste noch einmal und Sie können nun nacheinander die Tastentöne (Voreinstellung PIEP ON), den
DCF Empfang (Voreinstellung: DCF ON), die Zeitzone (Voreinstellung: DCF 00H), das 12- oder 24-Stunden-Zeitsystem
(Voreinstellung: FORMAT 24Hr), die Stunden, die Minuten, das Jahr, den Monat, den Tag, die Temperatureinheit (Voreinstellung: TEMP °C), die Luftdruckanzeige (Voreinstellung: L-DRUCK HPA) und den Luftdruckwert (Voreinstellung:
1013 hPa) ansteuern und mit der + oder – Taste einstellen.
• Bestätigen Sie die Eingabe mit der SET Taste.
• Bei erfolgreichem Empfang des DCF-Funksignals und bei aktiviertem Empfang (DCF ON) wird die manuell eingestellte Zeit
überschrieben.
8.1.1 Einstellung der Sprachauswahl für den Wochentag
• Im Einstellungsmodus können Sie die Sprache für den Wochentag auswählen.
• Drücken Sie die + oder – Taste.
• Im Display erscheint: Deutsch - DEUTSCH, Französisch - FRANCAIS, Italienisch - ITALIANO, Spanisch – ESPANOL, Niederländisch – NEDERLANDS und Englisch - ENGLISH.
8.1.2 Tastentöne
• Im Einstellungsmodus können Sie mit der + oder – Taste die Tastentöne aktivieren oder deaktivieren.
8.1.3 DCF-Funkempfang
• Standardgemäß ist der DCF-Empfang aktiviert (DCF ON) und nach erfolgreichem Empfang des DCF-Funksignals ist keine
manuelle Einstellung erforderlich.
• Drücken Sie im Einstellungsmodus die + oder – Taste, wenn Sie den DCF-Funkempfang deaktivieren wollen (DCF OFF).
• Bei deaktiviertem Empfang müssen Sie Uhrzeit und Datum manuell einstellen. Es erscheint keine Zeitzone.
TFA_No. 35.1150_Anleitung 28.01.2019 12:01 Uhr Seite 6
Page 7

1312
SEASON – Funk-Wetterstation
8.1.4 Einstellung der Zeitzone
• Im Einstellungsmodus können Sie mit der + oder – Taste die Zeitzonenkorrektur (+12/-12) vornehmen.
• Die Zeitzonenkorrektur wird benötigt, wenn das DCF Funksignal empfangen werden kann, die Zeitzone sich aber von der
funkgesteuerten Zeit unterscheidet (z.B. +1 = eine Stunde später).
8.1.5 Einstellung des 24- oder 12- Stunden-Formats
• Im Einstellungsmodus können Sie zwischen dem 24 Stunden oder 12 Stunden-Format auswählen.
• Drücken Sie die + oder – Taste.
• Im 12-h-Format erscheint AM (vormittags) und PM (nachmittags) auf dem Display.
8.1.6 Einstellung der Temperatureinheit
• Im Einstellungsmodus können Sie zwischen °C (Celsius) oder °F (Fahrenheit) als Temperatureinheit auswählen.
• Drücken Sie die + oder – Taste.
8.1.7 Einstellung der Luftdruckeinheit und des Luftdrucks
• Im Einstellungsmodus können Sie zwischen hPa oder inHg als Luftdruckeinheit auswählen. Drücken Sie die + oder – Taste.
• Bestätigen Sie die Eingabe mit der SET Taste.
• Haben Sie die Luftdruckeinheit gewählt, beginnt der Luftdruckwert zu blinken. Sie können während dieser Zeit mit der +
oder – Taste den Wert einstellen.
• Der relative Luftdruck ist bezogen auf Meereshöhe und muss auf Ihre Ortshöhe eingestellt werden. Erfragen Sie den aktuellen Luftdruck Ihrer Umgebung (Wert vom Wetteramt, Internet, Optiker, geeichte Wettersäulen an öffentlichen Gebäuden,
Flughafen).
9. Temperatur und Luftfeuchtigkeit
9.1 Höchst- und Tiefstwerte, Hitzeindex und Taupunkt
• Drücken Sie die TEMP Taste im Normalmodus.
• Die höchste Temperatur und Luftfeuchtigkeit für innen und außen seit der letzten Rückstellung werden angezeigt.
• Drücken Sie noch einmal die TEMP Taste.
• Die niedrigste Temperatur und Luftfeuchtigkeit für innen und außen seit der letzten Rückstellung werden angezeigt.
SEASON – Funk-Wetterstation
• Drücken Sie noch einmal die TEMP Taste.
• Die Hitzeindex-Anzeige für außen wird angezeigt.
• Drücken Sie noch einmal die TEMP Taste.
• Die aktuelle Taupunkt-Temperatur für außen wird angezeigt.
• Um wieder die Anzeige mit den aktuellen Werten zu erhalten, drücken Sie die TEMP Taste noch einmal.
• Das Gerät verlässt auch automatisch den Modus, wenn keine Tasten gedrückt werden.
• Die Höchst- und Tiefstwerte werden automatisch um Mitternacht zurückgesetzt.
9.1.1 Hitzeindex
• Der Hitzeindex bezeichnet das Temperaturempfinden in Verbindung mit der aktuellen Luftfeuchtigkeit.
9.1.2 Taupunkt
• Warme Luft kann viel mehr Wasser bzw. Wasserdampf aufnehmen als kalte Luft. Wird Luft kontinuierlich abgekühlt, steigt
bei gleich bleibender absoluter Luftfeuchtigkeit die relative Luftfeuchtigkeit bis auf 100% an. Kühlt die Luft weiter ab, so
wird der überschüssige Wasserdampf in Tröpfchenform ausgeschieden.
• Die Temperatur, bei der dieser Vorgang einsetzt, nennt man Taupunkt. Die Taupunkttemperatur ist somit abhängig von der
Temperatur und der relativen Luftfeuchtigkeit.
9.2 Trendpfeile
• Die Trendpfeile zeigen Ihnen, ob die Werte für die Außentemperatur und Luftfeuchtigkeit aktuell steigen, fallen oder gleich
bleiben.
10. Luftdruck
• Im Display werden der relative Luftdruck in hPa (oder inHg) und der Luftdruckverlauf der letzten 24 Stunden angezeigt.
11. Wettervorhersage-Symbole
• Die Wetterstation unterscheidet 6 unterschiedliche Wettersymbole (Sonnig, teilweise bewölkt, bedeckt, regnerisch, stürmisch und Schneefall).
TFA_No. 35.1150_Anleitung 28.01.2019 12:01 Uhr Seite 7
Page 8
1514
SEASON – Funk-Wetterstation
• Die Vorhersage über die Symbolanzeige bezieht sich auf einen Zeitraum von 12-24 Stunden und gibt lediglich einen Wettertrend an. Ist es zum Beispiel im Moment wolkig und es wird Regen angezeigt, deutet dies nicht auf eine Fehlfunktion des
Gerätes hin, sondern gibt an, dass der Luftdruck gesunken und eine Wetterverschlechterung zu erwarten ist, wobei es sich
aber nicht unbedingt um Regen handeln muss.
• Das Sonnensymbol wird auch bei Nacht angezeigt, wenn es sich um eine sternenklare Nacht handelt.
• Das Landschaftsbild verändert sich mit den Jahreszeiten.
Frühling 20.03. – 20.06.
Sommer 21.06. – 20.09.
Herbst 21.09. – 20.12.
Winter 21.12. – 19.03.
Wichtiger Hinweis!
Bitte beachten Sie, dass die Symbolvorhersage sich im Laufe des Betriebs präzisiert. Die Symbolvorhersage ist bereits ab der
Inbetriebnahme aktiv, allerdings steigt die Zuverlässigkeit der Prognosen mit der Menge an gesammelten Daten.
12. Mondphase
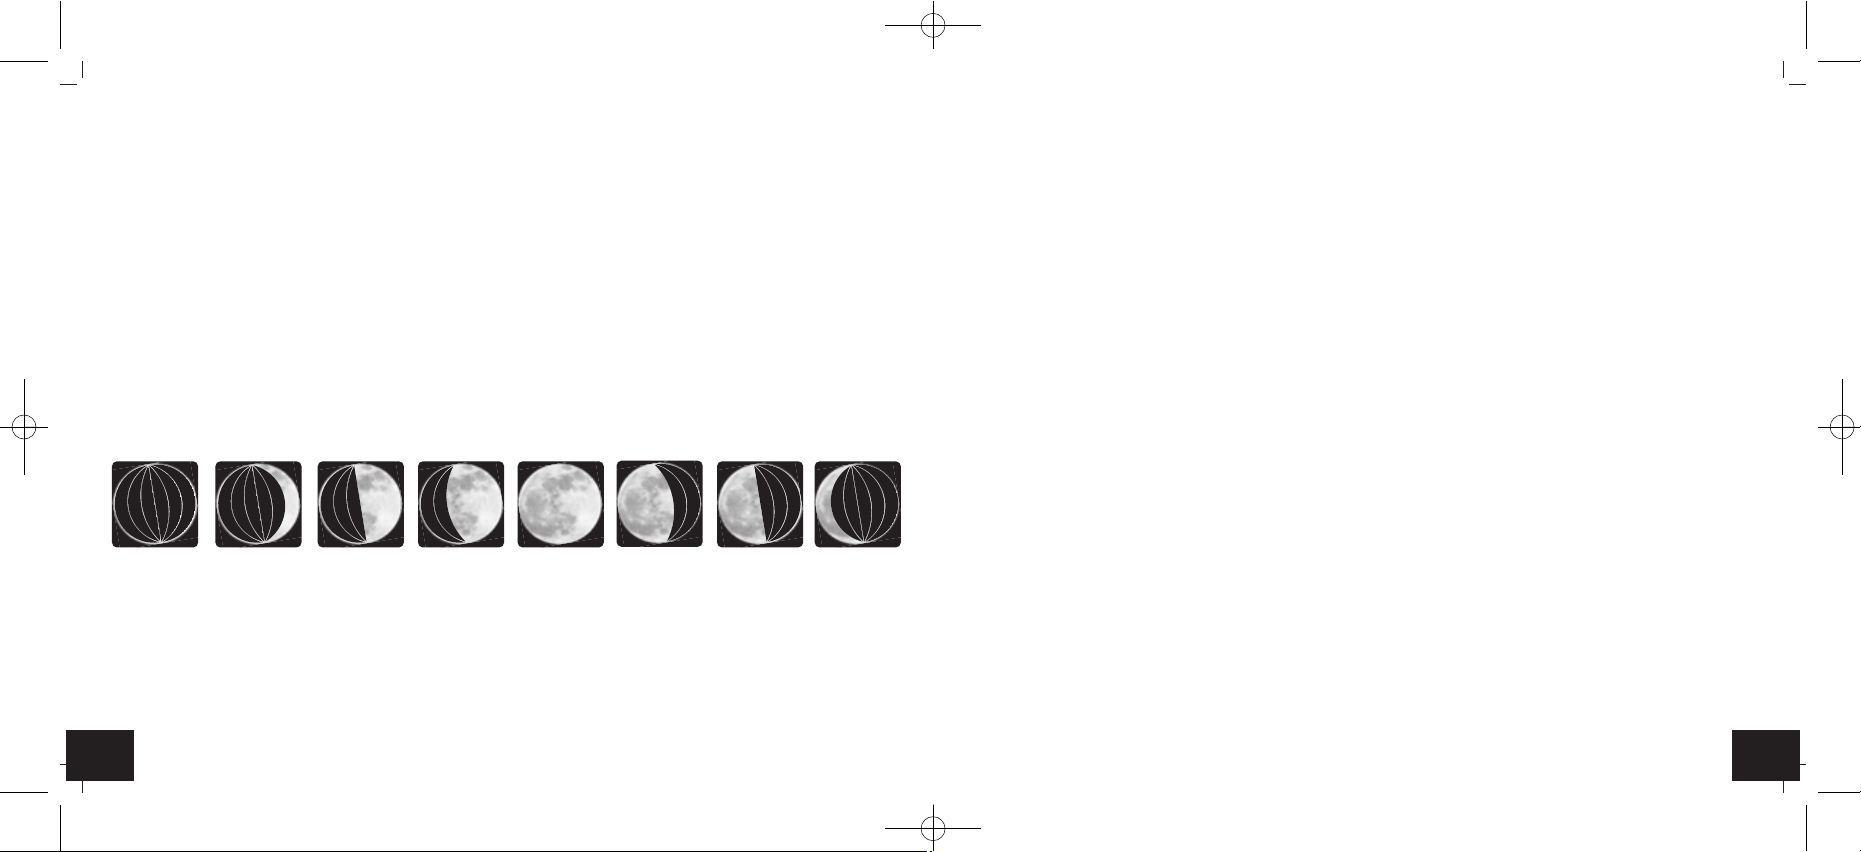
• Das Display zeigt Ihnen die aktuellen Mondphasen:
13. Einstellung der Alarmgrenzen für Temperatur und Luftfeuchtigkeit
13.1 Außentemperaturalarm einstellen
• Halten Sie die ALERTS Taste im Normalmodus gedrückt.
• LO ALARM wird auf dem Display angezeigt und OFF (Voreinstellung) blinkt.
• Drücken Sie die + oder – Taste, um die Alarmfunktion zu aktivieren.
SEASON – Funk-Wetterstation
• -40°C (Voreinstellung) oder die zuletzt eingestellte Außentemperatur-Untergrenze wird auf dem Display angezeigt.
• Bestätigen Sie mit der ALERTS Taste.
• Der Alarmwert blinkt.
• Stellen Sie mit der + oder – Taste die gewünschte Untergrenze ein.
• Bestätigen Sie mit der ALERTS Taste.
• HI ALARM wird auf dem Display angezeigt und OFF (Voreinstellung) blinkt.
• Drücken Sie die + oder – Taste, um die Alarmfunktion zu aktivieren.
• 60°C (Voreinstellung) oder die zuletzt eingestellte Außentemperatur-Obergrenze wird auf dem Display angezeigt.
• Bestätigen Sie mit der ALERTS Taste.
• Der Alarmwert blinkt.
• Stellen Sie mit der + oder – Taste die gewünschte Obergrenze ein.
• Bestätigen Sie mit der ALERTS Taste.
• Stellen Sie die Ober- und Untergrenzen für die Außenluftfeuchtigkeit, Innentemperatur und Innenluftfeuchtigkeit auf die
gleiche Weise ein.
• (Messbereich Temperatur außen -40…+60°C, Temperatur innen 0… +50 °C, Luftfeuchtigkeit 10…99% rH)
13.2 Alarmfall
• Im Alarmfall blinkt das entsprechende Symbol und ein Alarmton ertönt.
• Beenden Sie den Alarmton mit einer beliebigen Taste. Das Alarmsymbol blinkt solange weiter, bis der gemessene Wert wieder innerhalb der Alarmgrenzen liegt.
14. Aufstellen und Befestigen der Basisstation und des Senders
• Mit dem 3-stufig ausklappbaren Ständer auf der Rückseite kann die Basisstation auf einer glatten Oberfläche aufgestellt
werden. Drücken Sie fest mit beiden Daumen, bis der Ständer richtig eingerastet ist und ein Klicken zu hören ist.
• Mit den Aufhängeösen an der Rückseite kann die Basisstation an der Wand im Wohnraum befestigt werden. Vermeiden Sie
die Nähe zu anderen elektrischen Geräten (Fernseher, Computer, Funktelefone) und massiven Metallgegenständen.
• Der Außensender kann auf einer geraden, glatten Oberfläche aufgestellt werden oder mit der Aufhängeöse an der Wand
befestigt werden. Suchen Sie sich einen schattigen, niederschlagsgeschützten Platz für den Außensender aus. (Direkte
Sonneneinstrahlung verfälscht die Messwerte und ständige Nässe belastet die elektronischen Bauteile unnötig).
Neumond Zunehmen-
der Mond
Halbmond
(erstes
Viertel)
Zunehmende
Sichel
Vollmond Abnehmende
Sichel
Halbmond
(letztes
Viertel)
Abnehmen-
der Mond
TFA_No. 35.1150_Anleitung 28.01.2019 12:01 Uhr Seite 8
Page 9
1716
SEASON – Funk-Wetterstation
• Prüfen Sie, ob eine Übertragung der Messwerte vom Außensender am gewünschten Aufstellort zur Basisstation stattfindet
(Reichweite Freifeld ca. 80 Meter), bei massiven Wänden, insbesondere mit Metallteilen kann sich die Sendereichweite
erheblich reduzieren.
• Suchen Sie sich gegebenenfalls einen neuen Aufstellort für Außensender und/oder Basisstation.
15. Pflege und Wartung
• Reinigen Sie die Geräte mit einem weichen, leicht feuchten Tuch. Keine Scheuer- oder Lösungsmittel verwenden!
• Entfernen Sie die Batterien und ziehen Sie den Stecker, wenn Sie die Geräte längere Zeit nicht verwenden.
15.1 Batteriewechsel
• Sobald das Batteriesymbol im Displayfenster der Außenwerte auf der Basisstation erscheint, wechseln Sie bitte die Batterien im Außensender.
• Sobald das Batteriesymbol im Displayfenster der Innenwerte erscheint, wechseln Sie bitte die Batterien in der Basisstation.
• Achtung: Bei einem Batteriewechsel muss der Kontakt zwischen Außensender und Basisstation wieder hergestellt werden –
also immer beide Geräte neu in Betrieb nehmen oder manuelle Sendersuche starten.
16. Fehlerbeseitigung
Problem Lösung
Keine Anzeige Netzbetrieb:
auf der Basisstation ➜ Basisstation mit Netzteil anschließen
➜ Hintergrundbeleuchtung mit LIGHT Taste aktivieren
➜ Netzteil überprüfen
Batteriebetrieb:
➜ Batterien polrichtig einlegen
➜ Hintergrundbeleuchtung kurzzeitig aktivieren mit beliebiger Taste
➜ Batterien wechseln
Kein Außensenderempfang ➜ Kein Außensender installiert
Anzeige „---” ➜ Batterien des Außensenders prüfen (keine Akkus verwenden!)
SEASON – Funk-Wetterstation
➜ Neuinbetriebnahme von Außensender und Basisstation gemäß Betriebsanleitung
➜ Manuelle Außensendersuche gemäß Betriebsanleitung starten
➜ Anderen Aufstellort für Außensender und/oder Basisstation wählen
➜ Abstand zwischen Außensender und Basisstation verringern
➜ Beseitigen der Störquellen
Unkorrekte Anzeige ➜ Batterien wechseln
➜ Factory Reset: Um wieder die Werkseinstellung zu erhalten, halten Sie die ALERTS und
LIGHT Taste auf der Basisstation gleichzeitig für fünf Sekunden gedrückt.
Alle Einstellungen werden gelöscht.
HI LO Anzeige ➜ Außerhalb des Messbereichs
18. Entsorgung
Dieses Produkt wurde unter Verwendung hochwertiger Materialien und Bestandteile hergestellt, die recycelt und wiederverwendet werden können.
Batterien und Akkus dürfen keinesfalls in den Hausmüll!
Als Verbraucher sind Sie gesetzlich verpflichtet, gebrauchte Batterien und Akkus zur umweltgerechten Entsorgung beim Handel oder entsprechenden Sammelstellen gemäß nationaler oder lokaler Bestimmungen abzugeben.
Die Bezeichnungen für enthaltene Schwermetalle sind:
Cd=Cadmium, Hg=Quecksilber, Pb=Blei
Dieses Gerät ist entsprechend der EU-Richtlinie über die Entsorgung von Elektro- und Elektronik-Altgeräten
(WEEE) gekennzeichnet.
Dieses Produkt darf nicht mit dem Hausmüll entsorgt werden. Der Nutzer ist verpflichtet, das Altgerät zur
umweltgerechten Entsorgung bei einer ausgewiesenen Annahmestelle für die Entsorgung von Elektro- und Elektronikgeräten abzugeben.
TFA_No. 35.1150_Anleitung 28.01.2019 12:01 Uhr Seite 9
Page 10
1918
SEASON – Funk-Wetterstation
19. Technische Daten
Messbereich innen
Temperatur 0 °C… +50 °C (+32…+99 °F)
Luftfeuchtigkeit 10 %rH...99 %rH
Auflösung Temperatur 0,1 °C
Auflösung Luftfeuchtigkeit 1%
Genauigkeit Temperatur ±1°C (0….+50°C)
Genauigkeit Luftfeuchtigkeit ±5% (30%...80% rH) @25°C
Messbereich außen
Temperatur -40°C…..+60°C (-40…+140 °F)
Luftfeuchtigkeit 10 %rH...99 %rH
Auflösung Temperatur 0,1 °C
Auflösung Luftfeuchtigkeit 1%
Genauigkeit Temperatur ±1°C (0….+50°C)
Genauigkeit Luftfeuchtigkeit ±5% (20%...90% rH) @25°C
Reichweite ca. 80 m (Freifeld)
Übertragungsfrequenz 433 MHz
Maximale Sendeleistung < 10mW
Spannungsversorgung
Basisstation 3 x 1,5 V AA (Batterien nicht inklusive)
Netzstecker Input 230-240 50hz 50mA / Output 5.0 V 150mA DC
Außensender 2 x 1,5 V AA (Batterien nicht inklusive)
Basisstation
Größe 175 x 32 (84) x 165 mm
Gewicht 333 g (nur das Gerät)
SEASON – Funk-Wetterstation
Außensender
Größe 40 x 21 x 130 mm
Gewicht 47 g (nur das Gerät)
Diese Anleitung oder Auszüge daraus dürfen nur mit Zustimmung von TFA Dostmann veröffentlicht werden. Die technischen Daten entsprechen dem
Stand bei Drucklegung und können ohne vorherige Benachrichtigung geändert werden.
Die neuesten technischen Daten und Informationen zu Ihrem Produkt finden Sie auf unserer Homepage unter Eingabe der Artikel-Nummer in das Suchfeld.
EU-Konformitätserklärung
Hiermit erklärt TFA Dostmann, dass der Funkanlagentyp 35.1150 der Richtlinie 2014/53/EU entspricht. Der vollständige Text der EU-Konformitätserklärung
ist unter der folgenden Internetadresse verfügbar:
www.tfa-dostmann.de
E-Mail: info@tfa-dostmann.de
TFA Dostmann GmbH & Co.KG, Zum Ottersberg 12, D-97877 Wertheim, Deutschland 01/19
TFA_No. 35.1150_Anleitung 28.01.2019 12:01 Uhr Seite 10
Page 11
2120
SEASON – Wireless weather station
Thank you for choosing this instrument from TFA.
1. Before you use this product
• Please make sure you read the instruction manual carefully.
This information will help you to familiarize yourself with your new device, to learn all of its functions and parts, to find out
important details about its first use and how to operate it and to get advice in the event of a malfunction.
• Following and respecting the instructions in your manual will prevent damage to your instrument and loss of your
statutory rights arising from defects due to incorrect use.
• We shall not be liable for any damage occurring as a result of non following of these instructions. Likewise, we take
no responsibility for any incorrect readings or for any consequences resulting from them.
• Please take particular note of the safety advice!
• Please keep this instruction manual safe for future reference.
2. Delivery contents
• Wireless weather station (base station)
• Power adapter
• Outdoor transmitter (Cat.-No. 30.3206.02)
• Instruction manual
3. Range of application and all the benefits of your new instrument at a glance
• Wireless outdoor temperature and humidity (433 MHz), distance range up to 80 m (open field)
• Indoor temperature and humidity
• Forecast with colourful landscape image depicting the weather (changes with the seasons)
• Relative atmospheric pressure and bar graph indication for the last 24 hours
• Trend indicators
• Temperature and humidity alarm
• Maximum and minimum values with auto-reset
• Dew point and heat index
• Radio-controlled clock with date and weekday written in full letters (6 languages)
• Colour display with two brightness levels (continuous operation with power adapter only)
SEASON – Wireless weather station
4. For your safety
• This product is exclusively intended for the range of application described above. It should only be used as described within these instructions.
• Unauthorized repairs, alterations or changes to the product are prohibited.
Caution!
Risk of electrocution!
• Plug the base station only into a mains socket installed within your country’s electrical safety regulations and with a 230V
mains voltage!
• The mains socket must be located near the equipment and it must be easily accessible.
• The base station and the power adapter must not come into contact with water or moisture. Only suitable for indoor use.
• Do not use the device if the housing or the power adapter are damaged.
• Operate the device out of reach of persons (including children) who cannot fully appreciate the potential risks of handling
electrical equipment.
• Unplug the device immediately if any fault occurs or if the device is not to be used for a long period of time.
• Only use the supplied power adapter.
• Connect the lead to the base station first, then plug the power adapter into the mains socket.
• Do not pull the plug out of the socket by its cable.
• Route the mains cable so it does not come into contact with sharp-edged or hot objects.
Caution!
Risk of injury:
• Keep these devices and the batteries out of reach of children.
• Batteries contain harmful acids and may be hazardous if swallowed. If a battery is swallowed, this can lead to serious internal burns and death within two hours. If you suspect a battery could have been swallowed or otherwise caught in the body,
seek medical help immediately.
• Batteries must not be thrown into a fire, short-circuited, taken apart or recharged. Risk of explosion!
• Low batteries should be changed as soon as possible to prevent damage caused by leaking. Never use a combination of
old and new batteries together, nor batteries of different types. Wear chemical-resistant protective gloves and safety glasses when handling leaking batteries.
TFA_No. 35.1150_Anleitung 28.01.2019 12:01 Uhr Seite 11
Page 12

2322
SEASON – Wireless weather station
Important information on product safety!
• Do not expose the device to extreme temperatures, vibrations or shocks.
• The transmitter is splashproof, but not watertight. Should you decide to use the transmitter in the outdoor area, choose a
shady and dry place.
5. Elements
5.1 Wireless weather station (base station)
A: Display (Fig. 1):
A 1: Trend arrow for outdoor temperature A 2: Battery symbol for the transmitter
A 3: Outdoor temperature A 4: Reception symbol for outdoor transmitter
A 5: Alarm symbols HI/LO A 6: Outdoor humidity
A 7: Trend arrow for outdoor humidity A 8: Battery symbol for the base station
A 9: Indoor temperature and humidity A 10: Time
A 11: DST symbol A 12: DCF reception symbol
A 13: Day of the week A 14: Moon phase
A 15: Relative atmospheric pressure A 16: Date
A 17: Bar graph indication of atmospheric pressure for the last 24 hours
A 18: Seasons’ display A 19: Weather symbols
A 20: Trend indicator
B: Buttons (Fig. 2):
B 1: ALERTS button B 2: TEMP button
B 3: SEARCH button B 4: + button
B 5: – button B 6: SET button
B 7: LIGHT button
C: Housing (Fig. 2):
C 1: Wall mounting holes C 2: Battery compartment
C 3: Stand (fold out in 3 steps) C 4: Power adapter jack
C 5: Guide for the cable
SEASON – Wireless weather station
5.2 Outdoor transmitter (Fig. 3):
D 1: LED signal lamp D 2: Battery compartment
D 3: TX button inside battery compartment D 4: Wall mounting hole
6. Getting started
• Place the base station and the transmitter on a table at a distance of about 1.5 meters from each other. Avoid being close to
possible sources of interference such as electronic devices and radio equipment.
• Connect the attached power adapter to the base station. Insert the adapter into the base station jack and connect the power
adapter into a mains socket. Important! Make sure that your household voltage is no more than 240V! Otherwise your
device may be damaged.
• The device will alert you with a beep and all segments will be displayed for a short moment.
• The indoor temperature and humidity appear on the display.
6.1 Inserting the batteries in the base station
• The batteries will operate as a backup power source in case of power failure.
• For a permanent backlight and to save battery life, use the supplied power adapter.
• Open the battery compartment at the back of the base station.
• Insert three new AA 1,5 V batteries into the battery compartment. Make sure the polarities are correct.
• Close the battery compartment again.
6.2 Inserting the batteries in the outdoor transmitter/Reception of outdoor values
• Slide down the battery compartment lid of the transmitter.
• Insert two new batteries 1,5 V AA into the battery compartment of the outdoor transmitter. Make sure the polarities are
correct.
• After the batteries are inserted, the outdoor values will be transmitted to the base station. The LED signal lamp flashes.
• As soon as the base station receives the outdoor values, the outdoor temperature and humidity are permanently shown.
• If the reception of the outdoor values fails within three minutes, “- -” appears on the display. Check the batteries and try it
again. Check if there is any source of interference.
• As soon as the base station receives the radio-controlled time, you can start the manual initialisation of the transmitter.
Press and hold the SEARCH button for 3 seconds. The base station will try to receive the measured values.
• Press the TX button on the transmitter to transmit the measured values manually.
TFA_No. 35.1150_Anleitung 28.01.2019 12:01 Uhr Seite 12
Page 13
2524
SEASON – Wireless weather station
6.3 Reception of the DCF frequency signal
• After the reception of the outdoor values, the clock will now scan the DCF frequency signal and the DCF symbol flashes on
the display.
• When the time code is successfully received after 3-10 minutes, the radio-controlled time and the DCF symbol will be
shown steadily on the display.
• The DCF reception always takes place at 1:00 and 2:00 o'clock in the morning. If the reception is not successfully received
at 3:00 o'clock, further attempts will be taken at 4:00 and 5:00 o'clock.
• You can also activate the DCF reception manually.
• Press the SEARCH button.
• The DCF reception symbol flashes.
• There are three different reception states:
flashing – reception is active
solid – reception is very good
no symbol – no DCF reception / reception deactivated
• If the clock cannot detect the DCF-signal (e.g. due to interference, transmitting distance, etc.), the time can be set manually.
• The clock will then work as a normal quartz clock. (see: Manual settings).
6.4 Radio-controlled time reception
The time base for the radio-controlled time is a caesium atomic clock operated by the Physikalisch Technische Bundesanstalt
based in Braunschweig (Brunswick), Germany. It has a time deviation of less than one second in one million years. The time
is coded and transmitted from Mainflingen near Frankfurt via the frequency signal DCF-77 (77.5 kHz) and has a transmitting
range of approximately 1,500 km. Your radio clock receives the signal, converts it and always shows the exact time. T
he adjustment to Daylight Saving Time (summer/winter time) is automatic. In Daylight Saving Time DST is shown on the display. The reception quality depends mainly on geographic location. Normally there should be no reception problems within a
1,500 km radius around Frankfurt.
Therefore, please note the following steps:
• The recommended distance to any interfering sources like computer screens or TV sets is at least 1.5 - 2 meters.
• Within concrete walls (reinforced with steel) such as basements, the received signal is naturally weakened. In extreme cases,
please place the unit close to a window to improve reception.
SEASON – Wireless weather station
• During night-time, the atmospheric interference is usually less severe and reception is possible in most cases. A single daily
reception is adequate to keep the accuracy deviation under 1 second.
7. Backlight
• Attention: Continuous illuminated backlight only works when using the power adapter.
• Default for the backlight is HI.
• Press LIGHT (HI-LOW-OFF) button once (LOW) to dim the backlight.
• Press LIGHT (HI-LOW-OFF) button once more (OFF) to turn off the backlight.
• To temporarily activate the backlight, press any button (in battery operation only).
8. Operation
• Press the LIGHT button to quit the setting mode. The device will automatically quit the setting mode if no button is pressed
for a few seconds.
• Press and hold the + or – button in setting mode for fast mode.
8.1 Manual settings
• Press and hold the SET button in normal mode for three seconds to enter the setting mode.
• DEUTSCH (default) flashes on the display.
• Adjust the desired language with the + or – button.
• If you select English, the display will now appear in English.
• Press the SET button again to do the settings in the following sequence: the button tone (BEEP ON - default), DCF reception (ATOMIC ON - default), the time zone (DCF 00H - default), the 12 or 24 hours system (FORMAT 24Hr - default), the
hours, the minutes, the year, the month, the date, the temperature unit (TEMP °C - default), the atmospheric pressure unit
(PRESSURE HPA - default) and the atmospheric pressure value (1013 hPa - default). Press the + or –button to adjust it.
• Confirm the setting with the SET button.
• Once the DCF time signal is successfully received and the DCF reception is activated (DCF ON), the manually set time is
overwritten.
8.1.1 Day-of-week language setting
• In the setting mode you can choose the day-of-the-week language.
• Press + or – button.
TFA_No. 35.1150_Anleitung 28.01.2019 12:01 Uhr Seite 13
Page 14
2726
SEASON – Wireless weather station
• In the display appears: German - DEUTSCH, French – FRANCAIS, Italian - ITALIANO, Spanish - ESPANOL, Dutch – NEDERLANDS and English - ENGLISH.
8.1.2 Key tones
• In the setting mode, press the + or – button to activate or deactivate the key tone.
8.1.3 DCF reception
• By default, the DCF reception is activated (ATOMIC ON) and after successful reception of the DCF signal no manual adjustment is necessary.
• Press the + or – button in setting mode if you want to deactivate the DCF reception (ATOMIC OFF).
• Once the DCF time reception is deactivated the clock and date must be manually set. No time zone appears.
8.1.4 Time zone setting
• In the setting mode, press the + or – button to make the time zone correction (-12/+12).
• The time zone correction is needed for countries where the DCF signal can be received but the time zone is different from
the DCF time (e.g. +1=one hour plus).
8.1.5 24- or 12-hour system setting
• In the setting mode you can choose between the 12 - or 24 hour system.
• Press the + or – button.
• In the 12-HR system AM (before noon) or PM (after noon) appears on the display.
8.1.6 Temperature unit setting
• You can change between °C (Celsius) or °F (Fahrenheit) as temperature unit in setting mode.
• Press the + or – button.
8.1.7 Setting of atmospheric pressure unit and value
• You can change between hPa or inHg as atmospheric pressure unit in setting mode. Press the + or – button.
• Confirm the setting with the SET button.
• If you have chosen the relative atmospheric pressure unit, the pressure value flashes. Now enter the value by pressing the
+ or – button.
SEASON – Wireless weather station
• The relative atmospheric pressure is referred to the sea level’s pressure and has to be adjusted first to your local altitude.
Ask for the current atmospheric pressure of your home area (Local weather service, Internet, optician, calibrated instruments in public buildings and airport).
9. Temperature and humidity
9.1 Maximum and minimum values, dew point and heat index
• Press the TEMP button in normal mode.
• You can now get the indoor and outdoor maximum values for the temperature and humidity displayed since the last reset.
• Press the TEMP button again.
• You can now get the indoor and outdoor minimum values for the temperature and humidity displayed since the last reset.
• Press the TEMP button again.
• The outdoor heat index is indicated.
• Press the TEMP button again.
• The current dew point temperature for outdoors is indicated.
• Press the TEMP button once more, to go back to the current values display.
• The device will automatically quit the mode if no button is pressed.
• The maximum and minimum values are automatically reset at midnight.
9.1.1 Heat index
• The heat index is the temperature sensation in combination with humidity.
9.1.2 Dew point
• Warm air can absorb much more water or water vapour than cold air. If the air is cooled continuously at constant absolute
humidity, then the relative humidity will steadily increase up to a maximum of 100%. If the air is cooled further, then the
excess water vapour is extracted from it in the form of water droplets.
• The temperature at which this process starts is called the dew point. The dew point temperature is thus dependent on the
temperature and the relative humidity.
9.2 Trend arrows
• The trend arrows indicate whether the values for outdoor temperature and humidity are currently increasing, steady or
decreasing.
TFA_No. 35.1150_Anleitung 28.01.2019 12:01 Uhr Seite 14
Page 15

2928
SEASON – Wireless weather station
10. Atmospheric pressure
• The relative atmospheric pressure in hPa (or inHg) and the graphic development of the last 24 hours will appear on the display.
11. Weather forecast symbols
• The weather station has six different weather symbols (sunny, slightly cloudy, cloudy, rainy, stormy and snow).
• The weather forecast relates to a range of 12 to 24 hours and indicates only a general weather trend. For example, if the
current weather is cloudy and the rain symbol is displayed, it does not mean the product is faulty because it is not raining.
It simply means that the air pressure has dropped and the weather is expected to get worse but not necessarily rain.
• The sun symbol also appears on a starry night.
• The landscape picture changes with the seasons.
Spring: 20th March – 20th June
Summer: 21st June – 20th September
Autumn: 21st September – 20th December
Winter: 21st December – 19th March
Note:
Please note that the forecast symbol will become more defined in the course of operation. The forecast symbol is active right
from the start, however, the reliability of the forecasts increases with the amount of data collected.
12. Moon phase
• The moon phase of each day is shown on the display:
SEASON – Wireless weather station
13. Setting of the alerts for temperature and humidity
13.1 Set outdoor temperature alert
• Press and hold the ALERTS button in normal mode.
• LO ALERT appears on the display and OFF (default) flashes.
• Press the + or – button to activate the alert function.
• -40°C (default) or the last adjusted lower temperature limit appear on the display.
• Confirm with the ALERTS button.
• The alarm value flashes.
• Press the + or – button to set the desired lower limit.
• Confirm with the ALERTS button.
• HI ALERT appears on the display and OFF (default) flashes.
• Press the + or – button to activate the alert function.
• 60 °C (default) or the last adjusted upper temperature limit appear on the display.
• Confirm with the ALERTS button.
• The alarm value flashes.
• Press the + or – button to set the desired upper limit.
• Confirm with the ALERTS button.
• Set the upper and lower limits for the outdoor humidity, indoor temperature and indoor humidity in the same way.
• Temperature range outdoor: -40…+60°C, temperature indoor 0… +50 °C, humidity 10…99% rH
13.2 Alarm event
• In the event of an alarm, the corresponding symbol will be flashing and an alarm tone will sound.
• Stop the alarm tone with any button. The alarm symbol will continue flashing until the measured value is again within the
alarm limits.
14. Positioning and mounting of the base station and the transmitter
• The base station can be placed onto any flat surface with the 3-step foldable leg found at the back of the unit. Press firmly
with both thumbs until the stand is properly locked in place and a click is heard.
• The base station can be wall mounted at a chosen location by the mounting holes found at the back of the unit. Make sure
to avoid the vicinity of any source of interference such as computer screens, TV sets or solid metal objects.
New moon Waxing
gibbous
Half moon
(first quarter)
Waxing
crescent
Full Moon Waning
crescent
Half moon
(last quarter)
Waning
gibbous
TFA_No. 35.1150_Anleitung 28.01.2019 12:01 Uhr Seite 15
Page 16

3130
SEASON – Wireless weather station
• The outdoor transmitter can be placed onto any flat surface or wall mounted at a chosen location by the mounting hole
found at the back of the unit. When placed outdoors, choose a shady and dry place for the transmitter. Direct sunlight may
trigger incorrect measurement and continuous humidity damages the electronic components needlessly.
• Once the desired location is chosen, check whether the transmission from the device to the base station is possible (transmission range of up to 80 m in open areas). Within solid walls, especially ones with metal parts, the transmission range
can be reduced considerably.
• If necessary choose another position for the outdoor transmitter and/or base station.
15. Care and maintenance
• Clean the devices with a soft damp cloth. Do not use solvents or scouring agents.
• Remove the batteries and unplug the power adapter from the mains socket if the device will not be used for a long period
of time.
15.1 Battery replacement
• Change the outdoor transmitter's batteries when the battery symbol appears on the outdoor values display.
• Change the base station batteries when the battery symbol appears on the indoor values display.
• Please note: When the batteries are changed, the contact between the outdoor transmitter and the base station must be
restored – so always insert new batteries into both devices or start a manual transmitter search.
16. Troubleshooting
Problem Solution
No indication Operation with power adapter:
on the base station ➜ Connect the base station to the power adapter
➜ Press the LIGHT button to activate the backlight
➜ Check the power adapter
Battery operation:
➜ Ensure the batteries' polarities are correct
➜ Press any button to activate the backlight briefly
➜ Change the batteries
SEASON – Wireless weather station
No reception ➜ No outdoor transmitter is installed
of the outdoor transmitter ➜ Check the outdoor transmitter's batteries (do not use rechargeable batteries!)
Display “---” ➜ Restart the transmitter and the base station according to the manual
➜ Start the outdoor transmitter manual search according to the instruction manual
➜ Choose another place for the outdoor transmitter and/or the base station
➜ Reduce the distance between the outdoor transmitter and the base station
➜ Check if there is any source of interference
Incorrect indication ➜ Change the batteries
➜ Factory reset: To reset to factory setting, hold the ALERTS and LIGHT button on the base
station for five seconds at the same time. All settings will be deleted.
Display HI LO ➜ Outside measuring range
18. Waste disposal
This product has been manufactured using high-grade materials and components which can be recycled and reused.
Never dispose of empty batteries and rechargeable batteries with ordinary household waste.
As a consumer, you are required by law to take them to your retail store or to an appropriate collection site
depending on national or local regulations in order to protect the environment.
The symbols for the contained heavy metals are: Cd = cadmium, Hg = mercury, Pb = lead
This product is labelled in accordance with the EU Waste Electrical and Electronic Equipment Directive (WEEE).
Please do not dispose of this product in ordinary household waste. As a consumer, you are required to take endof-life devices to a designated collection point for the disposal of electrical and electronic equipment, in order to
ensure environmentally-compatible disposal.
19. Specifications
Measuring range indoor
Temperature 0 °C… +50 °C (+32…+99 °F)
Humidity 10 %rH...99 %rH
TFA_No. 35.1150_Anleitung 28.01.2019 12:01 Uhr Seite 16
Page 17

3332
SEASON – Wireless weather station
Temperature resolution 0.1°C
Humidity resolution 1%
Temperature accuracy ±1°C (0….+50°C)
Humidity accuracy ±5% (30%...80% rH) @25°C
Measuring range outdoor
Temperature -40 °C… +60 °C (-40 °F…+140 °F)
Humidity 10 %rH...99 %rH
Temperature resolution 0.1°C
Humidity resolution 1%
Temperature accuracy ±1°C (0….+50°C)
Humidity accuracy ±5% (20%...90% rH) @25°C
Range max. 80 m (open field)
Transmission frequency 433 MHz
Maximum
radio-frequency power < 10mW
Power consumption
Base station 3 x AA 1,5 V batteries (not included)
Power socket: Input 230-240 50hz 50mA / Output 5.0 V 150mA DC
Outdoor transmitter 2 x AA 1,5 V batteries (not included)
Base station
Dimensions 175 x 32 (84) x 165 mm
Weight 333 g (device only)
SEASON – Wireless weather station
Outdoor transmitter
Dimensions 40 x 21 x 130 mm
Weight 47 g (device only)
No part of this manual may be reproduced without written consent of TFA Dostmann. The technical data are correct at the time of going to print and may
change without prior notice.
The latest technical data and information about this product can be found in our homepage by simply entering the product number in the search box.
EU Declaration of conformity
Hereby, TFA Dostmann declares that the radio equipment type 35.1150 is in compliance with Directive 2014/53/EU. The full text of the EU declaration of
conformity is available at the following Internet address:
www.tfa-dostmann.de
E-Mail: info@tfa-dostmann.de
TFA Dostmann GmbH & Co.KG, Zum Ottersberg 12, D-97877 Wertheim, Germany 01/19
TFA_No. 35.1150_Anleitung 28.01.2019 12:01 Uhr Seite 17
Page 18

3534
SEASON –Station météo radio-pilotée
Nous vous remercions d'avoir choisi l'appareil de la société TFA.
1. Avant d'utiliser votre appareil
• Veuillez lire attentivement le mode d'emploi.
Vous vous familiariserez ainsi avec votre nouvel appareil, vous découvrirez toutes les fonctions et tous les éléments qui le
composent, vous noterez les détails importants relatifs à sa mise en service et vous lirez quelques conseils en cas de dysfonctionnement.
• En respectant ce mode d'emploi, vous éviterez d'endommager votre appareil et de perdre vos droits légaux en cas de
défaut si celui-ci résulte d’une utilisation non-conforme.
• Nous n'assumons aucune responsabilité pour des dommages qui auraient été causés par le non-respect du présent
mode d'emploi. De même, nous n’assumons aucune responsabilité pour des relevés incorrects et les conséquences
qu’ils pourraient engendrer.
• Suivez bien toutes les consignes de sécurité !
• Conservez soigneusement le mode d'emploi !
2. Contenu de la livraison
• Station météo radio-pilotée (station de base)
• Adaptateur secteur
• Émetteur (réf. 30.3206.02)
• Mode d'emploi
3. Aperçu du domaine d'utilisation et de tous les avantages de votre nouvel apparei
• Température et humidité extérieures sans fil (433 MHz), rayon d’action de max. 80 mètres (champ libre)
• Température et humidité intérieures
• Prévisions météo avec illustration en couleur (change avec les saisons)
• Pression atmosphérique relative e évolution graphique des dernières 24 heures
• Indicateurs de tendance
• Alarme de température et d'humidité
• Fonction max.-min avec réactualisation automatique
• Point de rosée et indice de chaleur
• Horloge radio-pilotée avec date et jours de la semaine affichés en toutes lettres (en 6 langues)
• Écran couleur
SEASON –Station météo radio-pilotée
4. Pour votre sécurité
• Le produit est destiné uniquement à l'utilisation décrite ci-dessus. N'utilisez jamais l’appareil à d'autres fins que celles
décrites dans le présent mode d'emploi.
• Vous ne devez en aucun cas réparer, démonter ou modifier l'appareil par vous-même.
Attention !
Danger de choc électrique !
• Branchez l'appareil uniquement sur une prise de courant réglementaire ayant une tension de secteur de 230V !
• La prise de courant doit être proche de l'équipement et facilement accessible.
• L'appareil et l'adaptateur secteur ne doivent pas entrer en contact avec de l'eau ou de l'humidité. Ils ne peuvent être utilisés
que dans des locaux secs.
• N'utilisez pas l'appareil si le boîtier ou l'adaptateur secteur sont endommagés.
• Opérez le produit hors de la portée de personnes (enfants compris) inaptes à évaluer les risques possibles liés au maniement d'appareils électriques.
• Retirez immédiatement la fiche de la prise en cas de défaut ou si l'appareil n'est pas utilisé pendant une longue période.
• Utilisez uniquement l'adaptateur secteur fourni.
• Commencez par brancher le cordon d'alimentation à l'appareil, branchez ensuite la fiche dans la prise secteur.
• Pour débrancher, tirez sur la fiche et non sur le cordon d’alimentation.
• Placez le cordon d'alimentation de sorte qu'il n'entre pas en contact avec des objets tranchants ou brûlants.
Attention !
Danger de blessure :
• Gardez vos appareils et les piles hors de la portée des enfants.
• Les piles contiennent des acides nocifs pour la santé et peuvent être mortelles dans le cas d’une ingestion. Si une pile a été
avalée, elle peut entraîner des brûlures internes graves ainsi que la mort dans l’espace de 2 heures. Si vous craignez
qu’une pile ait pu être avalée ou ingérée d’une autre manière, quelle qu’elle soit, contactez immédiatement un médecin
d’urgence.
• Ne jetez jamais de piles dans le feu, ne les court-circuitez pas, ne les démontez pas et ne les rechargez pas. Risque d'explosion !
TFA_No. 35.1150_Anleitung 28.01.2019 12:01 Uhr Seite 18
Page 19

3736
SEASON –Station météo radio-pilotée
• Une pile faible doit être remplacée le plus rapidement possible afin d'éviter toute fuite. N'utilisez jamais simultanément de
piles anciennes avec des piles neuves ou des piles de types différents. Pour manipuler des piles qui ont coulé, utilisez des
gants de protection chimique spécialement adaptés et portez des lunettes de protection !
Conseils importants de sécurité du produit !
• Évitez d’exposer l’appareil à des températures extrêmes, à des vibrations ou à des chocs.
• L'émetteur résiste aux éclaboussures d'eau mais il n'est pas étanche. Si vous installez l'émetteur à l’extérieur, choisissez
un emplacement à l’ombre et protégé de la pluie.
5. Composants
5.1 Station météo (station de base)
A : Affichage (Fig. 1) :
A 1 : Flèche de tendance pour température extérieure A 2 : Symbole de pile faible pour l’émetteur
A 3 : Température extérieure A 4 : Symbole de réception pour l'émetteur
A 5 : Symboles d'alarme HI/LO A 6 : Humidité relative extérieure
A 7 : Flèche de tendance pour humidité relative extérieure A 8 : Symbole de pile faible pour la station de base
A 9 : Température et humidité intérieure A 10 : Horloge
A 11 : Symbole DST A 12 : Symbole de réception DCF
A 13 : Jour de la semaine A 14 : Phase lunaire
A 15 : Pression atmosphérique relative A 16 : Date
A 17 : Développement graphique de la pression atmosphérique des dernières 24 heures
A 18: Affichage des saisons A 19 : Symboles météo
A 20 : Indication de la tendance
B : Touches (Fig. 2) :
B 1 : Touche ALERTS B 2 : Touche TEMP
B 3 : Touche SEARCH B 4 : Touche +
B 5 : Touche – B 6 : Touche SET
B 7 : Touche LIGHT
SEASON –Station météo radio-pilotée
C : Boîtier (Fig. 2) :
C 1 : Œillets de suspension C 2 : Compartiment à piles
C 3 : Support (dépliable en trois étapes) C 4 : Prise pour adaptateur secteur
C 5 : Guide pour le câble
5.2 Émetteur extérieur (Fig. 3) :
D 1 : Lampe de signalisation à DEL D 2 : Compartiment à piles
D 3 : Touche TX dans le compartiment à piles D 4 : Œillet de suspension
6. Mise en service
• Déposez la station de base et l'émetteur sur une table à une distance d'environ 1,5 mètre l'un de l'autre. Évitez la proximité
de sources parasites (appareils électroniques ou appareils radio).
• Raccordez la station de base avec l’adaptateur secteur fourni. Branchez le connecteur sur la prise de l’appareil et la fiche de
l'adaptateur sur le secteur. Important ! Assurez-vous que la tension de réseau ne dépasse pas 240V. Une autre tension de
réseau pourrait endommager votre appareil.
• Un signal sonore se fait entendre et tous les segments s'allument brièvement.
• La température et l'humidité ambiantes s'affichent sur l'écran.
6.1 Insertion des piles dans la station de base
• Les piles servent de source d'énergie de secours en cas de panne d'électricité.
• Pour utiliser l'éclairage de fond en permanence et pour économiser les piles, utilisez l'adaptateur secteur compris.
• Ouvrez le compartiment à piles au dos de la station de base.
• Insérez trois piles neuves 1,5 V AA. Veillez à la bonne polarité des piles.
• Refermez le compartiment à piles.
6.2 Insertion des piles dans l'émetteur extérieur / Réception des valeurs extérieures
• Poussez le couvercle du compartiment à piles de l'émetteur vers le bas.
• Insérez deux piles neuves 1,5 V AA dans le compartiment à piles. Veillez à la bonne polarité des piles.
• Après l'insertion des piles, les paramètres de mesure seront transférés de l'émetteur à la station de base. La lampe LED de
signalisation clignote.
TFA_No. 35.1150_Anleitung 28.01.2019 12:01 Uhr Seite 19
Page 20

3938
SEASON –Station météo radio-pilotée
• Dès que la station de base a reçu les valeurs extérieures, la température et l'humidité extérieures sont affichées en permanence.
• Si les valeurs extérieures ne sont pas reçues, « - - » apparaît sur l'écran. Contrôlez les piles et effectuez une nouvelle tentative. Éliminez les éventuelles sources parasites.
• Une fois que la station de base a reçu l'heure radio, vous pouvez également activer manuellement la réception. Maintenez
la touche SEARCH appuyée pendant trois secondes. La station de base cherche à recevoir les valeurs mesurées.
• La touche TX sur l'émetteur permet de retransmettre manuellement les valeurs mesurées.
6.3 Réception du signal DCF
• Après la réception des valeurs extérieures, l'horloge cherche le signal radio et le symbole de réception DCF clignote.
• En cas de réception correcte après 3-10 minutes, l’heure radio et le symbole de réception DCF sont affichés en continu sur
l'écran.
• La réception du signal DCF a lieu à 1:00 et 2:00 heures du matin. Au cas où la réception à 3 h du matin aurait échoué, un
nouvel essai de réception sera effectué à 4 et 5 h jusqu'à ce qu'il réussisse.
• Vous pouvez activer manuellement la réception de l’heure radio.
• Appuyez sur la touche SEARCH.
• Le symbole du signal DCF clignote.
• Il y a trois symboles de réception différents :
clignote – réception en cours
allumé en continu – la réception a abouti
aucun symbole – aucune réception / réception désactivée
• Si votre horloge radio-pilotée ne peut pas recevoir le signal DCF (par exemple en cas de perturbations, d'une distance de
transmission excessive etc.), vous pouvez régler l'horaire manuellement.
• L’horloge fonctionne comme une horloge à quartz normale (voir Réglages manuels).
6.4 Réception de l'heure radio
La transmission de l’heure radio s’effectue via une horloge atomique au césium, exploitée par la Physikalisch Technische
Bundesanstalt de Braunschweig (Institut Fédéral Physico-Technique de Braunschweig). L’écart de précision de cette horloge
est d'1 seconde pour un million d’années. L’heure est diffusée à partir de Mainflingen, près de Francfort-sur-le-Main, avec un
signal DCF-77 (77,5 kHz) d'une portée d’environ 1 500 km. L'horloge radio-pilotée reçoit le signal, le convertit et affiche
l'heure précise. Le passage de l'heure d'hiver à l'heure d'été et vice-versa s'effectue également automatiquement. Pendant
SEASON –Station météo radio-pilotée
l’heure d’été, « DST » apparaît sur l'écran. La réception dépend de votre position géographique. En règle générale, dans un
rayon de 1 500 km autour de Francfort, aucun problème de transmission ne devrait survenir.
Vérifiez les points suivants :
• Nous vous recommandons de respecter une distance de 1,5 - 2 m entre l'appareil et d’éventuelles sources de signaux parasites, comme les écrans d'ordinateurs et les postes de télévision.
• Dans les bâtiments en béton armé (caves, greniers aménagés), le signal reçu est affaibli. Dans les cas extrêmes, nous vous
conseillons de placer l’appareil près d’une fenêtre de manière à améliorer la réception du signal radio.
• La nuit, les perturbations s’affaiblissent en règle générale et la réception DCF est possible dans la plupart des cas. Une seule
réception par jour suffit pour garantir la précision de l’affichage de l’heure et pour maintenir d’éventuels écarts en dessous d'1
seconde.
7. Éclairage de fond
• Attention : l'éclairage de fond permanent fonctionne seulement avec l’adaptateur.
• Le réglage par défaut pour l'éclairage de fond est HI.
• Appuyez sur la touche LIGHT (HI-LOW-OFF) une fois (LOW) pour assombrir l'éclairage de fond.
• Appuyez sur la touche LIGHT (HI-LOW-OFF) encore une fois (OFF) pour désactiver l'éclairage de fond.
• Pour activer temporairement l'éclairage de fond, appuyez sur une touche de votre choix (seulement pour l’alimentation par
piles).
8. Utilisation
• Appuyez sur la touche LIGHT pour quitter le mode de réglage. L'appareil quitte automatiquement le mode de réglage si
aucune touche n’est pressée pendant un certain temps.
• Si vous maintenez la touche + ou – appuyée au cours d'un mode de réglage, vous passez en déroulement rapide.
8.1 Réglages manuels
• Maintenez la touche SET appuyée pendant trois secondes en mode normal pour accéder au mode de réglage.
• DEUTSCH (par défaut) clignote sur l’écran.
• Réglez la langue avec la touche + ou –.
• Si vous avez sélectionné le français, l'affichage apparaîtra maintenant en français.
TFA_No. 35.1150_Anleitung 28.01.2019 12:01 Uhr Seite 20
Page 21

4140
SEASON –Station météo radio-pilotée
• Appuyez encore une fois sur la touche SET pour ajuster la tonalité des touches (BIP ON - par défaut), la réception du signal
radio DCF (ON - par défaut), le fuseau horaire (DCF 00H - par défaut), l'affichage 12 heures ou 24 heures (FORMAT 24hr par défaut), les heures, les minutes, l'année, le mois et la date, l'affichage de la température (TEMP °C - par défaut), l'affichage de la pression atmosphérique (PRESSION HPA - par défaut) et la valeur de la pression atmosphérique (1013 HPA par défaut). Vous pouvez régler ces valeurs à l'aide de la touche + ou –.
• Validez au moyen de la touche SET.
• Lorsque la réception du signal DCF a abouti et quand la réception du signal radio est activée (DCF ON), l'heure ajustée
manuellement sera remplacée par l’heure radio.
8.1.1 Réglage de la langue des jours de la semaine
• En mode de réglage, vous pouvez régler la langue d’affichage des jours de la semaine.
• Appuyez sur la touche + ou –.
• Langues au choix pour les jours de la semaine : Allemand (DEUTSCH), Français (FRANCAIS), Italien (ITALIANO), Espagnol
(ESPANOL), Néerlandais (NEDERLANDS) et Anglais (ENGLISH).
8.1.2 Tonalité des touches
• En mode de réglage, vous pouvez activer ou désactiver la tonalité des touches avec la touche + ou –.
8.1.3 Réception de DCF
• Par défaut, la réception DCF est activée (DCF ON) et après une réception réussie du signal DCF, aucun réglage manuel n’est
nécessaire.
• Appuyez sur la touche + ou – en mode de réglage si vous souhaitez désactiver la réception radio DCF (OFF).
• Si la réception est désactivée, l'heure et la date doivent être réglées manuellement. Aucun fuseau horaire n'apparaît.
8.1.4 Réglage du fuseau horaire
• En mode de réglage, vous pouvez régler la correction du fuseau horaire (+12/-12) avec la touche + ou –.
• Vous avez la possibilité d'utiliser un autre fuseau horaire si votre horloge radio-pilotée peut recevoir le signal DCF mais
l'heure de votre fuseau horaire est différente de l’heure DCF (par exemple : +1 = une heure plus tard).
SEASON –Station météo radio-pilotée
8.1.5 Réglage de l'affichage de 12 heures et de 24 heures
• En mode de réglage, vous pouvez configurer le système horaire sur 12 heures ou sur 24 heures.
• Appuyez sur la touche + ou –.
• • En système 12 heures, AM (avant midi) ou PM (après midi) est affiché sur l'écran.
8.1.6 Réglage de l'unité de température
• En mode de réglage, vous pouvez régler la température en °C (Celsius) ou en °F (Fahrenheit).
• Appuyez sur la touche + ou –.
8.1.7 Réglage de l'unité et de la valeur de la pression atmosphérique
• En mode de réglage, vous pouvez régler l'unité de la pression atmosphérique en hPA ou inHg. Appuyez sur la touche + ou –.
• Validez au moyen de la touche SET.
• Si vous avez sélectionné l'unité de la pression atmosphérique, la valeur commence à clignoter. Vous pouvez alors changer
la valeur avec la touche + ou –.
• La pression atmosphérique relative se réfère toujours à l'altitude au-dessus du niveau de la mer et il faut effectuer un
réglage pour votre emplacement. Renseignez-vous sur la pression atmosphérique actuelle de votre environnement (valeur
communiquée par les services météorologiques, sur Internet, chez un opticien, sur les colonnes météorologiques étalonnées des bâtiments publics, par l'aéroport).
9. Température et humidité
9.1 Valeurs maximales et minimales, point de rosée et indice de chaleur
• Appuyez sur la touche TEMP en mode normal.
• La température et l'humidité maximales intérieures et extérieures, depuis la dernière réactualisation, s'affichent
• Appuyez une nouvelle fois sur la touche TEMP.
• La température et l'humidité minimales intérieures et extérieures, depuis la dernière réactualisation, s'affichent.
• Appuyez une nouvelle fois sur la touche TEMP.
• L'indice de chaleur pour l'extérieur est affiché.
• Appuyez une nouvelle fois sur la touche TEMP.
• La température du point de rosée actuelle est retenue.
TFA_No. 35.1150_Anleitung 28.01.2019 12:01 Uhr Seite 21
Page 22

4342
SEASON –Station météo radio-pilotée
• Appuyez une nouvelle fois sur la touche TEMP et les valeurs actuelles apparaissent sur l'écran.
• L'appareil quittera automatiquement le mode si aucune touche n'est utilisée pendant un certain temps.
• Les valeurs MAX-MIN sont automatiquement remises à zéro à minuit.
9.1.1 Indice de chaleur
• L'indice de chaleur se réfère à la sensation de température, en combinaison avec l'humidité actuelle.
9.1.2 Point de rosée
• L’air chaud peut absorber beaucoup plus d’humidité ou de vapeur que l’air froid.
• Si l'air se refroidit de manière continue et que l'humidité absolue reste constante, l'humidité relative augment jusqu'à un
maximum de 100%. Si l'air continue à se refroidir, la vapeur d'eau en excès sera éliminée sous forme de gouttelettes.
• La température à laquelle ce processus débute s’appelle point de rosée. La température du point de rosée dépend donc de
la température ambiante et de l’humidité relative.
9.2 Flèches de tendance
• Les flèches de tendance indiquent si la température et l'humidité extérieures montent, descendent ou restent stables.
10. Pression atmosphérique
• La pression atmosphérique relative en hPa (ou inHg) et le développement graphique de la pression atmosphérique
(24 heures) apparaissent sur l'écran.
11. Prévisions météo avec symboles
• La station météo radio-pilotée a 6 différents symboles météo (ensoleillé, partiellement nuageux, nuageux, pluvieux, orageux et neige).
• Les prévisions de l'affichage par symboles couvrent une période de temps de 12 - 24 heures et proposent uniquement une
tendance météorologique. Par exemple, si le ciel est nuageux et le symbole de pluie s'affiche, cela ne signifie pas que l'appareil est en panne, cela signifie simplement que la pression atmosphérique a baissé et qu'il faut s'attendre à une dégradation du temps : cela ne signifie pas forcément qu'il va pleuvoir.
• Le symbole de soleil est affiché également la nuit si elle est étoilée.
SEASON –Station météo radio-pilotée
• Le paysage change avec les saisons.
Printemps 20.03. – 20.06.
Été 21.06. – 20.09.
Automne 21.09. – 20.12.
Hiver 21.12. – 19.03.
Remarque !
Veuillez noter que le symbole de prévisions deviendra plus précis plus vous utilisez votre appareil. Le symbole de prévisions
est actif dès le début, cependant, la fiabilité des prévisions augmente avec la quantité de données recueillies.
12. Phase lunaire
• L'écran indique la phase lunaire actuelle :
13. Réglage de l'alarme de température et d'humidité
13.1 Régler l'alarme de température extérieure
• Maintenez la touche ALERTS appuyée en mode normal.
• LO ALARME est affiché à l'écran et OFF (par défaut) clignote.
• Appuyez sur la touche + ou – pour activer la fonction d'alarme.
• -40°C (par défaut) ou la limite inférieure de la température extérieure réglée précédemment apparaissent sur l'écran.
• Validez au moyen de la touche ALERTS.
• La valeur d'alarme clignote.
• Réglez la limite inférieure désirée avec la touche + ou –.
• Validez au moyen de la touche ALERTS.
Nouvelle lune Gibbeuse
croissante
Premier
quartier
Premier
croissant
Pleine lune Dernier
croissant
Dernier
quartier
Gibbeuse
décroissante
TFA_No. 35.1150_Anleitung 28.01.2019 12:01 Uhr Seite 22
Page 23

4544
SEASON –Station météo radio-pilotée
• HI ALARME est affiché à l'écran et OFF (par défaut) clignote.
• Appuyez sur la touche + ou – pour activer la fonction d'alarme.
• 60 °C (par défaut) ou la limite supérieure de température extérieure réglée précédemment apparaissent sur l'écran.
• Validez au moyen de la touche ALERTS.
• La valeur d'alarme clignote.
• Réglez la limite supérieure désirée avec la touche + ou –.
• Validez au moyen de la touche ALERTS.
• Réglez la limite supérieure et inférieure pour l'humidité extérieure, la température et l'humidité intérieure de la même
manière.
• (Plage de mesure température extérieure -40…+60°C, température intérieure 0… +50 °C, humidité 10…99% rH)
13.2 Cas d'alarme
• En cas d'alarme, le symbole correspondant clignote et un signal sonore se fait entendre.
• Appuyez sur une touche de votre choix pour éteindre l'alarme. Le symbole d'alarme continue à clignoter jusqu'à ce que la
valeur mesurée soit dans les limites d'alarme.
14. Placement ou accrochage au mur de la station de base et de l'émetteur
• La station de base peut être placée sur une surface plate à l'aide du support dépliable en trois étapes au dos de l'appareil.
Appuyez fermement avec les deux pouces pour enclencher le support jusqu’à ce qu’un clic se fasse entendre.
• La station de base peut être accrochée au mur à l'aide des œillets de suspension au dos de l'appareil. Évitez de la placer à
proximité d'autres appareils électriques (téléviseur, ordinateur, téléphone sans fil) ou d'objets métalliques.
• L'émetteur peut être mis en place sur une surface plate ou être accroché au mur à l'aide de l'œillet de suspension. Choisissez un emplacement protégé des rayons directs du soleil et de la pluie pour votre émetteur extérieur. (Un ensoleillement
direct fausse la mesure et une humidité continue use les composants électroniques inutilement).
• Vérifiez que les valeurs mesurées sont bien transmises de l'émetteur à la station de base (portée sur champ libre jusqu'à
80 mètres) depuis l'endroit choisi. Si les murs sont massifs, en particulier s'ils comportent des parties métalliques, la
portée d'émission peut se trouver réduite considérablement.
• Si nécessaire, choisissez un autre emplacement pour l'émetteur et/ou pour la station de base.
SEASON –Station météo radio-pilotée
15. Entretien et maintenance
• Pour le nettoyage de votre appareil, utilisez un chiffon doux et humide. N’utilisez pas de solvants ou d'agents abrasifs !
• Retirez les piles et retirez la fiche de la prise si vous n’utilisez pas votre appareil pendant une durée prolongée.
15.1 Remplacement des piles
• Lorsque le symbole de pile apparaît sur l'écran des valeurs extérieures, changez les piles de l'émetteur.
• Lorsque le symbole de pile apparaît sur l'écran des valeurs intérieures, changez les piles de la station de base.
• Attention : il faut rétablir le contact entre l'émetteur et le récepteur après le remplacement des piles - il faut donc toujours
recommencer la mise en service des deux appareils ou bien lancer la recherche manuellement.
16. Dépannage
Problème Solution
Aucun affichage sur Fonctionnement avec adaptateur :
la station de base ➜ Raccordement de la station de base avec adaptateur
➜ Appuyez sur touche LIGHT pour activer l'éclairage de fond
➜ Vérifiez l'adaptateur secteur
Fonctionnement avec piles :
➜ Contrôlez la bonne polarité des piles
➜ Appuyez sur une touche de votre choix pour activer temporairement l'éclairage de fond.
➜ Changez les piles
Pas de réception ➜ Aucun émetteur installé
de l'émetteur extérieur ➜ Vérifiez les piles de l'émetteur extérieur (n'utilisez pas d'accus)
Affichage « -- » ➜ Remettez l'émetteur et la station de base en service, conformément aux instructions
➜ Lancez la recherche de l'émetteur manuellement, conformément aux instructions
➜ Sélectionnez une autre position pour l'émetteur et la station de base
➜ Modifiez la distance entre l'émetteur et la station de base
➜ Éliminez les sources parasites
Affichage incorrect ➜ Changez les piles
TFA_No. 35.1150_Anleitung 28.01.2019 12:01 Uhr Seite 23
Page 24

4746
SEASON –Station météo radio-pilotée
➜ Repasser en réglage d’usine : pour revenir au réglage d'usine, appuyez simultanément sur les
touches ALERTS et LIGHT de la station de base pendant 5 secondes. Tous les réglages
seront effacés
Affichage HI/LO ➜ Valeurs hors de la plage de mesure
18. Traitement des déchets
Ce produit a été fabriqué avec des matériaux de haute qualité qui peuvent être recyclés et réutilisés.
Les piles usagées ne doivent pas être jetées dans les détritus ménagers.
En tant qu'utilisateur, vous avez l'obligation légale de rapporter les piles et piles rechargeables usagées à votre
revendeur ou de les déposer dans une déchetterie proche de votre domicile conformément à la réglementation
nationale et locale.
Les métaux lourds sont désignés comme suit : Cd=cadmium, Hg=mercure, Pb=plomb
Cet appareil est conforme aux normes de l'UE relatives au traitement des déchets électriques et électroniques
(WEEE).
L'appareil usagé ne doit pas être jeté dans les ordures ménagères. L’utilisateur s’engage, pour le respect de l’en-
vironnement, à déposer l’appareil usagé dans un centre de traitement agréé pour les déchets électriques et électroniques.
19. Caractéristiques techniques
Plage de mesure intérieure
Température 0 °C… +50 °C (+32…+99 °F)
Humidité 10 %rH...99 %rH
Résolution température 0,1°C
Résolution humidité 1%
Précision température ±1°C (0….+50°C)
Précision humidité ±5% (30%...80% rH) @25°C
SEASON –Station météo radio-pilotée
Plage de mesure extérieure
Température -40°C…..+60°C (-40…+140 °F)
Humidité 10 %rH...99 %rH
Résolution température 0,1°C
Résolution humidité 1%
Précision température ±1°C (0….+50°C)
Précision humidité ±5% (20%...90% rH) @25°C
Rayon d’action env. 80 mètres (champ libre)
Fréquence de transmission 433 MHz
Puissance de fréquence
radio maximale transmise < 10mW
Alimentation
Station de base 3 x 1,5 V AA (piles non incluses)
Adaptateur secteur : Input 230-240 50hz 50mA / Output 5.0 V 150mA DC
Émetteur 2 x 1,5 V AA (piles non incluses)
Station de base
Dimensions du boîtier 175 x 32 (84) x 165 mm
Poids 333 g (appareil seulement)
Émetteur extérieur
Dimensions du boîtier 40 x 21 x 130 mm
Poids 47 g (appareil seulement)
TFA_No. 35.1150_Anleitung 28.01.2019 12:01 Uhr Seite 24
Page 25

4948
SEASON –Station météo radio-pilotée
La reproduction, même partielle, du présent mode d'emploi est strictement interdite sans l'accord explicite de TFA Dostmann. Les caractéristiques techniques de ce produit ont été actualisées au moment de l'impression et peuvent être modifiées sans avis préalable.
Les dernières données techniques et les informations concernant votre produit peuvent être consultées en entrant le numéro de l'article sur notre site
Internet.
Déclaration de conformité UE
Le soussigné, TFA Dostmann, déclare que l'équipement radioélectrique du type 35.1150 est conforme à la directive 2014/53/UE. Le texte complet de la
déclaration UE de conformité est disponible à l'adresse Internet suivante :
www.tfa-dostmann.de
E-Mail : info@tfa-dostmann.de
TFA Dostmann GmbH & Co.KG, Zum Ottersberg 12, D-97877 Wertheim, Allemagne 01/19
SEASON – Stazione meteorologica radiocontrollata
Vi ringraziamo per aver scelto l'apparecchio della TFA.
1. Prima di utilizzare l'apparecchio
• Leggete attentamente le istruzioni per l'uso.
Avrete così modo di familiarizzare con il vostro nuovo apparecchio, di scoprirne tutte le funzioni e le componenti, di
apprendere importanti dettagli sulla sua messa in funzione, di acquisire dimestichezza nel suo utilizzo e di usufruire di
alcuni validi consigli da seguire in caso di guasti.
• Seguendo le istruzioni per l'uso, eviterete anche di danneggiare il prodotto e di pregiudicare, a causa di un utilizzo
scorretto, i diritti del consumatore che vi spettano per legge.
• Decliniamo ogni responsabilità per i danni derivanti dal mancato rispetto delle presenti istruzioni per l'uso. Allo stes-
so modo, non siamo responsabili per eventuali misurazioni errate e per le conseguenze che ne possono derivare.
• Prestate particolare attenzione alle misure di sicurezza!
• Conservate con cura queste istruzioni per l'uso.
2. La consegna include
• Stazione meteorologica (stazione base)
• Alimentatore
• Trasmettitore (n°. 30.3206.02)
• Istruzioni per l'uso
3. Tutte le applicazioni e tutti i vantaggi del vostro nuovo apparecchio
• Temperatura e umidità esterna trasmesse senza fili (433 MHz), raggio d'azione max: 80 metri (campo libero)
• Temperatura ed umidità interna
• Previsione con immagine meteorologica a colori (cambia con le stagioni)
• Pressione atmosferica e diagramma delle ultime 24 ore
• Indicatori di tendenza
• Allarme temperatura e umidità
• Valori massimi e minimi con aggiornamento automatico
• Indicazione del punto di rugiada e dell'indice di calore
• Orologio radiocontrollato con data e indicazione scritta del giorno della settimana (6 lingue)
• Display a colori con due livelli di luminosità (in funzionamento continuo con alimentatore)
TFA_No. 35.1150_Anleitung 28.01.2019 12:01 Uhr Seite 25
Page 26

5150
SEASON – Stazione meteorologica radiocontrollata
4. Per la vostra sicurezza
• Il prodotto è adatto esclusivamente agli utilizzi di cui sopra. Non utilizzate il prodotto in maniera diversa da quanto descritto in queste istruzioni.
• Non sono consentite riparazioni, alterazioni o modifiche non autorizzate del dispositivo.
Attenzione!
Pericolo di morte per scossa elettrica!
• Collegate la stazione base esclusivamente a una presa di corrente a norma di 230 V!
• La presa dell’alimentazione dovrebbe essere situata vicino al dispositivo ed essere facilmente accessibile.
• L'apparecchio e l’alimentatore non devono venire a contatto con acqua o umidità. Adatto solo all'uso in ambienti asciutti.
• Non utilizzate il dispositivo qualora la struttura esterna o l’alimentatore risultino danneggiati.
• Utilizzate il dispositivo fuori dalla portata di persone (per esempio i bambini) che potrebbero non riconoscere adeguatamente il rischio derivante dall’uso di apparecchi elettrici.
• Estraete immediatamente la spina dalla presa di corrente qualora rileviate un guasto o nel caso in cui non utilizziate il
dispositivo per un periodo prolungato.
• Utilizzate esclusivamente l'adattatore in dotazione.
• Collegate prima il cavo alla stazione base e successivamente inserite la spina nella presa di corrente.
• Quando estraete la spina dalla presa di corrente, non tiratela per il cavo.
• Proteggete il cavo di alimentazione in modo da evitare il contatto con oggetti appuntiti o caldi.
Attenzione!
Pericolo di lesioni:
• Tenete le batterie e i dispositivi lontano dalla portata dei bambini.
• Le batterie contengono acidi nocivi per la salute. Se ingerite, le batterie possono essere mortali. Se una batteria venisse
ingerita, potrebbe causare gravi ustioni e portare alla morte nel giro di due ore. Se si sospetta che una batteria sia stata
ingerita o inserita nel corpo in altra maniera, consultare immediatamente un medico.
• Non gettare le batterie nel fuoco, non polarizzarle in maniera scorretta, non smontarle e non cercare di ricaricarle. Pericolo
di esplosione!
SEASON – Stazione meteorologica radiocontrollata
• Sostituite quanto prima le batterie quasi scariche, in modo da evitare che si scarichino completamente. Non utilizzate mai
contemporaneamente batterie usate e batterie nuove né batterie di tipi diversi. Quando si maneggiano batterie esaurite
indossare sempre guanti resistenti alle sostanze chimiche e occhiali di protezione.
Avvertenze sulla sicurezza del prodotto!
• Non esporre l'apparecchio a temperature estreme, vibrazioni e urti.
• Il trasmettitore è resistente agli spruzzi d'acqua, ma non impermeabile. Se volete utilizzare il trasmettitore all'aperto, cercate
un luogo ombreggiato e al riparo dalla pioggia.
5. Componenti
5.1 Stazione meteorologica (stazione base)
A: Display (Fig. 1):
A 1: Freccia della tendenza temperatura esterna A 2: Simbolo della batteria del trasmettitore
A 3: Temperatura esterna A 4: Simbolo della ricezione del trasmettitore esterno
A 5: Simboli dell'allarme HI/LO A 6: Umidità esterna
A 7: Freccia della tendenza di umidità esterna A 8: Simbolo della batteria della stazione base
A 9: Temperatura e umidità interna A 10: Orologio
A 11: Simbolo DST (Daylight Saving Time – ora legale) A 12: Simbolo di ricezione del segnale DCF
A 13: Giorno della settimana A 14: Fasi lunari
A 15: Pressione atmosferica relativa A 16: Data
A 17: Diagramma della pressione atmosferica delle ultime 24 ore
A 18: Visualizzazione di stagioni A 19: Simboli meteorologici
A 20: Indicatore della tendenza
B: Tasti (Fig. 2):
B 1: Tasto ALERTS B 2: Tasto TEMP
B 3: Tasto SEARCH B 4: Tasto +
B 5: Tasto – B 6: Tasto SET
B 7: Tasto LIGHT
TFA_No. 35.1150_Anleitung 28.01.2019 12:01 Uhr Seite 26
Page 27

5352
SEASON – Stazione meteorologica radiocontrollata
C: Struttura esterna (Fig. 2):
C 1: Fori per sospensione alla parete C 2: Vano batteria
C 3: Supporto (pieghevole a 3 stadi) C 4: Presa di corrente
C 5: Passacavi
5.2 Trasmettitore esterno (Fig. 3):
D 1: Lampada di segnalazione a LED D 2: Vano batteria
D 3: Tasto TX interno del vano batteria D 4: Fori per sospensione alla parete
6. Messa in funzione
• Posizionare gli apparecchi su un tavolo ad una distanza di circa 1,5 metri l'uno dall'altro. Tenerli lontano da eventuali fonti
di interferenza (dispositivi elettronici e impianti radio).
• Collegare la stazione base all'alimentatore fornito in dotazione. Inserire l'adattatore nella presa e collegarlo ad una presa a
terra. Avvertenza importante! Controllate che il voltaggio della vostra abitazione non sia maggiore di 240V~. Tensioni
diverse possono danneggiare lo strumento.
• Viene emesso un breve segnale acustico e tutti i segmenti appaiono brevemente.
• Sul display appare la temperatura interna e l'umidità.
6.1 Inserimento delle batterie nella stazione base
• Le batterie agiscono quindi come alimentazione di supporto nel caso in cui manchi la corrente.
• Per una retroilluminazione permanente e per risparmiare le batterie, utilizzare l'alimentatore incluso.
• Aprire il vano batteria della stazione base sul retro.
• Inserite 3 batterie nuove AA da 1,5 V nel vano batteria. Accertarsi di aver rispettato le corrette polarità.
• Richiudere il vano batteria.
6.2 Inserimento delle batterie del trasmettitore e ricezione dei valori esterni
• Fare scorrere il coperchio del vano batteria del trasmettitore esterno verso il basso.
• Inserire due batterie nuove AA da 1,5 V nel vano batteria del trasmettitore. Accertarsi di aver rispettato le corrette polarità.
• Dopo la messa in funzione i dati di misurazione del trasmettitore vengono trasmessi alla stazione base. La lampada di
segnalazione a LED lampeggia.
• Appena la stazione base riceve i valori esterni, la temperatura e umidità esterna vengono visualizzati in modo permanente.
SEASON – Stazione meteorologica radiocontrollata
• Se i valori esterni non vengono ricevuti, dopo circa 3 minuti viene visualizzato “- -” sul display. Controllare le batterie e
riprovare di nuovo. Rimuovere eventuali fonti di interferenza.
• Se la stazione base ha ricevuto l'ora radiocontrollata è possibile avviare l'inizializzazione manualmente. Tenere premuto per
tre secondi il tasto SEARCH. La stazione base inizia a ricevere i valori di misurazione.
• Con il tasto TX sul trasmettitore è possibile trasferire manualmente i valori misurati.
6.3 Ricezione del segnale radio DCF
• L'orologio inizia a ricevere il segnale radio e il simbolo della ricezione del segnale DCF inizia a lampeggiare.
• Se il codice dell'ora è stato ricevuto entro 3-10 minuti, l'ora radiocontrollata e il simbolo della ricezione del segnale DCF
sono costantemente visualizzati sul display.
• La ricezione del segnale DCF avverrà tutti i giorni alle ore 1:00 e 2:00. Se la ricezione non è avvenuta con successo alle
3.00, verranno eseguiti diversi tentativi alle 4:00 e 5.00 del mattino.
• È possibile avviare l'inizializzazione manuale.
• Premere il tasto SEARCH.
• Il simbolo della ricezione del segnale DCF lampeggia.
• Ci sono tre differenti simboli di ricezione:
Simbolo lampeggiante – Ricezione attiva
Simbolo acceso – Ricezione molto buona
Nessun simbolo – nessuna ricezione / ricezione disattivata
• Nel caso in cui l’orologio non riesca a ricevere il segnale DCF (a causa di guasti, della distanza di trasmissione, ecc.), l'ora
può essere impostata manualmente.
• L'orologio funziona come un normale orologio al quarzo (vedi: Impostazioni manuali).
6.4 Ricezione dell'ora radiocontrollata
L'ora viene trasmessa da un orologio atomico al cesio gestito dal Physikalisch Technische Bundesanstalt di Braunschweig. La
deviazione è inferiore a 1 secondo in un milione di anni. L'ora è codificata e trasmessa da Mainflingen vicino Francoforte con
un segnale a frequenza DCF - 77 (77,5 kHz) entro un raggio di 1.500 km. L'orologio radiocontrollato riceve il segnale e lo converte per visualizzare l'ora precisa. Anche il passaggio tra ora solare e ora legale è automatico. Durante il periodo estivo sul
display appare DST. La qualità della ricezione dipende molto dalla posizione geografica. In circostanze normali e in assenza di
problemi di ricezione dovrebbe avvenire entro un raggio di 1.500 km da Francoforte.
TFA_No. 35.1150_Anleitung 28.01.2019 12:01 Uhr Seite 27
Page 28

5554
SEASON – Stazione meteorologica radiocontrollata
Rispettate le norme elencate qui di seguito:
• La distanza raccomandata da qualsiasi fonte di interferenza come monitor di computer o televisori deve essere di almeno
1.5 - 2 m.
• All'interno di strutture in cemento armato (seminterrati, sovrastrutture) la ricezione del segnale è naturalmente più debole. In
casi estremi si consiglia di sistemare l'unità vicino ad una finestra per ottenere una migliore ricezione del segnale.
• Durante le ore notturne, le interferenze dovute ad agenti atmosferici sono normalmente meno influenti e la ricezione è possibile nella maggior parte dei casi. Una singola ricezione giornaliera è sufficiente a garantire la precisione e a mantenere la
deviazione al di sotto di un secondo.
7. Retroilluminazione
• Attenzione: La retroilluminazione permanente del display funziona solo con l'alimentatore collegato.
• L'impostazione predefinita della retroilluminazione è HI.
• Premere il tasto LIGHT (HI – LOW - OFF) una volta (LOW), per diminuire l’intensità della retroilluminazione.
• Premere il tasto LIGHT (HI – LOW - OFF) nuovamente (OFF), per spegnere la retroilluminazione.
• La retroilluminazione è disattivata.
• Per attivare temporaneamente la retroilluminazione, premere un tasto qualunque (possibile solo in caso di funzionamento a
batteria).
8. Uso
• Premere il tasto LIGHT per uscire dalla modalità impostazione. L'apparecchio esce automaticamente dalla modalità impostazione se non si preme alcun tasto per un periodo prolungato.
• Tenere premuto il tasto + o – nella modalità impostazione per procedere velocemente.
8.1 Impostazioni manuali
• Tenere premuto il tasto SET nella modalità normale per tre secondi per ritornare alla modalità impostazione.
• Sul display lampeggia DEUTSCH (predefinita).
• Impostare con il tasto + o – la lingua per il giorno della settimana.
• Se avete selezionato l'italiano, il display verrà visualizzato in italiano.
SEASON – Stazione meteorologica radiocontrollata
• Premendo nuovamente il tasto SET è possibile modificare una dopo l'altra le impostazioni per il tono dei tasti (BIP ON -
predefinita), ricezione del segnale radio (DCF ON - predefinita), fuso orario (DCF 00H - predefinita), sistema orario 12 ore o
24 ore (FORMATO 24Hr - predefinita), ore, minuti, anno, mese, data, la visualizzazione della temperatura (TEMP °C - predefinita), la visualizzazione della pressione atmosferica (PRESSIONE HPA - predefinita), e il valore della pressione atmosferica (1013 HPA - predefinita). Impostare con il tasto + o –.
• Confermare con il tasto SET.
• In caso di corretta ricezione e quando il segnale DCF è attivo (ON), l'ora impostata in modalità manuale viene sostituita.
8.1.1 Impostazione della lingua nella quale verrà indicato il giorno della settimana
• In modalità impostazione è possibile scegliere la lingua nella quale verrà indicato il giorno della settimana.
• Premere il tasto + o –.
• Sul display appare: Tedesco (DEUTSCH), Francese (FRANCAIS), Italiano (ITALIANO), Spagnolo (ESPANOL), Olandese
(NEDERLANDS) e Inglese (ENGLISH).
8.1.2 Tono dei tasti
• In modalità di impostazione, premere il tasto + o – per attivare o disattivare il tono dei tasti.
8.1.3 Ricezione del segnale DCF
• La ricezione DCF è attiva per impostazione predefinita (DCF ON). Dopo l'avvenuta ricezione del segnale DCF non è necessaria alcuna regolazione manuale.
• Premere il tasto + o – se si desidera disattivare la ricezione radio DCF (OFF).
• Se la ricezione del segnale radio è disattivata è necessario impostare l'ora e la data manualmente. Il fuso orario non appare.
8.1.4 Impostazione del fuso orario
• In modalità di impostazione è possibile effettuare la correzione del fuso orario (+12/-12) con il tasto + o –.
• La correzione del fuso orario è attiva dove è possibile ricevere il segnale DCF ma il fuso orario differisce da quello tedesco
(ad esempio, +1 = un'ora dopo).
TFA_No. 35.1150_Anleitung 28.01.2019 12:01 Uhr Seite 28
Page 29

5756
SEASON – Stazione meteorologica radiocontrollata
8.1.5 Impostazione del sistema orario a 12 ore o a 24 ore
• Impostare il sistema orario di 12 - o 24-ore nella modalità impostazione.
• Premere il tasto + o –.
• Nel formato 12 ore compare AM (prima di mezzogiorno) e PM (dopo mezzogiorno) sul display.
8.1.6 Impostazione della visualizzazione della temperatura
• In modalità impostazione è possibile scegliere fra la visualizzazione della temperatura in °C (gradi Celsius) o °F (gradi
Fahrenheit).
• Premere il tasto + o –.
8.1.7 Impostazione della visualizzazione e del valore della pressione atmosferica
• In modalità impostazione è possibile scegliere fra la visualizzazione della pressione atmosferica in hPA o inHg. Premere il
tasto + o –.
• Confermare con il tasto SET.
• In caso di selezione della visualizzazione della pressione atmosferica, il valore della pressione atmosferica inizia a lampeggiare. Mentre lampeggia, potete impostare il valore con il tasto + o –.
• La pressione atmosferica relativa si riferisce al livello del mare e deve essere impostata in base all’altitudine della località in
questione. Informarsi sull’attuale pressione atmosferica del territorio in questione (valore fornito dall’ufficio meteorologico,
Internet, ottici, colonnine meteo tarate presenti su edifici pubblici, aeroporti).
9. Temperatura e umidità
9.1 Valori massimi e minimi, indice di calore e punto di rugiada
• Premere il tasto TEMP nella modalità normale.
• Vengono visualizzate la temperatura massima e l'umidità massima dell'aria esterne e interne raggiunte dopo l'ultimo azzeramento.
• Premere nuovamente il tasto TEMP.
• Vengono visualizzate la temperatura minima e l'umidità minima dell'aria esterne e interne raggiunte dopo l´ultimo azzeramento.
• Premere nuovamente il tasto TEMP.
• Viene visualizzato il punto di rugiada esterno.
SEASON – Stazione meteorologica radiocontrollata
• Premere nuovamente il tasto TEMP.
• Viene visualizzato il punto di rugiada esterno.
• Per tornare alla visualizzazione dei valori attuali, premere ancora una volta il tasto TEMP.
• L'apparecchio esce automaticamente dalla modalità se non si preme alcun tasto.
• I valori massimi e minimi verranno memorizzati e a mezzanotte vengono resettati automaticamente.
9.1.1 Indicazione dell'indice di calore
• L'indice di calore si riferisce alla temperatura percepita combinata con l'umidità.
9.1.2 Indicazione del punto di rugiada
• L’aria calda può trattenere molta più acqua o vapore acqueo rispetto all’aria fredda. Se l’aria viene raffreddata in modo continuo, a parità di umidità assoluta l’umidità relativa sale fino al 100%. Se l’aria viene raffreddata ulteriormente, l’eccesso di
vapore acqueo viene eliminato sotto forma di goccioline. La temperatura alla quale si verifica questo fenomeno viene denominato punto di rugiada. La temperatura del punto di rugiada è quindi dipendente da umidità relativa e temperatura.
9.2 Frecce di tendenza
• La freccia della tendenza mostra se la temperatura e l'umidità esterna sono in aumento, in discesa o stazionarie.
10. Pressione atmosferica
• Sul display vengono visualizzati la pressione atmosferica relativa in hPa (o inHg) e lo sviluppo grafico della pressione
dell'aria (24 ore).
11. Previsioni del tempo
• La stazione meteorologica visualizza sei simboli meteo diversi (soleggiato, parzialmente nuvoloso, coperto, piovoso, tempestoso e neve).
• La previsione tramite l'indicazione del simbolo si riferisce ad un periodo di tempo di 12 – 24 ore e indica solo una tendenza
atmosferica. Se ad esempio in questo momento è nuvoloso e viene segnalata pioggia, non si tratta di un funzionamento
difettoso dell'apparecchio, bensì di una indicazione che la pressione dell'aria è scesa e c'è da aspettarsi un peggioramento
del tempo, anche se non necessariamente la pioggia.
TFA_No. 35.1150_Anleitung 28.01.2019 12:01 Uhr Seite 29
Page 30

5958
SEASON – Stazione meteorologica radiocontrollata
• Il simbolo del sole viene visualizzato durante la notte se vi è una notte stellata.
• Il paesaggio cambia con le stagioni.
Primavera 20.03. – 20.06.
Estate 21.06. – 20.09.
Autunno 21.09. – 20.12.
Inverno 21.12. – 19.03.
Suggerimento!
Si prega di notare che il simbolo della previsione diviene più preciso con l'uso. Il simbolo della previsione è attivo sin dall'inizio,
ma l'affidabilità delle previsioni aumenta con la quantità dei dati raccolti.
12. Fasi lunari
• Sul display vengono visualizzate la fase lunari attuali:
13. Impostazione dell'allarme per temperatura e umidità
13.1 Impostare l'allarme della temperatura esterna
• Tenere premuto il tasto ALERTS nella modalità normale.
• LO ALLARME viene visualizzata e sul display lampeggia OFF (predefinita).
• Premere il tasto + o – per attivare la funzione dell'allarme.
• -40°C (predefinito) o il limite inferiore più di temperatura esterna impostato vengono visualizzati sul display.
• Confermare con il tasto ALERTS.
• Il valore di allarme lampeggia.
• Impostare con il tasto + o – il limite inferiore desiderato.
SEASON – Stazione meteorologica radiocontrollata
• Confermare con il tasto ALERTS.
• HI ALLARME viene visualizzato e sul display lampeggia OFF (predefinita).
• Premere il tasto + o – per attivare la funzione dell'allarme.
• 60°C (predefinito) o il limite superiore della temperatura esterna impostato vengono visualizzati sul display.
• Confermare con il tasto ALERTS.
• Il valore di allarme lampeggia.
• Impostare con il tasto + o – il limite superiore desiderato.
• Confermare con il tasto ALERTS.
• Impostare il limite superiore e inferiore dell'umidità esterna e della temperatura e umidità interna procedendo nello stesso
modo.
• (Campo di misura temperatura esterna -40…+60°C, temperatura interna 0… +50 °C, umidità 10…99% rH)
13.2 Caso di allarme
• In caso di allarme il corrispondente simbolo lampeggia e un allarme suonerà.
• Spegnere il segnale acustico con un tasto qualsiasi. Il simbolo dell'allarme continua a lampeggiare fino a quando il valore
misurato è all'interno dei limiti di allarme.
14. Posizionamento e fissaggio della stazione base e del trasmettitore esterno
• Con il supporto pieghevole a 3 stadi situato nella parte posteriore è possibile disporre la stazione base su superfici piane.
Premete forte con entrambi i pollici finché il supporto non è bene impostato. Si sentirà un click.
• La stazione base può essere posizionata su una superficie liscia diritta o appesa al occhiello di sospensione sulla parete.
Evitare l’installazione in prossimità di altri apparecchi elettrici (televisori, computer, cellulari) e oggetti metallici pesanti.
• Il trasmettitore può essere posizionato su una superficie liscia diritta o appeso al gancio di sollevamento sulla parete. Cercare un luogo ombreggiato e al riparo dalla pioggia per il trasmettitore. (La luce diretta del sole falsifica la misurazione e
l'umidità costante sforza inutilmente le componenti elettroniche).
• Verificare se il trasferimento dei valori di misura alla stazione base da parte del trasmettitore situato nel luogo cui esso è
destinato ha luogo correttamente (raggio d’azione in campo libero circa 80 metri) in caso di pareti spesse, in particolare
con parti metalliche, il raggio d’azione del trasmettitore potrà ridursi notevolmente.
• Se necessario, cercate nuove posizioni per il trasmettitore e/o la stazione base.
Luna nuova Luna
crescente
Primo quarto Falce
crescente
Luna piena Falce calante Ultimo
quarto
Luna calante
TFA_No. 35.1150_Anleitung 28.01.2019 12:01 Uhr Seite 30
Page 31

6160
SEASON – Stazione meteorologica radiocontrollata
15. Cura e manutenzione
• Per pulire i dispositivi utilizzare solo un panno morbido leggermente inumidito. Non usare solventi o abrasivi.
• Rimuovere le batterie e estraete la spina dalla presa se non si utilizza l'apparecchio per un periodo prolungato.
15.1 Sostituzione delle batterie
• Cambiare le batterie del trasmettitore, se il simbolo della batteria appare sul display dei valori esterni della stazione base.
• Cambiare le batterie della stazione base, se il simbolo della batteria appare sul display dei valori interni.
• Attenzione: dopo aver sostituito le batterie è necessario ristabilire il contatto tra il trasmettitore e la stazione base, pertanto
riavviate i dispositivi secondo le istruzioni oppure avviate manualmente la ricerca del trasmettitore.
16. Guasti
Problema Risoluzione del problema
Nessuna indicazione sul Funzionamento con spina di alimentazione:
display della stazione base ➜ Collegare la stazione base all'alimentatore
➜ Attivare la retroilluminazione con il tasto LIGHT
➜ Controllare l'alimentatore
Funzionamento a batteria:
➜ Inserire le batterie rispettando le corrette polarità
➜ Attivare brevemente la retroilluminazione con un tasto a piacere
➜ Sostituire le batterie
Nessuna ricezione ➜ Nessun trasmettitore installato
del trasmettitore ➜ Controllare le batterie del trasmettitore (non utilizzare le batterie ricaricabili!)
Indicazione “---” ➜ Riavviate il trasmettitore e la stazione base secondo le istruzioni
➜ Avviare l'inizializzazione manuale secondo le istruzioni
➜ Cercate nuove posizioni per il trasmettitore e/o la stazione base
➜ Diminuite la distanza tra il trasmettitore e la stazione base
➜ Eliminare fonti di interferenza
Indicazione non corretta ➜ Sostituire le batterie
SEASON – Stazione meteorologica radiocontrollata
➜ Factory reset: Per mantenere le impostazioni di fabbrica, tenere premuto contemporanea-
mente il tasto ALERTS e LIGHT della stazione base per 5 secondi. Tutte le impostazioni
vengono cancellate.
Indicazione “hi/lo” ➜ Fuori dal campo di misura
18. Smaltimento
Questo prodotto è stato realizzato utilizzando materiali e componenti di alta qualità che possono essere riciclati e riutilizzati.
È assolutamente vietato gettate le batterie tra i rifiuti domestici.
In qualità di consumatori, siete tenuti per legge a consegnare le batterie usate al negoziante o ad altri enti preposti al riciclaggio in conformità alle vigenti disposizioni nazionali o locali, ai fini di uno smaltimento ecologico.
Le sigle dei metalli pesanti contenuti sono: Cd=cadmio, Hg=mercurio, Pb=piombo
Questo apparecchio è etichettato in conformità alla Direttiva UE sullo smaltimento delle apparecchiature elettriche
ed elettroniche (WEEE).
Questo prodotto non deve essere smaltito insieme ai rifiuti domestici. Il consumatore è tenuto a consegnare il
vecchio apparecchio presso un punto di raccolta per lo smaltimento di apparecchiature elettriche ed elettroniche
ai fini di uno smaltimento ecologico.
19. Dati tecnici
Campo di misura interna
Temperatura 0 °C… +50 °C (+32…+99 °F)
Umidità 10 %rH...99 %rH
Risoluzione temperatura 0,1 °C
Risoluzione umidità 1%
Precisione temperatura ±1°C (0….+50°C)
Precisione umidità ±5% (30%...80% rH) @25°C
Campo di misura esterno
Temperatura -40°C…..+60°C (-40…+140 °F)
Umidità 10 %rH...99 %rH
TFA_No. 35.1150_Anleitung 28.01.2019 12:01 Uhr Seite 31
Page 32

6362
SEASON – Stazione meteorologica radiocontrollata
Risoluzione temperatura 0,1 °C
Risoluzione umidità 1%
Precisione temperatura ±1°C (0….+50°C)
Precisione umidità ±5% (20%...90% rH) @25°C
Raggio d'azione ca. 80 metri al massimo
Frequenza di trasmissione 433 MHz
Massima potenza a radiofrequenza trasmessa:< 10mW
Alimentazione
Stazione base 3 batterie AA da 1,5 V (non fornite)
Alimentatore: Input 230-240 50hz 50mA / Output 5.0 V 150mA DC
Trasmettitore esterno 2 batterie AA da 1,5 V (non fornite)
Stazione base
Dimensioni esterne 175 x 32 (84) x 165 mm
Peso 333 g (solo apparecchio)
Trasmettitore esterno
Dimensioni esterne 40 x 21 x 130 mm
Peso 47 g (solo apparecchio)
SEASON – Stazione meteorologica radiocontrollata
È vietata la pubblicazione delle presenti istruzioni o di parti di esse senza una precedente autorizzazione della TFA Dostmann. I dati tecnici corrispondono
allo stato del prodotto al momento della stampa e possono cambiare senza preavviso.
È possibile trovare dati tecnici e informazioni aggiornate sul prodotto inserendo il numero di articolo sul nostro sito.
Dichiarazione di conformità UE
Il fabbricante, TFA Dostmann, dichiara che il tipo di apparecchiatura radio 35.1150 è conforme alla direttiva 2014/53/UE. Il testo completo della dichiarazione di conformità UE è disponibile al seguente indirizzo Internet:
www.tfa-dostmann.de
E-Mail: info@tfa-dostmann.de
TFA Dostmann GmbH & Co.KG, Zum Ottersberg 12, D-97877 Wertheim, Germania 01/19
TFA_No. 35.1150_Anleitung 28.01.2019 12:01 Uhr Seite 32
Page 33

6564
SEASON – Radiografisch weerstation
Hartelijk dank dat u voor dit apparaat van de firma TFA hebt gekozen.
1. Voordat u met het apparaat gaat werken
• Leest u a.u.b. de gebruiksaanwijzing aandachtig door.
Zo raakt u vertrouwd met uw nieuw apparaat en leert u alle functies en onderdelen kennen, komt u belangrijke details te
weten met het oog op het in bedrijf stellen van het apparaat en de omgang ermee en krijgt u tips voor het geval van een
storing.
• Door rekening te houden met wat er in de handleiding staat, vermijdt u ook beschadigingen van het product en riskeert
u niet dat uw wettelijke rechten door verkeerd gebruik niet meer gelden.
• Voor schade die wordt veroorzaakt doordat u geen rekening houdt met de handleiding aanvaarden wij geen aansprake-
lijkheid. Ook zijn wij niet verantwoordelijk voor verkeerde metingen en de mogelijke gevolgen die daaruit voortvloeien.
• Volg in elk geval de veiligheidsinstructies op!
• Deze gebruiksaanwijzing goed bewaren a.u.b.!
2. Levering
• Radiografisch weerstation (basisapparaat)
• Stroomadapter
• Zender (cat.-nr. 30.3206.02)
• Gebruiksaanwijzing
3. Hoe u uw nieuw apparaat kunt gebruiken en alle voordelen ervan in één oogopslag
• Buitentemperatuur en luchtvochtigheid draadloos (433 MHz), zendbereik maximaal 80 meter (vrijveld)
• Binnentemperatuur en luchtvochtigheid
• Voorspelling met weerbeeld en kleur (verandert met de seizoenen)
• Relatieve luchtdruk en grafische ontwikkeling van de luchtdruk (24 uur)
• Tendenspijlen
• Temperatuur en luchtvochtigheidsalarm
• Maximum- en minimumwaarden met automatische reset
• Dauwpunt en warmte index
• Zendergestuurde klok met datum en volledig uitgeschreven weekdagen (6 talen)
• Kleurendisplay met helderheid in twee stappen (permanente verlichting met netadapter)
SEASON – Radiografisch weerstation
4. Voor uw veiligheid
• Het product is uitsluitend geschikt voor de hierboven beschreven doeleinden. Gebruik het product niet anders dan in deze
handleiding is aangegeven.
• Het eigenmachtig repareren, verbouwen of veranderen van het apparaat is niet toegestaan.
Voorzichtig!
Levensgevaar door elektrocutie!
• Sluit het basisapparaat uitsluitend aan op een volgens de voorschriften geïnstalleerd stopcontact met een netspanning van
230V!
• Het stopcontact moet zich dicht bij de apparatuur bevinden en gemakkelijk toegankelijk zijn.
• Het apparaat en de netvoeding mogen niet met water of vocht in aanraking komen. Ze zijn alleen geschikt voor het gebruik
in droge ruimtes.
• Gebruik het apparaat niet wanneer de behuizing of de netvoeding beschadigd is.
• Bewaar het apparaat buiten de reikwijdte van personen (ook kinderen) die de mogelijke gevaren van de omgang met elektrische apparaten zouden kunnen onderschatten.
• Trek de stekker uit het stopcontact als u het apparaat langere tijd niet gebruikt.
• Gebruik uitsluitend de bijbehorende netvoeding.
• Sluit eerst de kabel op het basisapparaat aan, steek daarna de stekker in het stopcontact.
• Trek de stekker niet aan de kabel uit het stopcontact.
• Leg het snoer zo neer dat het niet met scherpe of hete voorwerpen in aanraking komt.
Voorzichtig!
Kans op letsel:
• Bewaar de apparaten en de batterijen buiten de reikwijdte van kinderen.
• Batterijen bevatten zuren die de gezondheid schaden. Het inslikken van batterijen kan levensgevaarlijk zijn. Als een batterij
wordt ingeslikt, kan dit binnen 2 uur tot ernstige interne brandwonden en tot fataal letsel leiden. Als u denkt dat de batterijen zijn ingeslikt of in een willekeurig lichaamsdeel terecht zijn gekomen, dient u onmiddellijk medische hulp te zoeken.
• Batterijen niet in het vuur gooien, niet kortsluiten, niet uit elkaar halen of opladen. Kans op explosie!
TFA_No. 35.1150_Anleitung 28.01.2019 12:01 Uhr Seite 33
Page 34

6766
SEASON – Radiografisch weerstation
• Zwakke batterijen moeten zo snel mogelijk worden vervangen om lekkage van de batterijen te voorkomen. Gebruik nooit
tegelijkertijd oude en nieuwe batterijen of batterijen van een verschillend type. Draag handschoenen die bestand zijn tegen
chemicaliën en een beschermbril wanneer u met uitgelopen batterijen hanteert!
Belangrijke informatie voor de productveiligheid!
• Stel het apparaat niet bloot aan extreme temperaturen, trillingen en schokken.
• De zender is tegen spatwater beschermd maar niet waterdicht. Zoek een tegen regen beschermde plaats uit voor de zender.
5. Onderdelen
5.1 Weerstation (basisapparaat)
A: Display (Fig. 1):
A 1: Trendpijl buitentemperatuur A 2: Batterijsymbool voor zender
A 3: Buitentemperatuur A 4: Ontvangstsymbool buitenzender
A 5: Alarmsymbolen HI/LO A 6: Buitenluchtvochtigheid
A 7: Trendpijl buitenluchtvochtigheid A 8: Batterijsymbool voor basisapparaat
A 9: Binnentemperatuur en binnenluchtvochtigheid A 10: Tijd
A 11: DST symbool A 12: DCF ontvangstsymbool
A 13: Weekdag A 14: Maanstand
A 15: Relatieve luchtdruk A 16: Datum
A 17: Grafiek van de luchtdruk van de afgelopen 24 uren A 18: Seizoenenindicatie
A 19: Weersymbool A 20: Trendindicatie
B: Toetsen (Fig. 2):
B 1: ALERTS toets B 2: TEMP toets
B 3: SEARCH toets B 4: + toets
B 5: – toets B 6: SET toets
B 7: LIGHT toets
SEASON – Radiografisch weerstation
C: Behuizing (Fig. 2):
C 1: Wandbevestigingen C 2: Batterijvak
C 3: Standaard (uitklapbaar in drie positie) C 4: Adapter aansluiting
C 5: Gids voor de kabel
5.2 Buitenzender (Fig. 3):
D 1: LED signaallamp D 2: Batterijvak
D 3: TX toets in het batterijvak D 4: Wandbevestiging
6. Inbedrijfstelling
• Leg de apparaten op een afstand van ca. 1,5 meter van elkaar op een tafel. Vermijd de nabijheid van eventuele stoorbronnen (elektronische apparaten en zendergestuurde installaties).
• Sluit het basisapparaat met de bijgeleverde stekker aan. Steek de verbindingsstekker in de adapter van het basisapparaat
en de stekker van de adapter in een stopcontact. Belangrijk! Zorg ervoor dat de spanning van het stroomnet onder 240 V
ligt! Andere netspanningen kunnen het toestel beschadigen.
• U hoort een kort signaal en alle segmenten van het scherm verschijnen kort.
• De binnentemperatuur en de luchtvochtigheid verschijnen op het display.
6.1 Plaatsen van de batterijen in het basisapparaat
• De batterijen fungeren als een reserve-energiebron in geval van een elektriciteitsstoring.
• Voor een continue achtergrondverlichting en om de energie van de batterijen te besparen, gebruikt u de meegeleverde
netadapter.
• Open het batterijvak aan de achterkant van het basisapparaat.
• Plaats drie nieuwe batterijen 1,5 V AA in het batterijvak. Let op de juiste polariteit bij het plaatsen van de batterijen.
• Sluit het batterijvak weer.
6.2 Plaatsen van de batterijen in de buitenzender / ontvangst van de buitenwaarden
• Schuif het batterijdeksel van de buitenzender omhoog.
• Plaats twee nieuwe batterijen 1,5 V AA in het batterijvak. Let op de juiste polariteit bij het plaatsen van de batterijen.
• Na het plaatsen van de batterijen worden de meetgegevens van de buitenzender naar het basisapparaat getransporteerd.
Het LED signaallamp knippert.
TFA_No. 35.1150_Anleitung 28.01.2019 12:01 Uhr Seite 34
Page 35

6968
SEASON – Radiografisch weerstation
• Zodra het basisapparaat de buitenwaarden heeft ontvangen, worden buitentemperatuur en luchtvochtigheid permanent
weergegeven.
• Worden de buitenwaarden binnen 3 minuten niet ontvangen, verschijnt „- -” op het display. Test de batterijen en begin
opnieuw. Verwijder eventuele stoorbronnen.
• Zodra het basisapparaat de zendergestuurde tijd ontvangt kunt u de initiatie ook handmatig starten. Druk op de SEARCH
toets en houdt deze drie seconden lang ingedrukt. Het basisapparaat probeert de meetwaarden te ontvangen.
• Met de TX toets op de buitenzender kunt u de meetwaarde handmatig overdragen.
6.3 Ontvangst van de zendergestuurde tijd
• Na de ontvangst van de buitenwaarden, probeert de klok nu het tijdsignaal te ontvangen en het DCF-ontvangstsymbool
knippert.
• Als na 3-10 minuten de ontvangst succesvol is, verschijnt de zendergestuurde tijd en het DCF-ontvangstsymbool permanent op het display.
• Het DCF-signaal wordt dagelijks om 1:00 en 2:00 uur 's morgens ontvangen. Is de ontvangst om 3:00 uur niet geslaagd,
probeert de klok om 4:00 en 5:00 uur een signaal te krijgen.
• U kunt de DCF-ontvangst ook handmatig starten.
• Druk op de SEARCH toets.
• Het DCF-radiosignaal-symbool knippert.
• Er zijn drie verschillende ontvangstsymbolen:
knippert – ontvangst is actief
blijft staan – ontvangst is goed
geen symbool – geen ontvangst / ontvangst gedeactiveerd
• Als de zendergestuurde klok geen DCF-signaal ontvangt (wegens storingen, afstand, enz.), kunt u de tijd ook handmatig
instellen.
• De klok werkt dan als een gewone kwartsklok (zie: Manuele instellingen).
6.4 Ontvangst van de zendergestuurde tijd
De tijdbasis voor de zendergestuurde tijd is een cesium-atoomklok van het Physikalisch Technische Bundesanstalt Braunschweig.
Met een afwijking van minder dan 1 seconde in één miljoen jaar. De tijd is gecodeerd en wordt vanuit Mainflingen in de buurt van
Frankfurt aan de Main door een DCF-77 (77,5 kHz) frequentiesignaal uitgezonden met een bereik van ongeveer 1500 km.
SEASON – Radiografisch weerstation
Uw zendergestuurde klok ontvangt dit signaal en zet het om in de precieze tijd. Zelfs de overgang van zomer- naar wintertijd
gebeurt automatisch. Gedurende de zomertijd verschijnt DST op het display. De kwaliteit van de ontvangst hangt in belangrijke mate af van de geografische ligging. Normaliter zouden er binnen een straal van 1.500 km rondom Frankfurt geen ontvangstproblemen mogen zijn.
Let dan op de volgende stappen:
• De afstand van mogelijke storingsbronnen zoals computerbeeldschermen of tv-toestellen dient tenminste 1,5 à 2 meter te zijn.
• In ruimten met gewapend beton (kelders, torenflats) wordt het signaal uiteraard verzwakt ontvangen. In extreme gevallen is
het aan te bevelen, het toestel dichter bij het raam te zetten en / of u draait het apparaat om een beter ontvangst te verkrijgen.
• 's Nachts zijn atmosferische storingen over het algemeen minder ernstig en is ontvangst in de meeste gevallen wel mogelijk.
Eén enkel ontvangst per dag is voldoende om de tijdsafwijking onder 1 seconde te houden.
7. Achtergrondverlichting
• Opmerking: een continue achtergrondverlichting werkt alleen met een netadapter.
• Voorinstelling voor de achtergrondverlichting is HI.
• Druk op de LIGHT (HI - LOW - OFF) toets om de achtergrondverlichting te dimmen.
• Druk nog eens op de LIGHT (HI-LOW-OFF) toets om de achtergrondverlichting uit te schakelen.
• Druk op een willekeurige toets en de achtergrondverlichting gaat kort aan (bij batterijvoeding).
8. Bediening
• Druk op de LIGHT toets, om de instelmodus te verlaten. Het apparaat verlaat automatisch de instelmodus, als er geen toets
wordt ingedrukt.
• Houdt de + of – toets in de instelmodus ingedrukt en u komt in de snelloop.
8.1 Manuele instellingen
• Druk op de SET toets in de normaalmodus en houdt deze drie seconden ingedrukt, om in de instelmodus te komen.
• DEUTSCH (standaardinstelling) knippert op het display.
• Stel het uur met de + of – toets de taalkeuze in.
• Als u het Nederlands heeft gekozen, verschijnt nu het display in het Nederlands.
TFA_No. 35.1150_Anleitung 28.01.2019 12:01 Uhr Seite 35
Page 36

7170
SEASON – Radiografisch weerstation
• Druk nog eens op de SET toets, en u kunt zich begeven naar de weergave van de toetstoon (PIEP ON - standaardinstelling),
de ontvangst van het radiosignaal (DCF ON - standaardinstelling), de tijdzone (DCF 00H - standaardinstelling), het 12 uurof 24-uurtijdsysteem (FORMAAT 24Hr - standaardinstelling), de uren, de minuten, het jaar, de maand, de datum, de weergave van de temperatuur (TEMP °C - standaardinstelling), de weergave van de luchtdruk (LUCHTDRUK HPA - standaardinstelling), de luchtdrukwaarde (1013 hPa - standaardinstelling) en met de + of – toets instellen.
• Bevestig met de SET toets.
• Wanneer de ontvangst van het DCF signaal geslaagd is en wanneer de DCF-ontvangst geactiveerd is (ON), wordt de handmatig ingestelde tijd overschreven.
8.1.1 Taalinstelling voor de weekdagen
• In de instelmodus kunt u de taalkeuze voor de weekdag maken.
• Druk op de + of – toets.
• Op het display verschijnt: Duits (DEUTSCH), Frans (FRANCAIS), Italiaans (ITALIANO), Spaans (ESPANOL), Nederlands
(NEDERLANDS) en Engels (ENGLISH).
8.1.2 Toetstoon
• In de instelmodus kunt u met de + of de – toets de toetstoon activeren en deactiveren.
8.1.3 DCF ontvangst
• Normaal is de standaard DCF-ontvangst ingeschakeld (DCF ON) en na een succesvol ontvangst van het DCF-signaal is een
handmatige aanpassing niet nodig.
• Druk op de + of – toets in de instelmodus als u het DCF ontvangst wilt uitschakelen (DCF OFF).
• Nadat u de ontvangst gedeactiveerd heeft, moet u de tijd en de datum handmatig instellen. Op het display verschijnt geen
tijdzone.
8.1.4 Instelling van de tijdzone
• In de instelmodus kunt u met de + of – toets een correctie van de tijdzone maken (-12/+12).
• Instellen van een correctie voor de tijdzone is vereist wanneer het DCF-signaal wel kan worden ontvangen, maar de tijdzone
van de DCF tijd afwijkt (bijvoorbeeld, +1 = één uur later).
SEASON – Radiografisch weerstation
8.1.5 Instelling van het 24 uur- of het 12- uurtijdsysteem
• In de instelmodus kunt u tussen de weergave van de 24- of de 12-uurtijdsysteem kiezen.
• Druk op de + of – toets.
• Bij het 12-urensysteem verschijnt op het display AM (voor 12 h) en PM (na 12h).
8.1.6 Instelling van de temperatuureenheid
• In de instelmodus kunt u tussen de weergave van de temperatuur in °C (graden Celsius) of °F (graden Fahrenheit) kiezen.
• Druk op de + of – toets.
8.1.7 Instelling van de luchtdrukeenheid en de luchtdruk
• In de instelmodus kunt u tussen de weergave van de luchtdruk in hPA of inHg kiezen. Druk op de + of – toets.
• Bevestig met de SET toets.
• Als u de luchtdrukeenheid uitgekozen heeft, begint de luchtdrukweergave te knipperen. U kunt nu in deze tijd met de + of –
toets de waarde instellen.
• De relatieve luchtdruk geldt voor het zeeniveau en moet voor de specifieke hoogte van uw woonplaats worden ingesteld.
Informeer u over de actuele luchtdruk in uw omgeving (meteorologisch instituut, internet, opticien, geijkte weerstations
aan openbare gebouwen, luchthaven).
9. Temperatuur en luchtvochtigheid
9.1 Maximum- en minimumwaarden, dauwpunt en warmte index
• Druk op de TEMP toets in de normaalmodus.
• De maximale temperatuur en de luchtvochtigheid voor binnen en buiten sinds de laatste terugstelling worden aangetoond.
• Druk nog eens op de TEMP toets.
• De minimale temperatuur en de luchtvochtigheid voor binnen en buiten sinds de laatste terugstelling worden aangetoond.
• Druk nog eens op de TEMP toets.
• De weergave van de warmte index (voor buiten) verschijnt op het display.
• Druk nog eens op de TEMP toets.
• De weergave van het actuele dauwpunt (voor buiten) verschijnt op het display.
• Druk nog eens op de TEMP toets om het display met de actuele waarden te verkrijgen.
• Het apparaat verlaat automatisch de modus, als er geen toets wordt ingedrukt.
• De maximum- en minimumwaarden worden automatisch om middernacht teruggezet.
TFA_No. 35.1150_Anleitung 28.01.2019 12:01 Uhr Seite 36
Page 37

7372
SEASON – Radiografisch weerstation
9.1.1 Warmte index
• De warmte index verwijst naar de temperatuurgevoeligheid in combinatie met luchtvochtigheid.
9.1.2 Dauwpunt
• Warme lucht kan veel meer water, of te wel waterdamp opnemen als koude lucht. Wordt de lucht continu afgekoeld, stijgt
bij onveranderlijke absolute luchtvochtigheid de relatieve luchtvochtigheid tot 100%. Koelt de lucht verder af, wordt de
overtollige waterdamp in de vorm van druppels afgescheiden. De temperatuur, waarin dit proces begint, noemt men dauwpunt. De dauwpunttemperatuur is zo afhankelijk van de temperatuur en de relatieve luchtvochtigheid.
9.2 Trendpijlen
• De trendpijl toont u of de buitentemperatuur en de luchtvochtigheid actueel stijgt, daalt of gelijk blijft.
10. Luchtdruk
• Op het display verschijnt de relatieve luchtdruk in hPa (of inHg) en de ontwikkeling van de luchtdruk van de laatste 24 uren.
11. Weerverwachtingssymbolen
• Het radiografische weerstation gebruikt 6 verschillende weersymbolen (zonnig, halfbewolkt, bewolkt, regen, stormachtig
en sneeuwval).
• Het weerbericht via de symboolweergave heeft betrekking op een periode van 12 – 24 uur en geeft alleen een weertrend
aan. Is het bijvoorbeeld momenteel bewolkt en wordt er regen aangegeven, duidt dit niet op een verkeerd functioneren van
het apparaat, maar geeft aan, dat de luchtdruk gedaald is en u een weersverslechtering moet verwachten, waarbij het echter niet per se om regen hoeft te gaan.
• Het zonnetje wordt ook 's nachts als symbool weergegeven als er sprake is van een kraakheldere nacht.
• Het weerbeeld verandert met de seizoenen.
Lente 20.03. – 20.06.
Zomer 21.06. – 20.09.
Herfst 21.09. – 20.12.
Winter 21.12. – 19.03.
SEASON – Radiografisch weerstation
Opmerking!
Met betrekking tot de symboolvoorspelling a.u.b. opletten, want tijdens de exploitatie wordt deze nog aangepast. Het prognosesymbool is vanaf het begin actief, maar de betrouwbaarheid neemt toe door de hoeveelheid van de verzamelde gegevens.
12. Maanstand
• Het display toont u de actuele maanfasen:
13. Instelling van het alarm voor de temperatuur en luchtvochtigheid
13.1 Alarm voor de buitentemperatuur instellen
• Houdt de ALERTS toets ingedrukt in de normaalmodus.
• LO ALARM verschijnt op het display en OFF (standaardinstelling) knippert.
• Voor het activeren van het alarm drukt u op de + of – toets.
• -40°C (standaardinstelling) of de ingestelde buitentemperatuurondergrens verschijnt op het display.
• Bevestig met de ALERTS toets.
• De alarmwaarde knippert.
• Met de + of – toets kunt u de gewenste ondergrens instellen.
• Bevestig met de ALERTS toets.
• HI ALARM verschijnt op het display en OFF (standaardinstelling) knippert.
• Voor het activeren van het alarm drukt u op de + of – toets.
• 60°C (standaardinstelling) of de ingestelde buitentemperatuurbovengrens verschijnt op het display.
• Bevestig met de ALERTS toets.
• De alarmwaarde knippert.
Nieuwe maan Toenemende
maan
Halve maan
(eerste
kwartier)
Toenemende
sikkel
Volle maan Afnemende
sikkel
Halve maan
(laatste
kwartier)
Afnemende
maan
TFA_No. 35.1150_Anleitung 28.01.2019 12:01 Uhr Seite 37
Page 38

7574
SEASON – Radiografisch weerstation
• Stel de gewenste bovengrens met de + of – toetsen in.
• Bevestig met de ALERTS toets.
• Stel op dezelfde manier de boven- en de ondergrens voor de buitenluchtvochtigheid, binnentemperatuur en binnenluchtvochtigheid in.
• (Meetbereik temperatuur buiten -40…+60°C, binnen 0… +50 °C, luchtvochtigheid 10…99% rH)
13.2 Geval van een alarm
• In het geval van een alarm knippert het juiste symbool en u hoort een alarmsignaal.
• Het alarm kunt u met een willekeurige toets beëindigen. Het alarmsymbool knippert door totdat de gemeten waarde weer
binnen de ingestelde alarmgrens ligt.
14. Plaatsen en bevestigen van het basisapparaat en de buitenzender
• Met de uitklapbare standaard aan de achterkant kunt u het apparaat in drie positie op effen oppervlakken plaatsen. A.u.b.
stevig met beide duimen drukken totdat de standaard correct klikt en dit ook te horen is.
• U kunt het basisapparaat met het ophangoog aan de muur bevestigen. Vermijd de nabijheid van andere elektrische apparaten (televisie, computer, radiografische telefoons) en massieve metalen voorwerpen.
• U kunt de buitenzender op effen oppervlakken plaatsen of met het ophangoog aan de muur bevestigen. Zoek een tegen
regen beschermde plaats uit voor de buitenzender. (direct zonlicht vervalst de meetwaarden en continue vochtigheid belast
de elektronische componenten onnodig).
• Controleer of een overdracht van de meetwaarden van de buitenzender op de gewenste opstellingsplaats naar het basisapparaat plaatsvindt (reikwijdte vrij veld ca. 80 m), massieve wanden, in het bijzonder met metalen delen, kunnen de reikwijdte van de buitenzender aanzienlijk beperken.
• Zoek eventueel een nieuwe plaats voor de buitenzender en/of het basisapparaat.
15. Schoonmaken en onderhoud
• Maak de apparaten met een zachte, enigszins vochtige doek schoon. Geen schuur- of oplosmiddelen gebruiken!
• Verwijder de batterijen en trek de stekker uit het stopcontact als u de apparaten langere tijd niet gebruikt.
15.1 Batterijwissel
• Wanneer het batterijsymbool wordt weergegeven in het display van de buitenwaarden, vervang de batterijen in de buitenzender.
SEASON – Radiografisch weerstation
• Vervang de batterijen in het basisapparaat als het batterijsymbool op het display van de binnenwaarden verschijnt.
• Attentie: bij een batterijwissel moet het contact tussen de zender en het basisapparaat weer worden hersteld – dus altijd
beide apparaten opnieuw volgens de handleiding in bedrijf stellen of handmatig de buitenzender zoeken.
16. Storingswijzer
Probleem Oplossing
Geen indicatie Netbedrijf:
op het basisapparaat ➜ Aansluiten van het basisapparaat met stroomadapter
➜ Druk op de LIGHT toets om de achtergrondverlichting te activeren.
➜ Stroomadapter controleren
Batterijvoeding:
➜ Batterijen met de juiste poolrichtingen plaatsen
➜ Achtergrondverlichting kort activeren met een zelf uitgekozen toets
➜ Vervang de batterijen
Geen buitenzender ➜ Geen buitenzender geïnstalleerd
ontvangst ➜ Batterijen van de buitenzender controleren (geen accu’s gebruiken!)
Indicatie „---” ➜ Buitenzender en basisapparaat opnieuw volgens de handleiding in bedrijf stellen
➜ Handmatige zoeken van de buitenzender volgens de handleiding starten
➜ Zoek een nieuwe plaats voor de buitenzender en/of het basisapparaat
➜ Afstand tussen buitenzender en basisapparaat verminderen
➜ Verwijder stoorbronnen
Geen correcte indicatie ➜ Vervang de batterijen
➜ Factory reset: Om de fabrieksinstellingen te handhaven, houdt gelijktijdig de ALERTS en
LIGHT toets op het basisapparaat 5 seconden ingedrukt. Alle instellingen worden verwijderd.
Indicatie HI LO ➜ Waarden buiten het meetbereik
TFA_No. 35.1150_Anleitung 28.01.2019 12:01 Uhr Seite 38
Page 39

7776
SEASON – Radiografisch weerstation
18. Verwijderen
Dit product is vervaardigd van hoogwaardige materialen en onderdelen, die kunnen worden gerecycled en hergebruikt.
Batterijen en accu's mogen niet met het huisvuil worden weggegooid. Als consument bent u wettelijk verplicht
om gebruikte batterijen en accu's bij uw dealer af te geven of naar de daarvoor bestemde containers volgens de
nationale of lokale bepalingen te brengen om een milieuvriendelijk verwijderen te garanderen.
De benamingen van de zware metalen zijn: Cd=cadmium, Hg=kwikzilver, Pb=lood
Dit apparaat is gemarkeerd in overeenstemming met de EU-richtlijn (WEEE) over het verwijderen van elektrisch en
elektronisch afval.
Dit product mag niet met het huisvuil worden weggegooid. De gebruiker is verplicht om de apparatuur af te
geven bij een als zodanig erkende plek van afgifte voor het verwijderen van elektrische en elektronische apparatuur om een milieuvriendelijk verwijderen te garanderen.
19. Technische gegevens
Meetbereik binnen
Temperatuur 0 °C… +50 °C (+32…+99 °F)
Luchtvochtigheid 10 %rH...99 %rH
Resolutie temperatuur 0,1 °C
Resolutie luchtvochtigheid 1%
Precisie temperatuur ±1°C (0….+50°C)
Precisie luchtvochtigheid ±5% (30%...80% rH) @25°C
Meetbereik buiten
Temperatuur -40°C…..+60°C (-40…+140 °F)
Luchtvochtigheid 10 %rH...99 %rH
Resolutie temperatuur 0,1 °C
Resolutie luchtvochtigheid 1%
Precisie temperatuur ±1°C (0….+50°C)
Precisie luchtvochtigheid ±5% (20%...90% rH) @25°C
Reikwijdte Maximaal 80 meter (vrije veld)
SEASON – Radiografisch weerstation
Transmissie frequentie 433 MHz
Maximaal radiofrequentie
vermogen uitgezonden < 10mW
Spanningsvoorziening
Basisapparaat Batterijen 3 x 1,5 V AA (niet inclusief)
Stroomadapter: Input 230-240 50hz 50mA / Output: 5.0 V 150mA DC
Buitenzender Batterijen 2 x 1,5 V AA (niet inclusief)
Basisapparaat
Afmetingen 175 x 32 (84) x 165 mm
Gewicht 333 g (alleen het apparaat)
Buitenzender
Afmetingen 40 x 21 x 130 mm
Gewicht 47 g (alleen het apparaat)
Deze gebruiksaanwijzing of gedeelten eruit mogen alleen met toestemming van TFA Dostmann worden gepubliceerd. De technische gegevens van dit apparaat zijn actueel bij het ter perse gaan en kunnen zonder voorafgaande informatie worden gewijzigd.
De nieuwste technische gegevens en informatie over uw product kunt u vinden door het invoeren van het artikelnummer op onze homepage.
EU-conformiteitsverklaring
Hierbij verklaar ik, TFA Dostmann, dat het type radioapparatuur 35.1150 conform is met Richtlijn 2014/53/EU. De volledige tekst van de EU-conformiteitsverklaring kan worden geraadpleegd op het volgende internetadres:
www.tfa-dostmann.de
E-Mail: info@tfa-dostmann.de
TFA Dostmann GmbH & Co.KG, Zum Ottersberg 12, D-97877 Wertheim, Duitsland 01/19
TFA_No. 35.1150_Anleitung 28.01.2019 12:01 Uhr Seite 39
Page 40

7978
SEASON – Estación meteorológica inalámbrica
Muchas gracias por haber adquirido este dispositivo de TFA.
1. Antes de utilizar el dispositivo
• Lea detenidamente las instrucciones de uso.
De este modo se familiarizará con su nuevo dispositivo, conocerá todas las funciones y componentes, así como información relevante para la puesta de funcionamiento el manejo del dispositivo y recibirá consejos sobre cómo actuar en caso
de avería.
• Si sigue las instrucciones de uso, evitará que se produzcan daños en el dispositivo y no comprometerá a sus derechos
por vicios, previstos legalmente debido a un uso incorrecto.
• No asumimos responsabilidad alguna por los daños originados por el incumplimiento de estas instrucciones de uso.
Del mismo modo, no nos hacemos responsables por cualquier lectura incorrecta y de las consecuencias que pueden
derivarse de tales.
• Tenga en cuenta ante todo las advertencias de seguridad.
• Guarde estas instrucciones de uso en un sitio seguro.
2. Entrega
• Estación meteorológica inalámbrica (estación base)
• Enchufe de alimentación de red
• Emisor exterior (Cat.-No. 30.3206.02)
• Instrucciones de uso
3. Ámbito de aplicación y ventajas de su nuevo dispositivo
• Temperatura y humedad exterior sin cable (433 MHz), con rango de hasta 80 m (campo libre)
• Temperatura interior y humedad del ambiente
• Pronóstico con imagen meteorológica a color (cambia con las estaciones)
• Presión atmosférica relativa y gráfico de la presión atmosférica (24 horas)
• Indicación de tendencias
• Alarma de temperatura y humedad del aire
• Función MAX/MIN con reposición automático
• Punto de rocío e índice de calor
• Reloj radiocontrolado con fecha y día de la semana escrito con todas las letras (6 idiomas)
• Pantalla a color con dos niveles de brillo (en funcionamiento continuo con adaptador de red)
SEASON – Estación meteorológica inalámbrica
4. Para su seguridad
• El producto solo es adecuado para el ámbito de aplicación descrito anteriormente. No emplee el dispositivo de modo distinto al especificado en estas instrucciones.
• No está permitido realizar reparaciones, transformaciones o modificaciones por cuenta propia en el dispositivo.
¡Precaución!
¡Peligro de muerte por descarga eléctrica!
• Conecte la estación base solamente a una toma de corriente instalada según las prescripciones con una tensión de alimentación de 230 V. La toma de corriente debe estar instalada cerca del equipo y tener un fácil acceso.
• La toma de corriente debe estar instalada cerca del equipo y tener un fácil acceso.
• El dispositivo y la fuente de alimentación no deben tener contacto con el agua ni la humedad. Sólo para el uso en lugares
secos bajo techo.
• No utilice el dispositivo si la carcasa o el enchufe de alimentación están dañados.
• Mantenga el dispositivo fuera de alcance de las personas (también niños) que no puedan evaluar los riesgos con el manejo
de dispositivos eléctricos.
• Extraiga el enchufe inmediatamente de la toma de corriente si se produce perturbación o si no va a utilizar el dispositivo
por un largo periodo de tiempo.
• Utilice únicamente el enchufe de alimentación suministrado.
• Conecte primero el cable a la estación base y inserte después el enchufe de alimentación de red en la toma de corriente.
• No tire del cable del enchufe de alimentación para extraer el enchufe de la toma de corriente.
• Coloque el cable de alimentación de manera que no tenga contacto con objetos de cantos afilados o calientes.
¡Precaución!
Riesgo de lesiones:
• Mantenga los dispositivos y las pilas fuera del alcance de los niños.
• Las pilas contienen ácidos nocivos para la salud y pueden ser peligrosas si se ingieren. Si se ingiere una pila le puede causar dentro de 2 horas, quemaduras internas y llegar a la muerte. Si sospecha que se ha ingerido una pila o ha entrado en el
cuerpo de otro modo, busque inmediatamente ayuda médica.
• No tire las pilas al fuego, no las cortocircuite, desmonte ni recargue, ya que existe riesgo de explosión.
TFA_No. 35.1150_Anleitung 28.01.2019 12:01 Uhr Seite 40
Page 41

8180
SEASON – Estación meteorológica inalámbrica
• Las pilas con un estado de carga bajo deben cambiarse lo antes posible para evitar fugas. No utilice simultáneamente pilas
nuevas y usadas o pilas de diferente tipo. Utilice guantes protectores resistentes a productos químicos y gafas protectoras
si manipula pilas con fugas de líquido!
¡Advertencias importantes sobre la seguridad del producto!
• No exponga el dispositivo a temperaturas extremas, vibraciones ni sacudidas extremas.
• El emisor está protegido contra las salpicaduras de agua, pero no es estanco al agua. Puede utilizar el transmisor en zona
externa, busque un lugar sombreado y protegido de la lluvia.
5. Componentes
5.1 Estación meteorológica (estación base)
A: Indicación de pantalla (Fig. 1):
A 1: Flecha de tendencia temperatura exterior A 2: Símbolo de pila para el emisor
A 3: Temperatura exterior A 4: Símbolo de radio emisor exterior
A 5: Símbolos de alarma HI/LO A 6: Humedad exterior
A 7: Flecha de tendencia humedad exterior A 8: Símbolo de pila para la estación base
A 9: Temperatura y humedad interior A 10: Hora
A 11: Símbolo DST A 12: Símbolo de recepción DCF
A 13: Día de la semana A 14: Fase de la luna
A 15: Presión atmosférica relativa A 16: Fecha
A 17: Gráfico de la presión atmosférica de las últimas 12 horas
A 18: Indicación de las estaciones A 19: Símbolos meteorológicos
A 20: Indicador de tendencia
B: Teclas (Fig. 2):
B 1: Tecla ALERTS B 2: Tecla TEMP
B 3: Tecla SEARCH B 4: Tecla +
B 5: Tecla – B 6: Tecla SET
B 7: Tecla LIGHT
SEASON – Estación meteorológica inalámbrica
C: Cuerpo (Fig. 2):
C 1: Colgadores para pared C 2: Compartimento de las pilas
C 3: Soporte (desplegable de 3 etapas) C 4: Conexión de la alimentación de red
C 5: Guía para el cable
5.2 Emisor exterior (Fig. 3):
D 1: Luz de control LED D 2: Compartimento de las pilas
D 3: Tecla TX en el compartimento para las pilas D 4: Colgador para pared
6. Puesta en marcha
• Coloque la estación base y el emisor sobre una mesa a una distancia de 1,5 metros aprox. entre sí. Evite las fuentes de
interferencias próximas (dispositivos electrónicos y sistemas de radio).
• Conecte la estación base con el adaptador de alimentación suministrado. Ponga el enchufe de conexión en la estación base
y conecte el dispositivo con el enchufe de alimentación a la red ¡Importante! Asegúrese de que el voltaje de la línea no es
más de 240 V! Otras tensiones pueden dañar el dispositivo.
• Se emite una señal acústica corta y todos los segmentos se muestran brevemente.
• En la pantalla aparecen la temperatura interna y la humedad del aire.
6.1 Introducir las pilas en la estación base
• Las pilas actúan como pilas de respaldo en caso de un corte de energía.
• Para una iluminación de fondo permanente y para conservar la energía de las pilas, use el enchufe de alimentación de red
incluido.
• Abra el compartimento de las pilas situado en la parte posterior de la estación base.
• Introduzca tres pilas nuevas 1,5 V AA. Asegúrese que las pilas estén colocadas con la polaridad correcta.
• Cierre de nuevo el compartimento de las pilas.
6.2 Introducir las pilas en el emisor exterior / recepción de los valores externos
• Deslice la tapa del compartimento de las pilas del emisor exterior hacia abajo.
• Introduzca dos pilas nuevas 1,5 V AA en el compartimento de las pilas del emisor exterior. Asegúrese que las pilas estén
colocadas con la polaridad correcta.
TFA_No. 35.1150_Anleitung 28.01.2019 12:01 Uhr Seite 41
Page 42

8382
SEASON – Estación meteorológica inalámbrica
• Después de introducir las pilas, los datos de medición del sensor exterior se transmiten a la estación base. La lámpara de
control LED parpadea.
• En cuanto la estación base ha recibido los valores externos, la temperatura y humedad exterior aparecen permanentemente.
• Si no se recibe los valores externos dentro de tres minutos, aparece en la pantalla “- -”. Compruebe las pilas y inicie un
nuevo intento. Elimine las posibles fuentes de interferencia.
• Una vez que la estación base ha recibido la hora controlada por radio, puede comenzar la inicialización manualmente. Mantenga pulsada la tecla SEARCH durante tres segundos. La estación base intenta de recibir los valores medidos.
• Con la tecla TX puede transmitir manualmente los valores medidos.
6.3 Recepción de la señal de radio
• Después de la recepción de los valores externos el reloj está ahora tratando de recibir la señal de radio y el símbolo de
recepción DCF parpadea.
• Una vez que se ha recibido el código de horario después 3-10 minutos se muestra la hora controlada por radio y el símbolo de recepción DCF aparece constantemente en la pantalla.
• La recepción de la señal DCF se llevará a cabo diariamente a las 1.00 y 2:00 de la mañana. Si la recepción del reloj a las
3.00 no tiene éxito, el siguiente intento de recepción se llevará a cabo de nuevo a las 4:00 y 5:00 de la mañana.
• También puede activar la señal DCF manualmente.
• Pulse la tecla SEARCH.
• El símbolo de recepción DCF parpadea.
• Hay tres tipos de símbolos recibidos:
parpadea – recepción activa
se detiene – recepción exitosa
ninguna símbolo – Ninguna recepción de DCF / recepción desactivada
• Si su reloj radiocontrolado no es capaz de recibir la señal DCF (p. ej, debido a interferencias, distancia de transmisión,
etc.), puede ajustar la hora manualmente.
• El reloj funciona como un reloj normal de cuarzo (véase Ajustes manuales).
SEASON – Estación meteorológica inalámbrica
6.4 Recepción de la hora radiocontrolada
La transmisión de la hora se realiza por medio de un reloj atómico de cesio radiocontrolado a través de, por el instituto técnico físico de Braunschweig. La desviación es menor a 1 segundo en un millón de años. La hora viene codificada y es transmitida desde Mainflingen en las proximidades de Frankfurt am Main por una señal de frecuencia DCF-77 (77,5 kHz) con un
alcance de aprox. 1.500 km. Su reloj radiocontrolado recibe la señal, la convierte y muestra siempre la hora exacta. Incluso el
cambio de la hora de verano e invierno se produce automáticamente. Durante el tiempo de verano aparece DST en la pantalla.
La recepción depende básicamente de la situación geográfica. Generalmente éste debería funcionar de forma óptima en un
radio de 1.500 km en torno a Frankfurt.
Por favor, tenga en cuenta lo siguiente:
• Es recomendable mantener una distancia de como mínimo 1,5 – 2 metros de posibles aparatos perturbadores tales como
pantallas de ordenadores y televisores.
• En construcciones de hormigón armado (sótanos, superestructuras), la señal recibida es evidentemente más débil. En casos
extremos se aconseja de emplazar el dispositivo cerca de una ventana para obtener una mejor recepción.
• Por las noches las perturbaciones atmosféricas suelen ser reducidas y se dispone de recepción en la mayoría de los casos. Si
además se recibe como mínimo una vez al día, es suficiente para garantizar la precisión y mantener desviaciones inferiores a
1 segundo.
7. Iluminación de fondo
• Atención: ¡La iluminación de fondo en funcionamiento permanente, solo funciona con enchufe de alimentación!
• HI es el nivel preseleccionado para la iluminación de fondo.
• Pulse la tecla LIGHT (HI-LOW-OFF) una vez (LOW) para atenuar la iluminación de fondo.
• Pulse la tecla LIGHT (HI-LOW-OFF) otra vez (OFF) para desactivar la iluminación de fondo.
• Para activar brevemente la iluminación de fondo pulse una tecla cualquiera (sólo con funcionamiento a pilas).
8. Manejo
• Pulse la tecla LIGHT para abandonar el modo de ajuste. El dispositivo sale automáticamente del modo de ajuste si no se
presiona ninguna tecla durante un largo tiempo.
• Mantenga pulsada la tecla + o – en el modo de ajuste, accederá a la pasada rápida.
TFA_No. 35.1150_Anleitung 28.01.2019 12:01 Uhr Seite 42
Page 43

8584
SEASON – Estación meteorológica inalámbrica
8.1 Ajustes manuales
• Mantenga pulsada la tecla SET en modo normal durante tres segundos para acceder al modo de ajuste.
• DEUTSCH (nivel preseleccionado) parpadea en la pantalla.
• Con la tecla + o – puede seleccionar el idioma para el día de la semana.
• Si ha seleccionado español, la pantalla aparecerá ahora en español.
• Pulse otra vez la tecla SET y puede sucesivamente dirigir el tono de tecla (PITIDO ON - nivel preseleccionado), la recepción
de DCF (ON - nivel preseleccionado), la indicación de la zona horaria (DCF 00H - nivel preseleccionado), el sistema
12 horas o 24 horas (FORMATO 24Hr - nivel preseleccionado), las horas, los minutos, el año, el mes, la fecha y la visualización de la temperatura (TEMP °C - nivel preseleccionado), la indicación de la presión atmosférica (PRESION HPA - nivel
preseleccionado) y el valor de la presión atmosférica (1013 hPa - nivel preseleccionado) y puede ajustar con la tecla + o –.
• Confirme la entrada con la tecla SET.
• Si la recepción de la señal de radio para la hora DCF es exitosa y la recepción ésta activada (DCF ON), el tiempo ajustado
manualmente se sobrescribe.
8.1.1 Ajuste del idioma para el día de la semana
• En el modo de ajuste puede seleccionar el idioma para el día de la semana.
• Pulse la tecla + o –.
• En la pantalla aparece: alemán (DEUTSCH), francés (FRANCAIS), italiano (ITALIANO) español (ESPANOL), holandés
(NEDERLANDS) y inglés (ENGLISH).
8.1.2 Tono de tecla
• En el modo de ajuste puede activar o desactivar el tono de tecla con la tecla + o –.
8.1.3 Recepción de la señal de radio DCF
• De manera predeterminada, la recepción DCF es activada (DCF ON) y después de la recepción exitosa de la señal DCF no es
necesario un ajuste manual.
• En el modo de ajuste pulse la tecla + o – si desea desactivar la recepción de radio (DCF OFF).
• Con la recepción desactivada debe ajustar la hora y la fecha manualmente. No aparece ninguna zona horaria.
SEASON – Estación meteorológica inalámbrica
8.1.4 Ajuste de la zona horaria
• En el modo de ajuste puede ajustar la corrección de la zona horaria (-12/+12) con la tecla + o –.
• La corrección de la zona horaria es necesaria cuando se puede recibir la señal DCF, la zona horaria es diferente de la hora
DCF (por ejemplo: +1 = una hora más tarde).
8.1.5 Ajuste de la indicación de sistema de 24 y 12 horas
• En el modo de ajuste puede seleccionar el sistema de 12 o 24 horas.
• Pulse la tecla + o –.
• En el sistema de 12 horas, aparece en la pantalla AM (antes del mediodía) y PM (después del mediodía).
8.1.6 Ajuste de la unidad de la temperatura
• En el modo de ajuste puede seleccionar entre la indicación de la temperatura en °C (grados Celsius) o °F (grados Fahrenheit).
• Pulse la tecla + o –.
8.1.7 Ajuste de la unidad y el valor de la presión atmosférica
• En el modo de ajuste puede seleccionar entre la indicación de la presión atmosférica en hPA o inHg. Pulse la tecla + o –.
• Confirme la entrada con la tecla SET.
• Si ha seleccionado la unidad de la presión relativa atmosférica, el valor de presión atmosférica comienza a parpadear.
Puede ajustar el valor con la tecla + o – durante este tiempo.
• La presión atmosférica relativa hace referencia a la altura del nivel del mar y se debe ajustar a su altura del lugar donde
vive. Averiguar la presión del aire actual del entorno (valor de la Oficina meteorológica local, en farmacias, ópticas, Internet, estaciones meteorológicas contrastadas en edificios públicos, en aeropuertos).
9. Temperatura y humedad del aire
9.1 Valores máximos y mínimos, punto de rocío e índice de calor
• Pulse la tecla TEMP en el modo normal.
• El valor máximo de la temperatura y humedad interior y exterior tras la última reposición al estado inicial se muestran.
• Pulse de nuevo la tecla TEMP.
• El valor mínimo de la temperatura y humedad interior y exterior tras la última reposición al estado inicial se muestran.
TFA_No. 35.1150_Anleitung 28.01.2019 12:01 Uhr Seite 43
Page 44

8786
SEASON – Estación meteorológica inalámbrica
• Pulse de nuevo la tecla TEMP.
• La indicación del índice de calor (para el exterior) se visualiza en la pantalla.
• Pulse de nuevo la tecla TEMP.
• La temperatura actual del punto de rocío (para el exterior) se visualiza en la pantalla.
• Pulse otra vez la tecla TEMP para volver a la indicación de los valores actuales.
• El dispositivo sale automáticamente del modo si no se presiona ninguna tecla.
• Los valores máximos y mínimos, se restablecen automáticamente a medianoche.
9.1.1 Índice de calor
• El índice de calor se refiere a la sensibilidad a la temperatura en combinación con la humedad.
9.1.2 Punto de rocío
• El aire caliente puede absorber mucha más agua o vapor que el aire frio. Si se enfría el aire de forma continuada la humedad relativa del aire aumenta hasta el 100%, siendo la humedad absoluta del aire invariable. Si el aire se sigue enfriándose
el vapor de agua excesivo se eliminará en forma de gotas. La temperatura a la que comienza este proceso se denomina
punto de rocío. Por lo tanto la temperatura del punto de rocío depende de la temperatura y de la humedad relativa.
9.2 Flecha de tendencia
• La flecha de tendencia le indica si la temperatura y la humedad exterior actual suben, bajan o se mantienen igual.
10. Presión atmosférica
• En la pantalla aparecen la presión atmosférica relativa en hPa (o inHg) y el gráfico de la presión atmosférica (24 horas).
11. Símbolos meteorológicos
• La estación meteorológica distingue entre 6 diferentes símbolos meteorológicos (soleado, parcialmente nubloso, cubierto,
lluvioso, tempestuoso y nieve).
• La previsión a través de los símbolos hace referencia a un periodo de 12-24 horas y indica únicamente una tendencia
meteorológica. Si, por ejemplo, actualmente está nublado y se indica lluvia, eso no indicia un mal funcionamiento del dispositivo, sino que la presión atmosférica ha bajado y se está esperando un empeoramiento del tiempo, lo que necesariamente no debe significar que sea lluvia.
SEASON – Estación meteorológica inalámbrica
• El símbolo del sol también se muestra de noche cuando se trata de una noche estrellada.
• La imagen meteorológica a color cambia con las estaciones.
Primavera 20.03. – 20.06.
Verano 21.06. – 20.09.
Otoño 21.09. – 20.12.
Invierno 21.12. – 19.03.
Nota:
Tenga en cuenta que el símbolo de pronóstico sea preciso durante el curso de la operación. El símbolo de pronóstico está
activo desde el principio, sin embargo, la fiabilidad de los pronósticos aumenta con la cantidad de datos recopilados
12. Fase de la luna
• La pantalla le indica las fases actuales de la luna:
13. Ajuste de la alarma para la temperatura y humedad del aire
13.1 Ajustar la alarma de la temperatura exterior
• Mantenga pulsada la tecla ALERTS en el modo normal.
• LO ALARMA se muestra en la pantalla y OFF parpadea.
• Para activar la función de la alarma, pulse la tecla + o –.
• -40 °C (nivel preseleccionado) o el último ajuste del límite inferior de la temperatura exterior se indica en la pantalla.
• Confirme la entrada con la tecla ALERTS.
Luna nueva Luna
creciente
Media luna
(primer
cuarto)
Cuarto
creciente
Luna llena Cuarto
menguante
Media luna
(último
cuarto)
Luna
menguante
TFA_No. 35.1150_Anleitung 28.01.2019 12:01 Uhr Seite 44
Page 45

8988
SEASON – Estación meteorológica inalámbrica
• El valor de la alarma parpadea.
• Ajuste con la tecla + o – el límite inferior deseado.
• Confirme la entrada con la tecla ALERTS.
• HI ALARMA se muestra en la pantalla y OFF parpadea.
• Para activar la función de la alarma, pulse la tecla + o –.
• 60 °C (nivel preseleccionado) o el último ajuste del límite superior de la temperatura exterior se indica en la pantalla.
• Confirme la entrada con la tecla ALERTS.
• El valor de la alarma parpadea.
• Ajuste con la tecla + o – el límite superior deseado.
• Confirme la entrada con la tecla ALERTS.
• Introduzca del mismo modo el límite superior y inferior para la humedad exterior, la temperatura y la humedad interior.
• (Rango de medida temperatura exterior -40…+60°C, temperatura interior 0… +50 °C, humedad del aire 10…99% rH)
13.2 Caso de alarma
• En caso de alarma el símbolo correspondiente parpadea y suena una señal acústica corta.
• Finalice la alarma con cualquier tecla. El símbolo de la alarma sigue parpadeando hasta que el valor medido vuelva a estar
dentro de los límites de alarma.
14. Instalación de la estación base y fijación del emisor
• Con el soporte despegable de 3 etapas en el lado posterior de la estación base, se puede colocar sobre una superficie
plana. Pulse firmemente con los dos pulgares hasta que el soporte quede bien encajado y se oiga un clic.
• Con las anillas de suspensión en el lado posterior puede fijar la estación base en la pared. Evite la proximidad a otros dispositivos eléctricos (televisores, ordenadores, radioteléfonos) y objetos metálicos macizos.
• Se puede colocar el emisor exterior sobre una superficie plana o fijarlo con anillas de suspensión en la pared. Busque un
lugar sombreado y protegido de la lluvia para poner el emisor externo. (La irradiación solar directa falsea los valores de
medición y la humedad permanente perjudica innecesariamente los componentes electrónicos).
• Compruebe si se produce la transmisión de los valores medidos del emisor externo en el lugar de instalación deseado para
la estación base (alcance en campo libre hasta 80 metros), con paredes macizas, especialmente con piezas metálicas
puede reducirse considerablemente el alcance del emisor.
• Busque posiblemente un lugar nuevo para el emisor exterior y / o estación base.
SEASON – Estación meteorológica inalámbrica
15. Cuidado y mantenimiento
• Limpie los dispositivos con un paño suave, ligeramente humedecido. No utilice productos abrasivos o disolventes!
• Extraiga las pilas y extraiga el enchufe inmediatamente de la toma de corriente si no va a usar los dispositivos por un largo
período de tiempo.
15.1 Cambio de las pilas
• En cuanto aparezca en la pantalla de los valores externos el símbolo de pila, cambie las pilas del emisor exterior.
• En cuanto aparezca en la pantalla de los valores internos el símbolo de la pila, cambie las pilas de la estación base.
• Atención: Al cambiar las pilas, debe volver a establecerse el contacto entre el emisor exterior y el receptor; por esta razón,
deben introducirse pilas nuevas en ambos dispositivos o iniciarse una búsqueda manual de emisor.
16. Averías
Problema Solución
Ninguna indicación Funcionamiento a red:
de estación base ➜ Conectar la estación base con la fuente de alimentación
➜ Activar la iluminación de fondo con la tecla LIGHT
➜ Compruebe el enchufe de la red
Funcionamiento a pilas:
➜ Asegúrese que las pilas estén colocadas con la polaridad correcta
➜ Activar brevemente la iluminación de fondo con una tecla cualquiera
➜ Cambiar las pilas
Ninguna recepción ➜ Ningún emisor exterior instalado
de emisor ➜ Comprobar las pilas del emisor exterior (¡No utilizar baterías!)
Indicación "---" ➜ Vuelva a la puesta en marcha del emisor exterior y la estación base de acuerdo a las
instrucciones
➜ Iniciar la búsqueda manual para el emisor exterior
➜ Elegir otro lugar para el emisor exterior y/o la estación base
➜ Reducir la distancia entre el emisor exterior y la estación base
➜ Elimine las fuentes de interferencia
TFA_No. 35.1150_Anleitung 28.01.2019 12:01 Uhr Seite 45
Page 46

9190
SEASON – Estación meteorológica inalámbrica
Indicación incorrecta ➜ Cambiar las pilas
➜ Factory reset: Para mantener el ajuste de fábrica, mantenga pulsada al mismo tiempo la
tecla ALERTS y LIGHT a la estación base durante 5 segundos. Todos los ajustes se borrarán.
Indicación HI LO ➜ Valores están fuera del rango
18. Eliminación
Este producto ha sido fabricado usando materiales y componentes que pueden ser reciclados y reusados.
Las pilas y baterías no pueden desecharse en ningún caso junto con la basura doméstica.
Como consumidor, está obligado legalmente a depositar las pilas y baterías usadas de manera respetuosa con
el medio ambiente en el comercio especializado o bien en los centros de recogida y reciclaje previstos para ello
según el reglamento nacional o local.
Las denominaciones de los metales pesados que contienen son: Cd=cadmio, Hg=mercurio, Pb=plomo
Este dispositivo está identificado conforme a la Directiva de la UE sobre residuos de aparatos eléctricos y electró-
nicos (WEEE).
No deseche este producto junto con la basura doméstica. El usuario está obligado a llevar el dispositivo usado a
un punto de recogida de aparatos eléctricos y electrónicos acreditado para que sea eliminado de manera respetuosa con el medio ambiente.
19. Datos técnicos
Gama de medición interior
Temperatura 0 °C… +50 °C (+32…+99 °F)
Humedad del aire 10 %rH...99 %rH
Resolución de la temperatura 0,1°C
Resolución de la humedad del aire 1%
Precisión de la temperatura ±1°C (0….+50°C)
Precisión de la humedad del aire ±5% (30%...80% rH) @25°C
SEASON – Estación meteorológica inalámbrica
Gama de medición exterior
Temperatura -40°C…+60 °C (-40 °F…+140°F)
Humedad del aire 10 %rH...99 %rH
Resolución de la temperatura 0,1°C
Resolución de la humedad del aire 1%
Precisión de la temperatura ±1°C (0….+50°C)
Precisión de la humedad del aire ±5% (20%...90% rH) @25°C
Alcance Máximo de 80 m (campo libre)
Frecuencia de transmisión 433 MHz
Potencia máxima de
radiofrecuencia transmitida < 10mW
Alimentación de tensión
Estación base Pilas 3 x 1,5 V AA (no incluidas)
Adaptador de red: Input 230-240 50hz 50mA / Output: 5.0 V 150mA DC
Emisor exterior Pilas 2 x 1,5 V AA (no incluidas)
Estación base
Dimensiones del cuerpo 175 x 32 (84) x 165 mm
Peso 333 g (solo dispositivo)
Emisor exterior
Dimensiones del cuerpo 40 x 21 x 130 mm
Peso 47 g (solo dispositivo)
TFA_No. 35.1150_Anleitung 28.01.2019 12:01 Uhr Seite 46
 Loading...