

Page 1
Kat.Nr.: 14.1550.01
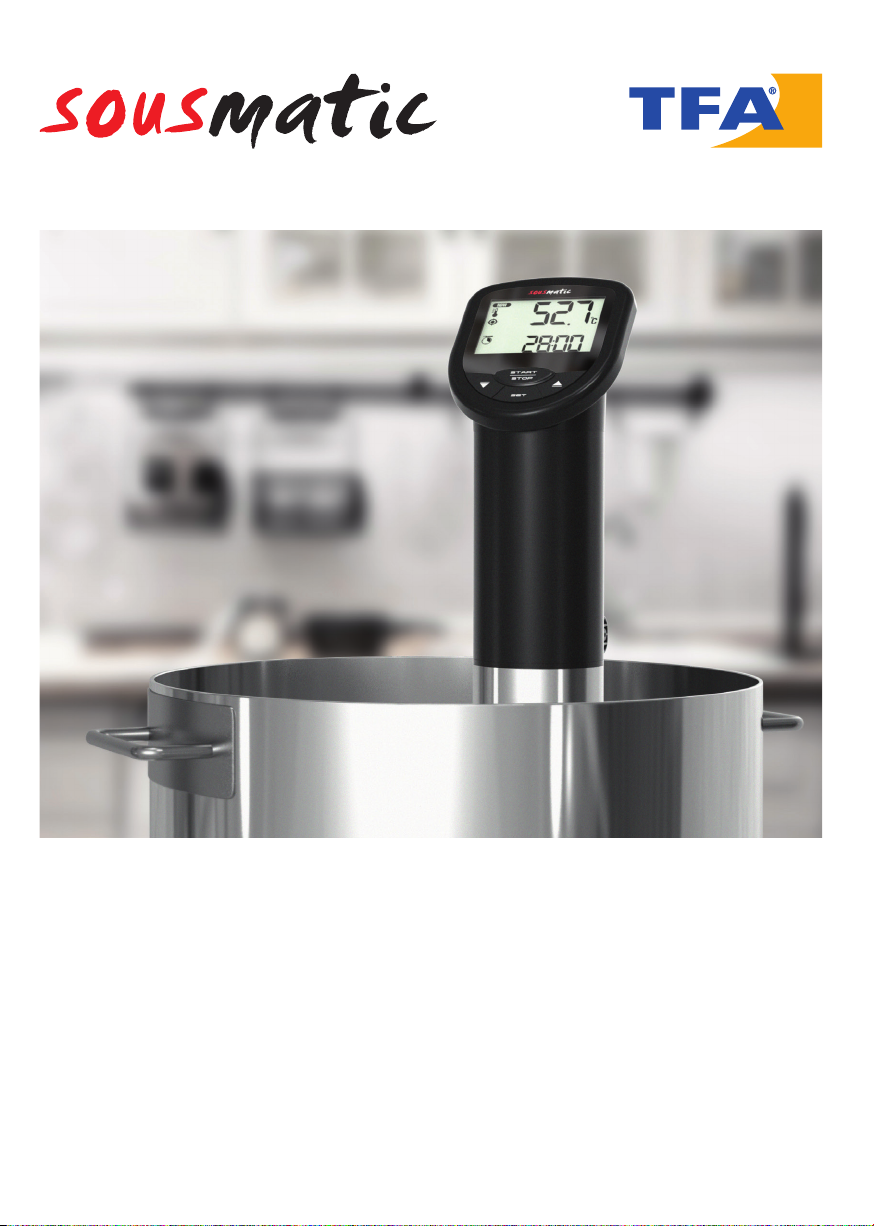
Sousmatic Sous-Vide Garer
Sousmatic Sous-Vide Cooker
Sousmatic Cuiseur Sous Vide
Sousmatic Sous-Vide Koker
Sousmatic Fornello per Cottura Sottovuoto
Sousmatic Cocedor Sous-Vide
Page 2
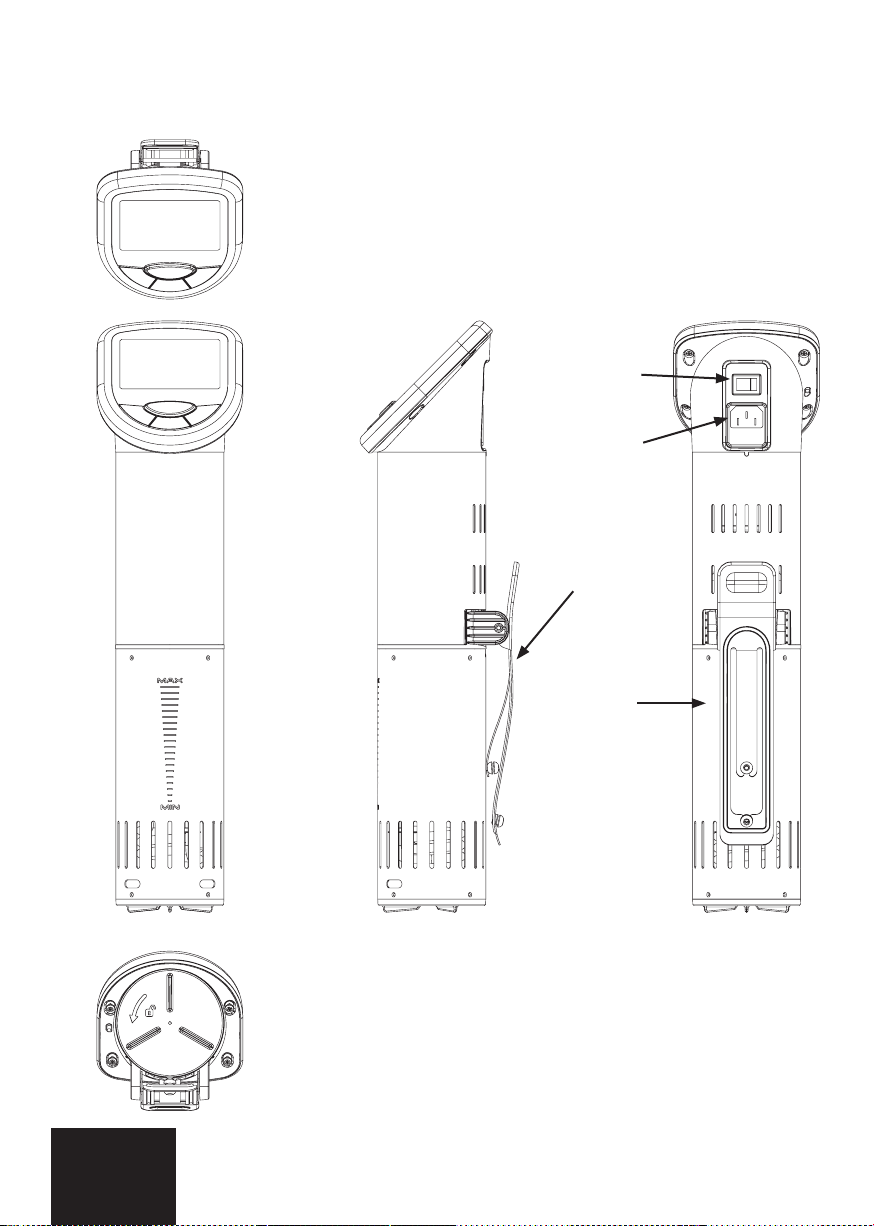
Fig. 01
D
A
B
2
C
Page 3

Fig. 02
D
C
A
B
E
F
H
K
I O P Q
N
G
M
L
3
Page 4
Bedienungsanleitung
Sousmatic Sous-Vide Garer
Kat.-Nr. 14.1550.01
Vielen Dank, dass Sie sich für dieses Gerät aus dem Hause TFA entschieden haben.
Bevor Sie mit dem Gerät arbeiten
Lesen Sie sich bitte die Bedienungsanleitung genau durch.
So werden Sie mit Ihrem neuen Gerät vertraut, lernen alle Funktionen und Bestandteile kennen, erfahren wichtige
Details für die Inbetriebnahme und den Umgang mit dem Gerät und erhalten Tipps für den Störungsfall.
Durch die Beachtung der Bedienungsanleitung vermeiden Sie auch Beschädigungen des Gerätes und die
Gefährdung Ihrer gesetzlichen Mängelrechte durch Fehlgebrauch. Für Schäden, die aus Nichtbeachtung dieser
Bedienungsanleitung verursacht werden, übernehmen wir keine Haftung.
Beachten Sie besonders die Sicherheitshinweise!
Bewahren Sie diese Bedienungsanleitung gut auf!
Lieferumfang:
• Sousmatic Sous-Vide Garer
• Abnehmbare Edelstahl-Schutzhülle
• Abnehmbare Halterung
• Netzteil
Einsatzbereich und alle Vorteile Ihres neuen Gerätes auf einen Blick:
Sous-Vide ist eine Garmethode, bei der Fleisch, Fisch oder Gemüse schonend im Wasserbad bei einer konstant
niedrigen Temperatur zubereitet werden, typischerweise bei 45 bis 85 Grad.
Die rohen Zutaten werden vorher in einem Vakuumbeutel oder einem geeigneten Gefrierbeutel vakuumiert und
versiegelt. Je nach Gusto können Kräuter und Gewürze hinzugegeben werden. So entweicht keine Flüssigkeit, alles wird
saftig, zart, aromatisch und perfekt gegart mit 100 Prozent Geling-Garantie.
Zu Ihrer Sicherheit:
• Das Produkt ist ausschließlich für den oben beschriebenen Einsatzbereich geeignet. Verwenden Sie das Produkt
nicht anders, als in dieser Anleitung dargestellt wird.
• Das eigenmächtige Reparieren, Umbauen oder Verändern des Gerätes ist nicht gestattet.
• Das Gerät nur mit Original-Zubehörteilen, unter Aufsicht und mit reinem Leitungswasser betreiben.
• Da beim Sous-Vide-Garen mit niedrigen Temperaturen gearbeitet wird, ist Hygiene und schnelle Verarbeitung der
Produkte erforderlich. Unterschreiten Sie nicht die in Ihrem Rezept angegebenen Temperaturen und Garzeiten.
Zur abschließenden Kontrolle der Kerntemperatur empfehlen wir ein Bratenthermometer
(z.B. TFA 14.1002.60.90).
Vorsicht! Lebensgefahr durch Stromschlag!
• Überprüfen Sie das Gerät und das Netzteil vor der Inbetriebnahme und jeder Nutzung auf Mängel und
Beschädigungen, die die Funktionssicherheit des Gerätes beeinträchtigen könnten. Benutzen Sie das Gerät nicht,
wenn Gehäuse oder Netzteil beschädigt sind.
4
Page 5

• Schließen Sie das Gerät nur an eine vorschriftsmäßig installierte Steckdose mit einer Netzspannung von 220 240V an!
• Das Netzteil darf nicht mit Wasser oder Feuchtigkeit in Kontakt kommen.
• Das Gerät bitte nur bis zur Markierung (MAX) mit Wasser in Berührung kommen lassen.
• Bewahren Sie das Gerät außerhalb der Reichweite von Personen (auch Kindern) auf, die mögliche Gefahren im
Umgang mit elektrischen Geräten nicht richtig einschätzen können.
• Ziehen Sie sofort den Netzstecker aus der Steckdose, wenn eine Störung auftritt, nach jedem Gebrauch und vor
der Reinigung.
• Verwenden Sie ausschließlich das mitgelieferte Netzteil.
• Ziehen Sie den Netzstecker nicht am Kabel aus der Steckdose.
• Verlegen Sie das Netzkabel so, dass es nicht mit scharfkantigen oder heißen Gegenständen in Berührung kommt.
Vorsicht!
Verletzungsgefahr:
• Die Kunststoff-Oberächen, das Wasser, der Behälter und das Gargut können bei und nach dem Betrieb heiß
sein, Verbrennungsgefahr! Daher nur mit geeigneten Schutzhandschuhen anfassen.
• Nicht die Metallteile, insbesondere den Tauchsieder und den Propeller berühren.
• Verwenden Sie ein geeignetes Gefäß, in dem das Gerät einen stabilen Stand hat, Kippgefahr!
• Immer mit der Schutzhülle betreiben.
! Wichtige Hinweise zur Produktsicherheit!
• Setzen Sie das Gerät keinen extremen Temperaturen, Vibrationen und Erschütterungen aus.
• Tauchen Sie nicht das komplette Gerät ins Wasser, sonst kann Feuchtigkeit in das Gerät eindringen und zu
Fehlfunktionen führen. Nicht in der Spülmaschine reinigen.
• Betreiben Sie das Gerät auf einer wasserunempndlichen, wärmebeständigen, ebenen Fläche.
• Betreiben Sie das Gerät nicht auf heißen Oberächen (z.B. Herdplatten).
• Verwenden Sie nur hochwertige Vakuumbeutel, die auch erhitzt werden dürfen.
Bestandteile
(siehe Seite 2 und 3)
Gehäuse
Fig.01-A: Anschluss für Netzteil auf der Rückseite des Gerätes
Fig.01-B: Halterung auf der Rückseite des Gerätes
Fig.01-C: Schutzhülle
Display
Fig.02-A: NOW = Indikator aktuelle Temperatur
Fig.02-B: Thermometer-Symbol = aktuelle Temperatur
Fig.02-C: Aktuelle Temperatur in °C
Fig.02-D: Warnsymbol = niedriger Wasserstand
Fig.02-E: Ziel-Symbol = Zieltemperatur genau erreicht
Fig.02-F: TARGET = Indikator Zieltemperatur
Fig.02-G: Rundumlaufendes Symbol = Gerät aktiviert
Fig.02-H: Timer-Symbol = Zeitdauer
Fig.02-I: Uhren-Symbol = Zeitverzögerung
Fig.02-K: Thermometer-Symbol = Zieltemperatur
Fig.02-L: Stopp-Symbol = Gerät schaltet sich aus
Fig.02-M: Zieltemperatur in °C/ Zeitverzögerung/Kochdauer Std./ Min.
5
Page 6

Tasten
Fig.01-D: Roter Ein- und Ausschalter auf der Rückseite des Gerätes
Fig.02-N: q Taste
Fig.02-O: START/STOP Taste
Fig.02-P: TIMER Taste
Fig.02-Q: p Taste
Inbetriebnahme
Reinigen Sie das Gerät vor dem ersten Gebrauch äußerlich mit einem feuchten Lappen.
Stellen Sie einen Topf, einen Kunststoffbehälter oder ein anderes geeignetes hitzebeständiges Gefäß auf
eine ebene, stabile und temperaturbeständige Unterlage und befestigen Sie das Gerät mit dem Halter an der
Topfwand. Die abnehmbare Halterung verfügt über zwei Spannstufen, je nachdem in welche Aussparung diese
eingerastet wird.
Stecken Sie den Anschlussstecker in den Anschluss und schließen Sie das Gerät mit dem Netzstecker am
Stromnetz an. Wichtig! Stellen Sie sicher, dass Ihre Netzspannung nicht mehr als 240 V beträgt! Andere
Netzspannungen können zur Beschädigung des Gerätes führen.
Füllen Sie Wasser in den Topf zwischen der Markierung MIN und MAX.
Legen Sie den vakuumierten Beutel mit dem Gargut ein. Achten Sie darauf, dass der Wasserstand
die MAX-Markierung nicht überschreitet.
ACHTUNG!
Sinkt der Wasserstand unter die MIN-Markierung, ertönt ein Dauersignalton, im Display werden das
Stopp- und das Warnsymbol angezeigt und das Gerät schaltet sich sofort aus.
Stellen Sie den roten Schalter auf der Rückseite des Gerätes auf EIN.
Der rote Schalter leuchtet.
Alle Segmente werden kurz angezeigt.
Im Display erscheinen oben die Symbole NOW, ein Thermometer und die aktuelle
Temperatur, unten erscheinen die Symbole TARGET, ein Thermometer und 70,0°C (Voreinstellung) blinken.
Auswahl des Kochmodus
Einfaches Kochen
Stellen Sie mit der q oder p Taste die gewünschte Zieltemperatur ein.
Drücken Sie die START/STOP Taste, um den Kochprozess zu starten.
Das Gerät schaltet sich ein und ein rundumlaufendes Symbol erscheint in der Mitte des Displays.
Ist die eingestellte Temperatur genau erreicht, erscheint das Ziel-Symbol im Display.
Kochen mit Zeitdauer
Drücken Sie die TIMER Taste. Das Timer-Symbol erscheint.
Das Thermometer-Symbol und 70,0°C (Voreinstellung) blinken. Stellen Sie mit der q oder p Taste die
gewünschte Zieltemperatur ein.
Drücken Sie die START/STOP Taste zur Bestätigung.
Das Timer-Symbol und 0:05 min (Voreinstellung) blinken. Stellen Sie mit der q oder p Taste in 5er-Schritten
die gewünschte Zeitdauer für den Kochprozess ein.
Drücken Sie die START/STOP Taste zur Bestätigung.
Drücken Sie die START/STOP Taste noch einmal, um den Kochprozess für die gewünschte Zeitdauer zu starten.
Das Gerät schaltet sich ein und ein rundumlaufendes Symbol erscheint in der Mitte des Displays.
Ist der Kochprozess beendet, ertönt ein Alarm und das Stopp-Symbol erscheint. Das Gerät schaltet sich
automatisch aus.
6
Page 7

Kochzeitprogrammierung
Drücken und halten Sie die TIMER Taste für zwei Sekunden. Das Timer-Symbol und das Uhren-Symbol erscheinen.
Das Thermometer-Symbol und 70,0°C (Voreinstellung) blinken. Stellen Sie mit der q oder p Taste die
gewünschte Zieltemperatur ein.
Drücken Sie die START/STOP Taste zur Bestätigung.
Das Uhren-Symbol und 0:05 min (Voreinstellung) blinken. Stellen Sie mit der q oder p Taste in 5er-Schritten
die Zeitverzögerung ein, mit der der Kochprozess beginnen soll.
Drücken Sie die START/STOP Taste zur Bestätigung.
Das Timer-Symbol und 0:05 min (Voreinstellung) blinken. Stellen Sie mit der q oder p Taste in 5er-Schritten
die gewünschte Zeitdauer für den Kochprozess ein.
Drücken Sie die START/STOP Taste zur Bestätigung.
Drücken Sie die START/STOP Taste zur Aktivierung.
Das Uhren-Symbol und ein rundumlaufendes Symbol erscheinen und die Zeitanzeige zählt im Minutentakt
rückwärts bis zum Start.
Nach Ablauf der Zeit schaltet sich das Gerät automatisch ein.
Ist der Kochprozess beendet, ertönt ein Alarm und das Stopp-Symbol erscheint im Display. Das Gerät schaltet sich
automatisch aus.
Während des Kochprozesses
Fragen Sie mit der q oder p Taste die verbleibende Zeitverzögerung/Kochdauer und die Zieltemperatur ab.
Zum Anhalten und erneuten Starten drücken Sie die START/STOP-Taste.
Um den Kochprozess zu beenden und alle Einstellungen zu löschen, drücken und halten Sie die START/STOP-
Taste für 2 Sekunden.
Nach dem Kochprozess:
Entnehmen Sie vorsichtig das Gargut aus dem Wasser.
Schalten Sie das Gerät nach Gebrauch aus.
Nach dem Gebrauch den Netzstecker ziehen, das Gerät abkühlen lassen und reinigen.
Pege und Wartung
Reinigen Sie das Gerät mit einem weichen, leicht feuchten Tuch. Keine Scheuer- oder Lösungsmittel verwenden!
Drehen Sie gegebenenfalls die Schutzhülle gegen den Uhrzeigersinn ab (siehe Markierung auf der Bodenplatte).
Bewahren Sie das Gerät an einem trockenen Platz auf.
Entkalken Sie den Tauchsieder und den Propeller von Zeit zu Zeit mit einem handelsüblichen Entkalker.
Entsorgung
Dieses Produkt wurde unter Verwendung hochwertiger Materialien und Bestandteile hergestellt, die recycelt und
wiederverwendet werden können.
Dieses Gerät ist entsprechend der EU-Richtlinie über die Entsorgung von Elektro- und Elektronik-Altgeräten
(WEEE) gekennzeichnet.
Dieses Produkt darf nicht mit dem Hausmüll entsorgt werden. Der Nutzer ist verpichtet, das Altgerät zur
umweltgerechten Entsorgung bei einer ausgewiesenen Annahmestelle für die Entsorgung von Elektro- und
Elektronikgeräten abzugeben.
7
Page 8

Technische Daten
Temperaturbereich 40°C…95°C
Temperatur-Stabilität +/-0,1°C bei 60°C
Pumpleistung Ca. 11 l pro Minute
Wassermenge 25 Liter
Zirkulation der Wassermenge 360°
Betriebsspannung 220 – 240 V (EU)
Timer Bis zu 99 Std.
Wärmeleistung 1000 Watt
Spannungsversorgung Netzstecker 220 - 240 V
Gehäusemaße 108 x 112 x 435 mm
Gewicht 1450 g (nur das Gerät)
TFA Dostmann GmbH & Co.KG, Zum Ottersberg 12, D-97877 Wertheim.
Diese Anleitung oder Auszüge daraus dürfen nur mit Zustimmung von TFA Dostmann veröffentlicht werden. Die
technischen Daten entsprechen dem Stand bei Drucklegung und können ohne vorherige Benachrichtigung geändert
werden. Die neuesten technischen Daten und Informationen zu Ihrem Produkt nden Sie unter Eingabe der Artikel-
Nummer auf unserer Homepage. www.tfa-dostmann.de
01/16
8
Page 9

Instruction manual
Sousmatic Sous-Vide Cooker
Cat.-No. 14.1550.01
Thank you for choosing this device from TFA.
Before you use this product
Please make sure you read the instruction manual carefully.
This information will help you to familiarize yourself with your new device, to learn all of its functions and parts, to nd
out important details about its rst use and how to operate it and to get advice in the event of a malfunction.
Following and respecting the instructions in your manual will prevent damage to your instrument and loss of your
statutory rights arising from defects due to incorrect use. We shall not be liable for any damage occurring as a
result of non following of these instructions.
Please take particular note of the safety advice!
Please keep this instruction manual safe for future reference.
Delivery contents
Sousmatic Sous-Vide Cooker
Removable stainless steel protective cover
Removable support
AC/DC power adaptor
Field of operation and all the bene ts of your new device at a glance.
Sous vide is a food preparation method where meat, sh or vegetables are cooked gently
in a water bath at a constant low temperature, typically between 45 and 85 degrees celsius.
The raw ingredients are rst vacuum packed and sealed in a vacuum sealer bag or a suitable freezer bag. The food can
be seasoned or have herbs added prior to cooking. This prevents moisture from escaping and everything comes out
succulent, tender, aromatic and perfectly cooked with a 100% guarantee of success.
For your safety:
This product is exclusively intended for the range of application described above. The product should only be
used as described within these instructions.
Unauthorized repairs, alterations or changes to the product are prohibited.
Operate the device only with its genuine accessories, under supervision at all times and always use
clean tap water.
As vacuum cooking is processed at low temperatures, hygiene and quick processing of the food are essential. Do
not go below the temperatures and duration times as indicated in your recipe!
Use a meat thermometer for the nal control of the core temperature (e.g. TFA 14.1002.60.90).
Caution!
Risk of electrocution!
Before the rst operation and before every use check the main body including the power cord thoroughly for any
defects, which may have adverse effects on the operational safety of the device. Do not use the device if the
housing or the power adapter are damaged.
9
Page 10

Plug the device only into a socket installed according to safety regulations and with amains voltage
of 220 - 240V!
The AC/DC power adaptor must not come into contact with water or moisture.
The device should only come into contact with water up to the MAX marking.
Keep the device out of reach of persons (including children) who cannot fully appreciate the potential risks of
handling electrical equipment.
Always remove the plug from the wall socket in case of any malfunction, after each use and before cleaning.
Only use the supplied power adapter.
Do not pull the plug out of the socket by its cable.
Route the mains cable so it does not come into contact with sharp-edged or hot objects.
Caution!
Risk of injury:
The plastic surfaces, the water, the container and the cooked food can be hot during and after operation. Risk of
burns! Only touch with suitable protective gloves.
Do not touch the metal parts, in particular the immersion heater and the propeller.
Use a suitable container that guarantees a stable position of the device, danger of tilting!
Always operate with the protective cover.
Important information on product safety!
Do not expose your device to extreme temperatures, vibrations or shocks.
Do not immerse the device completely in water. Water can penetrate and cause malfunction. Not suitable for
dishwasher.
Operate the device on a heat and water resistant at surface.
Do not operate the device on hot surfaces (such as hotplates).
Use only high quality vacuum sealer bags suitable for heating.
Elements
(see page 2 and 3)
Housing
Fig.01-A: Socket for power adaptor at the back of instrument
Fig.01-B: Support at the back of instrument.
Fig.01-C: Protective cover
Display
Fig.02-A: NOW = icon current temperature
Fig.02-B: Thermometer symbol = current temperature
Fig.02-C: Current temperature in ° C
Fig.02-D: Warning symbol = low water level
Fig.02-E: Target symbol = exact target temperature is reached
Fig.02-F: TARGET = icon target temperature
Fig.02-G: Circular symbol = device activated
Fig.02-H: Timer symbol = cooking time
Fig.02-I: Clock symbol = time delay
Fig.02-K: Thermometer symbol = target temperature
Fig.02-L: Stop symbol = device switches off
Fig.02-M: Target temperature in ° C / delay / cooking time in hrs. / min.
10
Page 11

Buttons
Fig.01-D: Red main power switch ON-OFF at the back of instrument.
Fig.02-N: q button
Fig.02-O: START/STOP button
Fig.02-P: TIMER button
Fig.02-Q: p button
Getting started
Clean the device outside surface with a soft damp cloth before the rst use.
Place a cooking pot, a plastic or another suitable heat resistant container on a at, stable and heat resistant
surface. Fasten the device support on the side of the pot. The removable bracket has two clamping levels,
depending on the gap which it is latched.
Insert the power adapter pin into the device jack and connect the plug to a wall socket. Important! Make sure
that your household voltage is not more than 240V! Otherwise your device may be damaged.
Fill the pot with water. The water level should be between the MIN and MAX markings.
Place the vacuum sealer bag containing the food into the device. Ensure that the water level does not go over the
MAX marking.
Attention:
If the water level falls below the MIN marking, a permanent alert will sound, the warning symbol and the stop
symbol appear in the display and the instrument will turn off immediately.
Slide the red switch on the back of the instrument to the position „ON“.
The red switch lights up.
All segments will be displayed briey.
The icon NOW, the thermometer symbol and the current temperature appear at the top part of the display; on the
bottom part appear the icon TARGET, the thermometer symbol and the temperature (70,0°C default) ashes.
Select cooking mode
Simple cooking
Press the q or p button to set the desired target temperature.
Press the START/STOP button to start the cooking process.
The instrument turns on and a circular symbol will appear in the middle of the display.
When the exact target temperature is reached, the target symbol appears in the display.
Cooking with time duration
Press the TIMER button. The timer symbol appears on the display.
The thermometer symbol and 70,0°C (default) ashes. Press the q or p button to set the desired target
temperature.
Press the START/STOP button to conrm.
The timer symbol and 0:05 min. (default) ashes. Press the q or p button to set the desired time duration for
the cooking process.
Press the START/STOP button to conrm.
Press the START/STOP button again to start the cooking process with the desired time duration.
The instrument turns on and the circular symbol appears in the middle of the display.
After the cooking is nished, an alarm sounds and the stop symbol appears. The device will turn off automatically.
11
Page 12

Cooking time programming (with timer delay)
Press and hold the TIMER button for two seconds. The timer and the clock symbols appear.
The thermometer symbol and 70,0°C (default) ashes. Press the q or p button to set the desired target
temperature.
Press the START/STOP button to conrm.
The clock symbol and 0:05 min. (default) ashes. Press the q or p button to set the time delay for the cooking
process in steps of 5 minutes each.
Press the START/STOP button to conrm.
The timer symbol and 0:05 min. (default) ashes. Press the q or p button to set the desired time duration for
the cooking process.
Press the START/STOP button to conrm.
Press the START/STOP button again to activate the process.
The clock symbol and the circular symbol appear and the time display counts down the minutes.
After time has expired, the instrument will automatically switch on.
After the cooking process is nished, an alarm sounds and the stop symbol appears. The instrument will
automatically switch off.
During the cooking process
Press the q or p button to check the remaining delay time/cooking time and target temperature.
You can stop and restart the cooking process with the START/STOP button.
Press and hold the START/STOP button for 2 seconds to nish the cooking process and reset all settings.
After nishing the cooking process
Take the cooked food carefully out of the water.
Turn off the instrument after each use.
Pull the plug out of the socket, let the instrument cool down and clean it straight after.
Care and maintenance
Clean the device with a soft damp cloth. Do not use solvents or scouring agents. If necessary, turn the protective
cover counter-clockwise to remove it (see marking on the bottom).
Keep the device in a dry place.
Descale the immersion heater and the propeller from time to time with a commercially available descaler.
Waste disposal
This product has been manufactured using high-grade materials and components which can be recycled and reused.
This product is labelled in accordance with the EU Waste Electrical and Electronic Equipment Directive
(WEEE).
Please do not dispose of this product with ordinary household waste. As a consumer, you are required
to take end-of-life devices to a designated collection point for the disposal of electrical and electronic
equipment, in order to ensure environmentally-compatible disposal.
12
Page 13

Specications
Temperature range
Temperature stability
Pump performance Approx. 11 l per minute
Water capacity
Circulation
Operating voltage
Timer Up to 99 hrs.
Heat capacity
Power consumption Power adapter 220 - 240 V
Housing dimension
Weight
TFA Dostmann GmbH & Co. KG, Zum Ottersberg 12, D - 97877 Wertheim
No part of this manual may be reproduced without written consent of TFA Dostmann. The technical data are correct at
the time of going to print and may change without prior notice. The latest technical data and information about your
product can be found by entering your product number on our homepage.
01/16
40°C…95°C
+/-0,1°C bei 60°C
25 litre
360°
220 – 240V (EU)
1000 Watt
108 x 112 x 435 mm
1450 g (device only)
13
Page 14

Mode d‘emploi
Sousmatic Cuiseur Sous Vide
N de l‘art. 14.1550.01
Nous vous remercions d‘avoir choisi l‘appareil de la Société TFA.
Avant d‘utiliser votre appareil
Veuillez lire attentivement le mode d‘emploi.
Vous vous familiariserez ainsi avec votre nouvel appareil, vous découvrirez toutes les fonctions et tous les éléments qui
le composent, vous noterez les détails importants relatifs à sa mise en service et vous lirez quelques conseils en cas
de dysfonctionnement.
En respectant ce mode d‘emploi, vous éviterez d‘endommager votre appareil et de perdre vos droits légaux en cas
de défaut si celui-ci résulte d’une utilisation non-conforme. Nous n‘assumons aucune responsabilité pour des
dommages qui auraient été causés par le non-respect du présent mode d‘emploi.
Suivez bien toutes les consignes de sécurité!
Conservez soigneusement le mode d‘emploi!
Contenu de la livraison:
Sousmatic Cuiseur Sous Vide
Gaine de protection amovible en acier inoxydable
Fixation amovible
Adaptateur secteur
Aperçu du domaine d‘utilisation et de tous les avantages de votre nouvel appareil:
La cuisson sous vide est une méthode permettant de cuire la viande, le poisson ou les légumes au bain marie, à
faible température constante, généralement entre 45 et 85 degrés. Les aliments à cuire sont préalablement mis
sous vide, dans un sac de conservation sous vide ou un sachet pour congélation adapté. Les aliments peuvent être
accompagnés d’herbes et d’épices. Le sachet hermétique permet aux aliments de conserver toute leur texture juteuse,
leur tendreté, leurs arômes et assure une cuisson parfaite, avec 100 % de chances de réussite.
Pour votre sécurité:
Le produit est destiné uniquement à l‘utilisation décrite ci-dessus. N‘utilisez jamais l’appareil à d‘autres ns
que celles décrites dans le présent mode d‘emploi.
Vous ne devez en aucun cas réparer, démonter ou modi er l‘appareil par vous-même.
N’utilisez l’appareil qu’avec ses accessoires d’origine, sous surveillance et avec de l’eau pure du robinet
La cuisson sous vide se faisant à basse température, l’hygiène et la cuisson rapide des aliments sont
essentielles. Les températures et heures de cuisson indiquées dans votre recette sont des limites inférieures à
ne pas dépasser!
Pour contrôler nalement la température à cœur, nous recommendons d‘utiliser un thermomètre de cuisson
(par ex. TFA 14.1002.60.90).
Attention! Danger de choc électrique!
Avant la mise en service et toute utilisation, véri ez soigneusement que l’appareil et l’adaptateur secteur ne
présentent aucun signe de détérioration qui pourrait avoir un effet néfaste sur la sécurité de fonctionnement de
l’appareil. N’utilisez pas l’appareil si le boîtier ou l’adaptateur secteur sont endommagés.
14
Page 15

Branchez l’appareil uniquement sur une prise de courant réglementaire ayant une tension de
secteur de 220 - 240V !
L’adaptateur secteur ne doit pas entrer en contact avec de l’eau ou de l’humidité.
Ne plongez l’appareil dans l’eau que jusqu’au marquage (MAX).
Conservez le produit hors de la portée de personnes (enfants compris) inaptes à évaluer les risques possibles
liés au maniement d’appareils électriques.
Retirez immédiatement la che de la prise en cas de défaut, après chaque usage ou avant le nettoyage.
Utilisez uniquement l’adaptateur secteur fourni.
Pour débrancher, tirez sur la che et non sur le cordon d’alimentation.
Placez le cordon d’alimentation de sorte qu’il n’entre pas en contact avec des objets tranchants ou chauds.
Attention!
Danger de blessure
Les surface en plastique, l‘eau, la casserole et les aliments à cuire peuvent être brûlantes pendant et après
l’utilisation, danger de brûlure! Ne les saisissez-donc qu’avec des gants de cuisine adaptés.
Ne pas toucher les parties en métal, surtout le thermoplongeur et l’hélice.
Utilisez une casserole appropriée, permettant une position stable à l‘appareil. Danger, l‘appareil pourrait
autrement basculer!
Toujours utiliser avec la gaine de protection.
! Conseils importants de sécurité du produit!
Évitez d’exposer l’appareil à des températures extrêmes, à des vibrations ou à des chocs.
N‘immergez pas l‘appareil entièrement dans l‘eau car de l‘humidité pourrait y pénétrer et causer des
dysfonctionnements. Votre instrument ne peut pas être lavé au lave-vaisselle.
Utilisez l’appareil sur une surface plane, résistant à la chaleur et à l’humidité.
N’utilisez pas l’appareil sur des surfaces brûlantes (par ex. plaque de cuisson).
N’utilisez que des sacs sous vide de haute qualité résistant à la cuisson.
Composants
(voir page 2 et 3)
Boîtier
Fig.01-A: Prise pour l’adaptateur secteur au dos de l’appareil
Fig.01-B: Fixation au dos de l’appareil
Fig.01-C: Gaine de protection
Afchage
Fig.02-A: Icône NOW = Indicateur température actuelle
Fig.02-B: Symbole de thermomètre = Température actuelle
Fig.02-C: Température actuelle en °C
Fig.02-D: Symbole d’avertissement = Niveau d’eau insufsant
Fig.02-E: Symbole de cible = Température souhaitée est atteinte
Fig.02-F: Icône TARGET = Indicateur température souhaitée
Fig.02-G: Symbole tournant = Appareil allumé
Fig.02-H: Symbole de minuteur = Durée de cuisson
Fig.02-I: Symbole d’horloge = Démarrage différé
Fig.02-K: Symbole de thermomètre = Température souhaitée
Fig.02-L: Symbole stop = L’appareil s’éteint
Fig.02-M: Température souhaitée en °C / démarrage différé / durée de cuisson en h / min.
15
Page 16

Touches
Fig.01-D: Interrupteur rouge au dos de l’appareil
Fig.02-N: Touche q
Fig.02-O: Touche START/STOP
Fig.02-P: Touche TIMER
Fig.02-Q: Touche p
Mise en service
Nettoyez les parties extérieures de l’appareil avant la première utilisation avec un chiffon humide.
Placez une casserole, un récipient en plastique ou un autre récipient résistant à la chaleur sur une surface plane,
stable et résistant à la chaleur et xez l’appareil avec sa xation sur le bord de la casserole. La xation amovible
permet deux niveaux de serrage suivant l’encoche dans laquelle elle est clipsée.
Branchez le connecteur sur la prise du réveil et branchez-le au secteur avec l‘adaptateur secteur. Important! Une
tension de réseau de plus de 240 V pourrait endommager votre appareil. Une autre tension de réseau pourrait
également endommager votre appareil.
Remplissez la casserole d’eau en veillant à ce que le niveau soit entre les marquages MIN et MAX.
Placez le sac de cuisson sous vide rempli des aliments à cuire dans l’eau. Veillez à ce que le niveau ne dépasse
pas le marquage MAX.
Attention!
Si le niveau d’eau descend en dessous du marquage MIN, un signal sonore retentit, l’écran afche le symbole stop et le
symbole d’avertissement et l‘appareil s‘arrête immédiatement.
Placez l’interrupteur au dos de l’appareil sur la position „marche“.
L‘interrupteur rouge s‘allume.
Tous les segments s‘allument brièvement.
L‘icône NOW, un symbole de thermomètre et la température actuelle apparaissent sur l‘afchage supérieur,
l‘icône TARGET, un sur l‘afchage inférieur apparaisset symbole de thermomètre et
70,0°C (par défaut) clignotent.
Choix du mode de cuisson
Cuisson simple
Réglez la température souhaitée avec la touche q ou p.
Appuyez sur la touche START/STOP pour démarrer le processus de cuisson.
L’appareil s’allume et un symbole tournant apparaît au milieu sur l‘écran.
Lorsque la température souhaitée est atteinte exactement, le symbole de cible apparaît sur l‘écran.
Cuisson avec minuteur
Appuyez sur la touche TIMER. Le symbole de minuteur apparaît sur l‘écran.
Un symbole de thermomètre et 70,0°C (par défaut) clignotent. Réglez la température souhaitée avec
la touche q ou p.
Appuyez sur la touche START/STOP pour conrmer.
Le symbole de minuteur et 0:05 min. (par défaut) clignotent. Réglez avec la touche q ou p par écarts de 5 la
durée de cuisson souhaitée.
Appuyez sur la touche START/STOP pour conrmer.
Appuyez une deuxième fois sur la touche START/STOP pour démarrer le processus de cuisson pour la durée de
temps souhaitée
L’appareil s’allume et un symbole tournant apparaît au milieu sur l‘écran.
Lorsque le temps s’est écoulé, un signal sonore retentit et le symbole stop s’afche. L’appareil s’éteint
automatiquement.
16
Page 17

Programmation de l’horaire de cuisson
Appuyez sur la touche TIMER pendant deux secondes. Les symboles de minuteur et de l‘horloge apparaissent.
Le symbole de thermomètre et 70,0°C (par défaut) clignotent. Réglez la température souhaitée avec la touche
q ou p.
Appuyez sur la touche START/STOP pour conrmer.
Le symbole d’horloge et 0:05 min. (par défaut) clignotent. Réglez avec la touche q ou p par écarts de 5 le
temps de retard du démarrage de la cuisson.
Appuyez sur la touche START/STOP pour conrmer.
Le symbole de minuteur et 0:05 min. (par défaut) clignotent. Réglez avec la touche q ou p par écarts de 5 la
durée de cuisson souhaitée.
Appuyez sur la touche START/STOP pour conrmer.
Appuyez sur la touche START/STOP pour activer l‘appareil.
Le symbole d’horloge et un symbole tournant apparaissent et l’écran afche le compte à rebours jusqu’au
démarrage de la cuisson.
Une fois cette durée écoulée, la cuisson démarre automatiquement.
Lorsque le temps de cuisson s’est écoulé, un signal sonore retentit et le symbole stop s’afche. L‘appareil
s‘arrête automatiquement.
Pendant le processus de cuisson
Afchez le reste du temps de retard / temps de cuisson et la température souhaitée en appuyant sur la touche
q ou p.
Appuyez sur la touche START/STOP pour arrêter et redémarrer.
Pour interrompre le processus de cuisson et effacer tous les réglages, appuyez pendant 2 secondes sur la touche
START/STOP.
Après la cuisson:
Retirez délicatement le sac de cuisson de l’eau.
Eteignez votre appareil après chaque utilisation.
Débranchez le cordon d’alimentation après usage, laissez refroidir l’appareil et nettoyez-le.
Entretien et maintenance
Pour le nettoyage de votre appareil, utilisez un chiffon doux et humide. N’utilisez pas de solvants
ou d‘agents abrasifs! Dévissez la gaine de protection éventuellement dans le sens contraire d‘horloge (voir
marcage sur la dalle de base).
Conservez votre appareil dans un endroit sec.
Détartrez régulièrement le thermoplongeur et l’hélice avec un produit ménager anti-calcaire.
Traitement des déchets
Ce produit a été fabriqué avec des matériaux de haute qualité qui peuvent être recyclés et réutilisés.
Cet appareil est conforme aux normes de l‘UE relatives au traitement des déchets électriques et
électroniques (WEEE).
L‘appareil usagé ne doit pas être jeté dans les ordures ménagères. L’utilisateur s’engage, pour le respect
de l’environnement, à déposer l’appareil usagé dans un centre de traitement agréé pour les déchets
électriques et électroniques.
17
Page 18

Caractéristiques techniques
Plage de température
Stabilité de température +/-0,1°C à 60°C
Puissance de la pompe Env. 11 litres par minute
Quantité d’eau
Circulation de la quantité d’eau
Tension d’alimentation
Minuteur Jusqu‘à 99 heures
Puissance calorique
Alimentation Adaptateur secteur 220 - 240 V
Dimensions du boîtier
Poids 1450 g (appareil seulement)
TFA Dostmann GmbH & Co.KG, Zum Ottersberg 12, D-97877 Wertheim.
La reproduction, même partielle, du présent mode d‘emploi est strictement interdite sans l‘accord explicite de TFA
Dostmann. Les caractéristiques techniques de ce produit ont été actualisées au moment de l‘impression et peuvent
être modiées sans avis préalable. Les dernières données techniques et les informations concernant votre produit
peuvent être consultées en entrant le numéro de l‘article sur notre site.
01/16
40°C…95°C
25 litres
360°
220 – 240 V EU
1000 Watt
108 x 112 x 435 mm
18
Page 19

Gebruiksaanwijzing
Sousmatic Sous-Vide Koker
Cat.-Nr. 14.1550.01
Hartelijk dank dat u voor dit apparaat van de rma TFA hebt gekozen.
Voordat u met het apparaat gaat werken,
leest u a.u.b. de gebruiksaanwijzing aandachtig door.
Zo raakt u vertrouwd met uw nieuw apparaat en leert u alle functies en onderdelen kennen, komt u belangrijke details
te weten met het oog op het in bedrijf stellen van het apparaat en de omgang ermee en krijgt u tips voor het geval
van een storing. Door rekening te houden met wat er in de handleiding staat, vermijdt u ook beschadigingen van het
product en riskeert u niet dat uw wettelijke rechten door verkeerd gebruik niet meer gelden. Voor schade die wordt
veroorzaakt doordat u geen rekening houdt met de handleiding aanvaarden wij geen aansprakelijkheid.
Volg in elk geval de veiligheidsinstructies op !
Deze gebruiksaanwijzing goed bewaren a.u.b.!
Levering:
Sousmatic Sous-Vide koker
Afneembare beschermkap uit roestvrij staal
Afneembare houder
Stroomadapter
Hoe u uw nieuw apparaat kunt gebruiken en alle voordelen ervan in één oogopslag:
Sous-vide is een gaarmethode waarbij het vlees, de vis of de groenten zorgvuldig worden bereid in een waterbad met
een constante, lage temperatuur, meestal tussen 45 en 85 graden.
De rauwe ingrediënten worden vooraf in een vacuümzak of in een geschikte diepvrieszak gevacumeerd en gesloten.
Naar smaak kunnen nog kruiden en specerijen worden toegevoegd. Op die manier kan er geen vloeistof ontsnappen,
blijft alles sappig en zacht en blijven de aroma’s behouden, een perfecte garing is verzekerd.
Voor uw veiligheid:
Het product is uitsluitend geschikt voor de hierboven beschreven doeleinden. Gebruik het product niet anders
dan in deze handleiding is aangegeven.
Het eigenmachtig repareren, verbouwen of veranderen van het apparaat is niet toegestaan.
Als het apparaat wordt gebruikt moet er op worden gelet dat enkel oorspronkelijke bijbehorende hulpstukken
worden gebruikt, het apparaat te allen tijde onder toezicht is en dat de pot gevuld is met schoon kraanwater.
Aangezien vacuüm koken bij lage temperaturen wordt gedaan, zijn hygiëne en een snelle verwerking van het
voedsel van essentieel belang. Houd de in het recept aangegeven minimale temperaturen en garingstijden aan.
Voor de laatste controle van de interne temperatuur gebruikt u een braadthermometer (bv. TFA 14.1002.60.90).
Voorzichtig! Levensgevaar door elektrocutie!
Voordat het apparaat wordt gebruikt moet zowel het apparaat inclusief de stroomadapter eerst zorgvuldig op
eventuele defecten worden gecontroleerd, die ongewenste effecten kunnen hebben op de gebruiksveiligheid van
het apparaat. Gebruik het apparaat niet wanneer de behuizing of de netvoeding beschadigd is.
19
Page 20

Sluit het apparaat uitsluitend aan op een volgens de voorschriften geïnstalleerd stopcontact met een
netspanning van 220 - 240V!
De netvoeding mag niet met water of vocht in aanraking komen.
Vul de pot maximaal tot aan de markering (MAX) met water.
Bewaar het apparaat buiten de reikwijdte van personen (ook kinderen) die de mogelijke gevaren van de omgang
met elektrische apparaten zouden kunnen onderschatten.
Trek altijd direct de stekker uit het stopcontact in het geval van een storing, na elk gebruik en voor u het apparaat
reinigt.
Gebruik uitsluitend de bijbehorende stroomadapter.
Trek de stekker niet aan de kabel uit het stopcontact.
Leg het snoer zo neer dat het niet met scherpe of hete voorwerpen in aanraking komt.
Voorzichtig!
Kans op letsel:
De kunststof onderdelen, het water, de pan en het te garen product kunnen tijdens en na gebruik heet zijn; let op
verbrandingsgevaar! Pak daarom alleen met geschikte beschermende handschoenen vast.
Raak de metalen onderdelen, met name de dompelaar en propeller, niet aan.
Gebruik een geschikte schaal waarin het apparaat een stabiele stand heeft, kantelgevaar!
Het apparaat alleen gebruiken met de beschermkap.
! Belangrijke informatie voor de productveiligheid!
Stel het apparaat niet bloot aan extreme temperaturen, trillingen en schokken.
Dompel het apparaat niet compleet in water, anders kan er vocht binnendringen en dit tot functiestoringen
leiden. Niet geschikt voor de vaatwasser.
Gebruik het apparaat op een warmte- en vochtbestendig oppervlak.
Gebruik het apparaat niet op warme oppervlakken (zoals kookplaten).
Alleen hoogwaardige vacuüm zakken, geschikt voor het opwarmen, moeten gebruikt worden.
Onderdelen
(zie blz 2+3)
Behuizing
Fig.01-A: Adapter aansluiting aan de achterkant van het apparaat
Fig.01-B: Houder aan de achterkant van het apparaat
Fig.01-C: Beschermkap
Display
Fig.02-A: NOW = Indicator actuele temperatuur
Fig.02-B: Thermometersymbool = Actuele temperatuur
Fig.02-C: Momentane temperatuur in °C
Fig.02-D: Waarschuwingssymbool = Te laag waterpeil
Fig.02-E: Doelsymbool = Ingestelde temperatuur bereikt
Fig.02-F: TARGET = Indicator ingestelde temperatuur
Fig.02-G: Ronddraaiend symbool = Apparaat geactiveerd
Fig.02-H: Timersymbool = Kooktijd
Fig.02-I: Kloksymbool = Delay-tijd
Fig.02-K: Thermometersymbool = Ingestelde temperatuur
Fig.02-L: Stopsymbool = Apparaat schakelt zich uit
Fig.02-M: Ingestelde temperatuur in °C/delay-tijd/kooktijd in uren/min.
20
Page 21

Toetsen
Fig.01-D: ON/OFF schakelaar op de achterkant van het apparaat
Fig.02-N: q toets
Fig.02-O: START/STOP toets
Fig.02-P: TIMER toets
Fig.02-Q: p toets
Inbedrijfstelling
Reinig het product voor het eerste gebruik met een vochtige doek.
Plaats een pan, een kunststofschaal of een andere geschikte hittebestendige bak op een vlakke, stabiele en
warmtebestendige ondergrond en bevestig het apparaat met de clip aan de wand van de pan. De afneembare
clip heeft twee standen, afhankelijk van de uitsparing waarin deze wordt vergrendeld.
Steek de netadapter in de daarvoor bestemde toegang en sluit het apparaat met de stekker in het stopcontact
aan. Belangrijk! Zorg ervoor dat de spanning van het stroomnet onder 240 V ligt! Andere netspanningen kunnen
het toestel beschadigen.
Vul de pan met water, ergens tussen de markeringen MIN en MAX.
Leg de gevacumeerde zak met het te garen product in de pan. Let erop dat het waterniveau daardoor niet stijgt
tot boven de MAX-markering.
Let op!
Als het waterniveau onder de MIN-markering daalt, klinkt er een aanhoudende toon en verschijnt er op het
display het stop- en waarschuwingssymbool en schakelt het apparaat zich direct uit.
Schuif de rode schakelaar op de instelling ON.
De rode schakelaar brandt.
Alle segmenten verschijnen kort.
NOW, het thermometersymbool en de actuele temperatuur verschijnen boven op het display, beneden verschijnen
TARGET, het thermometersymbool en 70,0°C (standaardinstelling) knippert.
Selectie van de kookmodus
Makkelijk koken
Met de q of p toets kunt u de gewenste temperatuur instellen.
Druk op de START/STOP-knop om het kookproces te starten.
Het apparaat schakelt zich in en in het midden van het display wordt een ronddraaiend pictogram weergegeven.
Wanneer de ingestelde temperatuur is bereikt wordt in het display het doelpictogram weergegeven.
Koken met tijdinstelling
Druk op de TIMER toets. Het timersymbool verschijnt op het display.
Het thermometersymbool en 70,0°C (standaardinstelling) knipperen. Met de q of p toets kunt u de gewenste
temperatuur instellen.
Druk op de START/STOP toets als bevestiging.
Het timersymbool en de tijdsaanduiding 0:05 min. (standaardinstelling) knipperen. Stel de gewenste tijdsduur
van het kookproces in met de toets q of p in stappen van 5 min.
Druk op de START/STOP toets als bevestiging.
Druk nogmaals op de START/STOP-toets om het bereidingsproces gedurende de gewenste tijdsduur te starten.
Het apparaat schakelt zich in en in het midden van het display wordt een ronddraaiend pictogram weergegeven.
Als de ingestelde tijd is verstreken klinkt een geluidssignaal en wordt in het display het stopsymbool weergegeven.
Het apparaat schakelt zich automatisch uit.
21
Page 22

Kooktijd programmeren
Druk op de TIMER toets en houdt deze 2 seconden ingedrukt. Het timersymbool en het kloksymbool verschijnen.
Het thermometersymbool en 70,0°C (standaardinstelling) knipperen. Met de q of p toets kunt u de gewenste
temperatuur instellen.
Druk op de START/STOP toets als bevestiging.
Het kloksymbool en de tijdaanduiding 0:05 min. (standaardinstelling) knipperen. Stel de gewenste vertragingstijd
voor het kookproces in met de toets q of p in stappen van 5 min.
Druk op de START/STOP toets als bevestiging.
Het timersymbool en de tijdaanduiding 0:05 min. (standaardinstelling) knipperen. Stel de gewenste tijdsduur van
het kookproces in met de toets q of p in 5 min. stappen.
Druk op de START/STOP toets als bevestiging.
Druk op de START/STOP toets om het apparaat te activeren.
In het display wordt het kloksymbool en een ronddraaiend symbool weergegeven en de tijdsaanduiding
telt terug naar nul.
Na aoop van de ingestelde tijd schakelt het apparaat zich automatisch aan.
Als de ingestelde tijd is verstreken klinkt een geluidssignaal en wordt in het display het stopsymbool weergegeven.
Het apparaat schakelt zich automatisch uit.
Tijdens het kookproces
Druk op de toets q of p om afwisselend de resterende tijdsduur/kooktijd en de ingestelde
temperatuur weer te geven.
Met de START/STOP toets kunt u ook het kookproces laten stoppen of overnieuw laten beginnen.
Om het kookproces te beëindigen en alle instellingen te wissen houdt u de START/STOP-toets
2 seconden ingedrukt.
Na het kookproces:
Neem het gegaarde product uit het water.
Schakel het apparaat na gebruik altijd uit.
Na elk gebruik verwijder de stekker uit het stopcontact, laat het apparaat voldoende afkoelen
voordat men het schoonmaakt.
Schoonmaken en onderhoud
Maak het apparaat met een zachte, enigszins vochtige doek schoon. Geen schuur- or oplosmiddelen gebruiken!
Draai eventueel de beschermkap linksom los (zie markering op de bodemplaat).
Bewaar het apparaat op een droge plaats.
Ontkalk de dompelaar en de propeller van tijd tot tijd met een normaal in de handel verkrijgbare ontkalker.
Verwijderen
Dit product is vervaardigd van hoogwaardige materialen en onderdelen, die kunnen worden gerecycled en
hergebruikt.
Dit apparaat is gemarkeerd in overeenstemming met de EU-richtlijn (WEEE) over het verwijderen van
elektrisch en elektronisch afval.
Dit product mag niet met het huisvuil worden weggegooid. De gebruiker is verplicht om de apparatuur
af te geven bij een als zodanig erkende plek van afgifte voor het verwijderen van elektrisch en elektronisch
apparatuur om een milieuvriendelijk verwijderen te garanderen.
22
Page 23

Technische gegevens
Temperatuurbereik
Temperatuurstabiliteit
Pompvermogen
Capaciteit
Watercirculatie
Spanning
Timer Tot 99 uren
Warmtevermogen
Spanningsvoorziening Stroomadapter 220 - 240 V
Afmetingen behuizing
Gewicht 1450 g (alleen het apparaat)
TFA Dostmann GmbH & Co.KG, Zum Ottersberg 12 D-97877 Wertheim
Deze gebruiksaanwijzing of gedeelten eruit mogen alleen met toestemming van TFA Dostmann worden gepubliceerd. De
technische gegevens van dit apparaat zijn actueel bij het ter perse gaan en kunnen zonder voorafgaande informatie
worden gewijzigd. De nieuwste technische gegevens en informatie over uw product kunt u vinden door het invoeren van
het artikelnummer op onze homepage. www.tfa-dostmann.de.
01/16
40°C…95°C
+/-0,1°C bij 60°C
Ca. 11 liter per minuut
25 L
360°
220 – 240 V (EU)
1000 Watt
108 x 112 x 435 mm
23
Page 24

Istruzioni per l’uso
Sousmatic Fornello per cottura sottovuoto
Cat.-N. 14.1550.01
Vi ringraziamo per aver scelto l’apparecchio della TFA.
Prima di utilizzare l’apparecchio
Leggete attentamene le istruzioni per l’uso.
Avrete così modo di familiarizzare con il vostro nuovo apparecchio, di scoprirne tutte le funzioni e le componenti, di
apprendere importanti dettagli sulla sua messa in funzione, di acquisire dimestichezza nel suo utilizzo e di usufruire di
alcuni validi consigli da seguire in caso di guasti.
Seguendo le istruzioni per l’uso, eviterete anche di danneggiare il prodotto e di pregiudicare, a causa di un utilizzo
scorretto, i diritti del consumatore che vi spettano per legge. Decliniamo ogni responsabilità per i danni derivanti
dal mancato rispetto delle presenti istruzioni per l’uso.
Prestate particolare attenzione alle misure di sicurezza!
Conservate con cura queste istruzioni per l’uso.
La consegna include:
Sousmatic Fornello per cottura sottovuoto
Involucro di protezione rimovibile in acciaio inox
Supporto rimovibile
Alimentatore
Tutte le applicazioni e tutti i vantaggi del vostro nuovo apparecchio:
Sous-Vide è un metodo di cottura con il quale vengono preparati la carne, il pesce e le verdure, immergendole in
acqua a temperature basse costanti, di solito tra 45°C e 85°C.
Inserire prima gli ingredienti crudi in un apposito sacchetto per sottovuoto o in un sacchetto per prodotti congelati,
creare il vuoto e sigillare ermeticamente. Si possono aggiungere a piacere erbe e spezie. Senza fughe di liquidi tutto
risulta morbido, sof ce, aromatico e cucinato alla perfezione con una garanzia di riuscita del 100%.
Per la vostra sicurezza:
Il prodotto è adatto esclusivamente agli utilizzi di cui sopra. Non utilizzate il prodotto in maniera diversa da
quanto descritto in queste istruzioni.
Non sono consentite riparazioni, alterazioni o modi che non autorizzate del dispositivo.
Quando utilizzate l’apparecchio, assicuratevi che siano usati solo accessori originali; tenete sempre sotto
controllo l’apparecchio e riempite la vaschetta con acqua fresca di rubinetto.
Se si esegue la cottura sottovuoto a basse temperature sono importanti l’igiene e la rapida lavorazione degli
alimenti. Le temperature e i tempi di cottura non devono essere inferiori a quelli speci cati nella vostra ricetta.
Per il controllo nale della temperatura interna, utilizzare un termometro per arrosti
(come ad esempio il TFA 14.1002.60.90).
Attenzione! Pericolo di morte per scossa elettrica!
Prima della messa in funzione e di ogni utilizzo dell’apparecchio, controllate attentamente che l’apparecchio e
l’alimentatore non presentino tracce di deterioramento potrebbero comportare conseguenze negative
24
Page 25

sulla sicurezza nel funzionamento dell’apparecchio. Non utilizzate il dispositivo qualora la struttura esterna o
l’alimentatore risultino danneggiati.
Collegate l’apparecchio esclusivamente a una presa di corrente a norma che fornisca corrente a una
tensione di 220 - 240V!
L’alimentatore non deve venire a contatto con acqua o umidtià.
Non lasciate entrare in contatto l’acqua con la parte superiore alla tacca MAX dell’apparecchio.
Conservate il dispositivo fuori dalla portata di persone (per esempio i bambini) che potrebbero non
riconoscere adeguatamente il rischio derivante dall’uso di apparecchi elettrici.
Disinserite sempre la spina dalla presa di corrente in caso di cattivo funzionamento, dopo l’uso, e
prima di pulire l’apparecchio.
Utilizzate esclusivamente l’adattatore in dotazione.
Quando estraete la spina dalla presa di corrente, non tiratela per il cavo.
Proteggete il cavo di alimentazione in modo da evitare il contatto con oggetti appuntiti o caldi.
Attenzione!
Pericolo di lesioni:
Le superci di plastica, l’acqua, il recipiente e il cibo da cuocere può raggiungere un’elevata temperatura durante
e dopo il funzionamento; rischio di ustioni! Pertanto, afferrare l’apparecchio solo con guanti protettivi adatti.
Non toccare le parti metalliche, soprattutto lo scaldatore ad immersione e l’elica.
Utilizzare un recipiente adatto in cui il dispositivo si trova in una posizione stabile, pericolo di ribaltamento!
Mettere in funzione sempre con l’involucro di protezione.
! Avvertenze sulla sicurezza del prodotto!
Non esporre l’apparecchio a temperature estreme, vibrazioni e urti.
Non immergere il dispositivo intero in acqua: l’umidità può penetrare e causare errori di funzionamento. Non
adatto per lavastoviglie.
Usare l’apparecchio su una supercie piana, resistente al calore e all’umidità.
Non usare l’apparecchio sopra delle superci calde (come piastre elettriche).
Per la cottura sottovuoto utilizzate solo sacchetti di alta qualità resistenti al calore.
Componenti
(vedi pag. 2+3)
Struttura esterna
Fig.01-A: Presa per l’adattatore sul retro del dispositivo
Fig.01-B: Supporto sul retro del dispositivo
Fig.01-C: Involucro di protezione
Display
Fig.02-A: NOW = Indicatore temperatura attuale
Fig.02-B: Simbolo termometro = temperatura attuale
Fig.02-C: Temperatura attuale in °C
Fig.02-D: Simbolo di avvertimento = livello basso dell’acqua
Fig.02-E: Simbolo obiettivo = esatta temperatura raggiunta
Fig.02-F: TARGET = Indicatore temperatura desiderata
Fig.02-G: Simbolo circolare = dispositivo attivato
Fig.02-H: Simbolo timer = durata del processo di cottura
Fig.02-I: Simbolo orologio = avvio differito
Fig.02-K: Simbolo termometro = temperatura desiderata
Fig.02-L: Simbolo di arresto = apparecchio si spegnerà
Fig.02-M: Temperatura desiderata in °C/ avvio differito/ durata di cottura in ore/min.
25
Page 26

Tasti
Fig.01-D: Interruttore rosso ON/OFF sul retro del dispositivo
Fig.02-N: Tasto q
Fig.02-O: Tasto START/STOP
Fig.02-P: Tasto TIMER
Fig.02-Q: Tasto p
Messa in funzione
Pulire il prodotto con un panno inumidito prima del primo utilizzo.
Poggiare una pentola, un contenitore di plastica o altro recipiente adatto resistente al calore su una base piana,
stabile e resistente alla temperatura e ssare l’apparecchio con il supporto alla parete della pentola. Il supporto
staccabile ha due livelli di serraggio, secondo l’incavo che viene bloccato in posizione.
Inserire l’adattatore nella presa e collegarlo ad una presa a terra. Avvertenza importante! Controllare che il
voltaggio della vostra abitazione non sia maggiore di 240V, perché il dispositivo potrebbe venire danneggiato.
Tensioni diverse possono danneggiare il dispositivo.
Lasciare che l’apparecchio entri in contatto con l’acqua solo no alla tacca (MAX).
Porvi dentro il sacchetto sottovuoto con il cibo da cuocere a bassa temperatura. Assicurarsi che il livello
dell’acqua non superi la tacca MAX.
Attenzione!
Se il livello dell’acqua scende al di sotto della tacca MIN, sarà emesso un segnale acustico continuo, sul display
saranno visualizzati il simbolo di arresto e di avvertimento e l’apparecchino si spegne automaticamente.
Muovere l’interruttore rosso sul retro sulla posizione di accensione.
Si accende l’interruttore rosso.
Tutti i segmenti appaiono brevemente.
Il simbolo NOW, un termometro e la temperatura attuale vengono visualizzati sul display superiore, sul display
inferiore vengono visualizzati il simbolo TARGET, un termometro e 70,0°C (predenita) lampeggiano.
Selezione della modalità di cottura
Cottura semplice
Impostare con il tasto q o p la temperatura desiderata.
Premere il tasto START/STOP per avviare il processo di cottura.
L’apparecchio si accenderà e al centro del display sarà visualizzato un simbolo circolare.
Quando sarà raggiunta l’esatta temperatura impostata, sul display comparirà il simbolo obiettivo.
Cottura con tempo preimpostato
Premere il tasto TIMER. Sul display appare il simbolo del timer.
Un termometro e 70,0°C (predenita) lampeggiano. Impostare con il tasto q o p la temperatura desiderata.
Premere il tasto START/STOP per confermare.
Il simbolo del timer e 0:05 min (impostazione predenita) inizieranno a lampeggiare. Impostare la durata
desiderata del processo di cottura per mezzo del pulsante q o p ad incrementi di 5.
Premere il tasto START/STOP per confermare.
Premere ancora una volta il pulsante START/STOP per avviare il processo di cottura per il tempo desiderato.
L’apparecchio si accenderà e al centro del display sarà visualizzato un simbolo circolare.
Quando il processo di cottura terminerà, sarà emesso un allarme e sul display comparirà il simbolo Stop.
L’apparecchio si spegne automaticamente.
26
Page 27

Programmazione del tempo di cottura
Tenere premuto il tasto TIMER per 2 secondi. Sul display vengono visualizzati il simbolo del timer e dell’orologio.
Un termometro e 70,0°C (predenita) lampeggiano. Impostare con il tasto q o p la temperatura desiderata.
Premere il tasto START/STOP per confermare.
Il simbolo dell’orologio e 0:05 min (predenita) inizieranno a lampeggiare. Impostare il tempo di ritardo
desiderato del processo di cottura per mezzo del pulsante q o p ad incrementi di 5.
Premere il tasto START/STOP per confermare.
Il simbolo del timer e 0:05 min (impostazione predenita) inizieranno a lampeggiare. Impostare la durata
desiderata del processo di cottura per mezzo del pulsante q o p ad incrementi di 5.
Premere il tasto START/STOP per confermare.
Premere il tasto START/STOP per attivare l’apparecchio.
Appariranno il simbolo dell’orologio e il simbolo circolare e l’indicatore del tempo indicherà il conto alla rovescia
no allo Start.
Trascorso il tempo, l’apparecchio si accende automaticamente.
Quando il processo di cottura terminerà, sarà emesso un allarme e sul display comparirà il simbolo Stop.
L’apparecchio si spegne automaticamente.
Durante il processo di cottura
Consultare il tempo di ritardo residuo/la durata di cottura e la temperatura desiderata con il pulsante q o p.
Con il tasto START/STOP si può arrestare o riavviare il processo.
Per interrompere il processo di cottura e annullare tutte le impostazioni, premere e mantenere premuto il
pulsante START/STOP per 2 secondi.
Dopo il processo di cottura
Rimuovere con cautela dall’acqua il cibo cotto a bassa temperatura.
Spegnete il dispositivo dopo l’uso.
Dopo l’uso disinserite sempre la spina dalla presa di corrente, lasciate all’apparecchio il tempo di raffreddarsi
sufcientemente e inne pulite l’apparecchio.
Cura e manutenzione
Per pulire l’apparecchio utilizzare solo un panno morbido leggermente inumidito. Non usare solventi o abrasivi.
Svitare la custodia di protezione in senso antiorario (vedi simbolo sulla piastra di base).
Collocare il dispositivo in un luogo asciutto.
Di tanto in tanto, decalcicare lo scaldatore ad immersione e l’elica con un comune prodotto anticalcare.
Smaltimento
Questo prodotto è stato realizzato utilizzando materiali e componenti di alta qualità che possono essere riciclati e
riutilizzati.
Questo apparecchio è etichettato in conformità alla Direttiva UE sullo smaltimento delle apparecchiature
elettriche ed elettroniche (WEEE).
Questo prodotto non deve essere smaltito insieme ai riuti domestici. Il consumatore è tenuto a
consegnare il vecchio apparecchio presso un punto di raccolta per lo smaltimento di apparecchiature
elettriche ed elettroniche ai ni di uno smaltimento ecologico.
27
Page 28

Dati tecnici
Campo di temperatura
Stabilità della temperatura
Potenza della pompa circa 11 litri al minuto
Capacità
Circolazione dell’acqua
Tensione di funzionamento
Timer
Potenza termica
Alimentazione Alimentatore 220 - 240 V
Dimensioni esterne
Peso 1450 g (solo apparecchio)
TFA Dostmann GmbH & Co.KG, Zum Ottersberg 12, D-97877 Wertheim / ww.tfa-dostmann.de
È vietata la pubblicazione delle presenti istruzioni o di parti di esse senza una precedente autorizzazione della TFA
Dostmann. I dati tecnici corrispondono allo stato del prodotto al momento della stampa e possono cambiare senza
preavviso. È possibile trovare dati tecnici e informazioni aggiornate sul prodotto inserendo il numero di articolo sul
nostro sito. www.tfa-dostmann.de.
01/16
40°C…95°C
+/-0,1°C a 60°C
25 L
360°
220 – 240 V (EU)
no a 99 ore
1000 Watt
108 x 112 x 435 mm
28
Page 29

Instrucciones de uso
Sousmatic Cocedor Sous-Vide
Cat.No. 14.1550.01
Muchas gracias por haber adquirido este dispositivo de TFA.
Antes de utilizar el dispositivo
Lea detenidamente las instrucciones de uso.
De este modo se familiarizará con su nuevo dispositivo, conocerá todas las funciones y componentes, así como
información relevante para la puesta de funcionamiento el manejo del dispositivo y recibirá consejos sobre cómo
actuar en caso de avería.
Si sigue las instrucciones de uso, evitará que se produzcan daños en el dispositivo y no comprometerá a sus derechos
por vicios, previstos legalmente debido a un uso incorrecto. No asumimos responsabilidad alguna por los daños
originados por el incumplimiento de estas instrucciones de uso.
Tenga en cuenta ante todo las advertencias de seguridad.
Guarde estas instrucciones de uso en un sitio seguro.
Entrega
Sousmatic Cocedor Sous-Vide
Caperuza protectora desmontable de acero inoxidable
Soporte desmontable
Fuente de alimentación
Ámbito de aplicación y ventajas de su nuevo dispositivo:
El sous-vide es un método de cocción mediante el cual se prepara pescado, carne o verduras en un cuidadoso baño
María a una temperatura baja constante, normalmente entre 45 y 85 grados.
Los ingredientes crudos se someten al vacío y se sellan previamente en una bolsa de vacío o en una bolsa de
congelación apropiada. Se pueden añadir hierbas aromáticas y especias al gusto de cada uno. De esta forma, no
se escapa ningún líquido y la comida queda jugosa, tierna, aromática y cocinada a la perfección con un 100 % de
garantía de éxito.
Para su seguridad
El producto solo es adecuado para el ámbito de aplicación descrito anteriormente. No emplee el dispositivo de
modo distinto al especi cado en estas instrucciones.
No está permitido realizar reparaciones, transformaciones o modi caciones por cuenta propia en el dispositivo.
Asegúrese de que sólo se utilizan accesorios originales, el aparato debe estar bajo supervisión en todo momento
y se usa agua limpia del grifo.
Dado que la cocción al vacío se realiza a temperaturas bajas, es esencial la higiene y la manipulación rápida de
los alimentos. Respete las temperaturas y los tiempos de cocción indicados en su receta.
Para el control nal de la temperatura interna, use un termómetro para carne (p. ej. TFA 14.1002.60.90).
¡Precaución! ¡Peligro de muerte por descarga eléctrica!
Antes de utilizar el dispositivo, siempre se debe comprobar que tanto el dispositivo como la fuente de
alimentación no están defectuosos. Los desperfectos pueden tener efectos adversos sobre la seguridad en el
uso del aparato. No utilice el dispositivo si la carcasa o la fuente de alimentación están dañadas.
29
Page 30

Conecte el dispositivo solamente a una toma de corriente instalada según las prescripciones con una tensión de
alimentación de 220 - 240 V.
La fuente de alimentación no debe tener contacto con agua ni humedad.
Llene la olla con agua únicamente hasta la marca (MAX).
Mantenga el dispositivo fuera de alcance de las personas (también niños) que no puedan evaluar los riesgos
con el manejo de dispositivos eléctricos.
Desenchufe siempre el aparato si hay una avería, después del uso y antes de limpiarlo.
Utilice únicamente la fuente de alimentación suministrada.
No tire del cable del enchufe de alimentación para extraer el enchufe de la toma de corriente.
Coloque el cable de alimentación de manera que no tenga contacto con objetos de cantos alados o calientes.
¡Precaución!
Riesgo de lesiones:
Las supercies de plástico, el agua, el recipiente y los alimentos a cocinar puedan estar calientes durante y
después del funcionamiento: peligro de quemaduras. Por ese motivo se debe agarrar únicamente con manoplas
protectoras apropiadas.
No tocar las partes metálicas, especialmente el calentador de inmersión y la hélice.
Utilice un recipiente adecuado en el que el dispositivo tiene una posición estable, peligro de vuelco!
Operar siempre con la caperuza protectora.
! Advertencias importantes sobre la seguridad del producto!
No exponga el dispositivo a temperaturas extremas, vibraciones ni sacudidas extremas.
No sumerja el dispositivo entero en agua, pues podría introducirse humedad y inducir funciones erróneas. No
limpiar en el lavavajillas.
Utilizar el dispositivo sobre una supercie plana resistente al calor y al agua.
No utilice el dispositivo encima de supercies calientes (por ejemplo placas eléctricas).
Sólo se deben utilizar bolsas para vacío de alta calidad adecuadas para el calentamiento.
Componentes
(véase página 2+3)
Cuerpo
Fig.01-A: Conexión de la alimentación de red en la parte posterior del dispositivo
Fig.01-B: Soporte en la parte posterior del dispositivo
Fig.01-C: Caperuza protectora
Pantalla
Fig.02-A: NOW = Indicador temperatura actual
Fig.02-B: Símbolo de termómetro = Temperatura actual
Fig.02-C: Temperatura actual en °C
Fig.02-D: Símbolo de advertencia = Nivel de agua bajo
Fig.02-E: Símbolo de la diana = Se alcanza la temperatura ajustada exacta
Fig.02-F: TARGET = Indicador de temperatura deseada
Fig.02-G: Símbolo dando vueltas = Dispositivo activado
Fig.02-H: Símbolo del temporizador = Tiempo de cocción
Fig.02-I: Símbolo del reloj = Tiempo de retardo
Fig.02-K: Símbolo de termómetro =Temperatura deseada
Fig.02-L: Símbolo de parada = Dispositivo se desconecta
Fig.02-M: Temperatura ajustada en °C, tiempo de cocción/temporización en horas/min.
30
Page 31

Teclas
Fig.01-D: Interruptor rojo en la parte posterior del dispositivo
Fig.02-N: Tecla q
Fig.02-O: Tecla START/STOP
Fig.02-P: Tecla TIMER
Fig.02-Q: Tecla p
Puesta en marcha
Limpie el producto antes del primer uso con un paño ligeramente humedecido
Coloque una olla, un recipiente de plástico u otro recipiente apropiado y resistente al calor sobre una base
plana, estable y resistente a las altas temperaturas y je el aparato con el soporte a la pared. El soporte
desmontable dispone de dos niveles de sujeción en función de la entalladura en la que se encaje.
Ponga el enchufe de conexión en la toma y conecte el dispositivo con el enchufe de alimentación a la red.
¡Importante! Asegúrese de que el voltaje de la línea no es más de 240 V! Otras tensiones pueden danar el
instrumento.
Llene la olla de agua entre las marcas MIN y MAX.
Introduzca la bolsa al vacío con los alimentos a cocinar. Preste atención para que el nivel de agua no sobrepase
la marca MAX.
Atención!
Si el nivel de agua desciende por debajo de la marca MIN, se escuchará una señal acústica permanente; en la
pantalla se mostrará el símbolo de parada y de advertencia y el aparato se desconectará inmediatamente.
Ajuste el interruptor rojo en la posición „connectado“.
El interruptor rojo se ilumina.
Todos los segmentos se muestran brevemente.
En la pantalla arriba aparecen los símbolos NOW, un termómetro y la temperatura actual, en la pantalla abajo
aparecen los símbolos TARGET, un termómetro y 70,0°C (nivel preseleccionado) parpadean.
Selección del modo de cocción
Cocción sencilla
Ajuste con la tecla q y p la temperatura deseada.
Pulse la tecla START/STOP para iniciar el proceso de cocción.
El aparato se conecta y aparece un símbolo dando vueltas en el centro de la pantalla.
Una vez que se haya alcanzado con exactitud la temperatura ajustada, aparecerá el símbolo de la diana en la
pantalla.
Cocinar con tiempo de cocción
Pulse la tecla TIMER. El símbolo del temporizador aparece en la pantalla.
El símbolo de termómetro y 70,0°C (nivel preseleccionado) parpadean. Ajuste con la tecla q y p la
temperatura deseada.
Pulse la tecla START/STOP para conrmar.
El símbolo del temporizador y 0:05 min (nivel preseleccionado) parpadean. Con la tecla q o p programe la
duración deseada para el proceso de cocción en incrementos de cinco minutos.
Pulse la tecla START/STOP para conrmar.
Pulse otra vez la tecla START/STOP para iniciar el proceso de cocción en la duración deseada.
El aparato se conecta y aparece un símbolo dando vueltas en el centro de la pantalla.
Una vez que haya nalizado el proceso de cocción, sonará una alarma y el símbolo de parada aparecerá en la
pantalla. El dispositivo se desconecta automáticamente.
31
Page 32

Programación del tiempo de cocción
Mantenga pulsada la tecla TIMER durante 2 segundos. El símbolo del temporizador y el símbolo del reloj
aparecen en la pantalla.
El símbolo de termómetro y 70,0°C (nivel preseleccionado) parpadean. Ajuste con la tecla q y p la
temperatura deseada.
Pulse la tecla START/STOP para conrmar.
El símbolo del reloj y 0:05 min. (nivel preseleccionado) parpadean. Con la tecla q o p programe el tiempo de
retardo para el proceso de cocción en incrementos de cinco minutos.
Pulse la tecla START/STOP para conrmar.
El símbolo del temporizador y 0:05 min (nivel preseleccionado) parpadean. Con la tecla q o p programe la
duración deseada para el proceso de cocción en incrementos de cinco minutos.
Pulse la tecla START/STOP para conrmar.
Pulse la tecla START/STOP para activar el proceso.
Aparecerá el símbolo del reloj y un símbolo que da vueltas, y la indicación de tiempo contará hacia atrás a un
ritmo de minutos hasta el inicio.
Después de haber transcurrido el tiempo el dispositivo se conecta automáticamente.
Una vez que haya nalizado el proceso de cocción, sonará una alarma y el símbolo de parada aparecerá en la
pantalla. El dispositivo se desconecta automáticamente.
Durante el proceso de cocción
Con la tecla q o p consulte el tiempo/duración de cocción restante y la temperatura deseada.
Pulse la tecla START/STOP para detener y reiniciar.
Para nalizar el proceso de cocción y borrar todos los ajustes, pulse y mantenga pulsada la tecla START/STOP
durante 2 segundos.
Tras el proceso de cocción:
Retire con cuidado los alimentos del agua.
Apague el dispositivo después de uso.
Después de uso, desenchufe el aparato de la pared, espere hasta que se haya enfriado sucientemente y
limpiarlo.
Cuidado y mantenimiento
Limpie el dispositivo con un paño suave, ligeramente humedecido. No utilice productos abrasivos o disolventes!
Si es necesario gire la caperuza protectora en sentido antihorario (vea marca en la placa base).
Mantenga el dispositivo en un lugar seco.
Descalcique de vez en cuando el calentador de inmersión y la hélice con un descalicador habitual en el
comercio.
Eliminación
Este producto ha sido fabricado usando materiales y componentes que pueden ser reciclados y reusados.
Este dispositivo está identicado conforme a la Directiva de la UE sobre residuos de aparatos eléctricos y
electrónicos (WEEE).
No deseche este producto junto con la basura doméstica. El usuario está obligado a llevar el dispositivo
usado a un punto de recogida de aparatos eléctricos y electrónicos acreditado para que sea eliminado de
manera respetuosa con el medio ambiente.
32
Page 33

Datos técnicos
Rango de temperatura
Estabilidad de la temperatura
Potencia de bombeo aprox. 11 l por minuto
Capacidad
Circulación de agua
Tensión de servicio
Timer
Potenza termica
Alimentación de tensión Adaptador de red: 220 - 240 V
Dimensiónes de cuerpo
Peso
TFA Dostmann GmbH & Co.KG, Zum Ottersberg 12, D-97877 Wertheim.
Estas instrucciones o extractos de las mismas no pueden ser publicados sin la autorización de la TFA Dostmann. Los
datos técnicos de este producto corresponden al estado en el momento de la impresión y pueden ser modicados sin
previo aviso. Los actuales datos técnicos e informaciones sobre su producto los puede encontrar bajo el número de
artículo en nuestra página web www.tfa-dostmann.de.
01/16
40°C…95°C
+/-0,1°C a 60°C
25 L
360°
220 – 240 V (EU)
de hasta 99 horas
1000 Watt
108 x 112 x 435 mm
1450 g (
solo dispositivo)
33
Page 34

Sous-Vide Gartabelle | Cooking table
Fleisch | Meat Garstufe|
Schwein | Pork
Filet
Rind | Beef
Medallion
Lamm | Lamb
Filet
Reh | Deer
Filet
Wildschwein | Wild boar
Rücken |Back
Geügel | Poultry
Ente | Duck
Brust |Breast
Hühnchen | Chicken
Brust | Breast
Fisch | Fish
Lachs |Salmon
Filet
Thunsch | Tuna
Filet
Gemüse | Vegetables
Karotten | Carrots
Spargel | Asparagus
Zwiebeln |Onions
Kartoffeln | Potatoes
Die angegebenen Garzeiten sind Durchschnittswerte für nicht gefrorene Lebensmittel.
The listed average cooking times are for non-frozen food.
Les temps de cuisson listés ne sont que des temps indicatifs pour aliments non surgelés.
De kooktijden in de lijst zijn gemiddelde waarden voor niet bevroren voedsel.
I tempi di cottura riportati sono solo approssimativi per alimenti non congelati.
Los tiempos de cocción son sólo tiempos aproximados, para alimentos no congelados.
Doneness
medium 40 mm 60 °C 60 min.
medium 30 mm 56 °C 50 min.
medium 20 mm 55 °C 25 min.
durch | done 20 mm 58 °C 20 min.
durch | done 25 mm 60 °C 30 min.
medium am Stück |
durch | done 25 mm 64 °C 60 min.
durch | done 20 mm 52 °C 15 min.
durch | done 20 mm 50 °C 8 min.
Dicke |
Thickness
in one piece
Temperatur |
Temperature
55 °C 120 min.
85 °C 45 min.
85 °C 25 min.
85 °C 35 min.
85 °C 40 min.
Kochdauer |
Cooking time
 Loading...