

Einführung:
Das Thermometer ist ein berührungs-
loses Infrarotthermometer mit Einstechfühler. Man kann sowohl nur mit
einem Fühler als auch mit beiden
Fühlern gleichzeitig messen. Bitte achten Sie darauf das Messgerät von Kindern fern zu halten.
Besonderheiten:
• Warn-LED 4-60°C
• Wasserdicht (IP65)
Infrarot Thermometer Funktion
(IR Mode):
• Das weiße Licht geht beim Messen
automatisch an.
• Messfleck-Entfernung (FOV)= 2.5:1
• Emissionsgrad = 0.1~1 Step.01
• Spektrale Empf. = 8µm-14µm
• Einfach den Infrarotdetektor auf das
zu messende Objekt richten und die
Scan-Taste betätigen. Das Verhältnis
von Messfleck zu Entfernung beträgt
2,5:1, daher ist wichtig aus möglichst
kurzer Entfernung zu messen.
In der oberen Displayhälfte erscheint
der gemessene Wert. Sobald die
Scan-Taste losgelassen wird erscheint
"HOLD" im Display und der zuletzt
gemessene Wert wird noch für ca.
15 Sekunden angezeigt.
MODE Auswahl:
MIN ➝ MAX ➝ LOCK ➝ °C/ °F ➝ EMIS
MINIMUM / MAXIMUM Mode:
• Mit dem Dualtemp können nur die
Maximal- und Minimalmesswerte
angezeigt werden.
• Zum Aktivieren der Minimalwertanzeige die Scan-Taste betätigen und
wieder loslassen. Danach die ModeTaste einmal betätigen. Es erscheint
„MIN“ in der oberen Displayhälfte.
Erneut die Scan-Taste betätigen. Es
werden jetzt nur noch die am niedrigsten gemessene Temperatur angezeigt.
• Zum Aktivieren der Maximalwertanzeige die Scan-Taste betätigen und
wieder loslassen. Danach die ModeTaste zweimal betätigen.
DualTEMP PRO
DualTEMP PRO
LOCK Mode:
• Mit dem Dualtemp können Dauermessungen (Lock-Funktion) durchgeführt werden.
• Zum Aktivieren der Lockfunktion die
Scan-Taste betätigen und wieder loslassen. Danach die Mode-Taste dreimal betätigen. Es erscheint „LOCK“
in der oberen Displayhälfte. Erneut
die Scan-Taste betätigen. Das Messgerät misst jetzt im Dauerbetrieb
und schaltet sich erst nach 60 Minuten automatisch wieder ab. Durch
erneutes Betätigen der Scan-Taste
wird der Lock-Mode deaktiviert.
°C/°F Umschalten:
• Zum Umschalten von °C (Celsius) auf
°F (Fahrenheit) die Scan-Taste betätigen und wieder loslassen. Danach
die Mode-Taste viermal betätigen. Es
erscheint „°C“ in der oberen Displayhälfte. Erneut die Scan-Taste
betätigen und es erscheint „°F“ in
der oberen Displayhälfte. Das Messgerät misst jetzt in °F (Fahrenheit).
Emissionsgrad einstellen:
• Das Dualtemp ist werksseitig auf
einen Emissionsgrad von 0.95 eingestellt. Dieser Wert ist für viele
Anwendungen geeignet (Lebensmittel, Kunststoff, Wasser…). Änderungen sollten nur von dazu autorisierten Personen durchgeführt
werden.
• Zum Ändern des Emissionsgrad die
Scan-Taste betätigen und wieder
loslassen. Danach die Mode-Taste
fünfmal betätigen. Es erscheint
„95E“ in der oberen Displayhälfte.
Durch weiteres betätigen der ScanTaste verändert sich jetzt der Emissionsgrad (Bereich 10E..100E). Ist der
gewünschte Wert eingestellt die
Mode-Taste betätigen. Das Messgeräte misst jetzt unter Berücksichtigung des neu eingestellten Emissionsgrad.
Wichtig: Infrarot-Temperaturmessge-
räte sind nicht geeignet um blanke,
glänzende und polierte Metalloberflächen zu messen.
DualTEMP PRO
Mit dem Einstechfühler Temperatur messen:
• Der Einstechfühler ist durch eine Halterung am Messgerät gesichert.
Schwenken Sie den Einstechfühler
um 180° und betätigen Sie die ProbeTaste. In der unteren Displayhälfte
erscheint der gemessene Wert. Das
Messgerät schaltet sich nachdem loslassen der Probe-Taste nach ca. vier
Minuten automatisch ab.
HACCP check:
• Die HACCP CHECK – FUNKTION zeigt
drei Grafiksymbole ” ” für
die kritischen Temperaturen für
Food-Applikationen an. Über zwei
grüne (unkritisch) und ein rotes (kritisch) LED wird der Zusammenhang
von Temperatur und Lebensmittel
dargestellt.
• Eine grüne LED erscheint über dem
Frostsymbol ” ” wenn die gemessene Temperatur unter +4°C beträgt.
• Die zweite grüne LED erscheint über
dem Heiße Tassesymbol ” ” wenn
die gemessene Temperatur über
+60°C beträgt.
• Wenn die gemessene Temperatur
zwischen +4°C und +60°C beträgt
erscheint die rote LED über dem
mittleren Symbol ” ”.
Fehlermeldungen:
Erscheint „Hi“ oder „Lo“ im Display ist
die gemessene Temperatur außerhalb
des zulässigen Messbereichs.
Erscheint „Er2“ oder „Er3“ im Display
ist die Umgebungstemperatur außerhalb 0..+50°C.
Bitte 30 Minuten warten bis sich das
Messgerät in der neuen Umgebungstemperatur stabilisiert hat.
Bei allen anderen Fehlermeldungen ist
die Batterie zu entfernen und nach
ca. 30 Sekunden neu einzulegen. Sollte
die Fehlermeldung erneut angezeigt
werden ist das Gerät an den Hersteller
bzw. an den zuständigen Händler
zurückzusenden.
DualTEMP PRO
Batterie:
Das DualTEMP PRO verfügt über eine
Batteriezustandsanzeige:
Batterie OK
➝ Messungen möglich
Schwache Batterie
➝ Batterie bitte wechseln,
Messungen noch möglich
Leere Batterie
➝ Batterie bitte wechseln,
➝ Messungen sind nicht
mehr möglich
Sobald das Battery Leer-Symbol
angezeigt wird sind die Batterien
unverzüglich zu wechseln. Bewahren
Sie Batterien immer sicher vor Kindern auf.
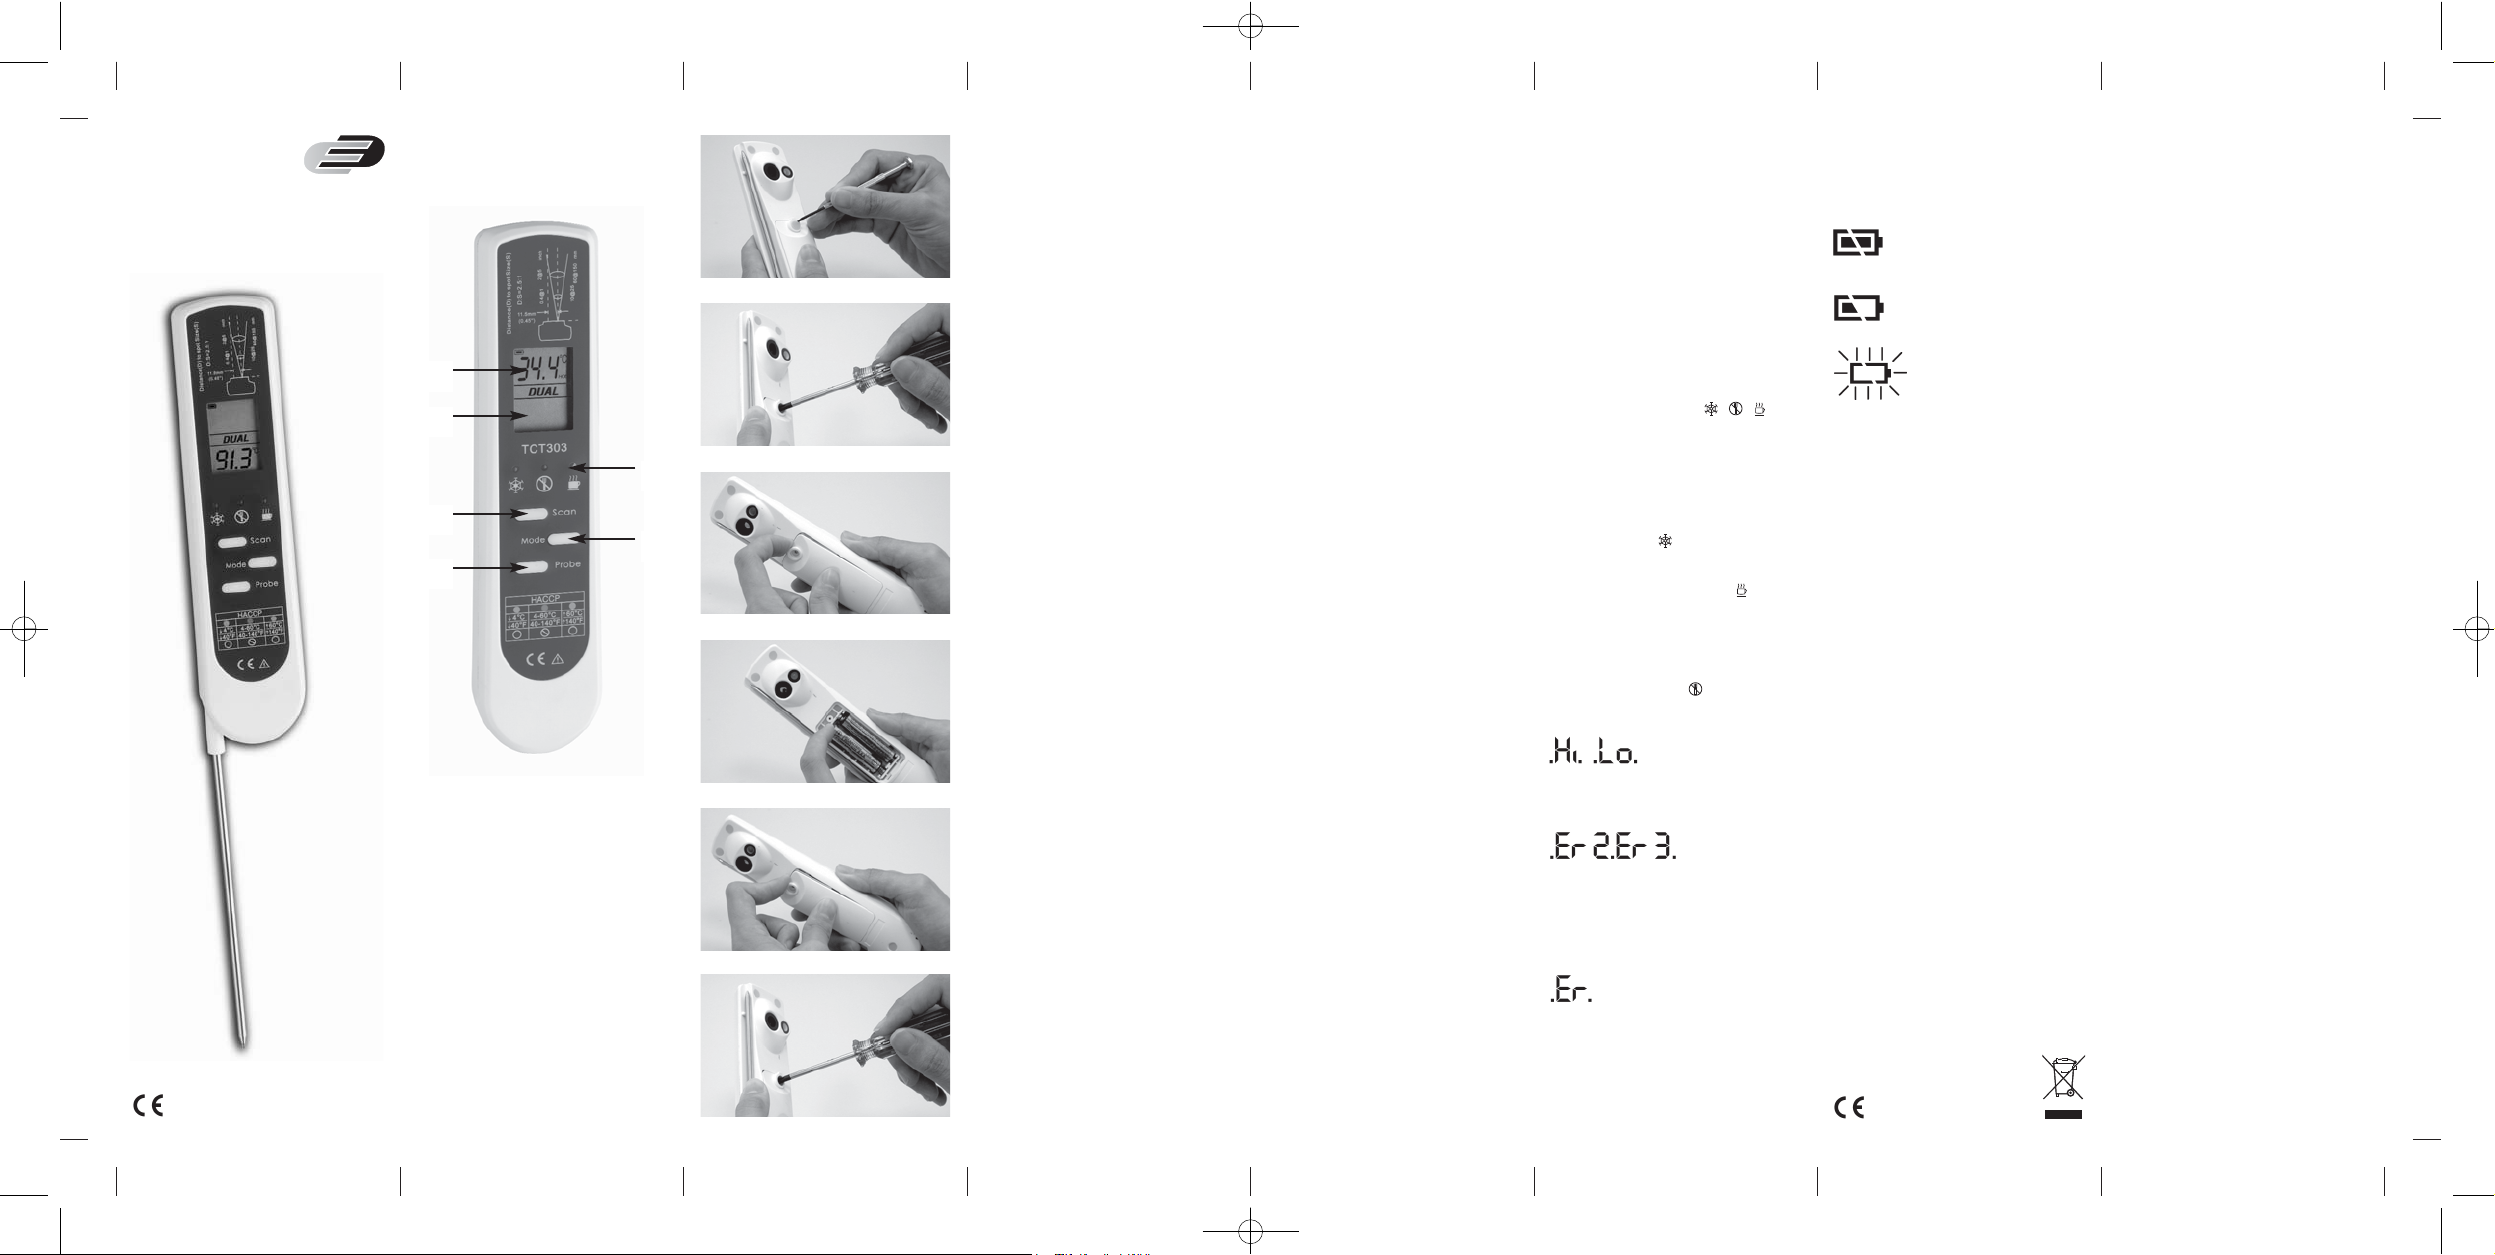
Batteriewechsel (Fig. 1-6):
1. Bitte entfernen Sie die Gummidichtung über der Schraube mit einem
kleinen Schraubenzieher.
2. Danach schrauben Sie den Batteriedeckel auf.
3. Entfernen Sie den Batteriedeckel.
4. Batterie auswechseln.
(2x Typ 1.5V AAA)
5. Erst das untere Ende des Batteriedeckels einsetzen.
6. Bitte wie unter 1 den Batteriedeckel
mit einem Schraubenzieher schließen.
Das Thermometer ist wasserdicht,
bitte achten Sie darauf, das der Batteriedeckel richtig geschlossen ist
und die Dichtung richtig sitzt.
Bitte entsorgen Sie Altgeräte und
leere Batterien nicht über den Hausmüll.
DualTEMP PRO
Spezifikationen:
Infrarotsensor (IR Mode):
Messbereich: -55~250°C
-67~482°F
Genauigkeit: -33~0 : ±1°C+0.1/°C
0~ 65 : ±1°C
65~200 : ±1.5%
vom Messwert
Thermoelementsensor (Typ K)
Einstechfühler:
Messbereich: -55~250°C
-67~482°F
Genauigkeit: unter-5 : ±1°C
-5~ 65 : ±0.5°C
über 65 : ±1%
vom Messwert
Auflösung: (-9.9~199.9°C)
0.2°C/0.5°F
Arbeitstemperatur: 0~50°C
32~122°F
Abmessungen: 160 x 38 x 22 mm
Gewicht: 100 g
Batteriestandzeit: 18 Stunden
EMC/RFI
Durch elektromagnetische Einflüsse
(> 3Volt) können sich höhere Messabweichungen ergeben. Das Gerät wird
dadurch jedoch nicht beschädigt.
Dieses Produkt erfüllt die Richtlinien
gemäß der Norm EN 13485.
Eignung: S (Lagerung)
Umgebung: A
Genauigkeitsklasse: 1
Messbereich: -55°C…+250°C
Nach EN 13485 ist eine regelmäßige
Überprüfung und Kalibrierung des Messgeräts gemäß EN 13486 durchzuführen
(Empfehlung: jährlich).
DualTEMP PRO
Bedienungsanleitung
Operating Instructions
Mode d’emploi
5020-0413
Fig. 1
Fig. 2
Fig. 3
Fig. 4
Fig. 5
Fig. 6
➅
➃
➄
➂
➁
➀
➀
Messwert Infrarot
Infrared reading
Valeur mesurée infrarouge
➁
Messwert Einstichfühler
Insertion probe reading
Valeur mesurée sonde
➂
HACCP LED Kontrollleuchte
HACCP check LED
HACCP LED lampe pilote
➃
SCAN-Taste (Infrarot)
SCAN button (infrared)
Touche SCAN (infrarouge)
➄
MODE-Taste
MODE button
Touche MODE
➅
PROBE-Taste (Einstichfühler)
PROBE button (insertion probe)
Touche PROBE (sonde)
DE_Anleit_31.1119_06/10 23.06.2010 14:36 Uhr Seite 1
Introduction:
The thermometer is a non-contact infra-
red thermometer, also with Probe thermometer. You can select only one Mode at
the same time but can change the Mode
at will. Please remember to keep away
from baby and children and don’t use it
for safety related applications.
Special Features:
• Food Code Zone Display
• Water Proof (IP65)
Non-contact Infrared Thermometer
function (IRT Mode):
• The white light will automatically turn
on while the Scan button is pressed.
• Distance:Spot (FOV) = 2.5:1
• Emissivity = 0.1~1 Step.01
• Wave Length = 8µm-14µm
• Simply aim the thermometer at the
measure target with “Infrared Lens“
and press Scan (infrared) key to display the surface temperature with a
‘Hold’ wording. The distance to target
ratio is 2.5:1 therefore the thermometer should be positioned as close to
the target as possible.
While scanning, the newest temperature will be updated on the LCD and the
measurement will continue as long as
the Scan (infrared) key is pressed.
When the Scan (infrared) key is released, icon ”Hold” will appear on the display and the last measurement will
remain visible for 15 sec. before the
display goes blank.
MODE Selection:
MIN ➝ MAX ➝ LOCK ➝ °C/ °F ➝ EMIS
MINIMUM / MAXIMUM mode:
• The thermometer will display the
minimum or maximum reading during
the measurement period only until the
Mode key is pressed.
• To utilize the minimum mode, please
press Scan (infrared) key → Mode key
→ Scan (infrared) key. And keep pressing Scan (infrared) key for measurement.
• To utilize the maximum mode, please
press Scan (infrared) key → Mode key
twice → Scan (infrared) key. And keep
pressing Scan (infrared) key for measurement.
LOCK mode:
• The lock mode is particularly useful
for continuous monitoring of temperatures. The thermometer will continuously display the temperature for
up to 60 minutes or until the Scan
(infrared) key button is pressed.
• To utilize the lock mode, please press
Scan (infrared) key → Mode key three
times → Scan (infrared) key.
DualTEMP PRO
°C or °F mode:
• To change the ‘°C’ or ‘°F’ mode, please
press Scan (infrared) key → Mode key
four times → Scan (infrared) key.
• Same steps can be taken when switching from °F to °C.
Emissivity:
• The infrared thermometer is supplied
with a default emissivity of 0.95. The
emissivity can be changed from 0.10
(10E) to 1 (100E). Changes should only
be carried out by experienced personnel. For information relating to the
emissivity of specific materials, please
contact the nearest retailer.
• To change the emissivity, please Scan
(infrared) key → Mode key five times
→ Scan (infrared) key for each 0.01
(1E) adjustment → Mode key.
Note: Non-contact infrared thermo-
meters are not recommended for use
in measuring the temperature of shiny
or polished metals.
Contact Thermocouple Probe function (COT Mode):
• Attach the thermometer at the measure target with ”Probe” and press Probe
key to continuously display the temperature for up to 4 minutes. After that
the device will automatically shut off
to extend the battery life. Press Probe
key will interrupt the scanning to display the last temperature with a 'Hold'
wording. To reenter scanning just press
Probe key again.
Do not twist the probe and rotate the
probe in wrong direction.
Over stress on probe may cause break.
After measure high temp, the probe
may remain HOT for a while.
Probe is dangerous for human when
the probe is in an open position.
Remember to hold the probe back
when not in use.
The probe of contact thermometer may
be damaged if exceeding the specification of measurement temperature range.
HACCP check:
• The "HACCP CHECK” feature is incorporated in our thermometer
temperature to graphically indicate
critical temperature zone. The icons
” ”and LED indicators located above the display indicate a food
product stays in a safe or unsafe
HACCP " Danger Zone” temperature.
The green and red LED light will
always be lit before power off.
• A green LED appears with icon ” ”
indicates a safe cool or frozen condition below 4°C(40°F) or appears with
icon ” ” indicates a safe holding
temperature above 60°C(140°F).
DualTEMP PRO
• When temperature is between 4°C and
60°C, the red LED with icon ” ” will
appear and indicate that the temperature is fallen within the HACCP
”Danger Zone” from 4°C to 60°C
(40~140°F).
LCD error Messages:
‘Hi’ or ’Lo’ is displayed when the temperature being measured is outside of the
range of the instrument, ‘Hi’ when
higher than +250°C (572°F) and ‘Lo’
when lower than -55°C (-67 °F).
‘Er2’ is displayed when the thermometer
is exposed to rapid changes in the
ambient temperature. ‘Er3’ is displayed
when the ambient temperature exceeds
0°C (32°F) or +50 °C (122 °F). The thermometer should be allowed plenty of time
(minimum 30 minutes) to stabilize to the
working/room temperature.
For all other error messages it is necessary to reset the thermometer. To reset it,
turn the instrument off, remove the battery and wait for a minimum of one
minute, reinsert the battery and turn on.
If the error message remains please
contact the Service Department for further assistance.
Batteries:
The thermometer incorporates visual low
battery indication as follows:
Battery OK
➝ Measurements
are possible
Battery Low
➝ Battery needs to be
replaced, measurements
are still possible
Battery Exhausted
➝ Measurements
are not possible
When the ‘Low Battery’ icon indicates
the battery is low, the battery should
be replaced immediately. It is important to turn the instrument off before
replacing the battery otherwise the
thermometer may malfunction.
Please do not dispose of old electronic
devices and empty batteries in household waste. Keep away from children.
DualTEMP PRO
Battery change (Fig. 1-6):
1. Please pick the rubber gasket on the
battery cover by using small, pointed
screwdriver with the "X” shaped, then
release the screw on the battery cover.
2. Open the battery cover.
3. Replace the new battery.
(Power Supply: AAA 2pcs, 1.5V)
4. First, close the bottom side and push
the battery cover in.
5. Use the same way as point 1 to close
the battery cover and stuff the screw
hole with the rubber gasket.
Since the thermometer is waterproof,
please make sure the battery cover is
tight for the thermometer and also
with the rubber gasket.
Spezifikations:
Infrared Scan function (IRT Mode):
Measuring range:
-55~250°C (-67~482°F)
Accuracy:
(Tobj=15-35°C,Tamb=25°C)
±0.6°C (1.1 °F)
(Tobj=above -33°C)
-33~0:+/-(1°C+0.1/degree)
0~ 65: +/-1°C
65~200:+/-1.5% of reading
Thermocouple Probe (K type, Grounded)
(COT Mode):
Measuring range:
-55~250°C
(-67~482°F)
Accuracy:
below -5 :±1°C
-5~ 65 : ±0.5°C
above 65 :±1% of reading
Resolution:
(-9.9~199.9°C) 0.2°C/0.5°F
Operating Range: 0~50°C (32~122°F)
Dimension: 160 x 38 x 22 mm
Weight: 100 g
Battery Life: 18 hrs
EMC/RFI Readings may be affected if
the unit is operated within a radio frequency electromagnetic field strength
of approximately 3 volts per metre, but
the performance of the instrument will
not be permanently affected.
This product fulfills the guidelines
according to EN 13485.
Suitability: S (Stockage)
Location: A
Accuracy class: 1
Measuring range: -55°C…+250°C
In accordance with EN 13485, this instrument is subject to regular inspections as
per EN 13486(recommendation: yearly)
DualTEMP PRO
Introduction:
Le Dualtemp est à la fois un thermomètre
infrarouge (mesure sans contact) et un
thermomètre à contact avec sonde de
pénétration. Appuyer sur la touche Scan
pour mesurer la température sans contact.
Appuyer sur la touche Meas pour mesurer
la température avec la sonde de pénétration.
Caractéristiques spéciales:
• Zone d'affichage code aliment
• Étanche à l'eau (IP65)
Mesure de température sans contact
(infrarouge):
• Diriger simplement le détecteur infrarouge sur l'objet à mesurer, et
actionner la touche Scan. Le rapport
de la surface mesurée à la distance est
de 2,5:1; il est donc important de
mesurer l’objet du plus près possible.
• La valeur mesurée apparaît dans la
moitié supérieure de l’affichage. Dès
que la touche Scan est relâchée,
”HOLD” apparaît sur l’affichage, et la
dernière valeur mesurée reste affichée
pendant encore 15 secondes.
MODE DE SÉLECTION:
MIN ➝ MAX ➝ LOCK ➝ °C/ °F ➝ EMIS
Mode Minimum/Maximum:
• Le Dualtemp permet d’afficher uniquement les valeurs mesurées minimales ou maximales.
• Pour activer l’affichage de la valeur
minimale, actionner puis relâcher la
touche Scan. Actionner ensuite une
fois la touche Mode. "MIN" apparaît
dans la moitié supérieure de l’affichage. Actionner à nouveau la touche
Scan. Seule la température mesurée la
plus basse sera maintenant affichée.
• Pour activer l’affichage de la valeur
maximale, actionner puis relâcher la
touche Scan. Actionner ensuite deux
fois la touche Mode. "MAX" apparaît
dans la moitié supérieure de l’affichage. Actionner à nouveau la touche
Scan. Seule la température mesurée la
plus haute sera maintenant affichée.
Mode Lock (mode verrouillé):
• Le Dualtemp permet d’effectuer des
mesures continues (fonction de verrouillage).
• Pour activer la fonction de verrouillage, actionner puis relâcher la touche
Scan. Actionner ensuite trois fois la
touche Mode. "LOCK" apparaît dans
la moitié supérieure de l’affichage.
Actionner à nouveau la touche Scan.
L’appareil mesure maintenant en continu et s’éteint automatiquement au
bout de 60 minutes.
DualTEMP PRO
• Pour désactiver le mode verrouillé,
actionner à nouveau la touche Scan.
Choix °C/°F:
• Pour passer des degrés Celsius (°C) aux
degrés Fahrenheit (°F), actionner la
touche Scan puis la relâcher. Actionner
ensuite quatre fois la touche Mode.
"°C" apparaît dans la moitié supérieure de l’affichage. Actionner à nouveau
la touche Scan, et "°F" apparaît dans
la moitié supérieure de l’affichage.
L’appareil mesure maintenant en
degrés Fahrenheit.
Réglage du facteur d’émission:
• Le Dualtemp est réglé en usine à un
facteur d’émission de 0,95. Cette
valeur convient pour de nombreuses
applications (produits alimentaires,
plastique, eau, ...). Le facteur d’émission ne doit être modifié que par des
personnes qualifiées.
• Pour modifier le facteur d’émission,
actionner la touche puis la relâcher.
Actionner ensuite cinq fois la touche
Mode. "95E" apparaît dans la moitié
supérieure de l’affichage. En
actionnant à nouveau la touche Scan,
on modifie maintenant le facteur d’émission (plage 10E ... 100E). Lorsque
la valeur souhaitée est réglée,
actionner la touche Mode. L’appareil
mesure maintenant en tenant compte
du nouveau facteur d’émission réglé.
Attention: Les appareils de mesure de
température à infrarouge ne conviennent pas pour mesurer des surfaces
métalliques nues, brillantes et polies.
Mesure de température avec la sonde
de pénétration:
• La sonde de pénétration est fixée sur
l’appareil par une attache. Faire pivoter
la sonde à 180° et actionner la touche
Meas. La valeur mesurée apparaît dans
la moitié inférieure de l’affichage.
Après avoir relâché la touche Meas,
l’appareil s’éteint automatiquement au
bout d’environ une minute.
La sonde du thermomètre à contact peut
être endommagée si la plage de mesure
de température spécifiée est dépassée.
Contrôle HACCP:
• Nos thermomètres intègrent la fonction "HACCP CHECK” pour indiquer
une zone de température critique sous
forme graphique.
Les symboles” ”et témoins
LED au-dessus de l'afficheur signalent
qu'un produit alimentaire se situe
dans une zone de température correcte ou non correcte HACCP ”Danger
Zone”. Les témoins LED vert et rouge
s'allument toujours avant la coupure
de l'alimentation électrique.
DualTEMP PRO
• Une LED verte apparaît avec un symbole ” ” pour signaler un état de
froid ou de gel inférieur à 4 °C (40 °F)
ou avec un symbole ” ” pour signaler un bon maintien de température
au-dessus de 60°C (140°F).
• Lorsque la température se situe entre
4°C et 60°C, la LED rouge avec le symbole ” ” apparaît pour signaler que
la température a chuté à l'intérieur de
la HACCP "Danger Zone” de 4°C à 60°C
(40~140°F).
Messages d’erreur:
Si ‘Hi‘ ou ‘Lo‘ s’affiche, la température
mesurée est en dehors de la plage autorisée.
Si ‘Er2‘ ou ‘Er3‘ s’affiche, la température
ambiante n'est pas comprise entre 0 et
+50°C.
Veuillez attendre 30 minutes que l’appareil se soit stabilisé à la nouvelle
température ambiante
Pour tous les autres messages d’erreur,
retirer la pile puis la remettre en place au
bout d’environ 30 secondes. Si le message d’erreur réapparaît, retourner l’appareil au fabricant ou au distributeur.
Pile:
Le Dualtemp est doté d’un affichage de
l’état de la pile:
Batterie OK
➝ Mesures sont possibles
Batterie Faible
➝ Changer la batterie,
mesures sont encore possibles
Batterie Vide
➝ Mesures ne sont plus
possibles
Lorsque le symbole ‘Low Battery’ indi-
que que la pile est déchargée, celle-ci
doit être immédiatement remplacée
par une pile au lithium CR2032.
Il est primordial d'éteindre l'instrument
avant de remplacer la pile, sinon le
thermomètre peut présenter des disfonctionnements. Mettre la batterie
rapidement au rebut et la tenir hors de
portée des enfants.
Changement de la pile (Fig. 1-6):
1.
Retirer le joint en caoutchouc sur le couvercle du compartiment de pile à l'aide
DualTEMP PRO
d'un petit thermomètre cruciforme puis
desserrer la vis retenant le couvercle.
2. Ouvrir le couvercle du compartiment
de pile.
3. Monter une pile neuve. (2x AAA, 1.5V)
4. Insérer tout d'abord le couvercle à la
base du compartiment puis appuyer.
5. Pour fermer le couvercle du compartiment de pile, procéder comme à l'étape 1 puis obturer le trou de la vis avec
le joint en caoutchouc.
Le thermomètre est étanche à l'eau,
verifier que le couvercle du compartiment de pile est bien serré sur le thermomètre et que le joint en caoutchouc
est aussi en place.
Caractéristiques techniques:
Infrarouge:
Plage de mesure:
-55~250°C (-67~482°F)
Précision:
(Tobj=15-35°C,Tamb=25°C)
±0.6°C (1.1 °F)
(Tobj=au-dessus de -33°C)
-33~0:+/-(1°C+0.1/degré)
0~ 65: +/-1°C
65~200:+/-1.5% de l’affichage
Sonde de pénétration:
Plage de mesure:
-55~250°C
(-67~482°F
)
Précision:
au-dessons-5 :±1°C
-5~ 65 : ±0.5°C
au-dessus de 65 :±1% de l’affichage
Résolution de l’affichage:
(-9.9~199.9°C) 0.2°C/0.5°F
Température d’utilisation:
0~50°C (32~122°F)
Dimensions: 160 x 38 x 22 mm
Poids: 100 g
Vie de la pile: Environ 18 heures
EMC/RFI Les mesures peuvent être né-
gativement influencés si l'instrument
est utilisé dans un champ intensif de
fréquence électromagnétique radio
d'environ 3 volts par mètre, la performance de l'instrument n'en sera cependant pas affectée en permanence.
Ce produit accomplit les directives selon
la norme EN 13485.
Aptitude: S ( Stockage )
Environs: A
Catégorie de précision: 1
Plage de mesure: -55°C…+250°C
Selon EN 13485 un contrôle régulier et
une calibration de l’instrument de
mesure est nécessaire selon EN 13486
(recommandation: par an).
DualTEMP PRO
DE_Anleit_31.1119_06/10 23.06.2010 14:36 Uhr Seite 2
 Loading...