

RoHS
Bedienungsanleitung
Instruction manual
Mode d’emploi
Istruzioni per l'uso
Gebruiksaanwijzing
Instrucciones de uso
Kat. Nr. 30.3065
TFA_No. 30.3065_Anleitung 18.01.2018 11:50 Uhr Seite 1

Fig. 1 Fig. 2
A 3
A 3
A 3
C 2
A 1 A 6
A 2
A 4
A 5
C 1
B 1 B 2C 3
32
TFA_No. 30.3065_Anleitung 18.01.2018 11:50 Uhr Seite 2

Fig. 3 Fig. 4
D3
D 1
D 2
54
TFA_No. 30.3065_Anleitung 18.01.2018 11:50 Uhr Seite 3
76
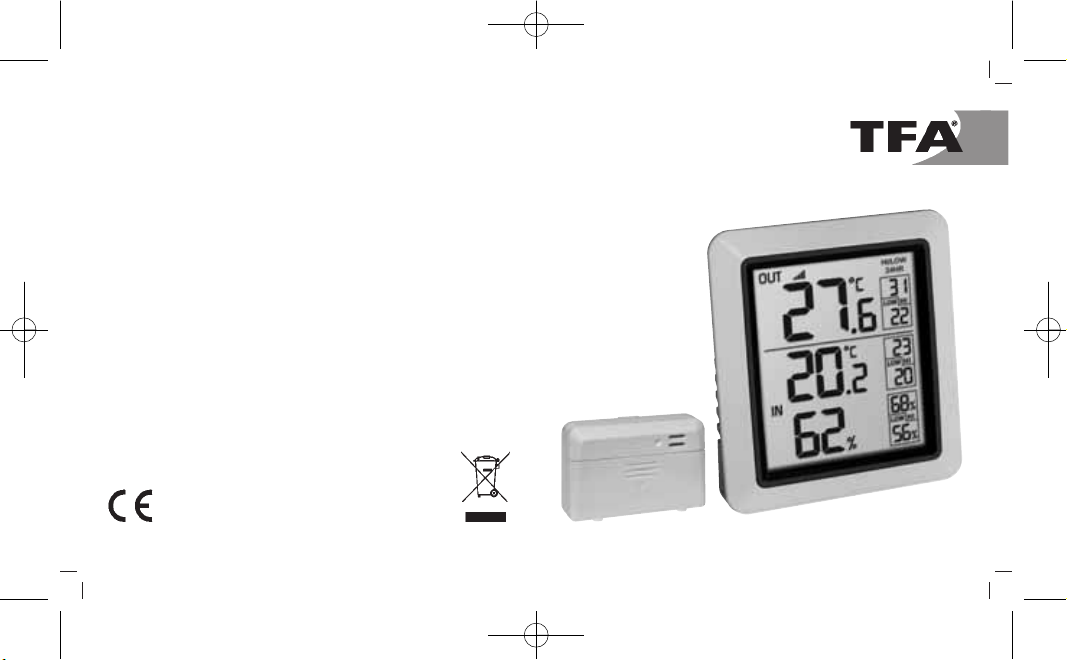
Funk-Thermometer
Vielen Dank, dass Sie sich für dieses Gerät aus dem Hause TFA
entschieden haben.
1. Bevor Sie mit dem Gerät arbeiten
• Lesen Sie sich bitte die Bedienungsanleitung genau
durch.
• Durch die Beachtung der Bedienungsanleitung vermeiden
Sie auch Beschädigungen des Gerätes und die Gefährdung Ihrer gesetzlichen Mängelrechte durch Fehlgebrauch.
• Für Schäden, die aus Nichtbeachtung dieser Bedienungsanleitung verursacht werden, übernehmen wir keine Haftung. Ebenso haften wir nicht für inkorrekte Messwerte
und Folgen, die sich aus solchen ergeben können.
• Beachten Sie besonders die Sicherheitshinweise!
• Bewahren Sie diese Bedienungsanleitung gut auf!
2. Lieferumfang
• Funk-Thermometer (Basisstation)
• Außensender (Kat.-Nr. 30.3234.02)
• Bedienungsanleitung
Funk-Thermometer
3. Einsatzbereich und alle Vorteile Ihres neuen Gerätes auf
einen Blick
• Außentemperatur über kabellosen Außensender (max. 80m)
• Anzeige der Innentemperatur und Luftfeuchtigkeit
• Höchst- und Tiefstwerte mit manueller oder automatischer
Rückstellung
• Zum Aufstellen oder an die Wand hängen
4. Zu Ihrer Sicherheit
• Das Produkt ist ausschließlich für den oben beschriebenen
Einsatzbereich geeignet.
• Verwenden Sie das Produkt nicht anders, als in dieser
Bedienungsanleitung dargestellt wird.
• Das eigenmächtige Reparieren, Umbauen oder Verändern
des Gerätes ist nicht gestattet.
Vorsicht!
Verletzungsgefahr:
• Bewahren Sie die Geräte und die Batterien außerhalb der
Reichweite von Kindern auf.
TFA_No. 30.3065_Anleitung 18.01.2018 11:50 Uhr Seite 4

98
Funk-Thermometer
• Batterien enthalten gesundheitsschädliche Säuren und können bei Verschlucken lebensgefährlich sein. Wurde eine
Batterie verschluckt, kann dies innerhalb von 2 Stunden zu
schweren inneren Verätzungen und zum Tode führen. Wenn
Sie vermuten, eine Batterie könnte verschluckt oder anderweitig in den Körper gelangt sein, nehmen Sie sofort medizinische Hilfe in Anspruch.
• Batterien nicht ins Feuer werfen, kurzschließen, auseinandernehmen oder aufladen. Explosionsgefahr!
• Um ein Auslaufen der Batterien zu vermeiden, sollten
schwache Batterien möglichst schnell ausgetauscht werden.
• Beim Hantieren mit ausgelaufenen Batterien chemikalienbeständige Schutzhandschuhe und Schutzbrille tragen!
Wichtige Hinweise zur Produktsicherheit!
• Setzen Sie die Geräte keinen extremen Temperaturen, Vibrationen und Erschütterungen aus.
Funk-Thermometer
• Schützen Sie die Basisstation vor Feuchtigkeit.
• Der Außensender ist spritzwassergeschützt, aber nicht wasserdicht. Suchen Sie einen niederschlagsgeschützten Platz
für den Außensender aus.
5. Bestandteile
5.1 Basisstation (Empfänger)
A: Display (Fig. 1):
A 1: Empfangssymbol
A 2: Außentemperatur
A 3: Max.-Min.-Werte
A 4: Innentemperatur
A 5: Innenluftfeuchtigkeit
A 6: Automatische Rückstellung der Max.-Min.-Werte
B: Tasten (Fig. 2):
B 1: °C / °F Taste
B 2: HI / LOW Taste
TFA_No. 30.3065_Anleitung 18.01.2018 11:50 Uhr Seite 5

1110
Funk-Thermometer
C: Gehäuse (Fig. 2):
C 1: Aufhängeöse
C 2: Batteriefach
C 3: Ständer
5.2 Sender (Fig. 3+4):
D 1: LED-Kontrolllampe
D 2: Batteriefach
D 3: Aufhängeöse
6. Inbetriebnahme
6.1 Einlegen der Batterien
• Legen Sie die Geräte in einem Abstand von ca. 1,5 Metern
voneinander auf einen Tisch. Vermeiden Sie die Nähe zu
möglichen Störquellen (elektronische Geräte und Funkanlagen).
• Öffnen Sie das Batteriefach des Außensenders und legen
Sie eine neue Batterie 1,5 V AA polrichtig ein. Die LED-Kontrolllampe blinkt.
• Schließen Sie das Batteriefach wieder.
Funk-Thermometer
• Ziehen Sie die Schutzfolie vom Display der Basisstation.
• Öffnen Sie das Batteriefach der Basisstation.
• Legen Sie eine neue Batterie 1,5 V AA polrichtig ein. Alle
Segmente werden kurz angezeigt. Die Innentemperatur und
Luftfeuchtigkeit erscheinen auf dem Display.
• Schließen Sie das Batteriefach wieder.
6.2 Empfang des Außensenders
• Nach dem Einlegen der Batterien startet der Außensender
automatisch mit der Übertragung der Außentemperatur. Das
Funksymbol blinkt auf dem Display.
• Wird die Außentemperatur nicht empfangen, erscheint „- -”
auf dem Display. Prüfen Sie die Batterie und starten Sie
einen weiteren Versuch. Beseitigen Sie eventuelle Störquellen.
• Sie können die Initialisierung auch manuell starten. Halten
Sie die °C / °F und HI / LOW Taste auf der Basisstation
gleichzeitig für fünf Sekunden gedrückt.
• Auf dem Display der Außentemperatur erscheint „- -” und
das Funksignal-Symbol blinkt. Die Basisstation versucht
nun wieder, die Außentemperatur zu empfangen.
TFA_No. 30.3065_Anleitung 18.01.2018 11:50 Uhr Seite 6

1312
Funk-Thermometer
7. Bedienung
7.1 Temperaturanzeige
• Mit der °C / °F Taste können Sie Celsius oder Fahrenheit als
Temperatureinheit auswählen.
7.2 Höchst- und Tiefstwerte
• Es gibt zwei Speicher für Höchst- und Tiefstwerte.
7.2.1 Speicher mit manueller Rückstellung
• Sobald die Basisstation und der Außensender aktiv sind,
werden die maximalen und minimalen Messwerte für innen
und außen gespeichert und im rechten Segment angezeigt.
• Drücken und halten Sie die HI / LOW Taste für drei Sekunden, werden die Werte gelöscht (Anzeige „-”) und auf den
aktuellen Wert zurückgesetzt.
7.2.2 Speicher mit automatischer Rückstellung
• Drücken Sie die HI / LOW Taste, um in den Modus mit automatischer Rückstellung der Höchst- und Tiefstwerte zu
gelangen.
Funk-Thermometer
• HI / LOW 24HR erscheint im Display.
• Die maximalen und minimalen Werte werden alle 24 Stunden (ab dem Zeitpunkt der Aktivierung) zurückgestellt.
8. Aufstellen und Befestigen der Basisstation und des Senders
•
Mit dem ausklappbaren Ständer auf der Rückseite kann die
Basisstation aufgestellt werden oder mit der Aufhängeöse an
der Wand befestigt werden. Vermeiden Sie die Nähe zu anderen elektrischen Geräten (Fernseher, Computer, Funktelefone)
und massiven Metallgegenständen.
•
Mit der Aufhängeöse auf der Rückseite des Senders kann dieser
an der Wand befestigt werden. Suchen Sie sich im Freien einen
schattigen, niederschlagsgeschützten Platz für den Sender aus.
(Direkte Sonneneinstrahlung verfälscht die Messwerte und
ständige Nässe belastet die elektronischen Bauteile unnötig).
•
Prüfen Sie, ob eine Übertragung der Messwerte vom Sender
am gewünschten Aufstellort zur Basisstation stattfindet
(Reichweite im Freifeld bis zu 80 Meter), bei massiven Wänden, insbesondere mit Metallteilen kann sich die Sendereichweite erheblich reduzieren.
TFA_No. 30.3065_Anleitung 18.01.2018 11:50 Uhr Seite 7
1514
Funk-Thermometer
•
Suchen Sie sich gegebenenfalls einen neuen Aufstellort für
Sender und/oder Basisstation.
9. Pflege und Wartung
• Reinigen Sie die Geräte mit einem weichen, leicht feuchten
Tuch. Keine Scheuer- oder Lösungsmittel verwenden!
• Entfernen Sie die Batterien, wenn Sie die Geräte längere Zeit
nicht verwenden.
• Bewahren Sie Ihre Geräte an einem trockenen Platz auf.
10. Fehlerbeseitigung
Problem Lösung
Keine Anzeige auf ➜ Batterie polrichtig einlegen
der Basisstation ➜ Batterie wechseln
Kein Senderempfang ➜ Kein Außensender installiert
Anzeige „---” ➜ Manuelle Sendersuche starten
➜ Batterie des Außensenders
prüfen (keine Akkus verwenden!)
Funk-Thermometer
➜ Neuinbetriebnahme von Außen-
sender und Basisstation gemäß
Bedienungsanleitung
➜ Anderen Aufstellort für Außen-
sender und/oder Basisstation
wählen
➜ Abstand zwischen Außensender
und Basisstation verringern
➜ Beseitigen der Störquellen
Unkorrekte Anzeige ➜ Batterie wechseln
Achtung: Bei einem Batteriewechsel muss der Kontakt
zwischen Sender und Basisstation wieder hergestellt werden –
also Batterien immer in beide Geräte neu einlegen oder manuelle Sendersuche starten.
11. Entsorgung
Dieses Produkt wurde unter Verwendung hochwertiger Materialien und Bestandteile hergestellt, die recycelt und wiederverwendet werden können.
TFA_No. 30.3065_Anleitung 18.01.2018 11:50 Uhr Seite 8

1716
Funk-Thermometer
Batterien und Akkus dürfen keinesfalls in den
Hausmüll!
Als Verbraucher sind Sie gesetzlich verpflichtet,
gebrauchte Batterien und Akkus zur umweltgerechten Entsorgung beim Handel oder entsprechenden Sammelstellen gemäß nationaler oder
lokaler Bestimmungen abzugeben.
Die Bezeichnungen für enthaltene Schwermetalle
sind: Cd=Cadmium, Hg=Quecksilber, Pb=Blei
Dieses Gerät ist entsprechend der EU-Richtlinie
über die Entsorgung von Elektro- und ElektronikAltgeräten (WEEE) gekennzeichnet.
Dieses Produkt darf nicht mit dem Hausmüll entsorgt werden. Der Nutzer ist verpflichtet, das Altgerät zur umweltgerechten Entsorgung bei einer
ausgewiesenen Annahmestelle für die Entsorgung von Elektro- und Elektronikgeräten abzugeben.
Funk-Thermometer
12. Technische Daten
Messbereich
Innentemperatur -10 °C… +60 °C
Luftfeuchtigkeit 10…99 %RH
Außentemperatur -40 °C… +60 °C
Genauigkeit Temperatur ± 1 °C
Genauigkeit Luftfeuchtigkeit ± 3% (35 … 75%)
Reichweite ca. 80 m (Freifeld)
Übertragungsfrequenz 433 MHz
Maximale Sendeleistung < 10mW
Spannungsversorgung Basisstation: 1 x 1,5 V AA
Außensender: 1 x 1,5 V AA
(Batterien nicht inklusive)
TFA_No. 30.3065_Anleitung 18.01.2018 11:50 Uhr Seite 9
1918
Funk-Thermometer
Basisstation
Größe 77 x 22 x 86 mm
Gewicht 70 g (nur das Gerät)
Außensender
Größe 64 x 20 x 41 mm
Gewicht 34 g (nur das Gerät)
Diese Anleitung oder Auszüge daraus dürfen nur mit Zustimmung von TFA Dostmann veröffentlicht werden. Die technischen Daten entsprechen dem Stand bei
Drucklegung und können ohne vorherige Benachrichtigung geändert werden. Die
neuesten technischen Daten und Informationen zu Ihrem Produkt finden Sie unter
Eingabe der Artikel-Nummer auf unserer Homepage.
EU-Konformitätserklärung
Hiermit erklärt TFA Dostmann, dass der Funkanlagentyp 30.3065 der Richtlinie
2014/53/EU entspricht. Der vollständige Text der EU-Konformitätserklärung ist
unter der folgenden Internetadresse verfügbar:
www.tfa-dostmann.de
E-Mail: info@tfa-dostmann.de
TFA Dostmann GmbH & Co.KG
Zum Ottersberg 12, D-97877 Wertheim, Deutschland 01/18
Wireless thermometer
Thank you for choosing this instrument from TFA.
1. Before you use this product
• Please make sure you read the instruction manual carefully.
• Following and respecting the instructions in your manual
will prevent damage to your instrument and loss of your
statutory rights arising from defects due to incorrect use.
• We shall not be liable for any damage occurring as a
result of non-following of these instructions. Likewise,
we take no responsibility for any incorrect readings or for
any consequences resulting from them.
• Please take particular note of the safety advice!
• Please keep this instruction manual safe for future re-
ference.
2. Delivery contents
• Wireless thermometer (base station)
• Outdoor transmitter Cat.-No. 30.3234.02
• Instruction manual
TFA_No. 30.3065_Anleitung 18.01.2018 11:50 Uhr Seite 10
2120
Wireless thermometer
3. Range of application and all the benefits of your new
instrument at a glance
• Outdoor temperature over wireless outdoor transmitter
(max. 80 m)
• Indication of indoor temperature and humidity
• Indication of maximum and minimum values with manual
or auto-reset
• Wall mounting or table stand
4. For your safety
• This product is exclusively intended for the range of application described above. It should only be used as described
within these instructions.
• Unauthorized repairs, alterations or changes to the product
are prohibited.
Caution!
Risk of injury:
• Keep these devices and the batteries out of reach of children.
Wireless thermometer
• Batteries contain harmful acids and may be hazardous if
swallowed. If a battery is swallowed, this can lead to serious internal burns and death within two hours. If you suspect a battery could have been swallowed or otherwise
caught in the body, seek medical help immediately.
• Batteries must not be thrown into a fire, short-circuited,
taken apart or recharged. Risk of explosion!
• Low batteries should be changed as soon as possible to
prevent damage caused by leaking.
• Wear chemical-resistant protective gloves and safety glasses when handling leaking batteries.
Important information on product safety!
• Do not expose the devices to extreme temperatures, vibrations or shocks.
• Protect the base station from moisture.
• The outdoor transmitter is splash proof, but not watertight.
When placed outdoors, choose a shady and dry place for
the transmitter.
TFA_No. 30.3065_Anleitung 18.01.2018 11:50 Uhr Seite 11

2322
Wireless thermometer
5. Elements
5.1 Base station (Receiver)
A: Display (Fig. 1):
A 1: Reception symbol
A 2: Outdoor temperature
A 3: Max/min values
A 4: Indoor temperature
A 5: Indoor humidity
A 6: Auto-reset of the maximum-minimum values
B: Buttons (Fig. 2):
B 1: °C / °F button
B 2: HI / LOW button
C: Housing (Fig. 2):
C 1: Mounting hole
C 2: Battery compartment
C 3: Stand
Wireless thermometer
5.2 Transmitter (Fig. 3+4):
D 1: LED signal lamp
D 2: Battery compartment
D 3: Mounting hole
6. Getting started
6.1 Insert the batteries
• Place the instruments on a table at a distance of about 1.5
meters from each other. Avoid being close to possible
sources of interference such as electronic devices and radio
equipment.
• Open the battery compartment of the transmitter and insert
a new battery (1,5 V AA), ensure that battery polarities are
correct. The LED signal lamp flashes.
• Close the battery compartment again.
• Remove the protective film from the base station display.
• Open the battery compartment of the base station.
• Insert a new battery (1,5 V AA), polarity as indicated. All
segments will be displayed briefly. The indoor temperature
and humidity appear on the display.
• Close the battery compartment again.
TFA_No. 30.3065_Anleitung 18.01.2018 11:50 Uhr Seite 12
2524
Wireless thermometer
6.2 Reception of outdoor transmitter
• After inserting the batteries the transmitter will automatically transmit the temperature. The reception symbol will be
flashing on the display.
• If the reception of outdoor temperature fails, “- -” appears
on the display. Check the battery and try it again. Check if
there is any source of interference.
• You can also start the initialization manually. Hold the
°C/°F and HI / LOW button on the base station for five se-
conds at the same time.
• “- -” appears on the outdoor temperature display and the
reception symbol flashes. The base station will scan again
the outdoor temperature.
7. Operation
7.1 Indication of the temperature
• Press the °C / °F button to change between °C (Celsius) or
°F (Fahrenheit) as temperature unit.
7.2 Maximum and minimum values
• There are two memory modes for highest and lowest values.
Wireless thermometer
7.2.1 Maximum and minimum values with manual reset
• As soon as the base station and the outdoor transmitter are
active the maximum and minimum values for indoor and
outdoor will be stored and displayed in the right row.
• Press and hold the HI / LOW button for three seconds, the
values are deleted (display “-”) and reset to the actual values.
7.2.2 Maximum and minimum values with auto reset
• Press the HI / LOW button to enter the automatic reset mode
of the maximum-minimum values.
• HI / LOW 24 HR appears on the display.
• The maximum and minimum values will be reset every 24
hours (from the moment of activation).
8. Positioning and mounting of the base station and the
transmitter
•
The base station can be placed onto any flat surface (foldout
stand) or wall mounted (mounting hole) at your chosen location. Make sure you avoid the vicinity of any source of interference such as computer screens, TV sets or solid metal objects.
TFA_No. 30.3065_Anleitung 18.01.2018 11:50 Uhr Seite 13
 Loading...