

Page 1

95E0091 © 2003 REV.A
The Tele-Mate®Pro Telephone Test Set will help deal with the increasing complexity of
telecom installation and maintenance. A complete butt-in test set, the PE830 adds
useful features like loudspeaker monitor, caller ID, speed dial, callback, intercom and
line voltage/current/frequency meter.
The Model PE830 consists of:
Tele-Mate®Pro Telephone Test Set
HS-1 HEADSET
PE830 T E L E - M AT E®P RO
TELEPHONE TEST SET
Read and understand this material before operating or
servicing this equipment. Failure to understand how to
safely operate this tool can result in an accident causing
serious injury or death.
WARNING
Tempo – Mesa | ehemals Progressive Electronics
Telefon: 001-815-397-4279
Gebührenfrei in den USAund Kanada: 1-800-282-7941 • Fax: 001-815-397-1865
Tempo Europa Telefon 0044-1633 225 600 • Tempo Europa Fax 0044-1633 225 601
www.tempo.textron.com
Einjährige beschränkte Garantie
Tempo garantiert dem Erstkäufer dieser Produkte, dass sie unter Ausschluss von
normalem Verschleiß oder Missbrauch ein Jahr lang frei von Material- und
Herstellungsfehlern sind.
Bei allen Reparaturen an Prüfgeräten in Amerika muss zunächst eine
Rücksendungserlaubnisnummer bei unser Kundendienstabteilung unter 001-940-3253000 App.256 eingeholt werden.Diese Nummer muss gut lesbar auf dem V ersandetikett
angegeben werden.Alle Geräte freigemacht senden an:
Tempo
6100 Columbia Street, Mineral Wells
Texas 76067 USA.
Attention TEST INSTRUMENT REPAIR.
Bei allen Reparaturen an Prüfgeräten außerhalb der USA und Kanada: Es muss
zunächst eine Rück s e n d u n g s e rl a u b n i s nummer bei der europäischen
Kundendienstabteilung von Tempo unter 0044-1633 225 600 eingeholt werden.Diese
Nummer muss gut lesbar auf dem Ve r s a n d e t i kett angegeben we r d e n . Alle Geräte
freigemacht senden an:
Tempo Europe Repair Centre
Unit 3, Maesglas Industrial Estate
Newport, South Wales NP20 2NN, UK
Attention TEST INSTRUMENT REPAIR.
Bei Geräten ohne Garantieschutz (z.B. gefallene oder missbrauchte Geräte) kann ein
Kostenvoranschlag für die Reparatur eingeholt werden.
Hinweis: Bitte laden Sie vor dem Einsenden die Batterien des Geräts vollständig auf.
Page 2
D9
Leitungsspannung:. . . . . . . . . . . . . . . . . . . . . . . . . . . . . . . . . . . . . . . . . max. 120 V DC
Schleifenstrom: . . . . . . . . . . . . . . . . . . . . . . . . . . . . . . . . . . . . . . . . . . . . . max. 125 mA
Klingelfrequenz: . . . . . . . . . . . . . . . . . . . . . . . . . . . . . . . . . . . . . . . . . . . . . . . 15 - 70 Hz
Leitungsschutz:
Überspannung: . . . . . . . . . . . . . . . . . . . . . . . . . . . . . . . . 360 V DC stetig >500 V Spitze
Strombeschränkung: . . . . . . . . . . . . . . . . . . . . . . . . . . . . . . . . . . . . . . . . . . . . . 140 mA
Blitze:. . . . . . . . . . . . . . . . . . . . . . . . . . . . . . . . . . . . . . . . . . . ITU K.17, 20, 21 (1500 V)
Reichweite der Wechselsprecheinrichtung:. . . . . . . . . . . . . . . . . . . 6 km
10. GLOSSAR
Aufgelegt: (on-hook): Das Telefon ist nicht aktiviert
Abgehoben (off-hook): Das Telefon ist aktiviert
Monitor: Die Telefonleitung kann nur zum Hören benutzt werden
Leitungsstrom: Die Menge an Strom, die von der Telefonleitung fließt, wenn abgehoben
(in Milliampere, mA)
Fl a s h : Eine vorübergehende Unterbrechung des Leitungsstrom, der vom Prüfgerät dazu
benutzt wird, Sonderfunktionen an das Telefonsystem zu signalisieren.
NOTICE: This document is an unpublished work protected by United States copyright
laws and is proprietary to Tempo. Disclosure, copying, reproduction, merger,
translation, modification, enhancement or use by anyone other than authorized
employees or licensees of Tempo and its affiliate companies without prior consent of
Tempois prohibited.
Copyright © 2003 Tempo - a Textron Company.All rights reserved.
Tempo Research, a Delaware Corporation
SAFETY
ALERT
SYMBOL
This symbol is used to call your attention to hazards or unsafe practices which could
result in an injury or property damage. The signal word, defined below, indicates the
severity of the hazard. The message after the signal word provides information for
preventing or avoiding the hazard.
Hazards which, if not avoided, COULD result in severe injury or death.
DANGER
WARNING
CAUTION
• Do not expose this unit to rain or moisture.
• Contact with live circuits can result in severe injury or death.
• Use this unit for the manufacturer’s intended purpose only, as described in this
manual. Any other use can impair the protection provided by the unit.
• Use test leads or accessories that are appropriate for the application. See the
category and voltage rating of the test lead or accessory.
• Inspect the test leads or accessory before use. The item(s) must be clean and
dry, and the insulation must be in good condition.
• Before opening the case, remove the test leads from the circuit and shut off the
unit.
Failure to observe these precautions may result in severe injury or death.
• Do not attempt to repair this unit. It contains no user-serviceable parts.
• Do not expose the unit to extreme temperatures or high humidity. See
Specifications.
• Extra loud speaker warning like PE961
Failure to observe these precautions can result in injury and can damage the
instrument.
WARNING
CAUTION
ELECTRIC
SHOCK HAZARD
Immediate hazards which, if not avoided, WILLresult in severe injury or death.
Hazards which, if not avoided, MAYresult in injury.
Page 3
CONTENTS
1. DESCRIPTION . . . . . . . . . . . . . . . . . . . . . . . . . . . . . . . . . . . . . . . .2
Features . . . . . . . . . . . . . . . . . . . . . . . . . . . . . . . . . . . . . . . . . . . . . . . . . . . . . .2
Key Specifications . . . . . . . . . . . . . . . . . . . . . . . . . . . . . . . . . . . . . . . . . . . . . .2
2. UNIT SET-UP . . . . . . . . . . . . . . . . . . . . . . . . . . . . . . . . . . . . . . . . .2
Battery Installation . . . . . . . . . . . . . . . . . . . . . . . . . . . . . . . . . . . . . . . . . . . . . .2
Low Battery Warning . . . . . . . . . . . . . . . . . . . . . . . . . . . . . . . . . . . . . . . . . . . .2
Reset . . . . . . . . . . . . . . . . . . . . . . . . . . . . . . . . . . . . . . . . . . . . . . . . . . . . . . . .3
3. BUTTONS & SWITCHES . . . . . . . . . . . . . . . . . . . . . . . . . . . . . . . .3
Operating Mode Icons . . . . . . . . . . . . . . . . . . . . . . . . . . . . . . . . . . . . . . . . . . .3
4. OPERATING MODES . . . . . . . . . . . . . . . . . . . . . . . . . . . . . . . . . . .3
Set-up Mode . . . . . . . . . . . . . . . . . . . . . . . . . . . . . . . . . . . . . . . . . . . . . . . . . . .4
Talk Mode . . . . . . . . . . . . . . . . . . . . . . . . . . . . . . . . . . . . . . . . . . . . . . . . . . . . .4
Flash . . . . . . . . . . . . . . . . . . . . . . . . . . . . . . . . . . . . . . . . . . . . . . . . . . . . . . .4
Off-Line Dialing & Automatic Redial of Last CID Number . . . . . . . . . . . . . .4
Pause . . . . . . . . . . . . . . . . . . . . . . . . . . . . . . . . . . . . . . . . . . . . . . . . . . . . . .4
Pulse Dialing Option . . . . . . . . . . . . . . . . . . . . . . . . . . . . . . . . . . . . . . . . . . .4
Current Measurement . . . . . . . . . . . . . . . . . . . . . . . . . . . . . . . . . . . . . . . . . .4
Over Current Protection . . . . . . . . . . . . . . . . . . . . . . . . . . . . . . . . . . . . . . . . . .5
SmartMute™ . . . . . . . . . . . . . . . . . . . . . . . . . . . . . . . . . . . . . . . . . . . . . . . . .5
Loudspeaker . . . . . . . . . . . . . . . . . . . . . . . . . . . . . . . . . . . . . . . . . . . . . . . . .5
Monitor Mode . . . . . . . . . . . . . . . . . . . . . . . . . . . . . . . . . . . . . . . . . . . . . . . . . .5
Over Voltage Warning . . . . . . . . . . . . . . . . . . . . . . . . . . . . . . . . . . . . . . . . . . .5
Elevated Voltage Warning . . . . . . . . . . . . . . . . . . . . . . . . . . . . . . . . . . . . . . . .5
Off Mode . . . . . . . . . . . . . . . . . . . . . . . . . . . . . . . . . . . . . . . . . . . . . . . . . . . . .5
Answering Incoming Call . . . . . . . . . . . . . . . . . . . . . . . . . . . . . . . . . . . . . . . . .5
Automatic Power Down . . . . . . . . . . . . . . . . . . . . . . . . . . . . . . . . . . . . . . . . . .6
5. MEMORY FUNCTIONS . . . . . . . . . . . . . . . . . . . . . . . . . . . . . . . . . .6
Last Number Redial . . . . . . . . . . . . . . . . . . . . . . . . . . . . . . . . . . . . . . . . . . . . . .6
Saving Speed Dial Number . . . . . . . . . . . . . . . . . . . . . . . . . . . . . . . . . . . . . . . .6
Recall Speed Dial Number . . . . . . . . . . . . . . . . . . . . . . . . . . . . . . . . . . . . . . . . .6
6. INTERCOM (LOCAL BATTERY) MODE . . . . . . . . . . . . . . . . . . . . . .7
7. CALLER ID . . . . . . . . . . . . . . . . . . . . . . . . . . . . . . . . . . . . . . . . . . .7
8. HEADSET . . . . . . . . . . . . . . . . . . . . . . . . . . . . . . . . . . . . . . . . . . . .7
9. SPECIFICATIONS . . . . . . . . . . . . . . . . . . . . . . . . . . . . . . . . . . . .7-8
10. GLOSSARY . . . . . . . . . . . . . . . . . . . . . . . . . . . . . . . . . . . . . . . . . . .9
One-Year Limited Warranty . . . . . . . . . . . . . . . . . . . . . . . . . . . .10
FIGURE INDEX
Fig. 1 - Mode Switch . . . . . . . . . . . .3
Fig. 2 - Volume & Mute Switch . . . .3
Fig. 3 - Main Keypad . . . . . . . . . . . .3
Fig. 4 - Setup Main . . . . . . . . . . . . .3
Fig. 5 - Setup Language . . . . . . . . .3
Fig. 6 - Dial Settings . . . . . . . . . . . .4
Fig. 7 - DTMF Level . . . . . . . . . . . .4
Fig. 8 - Setup Flash . . . . . . . . . . . . .4
Fig. 9 - Pulse Ratio . . . . . . . . . . . . .4
Fig. 10 - Setup Ringtone . . . . . . . . . .4
Fig. 11 - Setup Contrast . . . . . . . . . .4
Fig. 12 - Flash . . . . . . . . . . . . . . . . . .4
Fig. 13 - Pulse Dialing . . . . . . . . . . . .4
Fig. 14 - OFF Mode . . . . . . . . . . . . . .5
Fig. 15 - Monitor Mode . . . . . . . . . . .5
Fig. 16 - Over Voltage . . . . . . . . . . . .5
Fig. 17 - Off Mode . . . . . . . . . . . . . . .5
Fig. 18 - Power Cross . . . . . . . . . . . .6
Fig. 19 - Automatic LNR . . . . . . . . . .6
Fig. 20 - Store Screen 1 . . . . . . . . . .6
Fig. 21 - Store Screen 2 . . . . . . . . . .6
Fig. 22 - Store Screen 3 . . . . . . . . . .6
Fig. 23 - Recall 1 . . . . . . . . . . . . . . . .6
Fig. 24 - Recall 2 . . . . . . . . . . . . . . . .6
Fig. 25 - Recall 2 . . . . . . . . . . . . . . . .6
Fig. 26 - Intercom 1 . . . . . . . . . . . . . .7
Fig. 27 - Intercom 2 . . . . . . . . . . . . . .7
Fig. 28 - Intercom 3 . . . . . . . . . . . . . .7
Fig. 29 - Caller ID . . . . . . . . . . . . . . .7
Fig. 30 - Call Waiting . . . . . . . . . . . . .7
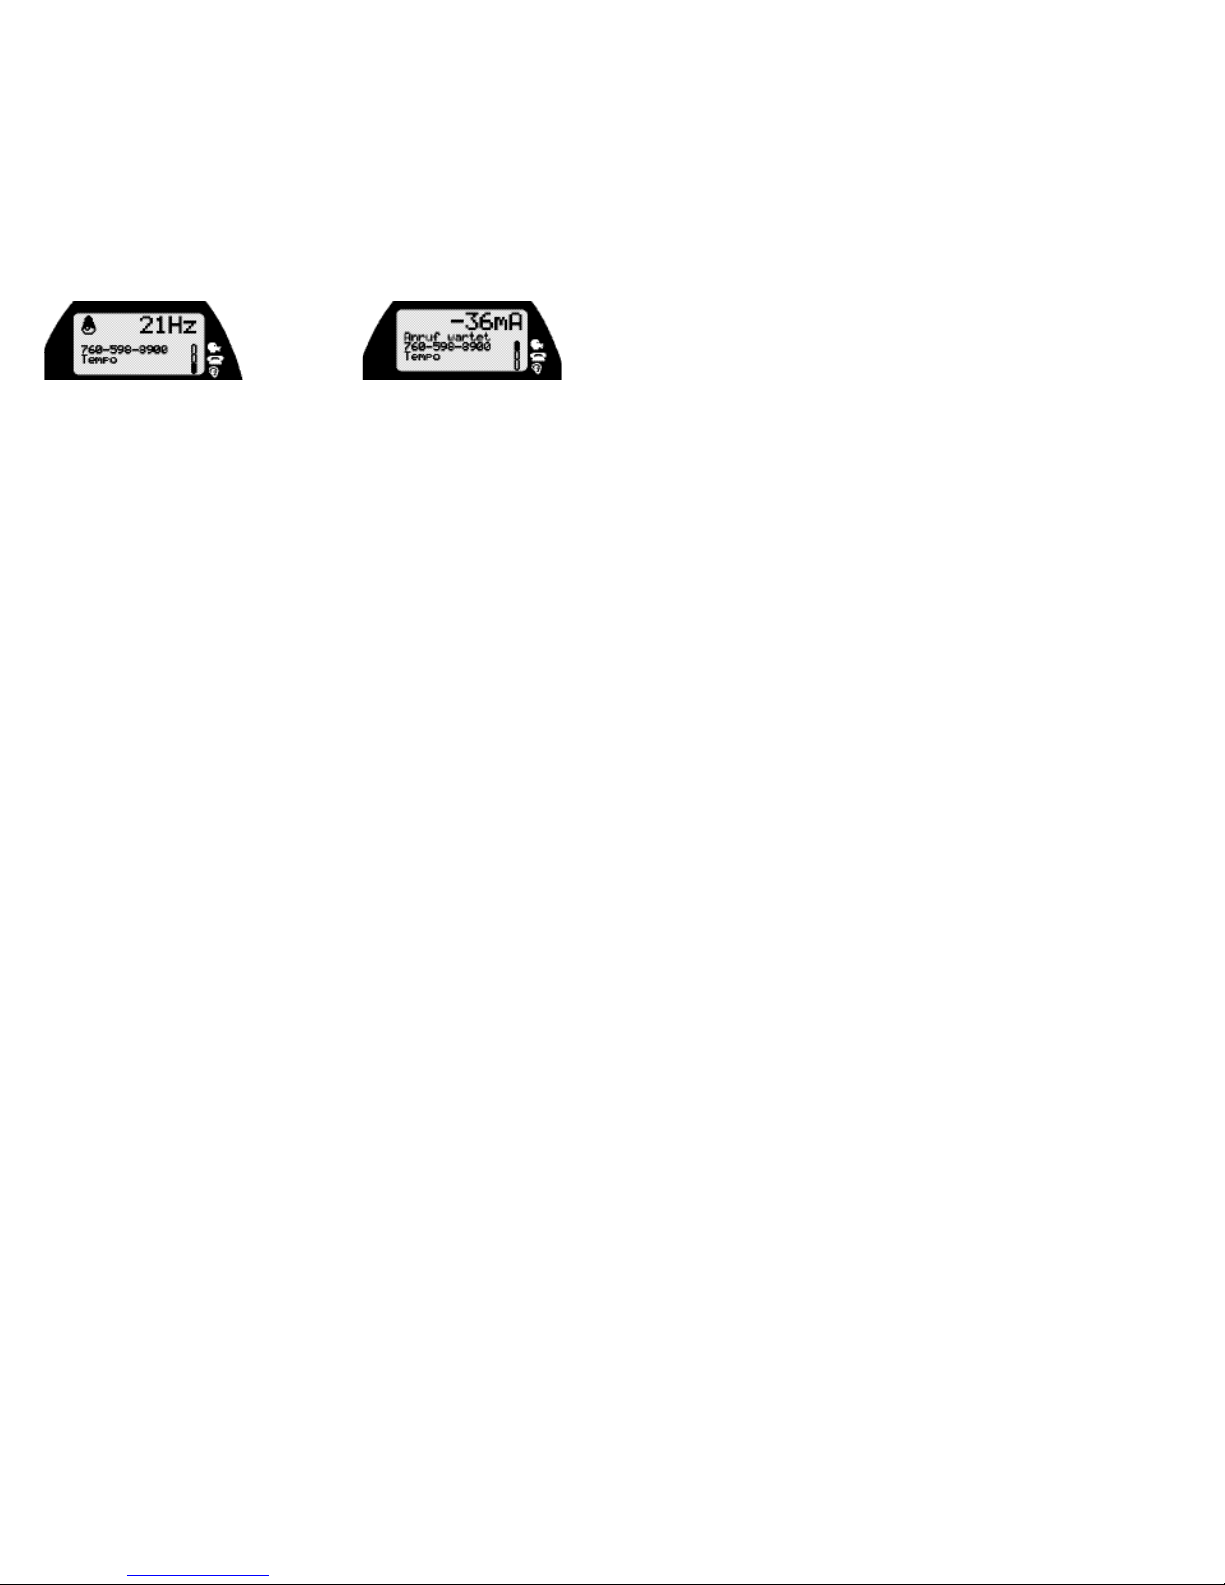
7. ANRUFER-ID
Anrufer-ID (CID) und Anrufer-ID bei Anklopfen (CIDCW) werden, wenn verfügbar, in allen
Funktionen angezeigt. Fehlermeldungen werden angezeigt, wenn die Anrufer-ID erkannt aber
nicht vollständig empfangen oder unterbrochen wurde oder nicht kompatibel ist. (Siehe
Abbildungen 29 - 30)
8. KOPFHÖRER
Um das PE830 als Freihandtelefon zu benutzen, den beiliegenden Kopfhörer oder einen
ähnlichen Kopfhörer in die Buchse oben auf dem Gerät einstöpseln. Dadurch werden die
interne Muschel und das Mikrofon automatisch stummgeschaltet. Beachten Sie, dass die
MUTE- und SPEAKER-Tasten weiterhin normal funktionieren, d.h. sie unterbrechen die
Übertragung, wenn aktiviert.
9. TECHNISCHE DATEN
Telefonkompatibilität:. . . . . . . . . . . . . . . . . . . . . . . . . . . . TIA/EIA-470-B und ETSI
Lagertemperatur:. . . . . . . . . . . . . . . . . . . . . . . . . . . . . . . . . . . . . . . . -10 bis +70 °C
Betriebstemperatur:. . . . . . . . . . . . . . . . . . . . . . . . . . . . . . . . . . . . . . . 0 bis +50 °C
Feuchtigkeit: . . . . . . . . . . . . . . . . . . . . . . . . . . . . . . . . . . . . . . . . . . . . . . . bis zu 90 %
Betrieb 95 % Lagerung (jeweils ohne Kondensierung)
CID und CIDCW:. . . . . . . . . Alle FSK-Typen einschließlich Bellcore TR-NWT-000030
(GR30) SR-TSV-002476 und ETSI
Lebensdauer der Batterie:. . . . . . . Mehr als drei Monate bei normaler Benutzung;
weniger als 40 uA in der OFF-Funktion erreicht mit einer neuen Batterie eine
Ladungserhaltungszeit von wenigstens 12 Monaten. Es werden nur alkalische
Batterien empfohlen. Die Batterie sollte herausgenommen werden, wenn das PE830
längere Zeit gelagert wird.
Schleifenbegrenzungen (bei 48 V):
Widerstand: . . . . . . . . . . . . . . . . . . . . . . . . . . . . . . . . . . . . . . . . . . . . . . . . . . . . . . . >5 k
Mindeststrom: . . . . . . . . . . . . . . . . . . . . . . . . . . . . . . . . . . . . . . . . . . . . . . . . . . <10 mA
Gleichstromwiderstand:
Abgehoben:. . . . . . . . . . . . . . . . . . . . . . . . . . . . . . . . . . . . . . . . . . . . . . . . . . . . . . . <300
Aufgelegt: . . . . . . . . . . . . . . . . . . . . . . . . . . . . . . . . . . . . . . . . . . . . . . . . . . . . . . . >10 M
Monitorimpedanz: . . . . . . . . . . . . . . . . . . . . . . . . . . . . . . . . . . . . . . . . . . . . . . >400 k
Wählen:
Impuls:
Rate:. . . . . . . . . . . . . . . . . . . . . . . . . . . . . . . . . . . . . . . . . . . . . . . . . . . . . . . . . . . 10 pps
Unterbrechung: . . . . . . . . . . . . . . . . . . . . . . . . . . . . . . . . . . . . . . . . . . . 60 % oder 66 %
Pause zwischen Ziffern: . . . . . . 800 ms (Streuung während der Unterbrechung: >5 M)
DTMF/Ton:. . . . . . . . . . . . . . . . . . . . . . . . . . . . . . . . . . . . . . -4 dBm /-6 dBm (TIA/ EIA)
. . . . . . . . . . . . . . . . . . . . . . . . . . . . . . . . . . . . . . . . . . . . . -9 dBm / 8-11 dBm (ETSI)
FSK Anrufer-Name/-Rufnummer und Anklopfen:
Bellcore GR-30-CORE, TR-NWT-000030
ETSI FSK Gattung
Anzeigen: Calling DN, Anrufername
Dialogtastenfunktion (auf zwei kontextabhängigen Tasten):
Flash/Rückruf bei getakteter Unterbrechung: . . . . . . . . . . . . . . . . . . . 100, 270, 600 ms
Wählen vom Speicher:
10 gespeicherte, 5 zuletzt gewählte und 5 zuletzt empfangene Rufnummern
Anzeigen:
LCD (96x48 Pixel) zeigt Folgendes an:
Anrufer-ID (Name u. Rufnummer) und Anklopfen
Gewählte Rufnummer
Überspannungsbedingungen
Telefonstatus (Monitor, abgehoben, aufgelegt usw.)
Abb.29 - Anrufer-ID Abb.30 - Anklopfen
D8
Page 4
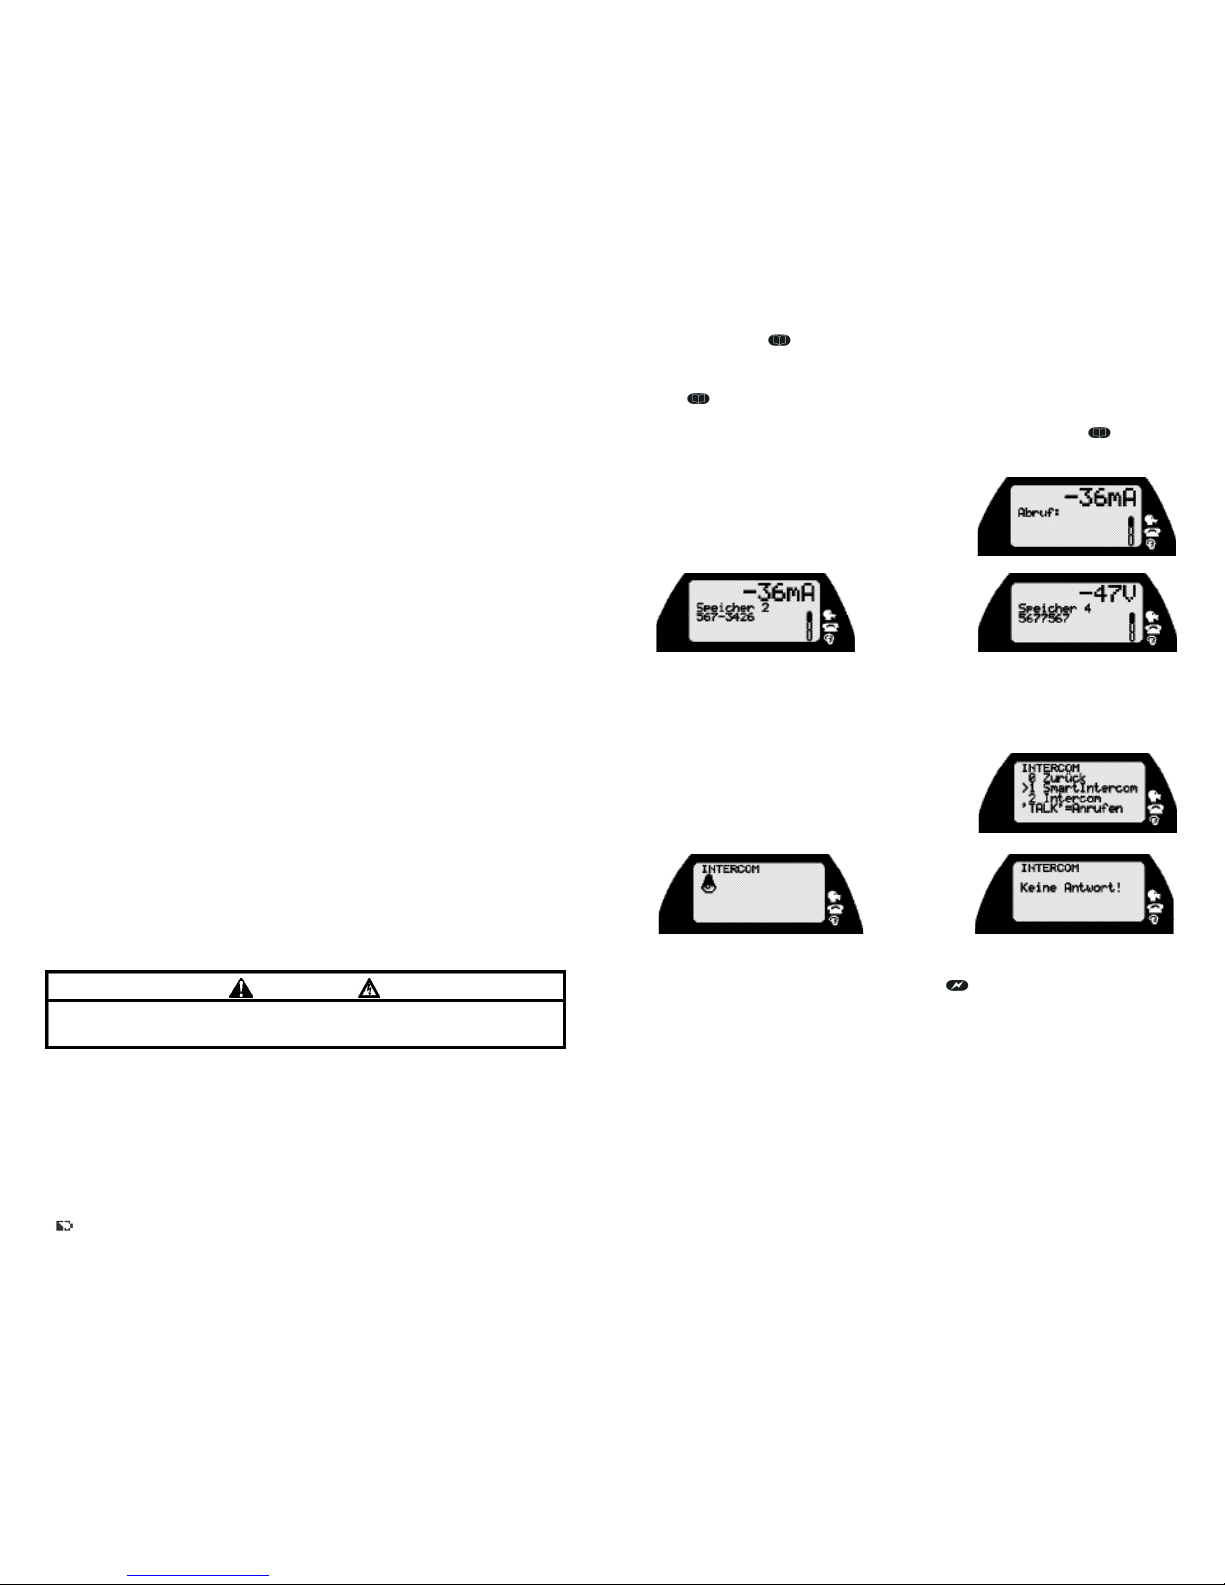
Schnellwahl-Rufnummern speichern
Eine Rufnummer eingeben oder eine ankommende ID-Meldung auf dem Bildschirm lassen.
Die Speichertaste ZWEIMALdrücken, um in die Speicherfunktion einzutreten, dann die
Tastenzahl (0-9) eingeben. (Siehe Abbildungen 20 - 22)
Schnellwahl-Rufnummern aufrufen
Die -Taste einmal gefolgt von der Tastenzahl (0-9) drücken. (Siehe Abbildungen 23 - 25)
Zusätzlich zu direktem Zugriff durch Drücken der entsprechenden Zahl (in aufgelegtem
Zustand, OFF- oder MONITOR-Funktion) erlaubt das wiederholte Drücken -Taste, alle
zehn gespeicherten Rufnummern in Folge zu durchblättern. Die Rufnummer bleibt in jedem
Fall in der Anzeige, was das automatische Wählen durch Umschalten in die TALK-Funktion
erlaubt.
Hinweis: Ist eine aufgerufene Speicherstelle nicht
belegt, wird keine Rufnmmer angezeigt.
6 .WECHSELSPRECHFUNKTION (INTERNE BAT T E R I E )
Die Wechselsprechfunktion ist eine besondere Funktion, die zwei PE830-Geräten erlaubt
miteinander zu kommunizieren, ohne dass Telefonservice zur Verfügung steht. In dieser
Funktion passieren nur Sprachsignale über das
Te l e f o n p a a r, jedoch ist kein Gleichstrom
(Sprechbatterie) verfügbar. Die SmartIntercomFunktion kann nur mit einem anderen PE830 benutzt
werden. Die Wechselsprechfunktion kann nur benutzt
werden, wenn keine Spannung auf der Leitung
vorhanden ist. (Siehe Abbildungen 26 - 28)
Um eine der beiden INTERCOM-Funktionen zu aktivieren, zuerst den Funktionsschalter in die
MONITOR-Funktion bringen und die Flash-Taste drücken. Das unten gezeigte Menü
erscheint jetzt in der Anzeige; die Voreinstellung ist SmartIntercom. Liegt jedoch auf der
Leitung Spannung vor, erklingt ein Fehlerton. Um den Anruf zu beginnen und am entfernten
Ende anzuklingeln, den Funktionsschalter auf TALK schalten.
Wenn Sie einen SmartIntercom-Anruf tätigen und das entfernte Gerät den Anruf erkennt,
hören Sie einen normalen "Rückruf"-Tone über den Lautsprecher. Erfolgt keine Antwort von
dem entfernten Gerät, hören Sie nach ein paar Sekunden einen Fehlerpiepser.
Ankommende SmartIntercom-Anrufsignale werden in der OFF- oder MONITO R - F u n k t i o n
empfangen; das Gerät muss sich nicht in der Wechselsprechfunktion befinden, um das
Warnsignal zu empfangen.
Das We c h s e l s p r e c h - Warnsignal (Klingelton) ist ein kadenziertes Klingeln mit höherer
Frequenz als das normale Klingeln. Wird es vernommen, einfach in die TA L K - F u n k t i o n
schalten, um den Anruf entgegen zu nehmen; das PE830 wird dadurch automatisch in die
Wechselsprechfunktion versetzt. Ein Bestätigungspiepser wird erzeugt, um anzuzeigen, dass
die INTERCOM-Funktion jetzt aktivert ist.
Um die Wechselsprechfunktion zu verlassen, den Funktionsschalter einfach von TA L K
entweder auf OFF oder auf MONITOR schalten. Ein Ton wird über die Leitung gesandt, um
den anderen Benutzer zu informieren, dass das Gespräch beendet ist.
D7
Abb.27 - Wechselsprechen 2 Abb.28 - Wechselsprechen 3
Abb.26 - Wechselsprechen 1
Abb.24 - Bildschirm 2 aufrufen Abb.25 - Bildschirm 3 aufrufen
Abb.23- Bildschirm 1 aufrufen
1. DESCRIPTION
The PE830 Te l e - M a t e®Pro Telephone Test Set will help deal with the increasing
complexity of telecom installation and maintenance. A complete butt-in test set, the
PE830 adds useful features like loudspeaker monitor, caller ID, speed dial, callback,
intercom and line voltage/current/frequency meter.
The PE830 Tele-Mate®Pro not only works in handset mode, but can be used with the
standard headset (included) and with the amplified loudspeaker line monitor. You can
use the premium telco-type test leads and clips or the integral modular jack for line
connection.
Features
• Complete telephone set with ringer
• Phone-to-phone intercom
• Modular or alligator clip connection
• Amplified loudspeaker line monitor
• Headset or handset operation
• Tone and pulse dialing
• Large 10-location speed dialing memory
• Five memory redial
• Caller ID with name display
• Call waiting Caller ID
• Missed call indication
• Line voltage and current display
• High voltage detect and lockout
• High current detect and lockout
• English, Spanish, German, or French language display
Key Specifications
• Bellcore and ETSI Caller ID compatible
• TIA/EIA RS-470-B or ETSI telephone performance selectable
• High voltage alert (120 VDC)
• High current alert (125 mA)
2. UNIT SET-UP
Battery Installation
The PE830 requires a 9V battery to be installed for all functions to operate. Te m p o
®
recommends that only alkaline types are used, as these are more leak resistant and offer
much longer operating life than standard zinc-carbon types.
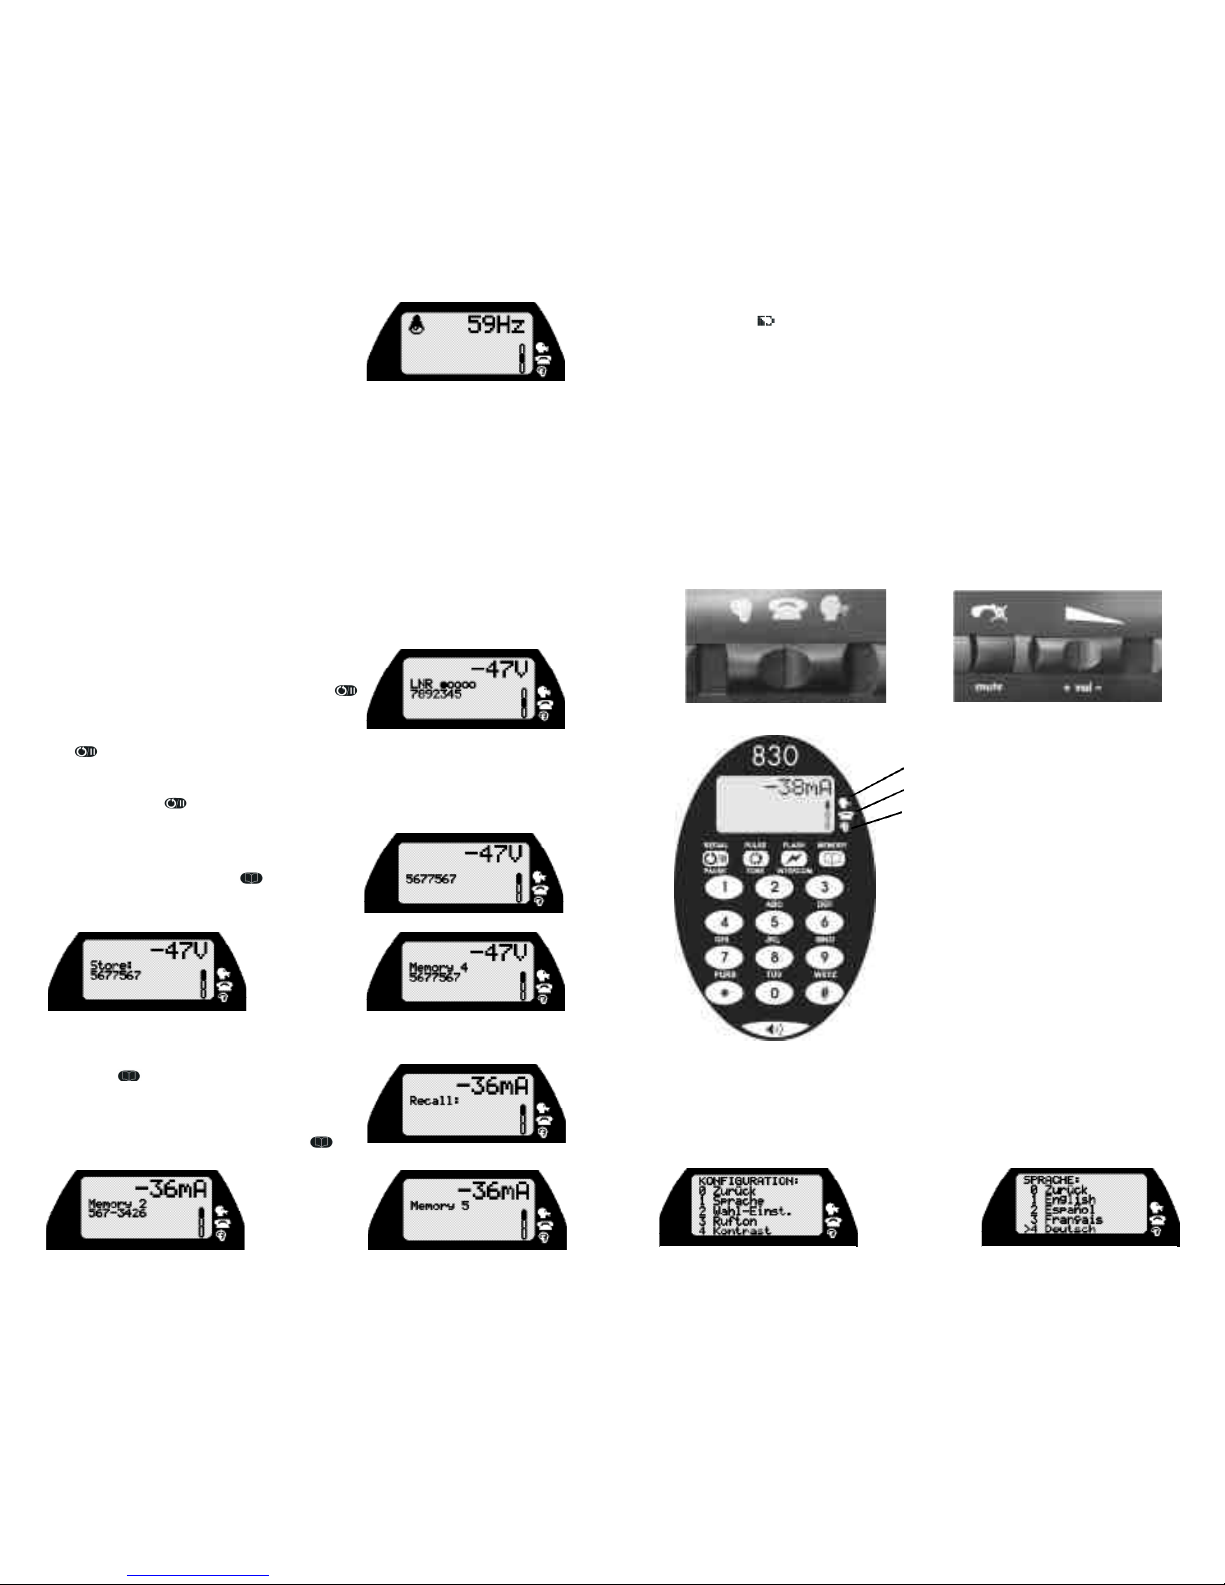
When a battery is first installed, the unit will default to a Language Setup display as shown
in Figure 5. Select a language before using the unit.
To retain the memories and settings while replacing the battery, it is vital that the PE830's
mode switch is set to "off" and the display is allowed to clear. Connect the new battery
within thirty seconds of disconnecting the old one. Prepare by opening any battery
packaging etc. before removing the old battery. Loosen the phillips head screw located
below the earpiece and remove the battery cover. Insert a new alkaline battery, carefully
checking that the polarity is correct and that the connector is fitted firmly before replacing
the cover and re-tightening the screw (Do not overtighten the screw).
Low Battery Warning
When the battery voltage drops below 6 volts a warning sound will be produced each
time the mode switch position changes. In addition a small battery icon
is displayed in the lower left of the screen. If the battery voltage is allowed to drop
below approximately 5 volts the unit will remind you to replace the battery for a few
seconds and then return to standby mode.
Before opening the case, remove the test leads from the circuit and shut off the unit.
Failure to observe these warnings can result in severe injury or death.
WARNING
2
Page 5
3
Reset
The PE830 should start operating normally following battery insertion or replacement. If
the unit fails to respond normally at any time, a manual reset can be performed by holding
the "speaker" button down for more than ten seconds. When released the unit should
start as normal, provided the battery voltage is greater than 5 volts.
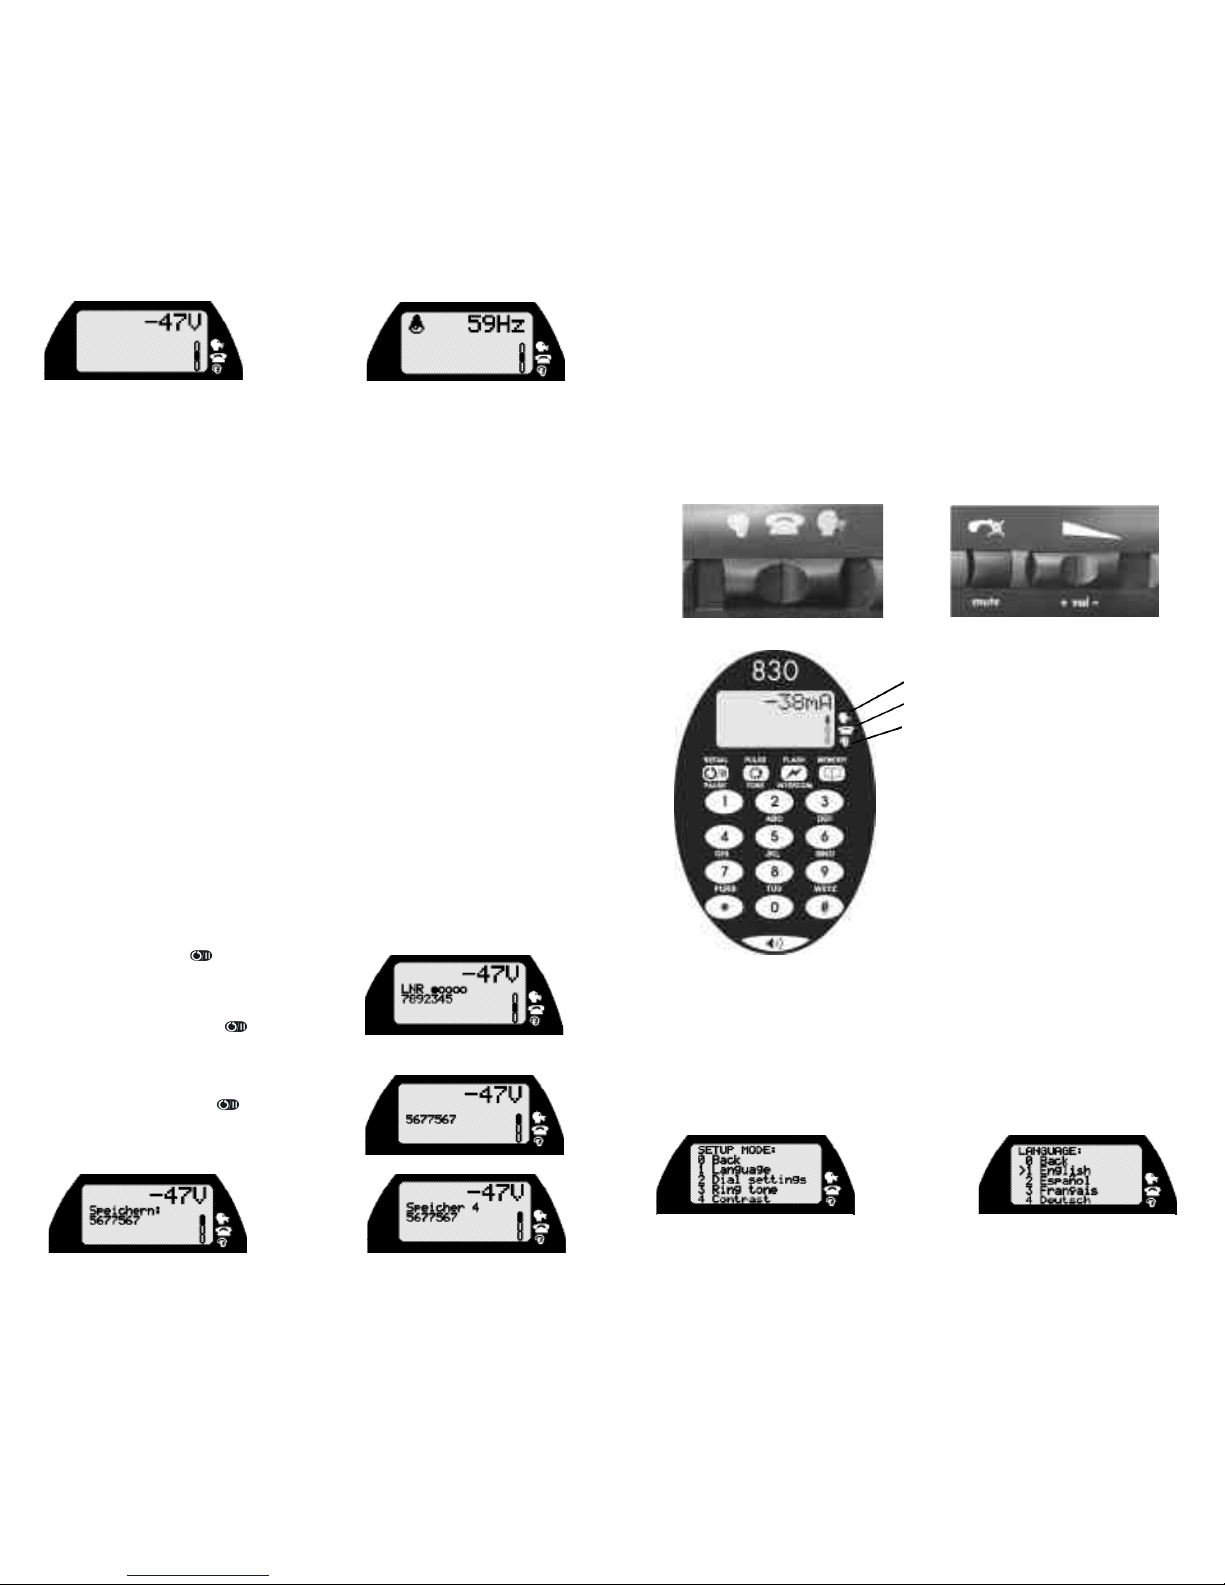
3. BUTTONS & SWITCHES
The main mode switch is located on the right side of the unit. (See Figure 1) This switch
has the following functions: MONITOR, OFF (ring) and TALK. These modes will be
explained in more detail later in this guide.
The volume switch is located on the left side of the unit and has three selectable l e v e l s .
The mute button is also situated on the left side of the unit. (See Figure 2)
Operating Mode Icons
1. TALK (telephone mode)
2. OFF (ring only mode)
3. MONITOR (listen or ring mode)
The solid bar on the display indicates the
operating mode.
The main keypad has seventeen keys. (See
Figure 3) The top four buttons situated directly
under the LCD have the following functions:
• Last number redial / Pause
• Tone or Pulse dialing selection
• Flash / Intercom (timed break recall)
• Memory recall/storing
The large button below the telephone keypad
activates the Speaker.
4. OPERATING MODES
PE830 Te l e - M a t e®Pro Telephone Test Set has four operating modes: Setup, Ta l k ,
Monitor, and Off.
SetUp Mode
With the mode switch still set to MONITOR, simultaneously press MUTE and #, the unit
then enters the setup mode. While in SETUPmode the language and other facilities can
be configured. (See Figures 4 - 11)
Fig.1 - Mode Switch Fig.2 - Volume & Mute Switch
Fig.3 - Main Keypad
Fig.4 - Setup Main Fig.5 - Setup Language
Off-Funktion
Befindet sich der Hauptfunktionsschalter in der OFF-Position und das Gerät ist an eine Leitung
angeschlossen, ist es aufgelegt und bereit, ankommende Anrufe anzunehmen. (Siehe
Abbildung 17)
Das Gerät tritt nach einem Zeitraum der Inaktivität in einen Stromsparzustand ein, wacht aber
für ankommende Anrufe, Anrufer-ID oder nach Anschließen an eine andere Leitung auf. Die
Anzeige wird dann für einen weiteren Zeitraum reaktiviert, um Leitungsstatusinformationen
anzugeben.
Annehmen eines ankommenden Anrufs
Während das PE830 klingelt, einfach den Funktionsschalter in die TA L K - P o s i t i o n
schieben. (Siehe Abbildung 18)
Hinweis: Das PE830 erlaubt kein Abnehmen, falls das Klingeln ununterbrochen ist. Die
auf dem Bildschirm angegebene Frequenz prüfen. Liegt sie in etwa zwischen 50 und 60
Hz, vorsichtig von der Leitung trennen.
Automatischen Ausschalten
Das PE830 schaltet sich nach Zeiträumen ohne Benutzerinteraktion in allen
Betriebsfunktionen außer im aktiven TALK-Modus aus. Dadurch wird unnötiger Verbrauch der
Batterie reduziert.
• TALK-Funktion ohne entdeckten Gleichstrom: . . . . . . . . . . . .Zeitlimit fünf Minuten
• TALK-Funktion mit entdecktem Gleichstrom: . . . . . . . . . . . . . . . . . . .Kein Zeitlimit
• INTERCOM-Funktion: . . . . . . . . . . . . . . . . . . . . . . . . . . . . . . . . . . . . .Kein Zeitlimit
• MONITOR-Funktion: . . . . . . . . . . . . . . . . . . . . . . . . . . . .Zeitlimit fünfzehn Minuten
• OFF-Funktion ohne entdeckten Gleichstrom: . . . . . . . . . . .Zeitlimit drei Sekunden
• OFF-Funktion mit entdecktem Gleichstrom: . . . . . . . . . . . . . .Zeitlimit fünf Minuten
Das PE830 kann nach einem Zeitlimit leicht reaktiviert werden, indem es in eine andere
Betriebsart geschaltet oder an Gleichstrom (stromgespeiste Leitung) angeschlossen wird.
5. SPEICHERFUNKTIONEN
Speicherfunktionen sind in allen Betriebsfunktionen verfügbar. Es sind zehn Speicherstellen
zur Speicherung von Rufnummern und ein Mehrfachspeicher zur Wiederwahl der letzten
Rufnummer vorhanden. Auf diese kann wie nachfolgend beschrieben zugegriffen werden.
Wiederwahl der letzten Rufnummer
Mit der Wiederwahltaste kann der Benutzer in der
OFF- oder MONITOR-Funktion eine der fünf zuletzt
gewählten Rufnummern oder der durch A n r u f e r - I D
(CLID) auf dem Gerät erhaltenen Rufnummern
wiederwählen. Die Rufnummern können durch
wiederholtes Drücken der - Taste aufgerufen
werden, wobei die entsprechende Information auf der
LCD erscheint. Diese Rufnummer wird automatisch
angewählt, wenn der Schalter wieder in die TA L K Funktion gebracht wird. (Siehe Abbildung 19)
In der TALK-Funktion ruft die -Taste nur die zuletzt
angewählte Rufnummer (oder letzte Anrufer-ID) auf,
wenn keine anderen Ziffern zwischenzeitlich gewählt
wurden; nach dem Wählen von Ziffern wird die Taste zur
PAUSE-Taste.
Abb. 18 - Netzberührung
D6
Abb.19 - Automatische LNR
Abb.21 - Bildschirm 2 speichern Abb. 22 - Bildschirm 3 speichern
Abb.20 - Bildschirm 1 speicher n
Abb. 17 - OFF-Funktion
Page 6
D5
während des Wählens von Impuls auf g e ä n d e r t
werden, indem die -, die Stern- oder
Rautentaste gedrückt wird. Deartige Wechsel der
Wählfunktion während des Anrufs werden gespeichert
und als in der gespeicherten Ziffernsequenz gezeigt,
womit der gewünschte Wechsel in den To n m o d u s
angezeigt wird. (Siehe Abbildung 13)
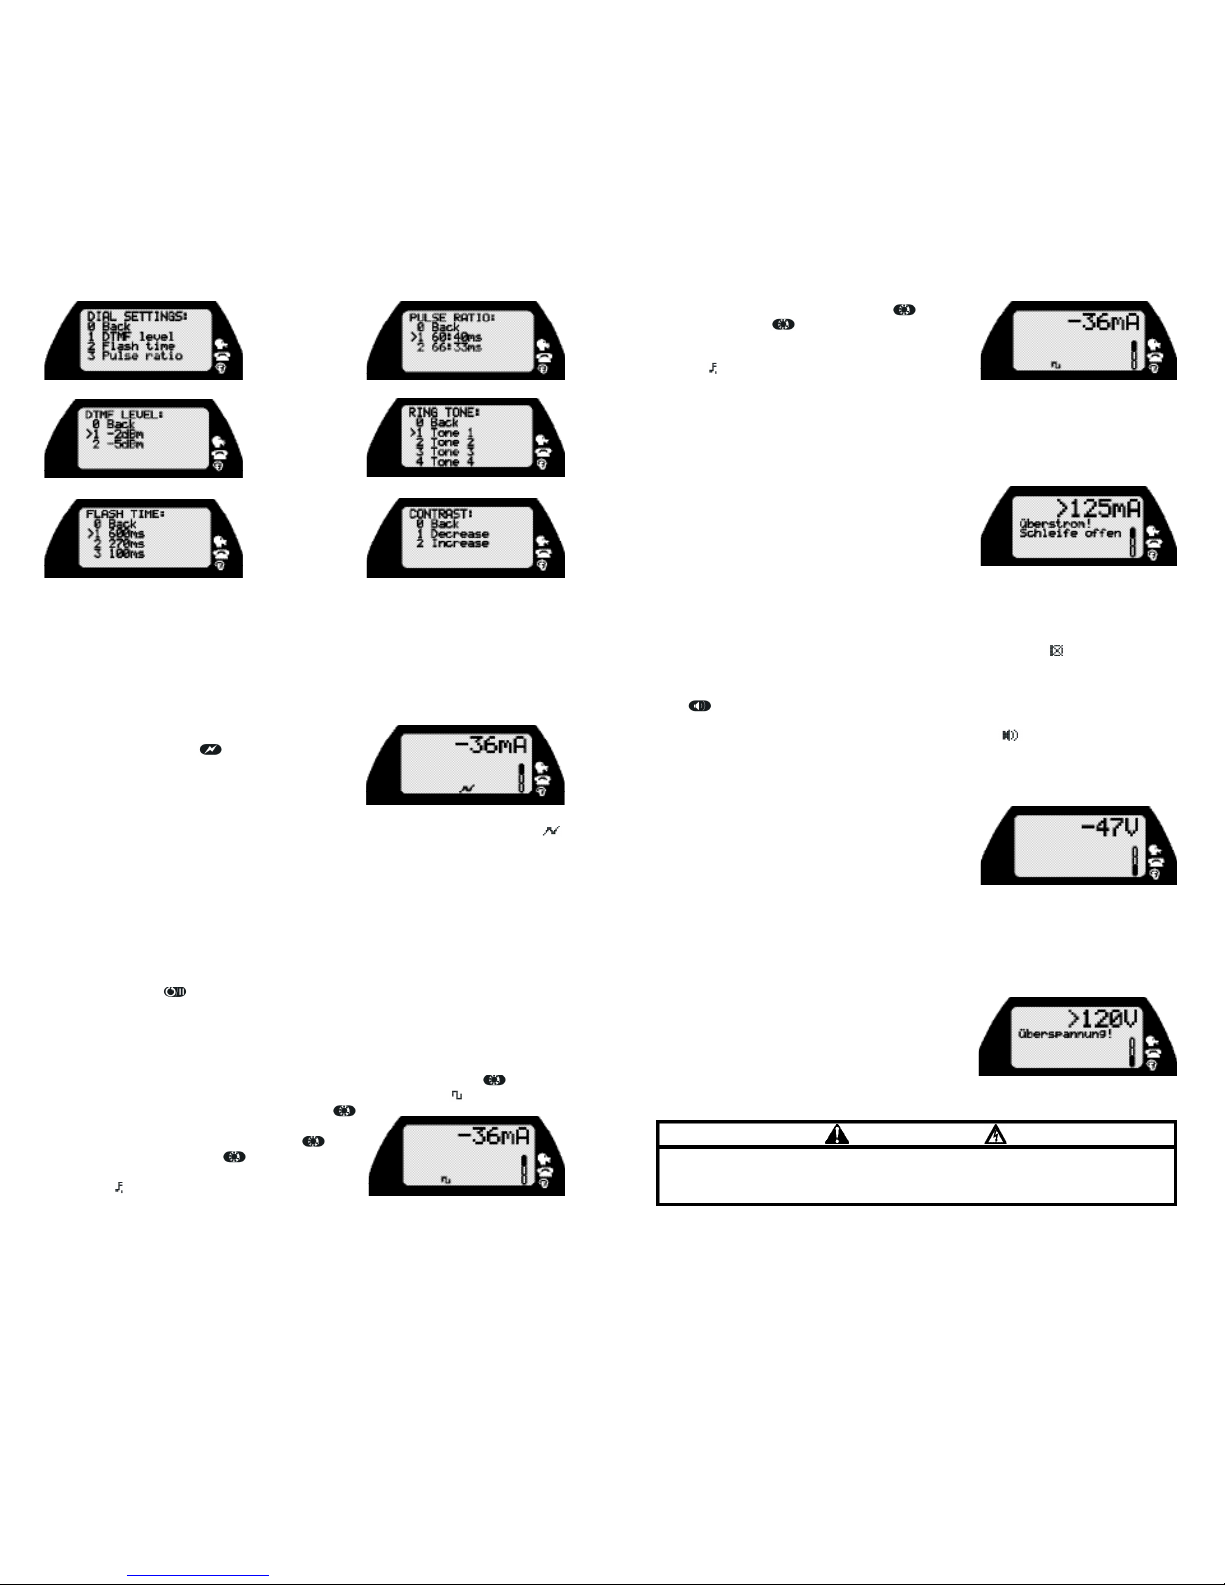
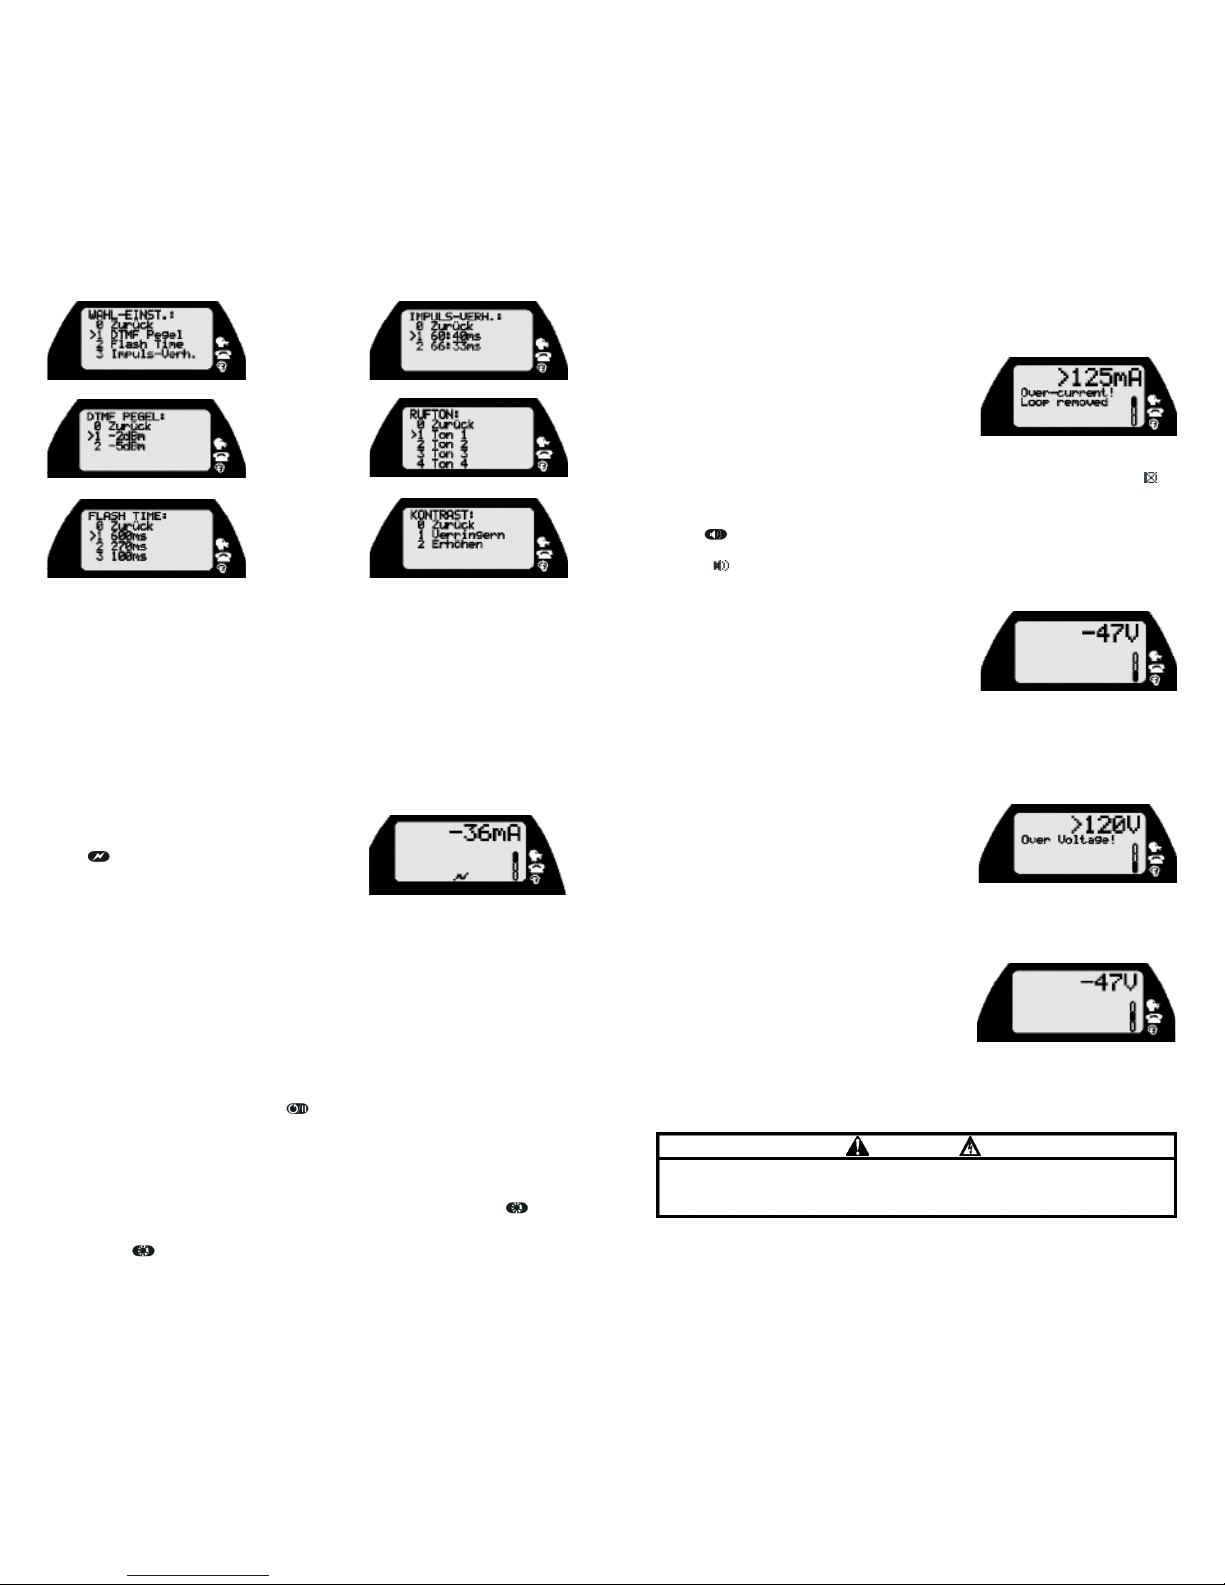
Strommessung
Während das PE830 abgehoben ist, wird der Leitungsstrom zusammen mit der Polarität
angezeigt.
Überstromschutz
Während das PE830 abgehoben ist, schützt es vor
Leitungsstrom über 125 mA, indem es automatisch einen
Stromgrenzwert anwendet. Wird der Zustand länger als
etwa eine halbe Sekunde aufrechterhalten, legt das
Gerät auf, eine Warnmeldung erscheint und ein Warnton
wird erzeugt, bis das Gerät von der Leitung entfernt oder
ausgeschaltet wird. (Siehe Abbildung 14)
SmartMute™
Kurzes Drücken der MUTE-Taste schaltet das Mikrofon ein oder aus, und ein
Bestätigungspiepser ist hörbar. Langes Drücken (länger als eine Sekunde) schaltet das
Mikrofon stumm, solange die Taste gehalten wird. Das MUTE-Symbol erscheint, während
das Mikrofon deaktiviert ist.
Lautsprecher
Die -Taste kann in der MONITOR- oder TALK-Funktion jederzeit gedrückt werden, um
den Lautsprecher ein- oder auszuschalten. Beachten Sie, dass das Mikrofon in der TALK- oder
INTERCOM-Funktion automatisch stummgeschaltet wird. wird angezeigt, wenn der
Lautsprecher aktiviert ist, um Sie daran zu erinnern, dass Zweiwegsprechen nicht möglich ist.
Der Lautsprecher bleibt während des gesamten Anrufs eingeschaltet und bleibt eingeschaltet,
während in eine andere Funktion gewechselt wird. Automatisches Ausschalten (siehe unten)
stellt den Lautsprecher ab.
Monitorfunktion
Wenn sich der Hauptfunktionsschalter in der MONITORPosition befindet, ist das Gerät aufgelegt. Diese Funktion
bietet eine hochohmige Verbindung, die dem Benutzer
erlaubt, die Leitung abzuhören, ohne sie zu belasten.
(Siehe Abbildung 15)
Die Monitorfunktion beobachtet auch ständig die Leitungsspannung und zeigt diese
zusammen mit der Polarität an. Wenn die rote Messleitung an die B-Ader und die schwarze
Messleitung an die A-Ader angeschlossen ist, zeigt die Anzeige negative (-) Spannung an.
Liegt ein ankommender Anruf vor, gibt die Anzeige Leitungsstatusinformationen mit AnruferID, falls vorhanden, an, und ein klingelndes Alarmsignal wird vom Lautsprecher erzeugt (siehe
Off-Funktion unten).
Warnung bei Überspannung
Das Gerät ist davor geschützt, in der TALK-Funktion zu
sein, wenn Spannungen über 120 V liegen. Der Warnton
wird erzeugt und die Anzeige gibt die Meldung
"Überspannung" an. (Siehe Abbildung 16)
Warnung bei erhöhter Spannung
Ist das Gerät an eine Spannung zwischen 80 und 120 V angeschlossen, werden hohe Piepser
erzeugt, die anzeigen, dass es sich hier möglicherweise nicht um eine normale Te l e f o n l e i t u n g
handelt. Sie können jedoch abnehmen, indem Sie den Betriebsfunktionsschalter auf TALK stellen.
Abb.15 - Monitorfunktion
Abb.16 - Überspannung
Sicherheitshinweis: Ist das Klingeln ununterbrochen, geht das PE830 davon aus, dass es
sich um eine Netzberührung handelt, d.h. elektrischer Strom liegt auf der Telefonleitung vor,
und es wäre gefährlich abzuheben.
WARNHINWEIS
Abb. 14 - Überstrom
Abb.13 - Impulswahl
4
Press the digit corresponding to the desired option to choose it.
To leave setup mode, press "0" (back) repeatedly or slide the mode switch to the OFF
position. An invalid entry will result in the error tone being produced.
Talk Mode
With the main mode switch in the TALK position and connected to a suitable telephone
line, the unit will go off-hook and dialing and speech will then be possible.
Flash
While off-hook, the Flash key is enabled, this key
generates a timed line break, which simulates a hook
flash to activate special features of a PBX or central
office. (See Figure 12)
The flash duration is user selectable via the setup
mode (see Setup Mode) as 100ms, 270ms, or the default of 600ms. The indication
is present on the bottom line of the display during Flash operation and for two seconds
after.
Off-Line Dialing & Automatic Redial of Last CID Number
Digits entered by hand or received by calling line ID in OFF and MONITOR modes, will
be dialed automatically upon switching to TALK. Any displayed number can be cleared
by pressing and holding "mute" for one second. Short presses of "mute" act as a
backspace allowing errors to be corrected before switching to TALK to dial.
Pause
The dual function LNR/Pause key inserts an inter-digit delay of three seconds
between digits dialed. The pause digit will be displayed as a '-' (minus sign) on the LCD
and will be stored in memory. Note that if this were the first key pressed this would recall
and immediately dial LNR (see Memory Functions).
Pulse Dialing Option
To make a call using pulse dialing, select PULSE mode by pressing the key, then
either dial or recall from memory the number to be called, the symbol will be displayed
on the bottom line of the display. Pressing the
key again would revert to tone mode. The dialing
mode is also changeable from pulse to t o n e
while dialing by pushing the , * or # keys. Such
mid-call transitions of dialing mode are stored and
shown as in the stored digit sequence indicating
the requested change to tone mode. (See Figure 13)
Current Measurement
While the PE830 is off-hook the line current is displayed along with the polarity.
Fig.10 - Setup Ringtone
Fig.11 - Setup Contrast
Fig. 12 - Flash
Fig. 13 - Pulse Dialing
Fig.6- Dial Settings
Fig. 7- DTMF Level
Fig. 8- Setup Flash
Fig.9- Pulse Ratio
Page 7
5
Over Current Protection
When the PE830 is off-hook it protects against line current over 125mAby automatically
applying a current limit. If the condition is maintained for more than about half a second,
the unit will go "on-hook", a warning message will be
displayed and a warning sound is produced until the
unit is disconnected from the line or switched to "off".
(See Figure 14)
SmartMute™
A quick press of the MUTE button will toggle the
microphone off or on and a confirming beep heard. A long press (over 1 second) will
cause the microphone to be muted while the button is held. The MUTE symbol is
displayed while the microphone is deactivated.
Loudspeaker
Press at any time in MONITOR or TALK modes to turn the speaker on or off. Note
that the microphone is automatically muted if you are in TALK or INTERCOM
modes. is displayed whenever the speaker is active to remind you that two-way
speech is not possible. The speaker remains on for the whole duration of a call, and is
kept on while switching to another mode. Automatic power-down (see below) will turn
the speaker off.
Monitor Mode
With the main mode switch in the MONITOR position
the unit will be on-hook. This mode provides a high
impedance connection that enables the user to listen
to the line without loading it. (See Figure 15)
Monitor mode also constantly monitors and displays the line Voltage along with the
polarity. With the red lead attached to ring and black to tip the display will show negative “-”
v o l t a g e .
In the presence of incoming ring the display will provide line status information with caller
ID if presented and a ringing alert signal will be produced from the loudspeaker (see Off
Mode below).
Over Voltage Warning
The unit is protected against operating in TALK when
voltages in exceed 120V. The warning tone will be
generated and the screen will display the message
"Over Voltage". (See Figure 16)
Elevated Voltage Warning
If the unit is connected to a voltage between 80V and 120V, high-pitched beeps will be
produced warning that this may not be a normal telephone line. You can still go off-hook
by moving the mode switch to TALK.
Off Mode
With the main mode switch in the OFF position and
connected to a line the unit will be on-hook and ready
to receive incoming calls. (See Figure 17)
The unit enters a power-saving state after a period of
inactivity, but will wake up for incoming ring, caller ID or upon connection to another line;
the display will then reactivate for a further period to provide line status information.
Answering Incoming Call
While the PE830 is ringing, simply move the mode switch to the TALK position. (See
Figure 18)
Fig.15 - Monitor Mode
Fig.16 - Over Voltage
Fig.17 - OFF Mode
Safety Notice: If ringing is continuous, the 830 assumes that this could be a "power
cross", i.e. electrical power is connected to the telephone line and it could be
dangerous to go off-hook.
WARNING
Fig.14 - Over Current
D4
Einrichtungsfunktion
Während der Funktionsschalter auf MONITOR gestellt ist, die MUTE- und Rautentasten
gleichzeitig drücken und das Gerät tritt in die Einrichtungsfunktion ein. In der SETUP-Funktion
können die Sprache und anderen Leistungsmerkmale konfiguriert werden. (Siehe
Abbildungen 4 - 11)
Die der gewünschten Option entsprechende Zahl drücken.
Um die Einrichtungsfunktion zu verlassen, wiederholt auf "0" (zurück) drücken oder den
Funktionsschalter in die OFF-Position schieben. Bei ungültiger Eingabe erklingt ein Fehlerton.
Sprechfunktion
Während sich der Hauptfunktionsschalter in der TALK-Position befindet und das Gerät an eine
geeignete Telefonleitung angeschlossen ist, nimmt es ab und wählt. Dann ist das Sprechen
möglich.
Flash
Während die Leitung abgehoben ist, ist die FlashTaste aktiviert. Diese Taste erzeugt eine getaktete
Leitungsunterbrechung, die ein Hook-Flash simuliert,
um besondere Funktionen eines PBX oder
Fernsprechamts zu aktivieren. (Siehe Abbildung 12)
Die Flash-Dauer kann vom Benutzer über die Einstellfunktion (siehe Einstellfunktion) als 100
ms, 270 ms oder (vorgegeben) 600 ms gewählt werden. Die Angabe ist in der untersten Zeile
der Anzeige während dem Flash-Betrieb und zwei Sekunden danach sichtbar.
Offline-Wählen und automatische Wiederwahl der letzten CIDNummer
Ziffern, die manuell eingegeben oder durch Anrufer-ID in den Betriebsfunktionen OFF und
M O N I TOR empfangen wurden, werden durch Schalten auf TALK automatisch gewählt.
Angezeigte Rufnummern können durch einsekundiges Drücken von MUTE gelöscht werden.
Kurzes Drücken von MUTE erzeugt einen Rückwärtsschritt, durch den Fehler korrigiert
werden können, bevor das Gerät zum Wählen auf TALK geschaltet wird.
Pause
Die doppelfunktionale LNR-/Pausentaste fügt eine Zwischenziffernverzögerung von drei
Sekunden zwischen gewählten Ziffern ein. Das Pausenzeichen wird als Minuszeichen (-) auf
der LCD angezeigt und im Speicher gespeichert. Beachten Sie, dass, falls dies die erste
gedrückte Taste ist, LNR (Wiederwahl der letzten Rufnummer) aufgerufen und sofort gewählt
wird (siehe Speicherfunktionen).
Impulswahloption
Um einen Anruf mit Impulswahl zu tätigen, die PULSE-Funktion durch Drücken der -Taste
wählen, dann entweder wählen oder die anzuwählende Rufnummer aus dem Speicher
aufrufen. Das Symbol wird in der untersten Zeile der Anzeige angegeben. Das nochmalige
Drücken der - Taste ruft die Tonwahlfunktion wieder auf. Die Wählfunktion kann auch
Abb.10 - Klingeltonwahl
Abb.11 - Kontrasteinstellung
Abb.12 - Flash
Abb.6 - Wähleinstellungen
Abb.7 - DTMF-Pegel
Abb.8 - Flash-Einstellung
Abb.9 - Impulsverhältnis
Page 8
D3
Position des Funktionsschalters geändert wird. Zusätzlich erscheint ein kleines
B a t t e r i e s y m b o l in der linken unteren Ecke des Bildschirms. Wenn die Spannung der
Batterie unter ca. 5 Volt fällt, erinnert das Gerät Sie ein paar Sekunden lang daran, die Batterie
zu erneuern, und schaltet sich dann in die Schlummerfunktion zurück.
Rückstellen
Das PE830 sollte nach dem Einlegen oder Austauschen der Batterie normal funktionieren.
Sollte das Gerät jemals nicht normal ansprechen, kann eine manuelle Rückstellung erfolgen,
indem die "Speaker"-Taste mehr als 10 Sekunden lang heruntergedrückt wird. Nach dem
Loslassen sollte das Gerät normal den Betrieb aufnehmen, vorausgesetzt, dass die
Spannung der Batterie über 5 Volt liegt.
3. TASTEN UND SCHALTER
Der Hauptfunktionsschalter befindet sich auf der rechten Seite des Geräts. (Siehe Abbildung
1) Dieser Schalter hat die folgenden Funktionen: MONITOR, OFF (Klingeln) und TALK. Diese
Betriebsarten werden nachfolgend in dieser Anleitung ausführlich beschrieben.
Der Lautstärkeschalter befindet sich auf der linken Seite des Geräts und hat drei wählbare
Stufen. Die Stummschaltetaste befindet sich ebenfalls auf der linken Seite des Geräts. (Siehe
Abbildung 2)
Betriebsfunktionssymbole
1. TALK (Telefonfunktion)
2. OFF (nur Klingelfunktion)
3. MONITOR (Hör- oder Klingelfunktion)
Der dunkle Balken auf der Anzeige gibt die
Betriebsart an.
Das Haupttastenfeld umfasst siebzehn Ta s t e n .
(Siehe Abbildung 3) Die vier oberen Tasten, die
sich direkt unter der LCD befinden, haben die
folgenden Funktionen:
• Wiederwahl der letzten Rufnummer / Pause
• Wahl von Ton- oder Impulswählen
• Flash / Wechselsprechen (getakteter
Unterbrechungsrückruf)
• Abfragen / Programieren des Speichers
Die große Taste unterhalb des Te l e f o n Tastenfelds aktiviert den Lautsprecher.
4. BETRIEBSFUNKTIONEN
Das Testtelefon PE830 Te l e - M a t e®Pro hat vier Betriebsfunktionen: Einrichten (Setup),
Sprechen (Talk), Beobachten (Monitor) und Aus (Off).
Abb.1 - Funktionsschalter Abb.2 - Lautstärke und Stummschaltung
Abb.3 - Haupttastenfeld
Abb.4 - Haupteinstellung Abb. 5 - Sprachwahl
Note: The PE830 will not allow off-hook if ringing is
continuous. Check the frequency reported on the
screen; if this is approximately 60Hz (50Hz) then
carefully disconnect from the line.
Automatic Power Down
The PE830 will power-down after periods of no user
interaction in all modes, except active TALK mode. This reduces unnecessary battery
drain.
• TALK mode with no DC detected: . . . . . . . . . . . . . . . . . Five-minute timeout
• TALK mode with DC detected:. . . . . . . . . . . . . . . . . . . . . . . . . . . No timeout
• INTERCOM mode: . . . . . . . . . . . . . . . . . . . . . . . . . . . . . . . . . . . . No timeout
• MONITOR mode:. . . . . . . . . . . . . . . . . . . . . . . . . . . . Fifteen-minute timeout
• OFF mode with no DC detected: . . . . . . . . . . . . . . . . Three-second timeout
• OFF mode with DC detected: . . . . . . . . . . . . . . . . . . . . Five-minute timeout
The PE830 can easily be re-activated following a timeout by switching to another mode,
or connecting to DC (powered line).
5. MEMORY FUNCTIONS
Memory and store facilities are available when in all modes. There are ten memory
locations for number storage and a multi-number "last number redial" store. These can
be accessed as described below.
Last Number Redial
When in OFF or MONITOR modes the Redial
key offers the user the ability to recall any of the last
five numbers dialed or received by CLID on the unit.
The numbers can be accessed by repeatedly pressing
the key with number information displayed on the
LCD. This number will be automatically dialed out when the switch is placed back to the
TALK mode. (See Figure 19)
In TALK mode the key offers the last number dialed (or last CLID) only if no other
digits have already been dialed; after dialing any digits this key becomes the PAUSE key.
Saving Speed Dial Number
Enter a number or leave an incoming ID message on
the screen. Push the memory key TWICE to
enter the store mode, and then enter the button
number (0-9). (See Figures 20 - 22)
Recall Speed Dial Number
Push the key once followed by the button
number (0-9). (See Figures 23 - 25)
In addition to direct access by pressing the
corresponding number, while on-hook, in OFF or
MONITOR mode, repeatedly pressing the key
will allow you to scroll sequentially through all ten
Fig.18 - Power Cross
6
Fig.19 - Automatic LNR
Fig.21 - Store Screen 2 Fig.22 - Store Screen 3
Fig.20 - Store Screen 1
Fig.24 - Recall Screen 2 Fig. 25 - Recall Screen 3
Fig.23- Recall Screen 1
Page 9

stored numbers. In all cases the number remains displayed, allowing automatic dialing
by simply switching to TALK.
Note: If a location recalled is unused then no number will be displayed.
6. INTERCOM (LOCAL BATTERY) MODE
The intercom mode is a special feature to allow two PE830’s to communicate without any
telephone service available. In this mode only speech
signals pass over the telephone pair, no DC power
(talk battery) is available. The ”Smartintercom”
feature will only work with other PE830s. The intercom
feature will only work if there is no voltage on the line.
(See Figures 26 - 28)
To activate either "intercom" mode, start with the mode switch in MONITOR position and
press the "Flash" button. You will be presented with the menu shown below; by
default SmartIntercom will be selected. However, if there is a voltage on the line an error
tone will sound.
To begin the call,and ring the far end, slide the mode switch to TALK.
If you are making a SmartIntercom call, when the distant unit recognizes the call request
you will hear a regular "ring-back" tone from the loudspeaker. If there is no reply from the
distant unit, after a few seconds you will hear an error beep.
Incoming SmartIntercom call alerts will be received in either OFF or MONITOR modes;
you do not need to be in "intercom" mode to receive the alerting signal. The intercomalerting signal (ring tone) is a fast cadenced higher pitched ring than normal. If this is
heard then simply switch to TALK mode to answer the call, automatically placing the
PE830 into intercom mode. A confirmation beep is produced to indicate that the
INTERCOM mode is now active.
To leave intercom mode, simply move the mode switch from TALK to either OFF or
MONITOR. A call-completed tone is sent down the line as you do this to alert the other
user.
7. CALLER ID
CID and CIDCW information will be displayed in all modes, when available. Error
messages will be displayed when the CID is detected, but not received in full, is corrupted
or is of an incompatible type. (See Figures 29 - 30)
8. HEADSET
To use the PE830 "hands free" simply plug the supplied headset or another similar type
into the socket at the top of the unit. This will automatically mute the internal earpiece
and microphone. Note that the MUTE and SPEAKER buttons will operate as normal, i.e.
will disable transmission when active.
9. SPECIFICATIONS
Telephone Compatibility:. . . . . . . . . . . . . . . . . . . . . TIA/EIA-470-B and ETSI
Storage Temperature: . . . . . . . . . . . . . . . . . . -10°C (14°F) to +70°C (158°F)
Operating temperature: . . . . . . . . . . . . . . . . . . 0°C (32°F) to +50°C (122°F)
Fig. 29 - Caller ID Fig.30 - Call Waiting
Fig.27 - Intercom 2 Fig. 28 - Intercom 3
Fig. 26 - Intercom 1
D2
1. BESCHREIBUNG
Das Testtelefon PE830 Tele-Mate®Pro hilft bei der Ausführung von zunehmend komplexeren
Installations- und Wartungsarbeiten in der Telekommunikation. Das PE830 ist ein komplettes
Testtelefon mit zusätzlichen, nützlichen Funktionen wie Lautsprechermonitor, A n r u f e r - I D ,
Schnellwahl, Rückruf, Wechselsprechfunktion und Messfunktionen für Spannung, Strom und
Frequenz.
Das PE830 Tele-Mate®Pro funktioniert nicht nur als Handtelefon, sondern kann auch mit dem
(beiliegenden) Standardkopfhörer und mit dem verstärkten Lautsprecher-Leitungsmonitor
benutzt werden. Zum Leitungsanschluss stehen Telco-artige Messleitungen und -klemmen
oder integrierte Modularstecker zur Verfügung.
Funktionen
• Komplettes Telefongerät mit Klingel
• Wechselsprecheinrichtung
• Modular- oder Krokodilklemmenanschluss
• Verstärkter Lautsprecher-Leitungsmonitor
• Kopfhörer- oder Handapparatbetrieb
• Ton- und Impulswahl
• Großer Speicher mit 10-Speicherplatz-Schnellwahl
• Funf Weiderholungsspeicher
• Anrufer-ID mit Namensanzeige
• Anrufer-ID bei Anklopfen
• Anzeige verpasster Anrufe
• Anzeige von Leitungsspannung und -strom
• Erkennung und Sperre von Hochspannung
• Erkennung und Sperre von Hochstrom
• Anzeige in Englisch, Spanisch, Deutsch oder Französisch
Wichtige technische Daten
• Bellcore und ETSI Anrufer-ID-kompatibel
• TIA/EIARS-470-B oder ETSI-Telefonfunktionsweise wählbar
• Hochspannungswarnung (120 V DC)
• Hochstromwarnung (125 mA)
2. EINRICHTEN DES GERÄTS
Einlegen der Batterie
Das PE830 erfordert zum Betrieb aller Funktionen den Einbau einer 9-V-Batterie. Te m p o
®
empfiehlt, nur alkalische Batterien zu verwenden, da diese auslaufsicherer sind und
wesentlich länger halten als gewöhnliche Zinkcarbon-Batterien.
Wenn zum ersten Mal eine Batterie eingelegt wird, zeigt das Gerät zunächst die Sprachwahl
wie in Abbildung 5 an. Wählen Sie vor Benutzen des Geräts eine Sprache aus.
Um die Speicher- und Einstellungsinformationen zu erhalten, während die Batterie
ausgetauscht wird, ist es wichtig, dass der Funktionsschalter des PE830 auf "OFF" gestellt
und Anzeige erloschen ist. Die neue Batterie innerhalb von 30 Sekunden, nachdem die alte
Batterie herausgenommen wurde, anschließen. Zur Vorbereitung die neue Batterie aus der
Verpackung nehmen, bevor die alte Batterie herausgenommen wird. Die
Kreuzschlitzschraube, die sich unter der Hörmuschel befindet, lösen und die
Batteriefachabdeckung abnehmen. Eine neue alkalische Batterie einlegen. Dabei darauf
achten, dass die korrekte Polarität vorliegt und das Verbindungsstück gut befestigt ist, bevor
die Abdeckung wieder angebracht und festgeschraubt wird. (Die Schraube nicht zu fest
anziehen.)
Warnanzeige bei schwacher Batterie
Wenn die Spannung der Batterie unter 6 Volt fällt, ertönt jedesmal eine Warnung, wenn die
Vor Öffnen des Gehäuses die Messleitungen von der Leitung entfernen und das Gerät
ausschalten.
Nichtbeachten dieser Sicherheitsvorkehrungen kann zu schweren Verletzungen oder zum
Tod führen.
ACHTUNG
7
Page 10

INHALT
1. BESCHREIBUNG . . . . . . . . . . . . . . . . . . . . . . . . . . . . . . . . . . . . .D2
Funktionen . . . . . . . . . . . . . . . . . . . . . . . . . . . . . . . . . . . . . . . . . . . . . . . . . . .D2
Wichtige technische Daten . . . . . . . . . . . . . . . . . . . . . . . . . . . . . . . . . . . . . .D2
2. EINRICHTEN DES GERÄTS . . . . . . . . . . . . . . . . . . . . . . . . . . . . .D2
Einlegen der Batterie . . . . . . . . . . . . . . . . . . . . . . . . . . . . . . . . . . . . . . . . . . .D2
Warnanzeige bei schwacher Batterie . . . . . . . . . . . . . . . . . . . . . . . . . . . . . .D2
Rückstellen . . . . . . . . . . . . . . . . . . . . . . . . . . . . . . . . . . . . . . . . . . . . . . . . . .D3
3. TASTEN UND SCHALTER . . . . . . . . . . . . . . . . . . . . . . . . . . . . . .D3
Betriebsfunktionsymbole . . . . . . . . . . . . . . . . . . . . . . . . . . . . . . . . . . . . . . . .D3
4. BETRIEBSFUNKTIONEN . . . . . . . . . . . . . . . . . . . . . . . . . . . . . . .D3
Einrichtungsfunktion . . . . . . . . . . . . . . . . . . . . . . . . . . . . . . . . . . . . . . . . . . .D4
Sprechfunktion . . . . . . . . . . . . . . . . . . . . . . . . . . . . . . . . . . . . . . . . . . . . . . . .D4
Flash . . . . . . . . . . . . . . . . . . . . . . . . . . . . . . . . . . . . . . . . . . . . . . . . . . . . . .D4
Offline-Wählen und automatische W i e d e r wahl der letzten CID-Rufnu m m e r . . .D4
Pause . . . . . . . . . . . . . . . . . . . . . . . . . . . . . . . . . . . . . . . . . . . . . . . . . . . . .D4
Impulswahloption . . . . . . . . . . . . . . . . . . . . . . . . . . . . . . . . . . . . . . . . . . . . .D4
Strommessung . . . . . . . . . . . . . . . . . . . . . . . . . . . . . . . . . . . . . . . . . . . . . .D5
Überstromschutz . . . . . . . . . . . . . . . . . . . . . . . . . . . . . . . . . . . . . . . . . . . . .D5
SmartMute™ . . . . . . . . . . . . . . . . . . . . . . . . . . . . . . . . . . . . . . . . . . . . . . . .D5
Lautsprecher . . . . . . . . . . . . . . . . . . . . . . . . . . . . . . . . . . . . . . . . . . . . . . . .D5
Monitorfunktion . . . . . . . . . . . . . . . . . . . . . . . . . . . . . . . . . . . . . . . . . . . . . . .D5
Warnung bei Überspannung . . . . . . . . . . . . . . . . . . . . . . . . . . . . . . . . . . . . .D5
Warnung bei erhöhter Spannung . . . . . . . . . . . . . . . . . . . . . . . . . . . . . . . . .D5
Off-Funktion . . . . . . . . . . . . . . . . . . . . . . . . . . . . . . . . . . . . . . . . . . . . . . . . . .D6
Annehmen eines ankommenden Anrufs . . . . . . . . . . . . . . . . . . . . . . . . . . . .D6
Automatisches Ausschalten . . . . . . . . . . . . . . . . . . . . . . . . . . . . . . . . . . . . . .D6
5. SPEICHERFUNKTIONEN . . . . . . . . . . . . . . . . . . . . . . . . . . . . . . .D6
Wiederwahl der letzten Rufnummer . . . . . . . . . . . . . . . . . . . . . . . . . . . . . . .D6
Schnellwahl-Rufnummern speichern . . . . . . . . . . . . . . . . . . . . . . . . . . . . . . .D7
Schnellwahl-Rufnummern aufrufen . . . . . . . . . . . . . . . . . . . . . . . . . . . . . . . .D7
6. WECHSELSPRECHFUNKTION (INTERNE BATTERIE) . . . . . . . . .D7
7. ANRUFER-ID . . . . . . . . . . . . . . . . . . . . . . . . . . . . . . . . . . . . . . . .D8
8. KOPFHÖRER . . . . . . . . . . . . . . . . . . . . . . . . . . . . . . . . . . . . . . . .D8
9. TECHNISCHE DATEN . . . . . . . . . . . . . . . . . . . . . . . . . . . . . .D8-D9
10. GLOSSAR . . . . . . . . . . . . . . . . . . . . . . . . . . . . . . . . . . . . . . . . . . .D9
Einjährige beschränkte Garantie . . . . . . . . . . . . . . . . . . . . . . .D10
VERZEICHNIS DER
ABBILDUNGEN
Abb. 1 - Funktionsschalter . . . . . .D3
Abb. 2 - Lautstärke und
Stummschaltung . . . . . . .D3
Abb. 3 - Haupttastenfeld . . . . . . . .D3
Abb. 4 - Haupteinstellung . . . . . . .D3
Abb. 5 - Sprachwahl . . . . . . . . . . .D3
Abb. 6 - Wähleinstellungen . . . . .D4
Abb. 7 - DTMF-Pegel . . . . . . . . . .D4
Abb. 8 - Flash-Einstellung . . . . . .D4
Abb. 9 - Impulsverhältnis . . . . . . .D4
Abb. 10 - Klingeltonwahl . . . . . . . . .D4
Abb. 11 - Kontrasteinstellung . . . . .D4
Abb. 12 - Flash . . . . . . . . . . . . . . . .D4
Abb. 13 - Impulswahl . . . . . . . . . . .D5
Abb. 14 - Überstrom . . . . . . . . . . . .D5
Abb. 15 - Monitorfunktion . . . . . . . .D5
Abb. 16 - Überspannung . . . . . . . .D5
Abb. 17 - OFF-Funktion . . . . . . . . .D6
Abb. 18 - Netzberührung . . . . . . . .D6
Abb. 19 - Automatische LNR . . . . .D6
Abb. 20 - Bildschirm 1 speichern . .D6
Abb. 21 - Bildschirm 2 speichern . .D6
Abb. 22 - Bildschirm 3 speichern . .D6
Abb. 23 - Bildschirm 1 aufrufen . . .D7
Abb. 24 - Bildschirm 2 aufrufen . . .D7
Abb. 25 - Bildschirm 3 aufrufen . . .D7
Abb. 26 - Wechselsprechen 1 . . . .D7
Abb. 27 - Wechselsprechen 2 . . . .D7
Abb. 28 - Wechselsprechen 3 . . . .D7
Abb. 29 - Anrufer-ID . . . . . . . . . . . .D8
Abb. 30 - Anklopfen . . . . . . . . . . . .D8
D18
Humidity: . . . . . . . . . . . . . . . . . . . . . . . . . . . . . . . . . . . . . . . . . . . . . . . . up to 90%
operating95% storage, both with no condensation.
CID and CIDCW: . . . All FSK types including Bellcore TR-NWT-000030 (GR30)
SR-TSV-002476, and ETSI
Battery Life: Over three months of typical use; less than 40uA in OFF
mode giving a shelf life with a new battery of at least 12
months. Only alkaline types recommended. It's always
best to remove the battery if storing PE830 for long
periods.
Loop Limits (at 48V):
Resistance: . . . . . . . . . . . . . . . . . . . . . . . . . . . . . . . . . . . . . . . . . . . . . . . . . . . >5 k
Minimum current: . . . . . . . . . . . . . . . . . . . . . . . . . . . . . . . . . . . . . . . . . . . <10 mA
DC Resistance:
Off-hook:. . . . . . . . . . . . . . . . . . . . . . . . . . . . . . . . . . . . . . . . . . . . . . . . . . . . . <300
On-hook: . . . . . . . . . . . . . . . . . . . . . . . . . . . . . . . . . . . . . . . . . . . . . . . . . . . . >5 M
Monitor impedance: . . . . . . . . . . . . . . . . . . . . . . . . . . . . . . . . . . . . . . . . >400 k
Dialing:
Pulse:
Rate: . . . . . . . . . . . . . . . . . . . . . . . . . . . . . . . . . . . . . . . . . . . . . . . . . . . . . . 10 pps
Break: . . . . . . . . . . . . . . . . . . . . . . . . . . . . . . . . . . . . . . . . . . . . . . . . . 60% or 66%
Inter-digit pause: . . . . . . . . . . . . . . . . . . . . . 800 ms (leakage during break: >5 M)
DTMF/Tone: . . . . . . . . . . . . . . . . . . . . . . . . . . . . . . . . . -4dBm /-6dBm (TIA/ EIA)
. . . . . . . . . . . . . . . . . . . . . . . . . . . . . . . . . . . . . . . . . . -9dBm / 8 -11dBm (ETSI)
FSK Caller Name/Number and Call Waiting:
Bellcore GR-30-CORE, TR-NWT-000030
ETSI FSK Types
Displays: Calling DN, Caller name
Soft Key Function (on two context sensitive keys):
Flash/Timed Break Recall: . . . . . . . . . . . . . . . . . . . . . . . . . . . . . 100, 270, 600 ms
Memory dialing:
10 memories, 5 last dialed & 5 last received
Indicators:
LCD (96x48 pixels) displays the following:
Caller ID (name & number) & Call Waiting
Dialed number
Over-voltage conditions
Phone status (monitor, off/on hook etc.)
Line voltage: . . . . . . . . . . . . . . . . . . . . . . . . . . . . . . . . . . . . . . . . . . . 120 Vdc max
Loop current: . . . . . . . . . . . . . . . . . . . . . . . . . . . . . . . . . . . . . . . . . . . 125 mAmax
Ring frequency: . . . . . . . . . . . . . . . . . . . . . . . . . . . . . . . . . . . . . . . . . . 15 – 70 Hz
Line protection:
Over-voltage: . . . . . . . . . . . . . . . . . . . . . . . . . . . . . . . . . . . . . 360 Vdc continuous
>500 V peak
Current limited: . . . . . . . . . . . . . . . . . . . . . . . . . . . . . . . . . . . . . . . . . . . . . 140 mA
Lightning: . . . . . . . . . . . . . . . . . . . . . . . . . . . . . . . . . . . ITU K.17, 20, 21 (1500 V)
Intercom Range: . . . . . . . . . . . . . . . . . . . . . . . . . . . . . . . . . . . . . . . . . . . . 6 km
Page 11

HINWEIS: Dieses Dokument ist ein nicht veröffentlichtes Werk, das unter dem Urheberrecht der
Vereinigten Staaten geschützt und Eigentum von Tempo ist. Die Veröffentlichung, Vervielfältigung,
Reproduktion, Einbeziehung, Übersetzung, Modifizierung, Verbesserung oder Verwendung durch
Personen, die nicht autorisierte Mitarbeiter oder Lizenznehmer von Tempo und seinen
Konzerngesellschaften sind, ist ohne vorherige schriftliche Genehmigung von Tempo verboten.
Copyright © 2003
Tempo - ein Textron-Unternehmen. Alle Rechte vorbehalten.
Tempo Research, eine Delaware Corporation
SICHERHEITSWARNSYMBOL
Dieses Symbol macht Sie auf gefährliche oder riskante Praktiken aufmerksam, die zu
Schäden oder Verletzungen führen können. Das Signalwort, wie nachfolgend definiert, gibt
den Ernst der Gefahr an. Der dem Signalwort folgende Hinweis informiert darüber, wie die
Gefahr vermieden wird.
Gefahr, die bei Nichtvermeiden zu schweren Verletzungen oder zum Tod führen kann.
GEFAHR
ACHTUNG
VORSICHT
• Dieses Gerät nicht Regen oder Feuchtigkeit aussetzen.
• Das Berühren von Stromkreisen kann zu schweren Verletzungen oder zum Tod führen.
• Dieses Gerät nur zu seinem vom Hersteller be-stimmten Zweck wie in dieser Anleitung
beschrieben verwenden. Andere Verwendungen beeinträchtigen u.U. den vom Gerät
gebotenen Schutz.
• Für den jeweiligen Einsatz geeignete Messleitungen bzw. Zubehör verwenden. Kategorie
und Nennspannung von Messleitung und Zubehör prüfen.
• Messleitungen und Zubehör vor dem Einsatz überprüfen. Alle Teile müssen sauber und
trocken sein, die Isolierung muss sich in gutem Zustand befinden.
• Vor Öffnen des Gehäuses die Messleitungen vom Stromkreis entfernen und das Gerät
abschalten.
Nichtbeachten dieser Sicherheitsvorkehrungen kann zu schweren Verletzungen oder zum Tod führen.
• An diesem Gerät keine Reparaturversuche unternehmen. Es enthält keine vom Benutzer
reparierbare Teile.
• Das Gerät keinen extremen Temperaturen oder hoher Feuchtigkeit aussetzen. (Siehe
Technische Daten)
• Besonders laute Lautsprecherwarnung wie beim PE961
Nichtbeachten dieser Sicherheitsvorkehrungen kann zu Verletzungen oder Schäden am Gerät
führen.
ACHTUNG
VORSICHT
BERÜHRUNGSGEFAHR
Akute Gefahr, die bei Nichtvermeiden zu schweren Verletzungen oder zum Tod führt.
G e f a h r, die bei Nichtvermeiden zu Verletzungen führen kann.
9
10. GLOSSARY
On Hook: (Idle): The phone is not active
Off Hook (Talk): The phone is activated
Monitor: The phone line is available for listening only
Line Current: The amount of current fed from the telephone line when off hook, in
milliamperes (mA)
Flash:A momentary line current break used by the butt set to signal the phone system
for special functions.
Page 12

Tempo – Mesa | Formerly Progressive Electronics
Telephone: +1 815 397-4279
Toll-free in the US and Canada: 1 800 282-7941 • Facsimile: +1 815 397-1865
Tempo Europe Telephone +44 1633 225 600 • Tempo Europe Facsimile +44 1633 225 601
www.tempo.textron.com
One-Year Limited Warranty
Tempo®warrants to the original purchaser of these goods for use that these products will
be free from defects in workmanship and material for one year, excepting normal wear
and abuse.
For all Test Instrument repairs within the Americas; you must first request a Return
Authorization Number by contacting our Customer Service department at 1 940 3253000 x256.This number must be clearly marked on the shipping label.Ship units Freight
Prepaid to :
Tempo
6100 Columbia Street, Mineral Wells
Texas 76067 USA.
Attention TEST INSTRUMENT REPAIR.
For all Test Instrument repairs outside the Americas; you must first request a Return
Authorization Number by contacting our T empo Europe Customer Service department at
+44 1633 225 600.This number must be clearly marked on the shipping label.Ship units
Freight Prepaid to:
Tempo Europe Repair Centre
Unit 3, Maesglas Industrial Estate
Newport, South Wales NP20 2NN, UK
Attention TEST INSTRUMENT REPAIR.
For items not covered under warranty (such as dropped, abused, etc.) repair cost quote
available upon request.
Note: Prior to returning any test instrument, please check to make sure batteries are fully
charged.
95E0091 © 2003 REV.A
Das Testtelefon Tele-Mate®Pro hilft bei der Ausführung von zunehmend komplexeren Installationsund Wartungsarbeiten in der Telekommunikation. Das PE830 ist ein komplettes Testtelefon mit
zusätzlichen, nützlichen Funktionen wie Lautsprechermonitor, Anrufer-ID, Schnellwahl, Rückruf,
Wechselsprechfunktion und Messfunktionen für Spannung, Strom und Frequenz.
Das Modell PE830 besteht aus:
Tele-Mate®Pro Testtelefon
HS-1 KOPFHÖRER
PE830 T E L E - M AT E®P RO
T E S T T E L E F O N
Lesen Sie vor Betrieb oder Wartung dieses Geräts die
Bedienungsanleitung sorgfältig durch. Mangelndes Verständnis
seiner sicheren Handhabung kann zu schweren bzw. tödlichen
Verletzungen führen.
ACHTUNG
Page 13

Tempo – Mesa | Formerly Progressive Electronics
Teléfono: +1 815 397-4279
Llamada gratis en los EE.UU y Canadá: 1 800 282-7941 • Facsímile: +1 815 397-1865
Teléfono de Tempo en Europa +44 1633 225 600 • Facsímile de Tempo Europe +44 1633 225 601
www.tempo.textron.com
Garantía limitada de un año
Tempo garantiza al comprador original de estos bienes, que el uso de los productos
estará libre de defectos de mano de obra y materiales durante un año, exceptuando el
desgaste normal y el abuso.
Para todas las reparaciones de instrumentos de prueba en las Américas; tiene
que pedir primero un número de autorización para devolución (Return Authorization
Number) comunicándose con el departamento de Servicio al Cliente (Customer
Service) al 1 940 325-3000 extensión 256.Este número debe estar claramente indicado en el rótulo de envío. Envíe las unidades con transporte pago a:
Tempo
6100 Columbia Street, Mineral Wells
Texas 76067 USA.
Attention TEST INSTRUMENT REPAIR.
Para todas las reparaciones de instrumentos de prueba fuera de los EE.UU. y
Canadá; tiene que pedir primero un número de autorización para devolución (Return
Authorization Number) comunicándose con el departamento de Servicio al Cliente
(Customer Service) al +44 1633 225 600. Este número debe estar claramente indicado
en el rótulo de envío. Envíe las unidades con transporte pago a:
Tempo Europe Repair Centre
Unit 3, Maesglas Industrial Estate
Newport, South Wales NP20 2NN, UK
Attention TEST INSTRUMENT REPAIR.
En el caso de los artículos que no están cubiertos por la garantía (como los equipos que
se han dejado caer, fueron abusados, etc.) se puede pedir un presupuesto para la
reparación.
Nota: Antes de devolver cualquier instrumento de prueba, por favor, compruebe para
asegurarse de que las baterías estén totalmente cargadas.
Le combiné d'essai Tele-MateMDPro permet de mieux gérer la complexité croissante qui
caractérise l'installation et la maintenance des équipements de télécommunication.
Appareil complet, le PE830 comporte des fonctions utiles telles que moniteur avec hautparleur, identification de l'appelant, composition rapide, rappel automatique, intercom et
voltmètre / ampèremètre / fréquencemètre.
Le modèle PE830 comporte les éléments suivants :
Combiné d'essai Tele-MateMDPro
CASQUE D'ÉCOUTE HS-1
95E0091 © 2003 RÉV. A
PE830 T E L E - M AT E
M D
P RO
COMBINÉ D'ESSAI
Veuillez lire et bien comprendre ce manuel avant
d'utiliser cet équipement ou d'en faire l'entretien. Le fait
de ne pas savoir comment utiliser cet outil de façon
sécuritaire peut entraîner des blessures graves ou la
mort.
AVERTISSEMENT
Page 14

E9
Marcando:
Pulso:
Velocidad: . . . . . . . . . . . . . . . . . . . . . . . . . . . . . . . . . . . . . . . . . . . . . . . . . . 10 pps
Interrupción: . . . . . . . . . . . . . . . . . . . . . . . . . . . . . . . . . . . . . . . . . . . . 60 % o 66%
Pausa entre dígitos: . . . . . . . . . . . . . . . . . . . . . . . . . . . . . . . . . . . . . . . . . . 800 ms
. . . . . . . . . . . . . . . . . . . . . . . . . . . . . . . . . (pérdida durante interrupción: >5 M)
DTMF/Tono: . . . . . . . . . . . . . . . . . . . . . . . . . . . . . . . . . . -4dBm / -6dBm (TIA/ EIA)
. . . . . . . . . . . . . . . . . . . . . . . . . . . . . . . . . . . . . . . . . . -9dBm / 8-11dBm (ETSI)
FSK Nombre de la persona que llama (Caller name)/Número y lla m a d a
en espera (Call Wa i t i n g ) :
Bellcore GR-30-CORE, TR-NWT-000030
ETSI FSK Pelaje
Visualiza: DN del que llama, Nombre del que llama
Funciones de teclas programables (en dos teclas sensibles al con
texto):
Flash/Rellamada de interrupción temporizada
(Timed Break Recall):. . . . . . . . . . . . . . . . . . . . . . . . . . . . . . . . 100, 270, 600 ms
Marcado de memoria:
10 memorias, 5 últimos números marcados y 5 últimos recibidos
Indicadores:
LCD (96x48 pixels) visualiza lo siguiente:
Identificación de llamadas (Caller ID) (nombre y número) y llamada en
espera (Call Waiting)
Número marcado
Condiciones de sobrevoltaje
Estado del teléfono (monitor, descolgado / colgado etc.)
Línea de voltage: . . . . . . . . . . . . . . . . . . . . . . . . . . . . . . . . . . . . . . . 120 Vdc máx.
Corriente de lazo:. . . . . . . . . . . . . . . . . . . . . . . . . . . . . . . . . . . . . . . . 125 mA máx.
Frecuencia de timbre: . . . . . . . . . . . . . . . . . . . . . . . . . . . . . . . . . . . . . 15 – 70 Hz
Protección de línea:
Sobrevoltaje: . . . . . . . . . . . . . . . . . . . . . . . . . . . . . . . . . . . . . . . . 360 Vcc continuo
>500 V pico
Corriente limitada: . . . . . . . . . . . . . . . . . . . . . . . . . . . . . . . . . . . . . . . . . . . 140 mA
Rayos:. . . . . . . . . . . . . . . . . . . . . . . . . . . . . . . . . . . . . . ITU K.17, 20, 21 (1500 V)
Alcance del intercomunicador: . . . . . . . . . . . . . . . . . . . . . . . . . . . . . . 6 km
10. GLOSARIO
Colgado: (Inactivo): El teléfono no está activo
Descolgado (Hablar): El teléfono está activado
Monitor: La línea de teléfono está disponible sólo para escuchar
Corriente de línea: La cantidad de corriente alimentada desde el teléfono cuando
está descolgado, en miliamperios (mA)
Flash: Una interrupción momentánea en la corriente de línea usada por la unidad de
empalme para emitir una señal al sistema de teléfono para funciones especiales.
AVIS : Ce document est une œuvre inédite protégée par les lois sur le droit d'auteur des ÉtatsUnis et est la propriété de Tempo.Toute divulgation, copie, reproduction, fusion, traduction,
modification, amélioration ou utilisation par quiconque autre que les employés ou les licenciés
autorisés de Tempo et ses sociétés affiliées sans accord préalable de Tempo est interdite.
Copyright © 2003 TempoMD- a Textron Company.Tous droits réservés.
Tempo Research, a Delaware Corporation
SYMBOLE
D'ALERTE DE
SÉCURITÉ
Ce symbole met en garde contre les risques et les manipulations dangereuses
pouvant entraîner des blessures ou des dommages matériels. Le mot indicateur,
défini ci-dessous, indique la gravité du danger. Le message qui le suit explique
comment prévenir ou éviter le danger en question.
Dangers qui, s'ils ne sont pas pris en considération, POURRAIENTentraîner des
blessures graves, voire mortelles.
DANGER
AVERTISSEMENT
MISE EN GARDE
• N'exposez pas cet appareil à la pluie ou à l'humidité.
• Tout contact avec des circuits sous tension peut causer des blessures graves,
voire mortelles.
• Employez cet outil uniquement selon l'usage prévu par le fabricant tel que décrit
dans ce manuel. Toute autre utilisation peut affaiblir la protection assurée par
l'appareil.
• Utilisez des fils d'essai ou accessoires appropriés à l'application. Voir la catégorie
et la tension nominale des fils d'essai ou accessoires.
• Inspectez les fils d'essai ou accessoires avant utilisation. Les pièces doivent être
propres et sèches et l'isolation en bon état.
• Avant d'ouvrir le boîtier, retirez les fils d'essai du circuit et éteignez l'appareil.
Le non-respect de ces précautions peut causer des blessures graves ou la mort.
• N'essayez pas de réparer l'appareil. Il ne contient pas de pièces réparables par
l'utilisateur.
• N'exposez pas l'appareil à des températures extrêmes ou à un niveau d'humidité
élevé. Voir les Caractéristiques techniques.
• Haut-parleur d'alerte similaire à celui du modèle PE961.
Le non-respect de ces précautions peut entraîner des blessures ou endommager
l'instrument.
AVERTISSEMENT
MISE EN GARDE
RISQUE DE CHOC
ÉLECTRIQUE
Dangers immédiats qui, s'ils ne sont pas pris en considération, ENTRAÎNERONT
des blessures graves, voire mortelles.
Dangers qui, s'ils ne sont pas pris en considération, POURRAIENT
ÉVENTUELLEMENTcauser des blessures.
Page 15

E8
Se le presentará el menú mostrado más abajo; debido a la opción por defecto, se
seleccionará SmartIntercom. Sin embargo, si hay voltaje en la línea sonará un tono de
error. Para comenzar la llamada y llamar al extremo alejado, deslice el interruptor de
modo a la posición HABLA(TALK).
Si está haciendo una llamada SmartIntercom, cuando una unidad distante reconoce el
pedido de llamada usted escuchará un tono normal de "retorno de llamada" a través del
altavoz. Si no hay respuesta de la unidad distante, después de unos segundos se oirá
un zumbido de error.
Las alertas de llamadas SmartIntercom entrantes se recibirán ya sea en los modos
APAGADO (OFF) o MONITOR; usted no tiene que estar en el modo "intercom" para
recibir la señal de alerta. La señal de alerta del intercom (tono de timbre) es un timbre
más agudo con una cadencia más rápida que el normal. Si se escucha esto,
simplemente cambie al modo HABLA(TALK) para responder a la llamada, colocando
automáticamente la unidad PE830 en el modo intercom. Se produce un zumbido de
confirmación para indicar que el modo INTERCOM ahora está activo.
Para salir del modo intercom, simplemente mueva el interruptor de modo desde HABLA
(TALK) a APAGADO (OFF) o a MONITOR. Cuando hace esto, se envía por la línea un
tono de llamada completa para alertar al otro usuario.
7 . I D E N T I F I C ACIÓN DE LLAMADAS (CALLER ID)
En todos los modos, cuando está disponible, visualizará la información CID y CIDCW.
Los mensajes de error se visualizarán cuando se detecta el CID, pero no se recibe por
completo, está corrupto o es de tipo no compatible. (Consulte las Figuras 29 - 30)
8. AURICULAR
Para usar la unidad PE830 "sin manos" simplemente enchufe el auricular suministrado
u otro tipo similar en el receptáculo en la parte superior de la unidad. Esto silenciará
automáticamente el auricular y el micrófono internos. Recuerde que los botones
SILENCIAR (MUTE) y ALTAVOZ (SPEAKER) funcionarán normalmente, por ejemplo,
desactivarán la transmisión cuando se activa.
9. ESPECIFICACIONES
Compatibilidad telefónica: . . . . . . . . . . . . . . . . . . . . . . TIA/EIA-470-B y ETSI
Temperatura de almacenamiento: . . . . . . . -10°C (14°F) a +70°C (158°F)
Temperatura de funcionamiento: . . . . . . . . . 0°C (32°F) a +50°C (122°F)
Humedad: . . . . . . . . . . . . . . . . . . . . . . . . . . . . . . . . . . . . . . . . . . . . . hasta el 90%
. . . . . . . . . . . . operando 95% en almacenamiento, ambas sin condensación.
CID y CIDCW: Todos los tipos FSK incluyendo Bellcore TR-NWT-000030 (GR30)
SR-TSV-002476 y ETSI
Duración de la batería: Más de tres meses de uso típico; menos de 40uA en
el modo APAGADO (OFF) con una vida útil de almacenamiento
con una batería nueva de por lo menos 12 meses. Se recomienda que sólo se usen baterías de tipo alcalinas. Siempre es mejor
extraer las baterías antes de almacenar la unidad PE830 durante
períodos largos de tiempo.
Límites de lazo (a 48V):
Resistencia:. . . . . . . . . . . . . . . . . . . . . . . . . . . . . . . . . . . . . . . . . . . . . . . . . . . >5 k
Corriente mínima: . . . . . . . . . . . . . . . . . . . . . . . . . . . . . . . . . . . . . . . . . . . <10 mA
Resistencia de CC:
Descolgado: . . . . . . . . . . . . . . . . . . . . . . . . . . . . . . . . . . . . . . . . . . . . . . . . . . <300
Colgado:. . . . . . . . . . . . . . . . . . . . . . . . . . . . . . . . . . . . . . . . . . . . . . . . . . . . >10 M
Impedancia del monitor: . . . . . . . . . . . . . . . . . . . . . . . . . . . . . . . . . . . >400 k
Fig.29 – Identificación de llamadas (Caller ID) Fig.30 – Llamada en espera (Call Waiting)
TABLE DES MATIÈRES
1. DESCRIPTION . . . . . . . . . . . . . . . . . . . . . . . . . . . . . . . . . . . . . . .F2
Caractéristiques . . . . . . . . . . . . . . . . . . . . . . . . . . . . . . . . . . . . . . . . . . . . . . . . .F2
Spécifications importantes . . . . . . . . . . . . . . . . . . . . . . . . . . . . . . . . . . . . . . . . .F2
2. RÉGLAGE DE L'APPAREIL . . . . . . . . . . . . . . . . . . . . . . . . . . . . . .F2
Installation de la pile . . . . . . . . . . . . . . . . . . . . . . . . . . . . . . . . . . . . . . . . . . . . .F2
Avertissement de pile faible . . . . . . . . . . . . . . . . . . . . . . . . . . . . . . . . . . . . . . . .F3
Réinitialisation . . . . . . . . . . . . . . . . . . . . . . . . . . . . . . . . . . . . . . . . . . . . . . . . . .F3
3. BOUTONS ET SÉLECTEURS . . . . . . . . . . . . . . . . . . . . . . . . . . . .F3
Icônes des modes de fonctionnement . . . . . . . . . . . . . . . . . . . . . . . . . . . . . . . .F3
4. MODES DE FONCTIONNEMENT . . . . . . . . . . . . . . . . . . . . . . . . .F4
Mode de réglage . . . . . . . . . . . . . . . . . . . . . . . . . . . . . . . . . . . . . . . . . . . . . . . .F4
Mode Conversation . . . . . . . . . . . . . . . . . . . . . . . . . . . . . . . . . . . . . . . . . . . . . .F4
Flash . . . . . . . . . . . . . . . . . . . . . . . . . . . . . . . . . . . . . . . . . . . . . . . . . . . . . . . .F4
Composition hors ligne et recomposition automatique du dernier numéro d'appelant . .F4
Pause . . . . . . . . . . . . . . . . . . . . . . . . . . . . . . . . . . . . . . . . . . . . . . . . . . . . . . .F4
Option de composition par impulsion . . . . . . . . . . . . . . . . . . . . . . . . . . . . . . .F5
Mesure du courant . . . . . . . . . . . . . . . . . . . . . . . . . . . . . . . . . . . . . . . . . . . . .F5
Protection de surintensité . . . . . . . . . . . . . . . . . . . . . . . . . . . . . . . . . . . . . . . .F5
SmartMuteMD(Coupure Micro) . . . . . . . . . . . . . . . . . . . . . . . . . . . . . . . . . . . . .F5
Haut-parleur . . . . . . . . . . . . . . . . . . . . . . . . . . . . . . . . . . . . . . . . . . . . . . . . . .F5
Mode Écoute discrète . . . . . . . . . . . . . . . . . . . . . . . . . . . . . . . . . . . . . . . . . . . .F5
Avertissement de surtension . . . . . . . . . . . . . . . . . . . . . . . . . . . . . . . . . . . . . .F5
Avertissement de tension élevée . . . . . . . . . . . . . . . . . . . . . . . . . . . . . . . . . . .F6
Mode Éteint . . . . . . . . . . . . . . . . . . . . . . . . . . . . . . . . . . . . . . . . . . . . . . . . . . . .F6
Réponse à un appel entrant . . . . . . . . . . . . . . . . . . . . . . . . . . . . . . . . . . . . . . .F6
Arrêt automatique . . . . . . . . . . . . . . . . . . . . . . . . . . . . . . . . . . . . . . . . . . . . . . .F6
5. FONCTIONS DE MÉMOIRE . . . . . . . . . . . . . . . . . . . . . . . . . . . . .F6
Recomposition du dernier numéro . . . . . . . . . . . . . . . . . . . . . . . . . . . . . . . . . .F6
Sauvegarde du numéro de composition rapide . . . . . . . . . . . . . . . . . . . . . . . .F7
Rappel du numéro de composition rapide . . . . . . . . . . . . . . . . . . . . . . . . . . . .F7
6. MODE INTERCOM (PILE LOCALE) . . . . . . . . . . . . . . . . . . . . . . . .F7
7. IDENTIFICATION DE L'APPELANT . . . . . . . . . . . . . . . . . . . . . . .F8
8. CASQUE D'ÉCOUTE . . . . . . . . . . . . . . . . . . . . . . . . . . . . . . . . . . .F8
9. SPÉCIFICATIONS . . . . . . . . . . . . . . . . . . . . . . . . . . . . . . . . . .F8-F9
10. GLOSSAIRE . . . . . . . . . . . . . . . . . . . . . . . . . . . . . . . . . . . . . . . . .F9
Garantie limitée d'un an . . . . . . . . . . . . . . . . . . . . . . . . . . . . . .F10
INDEX DES
ILLUSTRATIONS
Fig. 1 - Sélecteur de mode . . . . . . . . .F3
Fig. 2 - Sélecteur de volume et sourdine .F3
Fig. 3 - Clavier principal . . . . . . . . . . .F3
Fig. 4 - Menu de réglage principal . . .F3
Fig. 5 - Choix de langue . . . . . . . . . . .F3
Fig. 6 - Paramètres de composition . .F4
Fig. 7 - Niveau DTMF . . . . . . . . . . . . .F4
Fig. 8 - Réglage Flash . . . . . . . . . . . .F4
Fig. 9 - Rapport d'impulsions . . . . . . .F4
Fig. 10 - Réglage de tonalité . . . . . . . . .F4
Fig. 11 - Réglage du contraste . . . . . . .F4
Fig. 12 - Flash . . . . . . . . . . . . . . . . . . . .F4
Fig. 13 - Composition par impulsion . . .F5
Fig. 14 - Surintensité . . . . . . . . . . . . . . .F5
Fig. 15 - Mode Écoute discrète . . . . . . . .F5
Fig. 16 - Surtension . . . . . . . . . . . . . . . .F5
Fig. 17 - Mode ÉTEINT . . . . . . . . . . . . .F6
Fig. 18 - Croisement avec ligne électrique .F6
Fig. 19 - Recomposition automatique .
du dernier numéro . . . . . . . . .F6
Fig. 20 - Écran de stockage mémoire 1 . .F7
Fig. 21 - Écran de stockage mémoire 2 .F7
Fig. 22 - Écran de stockage mémoire 3 .F7
Fig. 23 - Écran de rappel 1 . . . . . . . . . .F7
Fig. 24 - Écran de rappel 2 . . . . . . . . . .F7
Fig. 25 - Écran de rappel 3 . . . . . . . . . .F7
Fig. 26 - Intercom 1 . . . . . . . . . . . . . . . .F7
Fig. 27 - Intercom 2 . . . . . . . . . . . . . . . .F7
Fig. 28 - Intercom 3 . . . . . . . . . . . . . . . .F7
Fig. 29 - Identification de l'appelant . . .10
Fig. 30 - Appel en attente . . . . . . . . . . .10
Page 16

E7
la pantalla de LCD. Este número se marcará
automáticamente cuando se coloca el interruptor en
el modo de HABLA(TALK). (Consulte la Figura 19)
En el modo de HABLA(TALK), la tecla ofrece el
último número marcado (o el último CLID) sólo si ya
no se ha marcado otro dígito; después de marcar
cualquier dígito, esta tecla se convierte en la tecla de
PAUSA(PAUSE).
Pa ra guardar un número de marcación rápida (Speed Dial)
Marque un número o deje un mensaje de
identificación (ID) entrante en la pantalla. Presione la
tecla de memoria DOS VECES para entrar al
modo de almacenamiento, y luego ingrese el número
del botón (0-9). (Consulte las Figuras 20-22)
Rellamada de un número de discado rápido
Presione una vez la tecla seguida por el número del botón (0-9). (Consulte las
Figuras 23 - 25)
Además del acceso directo presionando el número correspondiente mientras el teléfono
está colgado, en los modos de APAGADO o MONITOR (OFF o MONITOR), presionar
repetidamente la tecla le permitirá desplazarse de manera secuencial por los diez
números almacenados. En todos los casos el
número permanece visualizado, permitiendo la
marcación automática simplemente cambiando a
HABLA(TALK).
Nota: Si no se usa la localidad a la que se rellama no
se visualizará el número.
6. MODO INTERCOM (BATERÍA LOCAL)
El modo intercom es una característica especial para permitir que se comuniquen dos
unidades PE830 sin tener disponible un servicio telefónico. En este modo, sólo pasan
señales de habla por el par telefónico, no hay alimentación de CC (batería para habla)
disponible. La característica :”Smartintercom” solo
funcionará con otros PE830. La característica de
intercom solo funcionará si no hay voltaje en la línea.
(Consulte las Figuras 26 - 28)
Para activar cualquiera de los modos de
"intercomunicador", comience con el interruptor en la
posición MONITOR y presione el botón "Flash".
Fig.21– Pantalla de almacenamiento 2 Fig.22 – Pantalla de almacenamiento 3
Fig.24 – Pantalla de rellamada 2 Fig.25 - Pantalla de rellamada 3
Fig.20 – Pantalla de almacenamiento 1
Fig.23 - Pantalla de rellamada 1
Fig.26 - Intercomunicador 1
Fig.27 - Intercomunicador 2 Fig.28 - Intercomunicador 3
Fig.19 – LNR automático
F2
1. DESCRIPTION
Le combiné d'essai Te l e - M a t e
M D
Pro PE830 permet de mieux gérer la complexité
croissante qui caractérise l'installation et la maintenance des équipements de
télécommunication.Appareil complet, le PE830 comporte des fonctions utiles telles que
moniteur avec haut-parleur, identification de l'appelant, composition rapide, rappel
automatique, intercom et voltmètre / ampèremètre / fréquencemètre.
Le PE830 Te l e - M a t e
M D
Pro fonctionne non seulement en mode combiné, mais peut
également être utilisé avec le casque d'écoute standard inclus et le haut-parleur
amplifié. Vous pouvez utiliser les fils de test et les clips de style compagnie de téléphone
ou la prise modulaire intégrée pour vous connecter à la ligne.
Caractéristiques
• Appareil téléphonique complet avec sonnerie
• Intercom entre postes téléphoniques
• Connexion modulaire ou avec pince crocodile
• Moniteur de ligne avec haut-parleur amplifié
• Fonctionnement avec casque d'écoute ou combiné
• Composition à tonalité et à impulsion
• Large mémoire avec 10 numéros de numérotation rapide
• Cinq numéros de recomposition multi-mémoire
• Identification de l'appelant avec affichage du nom
• Identification de l'appelant avec appel en attente
• Indicateur d'appel en absence
• Affichage de tension de secteur et de courant
• Détection de haute tension et verrouillage
• Détection de courant élevé et verrouillage
• Affichage en anglais, espagnol, allemand ou français
Spécifications importantes
• Identification de l'appelant compatible Bellcore et ETSI
• Normes téléphoniques TIA/EIARS-470-B ou ETSI sélectable
• Alerte de haute tension (120 V c.c.)
• Alerte de courant élevé (125 mA)
2. RÉGLAGE DE L'APPAREIL
Installation de la pile
Pour que toutes les fonctions soient opérationnelles, le PE830 nécessite une pile de 9
V.Tempo recommande que seules les batteries alcalines soit utilisées car elles résistent
mieux aux fuites et ont une durée de vie utile plus longue que celles des batteries
standard de type zinc-carbone.
Lorsqu'une pile est installée pour la première fois, l'appareil adopte par défaut la
configuration de langue illustrée à la figure 5. Sélectionnez une langue avant d'utiliser
l'appareil.
Pour conserver les mémoires et les paramètres lors du remplacement de la pile, il est
essentiel que le sélecteur de mode de l'appareil soit mis sur Off (éteint) et que l'affichage
ait pu s'effacer. Prenez soin de connecter la pile neuve dans les 30 secondes après avoir
déconnecté l'ancienne. Préparez-vous, en ouvrant l'emballage de la pile etc., avant de
retirer l'ancienne pile. Desserrez la vis phillips située sous l'écouteur, puis retirez le
couvercle de la pile. Insérez une pile alcaline, en vérifiant soigneusement la polarité et
en vous assurant que le connecteur est bien mis avant de replacer le couvercle et de
resserrer la vis (évitez de trop la serrer).
Avant d'ouvrir le boîtier, retirez les fils d'essai du circuit et éteignez l'appareil. Le nonrespect de cet avertissement peut causer des blessures graves, voire mortelles.
AVERTISSEMENT
Page 17

E6
Advertencia de sobrevoltaje
La unidad está protegida contra la operación en HABLA ( TALK) cuando los voltajes
entrantes son mayores de 120V. Se generará el tono de advertencia y en la pantalla se
visualizará el mensaje "Over Voltage" (Sobre voltaje). (Consulte la Figura 16)
Advertencia de voltaje elevado
Si se conecta la unidad a un voltaje comprendido entre 80 y 120 Voltios, se producirán
tonos agudos de advertencia que avisan que no es una línea telefónica normal. Siempre
puede descolgar moviendo el interruptor de modo a HABLA(TALK).
Modo apagado (Off)
Con el interruptor principal de modo en la posición de
APAGADO (OFF) y conectado a una línea la unidad
estará colgada y lista para recibir llamadas
entrantes. (Consulte la Figura 17)
La unidad entra en un estado de ahorro de energía
después de un período de inactividad, pero se
activará para recibir un llamado entrante, identificación (ID) de la persona que llama o
después de conectarse a otra línea; se reactivará entonces la pantalla durante un
período adicional para proporcionar información del estado de la línea.
Respuesta a una llamada
entrante
Mientras timbra la unidad PE830, simplemente mueva
el interruptor de modo a la posición de HABLA( TA L K ) .
(Consulte la Figura 18)
Nota: La unidad PE830 no permitirá que se descuelgue
si el timbre es continuo. Compruebe la frecuencia reportada en la pantalla; si es de
aproximadamente 60Hz (50Hz)desconecte cuidadosamente de la línea.
Apagado automático
La unidad PE830 se apagará automáticamente después de períodos en los que no haya
interacción del usuario en todos los modos, excepto en el modo de HABLA ( TA L K )
activa. Esto reduce el drenaje innecesario de la batería.
• Modo de HABLAsin detección de CC: . . . . . . . Intervalo de espera de 5 minutos
• Modo de HABLAcon detección de CC: . . . . . . . . . . . . . . Sin intervalo de espera
• Modo de INTERCOM: . . . . . . . . . . . . . . . . . . . . . . . . . . . . Sin intervalo de espera
• Modo MONITOR: . . . . . . . . . . . . . . . . . . . . . . . Intervalo de espera de 15 minutos
• Modo APAGADO (OFF) sin detección de CC: Intervalo de espera de 3 segundos
• Modo APAGADO (OFF) con detección de CC: . Intervalo de espera de 5 minutos
La unidad PE830 se puede reactivar fácilmente después de un intervalo de espera
conmutando a otro modo o conectando a CC (línea alimentada).
5. FUNCIONES DE MEMORIA
La memoria y las instalaciones de almacenamiento están disponibles en todos los
modos. Hay diez localidades de memoria para el almacenamiento de números y un
almacenamiento para números múltiples para "volver a marcar el último número". Se
puede acceder a éstos como se describe más adelante.
Remarcación del último número
Cuando la unidad está en el modo APAGADO (OFF) o MONITOR, la tecla Remarcación
(Redial) ofrece al usuario la capacidad de recordar los últimos cinco números
marcados o recibidos por CLID en la unidad. Se puede acceder a los números
presionando repetidamente la tecla con la información de números visualizada en
Fig.17 - OFF Mode
Aviso de seguridad: Si el sonido de timbre es continuo, el 830 supone que esto puede
ser un “cruce de la alimentación", lo que quiere decir que hay alimentación eléctrica
conectada a la línea telefónica y que podría ser peligroso pasar a descolgado.
ADVERTENCIA
Fig.18 – Cruce de alimentación
F3
Avertissement de pile faible
Lorsque la tension de la pile baisse en dessous de 6 volts, une sonnerie retentit chaque
fois que la position du sélecteur de mode change. De plus, une petite icône de pile
s ' a ffiche dans le coin inférieur gauche de l'écran. Si la tension de la pile baisse en
dessous de 5 volts environ, l'appareil vous rappellera de remplacer la pile pendant
quelques secondes avant de passer en mode d'attente.
Réinitialisation
Le PE830 devrait fonctionner normalement après l'insertion ou le remplacement de la
pile. Si l'appareil se met à ne plus répondre normalement, effectuez une réinitialisation
en appuyant sur le bouton pendant plus de 10 secondes. L'appareil devrait
fonctionner normalement lorsque vous relâchez le bouton, à condition que la tension de
la pile soit supérieure à 5 V.
3. BOUTONS ET SÉLECTEURS
Le sélecteur de mode principal se trouve sur le côté droit de l'appareil. (Voir figure 1.) Ce
sélecteur comporte les fonctions suivantes : ÉCOUTE DISCRÈTE, ÉTEINT(sonnerie)
et CONVERSATION. Ces modes sont expliqués de façon plus détaillée plus bas dans
ce guide.
Le sélecteur de volume se trouve sur le côté gauche de l'appareil et comporte trois
niveaux sélectables. Le bouton de sourdine (mute) se trouve également sur le côté
gauche de l'appareil. (Voir figure 2.)
Icônes des modes de
fonctionnement
1. CONVERSATION (mode de téléphone)
2. ÉTEINT(mode sonnerie seulement)
3. ÉCOUTE DISCRÈTE (mode d'écoute ou
desonnerie)
La barre pleine sur l'affichage indique le mode
de fonctionnement.
Le clavier principal comporte dix-sept
touches. (Voir la figure 3.) Les quatre boutons
supérieurs situés directement sous
l ' a ffichage à cristaux liquides contrôlent les
fonctions suivantes :
• Recomposition du dernier numéro /
Pause
• Sélection de composition par tonalité ou
par impulsion
• Flash / Intercom (rappel d’enregistreur)
• Rappel/stockage en mémoire
Le gros bouton sur le cadran du téléphone
active le haut-parleur.
Fig.1 - Sélecteur de mode Fig.2 - Sélecteur de volume et sourdine
Fig.3 - Clavier principal
Fig.4 - Menu de réglage principal Fig.5 - Choix de langue
Page 18

E5
Pausa
La tecla de dos funciones LNR/Pausa inserta un retardo de tres segundos entre los
dígitos marcados. El dígito de pausa se verá como un '-' (signo de resta) en la LCD y se
almacenará en la memoria. Note que si esta fuera la primera tecla presionada esto
recordaría y marcaría inmediatamente LNR (consulte las Funciones de la memoria).
Opción de marcación por pulsos
Para efectuar una llamada usando marcación por pulsos, seleccione el modo PULSOS
(PULSE) presionando la tecla , luego marque o retire el número a ser llamado de
la memoria, se visualizará el símbolo en la línea inferior de la pantalla. Presionar
nuevamente la tecla invertirá al modo de marcación por tonos. El modo de
marcación también se puede cambiar de pulsos a tonos marcando mientras se
presionan las teclas , * ó #. Estas transiciones de
modo de marcación en el medio de una llamada se
almacenan y muestran como en la secuencia
digital almacenada indicando el cambio pedido al
modo de tonos. (Consulte la Figura 13)
Medición de la corriente
Mientras que la unidad PE830 esté descolgada, se visualiza la corriente de línea junto
con la polaridad.
Protección contra sobre corrientes
Cuando la unidad PE830 está descolgada, protege contra corrientes de línea mayores
de 125mAaplicando automáticamente un límite de la corriente. Si se mantiene el estado
durante más de medio segundo, la unidad cambiará
a "colgada", se visualizará un mensaje de
advertencia y se producirá un sonido de aviso hasta
que se desconecte la unidad de la línea o hasta que
se “apague” (off). (Consulte la Figura 14)
SmartMute™
Presionar rápidamente el botón SILENCIAMIENTO (MUTE) cambiará el micrófono
apagándolo o encendiéndolo y se escuchará un tono para confirmarlo. Presionar
durante largo rato (más de un segundo) hará que el micrófono se silencie mientras
se mantenga presionado el botón. Se visualiza el símbolo SILENCIAMIENTO
(MUTE) mientras el micrófono está desactivado.
Altavoz
Presione en cualquier momento en los modos MONITOR o HABLA(TALK) para
encender o apagar el altavoz. Note que el micrófono se silencia automáticamente si está
en los modos TALK (HABLA) o INTERCOM y se visualiza cada vez que el altavoz
está activo para recordarle que no es posible la conversación de dos vías. El altavoz
permanece encendido durante toda la duración de la llamada, y se mantiene encendido
mientras se cambia entre modos. El apagado automático (Automatic power-down)
(consulte más adelante) apagará el altavoz.
Modo Monitor
Con el interruptor principal de modo en la posición
M O N I TOR, la unidad estará colgada. Este modo
proporciona una conexión de alta impedancia que
permite que el usuario escuche a la línea sin aplicar
una carga a la misma. (Consulte la Figura 15)
El modo Monitor también monitorea y visualiza constantemente el voltaje de línea junto
con la polaridad. Con el conductor rojo conectado al hilo Ay el negro al hilo B la pantalla
mostrará un voltaje negativo “-”.
En la presencia de un timbre entrante la pantalla
proporcionará información del estado de la línea
incluyendo la presentación del ID de la persona que
llama y se producirá una señal de timbre de alerta en
el altavoz (consulte el Modo Apagado [Off] más
adelante).
Fig.13 – Marcación por pulsos
Fig.14 – Sobre corriente
Fig.15 – Modo Monitor
Fig.16 – Sobre voltaje
F4
4. MODES DE FONCTIONNEMENT
Le Te l e - M a t e
M D
Pro PE830 comporte quatre modes de fonctionnement : Réglage,
Conversation, Écoute discrète et Éteint.
Mode de réglage
Le sélecteur de mode étant mis sur ÉCOUTE DISCRÈTE, appuyez simultanément sur
les boutons SOURDINE (MUTE) et # pour mettre l'appareil en mode de réglage. Le
mode de réglage vous permet de paramétrer la langue et d'autres fonctions pratiques.
(Voir figures 4 - 11.)
Pour choisir une option, appuyez sur le chiffre correspondant.
Pour quitter le mode de réglage, appuyez sur « 0 » (précédent) plusieurs fois ou mettez
le sélecteur de mode en position ÉTEINT.Toute saisie non valide déclenche une tonalité
d'erreur.
Mode Conversation
Le secteur de mode principal étant en position CONVERSATION et l'appareil étant
connecté à une ligne téléphonique appropriée, l'appareil décroche et il devient alors
possible de composer des numéros et de parler.
Flash
Pendant que l'appareil est décroché, la touche Flash
est activée. Cette touche génère une ouverture
de boucle calibrée pour activer des fonctions
spéciales d'un PBX ou bureau central. (Voir figure
12.)
La durée du flash peut être établie par l'utilisateur en
mode de réglage (voir Mode de réglage) à 100 ms,
270 ms ou 600 ms (valeur par défaut).L'indication reste affichée sur la ligne du bas
de l'écran durant l'utilisation de Flash et pendant deux secondes plus tard.
Composition hors ligne et recomposition automatique du
dernier numéro appelant
Les chiffres saisis manuellement ou obtenus par le numéro du dernier appelant en mode
ÉTEINT et ÉCOUTE DISCRÈTE sont composés automatiquement dès le passage au
mode CONVERSATION. Pour effacer les chiffres affichés, il suffit d'appuyer sur le
bouton de sourdine (mute) pendant une seconde. Vous pouvez simuler la touche
d'espacement arrière en appuyant brièvement sur le bouton de sourdine (mute), ce qui
permet de corriger les erreurs avant de passer en mode de CONVERSATION pour
composer le numéro.
Pause
La touche à double fonction LNR/Pause introduit un délai de trois secondes entre
Fig.12 - Flash
Fig.10 - Réglage de tonalité
Fig.11 - Réglage du contraste
Fig.6 - Paramètres de composition
Fig.7 - Niveau DTMF
Fig.8 - Réglage Flash
Fig.9 - Rapport d'impulsions
Page 19

E4
4. MODOS DE OPERACIÓN
La teléfono de prueba PE830 Te l e - M a t e®Pro tiene cuatro modos de operación:
Configuración, Habla, Monitor y Apagado.
Modo Configuración (SetUp)
Con el interruptor de modo en MONITOR, presione simultáneamente SILENCIAMIENTO
(MUTE) y #, la unidad entra en el modo configuración (setup). Mientras se encuentra en
el modo CONFIGURACIÓN (SETUP) se puede configurar el idioma y otras funciones.
(Consulte las Figuras 4 - 11 )
Presione el dígito que corresponda a la opción deseada para seleccionarla.
Para salir del modo configuración (setup), presione "0" (back) repetidamente o coloque
el interruptor en la posición de APAGADO (OFF). Un ingreso erróneo resultará en que
se emita un tono de error.
Modo Hablar (Talk)
Con el interruptor principal de modo en la posición HABLA(TALK) y conectado a una
línea de teléfono adecuada, la unidad pasará a estar descolgada y a marcar, y luego
será posible hablar.
Flash
Mientras está descolgado, la tecla Flash está
habilitada, esta tecla genera una interrupción de
línea temporizada, que simula un flash de la horquilla
para activar características especiales de una PBX o
de una oficina central. (Consulte la Figura 12)
La duración del flash la puede seleccionar el usuario en el modo configuración (setup)
(consulte Modo Configuración [Setup]) como 100ms, 270ms, o el valor por defecto de
600ms. La indicación está presente en la línea inferior de la pantalla durante la
operación del Flash y durante dos segundos después.
Marcación fuera de línea (Off-Line Dialing) y Remarcación
automática del último número CID (Automatic Redial of Last
CID Number)
Los dígitos marcados a mano o recibidos al llamar la identificación (ID) de la línea en los
modos A PAGADO (OFF) y MONITOR, se discarán automáticamente después de
cambiar a HABLA ( TALK). Se pueden borrar todos los números visualizados
presionando y manteniendo presionado "silenciar” (mute) durante un segundo.
Presionar brevemente "silenciamiento” (mute) actúa como un retroceso permitiendo
que se corrijan errores antes de cambiar a HABLA(TALK) para marcar.
Fig.12 - Flash
Fig. 10 – Configuración del tono
de llamada
Fig.11 – Configuración del contraste
Fig.6- Ajustes del cuadrante
Fig.7- Nivel DTMF
Fig.8- Configuración del Flash
Fig.9- Relación de pulsos
F5
les chiffres composés. Le chiffre de pause s'affiche sous la forme du signe moins - sur
l'écran et il est stocké en mémoire. Notez que s'il s'agissait de la première touche
enfoncée, cela aurait pour effet de rappeler et de composer immédiatement le dernier
numéro (voir Fonctions de mémoire).
Option de composition par impulsion
Pour effectuer un appel à l'aide du mode de composition par impulsions, sélectionnez le
mode IMPULSION en appuyant sur la touche , puis composez le numéro ou
invoquez-le à l'aide de la mémoire. Le symbole s'affiche sur la ligne du bas de l'écran.
Si vous appuyez de nouveau sur la touche , vous retournez au mode tonalité. Vous
pouvez également passer du mode impulsion au
mode tonalité, lorsque vous composez un numéro,
en appuyant sur les touches , * ou #. Ces
changements du mode de composition en plein
milieu d'un appel sont stockés et sont indiqués, dans
la séquence numérique en mémoire, par le symbole
qui indique le passage au mode tonalité
demandé. (Voir figure 13.)
Mesure du courant
Lorsque le PE830 est décroché, le courant de ligne est affiché ainsi que la polarité.
Protection de surintensité
Lorsque le PE830 est décroché, il se protège contre
un courant de ligne supérieur à 125 mAen appliquant
automatiquement une limite de courant. Si la
condition se maintient pendant plus d'une demiseconde, l'appareil se met en mode « accroché », un
message d'avertissement s'affiche et l'appareil émet
une alarme jusqu'à ce qu'il soit déconnecté de la ligne
ou éteint. (Voir figure 14.)
SmartMuteMD(Coupure Micro)
Appuyez brièvement sur le bouton SOURDINE (MUTE) pour activer ou désactiver le
microphone, avec signal sonore de confirmation. Si vous appuyez plus longuement
(plus d'une 1 seconde), le microphone est mis en sourdine (mute) pendant que le bouton
est enfoncé. Le symbole de SOURDINE (MUTE) s ' a ffiche pendant que le
microphone est désactivé.
Haut-parleur
Appuyez sur en tout temps en mode ÉCOUTE DISCRÈTE ou CONVERSATION
pour allumer ou éteindre le haut-parleur. Notez que le microphone est mis en sourdine
(mute) automatiquement si vous êtes en mode de
CONVERSATION ou INTERCOM. Le symbole
s'affiche lorsque le haut-parleur est activé pour vous
rappeler que la conversation bidirectionnelle n'est
pas disponible. Le haut-parleur reste activé pendant
tout l'appel, et il demeure ainsi pendant que vous
passez à un autre mode. L'arrêt automatique (voir cidessous) éteint le haut-parleur.
Mode Écoute discrète
Lorsque le sélecteur de mode principal est en position d'ÉCOUTE DISCRÈTE, l'appareil
est accroché. Ce mode fournit une connexion à haute impédance qui permet à
l'utilisateur d'écouter la ligne sans la charger. (Voir figure 15.)
Le mode Écoute discrète contrôle et aff i c h e
constamment la tension de ligne ainsi que la polarité.
Le fil rouge étant connecté à la nuque et le fils noir à
l'anneau, l'écran affiche une tension négative « - ».
En présence d'une sonnerie entrante, l'écran affiche
l'état de la ligne ainsi que l'identification de l'appelant,
le cas échéant, et le haut-parleur émet une alerte de
sonnerie (voir Mode Éteint ci-dessous).
Fig.13 - Composition par impulsion
Fig.14 - Surintensité
Fig.15 - Mode Écoute discrète
Fig.16 - Surtension
Page 20

E3
Aviso de bajo voltaje de la batería
Cuando el voltaje de la batería baje a menos de 6 voltios se produce un sonido de aviso
cada vez que se cambia de posición el interruptor de modo. Además, se visualiza un
pequeño icono de bateríz en la parte inferior izquierda de la pantalla. Si se permite
que el voltaje de la batería baje aproximadamente a menos de 5 voltios, la unidad le
recordará durante algunos segundos que cambie la batería y luego volverá al modo en
espera (standby).
Restablecimiento
La unidad PE830 debe comenzar a funcionar normalmente después de que se le haya
insertado o cambiado la batería. Si la unidad no responde normalmente en cualquier
momento, se puede reponer manualmente manteniendo presionado el botón "altavoz”
(speaker) durante más de diez segundos. Cuando se suelta, la unidad debe comenzar
normalmente, siempre que el voltaje de la batería sea mayor de 5 voltios.
3. BOTONES E INTERRUPTORES
El interruptor principal de modo está situado en el lado derecho de la unidad. (Consulte
la Figura 1) Este interruptor tiene estas funciones: MONITOR, A PAGADO (OFF)
(timbre) y HABLA(TALK). Estos modos se explicarán detalladamente más adelante en
esta guía.
El interruptor de volumen está situado en el lado izquierdo de la unidad y tiene tres
niveles que se pueden seleccionar. El botón de silenciamiento (mute) también está
situado en el lado izquierdo de la unidad. (Consulte la Figura 2)
Iconos del modo
Funcionamiento (Operating)
1. HABLA(TALK) (modo de teléfono)
2. APAGADO (OFF) (modo sólo para timbre)
3. MONITOR (modo escuchar o timbre)
La barra continua en la pantalla indica el modo
de funcionamiento.
El teclado principal tiene diecisiete teclas.
(Consulte la Figura 3) Los cuatro botones
superiores situados directamente debajo del
LCD tienen estas funciones:
• Remarcación del último número / Pausa
• Selección de marcación por tonos o pul
sos
• Flash / Intercom (Rellamada de una
interrupción temporizadal)
• Rellamada de la memoria / almace
namiento
El botón grande abajo del teclado de teléfono
activa el altavoz.
Fig.1 – Modo Interruptor Fig.2 – Interruptor Volumen y
Silenciamiento
Fig. 4 – Configuración principal
Fig.3 – Teclado principal
Fig. 5 – Configuración del idioma
F6
Avertissement de surtension
L'appareil est protégé contre tout fonctionnement en mode CONVERSATION si la tension
dépasse 120 V. Une tonalité d'avertissement est émise et l'écran affiche le message «
Surtension » . (Voir figure 16.)
Avertissement de tension élevée
Si l'appareil est branché sur une tension située entre 80 V et 120 V, des signaux sonores
aigus sont émis pour indiquer qu'il ne s'agit peut-être pas d'une ligne téléphonique
normale. Vous pouvez quand même décrocher
l'appareil en mettant le sélecteur de mode sur
CONVERSATION.
Mode Éteint
Le secteur de mode principal étant en position
É T E I N T et l'appareil étant connecté à une ligne,
l'appareil raccroche et se tient prêt à recevoir des appels. (Voir figure 17.)
L'appareil se met en mode d'économie d'énergie après une période d'inactivité. Il se
réveille s'il reçoit une sonnerie, une identification de l'appelant ou s'il est connecté à une
autre ligne; l'écran est alors réactivé pendant une
période supplémentaire pour afficher des
informations sur l'état de la ligne.
Réponse à un appel entrant
Lorsque le PE830 sonne, mettez simplement le sélecteur
de mode sur CONVERSATION. (Voir figure 18.)
Remarque : Le PE0830 ne permet pas de décrocher
l'appareil si la sonnerie est continue. Vérifiez la fréquence affichée sur l'écran; si elle est
d'environ 60 Hz, débranchez alors soigneusement l'appareil de la ligne.
Arrêt automatique
Le PE830 s'éteint automatiquement après des périodes d'inactivité dans tous les
modes, à l'exception du mode CONVERSATION actif. Ceci permet de ménager la pile.
• Mode CONVERSATION sans détection de C.C. :. Délai d'inactivité de cinq minutes
• Mode CONVERSATION avec détection de C.C. :. . . . . Aucun délai d'inactivité
• Mode INTERCOM : . . . . . . . . . . . . . . . . . . . . . . . . . . . . Aucun délai d'inactivité
• Mode ÉCOUTE DISCRÈTE : . . . . . . . . . . . Délai d'inactivité de quinze minutes
• Mode ÉTEINT sans détection de C.C. : . . . Délai d'inactivité de trois secondes
• Mode ÉTEINT avec détection de C.C. : . . . . . Délai d'inactivité de cinq minutes
Le PE830 peut facilement être réactivé après un délai d'inactivité en changeant de mode
ou en se connectant sur C.C. (ligne sous tension).
5. FONCTIONS DE MÉMOIRE
La mémoire et les fonctions de stockage sont disponibles dans tous les modes.
L'appareil dispose de dix emplacements de mémoire pour stocker les numéros et d'un
emplacement multi-numéros pour « recomposition du dernier numéro ». L'accès à ces
emplacements est décrit ci-dessous.
Recomposition du dernier
numéro
En mode ÉTEINT ou ÉCOUTE DISCRÈTE, la
touche de recomposition permet à l'utilisateur
de rappeler l'un des cinq derniers numéros
composés ou obtenus à l'aide de la fonction
Identification de l'appelant. Vous pouvez accéder à
Fig.17 - Mode ÉTEINT
Consigne de sécurité : Si la sonnerie est continue, le PE830 interprète cela comme
un croisement avec une ligne électrique, c'est-à-dire que la ligne de courant électrique
est connectée à la ligne téléphonique et il serait dangereux de décrocher.
AVERTISSEMENT
Fig.18 - Croisement avec ligne
électrique
Fig.19 - Recomposition automatique
du dernier numéro
Page 21

E2
1. DESCRIPCIÓN
La teléfono de prueba PE830 Tele-Mate®Pro le ayudará a trabajar en la instalación y el
mantenimiento de sistemas telefónicos cada vez más complejos. Una unidad de
prueba de empalme completo, la PE830 agrega características útiles como un monitor
de altavoz, identificación de llamadas (Caller ID), marcación rápida (speed dial),
rellamada (callback), intercomunicador y medidor de voltaje / corriente / frecuencia.
La unidad PE830 Tele-Mate®Pro no solo trabaja en el modo de microteléfono, también
se puede usar con el auricular estándar (incluido) y con el monitor de línea con altavoz
amplificado. Usted puede usar los conductores de prueba tipo telco y clips o la ficha
modular integral para la conexión a la línea.
Características
• Unidad de teléfono completa con timbre
• Intercomunicador de teléfono a teléfono
• Conexión modular o con clip cocodrilo
• Monitor de línea con altavoz amplificado
• Operación de auricular o microteléfono
• Marcación por tonos o pulsos
• Memoria grande de discado rápido para 10 localidades
• Remarcación de cinco memorias
• Identificación de llamadas (Caller ID) con visualización del nombre
• Identificación de llamadas (Caller ID) de llamadas en espera
• Indicación de llamada perdida
• Visualización del voltaje y la corriente de línea
• Detección y bloqueo de alto voltaje
• Detección y bloqueo de alta corriente
• Visualización en idioma inglés, español, alemán o francés
Especificaciones claves
• Compatible con Caller ID Bellcore y ETSI
• Rendimiento de teléfono TIA/EIA RS-470-B seleccionable o ETSI
• Alerta de alto voltaje (120 VCC)
• Alerta de corriente alta (125 mA)
2. CONFIGURACIÓN DE LA UNIDAD
Instalación de la batería
La unidad PE830 requiere que se instale una batería de 9V para que operen todas las
funciones. Tempo®recomienda que se use sólo baterías de tipo alcalinas, pues son más
resistentes a las pérdidas y ofrecen una duración mucho mayor que las de tipo estándar
de zinc y carbón.
Cuando se instala por primera vez una batería, la unidad cambia por defecto a la
pantalla de Configuración del idioma (Language Setup) como se muestra en la Figura
5. Seleccione un idioma antes de utilizar la unidad.
Para conservar la memoria y los ajustes al cambiar la batería, es vital que el interruptor
de modo de la unidad PE830 esté en la posición de “apagado” (off) y que se permita
que la pantalla esté en blanco. Conecte la batería nueva en menos de 30 segundos de
haber desconectado la anterior. Prepárese abriendo el envoltorio de la batería nueva
antes de extraer la batería vieja. Suelte el tornillo de cabeza phillips situado abajo del
auricular y extraiga la cubierta de la batería. Inserte una batería alcalina nueva,
comprobando cuidadosamente que la polaridad sea correcta y que el conector esté
firmemente insertado antes de volver a instalar la cubierta y volver a apretar el tonillo
(No apriete demasiado el tornillo).
Antes de abrir la caja, retire los conductores de prueba del circuito y apague la unidad.
No cumplir con estas advertencias puede resultar en lesiones graves o muerte.
ADVERTENCIA
ces numéros en appuyant de façon répétée sur la touche , les numéros étant
affichés sur l'écran. Ce numéro est composé automatiquement lorsque le sélecteur est
mis en mode CONVERSATION. (Voir figure 19.)
En mode CONVERSATION, la touche fournit le dernier numéro composé (ou la
dernière identification de l'appelant) seulement si aucun autre chiffre n'a déjà été
composé;si des chiffres sont composés, cette touche se transforme en touche PAUSE.
Sauvegarde du numéro de composition rapide
Saisissez un numéro ou conservez le message
a ffiché sur l'écran qui identifie un appel entrant.
Appuyez DEUX FOIS sur la touche de mémoire
pour passer en mode de stockage, puis appuyez sur
une touche numérique (0-9). (Voir figures 20 - 22.)
Rappel du numéro de composition rapide
Appuyez une fois sur la touche suivie d'une touche numérique (0-9). (Voir figures
23 - 25.)
En plus de l'accès direct disponible lorsqu'on appuie sur la touche numérique
correspondante, vous pouvez également faire défiler de manière séquentielle les 10
numéros stockés en mémoire en appuyant de façon répétée sur la touche alors que
l'appareil est accroché ou en mode ÉTEINT o u
ÉCOUTE DISCRÈTE. Dans un cas comme dans
l'autre, le numéro reste affiché, ce qui permet de le
composer automatiquement en passant tout
simplement en mode CONVERSATION.
Remarque : Si vous rappelez un numéro en mémoire
sans l'utiliser, aucun numéro ne s'affiche.
6. MODE INTERCOM (PILE LOCALE)
Le mode intercom est une fonction spéciale qui permet à deux appareils PE830 de
communiquer entre eux sans passer par le service téléphonique. Dans ce mode, seuls
les signaux de conversation passent d'un téléphone à l'autre, sans alimentation C.C.
(pile de conversation). L'utilisation de la fonction «
Smartintercom » n'est disponible qu'avec d'autres
appareils PE830. La fonction d'intercom ne
fonctionne que s'il n'y a pas de tension sur la ligne.
(Voir figures 26 - 28.)
Pour activer l'un des modes « Intercom »,
F7
Fig.24 - Écran de rappel 2 Fig.25 - Écran de rappel 3
Fig.23 - Écran de rappel 1
Fig.27 - Intercom 2 Fig.28 - Intercom 3
Fig.26 - Intercom 1
Fig.21 - Écran de stockage mémoire 2 Fig.22 - Écran de stockage mémoire 3
Fig.20 - Écran de stockage mémoire 1
Page 22

Fig. 16 – Sobre voltaje . . . . . . . . . . . E5
Fig. 17 – OFF Mode . . . . . . . . . . . . . E6
Fig. 18 – Cruce de alimentación . . . E6
Fig. 19 – LNR automático . . . . . . . . E7
Fig. 20 – Pantalla de almacenamiento 1 E7
Fig. 21 – Pantalla de almacenamiento 2 E7
Fig. 22 – Pantalla de almacenamiento 3 E7
Fig. 23 – Pantalla de rellamada 1 . . E7
Fig. 24 – Pantalla de rellamada 2 . . E7
Fig. 25 – Intercom 3 . . . . . . . . . . . . . E7
Fig. 26 – Pantalla de rellamada 3 . . E7
Fig. 27 – Intercomunicador 2 . . . . . . E7
Fig. 28 – Intercomunicador 3 . . . . . . E7
Fig. 29 – Identificación de llamadas . .
(Caller ID) . . . . . . . . . . . . . E8
Fig. 30 – Llamada en espera . .
(Call Waiting) . . . . . . . . . . . E8
ÍNDICE DE FIGURAS
Fig. 1 – Interruptor Modo (Mode) . . E3
Fig. 2 – Interruptor Volumen y
Silenciamiento (Volume y Mute) E3
Fig. 3 – Teclado principal. . . . . . . . . E3
Fig. 4 – Configuración principal. . . . E3
Fig. 5 – Configuración del idioma . . E3
Fig. 6 – Ajustes del cuadrante. . . . . E4
Fig. 7 – Nivel DTMF. . . . . . . . . . . . . . . . . E4
Fig. 8 – Configuración del Flash . . . E4
Fig. 9 – Relación de pulsos. . . . . . . E4
Fig. 10 –Configuración del tono de lla .
mada . . . . . . . . . . . . . . . . . . E4
Fig. 11 – Configuración del contraste. . E4
Fig. 12 – Flash . . . . . . . . . . . . . . . . . E4
Fig. 13 – Marcación por pulsos . . . . E5
Fig. 14 – Sobre corriente . . . . . . . . . E5
Fig. 15 – Modo Monitor . . . . . . . . . . E5
ÍNDICE
1. DESCRIPCIÓN . . . . . . . . . . . . . . . . . . . . . . . . . . . . . . . . . . . . . . .E2
Características . . . . . . . . . . . . . . . . . . . . . . . . . . . . . . . . . . . . . . . . . . . . . . . .E2
Especificaciones claves . . . . . . . . . . . . . . . . . . . . . . . . . . . . . . . . . . . . . . . . . .E2
2.CONFIGURACIÓN DE LA UNIDAD . . . . . . . . . . . . . . . . . . . . . . . .E2
Instalación de la batería . . . . . . . . . . . . . . . . . . . . . . . . . . . . . . . . . . . . . . . . .E2
Aviso de bajo voltaje de la batería . . . . . . . . . . . . . . . . . . . . . . . . . . . . . . . . .E3
Restablecimiento . . . . . . . . . . . . . . . . . . . . . . . . . . . . . . . . . . . . . . . . . . . . . . .E3
3.BOTONES E INTERRUPTORES. . . . . . . . . . . . . . . . . . . . . . . . . . .E3
Iconos de los modos de operación . . . . . . . . . . . . . . . . . . . . . . . . . . . . . . . . .E3
4.MODOS DE OPERACIÓN . . . . . . . . . . . . . . . . . . . . . . . . . . . . . . . .E4
Modo Configuración (SetUp) . . . . . . . . . . . . . . . . . . . . . . . . . . . . . . . . . . . . . .E4
Modo Hablar (Talk) . . . . . . . . . . . . . . . . . . . . . . . . . . . . . . . . . . . . . . . . . . . . .E4
Flash . . . . . . . . . . . . . . . . . . . . . . . . . . . . . . . . . . . . . . . . . . . . . . . . . . . . . .E4
Marcación fuera de línea. . . . . . . . . . . . . . . . . . . . . . . . . . . . . . . . . . . . . . . .E4
Pausa . . . . . . . . . . . . . . . . . . . . . . . . . . . . . . . . . . . . . . . . . . . . . . . . . . . . . .E5
Opción de marcación por pulsos . . . . . . . . . . . . . . . . . . . . . . . . . . . . . . . . .E5
Medición de la corriente . . . . . . . . . . . . . . . . . . . . . . . . . . . . . . . . . . . . . . .E5
Protección contra sobre corriente . . . . . . . . . . . . . . . . . . . . . . . . . . . . . . . . .E5
SmartMute™ . . . . . . . . . . . . . . . . . . . . . . . . . . . . . . . . . . . . . . . . . . . . . . . .E5
Altavoz . . . . . . . . . . . . . . . . . . . . . . . . . . . . . . . . . . . . . . . . . . . . . . . . . . . . .E5
Modo Monitor . . . . . . . . . . . . . . . . . . . . . . . . . . . . . . . . . . . . . . . . . . . . . . . . .E5
Advertencia de sobrevoltaje . . . . . . . . . . . . . . . . . . . . . . . . . . . . . . . . . . . . .E6
Advertencia de voltaje elevado . . . . . . . . . . . . . . . . . . . . . . . . . . . . . . . . . .E6
Modo Apagado (Off) . . . . . . . . . . . . . . . . . . . . . . . . . . . . . . . . . . . . . . . . . . . .E6
Respuesta a una llamada entrante . . . . . . . . . . . . . . . . . . . . . . . . . . . . . . . .E6
Apagado automático . . . . . . . . . . . . . . . . . . . . . . . . . . . . . . . . . . . . . . . . . . . .E6
5. FUNCIONES DE MEMORIA . . . . . . . . . . . . . . . . . . . . . . . . . . . . .E6
Remarcación del último número . . . . . . . . . . . . . . . . . . . . . . . . . . . . . . . . . . .E6
Para guardar un número de marcación rápida . . . . . . . . . . . . . . . . . . . . . . . .E7
Rellamada de un número de marcación rápida . . . . . . . . . . . . . . . . . . . . . . .E7
6. MODO INTERCOM (BATERÍA LOCAL) . . . . . . . . . . . . . . . . . . . . .E7
7. IDENTIFICIÓN DE LLAMADAS (CALLER ID) . . . . . . . . . . . . . . . .E8
8. AURICULAR . . . . . . . . . . . . . . . . . . . . . . . . . . . . . . . . . . . . . . . . .E8
9. ESPECIFICACIONES . . . . . . . . . . . . . . . . . . . . . . . . . . . . . . . .E8-E9
10. GLOSARIO . . . . . . . . . . . . . . . . . . . . . . . . . . . . . . . . . . . . . . . . . .E9
Garantía limitada de un año . . . . . . . . . . . . . . . . . . . . . . . . . .E10
F8
commencez avec le sélecteur de mode en position ÉCOUTE DISCRÈTE et appuyez sur
la touche « Flash » . Vous obtenez le menu ci-dessous; la fonction SmartIntercom
est sélectionnée par défaut. Toutefois, si la ligne est sous tension, une tonalité d'erreur
retentit.
Pour commencer l'appel et contacter l'autre appareil, mettez le sélecteur de mode
principal sur CONVERSATION.
Si vous effectuez un appel SmartIntercom, dès que l'appareil distant reconnaît votre
appel, vous entendrez une tonalité normale de « sonnerie de réponse » par le hautparleur. Si l'appareil à distance ne répond pas, vous entendrez un signal d'erreur après
quelques secondes.
Les alertes d'appel entrant SmartIntercom sont reçues en mode ÉTEINTou ÉCOUTE
DISCRÈTE; vous n'avez pas besoin d'être en mode « Intercom » pour recevoir le signal
d'alerte. Le signal d'alerte intercom (tonalité) est une sonnerie de cadence rapide plus
aigue que la normale. Si vous l'entendez, passez en mode CONVERSATION pour
répondre à l'appel, ce qui met automatiquement le PE830 en mode Intercom. Un signal
de confirmation est émis indiquant que le mode INTERCOM est activé.
Pour quitter le mode Intercom, déplacez le sélecteur de mode pour passer de
CONVERSATION à ÉTEINTou ÉCOUTE DISCRÈTE. Une tonalité d'appel conclu est
envoyée à l'autre utilisateur pour l'avertir.
7. IDENTIFICATION DE L'APPELANT
S'ils sont disponibles, les renseignements CID et CIDCW (identification de l'appelant et
identification de l'appelant avec appel en attente) s'affichent dans tous les modes. Des
messages d'erreur s'affichent si l'identification de l'appelant est détectée mais qu'elle
n'est pas reçue intégralement, est corrompue ou est de type incompatible. (Voir figures
29 - 30.)
8. CASQUE D'ÉCOUTE
Pour utiliser le PE830 à mains libres, branchez tout simplement le casque d'écoute fourni
ou un autre de type similaire dans la prise en haut de l'appareil. Ceci met
automatiquement en sourdine (mute) l'écouteur interne et le microphone. Notez que les
boutons SOURDINE (MUTE) et HAUT- PARLEUR continuent de fonctionner
normalement, c'est-à-dire qu'is interromperont la transmission s'ils sont activés.
9. SPÉCIFICATIONS
Compatibilité téléphonique : . . . . . . . . . . . . . . . . . . . TIA/EIA-470-B et ETSI
Température de stockage : . . . . . . . . . de -10 °C (14 °F) à +70 °C (158 °F)
Température de fonctionnement : . . . . de 0 °C (32 °F) à +50 °C (122 °F)
Humidité : . . . . . . . . . . . . . . . . . . . . . . . . . . . . . . . jusqu'à 90 % (fonctionnement)
95 % (stockage), sans condensation dans les deux cas.
CID et CIDCW : . . . . . Tous types de MDF y compris Bellcore TR-NWT-000030
. . . . . . . . . . . . . . . . . . . . . . . . . . . . . . . . . . . (GR30) SR-TSV-002476, et ETSI
Durée de vie de la pile : . . . . . . . . . . Plus de trois mois d'utilisation normale;
moins de 40 uA en mode ÉTEINT, ce qui donne une durée
de conservation (avec une pile neuve d’au moins 12 mois. Seules les
batteries alcalines sont recommandées. Il vaut toujours mieux enlever
la pile si le PE830 doit être stocké pendant de longues périodes.
Impédance de ligne (à 48 V) :
Résistance : . . . . . . . . . . . . . . . . . . . . . . . . . . . . . . . . . . . . . . . . . . . . . . . . . . >5 k
Courant minimum : . . . . . . . . . . . . . . . . . . . . . . . . . . . . . . . . . . . . . . . . . . <10 mA
Fig.29 - Identification de l'appelant Fig.30 - Appel en attente
Page 23

AVISO: Este documento es un trabajo no publicado protegido por las leyes de la propiedad
intelectual de los EE.UU. y es propiedad de Te m p o®. Se prohíbe la difusión, copia,
reproducción, inclusión, traducción, modificación, mejora, u otro uso por parte de cualquiera
que no sean los empleados autorizados o licenciados de Tempo®y sus afiliadas sin tener
autorización previa de Tempo®.
Copyright © 2003 Tempo®- a Textron Company.Todos los derechos reservados.
Tempo Research, a Delaware Corporation
SÍMBOLO DE
ALERTA DE
SEGURIDAD
Este símbolo se utiliza para llamar su atención sobre los peligros o las prácticas no
seguras de trabajo que podrían resultar en lesiones o daños a la propiedad. La palabra
de aviso, definida a continuación, indica la gravedad del peligro. El mensaje después de
la palabra de aviso proporciona información para prevenir o evitar el peligro.
Peligros que, si no se evitan, PODRÍAN resultar en lesiones muy graves o muerte.
PELIGRO
ADVERTENCIA
PRECAUCIÓN
• No exponga esta unidad a la lluvia o a la humedad. El contacto con circuitos vivos puede
resultar en lesiones graves o muerte.
• El contacto con circuitos activos puede resultar en lesiones graves o muerte.
• Utilice esta unidad sólo para los fines que ha destinado el fabricante, como se indica en
este manual. Cualquier otro uso puede afectar la protección proporcionada por la unidad.
• Utilice conductores de prueba o accesorios que sean apropiados para la aplicación.
Consulte la categoría y el voltaje nominal del conductor o accesorio de prueba.
• Inspeccione los conductores o los accesorios de prueba antes de usarlos. Los elementos deben estar limpios y secos, y el aislamiento debe estar en buen estado.
• Antes de abrir la caja, retire los conductores de prueba del circuito y apague la unidad.
No cumplir con estas precauciones puede resultar
en lesiones graves o muerte.
• No intente reparar esta unidad. No contiene piezas a las que pueda prestar servicio el usuario.
• No exponga esta unidad a temperaturas extremas o alta humedad. Consulte las
especificaciones.
• Advertencia de altavoz extra sonora como el PE961
No cumplir con estas precauciones puede resultar en lesiones y puede dañar el
instrumento.
ADVERTENCIA
PRECAUCIÓN
PELIGRO DE
DESCARGA ELÉCTRICA
Peligros inmediatos que, si no se evitan, RESULTARÁN en lesiones graves o muerte.
Peligros que, si no se evitan, PUEDEN resultar en lesiones
F9
Résistance C.C. :
Décroché : . . . . . . . . . . . . . . . . . . . . . . . . . . . . . . . . . . . . . . . . . . . . . . . . . . . <300
Accroché : . . . . . . . . . . . . . . . . . . . . . . . . . . . . . . . . . . . . . . . . . . . . . . . . . . . >5 M
Impédance de la fonction d'écoute discrète : . . . . . . . . . . . . . . . >400 k
Composition :
Impulsion :
Fréquence : . . . . . . . . . . . . . . . . . . . . . . . . . . . . . . . . . . . . . . . . . . . . . . . . . 10 pps
Interruption : . . . . . . . . . . . . . . . . . . . . . . . . . . . . . . . . . . . . . . . . . . 60 % ou 66 %
Pause entre chiffres : . . . . . . . . . . . . . . . 800 ms (fuite durant interruption : >5 M)
DTMF/tonalité : . . . . . . . . . . . . . . . . . . . . . . . . . . . . . . -4dBm /-6 dBm (TIA/ EIA)
. . . . . . . . . . . . . . . . . . . . . . . . . . . . . . . . . . . . . . . . . -9 dBm / 8-11 dBm (ETSI)
MDF - Nom/numéro de l'appelant et appel en attente :
Bellcore GR-30-CORE, TR-NWT-000030
ETSI FSK Sorte
Affichage : numéro de l'appelant, nom de l'appelant
Fonction de touche progra m m able (sur deux touches contextuelles) :
Flash/saut de ligne minuté : . . . . . . . . . . . . . . . . . . . . . . . . . . . . 100, 270, 600 ms
Composition de numéros en mémoire :
10 mémoires, 5 derniers numéros composés et 5 derniers numéros reçus
Indicateurs :
A ffichage à cristaux liquides (96x48 pixels) affiche les informations suivantes :
Identification de l'appelant (nom et numéro) et appel en attente
Numéro composé
Conditions de surtension
État du téléphone (écoute discrète, décroché/accroché, etc.)
Tension secteur : . . . . . . . . . . . . . . . . . . . . . . . . . . . . . . . . . . . . . . 120 V c.c. max
Courant de boucle : . . . . . . . . . . . . . . . . . . . . . . . . . . . . . . . . . . . . . . 125 mAmax
Fréquence de sonnerie : . . . . . . . . . . . . . . . . . . . . . . . . . . . . . . . . . . . 15 – 70 Hz
Protection de ligne :
Surtension : . . . . . . . . . . . . . . . . . . . . . . . . . . . . . 360 V c.c. continu>500 V crête
Limite de courant : . . . . . . . . . . . . . . . . . . . . . . . . . . . . . . . . . . . . . . . . . . . 140 mA
Foudre : . . . . . . . . . . . . . . . . . . . . . . . . . . . . . . . . . . . . ITU K.17, 20, 21 (1500 V)
Portée intercom :. . . . . . . . . . . . . . . . . . . . . . . . . . . . . . . . . . . . . . . . . . . . 6 km
10. Glossaire
Accroché (inutilisé) : Le téléphone n'est pas actif
Décroché (Conversation) : Le téléphone est activé
Écoute discrète : La ligne téléphonique est disponible pour l'écoute uniquement
Courant de ligne : La quantité de courant provenant de la ligne téléphonique en mode
décroché, en milliampères (mA)
Flash : Une interruption temporaire du courant de ligne dont se sert l'appareil pour
signaler des fonctions spéciales au système téléphonique.
Page 24

La teléfono de prueba Te l e - M a t e®Pro le ayudará a trabajar en la instalación y el
mantenimiento de sistemas telefónicos cada vez más complejos. Una unidad de prueba
de empalme completo, la PE830 agrega características útiles como un monitor de
altavoz, identificación de llamadas (caller ID), marcación rápida (speed dial), rellamada
(callback), intercomunicador y medidor de voltaje / corriente / frecuencia.
El Modelo PE830 consiste en:
Teléfono de prueba Tele-Mate®Pro
AURICULAR HS-1
95E0091 © 2003 REV. A
TELÉFONO DE PRU E B A
PE830 T E L E - M AT E®P RO
Lea y entienda este material antes de operar o dar
servicio a este equipo. No entender cómo operar de
manera segura esta herramienta puede resultar en
accidentes, causando lesiones graves o muerte.
ADVERTENCIA
Garantie limitée d'un an
Tempo garantit à l’acheteur initial de ces produits que ceux-ci sont libres de défauts de
matériaux et de vices de fabrication pendant une période d’un an, exception faite de
l’usure normale et des abus.
Pour toute réparation d'appareil de vérification au sein des Amériques : vous
devez obtenir un numéro d'autorisation de retour de marchandise auprès de notre
service à la clientèle en appelant le 1 940 325-3000, poste 256. Ce numéro doit être
clairement indiqué sur l'étiquette d'envoi. Expédiez les appareils port payé à :
Tempo
6100 Columbia Street, Mineral Wells
Texas 76067 États-Unis.
(Inscrire la mention suivante sur les colis) Attention TEST INSTRUMENT REPAIR.
Pour toute réparation d'appareil de vérification en dehors des États-Unis et du
Canada : vous devez obtenir un numéro d'autorisation de retour de marchandise
auprès de notre service à la clientèle en appelant le +44 1633 225 600. Ce numéro
doit être clairement indiqué sur l'étiquette d'envoi. Expédiez les appareils port
payé à :
Tempo Europe Repair Centre
Unit 3, Maesglas Industrial Estate
Newport, South Wales NP20 2NN, UK
(Inscrire la mention suivante sur les colis) Attention TEST INSTRUMENT REPAIR.
Pour les articles non couverts par la garantie (chute, utilisation abusive, etc.), un devis
de réparation est disponible sur demande.
Remarque :avant de renvoyer un instrument de vérification, veuillez vous assurer que la
batterie est encore chargée.
Tempo – Mesa | Formerly Progressive Electronics
Téléphone : +1 815 397-4279
Numéro sans frais aux États-Unis et au Canada : 1 800 282-7941 • Téléc. : +1 815 397-1865
Téléphone Tempo Europe +44 1633 225 600 o Télécopieur Tempo Europe +44 1633 225 601
www.tempo.textron.com
 Loading...