

Page 1
4160165-Rev.A-SE
Safety & Operation Manual
Handbok för säkerhet och drift
Super LF 1880™ Fairway Mower with ROPS
Super LF 1880™ Klipparen Fairway med ROPS
67955 – Kubota D1105-E3B, 2WD
67956 – Kubota D1105-E3B, 4WD
67957 – Kubota D1105-T-E3B, 4WD
WARNING
If incorrectly used, this machine can cause severe injury. Those who use
and maintain this machine should be trained in its proper use, warned of its
dangers and should read the entire manual before attempting to set up,
operate, adjust or service the machine
VARNING
Om denna maskin används på fel sätt kan den orsaka svåra personskador.
De som använder och underhåller denna maskin ska utbildas i hur den
används korrekt, vara varnade för de förekommande riskerna och ska alltid
läsa hela handboken innan någon form av arbete utförs på eller med maskinen.
GB
United
Kingdom
SE
Sweden
When Performance Matters.
™
Page 2

FOREWORD
This manual contains safety and operating instructions
for your new Jacobsen machine. This manual should be
stored with the equipment for reference during operation.
Before you operate your machine, you and each operator
you employ should read the manual carefully in its
entirety. By following the safety, operating, and
maintenance instructions, you will prolong the life of your
equipment, and maintain its maximum efficiency.
If additional information is needed, contact your
Jacobsen Dealer.
CONTENTS
CONTENTS
1SAFETY
1.1 Operating Safety.................................................. 3
1.2 Important Safety Notes ........................................ 4
2DECALS
2.1 Decals.................................................................. 5
3 CONTROLS
3.1 Icons .................................................................... 8
3.2 Control Descriptions .......................................... 10
3.3 Operator Alerts .................................................. 12
4 OPERATION
4.1 Daily Inspection ................................................. 13
4.2 Interlock System ................................................ 13
4.3 Operating Procedures ........................................ 14
4.4 Starting .............................................................. 15
4.5 Stopping / Parking ............................................. 15
4.6 To Drive / Transport ........................................... 16
4.7 Hillside Operation .............................................. 16
4.8 Mowing .............................................................. 17
4.9 Towing / Trailering ............................................. 17
4.10 Daily Maintenance ............................................. 18
The serial plate is located on the left rear frame rail.
Jacobsen recommends you record these numbers below
for easy reference.
P.O. BOX 7708,
®
CHARLOTTE,
NC 28241, USA
Jacobsen.com
1-800-848-1636 (US)
kg kg kg kW
5 QUALITY OF CUT
5.1 Quality of Cut Troubleshooting .......................... 19
5.2 Washboarding ................................................... 19
5.3 Marcelling .......................................................... 20
5.4 Step Cutting ....................................................... 21
5.5 Scalping ............................................................. 22
5.6 Stragglers .......................................................... 23
5.7 Streaks .............................................................. 24
5.8 Windrowing ........................................................ 25
5.9 Rifling Or Tramlining .......................................... 26
5.10 Mismatched Cutting Units .................................. 26
6NOTES
2006/42/EC These are the Original instructions verified
by Jacobsen a Textron company.
© Copyright 2008, Textron Inc. “All rights reserved, including the
right to reproduce this material or portions thereof in any form.”
Litho In U.S.A. 10-2008
2
Proposition 65 Warning
This product contains or emits
chemicals known to the State of
California to cause cancer and birth
defects or other reproductive harm.
Page 3

SAFETY 1
!
1 SAFETY
1.1 OPERATING SAFETY ______________________________________________________
WARNING
EQUIPMENT OPERATED IMPROPERLY OR BY UNTRAINED PERSONNEL CAN BE DANGEROUS.
Familiarize yourself with the location and proper use of all controls. Inexperienced operators should receive
instruction from someone familiar with the equipment before being allowed to operate the machine.
1. Safety is dependent upon the awareness, concern,
and prudence of those who operate or service the
equipment. Never allow minors to operate any
equipment.
2. It is your responsibility to read this manual and all
publications associated with this equipment (Parts
and Maintenance Manual, Engine Manual, and
attachments/accessories instruction sheets). If the
operator cannot read English it is the owner’s
responsibility to explain the material contained in this
manual to them.
3. Learn the proper use of the machine, the location and
purpose of all the controls and gauges, before you
operate the equipment. Working with unfamiliar
equipment can lead to accidents.
4. Never allow anyone to operate or service the machine
or its attachments without proper training and
instructions; or while under the influence of alcohol or
drugs.
5. Wear all the necessary protective clothing and personal
safety devices to protect your head, eyes, ears, hands,
and feet. Operate the machine only in daylight or in
good artificial light.
6. Evaluate the terrain to determine what accessories and
attachments are needed to properly and safely perform
the job. Only use accessories and attachments
approved by Jacobsen.
7. Stay alert for holes in the terrain and other hidden
hazards.
8. Inspect the area where the equipment will be used.
Pick up all the debris you can find before operating.
Beware of overhead obstructions (low tree limbs,
electrical wires, etc.) and also underground obstacles
(sprinklers, pipes, tree roots, etc.). Enter a new area
cautiously. Stay alert for hidden hazards.
9. Never direct discharge of material toward bystanders,
nor allow anyone near the machine while in operation.
The owner/operator can prevent and is responsible for
injuries inflicted to themselves, to bystanders, and
damage to property.
10. Do not carry passengers. Keep bystanders and pets a
safe distance away.
11. Never operate equipment that is not in perfect working
order or is without decals, guards, shields, discharge
deflectors, or other protective devices securely
fastened in place.
12. Never disconnect or bypass any switch.
13. Do not change the engine governor setting or
overspeed the engine.
14. Carbon monoxide in the exhaust fumes can be fatal
when inhaled. Never operate the engine without proper
ventilation or in an enclosed area.
15. Fuel is highly flammable; handle with care.
16. Keep the engine clean. Allow the engine to cool before
storing and always remove the ignition key.
17. Disengage all drives and engage parking brake before
starting the engine (motor). Start the engine only when
sitting in operator’s seat, never while standing beside
the unit.
18. Equipment must comply with the latest federal, state,
and local requirements when driven or transported on
public roads. Watch out for traffic when crossing or
operating on or near roads.
19. Local regulations may restrict the age of the operator.
20. Operate the machine up and down the face of slopes
(vertically), not across the face (horizontally).
21. To prevent tipping or loss of control, do not start or stop
suddenly on slopes. Reduce speed when making sharp
turns. Use caution when changing directions.
22. Always use the seat belt when operating mowers
equipped with a Roll Over Protective Structure (ROPS).
Never use a seat belt when operating mowers
without a ROPS.
Accessory operator protective structures will
continue to be offered for all equipment currently
covered. This allows for the outfitting of any
machines without previous ROPS installations or
replacement of damaged structures.
23. Keep legs, arms and body inside the seating
compartment while the vehicle is in motion.
This machine is to be operated and maintained as specified in this manual and is intended for the professional
maintenance of specialized turf grasses. It is not intended for use on rough terrain or long grasses.
3
Page 4

1 SAFETY
!
!
1.2 IMPORTANT SAFETY NOTES _______________________________________________
This safety alert symbol is used to alert you to potential hazards.
DANGER - Indicates an imminently hazardous situation which, if not avoided, WILL result in death or serious injury.
WARNING - Indicates a potentially hazardous situation which, if not avoided, COULD result in death or serious
injury.
CAUTION - Indicates a potentially hazardous situation which, if not avoided, MAY result in minor or moderate injury
and property damage. It may also be used to alert against unsafe practices.
NOTICE - Indicates a potentially hazardous situation which, if not avoided, MAY result in property damage. It may
also be used to alert against unsafe practices.
For pictorial clarity, some illustrations in this manual may show shields, guards, or plates open or removed. Under no
circumstances should this equipment be operated without these devices securely fastened in place.
WARNING
The Interlock System on this mower prevents the mower from starting unless
the brake lever is engaged, mower switch is off, and traction pedal is in
neutral. The system will stop the engine if the operator leaves the seat
without engaging the parking brake or setting the mower switch off.
NEVER operate mower unless the Interlock System is working.
WARNING
1. Before leaving the operator’s position for any reason:
a. Return traction pedal to neutral.
b. Disengage all drives.
c. Lower all implements to the ground.
d. Engage parking brake.
e. Stop engine and remove the ignition key.
2. Keep hands, feet, and clothing away from moving parts. Wait for all
movement to stop before you clean, adjust, or service the machine.
3. Keep the area of operation clear of all bystanders and pets.
4. Never carry passengers, unless a seat is provided for them.
5. Never operate mowing equipment without the discharge deflector
securely fastened in place.
By following all instructions in this manual, you will prolong the life of your machine and maintain its maximum
efficiency. Adjustments and maintenance should always be performed by a qualified technician.
If additional information or service is needed, contact your Authorized Jacobsen Dealer, who is kept informed of the
latest methods to service this equipment, and can provide prompt and efficient service. Use of other than original or
authorized Jacobsen parts and accessories will void the warranty.
4
Page 5
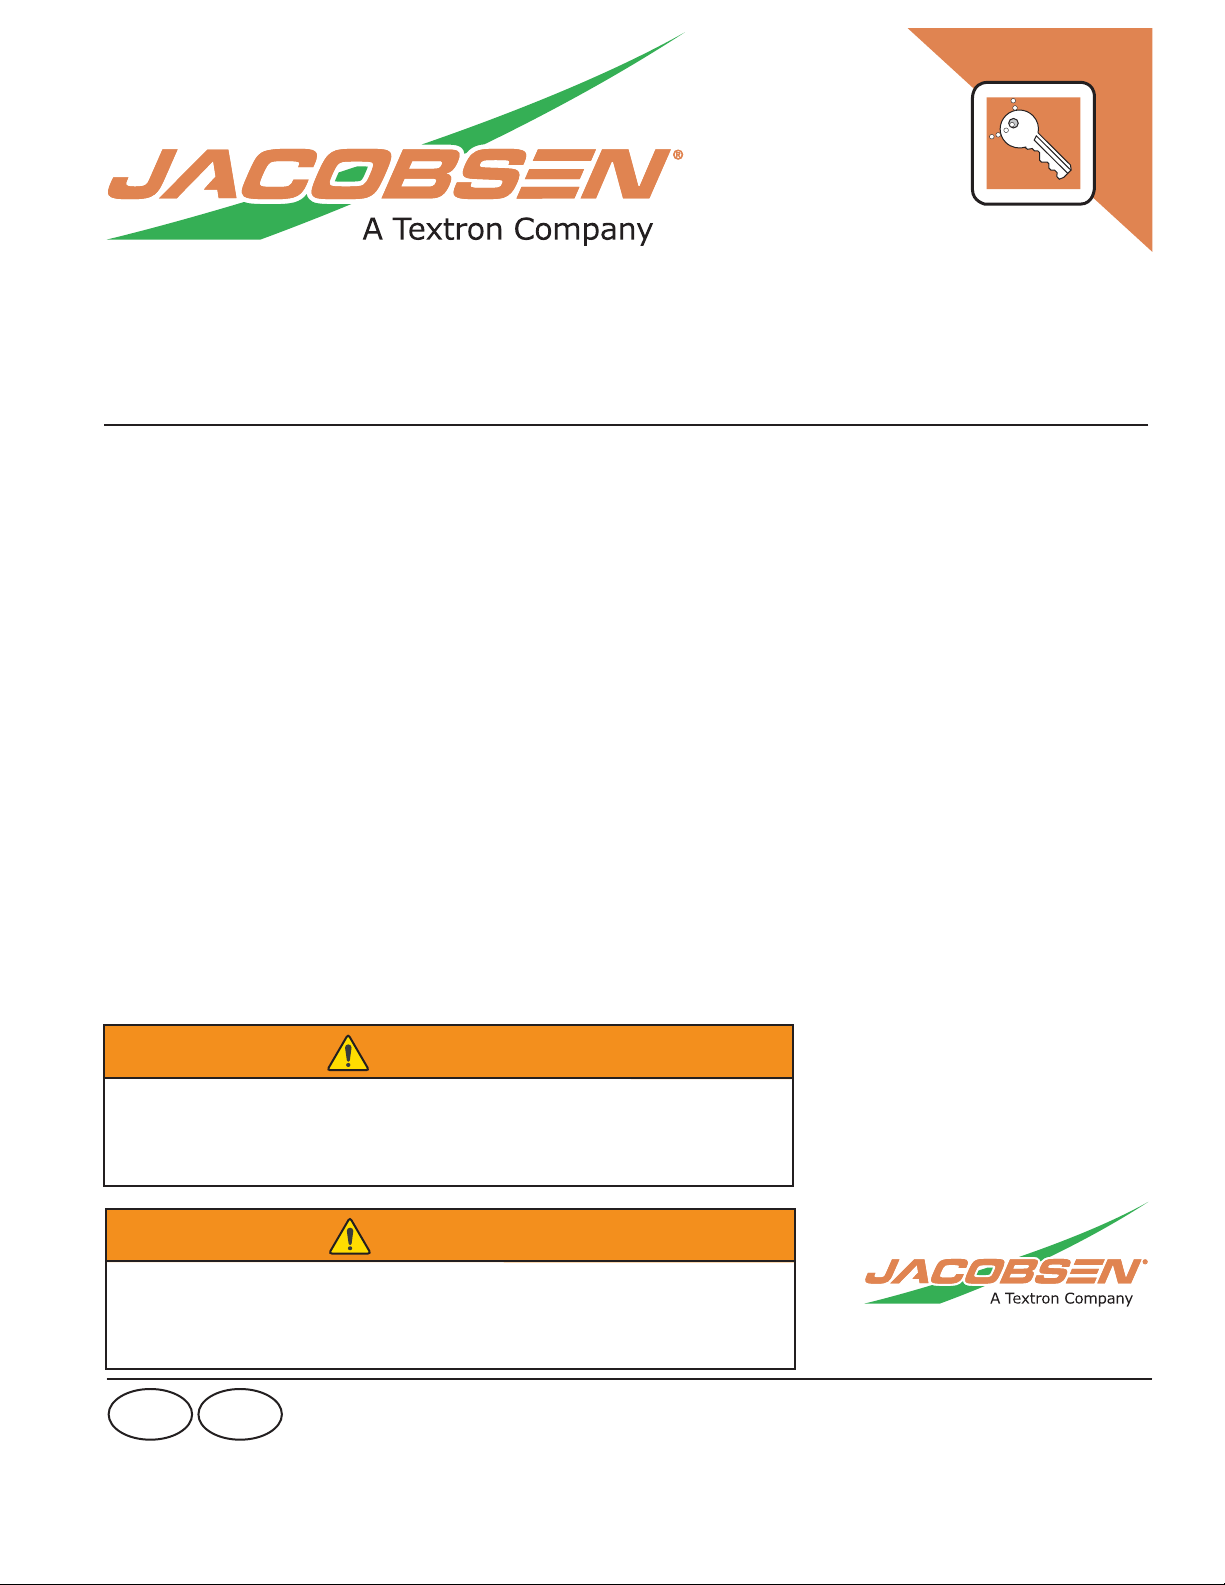
DECALS 2
4181865
4181864
• Read operator's manual. Do not allow untrained
operators to use machine.
• Keep shields in place and hardware securely
fastened.
• Keep hands, feet, and clothing away from moving
parts.
• Before you clean, adjust, or repair this equipment,
disengage all drives, engage parking brake, and
stop engine.
• Never carry passengers.
• Keep bystanders away.
• Do not use on slopes greater than 20°.
Danger
To avoid injury when working with battery:
1. Always connect the black (-) ground last and remove it
first.
2. Keep sparks and flames away, and avoid contact with
acid.
To avoid injury when jumping battery:
1. Connect positive (+) terminal to positive (+) terminal.
2. Connect negative (-) terminal on good battery to frame
of vehicle that has dead battery.
2 DECALS
2.1 DECALS _________________________________________________________________
Familiarize yourself with the following decals. They are critical to the safe operation of the
machine. REPLACE DAMAGED DECALS IMMEDIATELY.
5
Page 6
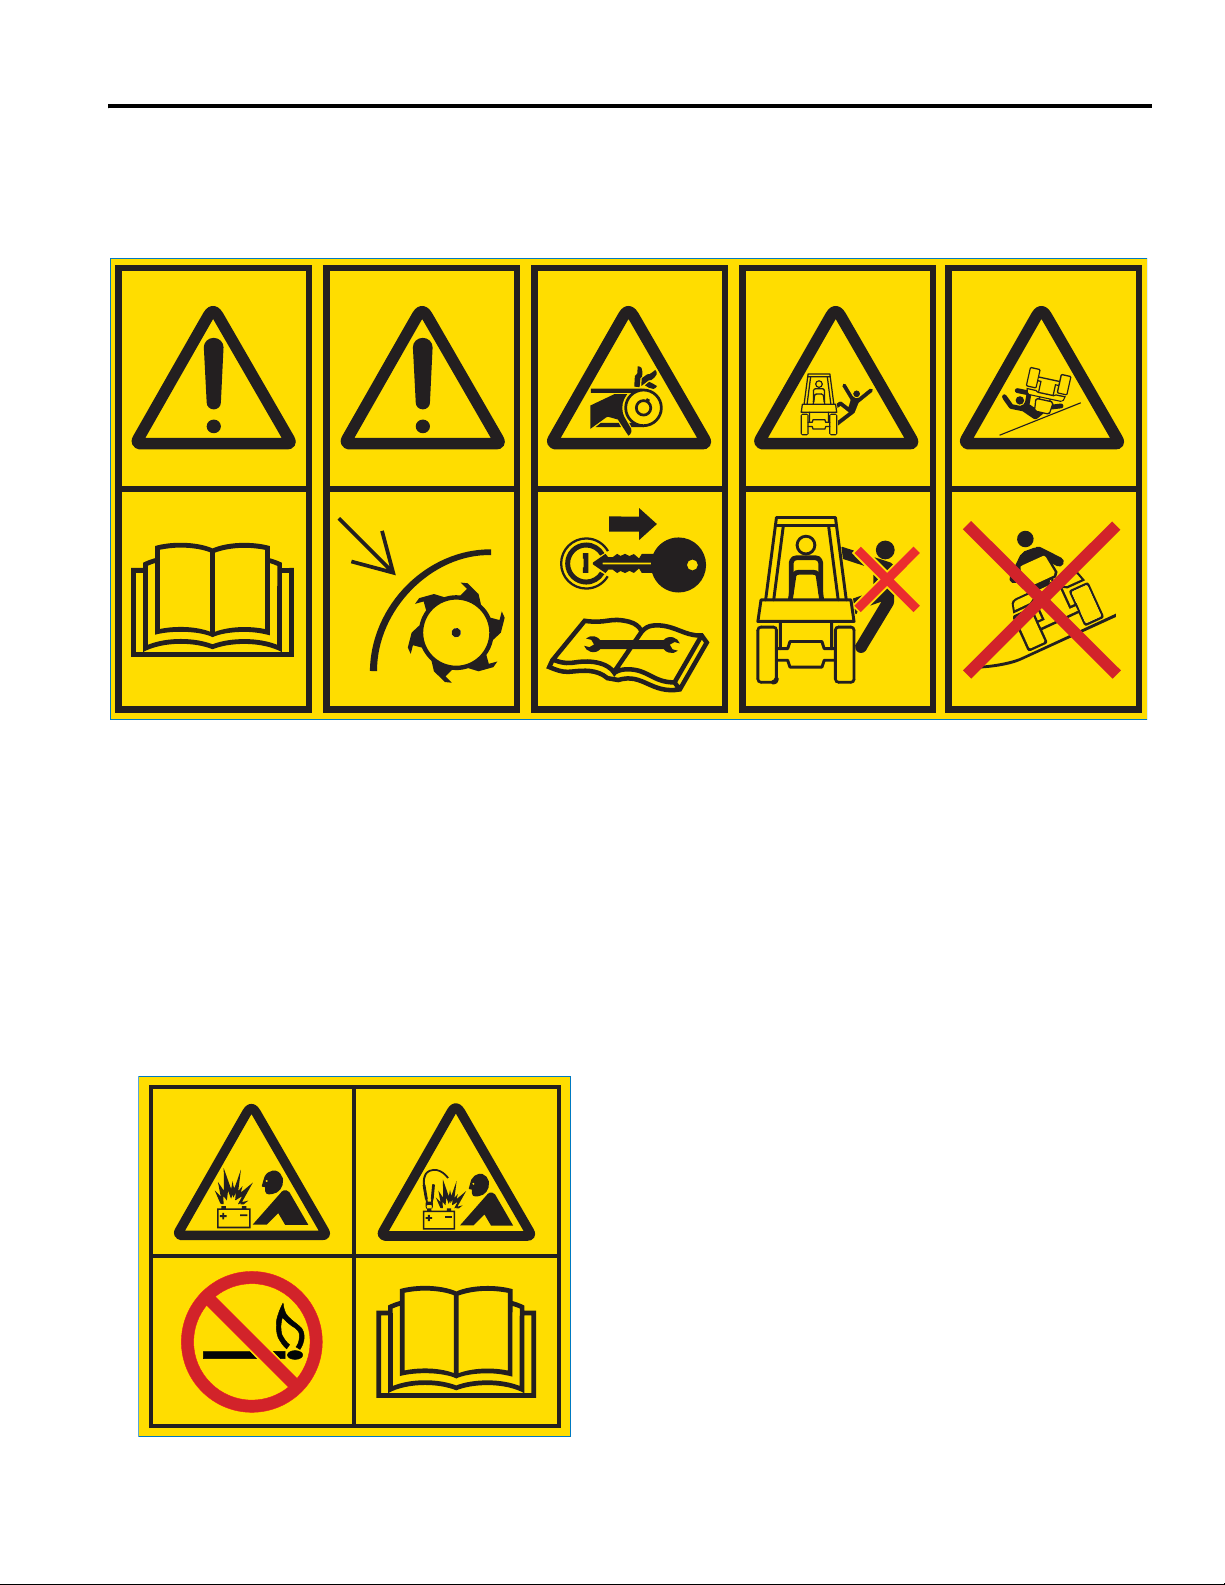
2 DECALS
4181862
4182520
WARNING
Radiator is under pressure. Remove
cap slowly to avoid personal injury.
IMPORTANT
DO NOT USE STARTING ASSIST FLUIDS
Use of starting assist fluids in the air intake system may be
potentially explosive or cause a "runaway" engine condition. This
could result in serious engine damage.
WARNING
Read mower manuals before operating or
performing any maintenance.
DANGER
To prevent injury, disengage all drives,
engage parking brake, stop engine, and
remove key before working on machine or
emptying grass catchers.
Familiarize yourself with the following decals. They are critical to the safe operation of the
machine. REPLACE DAMAGED DECALS IMMEDIATELY.
4181861
4181860
6
Page 7
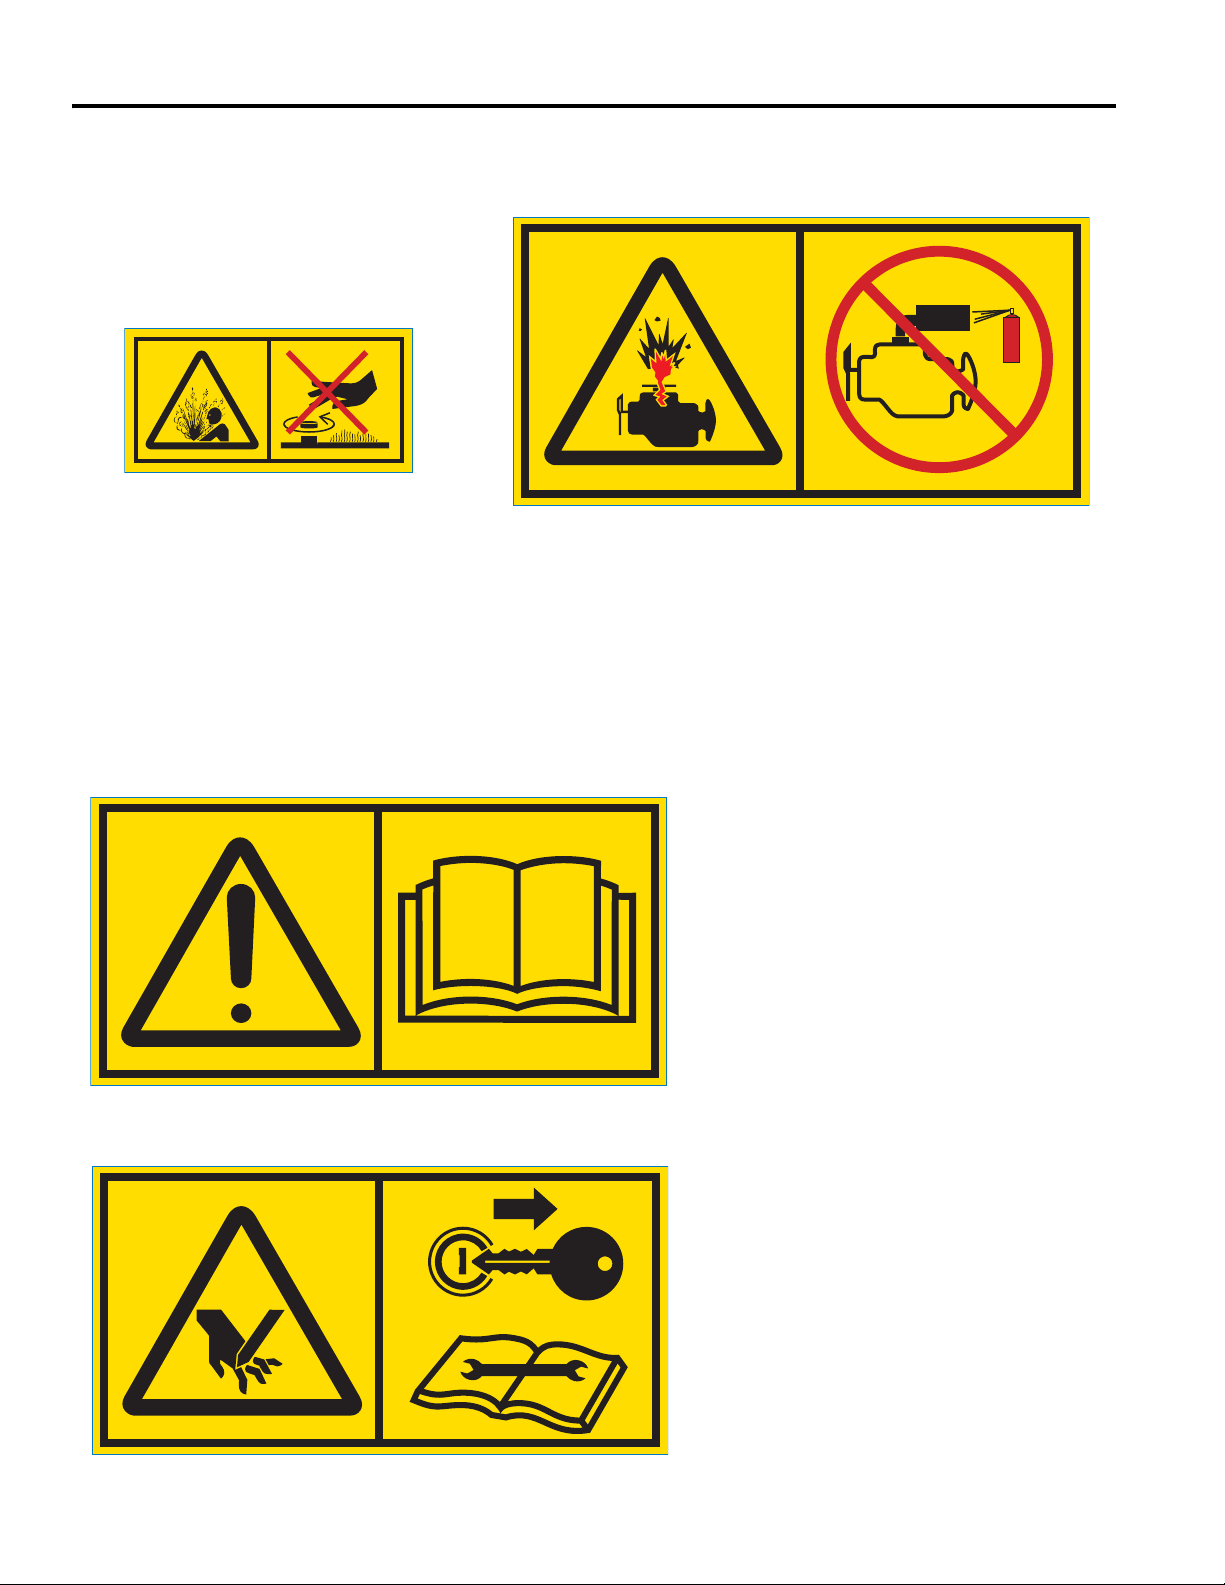
DECALS 2
105
dB
L
WA
3008004
4181863
WARNING
To prevent cuts use socket
wrench or Turf Groomer
®
knob to turn reel.
Traction Pedal
Reverse Forward
Engaged
Parking Brake
Disengaged
Sound Power
Level
.
3008521
7
Page 8
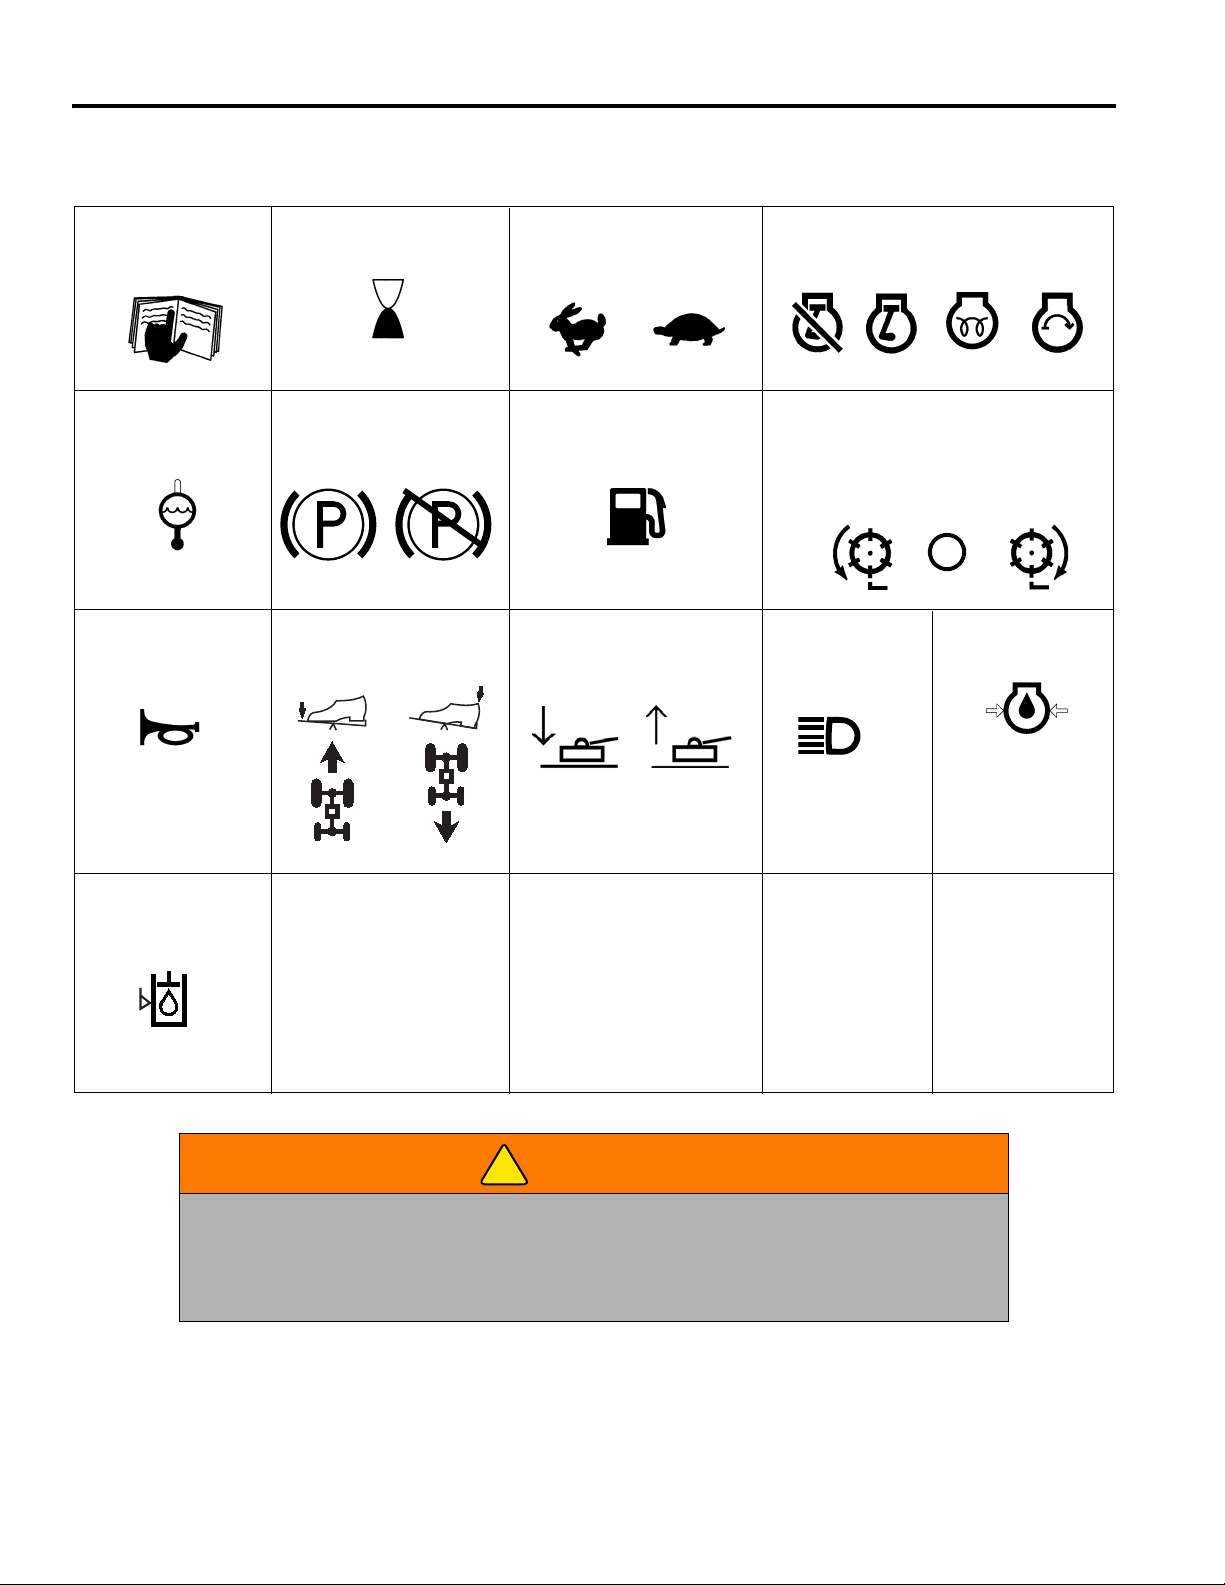
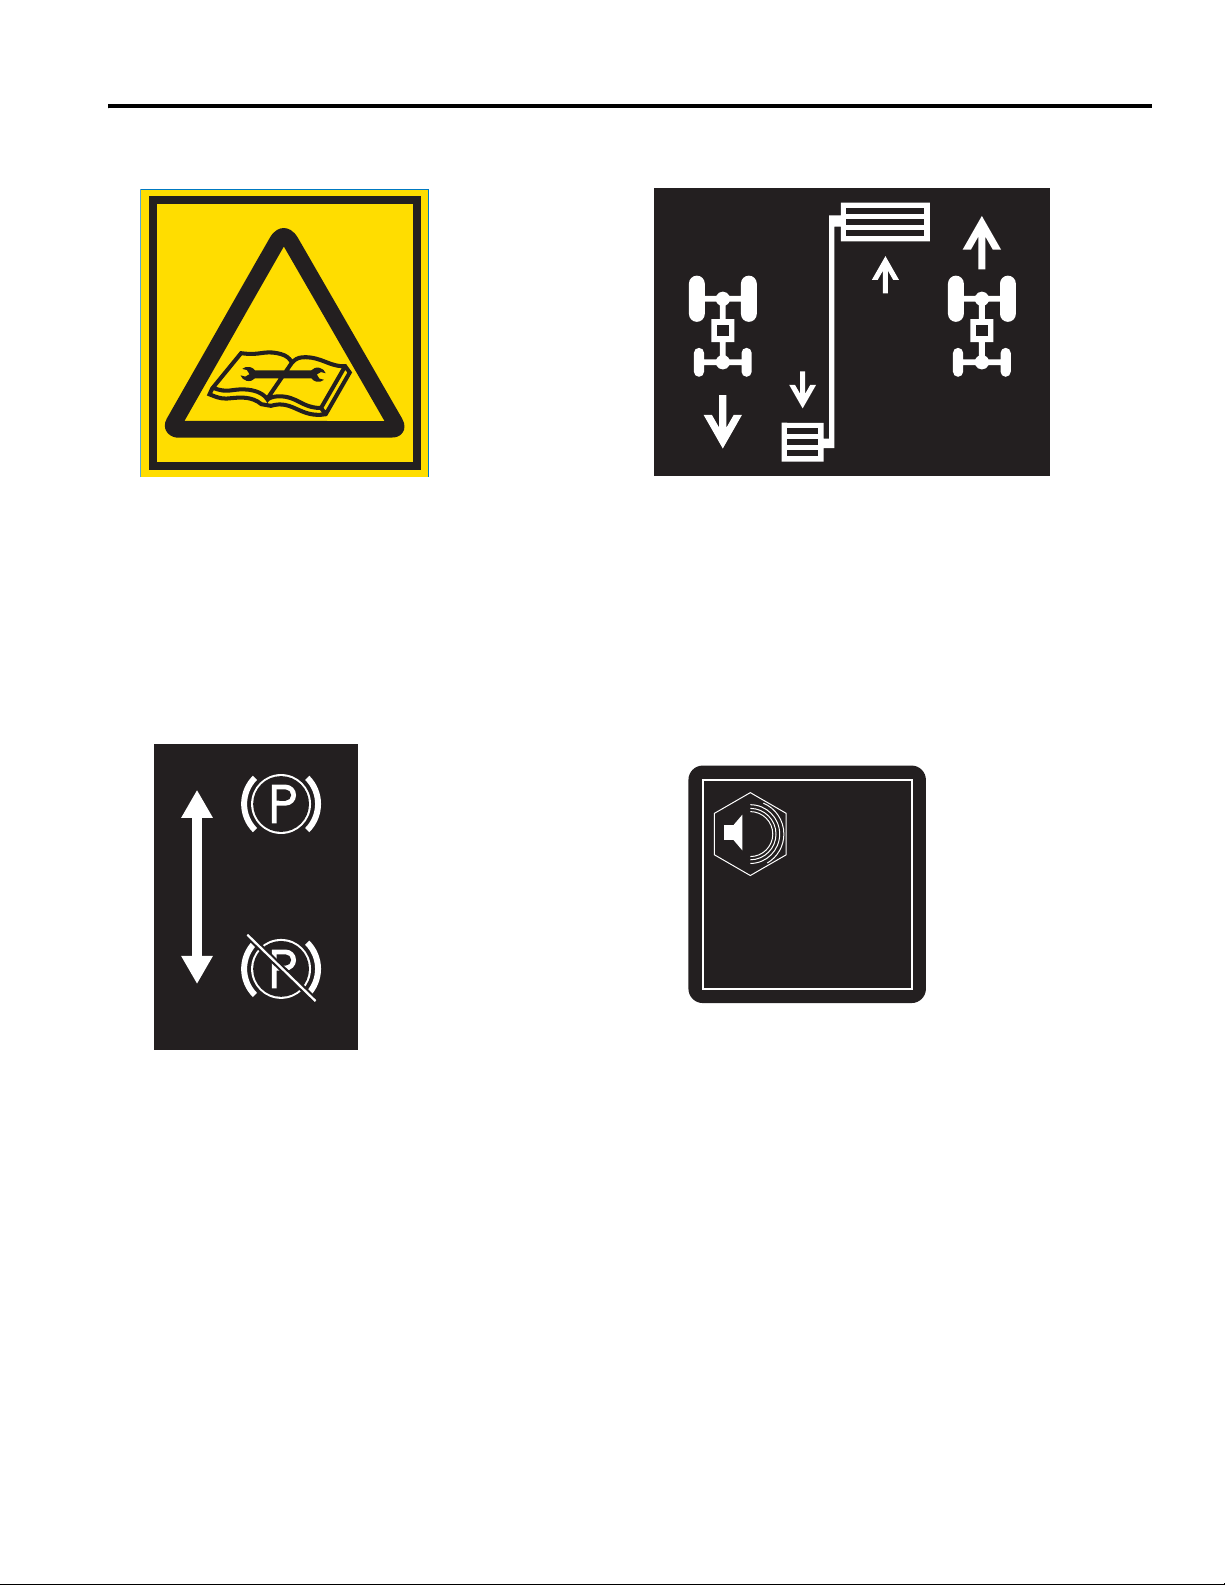
3 CONTROLS
Coolant
Temperature
D
Read Manual Engine Throttle
High Low
Hour Meter
Traction Pedal
Forward Reverse
Fuel
Diesel
Cutting Units
Forward Off Reverse
(Cut) (Backlap)
Horn
Engine
Off Run Glow Plug Start
Engine Oil
Pressure
Parking Brake
Engaged Disengaged
LightsMowers
Lower Raise
Hydraulic
Oil Level
!
3 CONTROLS
3.1 ICONS ___________________________________________________________________
WARNING
Never attempt to drive the mower unless you have read the Safety and Operation Manual
and know how to operate all controls correctly.
Familiarize yourself with the icons shown above and what they represent. Learn the
location and purpose of all of the controls and gauges before operating this mower.
8
Page 9
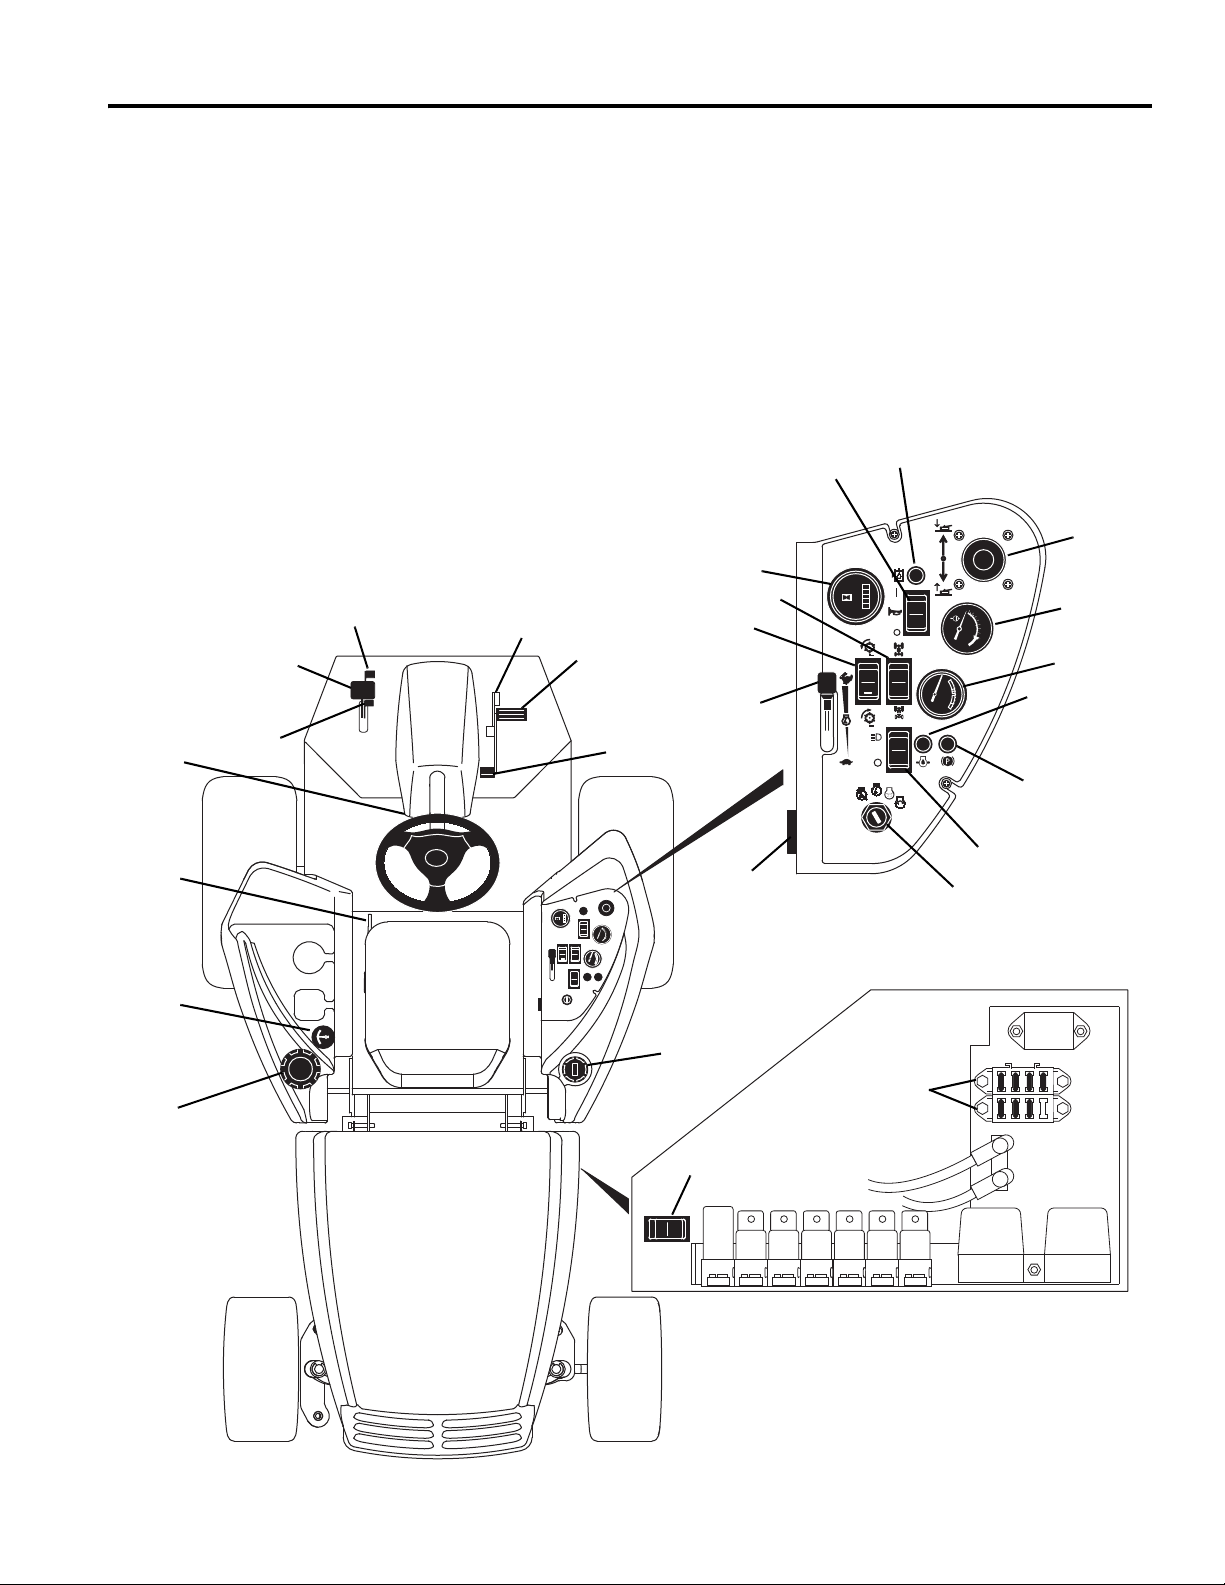
CONTROLS 3
10
12
14
16
A Tilt Steering Lever
B1 Parking Brake Lock
B2 Parking Brake Release
C Parking Brake Pedal
D Mow Speed Stop
E Traction Pedal - Forward
F Traction Pedal - Reverse
G Seat Adjustment
H Hydraulic Oil Cap
I Hydraulic Oil Light
J Fuel Cap
K Fuel Level Gauge
L Backlap Switch
M Hour Meter
N Water Temperature Gauge
O Volt Meter
P Engine Oil Pressure Light
Q Horn
R 2WD / 4WD Switch
S Raise / Lower Joystick
T Reel Switch
U Light Switch
V Ignition Switch
W Throttle
X Parking Brake Light
Y Fuse Blocks
Z Horn Switch
A
B
1
C
D
E
F
G
H
J
K
L
M
N
O
P
Q
R
S
T
U
V
W
X
Y
B
2
I
Z
9
Page 10
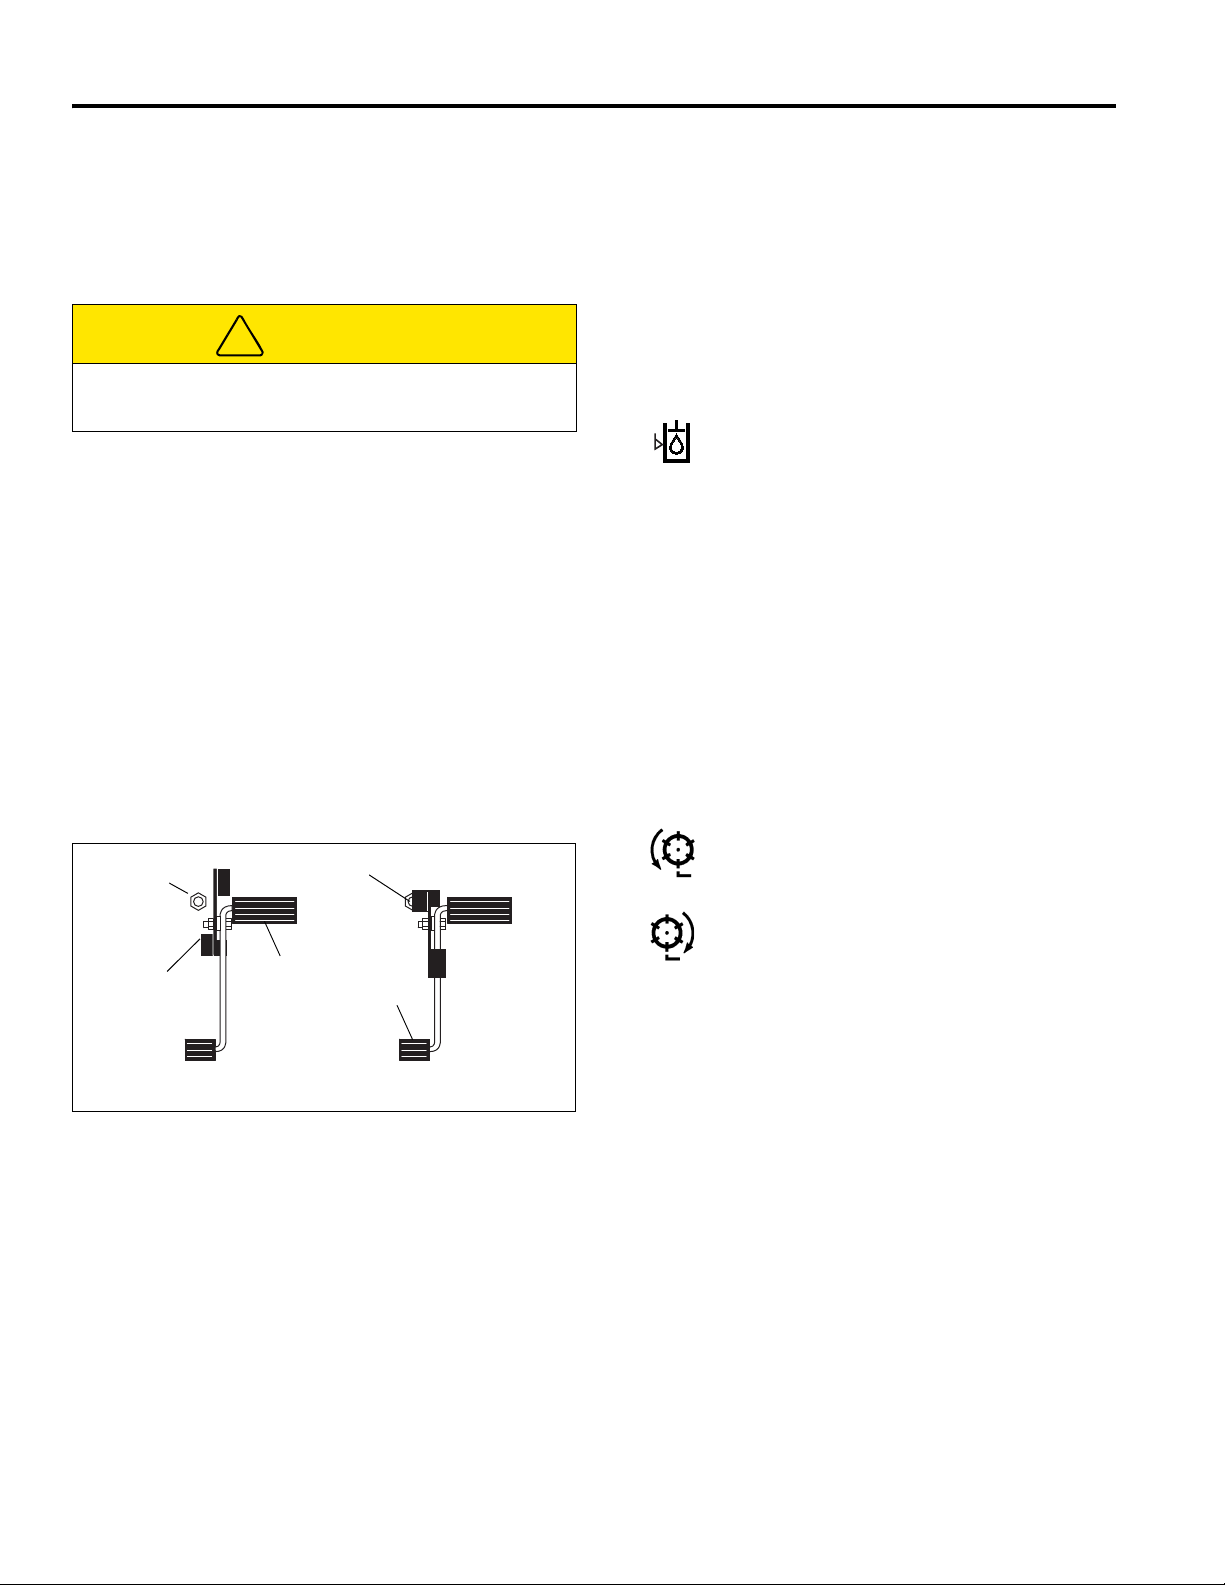
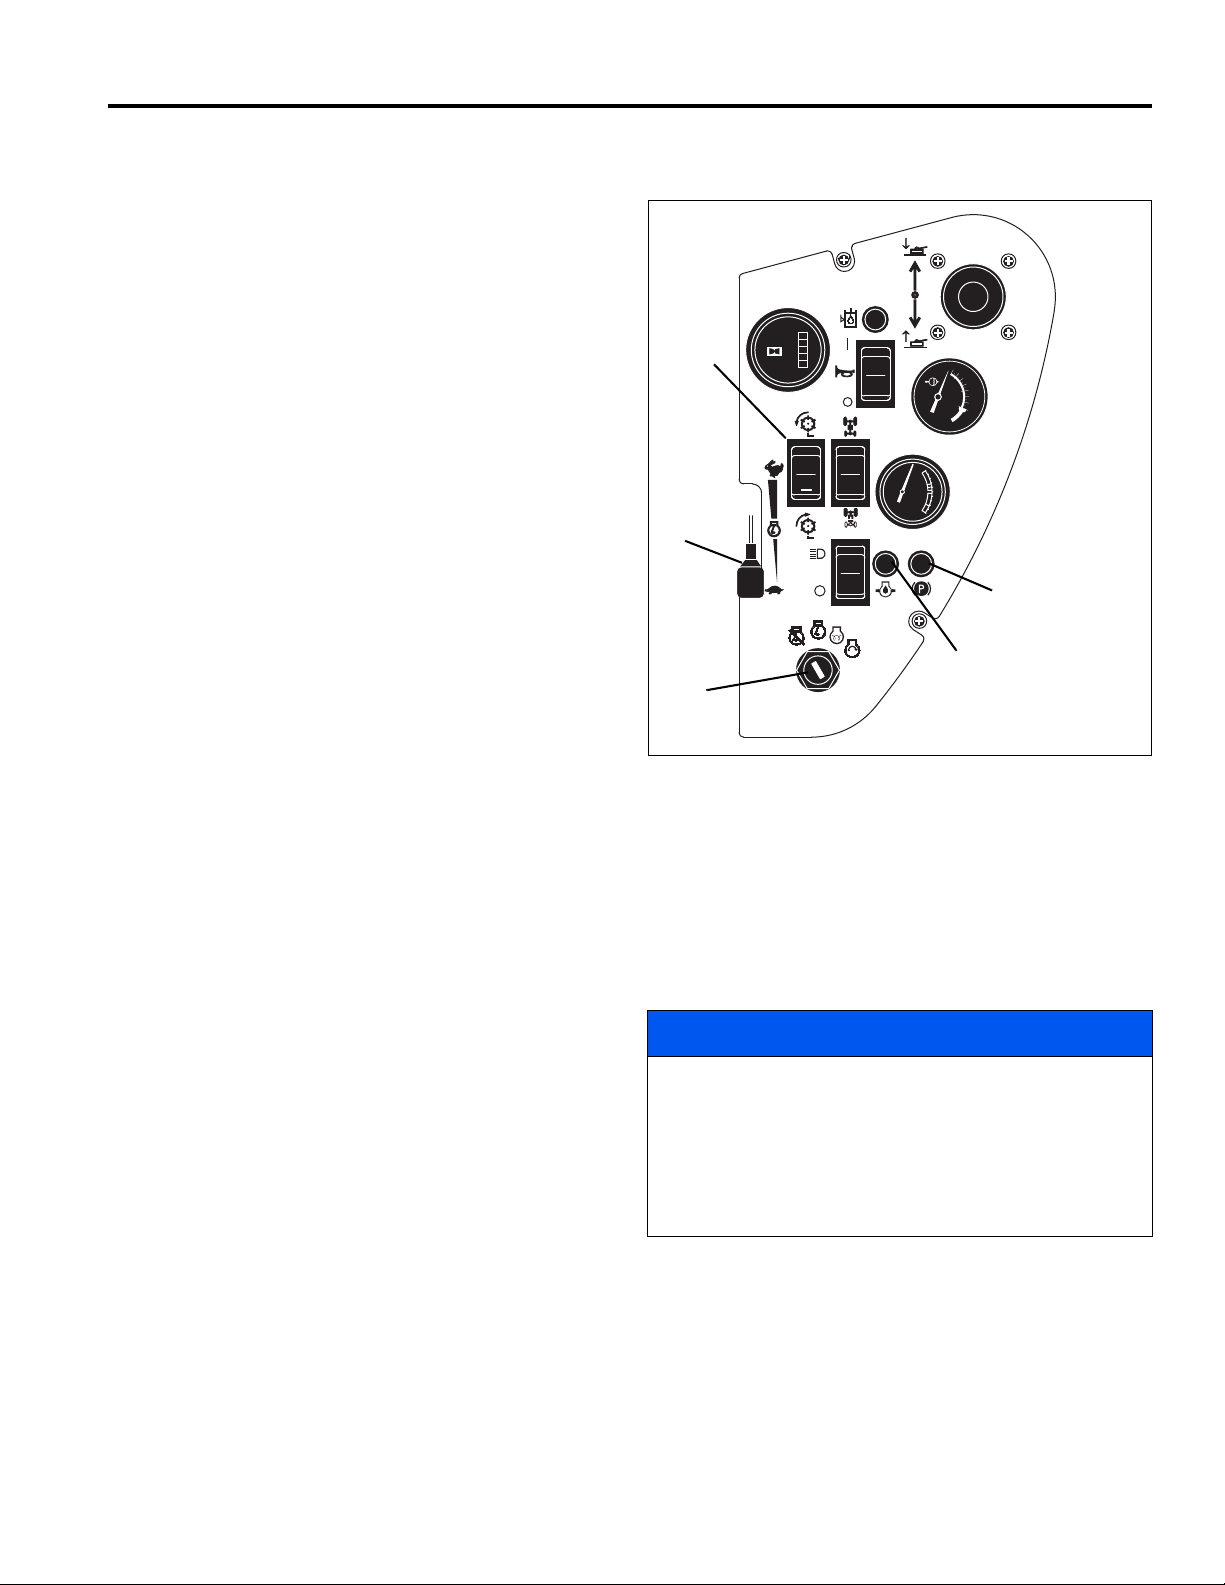
3 CONTROLS
!
Full Speed Reduced Speed
D
1
D
2
D
3
E
F
3.2 CONTROL DESCRIPTIONS__________________________________________________
A. Tilt Steering Lever
Pull lever up to release steering column. Tilt column
up or down to position desired. Release lever to lock
steering column in place.
CAUTION
Never adjust steering while mower is moving. Stop
unit and set parking brake before adjusting.
B. Parking Brake Lock / Release
To lock parking brake, hold brake pedal (C) down
and press lock (B
press brake pedal release (B
C. Parking Brake Pedal
To engage parking brake, press pedal down.
D. Mow Speed Stop
Limits forward speed while mowing. To operate at
lower travel speed while mowing, rotate lever so it
contacts stop screw (D1) on floor board when
forward travel pedal is pressed. To travel at full
speed, set lever in position shown (D3). Stop screw
(D2) can be adjusted to set specific mow speeds.
See the Parts & Maintenance manual.
) until it engages. To disengage,
1
).
2
G. Seat Adjustment
Pull left side lever out to adjust seat forward or
backward. To adjust spring tension under seat, turn
adjusting knob on front of seat.
H. Hydraulic Oil Cap
Fill to “green” area on gauge using clean hydraulic fluid
while machine is cool. Do not overfill.
I. Hydraulic Oil Light
Alerts the operator of a low fluid level in
hydraulic tank. This light operates in
combination with the alarm. See Section 3.3.
J. Fuel Cap
Remove cap to fill fuel tank with clean, fresh, #2 low or
ultra low sulfur diesel fuel, minimum Cetane Rating of
45. See Section 4.10.
K. Fuel Level Gauge
Indicates current fuel level. Check fuel gauge daily
before starting machine.
gauge; do not top off tank.
out of fuel.
L. Backlap Switch
The backlap switch allows the mowers to rotate in
reverse for backlapping.
Forward - For normal operation (mowing) the
switch must be set to the FORWARD (cut)
position.
Fill only to “green” area on
Do not allow machine to run
Figure 3A
E. Traction Pedal Forward Travel
Press front of pedal down for forward travel. Release
pedal to slow mower and stop. Do not press traction
pedal when parking brake is set and parking brake light
(X) is lit.
F. Traction Pedal Reverse Travel
Press rear of pedal down for reverse travel. Release
pedal to slow mower and stop. Allow mower to come to
a complete stop before reversing directions. Do not
press traction pedal when parking brake is set and
parking brake light (X) is lit.
Reverse - When backlapping, the mowers must
be operated in the reverse direction. Set switch
to the REVERSE (backlap) position.
When backlapping, the parking brake must be set and
both the reel switch (T) and backlap switch (L) must be
set to reverse. See Parts & Maintenance Manual.
M. Hour Meter
Records engine operating hours. Use hour meter to
schedule periodic maintenance.
N. Water Temperature Gauge
Indicates engine coolant temperature. Normal operating
temperature should be between 160° - 230°F (71°110°C). If temperature rises above 230°F (110°C),
alarm will sound. See Section 3.3.
O. Volt Meter
Indicates battery condition. During normal operation
meter should never be in the red area.
10
Page 11

CONTROLS 3
P. Engine Oil Pressure Light
The indicator will light if engine oil pressure drops
below 7 PSI (48 kPa). Stop engine immediately,
determine the cause, and correct the problem before
resuming operation.
Q. Horn
The alarm sounds to alert the operator to conditions
requiring immediate attention. See Section 3.3.
R. 2 WD / 4 WD Switch
Sets mower into two or four wheel drive.
S. Raise / Lower Joystick
The joystick raises and lowers the mowers. Push
forward to lower mowers, pull back to raise mowers.
T. Reel Switch
The reel switch is a 3-position rocker type switch with a
neutral locking tab. It sets the mowers for either forward
or reverse rotation. Set mower switch in its OFF (center)
position when starting the mower.
Forward - To mow, press switch to the
FORWARD (cut) position. With the switch in this
position, mowers will start automatically when
they are lowered and stop when they are raised. Return
switch to its center position to disable mowers.
Z. Horn Switch
This switch is used to test the alarm system or disable
the alarm after a low oil level has been detected. Keep
switch in its ON position when starting and operating
mower. To test alarm, set switch to OFF and turn
ignition key to RUN. See
Section 3.3.
Reverse - The mower can be operated in the
reverse direction for backlapping, running
vertical mowers, removing grass build-up in
mowers, or dislodging objects binding mowers. To
reverse blade rotation, press switch to the REVERSE
position.
When backlapping, the parking brake must be set,
traction pedal in neutral, and both the reel switch (T)
and backlap switch (L) must be set to REVERSE. See
Parts & Maintenance Manual.
U. Light Switch
Controls operation of work lights.
V. Ignition Switch
The ignition switch has four positions. OFF - RUN GLOW PLUG - START. See Section 4.4.
W. Throttle
Controls engine speed. Run machine at full throttle
during normal machine operation.
X. Parking Brake Light
Indicates that the parking brake is engaged. Parking
brake must be disengaged before depressing
traction pedal.
Y. Fuse Blocks
Used to provide circuit protection for electrical
systems. See Parts & Maintenance Manual.
11
Page 12

3 CONTROLS
3.3 OPERATOR ALERTS_______________________________________________________
The machine monitors vital machine systems. It uses an
audible alarm and warning lights to alert the operator of
conditions requiring immediate action. When an alert
occurs, follow the general guidelines listed in the chart
below and any specific actions outlined by the grounds
superintendent or service manager.
Alert Action
1. Engine Oil Pressure - Oil pressure
light comes on. Oil pressure low.
2. Engine Coolant Temperature
Alarm sounds. Engine coolant
temperature high.
3. Hydraulic fluid level - alarm
sounds and hydraulic fluid
warning light comes on.
Hydraulic fluid is below
recommended level.
Stop mower immediately, lower implements and shut off engine! Inspect oil
level in engine. If oil light remains on with oil at proper level, shut off engine and
tow or trailer mower back to a service area. NEVER operate engine with oil light
on, severe damage to the engine can occur.
Stop mower immediately, lower implements and shut off engine! Remove
debris such as leaves and grass clippings that may be restricting air flow through
front screen and area between radiator and oil cooler. If engine continues to run
hot, return mower to a service area.
CAUTION: Engine coolant is under pressure. Turn engine off and allow
fluid to cool before checking fluid level or adding coolant to radiator.
Stop mower immediately, lower implements and shut off engine! Visually
inspect mower for obvious signs of leaks around connections, hoses and
hydraulic components. Return mower to service area for maintenance.
CAUTION: Hydraulic fluid is under pressure. Turn engine off and allow
fluid to cool before checking fluid level or adding oil to hydraulic tank.
To test alarm system:
Turn ignition switch to RUN. Engine oil light will come on for
one second or more.
This system monitors:
1. Engine oil pressure.
2. Engine coolant temperature.
3. Hydraulic oil level.
12
Page 13

OPERATION 4
!
!
4 OPERATION
4.1 DAILY INSPECTION ________________________________________________________
2. Check the fuel supply, radiator coolant level,
CAUTION
The daily inspection should be performed only when
the engine is off and all fluids are cold. Lower mowers
to the ground, engage the parking brake, stop engine,
and remove ignition key.
1. Perform a visual inspection of the entire unit, look for
signs of wear, loose hardware, and missing or
damaged components. Check for fuel or oil leaks to
ensure connections are tight and hoses and tubes
are in good condition.
4.2 INTERLOCK SYSTEM ______________________________________________________
crankcase oil, and air cleaner indicator. All fluids
must be at the full level mark with engine cold.
3. Make sure all mowers are adjusted to the same
cutting height.
4. Check tires for proper inflation.
5. Test the Interlock System.
Note: For more detailed maintenance information,
adjustments and maintenance/lube charts, see the
Parts & Maintenance manual.
1. The Interlock System prevents the engine from
starting unless the parking brake is engaged, the
traction pedal is in neutral, and the reel switch is
OFF. The system also stops the engine if the
operator leaves the seat with the reel switch ON,
traction pedal out of NEUTRAL, or parking brake
DISENGAGED.
WARNING
Never operate equipment with the Interlock
System disconnected or malfunctioning. Do not
disconnect or bypass any switch.
2. Perform each of the following tests to insure the
Interlock System is functioning properly. Stop the
test and have the system inspected and repaired if
any of the tests fail as listed below:
l the engine does not start in test 1;
l the engine does start during tests 2, 3 or 4;
l the engine continues to run during tests 5 or 6.
Interlock System Check
3. Refer to the chart below for each test and follow the
check (
between each test.
Test 1: Represents normal starting procedure. The
operator is seated, parking brake is engaged, the
traction pedal is in neutral, and the reel switch is
OFF. The engine should start.
Test 2: The engine must not start if the reel switch is
ON.
Test 3: The engine must not start if the parking brake
is DISENGAGED.
Test 4: The engine must not start if traction pedal is
not in neutral.
Test 5: Start the engine in the normal manner then
turn reel switch ON and lift your weight off the seat.
Test 6: Start the engine in the normal manner then
disengage parking brake and lift your weight off the
seat.
4) marks across the chart. Shut engine off
H
H
Test Operator
Seated
Yes No Engaged Disengaged Yes No On Off Yes No
1 44 4 44
2 44 44 4
3 44444
4 4 4 444
5 4
6 4
H
H
H
Parking
Brake
444
44 4
Lift your weight off seat. The engine will shut down.
Traction Pedal
in Neutral
Reel
Switch
Engine
Starts
H
H
13
Page 14

4 OPERATION
!
!
!
!
4.3 OPERATING PROCEDURES_________________________________________________
WARNING
A Roll Over Protection Structure (ROPS) is included with this mower. Seat belts must be worn whenever operating
a mower with a ROPS. Always keep seat belt snugly adjusted. DO NOT use seat belts on a mower without a
ROPS.
If the mower is overturning, hold onto the steering wheel. Do not attempt to jump out or leave the seat.
CAUTION
To prevent injury, always wear safety glasses, leather work shoes or boots, a hard hat, and ear protection.
1. Under no circumstances should the engine be
started without the operator seated on the mower.
2. Do not operate mower or attachments with loose,
damaged, or missing components. Whenever
possible mow when grass is dry.
3. First mow in a test area to become thoroughly
familiar with the operation of the mower and control
levers.
Never operate the reels unless they are mowing
grass. Heat will develop between the bedknife and
reel and damage the cutting edge.
4. Study the area to determine the best and safest
operating procedure. Consider the height of the
grass, type of terrain, and condition of the surface.
Each condition will require certain adjustments or
precautions.
5. Never direct discharge of material toward
bystanders, nor allow anyone near the machine
while in operation. The owner/operator is
responsible for injuries inflicted to bystanders and/or
damage to their property.
CAUTION
Before mowing, pick up all debris such as rocks, toys,
and wire which can be thrown by the machine. Enter a
new area cautiously. Always operate at speeds that
allow you to have complete control of the mower.
8. Disengage the drive motors and raise the reels
when crossing paths or roadways. Look out for
traffic.
9. Stop and inspect the equipment for damage
immediately after striking an obstruction or if the
machine begins to vibrate abnormally. Have the
equipment repaired before resuming operation.
WARNING
Before you clean, adjust, or repair this
equipment, always disengage all drives, lower
implements to the ground, engage parking brake,
stop engine, and remove key from ignition switch
to prevent injuries.
10. Slow down and use extra care on hillsides. Read
Section 4.7. Use caution when operating near drop
offs.
11. Look behind and down before backing up to be sure
the path is clear. Use care when approaching blind
corners, shrubs, trees, or other objects that may
obscure vision.
12. Never use your hands to clean cutting units. Use a
brush to remove grass clippings from blades.
Blades are extremely sharp and can cause serious
injuries.
6. Use discretion when mowing near gravel areas
(roadway, parking areas, cart paths, etc.). Stones
discharged from the implement may cause serious
injuries to bystanders and/or damage the
equipment.
7. Always turn reel switch off to stop blades when not
mowing.
14
Page 15
OPERATION 4
V
T
W
P
X
4.4 STARTING________________________________________________________________
IMPORTANT: Do not use starting assist fluids. Use of
such fluids in the air intake system may be potentially
explosive or cause a “Runaway” engine condition and
could result in serious engine damage.
1. Make sure fuel shut off valve is completely open and
the tow valve (See Section 4.9) is closed.
2. Sit in operator’s seat, make sure reel switch (T) is
OFF, parking brake (C) is engaged, and traction
pedal (E and F) is in neutral.
3. Move throttle lever between 1/8 to 1/2 throttle (W).
Turn ignition switch (V) to RUN. Parking brake light
(X) and engine oil light (P) should be lit.
10
12
14
16
4. Turn ignition switch to GLOW PLUG position for
about 3 to 5 seconds, then turn key to START
position. Release as soon as engine starts. The
colder the temperature, the longer it will take to
energize plugs. Do not hold switch in GLOW PLUG
position for more than 5 seconds, or in the START
position for more than 15 seconds. Energizing glow
plugs is not necessary when starting a warm
engine. Once engine starts, engine oil light (P)
should go out.
Figure 4A
5. Allow the engine to become warm and properly
lubricated before operating at high RPM.
4.5 STOPPING / PARKING______________________________________________________
To stop:
Remove your foot from traction pedal. The mower will
automatically brake when the traction pedal returns to
neutral.
b. Disengage all drives, lower implements to the
ground, reduce throttle to slow, and allow engine
to operate at no load for several minutes.
NOTICE
To park the mower under normal conditions:
1. Disengage the reel switch, raise the implements, and
move away from the area of operation.
2. Select a flat and level area to park.
a. Release traction pedal to bring the mower to a
complete stop.
Permanent damage to the turbocharger may occur if
the engine is shut down without allowing the
turbocharger time to cool.
To prevent damage, operate the engine with no load
and at half throttle for 3 to 5 minutes before shutting
off engine.
3. Engage parking brake, stop the engine, and always
remove the ignition key.
If an emergency arises and the mower must be parked in
the area of operation, follow the guidelines outlined by
the grounds superintendent. If the mower is parked on an
incline, chock or block the wheels.
15
Page 16

4 OPERATION
!
!
!
4.6 TO DRIVE / TRANSPORT ___________________________________________________
Read and follow all safety notes contained in this manual
when driving or transporting mower. Refer to Section 4.3
for general operating instructions. When operating in
reverse, look behind you to ensure you have a clear path.
Important: If this mower is driven on public roads, it must
comply with federal, state, and local ordinances. Contact
local authorities for regulations and equipment
requirements.
1. Disengage all drives and raise implements to the
transport position when driving to and from the area
of operation.
2. Disengage parking brake and move throttle lever to
FAST. Depress traction pedal slowly.
CAUTION
To prevent tipping or loss of control, travel at reduced
speed when making turns.
4.7 HILLSIDE OPERATION _____________________________________________________
1. Always mow with the engine at full throttle but reduce
WARNING
To minimize the possibility of overturning, the safest
method for operating on hills and terraces is to travel
up and down the face of the slope (vertically), not
across the face (horizontally). Avoid unnecessary
turns, travel at reduced speeds, and stay alert for
hidden hazards and drop offs.
forward speed to maintain the proper cutting
frequency.
2. If the mower tends to slide or the tires begin to
“mark” the turf, angle mower into a less steep grade
until traction is regained or tire marking stops.
3. If mower continues to slide or mark the turf, the
grade is too steep for safe operation. Do not make
another attempt to climb, and back down slowly.
CAUTION
Do not operate this mower on slopes greater than
20°.
The mower has been designed for good traction and
stability under normal mowing conditions; however, use
caution when operating on slopes, especially over rough
terrain, or when the grass is wet. Wet grass reduces
traction and steering control.
4. When descending a steep slope, always lower
implements to the ground to reduce the risk of
mower overturning.
Correct tire pressure is essential for maximum traction.
Front and Rear - 10-12 psi (69-83 kPa).
16
Page 17
OPERATION 4
!
A
4.8 MOWING _________________________________________________________________
WARNING
To prevent serious injuries, keep hands, feet, and
clothing away from cutting unit when the blades are
moving.
NEVER use your hands to clean cutting units. Use a
brush to remove grass clippings from blades. Blades
can be sharp and could cause injuries.
To clear obstructions from cutting unit, disengage reel
switch, engage parking brake, stop engine, and
remove key from ignition switch; then remove
obstruction.
To mow:
1. Start the engine and lower the mowers to the ground.
2. Turn reel switch to ON and disengage parking
brake.
To prevent damage to the reel and bedknife, never
operate reels when they are not cutting grass.
3. Move throttle lever to FAST then slowly depress
traction pedal to the desired mowing speed.
a. For complete even cutting, overlap swaths by a
few inches.
b. Stop and raise the mowers to the transport
position when crossing paths or roadways. Look
out for traffic.
4. To remove or install the grass catchers, lower the
cutting units to the ground, engage the parking
brake, and shut off the engine. Tilt the grass catcher
body so the front edge clears the mower frame, and
slide the catcher onto or off of the catcher frame.
NOTICE
4.9 TOWING / TRAILERING _____________________________________________________
If the mower experiences problems and must be shut
down and removed from the area, it should be loaded
onto a trailer for transport. If a trailer is not available, the
unit can be towed slowly short distances.
Use care when loading and unloading mower. Fasten
mower to trailer to prevent mower from rolling or shifting
during transport.
Long Distance Trailering / Transport. If the mower is to
be trailered on the highway, before strapping to trailer,
inflate tires to:
Front - 18 psi (124 kPa)
Rear - 24 psi (165 kPa)
After unloading mower, reduce tire pressure to normal
operating pressure. See Section 4.7
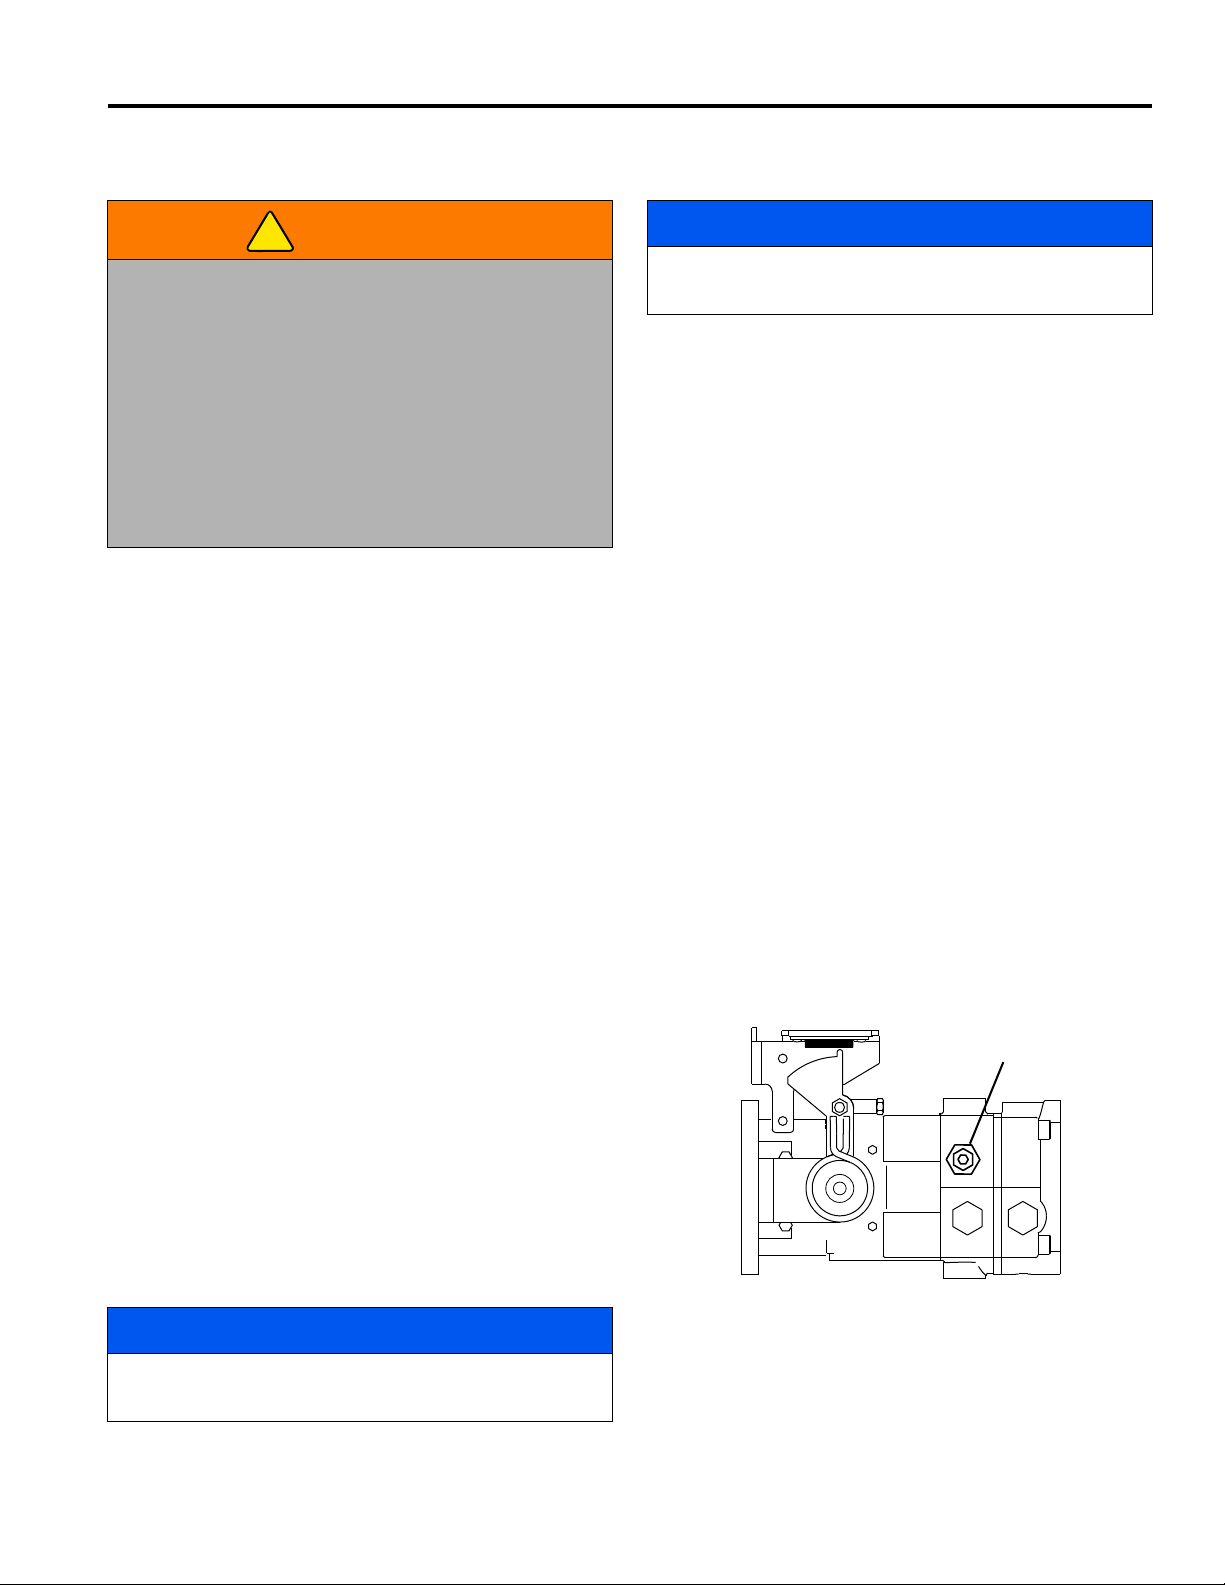
Before towing, open tow valve. The tow valve permits
moving the mower without starting the engine and
prevents possible damage to hydraulic components.
The tow valve (A) is located on the bottom of the drive
pump under the mower. To open valve, loosen jam nut
on valve stem and turn valve counterclockwise.
Before towing make sure cutting units are raised. If they
cannot be raised, remove them from the mower.
Close valve completely and lock in place with jam nut
after towing.
NOTICE
Do not exceed 2 MPH (3.2 KPH) while towing. Long
distance towing is not recommended.
Figure 4B
17
Page 18

4 OPERATION
!
!
4.10 DAILY MAINTENANCE _____________________________________________________
Important: For more detailed maintenance information,
adjustments, and maintenance/lubrication charts, see
the Parts & Maintenance manual.
1. Park the mower on a flat, level surface. Fully lower
the implements to the ground, engage parking brake,
stop the engine, and remove key from ignition switch.
2. Grease and lubricate all points if required. To
prevent fires, wash the cutting units and mower after
each use.
a. Use only fresh water for cleaning your
equipment.
NOTICE
Use of salt water or effluent water has been known to
encourage rust and corrosion of metal parts resulting
in premature deterioration or failure. Damage of this
nature is not covered by the factory warranty.
b. Do not use high pressure spray.
c. Do not spray water directly at the instrument
panel, or any electrical components.
d. Do not spray water into the cooling air intake or
the engine air intake.
NOTICE
Do not wash a hot or running engine. Use
compressed air to clean the mower, engine, and
radiator fins to reduce the potential for corrosion and
moisture contamination.
FUEL
Fill mower’s fuel tank at the end of each operating day to
full mark on fuel gauge.
Always use clean, fresh, #2 low or ultra low sulfur
diesel fuel. Minimum Cetane Rating 45.
Handle fuel with care - it is highly flammable. Use an
approved container; the spout must fit inside the fuel filler
neck. Avoid using cans and funnels to transfer fuel.
WARNING
Never remove the fuel cap from the fuel tank, or add fuel,
when the engine is running or while the engine is hot.
Do not smoke when handling fuel. Never fill or drain the
fuel tank indoors.
Do not spill fuel. Clean spilled fuel immediately.
Never handle or store fuel containers near an open flame
or any device that may create sparks and ignite the fuel
or fuel vapors.
Be sure to reinstall and tighten fuel cap securely.
• Store fuel according to local, state, or federal ordinances
and recommendations from your fuel supplier.
• Never overfill or allow the tank to become empty.
HYDRAULIC HOSE, OIL, AND FILTER
WARNING
To prevent serious injury from hot, high pressure
oil, never use your hands to check for oil leaks;
use paper or cardboard.
Hydraulic fluid escaping under pressure can have
sufficient force to penetrate skin. If fluid is injected
into the skin, it must be surgically removed within
a few hours by a doctor familiar with this form of
injury or gangrene may result.
1. Inspect hydraulic hoses and tubes daily. Look for wet
hoses or oil spots and replace worn or damaged
hoses and tubes before operating the machine.
2. Check the engine oil and hydraulic oil at the start of
each day, before starting the engine. If the oil level
is low, remove the oil filler cap, and add oil as
required. Do not overfill.
18
Page 19

QUALITY OF CUT 5
TN0159
5 QUALITY OF CUT
5.1 QUALITY OF CUT TROUBLESHOOTING _______________________________________
It is recommended that a “test cut” be performed to
evaluate the mower’s performance before beginning
repairs.
An area should be available where “test cuts” can be
made. This area should provide known and consistent
turf conditions to allow accurate evaluation of the
mower’s performance.
Another “test cut” should be performed after the
completion of the repairs and/or adjustments to verify the
mower’s performance.
Before performing a “test cut” to diagnose cut
appearance and mower performance, the following items
should be verified to ensure an accurate “test cut.”
1. Mowing (Ground) Speed.
2. Reel Bearing Condition and Pre-Load (End Play)
Adjustment.
3. Reel and Bedknife Sharpness.
4. Bedknife Alignment to Reel.
5. Reel-to-Bedknife Contact.
6. Height-of-Cut (HOC).
7. Roller and Roller Bearing Condition.
5.2 WASHBOARDING _________________________________________________________
Washboarding is a cyclical pattern of varying cutting
heights, resulting in a wave-like cut appearance. In most
cases, the wave tip-to-tip distance is approximately
6—8 in. (15—20 cm). Color variation (light-to-dark) may
also be noticed.
This condition is usually caused by a rocking motion in
the cutting unit(s). This condition is found mostly on
mowers with multiple (suspended) cutting units, but other
causes can produce the same result.
Washboarding may also be caused by variations in the
turf.
NOTE: Arrow indicates direction of travel.
Probable Cause Remedy
Mowing (ground) speed is too fast. Reduce mowing (ground) speed.
Grass build-up on roller. Clean the roller and use scrapers or brushes.
Roller is out of round. Replace roller.
Mowing in the same direction. Change mowing direction regularly.
Use of a groomer on cleanup pass. Groomers should be used only in a straight line.
19
Page 20

5 QUALITY OF CUT
TN0220
5.3 MARCELLING ____________________________________________________________
Marcelling, like washboarding, is a cyclical pattern of
varying cutting heights, resulting in a wave-like cut
appearance. In most cases, the wave tip-to-tip distance is
2 in. (5 cm) or less.
NOTE: Arrow indicates direction of travel.
Probable Cause Remedy
Mowing (ground) speed is too fast. Reduce mowing (ground) speed.
HOC (height-of-cut) setting is too low for turf
conditions.
Cutting reel diameter is worn. Check cutting reel diameter and replace if worn.
Check/adjust HOC to turf conditions.
20
Page 21

QUALITY OF CUT 5
TN0221
5.4 STEP CUTTING____________________________________________________________
Step cutting occurs when grass is cut taller on one side of
a reel than the other or one cutting unit to another. This is
usually caused by mechanical wear or an incorrect roller
or HOC (height-of-cut) adjustment.
NOTE: Arrow indicates direction of travel.
Probable Cause Remedy
HOC (height-of-cut) settings are different from one
side of a reel to the other or from one cutting unit to
another.
Worn front roller bearings. Check/replace front roller bearings.
Reel-to-bedknife contact is different from one side of
the cutting unit to the other or from one cutting unit to
another.
Cutting reel movement is restricted. Check/remove cutting reel movement obstruction.
Variations in turf density. Change mowing direction.
Machine weight distribution is uneven. Check/adjust tire inflation pressure.
Check HOC adjustment of cutting units.
Check reel-to-bedknife contact.
21
Page 22

5 QUALITY OF CUT
TN0222
5.5 SCALPING _______________________________________________________________
Scalping is a condition in which areas of grass are cut
noticeably shorter than the surrounding areas, resulting in
a light green or even brown patch. This is usually caused
by an excessively low height-of-cut (HOC) setting and/or
uneven turf.
NOTE: Arrow indicates direction of travel.
Probable Cause Remedy
HOC (height-of-cut) settings are lower than normal. Check/adjust the HOC settings.
Improper reel-to-bedknife adjustment. Adjust reel-to-bedknife setting for desired HOC.
Turf too uneven for the mower to follow. Change mowing direction.
Cutting too much grass at one time. Mow more often.
Mowing (ground) speed is too fast. Reduce mowing (ground) speed.
22
Page 23

QUALITY OF CUT 5
TN0223
5.6 STRAGGLERS ____________________________________________________________
Stragglers are scattered blades of uncut or poorly cut
grass.
NOTE: Arrow indicates direction of travel.
Probable Cause Remedy
Bedknife improperly adjusted. Adjust reel-to-bedknife setting.
Dull reel or bedknife cutting edges. Sharpen or replace reel blade and bedknife as
necessary.
Mowing (ground) speed is too fast. Reduce mowing (ground) speed.
Grass is too tall. Mow more often.
Mowing in the same direction. Change mowing direction regularly.
Nicks in reel or bedknife. Grind, sharpen or replace reel blades and bedknife as
necessary.
23
Page 24

5 QUALITY OF CUT
TN0224
5.7 STREAKS ________________________________________________________________
A streak is a line of uncut grass. This is usually caused by
a nicked or bent bedknife.
NOTE: Arrow indicates direction of travel.
Probable Cause Remedy
Damaged bedknife. Replace bedknife.
Damaged or unevenly worn reel. Inspect reel. Replace as needed.
Loose or missing bedknife fasteners. Check bedknife screws. Tighten loose screws; replace
missing screws.
Turning too aggressively. Cutting units don’t overlap
around turns or on side hills.
Tire mats down grass before it is cut. Check/adjust tire inflation pressure.
Wet grass is matted down before it is cut. Mow when grass is dry.
Turn less aggressively to allow cutting units to overlap.
Change mowing direction or pattern on side hills.
24
Page 25

QUALITY OF CUT 5
TN0225
5.8 WINDROWING ____________________________________________________________
Windrowing is the deposit of clippings concentrated at
one end of cutting unit(s) or between two cutting units,
forming a line in the direction of travel.
NOTE: Arrow indicates direction of travel.
Probable Cause Remedy
Grass is too tall. Mow more often.
Mowing while grass is wet. Mow when grass is dry.
Grass built up on roller(s). Clean roller(s) and scraper(s).
Grass collecting on bedknife. Adjust reel-to-bedknife setting.
25
Page 26

5 QUALITY OF CUT
5.9 RIFLING OR TRAMLINING __________________________________________________
Rifling or tramlining is a pattern of varying cutting heights,
resulting in a wave-like cut appearance, usually due to
heavy contact points across a reel and/or bedknife.
NOTE: Arrow indicates direction of travel.
Probable Cause Remedy
Reel and/or bedknife unevenly worn. Inspect bedknife and reel. Sharpen or replace reel and
bedknife as necessary.
Missing, loose, or overtorqued bedknife screws. Install, replace or tighten bedknife screws to proper
torque setting.
Mowing (ground) speed is too fast. Reduce mowing (ground) speed.
5.10 MISMATCHED CUTTING UNITS ______________________________________________
Mismatched cutting units is a pattern of varying cutting
heights, resulting in a stepped cut appearance, usually
due to mismatched HOC (height-of-cut) adjustment from
one cutting unit to another.
NOTE: Arrow indicates direction of travel.
Probable Cause Remedy
HOC inconsistent from one cutting unit to another. Check/adjust HOC on cutting units.
Difference in mower ride height side to side. Check/adjust tire inflation pressure.
26
Page 27

6 NOTES
NOTES 6
27
Page 28

FÖRORD
Handboken innehåller säkerhets-, kontroll- och
driftsinstruktioner för Jacobsen-maskinen. Den bör
förvaras tillsammans med utrustningen för referens vid
användning.
Innan du börjar använda maskinen ska du och en eventuellt
anlitad operatör läsa båda handböckerna noga i deras
helhet. Om du följer anvisningarna för säkerhet, användning
och underhåll håller din gräsklippare längre och fungerar på
högsta effektivitet.
Om du behöver mer information, kontakta Jacobsenförsäljaren.
INNEHÅLL
0 INNEHÅLL
1 SÄKERHET
1.1 Säker användning ................................................ 3
1.2 Viktiga säkerhetsanmärkningar ........................... 4
2 DEKALER
2.1 Dekaler ................................................................ 5
3REGLAGE
3.1 Symbole ............................................................... 8
3.2 Reglage ............................................................. 10
3.3 Varningar ........................................................... 12
4 DRIFT
4.1 Daglig inspektion ............................................... 13
4.2 Säkerhetssystem ............................................... 13
4.3 Procedurer för drift ............................................. 14
4.4 Start ................................................................... 15
4.5 Stopp / Parkering ............................................... 15
4.6 Körning / Transport ............................................ 16
4.7 Körning i sluttninga ............................................ 16
4.8 Klippning ............................................................ 17
4.9 Bogsering / Transport på släp ............................ 17
4.10 Dagligt underhåll ................................................ 18
Märkplåten sitter på den högra bakre ramen. Jacobsen
rekommenderar att du antecknar numren nedan så att du
har dem lättillgängliga.
kg kg kg kW
P.O. BOX 7708,
®
CHARLOTTE,
NC 28241, USA
Jacobsen.com
1-800-848-1636 (US)
5 KLIPPKVALITET
5.1 Felsökning, klippkvalitet......................................19
5.2 Ojämn klippning..................................................19
5.3 Mindre ojämnhet i klippning................................20
5.4 Stegvis klippning.................................................21
5.5 Rivning................................................................22
5.6 Tuvor ..................................................................23
5.7 Strängar..............................................................24
5.8 Strängar av klippt gräs........................................25
5.9 Olika klipphöjd ....................................................26
5.10 Felaktigt anpassade klippaggregat.....................26
6 ANTECKNINGAR
2006/42/EC: Detta är översättningar av originaltexten
som har verifierats av ACMTRAD SL.
© Copyright 2008, Textron Inc. “Samtliga rättigheter förbehålles,
inklusive rätten att reproducera detta material eller delar av det i
någon form.”
2
Varning enligt förslag 65
Produkten innehåller eller avger kemikalier
som enligt myndigheterna i Kalifornien kan
orsaka cancer och fosterskador eller andra
fortplantningsskador.
Litografi i USA 10-2008
Page 29

SÄKERHET 1
!
1 SÄKERHET
1.1 SÄKER ANVÄNDNING ______________________________________________________
VARNING
OM UTRUSTNINGEN ANVÄNDS FELAKTIGT ELLER AV EJ UTBILDAD PERSONAL KAN DEN UTGÖRA EN FARA.
Gör dig förtrogen med var reglagen sitter och hur de används. En oerfaren operatör måste få utbildning av någon som
känner till utrustningen innan han eller hon använder maskinen.
1. Säkerheten är beroende av att den som använder eller
underhåller utrustningen är medveten, noga och
förståndig. Låt aldrig minderåriga använda någon
utrustning.
2. Du är ansvarig för att läsa denna handbok och alla
trycksaker som har att göra med utrustningen
(säkerhets- och operatörshandbok, motorhandbok,
handböcker om tillbehör och tillsatser). Om operatören
inte kan språket som handböckerna är skrivna på, är
det ägarens ansvar att förklara för honom eller henne
vad som står i dem.
3. Lär dig hur maskinen används på rätt sätt och var
reglagen och indikatorerna sitter och vad de är till för,
innan du börjar använda utrustningen. Om du arbetar
med utrustning du inte känner till kan det leda till en
olycka.
4. Låt aldrig någon använda eller underhålla maskinen
eller dess tillbehör utan rätt utbildning och anvisningar
eller om han eller hon är påverkad av droger.
5. Använd alltid nödvändiga skyddskläder och
skyddsutrustning för att skydda huvudet, ögonen,
öronen, händerna och fötterna. Använd bara maskinen
i dagsljus eller starkt elljus.
6. Bedöm terrängen för att avgöra vilka tillbehör och
tillsatser som krävs för att utföra ett ordentligt och
säkert arbete. Använd endast tillbehör och tillsatser
som har godkänts av Jacobsen.
7. Var uppmärksam på hål i terrängen och andra dolda
risker.
8. Inspektera området där utrustningen ska användas.
Plocka upp så mycket skräp du kan innan du börjar
använda utrustningen. Var medveten om hinder
ovanför dig (låga trädstammar, elkablar etc.) och också
under jorden (sprinklers, rör, trädrötter etc.). Kör ut
försiktigt på ett nytt område. Var uppmärksam på dolda
risker.
9. Rikta aldrig utkast mot personer i omgivningen och låt
ingen komma nära maskinen när den används.
Ägaren/operatören kan förhindra och är ansvarig för
skador som åsamkas dem själva, personer i
omgivningen och egendom.
10. Låt aldrig någon åka med på fordonet. Håll personer
och husdjur på säkerhet avstånd.
11. Använd aldrig utrustning som inte är i perfekt
fungerande skick eller som saknar ordentligt fastsatta
dekaler, skydd, sköldar, utkastdeflektorer eller andra
skyddsanordningar.
12. Koppla aldrig från eller tjuvkoppla någon förregling.
13. Ändra inte regulatorinställningarna och rusa inte
motorn.
14. Kolmonoxiden i avgaserna kan vara livsfarliga att
indandas. Använd aldrig motorn utan ordentlig
ventilation eller på instängt område.
15. Bränsle är ytterst brandfarligt, och ska hanteras med
försiktighet.
16. Håll motorn ren. Låt alltid motorn kallna innan den
ställs undan, och tag alltid ut tändningsnyckeln.
17. Lägg växellådan i neutralläget, tryck ned kopplingen
och lägg i parkeringsbromsen innan motorn startar.
Starta motorn först när du sitter i förarsätet, aldrig när
du står bredvid enheten.
18. Utrustningen måste uppfylla gällande statliga och
lokala bestämmelser när den körs eller fraktas på
allmän väg. Se upp för trafik när du korsar en väg eller
arbetar på eller nära en väg.
19. Det kan finnas lokala bestämmelser om operatörens
minimiålder.
20. Kör uppför och nerför en sluttning (vertikalt) inte
tvärsöver den (horisontalt).
21. Starta inte eller stanna plötsligt på en sluttning. Då kan
fordonet välta eller du kan förlora kontrollen över det.
Minska hastigheten när du svänger kraftigt. Var
försiktig när du byter riktning.
22. Använd alltid säkerhetsbältet när gräsklipparen har
vältskydd (ROPS).
Använd aldrig säkerhetsbälte när gräsklipparen saknar
vältskydd (ROPS).
Extra skyddsutrustning för förare är tillgänglig för all
utrustning som tillhandahålls för tillfället. Detta innebär
att alla maskiner som tidigare saknat vältskydd (ROPS)
kan utrustas med detta eller att skadad utrustning kan
ersättas.
23. Håll ben, armar och bålen inuti sittavdelningen medan
fordonet är i rörelse.
Denna maskin är avsedd att köras och underhållas som beskrivet i denna handbok och den är avsedd för
yrkesmässigt underhåll av gräsplaner. Den är inte avsedd för användning i bruten terräng eller i långt gräs.
3
Page 30

1 SÄKERHET
!
!
1.2 VIKTIGA SÄKERHETSANMÄRKNINGAR ______________________________________
Denna symbol används för att uppmärksamma dig på potentiella risker.
FARA - Indikerar en omedelbart förestående riskabel situation som om den inte undviks KOMMER ATT resultera i
dödsfall eller allvarlig skada.
VARNING - Indikerar en potentiellt farlig situation som om den inte undviks KAN resultera i dödsfall eller allvarlig
skada.
VAR FÖRSIKTIG - Indikerar en potentiellt farlig situation som om den inte undviks KAN resultera i mindre till
medelstora skador på person eller egendom. Kan även användas till att varna för osäkra arbetsmetoder.
OBS! - Betecknar en potentiellt farlig situation som, KAN resultera i skador på egendom om den inte undviks. Kan
även användas till att varna för osäkra arbetsmetoder.
För tydlighetens skull saknar vissa illustrationer skydd eller plattor som är öppna eller borttagna. Under inga
omständigheter ska denna utrustning användas utan dessa säkerhetsdetaljer väl fastsatta på sina platser.
VARNING
Säkerhetssystemet på denna traktor hindrar den från att starta, annat än om bromspedalen
är nedtryckt, klipparen avslagen och dragkraftspedalen i friläge. Systemet stänger av motorn
om föraren lämnar sätet utan att dra åt parkeringsbromsen eller stänger av klipparen.
Kör ALDRIG traktorn om säkerhetssystemet inte fungerar korrekt.
VARNING
1. Innan förarsätet lämnas, oavsett orsak:
a. För dragkraftspedalen till friläge.
b. Koppla ur alla drivningar.
c. Sänk ned alla redskap på marken.
d. Dra åt parkeringsbromsen.
e. Stäng av motorn och dra ur tändningsnyckeln.
2. Håll undan händer, fötter och kläder från rörliga delar. Vänta på att alla rörelser ska
stanna innan du rengör, justerar eller underhåller maskinen.
3. Håll arbetsområdet fritt från åskådare och husdjur.
4. Transportera aldrig passagerare såvida det inte finns ett säte monterat för dessa.
5. Använd aldrig klipputrustning utan att avläggningsavböjaren sitter säkert på sin plats.
Genom att följa alla instruktioner i denna handbok kommer du att förlänga maskinens livslängd och upprätthålla
maximal effektivitet. Justering och underhåll ska alltid utföras av en kvalificerad tekniker.
Om mer information eller service behövs, kontakta din auktoriserade återförsäljare för Jacobsen, som alltid är
informerad om de senaste metoderna att underhålla denna utrustning och som kan ge snabb och effektiv service.
Användningen av andra än original, eller av Jacobsen reservdelar och tillbehör kommer att ogiltigförklara
garantin.
4
Page 31

DEKALER 2
4181865
4181864
• Läs användarhandboken. Låt inte outbildad
personal använda denna maskin.
• Håll skydden på plats och alla delar fastskruvade.
• Innan du rengör, justerar eller reparerar
utrustningen, koppla från alla drivningar, dra åt
parkeringsbromsen och stäng av motorn.
• Håll undan händer, fötter och kläder från rörliga
delar.
• Transportera aldrig passagerare.
• Håll åskådare på avstånd.
• Arbeta inte på sluttningar brantare än 20°.
FARA
Undvik skador vid arbete med batterier:
1. Anslut alltid den svarta jordkabeln (-) sist och ta alltid
bort den först.
2. Se till att det är ett betryggande avstånd till gnistor och
flammor, undvik kontakt med batterisyran.
Undvik skador vid användning av hjälpbatteri:
1. Anslut pluspol (+) till pluspol (+).
6. Anslut minuspolen (-) på det laddade batteriet till
ramen på det fordon som har ett urladdat batteri.
2 DEKALER
2.1 DEKALER ________________________________________________________________
Lär dig dekalerna och var de betyder, de är viktiga för säker användning av maskinen.
ERSÄTT OMEDELBART SKADADE DEKALER.
5
Page 32

2 DEKALER
4181862
4182520
VARNING
Kylaren innehåller övertryck. öppna
locket sakta för att undvika
skållning.
VIKTIGT
ANVÄND INGA STARTVÄTSKOR
Om startvätskor kommer in i luftinsugssystemet kan
explosionsrisk uppstå och motorn kan börja rusa. Detta kan
orsaka allvarliga motorskador.
VARNING
Läs alltid gräsklipparens handböcker innan
du använder utrustningen eller utför något
underhåll.
FARA
Undvik personskador. Koppla därför alltid ur
alla drivsystem, dra åt parkeringsbromsen,
stäng av motorn och ta ur nyckeln innan du
utför något arbete på maskinen eller tömmer
gräsuppsamlarna.
Lär dig dekalerna och var de betyder, de är viktiga för säker användning av maskinen.
ERSÄTT OMEDELBART SKADADE DEKALER.
4181861
4181860
6
Page 33

DEKALER 2
105
dB
L
WA
3008004
4181863
VARNING
Förhindra skärsår genom att
använda en hylsnyckel eller
Turf Groomer
®
knopp för att
snurra på klippcylindern.
Gaspedal
Bakåt Framåt
Aktiverad
Parkeringsbroms
Urkopplad
Ljudstyrka
.
3008521
7
Page 34

3 REGLAGE
Kylvätskans
temperatur
D
Läs
handboken
Trottel
Hög Låg
Timmätare
Dragkraftspedal
Framåt Bakåt
Bränsle
Diesel
Klippcylinder
Framåt Av Bakåt
(
klipp)(honing)
Signalhorn
Motor
Från Kör
Glödstift Start
Motor olja
tryck
Parkeringsbroms
På Av
ArbetsbelysningKlippcylindrar
Sänk Höj
Filter hydr.
olja
!
3 REGLAGE
3.1 SYMBOLE________________________________________________________________
VARNING
Försök inte att köra traktorn förrän du läst handbok för säkerhet och drift till hur du ska
manövrera alla reglage korrekt.
Lär dig vad ikonerna ovan betyder. Lär dig placeringen av och syftet med reglage och
mätare innan du kör denna traktor.
8
Page 35

REGLAGE 3
10
12
14
16
A Spak för justering av rattens
lutning
B1 Lås för parkeringsbroms
B2 Frigöring av parkeringsbroms
C Parkeringsbroms
D Stopp för klipphastighet
E Dragkraftspedal - Framåt
F Dragkraftspedal - Bakåt
G Sitsjustering
H Lock för hydraulolja
I Nivålampa för hydraulolja
J Tanklock
K Bränslenivåvisare
L Omkopplare för honing
M Timmätare
N Kylvätsketemperaturmätare
O Voltmätare
P Motorns oljetryckslampa
Q Signalhorn
R Omkopplare för 2- och 4-hjulsdrift
S Joystick för höjning / sänkning
T Rullomkopplare
U Omkopplare för strålkastare
V Tändningslås
W Trottel
X Parkeringsbromslampa
Y Säkringsblock
Z Signalknapp
A
B
1
C
D
E
F
G
H
J
K
L
M
N
O
P
Q
R
S
T
U
V
W
X
Y
B
2
I
Z
9
Page 36

3 REGLAGE
!
Transporthastighet Klipphastighet
D
1
D
2
D
3
E
F
3.2 REGLAGE________________________________________________________________
A. Spak för justering av rattens lutning
Dra upp spaken för att lossa rattstången. Luta
rattstången till önskat läge. Släpp spaken för att låsa
rattstången på plats.
VAR FÖRSIKTIG
Justera aldrig ratten under körning. Stoppa traktorn och
dra åt parkeringsbromsen först.
B. Lås / Frigöring av parkeringsbroms
Lås parkeringsbromsen genom att hålla bromspedalen
(C) nedtryckt och tryck på låset (B
greppar. Frigör genom att trycka på frigöringen (B
pedalen.
C. Parkeringsbroms
Dra åt parkeringsbromsen genom att trycka ned
pedalen.
D. Stopp för klipphastighet
Begränsar hastigheten framåt vid klippning. För körning
med lägre hastighet vid klippning, vrid spaken så att den
kommer i kontakt med stoppskruven (D
dragkraftspedalen är nedtryckt för framåt. För körning
med full fart ska spaken ställas till visat läge (D
Stoppskruven (D
klipphastighet, se Underhållshandbok och
reservdelslista.
) kan justeras till specifik
2
) till dess att det
1
) på golvet när
1
) för
2
G. Sitsjustering
Dra ut vänster spak för att flytta sitsen framåt eller
bakåt. Justera sitsens fjädring genom att vrida på
knoppen framför sitsen.
H. Lock för hydraulolja
Fyll på till det gröna märke med ren hydraulolja när
maskinen är kall. Fyll inte på för mycket.
I. Nivålampa för hydraulolja
Uppmärksammar operatören på att
hydrauloljenivån är låg. Denna lampa är
hopkopplad med larmet. Se avsnitt 3.3.
J. Tanklock
Använd rent och nytt dieselbränsle nr 2 med låg eller
ultralåg svavelhalt. Lägsta Cetantal 45
avsnitt 4.10.
K. Bränslenivåvisare
Indikerar aktuell bränslenivå i tanken. Kontrollera
dagligen innan maskinen startas. Fyll endast till det
gröna området på visaren, fyll inte på ända upp. Låt inte
maskinen köras till dess att bränslet tar slut.
L. Omkopplare för honing
Omkopplaren för honing låter klippcylindrarna rotera
).
3
baklänges för honing.
Framåt - Normalläget (för klippning),
omkopplaren måste vara ställd till FRAMÅT
(klippning).
Bakåt - Vid honing måste klippcylindern rotera
baklänges. Ställ omkopplaren till BAKÅT.
, se
E. Dragkraftspedal (Framåt)
Tryck på pedalens främre del för körning framåt. Släpp
upp pedalen för att bromsa och stoppa traktorn. Tryck
inte ned dragkraftspedalen när parkeringsbromsen är
åtdragen och parkeringsbromslampan (X) är tänd.
F. Dragkraftspedal (Bakåt)
Tryck på pedalens bakre del för körning bakåt. Släpp
upp pedalen för att bromsa och stoppa traktorn. Låt
traktorn stanna helt före byte av körriktning. Tryck inte
ned dragkraftspedalen när parkeringsbromsen är
åtdragen och P-bromslampan (X) är tänd.
10
Vid honing måste parkeringsbromsen vara åtdragen
och både omkopplaren för klippning (T) och
omkopplaren för honing (L) vara ställda för körning
bakåt, se Underhållshandbok och reservdelslista.
M. Timräknare
Noterar antalet timmar som motorn är igång. Använd
timräknaren för schemaläggning av det periodiska
underhållet.
Figur 3A
N. Kylvätsketemperaturmätare
Indikerar temperaturen på motorns kylvätska. Normal
arbetstemperatur ska vara mellan 71 och 110°C. Om
temperaturen stiger över 110°C avges larm, se
avsnitt 3.3.
O. Voltmätare
Indikerar batteriets skick. Vid normal drift ska mätaren
aldrig vara i det röda området.
Page 37

REGLAGE 3
P. Motorns oljetryckslampa
Denna indikator tänds om motorns oljetryck sjunker
under 48 kPa. Stäng omedelbart av motorn, fastställ
orsaken och åtgärda problemet innan driften
återupptas.
Q. Signalhorn
Larmet går för att göra föraren medveten om
förhållanden som kräver omedelbara åtgärder. Se
avsnitt 3.3.
R. Omkopplare för 2- och 4-hjulsdrift
Ställer in traktorn för 2- eller 4-hjulsdrift.
S. Joystick för höjning / sänkning
Joysticken lyfter och sänker klippaggregaten. Tryck
framåt för att sänka eller dra bakåt för att höja
klippaggregaten.
T. Rullomkopplare
Rullomkopplaren är en 3-läges vippbrytare med låsflik
för neutralläget. Den ställer klippaggregatens
rotationsriktning till framåt eller bakåt. Ställ
omkopplaren till OFF (AV) (centrala friläget) vid start av
traktorn.
Framåt - För klippning, tryck ned brytaren till
läget FRAMÅT (klipp). Med brytaren i detta läge
startar klippaggregaten automatiskt när de är
nedsänkta och stannar när de lyfts upp. Återställ
brytaren till det centrala läget för att deaktivera
klippaggregaten.
Bakåt - Klippaggregaten kan backas för honing
av bladen, körande vertikala klippare,
avlägsnande av gräsansamlingar i
klippaggregaten eller för att lösgöra föremål som
trasslat in sig i och stoppat klippaggregaten. Kasta om
bladens rotationsriktning genom att trycka ned brytaren
till läget BAKÅT.
Y. Säkringsblock
Används för att skydda kretsar i elektriska system. Se
Underhållshandbok och reservdelslista.
Z. Signalknapp
Denna kontakt används för att testa larmsystem eller
deaktivera larmet efter det att låg oljenivå upptäckts.
Håll i läget ON (PÅ) när traktorn startas och används.
Testa larmet genom att ställa kontakten till OFF (AV)
och vrida tändningsnyckeln till KÖR. Se avsnitt 3.3.
Vid backrotation måste parkeringsbromsen vara
åtdragen, dragkraftspedalen vara i friläge och både
rullomkopplare (T) och backrotationskontakt (L) måste
vara ställda till BAKÅT. Se Underhållshandbok och
reservdelslista.
U. Omkopplare för strålkastare
Tänder och släcker arbetsbelysningen.
V. Tändningslås
Tändningslåset har fyra lägen. OFF (AV) - RUN (KÖR) GLOW PLUG (GLÖDSTIFT) - START. Se avsnitt 4.4.
W. Trottel
Styr motorns hastighet. Kör maskinen på full trottel
under normala driftsförhållanden.
X. Parkeringsbromslampa
Indikerar att parkeringsbromsen är åtdragen.
Parkeringsbromsen måste läggas ur innan
dragkraftspedalen trampas ned.
11
Page 38

3 REGLAGE
3.3 VARNINGAR______________________________________________________________
Den elektroniska styrenheten övervakar vitala system i
maskinen. Den använder ett ljudlarm och varningslampor för
att uppmärksamma föraren på förhållanden som måste
korrigeras omedelbart. När en larmsituation uppstår ska de
generella riktlinjerna i tabellen nedan följas liksom specifika
instruktioner från arbetsledningen.
Larm Åtgärd
1. Motorns oljetryck - larmsignal
avges och varningslampan för
oljetryck tänds. Lågt oljetryck i
motorn.
2. Kylvätskans temperatur -
larmsignal avges. För hög
temperatur på kylvätskan.
Stoppa traktorn omedelbart och sänk ned redskapen, stäng av motorn.
Inspektera motorns oljenivå. Om varningslampan tänds fast oljenivån är korrekt,
lämna motorn avstängd och transportera traktorn tillbaka till serviceområdet. Kör
ALDRIG traktorn med oljetryckslampan tänd eftersom detta kan orsaka allvarliga
motorskador.
Stoppa traktorn omedelbart och sänk ned redskapen, stäng av motorn.
Avlägsna skräp som löv och klippt gräs som kan begränsa luftflödet genom
huvens bakre galler och området mellan kylaren och oljekylaren. Om motorn
fortsätter att gå varm, transportera traktorn tillbaka till serviceområdet.
VAR FÖRSIKTIG: Kylvätskan är under tryck. Stäng av motorn och låt den
svalna innan kylvätskenivån kontrolleras och kylvätska fylls på.
Testa larmsystemet:
Vrid tändningsnyckeln till RUN (KÖR), alla varningslampor
tänds i en sekund eller längre och larmsignalen hörs ett
ögonblick.
Detta system övervakar:
1. Motorns oljetryck.
2. Kylvätskans temperatur.
3. Nivån för hydrauloljan.
3. Nivån för hydraulolja -
larmsignal avges och varningslampan tänds. Nivån för
hydrauloljan är under den
rekommenderade.
Stoppa traktorn omedelbart och sänk ned redskapen, stäng av motorn.
Inspektera traktorn, leta efter tydliga tecken på oljeläckage kring anslutningar,
slangar och hydrauliska komponenter. Transportera traktorn tillbaka till
serviceområdet.
VAR FÖRSIKTIG: Hydrauloljan är under tryck. Stäng av motorn och låt
oljan svalna innan nivån kontrolleras och eventuell påfyllning görs i tanken
för hydraulolja.
12
Page 39

DRIFT 4
!
!
4 DRIFT
4.1 DAGLIG INSPEKTION ______________________________________________________
2. Kontrollera bränsleförsörjningen, kylarvätskans nivå,
VAR FÖRSIKTIG
Den dagliga inspektionen ska endast utföras när motorn
är avstängd och alla vätskor är kalla. Sänk ned klipparna
på marken, dra åt parkeringsbromsen, stoppa motorn
och ta ut tändningsnyckeln.
1. Utför en visuell inspektion av hela enheten, leta efter
tecken på slitage, lösa delar och saknade eller skadade
komponenter. Kontrollera att det inte läcker olja eller
bränsle och att anslutningar är säker åtdragna samt att
slangar och rör är i bra skick.
4.2 SÄKERHETSSYSTEM ______________________________________________________
vehusets olja och luftrenarindikator. Alla vätskor ska
vara vid fullnivåmärket med kall motor.
3. Kontrollera att alla klippare är injusterade till samma
klipphöjd.
4. Kontrollera att däcken har korrekt lufttryck.
5. Kontrollera förarens säkerhetssystem.
Obs: Mer detaljerad underhållsinformation, justeringar
och underhåll/smörjscheman återfinns i
Underhållshandbok och reservdelslista.
1. Förarens säkerhetssystem förhindrar att motorn startar,
såvida inte parkeringsbromsen dras åt, dragkraftspedalen är i friläge och rullbrytaren är OFF (AV).
Systemet stänger även av motorn om föraren lämnar
sätet med rullbrytaren ON (PÅ), klipp- eller lyftpedalen
inte i NEUTRAL (FRILÄGE) eller parkeringsbromsen
DISENGAGED (UPPSLÄPPT).
VARNING
Använd aldrig utrustningen om förarens säkerhetssystem
är urkopplat eller defekt. Ingen brytare får kopplas bort
eller förbikopplas.
2. Utför följande tester för att kontrollera att säkerhetssystemet fungerar korrekt. Avbryt testen och inspektera
och reparera systemet om något av testen nedan inte
lyckas:
l motorn inte startar i test 1;
l motorn startar under testerna 2,3 eller 4;
l motorn fortsätter att gå under testerna 5 eller 6.
Kontroll av säkerhetssystemet
3. Se schemat nedan för varje test och följ bockmarkeringarna (4) tvärs över. Stäng av motorn efter varje
test.
Test 1: Representerar den normala startproceduren.
Föraren i sätet, parkeringsbromsen åtdragen, förarens
fötter inte på pedalerna och rullbrytaren är OFF (AV).
Motorn ska stanna.
Test 2: Motorn får inte starta om rullbrytaren är ON
(PÅ).
Test 3: Motorn får inte starta om parkeringsbromsen är
DISENGAGED (UPPSLÄPPT).
Test 4: Motorn får inte starta om dragkraftspedalen är
nedtryckt.
Test 5: Starta motorn på normalt sätt, ON (PÅ)
rullbrytaren och ställ dig upp. Motorn ska stanna.H
Test 6: Starta motorn på normalt sätt, lossa
parkeringsbromsen och ställ dig upp. Motorn ska
stanna. H
Test
1 44 4 44
2 44 4 4 4
3 444 44
4 44 4 44
5 4
6 4
Sittande förare Parkeringsbroms
Ja Nej På Av Ja Nej På Av Ja Nej
H
H
44 4
44 4
Lyft din vikt från sätet. Motorn kommer att stanna.
H
Dragkraftspedal i friläge
Rullbrytare Motorn startar
H
H
13
Page 40

4 DRIFT
!
!
!
!
4.3 PROCEDURER FÖR DRIFT__________________________________________________
VARNING
Gräsklipparen är utrustad med vältskydd (ROPS). Om gräsklipparen är utrustad med vältskydd måste
säkerhetsbältet alltid bäras. Kontrollera att säkerhetsbältet är ordentligt åtdraget. Säkerhetsbältet får INTE
användas på gräsklippare som saknar vältskydd.
Håll i ratten om gräsklipparen tippar. Försök inte hoppa ut eller lämna förarsätet.
VAR FÖRSIKTIG
Hjälp till att undvika personskador genom att alltid bära ögonskydd, arbetsstor eller stövlar av läder, hjälm och
hörselskydd.
1. Under inga omständigheter ska motorn startas utan att
föraren sitter på sin plats.
2. Arbeta inte med traktor eller redskap om det
förekommer lösa, skadade eller saknade komponenter.
Närhelst möjligt ska gräset klippas när det är torrt.
3. Klipp först i ett provområde så att du lär dig behärska
taktorn och manöverspakarna.
Kör aldrig rullarna annat än om de klipper gräs
eftersom värme då alstras mellan den fasta kniven och
rullen vilket skadar klippeggen.
4. Studera arbetsområdet för att avgöra den bästa och
säkraste arbetsmetoden. Ta hänsyn till gräsets höjd,
terrängtypen och ytans skick. Varje variabel kräver
vissa justeringar eller förebyggande åtgärder.
5. Rikta aldrig materialavläggningen mot åskådare, låt
inte någon komma nära maskinen medan den körs.
Ägaren/föraren är ansvarig för skador på åskådare
och/eller deras egendom
.
VAR FÖRSIKTIG
Innan klippning ska lösa föremål som stenar, skräp,
leksaker och vajrar som kan kastas ut av maskinen
plockas undan. Var försiktigt vid körning in i ett nytt
område. Kör alltid med en hastighet som låter dig har
fullständig kontroll över traktorn.
8. Koppla ur drivmotorerna och lyft rullarna när du
korsar stigar eller vägar. Se upp för trafiken.
9. Stoppa och inspektera utrustningen omedelbart om du
slår mot ett hinder eller om maskinen börjar avge
onormala vibrationer. Reparera utrustningen innan
arbetet återupptas.
VARNING
Innan du rengör, justerar eller reparerar denna
utrustning, koppla ur alla drivningar, sänk ned redskapen
på marken, dra åt parkeringsbromsen, stoppa motorn
och ta ut tändningsnyckeln för att förhindra skador.
10. Sakta ned och var extra försiktig på sluttningar. Läs
avsnitt 4.7. Använd försiktighet vid arbete nära branta
sluttningar.
11. Titta bakåt och nedåt innan du backar så att du är
säker på att vägen är fri. Var försiktig när du närmar
dig blinda hörn, buskar, träd eller andra objekt som kan
skymma sikten.
12. Använd aldrig händerna till rengöring av skärande
enheter. Använd en borte till att avlägsna gräs från
bladen. Bladen är extremt vassa och kan orsaka
allvarliga skador.
6.
Använd omdöme vid klippning nära grusytor (vägar,
parkeringsplatser, vagnsspår etc.). Stenar som slungas
av redskapet kan orsaka allvarliga skador på åskådare
och/eller skada utrustningen.
7. Ställ alltid rullkontakten till AV för att stoppa bladen
när du inte klipper.
14
Page 41

DRIFT 4
V
T
W
P
X
4.4 START___________________________________________________________________
VIKTIGT: Använd inte starthjälpande vätskor.
Användningen av sådana vätskor i luftintaget kan vara
potentiellt explosivt eller orsaka en skenande motor, vilket
kan resultera i allvarliga motorskador.
1. Säkerställ att bränslets avstängningsventil är helt öppen
och att bogseringsventilen (se avsnitt 4.9) är stängd.
2. Sitt i förarsätet, se till att rullomkopplaren (T) är OFF
(AV), att P-bromsen (C) är åtdragen och att
dragkraftspedalen (E & F) är i friläge (neutral).
3. För trottelspaken (W) till mellan 1/8 & 1/2 trottel. Vrid
tändningsnyckeln (V) till RUN (KÖR). P-bromslampan
(X) och motorns oljetryckslampa (P) ska vara tända.
4. Vrid tändningsnyckeln till GLOW PLUG (GLÖDSTIFT)
under cirka 3 till 5 sekunder och vrid sedan nyckeln till
läget START. Släpp nyckeln så snart som motorn
startar. Ju lägre temperatur dess längre tid krävs för att
glödga stiften. Håll inte nyckeln i läget GLOW PLUG
(GLÖDSTIFT) längre än max fem sekunder eller i läget
START under mer än 15 sekunder. Det är inte nödvändigt att glödga stiften vid start av en varm motor. När
motorn startar ska oljetryckslampan (P) släckas.
10
12
14
16
5. Låt motorn bli varmkörd och korrekt smord innan den
körs med högre varvtal.
4.5 STOPP / PARKERING ______________________________________________________
Stoppa:
OBS!
Lyft foten från drivkraftspedalen. Traktorn bromsar
automatiskt när drivkraftspedalen återgår till friläge.
Parkering under normala förhållanden:
1. Deaktivera rullomkopplaren, lyft redskapen och kör bort
från arbetsområdet.
2. Välj en plan och slät yta att parkera på.
a. Släpp upp dragkraftspedalen för att stoppa traktorn.
b. Koppla ur alla drivningar, sänk ned redskapen på
marken, låt motorn arbeta på tomgång i en minut.
Permanent skada kan uppstå på turbon om motorn
stängs av utan att turbon svalnat.
Förhindra maskinskada genom att låta motorn gå utan
belastning på halv trottel i 3 - 5 minuter innan den stängs
av.
3. Dra åt parkeringsbromsen, stoppa motorn och ta, som
alltid, ut tändningsnyckeln.
Om ett nödläge uppstår och traktorn måste parkeras i
arbetsområdet, följ då gällande riktlinjer. Om den parkeras i
en sluttning ska hjulen klossas.
Figur 4A
15
Page 42

4 DRIFT
!
!
!
4.6 KÖRNING / TRANSPORT ___________________________________________________
Läs och följ alla säkerhetsmeddelanden i denna handbok
vid körning eller transport av denna traktor. Se avsnitt 4.3
för allmänna driftsanvisningar. Vid backning, titta bakåt för
att säkerställa att du har fri väg.
VIKTIGT: Om denna traktor körs på allmän väg måste den
vara utrustad som föreskrivet i lagen. Kontakta
myndigheterna för besked om regler och krav på utrustning.
1. Koppla ur alla drivningar och lyft redskapen till
transportläge vid körning till och från arbetsområden.
2. Lägg ur parkeringsbromsen och för trottelspaken till
SNABB. Tryck sakta ned dragkraftspedalen.
VAR FÖRSIKTIG
Förhindra vältning eller förlust av kontroll genom att
sakta ned i svängar.
4.7 KÖRNING I SLUTTNINGA ___________________________________________________
1. Klipp alltid med motorn på full gas men reducera
VARNING
För att minimera risken för vältning är den säkraste
metoden att köra i sluttningar att köra rakt upp och ned
(vertikalt), inte tvärs över (horisontalt). Undvik onödiga
svängar, kör med reducerad hastighet och var
uppmärksam på dolda risker och branter.
VAR FÖRSIKTIG
Kör inte denna traktor i sluttningar brantare än 20°.
Traktorn är designad för god dragkraft och stabilitet under
normala klippningsförhållanden, men använd försiktighet vid
arbete på sluttningar, speciellt i bruten terräng eller om
gräset är blött. Blött gräs minskar grepp och styrförmåga.
hastigheten framåt för att upprätthålla korrekt klippfrekvens.
2. Om traktorn tenderar att glida eller däcken börjar
lämna spår i gräsmattan ska den vinklas till en mindre
brant vinkel till dess att greppet återkommer eller
däcksmärkena upphör.
3. Om traktorn fortsätter att glida eller lämna märken är
sluttningen för brant för säkert arbete. Gör inget nytt
försök utan backa istället sakta ned.
4. Vid körning nedför en brant sluttning ska alltid
redskapen sänkas för att minska risken för att traktorn
ska välta.
Korrekt lufttryck i däcken är nödvändigt för maximalt grepp.
Fram och bak - 69-83 kPa.
16
Page 43

DRIFT 4
!
A
4.8 KLIPPNING _______________________________________________________________
VARNING
Förhindra allvarliga skador genom att hålla händer, fötter
och klädsel på betryggande avstånd från klipparna när
cylindrarna roterar.
Använd ALDRIG händerna till att rengöra klipparna.
Använd en borste för att avlägsna gräs från bladen.
Bladen är extremt vassa och kan orsaka allvarliga
skador.
Vid borttagande av hinder från klippaggregat ska du alltid
slå från rullkontakten, lägga an parkeringsbromsen, slå
av motorn och ta ut tändningsnyckeln ur låset innan du
tar bort hindret.
Klippning:
1. Starta motorn och sänk ned klippaggregaten på
marken.
2. Ställ rullomkopplaren till ON (PÅ) och lägg ur
P-bromsen.
Förhindra skador på klippcylindrar och fasta knivar
genom att aldrig köra klipparna annat än för klippning av
gräs.
3. För trottelspaken till SNABB och trampa sedan sakte
ned dragkraftspedalen till önskad klipphastighet.
a. För helt jämn klippning ska klippstråkens kanter
överlappa ett par decimeter.
b. Stanna och lyft klippaggregaten till transportläget
vid korsning av stigar eller vägar. Var uppmärksam
på medtrafikanterna.
4. Vid demontering eller installering av gräsuppsamlare
ska klippaggregaten sänkas ned på marken, dra åt Pbromsen och stäng av motorn. Luta gräsuppsamlarens kropp så att framkanten går fri från klipparramen
och dra sedan gräsuppsamlaren på eller av sin ram.
OBS!
4.9 BOGSERING / TRANSPORT PÅ SLÄP_________________________________________
Om traktorn får problem och måste stängas av och
transporteras bort från området ska den helst ställas på ett
släp för transport. Om sådant inte finns tillgängligt kan
maskinen bogseras sakta under en kortare sträcka.
Var försiktig vid lastning och lossning av traktorn. Spänn fast
traktorn på släpet så att den inte rullar eller skifta plats under
transporten.
Innan bogsering måste bogserventilen öppnas. Denna ventil
låter traktorn flyttas utan att motorn startas och förhindrar
möjliga skador på hydrauliska komponenter.
Bogseringsventilen (A) är placerad å bottendelen av
drivpumpen, under traktorn. Öppna ventilen genom att lossa
på låsmuttern på ventilskaftet och vrida ventilen motsols.
Innan bogseringen, se till att klipparna är lyfta. Om de inte
kan lyftas ska de avlägsnas från traktorn.
Stäng ventilen helt och sätt tillbaka ventilhuven efter
bogseringen.
OBS!
Överskrid inte 3,2 km/t under bogsering. Längre
bogseringsdistanser rekommenderas inte.
Långdistanstransport. Om traktorn ska transporteras på
släp på allmän väg, innan den säkras på lastflaket ska
däckens lufttryck höjas till:
Fram - 124 kPa
Bak - 165 kPa
Efter avlastningen ska däckens lufttryck sänkas till normalt
arbetstryck. Se avsnitt 4.7.
Figur 4B
17
Page 44

4 DRIFT
!
!
4.10 DAGLIGT UNDERHÅLL_____________________________________________________
VIKTIGT: Mer detaljerad information om underhåll,
justeringar och scheman för underhåll/smörjning finns i
Underhållshandbok reservdelslista.
1. Parkera traktorn på en slät, vågrät yta. Sänk ned redskapen på marken, dra åt parkeringsbromsen, stäng av
motorn och dra ut tändningsnyckeln.
2. Fetta och smörj alla punkter vid behov. Förhindra
brand genom att tvätta traktorn efter varje användning.
a. Använd endast färskt sötvatten för rengöring av
utrustningen.
OBS!
Bruk av saltvatten eller spillvatten är känt för att
uppmuntra rost och korrosion av metalldelar, ledande till
förtida utslitning eller haverier. Skador av denna natur
täcks inte av fabrikens garanti.
b. Använd inte högtryckstvätt.
c. Spruta inte vatten direkt på instrumentpanelen eller
några elektriska delar.
d. Spruta inte vatten i kylluftsintaget eller motorns
luftintag.
Hantera bränsle med försiktighet - det är mycket
lättantändligt. Använd en godkänd dunk vars mynning
måste passa in i bränslepåfyllningsröret. Undvik om möjligt
dunkar med trattar för hantering av bränsle.
VARNING
Avlägsna aldrig locket från bränsletanken och fyll aldrig
på bränsle medan motorn går eller är het.
Rök inte under hantering av bränsle. En tank får aldrig
dräneras eller fyllas på inomhus.
Spill inte bränsle. Om spill skulle uppstå, sanera det
omedelbart.
Bränslebehållare får aldrig hanteras eller förvaras nära
öppen eld eller anordningar som kan orsaka gnistor som
kan antända bränsle eller bränsleångor.
Säkerställ att tanklocket är på plats och väl åtdraget.
• Förvara bränsle i enlighet med gällande lagar och regler
samt rekommendationer från leverantören.
• Överfyll aldrig en tank och kör aldrig heller tanken tom.
OBS!
Tvätta inte en motor som är het eller går. Använd
tryckluft för rengöring av traktor, motor och kylflänsar för
att reducera riskan för korrosion och fuktkontaminering.
BRÄNSLE
Fyll traktorns bränsletank efter varje arbetsdag till
nivåvisarens märke för "Full".
Använd rent och nytt dieselbränsle nr 2 med låg eller
ultralåg svavelhalt. Lägsta Cetantal 45
.
HYDRAULSLANG, OLJA OCH FILTER
VARNING
För att förhindra allvarliga skador från het olja under högt
tryck ska aldrig bara händer användas för att leta efter
oljeläckor. Använd papp eller kartong.
Hydraulolja under tryck kan ha tillräcklig kraft att tränga
genom huden. Om oljan sprutas in i huden måste den
avlägsnas kirurgiskt inom ett par timmar av en läkare
som känner till denna typ av skador, i annat fall kan
kallbrand uppstå.
1. Inspektera hydraulslangar och rör dagligen. Leta
efter våta slangar och oljefläckar. Byt slitna eller
skadade komponenter innan maskinen körs igen.
2. Kontrollera motoroljan och hydrauloljan i början av
varje arbetsdag innan motorn startas. Om oljenivån är
låg, ta av oljelocket och fyll på efter behov. Fyll inte på
för mycket.
18
Page 45

KLIPPKVALITET 5
TN0159
5 KLIPPKVALITET
5.1 FELSÖKNING, KLIPPKVALITET ______________________________________________
Vi rekommenderar att ett ”klipptest” genomförs så att
gräsklipparens prestanda kan fastställas innan klipparen
repareras.
Ett ”klipptestområde” bör förberedas för detta syfte. Detta
område bör ha den typ av gräs som medger att en
korrekt utvärdering av gräsklipparens prestanda kan
göras.
Ett annat ”klipptest” av gräsklipparens prestanda bör
genomföras efter reparationen och/eller justeringen.
1. Klipphastighet.
2. Knivcylindrarnas lager och förbelastningsjustering
(ändspel).
3. Skärpa i knivcylinder och motstål.
4. Motstålens anpassning till knivcylindern.
5. Kontakt mellan knivcylinder och motstål.
6. Klipphöjd.
7. Rulle och rullagrets skick.
Kontrollera följande delar före ”klipptestet” så att
klipparens verkliga prestanda kan testas.
5.2 OJÄMN KLIPPNING ________________________________________________________
Ojämn klippning ger ett cirkelformat mönster av olika
klipphöjder och ett vågformat utseende. I de flesta fall
ligger avståndet mellan vågspetsarna på mellan
15 - 20 cm. Även färgskillnader (ljusa-mörka) kan
förekomma.
Detta orsakas ofta av rörelser i klippaggregatet. Detta
uppstår i regel på gräsklippare med flera klippaggregat,
men även andra orsaker kan ge detta resultat.
Ojämn klipphöjd kan även bero på ojämnheter i gräset.
Obs: Pil anger färdriktning.
Trolig orsak Lösning
För hög klipphastighet. Sänk klipphastigheten.
Gräsbildning på rullen. Rengör rullen och använd skrapor eller borstar.
Ej rund rulle. Byt rulle.
Klippning i samma riktning. Byt klippriktning med jämna mellanrum.
Bruk av utjämnare vid efterklippning. Utjämnare bör endast användas i rät linje.
19
Page 46

5 KLIPPKVALITET
TN0220
5.3 MINDRE OJÄMNHET I KLIPPNING ___________________________________________
Även här ger ojämn klippning ger ett cirkelformat mönster
av olika klipphöjder och ett vågformat utseende. I de
flesta fall är avståndet mellan vågspetsarna 5 cm eller
mindre.
Obs: Pil anger färdriktning.
Trolig orsak Lösning
För hög klipphastighet. Sänk klipphastigheten.
För låg inställning av klipphöjd för aktuellt underlag. Kontrollera/anpassa klipphöjden till underlaget.
Sliten knivcylinderdiameter. Kontrollera knivcylinderdiameter och byt vid behov.
20
Page 47

KLIPPKVALITET 5
TN0221
5.4 STEGVIS KLIPPNING_______________________________________________________
Stegvis klippning uppstår när gräset klipps i olika höjd på
olika sidor om knivcylindern eller klippaggregatet. Detta
orsakas ofta av mekaniskt slitage, felaktig rulle eller
justering av klipphöjd.
Obs: Pil anger färdriktning.
Trolig orsak Lösning
Olika inställning av klipphöjd på knivcylinderns eller
klippaggregatets sidor.
Slitna rullager i fram. Kontrollera/byt ut rullager i fram.
Kontakt mellan knivcylinder och knivstål olika på
klippaggregatets eller knicylinderns sidor.
Knivcylinderns rörelser hämmas. Kontrollera/avlägsna hinder för knivcylinderns rörelser.
Variationer i gräsets täthet. Byt klippriktning.
Ojämn viktfördelning av maskinen. Kontrollera/justera däcktrycket.
Kontrollera klippaggregatets höjdinställning.
Kontrollera kontakten mellan knivcylinder och motstål.
21
Page 48

5 KLIPPKVALITET
TN0222
5.5 RIVNING _________________________________________________________________
Rivning uppstår när gräset klipps märkbart kortare än
omgivande områden och en ljusgrön eller brun yta bildas.
Detta orsakas ofta av en alltför låg inställning av
klipphöjden och/eller ett ojämnt underlag.
Obs: Pil anger färdriktning.
Trolig orsak Lösning
Lägre inställning av klipphöjden än normalt. Kontrollera/åtgärda inställningen av klipphöjden.
Felaktig justering mellan knivcylinder och motstål. Justera avståndet mellan knivcylinder och motstål för att
åstadkomma korrekt klipphöjd.
Gräsklipparen kan inte följa det ojämna underlaget. Byt klippriktning.
För mycket gräs klipps åt gången. Klipp oftare.
För hög klipphastighet. Sänk klipphastigheten.
22
Page 49

KLIPPKVALITET 5
TN0223
5.6 TUVOR __________________________________________________________________
Tuvor är oklippt eller dåligt klippt gräs.
Obs: Pil anger färdriktning.
Trolig orsak Lösning
Ett felaktigt justerat motstål. Justera avståndet mellan knivcylinder och motstål.
Matta eggar på knicvylinder eller motstål. Slipa eller byt blad och motstål vid behov.
För hög klipphastighet. Sänk klipphastigheten.
För högt gräs. Klipp oftare.
Klippning i samma riktning. Byt klippriktning med jämna mellanrum.
Skada på knicvylinder eller motstål. Slipa, skärp eller byt blad och motstål vid behov.
23
Page 50

5 KLIPPKVALITET
TN0224
5.7 STRÄNGAR ______________________________________________________________
En sträng är en rad med oklippt gräs. Detta orsakas ofta
av ett skadat eller böjt motstål.
Obs: Pil anger färdriktning.
Trolig orsak Lösning
Skadat motstål. Byt motstål.
Skadad eller delvist sliten knivcylinder. Inspektera knivcylindern. Byt vid behov.
Fästelement för motstål saknas eller är lösa. Kontrollera motstålets skruvar. Dra åt lösa skruvar och ersätt
skruvar som saknas.
För snabb vändning. Klippaggregat överlappar inte i svängar
eller på lutningar.
Däckenheten trycker ned gräset innan det klipps. Kontrollera/justera däcktrycket.
Vått gräs trycks ned innan det klipps. Klipp när gräset är torrt.
Sväng mindre snävt så att klippaggregaten kan överlappa varandra.
Byt klippriktning eller -mönster på lutningar.
24
Page 51

KLIPPKVALITET 5
TN0225
5.8 STRÄNGAR AV KLIPPT GRÄS _______________________________________________
Strängar av klippt gräs bildas i färdriktningen när
klippning huvudsakligen sker på en sida av
klippaggregatet eller -aggregaten.
Obs: Pil anger färdriktning.
Trolig orsak Lösning
För högt gräs. Klipp oftare.
Klippning av vått gräs. Klipp när gräset är torrt.
Gräsbildning på rulle/rullar. Rengör rulle/rullar och skrapa/skrapor.
Gräsbildning på motstål. Justera avståndet mellan knivcylinder och motstål.
25
Page 52

5 KLIPPKVALITET
5.9 OLIKA KLIPPHÖJD ________________________________________________________
Olika klipphöjd ger ett vågformat utseende och beror i
regel på tunga kontaktpunkter mellan knivcylinder och/
eller motstål.
Obs: Pil anger färdriktning.
Trolig orsak Lösning
Ojämnt slitage på knivcylinder eller motstål. Inspektera motstål och knivcylinder. Slipa eller byt blad och motstål
vid behov.
Skruvar på motstål saknas, är lösa eller är för hårt dragna. Montera, byt ut eller dra åt motstålets skruvar till korrekt moment.
För hög klipphastighet. Sänk klipphastigheten.
5.10 FELAKTIGT ANPASSADE KLIPPAGGREGAT __________________________________
Ojämn klipphöjd mellan klippaggregaten resulterar i
stegvis klippning och beror ofta på en dåligt anpassad
inställning av klipphöjden mellan klippaggregaten.
Obs: Pil anger färdriktning.
Trolig orsak Lösning
Ojämn klipphöjd mellan klippaggregat. Kontrollera/justera klippaggregatens höjdinställning.
Olika klipparinställning på de två sidorna. Kontrollera/justera däcktrycket.
26
Page 53

6 ANTECKNINGAR
ANTECKNINGAR 6
27
Page 54

Page 55

World Class Quality, Performance and Support
Equipment from Jacobsen is built to exacting
standards ensured by ISO 9001 and ISO 14001
registration at all our manufacturing locations.
A worldwide dealer network and factory trained
technicians backed by Genuine Jacobsen Parts
provide reliable, high-quality product support.
Kvalitet, prestanda och support av världsklass
Utrustning från Jacobsen tillverkas vid samtliga
våra tillverkningsanläggningar enligt de högt ställda
kraven i standarderna ISO 9001 och ISO 14001.
Ett världsomfattande återförsäljarnätverk och fabriksutbildade
tekniker uppbackade av originaldelar från Jacobsen
tillhandahåller pålitlig produktsupport av hög kvalitet.
Jacobsen, A Textron Company
11108 Quality Drive, Charlotte, NC 28273
www.Jacobsen.com
800-848-1636
When Performance Matters.
™
 Loading...