

Texsport 14203 User Manual
Thank you for buying a Texsport Authentic Adventure Gear product. We hope you
enjoy your new lantern and that it will serve you for many years to come. We
encourage you to read and understand each step of the set-up and safety opera-
ion instructions prior to working with this lantern.
t
FOR OUTDOOR USE ONLY
GENERAL SAFETY INFORMATION
• NEVER use in an enclosed area.
• DO NOT use lantern while sleeping.
• Always use lantern in the upright position.
• Always use handle to move lantern.
• DO NOT expose the propane cylinder to excessive heat.
• Always return handle to “down” position after lighting or moving. If handle is left in the “up” position during operation it will become very hot
and should not be touched for at least 15 minutes after shut off.
• Never operate lantern with missing or damaged parts or mantles.
• Always inspect lantern, propane cylinder and connections for damage,
debris or dirt before attaching the lantern to the propane cylinder.
• DO NOT USE AS A SPACE HEATER.
• Always attach/detach propane cylinder outdoors away from any open
flame or pilot lights and only when the lantern is cool.
• DO NOT USE or operate if the lantern or propane cylinder is damaged.
• When storing or transporting lantern always disconnect the propane
cylinder and store it in a cool, well ventilated location, in an upright position.
• Be sure connection to propane cylinder is tightly secure (hand tighten
only) prior to each use.
• Never operate the lantern near any flammable liquid or vapors. Keep all
flammable or combustible materials beyond the clearance zone as indicated on the back panel of this booklet.
• Discontinue operation and close valve if:
– ambient temperature drops below -10˚ F.
– there is no fuel remaining in the propane cylinder
– combustion becomes unstable
– lighting cannot be performed quickly and easily
– you experience repeated flame outs
• Should blockage occur in the fuel jet do not attempt to clear with a metal
object. Call Texsport Customer Service at 800-231-1402 8AM – 5PM CST
Mon-Fri.
• Never leave lantern unattended when hot or in use.
• KEEP OUT OF REACH OF CHILDREN.
2 3
NSTRUCTIONS FOR USE
I
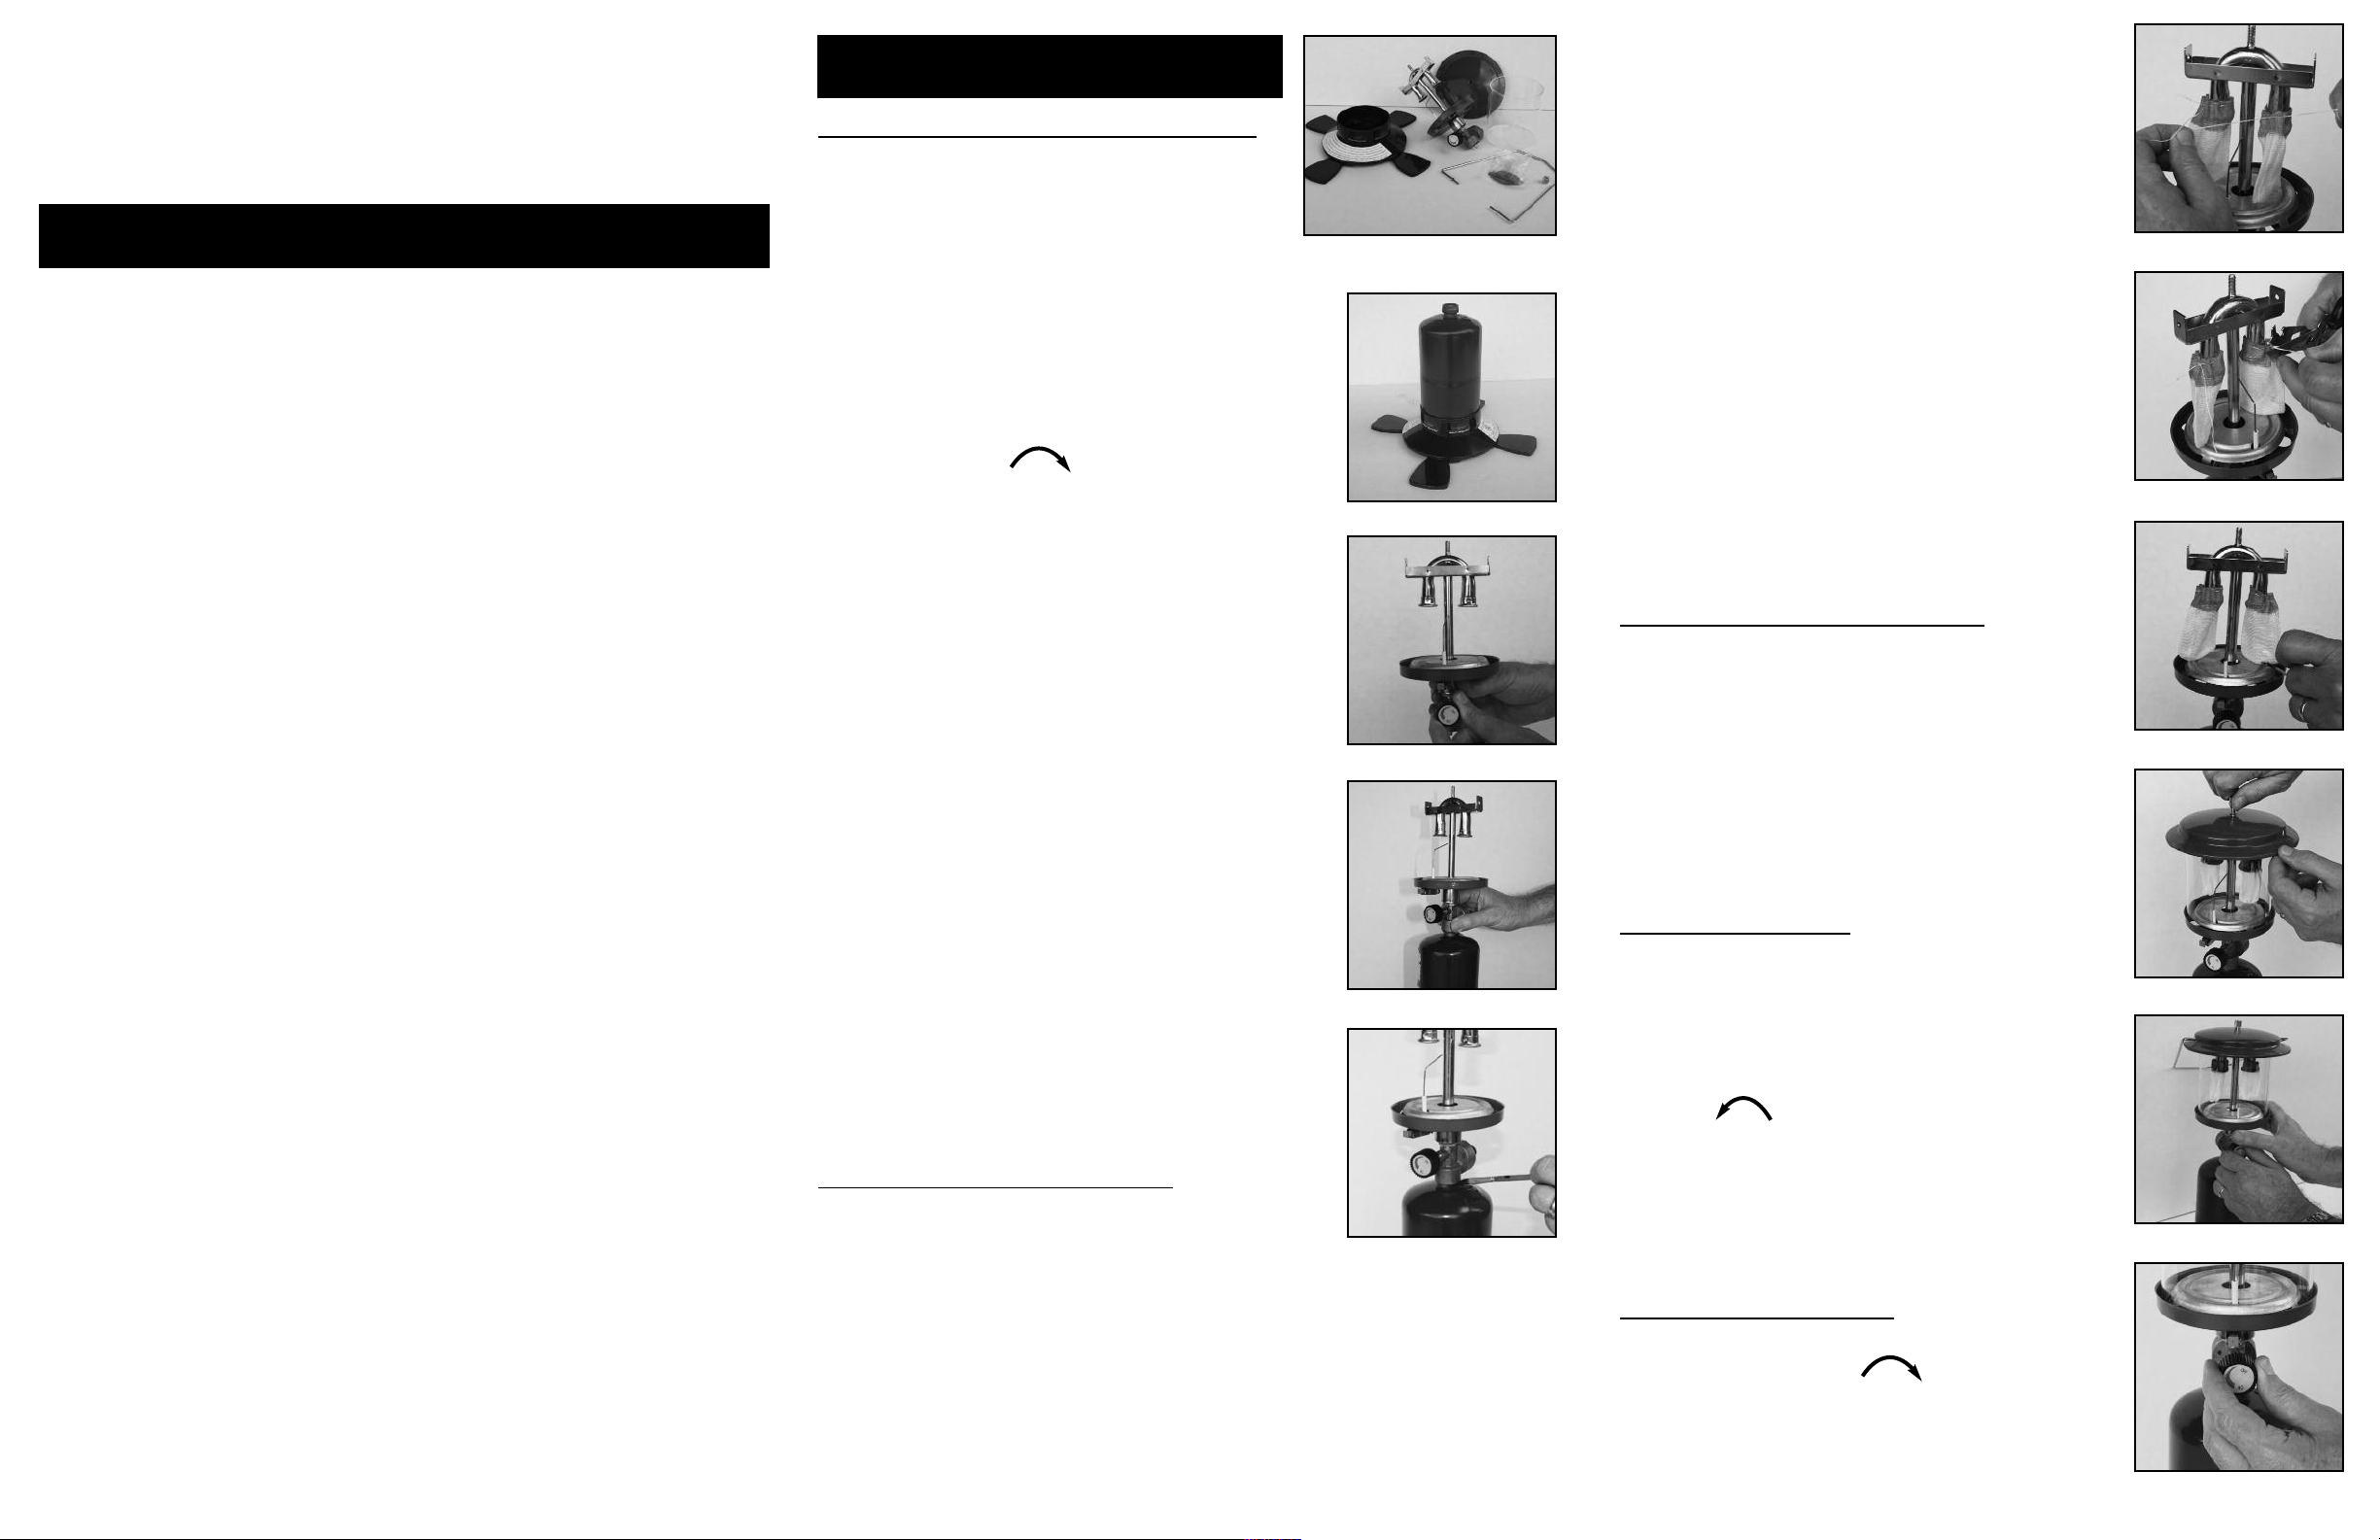
LANTERN ASSEMBLY – ASSEMBLE OUTDOORS
Step 1 ..Unpack lantern. Dispose of all packing
material. Carefully compare contents to
Illustration 1.
Step 2 ..Place the approved 16.4 oz/465 g dispos-
able propane cylinder approved for use by
the United States Department of Trans-portation
DOT-NRC 232/290 M1110 propane cylinder
into the plastic base. Unfold paddle feet for
additional stability. Illustration 2.
Step 3 ..Turn fuel valve to OFF position by twisting
clockwise fully. Illustration 3.
Step 4 ..Make sure valve adapter rubber seal is clean
and undamaged. Be certain the adapter is
undamaged.
Step 5 ..Remove the protective cap from the propane
cylinder. Keep this cap for use when storing
the cylinder for future use.
Step 6 ..Carefully screw the propane cylinder onto the
lantern. DO NOT cross thread. Hand Tighten
Only – DO NOT use any tools. Illustration 4.
Test the connection for leaking gas:
Step 7 ..Apply soapy water to the connection area.
Leaking gas will produce bubbles.
Illustration 5.
Do you smell gas?
If yes, there is a leak.
Is the connection area extremely cold?
If so, there is a leak
DO NOT USE LANTERN IF IT IS LEAKING.
When you are sure there are no leaks, you may
proceed to setup/lighting your lantern.
ATTACHING AND PRIMING MANTLES
Attaching the Mantle(s)
Step 1 ..Using the drawstring, tie the top of the new
mantle securely around the lip of each burner
tube. The flat side of the mantle should hang
next to the vertical section of the burner tube.
Illustration 6.
Step 2 ..Trim off any excess string. Illustration 7.
Step 3 ..Be careful not to damage the mantle during
installation. DO NOT operate lantern with a
hole in the mantle.
illustration 1
illustration 2
illustration 3
illustration 4
illustration 5
Priming the Mantle(s)
tep 1 ..Hold a flame source to the bottom of each
S
ttached mantle. Allow each mantle to ignite
a
and burn evenly until only a white ash
remains. It will burn out by itself. Illustration
8.
Step 2 ..This process will reduce the mantle in size
and it will cause it to turn a gray/white
color.
Step 3 ..This process will take 2 to 3 minutes.
Step 4 ..The mantle(s) will now be very fragile. After
Priming DO NOT touch the mantle.
Step 5 ..Always have extra mantles available for
replacement. NEVER operate with defective
mantles. A mantle with a hole or other
defect can cause the lantern to overheat.
INSTALL THE GLASS GLOBE & HANDLE
Step 1 ..Place glass globe over the mantle(s) and
burner tube.
Step 2 ..Attach the hood securely with the round nut,
being careful to align the hole in each side
of the hood with the corresponding hole on
the burner tube frame. Illustration 9.
Step 3 ..Install the bail handle – passing the ends
through the hood and burner tube frame.
LIGHTING THE LANTERN
Step 1 ..When lantern is completely assembled and
free of any gas leaks, position lantern on a
flat stable surface.
Step 2 ..Keeping your head and body well back,
open fuel valve turning counter clockwise
and depress the Insta-Light starter
button. The mantles will light. Illustration 10.
Step 3 ..Adjust the brightness as desired with the fuel
valve.
Note: Please wait a few minutes before moving the lit
lantern. Move lantern using the bail handle.
TURNING OFF THE LANTERN
Step 1 ..Turn fuel valve to OFF position by turning
fully clockwise . Illustration 11.
Step 2 ..Allow lantern to completely cool (approx.15
minutes) before touching it.
4
illustration 6
illustration 7
illustration 8
illustration 9
illustration 10
illustration 11
MAINTENANCE
e sure to keep equipment clean and make sure burner is always unobstructed.
1
7
2
8
3
B
ropane appliances seldom require service as long as you keep valves and ori-
P
fices away from dirt and dust. Always blow the valve clean before connecting it
to a cylinder. If damaged DO NOT use the appliance and contact Texsport
Customer Service @ 800-231-1402 8AM to 5PM CST Mon-Fri.
Operating Manual
ITEM# 14203
Insta-Light
Double Mantle
Propane Lantern
4
5
9
10
6
12
11
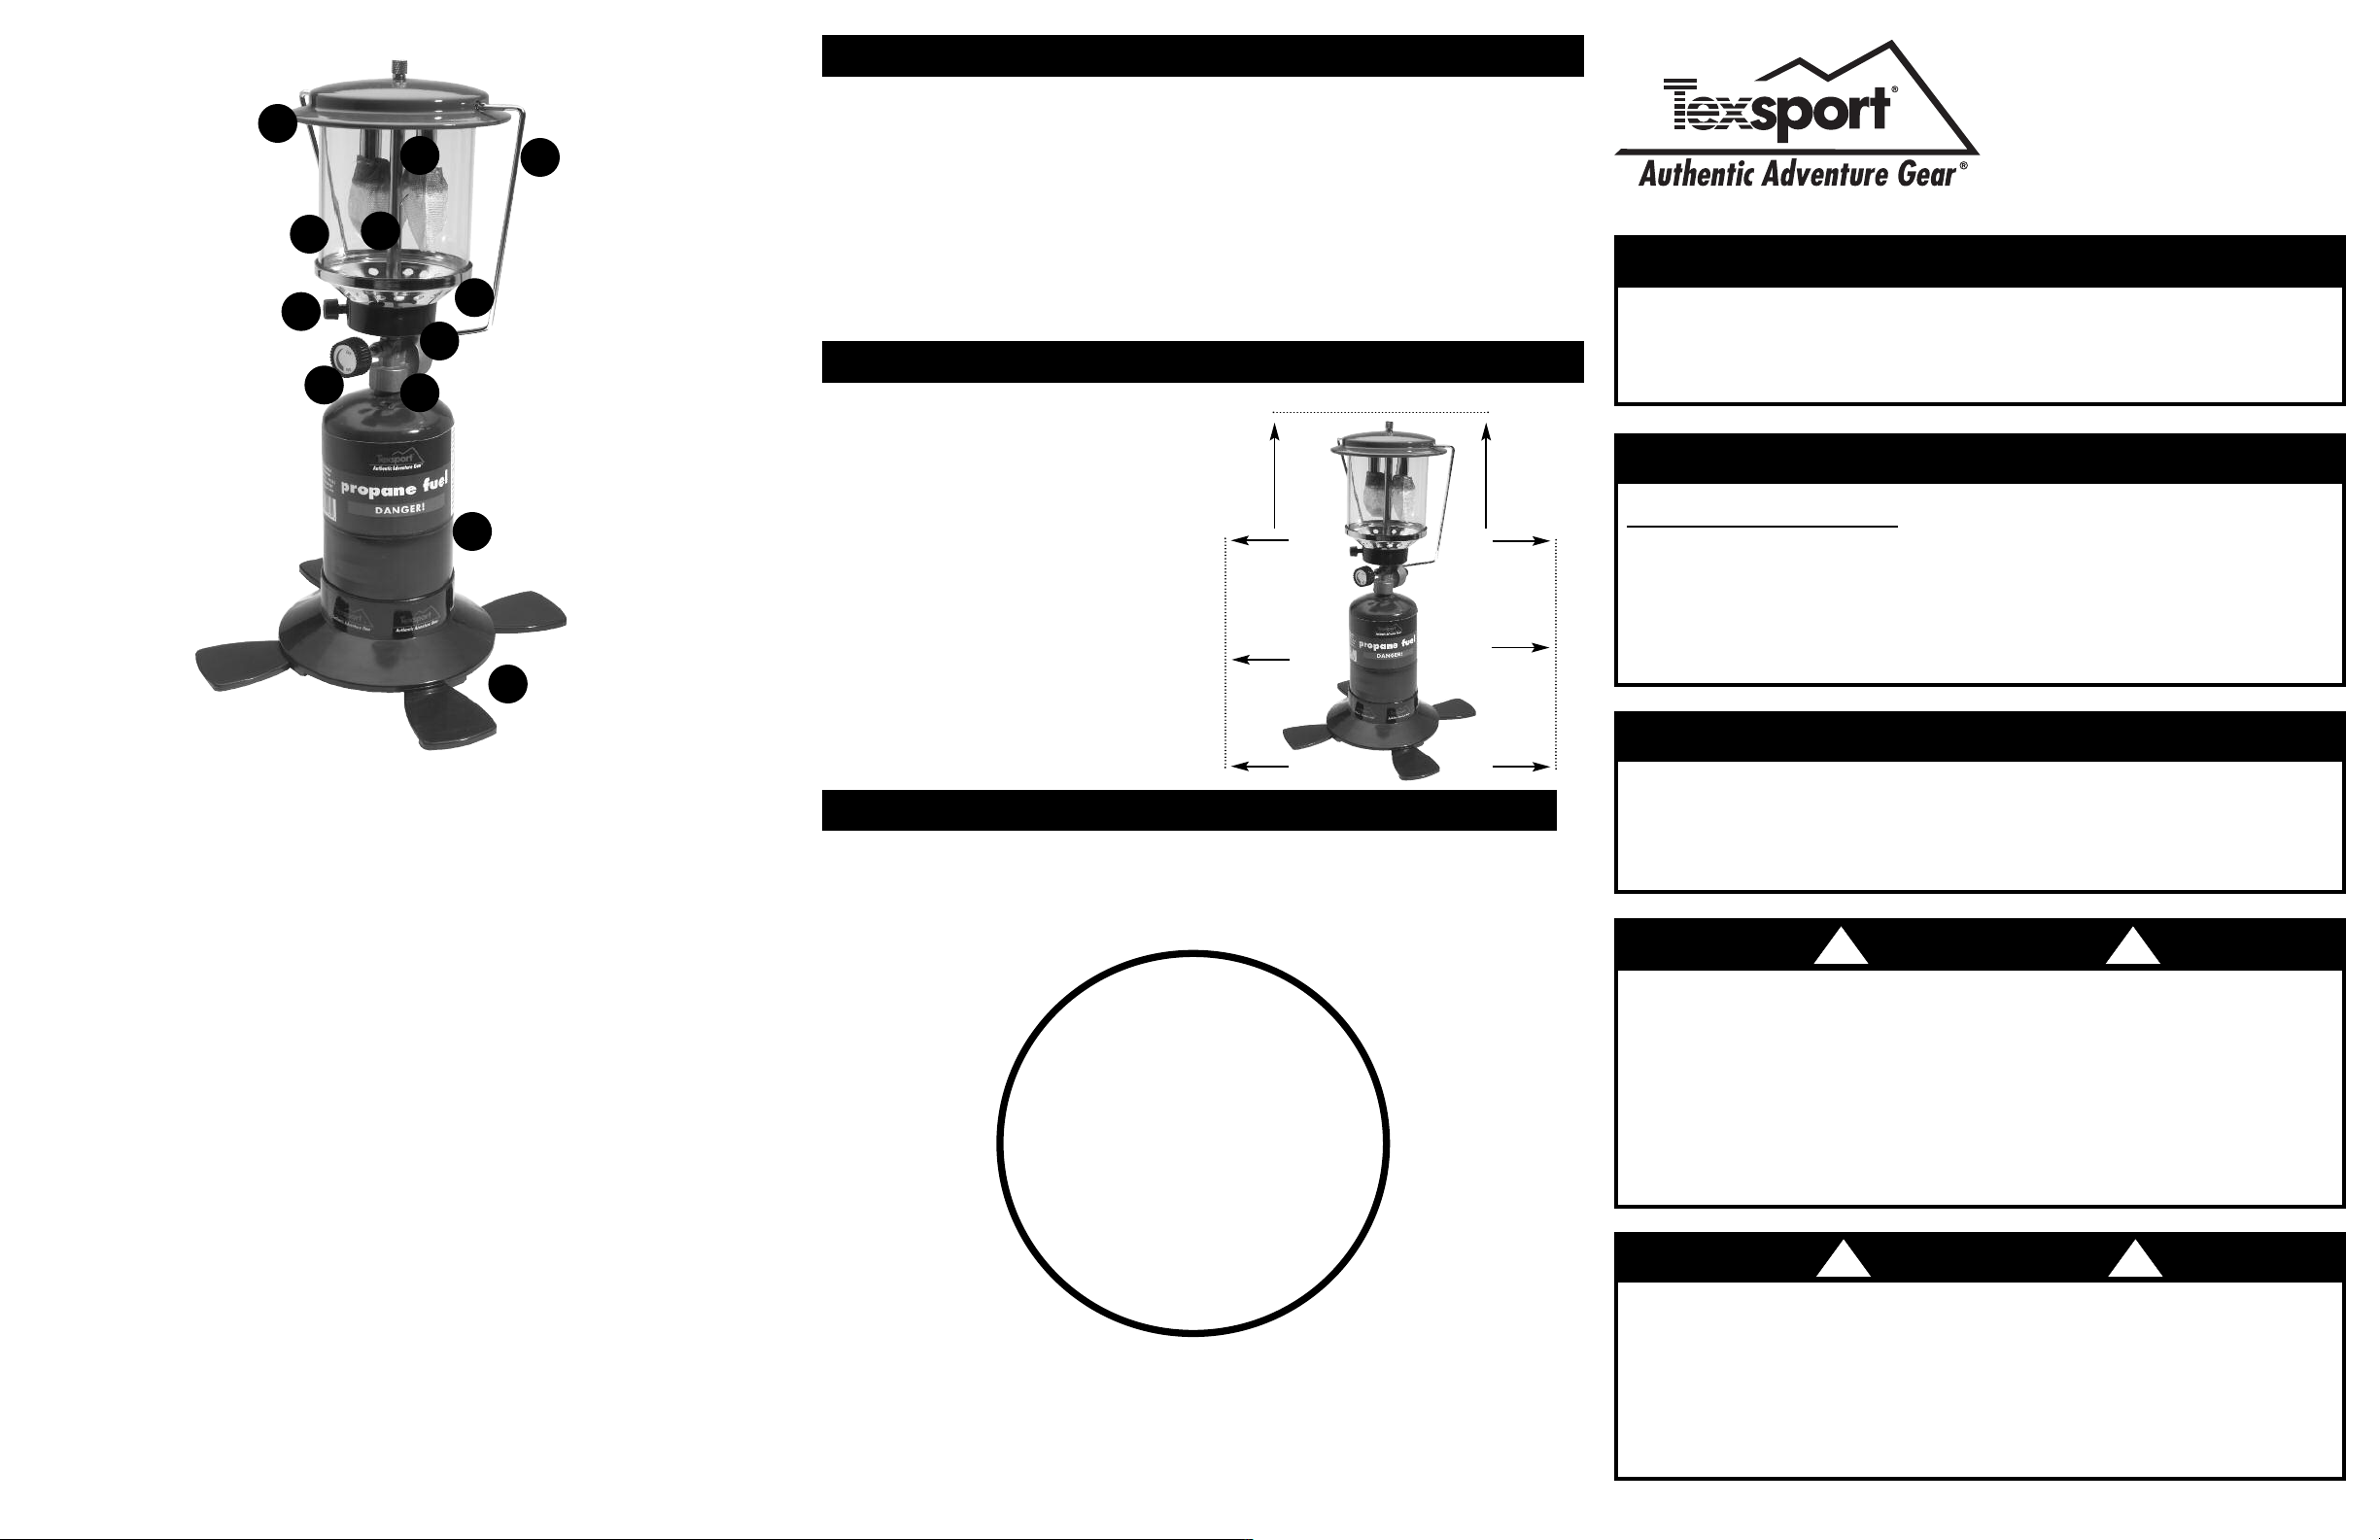
1. Hood
2. Glass globe
3. Handle
4. Insta-Light starter button
5. Fuel valve knob
6. Valve Adapter
7. Burner tube assembly
8. Mantles
9. Burner base
10. Fuel jet
DO NOT PERFORM MAINTENANCE WHILE THE LANTERN IS STILL HOT.
PLEASE ALLOW ADEQUATE TIME TO COOL.
MINIMUM CLEARANCE TO FLAMMABLES OR COMBUSTIBLES
8” Away from lantern hood
4
Please keep lantern away from any
flammable or combustible materials or
objects. DO NOT allow any fabric, clothing
or any flammable or combustible material
to come within the following distance
restrictions.
2” From
2” From
12” from all sides of lantern
Keep objects 48” inches above lantern
hood.
CONTACT INFORMATION
If you should have any questions, problems or comments, please call our
Customer Service Department at 1-800-231-1402. This Department is open
8AM – 5PM CST Mon-Fri. www.texsport.com
1
all sides
1
ll sides
a
DANGER
NEVER USE THIS
APPLIANCE IN AN ENCLOSED
SPACE SUCH AS CAMPER,
TENT, CAR OR HOME.
USING IT IN AN ENCLOSED
SPACE CAN KILL YOU.
USE OUTDOORS
ONLY!
IMPORTANT
Read this manual carefully before assembling,
using or servicing this lantern.
KEEP THIS MANUAL FOR FUTURE REFERENCE.
FOR YOUR SAFETY
IF YOU SMELL GAS:
• Do not attempt to light the appliance.
• Extinguish any open flame.
• Disconnect from fuel supply.
• If smell persists leave the area.
FOR YOUR SAFETY
NOTE: DO NOT STORE OR USE GASOLINE OR
OTHER LIQUID WITH FLAMMABLE VAPORS IN THE
VICINITY OF THIS OR ANY OTHER APPLIANCE.
!
CARBON MONOXIDE HAZARD
• This appliance can produce carbon monoxide which
has no odor.
• Using it in an enclosed space can kill you.
• Never use this appliance in an enclosed space such as
camper, tent, car or home.
Misuse of this lantern can lead to fire, explosion and
DANGER
WARNING
!
!
!
11. Plastic base
12. Disposable propane cylinder
(not included)
5
KEEP THIS MANUAL FOR
FUTURE REFERENCE.
serious personal injury to you or others.
Follow all instruction here, or on your
lantern and on the propane cylinder.
Re:1/08
 Loading...