

Page 1

USER MANUAL
Security Control Panels
This page is intentionally
THANK YOU FOR VOTING
THANK YOU FOR VOTINGTHANK YOU FOR VOTING
THANK YOU FOR VOTING
Page 2

Page 3
Content
s
P
888
8168
l
Contents
remier
&
User Manua
1. About the Alarm System................................ 3
Introduction ...................................................................3
Overview ...............................................................3
User Codes...........................................................3
Zones....................................................................3
Global Zones.........................................................3
Areas.....................................................................4
Monitoring .............................................................4
Keypads .........................................................................5
Display Window ....................................................5
Normal and Function Keys....................................5
2. Using the Alarm System................................. 6
Introduction ...................................................................6
Quick Arm Keys.............................................................7
Quick Arm .............................................................7
Quick Part Arm......................................................7
Reset and Service Messages.......................................7
Fault Messages.....................................................7
Other Messages....................................................7
3. The Arming Menu............................................ 8
Introduction ...................................................................8
Zone Faults During Arming ..........................................8
Arm Fail .................................................................8
The Ready LED .....................................................8
Arming and Disarming the System ..............................9
To Arm the System................................................9
To Part Arm the System........................................9
To Silent Arm the System....................................10
To Cancel the Exit Mode.....................................10
To Disarm the System During Entry....................10
To Disarm the System When Not in Entry...........10
Arming and Disarming Areas .....................................11
To Arm Areas ......................................................11
To Part Arm Areas...............................................11
To Silent Arm Areas ............................................12
To Cancel the Exit Mode.....................................12
To Disarm Areas During Entry ............................12
To Disarm Areas When Not in Entry ...................12
To Clear an Arm Fail....................................................13
To Silence an Alarm
To Reset an Alarm.......................................................14
User Reset ..........................................................14
Engineer Reset ...................................................14
Anti-code Reset...................................................14
To Omit Zones.............................................................15
Re-instating Zones Manually...............................15
....................................................13
View Zone Status.........................................................15
Omit 24Hr Zones
Reinstate 24Hr Zones .........................................16
Set Chime Areas..........................................................16
Turning Chime On and Off..................................16
View Act. Faults...........................................................18
View Act. Counts.........................................................18
.........................................................16
4. The User Menu .............................................. 19
Accessing the User Menu ..........................................19
View the Event Log
Event Log Descriptions.......................................21
Event Log Hotkeys..............................................22
Change Code ...............................................................23
Edit Chime Zones........................................................23
System Tests...............................................................24
Do Walk Test
Enable Engineer..........................................................26
Set System Time
Set System Date ..........................................................27
Change Timers ............................................................27
Change Ctl Times
Setup Users .................................................................30
Default User Codes............................................30
Assigning New Users..........................................30
User Number ......................................................30
User Code...........................................................30
User Areas..........................................................30
User Types..........................................................30
User Functions and Options...............................31
User Options.......................................................32
User Config.........................................................33
User Time Lock...................................................33
User Name Text..................................................33
Deleting User Codes ..........................................33
Alter Part Zones...........................................................35
Call Remote PC
......................................................19
................................................................24
.........................................................26
........................................................28
...........................................................35
5. Installation Details ........................................ 36
Notes ............................................................................36
European Standards
Warranty.......................................................................37
...................................................37
6. Quick Reference Guide................................. 38
Arming Menu ...............................................................38
User Menu....................................................................39
User Menu
Programming Text.......................................................40
....................................................................40
2 INS177
Page 4

P
remier
888
8168
l
Content
and
Installation Manua
1. About the Alarm System
s
Introduction
This section of the manual titled ‘About the Alarm System’
is a thorough explanation of general system concepts and
how the alarm system works.
The next section of this manual titled ‘Operating the Alarm
System’ explains how the alarm system operates and
instructs on how to arm, disarm and omit zones.
The following section of the manual, titled ‘The User Menu’
is reserved for more detailed system information like
programming User codes and viewing the Event Log etc.
Overview
The alarm system consists of a control panel, one or more
keypads and various detectors and sensors. The control
panel will normally be mounted out of sight in a utility room
or basement etc. The control panel houses the system’s
electronics and stand-by battery. There is normally no
reason for anyone except an installer or service person to
have access to the control panel.
The keypad is used to send commands to the system and
to display the current system status via the English text
display. The keypad also provides audible feedback each
time a key is pressed. Each keypad will be mounted in a
convenient location inside the protected premises, near
the designated points of entry/exit.
Global Zones
A zone that is assigned to more than one area will only be
monitored when all of the areas it is assigned to are
armed.
User Codes
Users of the alarm system will be assigned a unique 4, 5 or
6 digit User code. User codes are used to arm and disarm
areas to which they are assigned. Some User codes can
also access additional options such as, system tests and
omitting zones.
The User code may not allow access to certain system
functions. For instance, if the code is only allowed to arm
and disarm area A, it will not be able to arm or disarm
other areas, or the entire system.
Most User codes can arm and disarm areas assigned to them
from any keypad on the system. However, Local Users will
only be able to arm and disarm areas assigned to them, from
keypads assigned to the same areas.
Zones
A ‘zone’ is part of the protected premises and may consist
of one or more detection devices protecting rooms and
points of entry/exit, (e.g. front door, kitchen, downstairs
windows, upstairs bedrooms, etc.). When the alarm
system is fully armed, all of the zones on the system are
monitored
Some zones may belong to more than one area, such as
points of entry/exit i.e. the front door and the hallway.
These are called global zones because they are assigned
to multiple areas.
INS177 3
Page 5

About the Al
arm System
P
888
8168
l
Areas
An ‘area’ is a group of one or more zones and would
normally be used to split the premises into different
sections. Each area can be either ‘Full’ armed or ‘Part’
armed.
Example 1: Domestic Premises
The upstairs of a house could be area A, the downstairs
could be area B and the garage could be area C.
Each area can be ‘Full’ armed independently from each
other (all detection devices in the area monitored). For
instance, downstairs and the garage in example 1 (areas B
& C) could be armed at night allowing access to the
upstairs of the house (area A).
All of the areas together form the entire alarm system.
!
Example 2: Domestic Premises
The entire house could be area A.
Each area can be ‘Part’ armed. For instance, detection
devices upstairs, i.e. PIR’s, could be programmed so that
they will not be monitored during a ‘Part’ arm, allowing
access to the upstairs of the house at night.
All of the areas together form the entire alarm system.
!
remier
&
User Manua
Example 3: Commercial Premises
Office 1 in an office block could be area A, office 2 could
be area B and office 3 could be area C.
Each area can be armed and disarmed independently from
each other. For instance, any of the offices in example 2
above could be armed and disarmed to allow access
without affecting the other offices.
All of the areas together form the entire alarm system.
!
Example 1: Office Block
The foyer of the office block in example 3 would need to
be armed when the last office is armed and disarmed
when the first office is disarmed.
Because the foyer is a global area (used by everyone) the
zones in that area need to be assigned to areas A, B and
C. This ensures that the zone is only recognised by the
system when ALL areas (A, B & C) are armed, allowing
access to the foyer even if one of the areas is still armed.
Monitoring
This alarm system is capable of reporting Intruder alarms,
Panic alarms, Fire alarms and other types of information
over telephone lines to an Alarm Receiving Centre. If you
accidentally set the alarm off, call the Alarm Receiving
Centre immediately to prevent an unnecessary response.
The monitoring function must be enabled before it
!
will work.
4 INS177
Page 6
P
remier
888
8168
l
Content
y
and
Installation Manua
s
Keypads
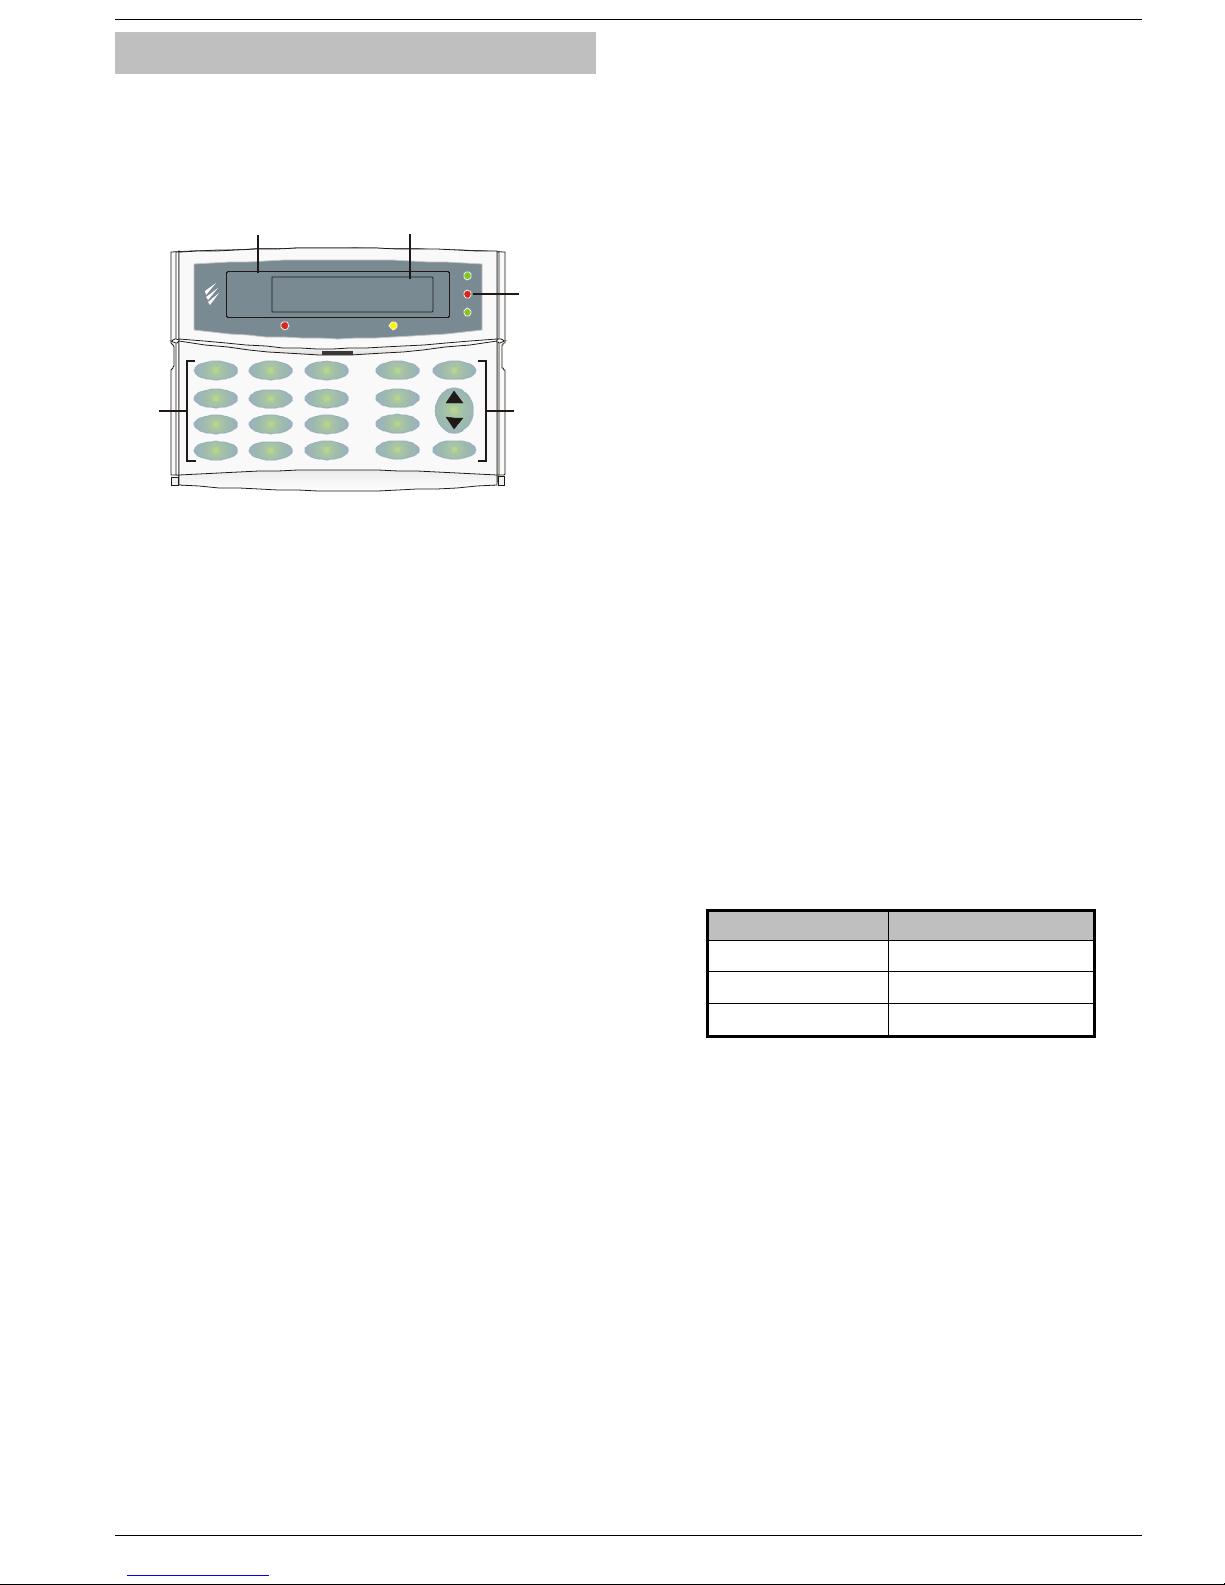
One or more keypads will be installed throughout the
protected premises, usually one at each entry/exit door.
The keypads are used to perform all of the system
functions i.e. Arming, Disarming etc.
No
Premier LCD
Display
Power
ServiceOmit
Omit
Chime
6
9
Part
Area
Read
Reset
Menu
Info .
Programmable
‘Info.’ LED
Function
Keys
Premier LCDL
Large Display
Screen N ot Show n
1
23
4
Ye s
5
7
8
0
Normal
Keys
Display Window
Premier LCD & LCDL Display
The 32-Character LCD display is used to show the status
of the system and to view system data.
Power LED
The Power LED will illuminate when AC Mains is
connected to the control panel and will flash when the
system is running on the standby battery.
Info. LED
The Info. LED can be programmed to mimic the keypad
output or show the armed status of an area.
Ready LED
The Ready LED will illuminate when all zones assigned to
the same area as the keypad are secure and the system is
ready for arming.
Omit LED
The Omit LED will illuminate whenever zones assigned to
the same area as the keypad have been omitted.
Service LED
The Service LED will illuminate whenever the system has a
fault and requires attention i.e. Tamper fault, reset
required, service required etc.
Normal and Function Keys
Keys
These keys are for entering User codes or inputting data
when in programming mode.
Yes & No Keys
The YES key is used to accept actions and the NO key is
to cancel actions.
Omit Key
This key is used to omit zones (see page 15 for details).
Chime Key
This key is used for turning the zone chime feature on and
off (see page 16 for details).
Part Key
This key is used to part arm the system (see page 7 for
details). It can also be used to do a ‘Quick’ part arm if this
feature is enabled.
Area Key
This key is used to arm or disarm particular areas (see
page 11 for details). It can also be used to do a ‘Quick’
area if arm feature is enabled.
Reset Key
This key is used to exit from the Arming or User menu, to
reset the system and also to display the Reset, Anti-code
and Service messages (see page 7 for details).
Scroll Key
This key is used to scroll through the various menus and
options.
Menu Key
This key is used to select the Arming or User menu.
Emergency Keys
In case of emergency, the alarm system can provide three
immediate emergency alarms by pressing and holding two
specific keys for three seconds.
!
to
!
!
!!
The emergency keys can be enabled/disabled for
each keypad on the system.
"
"
""
&
#
#
##
%
%
%%
&
&
&&
'
'
''
%
%
%%
(
(
((
)
)
))
%
%
%%
Emergency Alarm Press Keys
Panic
Fire
Medical
$
$
$$
!
+
-
&
&
&
*
,
"
INS177 5
The Panic alarm can be individually programmed for
either audible or silent operation for each keypad.
The Panic alarm can be individually programmed for
either instant or delayed operation for each keypad.
Page 7
About the Al
arm System
P
888
8168
l
!
=1
!
=1
!
A.)#BC1
/
!
D,1)#78E+#F
/
!
G
/
!
!
=1
!
!
Y
!
BC'(L.#M1
/
!
=1
L/
!
!
I<1)#BC1
/
!
BC'(L.#B)@#)1
/
!"#A$-)
/
A.)#A$-)
/
A.)#A$-)
/
I('P@.#I(L1
/
!
*@)
/
!
!
B'@@#Q
0B/
Y
Y
2. Using the Alarm System
remier
&
User Manua
Introduction
All users of the alarm system should read sections 2, 3 and
4 carefully so as to familiarise themselves with the
operation of the alarm system.
The operation of the system is divided up into two
sections, the Arming menu and the User menu.
To access either menu, enter a valid User code
....
....
........
User code, simply re-enter the correct code).
The control panel may have been programmed so
!
that too many incorrect code entries will cause a
Tamper alarm or lock the keypad out for 5 minutes.
Once in the Arming menu, various functions can be
selected by using the
selected, press
Whilst in the Arming menu, the User menu can be selected
by pressing
/
Once in the User menu, various options can be selected
by using the
press
)
to access that option.
#
#
##
To exit from either menu press the
system will return to normal.
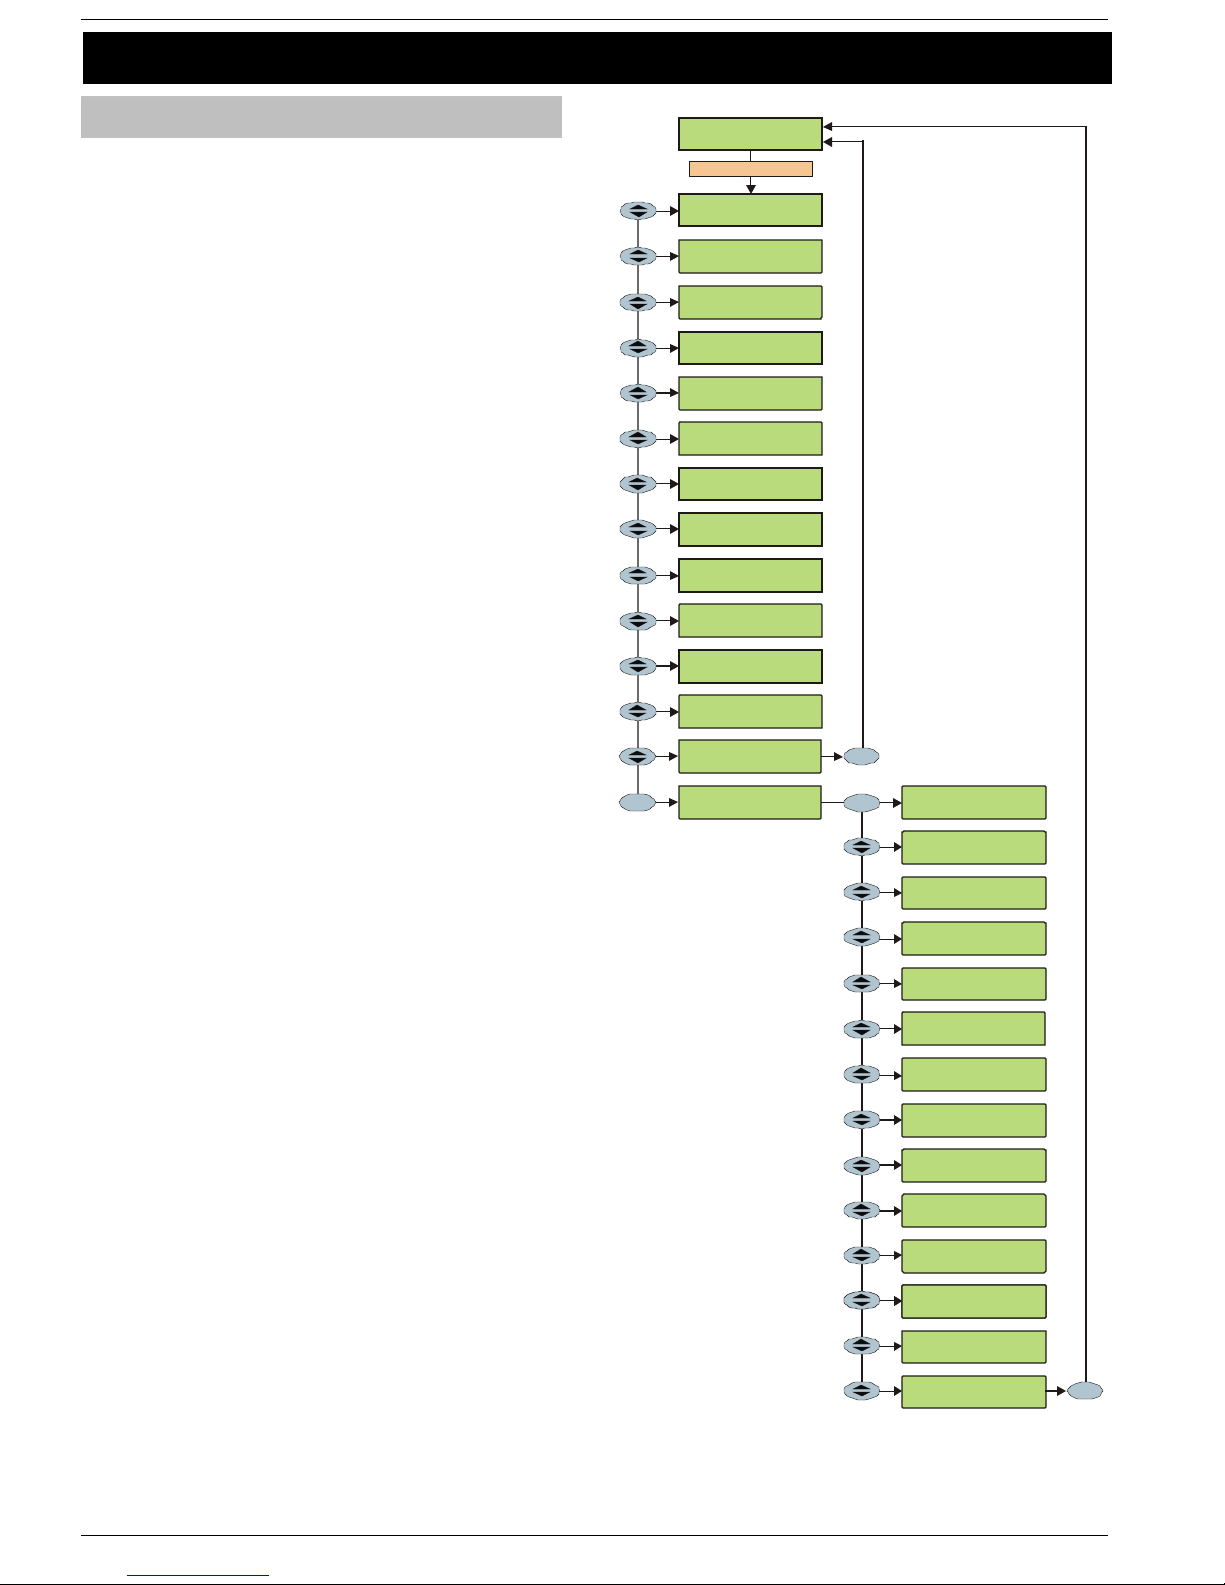
The diagram to the right shows both menus and all the
functions and options available.
Not all functions and options are available to all users. If
!
a function or option cannot be selected, it may be
that it is not assigned to that user (see page 31 for
details).
(if a mistake is made whilst entering a
key. Once a function has been
)
to access that function.
#
#
##
.
key. Once an option has been selected,
key and the
(
(
((
Menu
##0+.,1.+#2342
356789::'#;.<#53
Enter A Va lid Us er Co de
!"#$"%#&'()#)"
*+,#-$-).,/
!"#$"%#&'()#)"
0'+)#*+,#-$-).,/
!"#$"%#&'()#)"
A1@.()#*+,/
!"#$"%#&'()#)"
B'(>.@#IJ1)/
!"#$"%#&'()#)"
!1-'+,#*+.'-/
"#$"%#&'()#)"
-.#*()1H>"<.
"#$"%#&'()#)"
D,1)#F"(.-/
"#$"%#&'()#)"
.&#F"(.#A)')%-
"#$"%#&'()#)"
"#$"%#&'()#)"
"#$"%#&'()#)"
.&#*>)9#?'%@)-
"#$"%#&'()#)"
.&#*>)9#?'%@)-
"#$"%#&'()#)"
IJ1)#K.(%/
!"#$"%#&'()
G-.+#K.(%#/
"(.-
,.#*+.'-
es
es
"#$"%#&'()#)"
.&#A$-).,#@"
"#$"%#&'()#)"
BC'(L.#B"<./
"#$"%#&'()#)"
,.#F"(.-
!"#$"%#&'()#)"
.,#).-)-
!"#$"%#&'()#)"
!"#;'@O#M.-)/
!"#$"%#&'()#)"
!"#$"%#&'()#)"
!"#$"%#&'()#)"
"#$"%#&'()#)"
"#$"%#&'()#)"
"#$"%#&'()#)"
A.)%N#G-.+-/
!"#$"%#&'()#)"
"#$"%#&'()#)"
IJ1)#K.(%/
.+#A)'$#F"(.-
"#$"%#&'()#)"
"#$"%#&'()#)"
IJ1)#K.(%/
(..+
.,#M1,.
.,#!').
,.+-
.,").#
,.-
es
6 INS177
Page 8
P
remier
888 & 8168
l
O
Installation Manua
perating the Alarm System
Quick Arm Keys
The ‘Quick’ keys allow the system to be armed without
having to enter a User code first.
The ‘Quick’ keys will only work if the keypad has
!
been programmed to allow arming in this way.
Quick Arm
To arm the system, press
All areas that the keypad being used is assigned to
!
will now Arm.
%
%
%%
.
Quick Part Arm
To part arm the system, press
All areas that the keypad being used is assigned to
!
will now Part Arm.
'
'
''
.
Reset and Service Messages
When the system requires attention because of a potential
problem, the display will show one of three service
messages. These messages can also be accessed at any
time, allowing the user to view installer information.
These messages would normally be programmed
!
with the telephone numbers of the installer or the
Alarm Receiving Centre.
Fault Messages
K'1(-#0"&.+#DSS
#M%.#54#K'+#7553
0C"(.#T1(.#?'%@)
#M%.#54#K'+#7553
*+.'#?'1@.<#M.-)
#M%.#54#K'+#7553
U')).+$#?'%@)
#M%.#54#K'+#7553
//// //// #M' ,N. +
#M%. #54# K'+ #75 53
//// #?%- .#U @"& (
#M%. #54# K'+ #75 53
There is a Mains failure (the keypad may
chime every minute, enter a valid User
code to stop the chime). The display will
automatically clear when mains is
reapplied.
There is a Phone Line fault (the keypad
may chime every minute, enter a valid
User code to s top the chime). The
display will automatically clear when line
fault clears.
Zones that have been placed on test by
the engineer have failed the test (the
system can still be used). Contact your
alarm company to advise.
There is a fault with the standby battery
(the keypad may chime every minute,
enter a valid User code to stop the
chime). Contact your alarm company
immediately.
There is a tamper fault (the alarm will
sound, enter a valid User code to silence
the alarm, this fault cannot be cleared).
Contact your alarm company
immediately.
A fuse has blown (the alarm will sound,
enter a valid User code to silence the
alarm, this fault cannot be cleared).
Contact your alarm company
immediately.
➤ To display the service messages, proceed as follows:
The display will normally show the time & date:
##0+ .,1. +#2 342
3868 4958 N#M %.#5 4
Press
display will look something like this:
Press
the display will look something like this:
Press
the display will look something like this:
!
followed by
/
/
//
followed by
/
/
//
followed by
/
/
//
Press
(
(
((
will then return to normal.
!
!
!!
B'@@ #I(L 1(. .+#) "
##Q. -.)# A$- ).,
0
0
00
B'@@ #*QB #)"
Q.-. )#A$ -). ,
*
*
**
B'@@ #*@' +,# B"9
##?" +#A. +R1 >.
to exit from the message, the display
for the Reset message, the
for the An ti-co de message,
for the Service message,
Other Messages
*@'+ ,#I( L1( ..+
;"+O 1(L# D(# A1) .
Q.,").#V.$N'<#1("&#TDBVI!#"%)
W#*+ .'#A .>% +.< #W
#M%. #54# K'+ #75 53
M1,.#*+,1(L#X
####*9999999
A.+R1>.#Q.Y%1+.<
#M%.#54#K'+#7553
The alarm engineer has logged into the
programming menu and is working on
site (this message will clear when the
engineer logs off or the system is armed.
Too many invalid code attempts have
caused the keypad to lock out. The
keypad will remain like this for 5 minutes.
The keypad has been disabled to prevent
unauthorised access. The display will
automatically clear when the keypad is
enabled.
Areas are being armed using one of the
control timers (enter a valid User code to
defer the arming for 30 minutes).
The service timer has expired indicating
that the system requires a service (the
system can still be used). Contact your
alarm company to advise.
INS177 7
Page 9

Usi
ng the Alarm System
P
888
8168
l
3. The Arming Menu
remier
&
User Manua
Introduction
The normal day-to-day operations of the system are
carried out using the Arming menu i.e. arming, disarming,
omitting zones etc.
Not all functions are available to all users. If a function
!
cannot be selected, it may be that it is not assigned
to that user (see page 31 for details).
The table below shows the various functions available:
Key Function Page
)
)
)
)
)
)
)
)
)
)
)
)
/
➤ To access the Arming Menu, proceed as follows:
The display will normally show the time & date.
The top line of the display is programmable.
!
Enter a valid User code
should look like this:
Press
select that function, press
Press
!
until the required function is displayed, to
)
)
))
, to exit the menu and return to normal.
(
(
((
If no keys are pressed, the display will return to
normal after 8 seconds.
Arming Menu
Arm System
Part Arm System
Silent Arming
Cancel Exit
Disarm the System
Use Anti-code
Omit Zones
View Zone Status
Omit 24Hr Zones
Set Chime Areas
View Act. Faults
View Act. Counts
User Menu
##0+ .,1. +#2 342
3868 4958 N#M %.#5 4
....
....
........
!"#$"%#&'()#)"
*+,#-$-).,/
.
#
#
##
9
9
10
10
10
14
15
15
16
16
18
18
19
, the display
Zone Faults During Arming
Before attempting to arm the system, ensure that the
premises are secure (all doors and windows closed etc.)
and the Ready light is on.
If an attempt is made to arm the system with any zones
active (e.g. door ajar, open window, etc.) the display will
show the zones that are active.
The display will look something like this:
F"(. -#N+ .R. ()1( L
IZ[M #-)' +)# '+.6
Active zones that will be secured during exit (e.g.
!
entry zones, like the front door) can be ignored, all
other zones should be secured.
To continue arming with a zone active, press
The internal sounders will bleep repeatedly (fault tone) and
the display will show the zones that are active.
The display will look something like this:
F"(. #553 #*> )1R .
?+"()#<""+
The fault tone will stop and the exit tone will resume
!
when all zones are secure. If it is necessary to leave
a zone open then it must be omitted (see page 15
for details).
If an active zone cannot be secured then it may be ‘in fault’
in this case contact the alarm company immediately.
Arm Fail
If the exit procedure is started and zones are still ‘Active’ at
the end of the exit procedure, an Internal alarm will occur
(internal sounders only) and the strobe light on the
external sounder will flash.
If this occurs the arm fail must be cleared and the zone in
fault identified before the system can be armed (see page
13 for details on clearing an Arm Fail).
The Ready LED
To help prevent faults during arming, a Ready light has
been provided. The Ready light works as follows:
• If the Ready light is on steady then all zones are
secure and the system is ready to be armed
• If the Ready light is flashing then the system has
zones (with the ‘Force Omit’ attribute) that are active,
check these zones before proceeding
• If the Ready light is off then one or more zones are
active, either secure or omit these zones before
proceeding
F"(.#557#*>)1R.
U.<+"",#;1(<"&
#
#
##
.
8 INS177
Page 10
P
remier
888 & 8168
l
The Armi
User Manua
ng Menu
Arming and Disarming the System
The system is Armed, when ALL areas that are controlled
by the User code, have been armed with ALL zones ON
(not omitted).
The system is Part Armed, when ALL areas that are
controlled by the User code have been armed with SOME
zones OFF (omitted) or SOME areas controlled by the
User code have not been armed.
The system is only Part Armed when zones are
!
omitted using the ‘Part Arm 1, 2 or 3’ procedure.
Omitting zones manually (see page 15 for details) is
not classed as Part Arming.
To Arm the System
➤ To arm the system, proceed as follows:
Ensure that the premises are secure (all doors and
windows closed etc.) and the Ready light is on.
To do a quick arm, press
Or
Enter a valid User code
should look like this:
!"#$"%#&'()#)"
*+,#-$-).,/
.
%
%
%%
....
....
........
, the display
To Part Arm the System
➤ To part arm the system, proceed as follows:
Ensure that the premises are secure (all windows and doors
not being omitted are closed) and the Ready light is on.
To do a quick part arm, press
Or
Enter a valid User code
should look like this:
Press
Use keys
area suite, the display will look something like this:
!
, the display will look something like this:
'
'
''
!"#$ "%#& '() 6H
IR.( 1(L# *+, #K"< .
-
!
!
!!
!"#$ "%#& '() 6H
U.<) 1,.# *+, #3
The bottom line of the display is programmable for
each Part Arm.
The top line of the display is programmable for each
Area suite.
....
....
........
!"#$"%#&'()#)"
*+,#-$-).,/
or
to select the required part arm or
1
1
11
or
.
'
'
''
*+.' #*+, #A% 1).# 3
#### *999 999 9
*+.' #*+, #A% 1).# 7
#### *UB9 999 9
, the display
Press
been selected) and the display will look something like
this:
Leave the premises, when the system has armed the exit
tone will stop (if sounding).
The system is now armed.
, the exit tone will sound (if silent arm has not
#
#
##
*+.' -#1( #IJ 1)# X
#### *999 999 9#
When the required part arm or area suite has been
selected press
has not been selected) and the display will look something
like this:
Leave the protected area. When the system has armed,
the exit tone (if sounding) will stop and the display will look
something like this:
*+.' -#*+ ,.< #X
#### *999 999 9#
The system is now part armed.
, the exit tone will sound (if silent arm
#
#
##
*+.' -#1( #IJ 1)# X
#### *999 999 9#
W##0*QM#*QKI!##W
#M%.#54#K'+#7553
INS177 9
Page 11
The Armi
ng Menu
P
888
8168
l
remier
&
User Manua
To Silent Arm the System
➤ To silent arm the system, proceed as follows:
Ensure that the premises are secure (all doors and
windows closed etc.) and the Ready light is on.
Enter a valid User code
should look like this:
!"#$"%#&'()#)"
*+,#-$-).,/
Press
Press
Or
Press
Continue to arm as normal.
until the display looks like this:
)
)
))
!"#$"%#&'()#)"
A1@.()#*+,/
to arm the system
#
#
##
to part arm the system.
'
'
''
....
....
........
, the display
To Cancel the Exit Mode
➤ To cancel the exit mode, proceed as follows:
The display will look something like this:
*+.' -#1( #IJ 1)#X
#### *U99 999 9#
To Disarm the System During Entry
➤ To disarm the system, proceed as follows:
Enter the premises via the designated entry point, the
entry tone will start and the display will look something like
this:
*+.' -#1( #I( )+$# X
#### *UB9 999 9#
Enter a valid User code
tone will stop and the display will look something like this:
The system is now disarmed.
If the entry time expires, an Internal alarm will occur
!
for the duration of the ‘2
nd
If the 2
occur (all internal and external sounders).
Entry Delay expires, an Intruder alarm will
....
....
........
##0+ .,1. +#2 342
3868 4958 N#M %.#5 4
nd
Entry Delay’.
, the entry
To Disarm the System When Not in Entry
➤ To disarm the system, proceed as follows:
The display will look something like this:
##0+ .,1. +#2 342
3868 4958 N#M %.#5 4
Enter a valid User code
should look like this:
Press
something like this:
The exit mode has now been cancelled.
, the exit tone will stop and the display will look
#
#
##
....
....
........
!"#$ "%#& '() #)"
B'(> .@#I J1) /
###0+.,1.+#222
#M%.#54#K'+#7553
, the display
Enter a valid User code
should look like this:
Press
The system is now disarmed.
, the display will look something like this:
#
#
##
....
....
........
!"#$"%#&'()#)"
!1-'+,#A$-).,/
###0+.,1.+#222
#M%.#54#K'+#7553
, the display
10 INS177
Page 12
P
remier
888 & 8168
l
The Armi
User Manua
ng Menu
Arming and Disarming Areas
An area is Armed, when ALL zones within that area are ON
(not omitted).
An area is Part Armed, when SOME zones within that area
are ON (not omitted) and some zones within that area are
OFF (omitted).
An area is only Part Armed when zones are omitted
!
using the ‘Part Arm 1, 2 or 3’ procedure.
Omitting zones manually (see page 15 for details) is
not classed as Part Arming.
To Arm Areas
➤ To arm areas, proceed as follows:
Ensure that the premises are secure (all doors and
windows closed etc.) and the Ready light is on.
To do a quick arm, press
Or
Enter a valid User code
should look like this:
!"#$"%#&'()#)"
*+,#-$-).,/
Press
, the display will look something like this:
%
%
%%
A.@. >)#* +. '-#X
##X# WWWW WW 99#\
.
%
%
%%
....
....
........
, the display
To Part Arm Areas
➤ To part arm areas, proceed as follows:
Ensure that the premises are secure (all windows and doors
not being omitted are closed) and the Ready light is on.
To do a quick part arm, press
Or
Enter a valid User code
should look like this:
Press
Press
Use keys
0
something like this:
!
until the display looks like this:
)
)
))
, the display will look something like this:
%
%
%%
-
!
!
!!
and
Only areas that exist on the system can be selected.
A ‘Star’ means the area can be selected and a ‘Dot’
means the area cannot be selected.
= Areas A, B and C, the display will look
*
....
....
........
!"#$"%#&'()#)"
*+,#-$-).,/
!"#$"%#&'()#)"
0'+)#*+,#-$-).,/
A.@. >)#* +. '-#X
##X# WWWW WW 99#\
to select/deselect areas i.e.
1
1
11
A.@. >)#* +. '-#X
##X# *UBW WW 99#\
'
'
''
.
, the display
!
,
Use keys
= Areas A and B, the display will look something like
0
this:
Only areas that exist on the system can be selected.
!
(A ‘Star’ means the area can be selected and a ‘Dot’
means the area cannot be selected).
Pressing
Pressing
I to P (Premier 8168 only).
When all the required areas have been selected press
, the exit tone will sound (if silent arm has not been
#
#
##
selected) and the display will look something like this:
Leave the premises, when the system has armed, the exit
tone (if sounding) will stop.
The selected areas are now armed.
!
!
!!
-
to select/deselect areas i.e.
1
1
11
A.@. >)#* +. '-#X
##X# *UWW WW 99#\
will select/deselect all areas.
2
will toggle between areas A to H and
%
*+.' -#1( #IJ 1)#X
#### *U99 999 9#
!
and
Pressing
Pressing
I to P (Premier 8168 only).
When all the required areas have been selected press
, the display will look something like this:
#
#
##
Leave the protected area. When the areas have armed,
the exit tone (if sounding) will stop and the display will look
something like this
*+.' -#A) '$# *+, .<
#### *UB9 999 9
The selected areas are now part armed.
will select/deselect all areas.
2
will toggle between areas A to H and
%
*+.' -#1( #IJ 1)#X
#### *UB9 999 9#
W##0*QM#*QKI!##W
#M%.#54#K'+#7553
INS177 11
Page 13
The Armi
ng Menu
P
888
8168
l
remier
&
User Manua
To Silent Arm Areas
➤ To silent arm areas, proceed as follows:
Ensure that the premises are secure (all doors and
windows closed etc.) and the Ready light is on.
Enter a valid User code
should look like this:
!"#$"%#&'()#)"
*+,#-$-).,/
Press
Press
Or
Press
Continue to arm as normal.
until the display looks like this:
)
)
))
!"#$"%#&'()#)"
A1@.()#*+,/
to arm areas.
%
%
%%
to part arm areas.
'
'
''
....
....
........
, the display
To Cancel the Exit Mode
➤ To cancel the exit mode, proceed as follows:
The display will look something like this:
*+.' -#1( #IJ 1)#X
#### *U99 999 9#
To Disarm Areas During Entry
➤ To unset areas, proceed as follows:
Enter the premises via the designated entry point, the
entry tone will start and the display will look something like
this:
*+.' -#1( #I( )+$# X
#### *UB9 999 9#
Enter a valid User code
tone will stop and the display will look something like this:
The selected areas are now disarmed.
If the entry timer expires, an Internal alarm will occur
!
for the duration of the ‘2
nd
If the 2
occur (all internal and external sounders).
Entry Delay expires, an Intruder alarm will
....
....
........
##0+ .,1. +#2 342
3868 4958 N#M %.#5 4
nd
Entry Delay’
, the entry
To Disarm Areas When Not in Entry
➤ To unset areas, proceed as follows:
The display will look something like this:
*+.' -#*+ ,.< #X
#### *U99 999 9
W#A]AMIK#*QKI!#W
#M%.#54#K'+#7553
Enter a valid User code
should look like this:
Press
something like this:
The exit mode has now been cancelled.
, the exit tone will stop and the display will look
#
#
##
....
....
........
!"#$ "%#& '() #)"
B'(> .@#I J1) /
###0+.,1.+#222
#M%.#54#K'+#7553
, the display
Enter a valid User code
should look like this:
Press
Use keys
require disarming i.e.
the display will look something like this:
!
When all the required areas have been selected press
#
#
##
, the display will look something like this:
%
%
%%
-
!
!
!!
Only areas that exist on the system can be selected.
A ‘Star’ means the area can be selected and a ‘Dot’
means the area cannot be selected.
Pressing
Pressing
I to P (Premier 8168 only).
, the display will look something like this:
2
%
....
....
........
!"#$"%#&'()#)"
!1-'+,#A$-).,/
A.@. >)#* +. '-#X
##X# WWWW WW 99#\
to select/deselect areas that
1
1
11
and
!
!
!!
A.@. >)#* +. '-#X
##X# *UWW WW 99#\
will select/deselect all areas.
will toggle between areas A to H and
##0+ .,1. +#2 342
3868 4958 N#M %.#5 4
0
0
00
, the display
= Areas A and B,
12 INS177
The selected areas are now disarmed.
Page 14
P
remier
888 & 8168
l
The Armi
User Manua
ng Menu
To Clear an Arm Fail
When the system tries to arm with zones active (open), the
internal sounders will sound and the external strobe will be
flashing to indicate a problem.
If you were not present when the arm fail occurred
!
or you do not clear the arm fail condition, the
internal sounders will continue to sound and the
external strobe will continue to flash.
The system is NOT armed.
➤ To clear the arm fail, proceed as follows:
The alarm will be sounding and the display will look
something like this:
*+.'#*QK#?*[T#X
####*9999999
Enter a valid User code
The internal and external sounders will stop but the
external strobe will continue to flash and the display will
look something like this.
*+.'#*QK#?*[T#X
####*9999999
The number of the zone that caused the alarm will
!
be displayed (in this case Zone 2) and the numbers
of any subsequent zones activated (if any) will be
alternating on the display.
To try to arm again, clear the fault and press
Or
....
....
........
F"(.#557#*>)1R.
U.<+"",#;1(<"&
.
#
#
##
.
To Silence an Alarm
When an alarm occurs on the system, the internal
and external sounders will normally sound for a
pre-programmed time (normally 15 minutes).
If you were not present when the alarm activated,
!
the internal and external sounders will have already
stopped. The system will re-arm but the external
strobe will continue to flash.
➤ To silence an alarm, proceed as follows:
The alarm will be sounding and the display will look
something like this:
##0+ .,1. +#2 342
3868 4958 N#M %.#5 4
The top line of the display is programmable.
!
Enter a valid User code
The internal and external sounders will stop, the external
strobe will continue to flash and the display will look
something like this.
F"(.#557#*@'+,
38684958N#M%.#54
The number of the zone that caused the alarm will
!
be displayed (in this case Zone 2) and the numbers
of any subsequent zones activated (if any) will be
alternating on the display.
The alarm now needs to be reset (see page 14 for details).
....
....
........
MC.#E'@@&'$#01+
.
To clear the arm fail display, enter a valid User code
....
....
........
For details on preventing an Arm Fail condition, please
refer to page 8.
and press
##0+ .,1. +#2 342
3868 4958 N#M %.#5 4
(
(
((
.
INS177 13
Page 15
The Armi
ng Menu
P
888
8168
l
remier
&
User Manua
To Reset an Alarm
Once the alarm has been silenced (see page 13 for
details), the system will need to be reset.
User Reset
➤ To reset the alarm, proceed as follows:
Enter a valid User code
should look like this:
Press
stop, the system will chime and the display will return to
normal.
!
to clear the alarm, the external strobe will
(
(
((
If the system has been programmed, to be reset by
an Engineer, pressing
display to normal. If this is the case, see Engineer
Reset for details.
The system may have been programmed to be reset
by Anti-code, if this is the case, see Anti-code Reset
for details.
....
....
........
0+.- -#QI AIM #)"
B@.' +#)C .#* @'+,
(
will not return the
Engineer Reset
If the system has been programmed to be reset by an
Engineer following an alarm activation, you will still be able
to silence the alarm by entering a valid User code (see
page 13 for details).
➤ To reset the alarm, proceed as follows:
, the display
Anti-code Reset
If the system has been programmed to be reset using an
Anti-Code following an alarm activation, you will still be
able to silence the alarm by entering a valid User code.
➤ To reset the alarm, proceed as follows:
Enter a valid User code
will look something like this:
Press
!
Contact the telephone number on the display
(if programmed) or the telephone number on the last
page of the Control Panel User Guide with the random
code number, in order to obtain a 4-digit Anti-Code.
!
Enter the Anti-code that has been given, i.e. 5624, the
display will look something like this:
Press
, the display will look something like this:
(
(
((
Where 4281 is the random code in this example.
The area that the alarm occurred in cannot be
armed again until the alarm has been reset.
, the display should look like this:
#
#
##
....
....
........
B'@@ #*QB #)"
Q.-. )#A$ -). ,
^%") .#X# 872 3
Q.N@ $#X# HHH H
^%").#X#8723
Q.N@$#X#:478
0+.- -#QI AIM #)"
B@.' +#)C .#* @'+,
, the display
F"(.#557#*@'+,
38684958N#M%.#54
Enter a valid User code
will look something like this:
B'@@ #I(L 1(. .+#) "
##Q. -.)# A$- ).,
The number of the zone that caused the alarm will
!
be displayed (in this case Zone 2) and the numbers
of any subsequent zones activated (if any) will be
alternated on the display.
Contact the telephone number on the display (if
programmed) or the telephone number at the rear of
this User Guide.
The area that the alarm occurred on cannot be
!
armed again until the alarm has been reset.
MC.# E'@@ &' $#01 +
....
....
........
, the display
Press
The external strobe will stop, the system will chime and the
display will return to normal.
to clear the alarm.
(
(
((
14 INS177
Page 16
P
remier
888 & 8168
l
The Armi
User Manua
To Omit Zones
It is possible to exclude (omit) or include individual zones
during setting i.e. if a zone is ‘in fault’. Users with access to
this function can only omit zones that have been
programmed as ‘Omittable’.
➤ To omit zones when arming, proceed as follows:
Enter a valid User code
should look like this:
....
....
........
, the display
ng Menu
View Zone Status
Users with access to this feature will be able to check the
status of each zone on the system to see whether it is
in ‘Fault’, ‘Secure’, ‘Tamper’ or ‘Shorted’.
!"#$"%#&'()#)"
*+,#-$-).,/
Press
Enter the zone number
key to search, the display will look something like this:
!
Press
something like this:
!
When all the required zones have been selected for omitting
press
Continue to arm the system/area as normal (see page 9 or
11 for details).
The selected zones are now omitted.
!
, the display will look something like this:
3
3
33
F"(. #553 WA. >%+.
?+"( )#!" "+# #### X
...
...
......
F"(. #535 W*> )1R.
T"%( L.#! .). >)"+ #X
If the zone can be omitted, there will be a ‘Star’ to
the right of the zone number. Only zones that have
the ‘Omit’ attribute assigned to them can be omitted.
to omit the selected zone, the display will look
3
3
33
F"(. W535 W*> )1R.
1-#D,1)).<
A ‘Star’ will appear to the left of the zone number to
indicate that the zone has been selected for omitting.
Repeat for other zones if required.
, the display should look like this:
/
/
//
!"#$"%#&'()#)"
*+,#-$-).,/
All omitted zones will be automatically reinstated the
next time the system/area is disarmed, unless
programmed otherwise.
F"(. W535 WA. >%+.
T"%( L.#! .)> )"+# X
or use the
)
)
))
➤ To view the status of zones, proceed as follows:
Enter a valid User code
should look like this:
Press
Press
Enter the zone number
key to search, the display will look something like this:
!
Every time the selected zone is activated, its status will be
displayed and the keypad will chime (if selected), the
display will also look something like this:
Press
Press
until the display looks like this:
)
)
))
, the display will look something like this:
#
#
##
Pressing
it is activated (an Arrow will appear to the right of the
zone number), to clear the chime, press
Pressing
#
#
##
(
(
((
&
%
F"(. #535 X*> )1R.
T"%( L.#! .). >)"+ #X
when finished, the display should look like this:
to exit the menu and return to normal.
....
....
........
!"#$"%#&'()#)"
*+,#-$-).,/
!"#$ "%#& '() #)"
=1.& #F"( .#A )')% -
F"(. #553 #A. >%+.
?+"( )#!" "+# #### X
...
...
......
F"(. #535 #A. >%+.
T"%( L.#! .). >)"+ #X
will make the zone chime every time
will display the zone text.
F"(. #535 XA. >%+.
T"%( L.#! .). >)"+ #X
!"#$ "%#& '() #)"
=1.& #F"( .#A )')% -
, the display
or use the
&
)
)
))
again.
Re-instating Zones Manually
If the system has been programmed for zones to be re-instated
manually, simply follow the instructions again. However, when
the
INS177 15
key is pressed, the display will look something like this:
3
F"(. W53: #A. >%+.
1-#_ ")#D ,1) ).<
F"(. W53: #A. >%+.
U'>O #!"" +## #### X
Page 17
The Armi
ng Menu
P
888
8168
l
Omit 24Hr Zones
It is possible to exclude (omit) or include 24Hr zones whilst
the system is disarmed to allow access to an area. Users
with access to this function can only omit zones that have
been programmed as ‘Omittable’.
➤ To omit 24Hr zones, proceed as follows:
Enter a valid User code
should look like this:
!"#$"%#&'()#)"
*+,#-$-).,/
....
....
........
, the display
remier
&
User Manua
Set Chime Areas
When a zone is enabled for Chime the Keypad will
generate a Chime tone every time the zone is activated.
Users with access to this function will be able to turn
Chime on and off for selected areas.
Zones within an area can be individually programmed for
chime in Edit Chime Zones (see page 23 for details).
Press
Press
Enter a zone number
to search, the display will look something like this:
!
Press
something like this:
!
until the display looks like this:
)
)
))
!"#$ "%#& '() #)"
D,1) #78E +#F "(.-
, the display will look something like this:
#
#
##
F"(. #553 #A. >%+.
?+"( )#!" "+# #### X
...
...
......
F"(. #53: #A. >%+.
U'>O #!"" +## #### X
If the zone can be omitted, there will be a ‘Star’ to
the right of the zone number. Only zones that have
the ‘Omit’ attribute assigned to them can be omitted.
to omit the selected zone, the display will look
3
3
33
F"(. W53: #A. >%+.
1-#D,1)).<
A ‘Star’ will appear to the left of the zone number to
indicate that the zone has been selected for omitting.
or use the
F"(. W53: #A. >%+.
U'>O #!"" +## #### X
)
)
))
key
➤ To set Chime areas, proceed as follows:
Enter a valid User code
should look like this:
Press
Use keys
0
something like this:
!
, the display will look something like this:
&
&
&&
-
!
!
!!
and
Only areas that have been programmed for ‘Chime’
can be selected. A ‘Star’ means the area can be
selected and a ‘Dot’ means the area cannot be
selected.
Pressing
Pressing
I to P (Premier 8168 only).
= Areas A, B and C, the display will look
*
2
%
....
....
........
!"#$"%#&'()#)"
*+,#-$-).,/
I('P @.#B C1, .#"(
##X# WWW9 999 9#\
to select/deselect areas i.e.
1
1
11
I('P@.#BC1,.#"(
##X#*UB99999#\
will select/deselect all areas.
will toggle between areas A to H and
, the display
!
,
Repeat for other zones.
When all the required zones have been selected for omitting
press
Press
The selected 24Hr zones are now omitted.
, the display should look like this:
/
/
//
!"#$"%#&'()#)"
IJ1)#K.(%/
, the display will look something like this:
#
#
##
W#F"(.-#D,1)).<#W
#M%.#54#K'+#7553
Reinstate 24Hr Zones
To reinstate the omitted zones, simply follow the instructions
again. However, when the
look something like this:
F"(. W53: #A. >%+.
1-#_ ")#D ,1) ).<
key is pressed, the display will
3
F"(. W53: #A. >%+.
U'>O #!"" +## #### X
When all the required areas have been selected for
‘Chime’ press
Press
to exit the menu and return to normal.
(
(
((
, the display should look like this:
#
#
##
!"#$ "%#& '() #)"
A.)# BC1, .#* +.'- /
Turning Chime On and Off
The display will normally show the time & date.
##0+ .,1. +#2 342
3868 4958 N#M %.#5 4
➤ To turn Chime On, proceed as follows:
Press
is now enabled.
➤ To turn Chime Off, proceed as follows:
Press
now disabled.
, the keypad will chime to indicate that Chime
&
&
&&
, the keypad will bleep to indicate that Chime is
&
&
&&
16 INS177
Page 18

P
remier
888 & 8168
l
The Armi
User Manua
ng Menu
INS177 17
Page 19
The Armi
ng Menu
P
888
8168
l
View Act. Faults
If any zones with the ‘Activity’ attribute have not been
activated within a certain time period, an activity fault will
be displayed at the time of arming. Users with access to
this function will be able to view the activity faults.
remier
&
User Manua
View Act. Counts
Users with access to this menu will be able to view the
number of activity faults that have occurred on each area.
The system may have been programmed so that an
!
activity fault will not allow arming. If this is the case
the system can only be armed once the zone in fault
has been activated (forced walk test).
➤ To view activity faults, proceed as follows:
Enter a valid User code
should look like this:
Press
Press
Press
!
When all the required zones have been viewed press
#
#
##
until the display looks like this:
)
)
))
, the display will look something like this:
#
#
##
to scroll up and down through the zones.
)
)
))
Only zones with the ‘Activity’ attribute that have not
been activated will be shown.
, the display should look like this:
....
....
........
!"#$"%#&'()#)"
*+,#-$-).,/
!"#$ "%#& '() #)"
=1.& #*>) 9#? '%@) -
F"(. #553 #A. >%+.
?+"( )#!" "+# #### X
!"#$ "%#& '() #)"
=1.& #*>) 9#? '%@) -
, the display
➤ To view activity counts, proceed as follows:
Enter a valid User code
should look like this:
Press
Press
Use keys
Area B or use the
something like this:
!
Press
this:
Press
until the display looks like this:
)
)
))
, the display will look something like this:
#
#
##
-
!
!
!!
To reset the activity counter, press
when finished, the display should look like
/
/
//
to exit the menu and return to normal.
(
(
((
....
....
........
!"#$"%#&'()#)"
*+,#-$-).,/
!"#$ "%#& '() #)"
=1.& #*>) 9#B "%() -
*>)1 R1)$ #*X #555 5
M")' @#B" %() #555 :
to view specific areas i.e.
1
1
11
key to search, the display will look
)
*>)1 R1)$ #UX #55 5:
M")' @#B" %() #55 55
(
(
((
!"#$ "%#& '() #)"
=1.& #*>) 9#B "%() -
, the display
=
0
.
Press
to exit the menu and return to normal.
(
(
((
18 INS177
Page 20

P
remier
888
8168
l
The U
&
User Manua
4. The User Menu
Accessing the User Menu
Advanced operations of the system are carried out using the
User Menu i.e. System Tests, Assigning Users etc.
Not all options are available to all users. If an option
!
cannot be selected, it may be that it is not assigned
to that user (see page 31 for details).
The table below shows the various options available:
Key Option Page
)
)
)
)
)
)
)
)
)
)
)
)
)
User Menu
View System Log
Change Code
Edit Chime Zones
System Tests
Walk Test
Enable Engineer
Set System Time
Set System Date
Change Timers
Change Ctl Times
Setup Users
Alter Part Zones
Call Remote PC
19
23
23
24
24
26
26
27
27
28
30
35
35
ser Menu
View the Event Log
The control panel has two Event Logs, which are time and
date stamped. The first log which is a system log, records
all events that occur on the system, i.e. Users entering their
codes to arm or disarm areas, alarm events, failures to arm
etc. and the second log which is an alarm log, only records
alarm events that occur on the system.
Users with access to this option can view the Event Log to
see what events occurred on the system and when they
occurred.
When viewing the system log there are 8 hotkeys available.
These hotkeys allow certain events to be found easier
without the need for searching (see page 22 for details).
➤ To view the Event Log, proceed as follows:
Enter a valid User code
should look like this:
!"#$"%#&'()#)"
*+,#-$-).,/
Press
, the display should look like this:
/
/
//
!"#$"%#&'()
G-.+#K.(%/
....
....
........
, the display
➤ To access the User menu, proceed as follows.
The display will normally show the time & date:
##0+ .,1. +#2 342
3868 4958 N#M %.#5 4
The top line of the display is programmable.
!
Enter a valid User code
should look like this:
Press
Press
Press
that option, press
Press
!
, the display should look like this:
/
/
//
, the display should look like this:
#
#
##
until the required option is displayed, to select
)
)
))
#
##
to exit the User menu and return to normal.
(
(
((
If no keys are pressed, the display will return to
normal after the ‘Menu Time Out’ timer has expired.
....
....
........
!"#$"%#&'()#)"
*+,#-$-).,/
!"#$"%#&'()
G-.+#K.(%/
!"#$ "%#& '( )#)"
=1.& #A$- ). ,#T" L/
.
#
, the display
Press
Press
Press
the display will look something like this:
Press
!
Press
information and the time/date, the display will look
something like this:
, the display should look like this:
#
#
##
!"#$ "%#& '( )#)"
=1.& #A$- ). ,#T" L/
, the display should look like this:
#
#
##
3#`#A$-).,#T"L
7#`# *@'+ ,#T "L
for the System Log or
!
!
!!
B"<.#53#!'R1<
*+.'6#*UB99999
to scroll up and down through the Log.
)
)
))
The down key moves you to the previous event
(backwards in time), and the up key moves you
forwards again.
Use keys
events (see page 22 for details).
to toggle the display between the area
%
%
%%
-
!
!
-
-
!!
--
B"<. #53# !'R 1<
#376 7295 8#5 4a5b
or
&
&
&&
for the Alarm Log,
0
0
00
to search for specific
INS177 19
Press
this:
when finished, the display should look like
/
/
//
!"#$ "%#& '( )#)"
=1.& #A$- ). ,#T" L/
Page 21

The U
ser Menu
P
888
8168
l
remier
&
User Manua
Press
!
to exit the menu and return to normal.
(
(
((
For a full list of Log Events and their descriptions,
please see next page.
20 INS177
Page 22

P
remier
888
8168
l
The U
&
User Manua
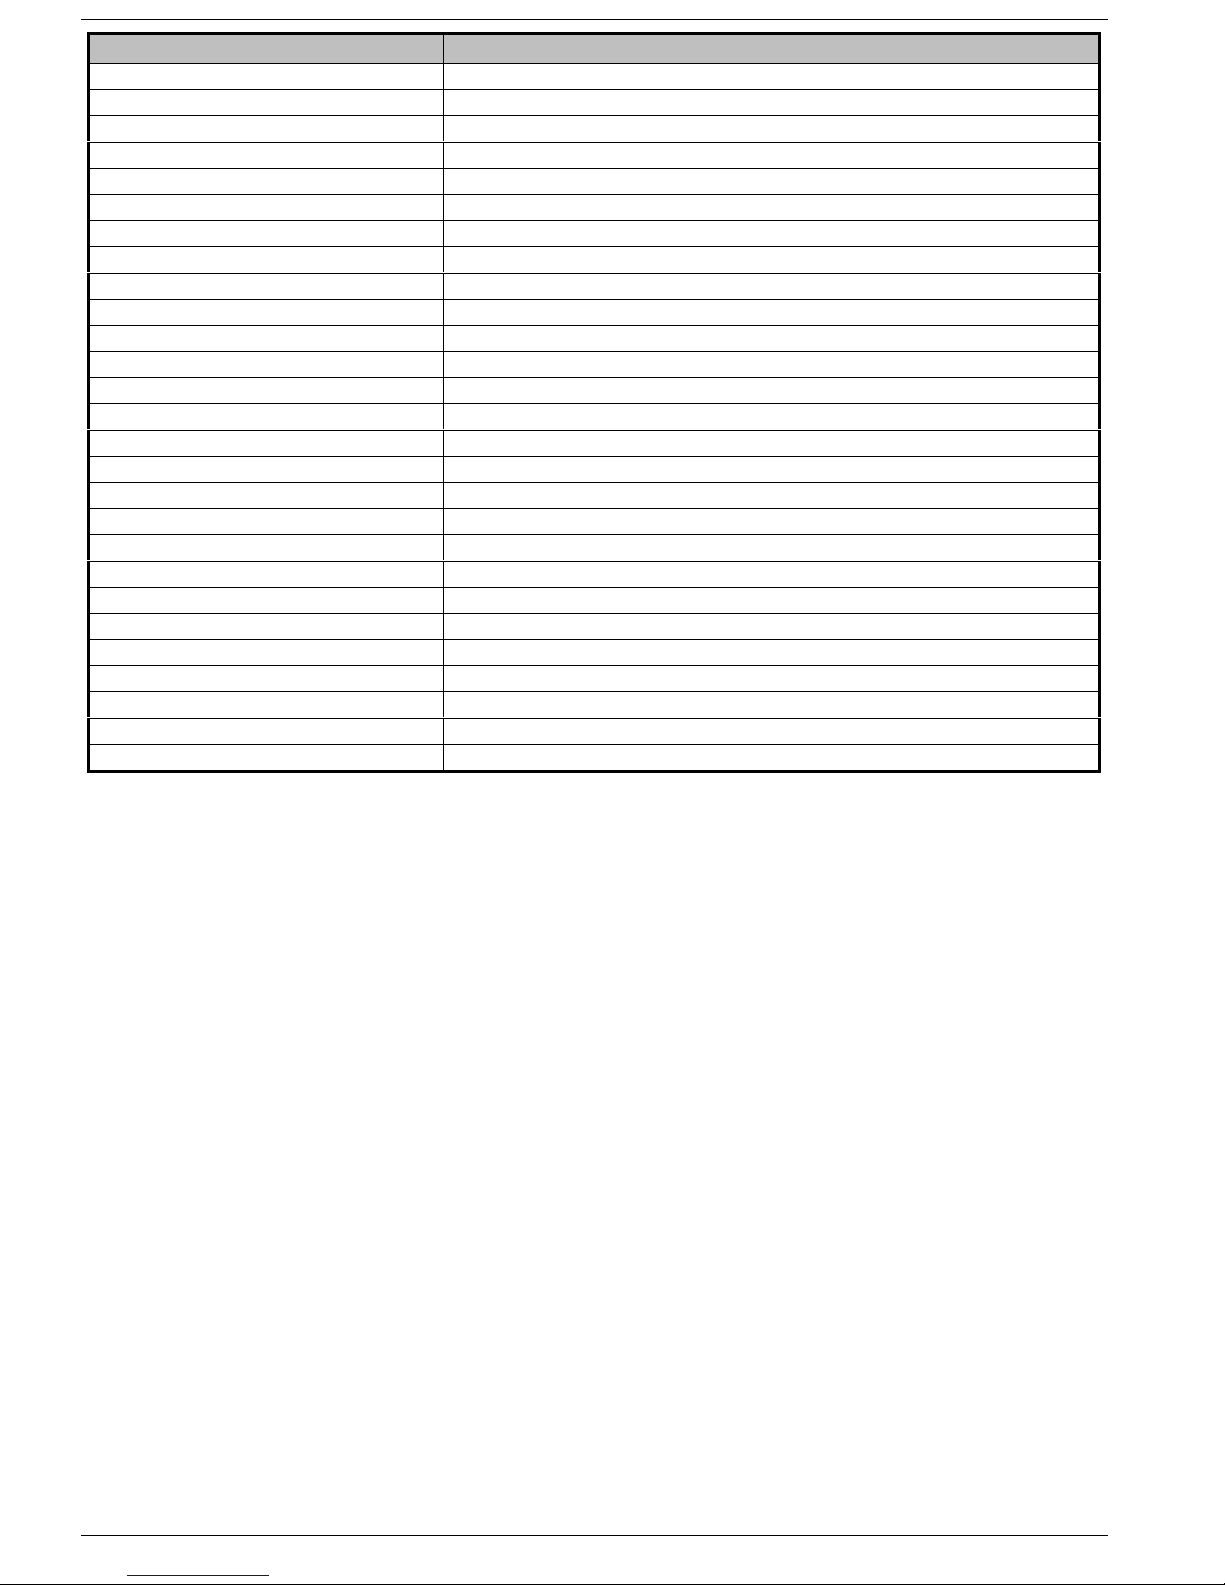
Event Log Descriptions
Log Event Description
KSW ### Active A Keyswitch zone type has been activated (zone number ###)
RKP #,# MEDICAL A Medical alarm (7 & 9) has occurred from keypad number #,#
RKP #.# FIRE A Fire alarm (4 & 6) has occurred from keypad number #,#
RKP AUD PA #,# An Audible PA alarm (1 & 3) has occurred from keypad number #,#
RKP SIL PA #,# A Silent PA alarm (1 & 3) has occurred from keypad number #,#
DURESS User ## has entered a Du ress Code at a keypad
ALARM Active An Intruder alarm signal has been activated for area ?
BELL Active The Bell output has been activated for area ?
REARM LOCK ### Zone ### has re-armed after causing an alarm
CROSS ### A Verified Cross Zone Alarm has occurred from zone ###
USER ## User ## has entered their code
AREAS EXIT The Exit mode has been started for area ?
ARMING FAILED A Exit Error-Arm Fail has occurred on area ?
AREAS ENTRY The Entry mode has been started for area ?
ARMING SUITE Area Arm Suite # was used to arm the system
ARMED WITH L/F The system has been armed with a Line Fault condition present
AREA Armed Area ? has been armed
AREA Disarmed Area ? has been disarmed
PART Armed Area ? has been Part Armed
TIME A rmed Area ? was armed automatically using one of the timer controls
TIME Disarmed Area ? was disarmed automatically using one of the timer controls
DEFERRED The arming mode was deferred for area ?
ALARM ABORT An Open After Alarm-Abort has occurred for area ?
REMOTE Armed Area ? was armed using the Wi ntex UDL software
REMOTE Disarmed Area ? was disarmed using the Wintex UDL software
QUICK Armed Quick Arm from keypad #,#
RECENT Armed Area ? has been armed recently
#,# RESET AREAS - Area have been reset using keypad #,# following an Intruder alarm
Engineer Reset A reset has been performed using an Engineers code
Anti-Code Reset A reset has been performed using the Anti-code reset procedure
Remote Reset A reset has been performed using the ‘Remote Reset’ input
Redcare Reset A reset has been performed by the Redcare
Key switch Reset A reset has been performed using a key switch
User Reset A reset has been performed using a User code
EXP #,# Reset A reset has been performed using the input on expander #,# (programmed as reset)
Remote PC Reset A reset has been performed by the remote download PC
FUSE #,# FAIL The Auxiliary 12V Fuse in device #,# has failed
AC POWER The control panel has registered a AC Mains failure
LOW BAT The control panel has registered a low battery condition
POWERED UP System Power Up (without doing a factory restart)
BELL FUSE The control panel Bell Fuse has failed
LINE FLT There is a problem with the telephone line
Panel Line Fault The control panel line fault input has been activated
Redcare Line Fault The Redcare has detected a line fault
Com??? Line Fault The Com300, 2400 or ISDN has detected a line fault
Exp #,# Line Fault The Input on expander #,# (programmed as line fault) has been activated
COMS FAILED The Com300 or Com2400 has failed to report to the Alarm Receiving Centre
DOWNLOAD START An Upload/Download has been initiated
DOWNLOAD END The Upload/Download has finished
LOG ALERT 80% of the Event Log has filled (since the last Upload/Download)
DATE CHANGED The control panel Time has been changed
TIME CHANGED The control panel Date has been changed
ser Menu
INS177 21
Page 23
The U
ser Menu
P
888
8168
l
Log Event Description
PROG. START An Engineer code has been entered
PROG. END The Engineer has logged out of the Programming menu
BOX LID The control panel lid has been removed causing a Tamper alarm
BELL #,# Tamper A Bell Tamper input from device #,# has been activated
AUX #,# Tamper An Auxiliary Tamper input from device #,# has been activated
EXP #,# Tamper The cover of expander #,# has been removed
RKP #,# Tamper The cover of keypad #,# has been removed
RKP #,# LOST Keypad ## has been lost from the network
EXP #,# LOST Expander ## has been lost from the network
FIRE ### Active Zone ### (programmed as Fire Alarm) has caused an alarm
Zone ### Tamper Zone ### has caused a Tamper alarm
Zone ### Active Zone ### has been activated
Zone ### Restore Zone ### has restored to its normal condition
Zone ### Omitted Zone ### has been omitted
Zone ### Un-Omit Zone ### has been reinstated
Zone ### Test Start Zone ### has been put on test
Zone ### Test End Zone ### has been removed from test
RKP LOCKED #,# Keypad #,# has been locked out from too many invalid key presses
CODE #,# Too many invalid key presses have caused a tamper alarm from keypad #,#
TEST FAIL ###) Zone ### has failed its Soak test
MANUAL TEST CALL A manual test transmission has been initiated
AUTO TEST CALL An Automatic test transmission has been initiated
WALK The Walk Test mode has been initiated
TESTED ### Zone ### has been tested
DEFAULTS LOADED The factory default values have been loaded into memory
FIRST KNOCK ### Zone ### (which is programmed as double knock) has activated for the first time
CURRUPT EVENT No event has been stored in memory
remier
&
User Manua
Event Log Hotkeys
When viewing the system log there are 8 hotkeys available.
These hotkeys allow certain events to be found easier
without the need for searching.
The following hotkeys are available:
= Priority Alarms (PA, Fire etc.)
!
= Normal Alarms (Guard, 24hr, Entry/Exit etc.)
0
= Opens and Closings (Arm, Disarm etc.)
*
= Omits and Reinstates (Zone Omits etc.)
+
= Maintenance (System Tests, Engineer Program etc.)
4
= Tampers (Zone, Bell, Aux etc.)
,
= Test Calls (Communicator Active, successful etc.)
-
= Next Matching Event (On Screen Event)
&
The CHIME key will jump straight to an event that
!
matches the one that is displayed on the screen i.e.
if Code 01 is displayed, pressing CHIME will find
any preceding event that relates to a User code
being entered.
22 INS177
Page 24
P
remier
888
8168
l
The U
&
User Manua
Change Code
Users with access to this option can change their own
User codes if required. User codes are unique to each user
and can be 4, 5 or 6 digits long.
Only the User code that is entered to access the
!
change code menu will be changed.
➤ To change a User code, proceed as follows:
Enter the User code that requires changing
....
....
........
Press
, the display should look like this:
/
/
//
, the display should look like this:
!"#$"%#&'()#)"
*+,#-$-).,/
!"#$"%#&'()
G-.+#K.(%/
ser Menu
Edit Chime Zones
When a zone is enabled for Chime the Keypad will
generate a Chime tone every time the zone is activated.
This function allows you to turn the Chime feature on and
off on selected zones. Users with access to this option will
be able to program zones for Chime.
Zones will only cause the sounders to chime if the
!
area they are assigned to is enabled for Chime (see
page 16 for details).
➤ To program Chime zones, proceed as follows:
Enter a valid User code
should look like this:
!"#$"%#&'()#)"
*+,#-$-).,/
....
....
........
, the display
Press
Press
Press
Enter the new User code
display will look something like this:
Press
Press
, the display should look like this:
#
#
##
!"#$ "%#& '( )#)"
=1.& #A$- ). ,#T" L/
until the display looks like this:
)
)
))
!"#$ "%#& '( )#)"
BC'( L.#B "< ./
, the display will look something like this:
#
#
##
I(). +#_. &#B "<.X
#### #HHH HHH
....
....
........
I(). +#_. &# B"<. X
#### #HH2 c2 c
, the display should look like this:
#
#
##
!"#$ "%#& '( )#)"
BC'( L.#B "< ./
to exit the menu and return to normal.
(
(
((
, the
Press
Press
Press
Press
Enter a zone number
key to search, the display will look something like this:
Press
Chime 2 etc. to omit the selected zone, the display will
look something like this:
, the display should look like this:
/
/
//
!"#$"%#&'()
G-.+#K.(%/
, the display should look like this:
#
#
##
!"#$ "%#& '( )#)"
=1.& #A$- ). ,#T" L/
until the display looks like this:
)
)
))
!"#$ "%#& '( )#)"
I<1) #BC1 ,. #F"( .-
, the display should look like this:
#
#
##
F"(. #553 #A1 @.()
?+"( )#!" "+# #### X
...
...
......
F"(. #53: #A1 @.()
U'>O #!"" +## #### X
to select Chime, once for Chime 1, twice for
&
&
&&
or use the
)
)
))
INS177 23
F"(. #53: #BC 1,.# 7
U'>O #!"" +## #### X
The zone will only cause the sounders to Chime if
!
the area it is assigned to is enabled for Chime (see
page 16 for details).
Repeat for other zones.
When all the required zones have been selected for Chime
press
Press
, the display should look like this:
#
#
##
!"#$ "%#& '( )#)"
I<1) #BC1 ,. #F"( .-
to exit the menu and return to normal.
(
(
((
Page 25
The U
ser Menu
P
888
8168
l
System Tests
Users with access to this option can test various system
outputs to ensure that they operate correctly. These
include any outputs that have been programmed for
specific operations i.e. bringing on floodlights, sounding
buzzers etc. The internal sounders, speakers and the
external sounder can also be tested to ensure that they are
operating correctly.
➤ To perform system tests, proceed as follows:
Enter a valid User code
should look like this:
Press
Press
Press
Press
Speaker, the display will look something like this:
Press
!
When all the required outputs have been tested press
/
/
//
, the display should look like this:
/
/
//
, the display should look like this:
#
#
##
, the display should look like this:
#
#
##
until the required test is displayed i.e.
)
)
))
to test the selected output.
#
#
##
Only outputs that have been programmed for ‘User
Test’ can be activated.
, the display should look like this:
....
....
........
!"#$"%#&'()#)"
*+,#-$-).,/
!"#$"%#&'()
G-.+#K.(%/
!"#$ "%#& '( )#)"
=1.& #A$- ). ,#T" L/
0%-C #]IA #)" #).- )
U.@@ #1-# ### #XDS S
0%-C #]IA #)" #).- )
AN.' O.+# ### #XDS S
!"#$ "%#& '( )#)"
!"#A $-). ,# ).-) -/
, the display
remier
&
User Manua
Do Walk Test
Users with access to this option can walk test any of the
zones on the system to ensure that they operate correctly.
A walk test can only be performed when the system or
area is disarmed. 24 Hours zones (except Fire and
Tampers) are disabled during walk test allowing Audible
PA buttons, Silent PA buttons, etc. to be tested. To perform
a walk test, proceed as follows:
Enter a valid User code
should look like this:
Press
Press
Press
Press
Use keys
= Area A, the display will look something like this:
!
, the display should look like this:
/
/
//
, the display should look like this:
#
#
##
until the display looks like this:
)
)
))
, the display will look something like this:
#
#
##
-
!
!
1
1
!!
11
Only areas that exist on the system can be selected.
A ‘Star’ means the area can be selected and a ‘Dot’
means the area cannot be selected.
....
....
........
!"#$"%#&'()#)"
*+,#-$-).,/
!"#$"%#&'()
G-.+#K.(%/
!"#$ "%#& '( )#)"
=1.& #A$- ). ,#T" L/
!"#$ "%#& '( )#)"
!"#; '@O# ). -)/
;'@O #).- )#' +.'- X
##X# WWWW WW9 9#\
to walk test specific areas i.e.
;'@O#).-)#'+.'-X
##X#*WWWWW99#\
, the display
!
Any outputs that have been left ‘On’ will
!
automatically be turned ‘Off’ when the System Tests
menu is exited.
Press
24 INS177
to exit the menu and return to normal.
(
(
((
Pressing
Pressing
I to P (Premier 8168 only).
Press
Every time zones are activated the keypad will chime and
the display will look something like this:
Press
Press
, the display will look something like this:
#
#
##
when finished, the display should look like this:
/
/
//
to exit the menu and return to normal.
(
(
((
will select/deselect all areas.
2
will toggle between areas A to H and
%
#### W#_D _I# W
F"(. #535 X*> )1R.
T"%( L.#! .). >)"+ #X
!"#$ "%#& '( )#)"
!"#; '@O# ). -)/
Page 26

P
remier
888
8168
l
The U
&
User Manua
ser Menu
INS177 25
Page 27
The U
ser Menu
P
888
8168
l
Enable Engineer
If Engineer access (either on-site or via remote download
computer) has been programmed as User authorised, this
option must be used to allow the Engineer access to the
programming menu. Users with access to this option can
authorise Engineer access.
Engineer access is only permitted for 4 Hours after it
!
is enabled, after which, it will automatically be
disabled again.
remier
&
User Manua
Set System Time
The alarm system has a real time clock that is used to date
and time stamp events that are recorded within the system
Log. Users with access to this option will be able to set the
Time on your alarm system.
➤ To set the system time, proceed as follows:
➤ To enable Engineer access, proceed as follows:
Enter a valid User code
should look like this:
Press
Press
Press
Press
Press
display will look something like this:
Press
, the display should look like this:
/
/
//
, the display should look like this:
#
#
##
until the display looks like this:
)
)
))
, the display will look something like this:
#
#
##
to enable/disable Engineer access, the
$
$
$$
, the display should look like this:
#
#
##
....
....
........
!"#$"%#&'()#)"
*+,#-$-).,/
!"#$"%#&'()
G-.+#K.(%/
!"#$ "%#& '( )#)"
=1.& #A$- ). ,#T" L/
!"#$ "%#& '( )#)"
I('P @.#I (L 1(.. +/
I(L1 (..+ #*> >.-- X
!1-' P@.<
I(L1 (..+ #*> >.-- X
I('P @.<
!"#$ "%#& '( )#)"
I('P @.#I (L 1(.. +/
, the display
Enter a valid User code
should look like this:
Press
Press
Press
Press
Enter the new time (24-Hour format)
5566
5566
55665566
this:
Press
will look something like this:
, the display should look like this:
/
/
//
, the display should look like this:
#
#
##
until the display looks like this:
)
)
))
, the display will look something like this:
#
#
##
to change between BST and GMT, the display
(
(
((
....
....
........
!"#$"%#&'()#)"
*+,#-$-).,/
!"#$"%#&'()
G-.+#K.(%/
!"#$ "%#& '( )#)"
=1.& #A$- ). ,#T" L/
!"#$ "%#& '( )#)"
A.)# A$-) ., #M1, ./
I(). +#_. &#M 1,.# X
#### #376 72# UAM
, the display will look something like
I(). +#_. &#M 1,.# X
#### #736 8:# UAM
I(). +#_. &#M 1,.# X
#### #736 8:# dKM
, the display
Press
26 INS177
to exit the menu and return to normal.
(
(
((
Press
Press
, the display should look like this:
#
#
##
!"#$ "%#& '( )#)"
A.)# A$-) ., #M1, ./
to exit the menu and return to normal.
(
(
((
Page 28
P
remier
888
8168
l
The U
&
User Manua
Set System Date
The alarm system has a real time clock that is used to date
and time stamp events that are recorded within the system
Log. Users with access to this option will be able to set the
Time on your alarm system.
ser Menu
Change Timers
➤ To change a User code, proceed as follows:
Enter a valid User code
should look like this:
Press
Press
Press
Press
, the display should look like this:
/
/
//
, the display should look like this:
#
#
##
until the display looks like this:
)
)
))
, the display will look something like this:
#
#
##
....
....
........
!"#$"%#&'()#)"
*+,#-$-).,/
!"#$"%#&'()
G-.+#K.(%/
!"#$ "%#& '( )#)"
=1.& #A$- ). ,#T" L/
!"#$ "%#& '( )#)"
A.)# A$-) ., #!') ./
I(). +#_. &#! ').# X
#### 54a5 ba5 3
, the display
The system has 8 control timers that may have been
programmed to activate outputs, arm areas or lockout
users at different times of the day. Users with access to
this option can turn the 8 control timers on and off
manually if required.
➤ To turn the control timers on & off, proceed as follows:
Enter a valid User code
should look like this:
!"#$"%#&'()#)"
*+,#-$-).,/
Press
Press
Press
, the display should look like this:
/
/
//
!"#$"%#&'()
G-.+#K.(%/
, the display should look like this:
#
#
##
!"#$ "%#& '( )#)"
=1.& #A$- ). ,#T" L/
until the display looks like this:
)
)
))
!"#$ "%#& '( )#)"
BC'( L.#M 1, .+-/
....
....
........
, the display
Enter the new date
display will look something like this:
Press
Press
, the display should look like this:
#
#
##
to exit the menu and return to normal.
(
(
((
776688
776688
776688776688
I(). +#_. &# !'). #X
#### 78a5 :a 53
!"#$ "%#& '( )#)"
A.)# A$-) ., #!') ./
, the
Press
Use keys
!
Press
Press
, the display will look something like this:
#
#
##
M1,. +#B"( )+ "@D(#' +.#9 999 9999
-
!
!
!!
= Timer 1, the display will look something like this:
, the display should look like this:
#
#
##
to exit the menu and return to normal.
(
(
((
to turn specific timers on and off i.e.
1
1
11
M1,. +#B"( )+ "@D(#' +.#3 999 9999
!"#$ "%#& '( )#)"
BC'( L.#M 1, .+-/
INS177 27
Page 29
The U
ser Menu
P
888
8168
l
remier
&
User Manua
Change Ctl Times
The system has 8 control timers. Each timer has two ON
and OFF times, and can be programmed to operate on
any days of the week. Once configured the timers can be
used to automatically arm or disarm areas, lockout User
codes and control outputs etc. Users with access to this
option can program the 8 control timers.
➤ To program control timers, proceed as follows:
Enter a valid User code
should look like this:
!"#$"%#&'()#)"
*+,#-$-).,/
Press
Press
Press
, the display should look like this:
/
/
//
!"#$"%#&'()
G-.+#K.(%/
, the display should look like this:
#
#
##
!"#$ "%#& '( )#)"
=1.& #A$- ). ,#T" L/
until the display looks like this:
)
)
))
....
....
........
, the display
B"() +"@# M1, .+#7 '
1-#D SS#' )#X 3865 5
!"#$ "%#& '( )#)"
BC'( L.#B )@ #)1, .-
Press
Select a Control Timer from 1 to 8 by pressing
search, the display should look like this:
Enter the timers first required On time (24Hr format)
5566
5566
55665566
this:
Press
will look something like this:
Use keys
(SUN to SAT) i.e.
the display will look something like this:
, the display should look like this:
#
#
##
B"()+"@#M1,.+#3'
1-#D(#')#X55655
B"() +"@# M1, .+#7 '
1-#D (#') #X5 5655
, the display will look something like
B"() +"@# M1, .+#7 '
1-#D (#') #X3 76b:
to program the timers On days, the display
#
#
##
M1,.+#7'#D(#!'$9999999999999999
!
!
!!
-
to select the timers On days
-
-
--
!
and
= Sunday and Monday,
0
)
)
))
to
M1,.+#7'#D(#!'$A%K"999999999999
Press
display will look something like this:
Enter the timers required Off time (24hr format)
5566
5566
55665566
this:
28 INS177
to program the timers first Off time, the
#
#
##
B"() +"@# M1, .+#7 '
1-#D SS#' )#X 3765 5
, the display will look something like
Page 30
P
remier
888
8168
l
The U
&
User Manua
ser Menu
Press
look something like this:
Use keys
to SAT) i.e.
display will look something like this:
Press
!
Press
Press
to select the timers Off days, the display will
#
#
##
M1, .+#7 ' #DSS# !'$9999999999999999
-
!
!
!!
,
, the display will look something like this:
#
#
##
Program the timers Second On times, On days, Off
times and Off days exactly the same as the timers
First On times, On days, Off times and Off days.
, the display should look like this:
/
/
//
to exit the menu and return to normal.
(
(
((
to select the first On days (SUN
-
-
--
and
M1, .+#7 ' #DSS# !'$A%K"999999999999
B"()+"@#M1,.+#7P
1-#D(#')#X55655
!"#$ "%#& '( )#)"
BC'( L.#B )@ #)1, .-
= Friday and Saturday, the
-
INS177 29
Page 31

The U
ser Menu
P
888
8168
l
remier
&
User Manua
Setup Users
This section covers the alteration of existing users and the
addition of new users to the system. The Pre mi er 888 can be
assigned up to 49 users (plus Engineer) and the Premier
8168 can be assigned up to 99 users (plus Engineer).
Default User Codes
When the control panel is first powered up and the factory
default settings are loaded, only the Engineer code and
the Master User code exist.
The factory default Master User code is
4,-1
4,-1
4,-14,-1
The Master User is always User 01.
!
If the Master User code has been lost or forgotten, it
can be reprogrammed by the Engineer.
Assigning New Users
Before assigning new users to the system, the following
should be decided:
• Which User number they will be assigned to
• What the User code number is going to be
• Which areas the user will need access to
• Which User type they will be
• Whether the user should be time locked
• What name will be assigned to the user
User Number
When users are assigned to the system, they need to be
identified by the control panel. Each user is identified as
Users 01 through to 49 (Premier 888) or 01 through to 99
(Premier 8168). User 00 is always the Engineer and User
01 is always the Master User.
.
0: Engineer
Engineers can arm, disarm, omit zones, silence alarms
and reset their assigned areas. In addition, Engineers can
access the Programming menu and all User menu options.
Engineers can also change their own User codes and
assign new users to the system.
The default Engineer User type (User 00) can assign
!
any User types to the system.
Engineers can only disarm areas that were armed
using an Engineer code. They cannot disarm any
areas that were armed with another User code.
1: Master
Master users can arm, disarm, omit zones, silence alarms
and reset their assigned areas. In addition, Master users
can access all User menu options. Master users can also
change their own User codes and assign new users to the
system. The Master user will also activate any output
programmed as ‘Door Strike’.
2: Manager
Manager users can arm, disarm, omit zones, silence
alarms and reset their assigned areas. In addition,
Manager users can access all User menu options except
Setup Users. Manager users can also change their own
User codes.
3: Standard
Standard users can arm, disarm, omit zones, silence alarms
and reset their assigned areas. In addition, Standard users
can access all User menu options except for Setup Users,
System Tests, and Change Timers. Standard users can also
change their own User codes.
4: Local
Local users behave the same way as Standard users.
However, Local users will only be able to arm and disarm
areas assigned to their codes from keypads assigned to the
same areas.
5: Duress
Duress users behave the same way as Standard users.
However, Duress users will activate any outputs programmed
as ‘Duress’ whenever their codes are entered.
User Code
This is a unique 4, 5 or 6 digit code number that is assigned
to a user. The system will allow a mixture of different length
User codes. The User code must be entered at a keypad
before the alarm system can be operated (see page 6 for
details).
User Areas
Any number of areas can be assigned to the selected user.
Assigning areas to a user determines which areas can be
armed, disarmed, reset etc. by that user. In addition,
assigning areas to a user determines which of the area
related functions i.e. omitting zones, silent arming etc. will
be available to that user.
User Types
The User type determines which functions are available to
the user i.e. arming, disarming, resetting etc. In addition, the
User also type determines which options the user can
access i.e. Setup Users, System Tests etc. The following
User types are available:
30 INS177
6: Arm Only
Arm Only users can only arm or reset their assigned areas
and view the event log.
7: Door Strike
Door strike users have no access to User functions or User
menu options. However, Door strike users will activate any
outputs programmed as ‘Door strike’ whenever their codes
are entered.
8: Vacation
Vacation users behave the same way as Standard users.
However, Vacation users will automatically be deleted the
first time that the Master User code (User 01) is used to
disarm the system.
A Vacation user can only be deleted by the Master
!
user, after it has been used to disarm the system at
least once.
Page 32
P
remier
888
8168
l
The U
&
User Manua
ser Menu
9: Custom
Custom users can access any functions and User menu
options that have been assigned to them in ‘User Options’
and ‘User Config’. This flexibility allows new User types to be
created that have their own unique set of characteristics.
Any number of Custom users can be assigned to the system
and each one will respond differently, depending on the
functions and features that have been assigned to them.
Custom users have no functions or features
!
assigned to them when first selected.
User Functions and Options
The table below shows the functions and options that are
available to each user.
All users have access to the ‘View Event Log’ menu
!
allowing them to view the event log.
User Functions
Engineer Master Manager Standard Local Duress Arm Only Door Strike Vacation Custo m
Arming Arming Arming Arming Arming Arming Arming - Armi ng -
Disar ming Disar ming Disar ming Disar ming Disar ming Disar ming - - Disar ming -
Omitting Omitting Omitti ng Omitting Omitting Omitting - - Omitting -
Eng. Reset---------
----Local Arming-----
----Local Disarm-----
Silent ArmSilent ArmSilent ArmSilent ArmSilent Arm-----
Disarm First---------
User Menu User Menu User Menu User Menu User Menu - User Menu - User Menu -
Eng. Program---------
--------
--------
Door Strike------Door Strike--
Call Rem PCCall Rem PCCall Rem PC-----
-----Duress Code----
Open/Close Open/Close Open/Close Open/Close Open/Close Open/Close Open/Close - Open/Close -
-
Vacation
-
-
-
-
Engi neer Mas ter Ma nage r Sta nda rd Lo cal Dure ss Arm Onl y Do or S trik e V aca tion No t Used
Change CodeChange CodeChange CodeChange CodeChange Code-----
Chime ZonesChime ZonesChime ZonesChime ZonesChime Zones-----
Change TimerChange TimerChange Timer-------
System TestsSystem TestsSystem Tests-------
User SetupUser Setup--------
- Eng. Access Eng. Access Eng. Access Eng. Access - Eng. Access - Eng. Access -
Add Eng. Code---------
NVM Locking---------
INS177 31
User Options
Page 33

The U
ser Menu
P
888
8168
l
remier
&
User Manua
User Options
This menu will only be displayed if the Custom User type is
selected (see page 31 for details).
This option defines which functions the selected user can
access when their code is entered.
The following options are available:
1 - Arming
Yes: Areas assigned to the selected user can be armed.
No: Areas assigned to the selected user cannot be armed.
2 - Disarming
Yes: Areas assigned to the selected user can be
disarmed.
No: Areas assigned to the selected user cannot be
disarmed.
3 - Omitting
Yes: Zones assigned to the same areas as the selected
user can be omitted, providing that they have the
‘omit’ attribute assigned to them.
No: Zones assigned to the same areas as the selected
user cannot be omitted.
4 - Eng. Reset (Engineers only)
Yes: Areas assigned to the selected user can be Engineer
reset after an Alarm has occurred.
No: Areas assigned to the selected user cannot be
Engineer reset after an Alarm has occurred.
5 - Local Arming
Yes: Areas assigned to the selected user can only be
armed from a keypad assigned to the same areas.
No: Areas assigned to the selected user can be armed
from any keypad on the system.
6 - Local Disarm
Yes: Areas assigned to the selected user can only be
disarmed from a keypad assigned to the same areas.
No: Areas assigned to the selected user can be disarmed
from any keypad on the system.
7 - Silent Arm
Yes: Areas assigned to the selected user can be armed
silently (see page 10 for details).
No: Areas assigned to the selected user cannot be armed
silently.
8 - Disarm First
Yes: If areas are already armed and the selected user
enters their code, the ‘Disarm’ option is displayed.
No: If areas are already armed and the selected user
enters their code, the ‘Arm’ option is displayed.
9 - User Menu
Yes: The selected user has access to the User menu.
However, the selected user will only have access to
options assigned in ‘User Config.’ (see page 33 for
details).
No: The selected user will not have access to any of the
options in ‘User Config.’
10 - Eng. Program (Engineers only)
Yes: The selected user can acce ss the Engineer
Programming mode. This option should NEVER be
enabled for normal users, as it will allow the
programming of the system to be altered to such a
degree that the system may fail to operate.
No: The selected user cannot access the Engineer
Programming menu.
11 - Dual Code
Yes: The selected user can only access an area when a
second User code (with the ‘Dual Code’ attribute and
also assigned to the same area) is entered. Dual
Code users will also activate the ‘1
st
and 2nd Code’
output type.
No: The selected user will operate as normal.
12 - Vacation
Yes: The selected user is enabled the first time it is used to
disarm the system and can be used as many times as
required. However, it will be automatically deleted the
first time that the User 01 code is used to disarm.
Vacation users will only be deleted by the Master user,
once they have been used on the system.
No: The selected user will operate as normal.
13 - Door Strike
Yes: The selected user will activate any outputs
programmed as ‘Door Strike’, whenever their codes
are entered.
No: The selected user will not activate any outputs
programmed as ‘Door Strike’.
14 - Call Rem. PC
Yes: The selected user has access to the ‘Call Remote PC’
option, allowing them to initiate a call to a remote
upload/download PC (see page 35 for details).
No: The selected user does not have access to the ‘Call’
Remote PC’ option.
15 - Duress Code
Yes: The selected user will activate any outputs
programmed as ‘Duress’, whenever their codes are
entered.
No: The selected user will not activate any outputs
programmed as ‘Duress’
16 - Open/Close
Yes: The selected user will report open (disarm) and close
(arm) events to an Alarm Receiving Centre every time
they arm or disarm.
No: The selected user will report open (disarm) and close
(arm) events to an Alarm Receiving Centre.
32 INS177
Page 34
P
remier
888
8168
l
The U
&
User Manua
User Config.
This menu will only be displayed if a Custom User type is
selected AND ‘User Menu’ (User Option: 9) is enabled (see
page 32 for details).
This option defines which User menu options the selected
User can access when they enter their code.
The following options are available:
ser Menu
User Time Lock
This option allows the selected user to be denied access
to the system at different times of the day and days of the
week. When a Control Timer is assigned to a user, the
User code will not allow access to any functions during the
timer ‘On’ period.
1 - Change Code
Yes: The selected user can change their own User code.
No: The selected user cannot change their own User code.
If the User code needs to be changed, another user,
with access to ‘Setup Users’ will have to do it.
2 - Chime Zones
Yes: The selected user can access the ‘Edit Chime Zones’
option, allowing them to select which zones chime
when activated (see page 23 for details).
No: The selected user cannot access the ‘Edit Chime
Zones’ option.
3 - Change Timer
Yes: The selected user can access the ‘Change Timer’
option, allowing them to override the Control Timers
if required (see page 27 for details).
No: The selected user cannot access the ‘Control Timer’
option.
4 - System Tests
Yes: The selected user can access the ‘System Tests’
option, allowing them to walk test zones, activate the
external sounder etc. (see page 24 for details).
No: The selected user cannot access the ‘System Tests’
option.
5 - Setup Users
Yes: The selected user can access the ‘Setup Users’
option, allowing them to alter existing users or assign
new users (see page 30 for details). However, users
cannot assign User types to the system that have a
higher access level than themselves. Also, if a user
assigns a Custom User type, functions that are not
available to them cannot be assigned to the Custom
user.
No: The selected user cannot access the ‘Setup Users’
option.
6 - Eng. Access
Yes: The selected user can access the ‘Enable Engineer’
option, allowing them to authorise Engineer access
or Remote UDL access to the system (see page 26
for details).
No: The selected user cannot access the ‘Enable
Engineer’ option.
User Name Text
Each user can be assigned up to 16 characters of name
text. This can be beneficial when reading the log, as
identification of people is made easier.
Text is programmed in a similar way to mobile phones.
Select characters by pressing the corresponding key the
appropriate number of times (to select a character on the
same key, press the
key to move the cursor along).
)
Deleting User Codes
If a User code needs to be deleted from the system, this
must be done, by a user that has access to the ‘Setup
Users’ menu (see page 30 for details).
➤ To delete User codes proceed as follows:
Ensure that Setup Users is selected, the display should
look like this:
!"#$"%#&'()#)"
A.)%N#G-.+-/
Press
Select a user from 1 to 49 (Premier 888) or 1 to 99
(Premier 8168)
should look like this:
Press
!
Press
Press
, the display should look like this:
#
#
##
A.)%N#G-.+-#
I().+#G-.+#HH
..
..
....
, the display will look something like this:
(
(
((
Where ‘15’ is the selected User number.
to confirm deletion of the selected User code.
#
#
##
to exit from Setup Users
/
/
//
then press
I(). +#G- .+# B"<. X
#### #HHH HHH
!"#$ "%#& '() #)"
!ITI MI#G -.+ #3:
#
#
##
, the display
7 - Add Eng. Code (Engineers only)
Yes: The selected user can assign new Engineers to the
system.
No: The selected user cannot assign new Engineers to the
system.
8 - NVM Locking (Engineers only)
Yes: The selected user can alter the ‘NVM Locked’ option
in ‘System Options’.
No: The selected user cannot alter the ‘NVM Locked’
option in ‘System Options’.
INS177 33
Page 35
The U
ser Menu
P
888
8168
l
remier
&
User Manua
➤ To assign new users, proceed as follows:
Enter a valid User code
should look like this:
Press
Press
Press
Press
Select a User from 1 to 49 (Premier 888) or 1 to 99
(Premier 8168)
should look like this:
Enter the new User code
press
Use keys
0
display will look something like this:
, the display should look like this:
/
/
//
, the display should look like this:
#
#
##
until the display looks like this:
)
)
))
, the display should look like this:
#
#
##
..
..
....
, the display will look something like this:
#
#
##
-
!
!
!!
and
= Areas A, B and C, then press
*
....
....
........
!"#$"%#&'()#)"
*+,#-$-).,/
!"#$"%#&'()
G-.+#K.(%/
!"#$ "%#& '( )#)"
=1.& #A$- ). ,#T" L/
!"#$ "%#& '( )#)"
A.)% N#G- .+ -/
A.)%N#G-.+I().+#G-.+#HH
then press
I(). +#G- .+# B"<. X
#### #HHH HHH
....
....
........
G-.+#35#'+.'-#X
##X#*WWWWWWW#\
to select/deselect areas i.e.
1
1
11
G-.+ #35# M$ N.#1 -X
_")# 1(#G -.
, the display
, the display
#
#
##
#
#
##
then
!
, the
Press
Press
options, the display will look something like this:
Press
#
#
##
Press
options, the display will look something like this:
Press
to continue, the display will look something like this:
!
Use keys
press
like this:
,
Press
when finished, the display will look something like this:
, the display will look something like this:
#
#
##
The following options will only be displayed
if a Custom User type is selected
G-.+ #35# DN )1"( -9
*+,1 (L## ## ##X# D(
to scroll up and down through the various
)
)
))
G-.+ #35# DN )1"( -9
G-.+ #K.( %# ##XD SS
to enable/disable the options, then Press
$
$
$$
to continue, the display will look something like this:
G-.+ #35# B" (S1L 9
G-.+ #A.) %N ##XD SS
to scroll up and down through the various
)
)
))
G-.+ #35# B"( S1L9
G-.+ #A.) %N# #X#D (
to enable/disable the option then press
$
$
$$
User Config. will only be displayed if a Custom User
type has been selected AND User Menu (in the
User Options) has been enabled:
G-.+ #35# T" >O.< X
P$#) 1,.+
-
!
!
!!
to continue, the display will look something
#
#
##
, to edit the User name text, then press
$
$
$$
to select a timer, if required, then
1
1
11
G-.+ #35# _' ,.#1 -6
G-.+ #35# _' ,.#1 -6
#
#
##
#
#
##
Only areas that exist on the system can be selected.
!
A ‘Star’ means the area can be selected and a ‘Dot’
means the area cannot be selected.
Pressing
Pressing
I to P (Premier 8168 only).
Use keys
)
)
))
display will look something like this:
!
34 INS177
!
!
!!
key to search, i.e.
Please refer to page 30 for a list of available User types.
will select/deselect all areas.
2
will toggle between areas A to H and
%
-
to select a User type or use the
1
1
11
G-.+ #35# M$ N.#1 -X
A)'( <'+<
= Standard User type, the
*
For details on programming text please refer to page
!
40.
Press
Press
, the display should look like this:
/
/
//
!"#$ "%#& '( )#)"
A.)% N#G- .+ -/
to exit the menu and return to normal.
(
(
((
Page 36
P
remier
888
8168
l
Installati
and
Installation Manua
Alter Part Zones
When a Part Arm 1, 2 or 3 is selected, pre-programmed
zones are omitted to allow access to certain parts of the
building. This option allows these zones to be
programmed or altered by any User that has access to the
‘Omit’ menu.
➤ To program part arm zones, proceed as follows:
Enter a valid User code
should look like this:
....
....
........
, the display
on Records
Call Remote PC
This option is used to initiate a call to a remote uploading
and downloading computer.
➤ To initiate a call, proceed as follows:
!"#$"%#&'()#)"
*+,#-$-).,/
Press
Press
Press
Press
Enter a zone number
key to search, the display will look something like this:
Press
Press
, the display should look like this:
/
/
//
!"#$"%#&'()
G-.+#K.(%/
, the display should look like this:
#
#
##
!"#$ "%#& '( )#)"
=1.& #A$- ). ,#T" L/
until the display looks like this:
)
)
))
!"#$ "%#& '() #)"
*@). +#0' +)# F"(. -
, the display should look like this:
#
#
##
F"(. #553 #0' +)99 9
?+"()#!""+
...
...
......
F"(. #535 #0' +)99 9
T'(< 1(L# 0[Q
to select Part Arm 1
3
3
33
to select Part Arm 2
&
&
&&
or use the
)
)
))
Enter a valid User code
should look like this:
!"#$"%#&'()#)"
*+,#-$-).,/
Press
Press
Press
Press
Use keys
i.e.
0
something like this:
, the display should look like this:
/
/
//
!"#$"%#&'()
G-.+#K.(%/
, the display should look like this:
#
#
##
!"#$ "%#& '( )#)"
=1.& #A$- ). ,#T" L/
until the display looks like this:
)
)
))
!"#$ "%#& '() #)"
B'@@ #Q., "). #0B /
, the display will look something like this:
#
#
##
B'@@ #U'> O# _"93 6
537b 8:4e 2c 5
-
!
!
!!
= Call Back number 2, the display will look
*
*
**
B'@@ #U'> O#_ "976
537b8:4e2c5
....
....
........
to select a telephone number
, the display
Press
The display will look something like this:
!
When all the required zones have been selected for their
particular Part Arms press
this:
Press
INS177 35
to select Part Arm 3
'
'
''
F"(. #535 #0' +)39 9
D,1) ).<# "(# 0'+) 3
The zone will now be omitted when Part Arm 1 is
selected.
Repeat for other zones.
!"#$ "%#& '() #)"
*@). +#0' +)# F"(. -
to exit the menu and return to normal.
(
(
((
F"(. #535 #0' +)39 9
T'(< 1(L# 0[Q
, the display should look like
/
/
//
Press
Press
, the display should look like this.
#
#
##
!"#$"%#&'()#)"
B'@@#Q.,").#0B/
to exit the menu and return to normal.
(
(
((
Page 37

The U
ser Menu
P
888
8168
l
5. Installation Details
Notes
remier
&
User Manua
36 INS177
Page 38
P
remier
888
8168
l
Installati
&
User Manua
European Standards
Conforms to European Union (EU) Low Voltage Directive
(LVD) 73/23/EEC and Electro-Magnetic Compatibility
(EMC) Directive 89/336/EEC
The CE mark indicates that this product complies with the
European requirements for safety, health, environmental
and customer protection.
This equipment is designed to enable an intruder alarm
system in which it is installed to comply with the
requirements of security grades 1 or 2 of EN 50131-1 and
EN 50131-6 and is suitable for installation in any indoor
environment.
Warranty
All Texecom products are designed for reliable, trouble
free operation. Quality is carefully monitored by extensive
computerised testing. As a result the control panel is
covered by a two-year warranty against defects in
materials or workmanship.
As the control panel is not a complete alarm system but
only a part thereof, Texecom cannot accept responsibility
or liability for any damages whatsoever based on a claim
that the control panel failed to function correctly.
Due to our policy of continuous improvements Texecom
reserve the right to change specification without prior
notice.
on Details
Premier is a trademark of Texecom.
INS177 37
Page 39
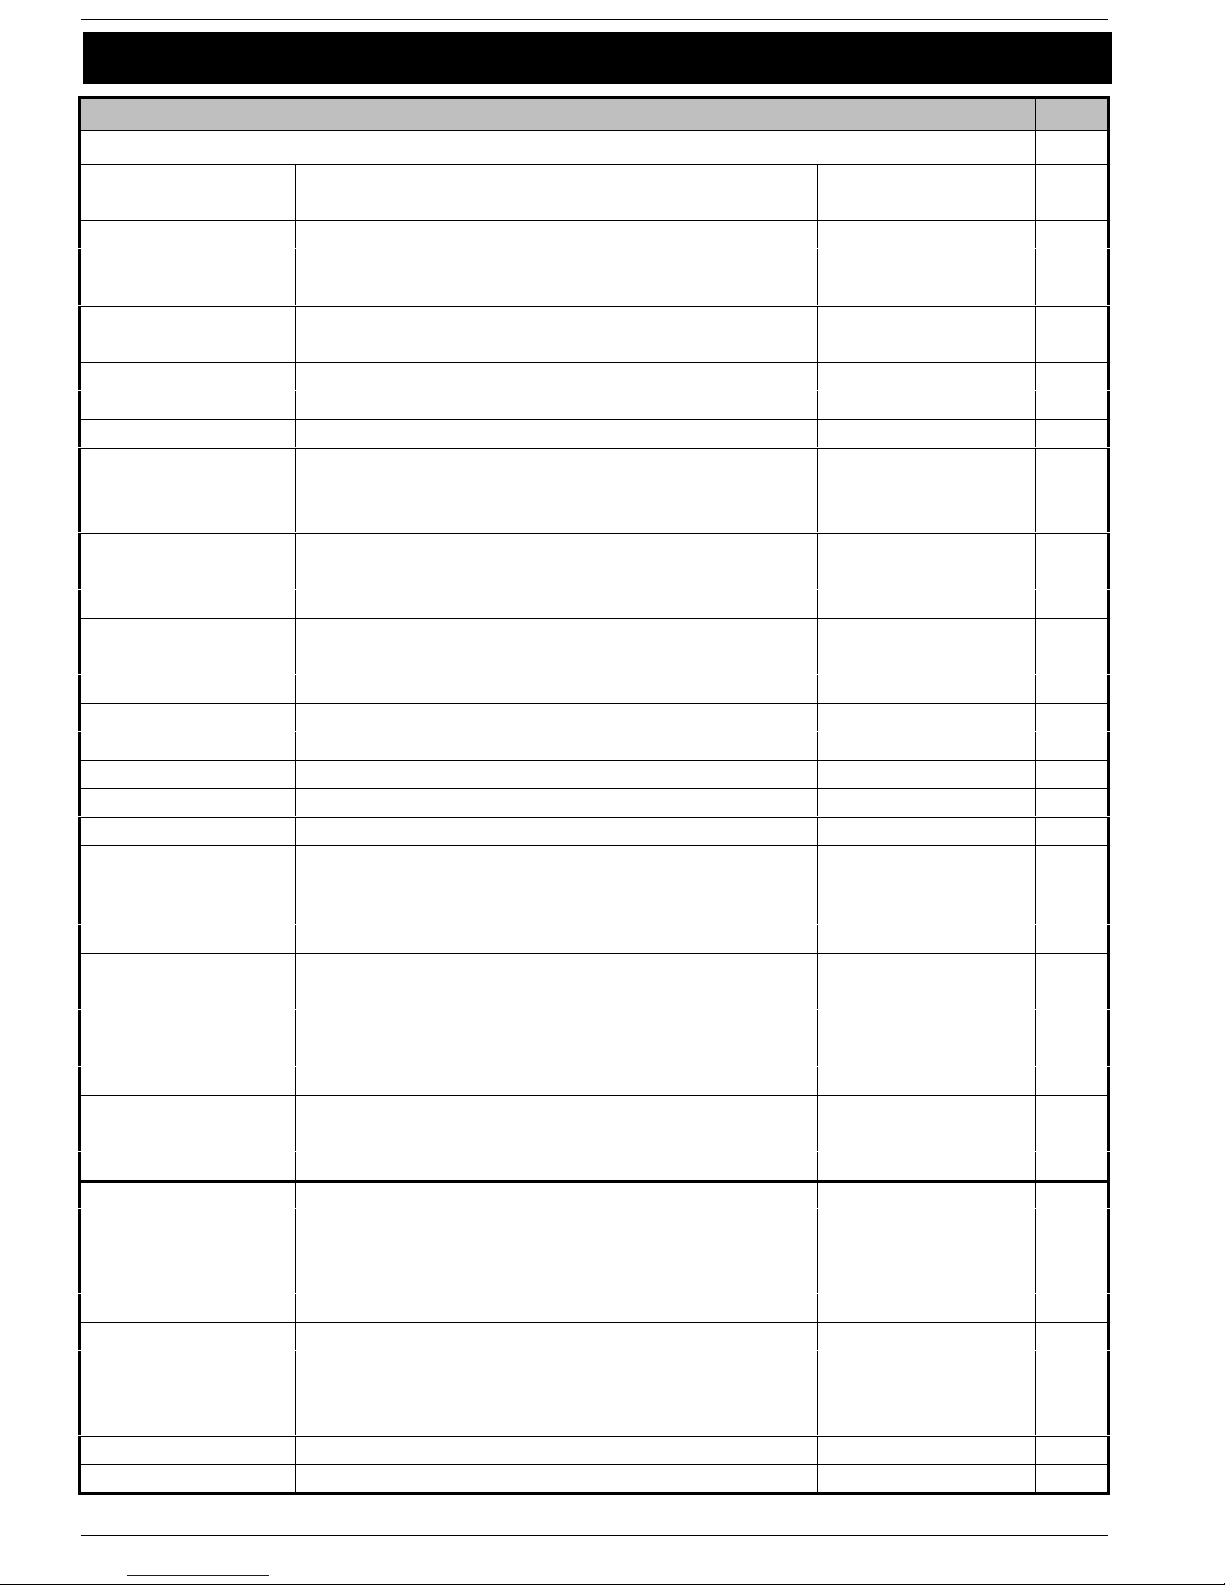
Quick Ref
erence Guide
P
888
8168
l
remier
&
User Manua
6. Quick Reference Guide
Menu Page
Arming Menu
Arm the System Enter a valid User code
Press Yes
Part Arm the System Enter a valid User code
Press Part
Select a Part Arm using keys 1 - 8 and press Yes
Silent Arm the System Enter a valid User code
Use the Scroll key to find Silent Arm? then press Yes or Part
Cancel the Exit Mode During the exit mode, enter a valid User code
Press Yes
Disarm the System During the entry mode, enter a valid User code
Arming Areas Enter a valid User code
Press Area
Select areas using keys 1 - 8 then press Yes
Part Arming Areas Enter a valid User code
Use the Scroll key to find Part Arming? then press Area
Select areas using keys 1 - 8 then press Yes
Silent Arming Areas Enter a valid User code
Use the Scroll key to find Silent Arm? then press Area
Select areas using keys 1 - 8 then press Yes
Clearing an Arm Fail Enter a valid User code
Press Reset
Silencing an Alarm Enter a valid User code
User Reset Press Reset
Engineer Reset Contact the Installation Company 14
Anti-Code Reset Contact the Alarm Receiving Centre and quote the 4 digit
code that appears on the display
Enter the code that is given by the Alarm Receiving Centre
Press Yes
Omit Zones Enter a valid User code
Press Omit
Select zones using keys 0 - 9
Press Omit to select the zone for omitting
Press Menu and continue to arm as normal
View Zone Status Enter a valid User code
Use the Scroll key to find View Zone Status then press Yes
Select the required zones using keys 0 - 9
Omit 24Hr Zones Enter a valid User code
Use the Scroll key to find Omit 24Hr Zones then press Yes
Select the required zones using keys 0 - 9
Press Omit to select the zone for omitting
Press Yes, the zones are now omitted
Set Chime Areas Enter a valid User code
Use the Scroll key to find Chime Areas then press Yes
Select the required areas using keys 1 - 8
Press Yes when finished
Turn Chime On Press Chime
Turn Chime Off
Press Chime
....
#
....
'
- 1 then
!
....
then # or
)
....
#
....
....
%
- 1 then
!
....
then
)
!
%
- 1 then
....
then
)
!
%
- 1 then
....
(
....
(
....
....
#
....
3
-
2
"
3
/
....
then
)
2
-
#
"
....
then
)
2
-
#
"
3
#
....
then
)
!
-
#
1
#
&
&
#
10
'
10
10
11
#
11
#
12
#
13
13
14
14
15
15
16
16
16
16
9
9
38 INS177
Page 40
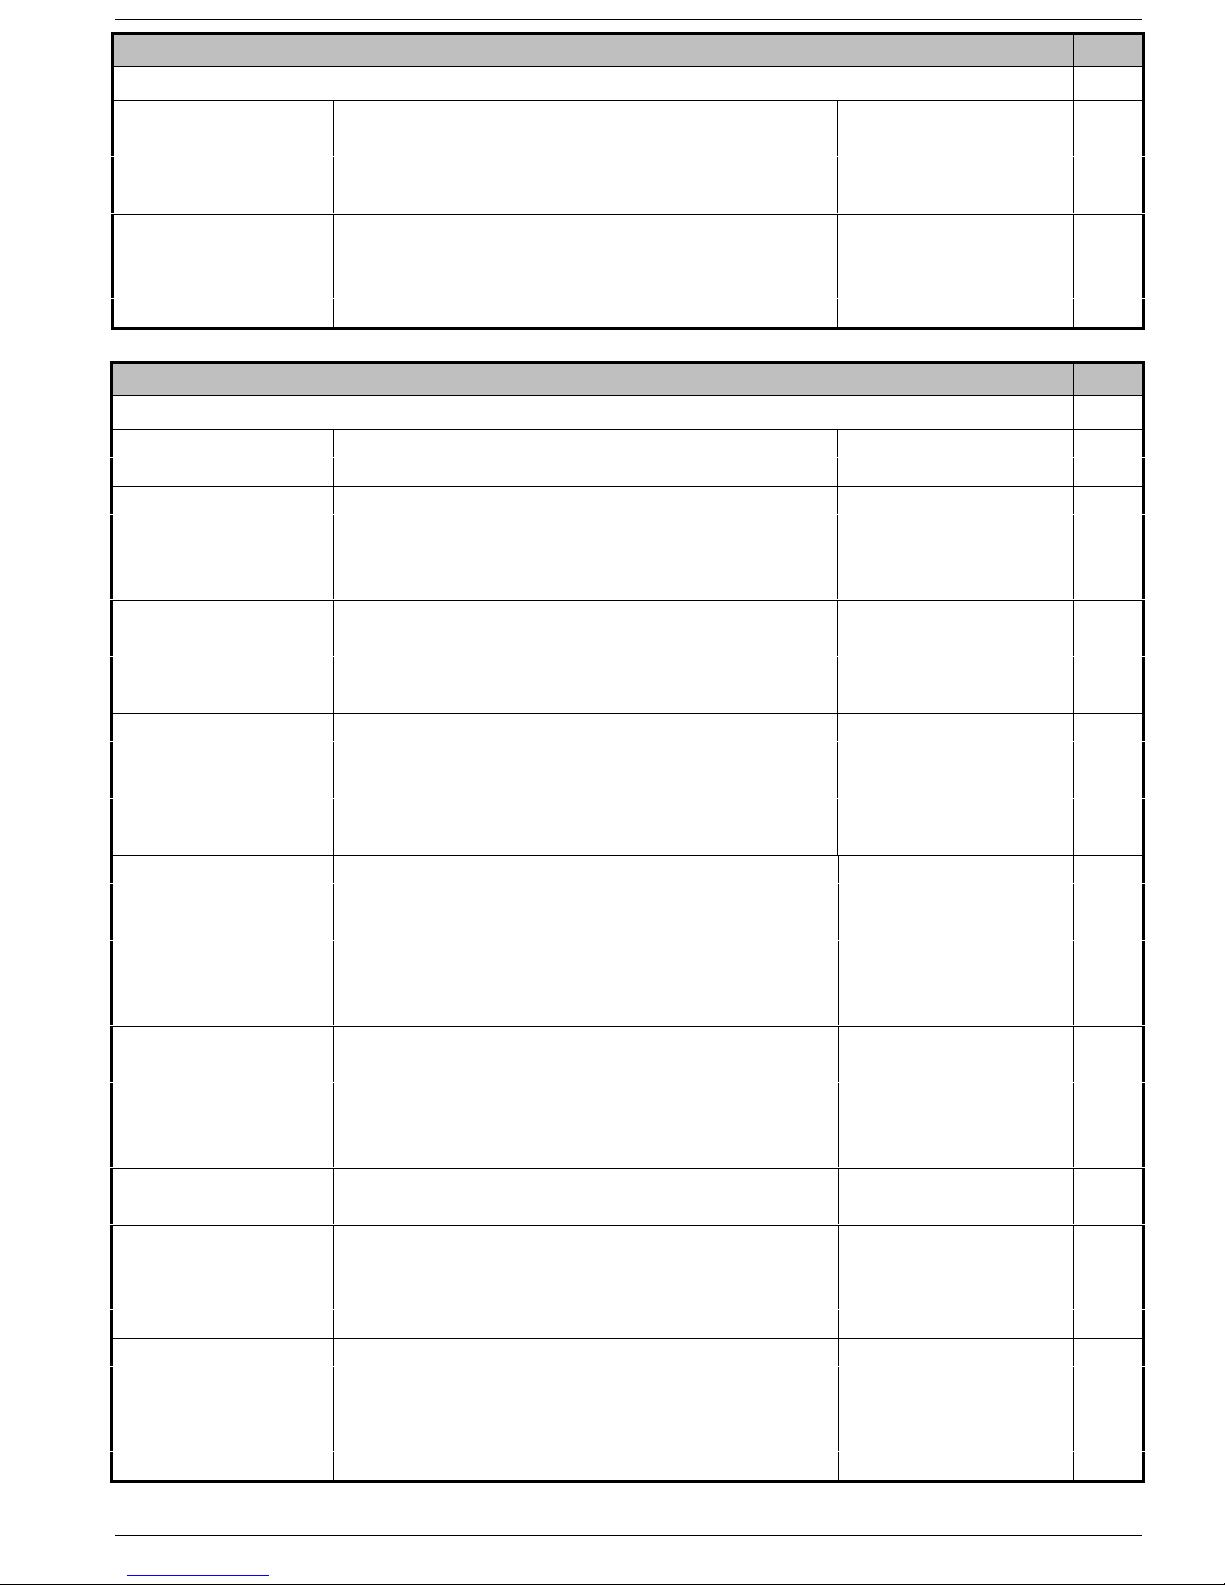
P
remier
888
8168
l
Quick Ref
&
User Manua
erence Guide
Menu Page
Arming Menu Continued…
View Act. Faults Enter a valid User code
Use the Scroll key to find View Act. Faults then press Yes
Use the Scroll key to scroll up and down through the zones
Press Yes when finished
View Act. Counts Enter a valid User code
Use the Scroll key to find View Act. Counts then press Yes
Select the required areas using keys 1 - 8
Press Yes when finished
Menu Page
User Menu
Access the User Menu Enter a User code
Press Menu and then press Yes
Viewing the Event Log Access the User menu
Use the Scroll key to find View Event Log then press Yes
Press Down for the previous event (back in time)
Press Up for the next event (forward in time)
Change User Code Access the User menu
Use the Scroll key to find Change Code then press Yes
Enter a new User code 4, 5 or 6 digits
Press Yes to accept the code
Edit Chime Zones Access the User menu
Use the Scroll key to find Edit Chime Zones then press Yes
Select zones using keys 1 - 8
Press Chime to select the zone for chiming
Press Menu when finished
System Tests Access the User menu
Use the Scroll key to find System Tests then press Yes
Use the Scroll key to select the an option then press Yes
When testing outputs, use the Scroll key to select an option
To test outputs, press Yes or use keys 1 - 8
Press Menu when finished
Do Walk Test Access the User menu
Use the Scroll key to find Do Walk Test then press Yes
Test required zones
Press Yes to accept the Time
Press Menu when finished
Enable Engineer Access the User menu
Use the Scroll key to find Enable Engineer then press Yes
Set System Time Access the User menu (see above)
Use the Scroll key to find Set System Time then press Yes
Enter the correct Time (HH:MM)
Press Yes to accept the Time
Set System Date Access the User menu
Use the Scroll key to find Set System Date then press Yes
Press Yes
Enter the correct Date (DD/MM/YY)
Press Yes to accept the Date
....
then
)
#
)
#
....
then
)
!
-
#
1
#
....
then
/
#
..../#
then
)
#
)
)
..../#
then
)
#
....
#
..../#
then
)
!
-
#
1
&
/
..../#
then
)
)
then
#
#
)
or ! -
#
1
/
..../#
then
)
#
#
/
..../#
then
)
#
..../#
then
)
#
5566
#
..../#
then
)
#
#
776688
#
18
18
19
19
23
23
24
24
26
26
27
INS177 39
Page 41

Quick Ref
erence Guide
P
888
8168
l
Change Timers Access the User menu
Use the Scroll key to find Change Timers then press Yes
Select the required timer using keys 1 - 8
Press Yes when finished
Change Ctl Times Access the User menu
Use the Scroll key to find Change Ctl Times then press Yes
Use the Scroll key to select the required timer
Enter the required on time (HH/MM) then press Yes
Use keys 1 - 8 to select the days of operation and press Yes
Enter the required off time (HH/MM) and press Yes
Use keys 1 - 8 to select the days of operation and press Yes
Press Menu when finished
User Setup Access the User menu
Use the Scroll key to find User Setup then press Yes
Enter the required User number using keys 0 - 9
Press Yes
Enter the required User code using keys 0 - 9
Press Yes
Enter the required User type using keys 0 - 9
Press Yes
Enter the required User time lock using keys 1 - 8
Press Yes
Program the required User text
Press Yes
Alter Part Zones Access the User menu
Use the Scroll key to find Alter Part Zones then press Yes
Select zones using keys 1 - 8
Press Omit, Chime or Part to select the required part omit
Press Menu when finished
Call Rem PC Access the User menu
Use the Scroll key to find Call Rem PC then press Yes
Use keys 1 -3 to select the required number then press Yes
remier
Menu Page
User Menu
&
User Manua
..../#
then
)
!
-
#
1
#
..../#
then
)
#
)
5566#
-
!
1#
5566 #
-
!
1#
/
..../#
then
)
2
-
#
"
#
......
#
-
2
"
#
-
!
1
#
....
#
..../#
then
)
!
3&
-
1
or
#
'
/
..../#
then
)
!
#
- 1 then
#
27
28
30
35
35
Programming Text
Text is programmed in a similar way to mobile phones.
Characters are selected by pressing the corresponding
key the appropriate number of times (to select a character
on the same key, press
The control panel also features Predictive text. This can be
used to make inserting words easier, i.e. when spelling the
word COLIN, instead of typing 222666555444666, all that
you need to do is type 26546 and the word is automatically
selected.
It is advised that predictive text be turned off when
!
programming User name text as the library is not
comprehensive enough to include all known names.
The table to the right shows the keys to use and the
characters that are assigned to them:
40 INS177
to move the cursor along).
)
Key Character
2
!
0
*
+
4
,
1
"
)
(
&
'
3
$
_0
.,?!1@“-&
ABC2ab c
DEF3de f
GH I 4gh i
JKL5 j kl
MNO6mn o
PQRS7pq r s
TUV8 tuV
WXYZ9w x y z
Move Cursor
Backspace (delete)
Copy Text
Paste Text
Predictive Text
Upper/Lowercase, Predictive text and Clear Screen
Page 42

P
remier
888
8168
l
Quick Ref
&
User Manua
erence Guide
Texecom Limited, Bradwood Court, St. Crispin Way, Haslingden, Lancashire BB4 4PW, England.
INS177 41
Technical Support:
Tel: +44 (0)1706 234833
Tel: +44 (0)1706 234811
Fax: +44 (0)1706 213187
 Loading...