

Page 1

THANK YOU FOR VOTING TEXECOM
MASTER USER MANUAL
Security Control Panels with Integrated
Communicator
INS141-7
Page 2

Contents Premier 412/816/832 Master User Manual
Contents
1. About the Alarm System ............................ 3
Introduction ......................................................................3
About this Manual ............................................................ 3
Fire Detection................................................................... 3
Monitoring ........................................................................ 3
Zones and Partitions........................................................ 3
Access Codes.................................................................. 3
Remote Keypads .............................................................. 4
Keypad Types .................................................................. 4
Keypad Layouts ............................................................... 4
Function Keys .................................................................. 5
Emergency Keys.............................................................. 5
2. Operating the Alarm System .....................6
Introduction ......................................................................6
Access Codes.................................................................. 6
Arming & Disarming the Alarm System........................... 6
Checking if the System is Ready to Arm ........................ 6
Away Arming .................................................................... 6
Stay Arming ..................................................................... 6
Cancelling the Arming Process ....................................... 7
Disarming During Entry ................................................... 7
Disarming when not in Entry ........................................... 7
Disarming after an Alarm ................................................. 7
Auto Stay Arming ............................................................. 7
Changing between Delayed and Instant Stay ................ 7
Arming and Disarming Partitions ....................................8
Away Arming Partitions ................................................... 8
Stay Arming Partitions ..................................................... 8
Disarming Partitions ........................................................ 8
Changing to another Partition ......................................... 9
Bypassing Zones.............................................................. 9
Manually Bypassing Zones ............................................. 9
Unbypassing Zones......................................................... 9
Group Bypass ................................................................ 10
Quick Bypass and Arm.................................................. 10
Program Time (' ................... 20
Program Date () ................... 20
Program Banner Text (LCD only) (* ................... 20
Print 100 Events (! ................... 20
Exit Program Mode (( ................... 20
5. Fire Safety & Maintenance .......................21
Fire Safety .......................................................................21
Fire Alarm Operation ......................................................21
Household Fire Safety Audit ..........................................21
Fire Escape Planning .....................................................21
Maintenance ...................................................................22
Glossary..........................................................................22
6. Installation Records..................................23
Control Panel .................................................................. 23
Keypads..........................................................................23
Timers .............................................................................23
Users...............................................................................23
Zones .............................................................................. 24
DO NOT REMOVE COVER
3. User Functions Menu ............................... 11
Reset Alarms ..................................................................11
Last Alarm Log ...............................................................11
Service Faults.................................................................11
Acknowledging a New Service Fault ............................ 11
View Service Faults........................................................ 11
Anti-code Reset.............................................................. 12
Toggle Chime On and Off .............................................. 12
Change User Code.........................................................13
View Log (LCD Only)...................................................... 13
Abort Communications .................................................. 13
MAINS VOLTAGES INSIDE
No user serviceable parts, servicing by qualified
!
personnel only.
4. System Program Menus........................... 14
Programming Text (LCD Only)...................................... 14
Programming Users ....................................................... 15
Program User !"................................ 16
User Options 1 !#................................ 17
User Options 2 !$................................ 17
User Options 3 !%................................ 17
User Text (LCD Only) !&................................ 18
Program Standard Users !'................................ 18
System Tests & Utilities .................................................19
Walk Test (" .................. 20
Test Speakers & Outputs (# .................. 20
Send Test Call ($ .................. 20
Enable Remote/Engineer Access (% .................. 20
Start Call Back (& .................. 20
2 INS141
Page 3
Premier 412/816/832 Master User Manual About the Alarm System
1. About the Alarm System
Introduction
Your alarm system consists of a control panel, one or more
keypads and various detectors and sensors. The control
panel will normally be mounted out of sight in a utility room
or basement etc. The control panel houses the system’s
electronics and stand-by battery. There is normally no
reason for anyone except an installer or service person to
have access to the control panel.
The remote keypad is used to send commands to the
system and to display the current system status via the
various coloured lights (LED’s). The keypad also provides
audible feedback each time a key is pressed. Each keypad
will be mounted in convenient locations inside the protected
premises, near designated points of entry/exit.
Read this manual carefully and have your installer instruct
you on your system’s operation. Become familiar with the
features that have been implemented on your system. All
users of this system should be equally instructed in its use.
About this Manual
This manual is a thorough explanation of all system
functions, including troubleshooting and programming
Access codes in addition to performing basic system
functions. Most users of the system will not need to know all
of this information. The section of this manual, titled
“Operating your Alarm System” explains general system
concepts and instructs the user on how to arm and disarm
the system and bypass zones. The remaining sections of the
manual are reserved for more detailed system information.
Fire Detection
This equipment is capable of monitoring fire detection
devices such as smoke detectors and providing a warning
alarm if a fire condition is detected. Good fire detection
depends on having adequate numbers of fire detectors
placed in appropriate locations. This equipment should be
installed in accordance with the relevant local authority fire
regulations. Carefully review the “Fire Escape Planning”
guidelines in this manual.
Your installer must enable the fire detection feature of
"
this equipment before it will work.
Monitoring
This system is capable of transmitting alarms, troubles and
emergency information over telephone lines to an alarm
monitoring station. If you inadvertently initiate an alarm,
immediately call the Alarm Receiving Centre (ARC) to
prevent an unnecessary response.
Your installer must enable the monitoring function
"
before it will work.
Zones and Partitions
Your installer has divided the protected premises into zones
and partitions. A zone is an area of protection that has one
or more detection sensors connected to it (motion detectors,
glass-break detectors, door contacts or shock sensors). A
single zone might be a room, a hallway or a door or window.
Two or more of these zones will be linked together by the
control panel to form a partition.
A partition is an area of the protected premises. A partition
can be armed and disarmed independently from other
partitions. All of the partitions together form the entire alarm
system. If your alarm system is not divided into partitions
then all devices will be assigned to Partition 1.
Some zones may belong to more than one partition, such as
points of entry/exit and hallways. These are called Global
Zones because they are not assigned to a single partition.
The following table shows the number of zones and
partitions for the Premier 412, 816 & 832 control panels:
Control Panel Partitions Zones Zones (max)
Premier 412 2 4 12
Premier 816 4 8 16
Premier 832 4 8 32
Access Codes
As a user of the alarm system, you will be assigned a 4, 5 or
6 digit Access code. Access codes are used to arm and
disarm the partition(s) to which they are assigned. Some
Access codes can perform additional system functions,
such as programming system options, bypassing zones and
performing system tests.
Your Access code may not allow you to access certain
system functions. For instance, if your code is only allowed
to arm and disarm Partition 1, you will not be able to arm or
disarm other partitions, or the entire system.
Your Access code may also be programmed for Global
Access. A Global Access code can be used at any keypad
and will allow you to arm and disarm any of the partitions
assigned to your code. Alternatively your code may be
programmed for Partition Access. A Partition Access code
will only allow you to arm and disarm the partitions that are
assigned to both the keypad and your code.
The following table shows the number of users for the
Premier 412, 816 & 832 control panels:
Control Panel Number of Users
Premier 412 32
Premier 816 32
Premier 832 64
INS141 3
Page 4
About the Alarm System Premier 412/816/832 Master User Manual
Remote Keypads
One or more remote keypads will be installed throughout
the protected premises, usually one at each entry/exit door.
Each remote keypad is normally assigned to the partition
that it is going to control. A keypad can be assigned to more
than one partition, if required (global keypad).
Keypad Types
The following keypad types are available:
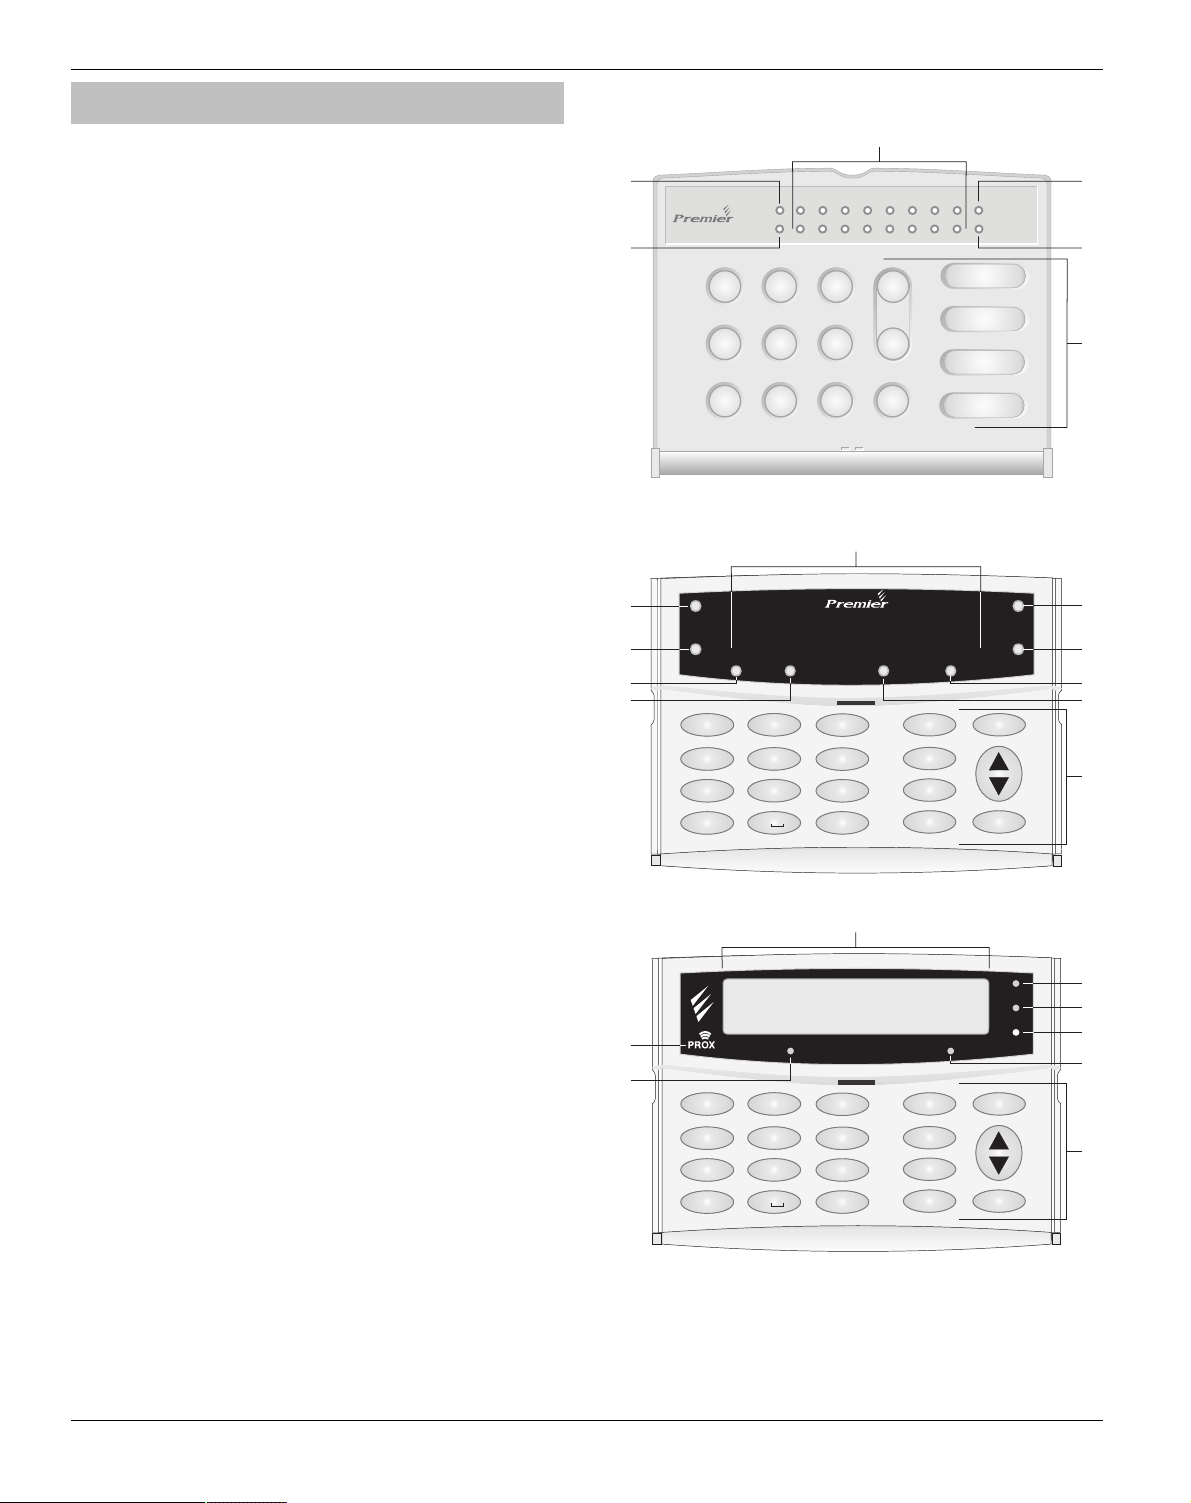
Premier RKP4: The Premier RKP4 is the standard remote
keypad for the Premier 412 control panel. This remote
keypad has 4 zone indicator lights and four status lights
(Alarm, Service, Armed and Ready).
Premier RKP8: The Premier RKP8 has same features as the
Premier RKP4 but has 8 zone indicator lights. This keypad is
normally used on systems that monitor up to 8 zones.
Premier RKP16: The Premier RKP16 has same features as
the Premier RKP4 but has 16 zone indicator lights. This
keypad is normally used on systems that monitor up to 16
zones.
Premier RKP8 Plus: The Premier RKP8 Plus has all the
features of the standard Premier RKP4 plus dedicated
indications for Fire, Bypass, Instant and Stay. It also features
two programmable zone inputs that can be utilised by your
installer for detection devices close to the location of the
remote keypad. This keypad is normally used on systems
that monitor up to 8 zones.
Premier RKP16 Plus: The Premier RKP16 Plus has same
features as the Premier RKP8 Plus but has 16 zone indicator
lights. This keypad is normally used on systems that monitor
up to 16 zones.
Keypad Layouts
1
Alarm
Service
2
123
456
7890
Premier RKP4/8/16
1
2
7
8
Alarm
Service
1
4
7
Yes
ghi
pqrs
12
9
10
Fire
2
abc
5
jkl
8
tuv
0
5
Zones
3112
1019
12
BY
PAS S
MENU
5
3
11 12
Bypass Instant
5
4
13
14
3
def
6
mno
9
wxyz
No
6
Bypass
Chime
Stay
Area
8167156145134
ARM
STAY
DISARM
AREA
7
8
16
15
Stay
Armed
Ready
Armed
Ready
Reset
Menu
3
4
6
3
4
9
-
6
Premier LCD: The Premier LCD has a standard size 32
character back-lit Liquid Crystal Display plus dedicated
indications for Bypass, Service, Ready, Armed and Power. It
Premier RKP8/16 Plus
"
also features two programmable zone inputs that can be
utilised by your installer for detection devices close to the
location of the remote keypad. This keypad is normally used
on systems that monitor up to 32 zones.
Premier LCDL: The Premier LCDL has the same features as
the Premier LCD but has a large size 32 character back-lit
Liquid Crystal Display. This keypad is normally used on
systems that monitor up to 32 zones.
Premier LCDP: As Premier LCD with a built in proximity tag
reader.
Premier LCDLP: As Premier LCDL with a built in proximity
#
8
Premier 816
12:55.22 28/04
Bypass
2
abc
3
1
4
7
Yes
ghi
pqrs
5
jkl
8
tuv
0
def
6
mno
9
wxyz
No
Service
Bypass
Chime
Stay
Area
Power
Armed
Ready
Reset
Menu
=
3
4
2
6
tag reader.
Premier LCD/LCDL/LCDP/LCDLP
4 INS141
Page 5
Premier 412/816/832 Master User Manual About the Alarm System
f
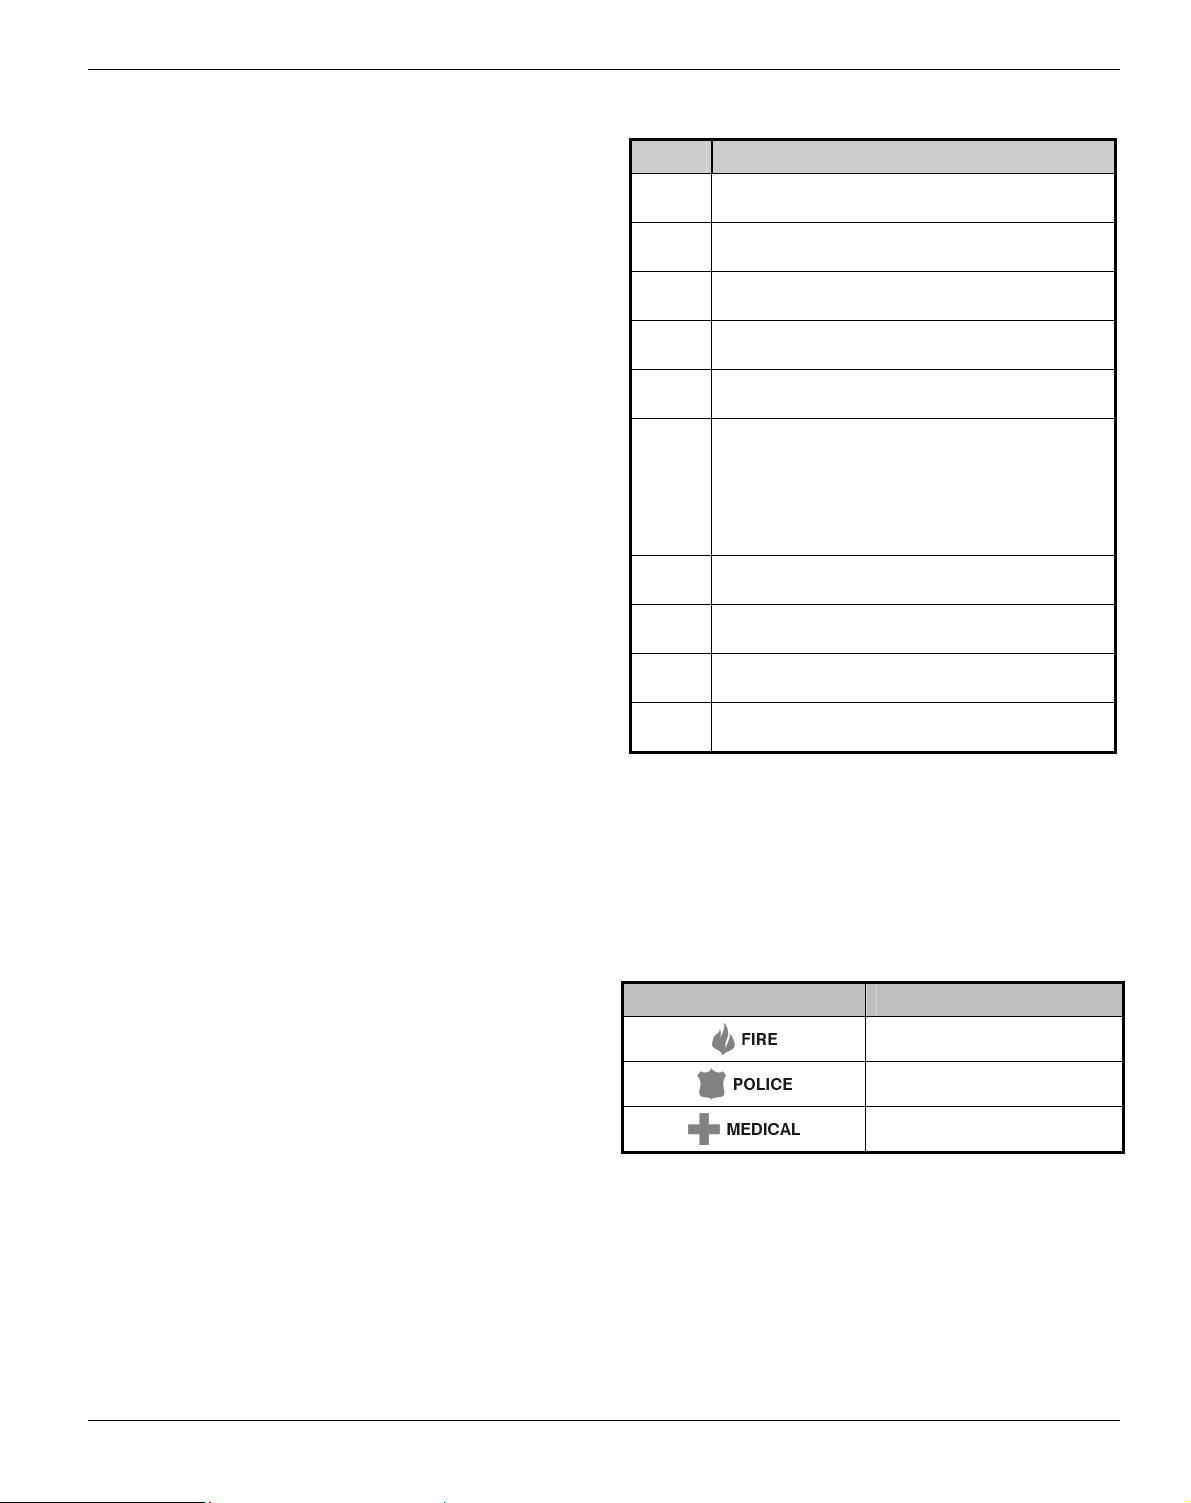
Alarm Light: If an alarm has occurred whilst the
-
#
partition/system was armed the Alarm light will illuminate.
The alarm partition/system cannot be Armed until a
standing Alarm has been acknowledged/reset (see
“Acknowledging an Alarm” on page 11).
Service Light: The Service light will flash when a new fault
-
$
occurs and will change to on steady when the fault has
been acknowledged. When the system is free of all faults
the Service light will be off.
The alarm system cannot be armed until the new faults
have been acknowledged (see “Service Faults” on page
11).
Armed Light: The Armed light indicates the armed status o
-
%
the partition/system. The Armed light is on when the
partitions assigned to the keypad are armed. When the
Armed light is off the partitions are disarmed. The Armed
light will flash as follows:
Partition in Exit: Slow flash (1 second on, 1 second off).
Partition is Delayed Stay Armed: Slow flash (1 second on,
1 second off).
Partition is Instant Stay Armed: Fast flash (200
milliseconds on, 200 milliseconds off).
Ready Light: If the Ready light is on the partition/system is
-
&
ready for arming. If the Ready light is off, one or more
zones within the partition/system are violated, check the
relevant zones as indicated on the keypads. If the Ready
light is flashing, one or more zones are bypassed or are
violated and force-armable.
Zone Lights: The zone lights indicate the status of each
-
'
alarm zone within the partition. When a zone is violated or
in trouble the relevant zone light will illuminate. When a
zone is secure the relevant zone light will be off.
A keypad can be programmed to blank its display after a
period of time. An Access code may be required to reenable the display. Otherwise simply press any key.
Zone display is always enabled when the alarm system is in
alarm.
Function Keys: See “Function Keys”.
-
(
Fire: if the Fire light is on with no zone indicators
-
)
illuminated, then a fire alarm has occurred from one of the
2-wire smoke sensors. If there is an accompanied zone
indication, the fire alarm has occurred from the smoke
sensor on the indicated zone.
Bypass: If the Bypass light is on, one or more zones have
-
*
been manually bypassed, (see “Manually Bypassing
Zones” on page 9).
Stay: If the Stay light is on, the partition/system is in the
-
+
stay armed mode. The Armed light will also be flashing.
Instant: If the Instant light is on, the partition/system is in
-
,
the stay armed mode and the delayed zones (front door
etc) are instant. The Armed light will also be flashing
rapidly.
Power Light: The power light is on steady when mains
-
-
supply is present and flashes when the system is running
on battery (mains fail).
LCD Display: 16 character Liquid Crystal Display (LCD).
-
.
Proximity Tag Reader: On Premier LCDP and LCDLP only.
/ -0
Function Keys
The remote keypad function keys are described as follows:
Key Function
+
-
.
/
0
1
2
3
4
5
"
The Bypass key is used for either group or manual
bypass of zones (see page 9).
The Menu key is used to access the more advanced
user functions and programming options.
The Arm key is used when away arming the system or
partition.
The Stay key is used when Stay arming the system or
partition.
The Disarm key is used when disarming the system or
partition.
The Area key is normally used when arming and
disarming a particular partition. When the Area key is
pressed on its own the keypad will indicate the armed
status of all partitions.
The Area key can also be used to temporarily switch
the keypad to a different partition, see page 9.
The Chime key is used to enable/disable the chime
feature, see page 12.
The Reset key is used to reset the system after an
alarm or service fault condition, see page 11.
The Yes key is used to arm the system and to select
menu options.
The No key is used when disarming the system or
partition.
When a keypad is in use other keypads will be lockedout except for emergency functions. The lock-out will
persist 4 seconds after the last key is pressed.
Information tones will be limited to the keypad in use.
Emergency Keys
In case of emergency, the alarm system can provide three
immediate emergency alarms by pressing and holding two
specific keys for three seconds.0
Emergency Alarm Press Keys
The emergency keys can be individually enabled or
"
disabled for each keypad on your alarm system by
the installer.
The Panic alarm can be individually programmed for
either audible or silent operation for each keypad.
Emergency commands are detailed on the inside flap
label of each remote keypad.
# & %
& & )
* & (
INS141 5
Page 6
Operating the Alarm System Premier 412/816/832 Master User Manual
2. Operating the Alarm System
Introduction
Before attempting to operate the alarm system ensure you
have familiarised yourself with all the arming and disarming
methods covered in this section.
Access Codes
• If you make a mistake whilst entering your Access code,
simply enter the correct Access code.
Arming & Disarming the Alarm System
Checking if the System is Ready to Arm
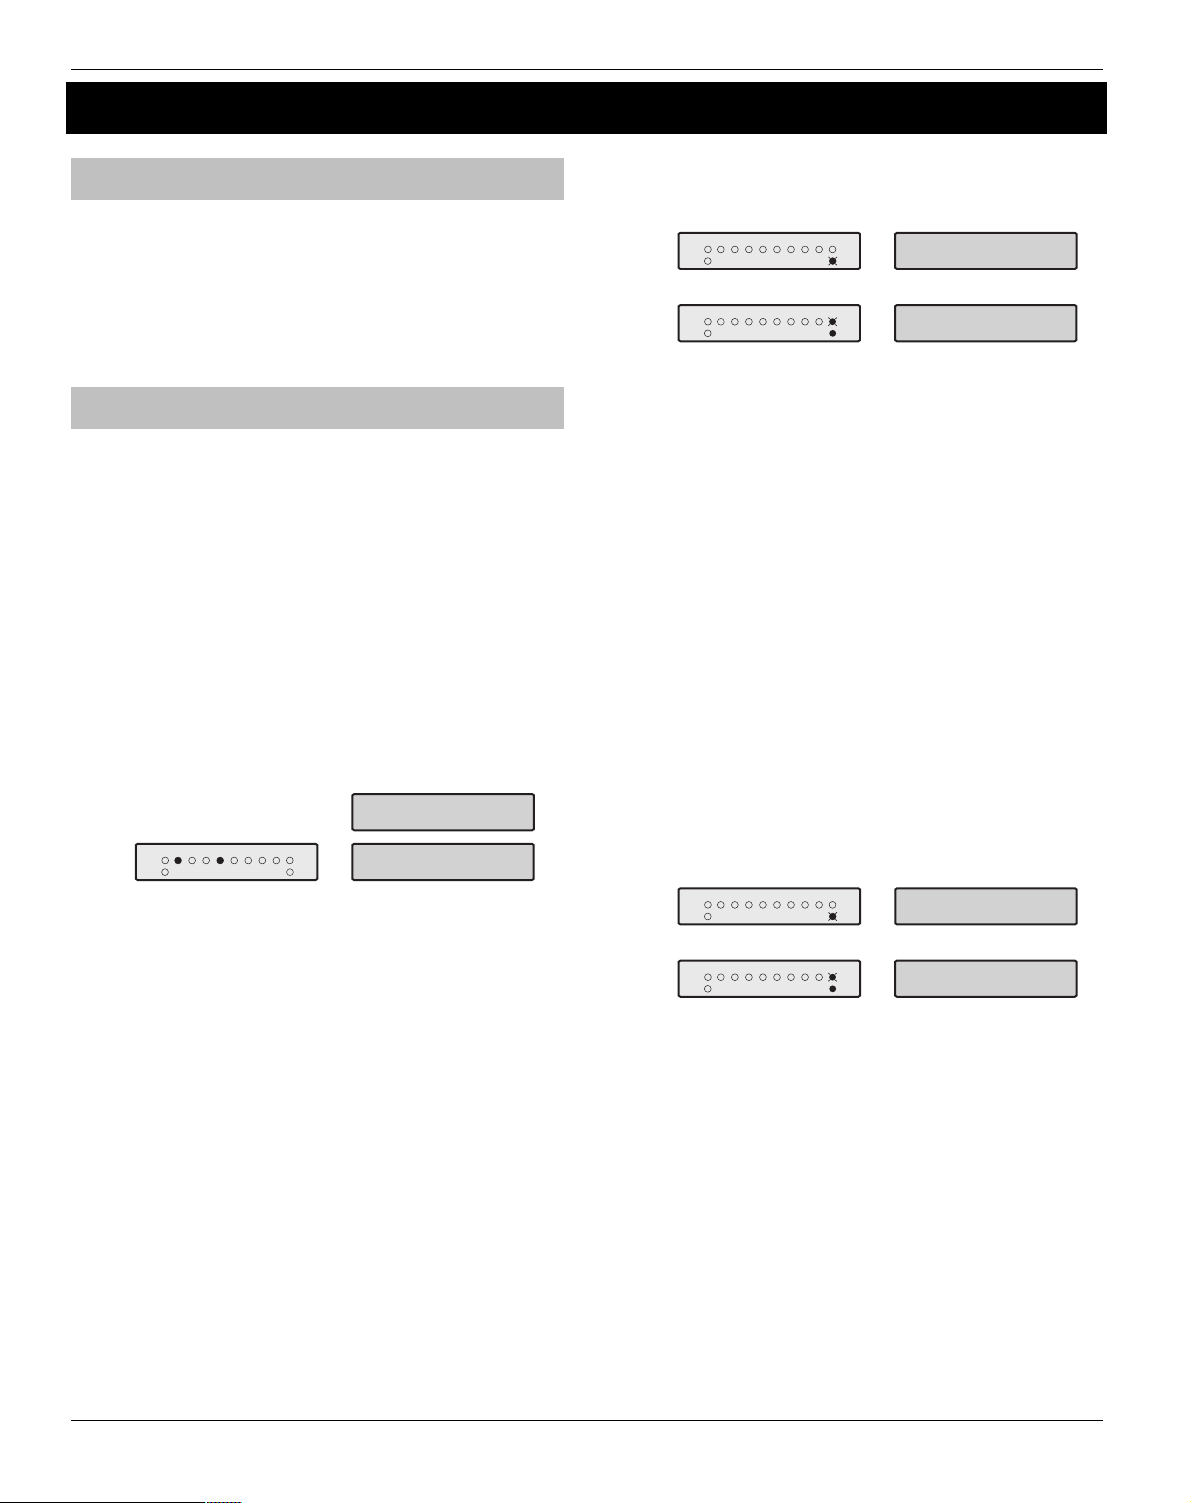
To help prevent faults during arming, a Ready light has
been provided on each keypad. The Ready light works as
follows:
• If the Ready light is on steady then the alarm system is
ready to be armed.
• If the Ready light is flashing then the alarm system has
bypassed zones and/or Force Armable zones that are
violated, check these zones before proceeding.
• If the Ready light is off then one or more zones are
violated, either secure or bypass these zones before
proceeding. The keypads will display the zones that are
violated:
Zone 01 Active
Front Door
Zones
87654321
Alarm
Service
Active zones are indicated by
the relevant zone lights on
LED Keypads
If any unbypassed zones that are not enabled for
"
“Force Arming” are violated at the end of the exit
Armed
Ready
delay this is termed an exit error and the alarm system
will go into fail set state (internal alarm). If
programmed by the installer the external bell will also
sound. Enter a valid user Access code to silence this
alarm.
A zone will only be armed when ALL associated
partitions are armed but will be disarmed when ANY
associated partition is disarmed.
Away Arming
The Away arming mode is normally used when leaving the
premises. When the system is armed in this mode all
detection zones assigned to your partition(s) will be armed.
The Ready light must be on steady before the alarm system
can be Away armed.
Zone 04 Active
Patio Doors
Active zones are scrolled
in sequence on LCD keypads
" To Away arm the alarm system proceed as follows:
1
Alarm
Service
2
Alarm
Service
The light will flash and the exit tone will sound.Armed
Leave the premises, when the system has armed the
3
"
exit tone will stop. The system is now Away armed.
If the Quick Arm feature is enabled, you can omit step
1 from the above procedure.
Enter Access code ????
Zones
Press a
Zones
87654321
Armed
Ready
87654321
Armed
Ready
YES to Arm?
MENU for Options
Please Exit....
17:30.21 28/04
Press y
Stay Arming
The Stay arming mode is normally used when the premises
will be occupied. When the system is armed in this mode all
Interior detection zones assigned to your partition(s) will be
bypassed. Before Stay arming check the following:
• Secure or bypass any perimeter zones that are violated.
• Ensure no perimeter zones are bypassed
unintentionally.
• Ensure no perimeter Force Armable zones are violated
unintentionally.
" To Stay arm the alarm system proceed as follows:
1
Alarm
Service
2
Alarm
Service
The alarm system will arm immediately and the
3
If the Quick Arm feature is enabled, you can omit step
"
1 from the above procedure.
If the system is fitted with a Premier RKP8/16 Plus then
the Stay light will also illuminate when the system is
Stay armed.
Enter Access code ????
Zones
87654321
Armed
Ready
Zones
The system is now Stay armed.
Press s
87654321
Armed
Ready
light will flash.
YES to Arm?
MENU for Options
Premier 816
17:30.21 28/04
Armed
6 INS141
Page 7
Premier 412/816/832 Master User Manual Operating the Alarm System
Cancelling the Arming Process
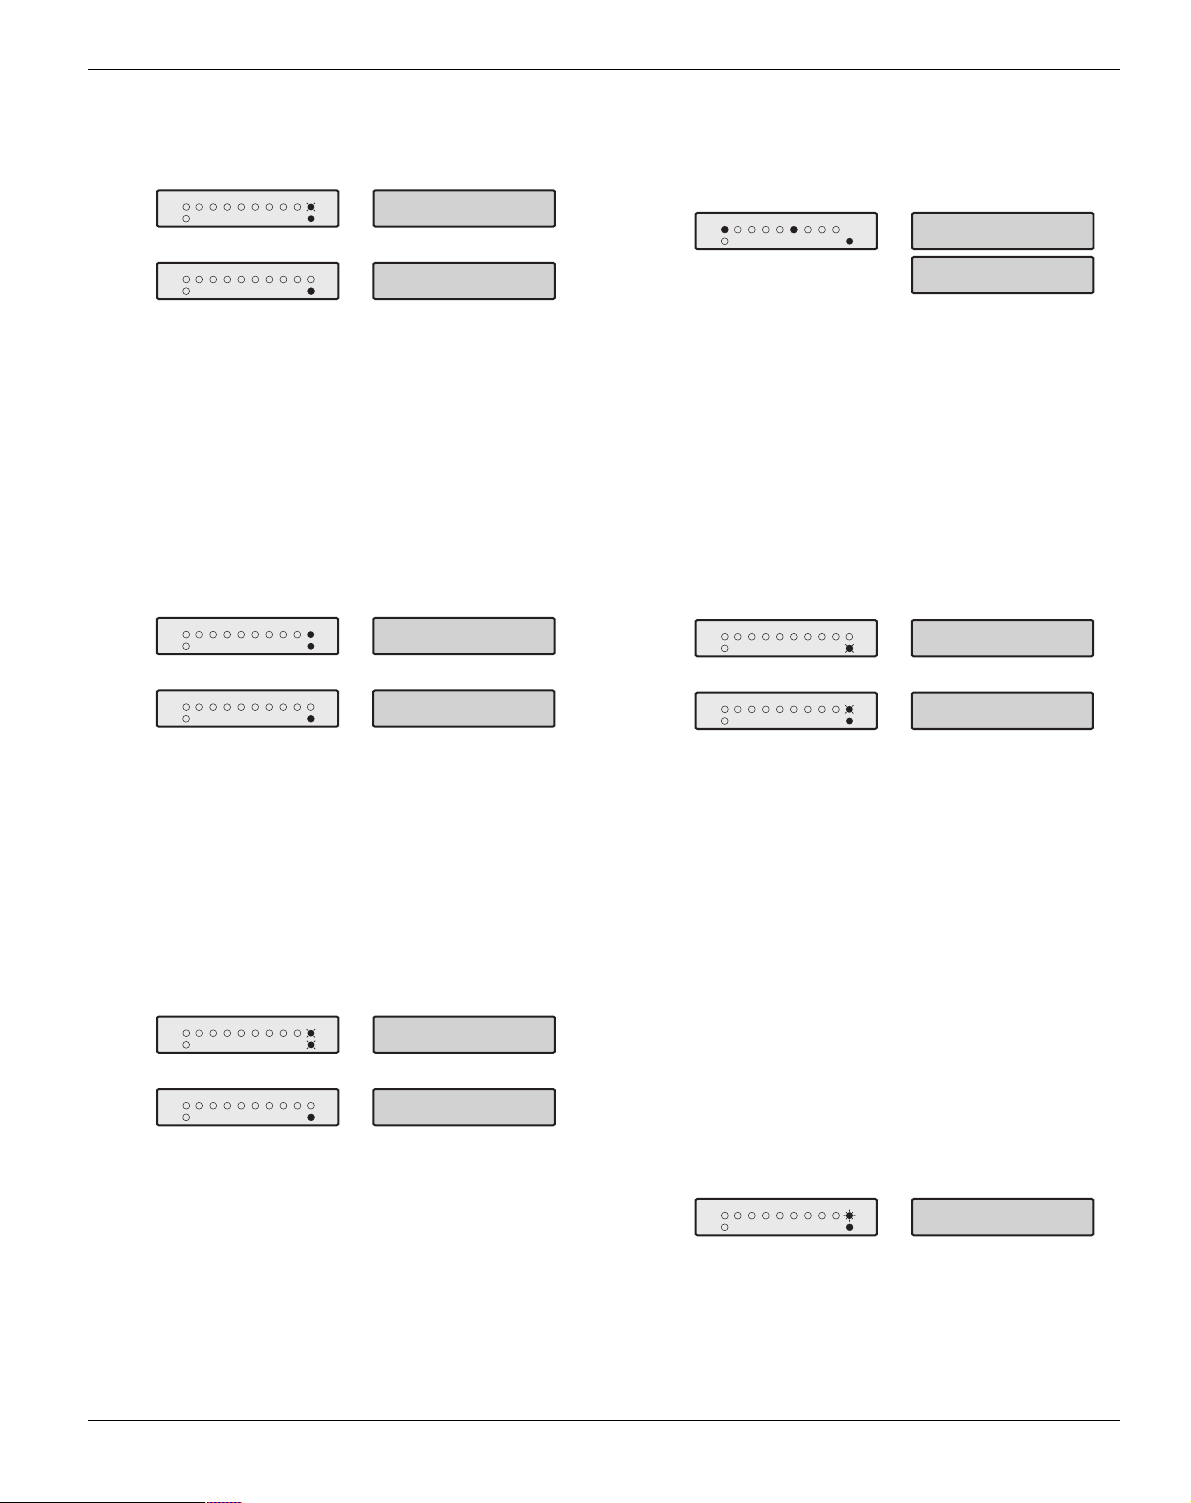
" To cancel the arming process during the exit delay:
1
Alarm
Service
2
Alarm
Service
Arming has been cancelled and the alarm system is
3
Enter Access code ????
Zones
87654321
Armed
Ready
MENU for Options
NO to Disarm?
Press d
Zones
87654321
Armed
Ready
Premier 816
17:30.21 28/04
now disarmed.
Press n
If the system only has one partition you will not have
"
to perform step 2.
Disarming During Entry
" To disarm the alarm system during entry, proceed as
follows:
Enter the premises via the designated entry point,
1
the entry tone will sound. Proceed directly to the
remote keypad.
Zones
87654321
Alarm
Service
2
Alarm
Service
The entry tone will stop and the light will turn off.
3
Enter Access code ????
Zones
Armed
Ready
87654321
Armed
Ready
Enter Your Code
08:30.59 28/04
Premier 816
08:31.12 28/04
Armed
The alarm system is now disarmed.
If a valid Access code is not entered before the end of
"
the entry delay, an alarm will occur.
Disarming when not in Entry
" To disarm the alarm system when not in entry, proceed
as follows:
1
Alarm
Service
2
Alarm
Service
The light will turn off. The alarm system is now
3
If the system only has one partition you will not have
"
to perform step 2.
If the Quick Disarm feature is enabled and the system
is Stay armed you can omit step 1 from the above
procedure.
Enter Access code ????
Zones
87654321
Armed
Ready
Press d
Zones
87654321
Armed
Ready
Armed
disarmed.
MENU for Options
NO to Disarm?
Press n
Premier 816
17:30.21 28/04
Disarming after an Alarm
" To disarm the alarm system after an alarm, proceed as
follows:
1
Alarm
Service
The system is disarmed and the keypads display the
2
Enter Access code ????
Zones
87654321
Armed
Ready
Master Bedroom
1... 21:10.56 28
Zone 05 Active
Master Bedroom
source of the alarm.
The system must now be reset before you can arm again,
see page 11 for details on resetting alarms.
Auto Stay Arming
If your installer has enabled the Auto Stay feature the system
will automatically Stay arm if the entry/exit zone (front door)
is not activated whilst attempting to Away arm the system.
" To auto Stay arm your alarm system proceed as follows:
1
Alarm
Service
2
Alarm
Service
The light will flash and the exit tone will sound.Armed
Do NOT leave the premises during the exit delay. At
3
the end of the exit delay the alarm system will Stay arm.
Enter Access code ????
Zones
87654321
Armed
Ready
YES to Arm?
MENU for Options
Press a
Zones
87654321
Armed
Ready
Please Exit....
17:30.21 28/04
Press y
Changing between Delayed and Instant Stay
When Stay arming the system the delayed zones (front door
etc) are normally delayed, i.e., when a delayed zone is
violated it will start the entry delay timer. However, it is
possible to change the delayed zones to instant when the
system is in a Stay armed mode. If a delayed zone is
violated when the system is in the “Instant Stay” mode the
system will generate an alarm immediately.
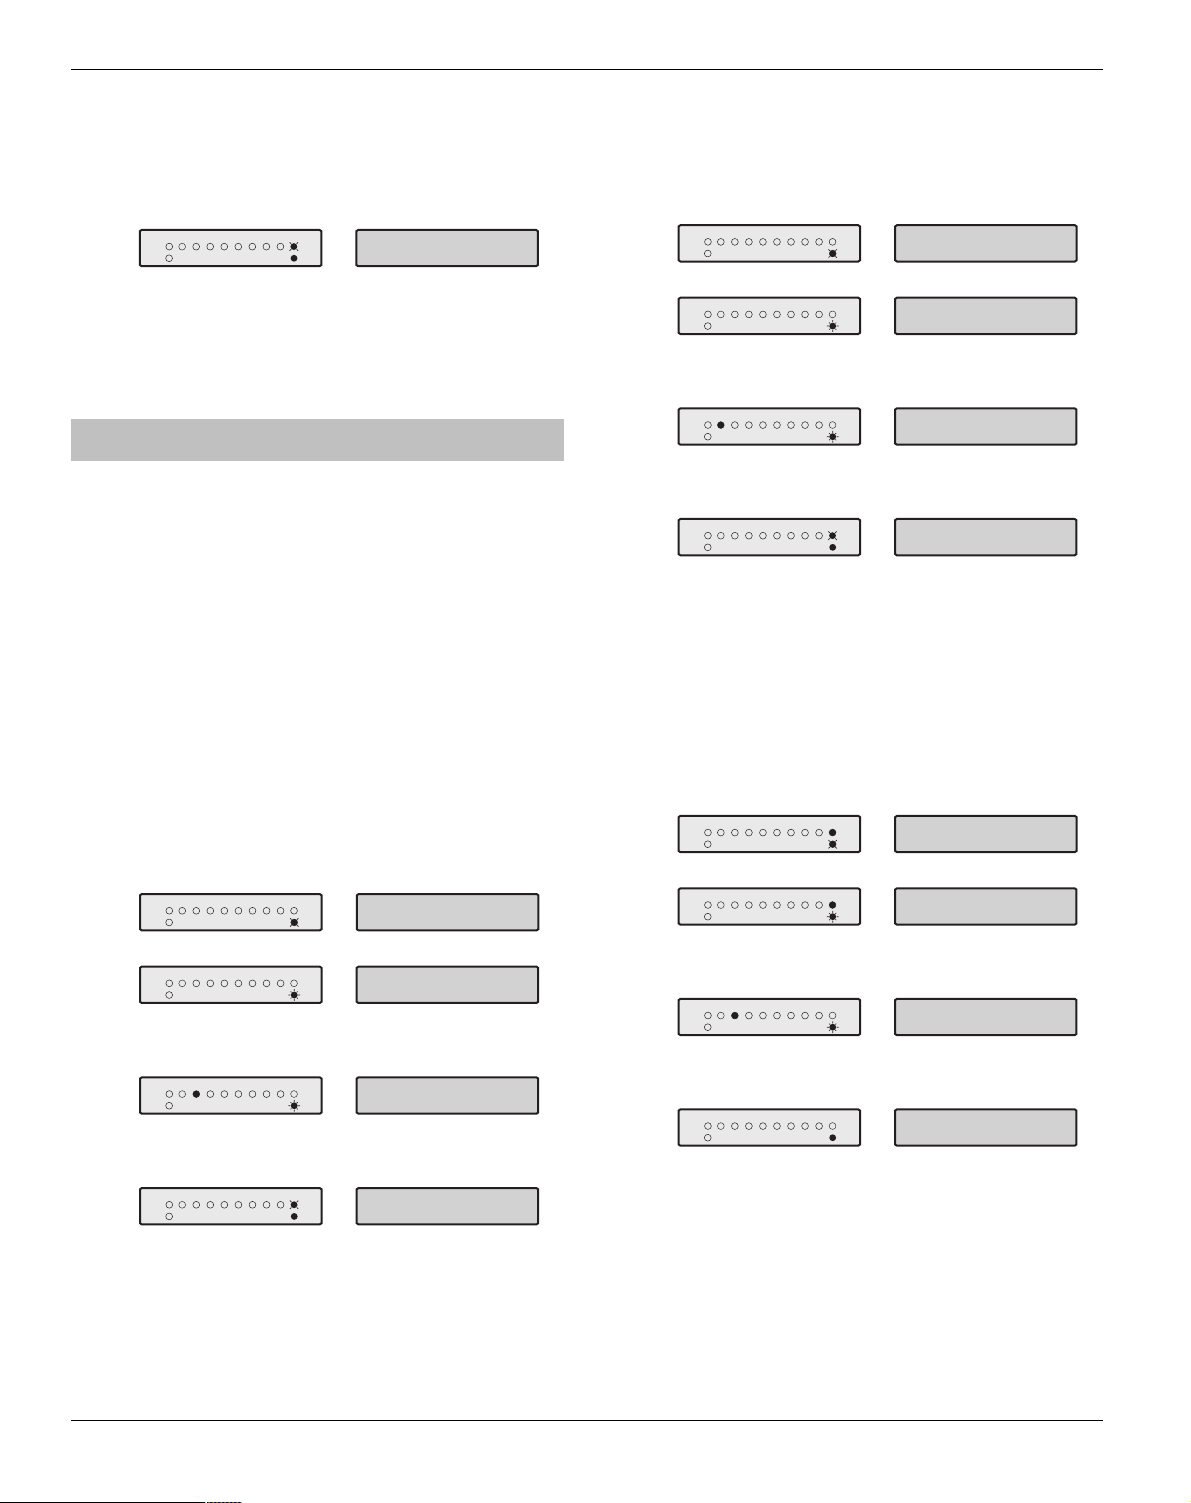
" To change from Delayed Stay to Instant Stay, proceed
as follows:
1
2
Service
3
If the system is fitted with a Premier RKP8/16 Plus the
"
Instant light will also illuminate.
Ensure that the system is armed.Stay
Press and hold the key until you hear the
s
confirmation tone.
Zones
Alarm
87654321
Armed
Ready
The light will flash quickly.
Armed
The system is armed.
Instant Stay
INSTANT STAY
17:30.21 28/04
INS141 7
Page 8
Operating the Alarm System Premier 412/816/832 Master User Manual
" To change from Instant Stay to Delayed Stay, proceed
as follows:
1
2
3
"
Ensure that the system is armed.Instant Stay
Press and hold the key until you hear the
s
confirmation tone.
Zones
Service
Alarm
87654321
Armed
Ready
The light will flash slowly.
Armed
The system is armed.
Delayed Stay
DELAYED STAY
17:38.21 28/04
If your system is fitted with a Premier RKP8/16 Plus the
Instant light will go off.
Arming and Disarming Partitions
This section covers arming and disarming partitions. In
order to use these procedures the following requirements
must be configured:
• The alarm system must be split into one or more
partitions.
• Your Access code must be assigned to more than one
partition.
• The keypad that you use to operate the alarm system
must be assigned to multiple partitions OR your Access
code is enabled for Global Access.
Stay Arming Partitions
This option allows you to Stay arm one or more partitions.
" To Stay Arm selected partitions, proceed as follows:
1
Alarm
Service
2
Alarm
Service
3
Alarm
Service
4
Alarm
Service
The selected partition(s) will arm immediately and the
5
Enter Access code ????
Zones
87654321
Armed
Ready
YES to Arm?
MENU for Options
Press A
Zones
87654321
Armed
Ready
YES to Arm?
Area > **.. <
The light will flash quickly.Ready
Press - to select/deselect partitions,
14
e.g. Press to select Partition 1.
Zones
87654321
1
Armed
Ready
YES to Arm?
Area > 1*.. <
Partition 1 is now selected.
Press s
Zones
87654321
Armed
Ready
Premier 816
17:30.21 28/04
light will flash.Armed
The selected partition(s) is now armed.Stay
Disarming Partitions
This option allows you to disarm one or more partitions.
Away Arming Partitions
This option allows you to Away arm one or more partitions.
" To Away arm selected partitions, proceed as follows:
1
Alarm
Service
2
Alarm
Service
3
Alarm
Service
4
Alarm
Service
The light will flash and the exit tone will sound.Armed
Leave the area being armed, when the partition has
5
armed the exit tone will stop. The selected partition(s) is
If the Quick Arm feature is enabled, you can omit step
"
1 from the above procedure.
Enter Access code ????
Zones
87654321
Armed
Ready
YES to Arm?
MENU for Options
Press A
Zones
87654321
Armed
Ready
YES to Arm?
Area > **.. <
The light will flash quickly.Ready
Press - to select/deselect partitions,
14
e.g. Press to select Partition 2.
Zones
2
87654321
Armed
Ready
YES to Arm?
Area > *2.. <
Partition 2 is now selected.
Press a Press y
Zones
87654321
Armed
Ready
Please Exit....
17:30.21 28/04
now Away armed.
" To disarm selected partitions, proceed as follows:
1
Alarm
Service
2
Alarm
Service
3
Alarm
Service
4
Alarm
Service
5
Enter Access code ????
Zones
87654321
Armed
Ready
MENU for Options
NO to Disarm?
Press A
Zones
87654321
Armed
Ready
NO to Disarm?
Area > **.. <
The light will flash quickly.Ready
Press - to select/deselect partitions,
14
e.g. Press to select Partition 2.
Zones
87654321
2
Armed
Ready
NO to Disarm?
Area > *2.. <
Partition 2 is now selected for disarm.
Press d
Zones
87654321
Armed
Ready
Press n
Premier 816
17:30.21 28/04
The selected partitions are disarmed.
8 INS141
Page 9
Premier 412/816/832 Master User Manual Operating the Alarm System
Changing to another Partition
Normally the remote keypad that you use will be assigned to
a particular partition and therefore the zone and status lights
will indicate information relevant to the assigned partition.
However, you can temporarily switch the remote keypad to a
different partition so that the zone and status lights indicate
the information relevant to the partition that you have
selected. Whilst in this mode you can also use your Access
code to arm/disarm the partition you have selected
(providing you have access to the selected partition).
In order to use the cross partitioning feature, it is
recommend that the system is configured as follows:
• Cross partitioning must be enabled.
• The user must be assigned to multiple partitions.
• The user should be set for “Local Partition Access Only”,
see page 18.
• The remote keypads should only be assigned to a
single partition.
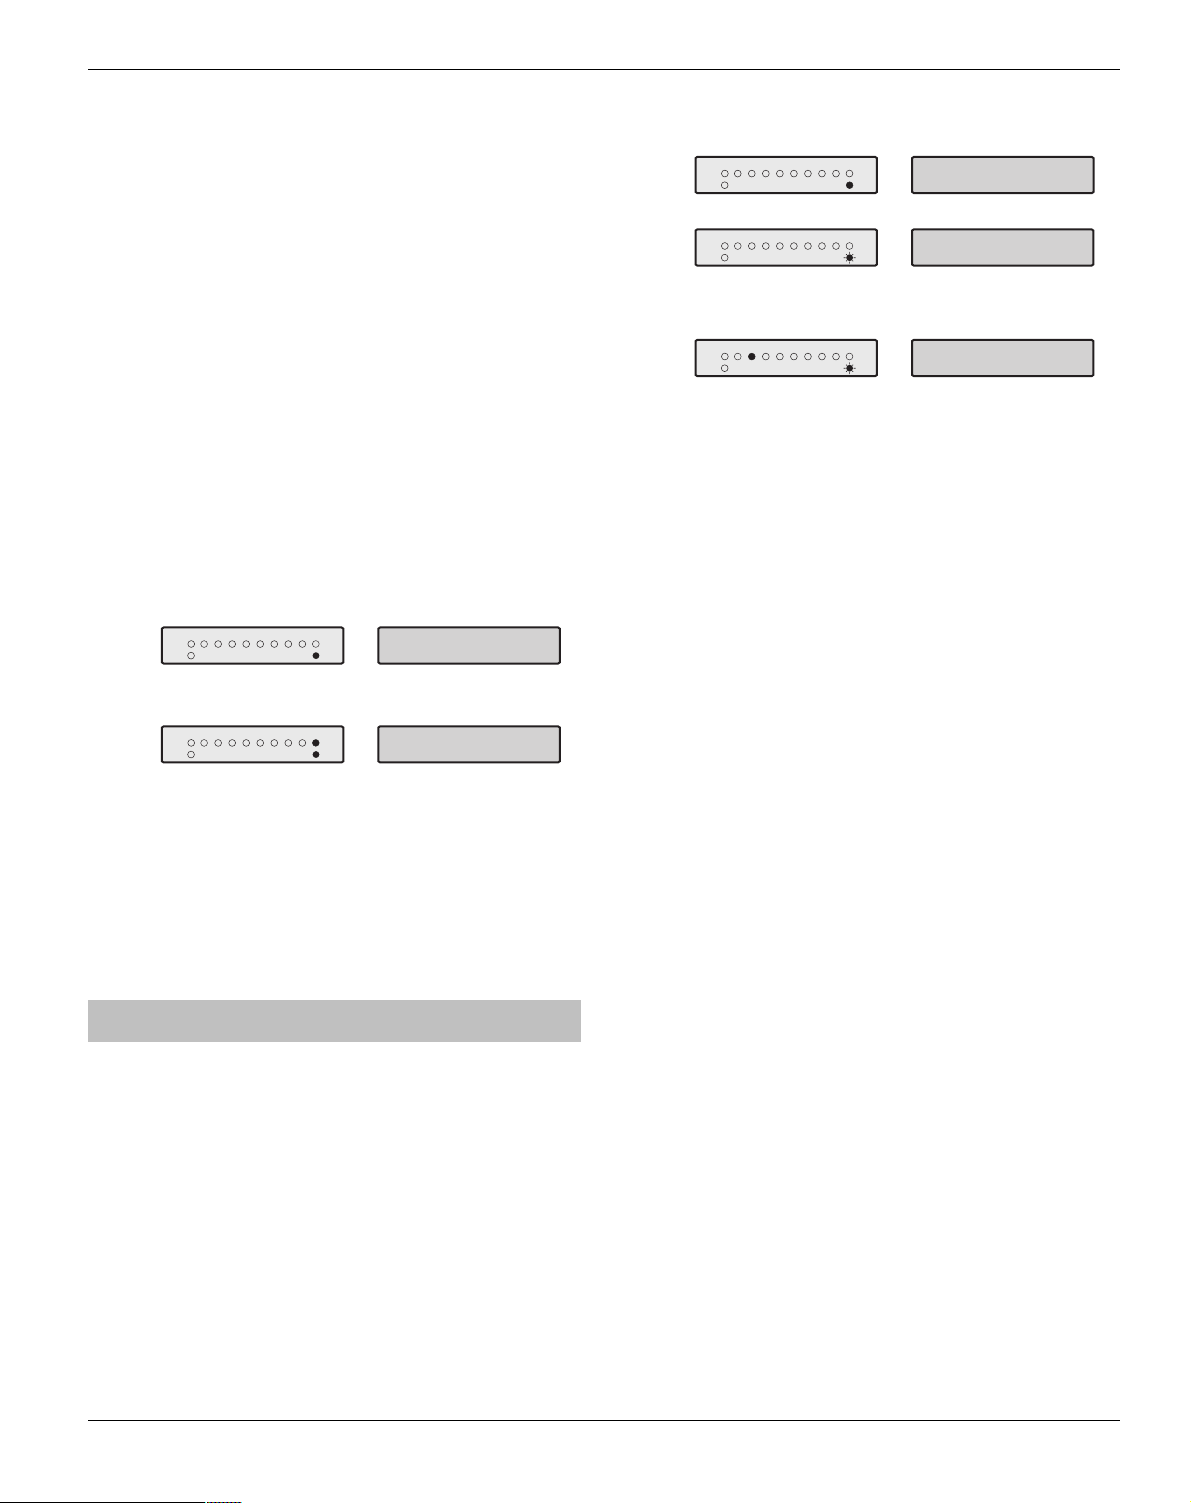
" To change to another partition, proceed as follows:
1
Zones
Service
Alarm
2
e.g. Press to select Partition 2.
Alarm
Service
After changing to the selected partition, the remote
"
keypad will only remain in the selected partition for 10
seconds after the last key press. However if an
Access code is entered whilst the remote is in this
mode, the remote keypad will remain in the selected
partition for 1 minute after the last key press.
Zones
The remote keypad will now indicate information
relevant to the selected partition.
Press A
87654321
Armed
Ready
Enter partition - ,
AREA ARMED >....
17:35.34 28/04
14
2
87654321
Armed
Ready
Premier 816
17:35.38 28/04
" To manually bypass zones, proceed as follows:
1
Alarm
Service
2
Alarm
Service
3
Alarm
Service
The selected zone is now bypassed. Repeat step 3 to
4
Once the selected zones have been bypassed press:
5
Enter Access code ????
Zones
87654321
Armed
Ready
YES to Arm?
MENU for Options
Press B
Zones
87654321
Armed
Ready
Bypass Zone> 00
*NONE BYPASSED*
The light will flash quickly.Ready
Enter the zone number ,
e.g. Enter to select Zone 2.
Zones
02
87654321
Armed
Ready
??
Bypass Zone> 02
Zone 02 Bypassed
bypass additional zones.
/ to Away arm
ya
to Stay arm
to return to the normal disarmed state
N
s
If the Quick Bypass feature is enabled, you can omit
"
step 1 from the above procedure.
When one or more zones are bypassed the Ready
light will flash and if the system is fitted with a Premier
RKP8/16 Plus or LCD remote keypad then the Bypass
light will also illuminate.
Unbypassing Zones
To manually unbypass zones, perform the manual Bypass
procedure on a zone that is already bypassed.
• 24 hour zones cannot be unbypassed if they are still
violated.
• If your installer has enabled the “Reinstate Bypassed
Zones on Disarm” option, all zones will automatically be
unbypassed each time the system is disarmed.
Bypassing Zones
Manually Bypassing Zones
Bypassing a zone prevents it from causing an alarm.
After manually bypassing a zone, the zone will remain
"
bypassed until the zone is manually unbypassed.
The Bypass menu will time-out if no key is pressed for
60 seconds.
INS141 9
Page 10

Operating the Alarm System Premier 412/816/832 Master User Manual
Group Bypass
The Group Bypass feature allows you to bypass a
predefined group of zones. The alarm system has up to four
groups.
" To bypass a group of zones, proceed as follows:
1
Alarm
Service
2
Alarm
Service
If required, zones can be added or removed from the
3
group by entering the required zone number ,
Alarm
Service
The selected zone is now bypassed. Repeat step 3 to
4
Once the selected zones have been bypassed press:
5
Enter Access code ????
Zones
87654321
Armed
Ready
YES to Arm?
MENU for Options
Enter bypass group 14- followed by B
Zones
87654321
Armed
Ready
Bypass Zone> 00
Zone 03 Bypassed
Bypass Zone> 00
Zone 04 Bypassed
The keypad will display the bypassed zones.
??
e.g. Enter to add Zone 5.
Zones
05
87654321
Armed
Ready
Bypass Zone> 05
Zone 03 Bypassed
Bypass Zone> 05
Zone 04 Bypassed
Bypass Zone> 05
Zone 05 Bypassed
bypass additional zones.
/ to Away arm
ya
to Stay arm
to return to the normal disarmed state
N
s
" To Quick Bypass a group of zones and Away arm,
proceed as follows:
1
Alarm
Service
2
Alarm
Service
The and lights will flash and the exit tone
Armed Ready
When the system is Away armed
3
Enter bypass group 14-
Zones
87654321
Armed
Ready
Premier 816
19:30.56 28/04
Press a Press y
Zones
87654321
Armed
Ready
Please Exit....
19:30.56 28/04
will sound.
exit tone stops, the
with the selected group of zones bypassed.
" To Quick Bypass a group of zones and Stay arm,
proceed as follows:
1
Alarm
Service
2
Alarm
Service
The alarm system will arm immediately and the
The system is Stay armed with the selected group of
3
Enter bypass group 14-
Zones
87654321
Armed
Ready
19:30.56 28/04
Press s
Zones
87654321
Armed
Ready
and lights will flash.
Ready
19:30.56 28/04
zones bypassed.
Premier 816
Premier 816
Armed
If the Quick Bypass feature is enabled, you can omit
"
step 1 from the above procedure.
When one or more zones are bypassed the Ready
light will flash and if the system is fitted with a Premier
RKP8/16 Plus or LCD remote keypad then the Bypass
light will also illuminate.
Quick Bypass and Arm
The Quick Bypass and Arm feature allows you to bypass a
predefined group of zones and Away or Stay arm the
system. The alarm system has up to four groups.
The Quick Arm feature must be enabled to use this
"
feature.
10 INS141
Page 11

Premier 412/816/832 Master User Manual User Functions Menu
3. User Functions Menu
This section covers the more advanced functions that
selected users can perform with the alarm system. The
following functions are available:
Reset Alarms
Service Faults
The response to a Service Fault condition is programmed by
the installer but is normally limited to the keypad buzzer. To
silence the Service Fault alarm, enter your Access code.
This function is used to reset any standing alarms and
service faults. It is also used to reset detectors with a latched
alarm indication, e.g., Smoke Detectors.
" To Reset Alarms, proceed as follows:
1
Alarm
Service
2
Alarm
Service
The keypad will bleep and the alarm system will reset
3
all latching detectors and attempt to clear any standing
Enter Access code ????
Zones
87654321
Armed
Ready
YES to Arm?
MENU for Options
Press N0
Zones
87654321
Armed
Ready
or .Alarms Service Faults
Press R
Premier 816
17:30.21 28/04
Last Alarm Log
The control panel has a memory that stores the zones that
caused an alarm when the system was last armed.
" To view the alarm memory, proceed as follows:
1
Alarm
Service
2
Alarm
Service
The keypad will display the zones that caused an alarm
3
Enter Access code ????
Zones
87654321
Armed
Ready
Press N1
Zones
87654321
Armed
Ready
when the system was last armed.
Press to return to the normal disarmed state.N
YES to Arm?
MENU for Options
Last Alarm From:
Zone 03
Last Alarm From:
Zone 04
A flashing Service light indicates a new fault condition. The
alarm system cannot be armed whilst a new fault exists. The
Service light will remain flashing until the new fault is
acknowledged, after which it will revert to a steady yellow
and the alarm system can be armed. The Service light will
remain steady until all faults have been cleared.
AC Fail and Telephone Line Fault can each have a delay
programmed. The Service light will turn steady yellow
immediately on either of these faults but no Service Fault
Alarm (transmission or audible alarm) will occur unless the
delay expires.
If your installer has disabled AC fail acknowledgement
"
the Service light will flash “rapidly” during an AC fail
condition. The system can be armed without requiring
acknowledgement of this fault.
Acknowledging a New Service Fault
" New service faults can be acknowledged as follows:
1
Alarm
Service
2
Alarm
Service
Press or to acknowledge the fault and return to
3
Enter Access code ????
Zones
87654321
Armed
Ready
YES to Arm?
MENU for Options
Press N2
Zones
87654321
Armed
Ready
System Faults:Press Menu/Reset
Line Fault
Press Menu/Reset
The keypad will display all Service Faults.
NR
the normal disarmed state.
View Service Faults
" Standing faults can be viewed as follows:
1. Press the - key followed by the $ key.
2. The keypad will display any Service Faults (see
tables on next page).
3. On completion press the - key.
INS141 11
Page 12
User Functions Menu Premier 412/816/832 Master User Manual
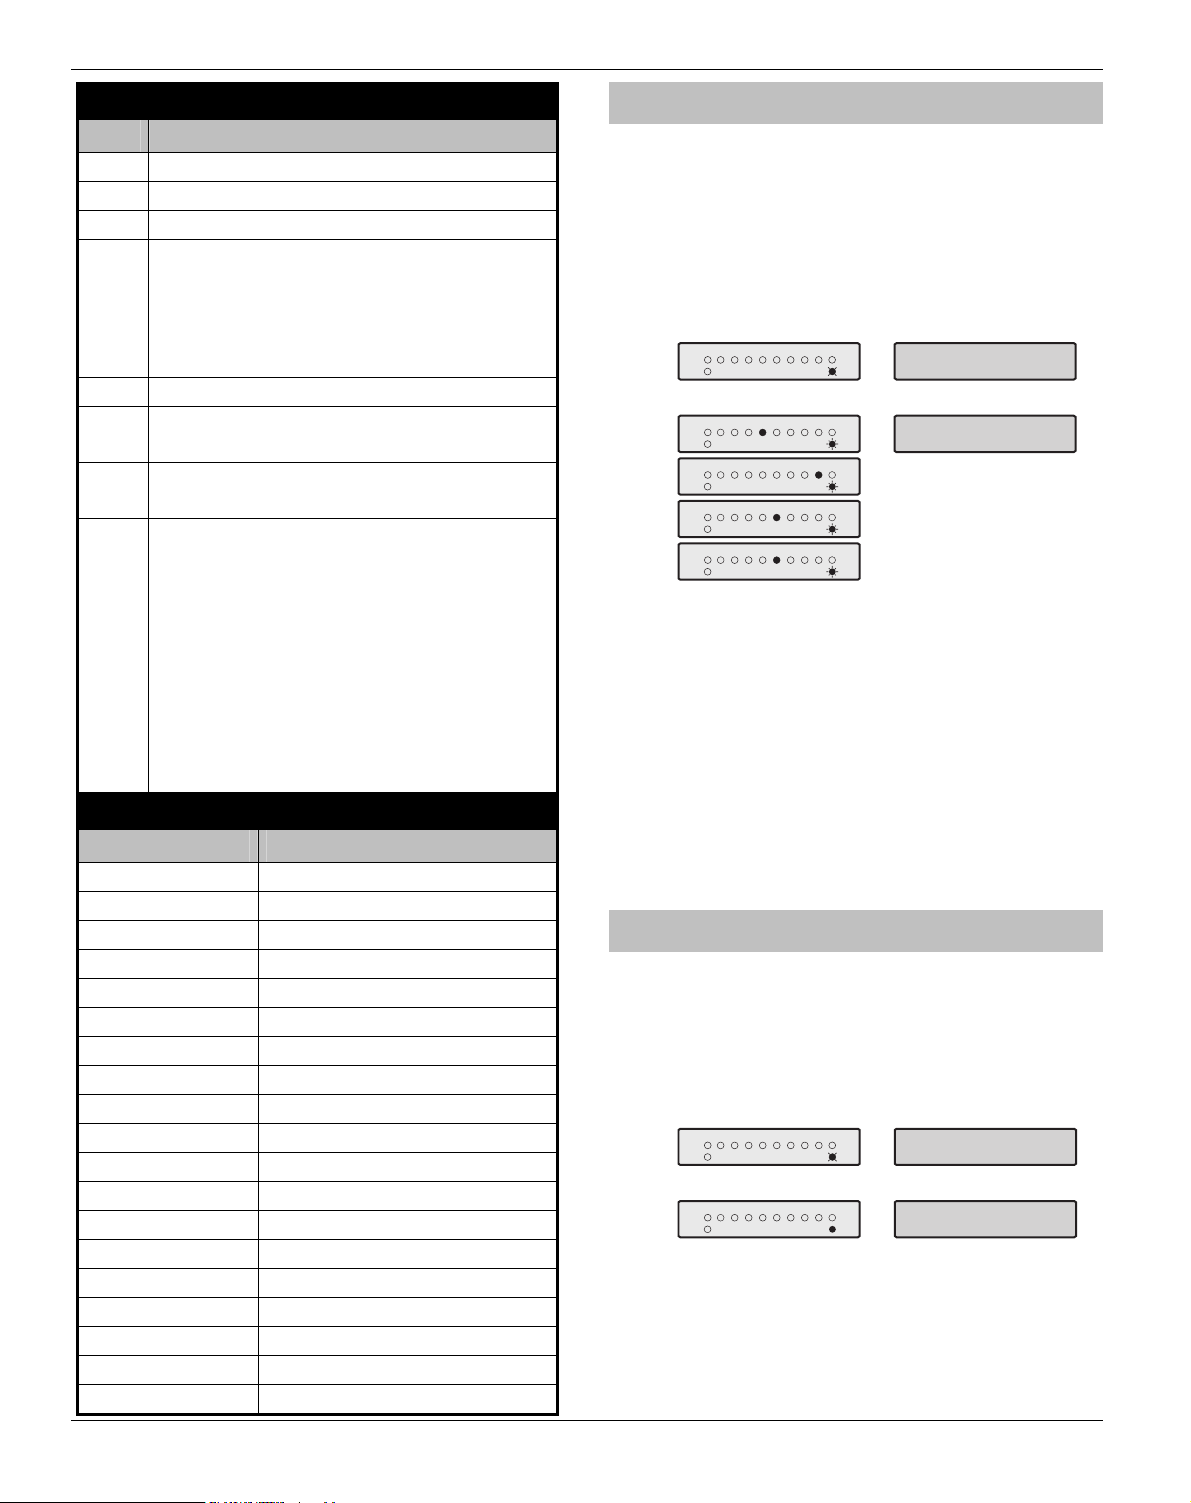
Service Faults Displayed on LED Keypads
Light Fault Condition
1 AC Fail
2 Telephone Line Fault
3 2-Wire Smoke Alarm
Box Tamper & Auxiliary Input:
Press & to view type, lights 1 - 5 indicate:
4
1 = Box Tamper 4 = Auxiliary Tamper *
2 = Auxiliary Tamper 5 = Bell Tamper *
3 = Auxiliary PA * = UK Bell Module
5 Date or Time Lost
Zone Tamper/Trouble
6
Press ) to view zone number
Keypad Tamper/Removed
7
Press * to view keypad number
Equipment Faults
Press ! to view fault type, lights 1 - 8 indicate:
1 = Output 1 Fault
2 = Output 2 Fault
3 = Siren/Bell Fault
8
4 = 2-Wire Smoke Sensor Fault
5 = Auxiliary Fuse Failed
6 = Battery Fault
7 = Service Timer/Zone Soak Test Failed
8 = Com1 Fault or Fail To Communicate
Service Faults Displayed on LCD Keypads
LCD Fault Condition
!"#$%&'# AC Fail
(&)*#$%+',# Telephone Line Fault
-./0*#!'%1.#2345# 2-Wire Smoke Alarm
6/78!+7#9%.:*1# Box Tamper
!+7#9%.:*1# Auxiliary Tamper (Aux Input)
!+7&'&1;#9%.:*1 Auxiliary Tamper (UK Bell Module)
6*''#9%.:*1# Bell Tamper (UK Bell Module)
!+7#<!#!'%1.# Auxiliary PA (Aux Input)
=%,*89&.*#(/>># Date or Time Lost
9%.:*1#?/)*#@#AB# Zone Tamper/Trouble
9%.:*1#C*;:%D@#B# Keypad Tamper/Removed
E+,:+,#B#$%+',# Output 1 Fault
E+,:+,#3#$%+',# Output 2 Fault
-&1*)#$%+',# Siren/Bell Fault
-./0*#-*)F#$%+',# 2-Wire Smoke Sensor Fault
!+7F#$+>*#$%+',# Auxiliary Fuse Failed
6%,,*1;#$%+',# Battery Fault
-*1G&H*#I*J+&1*D Service Timer/Zone Soak Test Failed
"/.>#$%+',# Com1 Fault or Fail To Communicate
Anti-code Reset
This feature is normally used in the UK where users are not
permitted to reset the panel following a communicated
alarm. However, the user can reset the panel after entering a
unique remote reset number, which is supplied by their
installer or ARC.
" To perform an Anti-code Reset, proceed as follows:
1
Alarm
Service
2
Alarm
Service
Alarm
Service
Alarm
Service
Alarm
Service
Contact your ARC/Installer to obtain a Anti-code Reset
3
Tel No.__________________________________________
Enter the Anti-code Reset number given to you by your
4
acceptance tone and the system will reset and return to
Enter Access code ????
Zones
87654321
Armed
Ready
YES to Arm?
MENU for Options
Press N3
Zones
Zones
Zones
Zones
87654321
Armed
Ready
87654321
Armed
Ready
87654321
Armed
Ready
87654321
Armed
Ready
Quote Code> 4855
Enter Reply>????
The keypad will display a
randomly generated
4-digit Code.
number.
ARC/Installer .
????
If the code is accepted, the keypad will sound an
the normal disarmed state.
Toggle Chime On and Off
When a zone is enabled for Chime the keypad will generate
a Chime tone every time the zone is violated. This function
allows you to turn the Chime feature on and off.
" To toggle Chime on and off, proceed as follows:
1
Alarm
Service
2
Alarm
Service
3
sound the Chime tone. If Chime was on, it will turn off
Enter Access code ????
Zones
Enter N4
Zones
87654321
Armed
Ready
87654321
Armed
Ready
YES to Arm?
MENU for Options
Press C
Premier 816
17:30.21 28/04
If Chime was off, it will turn on and the keypad will
and the keypad will sound the acceptance tone.
12 INS141
Page 13
Premier 412/816/832 Master User Manual User Functions Menu
Change User Code
All users of the alarm system can change their own Access
code number.
" To change your Access code, proceed as follows:
1
Alarm
Service
2
Alarm
Service
If the code is 4 or 5 digits the / key to
3
Alarm
Service
4
The keypad will sound an acceptance tone if the new
5
Access code was accepted. If you hear an error tone
Enter Access code ????
Zones
87654321
Armed
Ready
YES to Arm?
MENU for Options
Enter N5
Zones
87654321
Armed
Ready
Enter new code
Code : ******
????
aypress
accept.
Zones
87654321
Armed
Ready
Code : ****
Re-enter new code ????
(low), please repeat from step 1.
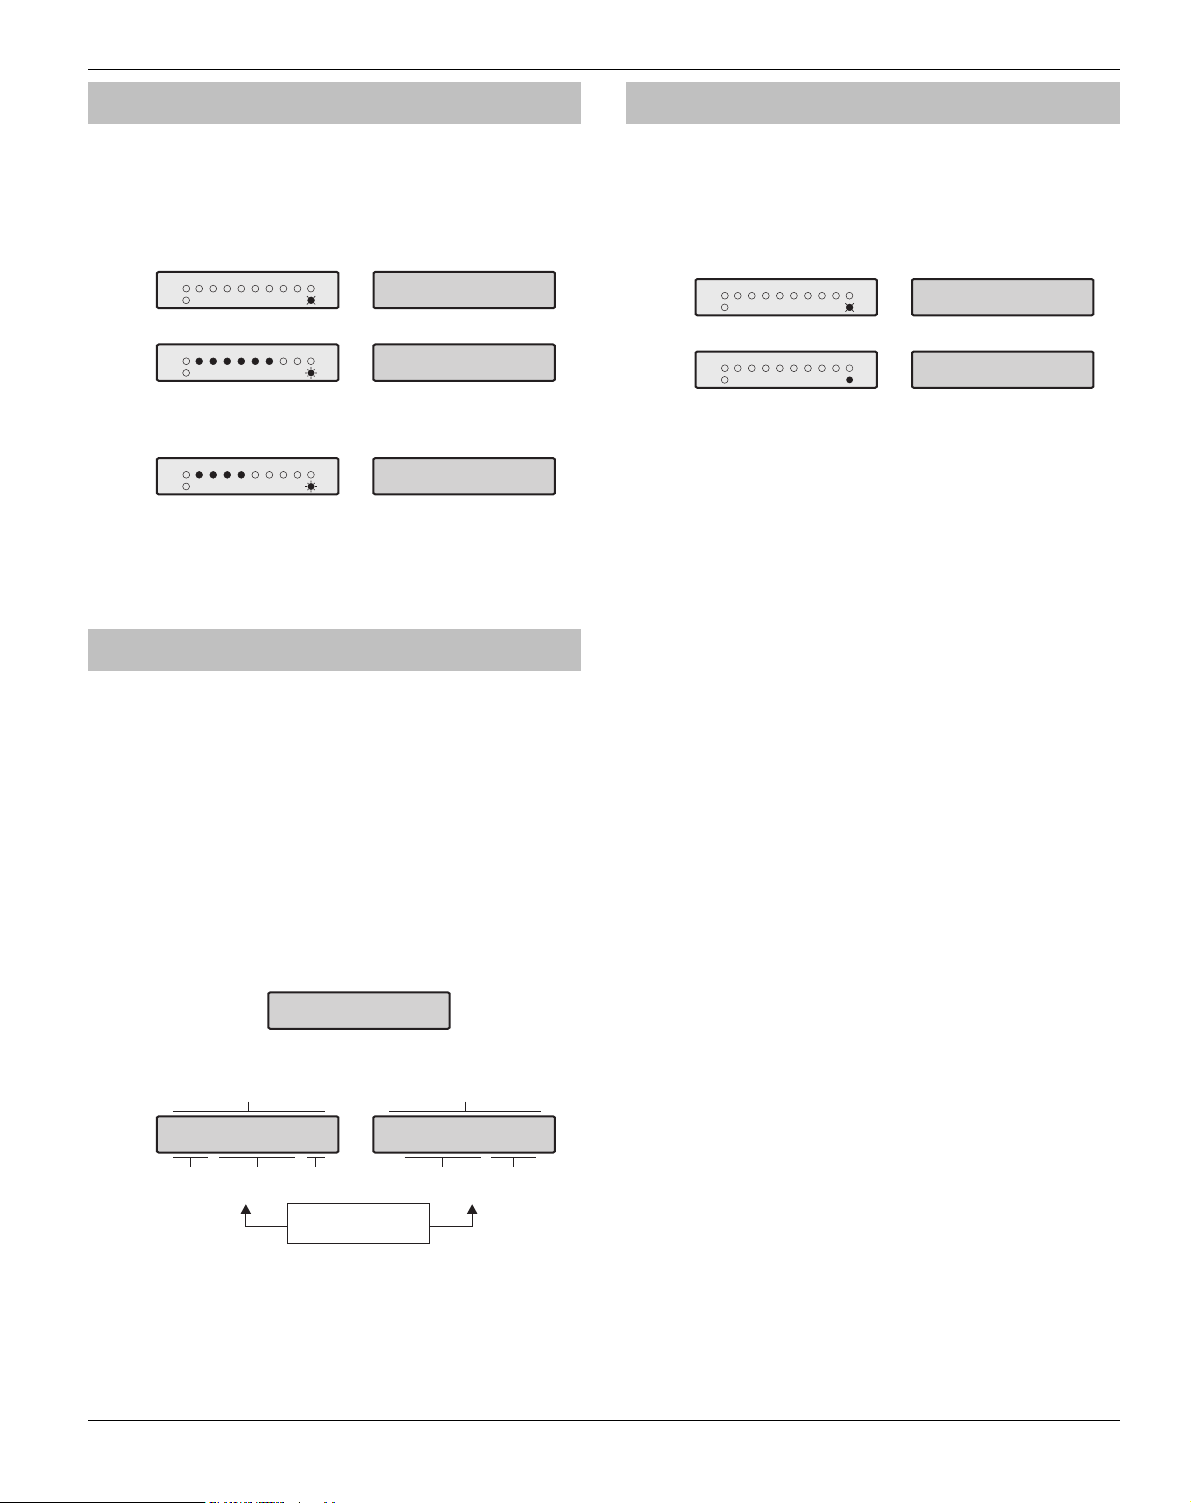
View Log (LCD Only)
Abort Communications
This option aborts any communications to the Alarm
Receiving Centre.
" To Abort Communications, proceed as follows:
1
Alarm
Service
2
Alarm
Service
The keypad will bleep and the alarm system will abort
3
,
Enter Access code ????
Zones
87654321
Armed
Ready
YES to Arm?
MENU for Options
Enter N7
Zones
87654321
Armed
Ready
Premier 816
17:30.21 28/04
all communications to the Alarm Receiving Centre.
The control panel has an Event Log, which stores all system
activity i.e., users entering their codes to arm and disarm the
system, alarm events, faults etc. Each event is time and date
stamped. The number of events stored in the control panel
is as follows:
• Premier 412 - 750 events
• Premier 816 - 750 events
• Premier 832 - 1000 events
" To view the Event Log, proceed as follows:
1
2
Bedroom 1 PA
3
1... 13:15.56 28
4
Enter Access code ????
YES to Arm?
MENU for Options
Enter N6
Event Type
(showing Zone Text)
TimePartitions Day/Month
Press to scroll up and down through the log.
U
Day
Press to toggle
A
information displayed
Press to when finished.
N
Event Type
(Alarm Type & Zone No)
PA Aud 02 Alm
13:15.56 28/04
Time
INS141 13
Page 14
System Program Menus Premier 412/816/832 Master User Manual
4. System Program Menus
The Master User and Users with the relevant access level
can access the System Program Menus. These menus allow
the users access to the more advanced features and
functions of the alarm system.
The following programming menus are available:
Menu Function Page
Programming Users
!", Program User 16
!#, User Options 1 17
!$, User Options 2 17
!%, User Options 3 17
!&, User Text 18
!', Program Standard Users 18
System Tests and Utilities
(", Walk Test 20
(#, Test Speakers and Outputs 20
($, Send Test Call 20
(%, Enable Download Access 20
(&, Start Call Back 20
(', Program Time 20
(), Program Date 20
(*, Program Banner Text 20
(!, Print 100 Events 20
((, Exit Program Mode 20
Menus !" - !' are restricted to Access
"
codes enabled for Code Programming (Master
Users).
Menus (" - (! are restricted to Access
codes enabled for User Programming.
To abort programming at any stage and preserve the
original settings, press -.
The alarm system will automatically exit program
mode if no key is pressed for 60 seconds.
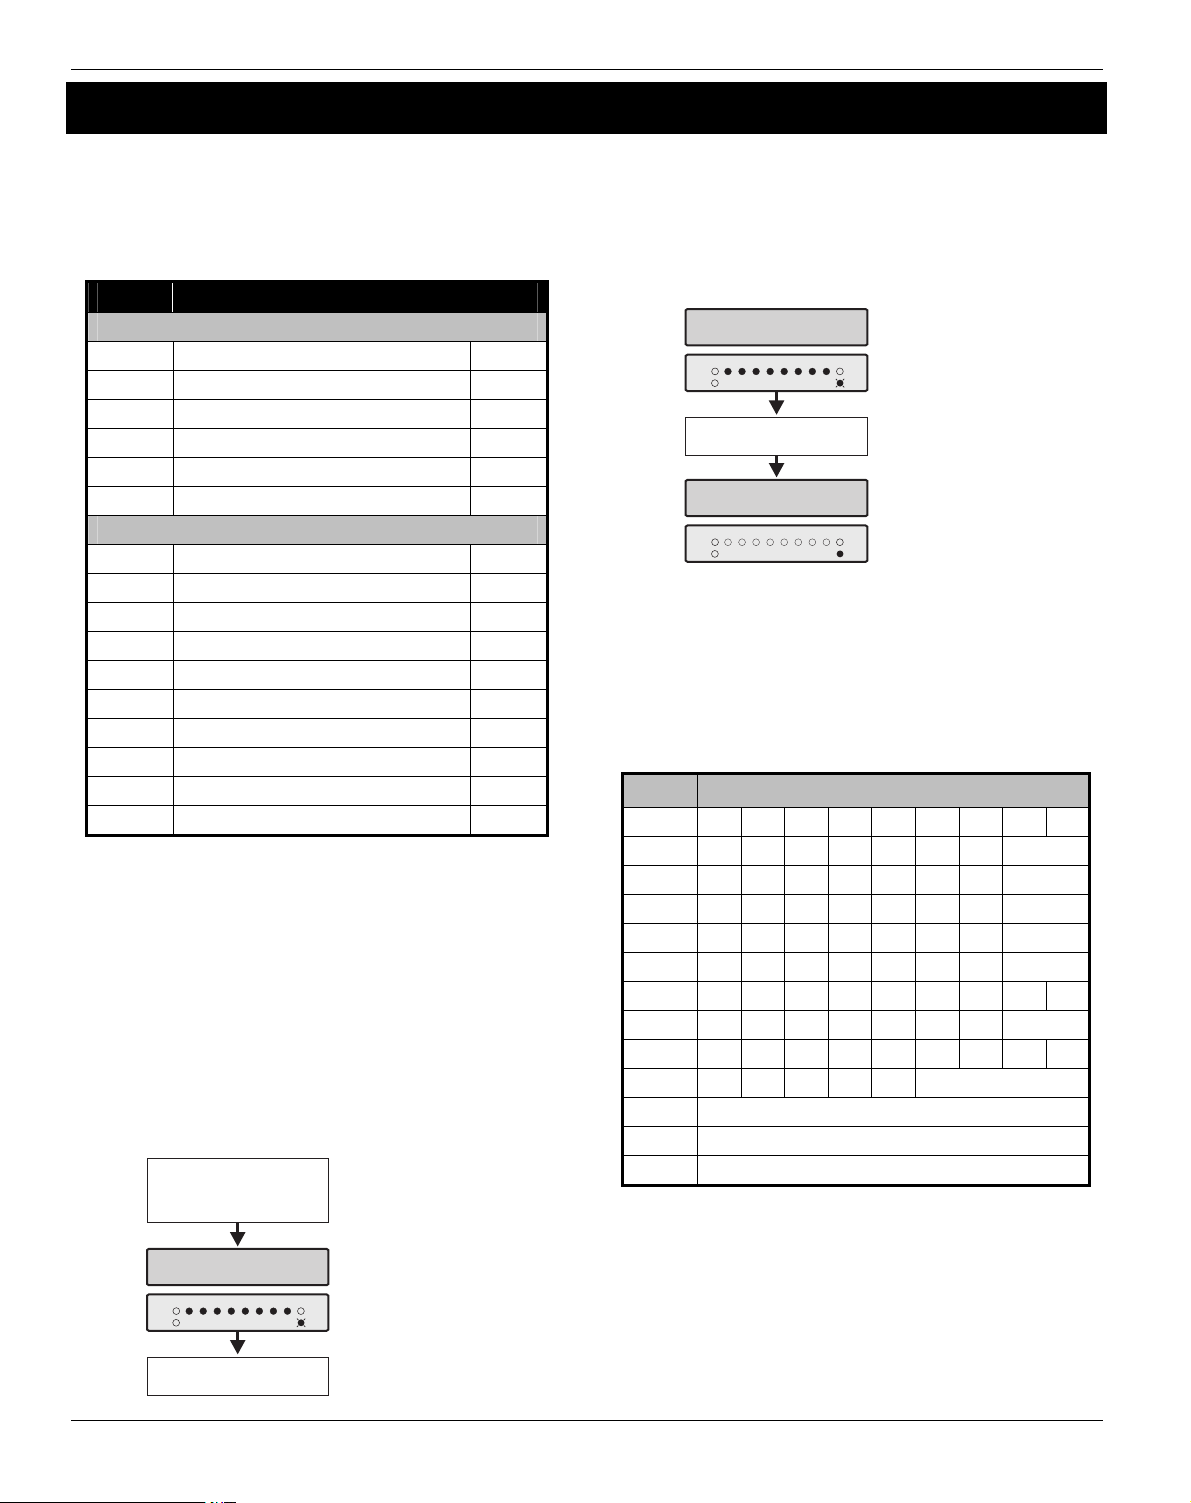
To access the programming menu, enter your Access
6666 and press - followed by (:
code
Enter Access code
????
Then press then
N9
A programming menu is selected by entering a two-digit
menu code. On completion of each menu option, the
system reverts to the main programming menu, allowing
other programming menu options to be accessed.
To exit the programming menu, enter (( or press the
- key, the system will revert to normal operation:
Programming Menu
Enter Code > ??
Zones
87654321
All Zone lights lit and
Alarm
Service
To exit programming mode,
99 N
enter or press
Premier 816
12:45.59 28/04
Alarm
Service
Zones
Armed
Ready
LCD shows banner text
and time/date.
87654321
All zones clear and
Armed
Ready
light flashesReady
light on.Ready
Programming Text (LCD Only)
Text is programmed in a similar way to mobile phones.
Characters are selected by pressing the corresponding key
the appropriate number of times (to select a character on
the same key, press 7 to move the cursor along).
The table below shows the keys to use and the characters
that are assigned to them:
Key Characters
!
#
$
%
&
'
(
)
*
+
,
.
. , ? ! 1 @ “ - &
a b c 2 A B C
d e f 3 D E F
g h i 4 G H I
j k l 5 J K L
m n o 6 M N O
p q r s 7 P Q R S
t u v 8 T U V
w x y z 9 W X Y Z
_ 0 , # * Custom characters
Move cursor left and right
Backspace (delete)
Accept text
Programming Menu
Enter Code > ??
Zones
87654321
All Zone lights lit and
Alarm
Service
Enter menu command
??
Armed
Ready
light flashesReady
14 INS141
Page 15
Premier 412/816/832 Master User Manual System Program Menus
Programming Users
Enter Access code
????
Then press then
N9
Programming Menu
Enter Code > ??
Zones
Service
Alarm
80
81
87654321
Armed
Ready
Program User 00
Enter User No.??
Alarm
Service
Zones
N
A
User 00 Options1
Enter User No.??
Alarm
Service
Zones
N
Led Key
Off
On
Slow Flash
Fast Flash
Program User
Program User 03
Enter User Number
??
87654321
Armed
Ready
.
Code : ******
Alarm
Service
Enter Code
Press or if code is
Program User 03
Code : ****
Alarm
Service
Zones
????
ya
less than 6 digits.
Zones
Re-enter New Code
????
87654321
Armed
Ready
87654321
Armed
Ready
User Options 1
Armed
Ready
User Options 1
Enable for Partition 1
1
Enable for Partition 2
2
Enable for Partition 3 ( )
3
Enable for Partition 4 ( )
4
Allow Arming
5
Allow Bypassing
6
Allow Disarming
7
Allow User Functions
8
Premier 816/832
Premier 816/832
User 03 Options1
Enter User Number
??
87654321
Armed
Ready
.
> 1***5678 <
Alarm
Service
select/deselect Options.
Zones
Use keys - to
18
Then press or
ya
87654321
User Options 2
User Options 2
Enable One Time Use Access Code
1
Time Lock Code with Control Timer 1
2
Enable Open Reporting
3
Armed
Ready
Enable Close Reporting
4
Enable User as Duress Code
5
Activate Door Strike Output
6
Allow Global Bell/Sounder Silence
7
8 Disable Remote Access
82
User 00 Options2
Enter User No.??
Alarm
Service
Zones
N
User 03 Options2
Enter User Number
??
87654321
Armed
Ready
.
> **34**** <
Alarm
Service
select/deselect Options.
Zones
Use keys - to
18
Then press or
ya
87654321
User Options 3
83
User 00 Options3
Enter User No.??
Alarm
Service
Zones
N
Enter User Number
??
87654321
Armed
Ready
.
User 03 Options3
> ****5*** <
Alarm
Service
select/deselect Options.
Zones
Use keys - to
18
Then press or
ya
Return to point
87654321
A
Continues on
Next Page
INS141 15
Armed
Ready
User Options 3
Allow Engineer Code Programming
1
Allow NVM Locking
2
Allow Engineer Programming
3
Allow Test Call Transmission
4
Allow Alarm/Fault Acknowledgement
5
Allow User Programming
6
Allow User Code Programming
7
Local Partition Access Only
8
Page 16
System Program Menus Premier 412/816/832 Master User Manual
Previous Page
84
85
From
Engineer
User 00 Text
N
Program User 00
Enter User No.??
Zones
Service
Alarm
N
User Text
Use to select User.
PressUn to edit text.
Program Standard Users
Enter User Number
??
87654321
Armed
Ready
.
Engineer
^ser 00 Text
Use keys to enter/edit text.
Then press to accept.y
Program User 03
Code : ******
Alarm
Service
Enter Code
Press or if code is
Program User 03
Code : ****
Alarm
Service
Zones
????
ya
less than 6 digits.
Zones
Re-enter New Code
????
Text Editing Keys
.,?!1@”-&
1
abc2ABC
2
def3DEF
3
ghI4GHI
4
jkl5JKL
5
mno7MNO
6
pqrs7PQRS
7
tuv8TUV
8
wxyz9WXYZ
9
Space 0 , # *
0
Move Left/Right
U
Backspace (delete)
R
87654321
Armed
Ready
87654321
Armed
Ready
Delete User
Program User 00
80
Enter User No.??
Zones
Service
Alarm
87654321
Enter User Number
Armed
Ready
??.
N
Program User !"
The Program User option allows the master user or users
with the appropriate access level to assign new users for the
alarm system. The number of users (including the engineer)
that are available is as follows:
• Premier 412 - 32 Users
• Premier 816 - 32 Users
• Premier 832 - 64 Users
User 00 is the Engineer and can only be accessed by the
engineer code. User 01 is the Master User which has a
default code of 5678. Neither of these two users can be
deleted from the system.
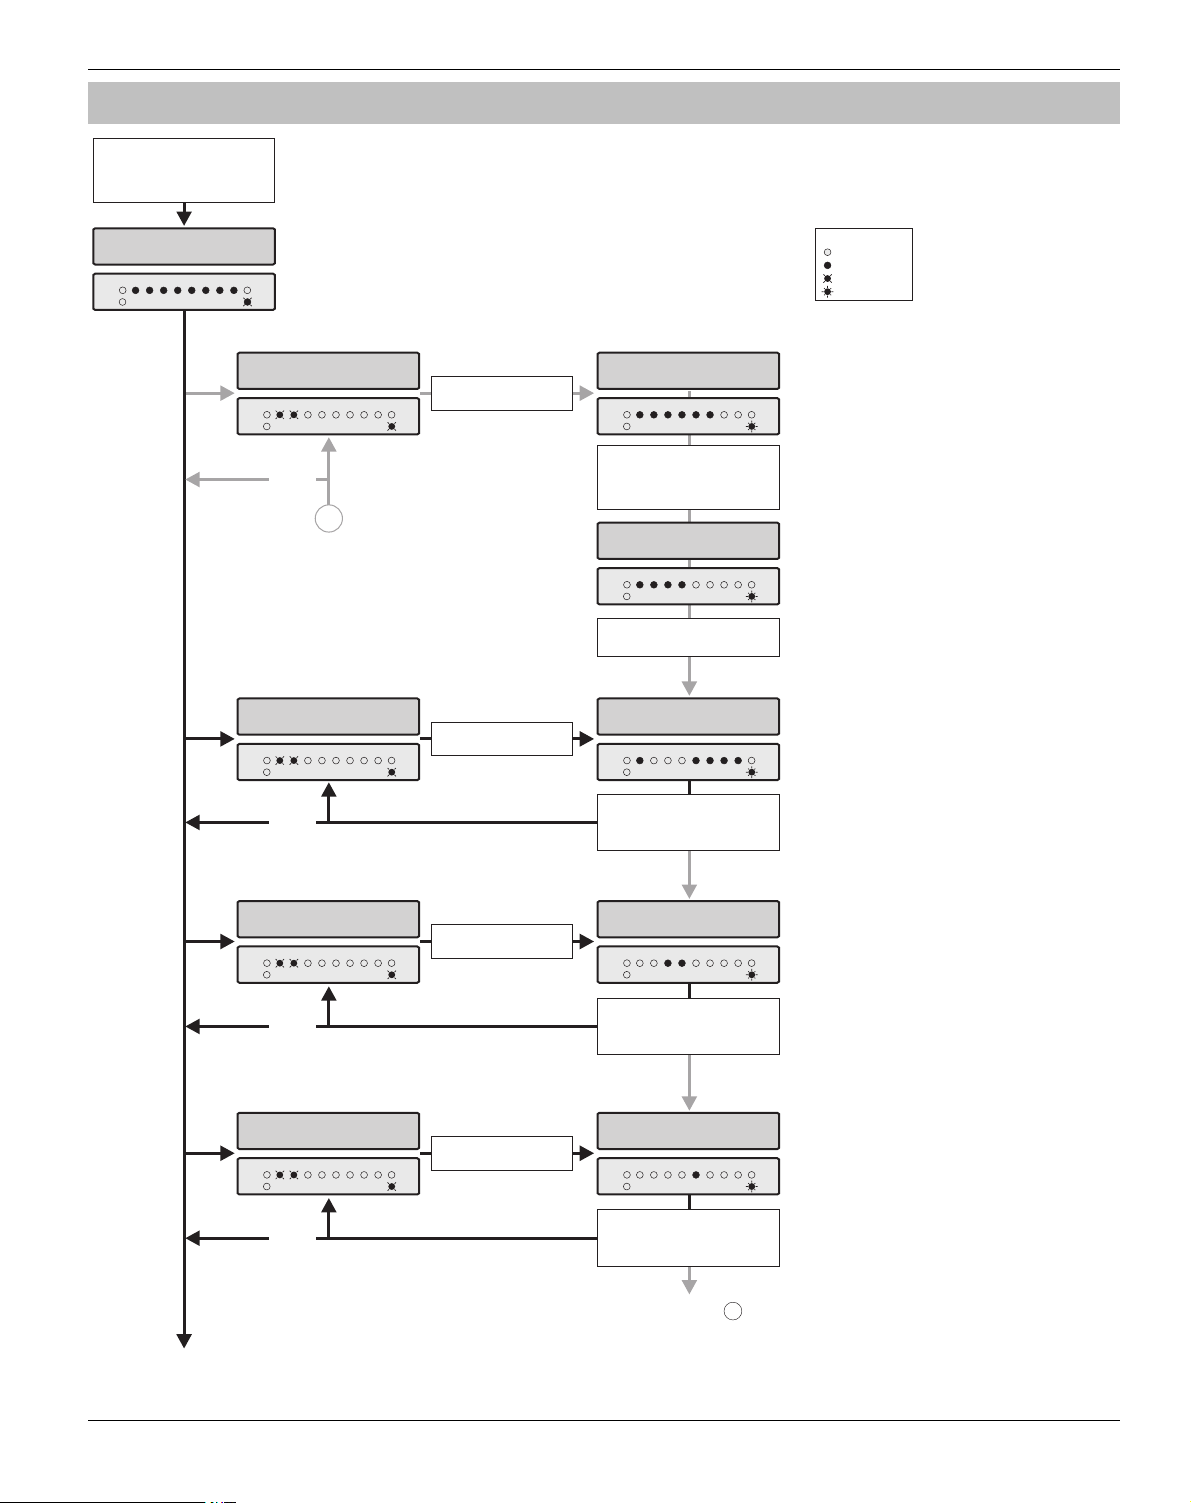
Each user is assigned the following attributes:
• Access Code
This is a unique 4, 5 or 6 digit code that is assigned to
the user. The system will allow a mixture of different
length Access codes. The Access code must be entered
at a keypad before the user can operate the alarm
system.
Program User 03
Code : ******
Zones
87654321
Alarm
Service
Press B
Armed
Ready
• User Options 1
See User Options 1 on page 17 for details.
• User Options 2
See User Options 2 on page 17 for details.
• User Options 3
See User Options 3 on page 17 for details.
• User Text (LCD Only)
See User Text on page 18 for details.
16 INS141
Page 17

Premier 412/816/832 Master User Manual System Program Menus
User Options 1 !#
User Options 1 can be enabled or disabled for a selected
user so that the level of access to the system may be
altered. The following options are available:
# Enable for Partition 1
On: The user can access Partition 1.
Off: The user cannot access Partition 1.
$ Enable for Partition 2
On: The user can access Partition 2.
Off: The user cannot access Partition 2.
%, Enable for Partition 3 (Premier 816/832 Only)
On: The user can access Partition 3.
Off: The user cannot access Partition 3.
&, Enable for Partition 4 (Premier 816/832 Only)
On: The user can access Partition 4.
Off: The user cannot access Partition 4.
', Allow Arming
On: The user can arm the partitions they have been given
access to.
Off: The user cannot arm any partitions.
), Allow Bypassing
On: The user can bypass zones in partitions they have
been given access to.
Off: The user cannot bypass zones.
*, Allow Disarming
On: The user can disarm the partitions they have been
given access to.
Off: The user cannot disarm any partitions.
The Engineer code (User 00) can only disarm the
"
system if the system was armed with the Engineer
code.
!, Allow User Functions
On: The user can access the following user functions:
• Reset
• View Alarm Log
• View Service Faults
• Enable Chime
• Change Own Code
Off: The user cannot access the above user functions.
User Options 2 !$
User Options 2 can be enabled or disabled for a selected
user so that the level of access to the system may be
altered. The following options are available:
#, Enable One Time Use Access Code
On: The Access code can only be used once to arm and
disarm the system. After the Access code has been
used to disarm the system it is automatically deleted.
Off: The Access code behaves normally.
$, Time Lock Code with Control Timer 1
On: When Control Timer 1 is on, the Access code will not
be accepted by the system. When Control Timer 1 is
off, the Access code will be accepted by the system.
Off: The Access code will be accepted at all times.
%, Enable Open Reporting
On: The system will report an ‘Open’ condition to the alarm
receiving centre when the Access code is used to
disarm one or more partitions.
Off: The system will not report an ‘Open’ status.
The panel will always send an open signal after an
"
alarm even if this option is disabled.
&, Enable Close Reporting
On: The system will report a ‘Close’ condition to the
monitoring station when the Access code is used to
arm one or more partitions.
Off: The system will not report a ‘Close’ condition.
', Enable User as Duress Code
On: The Access code will report a ‘Duress’ condition to the
monitoring station when the Access code is used.
Off: The Access code behaves normally.
), Activate Door Strike Output
On: When a user Access code is entered, the output type
“Door Strike” is activated for 2 seconds.
Off: The user Access code will not activate the “Door
Strike” output.
*, Allow Global Bell/Sounder Silence
On: This option allows users to silence the bell and internal
sounder for any partition, even if the user is not
assigned to the partition that is in alarm. The user
cannot disarm or reset the partition if they are not
assigned to it.
Off: The user can only silence alarms for partitions that are
assigned to their code.
!, Disable Remote Access
On: The remote access feature is disabled for the selected
user.
Off: The remote access feature is enabled for the selected
user.
The Remote Access feature is only available on the
"
Premier 816+ and Premier 832. It allows the user to
dial in to their alarm system remotely control the
system using a standard touch-tone telephone.
User Options 3 !%
User Options 3 can be enabled or disabled for a selected
user so that the level of access to the system may be
altered. The following options are available:
#, Allow Engineer Code Programming
On: The Access code can access User 00 (Engineer) in the
Program New Users menu (menu 80).
Off: The Access code cannot access user 00 in the
Program New Users menu.
INS141 17
Page 18

System Program Menus Premier 412/816/832 Master User Manual
$, Allow NVM Locking
On: The Access code is allowed to lock/unlock the NVM
(providing “Allow Engineer Programming” is enabled).
Once the NVM is locked the “Load Defaults” jumper
pins on the main control panel are disabled, thus
preventing the panel from being defaulted.
Off: The Access code cannot lock/unlock the NVM.
%, Allow Engineer Programming
On: The Access code can access the Engineer
programming menus.
Off: The Access code cannot access the Engineer
programming menus.
&, Allow Test Call Transmission
On: The Access code can perform a test transmission to
the monitoring station (menu 92, see page 20).
Off: The Access code cannot perform a test transmission.
', Allow Alarm/Fault Acknowledgement
On: The Access code can be used to acknowledge and
reset alarms and service faults. A user with this option
can disarm the system after an alarm, even if the user
does not have the "Allow Disarming" option.
Off: The Access code cannot be used to acknowledge and
reset alarms and service faults.
), Allow User Programming
On: The Access code can access the user program menus
(menu 90 - 98).
Off: The Access code cannot access the user program
menus.
*, Allow User Code Programming
On: The Access code can access users 01 to 31 in the
User programming menus (menus 80 - 85).
Off: The Access code cannot access user 01 to 31 in the
User programming menus.
!, Local Partition Access Only
On: The Access code can only be used to arm and disarm
the partitions that are assigned to the remote keypad.
For example, if the user is assigned to all four
partitions and they use a remote keypad that is only
assigned to Partition 1, they will only be permitted to
arm and disarm Partition 1 at that particular remote
keypad.
Off: The Access code can be used at any remote keypad
(Global Access).
Program Standard Users !'
This menu option allows you to add “Standard” users to the
system. The user will automatically be assigned the
following options:
User Options 1: Partition 1 Access
Allow Arming
Allow Bypassing
Allow Disarming
Allow User Functions
User Options 2: Enable Open Reporting
Enable Close Reporting
Allow Global Bell/Sounder Silence
User Options 3: Allow Alarm/Fault Acknowledgement
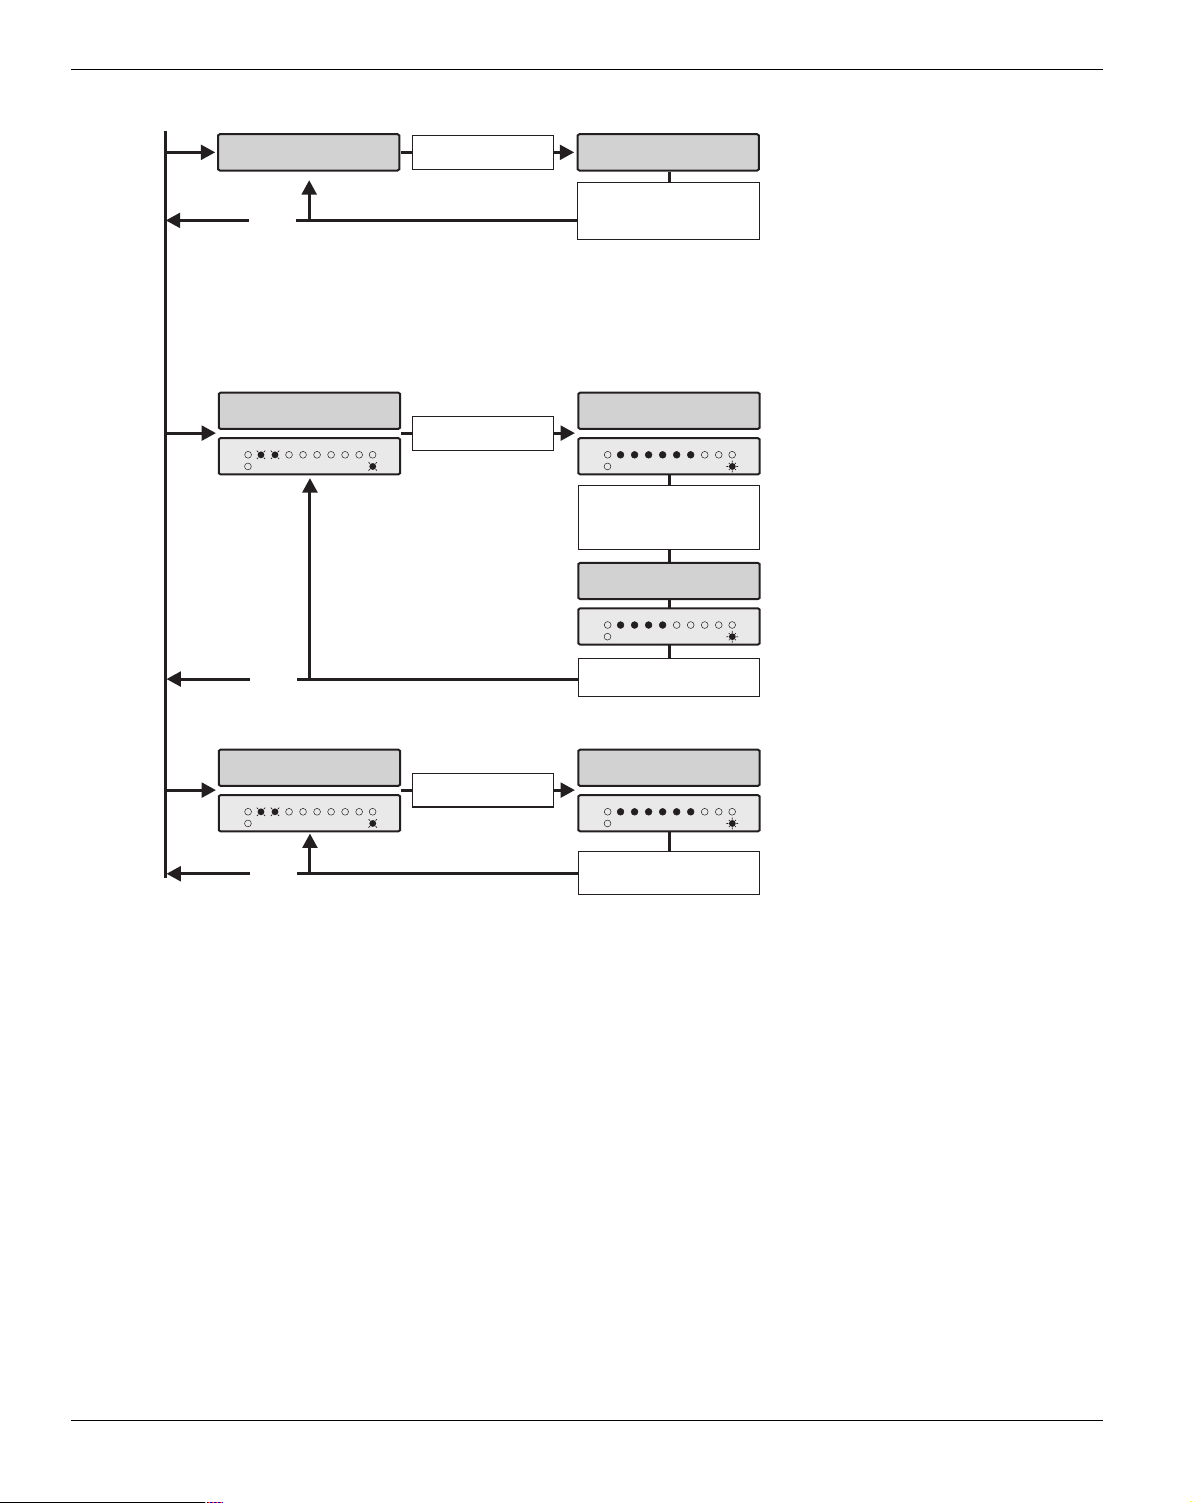
User Text (LCD Only) !&
If the system is fitted with a LCD remote keypad you can
assign up to 8 characters of text to each user. This text is
used when viewing the system Event Log, see page 13.
User text is programmed in a similar way to mobile phones.
Characters are selected by pressing the corresponding key
the appropriate number of times (to select a character on
the same key, press 7 to move the cursor along). For
details on entering text, see page 14.
18 INS141
Page 19
Premier 412/816/832 Master User Manual System Program Menus
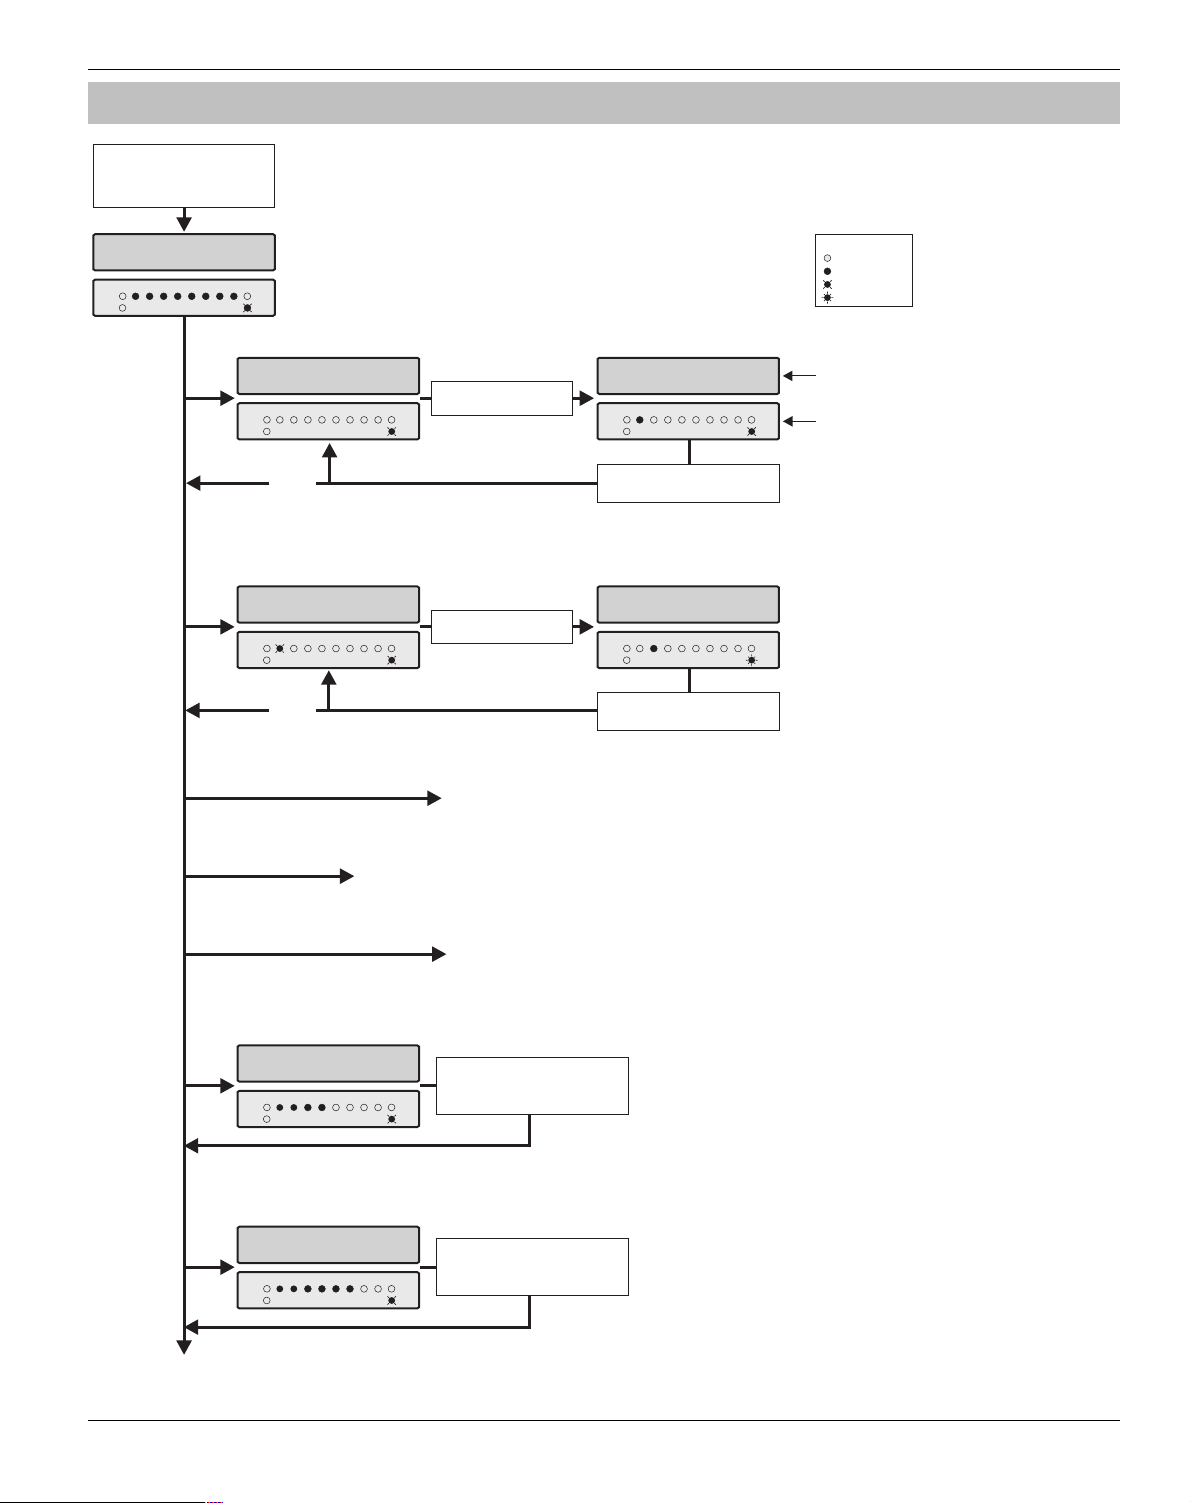
System Tests & Utilities
Enter Access code
????
Then press then
N9
Programming Menu
Enter Code > ??
Zones
Service
Alarm
90
91
92
87654321
Armed
Ready
Walk Test
No Zones Tested
Alarm
Service
Zones
N
Test System
Enter 1 to 5
Alarm
Service
Zones
N
Walk Test
87654321
Armed
Ready
Activate Zones
Test Speakers & Outputs
Enter Test Number
87654321
Armed
Ready
1 - 5
Send Test Call
Zone 01 Active
Zone 01 Tested
Alarm
Service
Press to clear tested
Test System
Bells Active
Alarm
Service
Zones
0
zones from display
Zones
Press to reset test0
Led Key
Off
On
Slow Flash
Fast Flash
Top line scrolls active zones
Bottom line scrolls tested zones
87654321
87654321
Zone light flashing = zone active
Armed
Zone light on = zone tested
Ready
System Tests
1
Test Speakers
2
Test Bells
3
Armed
Ready
Test Strobes
4
Test Outputs
5
Test LCD Display
93
94
Enable Remote/Engineer Access
Start Call Back
Program Time
95
Program Time
> 13:15
Alarm
Service
Zones
87654321
Enter the Time in 24hr format
e.g. 6.30pm = 1830
Armed
Ready
HHMM
Program Date
Program Date
96
> 28/04/01
Alarm
Service
Zones
87654321
Armed
Ready
Continues on
Next Page
INS141 19
Enter the Date in a
DDMMYY
e.g. 28 April 2001 = 280401
format
Page 20
System Program Menus Premier 412/816/832 Master User Manual
From
Previous Page
Banner Text (LCD Only)
97
98
99
Premier 8SP
Banner Text
N
Pressnto edit text.
Print 100 Events
Exit Program Mode
Premier 8SP
^anner Text
Use keys to enter/edit text.
Then press to accept.
y
Text Editing Keys
.,?!1@”-&
1
abc2ABC
2
def3DEF
3
ghI4GHI
4
jkl5JKL
5
mno7MNO
6
pqrs7PQRS
7
tuv8TUV
8
wxyz9WXYZ
9
Space 0 , # *
0
Move Left/Right
U
Backspace (delete)
R
Walk Test ("
The Walk Test feature can only be performed when the
partition is disarmed. 24 hour zones (except Fire, Tamper
and Trouble) are disabled during Zone Test allowing Audible
PA buttons, Silent PA buttons, etc. to be tested.
Test Speakers & Outputs (#
This menu options allows you to perform the following tests:
# Test Speakers
$ Test Bells
% Test Strobes
& Test System Outputs
When performing the “Test System Outputs” option,
"
only outputs programmed by your installer will be
activated during this test.
Send Test Call ($
This menu options allows you to send a test call
transmission to your Alarm Receiving Centre.
If the test call is unsuccessful, the keypad will sound
"
an error tone.
Enable Remote/Engineer Access (%
Your alarm system may be configured in such a way that
you have to authorise Remote/Engineer Access. Once
authorised, your alarm system will allow:
• Your installer/Alarm Receiving Centre to access the
alarm system via the remote downloading computer.
• Your installer/engineer to access the control panel
programming menus.
Start Call Back (&
This option will cause the control panel to initiate a call back
sequence. This will allow the remote downloading computer
to remotely access the control panel.
You should only use this feature when requested by
"
your installer/Alarm Receiving Centre. If the Call Back
is unsuccessful the keypad will sound an error tone.
Program Time ('
The control panel has a real time clock that is used to date
and time stamp events that are recorded within the system
log. The option allows you to set the control panel time.
Program Date ()
The control panel has a real time clock that is used to date
and time stamp events that are recorded within the system
log. The option allows you to set the date on the control
panel.
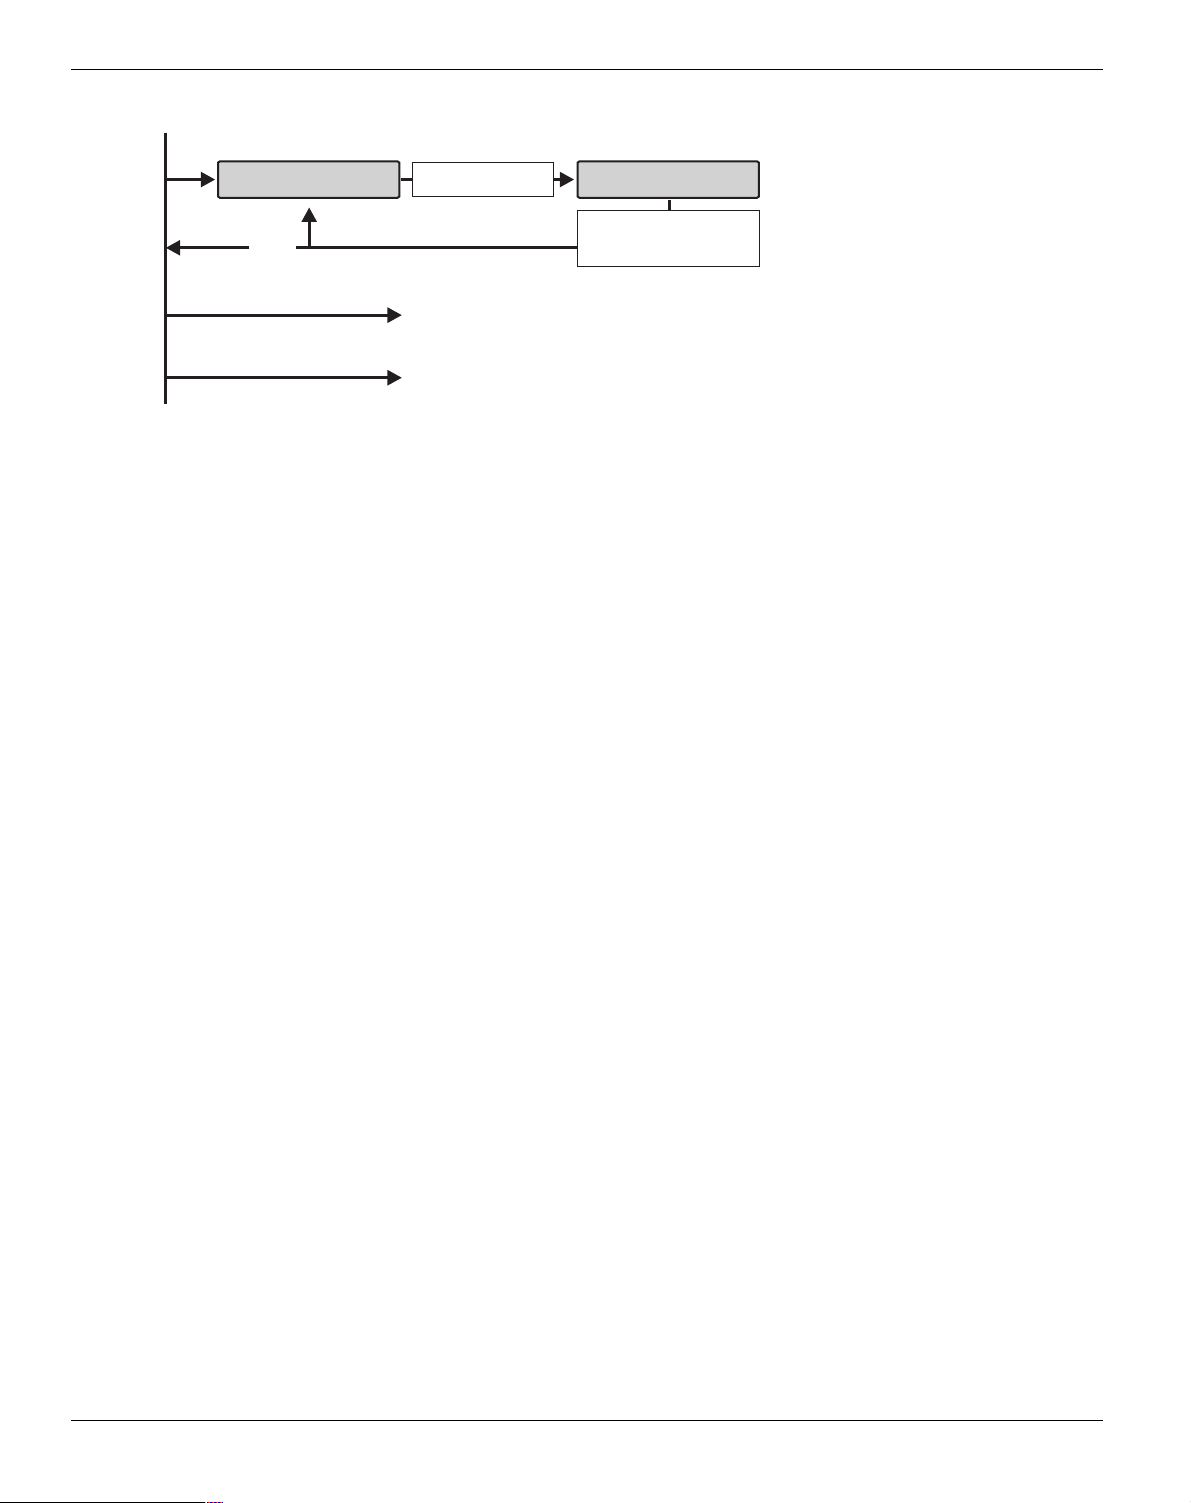
Program Banner Text (LCD only) (*,
If the system is fitted with a LCD remote keypad you can
assign up to 16 characters of text to the Banner Message.
The Banner Message is displayed on the top line of the LCD
display during the normal disarmed state. Text is
programmed in a similar way to mobile phones. Characters
are selected by pressing the corresponding key the
appropriate number of times (to select a character on the
same key, press 7 to move the cursor along). For details
on entering text, see page 14.
Print 100 Events (!,
If your system has a printer connected, this menu option
allows the last 100 events in the system Event Log to be
sent to the printer.
The alarm system will allow access until 12.00am, after
which, both Remote and Engineer Access will be denied.
20 INS141
Exit Program Mode ((,
Selecting this menu option will log you out of programming
mode and return the system to its normal state
Page 21

Premier 412/816/832 Master User Manual Fire Safety & Maintenance
5. Fire Safety & Maintenance
• Are furnaces and wood burning appliances properly
Fire Safety
installed, clean and in good working order? Have a
professional evaluate these appliances.
Fire Alarm Operation
Alarm
On a fire alarm, the bell or siren will pulse ON and OFF. If
your system is fitted with a Premier RKP8/16 Plus then the
Fire light will be illuminated. The alarm is also transmitted to
the Alarm Receiving Centre, if your installer has enabled this
feature.
Silence
To silence the bell or siren, enter your Access code.
Resetting Smoke Detectors
Once the smoke detector is reset, if it still detects smoke, the
alarm sequence will resound as described above. If there is
no smoke, the system will return to normal operation.
" To reset smoke detectors, proceed as follows:
1. Enter your Access code 6666.
2. Press the - key followed by the " key. If your
system is fitted with either a Premier RKP8/16 Plus or
LCD remote keypad then press the 3 key.
3. The keypad will bleep and the alarm system will reset
all latching detectors.
If you suspect that a fire alarm has transmitted and
"
that there is no fire condition, call the alarm receiving
centre to avoid an unnecessary response. If a fire
condition is apparent, follow your evacuation plan
immediately. If the alarm sounds at night, evacuate
immediately.
The description above may not be applicable
depending on how your installer has programmed the
fire alarm operations on your system. Ask your
installer for more information regarding your system's
operation.
Household Fire Safety Audit
Most fires occur in the home. To minimise the risk of fire, it is
recommended that a household safety audit is conducted
and a fire escape plan is developed.
• Are all electrical appliances and outlets in a safe
condition? Check for frayed cords, overloaded lighting
circuits, etc. If you are uncertain about the condition of
your electrical appliances or household service, have a
professional evaluate these units.
• Are all flammable liquids stored safely in closed
containers in a well ventilated cool area? Cleaning with
flammable liquids should be avoided.
• Are fire hazardous materials (matches) well out of reach
of children?
Fire Escape Planning
There is often very little time between the detection of a fire
and the time it becomes deadly. It is therefore very important
that a family escape plan be developed and rehearsed.
1. Every family member should participate in developing
the escape plan.
2. Study the possible escape routes from each location
within the house. Since many fires occur at night,
special attention should be given to the escape routes
from sleeping quarters.
3. Escape from a bedroom must be possible without
opening the interior door. Consider the following when
making your escape plans:
• Make sure that all perimeter doors and windows are
easily opened. Ensure that they are not painted shut
and that their locking mechanisms operate
smoothly.
• If opening or using the exit is too difficult for
children, the elderly or handicapped, plans for
rescue should be developed. This includes making
sure that those who are to perform the rescue can
promptly hear the fire warning signal.
• If the exit is above the ground level, an approved
fire ladder or rope should be provided as well as
training in its use.
• Exits on the ground level should be kept clear. Be
sure to remove snow from exterior patio doors in
winter; outdoor furniture or equipment should not
block exits.
• Each person should know of a predetermined
assembly point where everyone can be accounted
for i.e. across the street or at a neighbour's house.
Once everyone is out of the building, call the Fire
Services.
• A good plan emphasises quick escape. Do not
investigate or attempt to fight the fire, and do not
gather belongings or pets as this wastes valuable
time. Once outside, do not re-enter the house. Wait
for the Fire Services.
• Write the fire escape plan down and rehearse it
frequently so that should an emergency arise,
everyone will know what to do. Revise the plan as
conditions change, such as the number of people in
the home, or if there are changes to the building's
construction.
INS141 21
Page 22

Fire Safety & Maintenance Premier 412/816/832 Master User Manual
• Make sure your fire warning system is operational
by conducting weekly tests (see “Fire Alarm
Operation” on page 21). If you are unsure about
system operation, contact your installing dealer.
• We recommend that you contact your local fire
department and request further information on fire
safety and escape planning. If available, have your
local fire prevention officer conduct an in-house fire
safety inspection.
Maintenance
With normal use, the system requires minimum
maintenance. The following points should be observed.
1. Do not wash the security control panel or keypads with
a wet cloth. Light dusting with a slightly moistened cloth
should remove normal accumulations of dust.
2. The battery test is designed to determine battery
condition. We recommend, however, that the stand-by
batteries are replaced every five years.
3. For other system devices such as smoke detectors,
passive infrared, ultrasonic or microwave motion
detectors or glass-break detectors, consult the
respective manufacturer’s literature for testing and
maintenance.
Glossary
Glossary of terms used in this manual:
Access Code: A four, five or six digit code that is used to
operate the alarm system.
Alarm Receiving Centre: A remote location where alarm
status data is received via the telephone line from the control
panel.
Bypass: A feature that allows the user to exclude selected
zones from being monitored by the alarm system.
Chime: A feature that allows the keypads and internal
sounder to generate a ding-dong sound whenever the
selected zones are violated.
Duress Code: A special type of Access code that reports a
signal to the alarm receiving centre that indicates the system
is being operated under duress.
Forced Armable: An option that can be selected on a zone
by zone basis, that will allow the system to be armed, even if
the selected zone is violated.
Group Bypass: A feature that allows the user to bypass a
group of zones in one go.
Partition: One or more zones that make up an individual
area. This area can independently be armed and disarmed
from other partitions.
Service: A condition that will indicate that a problem has
occurred with the alarm system or with one of its detection
devices.
Zone: A zone is an area of protection that has one or more
detection sensors connected to it (motion detectors, glassbreak detectors, door contacts or shock sensors).
22 INS141
Page 23
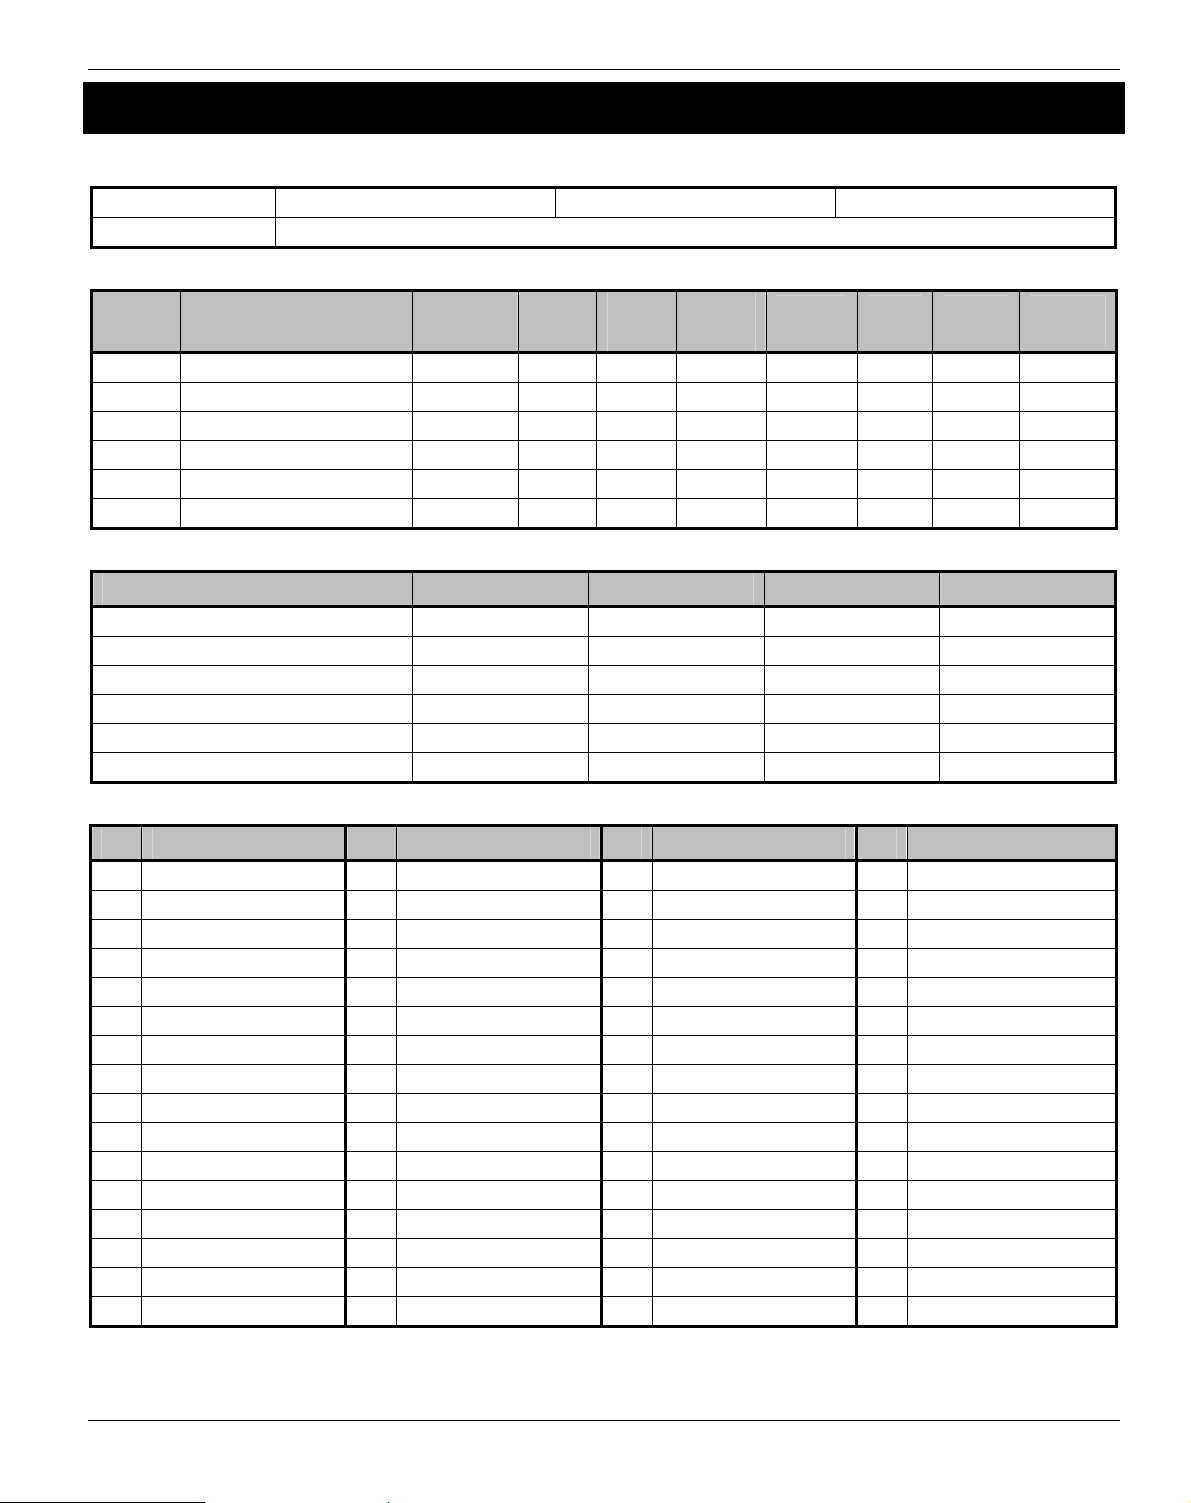
Premier 412/816/832 Master User Manual Installation Records
6. Installation Records
Control Panel
Model: Premier 412: ! Premier 816: ! Premier 832: !
Location:
Keypads
Keypad Location Partitions
1
2
3
4
5
6
Fire
(1 & 3)
Police
(4 & 6)
Medical
(7 & 9)
PA
Silent
Quick
Arm
Quick
Disarm
Quick
Bypass
Timers
Timer Partition 1 Partition 2 Partition 3 Partition 4
Exit Time Sec. Sec. Sec. Sec.
Entry Delay 1 Time Sec. Sec. Sec. Sec.
Entry Delay 2 Time Sec. Sec. Sec. Sec.
Alarm Delay Time Min. Min. Min. Min.
Bell Delay Time Min. Min. Min. Min.
Bell Duration Time Min. Min. Min. Min.
Users
No. Name No. Name No. Name No. Name
00 Engineer 16 32 48
01 Master 17 33 49
02 18 34 50
03 19 35 51
04 20 36 52
05 21 37 53
06 22 38 54
07 23 39 55
08 24 40 56
09 25 41 57
10 26 42 58
11 27 43 59
12 28 44 60
13 29 45 61
14 30 46 62
15 31 47 63
INS141 23
Page 24

Zones
No. Location Partitions B C No. Location Partitions B C
1 17
2 18
3 19
4 20
5 21
6 22
7 23
8 24
9 25
10 26
11 27
12 28
13 29
14 30
15 31
16 32
B = Bypass; C = Chime
Installation Company: _________________________________________________________________________________
Address: _________________________________________________________________________________
_________________________________________________________________________________
_________________________________________________________________________________
Telephone: _________________________________________________________________________________
Fax: _________________________________________________________________________________
Email: _________________________________________________________________________________
Alarm Receiving Centre: ________________________________________________________________________________
Account No: _________________________________________________________________________________
Telephone: _________________________________________________________________________________
Email: _________________________________________________________________________________
© Texecom Ltd. 2000 - 2005
Premier Endstation and Keypads are protected by UK and International
Registered Design.
Registered Design Numbers: 2041830, 2047440 and 2089016
INS141-7
 Loading...