

Page 1

User’s Guide
User’ s Gu ide
1
Page 2

EVM IMPORTANT NOTICE
Texas Instruments (TI) provides the enclosed product(s) under the following conditions:
This evaluation kit being sold by TI is intended for use for ENGINEERING DEVELOPMENT OR EVALUATION
PURPOSES ONLY and is not considered by TI to be fit for commercial use. As such, the goods being provided
may not be complete in terms of required design-, marketing-, and/or manufacturing-related protective
considerations, including product safety measures typically found in the end product incorporating the goods.
As a prototype, this product does not fall within the scope of the European Union directive on electromagnetic
compatibility and therefore may not meet the technical requirements of the directive.
Should this evaluation kit not meet the specifications indicated in the EVM User’s Guide, the kit may be returned
within 30 days from the date of delivery for a full refund. THE FOREGOING WARRANTY IS THE EXCLUSIVE
WARRANTY MADE BY SELLER TO BUYER AND IS IN LIEU OF ALL OTHER WARRANTIES, EXPRESSED,
IMPLIED, OR S TA TUTOR Y, INCLUDING ANY WARRANTY OF MERCHANTABILITY OR FITNESS FOR ANY
PARTICULAR PURPOSE.
The user assumes all responsibility and liability for proper and safe handling of the goods. Further, the user
indemnifies TI from all claims arising from the handling or use of the goods. Please be aware that the products
received may not be regulatory compliant or agency certified (FCC, UL, CE, etc.). Due to the open construction
of the product, it is the user’s responsibility to take any and all appropriate precautions with regard to electrostatic
discharge.
EXCEPT TO THE EXTENT OF THE INDEMNITY SET FORTH ABOVE, NEITHER PARTY SHALL BE LIABLE
TO THE OTHER FOR ANY INDIRECT, SPECIAL, INCIDENTAL, OR CONSEQUENTIAL DAMAGES.
TI currently deals with a variety of customers for products, and therefore our arrangement with the user is not
exclusive.
TI assumes no liability for applications assistance, customer product design, software performance, or
infringement of patents or services described herein.
Please read the EVM User’s Guide and, specifically, the EVM Warnings and Restrictions notice in the EVM
User’s Guide prior to handling the product. This notice contains important safety information about temperatures
and voltages. For further safety concerns, please contact the TI application engineer.
Persons handling the product must have electronics training and observe good laboratory practice standards.
No license is granted under any patent right or other intellectual property right of TI covering or relating to any
machine, process, or combination in which such TI products or services might be or are used.
Mailing Address:
Texas Instruments
Post Office Box 655303
Dallas, Texas 75265
Copyright 2003, Texas Instruments Incorporated
2
Page 3

DYNAMIC WARNINGS AND RESTRICTIONS
It is important to operate this EVM within the input voltage range of 0 Vdc to100 Vdc.
Exceeding the specified input range may cause unexpected operation and/or irreversible damage to the EVM.
If there are questions concerning the input range, please contact a TI field representative prior to connecting
the input power.
Applying loads outside of the specified output range may result in unintended operation and/or possible
permanent damage to the EVM. Please consult the EVM User’s Guide prior to connecting any load to the EVM
output. If there is uncertainty as to the load specification, please contact a TI field representative.
During normal operation, some circuit components may have case temperatures greater than 50°C. The EVM
is designed to operate properly with certain components above 50°C as long as the input and output ranges are
maintained. These components include but are not limited to linear regulators, switching transistors, pass
transistors, and current sense resistors. These types of devices can be identified using the EVM schematic
located in the EVM User’s Guide. When placing measurement probes near these devices during operation,
please be aware that these devices may be very warm to the touch.
Mailing Address:
Texas Instruments
Post Office Box 655303
Dallas, Texas 75265
Copyright 2004, Texas Instruments Incorporated
3
Page 4

SLUU195 − June 2004
r
TPS40090 Multi-Phase Buck Converter and TPS2834
Drivers Steps-Down from 12-V to 1.5-V at 100 A
Systems Powe
Contents
1 Introduction 4. . . . . . . . . . . . . . . . . . . . . . . . . . . . . . . . . . . . . . . . . . . . . . . . . . . . . . . . . . . . . . . . . . . . . . . . .
2 Features 5. . . . . . . . . . . . . . . . . . . . . . . . . . . . . . . . . . . . . . . . . . . . . . . . . . . . . . . . . . . . . . . . . . . . . . . . . . . .
3 Schematic 5. . . . . . . . . . . . . . . . . . . . . . . . . . . . . . . . . . . . . . . . . . . . . . . . . . . . . . . . . . . . . . . . . . . . . . . . . . .
4 Component Selection 7. . . . . . . . . . . . . . . . . . . . . . . . . . . . . . . . . . . . . . . . . . . . . . . . . . . . . . . . . . . . . . . .
5 Test Setup 14. . . . . . . . . . . . . . . . . . . . . . . . . . . . . . . . . . . . . . . . . . . . . . . . . . . . . . . . . . . . . . . . . . . . . . . . .
6 Test Results/Performance Data 15. . . . . . . . . . . . . . . . . . . . . . . . . . . . . . . . . . . . . . . . . . . . . . . . . . . . . .
7 Layout Considerations 19. . . . . . . . . . . . . . . . . . . . . . . . . . . . . . . . . . . . . . . . . . . . . . . . . . . . . . . . . . . . . .
8 EVM Assembly Drawing and PCB Layout 20. . . . . . . . . . . . . . . . . . . . . . . . . . . . . . . . . . . . . . . . . . . . .
9 List of Materials 24. . . . . . . . . . . . . . . . . . . . . . . . . . . . . . . . . . . . . . . . . . . . . . . . . . . . . . . . . . . . . . . . . . . .
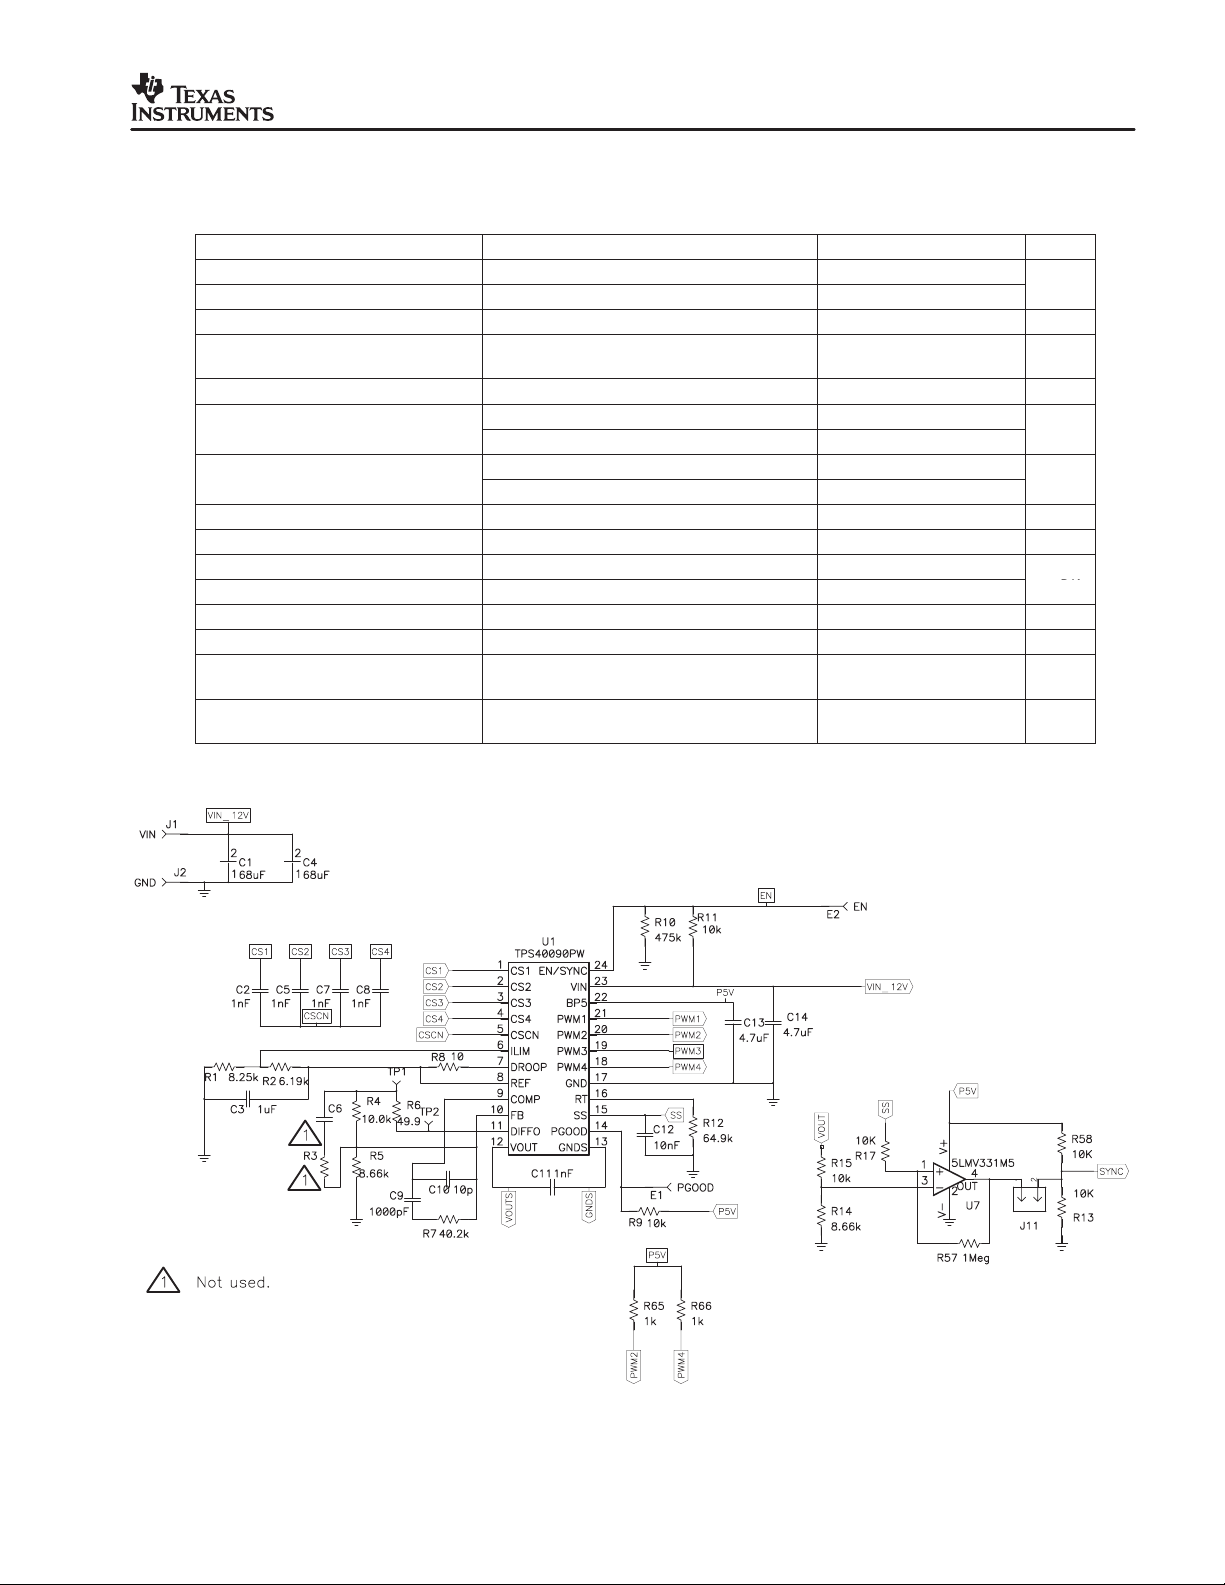
1 Introduction
The TPS40090EVM−002 multi-phase dc-to-dc converter utilizes the TPS40090 multi-phase
controller and TPS2834 adaptive driver to step down a 12-V input to 1.5-V at 420 kHz. The
output current can exceed 100 A. The TPS40090 provides fixed-frequency, peak current-mode
control with forced-phase current balancing. Phase currents are sensed by the voltage drop
across the DC resistance (DCR) of inductors. Other features include a single voltage operation,
true differential output voltage sense, user programmable current limit, capacitor-programmable
soft-start and a power good indicator. Device operation is specified in the TPS40090
datasheet
TPS40090EVM-002 can be configured into 2-, 3− or 4-phase operation. For 2-phase operation,
populate R65 and R66 to tie PWM2 and PWM4 up to internal 5-V and leave components in
related phases unpopulated. For 3-phase operation, tie PWM4 to BP5 through R66 only. For
4-phase operation, leave both R65 and R66 unpopulated.
In this user’s guide, all the tests are conducted under 4 phase operation.
[1]
.
4
TPS40090 Multi-Phase Buck Converter and TPS2834 Drivers Steps-Down from 12-V to 1.5-V at 100 A
Page 5
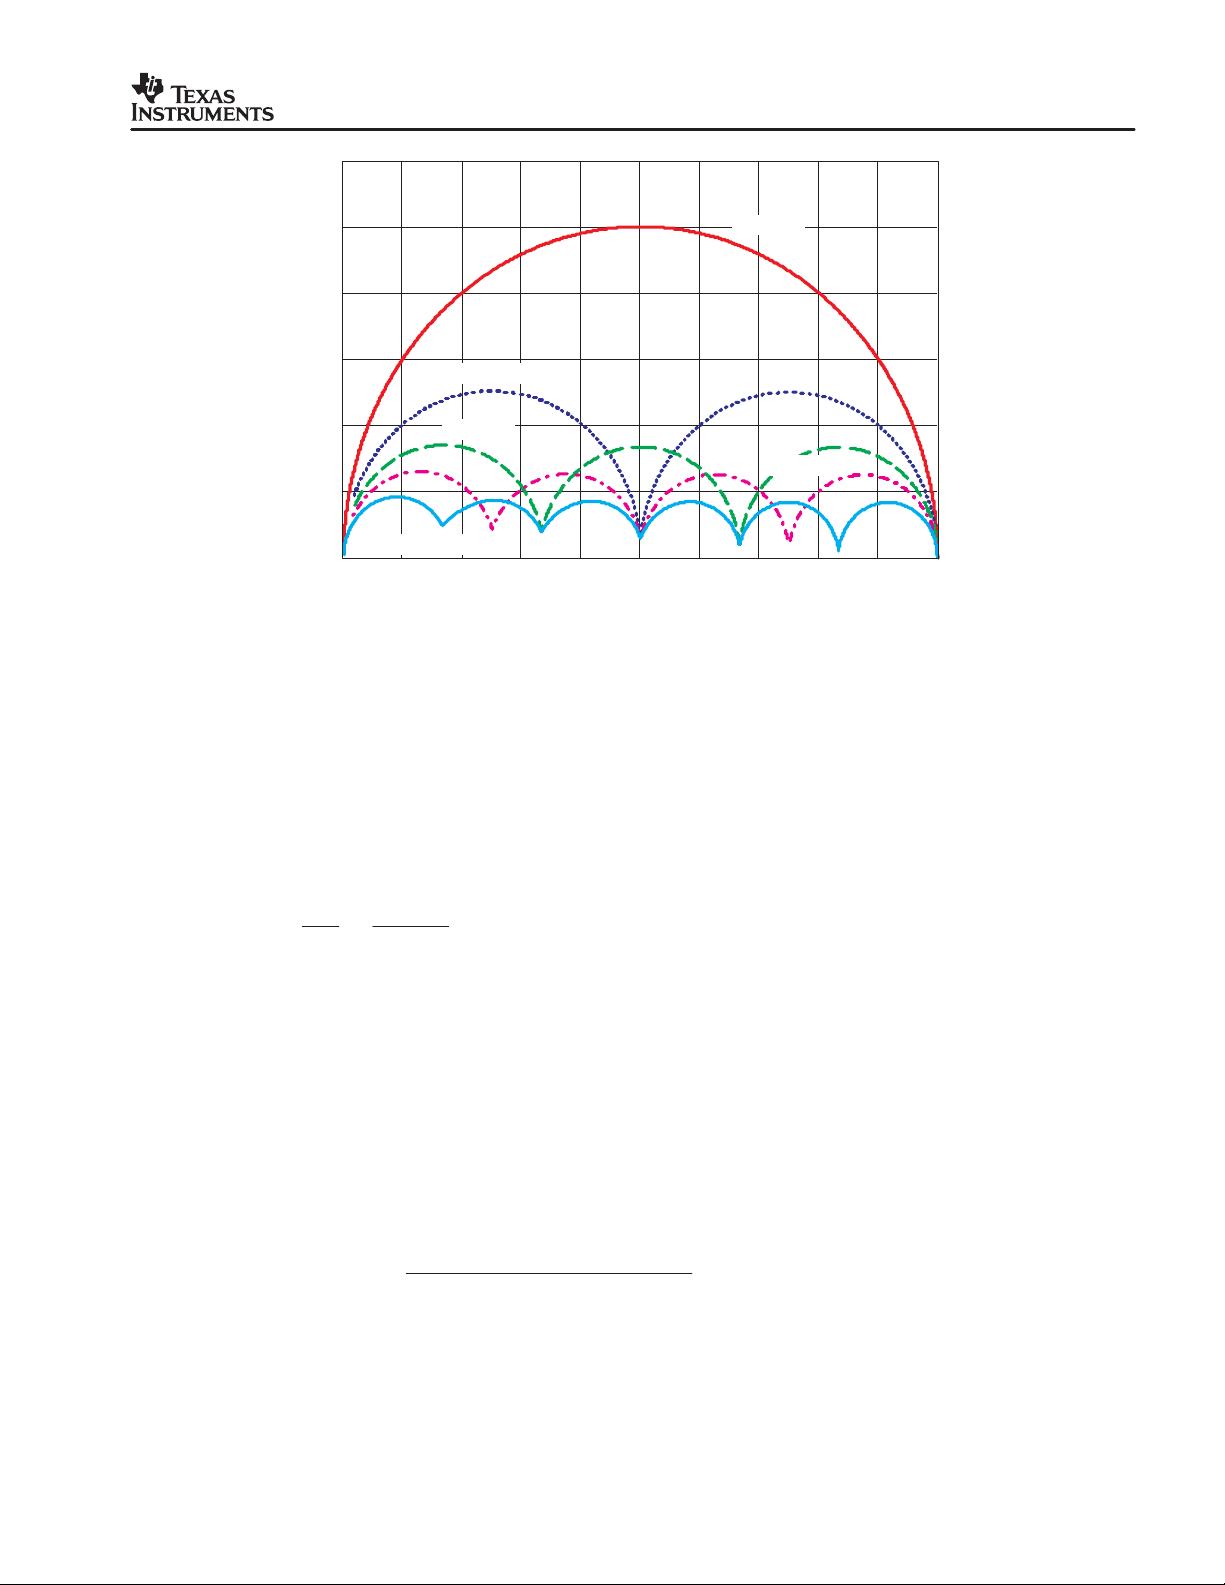
2 Features
Load transient response voltage
Load transient response voltage
Load transient response recovery
Load transient response recovery
PARAMETER TEST CONDITIONS MIN TYP MAX UNITS
Input voltage range 10.5 12.0 14.0
Output voltage set point 1.477 1.508 1.540
Output current range VIN = 12 V 0 100 120 A
Line regulation
Load regulation I
change
time
Loop bandwidth I
Phase margin I
Input ripple voltage 80 200
Output ripple voltage 15 25
Output rise time ms
Operating frequency 370 418 454 kHz
Full load efficiency
Current sharing tolerance
Table 1. TPS40090EVM−002 Performance Summary
I
rising from 10 A to 100 A,
(1)
OUT
10.5 V ≤ VIN ≤ 14 V
rising from 10 A to 100 A ±0.3%
OUT
I
rising from 10 A to 100 A −160
OUT
I
falling from 100 A to 10 A 200
OUT
I
rising from 10 A to 100 A < 10
OUT
I
falling from 100 A to 10 A < 15
OUT
= 100 A, I
OUT
= 100 A 40 °
OUT
VIN = 12 V, V
I
= 100 A
OUT
VIN = 12 V, V
I
= 100 A
OUT
= 10 A 89 kHz
OUT
= 1.5 V,
OUT
= 1.5 V,
OUT
SLUU195 − June 2004
±0.1%
84.3%
±5% ±10%
mV
mV
V
PK
µs
PK
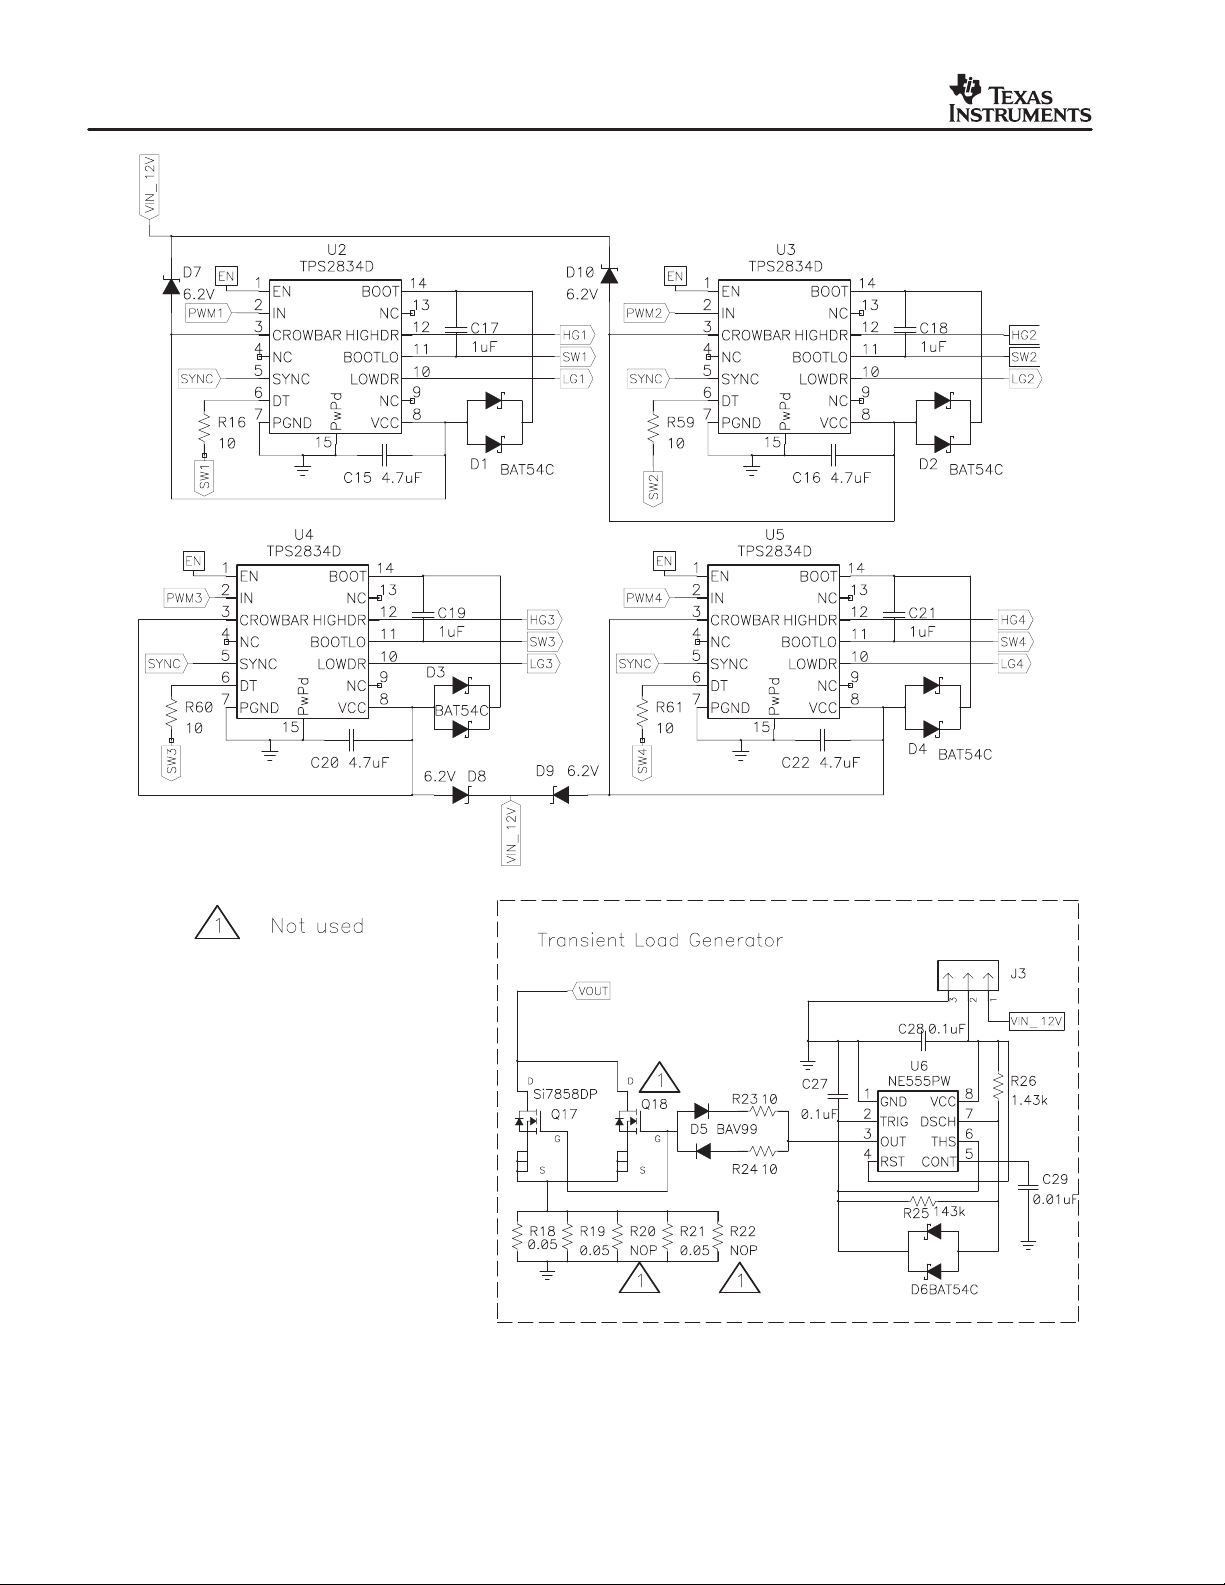
3 Schematic
12V
+
+
Phase Programming
R65 R66
4−phase open open
3−phase open 1k
2−phase 1k 1k
Figure 1. TPS40090EVM−002 Schematic Part 1 − TPS40090 Controller and Pre-Bias Circuit
TPS40090 Multi-Phase Buck Converter and TPS2834 Drivers Steps-Down from 12-V to 1.5-V at 100 A
5
Page 6
SLUU195 − June 2004
TRANS_EN
Figure 2. TPS40090EVM−002 Schematic Part 2 − Driver Circuit and Load Transient Generator
6
TPS40090 Multi-Phase Buck Converter and TPS2834 Drivers Steps-Down from 12-V to 1.5-V at 100 A
Page 7

SLUU195 − June 2004
(1)
+ +
+ +
Figure 3. TPS40090EVM−002 Schematic Part 3 − Power Stage
4 Component Selection
4.1 Frequency of Operation
+ + +
+
1.5V/100A
The clock oscillator frequency for the TPS40090 is programmed with a single resistor from RT
(pin 16) to signal ground. Equation (1) from the datasheet allows selection of the R
resistor in
T
kΩ for a given switching frequency in kHz.
+ R12 + K
R
T
PH
ǒ
39.2 103 f
*1.024
PH
* 7
Ǔ
(kW)
where
• K
• f
• for 2-phase and 3-phase configurations K
• for 4-phase K
The R
T
is the coefficient that depends on the number of active phases
PH
is the single phase frequency, in kHz
PH
=1.333
PH
=1.0 is a single phase frequency, kHz.
PH
resistor value is returned by the last expression in kΩ. For 420 kHz, RT is calculated as
65.8 kΩ and a resistor with a 64.9-kΩ standard value is used.
TPS40090 Multi-Phase Buck Converter and TPS2834 Drivers Steps-Down from 12-V to 1.5-V at 100 A
7
Page 8

SLUU195 − June 2004
(2)
(3)
4.2 Inductance Value
The output inductor value for each phase can be calculated from the volt-second during off time,
shown in equation (2).
V
L +
where
• I
RIPPLE
With I
RIPPLE
to be 0.63 µH. Using SPM12550−R62M300 inductors from TDK, each had inductance of 0.6µH
and resistance of 1.75-mΩ.
In multi-phase high current buck converter design, due to the ripple cancellation factor from
interleaving, the inductor value could be smaller than that in a single phase operation. But from
conduction loss point of view, the inductor value tends to be big to reduce the ripple current, thus
losses.
4.3 Input Capacitor Selection
The bulk input capacitor selection is based on the input voltage ripple requirements. Due to the
interleaving of multi phase, the input RMS current is reduced. The input ripple current RMS
value over load current is calculated in equation (3).
D I
IN(nom)
OUT
f I
RIPPLE
is usually chosen to be between 10% and 40% of maximum phase current I
= 20% of I
ǒ
NPH,D
ǒ1*
PH(max)
Ǔ
+
V
OUT
V
IN(max)
Ǔ
PH(max)
, there is a ripple current of 5 A, and the inductance value is found
.
2
D *
ǒ
NPH,D
k
ȱ
ȧ
ǒ
Ȳ
ȱ
ǒ
kǒNPH,DǓ) 1
ȧ
Ȳ
where
ǒ
• k
NPH,DǓ+ floorǒNPH D
• floor(x) is the function to return the greatest integer less than N
• N
Figure 4 shows the input ripple current RMS value over the load current versus duty cycle with
different number of active phases.
is the number of active phases
PH
Ǔ
N
Ǔ ǒ
PH
2
Ǔ
kǒNPH,DǓ) 1
D *
ǒ
N
PH
ǒ
NPH,D
k
N
Ǔ
Ǔ
Ǔ
PH
ȳ
* D
Ǔ
ȧ
)
ȴ
3
) kǒNPH,D
N
ǒ
12 D
Ǔ
PH
Ǔ
2
kǒNPH,DǓ) 1
2
ǒ
V
ƪ
L f
N
OUT
PH
PH
× D
(
1 * D
ǒ
I
OUT
* D
Ǔ
Ǔ
)
ƫ
3
ȳ
ȧ
ȴ
8
TPS40090 Multi-Phase Buck Converter and TPS2834 Drivers Steps-Down from 12-V to 1.5-V at 100 A
Page 9
0.6
(4)
(5)
(6)
SLUU195 − June 2004
0.5
0.4
0.3
− Normalized RMS Input − A
0.2
0.1
RMS_CIN(nom)
I
0
0 10 20304050 60708090100
The maximum input ripple RMS current can be estimated as shown in (4).
I ^ I
OUT
D I
NPH = 6
Figure 4. Input Ripple Current RMS Value Overload Current
IN(nom)
NPH = 3
ǒ
4, D
NPH = 2
Ǔ
min
Duty Cycle − %
+ 3.18 A
NPH = 1
NPH = 4
It is also important to consider a minimum capacitance value which limits the voltage ripple to a
specified value if all the current is supplied by the onboard capacitor. For a typical ripple voltage
of 150 mV the maximum ESR is calculated in (5) as:
ESR +
Two 68-µF, 20-V Oscon capacitors (20SVP68M) from Sanyo are placed on the input side of the
board. The ESR is 40 mΩ for each capacitor.
D V
D I
150 mV
+
3.18 A
+ 47 mW
4.4 Output Ripple Cancellation and Capacitor Selection
Due to the interleaving of channels, the total output ripple current is smaller than the ripple
current from a single phase. The ripple cancellation factor is expressed in equation (6).
N
PH
P
ǒ
i + 1
ǒ
OUT
NPH,D
DI
kǒNPH,DǓ+ ifǒNPHv 1, DI
Ǔ
+
N
ƪ
i + 1
PH
P
*1
Ť
ǒ
Ť
i * NPH D
i * NPH DŤ) 1
(D), DI
OUT
OUT
Ť
Ǔ
Ǔ
ƫ
ǒ
NPH,D
Ǔ
Ǔ
TPS40090 Multi-Phase Buck Converter and TPS2834 Drivers Steps-Down from 12-V to 1.5-V at 100 A
9
Page 10

SLUU195 − June 2004
(7)
(8)
(9)
where
• D is the duty cycle for a single phase
• N
• K (N
In this case, N
is the number of active phases
PH
) is the intermediate function for calculation
PH
=4 and D
PH
=0.107 which yields k=0.573.
min
The actual output ripple is calculated in equation (7)
I
RIPPLE
V
OUT
+
1.0
0.8
0.6
− Normalized RMS Input − A
0.4
0.2
KǒNPH,D
L f
Ǔ
+
0.6m H 420 kHz
NPH = 4
NPH = 3
1.5 V
NPH = 2
0.573 + 3.41 A
NPH = 1
RMS_Cout(nom)
I
NPH = 6
0
0 10 20304050 60708090100
Duty Cycle − %
Figure 5. Output Ripple Current Cancellation
Selection of the output capacitor is based on many application variables, including function, cost,
size, and availability. There are three ways to calculate the output capacitance.
1. The minimum allowable output capacitance is determined by the amount of inductor ripple
current and the allowable output ripple, as given in equation (8).
C
OUT(min)
+
In this design, C
I
RIPPLE
8 f V
OUT(min)
+
RIPPLE
8 420 kHz 10 mV
is 101-µF with V
3.41 A
RIPPLE
+ 101 mF
=10 mV. However, this affects only the
capacitive component of the ripple voltage, and the final value of capacitance is generally
influenced by ESR and transient considerations.
2. ESR limitation. (To limit the ripple voltage to 10 mV, the capacitor ESR should be less than
the value calculated in equation (9)).
V
t+
R
C
RIPPLE
I
RIPPLE
+
10 mV
3.41 A
+ 2.93 mW
10
TPS40090 Multi-Phase Buck Converter and TPS2834 Drivers Steps-Down from 12-V to 1.5-V at 100 A
Page 11

SLUU195 − June 2004
(10)
3. Transient consideration. An additional consideration in the selection of the output inductor
and capacitance value can be derived from examining the transient voltage overshoot
which can be initiated with a load step from full load to no load. By equating the inductive
energy with the capacitive energy the equation (10) can be derived.
C
where
• I
• I
• V
• V
In this 100-A design the capacitance required for limiting the transient is significantly larger than
the capacitance required to keep the ripple acceptably low. Eight 220-µF POSCAP capacitors
are in parallel with four 22-µF ceramic capacitors. The ESR of each POSCAP is 15mΩ.
+
OUT
is full load
OH
is no load
OL
OUT2
OUT1
is the the allowed transient voltage rise
is the initial voltage
+
2
V
2
L I
4.5 MOSFET Selection
There are different requirements for switching FET(s) and rectifier FET(s) in the high-ratio step
down application. The duty cycle is around 12%. So the rectifier FET(s) is on for most of the
cycle. The conduction loss is dominant. Low-R
turn on of the rectifier FET(s) and cross conduction, choose a rectifier FET with Qgs > Qgd.
When the switch node is falling, the Qgd can pull the gate of the lower FET below GND, which
upsets the driver. Two Si7880DP from Siliconix are in parallel for the rectifier FET. The R
this FET is 3 mΩ and Qgs=18nC, and Qgd=10.5nC.
2
ǒ
Ǔ
EQ
ǒ
V
OUT2
ǒ
I
*
OH
2
Ǔ
ǒ
*
V
L
ǒ
I
OL
OUT1
2
Ǔ
2
Ǔ
Ǔ
+
DS(on)
0.6mH
4
ǒ
(
1.75 V
FET(s) are preferred. Also due to the dV/dt
)
2
(
100 A
*
(
1.5 V
2
)
+ 1846 mF
2
Ǔ
)
DS(on)
of
The switching FET switches at high voltage and high current, the switching loss is dominant.
One single Si7860DP is selected for its low total gate charge.
Both types of FET(s) are offered in the Powerpak SO−8 package.
The PCB is layed out for two FETs in parallel, for both switching FET(s) and rectifier FET(s), to
give the feasibility to modify the board for different applications.
4.6 Current Sensing
TPS40090 supports both resistor current sensing and DCR current sensing approach. DCRs of
the output inductors are used in this design as the current sensing components. The DCR
current sensing circuit is shown in Figure 5. The idea is to parallel a R-C network to the inductor.
If the two time constants are same (L/DCR=R × C), then V
used to compensate the positive temperature coefficient of copper specific resistance, which is
0.385%/°C. See detail explanation in the datasheet.
TPS40090 Multi-Phase Buck Converter and TPS2834 Drivers Steps-Down from 12-V to 1.5-V at 100 A
C=VDCR
. Extra circuit, shown in (b), is
11
Page 12

SLUU195 − June 2004
(11)
With the chosen inductor described in Inductance Value, (section 4.2, of this document) the
following values are used.
• R=19.6 kΩ
• C=10 nF
• R
NTC
=100 kΩ
• R1=124 kΩ
• R2=22.6 kΩ
V
DCR
L
V
IN
R
DCR
C
V
C
Figure 6. DCR Current Sensing Circuit with Copper Temperature Compensation
4.7 Overcurrent Limit Protection
V
OUT
L
V
IN
R
R
THE
R2
DCR
C
R1
R
NTC
UDG−03136
12
The overcurrent function monitors the voltage level separately on each current sense input and
compares it to the voltage on ILIM pin set by the divider from the controller’s reference.
If the threshold of V
/2.7 is exceeded, the PWM cycle on the respected phase is terminated.
ILIM
Voltage level on the ILIM pin is determined by (11).
V
ILIM
+ 2.7 I
PH(max)
RCS;I
PH(max)
+ I
OUT
)
ǒ
VIN* V
2 L
OUT
Ǔ
V
OUT
fSW V
OUT
IN
where
• I
PH(max)
• R
CS
TPS40090 Multi-Phase Buck Converter and TPS2834 Drivers Steps-Down from 12-V to 1.5-V at 100 A
is the maximum allowable value of the phase current
is the value of the current sense resistor
Page 13

4.8 Compensation Components
(12)
(13)
(14)
The TPS40090 uses peak current mode control. Type II network is used here, which is
implemented to provide one zero and two poles. The first pole is placed at the origin to improve
DC regulation.
The ESR zero of the power stage is:
SLUU195 − June 2004
f
The zero is placed near 3.96 kHz to produce a reasonable time constant.
f
The second pole is placed at ESR zero (354 kHz).
f
The resulting values selected for this design are:
+
ESRZ
+
Z
P1
2p R
2p R11 C11
+
2p R11
1
C
C
1
1
ǒ
+ 354 kHz
OUT
ǒ
C11 C12
ǒ
C11)C12
Ǔ
Ǔ
Ǔ
• R11 = 40.2 kΩ
• C11 = 1000 pF
• C12 = 10 pF
TPS40090 Multi-Phase Buck Converter and TPS2834 Drivers Steps-Down from 12-V to 1.5-V at 100 A
13
Page 14

SLUU195 − June 2004
5 Test Setup
The HPA072 has the following input/output connections: 12-V input J1 (VIN) and J2 (GND),
1.5-V output J9 (VOUT) and J10 (GND). A diagram showing the connection points is shown in
Figure 5. A power supply capable of supplying 18 A should be connected to VIN and GND
through a pair of 10 AWG wires. The 1.5-V load should be connected respectively to J9 and J10
through pairs of 0 AWG wires. Wire lengths should be minimized to reduce losses in the wires.
A 5-inch fan with 200-cfm air flow is recommended to operate this board at full load.
12 V/ 20 A
Power
Supply
Oscilloscope
CH1
J8
J1
TPS40090EVM−002
Board
J2
J9
J10
Figure 7. Connections for the Test
Fluke 45
V
DC
OUT
Electronic
Load
UDG−04063
14
TPS40090 Multi-Phase Buck Converter and TPS2834 Drivers Steps-Down from 12-V to 1.5-V at 100 A
Page 15

6 Test Results and Performance Data
6.1 Efficiency and Power Loss
Figure 8 shows the efficiency as the load varies from 10 A to over 100 A. The efficiency at full
load is about 84.3%.
Figure 7 shows the total loss versus the load current, which is approximately 28.3W at 100 A.
SLUU195 − June 2004
OVERALL EFFICIENCY
90
VIN = 12 V
fSW = 420 kHz
85
80
75
Percent Efficiency − %
70
65
0
20
I
OUTPUT CURRENT
vs
40 60 80 100 120
− Output Current − A
OUT
Figure 8.
TOTAL POWER LOSS
vs
40
35
30
25
20
− Power Loss − W
15
LOSS
P
10
VIN = 12 V
fSW = 420 kHz
5
0
0 20 40 60 80 100 120
OUTPUT CURRENT
I
− Output Current − A
OUT
Figure 9.
TPS40090 Multi-Phase Buck Converter and TPS2834 Drivers Steps-Down from 12-V to 1.5-V at 100 A
15
Page 16

SLUU195 − June 2004
6.2 Closed-Loop Performance
The TPS40090 uses peak current-mode control. Figure 10 shows the bode plots at 100 A of
load current, where no droop function is implemented. The crossover frequency is at 89 kHz with
phase margin of 40°.
80
GAIN AND PHASE
vs
OSCILLATOR FREQUENCY
180
60
40
Gain − dB
20
0
−20
VIN = 12 V
V
= 1.5 V
OUT
I
= 10 A
OUT
−40
100
6.3 Output Ripple and Noise
Figure 11 shows typical output noise where VIN=12 V, and I
than 10 mV.
PHASE
GAIN
1 k 10 k 100 k 1 M
f
− Oscillator Frequency − kHz
OSC
Figure 10. Bode Plot
=100A. The output ripple is less
OUT
I
= 100 A
OUT
135
90
45
0
−45
−90
−135
−180
Phase − 5
16
Output Voltage Ripple
(10 mV/div)
t − Time − 500 ns / div
Figure 11. Output Noise
TPS40090 Multi-Phase Buck Converter and TPS2834 Drivers Steps-Down from 12-V to 1.5-V at 100 A
Page 17

6.4 Transient Response
The on-board load transient circuit enables to check the step load transient response on the
same board. Simply by putting a jumper to connect Pin1 and 2 of J3, a 90-A step load is created
by three 50-mΩ resistors placed on the board. The slew rates of the transient are 200 A/µs for
the load step-down and 160 A/µs for the load step-up.
The transient response is shown in Figure 6 as the load is stepped from 10 to 100 A. The output
deviation is approximately 200 mV and the settling time is within 15 µs.
SLUU195 − June 2004
Load Step = 90 A
Something Voltage
(10 mV/div)
Something Voltage
(10 mV/div)
t − Time − 20 µs / div
Figure 12. Transient Response
TPS40090 Multi-Phase Buck Converter and TPS2834 Drivers Steps-Down from 12-V to 1.5-V at 100 A
17
Page 18

SLUU195 − June 2004
6.5 Start up with Pre-Biased Output
In synchronous buck converter, the bottom FET discharges the pre-biased output during
start-up. To avoid this, a comparator U9 and surround components are used to pull the SYNC
pin of the drivers low, which keeps the bottom FET off during startup. So the output can rise
smoothly. After the SS pin comes up, SYNC is pulled up high and enable the bottom FET’s
driving signal. The converter goes back to normal synchronization mode. This function can be
enabled by shorting J11 on the board.
Figure 8 shows the start-up waveform with pre−biased output with J11 short and open
respectively. In Figure 12, there are two glitches of SYNC waveform. The first one is cause by
P5V from TPS40090. When TPS40090 is enabled, P5V comes up first. SYNC is connected to
P5V through a divider. The second one happens when the driver is ready and turns on the
bottom FET when PWM signal is low. So the pre-biased output is pulled low which causes the
SYNC signal high to turn off the bottom FET. Then output voltage goes back and rises up
smoothly.
V
OUT
(2 V/div)
V
(2 V/div)
SYNC
V
OUT
(2 V/div)
V
SYNC
(5 V/div)
V
SS
(5 V/div)
t − Time − 1 ms / div
Figure 13. J11 Short Circuit
V
EN
(2 V/div)
V
SS
(5 V/div)
t − Time − 2.5 ms / div
Figure 14. J11 Open Circuit
V
EN
(2 V/div)
18
TPS40090 Multi-Phase Buck Converter and TPS2834 Drivers Steps-Down from 12-V to 1.5-V at 100 A
Page 19

7 Layout Considerations
The PCB layout plays a critical role in the performance in a high frequency switching power
supply design. Following the suggestions listed below will help to improve the performance and
expedite the design.
• To take full advantage of the ripple cancellation factor from interleaving, place the input
capacitors before the junction where the input voltage is distributed to each phase. Place the
output capacitors after the junction where all the inductors are connected;
• Place the external drivers right next to the FETs and use at least 25 mil trace for gate drive
signal to improve noise immunity
• Place some ceramic capacitors in the input of each channel to filter the current spikes
• Place the NTC resistor right next to its related inductor for better thermal coupling
• 2 oz. or thicker copper is recommended to reduce the trace impedance
• Place enough vias along pads of the power components to increase thermal conduction
• Keep the current sensing traces as short as possible to avoid excessive noise pick up
SLUU195 − June 2004
• Place the output inductors as symmetric as possible in relation to the output connectors to
obtain similar voltage drop from the trace impedance
TPS40090 Multi-Phase Buck Converter and TPS2834 Drivers Steps-Down from 12-V to 1.5-V at 100 A
19
Page 20

SLUU195 − June 2004
8 EVM Assembly Drawing and PCB Layout
Figure 15. Top Side Component Assembly
20
Figure 16. Bottom Assembly
TPS40090 Multi-Phase Buck Converter and TPS2834 Drivers Steps-Down from 12-V to 1.5-V at 100 A
Page 21

SLUU195 − June 2004
Figure 17. Top Side Copper
Figure 18. Internal 1 (Ground Plane)
TPS40090 Multi-Phase Buck Converter and TPS2834 Drivers Steps-Down from 12-V to 1.5-V at 100 A
21
Page 22

SLUU195 − June 2004
Figure 19. Internal 2 (Power Plane)
22
Figure 20. Internal 3
TPS40090 Multi-Phase Buck Converter and TPS2834 Drivers Steps-Down from 12-V to 1.5-V at 100 A
Page 23

SLUU195 − June 2004
Figure 21. Internal 4
Figure 22. Bottom Layer Copper
TPS40090 Multi-Phase Buck Converter and TPS2834 Drivers Steps-Down from 12-V to 1.5-V at 100 A
23
Page 24

SLUU195 − June 2004
9 List of Materials
The following table lists the TPS40090EVM−002 components corresponding to the schematic
shown in Figure 1.
Table 2. List of Materials
Reference
Designator
C1, C4 2 Capacitor, OS−CON, 68 µF, 20 V, 40 mΩ, 20% 10.3mm (F8) Sanyo 20SVP68M
C2, C5, C7,
C8,C9, C10,
C11
C3,C17, C18,
C19, C21
C6 0 603 Std Std
C12 1 Capacitor, ceramic, 0.01 µF, 50 V, X7R, ±5% 805 muRata GRM40UJ103J50
C13, C14, C15,
C16, C20, C22
C30, C31, C32,
C33, C34, C35,
C36, C37
C38, C39, C40,
C41
C42, C43, C44,
C45
C23, C24, C25,
C26,C46,
C47,C50, C51
C48, C49, C52,
C53
D1, D2, D3, D4,
D6
D7, D8, D9,
D10
J1, J2, J9, J10 1 Lug, Solderless, #2 − #8 AWG, 1/4 Copper 524600 ILSCO
J4, J5, J6, J7,
J8
L1, L2, L3, L4 4 Inductor, SMT, 0.62 µH, 30 A, 1.75 mΩ 0.524 x 0.492 TDK SPM12550−R62M300
Q2, Q3, Q4, Q5 4 MOSFET, N-channel, 30 V, 18 A, 8.0 mΩ
Q6, Q7, Q8, Q9 0 MOSFET, N-channel, 30 V, 18 A, 8.0 mΩ
Q1, Q10, Q11,
Q12, Q13, Q14,
Q15, Q16
R1 1 Resistor, chip, 8.25 kΩ, 1/16−W, 1% 603 Std Std
R2 1 Resistor, chip, 6.19 kΩ,, 1/16−W, 1% 603 Std Std
R3 0 603 Std Std
R4, R9, R11 3 Resistor, chip, 10 kΩ, 1/16−W, 1% 603 Std Std
R5 1 Resistor, chip, 8.66 kΩ, 1/16−W, 1% 603 Std Std
R6 1 Resistor, chip, 49.9 Ω, 1/16−W, 1% 603 Std Std
R7 1 Resistor, chip, 40.2 kΩ, 1/16−W, 1% 603 Std Std
R8, R16, R55,
R56, R59, R60,
R61
R10 1 Resistor, chip, 475 kΩ, 1/16−W, 5% 603 Std Std
R12 1 Resistor, chip, 64.9 kΩ, 1/16−W, 1% 603 Std Std
QTY Description Size Manufacturer Part Number
7 Capacitor, ceramic, 1000−pF, 25 V, X7R, ±5% 603 muRata GRM39SL102J25
5 Capacitor, dielectric, 1.0 µF, 16 V, X7R, ±10% 805 muRata GRM40B105K16
6 Capacitor, dielectric, 4.7 µF, 16 V, X5R, ±10% 1206 muRata
8 Capacitor, dielectric, 10 µF, 25 V, X5R 1210 TDK C3225X5R1E106M
4 Capacitor, ceramic, 1000−pF, 50 V, X7R, ±5% 805 muRata GRM40TH102J50
4 Capacitor, ceramic, 0.01 µF, 50 V, COG 805 TDK C2012COG1H103JT
8 Capacitor, POSCAP, 220 µF, 2.5 V, 15 mΩ, 20% 7343 (D) Sanyo 2R5TPE220M
4 Capacitor, Ceramic, 10 µF, 6.3 V, X5R 1206 TDK C3216X5R0J106M
5 Diode, dual schottky, 200 mA, 30 V SOT-23 Vishay−Liteon BAT54C
4 Diode, zener, 6.2 V, 350 mW SOT−23 Diodes, Inc. BZX84C6V2
5 Connector, shielded, test jack, vertical 0.0125 DIA
PWRPAK
S0−8
PWRPAK
S0−8
8 MOSFET, N-channel, 30 V, 29 A, 3 mΩ
7 Resistor, chip, 10−Ohms, 1/16−W, 1% 603 Std Std
PWRPAK
S0−8
Johnson
Components
Vishay−Siliconix Si7860DP
Vishay−Siliconix Si7860DP
Vishay−Siliconix Si7880DP
GRM42−
65X5R475K16
129−0701−202
24
TPS40090 Multi-Phase Buck Converter and TPS2834 Drivers Steps-Down from 12-V to 1.5-V at 100 A
Page 25

SLUU195 − June 2004
Reference
Designator
R27, R28, R29,
R30
R31, R32,R35,
R36
R33, R34, R37,
R38, R41, R42,
R45, R46
R39, R40, R43,
R44
R47, R49, R51,
R52
R48, R50, R53,
R54
R65, R66 2 Resistor, chip, 1.0 kΩ, 1/10-W, 1% 805 Std Std
TP1 1 Test point, 0.062 Hole, Red 0.25 Keystone 5011
TP2 1 Test point, 0.062 Hole, Black 0.25 Keystone 5010
U1 1 IC, high-frequency, multiphase controller 108,800 TI TPS40090PW
U2, U3, U4, U5 4 IC, MOSFET driver, fast synchronous buck with DTC PWP14 TI TPS2834PWP
U6 1 IC, Precision timer TSSOP 8 TI NE555PW
E1, E2 2 Test point, black, 1 mm 0.038 Farnell 240−333
LOAD TRANSIENT CIRCUIT
Q17 1 MOSFET, N-channel, 12 V, 29 A, 3.0 mΩ,
Q18 0 MOSFET, N-channel, 12 V, 29 A, 3.0 mΩ,
R18, R19, R21 3 Resistor, chip, 0.050 Ω,, 1-W, 0.5% 2512 Vishay
R20, R22 0 Resistor, chip, 0.050 Ω,, 1-W, 0.5% 2512 Vishay
R23, R24 2 Resistor, chip, 10 Ω, 1/16−W, 1% 603 Std Std
R25 1 Resistor, chip, 143 kΩ, 1/10−W, 1% 805 Std Std
R26 1 Resistor, chip, 1.43 kΩ, 1/10−W, 1% 805 Std Std
C27, C28 2 Capacitor, ceramic, 0.1 µF, 25 V, X7R, ±10% 805 TDK C2012X7R1E104K
C29 1 Capacitor, ceramic, 0.01 µF, 50 V, X7R, ±5% 805 muRata GRM40UJ103J50
D5 1 Diode, dual ultra fast, series, 200 mA, 70 V SOT23 Fairchild BAV99
D6 1 Diode, dual schottky, 200 mA, 30 V SOT23 Vishay−Liteon BAT54C
J3 1 Header, 3-pin, 100 mil spacing, (36-pin strip) 0.100 x 3 Sullins PTC36SAAN
PRE-BIAS CIRCUIT
U7 1 IC, Single GP comparator, low voltage SOT23−5 National LMV331M5
J11 1 Header, 2-pin, 100 mil spacing, (36-pin strip) 0.100 x 2 Sullins PTC36SAAN
R13, R15, R17,
R58
R57 1 Resistor, chip, 1 MΩ, 1/10−W, 1% 805 Std Std
R14 1 Resistor, chip, 8.66 kΩ, 1/16−W, 1% 603 Std Std
QTY Description Size Manufacturer Part Number
4 Resistor, chip, 2.2 Ω, 1/10−W, 1% 805 Std Std
4 Resistor, chip, 19.6 kΩ, 1/10−W, 1% 805 Std Std
8 Resistor, chip, 2.7 Ω, 1/16−W, 1% 603 Std Std
4 Resistor, chip, 22.6 kΩ, 1/10−W, 1% 805 Std Std
4 Resistor, chip, 124 kΩ, 1/10−W, 1% 805 Std Std
4 NTC Resistor, chip, 100 kΩ, 1/10-W, 1% 805 Vishay
PWRPAK
S0−8
PWRPAK
S0−8
4 Resistor, chip, 10 kΩ, 1/16−W, 1% 603 Std Std
Si7858DP
Si7858DP
NTHS0603N01N1003
J
WSL−2512−R050
0.5% R86
WSL−2512−R050
0.5% R86
TPS40090 Multi-Phase Buck Converter and TPS2834 Drivers Steps-Down from 12-V to 1.5-V at 100 A
25
Page 26

IMPORTANT NOTICE
Texas Instruments Incorporated and its subsidiaries (TI) reserve the right to make corrections, modifications,
enhancements, improvements, and other changes to its products and services at any time and to discontinue
any product or service without notice. Customers should obtain the latest relevant information before placing
orders and should verify that such information is current and complete. All products are sold subject to TI’s terms
and conditions of sale supplied at the time of order acknowledgment.
TI warrants performance of its hardware products to the specifications applicable at the time of sale in
accordance with TI’s standard warranty. Testing and other quality control techniques are used to the extent TI
deems necessary to support this warranty . Except where mandated by government requirements, testing of all
parameters of each product is not necessarily performed.
TI assumes no liability for applications assistance or customer product design. Customers are responsible for
their products and applications using TI components. To minimize the risks associated with customer products
and applications, customers should provide adequate design and operating safeguards.
TI does not warrant or represent that any license, either express or implied, is granted under any TI patent right,
copyright, mask work right, or other TI intellectual property right relating to any combination, machine, or process
in which TI products or services are used. Information published by TI regarding third-party products or services
does not constitute a license from TI to use such products or services or a warranty or endorsement thereof.
Use of such information may require a license from a third party under the patents or other intellectual property
of the third party, or a license from TI under the patents or other intellectual property of TI.
Reproduction of information in TI data books or data sheets is permissible only if reproduction is without
alteration and is accompanied by all associated warranties, conditions, limitations, and notices. Reproduction
of this information with alteration is an unfair and deceptive business practice. TI is not responsible or liable for
such altered documentation.
Resale of TI products or services with statements different from or beyond the parameters stated by TI for that
product or service voids all express and any implied warranties for the associated TI product or service and
is an unfair and deceptive business practice. TI is not responsible or liable for any such statements.
Following are URLs where you can obtain information on other Texas Instruments products and application
solutions:
Products Applications
Amplifiers amplifier.ti.com Audio www.ti.com/audio
Data Converters dataconverter.ti.com Automotive www.ti.com/automotive
DSP dsp.ti.com Broadband www.ti.com/broadband
Interface interface.ti.com Digital Control www.ti.com/digitalcontrol
Logic logic.ti.com Military www.ti.com/military
Power Mgmt power.ti.com Optical Networking www.ti.com/opticalnetwork
Microcontrollers microcontroller.ti.com Security www.ti.com/security
Telephony www.ti.com/telephony
Video & Imaging www.ti.com/video
Wireless www.ti.com/wireless
Mailing Address: Texas Instruments
Post Office Box 655303 Dallas, Texas 75265
Copyright 2004, Texas Instruments Incorporated
 Loading...