

Page 1

User's Guide
SBAU125A – August 2007 – Revised September 2007
ADS1230REF User's Guide
The ADS1230REF is a reference design for the ADS1230 20-bit, delta-sigma analog-to-digital converter
(ADC). It contains all the circuitry and user interface elements needed for a weigh-scale digitizer, and is
meant as an example of good design for a basic weigh-scale system. The ADS1230REF is also suitable
for general evaluation of the ADS1230 device.
The ADS1230REF hardware has the following features:
• ADS1230 ADC
• Connections for load cells or other voltage sources
• Low-side excitation switch on the load cell header connector
• Ample EMI/RFI suppression between the ADC and rest of design
• Eight-digit starburst LCD readout
• USB connection for firmware updates and remote control
• Designed for very low power consumption
• Battery (9V) or wall power
Version 1.1.0 of the firmware includes the following features:
• Weigh-scale mode with two-point calibration
• Complete configuration of the device
• Real-time peak-to-peak and RMS noise calculation
• Autoranging voltage display
• Noise displayed in volts, codes, and bits
• Voltage displayed in volts or codes
• Adjustable averaging mode
• Raw hexadecimal code display
• Simple and fast configuration
• Parameters saved to internal flash memory
• Computer link
Graphical PC software is also provided for histogram display, datalogging, and device control.
We welcome bug reports and suggestions for additional features; please contact the Texas Instruments
Precision Analog Applications Group.
Hyperterm is a trademark of Microsoft Corporation.
Windows is a registered trademark of Microsoft Corporation.
All other trademarks are the property of their respective owners.
SBAU125A – August 2007 – Revised September 2007 ADS1230REF User's Guide 1
Submit Documentation Feedback
Page 2

www.ti.com
Contents
1 Getting Started ............................................................................................................... 3
2 Weigh Scale Mode........................................................................................................... 7
3 Analysis Mode .............................................................................................................. 11
4 Using the PC Software .................................................................................................... 14
5 Serial Console .............................................................................................................. 18
6 Hardware .................................................................................................................... 20
Appendix A Schematic and Layout ........................................................................................... 24
List of Figures
1 ADS1230REF Controls and Connectors .................................................................................. 3
2 4-Wire Load Cell to Terminal Block ....................................................................................... 4
3 6-Wire Load Cell to Terminal Block ....................................................................................... 5
4 4-Wire Load Cell to Header ................................................................................................ 5
5 6-Wire Load Cell to Header ................................................................................................ 5
6 ADS1230REF PC Software Display ..................................................................................... 15
7 ADS1230REF Average Data ............................................................................................. 16
8 ADS1230REF Hardware Block Diagram ................................................................................ 20
A-1 ADS1230REF PCB—Top Side ........................................................................................... 26
A-2 ADS1230REF PCB—Bottom Side ....................................................................................... 26
A-3 ADS1230REF Schematic—ADC ......................................................................................... 27
A-4 ADS1230REF Schematic—MCU ......................................................................................... 28
A-5 ADS1230REF Schematic—USB ......................................................................................... 29
List of Tables
1 Unit Conversion Factors and Display Formats ........................................................................... 8
2 Parameters in Configuration Mode ........................................................................................ 9
3 Modes and Example Displays ............................................................................................ 11
4 Voltage Display Ranges ................................................................................................... 12
5 Parameters in Analysis Mode............................................................................................. 13
6 Console Mode Commands ................................................................................................ 19
7 Load Cell Header Pinout .................................................................................................. 21
8 Terminal Block Pinout ..................................................................................................... 22
A-1 ADS1230REF Bill of Materials ............................................................................................ 24
2 ADS1230REF User's Guide SBAU125A – August 2007 – Revised September 2007
Submit Documentation Feedback
Page 3

www.ti.com
1 Getting Started
Getting Started
A diagram of the ADS1230REF is shown in Figure 1 .
1.1 Operating Modes
The ADS1230REF operates in one of three modes:
• Scale mode: When the mode select switch is in Scale position, the ADS1230REF acts as a basic
• Analysis mode: When the mode select switch is in Analysis position, codes are taken directly from the
• Configuration mode: Parameters governing the operation of the ADS1230REF can be viewed and
Figure 1. ADS1230REF Controls and Connectors
weigh scale. The scale has tare, range, and calibrate functions, and can display metric (SI) units. Other
parameters can be configured in configuration screens. Scale mode is described in detail in Section 2 .
ADS1230 device and various measurements are made upon them. Several measurements are
available, including raw display, voltage, RMS noise, and peak-to-peak measurements. The ADS1230
can also be configured directly from this mode. Analysis mode is described in detail in Section 3 .
altered in this mode. Scale and Analysis modes have different options in configuration mode:
configuration for Scale mode is described in Section 2.4 , and configuration for Analysis mode is
described in Section 3.4 .
SBAU125A – August 2007 – Revised September 2007 ADS1230REF User's Guide 3
Submit Documentation Feedback
Page 4

www.ti.com
EXCSNSSNS+
SIG+
SIGEXC+
OUT+
EXC-
OUT-
EXC+
Getting Started
1.2 Controls
The main controls for the ADS1230REF are the four buttons and the mode selection slide-switch (see
Figure 1 ).
The slide-switch selects between weigh-scale (Scale) and Analysis modes. The ADS1230REF switches
modes only when it is displaying data. If the switch is changed in a configuration mode, nothing happens
until the configuration mode is exited. At that time the ADS1230REF reads the switch and enters the
selected mode.
The four buttons have different functions, depending on the operating mode. In Scale mode, the switches
have the functions in the box labeled SCALE. In Analysis mode, the switches have the functions shown in
the box labeled ANALYSIS. In configuration mode, the switches have the functions shown in the box
labeled CONFIG.
The buttons also have different names in different modes. In this document, they are identifed by the
respective names they have in the mode under discussion.
1.2.1 Auxiliary Controls
The Reset switch resets the board, except for the USB interface.
The USB Reset switch resets the USB interface. If USB communication fails, pressing USB Reset may
solve the problem.
The Programming Mode switch is used to update the firmware. For normal operation, it should be set to
JTAG.
1.3 Power
To apply power to the ADS1230REF, connect a 9V battery or plug in a 6V–9V ac wall adapter.
AC adapters must be tip positive/sleeve negative. When an ac adapter is plugged in, the board always
takes power from it, and not from the battery.
The ADS1230REF is protected against polarity reversal. If a power source is connected in reverse by
mistake, the display remains blank. To prevent damage to the board, do not leave a reversed power
source connected for longer than a few seconds.
1.4 Connecting a Load Cell
The ADS1230REF is specifically designed for connection to load cells. Two connectors are provided for
this application. The terminal block is used for load cells having stripped wire connections; the load cell
header is for load cells having a header connector. The terminal block provides connections to the
reference input (or power supply) and the header has switched excitation.
1.4.1 Connecting a 4-Wire Load Cell to the Terminal Block
Figure 2 shows the connection of a 4-wire load cell to the terminal block. In this configuration, the load cell
is excited by the +5V power supply, and the ADC reference is taken from the power supply.
For this configuration, the reference select switch must be in the +5VA position.
ADS1230REF User's Guide4 SBAU125A – August 2007 – Revised September 2007
Figure 2. 4-Wire Load Cell to Terminal Block
Submit Documentation Feedback
Page 5

www.ti.com
1.4.2 Connecting a 6-Wire Load Cell to the Terminal Block
EXCSNSSNS+
SIG+
SIGEXC+
OUT+
EXCSENSE-
OUTSENSE+
EXC+
OUT+
EXC-
OUT-
EXC+
1
2
3
4
5
6
OUT-
EXC+
OUT+
EXC-
SENSE+
SENSE-
1
2
3
4
5
6
Figure 3 shows the connection of a 6-wire load cell to the terminal block. In this configuration, the load cell
is excited by the +5V power supply, and the ADC’s reference is taken from the sense wire returning from
the load cell. The sense wire connects to the excitation wire at the bridge sensor.
Figure 3. 6-Wire Load Cell to Terminal Block
1.4.3 Connecting a 4-Wire Load Cell to the Header
Figure 4 shows the connection of a 4-wire load cell to the header. In this configuration, the load cell is
excited by the +5V power supply, and the ADC reference is taken from the power supply.
Getting Started
For this configuration, the reference select switch must be in the +5VA position; the EXT position does not
work.
1.4.4 Connecting a 6-Wire Load Cell to the Header
Figure 5 shows the connection of a 6-wire load cell to the header. In this configuration, the load cell is
excited by the +5V power supply, and the ADC reference is taken from the sense wire returning from the
load cell. The sense wire connects to the excitation wire at the bridge sensor.
For this configuration, the reference select switch should be in the EXT position for best performance. The
+5V position also works, but the device may not perform as well.
SBAU125A – August 2007 – Revised September 2007 ADS1230REF User's Guide 5
Submit Documentation Feedback
Figure 4. 4-Wire Load Cell to Header
Figure 5. 6-Wire Load Cell to Header
Page 6

www.ti.com
Getting Started
1.5 Connecting Other Signal Sources
In general, the ADS1230REF can accurately measure any voltage in the input range of the ADS1230
ADC, as long as the following rules are observed:
• Never apply a negative voltage to the inputs of the ADS1230REF. The ADS1230 cannot accept
negative voltages at its input. Applying negative voltages may damage both the device and the
ADS1230REF. (The negative signs used in some signal names indicate inversion, not polarity.)
• For single-ended signals, ground the negative input or connect it to 2.5V. 2.5V is available from a
voltage divider by shorting J7; see Section 6.4.5 for details.
• The input range of the amplifier on the ADS1230 does not extend to the supplies. See the ADS1230
data sheet for details.
Note that Scale mode is designed only for use with load cells. Although it can be tested with a voltage
source or resistive divider, Scale mode does not, in general, display meaningful data unless a load cell is
connected and calibration is performed.
1.6 Connecting an External Clock
To connect an external clock, connect a clock oscillator to the EXTCLK test point. No settings need to be
changed; the ADS1230 will automatically use the attached clock.
The clock source must conform to 3.3V TTL or CMOS logic rules.
1.7 Common Tasks
1.7.1 Shorted-Input Noise Test
The noise measurements given in the product data sheet are taken with the inputs shorted to 2.5V. These
noise measurements can be replicated on the ADS1230REF with no external hardware. To set up these
measurements on the ADS1230REF, perform the following steps:
1. Move the mode switch to Analysis mode.
2. Short jumpers J8 and J7. (These jumpers are located very near the terminal block, and are marked
Input Shorting Jumpers in Figure 1 .)
3. Set up the ADS1230 as desired, as described in the previous sections.
4. Hold down the DISP button. The display shows the current display mode. While holding down DISP,
press the MODE button until the word on the left side is RMS.
5. While still holding down DISP, press the UNIT button until the word on the right side is VOLT.
6. Release the DISP button. The display shows the word GOT followed by an increasing number. Once
the appropriate number of points is collected, the calculated noise voltage is displayed. This value is
the shorted-input RMS noise voltage, input-referred.
The first RMS noise measurement may be incorrect as a result of device settling. The second
measurement is generally correct.
For a detailed description of Analysis mode, see Section 3 .
1.7.2 Measuring Mass
The following items are required to measure mass with the ADS1230REF:
• A load cell, connected as described in Section 1.4
• An object of known mass within the load cell range
To avoid performing calibration on each power-up, you can save the calibration settings to flash memory.
See Section 3.4.1 for details.
6 ADS1230REF User's Guide SBAU125A – August 2007 – Revised September 2007
Submit Documentation Feedback
Page 7

www.ti.com
Weigh Scale Mode
Obtaining a calibration weight:
Before the ADS1230REF can display the mass of an object, it must measure the output of the load cell for
a previously known mass. The known mass can be adjusted.
At power-up, the ADS1230REF expects a 5kg mass. If this mass is not available, or if the load cell range
is not compatible with this mass, the calibration mass can be changed in the following manner:
1. Determine the mass of the calibration weight. The most accurate way to determine the mass is to
weigh the calibration object on an accurately calibrated scale. If the weight is precalibrated, its given
mass can be used, although this approach is not generally as accurate. (Note that the accuracy of the
ADS1230REF as a scale directly depends on the accuracy to which the calibration weight can be
measured.)
2. Switch the mode switch to SCALE mode.
3. Press the ENT and SEL buttons simultaneously. The ADS1230REF enters configuration mode.
4. Use the PARM buttons to select the screen which shows UNIT =. This screen allows you to select the
units used for the calibration mass. If the units shown are not correct, adjust them using the VALUE
buttons.
5. Use the PARM buttons to select the screen that shows CW= followed by the calibration mass. On this
screen, you can adjust each digit of the calibration mass separately. Select the digit using the PARM
buttons. The currently-selected digit flashes, and can be adjusted using the VALUE buttons.
6. Adjust the calibration mass to match the mass of the calibration weight.
7. Press the VALUE buttons simultaneously to exit the configuration mode.
Preparing Scale mode:
Do the following steps to set up the scale mode:
1. Connect the load cell.
2. If the input shorting jumpers J8 and J7 are connected, disconnect them (see Figure 1 ).
3. Obtain a weight of known mass.
4. If the mass of the weight is not equal to the configured calibration mass, adjust the calibration mass as
described above.
5. Move the mode switch to SCALE position. If calibration has not been performed, the display reads
NO CAL.
6. Press the CAL button, and follow the calibration procedure given in Section 2.3 .
If the calibration is performed properly, and the load cell is connected correctly, the ADS1230REF will
measure the mass of an object placed on the load cell (provided that the mass of the object is within the
device range).
Weigh scale mode is described in detail in Section 2 .
2 Weigh Scale Mode
In weigh scale mode, the ADS1230REF displays mass.
units based on the voltage received from a load cell.
The ADS1230REF operates in Scale mode when the mode switch is set to the Scale position.
To accurately calculate mass, the ADS1230REF must have calibration information for the load cell. When
scale mode is first entered, the ADS1230REF displays NO CAL, because the ADS1230REF has no
calibration data when it is powered on.
By default, mass is calculated from the average of four successive readings from the ADC. The number of
points for averaging can be adjusted, and averaging can be turned off.
(1)
Load cells do not measure mass directly; they output a voltage proportional to the weight of an object. The mass of an object can be
accurately inferred from this voltage as long as a calibration is accurately performed, the downward force of gravity remains constant (as
it does if the load cell is not moved to a different altitude), and the tilt of the load cell does not change; if either of the latter conditions
change, a new calibration must be performed.
SBAU125A – August 2007 – Revised September 2007 ADS1230REF User's Guide 7
Submit Documentation Feedback
(1)
Mass is displayed in either SI or avoirdupois
Page 8

www.ti.com
m=
w
fs
c-c
fs zs
Weigh Scale Mode
2.1 Display
Weigh scale mode can display mass in these uints: μ g (displayed as ug), g, kg, pounds ( lb), stone ( st),
and ounces ( oz).
Internally, mass is measured in grams, and calibration factors are stored in grams. At display time, grams
are converted to the desired display unit using the conversion factors given in Table 1 .
xxx
(2)
The avoirdupois units used by the ADS1230REF are equal in the imperial and U. S. customary systems.
The display format for stone differs from the format used for the other units. One stone is equal to fourteen
pounds; weight in stone is commonly expressed as a number of stone followed by a number of pounds.
On the ADS1230REF, two digits are shown for stone, followed by st, followed by pounds displayed to two
decimal places.
(2)
Table 1. Unit Conversion Factors and Display Formats
Unit Multiplier Format
micrograms ( μ g) 10
milligrams (mg) 1000 nnn.nnnmg
grams (g) 1 nnn.nnng
kilograms (kg) 10
ounces (oz) 0.035274 nnn.nnnoz
pounds (lb) 0.0022046 nnn.nnnlb
stone (st) 157.473 × 10
6
–3
–6
nnn.nnnug
nnn.nnnkg
nnstnn.nn
2.1.1 Calculation of Mass
Mass is calculated from ADC code using the formula:
w = mc + w
where:
• w = mass
• c = the ADC code
• w
= t are weight
t
• m, w
, wt = values determined in the calibration process
zs
m is a calibration constant, and is calculated using Equation 1 :
where w
is the user-specified calibration mass, cfsis the ADC code taken with the calibration mass
fs
applied, and c
w
, the zero-scale mass, is calculated from m and c
zs
w
= –mc
zs
2.2 Button Functions
2.2.1 TARE
The tare function allows the mass of a substance to be measured separately from the mass of its
container. When the TARE button is pressed, the scale measures the mass and records it. This reading is
subtracted from each subsequent measurement.
The recorded tare value can be reset to zero by holding the TARE button down for at least one second.
When the tare value is to be reset, the display reads TARE OFF.
Tare is also reset following a calibration.
– w
zs
t
is the ADC measurement taken with no load.
zs
zs
using Equation 2 :
zs
(1)
(2)
ADS1230REF User's Guide8 SBAU125A – August 2007 – Revised September 2007
Submit Documentation Feedback
Page 9

www.ti.com
2.2.2 RANGE
2.2.3 CAL
2.3 Calibration
Weigh Scale Mode
The RANGE button changes the units or range of the display. RANGE cycles through all available units;
see Section 2.1 for details. When the RANGE button is depressed, it displays the selected unit.
Pressing CAL initiates the two-point calibration sequence. See Section 2.3 for details.
Two-point calibration is performed by pressing the CAL button. When this button is pressed, the board
executes the following command sequence:
1. The board scrolls the message, REMOVE WEIGHT.
2. The user removes all weight from the load cell and presses any button.
3. The board measures the load cell voltage and records it as the zero point.
4. The board scrolls the message PLACE CAL
WEIGHT.
5. The user places a weight on the load cell and presses any button. The weight should have the mass
that was selected in the configuration mode.
6. The board measures the load cell voltage and records it as the calibration weight.
New calibration data is lost when power is removed. To prevent this data loss, calibration data can be
saved, with other board settings, to flash memory. See Section 3.4.1 for details.
2.4 Configuration
The parameters for Scale mode can be adjusted in the configuration mode.
To enter configuration mode, press the VALUE buttons simultaneously. The four buttons then assume the
functions shown in the CONFIG box. To exit Configuration mode, press the VALUE buttons
simultaneously again. This function does not cause parameters to be adjusted, because only button
releases are detected in Configuration mode.
Configuration mode contains a number of adjustable parameters. To scroll through the available
parameters, use the PARM buttons. To change the parameter values, use the VALUE buttons.
Some items in configuration mode are not parameters, but commands or gateways to a submenu. These
items are labelled as words with a question mark. To enter these or to execute the command, press SEL
or ENT.
All parameters in the analysis and scale configuration menus are independent, including the parameters
found in both modes.
Table 2 summarizes the available parameters.
Table 2. Parameters in Configuration Mode
Parameter Display Value Range Description
Display units UNIT= μ g, mg, g, kg, lb, st, oz Display units
Averages AVGS= 2–128 Number of points to
ADC speed SPD= FAST, SLOW Acquisition rate
Calibration mass CW= 0–99.9 in various units Calibration mass and unit
Offset calibration OCAL? — Offset calibration; see text
Save parameters SAVE? — Save parameters; see text
Version number V1.1.0 — Firmware version number
average
display
SBAU125A – August 2007 – Revised September 2007 ADS1230REF User's Guide 9
Submit Documentation Feedback
Page 10

www.ti.com
Weigh Scale Mode
2.4.1 Parameters
Display units: The units to use when displaying mass. Available units are μ g (displayed as ug), mg, g, kg,
ounces (oz), pounds, (lb), and stone (st). See Section 2.1 for details.
Averages: Number of points to use when reading weight. The choices available are 2, 4, 8, 10, 16, 32,
50, 64, 100, and 128. The default is 50.
ADC speed: This parameter selects between the two data rates on the ADS1230, which are called
high-speed and low-speed. When high-speed mode is selected, FAST is shown; for low-speed mode,
SLOW is shown.
(1)
The actual data rate of the ADS1230 depends on the frequency of the master clock, f
data rate is f
/61440; in slow mode, the data rate is f
CLK
/491520. See the ADS1230 data sheet for
CLK
further information.
The default setting is low-speed mode.
Calibration weight: This parameter gives the expected mass of the calibration weight used in the
calibration procedure (Section 2.3 ). The calibration mass can be given in any of the available units, in
three significant figures. The unit is independent of the display unit.
Each digit in the mass is adjusted separately. The currently-selected digit flashes, and can be adjusted
with the VALUE buttons. The PARM buttons are used to select the digit. The unit is adjusted in the same
manner, and flashes when selected.
When the unit is changed, the value changes to the equivalent mass in the new unit.
Offset calibration: This screen has the same function as it does in Analysis mode. See Calibration
section 2.3 for information.
Save parameters: This screen allows the settings of the ADS1230REF to be stored in flash memory. It
functions the same as it does in Analysis mode. When ENT or SEL is pressed on this screen, the
ADS1230REF saves its settings to flash memory. These settings are loaded from flash memory when the
board is reset or powered on. All operating parameters are saved, including scale calibration settings,
voltage reference, display mode, and units.
Version number: This screen displays the version number of the ADS1230REF firmware.
(1)
The ADS1230REF cannot detect the frequency of the ADS1230 master clock, so it cannot display the actual data rate of the ADS1230
device.
. In fast mode, the
CLK
ADS1230REF User's Guide10 SBAU125A – August 2007 – Revised September 2007
Submit Documentation Feedback
Page 11

www.ti.com
3 Analysis Mode
v=
2 1-
24
x
v
REF
A
·
In Analysis mode, the ADS1230REF analyzes code output from the ADS1230 and displays it in different
ways. Table 3 summarizes the numerous display modes available, together with example displays.
Raw 1992E9H +1676001 +499.488M n/a
RMS n/a +5.789 +17.495N +23.18BIT
Peak-to-Peak n/a +31.256 +90.293N +21.92BIT
Averaged n/a +1676001 +499.488M n/a
The ADS1230REF operates in Analysis mode when the mode switch is set to the ANALYSIS position.
The default Analysis mode is RAW HEX.
To change measurement types, hold down DISP and press MODE. This function cycles through the four
available measurement types. When DISP is released, the newly selected measurement is made. To
change units, press UNIT. This option cycles through the available units for the active measurement type.
This procedure can also be done while DISP is depressed; in that case, the new unit is shown by name
on the display. The measurement modes are described in detail in Section 3.2 .
The ADS1230 itself can be configured directly from this mode, as described in Section 3.1 .
3.1 Switch Functions
NEW BLOCK: Pressing this switch resets the collection process for the RMS, peak-to-peak, and
averaged measurements.
UNIT: Cycles between available units. Not all units are available in all modes.
DISP: When this switch is pressed, the display shows the current measurement mode and unit. While
DISP is still pressed, pressing NEW BLOCK / MODE cycles through the available measurement modes.
CHIP: Holding this switch down allows the settings of the ADS1230 to be changed, using the PARM
(NEW BLOCK) and VAL (UNIT) buttons.
Pressing PARM while DISP is pressed down cycles through the available parameters—gain, data rate,
and active channel.
The gain setting is displayed as GAIN= followed by the gain setting. Gains of 64 and 128 are available.
Data rate is shown on the display as SPD=FAST or SPD=SLOW. See ADC speed in the Parameters section
for further information.
If any of these parameters are changed during a multisample measurement, the measurement is
restarted.
Analysis Mode
Table 3. Modes and Example Displays
Hex Code Dec Code Voltage ENOB
3.2 Measurement Modes
Raw: In this measurement, codes are read from the ADS1230 and displayed. No processing or analysis is
done on the sample stream. Data can be displayed as hexadecimal codes, decimal codes, or volts.
Voltage is calculated according to Equation 3 :
Where:
• A is the converter gain (64 or 128), determined from the programmed gain setting
• v
• x is the ADC decimal code
v
is adjustable from Configuration mode. By default, it is 5V.
REF
SBAU125A – August 2007 – Revised September 2007 ADS1230REF User's Guide 11
Submit Documentation Feedback
is the voltage at the converter reference input
REF
(3)
Page 12

www.ti.com
s =
N
(x )-ix
2
N
i =1
1
N
å
E=
24 log s :-
2 N0sN
¹
24:s 0N=
Analysis Mode
The voltage display is autoranging. All ranges are shown with six significant figures having three decimal
places. The ranges are given in Table 4 .
Table 4. Voltage Display Ranges
VOLTAGE RANGE DISPLAY SUFFIX
Nanovolts < 1 μ V n
Microvolts < 1mV u
Millivolts < 1V m
Volts ≥ 1V V
RMS noise: In this mode, a number of codes are read from the ADS1230, and an RMS noise calculation
is performed on them using the standard-deviation formula (given in Equation 4 ):
The result can be displayed as decimal codes, volts, or an effective number of bits (ENOB). For decimal
codes, sNis displayed directly. (Hexadecimal is not available because sNmay be fractional.) For volts, s
is converted to a voltage as in raw mode.
ENOB: E is calculated using Equation 5 :
(4)
N
The zero case is needed when a string of equal codes is read. This can happen when the converter is
clipping.
This measurement requires a number of codes to be read before a calculation can be made. Therefore,
during the first run, the display shows the word GOT followed by the number of samples collected. This
event happens when the mode is first entered, when the converter configuration changes, or when NEW
BLOCK is pressed.
The number of codes used in the calculation is selected in Configuration mode; 50 codes are used in
laboratory characterization, so this value is the default.
Peak-to-peak noise: In this mode, a number of codes are collected, and the absolute value of the
difference between the minimum and maximum is calculated. The result can be displayed in decimal or
hexadecimal codes, volts, or noise-free bits (ENOB). Volts are calculated as in raw mode; ENOB is
calculated in the same way as in RMS mode.
The number of codes used in the calculation is selectable in Configuration mode.
Averaged: In this mode, a number of codes are collected, and the average is calculated. The result can
be displayed in decimal codes or volts. (Hexadecimal is not available because the result may be
fractional.) Volts are calculated as in raw mode.
The number of codes used in the calculation is selectable in Configuration mode.
3.3 Progress Graph
The row of apostrophes at the top of the display are used to indicate measurement progress. In Raw
mode, the apostrophe moves across the display when data is being received from the converter. The
apostrophe moves once for every eight samples collected from the ADC.
In block collection modes, the apostrophes form a bar graph. As the collection of a block proceeds, the
bar graph increases. When the bar graph reaches all the way to the right, the new result is generated and
collection restarts.
(5)
ADS1230REF User's Guide12 SBAU125A – August 2007 – Revised September 2007
Submit Documentation Feedback
Page 13

www.ti.com
Analysis Mode
3.4 Configuration
To enter Configuration mode, press the VALUE buttons simultaneously. The four buttons then assume the
functions shown in the CONFIG box. To exit Configuration mode, press the VALUE buttons
simultaneously again. This operation does not cause parameters to be adjusted; only button releases are
detected in Configuration mode.
Configuration mode contains a number of adjustable parameters. To scroll through the available
parameters, use the PARM buttons. To change the parameter values, use the VALUE buttons.
Some items in configuration mode are not parameters, but commands or gateways to a submenu. These
items are labelled as words with a question mark. To enter these items or to execute the command, press
SEL or ENT.
Although a few of the parameters in the Analysis and Scale configuration menus are the same, the
settings are kept separate between the modes.
Table 5 summarizes the available parameters.
Table 5. Parameters in Analysis Mode
Parameter Display Value Range Description
Averages AVG= 2–128 Number of points for average,
Voltage Reference VREF= 0.5–5.0 Voltage used in various
Power-down mode PDWN? — Power-down mode; see text
Offset calibration OCAL? — Offset calibration; see text
Save parameters SAVE? — Save parameters; see text
Version number V1.0.0 — Firmware version number display
peak-to-peak, and RMS modes
calculations
3.4.1 Parameters
Averages: Number of points to use in Averaged, RMS noise, and Peak-Peak calculations. The choices
available are 2, 4, 8, 10, 16, 32, 50, 64, and 128. The default setting is 50.
Voltage reference: To convert voltages to codes, the ADS1230REF requires the voltage reference level.
Since this level cannot be measured, it must be selected manually. This parameter allows the reference
level to be set.
Each digit of the voltage reference is selected and adjusted separately. Use the PARM buttons to select a
digit, and the VALUE buttons to adjust it. The selected digit flashes.
This parameter does not affect the actual voltage reference used. If it is incorrect, voltage calculations will
be wrong. The voltage reference is typically the +5V rail; the default value for this parameter is 5.0V.
Power-down mode: When ENT or SEL is pressed on this screen, the ADS1230REF causes the
ADS1230 to enter power-down mode. This action occurs by pulling the PDWN line low. While the PDWN
line is low, the display reads POWER DN. When a button is pressed from this display, the ADS1230REF
powers the converter on and returns to the analysis display, exiting configuration mode.
This mode can be used to test the current consumption of the board when the ADS1230 is powered down.
Offset calibration: When ENT or SEL is pressed on this screen, the ADS1230REF initiates a hardware
offset calibration on the ADS1230 by providing two extra shift clock cycles on the next data read cycle, as
described in the ADS1230 data sheet .
When ENT or SEL is pressed, the display briefly shows OK, indicating that calibration was performed.
Offset calibration is performed when the ADS1230REF is powered on, but is not automatically performed
at any other time.
Version number: This screen displays the version number of the ADS1230REF firmware.
SBAU125A – August 2007 – Revised September 2007 ADS1230REF User's Guide 13
Submit Documentation Feedback
Page 14

www.ti.com
Using the PC Software
4 Using the PC Software
The ADS1230REF is supplied with software that performs various analyses on data received from the
board via the USB connection. It also provides a means of recording received data to a file.
The program currently runs only on a Microsoft Windows
communicates with the ADS1230REF using a virtual COM port driver that causes the USB connection to
appear to Windows as a normal serial port. The necessary driver is installed with the EVM software.
4.1 Installation and Setup
The ADS1230REF software is distributed in an installer program called
ADS123x-setup-withLVRT-1.1.1.exe (the version number in the file name may differ), distributed on
the CD-ROM or available from Texas Instruments. To install the software, execute this program. The
program guides you through the installation process.
Note the following points:
• The installer installs two packages: the ADS123xREF program itself, and the TI Virtual COM Port
driver.
• If any version of the ADS123xREF program is already installed, the installer uninstalls it and quits. You
must run the installer again to complete the installation.
• If the Virtual COM Port driver is already installed, the installer offers to uninstall it. Do not uninstall it;
cancel this part of the installation.
The installer displays messages reminding you of these points.
®
platform. In Windows, the program
4.1.1 First Time Connection of the ADS123xREF
If the ADS1230REF has never been connected to your computer before, Windows detects the device as
unknown hardware and takes you through a series of dialogs to install the correct driver. Accept the
default settings; the driver is present and only needs to be copied to the correct location. If the driver is
successfully installed, Windows does not issue this prompt again.
On some computers, if the board is connected to a different USB port, the operating system detects the
board as new hardware. If this action occurs, proceed through the new hardware dialogs as usual, and
allow Windows to reinstall the driver.
4.2 The Display
The ADS1230REF software has a single display; see Figure 6 for a typical display. The major elements of
the display discussed next.
Strip chart: This feature displays a scrolling graph of data received from the board.
Histogram: A sliding histogram of data received from the board is also displayed. The number of points
used in the analysis is adjustable.
14 ADS1230REF User's Guide SBAU125A – August 2007 – Revised September 2007
Submit Documentation Feedback
Page 15

www.ti.com
DC analysis section: The results of RMS noise analysis, peak-to-peak analysis, and a running voltage
number are shown in this section. The number of analysis points and the reference voltage used for
voltage calculations are also adjustable here.
Recording section: This feature controls recording of data to a file.
Device control section: This section allows device parameters to be adjusted.
Status display: This display shows messages indicating the current state of the program.
Acquire button: This button starts and stops the running acquisition of data.
4.3 Starting the Program
When the program launches, a screen similar to that shown in Figure 6 appears. Immediately after launch,
the program searches all available serial ports for the board. To do this step, it opens every available
serial port in turn, testing it to see if there is an ADS1230REF connected. The program uses the first
ADS1230REF it finds.
Using the PC Software
Figure 6. ADS1230REF PC Software Display
Although this procedure is conceptually simple, it may not go as smoothly as expected. The following
process ensures that the board is found correctly. Note that Steps 1–3 can be done in any order.
Step 1. Apply power to the ADS1230REF.
Step 2. Plug in the USB connector.
Step 3. Start the program.
Step 4. Watch the status display. It reads Scanning followed by the name of the serial port being
tested. When the board is found, the display reads Idle. Until a board is found, the display
cycles through every port, spending approximately one second on each port.
Once the board is detected, the program enters Idle mode and is ready for use.
Note: If the board is never detected, it is still possible (and safe) to exit the program during the
search process. If the board does not respond, pressing the USB Reset switch (SW1) may
help.
SBAU125A – August 2007 – Revised September 2007 ADS1230REF User's Guide 15
Submit Documentation Feedback
Page 16

www.ti.com
Histogram
StripChart
Using the PC Software
4.4 Analysis or Record Mode
The program will operate in analysis mode or record mode. Both modes acquire the data and update the
displays, but record mode also writes the result to the selected file.
4.5 Adjusting Device Parameters
To adjust device parameters, use the controls in the Device control box. Each control corresponds to a
setting that can also be made from the board itself.
4.6 Acquiring Data
To start receiving and analyzing data from the board, click the Acquire button, located in the lower
right-hand corner of the display. The program begins to receive data from the board, displaying the results
in near-real time.
It is not possible for the program to adjust board parameters in Analysis mode. For this reason, the board
controls are disabled and dimmed while Analysis occurs.
4.6.1 Averaging
The PC software can process data collected from the board using a sliding-window averager. The controls
for the averager are found in the Averager box.
To turn the averager on, use the Averaging switch. The number of points averaged is set by the Points
control, and the number of points currently collected is shown in the Collected box.
When the averager is turned on, it is cleared. To reset the averager, turn it off and then on again.
The histogram displays an integer representation of the averaged data. Note that when selecting a high
number of averages, the integer results might include only one code; the histogram for that case will be
blank. The strip chart display shows both the full precision result of the averages and the integer version,
as illustrated in Figure 7 .
ADS1230REF User's Guide16 SBAU125A – August 2007 – Revised September 2007
Figure 7. ADS1230REF Average Data
Submit Documentation Feedback
Page 17

www.ti.com
4.6.2 Block Analysis Length
The histogram, RMS, and peak-to-peak calculations require a set of samples. These calculations are
updated with every group of samples received, and are performed on a block of the most recently
acquired (or averaged) samples.
The number of samples used is set using the Analysis points control. By default, this number is 50, but
can be changed at any time. This value also controls the RMS and peak-to-peak noise analysis lengths.
If the number of samples collected is not yet equal to the number of samples specified by the Analysis
points control, 0s are substituted for the samples not yet received.
In Analysis mode, the analysis can be reset using the button marked Reset analysis. This function clears
the internal analysis buffer. This button cannot be used outside of Analysis and Recording modes.
Analysis is automatically reset when Analysis and Recording modes are entered.
4.6.3 RMS and Peak-to-Peak Noise Analysis
The RMS and peak-to-peak noise analysis calculations are performed in exactly the same way as they are
in the ADS1230REF firmware, as described in Section 3.2 . Each calculation can be displayed in units of
volts, codes, or bits, as on the board. See Section 3.2 for detailed descriptions of the calculations.
The number of samples used in each calculation is set using the Analysis points control. By default, this
number is 50, but can be changed at any time. This control also controls the histogram length.
4.6.4 Displaying Volts
When units of volts are displayed, the program must have a value for the reference voltage applied to the
ADS1230 to properly calculate the voltage. Because this voltage cannot be measured using the
ADS1230REF, it is set manually using the Vref control.
The value of Vref defaults to 5V, because the reference is normally taken from the 5V power supply. If a
different reference voltage level is used, the value of Vref should be changed to reflect the different level,
so that voltage calculations are performed correctly.
The Vref control also affects voltages recorded in Record mode.
Using the PC Software
4.6.5 Block Acquisition
To enable the program to run reliably on slower computers, results are not calculated each time a sample
is received. Instead, groups of samples are collected and added to an analysis buffer that is processed as
it becomes full. This processing delay is timed so that the display updates at least every 0.75 seconds.
4.7 Data Recording
The ADS1230REF software can record incoming samples to a text file. This file can be loaded into other
programs for analysis. Data recording is performed using the controls in the Recording box.
Follow these steps to record data to a file:
Step 1. Select or create a destination file. Either type the file path directly into the Destination file
control, or click the small open folder icon to the right of the control to open a dialog box from
which a file can be selected. If the selected file exists already, the program will display a
warning. Otherwise, type the name of the file that you wish to create.
Step 2. Select a data format. Samples can be recorded as raw (decimal) codes or as volts. In both
cases, the data are written to the file as ASCII data, and the file is a text file.
Step 3. Click the Record button. The program begins to collect and analyze data from the board, as
well as write it to the selected file. As recording proceeds, the recording time indicators are
updated.
Step 4. Click Record again to stop the recording when the desired amount of data has been
collected.
SBAU125A – August 2007 – Revised September 2007 ADS1230REF User's Guide 17
Submit Documentation Feedback
Page 18

www.ti.com
Serial Console
4.7.1 File Format
5 Serial Console
The selected file is not opened or created until recording begins. If an error occurs at that time, recording
stops and a message displays in the status box.
Recording time is not measured, but calculated from the number of samples collected. The speed is used
to determine the amount of time for each sample. If the data rate is changed at the board, the recording
time will be incorrect. This change does not affect the data file, except that samples continue to be
collected with the different settings.
In Recording mode, analysis proceeds as in Analysis mode; Recording mode is identical to Analysis
mode, except that data is written to a file. See the previous section for documentation on Analysis mode.
When Recording mode begins, if the selected file exists, it is erased and overwritten. The pre-existence of
the file is checked only when a new file is selected.
Data files begin with a header that contains the text collected from ADS1230REF, the time of recording,
and the speed and gain. Following this header, values are written in either volts or raw codes, with one
value per line. Line separators are in DOS format, consisting of a carriage return and a line feed. This
format can be examined in a text editor and loaded or imported into most other software, including
spreadsheets.
Voltages are calculated using the reference voltage given in the Vref control; it is therefore important that
this value be correct.
The ADS1230REF provides a console mode that can be used with any Windows terminal emulation
program, such as Hyperterm™. In Windows, this configuration is done through the Virtual COM Port driver
supplied with the EVM software, causing the ADS1230REF to appear in Windows as an extra serial port.
5.1 Using the Console
To use the console, load a terminal emulation program and connect to the EVM serial port using the
following parameters:
• Baud rate: 115200
• Data bits: 8
• Parity: none
• Stop bits: 1
• Flow control: none
• Local echo: off
• Terminal emulation: ANSI or VT100
Setting up the terminal program is beyond the scope of this document; see the specific terminal program
documentation for details.
To locate the serial port, try higher port numbers first. When the board first starts, it outputs the following
message:
ADS1230REF 1.1.0c
(c)2005-2007 Texas Instruments
1230>
Pressing Reset causes the board to output this message.
The command prompt is always 1230> . Commands are entered at this prompt. Commands consist of
one letter possibly followed by arguments. The format of the arguments depends on the command.
Commands are case insensitive. Upper-case characters are printed here, but lower-case characters also
work.
18 ADS1230REF User's Guide SBAU125A – August 2007 – Revised September 2007
Submit Documentation Feedback
Page 19

www.ti.com
5.2 Command Reference
Serial Console
The available commands are listed in Table 6 . In this table, values in brackets indicate a range or list of
possible characters. A dash ( –) indicates a range, and commas ( ,) indicate a list.
Table 6. Console Mode Commands
COMMAND FORMAT OPERATION
P Set PGA
R Set data rate
K
V
S Start streaming
D Read data once
Q Query parameters
P [0,1]
R [F,S]
K
V
S
D
Q
Perform offset
calibration
Show firmware
version
Console mode does not interrupt standalone operation. It is always available, even when the standalone
mode is in use. However, if parameters are changed using both the console and standalone modes,
parameters may become out of sync.
5.2.1 P—Set PGA
This command sets the gain of the ADS1230 PGA, according to these parameters:
• P0—sets gain to 64
• P1—sets gain to 128
• P—(with no argument) prints the current gain setting
5.2.2 R—Set Data Rate
This command sets the speed of the ADS1230 according to these parameters:
• RF—sets rate to fast
• RS—sets rate to slow
• R—(with no argument) prints the current data rate setting
Note that the actual data rate depends on the frequency of the device clock.
5.2.3 K—Perform Offset Calibration
Initiates an offset calibration on the ADS1230, using the method described in the datasheet.
5.2.4 V—Show Version
Displays a message containing the firmware version and copyright notice.
SBAU125A – August 2007 – Revised September 2007 ADS1230REF User's Guide 19
Submit Documentation Feedback
Page 20

www.ti.com
USB-SERIAL
INTERFACE
POWER
SUPPLY
LOADCELL
CONNECTORS
INPUT
FILTERING
MSP430F449
USBCONNECTOR
LCD
SWITCHES
ADS1230
+5V
+3.3V
CH1
SPI
GPIO
UART
Hardware
5.2.5 S—Start Streaming
When S is issued, the ADS1230REF begins printing raw output codes from the ADS1230 in hexadecimal
format, separated by new lines. The device iterates continuously until a character is received from the
serial port.
S is used primarily by the EVM software for data collection.
5.2.6 D—Collect One Sample
Issuing the D command causes the ADS1230REF to report the latest collected sample from the ADS1230.
The sample is displayed in raw hexadecimal.
5.2.7 C—Set Channel
This command has no effect on the ADS1230 since there is only one channel.
• C0—set to channel 0
• C—(with no arguments) prints the current channel, always CHAN=0
5.2.8 Q—Query Parameters
Q causes the ADS1230REF to issue a coded string summarizing the current settings. The format of the
string is:
P[0,1]R[F,S]OIC0
followed by a carriage-return and linefeed.
6 Hardware
A block diagram of the ADS1230REF is shown in Figure 8 . The schematic and layout drawings are given
in Appendix A .
Figure 8. ADS1230REF Hardware Block Diagram
ADS1230REF User's Guide20 SBAU125A – August 2007 – Revised September 2007
Submit Documentation Feedback
Page 21

www.ti.com
6.1 Microcontroller
6.2 Power Supply
6.3 User Interface
6.4 ADC Section
Hardware
The ADS1230REF uses the MSP430F449 microcontroller. This device provides an LCD controller,
hardware SPI and UART interfaces, and a multiplier. The latter is important because the firmware must
perform many multiplications.
The ADS1230REF operates from +5VDC and +3.3VDC. These supplies are generated by linear
regulators U1 and U2. Input power comes from either wall-adapter connector J2, or battery connector
BT1. J2 is switched; when a connector is plugged in, BT1 is disconnected.
Noise is important because the ADS1230 voltage reference is typically taken from the power supply. The
supplies are heavily bypassed to reduce noise.
The ADS1230REF user interface consists of the display and switches SW2–5 and SW8. Switches are
connected to interrupt-capable GPIOs on the microcontroller, allowing them to wake the microcontroller
from sleep mode.
The ADC section consists of the ADS1230 device itself and ancillary circuitry.
All signals on the ADS1230 are filtered by pass-through capacitors that help to reject electromagnetic
interference (EMI), radio frequency interference (RFI), and noise generated by the digital circuitry.
6.4.1 Input Circuitry
The ADS1230REF is designed to connect to resistive bridge sensors, particularly load cells. The input
channel is filtered by pass-through capacitors C46 and C47 and differential capacitor C7. Common-mode
capacitors C32 and C29 provide additional RF rejection.
6.4.2 Load Cell Header
The load cell header, J6, provides a convenient terminal for load cells having a properly fitted header
connector. It provides excitation and sense connections. The negative excitation line is connected to
ground through analog switch U7, which is controlled by the microcontroller. This arrangement allows for
sleep-and-convert control, which can reduce self-heating in the load cell and conserve power.
The load cell connector’s pinout is given in Table 7 . For connection examples, see Section 1.4.3 and
Section 1.4.4 .
Table 7. Load Cell Header Pinout
PIN NO. PIN NAME FUNCTION
1 EXC+ Positive excitation; connected to +5VA
2 EXCSNS+ Positive sense; connected to external positive reference input
3 SIG+ Input for positive load cell output
4 SIG– Input for negative load cell output
5 EXCSNS– Negative sense; connected to external negative reference input
6 EXC– Negative excitation; connected to ground through switch U7
SBAU125A – August 2007 – Revised September 2007 ADS1230REF User's Guide 21
Submit Documentation Feedback
Page 22

www.ti.com
Hardware
6.4.3 Input Terminal Block
The input terminal block consists of J4 and J5. It provides connections to all of the analog inputs on the
ADS1230, and connections to the ADS1230REF voltage reference network.
The terminal block pinout is given in Table 8 .
6.4.4 Voltage Reference
The ADS1230REF is designed to operate either ratiometrically or with an external reference. The two
modes are selected using switch SW7.
In the EXT position, the ADS1230 reference inputs are taken from the load cell connectors. In the +5VA
position, the ADS1230 positive reference input comes from the 5V analog supply, and the negative
reference input is connected to ground.
After the switch is placed a filtering network that consists of resistors R14 and R15, bulk capacitor C4,
pass-through capacitors C44 and C45, and filtering capacitors C28, C30, and C31.
Table 8. Terminal Block Pinout
TERMINAL NAME FUNCTION
EXC–
SNS– Inverting excitation sense input
SNS+ Noninverting excitation sense input
SIG+ Noninverting input
SIG– Inverting input
EXC+
Negative excitation connected to ground
through SW7
Positive excitation output (+5V) or positive
reference input
6.4.5 Input Shorting Jumpers
The shorted-input noise test for the ADS1230 is best performed with both inputs connected to 2.5V. To
make this test easy to perform, jumpers J7 and J8 are provided.
Jumper J8 shorts the inputs together. Jumper J7 connects the inverting input to a voltage divider made
from R25 and R26, dividing the power supply by 2. This voltage divider electrically resembles an ideal
bridge sensor.
6.5 USB Interface
The USB interface can be used for firmware download or data communications. Its role in firmware
download is discussed in Section 6.6 .
The USB interface consists of USB-to-serial converter U4, a Texas Instruments TUSB3410 . This device
incorporates a USB interface module, a microcontroller, and a 16550-type UART. Driver software is
available that causes the device to appear as a serial port on the host PC.
The USB interface is powered separately from the rest of the ADS1230REF; it takes power from the USB
line, through linear regulator U3.
The serial port side of U4 is connected to the microcontroller UART signals. To keep the power domains
separate, and to keep the USB and microcontroller sides from inadvertently powering each other, the
UART is connected through isolators U8 and U9.
ADS1230REF User's Guide22 SBAU125A – August 2007 – Revised September 2007
Submit Documentation Feedback
Page 23

www.ti.com
6.6 Programming Connections
The MSP430 can be programmed via the dedicated JTAG port or the serial bootstrap loader.
The JTAG connector is not factory-installed. The footprint is similar to an edge-card pattern, and accepts a
standard dual-row 0.100in header mounted on the side of the board. This header is compatible with
MSP430 parallel-port JTAG adaptors.
To allow firmware to be downloaded through USB, U4 is connected to the microcontroller bootstrap loader
pins. The DTR and RTS pins are connected to the RST and TCK inputs on the microcontroller to allow the
serial bootstrap loader to operate. These lines are not isolated; instead, they are switched through SW9,
which also connects USB ground and power to the microcontroller ground and power. Normally this switch
is open; it is only switched on when firmware is to be downloaded through USB. This feature also protects
the microcontroller from unknown states on these pins at power-up.
Hardware
SBAU125A – August 2007 – Revised September 2007 ADS1230REF User's Guide 23
Submit Documentation Feedback
Page 24

www.ti.com
Appendix A
Appendix A Schematic and Layout
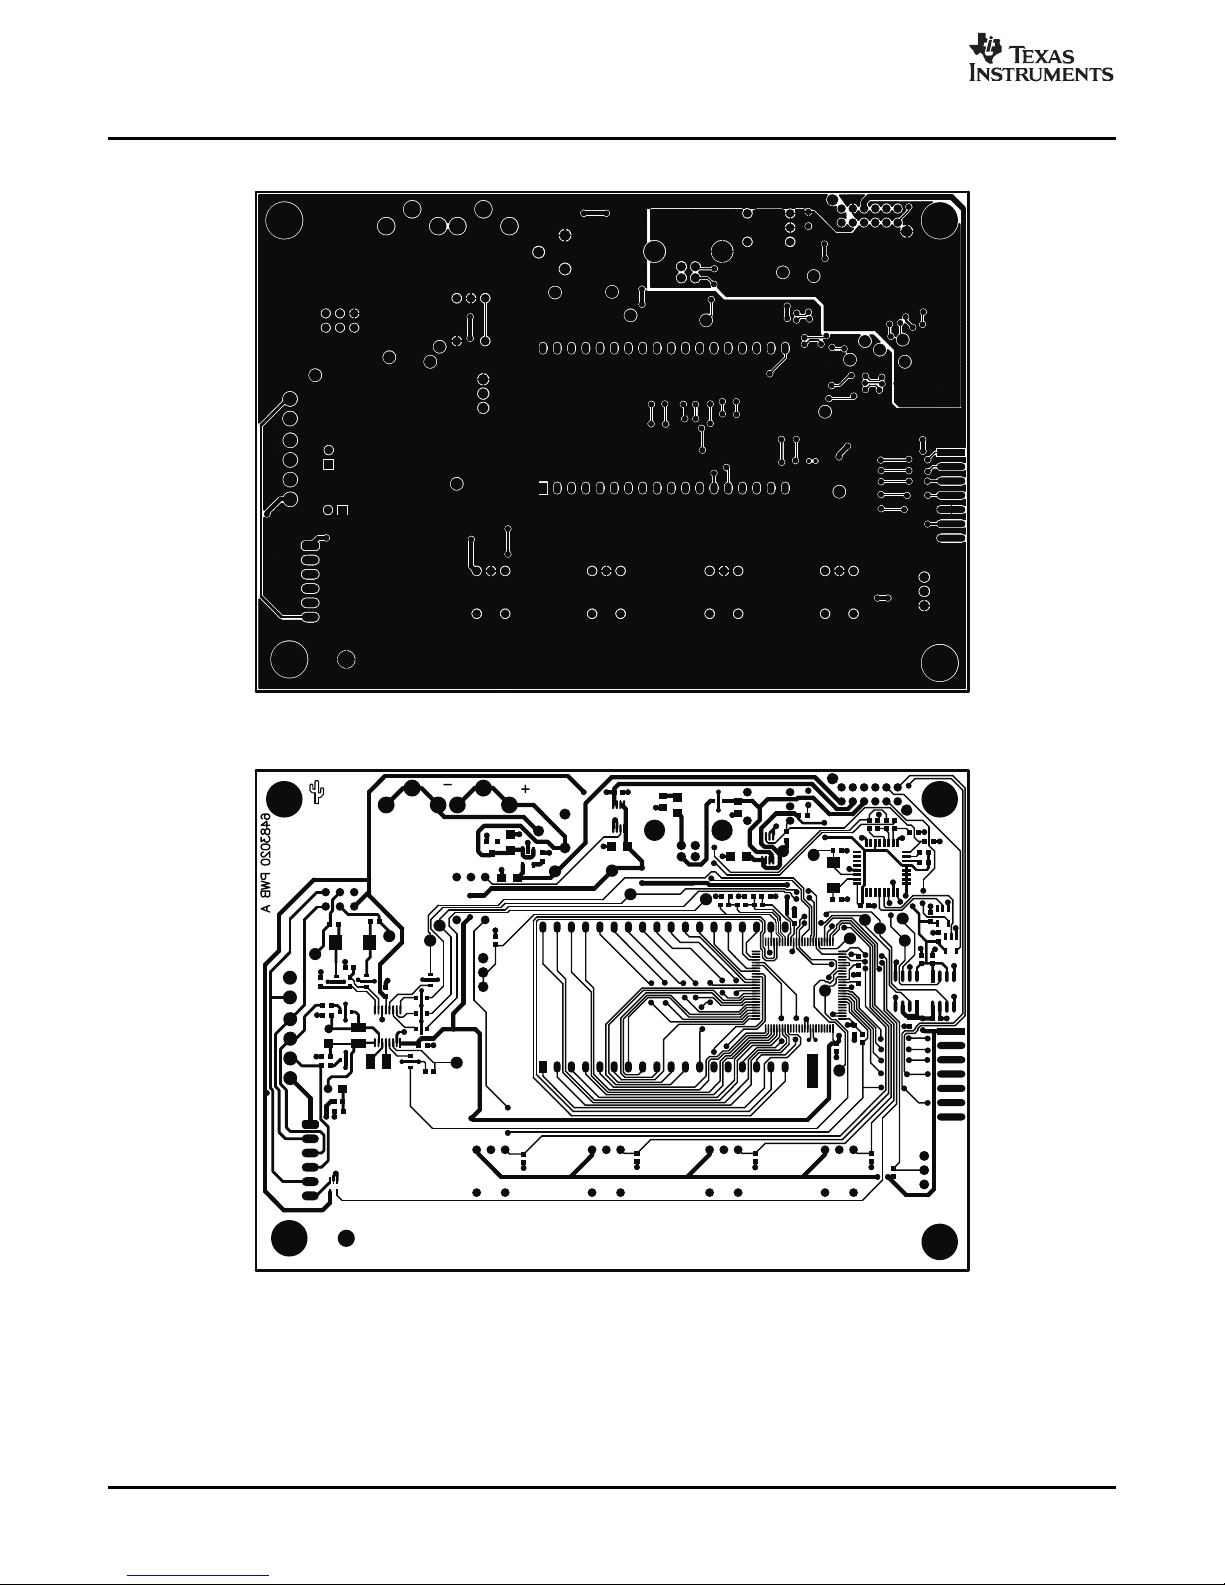
The printed circuit board (PCB) layouts for the top and bottom sides of the ADS1230REF are
shown in Figure A-1 and Figure A-2 , respectively. Schematics for the ADS1230REF are shown in
Section A.3 . The bill of materials is provided in Table A-1 .
A.1 Bill of Materials
Reference Designator Description Manufacturer Mfg. Part Number
R23, R24 0 1/16W 1% Chip Resistor Panasonic ERJ-3GEY0R00V
R17 20 1/4W 5% Chip Resistor Panasonic ERJ-8GEYJ200V
R2, R3 33 1/10W 5% Chip Resistor Panasonic ERJ-3GEYJ330V
R12–R15 100 1/10W 5% Chip Resistor Panasonic ERJ-3GEYJ101V
R11 220 1/10W 5% Chip Resistor Panasonic ERJ-3GEYJ221V
R1 1.5K 1/10W 5% Chip Resistor Panasonic ERJ-3GEYJ152V
R4–R10, R16 10K 1/10W 5% Chip Resistor Panasonic ERJ-3GEYJ103V
R25, R26 20K 1/16W 1% Chip Resistor Panasonic ERJ-3EKF2002V
R18, R30 47K 1/10W 5% Chip Resistor Panasonic ERJ-3GEYJ473V
R22 200k Potentiometer 200k Ω , Bourns 3362U-1-204LF
R19-R21 221k 1/16W 1% Chip Resistor Panasonic ERJ-3EKF2213V
C1, C2, C16, C17 22pF 50V Ceramic Chip TDK C1608C0G1H220J
C29, C30, C31, C32 100pF 16V PPS Film Chip Panasonic ECH-U1C101GX5
C38, C40–C43 100pF Filter High Frequency, Murata NFM21CC101U1H3D
C5, C11, C13–C15 0.01 μ F 50V Ceramic Chip TDK C1608X7R1H103K
C12, C21, C33–C36 0.1 μ F 50V Ceramic Chip TDK C1608X7R1H104K
C6, C7 0.1 μ F 16V PPS Film Chip Panasonic ECH-U1C104GX5
C9, C10, C22 1 μ F 16V Ceramic Chip TDK C1608X7R1C105K
C37, C44–C47 1 μ F Filter High-Frequency, Murata NFM21PC105B1C3D
C23–C28 2.2 μ F 6.3V Ceramic Chip TDK C1608X5R0J225M
C3 4.7 μ F 16V Ceramic Chip TDK C2012Y5V1C475Z
C8, C18–C20 10 μ F 16V Ceramic Chip TDK C3216X7R1C106M
C4 100 μ F 10V Tantalum Chip Kemet T494D107K010AT
U6 Analog-to-Digital Converter Texas Instruments ADS1230IPW
U5 Microcontroller Texas Instruments MSP430F449IPZ
U2, U3 Linear Voltage Regulator, Texas Instruments TPS77133DGKG4
U1 Linear Voltage Regulator, +5V Texas Instruments TPS76350DBVG4
Table A-1. ADS1230REF Bill of Materials
1/4in SQ
Capacitor, ± 0.5pF, NPO
Capacitor, 2%
100pF
Capacitor, ± 10%, X7R
Capacitor, ± 10%, X7R
Capacitor, 2%
Capacitor, ± 10%, X7R
1.0 μ F
Capacitor, ± 20%, X5R
Capacitor, +80/-20%, Y5V
Capacitor, ± 20%, X7R
Capacitor, ± 10%
+3.3V
24 Schematic and Layout SBAU125A – August 2007 – Revised September 2007
Submit Documentation Feedback
Page 25

www.ti.com
Table A-1. ADS1230REF Bill of Materials (continued)
Reference Designator Description Manufacturer Mfg. Part Number
U4 USB to Serial Converter Texas Instruments TUSB3410VFG4
U7 Analog Switch, SPST Texas Instruments TS5A3166DCKR
U8, U9 Digital Isolator Texas Instruments ISO721DG4
U10, U11 Inverter, Single Gate Texas Instruments SN74LVC1G04DBVRG4
BT1 (+) 9 Volt Battery Clip Female Keystone Electronics 594
BT1 (–) 9 Volt Battery Clip Male Keystone Electronics 593
J1 USB Type B Socket Mill-Max 897-43-004-90- 000000
J2 2.5mm Power Jack CUI PJ-102BH
J6 1 X 6 Header Samtec TSW-106-07-G-S
J7, J8 1 X 2 Header Samtec TSW-102-07-G-S
J4 3.5mm PCB Terminal Block, On Shore Technology ED555/4DS
4-position
J5 3.5mm PCB Terminal Block, On Shore Technology ED555/2DS
2-position
N/A ADS1230 REF PCB Texas Instruments 6483020
D1 30V, 200mA Schottky Diode Fairchild Semiconductor BAT54
D2 Green LED, SMD Lumex SSL-LX3052GD
L1 Ferrite Bead Core, 4A 100MHz Panasonic EXC-ML20A390U
LCD1 8-Character LCD Display, TN Varitronix VIM878-DP-RC-S-LV
Type
SW1–SW6 Push-button Switch ITT KSA1MZIILFT
SW7 DPDT Slide Switch, Top NKK SS22SDP2
Actuator
SW8 SPDT Slide Switch, Top NKK SS12SDP2
Actuator
SW9 4PDT Slide Switch, RA E-Switch EG4208
Actuator
TP15 Testpoint Keystone Electronics 5011
X1 12MHz Quartz Crystal Citizen CS10-12.000MABJUT
X2 32.678kHz Quartz Crystal Epson C-002RX 32.7680KE: PBFREE
Bill of Materials
SBAU125A – August 2007 – Revised September 2007 Schematic and Layout 25
Submit Documentation Feedback
Page 26
www.ti.com
PCB Layout
A.2 PCB Layout
Figure A-1. ADS1230REF PCB—Top Side
Figure A-2. ADS1230REF PCB—Bottom Side
Schematic and Layout26 SBAU125A – August 2007 – Revised September 2007
Submit Documentation Feedback
Page 27

www.ti.com
C26
2.2uF
+3.3VD
TP11
EXTCLK
C38
C43
C40
+5VA
C27
2.2uF
C6
0.1uF
C44
C45
R14
100
R15
100
C28
2.2uF
C31
100
p
F
C30
100pF
C46
MUR_NFM 21PC105F1C3D
C47
MUR_NFM 21PC105F1C3D
R23
0
R24
0
C7
0.1uF
C29
100pF
C32
100
p
F
SW7
SW-DPDT
+5VA
+5VA
DOUT
SCLK
SPEED
PDW N/RST
TP13
VREF+
TP14
VREF-
TP5
TEMP
TP9
SCLK
TP10
SPEED
TP12
PWDN/ RST
C41
C42
TP15
GND
J4
OST_ED555/4DS
1
2
345
6
J6
HEADER-6
+5VA
EXC+
EXCSNS+
SIG+
SIG-
EXCSNS-
EXC-
NO
1
GND
3
COM
2
V+
5
IN
4
U7
TS5A3166
DCK
+5VA
EXC
C4
100uF
1 2
J8
R26
20K
R25
20K
+5VA
1 2
J7
TP6
DOUT
TEMP
J2
CUI-STACK PJ-102BH
VIN
1
VOUT
5
GND
2
NR/ADJ UST
4
ENABLE
3
U1
TPS76350DBV
BT1
9V
C8
10uF
D1
C11
0.01uF
C19
10uF
C20
10uF
TP3
+5V
TP4
+3.3VD
+3.3VD
+5V
+5VA
C9
1uF
DVDD
1
DGND
2
CLKIN
3
TEMP
4
C1
5
C2
6
AIN P
7
AIN N
8
REFN
9
REFP
10
AGND
11
AVDD
12
SPEED
13
PDWN14SCLK
15
DRDY/DOUT
16
U6
ADS1230IPW
J5
OST_ED555/2DS
FB/SENSE
1
RESET
2
EN
3
GND
4
IN
5
IN
6
OUT7O
U
T
8
U2
TPS77
133
DGK
RST
R30
47K
Schematics
A.3 Schematics
Figure A-3. ADS1230REF Schematic—ADC
SBAU125A – August 2007 – Revised September 2007 Schematic and Layout 27
Submit Documentation Feedback
Page 28

www.ti.com
DVCC1
1
P6.3/A3
2
P6.4/A4
3
P6.5/A5
4
P6.6/A6
5
P6.7/A7/ SVSIN
6
VREF+
7
XIN
8
XOUT
9
VeREF+
10
VREF-/ VeREF-
11
P1.0/TA0
87
P1.1/TA0/M CLK
86
P1.2/TA1
85
P1.3/TBOU
TH/SVSOU
T
84
P1.4/TBCLK/SMCLK83P1.5/TACLK/ACLK
82
P1.6/CA0
81
P1.7/CA1
80
P2.0/TA2
79
P2.1/TB0
78
P2.2/TB1
77
P2.3/TB2
76
P2.4/UTXD0
75
P2.5/URXD0
74
P2.6/CAOUT
73
P2.7/ADC12CLK
72
P3.0/STE0
71
P3.1/SIM O0
70
P3.2/SOM I0
69
P3.3/UCLK0
68
P3.4/TB3
67
P3.5/TB4
66
P3.6/TB5
65
P3.7/TB6
64
P4.0/UTXD1
63
P4.1/URXD1
62
P4.2/STE1/S39
51
P4.3/SIM O1/S38
50
P4.4/SOMI1/ S37
49
P4.5/UCLK1/S36
48
P4.6/S35
47
P4.7/S34
46
P5.0/S1
13
P5.1/S0
12
P5.2/COM1
53
P5.3/COM2
54
P5.4/COM3
55
P5.5/R13
57
P5.6/R23
58
P5.7/R33
59
XT2O
U
T
88
XT2IN89TDO/TDI90TDI/TCLK
91
TMS
92
TCK93RST/NM I94P6.0/A0
95
P6.1/A1
96
P6.2/A2
97
AVSS
98
DVSS1
99
AVCC
100
S2
14
S3
15
S4
16
S5
17
S6
18
S7
19
S8
20
S9
21
S10
22
S11
23
S12
24
S13
25
S14
26
S15
27
S1628S1729S1830S19
31
S20
32
S21
33
S2234S2335S2436S2537S2638S2739S2840S2941S30
42
S31
43
S3244S33
45
COM0
52
R03
56
DVCC2
60
DVSS2
61
U5
MSP430F449IPZ
R19
221K
R20
2
21
K
R21
2
21
K
C13
0.01uF
C14
0.01uF
C15
0.01uF
+3.3VD
R22
200K
SW2
RA
NG
E
SW3
TARE
SW4
CAL
SW5
CONFIG
+3.3VD
R7
10K
R8
10K
R9
10K
R10
10K
R12 100
R13
100
C25
2.2uF
+3.3VD
246
135
7
8
9
10
111213
14
J3
HEADER-7X2
+3.3VD
SW6
RESET
+3.3VD
36
35
34
33
32
31
30
29
28
27
26
25
24
23
22
21
20
1918
17
16
15
14
13
12
11
10
9
8
7
6
5
4
3
2
1
LCD1
LCD_DISPLAY
TDO/TDI
TDI/CLK
TMS
TCK
RST
BSLRX
BSLTX
MCURX
MCUTX
TEMP
DOUT
SCLK
SPEED
PDWN /RST
COM(3)
COM(2)
COM(1)
COM(0)
S(39)
COM(3)
COM(2) COM (1)
COM(0)
S(38)
S(37)
S(36)
S(35)
S(34)
S(33)
S(32)
S(31)
S(30)
S(29)
S(28)
S(27)
S(26)
S(25)
S(24)
S(23)
S(22)
S(21)
S(20)
S(19)
S(18)
S(17)
S(16)
S(15)
S(14)
S(36)
S(35)
S(34)
S(33)
S(32)
S(31)
S(30)
S(29)
S(28)
S(27)
S(26)
S(25)
S(24)
S(23)
S(22)
S(21)
S(20)
S(19)
S(18)
S(17)
S(16)
S(15)
S(14)
S(5)
S(6)
S(7)
S(8)
S(9)
S(10)
S(11)
S(12)
S(13)
S(5)
S(6)
S(7)
S(8)
S(9)
S(10)
S(11)
S(12)
S(13)
C5
0.01uF
C23
2.2uF
C24
2.2
u
F
SW8
NKK_SS12SDP2
R16
10K
+3.3VD
EXC
R18
47K
DOUT
TP18
MCURX
TP8
MCUTX
SIM O0
TP7
DNP
RST
TCK
X2
EPS_C-002
RX32.7680
K-A:PBFREE
TP20
P1.4/SMCLK
Schematics
Figure A-4. ADS1230REF Schematic—MCU
28 Schematic and Layout SBAU125A – August 2007 – Revised September 2007
Submit Documentation Feedback
Page 29

www.ti.com
VCC
1
D-
2
D+
3
GND
4
J1
USB SLAVECONN
CTS
13
DCD
15
DSR14DTR
21
RTS
20
SIN/IR_SIN
17
SOUT/IR_SOUT
19
SDA
10
SCL
11
X2
26
X1/CLKI
27
CLKOUT
22
PUR
5
DP6DM
7
RESET
9
GND
8
G
N
D
18
GND
28
SUSPEND
2
VREGEN
1
RI/CP
16
WAK EUP
12
TEST124TEST0
23
P3.0
32
P3.1
31
P3.3
30
P3.4
29
VCC
25
VCC
3
VDD
4
U4
TUSB3410VF
R2
33
R3
33
R1
1.5K
C16
22pF
C17
22pF
X1
12MHz
C1
22pF
C2
22pF
C22
1uF
USB3.3V
USB3.3V
USB5V
R6
10K
C18
10uF
D2
GREEN
R11
220
L1
FERRITEB EAD
TP1
USB_CLK
R4
10K
R5
10K
C37
MUR_NFM 21PC105F1C3D
SW1
USB RESET
TP2
3.3V_USB
RX
TX
RTS
DTR
C3
4.7uF
R17
20
FB/SENSE
1
RESET
2
EN
3
GND4IN
5
IN
6
OUT
7
OUT
8
U3
TPS77133DGK
2
4
53
U10
SN74LVC1G04DBV
2
4
53
U11
SN74LVC1G04DBV
USB3.3V
USB3.3V
USB3.3V
USB3.3V
USB3.3V
+3.3VD
+3.3VD
MCURX
MCUTX
TP16
RX
TP17
TX
VCC11IN
2
VCC1
3
GND1
4
GND2
5
OUT
6
GND2
7
VCC2
8
U8
ISO721D
VCC1
1
IN
2
VCC1
3
GND1
4
GND25OUT
6
GND27VCC2
8
U9
ISO721D
C10
1uF
PROGRAMM ING M ODE
RST
TCK
+5V
USB5V
+5VA
C12
0.1uF
C21
0.1uF
C33
0.1uF
C34
0.1uF
C35
0.1uF
C36
0.1uF
SW9
ESW_EG4208
Schematics
Figure A-5. ADS1230REF Schematic—USB
SBAU125A – August 2007 – Revised September 2007 Schematic and Layout 29
Submit Documentation Feedback
Page 30

EVALUATION BOARD/KIT IMPORTANT NOTICE
Texas Instruments (TI) provides the enclosed product(s) under the following conditions:
This evaluation board/kit is intended for use for ENGINEERING DEVELOPMENT, DEMONSTRATION, OR EVALUATION PURPOSES
ONLY and is not considered by TI to be a finished end-product fit for general consumer use. Persons handling the product(s) must have
electronics training and observe good engineering practice standards. As such, the goods being provided are not intended to be complete
in terms of required design-, marketing-, and/or manufacturing-related protective considerations, including product safety and environmental
measures typically found in end products that incorporate such semiconductor components or circuit boards. This evaluation board/kit does
not fall within the scope of the European Union directives regarding electromagnetic compatibility, restricted substances (RoHS), recycling
(WEEE), FCC, CE or UL, and therefore may not meet the technical requirements of these directives or other related directives.
Should this evaluation board/kit not meet the specifications indicated in the User’s Guide, the board/kit may be returned within 30 days from
the date of delivery for a full refund. THE FOREGOING WARRANTY IS THE EXCLUSIVE WARRANTY MADE BY SELLER TO BUYER
AND IS IN LIEU OF ALL OTHER WARRANTIES, EXPRESSED, IMPLIED, OR STATUTORY, INCLUDING ANY WARRANTY OF
MERCHANTABILITY OR FITNESS FOR ANY PARTICULAR PURPOSE.
The user assumes all responsibility and liability for proper and safe handling of the goods. Further, the user indemnifies TI from all claims
arising from the handling or use of the goods. Due to the open construction of the product, it is the user’s responsibility to take any and all
appropriate precautions with regard to electrostatic discharge.
EXCEPT TO THE EXTENT OF THE INDEMNITY SET FORTH ABOVE, NEITHER PARTY SHALL BE LIABLE TO THE OTHER FOR ANY
INDIRECT, SPECIAL, INCIDENTAL, OR CONSEQUENTIAL DAMAGES.
TI currently deals with a variety of customers for products, and therefore our arrangement with the user is not exclusive.
TI assumes no liability for applications assistance, customer product design, software performance, or infringement of patents or
services described herein.
Please read the User’s Guide and, specifically, the Warnings and Restrictions notice in the User’s Guide prior to handling the product. This
notice contains important safety information about temperatures and voltages. For additional information on TI’s environmental and/or
safety programs, please contact the TI application engineer or visit www.ti.com/esh .
No license is granted under any patent right or other intellectual property right of TI covering or relating to any machine, process, or
combination in which such TI products or services might be or are used.
FCC Warning
This evaluation board/kit is intended for use for ENGINEERING DEVELOPMENT, DEMONSTRATION, OR EVALUATION PURPOSES
ONLY and is not considered by TI to be a finished end-product fit for general consumer use. It generates, uses, and can radiate radio
frequency energy and has not been tested for compliance with the limits of computing devices pursuant to part 15 of FCC rules, which are
designed to provide reasonable protection against radio frequency interference. Operation of this equipment in other environments may
cause interference with radio communications, in which case the user at his own expense will be required to take whatever measures may
be required to correct this interference.
EVM WARNINGS AND RESTRICTIONS
It is important to operate this EVM within the input voltage range of 0V to 9V and the output voltage range of 0V to 5V.
Exceeding the specified input range may cause unexpected operation and/or irreversible damage to the EVM. If there are questions
concerning the input range, please contact a TI field representative prior to connecting the input power.
Applying loads outside of the specified output range may result in unintended operation and/or possible permanent damage to the EVM.
Please consult the EVM User's Guide prior to connecting any load to the EVM output. If there is uncertainty as to the load specification,
please contact a TI field representative.
During normal operation, some circuit components may have case temperatures greater than +30 ° C. The EVM is designed to operate
properly with certain components above +50 ° C as long as the input and output ranges are maintained. These components include but are
not limited to linear regulators, switching transistors, pass transistors, and current sense resistors. These types of devices can be identified
using the EVM schematic located in the EVM User's Guide. When placing measurement probes near these devices during operation,
please be aware that these devices may be very warm to the touch.
Mailing Address: Texas Instruments, Post Office Box 655303, Dallas, Texas 75265
Copyright © 2007, Texas Instruments Incorporated
Page 31

IMPORTANT NOTICE
Texas Instruments Incorporated and its subsidiaries (TI) reserve the right to make corrections, modifications, enhancements,
improvements, and other changes to its products and services at any time and to discontinue any product or service without notice.
Customers should obtain the latest relevant information before placing orders and should verify that such information is current and
complete. All products are sold subject to TI’s terms and conditions of sale supplied at the time of order acknowledgment.
TI warrants performance of its hardware products to the specifications applicable at the time of sale in accordance with TI’s
standard warranty. Testing and other quality control techniques are used to the extent TI deems necessary to support this
warranty. Except where mandated by government requirements, testing of all parameters of each product is not necessarily
performed.
TI assumes no liability for applications assistance or customer product design. Customers are responsible for their products and
applications using TI components. To minimize the risks associated with customer products and applications, customers should
provide adequate design and operating safeguards.
TI does not warrant or represent that any license, either express or implied, is granted under any TI patent right, copyright, mask
work right, or other TI intellectual property right relating to any combination, machine, or process in which TI products or services
are used. Information published by TI regarding third-party products or services does not constitute a license from TI to use such
products or services or a warranty or endorsement thereof. Use of such information may require a license from a third party under
the patents or other intellectual property of the third party, or a license from TI under the patents or other intellectual property of TI.
Reproduction of TI information in TI data books or data sheets is permissible only if reproduction is without alteration and is
accompanied by all associated warranties, conditions, limitations, and notices. Reproduction of this information with alteration is an
unfair and deceptive business practice. TI is not responsible or liable for such altered documentation. Information of third parties
may be subject to additional restrictions.
Resale of TI products or services with statements different from or beyond the parameters stated by TI for that product or service
voids all express and any implied warranties for the associated TI product or service and is an unfair and deceptive business
practice. TI is not responsible or liable for any such statements.
TI products are not authorized for use in safety-critical applications (such as life support) where a failure of the TI product would
reasonably be expected to cause severe personal injury or death, unless officers of the parties have executed an agreement
specifically governing such use. Buyers represent that they have all necessary expertise in the safety and regulatory ramifications
of their applications, and acknowledge and agree that they are solely responsible for all legal, regulatory and safety-related
requirements concerning their products and any use of TI products in such safety-critical applications, notwithstanding any
applications-related information or support that may be provided by TI. Further, Buyers must fully indemnify TI and its
representatives against any damages arising out of the use of TI products in such safety-critical applications.
TI products are neither designed nor intended for use in military/aerospace applications or environments unless the TI products are
specifically designated by TI as military-grade or "enhanced plastic." Only products designated by TI as military-grade meet military
specifications. Buyers acknowledge and agree that any such use of TI products which TI has not designated as military-grade is
solely at the Buyer's risk, and that they are solely responsible for compliance with all legal and regulatory requirements in
connection with such use.
TI products are neither designed nor intended for use in automotive applications or environments unless the specific TI products
are designated by TI as compliant with ISO/TS 16949 requirements. Buyers acknowledge and agree that, if they use any
non-designated products in automotive applications, TI will not be responsible for any failure to meet such requirements.
Following are URLs where you can obtain information on other Texas Instruments products and application solutions:
Products Applications
Amplifiers amplifier.ti.com Audio www.ti.com/audio
Data Converters dataconverter.ti.com Automotive www.ti.com/automotive
DSP dsp.ti.com Broadband www.ti.com/broadband
Interface interface.ti.com Digital Control www.ti.com/digitalcontrol
Logic logic.ti.com Military www.ti.com/military
Power Mgmt power.ti.com Optical Networking www.ti.com/opticalnetwork
Microcontrollers microcontroller.ti.com Security www.ti.com/security
RFID www.ti-rfid.com Telephony www.ti.com/telephony
Low Power www.ti.com/lpw Video & Imaging www.ti.com/video
Wireless
Mailing Address: Texas Instruments, Post Office Box 655303, Dallas, Texas 75265
Wireless www.ti.com/wireless
Copyright © 2007, Texas Instruments Incorporated
Page 32

Mouser Electronics
Authorized Distributor
Click to View Pricing, Inventory, Delivery & Lifecycle Information:
Texas Instruments:
ADS1230REF
 Loading...