

Page 1

Extensa™ 900 Series
Notebook Computers
User’s Guide
9813630-0001
Page 2

Copyright © 1996 Texas Instruments
All Rights Reserved — Printed in Taiwan
Extensa™ 900 Series Notebook Computer User’s Guide
TI Part No. 9813630-0001
Original Issue: September 1996
First Revision: November 1996
Changes may be made periodically to the information
in this publication. Such changes will be incorporated
in new editions of this manual.
Record the serial number, purchase date, and model
number in the space provided below. The serial
number and model number are recorded on the label
affixed to the case. All correspondence concerning
your unit should include the serial number, model
number, and date of purchase.
No part of this publication may be reproduced, stored
in a retrieval system, or transmitted, in any form or by
any means, electronic, mechanical, photocopy,
recording, or otherwise, without the prior written
permission of Texas Instruments.
Extensa Notebook Computer
Model_______Serial No.____________Purchase Date________
Page 3

Contents
Extensa and livegear are trademarks of Texas Instruments. The
icons in the Windows Notebook and Startup groups are
copyrighted by Texas Instruments.
AT and PS/2 are registered trademarks and OS/2 is a trademark
of International Business Machines Corporation.
Microsoft, MS-DOS, Windows and Xenix are registered trademarks
of Microsoft Corporation.
Kensington is a registered trademark of Kensington Microware,
Inc.
Synaptics is registered trademark of Synaptics, Inc.
SimulSCAN is a trademark of Cirrus Logic, Inc.
IrDA is a trademark of Infra Red Data Association.
Phillips is a registered trademark of H.A. Phillips & Co.
3
Page 4

This device has been tested and found to comply with the limits
for a Class B digital device pursuant to Part 15 of the FCC Rules.
These limits are designed to provide reasonable protection
against harmful interference in a residential installation. This
device generates, uses, and can radiate radio frequency energy
and, if not installed and used in accordance with the
instructions, may cause harmful interference to radio
communications.
However, there is no guarantee that interference will not occur in
a particular installation. If this device does cause harmful
interference to radio or television reception, which can be
determined by turning the device off and on, the user is
encouraged to try to correct the interference by one or more of the
following measures:
n Reorient or relocate the receiving antenna
n Increase the separation between the device and receiver
n Connect the device into an outlet on a circuit different from
that to which the receiver is connected
n Consult the dealer or an experienced radio/television
technician for help
Notice: Shield Cables
All connections to other computing devices must be made using
shielded cables to maintain compliance with FCC regulations.
Notice: Peripheral Devices
Only peripherals (input/output devices, terminals, printers, etc.)
certified to comply with the Class B limits may be attached to this
equipment. Operation with non-certified peripherals is likely to
result in interference to radio and TV reception.
Caution
Changes or modifications not expressly approved by the
manufacturer could void the user’s authority, which is granted by
the Federal Communications Commission, to operate this
computer.
Page 5

FCC Notice
Use Conditions
This part complies with Part 15 of the FCC Rules. Operation is
subject to the following two conditions: (1) this device may not
cause harmful interference, and (2) this device must accept any
interference received, including interference that may cause
undesired operation.
Notice: Canadian Users
This Class B digital apparatus meets all requirements of the
Canadian Interference-Causing Equipment Regulations.
Remarque à l’intention des utilisateurs canadiens
Cet appareil numérique de la classe B respected toutes les
exigences du Règlement sur le matériel brouilleur du Canada.
Page 6

Contents
Preface
Chapter 1 Before You Begin
Creating Backup Disks.................................1-2
Features of the Computer .............................1-3
Environmental Specifications........................1-5
Using the Computer .....................................1-7
Power Saving Modes .....................................1-9
Securing the Computer...............................1-14
Using the AC Adapter .................................1-15
Chapter 2 Using Your Computer
Starting the Computer..................................2-3
Running the “About Your Extensa” Demo
Program ...................................................2-4
Using the Brightness and Contrast
Controls ...................................................2-6
Turning the Speakers On and Off..................2-7
Using the Microphone...................................2-8
Using PC Cards............................................2-9
Using Indicator Lights.................................2-12
Using the Touchpad....................................2-14
Using Disk Drives .......................................2-16
Adding Memory ..........................................2-22
Using the Keyboard ....................................2-25
Using the Internal Numeric Keypad.............2-29
Using Connectors and Ports........................2-31
Chapter 3 Using Battery Power
Guidelines for Battery Use............................3-2
Switching to Battery Power ...........................3-3
Responding to Low Battery Conditions ..........3-4
Recharging the Battery .................................3-6
vi
Page 7

Calibrating the Battery .................................3-7
Removing and Installing the Battery Pack ......3-9
Conserving Battery Power...........................3-12
Chapter 4 Options
AC Adapter ...................................................4-2
PC Cards......................................................4-3
PS/2 Devices................................................4-4
External Monitor ..........................................4-5
External Mouse ............................................4-6
Memory........................................................4-7
Audio Options ..............................................4-8
Mobile Productivity Base Option....................4-9
Miscellaneous Options................................4-10
Chapter 5 Using Software
Using Supplied Software...............................5-2
Getting Online Help......................................5-3
Guidelines for Installing Applications............5-4
Using System Passwords ..............................5-6
Contents
Chapter 6 Mobility
Overview of Mobility .....................................6-1
Disconnecting from the Desktop ...................6-3
Moving Around.............................................6-4
Taking the Computer Home ..........................6-5
Traveling with the Computer.........................6-7
Traveling Internationally with the Computer..6-9
Chapter 7 Care and Troubleshooting
Cleaning the Computer.................................7-2
Troubleshooting Tips ....................................7-3
Startup Error Messages................................7-4
Appendix A Where to Get Help
vii
Page 8

Preface
This manual describes features of the Texas
Instruments Extensa™ 900 Series notebook
computers. The Extensa series computers share
similar appearance and incorporate such
features as: CardBus with Zoomed Video
support, 16-bit stereo audio, Fast Infrared and
internal pointing device in an ultra-slim form
factor and light weight package.
This manual should answer most of the
questions you have about the day-to-day
operation of your Extensa notebook computer.
Use the Just for Starters… instructions that
came with your computer to get your computer
running for the first time.
viii
You should also take advantage of the online
help files that are available with almost all of the
programs shipped with your computer.
Enjoy your Extensa computer. With proper care,
your computer will provide you with years of
productive service.
Page 9

1
Before You Begin
After completing the instructions in Just for
Starters…, read this chapter to learn about the
important functions of your computer. Some
functions, such as Creating Backup Disks,
should be performed as soon as possible after
the purchase of your computer.
Contents
Creating Backup Disks................................ 1-2
Features of the Computer ............................ 1-3
Standard Features................................ 1-3
Customizing Features........................... 1-4
Environmental Specifications....................... 1-5
Using the Computer..................................... 1-7
Power Saving Modes .................................... 1-9
Power Savings Options ......................... 1-9
0V Suspend Mode............................... 1-11
5V Suspend Mode............................... 1-12
Standby Mode .................................... 1-13
Securing the Computer.............................. 1-14
Using the AC Adapter ................................ 1-15
1-1
Page 10

Creating Backup Disks
You should create your backup system disks as
soon as possible after purchasing your
computer. The process you follow depends on
the operating system you selected when you
setup the computer for the first time.
Windows® 95
Backing up Windows 95 requires several boxes
of formatted 3½-inch, 1.44 MB floppy disks.
Labels for the floppy disks are included with the
manual.
To create backup system disks, use the Create
System Disk tool from Windows 95.
Windows for Workgroups
1-2
Backing up MS-DOS® and Windows for
Workgroups requires several boxes of 3½-inch,
1.44 MB floppy disks.
To create backup system disks, use the Make
Disk utility, located in the Main program group.
Page 11

Features of the Computer
Standard Features
The following list displays the standard features
of your Extensa computer:
q PCI Bus architecture
q 16 MB EDO (Extended Data Out) memory
q 256 KB Level-2 cache memory
q 2 MB EDO video memory
q Fast video graphics accelerator
q 0-Volt Suspend, 5-Volt Suspend and
Standby power saving modes
q No-reboot setup function
q STN or TFT color display
q 16-bit stereo audio
q Fast infrared communication
q Li-Ion (Lithium-Ion) battery pack
q 1.35 GB (or higher) capacity hard disk drive
with Local Bus
q Embedded touchpad pointing device
q Small, lightweight AC adapter
1-3
Page 12

Features of the Computer
Customizing Features
The following features allow you to customize
your computer to fit your requirements.
q PS/2 port for connecting an external
keyboard, numeric keypad, or mouse
q 9-pin serial port for connecting external
devices such as a modem or mouse
q Simultaneous display with external CRT
q One Type III or two Type II or Type I
Cardbus PC Card slots; lower slot accepts
Zoomed Video port enabled PC Cards
q Parallel port with EPP and ECP for
connecting to a printer or the floppy disk
drive module
1-4
q 8 MB, 16 MB and 32 MB EDO 64-bit type
small outline dual inline memory module
(soDIMM) upgrades
q Docking module option for further
expansion
Page 13

Environmental Specifications
This section provides information on the
optimum operating environment for your
Extensa notebook computer.
Temperature
Operating: 50° to 95°F
(10° to 35°C)
Storage: -4° to 140°F
(-20° to +60°C)
Relative Humidity (Noncondensing)
Operating: 20% to 85%
Storage: 20% to 85%
Shock
Operating: Maximum 5g pulse in X,
Y, and Z orientations
Storage: Maximum 50g pulse in X,
Y, and Z orientations
Vibration
Operating: Sinusoidal 5 to 25.6 Hz
limited to 0.015 inch
peak-to-peak maximum
displacement
0.5g, 25.6 to 250 Hz
Storage: Sinusoidal 5 to 27.1 Hz
limited to 0.016 inch
peak-to-peak maximum
displacement
2.0g, 27.1 to 500 Hz
1-5
Page 14

Environmental Specifications
Note: Your computer is equipped with a fan to
keep the computer cool under extreme high
temperature conditions. The fan will not normally
operate, but may turn on when the computer’s
internal components become warm. You will hear
the fan when it turns on. This is nothing to be
concerned about.
1-6
Page 15

Using the Computer
q Never pick up or carry the computer by the
display.
q Never use the computer in harsh
environments where it could be subjected to
rapid temperature changes or excessive
dust.
q Never expose the computer to excessive
vibration.
q Never expose the hard disk drive or floppy
disk(s) to strong magnetic fields, such as
those generated by audio system speakers,
telephone handsets, or hand-held metal
detectors.
q To avoid overheating the computer, never
place anything on top of the computer when
it is operating or recharging the battery.
q Before moving an active computer, close the
display, and wait for the system to go into
5V Suspend mode.
q Do not try to force the display beyond its
fully opened position — about 180 degrees.
1-7
Page 16

Using the Computer
Caution: In the rare event that you see or
smell anything that indicates overheating
(smoke or a strange smell):
1. Turn off the power.
!
2. Disconnect the AC adapter from the power
source and the computer.
3. Remove the battery pack.
4. Contact your Texas Instruments dealer or
service center.
1-8
Page 17

Power Saving Modes
Power Savings Options
Your Extensa system offers several options for
you to extend your battery life while you are not
actively using your computer. These options
turn off different sections of the computer that
are not currently being used.
These options are listed in the POWER
MANAGEMENT page of the System Setup screen
(accessed via Fn+F1 anytime or F2 during boot
up). They are described below:
Power
Management
Standby
Timeout
5V Suspend
Timeout
This option sets when you want the
time outs to take effect.
ALWAYS: Enables the time out
settings regardless of whether the
computer is on AC or battery power.
BATTERY ONLY: Only enables the
time outs when the computer is
running off the battery power.
DISABLE: Disables all power time out
settings.
The length of time the computer
needs to be idle before the computer
enters Standby mode.
The length of time the computer
needs to be idle before the computer
enters 5V Suspend.
1-9
Page 18

Power Saving Modes
0V Suspend
Timeout
Hard Disk
Timeout
Display
Timeout
The length of time the computer
needs to be idle before the computer
enters 0V Suspend.
The length of time the computer
needs to be idle before the hard disk
drive’s motor is turned off.
The length of time the computer
needs to be idle before the display
back light is turned off.
The computer will not enter any of the power
management time-out modes if the hard disk
drive, floppy disk drive (or CD-ROM drive in the
optional MPB docking module) is active.
Note: If the “Auto Insert Notification” option is
enabled in the CD ROM setting, the computer will
not time out on any of the power management
time-outs because Windows 95 will constantly be
looking for a new CD to be inserted. This option
is set to a default of DISABLED by Texas
Instruments.
1-10
0V Suspend Mode
0V Suspend mode saves the exact spot you are
at on your computer, then shuts off all power
without losing any data.
Page 19

Power Saving Modes
In 0V Suspend mode, the computer saves the
current computer state onto your hard disk
drive then shuts off. When you turn the
computer on again, it restores the computer to
the saved state within about a minute.
Press the 0V Suspend hot key (Fn+F2) to enter
0V Suspend mode. To resume normal operation,
press the power switch. 0V Suspend mode
occurs automatically if the 0 VOLT SUSPEND
TIMEOUT parameter in Setup is enabled and
times out or if the BATTERY LOW SUSPEND option is
enabled and your battery runs down to a
critically low level.
Note: Your computer will not enter 0V Suspend
mode if the 0V Suspend file is missing or is the
incorrect size. Refer to Chapter 2, the Adding
Memory section for further information.
5V Suspend Mode
5V Suspend mode consumes very little power
when you are not using your computer, yet still
resumes quickly. With a fully charged battery,
your computer can remain in 5V Suspend mode
for days.
Caution: If your computer loses power while
!
in 5V Suspend, you will lose all of your
unsaved data.
1-11
Page 20

Power Saving Modes
In 5V Suspend mode, the computer saves the
current computer state onto your system
memory then shuts off power to most of the
devices except the system memory. The standby
indicator flashes to indicate the computer is in
5V Suspend mode. When the computer resumes
from 5V Suspend mode, it restores the computer
to the saved state.
Press the 5V Suspend hot key (Fn+F3) or close
the display cover to enter 5V Suspend mode.
The computer also enters 5V Suspend mode if
the 5V SUSPEND TIMEOUT parameter in Setup is
enabled and times out.
To resume normal operation, press any key on
the internal keyboard or press the power switch.
The computer also resumes from 5V Suspend if
the RESUME ON MODEM RING or RESUME ON ALARM
options are enabled in the System Setup and a
modem ring or alarm occurs.
1-12
Note: It takes the computer a few seconds to
resume from a 5V Suspend. You may see the
screen blank a few times while the computer
restores all of the system states.
Standby Mode
Standby mode saves some computer power by
turning off a few of the unused devices and still
allows you to resume your work instantly. The
standby indicator lights up in Standby mode.
Page 21

Power Saving Modes
Press the Standby hot key (Fn+F4) to enter
Standby mode. The computer also enters
Standby mode if the STANDBY TIMEOUT parameter
in Setup is enabled and times out.
To resume from Standby mode, press any key or
touch the touchpad. The computer also
resumes from Standby if the RESUME ON MODEM
RING or RESUME ON ALARM options are enabled in
the System Setup and a modem ring or alarm
occurs.
Note: The computer acts on the key you press.
To prevent unintended results, press a nonprinting character such as Shift, Ctrl or Alt.
Refer to Chapter 3, Responding to Low Battery
Conditions, for more ideas on how to conserve
power.
1-13
Page 22
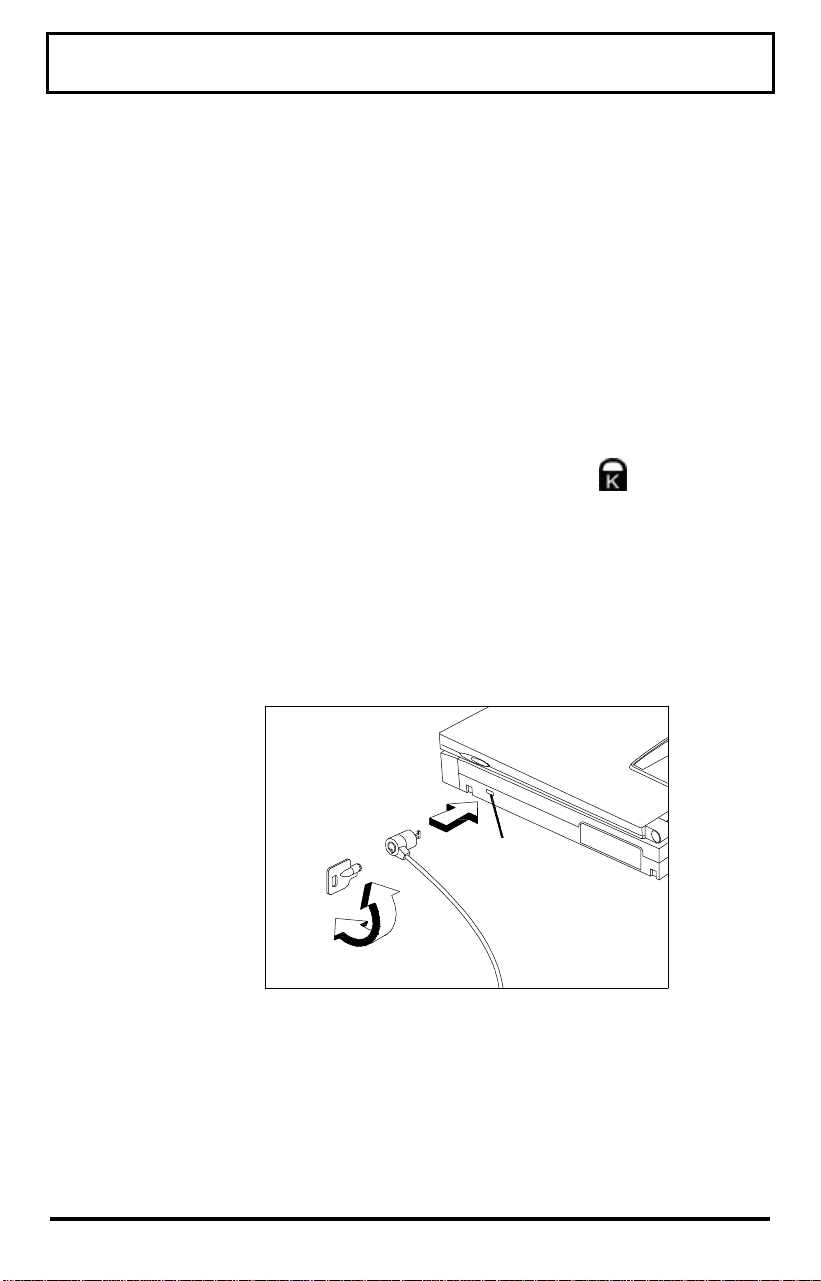
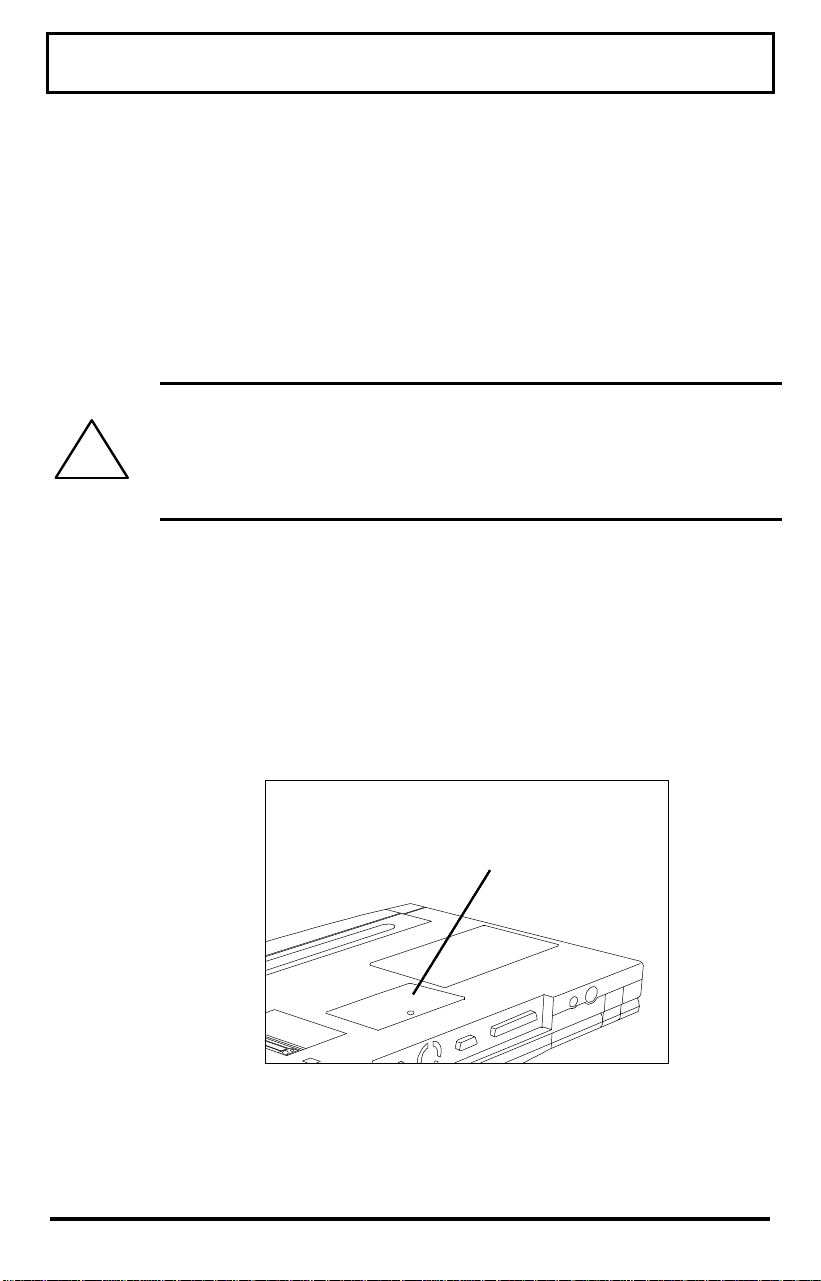
Securing the Computer
Your computer comes with a Kensington® lock
notch. If your computer store does not carry
Kensington locks, you can buy one directly from
Texas Instruments. To secure your computer,
follow these steps:
1. Wrap the cable of a portable computer
Kensington security lock (optional) around a
table, desk drawer handle, or any immovable
object.
2. Locate the Kensington lock icon at the
right front side of the computer and insert the
lock into the notch.
3. Turn the key to secure the lock.
4. Remove the key from the lock.
1-14
Notch
Securing the Computer
Page 23

Using the AC Adapter
DC Connector
AC Adapter
Male
Plug
Female
Connector
AC Adapter
AC
Adapter
Charges the internal battery pack and
operates the computer on AC power
whether or not a battery pack is installed.
The AC adapter can be operated anywhere
where the outlet supplies between 100240 volts AC at 50 - 60 Hz. The AC
adapter has a detachable AC power cord.
Caution: Use only the AC adapter supplied
with your computer. Another adapter can
!
damage your computer and create a safety
hazard.
1-15
Page 24

2
Using Your Computer
Before beginning this chapter, ensure you have
read and understood Chapter 1. Chapter 2
describes how to start and use your Extensa
notebook computer.
Contents
Starting the Computer................................. 2-3
Running the “About Your Extensa” Demo
Program .................................................. 2-4
Contents of the Demo Program.............. 2-4
Running the Demo Program.................. 2-4
Deleting the Demo Program .................. 2-5
Using the Brightness and Contrast
Controls .................................................. 2-6
Turning the Speakers On and Off................. 2-7
Using the Microphone.................................. 2-8
Using PC Cards ........................................... 2-9
Inserting PC Cards................................ 2-9
Ejecting PC Cards............................... 2-10
Using Indicator Lights................................ 2-12
Using the Touchpad ................................... 2-14
Moving the Cursor.............................. 2-14
Configuring the Touchpad................... 2-15
Using Disk Drives...................................... 2-16
Hard Disk Drive Guidelines................. 2-16
2-1
Page 25

Removing Your Hard Disk Drive.......... 2-17
Inserting Your Hard Disk Drive........... 2-19
Using the External Floppy Disk Drive.. 2-19
Floppy Disk Drive Guidelines.............. 2-20
Adding Memory ......................................... 2-22
Running PHDISK................................ 2-23
Using the Keyboard ................................... 2-25
Special Keys....................................... 2-25
Windows 95 Keys................................ 2-28
Using the Internal Numeric Keypad............ 2-29
Num Lock On..................................... 2-30
Num Lock Off..................................... 2-30
Using Connectors and Ports....................... 2-31
2-2
Page 26
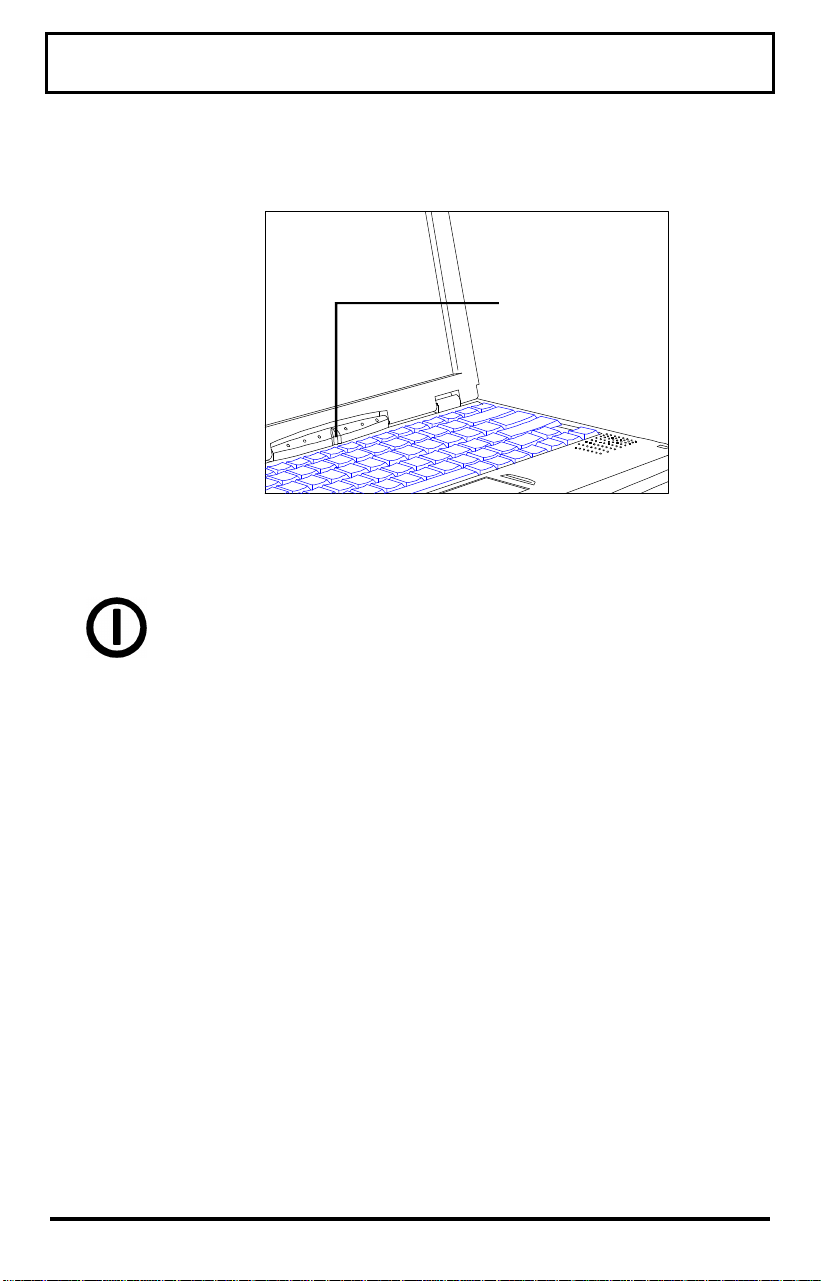
Starting the Computer
Power
Switch
Power Switch
Power
Switch
Turns the computer on and off for both
AC and battery operation; also resumes
from 0V Suspend and 5V Suspend
modes.
The power switch is software controlled
to allow for a proper shutdown of the
Windows 95 operating system. If the
operating system locks up and cannot
shutdown, press and hold the power
switch for 1-2 seconds to force the
computer to turn off.
2-3
Page 27

Running the “About Your
Extensa” Demo Program
Contents of the Demo Program
Your computer is loaded with an entertaining
and informative demo program which includes
the following information:
q The features of your computer and how to
use them
q The livegear accessories available for your
computer
q The software loaded on your computer
q How to get service and technical support
q More about Texas Instruments
2-4
Running the Demo Program
To run the demo program, do one of the
following:
In Windows 95
1. Double-click on the About Your Extensa icon
on the desktop.
2. Follow the directions to use the program.
In Windows for Workgroups
1. From the Program Manager double-click on
the Texas Instruments Multimedia group.
Page 28

Running the “About Your
Extensa” Demo Program
2. Double-click on the About Your Extensa
icon.
3. Follow the directions to use the program.
Deleting the Demo Program
An uninstall program helps you delete all or part
of the demo program to free up space on your
hard disk drive.
In Windows 95
1. Double-click on the Uninstall Demo icon on
the desktop.
2. When the Uninstall window appears, you can
choose a complete or partial uninstall. If you
want to keep some parts of the demo, you can
deselect those parts, then click on Ok. To
uninstall the entire demo, click on the large
uninstall button, then click on Ok.
In Windows for Workgroups
1. From the Program Manager double-click on
the Texas Instruments Multimedia group.
2. Double-click on the Uninstall Demo icon.
3. When the Uninstall window appears, you can
choose a complete or partial uninstall. If you
want to keep some parts of the demo, you can
deselect those parts, then click on Ok. To
uninstall the entire demo, click on the large
uninstall button, then click on Ok.
2-5
Page 29

Using the Brightness and
Contrast Controls
You can adjust the screen brightness and
contrast levels using hot keys.
Note: The hot keys for brightness and contrast
are continuous keys. They will adjust as long as
you hold them down.
Brightness
Control
Contrast
Control
Press Fn+↑↑ and Fn+↓↓ to increase and
decrease the brightness of the display
respectively.
The brighter the screen, the more
power is used during battery operation.
Press Fn+→→ and Fn+←← to increase and
decrease the contrast of the display
respectively.
The higher the contrast setting, the
more power is used during battery
operation.
2-6
Page 30

Turning the Speakers On and Off
Left
Your computer comes with 16-bit stereo audio.
Two built-in speakers are located on the
palmrest.
Right
Speaker
Speaker
Built-in Speakers
You can turn the built-in speakers on and off
using a hot key.
Speaker
On/Off
Press Fn+PgUp (or Ctrl+Alt+S on an
external keyboard) to toggle the
speaker output on and off.
You can also enable or disable the speaker from
your Setup screen. The setting in Setup
determines whether the speakers are enabled
when you reboot or turn on your computer.
Pressing Fn+PgUp (or Ctrl+Alt+S on an external
keyboard) overrides the setting.
2-7
Page 31

Using the Microphone
Your computer has a built-in microphone
located in the LED display area to the upper
right of the power switch.
Microphone
Built-in Microphone
To use the microphone, face your computer from
a normal distance and speak in a normal voice.
You do not need to bend down to speak directly
into the microphone.
2-8
Page 32
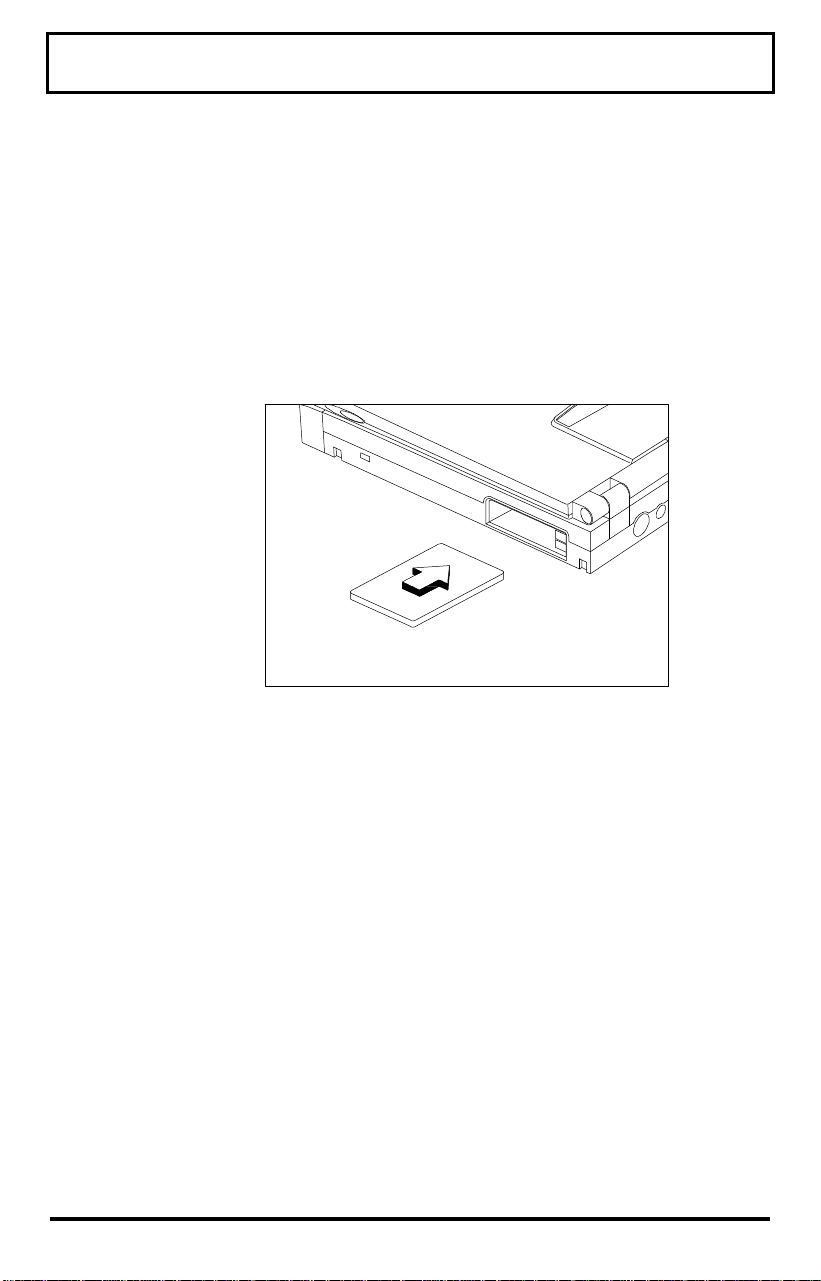
Using PC Cards
Inserting PC Cards
You can insert up to two Type I or Type II PC
cards, or one Type III PC card, into the slots on
the side of the computer. You can install PC
cards while the computer is running.
Inserting a PC Card
In Windows 95
Windows 95 beeps to indicate it has detected a
PC card when you insert one. If Windows 95
recognizes the PC card, it sets up the necessary
drivers. If Windows 95 does not recognize the
PC card, you are asked to load the driver for the
card.
2-9
Page 33
Using PC Cards
In Windows for Workgroups
Windows for Workgroups beeps to indicate it has
detected the card. If a driver for the PC card has
already been loaded, you can use the card
immediately. If a driver has not been loaded,
you must manually load the driver. Windows for
Workgroups does not ask you to load a driver.
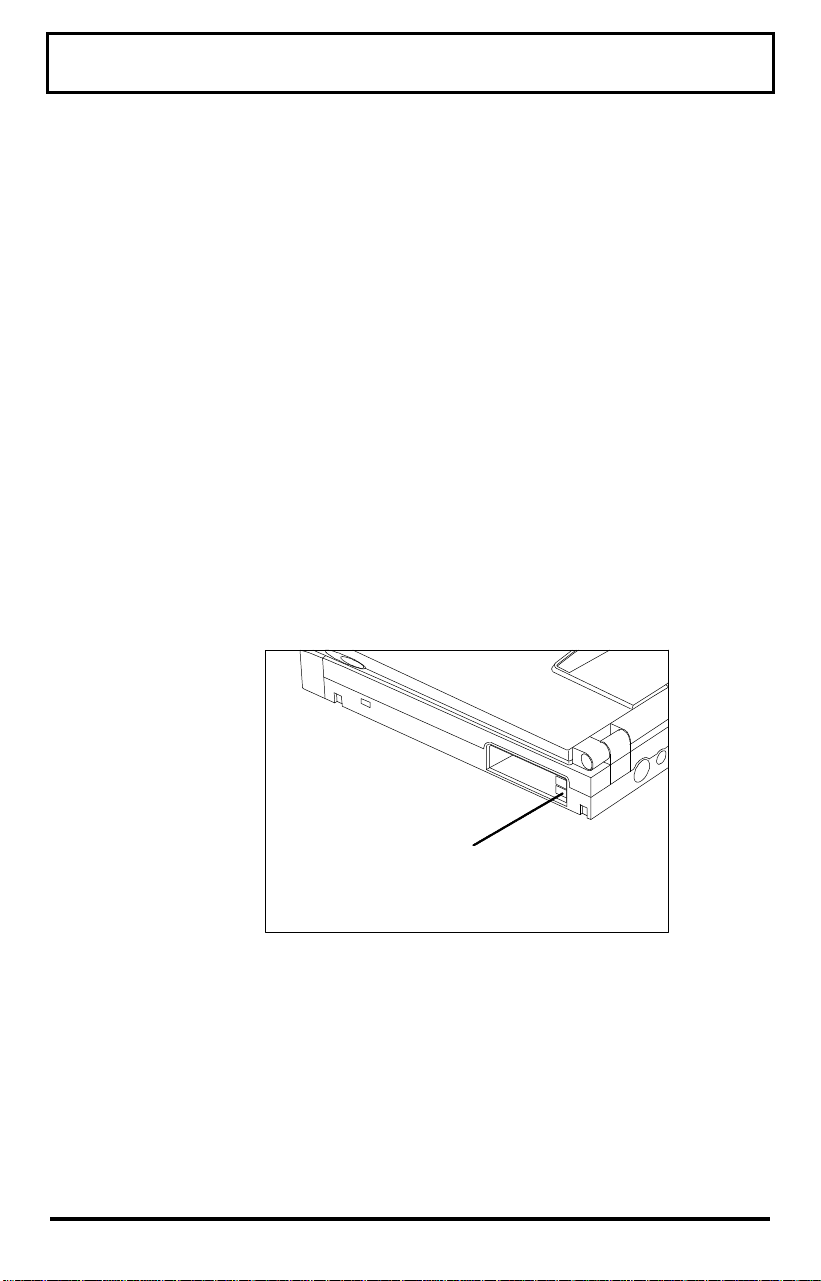
Ejecting PC Cards
Eject buttons are located beside each PC card
slot. Pressing an eject button ejects the PC card
from the slot. To eject a Type III card, press both
eject buttons.
2-10
PC Card
Eject Buttons
PC Card Eject Buttons
Page 34

Using PC Cards
In Windows 95
Follow these steps to eject a PC Card while using
Windows 95.
1. Open the Control Panel.
2. Click on the PC Card icon.
3. Select the card you want to eject.
4. Click on Stop.
5. When Windows 95 responds with the
message “You may safely remove this device”,
click Ok, then press the eject button to eject
the PC Card.
In Windows for Workgroups
Windows for Workgroups has no special
procedure for ejecting PC cards. Simply press
the eject button for the PC card and remove the
card.
2-11
Page 35

Using Indicator Lights
Standby Mode Indicator
Power/ Battery-Low Indicator
Num Lock Indicator
Caps Lock Indicator
Battery Charging Indicator
Disk Media Indicator
The computer uses the following indicator lights.
Indicator Lights
Disk Media
Indicator
Battery
Charging
Indicator
Lights when the computer writes to or
reads from the hard disk drive, or
reads from the CD-ROM drive.
Lights when a powered AC adapter
connected to the computer is charging
the battery.
Flashes when there is a problem with
the battery or the battery is not
recognized by the smart charger.
Turns off when there is no battery or
the battery is fully charged.
2-12
Page 36

Using Indicator Lights
Standby
Mode
Indicator
Power/
Battery-low
Indicator
Lights when the computer is in
Standby mode. Off when the computer
is in 5V Suspend mode.
The computer enters Standby mode if
the Standby hot key (Fn+F4) is
pressed or the STANDBY TIMEOUT
parameter in Setup is enabled and
expires.
The computer enters 5V Suspend mode
when you press the 5V Suspend hot
key (FN+F3), the 5 VOLT SUSPEND
TIMEOUT parameter in Setup is
enabled and expires, or the display is
closed.
Lights when the computer is on and
there is power to the computer.
Flashes when the battery power is low.
Connect a powered AC adapter to the
computer as soon as possible.
Caps Lock
Indicator
Num Lock
Indicator
Lights when the caps lock function is
toggled ON using the Caps Lock key.
Lights when the embedded numeric
keypad is toggled ON using the Num
Lock hot key (Fn+F7). Refer to Using
the Internal Numeric Keypad later in
this section for further details.
2-13
Page 37

Using the Touchpad
Moving the Cursor
The embedded touchpad offers a unique and
efficient way of pointing and selecting in a
Windows environment. The following figure
shows the touchpad.
Left Button
Touchpad
Right Button
2-14
Touchpad
The touchpad responds to finger movements on
its surface. To move the cursor, move your
finger on the touchpad surface.
Once the cursor is in the proper place, tap once
on the surface of the touchpad or use the left
button to click just as you would a mouse. Tap
twice to double-click.
Note: You can also connect an external PS/2 or
serial mouse to your computer. Refer to Using
Connectors and Ports later in this chapter.
Page 38

Using the Touchpad
Configuring the Touchpad
You can personalize the control of the touchpad
by configuring various settings using the
Synaptics Touchpad utility. Configure the
touchpad using the Mouse utility located in the
Control Panel window. Follow these steps to
configure the touchpad:
In Windows 95
1. Select the Start button, then select Settings.
2. Select Control Panel to display the Control
Panel window.
3. Double-click on the Mouse icon.
4. Select the Touchpad tab to customize the
touchpad to your preference.
5. Click on Enhancements to bring up
additional features and to get to the online
help for the Synaptics Touchpad drivers.
In Windows for Workgroups
1. From the Program Manager double-click on
the Main program group.
2. Double-click on the Control Panel icon.
3. Double-click on the Mouse icon.
4. Select the Touchpad tab to customize the
touchpad to your preference.
5. Click on Help for the Synaptics Touchpad
drivers online documentation.
2-15
Page 39

Using Disk Drives
Hard Disk
Drive
Floppy Disk
Drive
The Extensa computer comes with a
1.35 GB or higher capacity hard disk
drive. The hard disk drive is formatted
and loaded with software during
manufacture. Do not format the hard
disk drive.
The floppy disk drive can access
formatted 3.5-inch, double-sided, highdensity (2HD), 1.44 MB floppy disks
and lower capacity, 720 KB, doubledensity (2DD) floppy disks. The floppy
disk drive does not function at low
speed with the OS/2™ or Xenix
operating systems.
The floppy disk drive easily connects to
the parallel port on the computer’s rear
panel.
2-16
Hard Disk Drive Guidelines
If you format the hard disk drive, all data on the
hard disk drive will be erased.
Do not move the computer when the Disk Media
indicator is on. Press the 0V Suspend hot key
(Fn+F2) to suspend the computer or turn off the
computer before moving it.
Page 40

Using Disk Drives
If the HARD DISK TIMEOUT parameter in Setup is
enabled and expires, the hard disk drive will
spin down to save power.
Caution: If the hard disk drive is damaged,
!
you can lose data. To reduce the impact of
data loss, back up data frequently.
Removing Your Hard Disk Drive
You may remove your hard disk drive for safe
keeping away from your computer and/or swap
drives with other Extensa 900 series systems.
The following steps show you how to remove and
install your hard disk drive. You may also
purchase upgrades to your current hard disk
drive by contacting Texas Instruments.
Caution: Turn off the computer and
!
disconnect all sources of power before
removing or installing a hard disk drive.
1. Turn off the computer. Disconnect the AC
adapter and remove the battery.
2. Disconnect all external devices such as a
keyboard or monitor.
3. Turn the computer over and locate the hard
disk drive bay cover.
2-17
Page 41

Using Disk Drives
4. Unlock the release latches on the hard disk
drive bay cover, and remove the cover.
Removing the Hard Disk Drive Bay Cover
5. Using a Phillips screwdriver, remove the two
screws that secure the hard disk drive to the
computer. Then pull on the pull tab to lift up
the hard disk drive and disconnect the hard
disk drive cable.
2-18
Loop
Pull Tab
Removing a Hard Disk Drive
Page 42

Using Disk Drives
Inserting Your Hard Disk Drive
Use the following instructions to re-insert a
hard disk drive. Follow the instructions that
came with your hard disk drive upgrade kit for
inserting a new hard disk drive.
1. Connect the hard disk drive cable to the hard
disk drive, making sure to match the key on
the connector. Make sure the connector is
fully engaged. Insert the hard disk drive into
the bay.
2. Replace the two screws to secure the hard
disk drive to the computer.
3. Replace the hard disk drive bay cover.
Using the External Floppy Disk
Drive
You can connect an external floppy disk drive to
your computer through a connection to the
parallel port. To connect the floppy disk drive to
your computer, follow these steps.
1. Plug the 25-pin end of the floppy disk drive
cable into the parallel port on the rear panel
of the computer.
2. Attach the other end of the cable to the floppy
disk drive.
2-19
Page 43

Using Disk Drives
Connecting the External Floppy Disk Drive
Floppy Disk Drive Guidelines
2-20
Failure to observe the following precautions can
damage both the floppy disk drive and the data
on the floppy disk:
q Insert the floppy disk into the floppy disk
drive slot label side up and the metal
shutter end first. Gently push the floppy
disk into the floppy disk drive slot until the
floppy disk clicks into place.
q To remove a floppy disk, press the eject
button until the floppy disk pops out.
q Never remove a floppy disk while the
indicator on the floppy disk drive is on.
q Never force open the access shutter on a
floppy disk.
Page 44

Using Disk Drives
q Always remove a floppy disk from the floppy
disk drive before turning off the computer.
q Never transport the computer with a floppy
disk in the floppy disk drive. Doing so can
damage the drive head.
q If a floppy disk is damaged, try to make a
copy of it and immediately discard it.
q When floppy disks are not in use keep them
in a storage box to protect them from
damage or loss.
q When using an external floppy disk drive,
make sure the connecting cable is securely
connected to the drive and to the parallel
port on the computer’s rear panel.
2-21
Page 45
Adding Memory
Your computer has 16 MB of EDO dynamic
random access memory (DRAM) for computer
system memory. You can increase the amount
of your computer system memory (up to 48 MB)
by adding industry-standard, small outline Dual
Inline Memory Modules (soDIMMs) into the
memory upgrade slot.
Caution: TI does not warrant the use of non-TI
memory. TI will not be held responsible for
!
problems or degradation of performance
incurred by using any memory other than TI
memory described in this document.
To ensure compatibility and best performance,
you should purchase soDIMMs from your local
Texas Instruments dealer. Refer to Chapter 4,
Options, for ordering information.
2-22
To add memory, locate the memory option door
on the bottom of your computer.
Memory
Door
Memory Option Door
Page 46

Adding Memory
Remove the screw from the memory door. Lift
up the memory door from the recess in the
screw area, then remove the door. Follow the
instructions that came with your memory
upgrade option to install the additional memory.
Whenever you change your memory size, you
should run the PHDISK utility to re-size your
Suspend to Disk file. This file is used to store
all your computer information onto the hard
disk drive for the 0V Suspend function. If you
do not re-size the Suspend to Disk file, you will
not be able to use the Suspend to Disk utility.
Caution: The Suspend to Disk file is a hidden
file named SAVE2DSK.BIN; DO NOT delete or
alter this file in any way except by using the
!
PHDISK utility. Improper deletion or
alteration of this file could cause you to lose
all access to your computer.
Running PHDISK
To run PHDISK follow the instructions below.
In Windows 95
1. From the Taskbar, select Start then Shut
Down.
2. Select the “Restart the Computer in MS-
DOS mode” option.
3. Click on Yes.
4. Type PHDISK /C /F at the DOS Prompt.
2-23
Page 47

Adding Memory
In Windows for Workgroups
1. Save and exit all applications.
2. From the Program Manager Window, select
File.
3. Select Exit Windows.
4. When asked to confirm, click on Ok.
5. Type PHDISK /C /F at the DOS Prompt.
Note: If you are using an operating system other
than Windows 95, Windows for Workgroups, or
DOS, you may need to re-partition your hard disk
drive to allow for the additional memory. Check
with your system administrator.
2-24
Page 48

Using the Keyboard
The computer has many special keys, most of
which depend on an application for their
functionality.
Special Keys
The following keys have special functions at the
command level of MS-DOS and within many
programs.
Fn+Pause
Fn+Prt Sc
Fn+Break
Ctrl+P
Ctrl+Alt+Del
Stops a command or application;
primarily used to stop the screen from
scrolling; pressing any other key
resumes the execution of the
command or application
Sends the contents of the screen to the
printer port; prints only text
characters unless you have run the
GRAPHICS.COM utility to enable
printing graphics
Terminates the current command or
application
Sets the computer to echo keystrokes
to the printer; prints a line when you
press Enter; continues until you press
Ctrl-P again
Terminates all programs, reloads
MS-DOS and executes the AUTOEXEC
file; also called “warm start” or “warm
2-25
Page 49

Using the Keyboard
Ctrl+Alt+F1
Ctrl+Alt+F2
Ctrl+Alt+F3
Ctrl+Alt+F12
Ctrl+Alt+S
F2
(during POST)
Fn+F1
Brings up the System Setup screen
anytime from an external keyboard
Invokes 0V Suspend from an external
keyboard
Invokes 5V Suspend from an external
keyboard
Toggles the screen output between the
LCD, external CRT or both
(SIMULSCAN) from an external
keyboard
Toggles the internal speaker on and off
from an external keyboard
Loads the ROM-based Setup when
pressed during POST (power on self
test) at computer startup.
Brings up the System Setup screen
anytime
2-26
Fn+F2
Fn+F3
Fn+F4
Fn+F6
Invokes 0V Suspend
Invokes 5V Suspend
Invokes Standby
Toggles the scroll lock function ON
and OFF. When ON, the screen moves
one line up and down when you press
the up and down keys.
Page 50

Using the Keyboard
Fn+F7
Fn+F11
Fn+F12
Fn+T
Fn+↑↑
Fn+↓↓
Fn+→→
Toggles the NumLock function ON and
OFF. The internal numeric keypad is
activated when NumLock is ON. Refer
to the Using the Internal Numeric
Keypad section for more details.
Turns the LCD backlight off (blanks
the screen). Press any key to turn it
back on.
Toggles the screen output between the
LCD, external CRT or both
(SIMULSCAN)
Enables/disables the internal
touchpad
Adjusts the brightness up
Adjusts the brightness down
Adjusts the contrast brighter
Fn+←←
Fn+PgUp
Adjusts the contrast darker
Toggles the internal speaker on and off
2-27
Page 51

Using the Keyboard
Windows 95 Keys
The keyboard also has two Windows 95-specific
keys that allow you to perform special functions
under Windows 95.
Windows logo key Start button
Windows logo key + Tab Activates next Taskbar
Windows logo key + E Explore My Computer
Combinations with this key
perform special functions.
The following are a few
examples:
button
2-28
Windows logo key + F Find Document
Windows logo key + M Minimize All
Windows logo key + R Displays Run dialog box
Application key Displays the application’s
context menu (same as a
right-click)
Please refer to your Windows 95 manual for
more information on these Windows 95-specific
keys and their functions.
Page 52

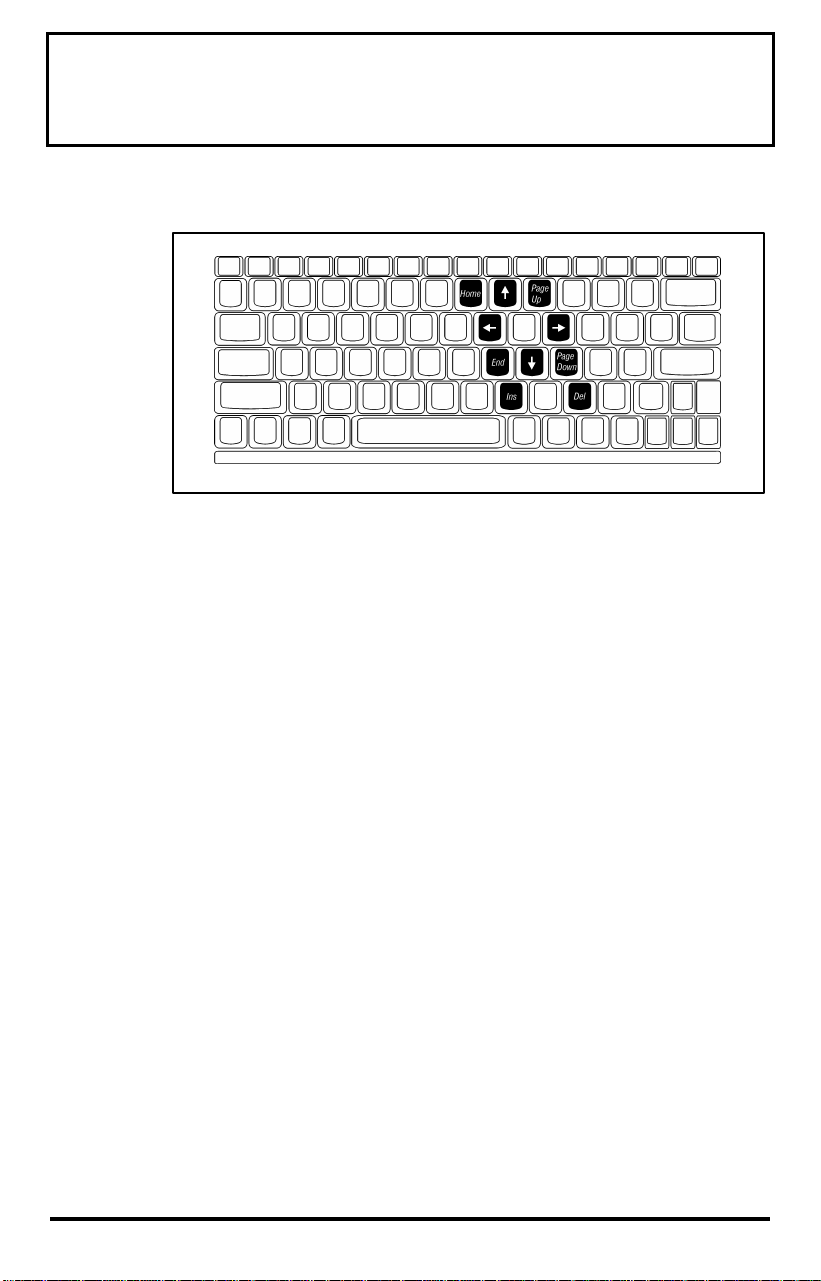
Using the Internal
Numeric Keypad
The keyboard has an embedded keypad that
provides the same functions as the discrete
numeric keypad on an AT enhanced keyboard.
The embedded numeric keypad keys shown in
the following figure generate AT-keypad
characters and functions when pressed in
conjunction with Num Lock, Fn and Shift.
The embedded numeric keypad has two modes
you can enter by toggling Num Lock (Fn+F7) as
signaled by the Num Lock indicator: ON or OFF.
Num Lock On
When the Num Lock indicator is on, pressing a
key generates the characters shown in the
following figure.
Num Lock On
2-29
Page 53
Using the Internal
Numeric Keypad
Pressing Shift with a key generates the
characters shown in the following figure.
Num Lock On (with Shift)
If you press and hold Fn in this mode, the
keypad generates their normal characters.
2-30
Num Lock Off
When the Num Lock indicator is OFF, the
keyboard acts as normal.
Pressing Fn with a key generates the same
characters shown in the previous figure, Num
Lock On (with Shift).
Page 54

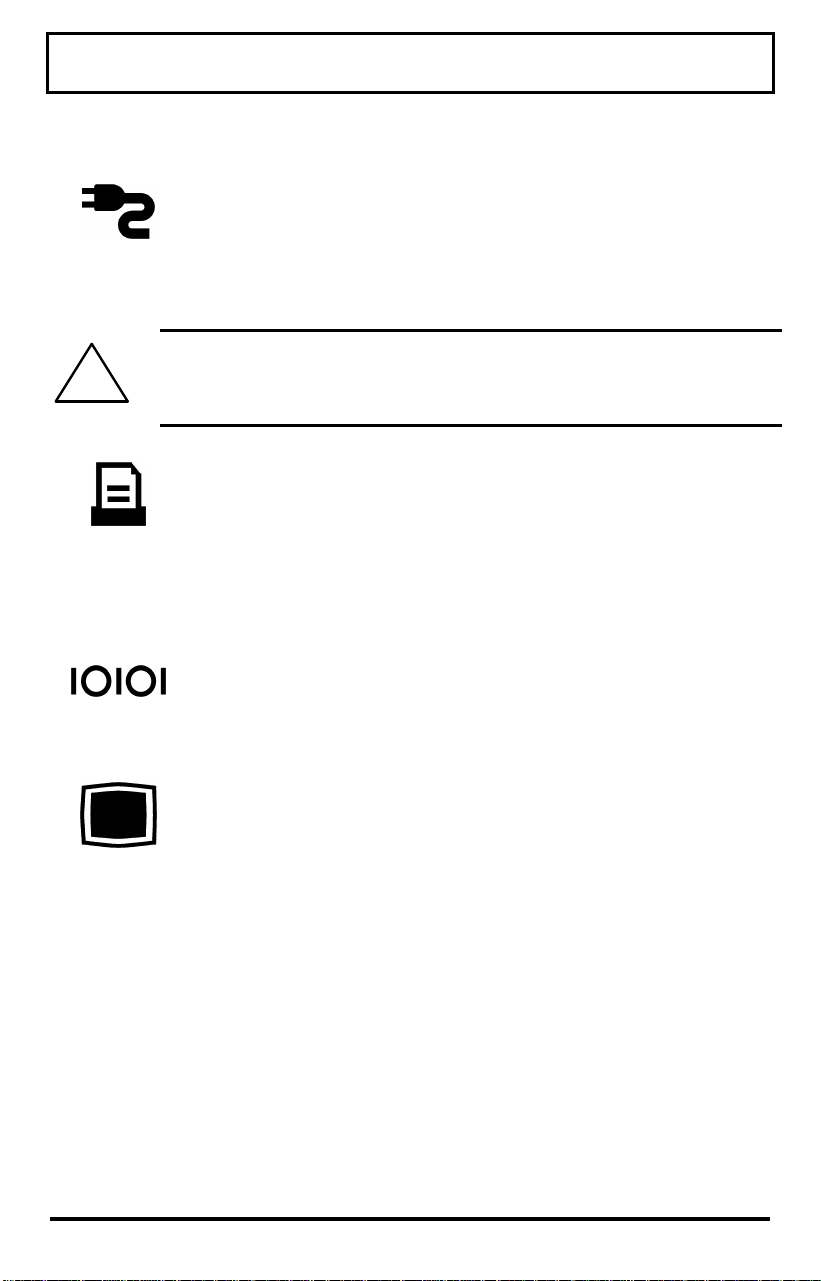
Using Connectors and Ports
This section provides a description of connectors
and ports on the Extensa notebook computer.
Ports are found on the right, left and rear of the
computer.
Right and Rear Ports
VGA
Serial
Parallel
DC In
PC Card
PS/2
Right and Rear Ports
PC Card The PC card slots supports one
Type III or two Type II or Type I PC
cards
PS/2 Connects to an external PS/2
keyboard, numeric keypad or
mouse. If you are connecting a
keyboard with a 5-pin DIN
connector, you need to purchase a
6-pin mini-DIN adapter
2-31
Page 55
Using Connectors and Ports
DC In Connects the AC adapter output
connector to this jack to recharge
the battery and supply power to the
computer
Caution: Use only the supplied AC adapter
!
with your computer. Other adapters can cause
serious damage to the electronic circuits.
Parallel
(25-pin)
Serial
(9-pin)
External
Monitor
(15-pin)
Connects to a parallel printer or
other device that uses a standard
parallel interface; EPP/ECP
compatible; also connects to the
floppy disk drive when used
externally
Connects to external devices such
as a serial printer. 16550 UART
compatible
Connects to an external analog
monitor
2-32
Page 56

Using Connectors and Ports
Left Ports
FIR
Line Out
Line In
Microphone In
Left Ports
FIR Connects to any IrDA compliant
device (such as another IrDA
computer or printer) without the
use of a cord or cable. Transmits
up to 4 Megabits per second
Line out Connects to a line out device such
as headphones or amplified
speakers
Line in Connects to a line in device such as
a synthesizer, stereo walkman or
audio CD player
Microphone in Connects to an external
microphone
2-33
Page 57

Using Connectors and Ports
Bottom Port
Expansion
Bottom Port
Expansion
(200-pin)
Connects to the Extensa Mobile
Productivity Base Module. Refer to
the Mobile Productivity Base Option
in Chapter 4.
2-34
Page 58

3
Using Battery Power
The primary difference between using battery
power and AC power is the time you can operate
before you must recharge the battery.
This chapter covers charging the battery and
maximizing the time between charges and
assumes that you installed and charged the
battery as directed in Just for Starters….
Contents
Guidelines for Battery Use........................... 3-2
Switching to Battery Power .......................... 3-3
Responding to Low Battery Conditions ......... 3-4
Recharging the Battery ................................ 3-6
Calibrating the Battery ................................ 3-7
Removing and Installing the Battery Pack..... 3-9
Removing the Battery Pack ................... 3-9
Installing the Battery Pack.................. 3-10
Re-Installing the Battery Locks............ 3-11
Conserving Battery Power .......................... 3-12
3-1
Page 59

Guidelines for Battery Use
Caution: Never dispose of exhausted batteries
!
in a fire. Observe applicable environmental
regulations and recycle if possible.
The battery should be handled carefully to
ensure maximum life. In particular:
q Do not drop the battery or subject it to
shocks.
q Do not expose the battery to direct sunlight,
moisture, chemicals, or temperature
extremes.
q Do not short the battery leads or insert the
battery upside down.
q Charge the battery after several days of
disuse to keep it fully charged. If your
computer is idle for an extended period of
time, charge the battery every three (3)
months.
q Never use the battery to power other
products.
q The battery pack has thermal fuses to
prevent unsafe computer operation. The
computer may not operate on battery power
after storage in a very warm place until the
thermal fuses cool.
q This computer is designed to only work with
the smart battery packs. Only use the
authorized packs with this computer.
3-2
Page 60

Switching to Battery Power
To use battery power, install batteries as
described in Installing the Battery Pack later in
this section.
As long as the battery has charge remaining, you
can switch to battery power by removing the
connection to the AC adapter, even if the
computer is already on.
Your computer switches back to AC power when
an AC adapter is plugged into the computer,
even if the computer is already on.
To maintain a full charge on your battery,
always reconnect the computer to the AC
adapter whenever possible.
3-3
Page 61

Responding to
Low Battery Conditions
There are two battery low stages in this
computer. When the battery capacity reaches
7% (about 10 minutes remaining), the computer
enters the first stage of battery-low warning. At
this time the battery-low LED, found on the LCD
center hinge, flashes and an audible warning
sounds. You can keep the battery audible
warning from ever sounding by disabling the
BATTERY LOW WARNING BEEP option in Setup. If the
BATTERY LOW SUSPEND option is enabled in Setup,
the computer enters 0V Suspend mode after 1
minute of system inactivity if no AC is plugged
in.
When the battery capacity reaches 4% capacity
(about 2 minutes remaining), a second audible
warning sounds. If the BATTERY LOW SUSPEND
option is enabled in Setup, the computer enters
0V Suspend mode after 10 seconds of system
inactivity if no AC is plugged in.
3-4
The following actions can maximize the time
before the battery is depleted and minimize the
effect of losing power:
q Set the screen brightness and contrast
control to the lowest possible setting.
q Save your work in progress to minimize the
danger of losing data.
q If you are using a RAM disk, save the
contents of the RAM disk to the hard disk
drive.
Page 62

Responding to
Low Battery Conditions
q Whenever you are not actively using the
computer, press the 5V Suspend hot key
(Fn+F3) or Standby hot key (Fn+F4) to put
the computer into 5V Suspend mode or
Standby mode respectively.
q Turn off the computer or put it in 0V
Suspend mode (Fn+F2) if it does not need to
be active. The computer does not consume
power in 0V Suspend mode.
Once your computer enters 0V Suspend mode,
you can install a fully-charged battery and then
resume from 0V Suspend mode. AC power can
be connected at any time.
3-5
Page 63

Recharging the Battery
Caution: Never recharge the battery differently
!
from the procedure described in this manual.
The following procedure is acceptable under
most circumstances:
1. Install the battery pack into your computer (if
not already installed).
2. Connect the AC adapter.
To maintain a full charge, leave the computer
connected to the AC adapter except when
transporting the computer.
The battery is charged whether the computer is
on or off, as long as the AC is plugged in.
However, the battery charges faster when the
computer is off.
3-6
Page 64

Calibrating the Battery
The Extensa system uses a smart Lithium-Ion
(Li-Ion) rechargeable battery. Your new smart
batteries keep extremely accurate track of the
battery capacity. However, all rechargeable
batteries lose capacity over time due to different
charging and discharging conditions, as well as
general wear and usage. In order to keep
accurate track of the true capacity, the battery
must be calibrated every once in awhile.
Caution: If the battery loses track of the true
!
capacity, it will not correctly predict low
battery conditions and can cause the system
to shut off prematurely and without warning.
The battery itself keeps track of when it needs to
be calibrated. The computer will post a warning
when you boot up the system when it is time to
re-calibrate. To calibrate the battery, you must
first fully charge the battery, then fully discharge
the battery.
Use the following instructions to calibrate your
battery.
1. Charge the battery by leaving the battery in
the computer and having the AC adapter
plugged into the computer. The battery is
fully charged when the charging LED turns
off.
2. Disconnect the AC adapter from the
computer.
3-7
Page 65

Calibrating the Battery
3. Turn the computer power ON, if not already
on.
4. Exit the Windows operating System to DOS.
a) From Windows 95, Exit by selecting
Restart in MS-DOS Mode from the
Shutdown menu.
b) From Windows for Workgroups, Exit by
selecting FILE then EXIT WINDOWS from
the Program Manager.
5. Enter Setup by pressing the Setup hot key
(Fn+F1).
6. Set the POWER MANAGEMENT FUNCTION
parameter and the BATTERY LOW SUSPEND
parameter to Disabled.
3-8
7. Save the changes, then Exit Setup.
8. Allow the computer to run down completely
until it powers off on its own.
9. Re-connect the AC power.
10. Turn the Computer back ON. Enter Setup
by pressing Fn+F1.
11. Set the POWER MANAGEMENT FUNCTION
parameter and the BATTERY LOW SUSPEND
parameter to your preferred settings.
12. Recharge the battery.
Page 66
Removing and Installing the
Battery Pack
Removing the Battery Pack
Follow these steps to remove the battery:
Caution: You will lose all power to the
!
computer when the battery is removed unless
an external AC source is attached.
1. Unlatch the battery locks on both ends of the
battery by pushing the endcaps outward with
your thumbs.
Unlatching the Battery Locks
3-9
Page 67
Removing and Installing the
Battery Pack
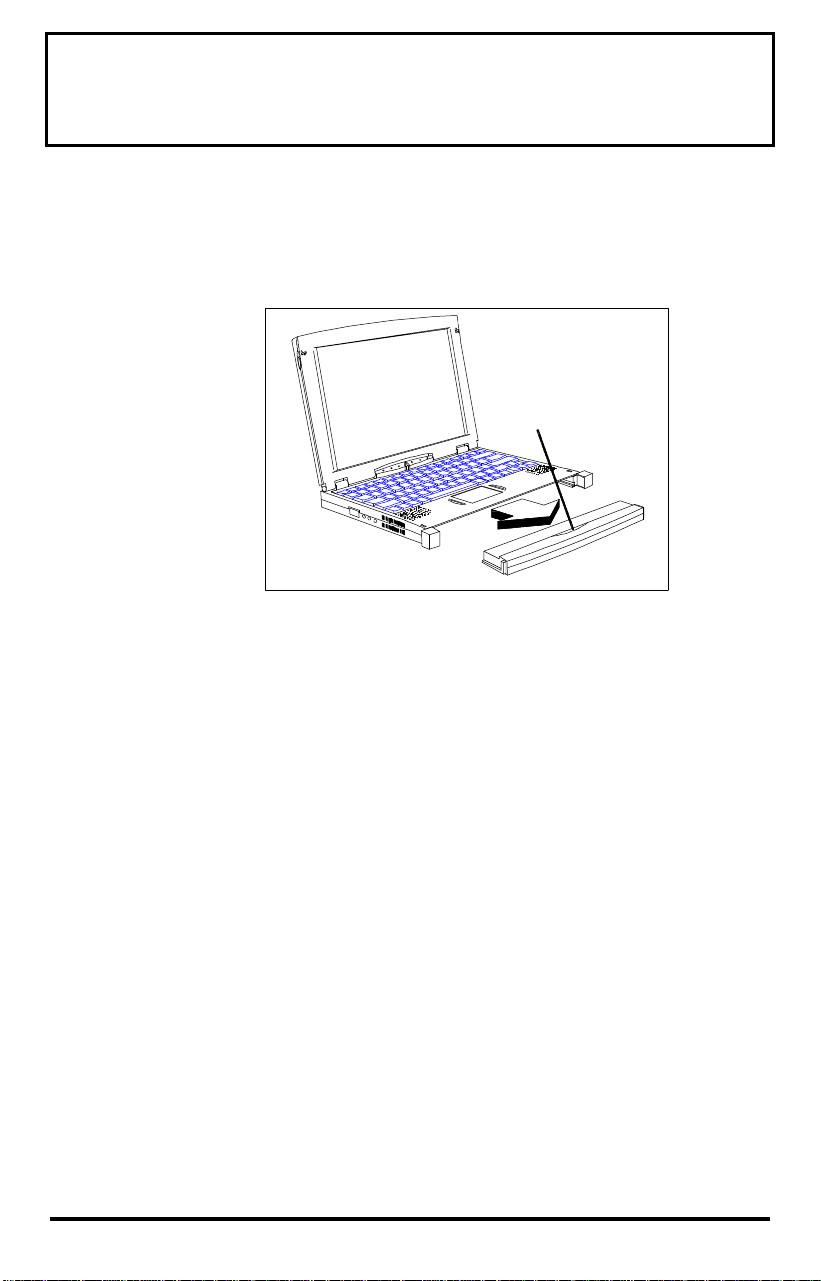
2. Grasp the grooves on the top and bottom of
the battery pack and pull the battery out.
Groove
Removing the Battery
Installing the Battery Pack
Follow these steps to install the battery:
1. Unlatch the battery locks on both ends of the
computer.
2. Insert the battery pack (connector side up)
into the slot, then push the battery pack
completely into the slot until you feel the
contacts engage.
3. Re-latch the battery locks on both ends of the
battery.
3-10
Page 68

Removing and Installing the
Battery Pack
Re-installing the Battery Locks
The battery locks are designed to not break, but
come off easily when they have been forced open
too far.
To re-install the battery locks, follow these
instructions:
Note: The left and right battery locks are not
interchangeable.
1. Align the battery lock with the edge of the
computer as shown in the figure below.
Flush
Slide
Right
Aligning the Battery Locks
2. Push the lock to the right (for the left battery
lock) and to the left (for the right battery lock)
until the lock(s) are flush with the computer.
3-11
Page 69

Conserving Battery Power
The following tips can help you prolong the life of
a battery charge:
q Keep the display at the lowest comfortable
brightness and contrast level. Reducing
brightness and contrast even a small
amount can significantly reduce power
consumption and increase operating time.
q Set the power management settings in
Setup to optimize the time-outs.
q You can minimize the number of times the
computer needs to access the hard disk
drive by using disk caches or RAM disks.
q Disconnect or turn off external options that
you are not using.
q Use only Texas Instruments options. These
options are designed to operate with the
least possible energy consumption. Thirdparty options (such as RAM and mouse
devices) can drain the battery more quickly.
3-12
Page 70

4
Options
This chapter provides some basic information on
options available for your Extensa computer.
For more detailed information and instructions
please refer to the installation instructions that
come with your option.
To get the most up to date list of options
available with your Extensa computer, please
call 1-800-TI-TEXAS, option 2, then 1, in the
United States or Canada. Outside of the United
States or Canada, please contact your local
Texas Instruments dealer. A listing of local
dealers is available at the end of this User’s
Guide.
Contents
AC Adapter.................................................. 4-2
PC Cards..................................................... 4-3
PS/2 Devices............................................... 4-4
External Monitor ......................................... 4-5
External Mouse ........................................... 4-6
Memory....................................................... 4-7
Audio Options ............................................. 4-8
Mobile Productivity Base Option................... 4-9
Miscellaneous Options............................... 4-10
4-1
Page 71

AC Adapter
Your Extensa uses a small lightweight external
AC adapter to charge and power the computer.
The AC adapter can be operated anywhere
between 100 - 240 volts AC and has a
detachable AC power cord.
You can order power cords with specific plugs
for the region you will be operating the computer
in.
Caution: Use only the AC adapter
recommended in this document (TI Part No.
!
9813497-0004). Another adapter can damage
your computer.
4-2
DC Connector
AC Adapter
Female
Connector
Male
Plug
AC Adapter
Page 72

PC Cards
Your Extensa computer supports all PCMCIA
and Cardbus PC cards. These PC cards are used
to add functionality to your computer, such as
communicating over a telephone or connecting
to a network.
The computer has built-in slots that support one
Type III or two Type II or Type I PC cards. Type
III PC cards must be inserted into the lower slot.
Your Extensa computer is designed to support
additional functionality on top of the standard
Cardbus interface. These functions include the
Zoomed Video port interface required by MPEG
cards (on the bottom PC card slot) and the
DataRace Speakerphone modems.
4-3
Page 73

PS/2 Devices
Your Extensa computer supports external
devices that connect to a PS/2 port. Such
devices include an external numeric keypad,
external keyboards, or external mouse.
4-4
Page 74

External Monitor
Your Extensa computer supports standard
analog external monitors with resolutions up to
1280 x 1024. The computer also supports DDC
compatible monitors allowing you to use the
“Green” monitors (those monitors that meet the
Energy Star standards).
When the computer is connected to an external
monitor, you can use the computer with the
display closed.
You can also display images on the external and
internal display at the same time. This feature
is called SimulSCAN™. To enable this feature,
set the DISPLAY parameter in Setup to Both.
You can also easily switch between the displays
LCD, CRT, or both by using the Fn+F12 hot key.
4-5
Page 75

External Mouse
Your Extensa computer comes with a pointing
device already installed, but you can also use an
external PS/2 or serial mouse.
q To connect a PS/2 mouse, insert the
connector into the PS/2 port in the rear of
the Extensa.
q To connect a serial mouse, attach the
connector to the 9-pin serial port in the rear
of the Extensa.
Note: A serial mouse is not a Plug and Play
device. For Windows 95 to detect a serial mouse,
use the Add New Hardware icon in the Control
Panel.
4-6
Page 76

Memory
Your Extensa computer comes with 16 MB of
dynamic random access memory (DRAM). Your
computer has one memory slot. You can
increase memory by installing an upgrade
module into the memory upgrade slot on your
computer. You can expand RAM from 16 MB up
to 48 MB.
Caution: TI does not warrant the use of any
memory other than that supplied by TI
specifically for the Extensa computer. TI will
!
not be held responsible for problems or
degradation of performance incurred by using
any memory other than TI memory described
in this document.
4-7
Page 77

Audio Options
Your computer comes with a set of built-in
stereo speakers and a monaural microphone,
but if you wish to use other stereo equipment,
the computer comes with three audio jacks —
Line-out, Line-in and Microphone-in.
4-8
Connecting Audio Devices
Line-out allows you to use a headset or
amplified external speakers. The computer’s
internal speakers are disabled when a headset or
external speakers are plugged in.
Line-in connects to an external stereo source.
This allows you to play an external CD through
the computer speakers, for example, or make a
recording if you have the correct software.
Microphone-in allows you to record input into
the computer through an external microphone.
Page 78

Mobile Productivity Base Option
The Mobile Productivity Base (MPB) option is a
full-featured docking module that duplicates all
of the ports on your computer plus additional
ports. In addition to replicating ports, the MPB
docking option also has a removable modular
bay that houses a CD-ROM drive or floppy disk
drive module and supports the Texas
Instruments proprietary Advance PCI card.
The MPB can be used as a desktop only unit, or
be carried with the notebook to make a portable
full function notebook computer.
Refer to the instructions that come with your
docking module for more details.
4-9
Page 79

Miscellaneous Options
Your Extensa computer can accept many
additional options, and Texas Instruments is the
best source for these options. Some of the
additional options include:
Batteries You can purchase spare Li-Ion batteries.
For more information, call 1-800-TITEXAS.
For information on these batteries, refer
to Chapter 3, Using Battery Power.
Carrying
Case
Printers You can connect a parallel printer to the
Helps protect the computer and
accessories during transport.
Several carrying cases are available
including leather cases, accessory cases,
portfolios and backpacks.
For the current list of available
accessories, call 1-800-TI-TEXAS.
parallel port or a serial printer to the
serial port connectors.
4-10
Page 80

5
Using Software
This chapter describes the software supplied
with the computer and how to configure
application software to run on the computer.
Contents
Using Supplied Software.............................. 5-2
Getting Online Help..................................... 5-3
Guidelines for Installing Applications ........... 5-4
Adjusting the Software for the
Computer ......................................... 5-4
Configuring the Computer for the
Software ........................................... 5-5
Using System Passwords.............................. 5-6
Setting a System Password ................... 5-7
Disabling or Changing a System
Password.......................................... 5-8
5-1
Page 81

Using Supplied Software
Your computer is shipped with the following
software installed on the hard disk drive:
q Microsoft Windows 95
q Power-saving utilities
q PC-Doctor
q About Your Extensa system demo program
q Various third-party application software
5-2
Page 82

Getting Online Help
The supplied software has online help files,
which reduce the need to refer to printed
manuals and provide you with help any time it’s
needed.
To obtain Windows 95 help, select the Start
button and then select Help.
5-3
Page 83

Guidelines for Installing
Applications
Adjusting the Software for the
Computer
Your computer can execute almost all programs
written to execute on AT® computers. When
installing software, you may need to provide the
following information to the installation
program:
Display The 11.3-inch or 12.1-inch display has
an 800 x 600 (SVGA) resolution. When
installing an application, select the
highest resolution configuration that
both the program and the computer can
support. If you are using the computer
with a high-resolution external monitor,
you can select resolutions up to 1280 x
1024 depending on the model of your
monitor.
5-4
If you select a resolution larger than that
supported by your display, you can still
view the display by panning the screen.
Keyboard The computer keyboard emulates all
functions of an IBM AT-101 enhanced
keyboard. When installing an
application, select the IBM 101 or AT
enhanced keyboard configuration.
Page 84

Guidelines for Installing
Applications
Mouse If you are using the built-in pointing
device or an external PS/2 mouse, you
may select the Microsoft® or Standard
PS/2 port mouse.
You can also select Synaptics PS/2
touchpad for the built-in pointing device.
Configuring the Computer for
the Software
Some programs require you to modify the way
the computer operates to ensure compatibility.
Memory Your computer comes with 16 MB of
memory. This is sufficient to run most
software. For improved operation, you
may want to install additional memory
(refer to Chapter 2 and Chapter 4 for
information on upgrading your memory).
5-5
Page 85

Using System Passwords
The computer has a two-password security
system — Supervisor and User.
The Supervisor password is used by system
administrators who manage multiple notebooks
and gives an extra level of security while still
allowing users to set their individual Setup
preferences in the system Setup menu. If only
one password is set, the Supervisor password is
also the User password.
If both the Supervisor password and the User
password are set, the Supervisor password must
be entered to gain access to the Setup Security
options: SUPERVISOR PASSWORD, DISKETTE ACCESS,
and FIXED DISK BOOT SECTOR.
5-6
Both passwords prevent unauthorized access to
the computer at system startup or when the
computer resumes from 0V Suspend mode if the
PASSWORD CHECK DURING RESUME parameter in
Setup is enabled.
Page 86

Using System Passwords
Setting a System Password
Caution: If you forget the system password,
you will not be able to use your computer. To
regain access, you will need to send your
!
computer to Texas Instruments. This service
is not covered by warranty.
To set a password in Setup, follow these steps:
1. Press Fn+F1 (or F2 during boot) to enter
Setup.
2. Press the arrow keys to move to SECURITY.
3. Move down the screen to a Password
parameter, then press Enter.
Note: The Supervisor password must be set
before the User password can be set.
4. A window pops up requesting a new
password.
5. Enter the new password (up to seven
printable text characters) and press Enter,
then retype the password for verification and
press Enter.
6. The password becomes active after you save
the changes and exit Setup.
5-7
Page 87

Using System Passwords
If you set a password, you are prompted for the
new password before starting your computer or
entering Setup.
Disabling or Changing a
System Password
To disable or change a system password:
1. Press Fn+F1 (or F2 during boot) to enter
Setup.
2. Enter your password when prompted.
3. Press the arrow keys to move to SECURITY.
4. Move down the screen to a Password
parameter, then press Enter.
Note: You can only change the User password if
you used the User password to enter Setup. You
can change both the User password and the
Supervisor password if you used the Supervisor
password to enter Setup.
5. Enter a new password to set a new password,
or press Enter with no entries to clear the
password. Verify your entry, then press
Enter.
6. Save the changes then exit Setup.
5-8
Page 88

6
Mobility
This chapter describes all the considerations to
help you take advantage of your computer’s
mobility.
Contents
Overview of Mobility .................................... 6-2
Disconnecting from the Desktop................... 6-3
Moving Around............................................ 6-4
Preparing the Computer........................ 6-4
What to Bring to Short Meetings ........... 6-4
What to Bring to Long Meetings ............ 6-4
Taking the Computer Home ......................... 6-5
Preparing the Computer........................ 6-5
What to Bring with You......................... 6-5
Special Considerations.......................... 6-5
Setting Up a Home Office...................... 6-6
Traveling with the Computer........................ 6-7
Preparing the Computer........................ 6-7
What to Bring with You......................... 6-7
Special Considerations.......................... 6-8
Traveling Internationally with the
Computer.................................................... 6-9
Preparing the Computer........................ 6-9
What to Bring with You......................... 6-9
Special Considerations........................ 6-10
6-1
Page 89

Overview of Mobility
Disconnecting from the Desktop
No matter where you are taking your computer,
you need to disconnect it from your desktop
accessories.
Moving Around
“Moving around” refers to using your computer
at different locations within the same building,
for example, taking it with you to meetings.
Taking the Computer Home
Since you are taking the computer to the same
place every night, you can save yourself time
and effort by setting up a home desktop.
6-2
Traveling with the Computer
The farther you get away from home or office,
the more important it is to bring the necessary
equipment and supplies with you.
Traveling Internationally with the
Computer
Traveling internationally with your computer
creates special concerns you need to address
before you leave the country.
Page 90

Disconnecting from the Desktop
Follow these steps to disconnect your computer
from external accessories.
1. Save your work in progress.
2. Shut down the operating system.
3. Turn off the computer.
4. Disconnect the cord from the AC adapter.
5. Disconnect the keyboard, pointing device,
printer, external monitor, and other external
devices.
If your external devices are connected to an
optional docking module, just disconnect the
notebook from the docking module. You do
not need to disconnect the external devices
from the docking module.
6. Disconnect the Kensington lock if you are
using one to secure the computer.
6-3
Page 91

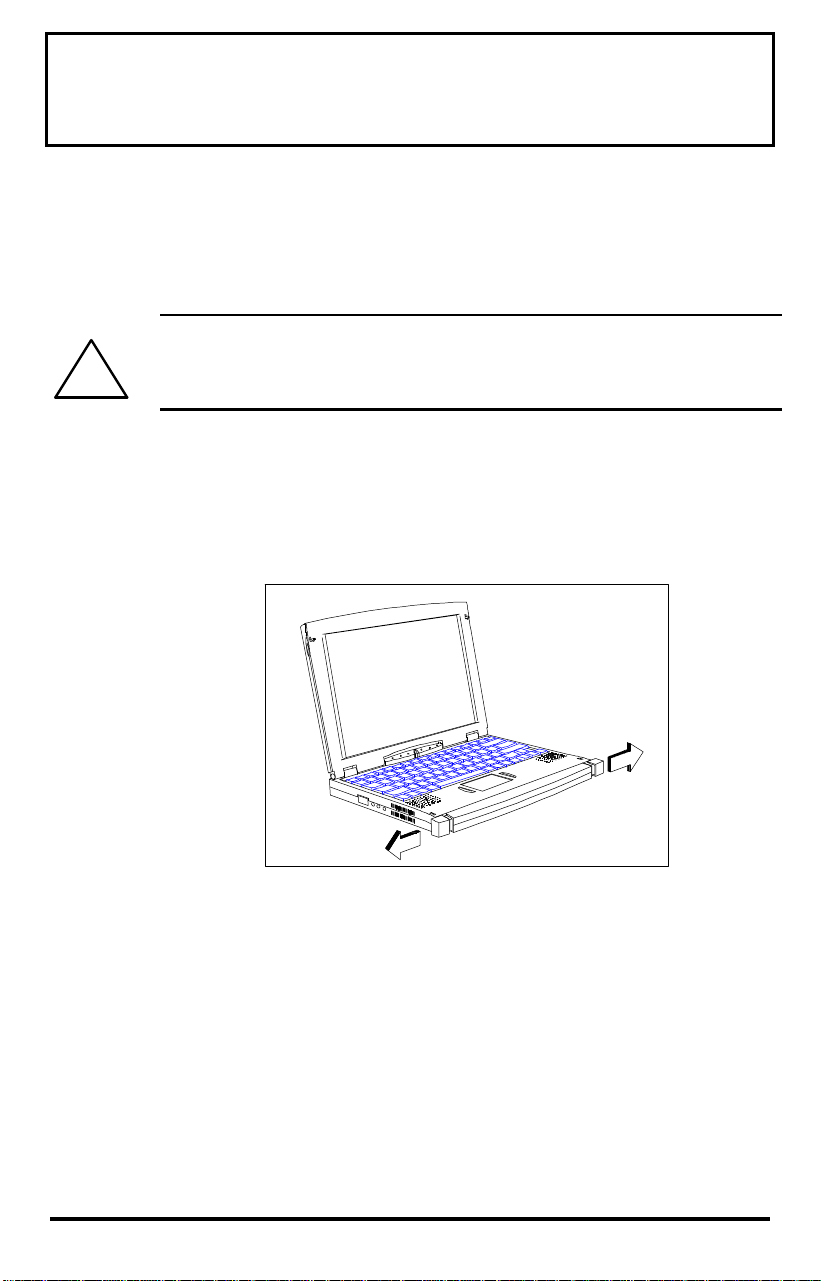
Moving Around
Preparing the Computer
Before moving the computer, press Fn+F3 to
place it in 5V Suspend mode. After placing the
computer in 5V Suspend mode, close and latch
the cover. You can now safely take the computer
anywhere you go within the building.
To bring the computer out of 5V Suspend mode,
press a key or touch the touchpad.
What To Bring to Short Meetings
A fully charged battery runs the computer for 23 hours under most circumstances. If your
meeting is shorter than that, you probably do
not need to bring anything with you other than
the computer.
6-4
What To Bring to Long Meetings
If your meeting will last longer than 3 hours or if
your battery is not fully charged, you may want
to bring the AC adapter with you to plug in your
computer in the meeting room.
If the meeting room does not have an electrical
outlet, reduce the drain on the battery by
putting the computer in 5V Suspend mode
(Fn+F3) or Standby mode (Fn+F4) whenever you
are not actively using the computer.
Page 92

Taking the Computer Home
Preparing the Computer
After disconnecting the computer from your
desktop, follow these steps to prepare the
computer for the trip home.
1. Remove all media from the drives. Failure to
remove the media can damage the drive head.
2. Pack the computer in a protective case that
can prevent the computer from sliding around
and cushion it if it should fall.
Caution: Avoid packing items next to the top
!
cover of the computer. Pressure against the
top cover can damage the screen
What To Bring with You
Unless you already have some items at home,
bring the following items with you.
q AC adapter
q The printed user’s manual
Special Considerations
Follow these guidelines to protect your computer
while traveling to and from work.
6-5
Page 93

Taking the Computer Home
q Minimize the effect of temperature changes
by keeping the computer with you.
q If you need to stop for an extended period of
time and cannot bring the computer with
you, leave the computer in the trunk of the
car to avoid exposing the computer to
excessive heat.
q Changes in temperature and humidity can
cause condensation. Allow the computer to
return to room temperature, and inspect the
screen for condensation before turning on
the computer. If the temperature change is
greater than 18°F (10°C), allow the
computer to come to room temperature
slowly. If possible, leave the computer for 30
minutes in an environment with a
temperature between outside and room
temperature.
6-6
Setting Up a Home Office
If you frequently work on your computer at
home, it may be worthwhile purchasing a second
AC adapter for use at home. With a second AC
adapter, you can avoid transporting the extra
weight to and from home.
If you use your computer at home for significant
periods of time, you might also want to add an
external keyboard, monitor, or mouse.
Purchasing a docking module for your home may
also help increase your productivity.
Page 94

Traveling with the Computer
Preparing the Computer
Prepare the computer as if you were taking it
home. Be sure the battery in the computer is
charged. Airport security often requires you to
turn on your computer when bringing it to the
gate area.
What To Bring with You
Bring the following items with you.
q AC adapter
q External floppy disk drive and floppy disk
drive cable
q Spare, fully-charged battery packs
q Additional printer driver files if you plan to
use another printer
q Docking module if you need to use the
CD-ROM drive
q The printed user’s manual
6-7
Page 95

Traveling with the Computer
Special Considerations
In addition to the guidelines for taking the
computer home, follow these guidelines to
protect your computer while traveling.
q Always take the computer as carry-on
luggage
q Have the computer inspected by hand or X-
ray machine. Do not put the computer
through a security metal detector.
q Avoid exposing floppy disks to hand-held
metal detectors.
6-8
Page 96

Traveling Internationally
with the Computer
Preparing the Computer
Prepare the computer as you would normally
prepare it for traveling.
What To Bring with You
Bring the following items with you.
q AC adapter
q Power cords that are appropriate to the
country to which you are traveling
q External floppy disk drive and floppy disk
drive cable
q Spare, fully-charged battery packs
q Additional printer driver files if you plan to
use another printer
q Docking module if you need to use the
CD-ROM drive
q Proof of purchase, in case you need to show
it to Customs officials
q The printed User’s Manual
q Proof of ownership
6-9
Page 97

Traveling Internationally
with the Computer
Special Considerations
Follow the same special considerations as when
traveling with the computer.
6-10
Page 98

7
Care and Troubleshooting
This chapter tells you how to clean your
computer safely and solve operational problems.
Contents
Cleaning the Computer................................ 7-2
Troubleshooting Tips ................................... 7-3
Startup Error Messages ............................... 7-4
7-1
Page 99

Cleaning the Computer
To ensure trouble-free computing, regularly take
the time to check your computer and clean the
screen, keyboard, and case.
Caution: Never use alcohol, benzene, thinner,
or strong chemical agents that could damage
the computer’s case, and never apply liquid
!
directly to the computer, only to a clean cloth.
Never spray cleaning fluid or any liquid
directly onto the case or screen.
Keep the case of the computer free of dust.
Apply a small amount of mild liquid cleaner to a
dry, lint-free cloth, and wipe the case with the
cloth.
The surface of the screen is covered with a
protective plastic film that may become smeared
and accumulate dust during use. Avoid
touching the screen with your fingers.
7-2
Clean the screen regularly by applying a small
amount of diluted neutral detergent to a dry,
lint-free cloth. Gently rub the surface of the
screen with the cloth.
Page 100

Troubleshooting Tips
Computer does not
turn off
Computer does not
come on when power
switch is pressed
Computer power is on
but screen is blank
o The Operating System is locked up;
press and hold the power switch for 2
seconds to force the computer to turn
off.
o Low battery; use AC adapter and
recharge battery.
o Ensure AC adapter cable and power
cord are securely connected.
o Connect AC adapter to another outlet.
o Adjust contrast and brightness
control.
o The LCD standby timer in Setup is
enabled and has expired. Press any
key or move the mouse.
o Computer set for external monitor;
cycle power, use Fn+F12 to switch to
LCD panel display, or plug in an
external monitor.
Computer indicates
an error at start-up
o Turn the computer off; wait several
seconds; then turn the computer on
again. If error persists, check list of
error messages for corrective action.
Press Fn+F1 to ensure all settings are
correct.
7-3
 Loading...