

Page 1

TEXAS
INSTRUMENTS
TravelMate 3000
Notebook Computer
User’s Manual
Page 2

Contents
Preface.......................................................................................................................... v
1 Taking a First Look
Learning About Hardware........................................................................................................ 1-2
Learning About Options........................................................................................................... 1-7
Learning About Software........................................................................................................1-10
2 Learning About Your Computer
LCD Screen .............................................................................................................................2-3
Connectors and Ports................................................................................................................2-6
Keyboard Keys....................................................................................................................... 2-10
Indicator Lights......................................................................................................................2-19
3 Getting Started
Guidelines & Precautions ......................................................................................................... 3-3
Providing Power.......................................................................................................................3-6
Handling the Battery Pack ........................................................................................................ 3-9
Starting Your Computer......................................................................................................... 3-13
Restarting the Computer.........................................................................................................3-14
Using the Floppy Drive ..........................................................................................................3-15
Help Displays ........................................................................................................................ 3-18
ii Table of Contents
4 Customizing Your Computer
Accessing the Setup Program ................................................................................................... 4-3
System Options, Page 1 ............................................................................................................ 4-6
User Features, Page 2............................................................................................................. 4-11
External Communications, Page 3.......................................................................................... 4-18
5 Installing and Using Application Programs
Guidelines for Installing Applications.......................................................................................5-2
Using Laptop Manager.............................................................................................................5-7
Using a Password ..................................................................................................................... 5-9
Page 3

Contents
6 TravelMate 3000 Options
Numeric Keypad........................................................................................................6-2
RAM Modules ...........................................................................................................6-3
Internal Modem ......................................................................................................... 6-8
80387SX Coprocessor................................................................................................ 6-9
Other Options .......................................................................................................... 6-10
7 Taking Care of Your Computer
Do's and Don'ts.......................................................................................................... 7-2
Cleaning the TravelMate 3000................................................................................... 7-3
Conserving Battery Power..........................................................................................7-4
Care and Handling of the Battery............................................................................... 7-5
Appendixes
Specifications............................................................................................................ A-1
Character Sets ............................................................................................................B-1
Keyboard Layouts ......................................................................................................C-1
Diagnostics............................................................................................................... D-1
Troubleshooting......................................................................................................... E-1
Configuring Memory .................................................................................................F- I
Connector Pin Assignments ...................................................................................... G-1
Screen Standards....................................................................................................... H-1
Glossary
Index
Getting Support for Your TI Product
Warranty and Service
Repair Request Form
Table of Contents iii
Page 4

Copyright 1991 Texas Instruments Incorporated
All Rights Reserved - Printed in U.S.A
TravelMate 3000 Notebook Computer User's Manual
Part No. 2566946-0001
Original Issue: October 1990
Revision C: September 1991
Changes may be made periodically to the information in this publication. Such changes
will be incorporated in new editions of this manual.
Record the serial number, purchase date, and model number in the spaces provided below.
The serial number and model number are recorded on the label affixed to the case. All
correspondence concerning your unit should include the serial number, model number,
and date of purchase.
TravelMate 3000 Notebook Computer:
Serial Number: Purchase Date:
No part of this publication may be reproduced, stored in a retrieval system, or transmitted
in any form or by any means, electronic, mechanical, photocopy, recording, or otherwise,
without the prior written permission of Texas Instruments Incorporated.
The equipment, as well as the programs that TI has created to use with them, are tools
that can help people better manage the information used in their business. But tools
including TI products-cannot replace sound judgment nor make the manager's business
decisions.
Consequently, TI cannot warrant that its products are suitable for any specific customer
application. The manager must rely on judgment of what is best for Ms or her business.
TravelMate and BatteryPro are trademarks of Texas Instruments Incorporated. BitCom and BitFax are trademarks of
BIT Software, Inc.
Hayes is a registered trademark and SmartModem 2400 is a trademark of Hayes Microcomputer Products Inc.
IBM, PC, XT, OS/2, AT, and PS/2 are trademarks of International Business Machines Corporation.
INSTALL program is copyrighted by Knowledge Dynamics Corp.
Intel, 386, and 387 are trademarks of Intel Corporation.
LapLink and Battery Watch are registered trademarks of Traveling Software, Inc.
Lotus is a trademark of Lotus Development Corporation.
Microcom is a trademark and MNP is a registered trademark of Microcom, Inc.
Microsoft, GW-BASIC, and MS-DOS are registered trademarks and Windows is a trademark of Microsoft
Corporation.
Page 5

Preface
Your new Texas Instruments TravelMateTM 3000 Notebook Computer is a lightweight,
full-function computer with the features and power of many desktop personal computers.
The TravelMate 3000 has a standard 20-megabyte (MB) or optional 40-MB internal hard
disk drive, an 80386TMSX microprocessor, factory-installed MS-DOS ® version 4.01.
Several options, some of which are described in Chapter 6, are available to make your
TravelMate 3000 more powerful and more useful for your particular applications.
Note: Your TravelMate 3000 Computer’s hard disk drive is already formatted and
loaded with MS-DOS 4.01, GW-BASIC ®, BatteryProTM power-conservation utilities,
Laptop Manager, Laptop File Manager, diagnostics, and other useful programs.
Therefore, do not format the hard disk (drive C) or you will delete these programs. Any
data you have entered into the computer will be lost forever if you reformat the hard diskunless you have backed up the data on floppy diskettes. However, the aforementioned
programs also are stored on the 3.5-inch floppy diskettes furnished with your new
computer so that you can restore the programs to the hard disk if necessary. See
'Restoring MS-DOS System Files" in Appendix E for instructions.
Your TravelMate 3000 accepts a variety of options, including:
q 2400-bps Internal Modem with send-fax capabilities
q 80387TMSX Math Coprocessor
q Internal RAM Modules
q External monitors
q Numeric Keypad
q Deluxe carrying case
q External printers
All these options are available from Texas Instruments. Contact your dealer or telephone
TI-Express, 1-800-TI PARTS.
v
Page 6

Preface
Unpacking
When you open the container in which your computer is packed, you should find the
following items:
q TravelMate 3000 Notebook Computer
q AC Adapter and detachable wall receptacle cord
q Two tilt legs that insert into the bottom rear corners of the unit to
increase the keyboard angle
q This user's manual and the MS-DOS User’s Manual
q Three 3.5-inch floppies with MS-DOS, version 4.01 and one 3.5-inch
floppy for use with the MS-DOS Select Copy program
q BatteryPro & Productivity Software User's Manual and one 3.5-inch
floppy plus two floppies with external analog monitor utilities
q Two function key template strips
If any of the above items are missing, contact your Texas Instruments dealer.
Conventions and Symbols
Throughout this manual, the following conventions are used to distinguish elements of
text:
SMALL CAPS Used for directory names, commands, command
options, switches, and literal portions of syntax that
must appear exactly as shown
vi
Page 7
italics Used to denote Setup Program items and settings, key
Monospace Used for prompts and menus that display during
Bold Used for keys, key sequences, and drive designator
Several international symbols are used throughout this manual to advise you of important
information.
continued on the next page.
Preface
words, and references to other publications
operation of your computer, including prompts (text
generated by the computer) and entries you are
supposed to type on the keyboard
prompts
This symbol indicates a Note concerning operating procedures or information
you should know to help you operate your TravelMate 3000.
This symbol alerts you to a Warning or Caution that can prevent you from
causing injury to yourself or damage to your equipment.
This symbol tells you that more information about the same subject is
About this Manual
This manual describes the operation of your Texas Instruments TravelMate 3000
Notebook Computer. We have tried to design this manual so that you can locate
information quickly and easily. Each chapter begins with a title page that lists the major
sections in the chapter and a table of contents.
vii
Page 8

Preface
Keyboard keys are listed several ways in this manual, depending on the number of keys
you must press to produce a character or function. For example, some key fronts on the
keyboard are labeled with blue to indicate their use only in conjunction with the Fn key.
The text refers to these keys according to their function, preceded by the additional key
you must also press. Your application programs may use various other key combinations;
refer to your application program documentation for specific information.
The word floppy is used in this manual to refer to diskettes, microdiskettes, disks, and
other terms commonly used to describe a removable, nonvolatile, magnetic-media
diskette. The words disk and diskette are used in direct quotations, for example, in
describing a displayed error message, Setup Program menu, and like items.
Contents of this Manual
Here is an overview of what to expect in each chapter:
Chapter 1 - Taking A First Look gives users who are not familiar with computers some
basic information about the parts of a computer, the software it uses, and a brief overview
of the TravelMate 3000 and its options. Experienced users may only need to skim this
chapter.
Chapter 2 - Learning More About Your Computer describes specific TravelMate 3000
hardware features and explains their functions.
viii
Chapter 3 - Getting Started lists recommended operating and storage environments and
tells you how to connect the AC Adapter, how to care for the battery pack, and how to
start and restart your TravelMate 3000.
Chapter 4 - Customizing Your Computer describes how to use the Setup Program to
customize your TravelMate 3000 for your working environment.
Page 9

Preface
Chapter 5 - Installing and Using Application Programs briefly describes guidelines for
installing your own application programs plus some of the software installed at the factory
in your TravelMate 3000, including the BatteryPro, Laptop Manager, and password
utilities.
Chapter 6 - TravelMate 3000 Options describes several options that can enhance the
performance of your TravelMate 3000-Numeric Keypad, RAM Modules, Internal Modem,
80387SX Coprocessor, external CRT monitors, and printers.
Chapter 7- Taking Care of Your Computer provides information on cleaning your
TravelMate 3000, as well as caring for your battery and conserving battery power.
Appendix A - Specifications lists operating and environmental specifications for your
TravelMate 3000.
Appendix B - Character Sets Illustrates U.S. and international character sets used by the
TravelMate 3000.
Appendix C - Keyboard Layouts illustrates the characters generated by the U.S. and
other national keyboards.
Appendix D - Diagnostics describes the diagnostic routines you can run to ensure that
your TravelMate 3000 is functioning properly.
Appendix E - Troubleshooting describes problems that can occur with your TravelMate
3000 and what to do about them, plus how to restore MS-DOS system files to your hard
disk in case they are erased for some reason.
Appendix F - Configuring Memory describes the TravelMate 3000's standard memory
and the memory options available for the computer.
ix
Page 10

Preface
Appendix G - Connector Pin Assignments lists the signals produced by the connectors
provided on the TravelMate 3000.
Appendix H - Screen Standards lists the characteristics of the various display adapters
supported by the TravelMate 3000.
A Glossary of frequently used technical terms and an
Index are included near the back of the manual to help you.
Warranty and Service at the back of the manual describes the standard warranty and
outlines the procedure to follow if your TravelMate 3000 ever requires service.
Other Manuals About the TravelMate 3000
The following manuals are furnished with your new TravelMate 3000 to help you operate
your computer.
Title Part Number
BatteryPro & Productivity Software 2566930-0001
User's Manual
MS-DOS User's Manual 2566932-0001
x
Page 11

Taking A First Look
This chapter tells you about:
q Computer hardware such as the main circuit board, the display, and the
keyboard
q Hardware options available for your TravelMate 3000 Notebook
Computer
q Software operating systems and application programs
Contents
Learning About Hardware .......................................................................................... 1-2
System Board...................................................................................................... 1-3
Microprocessor.................................................................................................... 1-3
RAM ..............................................................................................................1-4
ROM ..............................................................................................................1-4
Keyboard............................................................................................................. 1-4
LCD Screen ........................................................................................................1-4
Ports and Connectors...........................................................................................1-5
Hard Disk............................................................................................................1-5
Hard Disk Formatting ......................................................................................... 1-6
Floppy Diskette Drive..........................................................................................1-6
Learning About Options............................................................................................. 1-7
RAM Modules..................................................................................................... 1-7
Internal Modem ..................................................................................................1-7
Numeric Keypad ................................................................................................. 1-8
Extra Internal Battery Pack ................................................................................. 1-8
80387SX 20-MHz Math Coprocessor..................................................................1-8
Cables ..............................................................................................................1-8
Printers ..............................................................................................................1-9
External Monitors...............................................................................................1-9
Mouse .............................................................................................................. 1-9
Learning About Software ......................................................................................... 1-10
1
Taking a First Look 1-1
Page 12
Learning About Hardware
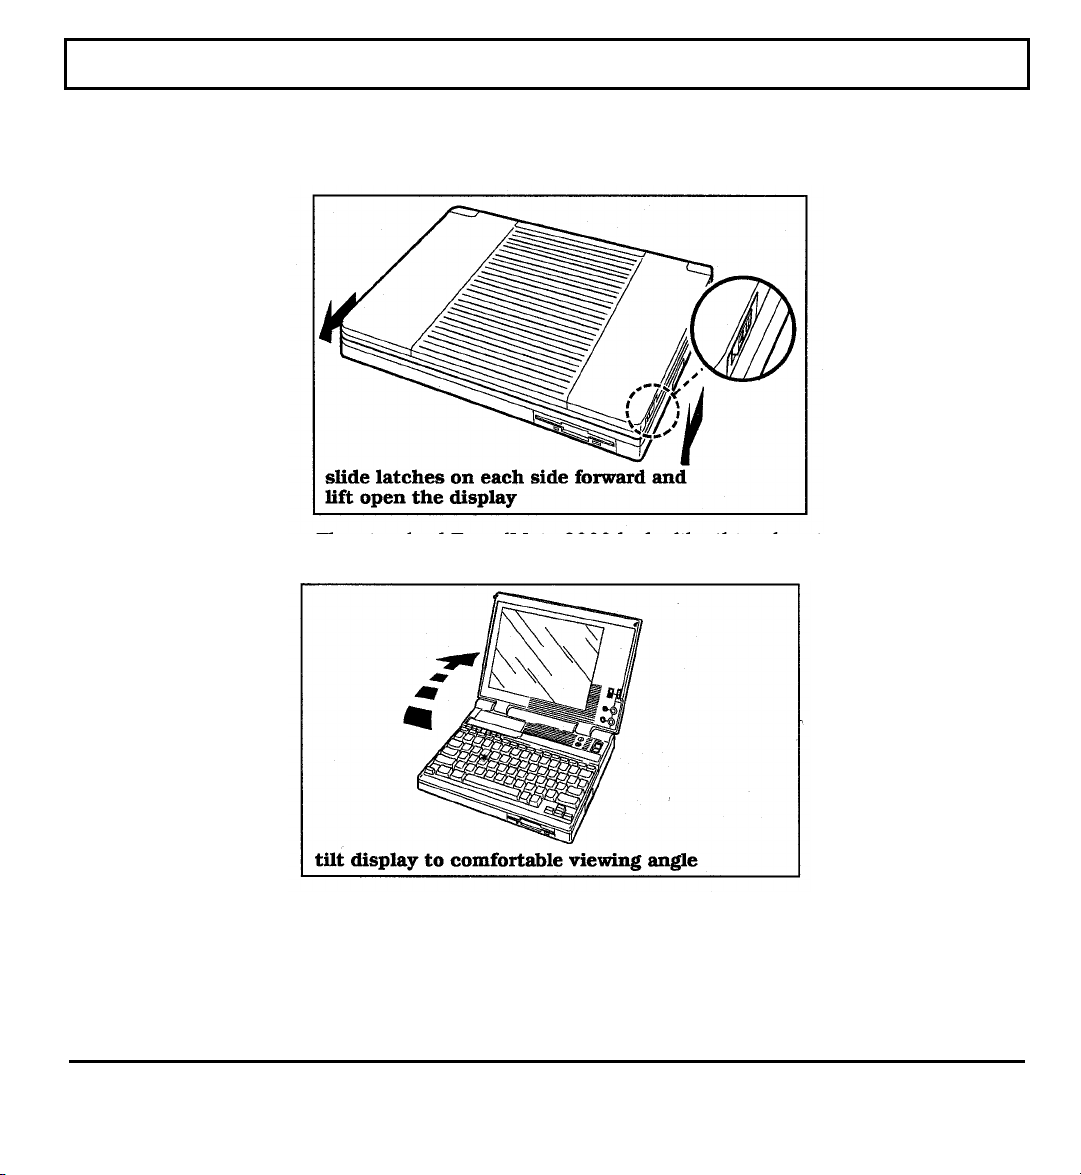
The standard Texas Instruments TravelMate 3000 Notebook Computer looks like this
when it is closed.
The standard TravelMate 3000 looks like this when it is set up and ready to operate.
1-2 Taking a First Look
If you are already familiar with the main components of a computer, you may want to
skim the remainder of this chapter and skip ahead to Chapter 2 to learn more about your
new TravelMate 3000's standard hardware and available options. Otherwise, please
continue on.
Page 13

Learning About Hardware
The TravelMate 3000's standard hardware consists of a system circuit board, a keyboard,
an LCD (liquid crystal display) screen, a hard disk drive, a 3.5-inch floppy diskette drive,
serial and parallel I/O (input/output) ports, mouse port, and other electronic circuits
needed to control the display and external options.
System Board
The system board holds the integrated circuits that make up the microprocessor and
memory. The system board also contains the hardware that controls the screen and
keyboard. The optional RAM modules, optional Internal Modem, and optional 80387SX
Math Coprocessor all plug into the system board.
Microprocessor
The microprocessor is the 'brain" of the computer. It processes data-or information-at
speeds so fast, its performance is measured in millionths of a second. The microprocessor
handles information in binary code, using the digit 0 or 1. Any piece of information (for
example, a number or character) is represented by a string of 0's and l's.
For example, the number 23 in binary code is 10111. A 0 or 1 in the binary system is
referred to as a bit, the smallest piece of information handled by the processor. A byte is a
group of eight bits, and represents a single character or number, such as "H" or "9". The
microprocessor in the TravelMate 3000 is a high-speed 80386SX microprocessor, running
at a clock speed of up to 20 MHz.
Taking a First Look 1-3
Page 14

Learning About Hardware
RAM
RAM (random access memory) stores data and application software for the processor.
You can write to or read from RAM freely, but once the power is turned off, the data in
RAM is lost. RAM size is described by the amount of information (bytes) it can store.
Symbols often used for this are "K" and "M". One K byte (1 K byte) represents 1024 bytes
and one M byte (1 M byte) represents 1024 K bytes. K bytes and M bytes are shown in
this manual as KB and MB, respectively.
The TravelMate 3000 has a standard RAM size of 2 MB. This can be increased up to 6
MB by installing up to two optional RAM modules.
ROM
ROM (read-only memory) contains factory-programmed information that remains stored
even with the power switch turned off. You cannot change the contents of ROM. The
TravelMate 3000 ROM, sometimes called firmware, is used to store the IPL (initial
program loader), BIOS (basic input/output system), and Setup Program functions.
Keyboard
You communicate with a computer by typing on the keyboard. Many of the keys work
like those on a standard typewriter. However, some keys have special functions not
available on a typewriter. The TravelMate 3000 keyboard is modeled after the IBM ®
101/102-key enhanced keyboard layout.
1-4 Taking a First Look
LCD Screen
The LCD (liquid crystal display) screen acts as a window for the computer to send
information for you to view. Information you enter on the keyboard, or information read
from the hard disk or a floppy, or sent via a modem, is displayed on the screen.
Page 15

Learning About Hardware
The TravelMate 3000's LCD screen can be set to emulate industry-standard display
modes, including the VGA (video graphics array) mode used by IBM in its latest PS/2
series of personal computers. The screen displays colors as various shades of gray. The
illuminated, triple supertwist, LCD screen gives you maximum readability in all lighting
conditions with a true black-on-white display. Screen standards are summarized in
Appendix H of this manual.
TM
Ports and Connectors
The parallel port (connector) is used to connect a parallel printer, and the RS-232C serial
port is used to connect an external modem, a serial printer, or other device that uses a
serial connector. The TravelMate 3000 also provides a 15pin connector for an external
analog monitor.
An external mouse connector on the left side of the case accepts an IBM PS/2 or
compatible mouse connector.
Hard Disk
The built-in hard disk is a permanently installed magnetic disk. Information is read from
and written to both sides of the disk at extremely high speeds by heads that float above the
disk surface on a cushion of air. When the disk is not actually being used, these heads
automatically 'park" themselves out of the way to prevent the disk surface from being
damaged by head movement.
The TravelMate 3000's standard hard disk can store up to 20 MB of information-the
equivalent of about 14 high-density floppies-and can write and read data very quickly.
This makes the hard disk the best place to store the programs you use most frequently.
Taking a First Look 1-5
Page 16

Learning About Hardware
Hard Disk Formatting
The hard disk consists of a platter that is divided into cylinders. A cylinder is a collection
of tracks in the same position on different sides of the hard disk platters.
The tracks of each cylinder are further divided into sectors. Each sector is numbered and
holds 512 bytes of data. The computer locates data on the disk by looking for its sector
number.
The hard disk in the TravelMate 3000 is formatted and loaded with software by Texas
Instruments during manufacture. Do not format the hard disk.
Caution: If you format the hard disk, all data on the hard disk will be erased.
Floppy Diskette Drive
A floppy diskette is a magnetic device that stores information created on a computer.
Once data is stored on a floppy, as diskettes are called in this manual, you can access the
data whenever necessary, or you can replace the old data with new when you no longer
need the old data.
1-6 Taking a First Look
During operation, the floppy rotates inside its plastic casing. As it rotates, the read/write
head of the drive moves from one track to another, locating information or finding space
available to store new information.
Page 17

Learning About Option
You can enhance the performance of a standard TravelMate 3000 with the addition of
hardware options available from Texas Instruments. These options enable you to send
and receive data over telephone lines, increase memory, enter numeric data more easily,
and add several other features.
The following hardware options are available rom your Texas Instruments dealer or TIExpress, 1-800-TI-PARTS. See Chapter 6 for more information on most of these options.
RAM Modules
Your TravelMate 3000 comes with 2 MB of standard RAM. You can increase this
capacity to 4 MB by installing an optional RAM Module Kit (TI Part No. 2566996-0001).
You can further increase memory by adding additional RAM Module Kits to increase
RAM to a total of 6 MB.
The memory on the optional RAM can be used as Extended memory or as Expanded
memory, conforming to version 4.0 of the LotusTM/IntelTM/Microsoft ® Expanded Memory
Specifications. See Chapter 4 for Setup Program instructions and Appendix F for
information on Expanded and Extended memory.
Internal Modem
Installing the 2400-bps Internal Modem option (TI Part No. 2566941-0003) with faxsending and MNP ® Class 5 error-correcting capabilities in your TravelMate 3000
enables you to send data and facsimile (fax) information over standard telephone lines.
Note: The Internal Modem option may not be available in some countries. For
information on this option, contact your dealer.
Taking a First Look 1-7
Page 18

Learning About Options
Numeric Keypad
The Numeric Keypad option (TI Part No. 2568033-0001) connects to the right side of the
TravelMate 3000 case, enabling you to more easily type numeric data. The Numeric
Keypad layout is similar to the keypad on a full-sized IBM enhanced ATTM keyboard.
Extra Internal Battery Pack
With an extra internal battery pack (TI Part No. 2566962-0001) you can double the time
you can operate your computer on battery power. You can charge the extra battery in the
computer.
80387SX 20-MHz Math Coprocessor
Adding the 80387SX Coprocessor option (TI Part No. 2566997-0001) to the TravelMate
3000 system board significantly improves processing performance of application programs
that support a math coprocessor.
Note: Use only the TravelMate 3000 Coprocessor option or equivalent. Some
coprocessors exceed the computer's power capacity.
1-8 Taking a First Look
Cables
You can order a parallel printer cable (TI Part No. 25518040001) or a serial interface
cable (TI Part No. 2557455-0001) for use with your computer. Pin assignments for both
cables are listed in Appendix G of this manual.
You also can order a LapLink ® cable and User's Manual (TI Part No. 2567016-000 1) to
connect your TravelMate 3000 to another compatible computer. The LapLink software is
furnished with your TravelMate 3000.
Page 19

Learning About Options
Printers
Texas Instruments makes a variety of laser and impact printers you can use with the
TravelMate 3000, enabling you to a produce hard copy of information you have created.
You can connect almost any parallel printer to the TravelMate 3000 parallel printer port
or serial printer to the serial port.
External Monitors
Your TravelMate 3000 has a CRT connector to which you can connect an external, analog
CRT monitor. See Chapter 6 for a list of monitor types supported by the TravelMate
3000.
Mouse
You can connect an IBM PS/2 (or compatible) mouse to the furnished mouse adapter
cable with ferrite, which connects to the six-pin mini-DIN connector on the left side panel
of the computer.
Taking a First Look 1-9
Page 20

Learning About Software
A computer system needs software before it can carry out any useful task. Without
software, your computer is just a Collection of electrical components. In order to use
computer hardware for tasks like writing memos or balancing a checking account,
software is necessary.
Software is a series of instructions that direct the computer to perform specific tasks.
Generally, these instructions are loaded from a floppy diskette or your hard disk into main
memory where they remain until you exit the software program or turn off the computer.
Your computer needs three levels of software to function-an input/output system, an
operating system, and an application program.
q The BIOS (basic input/output system) is stored in ROM on the system
board. The BIOS controls the input/output functions of the hardware
itself, according to information received from the operating system or
software program, also known as BIOS calls.
q The operating system is a software program that manages the computer's
resources, such as disk drives and printers. By performing these general
routines, the operating system is the base on which application programs
run. The operating system for this computer is MS-DOS, version 4.01,
and is provided with some diskettes.
1-10 Taking a First Look
q An application program is software that helps you perform business and
personal tasks such as word processing, spreadsheet analyses, and
graphics presentations. Almost all application programs written to run
under MS-DOS on IBM and compatible personal computers can be used
with the TravelMate 3000 Notebook Computer.
Page 21

Learning About Your Computer
This chapter tells you about:
q The Texas Instruments TravelMate 3000 Notebook Computer LCD
screen and how to adjust it
q Ports and connectors on the side panels of the computer case
q The keyboard and common key assignments
q The status indicator lights and their meaning
Contents
LCD Screen 2-3
Resolution........................................................................................................... 2-3
Screen Angle....................................................................................................... 2-3
Screen Controls ................................................................................................... 2-4
Brightness Control ....................................................................................... 2-4
Contrast Control........................................................................................... 2-4
Standard/Reverse Switch.............................................................................. 2-5
Connectors and Ports ................................................................................................. 2-6
Right Side Panel..................................................................................................2-6
Left Side Panel....................................................................................................2-6
Parallel (Printer) Port...................................................................................2-7
External Monitor Connector.........................................................................2-7
Mouse Connector .........................................................................................2-7
Modem Connector........................................................................................2-7
Serial (RS-232-C) Port ................................................................................. 2-7
Rear Panel........................................................................................................... 2-8
AC Adapter Jack..........................................................................................2-8
Expansion Bus Connector.............................................................................2-8
Bottom Panel.......................................................................................................2-9
Operator Panel....................................................................................................2-9
Power Switch ...............................................................................................2-9
Option Card Slot Cover................................................................................ 2-9
2
Learning About Your Computer 2-1
Page 22

Contents
Keyboard Keys.................................................................................................. 2-10
Color Coded Keys....................................................................................... 2-10
Function Keys ............................................................................................ 2-10
Enter.......................................................................................................... 2-11
Shift........................................................................................................... 2-11
Caps Lock .................................................................................................. 2-11
Tab ............................................................................................................ 2-11
Backspace .................................................................................................. 2-12
Ctrl ............................................................................................................ 2-12
Alt ............................................................................................................ 2-12
Fn ............................................................................................................ 2-12
SysRq......................................................................................................... 2-12
Prtsc........................................................................................................... 2-12
Cursor Control Keys ................................................................................... 2-13
Esc ............................................................................................................ 2-13
Ins ............................................................................................................ 2-13
Del ............................................................................................................ 2-14
Using the NumLk Key and
the Embedded Numeric Keypad ........................................................... 2-14
Num Lock On............................................................................................. 2-15
Num Lock Off............................................................................................ 2-15
Num Lock Blinking.................................................................................... 2-16
ScrLk ......................................................................................................... 2-16
Pause.......................................................................................................... 2-16
Combination Keys...................................................................................... 2-16
Break ......................................................................................................... 2-17
Set Up........................................................................................................ 2-17
Stndby (Stand By) ...................................................................................... 2-17
Turbo ......................................................................................................... 2-18
Speed Control Keys.................................................................................... 2-18
Palette Control Keys................................................................................... 2-18
Indicator Lights................................................................................................. 2-19
Power......................................................................................................... 2-19
Low Batt (Battery) ...................................................................................... 2-19
Turbo ......................................................................................................... 2-20
Floppy Disk ................................................................................................ 2-20
Hard Disk................................................................................................... 2-20
Caps Lock .................................................................................................. 2-20
Num Lock (Numeric Keypad Lock)............................................................ 2-21
Scroll Lock ................................................................................................. 2-21
2-2 Learning About Your Computer
Page 23

LCD Screen
Your Texas Instruments TravelMate 3000 Notebook Computer displays text and graphics
on a triple supertwist, illuminated, liquid crystal display (LCD) with cold cathode
fluorescent tube (CCFT) backlight, giving true black-on-white contrast. The TravelMate
3000 is able to emulate IBM's video graphics array (VGA) by displaying colors as shades
of gray.
You can also connect an external monitor to your TravelMate 3000. External monitor
display modes are described in Appendix H of this manual.
Resolution
The LCD screen displays a maximum resolution of 640 dots horizontally by 480 dots
vertically. Resolution depends on which display mode you select on page 2 of the Setup
Program described in Chapter 4. The TravelMate 3000 enables you to select display
modes for both the LCD and external monitors.
Screen Angle
You can tilt your TravelMate 3000 combination cover/screen to adjust it to the best
viewing angle. Do not attempt to tilt the screen more than approximately 130 degrees:
damage to the hinge can result.
Caution: To save battery power, the TravelMate 3000 beeps for about 10 seconds
(continuously if OS/2TM is executing) if you happen to close the screen with the power
still on. Never transport the TravelMate 3000 with the power on.
The TravelMate 3000 is designed so that it can be used with the cover/screen closed, for
example, to connect an external monitor to your computer to run a demonstration
program. For this purpose, you can disable the coverclosed alarm by changing a setting in
the Setup Program (see Chapter 4).
Learning About Your Computer 2-3
Page 24

LCD Screen
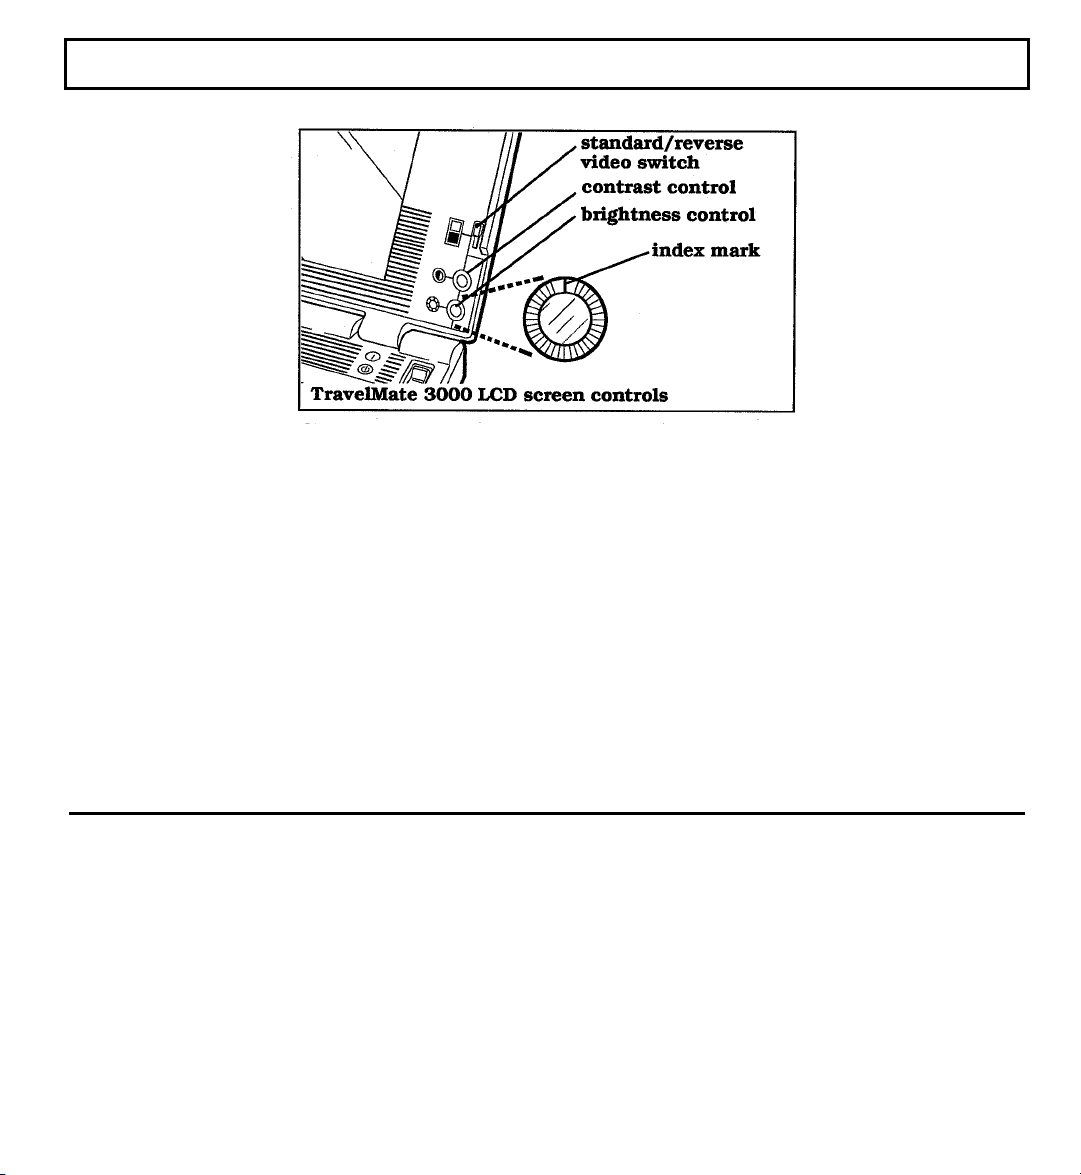
Screen Controls
The LCD screen is illuminated to enable you to control background brightness and
contrast for better readability. The backlight turns on automatically when you turn on the
computer.
Note: To conserve battery power and prolong screen life, you can set the backlight to
turn off automatically if you do not use the keyboard for a preset time. Set the delay
period at the Setup Program menu described in Chapter 4. Press the Shift key
(recommended) or almost any other key on the keyboard to turn the backlight on again.
Brightness Control
The Brightness rotary control adjusts the brightness of the illuminated screen. Adjust
this control in conjunction with the Contrast control.
Note the index mark on the Brightness control. Set the index mark to the up position for
the brightest image, but the highest battery power consumption. Set the index mark
facing left for medium brightness and lower power use. Set the index mark facing down
for the least battery power consumption.
2-4 Learning About Your Computer
Contrast Control
The Contrast rotary control adjusts the contrast between the displayed image and the
background for the best viewing condition. Adjust this control in conjunction with the
Brightness control.
The Contrast control does not affect power consumption.
Page 25
LCD Screen
Standard/Reverse Switch
The screen normally displays black characters on a white background. You can reverse
this image to white on black by setting the standard/reverse switch to the q (reverse)
position.
Some graphic images may display like a photographic negative on the LCD screen.
Reversing the image should correct this effect.
Learning About Your Computer 2-5
Page 26
Connectors and Ports
Caution: Turn off the computer before connecting any external devices to the
computer's connectors.
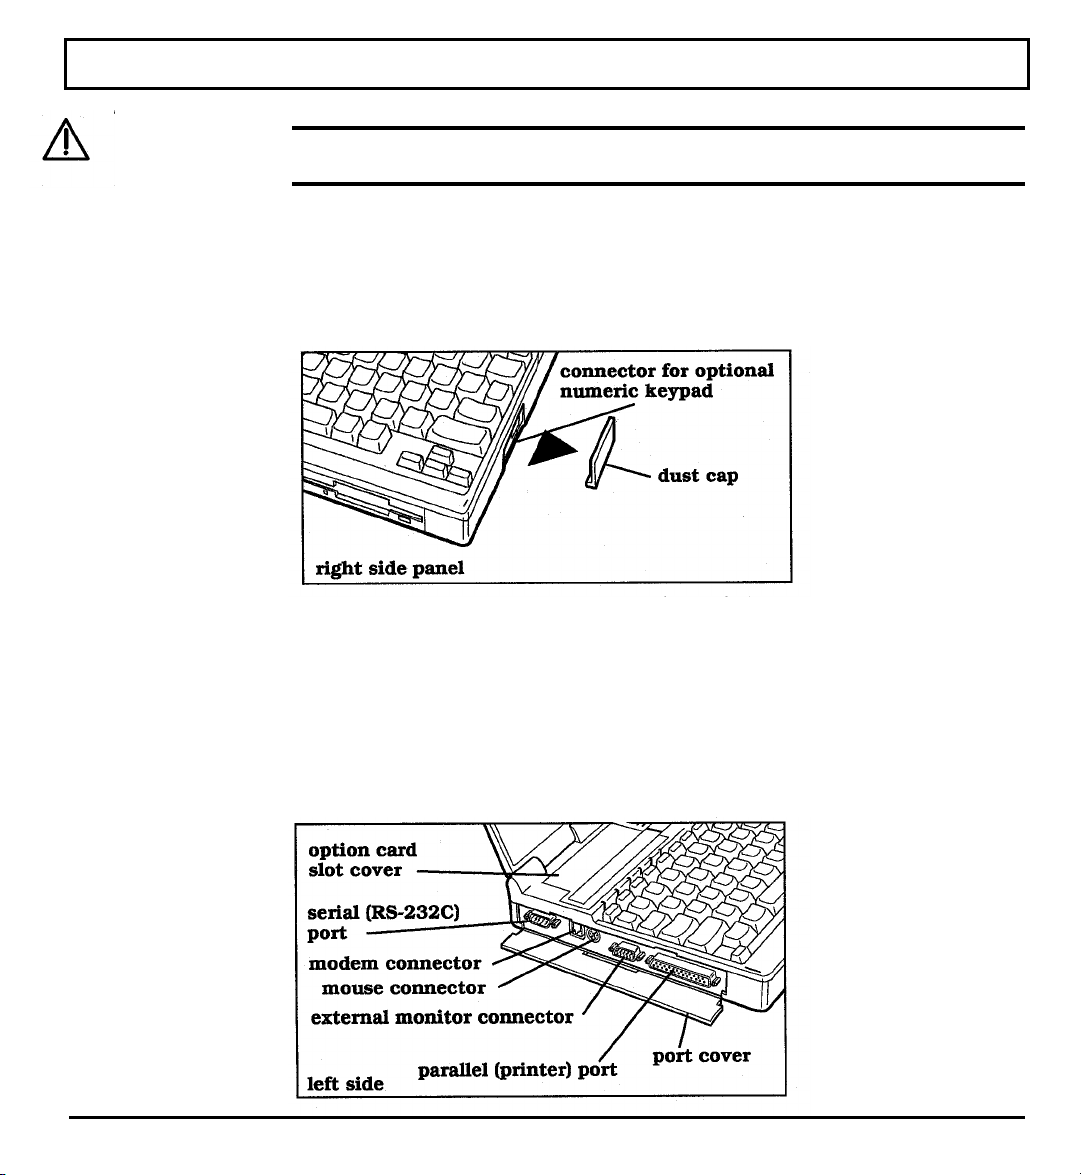
Right Side Panel
The right side panel of the computer contains the numeric keypad connector to connect
the optional Numeric Keypad to your computer.
A dust cap is provided for the numeric keypad connector. Remove and store this cap in a
safe place while the connector is in use.
2-6 Learning About Your Computer
Left Side Panel
On the left side panel of the computer are the five connectors shown in the figure on the
inside front cover.
Page 27

Connectors and Ports
Parallel (Printer) Port
You can connect a parallel printer or other device that uses a standard parallel interface to
this 25-pin female connector. The cable from the printer or other device must terminate
in a 25-pin IBM-PC-style male connector to connect to this port. Pin assignments for this
connector are listed in Appendix G.
External Monitor Connector
The TravelMate 3000 can display data on either its built-in LCD screen or on an external
analog VGA monitor connected to the 15-pin VGA monitor connector. See Chapter 6 for
details on compatible external monitors. Pin assignments for this connector are listed in
Appendix G.
Mouse Connector
The mouse port accepts the furnished six-pin mini-DIN mouse adapter cable, which
connects to an IBM PS/2-compatible mouse connector for use with application programs
that support a mouse. Pin assignments for this connector are listed in Appendix G.
Modem Connector
If your TravelMate 3000 is equipped with the optional Internal Modem, the modular RJ11-C telephone jack is located on the left side panel next to the mouse connector.
Serial (RS-232C) Port
The RS-232C serial port can be used to connect external devices such as a serial printer,
mouse, or an external modem. The cable used to connect to this port must terminate in a
nine-pin female IBM AT-style connector. See Appendix G for a list of pin assignments
for the serial port.
Learning About Your Computer 2-7
Page 28
Connectors and Ports
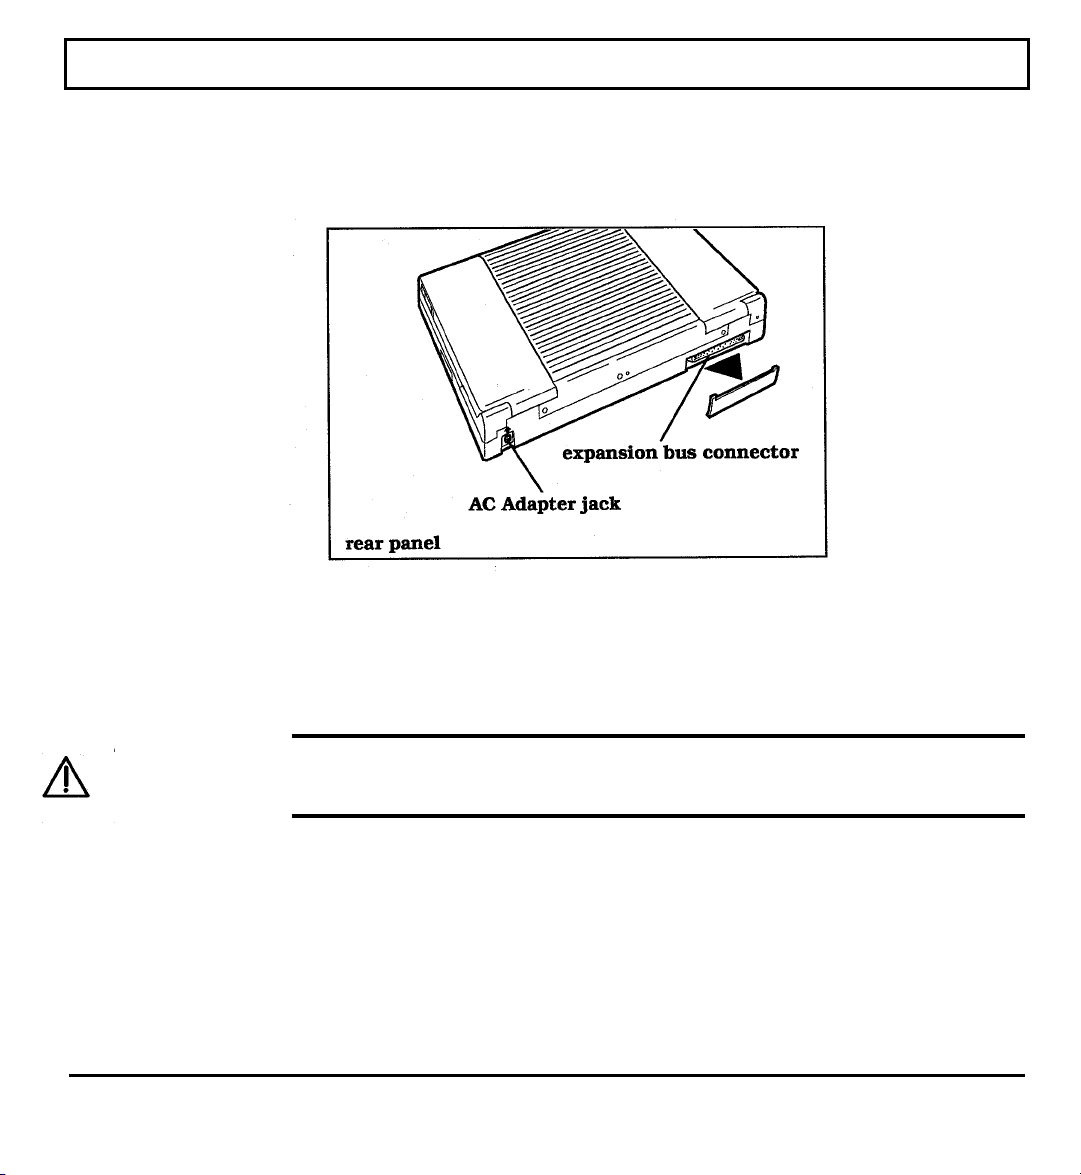
RearPanel
The rear panel of the computer has the expansion bus connector and the AC Adapter jack.
AC Adapter Jack
The AC Adapter mini-DIN jack connects to this jack to recharge the battery and supply ac
power to the computer. See Chapter 3 for instructions on charging and conditioning the
internal battery pack.
2-8 Learning About Your Computer
Caution: Use only the supplied AC Adapter with your TravelMate 3000
Notebook Computer. Other adapters A may not match the power requirements of
the TravelMate 3000 and can cause serious damage to the electronic circuits.
Expansion Bus Connector
The 120-pin expansion bus connector is provided to attach future optional devices to your
TravelMate 3000.
Page 29

Connectors and Ports
Bottom Panel
The bottom panel of the computer provides access to remove and install the supplied
internal battery pack. See Chapter 3 for battery pack removal and installation
instructions.
Tilt Legs - In the rear corners of the bottom panel are two holes into which you can insert
the furnished tilt legs to increase the angle of the keyboard.
Operator Panel
The computer's operator panel has a power switch, an optional card slot cover, the
keyboard, and eight status indicator lights. The keyboard and the indicator lights are
described in the next section of this chapter.
Power Switch
The power switch turns the power to the computer on and off for both battery-powered
and ac operation. Set the switch to the I (on) position to turn on the computer and to the
(off) position to turn off the computer.
Option Card Slot Cover
A cover for the option card slot is located at the rear left corner of the operator panel. The
optional Internal Modem card can be installed in this slot. For details, see the instructions
furnished with the Internal Modem kit.
Learning About Your Computer 2-9
Page 30
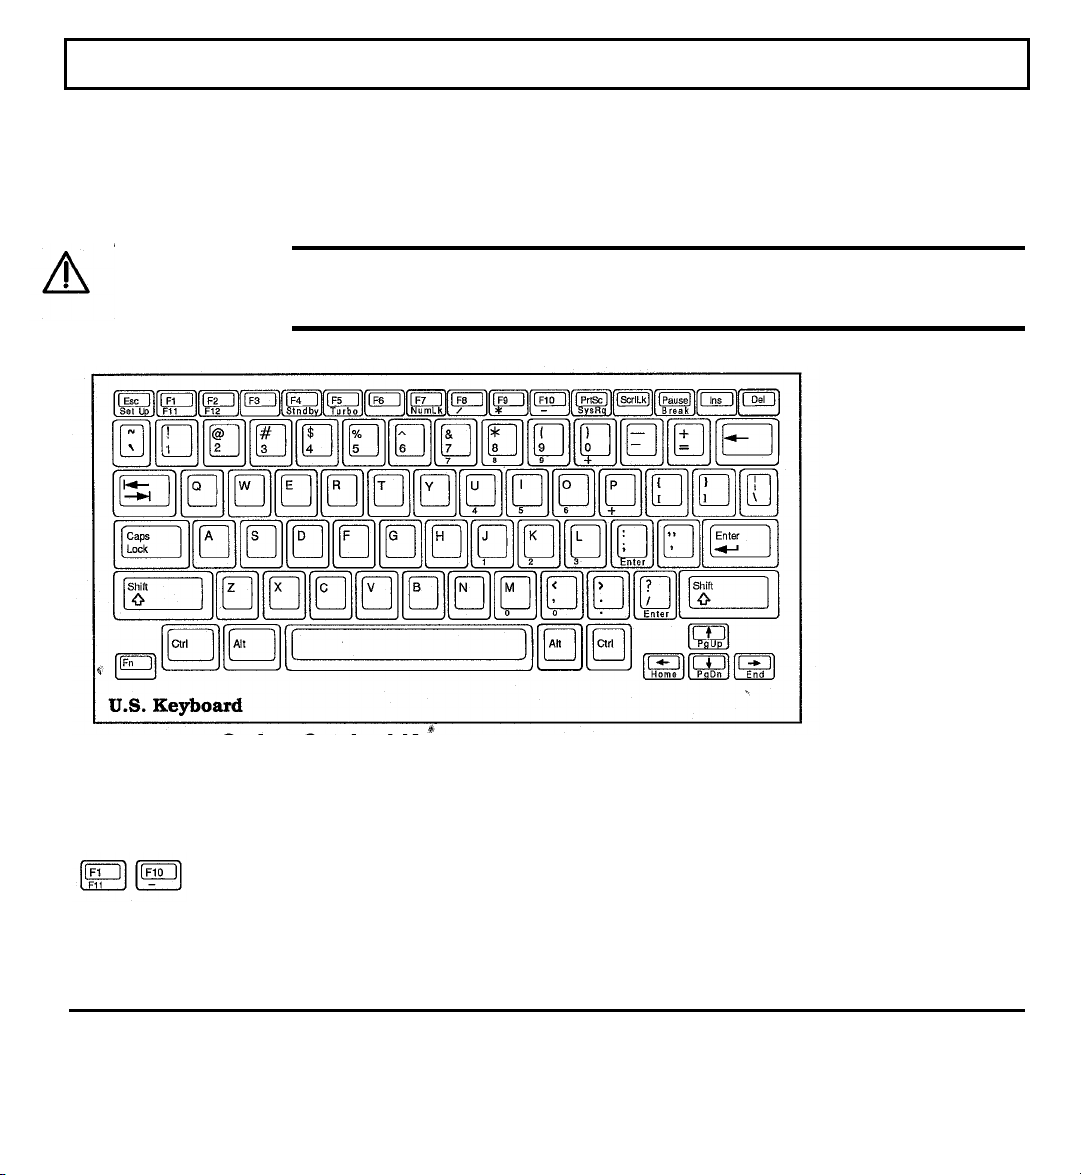
Keyboard Keys
The TravelMate 3000 keyboard provides all the functions of the IBM AT-101 -style
enhanced keyboard. Many keys on the keyboard are similar to those on a standard
typewriter, but you may not be familiar with some keys. The following sections describe
special function keys not found on a standard typewriter.
Note: MS-DOS and application programs use keys for special purposes not defined here.
Refer to your application program documentation and the MS-DOS User’s Manual
provided with your TravelMate 3000.
Color Coded Keys
Note that the fronts of some keys (for example, F11, F12, Home, End) are labeled in blue
to indicate that these keys work in conjunction with the Fn key to produce their function.
Along the top row of the keyboard are 1 0 function keys labeled F1 through F10. Two
additional function keys, labeled in blue as F11 and F12, are available for many
applications by pressing them in conjunction with the Fn key.
2-10 Learning About Your Computer
Function Keys
Page 31

Keyboard Keys
The function keys perform editing functions in MS-DOS (see the MS-DOS User's Manual
supplied with your computer). Applications programs use the function keys for various
purposes; see your application program documentation.
Note: Above the function keys is a slot to hold the furnished blank template where you
can write the specific functions of the keys in your application program.
Enter
The Enter key is generally used to end a fine or menu entry and move to the next one.
This key is also called the Return key by some application programs.
Shift
The TravelMate 3000 provides two identical Shift keys. Pressing any alphanumeric key
while you press and hold the Shift key generates that key's uppercase character or the
symbol at the top of two-character keys. When the Caps Lock key function is on, the
Shift keys work in reverse, generating a lowercase character.
CapsLock
The Caps Lock key makes all alphabet letters you type uppercase. It is a toggle key;
pressing it once turns it on and pressing it again turns it off. This key has no effect on
numeric characters or symbols. When the Caps Lock function is on, the Caps Lock
indicator light comes on.
Tab
With most applications the Tab key works like the tab key on a regular typewriter,
moving the cursor to the next preset tab position. Pressing the Shift-Tab keys causes the
cursor to move left to the previous preset tab position.
Learning About Your Computer 2-1 1
Page 32

Keyboard Keys
With most applications the ← (Backspace) key moves the cursor to the left one space at a
time, erasing any character it passes.
The keyboard has two identical Ctrl (Control) keys. With many applications the Ctrl key
changes the function of another key when both keys are pressed simultaneously. For
example, under MS-DOS, pressing the Ctrl-Pause keys sends a Break signal to stop
execution of the current program.
The U.S. keyboard has two identical Alt (Alternate) keys. Like the Ctrl key, the Alt key
generates an alternate function for another key in many applications.
With many applications the Fn (Function) key is used to access numbers, characters, or
the functions printed in blue on the fronts of some keys on the TravelMate 3000 keyboard.
Backspace
Ctrl
Alt
Fn
The function of SysRq (System Request), produced by pressing the Alt-PrtSc keys, varies
by application program. Not all programs use this key; check your application program
documentation for details.
With many applications pressing the PrtSc (Print Screen) key causes your printer to print
whatever is displayed on the screen if your printer is connected, turned on, and online.
2-12 Learning About Your Computer
SysRq
Prtsc
Page 33

Keyboard Keys
Note: You must first run the MS-DOS utility, GRAPHICS.COM, to print graphic
displays; if not, only text characters are printed. See your MS-DOS User's Manual for
details.
You can press the Ctrl-PrtSc keys to toggle on the "echo" function, during which your
printer prints the currently displayed line of data each time you press the Enter key.
Cursor Control Keys
The four arrow keys move the cursor in the direction of the arrow: left and right one space
or up and down one line. With most applications if you press and hold an arrow key for
more than a half second, the cursor moves at a faster speed. You can adjust the speed
using the Setup Program described in Chapter 4 and with some application programs.
Pressing the Fn key with the arrow keys generates the functions shown on the front of the
keycaps: Home, End, PgUp, and PgDn. Some applications use the arrow keys for
different and additional functions; see your application program documentation for
particular arrow key functions.
Esc
The Esc (Escape) key is used in many applications to cancel a command, exit the
application, or introduce a special command called an escape sequence. See your
application program documentation for particular Esc key functions.
Ins
The Ins (Insert) key toggles on and off the insert mode in MS-DOS and many
applications. In insert mode you can move the cursor anywhere on the line of text and
insert characters, pushing existing characters on the line to the right. Press the Ins key
again to cancel insert mode, in many applications pressing other keys also cancels insert
mode.
Learning About Your Computer 2-13
Page 34

Keyboard Keys
Press the Del (Delete) key to delete the character at the cursor. In MS-DOS and many
applications, characters on the line to the right of the cursor are pulled to the left.
Using the NumLk Key and
the Embedded Numeric Keypad
Your TravelMate 3000 features an embedded keypad (built into the keyboard) that
provides the same functions as the discrete numeric keypad on an AT enhanced keyboard.
An AT-style numeric keypad provides cursor movement, paging, and other functions in
normal mode. In the number lock mode the AT-style numeric keypad keys generate
numerals.
The TravelMate 3000 embedded numeric keypad keys shown in the following figure
generate AT-keypad characters and functions when pressed in conjunction with the
NumLk key and the Fn key.
Del
2-14 Learning About Your Computer
Note: If you have installed the optional external Numeric Keypad, the embedded
numeric keypad does not function.
Page 35

Keyboard Keys
The embedded numeric keypad has three modes you can enter by toggling the Fn-F7
(NumLk) keys as signaled by the Num Lock indicator light: off, on, or blinking. The
three modes are described below.
Num Lock On
When the Num Lock indicator light is on, pressing the Fn key with the appropriate keys
generates the characters shown in this figure.
Num Lock Off
When the Num Lock indicator light is off, pressing the Fn key with the appropriate keys
generates the characters shown in the following figure.
Page 36

Keyboard Keys
Num Lock Blinking
When the Num Lock indicator light is blinking-caused by pressing the Fn-F7 (NumLk)
keys-the embedded numeric keypad becomes a temporary numeric keypad that does not
require you to press any other key. This mode is particularly useful when you have to
enter a large quantity of numbers. If you press and hold the Fn key in this mode, the
keypad keys generate their normal characters.
Press the ScrLk (Scroll Lock) key to toggle on and off the scroll-lock function. The
Scroll Lock indicator above the keyboard also lights. This key has no fixed function, see
your application program documentation.
In MS-DOS and many applications, pressing the Pause key stops the displayed text from
scrolling. Pressing any other key restarts scrolling.
Note: If you press the Shift key in addition to the keys shown in the figures above, the
shifted status is reversed; that is, shifted is unshifted and unshifted is shifted.
ScrLk
Pause
Combination Keys
Several functions are generated on the keyboard by pressing the Ctrl and Fn keys in
conjunction with the keys described below to produce the functions labeled on the front of
the key.
2-16 Learning About Your Computer
Page 37

Keyboard Keys
Break
Pressing the Ctrl-Pause (Break) keys sends a Break signal to stop current program
execution. Your application program may have other or additional functions for the
Break signal.
Set Up
Pressing the Fn-Esc (Set Up) keys when the computer displays the MS-DOS C:\> prompt
loads the Setup Program from the hard disk. The Setup Program permits you to configure
the computer's basic functions. Although not recommended, you also can load the Setup
Program from ROM while you are working in an application program by pressing the
Ctrl-Alt-Esc keys. Be sure to update your application program before loading the Setup
Program or you can lose work.
See Chapter 4 for details on using the Setup Program.
Stndby (Stand By)
Pressing the Fn-F4 (Stndby) keys sets the TravelMate 3000 to the Standby mode and the
processor to the "sleep" mode, which turns off both the LCD display and the hard disk
drive. In this mode the processor responds only to pressing the Fn-F4 keys again, which
causes the system to resume normal operation.
The Power indicator light glows orange when the computer is in the Standby mode.
Note: See Chapter 4 of this manual and see the BatteryPro & Productivity Software
User's Manual furnished with your computer for more details on the Standby and other
power-saving modes.
Learning About Your Computer 2-17
Page 38

Keyboard Keys
Turbo
Pressing the Fn-F5 (Turbo) keys increases the CPU processing speed to 20 MHz. When
the Turbo feature is off, the CPU runs at 8 or 10 MHz. The Turbo feature uses more
battery power but provides faster processing.
When you turn on the Turbo feature, the Turbo indicator light comes on. You also can
change CPU speed using the speed control keys described below and in the Setup Program
described in Chapter 4.
Speed Control Keys
Pressing the Ctrl-Alt-↑ keys increases the CPU processing speed in the range of 8, 10,
and 20 MHz, and the computer sounds low, medium, and high frequency tones. Pressing
the Ctrl-Alt-↓ keys decreases CPU speed.
Palette Control Keys
Pressing the Fn-Alt-Esc keys toggles the LCD display through six different gray scale
palette configurations. You also can adjust the gray scale (and color if an external color
monitor is connected to your TravelMate 3000) using the RPAL and PAL utilities
supplied with your computer. See your BatteryPro & Productivity Software User's
Manual for more details.
2- 18 Learning About Your Computer
Page 39

Indicator Lights
Above the keyboard are eight indicator lights that show the status of certain operating
features.
Power
The Power indicator glows green when you turn on the Power switch (located above the
right side of the keyboard). If the light does not come on, the AC Adapter may not be
plugged in or the battery may be discharged.
The Power indicator glows orange when the computer is set to the stand-by mode.
Low Batt (Battery)
If the internal battery pack is installed in the TravelMate 3000, the Low Batt light
indicates the following:
q The Low Batt indicator remains off if the battery has more than 10 to
20 minutes charge remaining.
q The Low Batt indicator turns on (red) when the battery has
approximately 10 to 20 minutes charge remaining.
q The Low Batt indicator blinks red and the alarm sounds (if enabled
using the Setup Program) when the battery has approximately 2 to 10
minutes charge remaining. Both the indicator and the alarm remain on
until the computer shuts itself off.
Learning About Your Computer 2-19
Page 40

Indicator Lights
Note: The time variations in the Low Batt indicator functions are affected by the battery
charge remaining when you turn on power and may also vary among individual
computers.
Note: See "Conditioning the Battery Pack- in Chapter 3 for more details on the Power
and Low Batt indicators.
Turbo
The Turbo indicator comes on when the processor is operating at high speed (20 MHz)
and goes off at the low speeds (8 or 10 MHz). The Turbo indicator also goes off while the
computer is accessing the floppy drive and when in the sleep mode.
Floppy Disk
The Floppy Disk indicator comes on when the computer writes to or reads from the builtin 3.5-inch microdiskette drive. Also note that the indicator light on the front of the
floppy drive also comes on during floppy drive accesses.
Hard Disk
The Hard Disk indicator comes on when the computer writes to or reads from the built-in
hard disk drive.
Caps Lock
The Caps Lock indicator comes on when you press the Caps Lock key to toggle on the
caps lock function and turns off the next time you press the Caps Lock key.
2-20 Learning About Your Computer
Caution: Never remove a floppy from the drive while the Floppy Disk indicator is
on. You could destroy data and damage the drive.
Page 41

Indicator Lights
Num Lock (Numeric Keypad Lock)
The Num Lock indicator comes on when you press the Fn-F7 (NumLk) keys to toggle on
the numeric keypad lock function. See 'Using the NumLk Key and the Embedded
Numeric Keypad" earlier in this chapter for full details.
Scroll Lock
The Scroll Lock indicator comes on when you press the ScrLk key to toggle on the scroll
lock function and turns off the next time you press the ScrLk key.
Learning About Your Computer 2-21
Page 42

Page 43

Getting Started
This chapter tells you about:
q Recommended operating and storage environments for your Texas
Instruments TravelMate 3000 Notebook Computer
q How to take care of the computer's hard disk
q Connecting the AC Adapter and installing, removing, and charging the
internal battery pack
q Starting up your TravelMate 3000
q Using the floppy diskette drive and how to take care of your floppies
q Help displays you can view to help you use your computer
Contents
Guidelines & Precautions...........................................................................................3-3
Operating Environment....................................................................................... 3-3
Operating Guidelines .......................................................................................... 3-3
Taking Care of the Hard Disk..............................................................................3-4
Providing Power.........................................................................................................3-6
Connecting the AC Adapter ................................................................................ 3-6
AC Adapter Indicator Lights............................................................................... 3-7
Handling the Battery Pack.......................................................................................... 3-9
Removing the Battery Pack .................................................................................3-9
Installing the Battery Pack ................................................................................ 3-10
Conditioning the Battery Pack ........................................................................... 3-11
Automatic Discharge......................................................................................... 3-12
Starting Your Computer........................................................................................... 3-13
Restarting the Computer .......................................................................................... 3-14
3
Getting Started 3-1
Page 44

Contents
3-2 Getting Started
Using the Floppy Drive............................................................................................ 3-15
Taking Care of Your Floppies ........................................................................... 3-15
Using Your Floppies ......................................................................................... 3-16
Inserting a Floppy Into the Drive....................................................................... 3-17
Help Displays........................................................................................................... 3-18
DOS Commands Description............................................................................. 3-18
TravelMate 3000 Utilities Description ............................................................... 3-19
Page 45

Guidelines & Precautions
Operate your Texas Instruments TravelMate 3000 Notebook Computer according to the
following environmental specifications and operating guidelines.
Operating Environment
When using your computer, always try to ensure that the temperature and humidity of the
surroundings fall within the following ranges.
Temperature
Operating: 50 to 95 degrees F (10 to 35 degrees C)
Storage: -4 to 140 degrees F (-20 to 60 degrees C)
Relative Humidity (Noncondensing)
Operating: 20 to 80%
Storage: 10 to 90%
Operating Guidelines
q When operating your TravelMate 3000 with the AC Adapter, make sure the wall
outlet supplies the correct voltage. Check the label on the bottom of the
computer case and on the AC Adapter.
q For information on installing hardware options, see Chapter 6 of this manual and
the instructions supplied with the option.
q For instructions on configuring the computer for your operating environment, see
Chapter 4.
Getting Started 3-3
Page 46

Guidelines & Precautions
Taking Care of the Hard Disk
The hard disk in your TravelMate 3000 is specially designed to withstand the rigors of
travel. The hard disk heads automatically park themselves when the computer is turned
off. However, it is still a precision device and careful treatment will prolong its life.
Follow these guidelines to get the most out of your hard disk's performance:
q Never move the computer when the hard disk is being accessed.
q Never subject the computer to strong vibration or sudden shocks,
especially during transportation.
q You can move your computer with the power on; however, it is a good
idea to put the computer in Standby mode.
q Always keep backup floppies of all programs and data stored on your
hard disk in case of a hard disk accident or failure. The time spent
backing up your data is always worthwhile.
Caution: You should back up your hard disk to floppies on a regular basis to
protect against loss of data because of a hard disk failure. Follow the backup
procedure outlined in your MS-DOS User's Manual or use a backup procedure
provided by your application program. If your hard disk fails, TI service
personnel may or may not be able to save some or most of the contents of your
hard disk if replacement is required.
3-4 Getting Started
Page 47

Guidelines & Precautions
q When moving your computer to a location where the temperature is
more than 18° F (10° C) different from the current location, do the move
in two stages:
(1) First, leave the computer in a place where the temperature is
somewhere between that of the new location and the old location for
about I hour.
(2) Then move the computer to the new location. This ensures that
the hard disk mechanisms have time to adjust to the new environment
and prevents moisture from condensing on vital parts.
q In case of a hard disk failure, telephone Texas Instruments at 1-800-
847-5757 for information about data recovery.
Getting Started 3-5
Page 48

Providing Power
You can operate your TravelMate 3000 from ac power of the correct voltage via the
furnished AC Adapter. You also can run the computer using the internal battery pack
installed at the factory. The first time you use the computer or after the computer has
been out of service for several weeks, connect the AC Adapter as described below, both to
operate the computer and to recharge the battery pack.
Refer to "Handling the Battery Pack" later in this chapter to learn how to remove, install,
charge, and condition the battery pack for optimum service.
Connecting the AC Adapter
The AC Adapter supplied with your TravelMate 3000 both charges the internal NiCad
battery pack and, of course, operates the computer on ac power. You can operate your
TravelMate 3000 on ac power with the battery pack removed or installed.
Caution: Use only the AC Adapter supplied with your TravelMate 3000. Using
another adapter can damage A your computer. Be sure to plug the AC Adapter into
a grounded outlet or use a grounded plug adapter.
Caution: Before connecting or disconnecting the AC Adapter to the computer,
always turn off computer power or set the computer to Standby mode.
3-6 Getting Started
Enter Standby mode by pressing the Fn-F4 (Stndby) keys (the normally green Power
indicator light will turn orange). After you disconnect or connect the AC Adapter,
again press the Fn-F4 keys to return to normal mode (the orange Power indicator
light will change to green) .
Page 49

Providing Power
Connect the AC Adapter to your TravelMate 3000 as follows.
1. Set the computer's power switch to the off position .
2. Connect the female end of the supplied ac cord to the inlet on the AC Adapter
body.
3. Connect the male end of the ac cord into a grounded wall receptacle of the
correct voltage. Use a grounded plug adapter if necessary.
4. Holding the round rnini-DIN jack from the AC Adapter so that the arrow
embossed on the connector faces up, press the connector into the matching jack
on the rear panel of the computer.
Note: For best air circulation, set the AC Adapter on your work surface on its short side
with the indicator lights up.
AC Adapter Indicator Lights
The two status indicator lights on the AC Adapter signal the following states.
q The amber indicator comes on when the AC Adapter is connected to
both the computer and a wall outlet, and the installed battery is being
charged.
Getting Started 3-7
Page 50

Providing Power
q The green indicator comes on when the AC Adapter is connected to both
Note: When the amber light goes off after you have charged the battery pack, wait 10
minutes for the battery pack to cool down to operating temperature before running the
computer on battery power. The computer's internal temperature sensors may prevent
battery operation until the batteries have cooled.
Note: To obtain the maximum computer battery charge, always leave the AC Adapter
connected to the computer an additional 1 1/2 hours after the amber indicator light on the
AC Adapter goes off and the green light turns on.
the computer and a wall outlet and the battery is not charging or is not
installed in the computer.
3-8 Getting Started
Page 51

Handling the Battery Pack
Removing the Battery Pack
The internal NiCad battery pack and its cover are built as one unit; do not try to separate
the cover from the battery pack. Remove the battery pack from the computer as follows.
1 Turn off the computer and disconnect the AC Adapter and any other
external device connectors.
2. Close the display and carefully lay the computer upside down on a
padded surface.
3. Slide the battery pack locking latch toward the or (open padlock)
symbol.
4. Holding the computer in one hand, carefully turn the computer right
side up and allow the battery pack to fall out of the computer into your
other hand.
You now can operate the computer solely on ac power via the AC Adapter, or you can
install a fully charged battery pack for battery operation.
Getting Started 3-9
Page 52

Handling the Battery Pack
Installing the Battery Pack
Install an internal NiCad battery pack as follows. If the battery is new or not fully
charged, condition and/or charge the battery as described later in this chapter.
1. Turn off the computer, disconnect the AC Adapter and any other
external devices, and carefully lay the computer upside down on a
padded surface.
3-10 Getting Started
2. Insert the battery pack and integral cover into the computer's battery
compartment so that the two smaller tabs in the cover engage the
matching slots in the rear of the compartment.
3. Lower the battery pack into the computer battery compartment so that
the cover is Hush with the bottom of the computer case. Then slide the
locking latch toward the (closed padlock) symbol.
4. Turn the computer right side up and reconnect the AC Adapter and any
other external devices to the computer.
Page 53

Handling the Battery Pack
Conditioning the Battery Pack
An unconditioned battery-one that is brand-new, one installed in a computer that has not
been used for a long time, or one that has sat 'on the shelf for several months must be
conditioned before it will accept a full charge. Condition and charge the battery pack as
follows.
1. Install the internal battery pack in your computer (if not already
installed) as described earlier in this chapter.
2 . Allow the battery to discharge fully by using the computer on battery
power (or just leave the computer turned on) until the Low Batt
indicator light comes, then starts blinking, and finally the Low Batt and
Power indicators turn off. See "Automatic Discharge" later in this
chapter for more details.
Note: The Battery Watch program supplied with your TravelMate 3000 provides a deepdischarge feature to help you discharge the battery. See the BatteryPro & Productivity
Software User's Manual furnished with your computer.
3. After the battery is fully discharged, recharge the battery completely by
connecting the AC Adapter as described earlier in this chapter.
The AC Adapter's amber indicator glows while the battery is charging.
The green indicator comes on when the battery is at least 90-percent
charged. The battery requires about 4 hours to completely charge with
the computer turned off.
4. After completing step 3, wait approximately 20 minutes to allow the
battery to cool down to room temperature before starting step 5.
Getting Started 3-11
Page 54

Handling the Battery Pack
5. Disconnect the AC Adapter and fully discharge the battery again by
using the computer solely on battery power, or use the Battery Watch
deep discharge feature.
6. Recharge the battery completely a second time. Your battery is now
conditioned and able to achieve a maximum charge.
Note: You should always allow up to 11/2 hours of trickle charge after the AC Adapter's
amber indicator goes off to gain the maximum battery power operation.
Note: If you use the computer while charging the battery, a full charge may require up to
16 hours-less if the power-saving features are active (BatteryPro, hard disk and display
time-outs, Standby mode, etc.). You can use the Battery Watch feature to monitor the
charge status.
Automatic Discharge
Your TravelMate 3000 has an automatic battery discharge circuit that activates when the
Low Batt indicator begins blinking. This circuit automatically discharges the battery at a
rate sufficient to ensure proper battery conditioning. The automatic discharge circuit
remains on as long as the computer's power switch is in the on ( I ) position, even after the
display blanks.
3-12 Getting Started
If the Low Batt indicator is still blinking and the Power indicator is on, the automatic
discharge cycle is not complete.
Page 55

Starting Your Computer
Your new TravelMate 3000 Notebook Computer is shipped from the factory with software
already installed on the hard disk. The TravelMate 3000 has MS-DOS version 4.01,
Laptop Manager, Laptop File Manager, BatteryPro, Battery Watch, RPAL palette utility,
and other software programs that make your computer more powerful and easier to use.
Follow these steps to start your computer.
1. If you have not done so, set up your computer for either battery
operation or AC Adapter operation, as described earlier in this chapter.
2. Set the computer power switch to the I (on) position. The TravelMate
3000 begins its internal memory checks and displays copyright and
version-number data.
Note: Do not turn the power switch off and on quickly. Leave the power off at least 5
seconds before turning it on again.
The TravelMate 3000 then loads the expanded memory driver, BatteryPro, MS-DOS,
Cache, Shadow, RPAL, Battery Watch, and other utilities, displaying copyright and
version number messages on the screen as each program loads. The computer then loads
Laptop Manager and displays its main menu.
See the BatteryPro & Productivity Software User's Manual furnished with your computer
for detailed instructions on configuring and using the Laptop Manager program and its
main menu.
Getting Started 3-13
Page 56

Restarting the computer
You may sometime want to return the system to its startup state without turning off the
power. This is called restarting or rebooting the system (sometimes called a warm boot,
as opposed to a cold boot, which involves turning the power off and on again).
Caution: Any data in main memory (RAM) will be erased when you restart the
computer. Be sure to save the file you are working on before you restart the
computer.
To restart the computer, press the Del key while holding down the Ctrl and Alt keys. The
computer responds as if power was just turned on-it performs an internal check, then
loads MS-DOS from the hard disk. When restarting, the computer bypasses the initial
memory check it performs during a cold start.
3-14 Getting Started
Page 57

Using the Floppy Drive
The TravelMate 3000 floppy drive can read from and write to 3.5-inch, double-sided,
high-density (2HD), 1.44 MB floppy diskettes-the equivalent of approximately 800 typed
sheets. The floppy drive also can read/write to the lower capacity, 3.5-inch, 720 KB,
double-density (2DD) floppies.
Before data can be stored on a new floppy, the operating system must first prepare-formatthe floppy. Formatting enables stored information to be easily located. During
formatting, the floppy is divided into circular tracks. Floppy formatting instructions are
included in the MS-DOS User's Manual furnished with your computer.
Taking Care of Your Floppies
To safeguard information stored on your floppies, you should handle floppies with the
following in mind.
Storage - Although your 3.5-inch floppies are housed in a durable plastic casing, keep all
floppies you are not using in a disk box to protect them against damage or loss. Plastic
disk boxes are available from most computer stores.
Labels - When you purchase blank floppies, labels arc usually supplied. Get into the
habit of labeling your floppies with the names of the directories or programs and the date
you made the copy. This is particularly important when making backup floppies.
Access Shutter - The metal access shutter allows the disk head to read from and write to
the floppy. The shutter opens automatically when you insert the floppy into the drive. Do
not open the shutter manually; this exposes the delicate recording surface to dust.
Getting Started 3-15
Page 58

Using the Floppy Drive
Write-Protect Tab - The write-protect tab is used to prevent changes being made
inadvertently to important files. To write-protect a floppy, slide the write-protect tab to
the open position: to allow the computer to write on the floppy, slide the tab to the closed
position.
Using Your Floppies
Follow these guidelines when handling your floppies:
3-16 Getting Started
q When inserting a floppy into the floppy drive on the right front side of
your TravelMate 3000, be sure the floppy clicks into place. An
improperly inserted floppy can damage both the drive and the floppy.
q Never open the metal shutter. This exposes the recording surface of the
floppy to dust.
q Keep floppies away from strong magnetic fields such as those generated
by audio system speakers and telephone handsets.
q Never remove a floppy from the drive while the computer is reading
from or writing to the floppy. Be sure the Floppy Disk indicator light
above the keyboard is off.
Page 59

Using the Floppy Drive
q If a floppy appears to be damaged, make a copy of it, if you can, and
immediately discard the damaged floppy.
q Before turning off the computer, always remove a floppy from the floppy
drive.
Inserting a Floppy Into the Drive
Insert a floppy diskette into the TravelMate 3000 floppy drive as follows.
1. Insert the floppy into the drive slot with the label side up and the metal-
shutter end first.
2. Gently push the floppy into the slot until the floppy clicks into place.
3. To remove a floppy, press the eject button until the floppy pops out.
Cautions: Failure to observe the following precautions can damage both the
data on the floppy and the floppy drive.
* Never remove a floppy from the drive while the indicator light on the floppy drive
and the Floppy Disk indicator light on the indicator panel are on.
* Always remove a floppy from the drive before turning off the computer.
Getting Started 3-17
Page 60

Help Displays
The TravelMate 3000 offers two easily accessed help files that display information to help
you use your computer: One file describes MS-DOS commands; the second file describes
the productivity software supplied with your computer. Both help files are similar in
appearance and both have their own help file (accessed by pressing the PI key at the help
display).
You can use the ↑ and ↓ keys to select a subject or command to be defined, and you can
use the PgUp and PgDn keys to page through the multipage descriptions. (The PI key
help display describes several other keys available for your use.)
Press the Esc key both to exit the F1 help display and to exit the TM3000 DOS Commands
Description and the TM3000 Utilities Description help files.
DOS Commands Description
You can view the MS-DOS help file by typing at the MS-DOS C:\> prompt:
DOSHELP
and pressing the Enter key.
This help file briefly describes most of the MS-DOS commands and their options and
switches. For more details on MS-DOS commands, see the MS-DOS User’s Manual
furnished with your computer.
3-18 Getting Started
Note that you can add the DOS help file to your Laptop Manager main menu for quicker
access; see the BatteryPro, & Productivity Software User's Manual furnished with your
computer for instructions.
Page 61

Help Displays
TravelMate 3000 Utilities Description
You can view the Utilities Description help file by pressing the F1 key at the Laptop
Manager main menu, or by typing at the MS-DOS C:\> prompt:
HELP
and pressing the Enter key.
This help file briefly describes most utility programs available under the UTILS directory.
See your BatteryPro & Productivity Software User's Manual for more detailed
instructions.
Getting Started 3-19
Page 62

Customizing Your Computer
This chapter tells you about:
q How to enter and exit the Setup Program to customize your TravelMate
3000 Notebook Computer
q Using the Setup Program to configure the computer for your operating
environment
Contents
Accessing the Setup Program..................................................................................... 4-3
Disk-Based Setup Program .................................................................................. 4-3
ROM-Based Setup Program ................................................................................4-3
Accessing Setup From MS-DOS.......................................................................... 4-3
Accessing Setup From an Application................................................................. 4-4
Making Selections on the Menus.........................................................................4-4
Exiting the Setup Program .................................................................................. 4-5
System Options, Page 1 .............................................................................................. 4-6
Clock .................................................................................................................. 4-6
Time ............................................................................................................4-6
Date ............................................................................................................. 4-6
Date Display................................................................................................. 4-7
Memory ..............................................................................................................4-7
Standard Memory ......................................................................................... 4-7
Extended Memory........................................................................................4-7
Expanded Memory ....................................................................................... 4-7
Shadow ROM ............................................................................................... 4-8
Unused Memory........................................................................................... 4-8
Guidelines for Allocating Memory................................................................4-8
Diskette Drives.................................................................................................... 4-9
Diskette A....................................................................................................4-9
Diskette B ....................................................................................................4-9
Hard Disk Drives .............................................................................................. 4-10
Hard Disk 1 ................................................................................................ 4-10
Hard Disk 2 ................................................................................................ 4-10
4
Customizing Your Computer 4-1
Page 63

Contents
User Features. Page 2............................................................................................... 4-11
Power Savings................................................................................................... 4-11
Backlight Off.............................................................................................. 4-12
HDD Motor Off.......................................................................................... 4-12
Default CPU Speed..................................................................................... 4-12
LCD Power ................................................................................................ 4-13
Screen............................................................................................................... 4-14
CRT Type................................................................................................... 4-14
Display Mode............................................................................................. 4-15
Cursor Type ............................................................................................... 4-15
Keyboard........................................................................................................... 4-15
Caps Lock .................................................................................................. 4-15
Num Lock .................................................................................................. 4-15
Scroll Lock ................................................................................................. 4-16
Repeat Rate................................................................................................ 4-16
System Configurations ...................................................................................... 4-16
Battery Alarm............................................................................................. 4-16
Cover Alarm .............................................................................................. 4-16
Cover Closed.............................................................................................. 4-16
Quick Boot................................................................................................. 4-17
External Communications, Page 3............................................................................ 4-18
Parallel Port...................................................................................................... 4-18
Mouse Port ........................................................................................................ 4-18
Standard Comm................................................................................................ 4-19
Baud Rate................................................................................................... 4-19
Data Bits.................................................................................................... 4-19
Stop Bits..................................................................................................... 4-19
Parity ......................................................................................................... 4-19
CTS (Clear to Send)................................................................................... 4-19
DSR (Data Set Ready)................................................................................ 4-20
DCD (Data Carrier Detect) ......................................................................... 4-20
Option Comm ................................................................................................... 4-20
4-2 Customizing Your Computer
Page 64

Accessing the Setup Program
You can customize many computer settings so that your Texas Instruments TravelMate
3000 Notebook Computer always powers up with your settings, using either of two Setup
Programs to specify hardware and software configurations. The Setup Program factory
default settings are satisfactory for most working environments and applications, but you
can select the settings best for your situation.
Disk-Based Setup Program
One Setup Program is resident on the hard disk under the UTILS directory, accessed from
the MS-DOS C:\> prompt. You should use this Setup Program in almost all cases. The
program is divided into three pages: the first page lists system operating options; the
second page covers user features; and the third page lists external communication
parameters.
You can press the F1 key to get context-sensitive help displays for each Setup Program
page.
ROM-Based Setup Program
The second Setup Program is resident on the internal ROM (read-only memory) and is
identical to the hard disk-based program except no help displays are available. You
should access this version of the program only if a major configuration error prevents the
computer from booting. You can also access this version from an application program.
Accessing Setup From MS-DOS
Load the hard disk-based Setup Program as follows: At the MS-DOS C:\> prompt, press
the Fn-Esc (Set Up) keys. This executes the SET-UP command in the UTILS directory
and displays the first Setup Program menu page.
Customizing Your Computer 4-3
Page 65

Accessing the Setup Program
Accessing Setup From an Application
You can load the ROM-based Setup Program directly from any application program by
pressing the Ctrl-Alt-Esc keys. This method is not recommended unless the computer
will not boot otherwise because the computer restarts (reboots) when you exit the Setup
Program and erases all data in memory.
Caution: Save all work in progress before accessing the Setup Program from
an application program. The computer restarts when It exits the Setup Program,
erasing the contents of memory.
Making Selections on the Menus
You can use the keyboard keys summarized in the following table at the Setup Program
menus.
Setup Program Menus Key Functions
Key Function
Space Bar, → select next available value for highlighted item
-, ← select previous available value for highlighted item
Tab move highlight to first item in next category
Shift-Tab move highlight to first item in previous category
↓ move highlight to next item
↑ move highlight to previous item
Home move highlight to first category on current page
End move highlight to last category on current page
PgDn show next menu page
PgUp show previous menu page
F1* show help display for this page
F2 show system information display
Esc show exit menu
*Not available with the ROM-based program.
4-4 Customizing Your Computer
Pressing the F1 key displays a context-sensitive Help screen briefly describing each item.
(The Help screen is not available if you entered the Setup Program via the Ctrl-Alt-Esc
keys.)
Page 66

Accessing the Setup Program
Pressing the F2 (Sys Info) key displays an informational screen listing the computer's
firmware version numbers, coprocessor type (if installed), port addresses (in
hexadecimal), and option ROM data. (Also refer to the DATES utility described in the
BatteryPro & Productivity Software User's Manual for similar information.)
Exiting the Setup Program
When you have completed your Setup Program settings, press the Esc key. The system
then displays a menu prompting you for one of the following choices:
q Press the Esc key to erase the exit menu and remain in the Setup
Program.
q Press the F4 key to save your settings and exit the Setup Program. The
computer will restart.
q Press the F5 key to set all items to the factory default and remain in the
Setup Program. This also automatically sets the Hard Disk type in the
Setup Program to the type of hard disk installed in your computer.
q Press the F6 key to discard any changes you may have made and return
to MS-DOS without updating. The ROM-based Setup Program will
restart the computer when you press the F6 key.
Each item on the three Setup Program menus is described on the following pages.
Customizing Your Computer 4-5
Page 67

System Options, Page 1
When you first load the Setup Program, it displays page I of the three-page Setup
Program.
4-6 Customizing Your Computer
Clock
The computer has a battery-operated clock that keeps track of the time and date. This
category enables you to set or correct the current time and date.
Time
This item sets the current time. When seconds are high-lighted, pressing the Space Bar
resets seconds to 00.
Date
This item specifies the current date. The day of the week (Mon, Tue, Wed ... ) is set
automatically when you select the date.
Page 68

System Options, Page 1
Date Display
This item enables you to choose either the U.S. 12-hour or European 24-hour time display.
Memory
The memory category specifies the type and amount of memory and how you want
memory allocated in the computer.
Standard Memory
This item specifies the amount of memory to allocate to the main memory. Select the 640
KB value unless your application program specifically requires a different value.
Extended Memory
This item specifies the amount of memory to allocate to the processor's extended memory
system. Extended memory is directly addressed by application programs that use a high
memory manager or by IBM's OS/2TM operating system. EMS emulation drivers such as
EMM386 supplied by MS-DOS (version 4. 1) use this memory to emulate LIM 4.0
memory. However, this emulation cannot provide the performance of the supplied
EMM.SYS hardware LIM EMS driver that uses expanded memory. Some MS-DOS
programs can use this memory directly. The factory default value is 1280 KB with the
standard 2 MB memory, 3328 KB with optional 4 MB memory, and 5376 KB with
optional 6 MB memory.
Expanded Memory
This item specifies the amount of memory to allocate to the processor's expanded memory
system. Expanded memory is not directly addressed by application programs unless a
LIM EMS device driver is installed. The EMM.SYS (which is an EMS LIM driver)
furnished with your computer should be added to your CONFIG.SYS file unless this value
is zero.
Customizing Your Computer 4-7
Page 69

System Options, Page 1
Because the EMM.SYS device driver controls hardware registers to enhance computer
performance, other LIM 4.0 drivers should not be used on the computer unless they
comply with the specifications found in this chapter. The factory default is 32 KB.
Shadow ROM
This item selects whether or not to use shadow ROM in the computer. If set to YES (96
KB), the BIOS (basic input/output system) is loaded into faster Extended RAM memory
when the computer boots. The BIOS and your application programs then operate much
faster. Select the YES (96 KB) setting unless your application program needs the 96 KB
this feature uses. The factory default is YES.
Unused Memory
This item is informational, showing the amount of memory not currently allocated to the
other memory items. Unused memory should always equal 0 (zero). Use the guidelines
for allocating memory in the next section to make the Unused item equal 0.
Guidelines for Allocating Memory
Consider the following guidelines when allocating memory among the memory items.
4-8 Customizing Your Computer
1. Set Shadow ROM to Yes unless your application program needs the 96
KB that Shadow ROM uses.
2. Move the highlight to the memory item you want to reduce and select
the new value you want. Note that the difference is added to the Unused
item value.
3. Move the highlight to the memory item you want to increase and select
the new value you want. Note that the difference is subtracted from the
Unused item value.
Page 70

System Options, Page 1
4. Check that the Unused item equals 0 (zero). If not repeat steps 2 and 3
as necessary.
Note: Do not exit the Setup Program with the Unused item showing any value except 0.
Allocate memory to the other memory item until Unused equals 0; otherwise, the
computer will report an error condition the next time you try to start it.
When you start (boot or reboot) the TravelMate 3000, the Setup Program checks the total
memory available. If your settings exceed total available memory, the computer displays
an error message the next time it boots, asking you to run the "SET_UP" program. Press
the F1 key, follow the prompts, and check your memory settings.
Diskette Drives
The Diskette category enables you to select the type of floppy in use. The settings
available are 5.25" 360 KB, 5.25" 1.2 MB, 3.5" 720 KB, and 3.5" 1.44 MB or Not
Installed.
Diskette A
This item specifies the standard floppy drive (drive A) installed in your computer. Set
Diskette A to 3.5" 1.44 MB (the factory default) unless you are using an external drive you
want to address as drive A that requires a different setting.
Diskette B
Set this item to Not Installed unless you have an external floppy drive connected to your
computer. Then set this item to match the external drive, and address the external drive
as drive B. The default is Not Installed.
Customizing Your Computer 4-9
Page 71

System Options, Page 1
Hard Disk Drives
The Hard Disk category specifies the built-in hard disk drive and a future external hard
disk option.
Hard Disk 1
The Hard Disk I category is the built-in hard disk drive. Set this item properly according
to your hard disk type. The other items in this category are automatically set with any
type except the Type 48 setting.
The drive types are summarized in the following table.
Hard Disk Drive Sixes
Type Size (nominal)
2 20 MB
33 40 MB
34 60 MB (default)
35 30 MB
36 80 MB
48 define custom size
4- 10 Customizing Your Computer
Hard Disk 2
The Hard Disk 2 category is provided to configure a future hard disk drive option or thirdparty drive. If you connect an external Type 48 drive, you must also set the Cylinders,
Heads, Write Precompensation, Landing Zone, and Sectors items.
Page 72

User Features, Page 2
Press the Fn-↓ (PgDn) keys to continue to page 2 of the Setup Program. Page 2 provides
power-savings, display control, keyboard-lock, and alarm configuration categories.
Power Savings
The Power Savings category specifies the delay (or time-out) period of four power-saving
functions. Each power-saving delay function occurs approximately within the delay
period you select.
Note: Please refer to the BatteryPro & Productivity Software User's Manual for more
information on getting the most computer time from a battery charge.
Customizing Your Computer 4-1 1
Page 73

User Features, Page 2
Backlight Off
After a selected period of no input from the keyboard, the system automatically shuts off
the LCD screen. Pressing any key on the keyboard-preferably the Shift key-turns the LCD
on again. The default setting is 2 minutes.
Note: If you are using a mouse with your application program, you may want to set the
Backlight Off item to Always On to prevent the screen from blanking because of
keyboard inactivity.
HDD Motor Off
To conserve battery charge life, you can set the hard disk motor to turn off automatically
after a period of no accesses to the hard disk. The default setting is 5 minutes.
Note: Although turning off the hard disk when not in use conserves battery charge life,
you may note slower disk access times because the computer must wait for the disk motor
to reach operating speed before accessing data.
4-12 Customizing Your Computer
Default CPU Speed
This item specifies the CPU speed used when the computer boots. The default setting is
Auto. The Low setting corresponds to 8 MHz CPU speed, Medium to 10 MHz, and High
to 20 MHz. The lower speeds increase battery charge life but may slow processing of
some application programs.
The Auto setting enables the computer to operate as follows.
q When operated on ac power, the computer sets the CPU speed to 20
MHz when it powers up.
q When operated on battery power, the computer sets the CPU speed to 10
MHz when it powers up.
Page 74

User Features, Page 2
Note: CPU speed always reverts to 8 MHz when the computer accesses the floppy drive.
You also can change CPU speed while the computer is running by using the SPEED
utility (described in your BatteryPro & Productivity Software User's Manual) at the MSDOS prompt. And you can use the speed keys: Ctrl-Alt-↑ and Ctrl-Alt-↓ that set CPU
speed higher and lower, respectively; or you can use the Turbo key (Fn-F5) that changes
CPU speeds. The SPEED command and the speed keys all override the Auto setting
described above.
LCD Power
This item specifies the sharpness of, and power used by, the LCD screen. The default
setting is Medium
Low - The LCD consumes the least power at the Low setting. Some application programs
may require this setting for compatibility.
Medium - The LCD consumes more power at this setting but produces a sharper image.
High - The LCD consumes the most power at this setting but produces the sharpest
image.
Auto - At the Auto setting the computer operates as follows.
q When operated on ac power, the computer sets the LCD Power to
Medium
q When operated on battery power, the computer sets the LCD Power to
Low.
When you are using graphics programs with icons (for example, Microsoft WindowsTM,
select a higher setting for increased sharpness.
Customizing Your Computer 4-13
Page 75

User Features, Page 2
Screen
The Screen category enables you to select several operating features for the built-in LCD
screen or for an external monitor connected to your TravelMate 3000. The computer
automatically powers up using the built-in LCD. Switch to your external monitor by
entering ALTVID at the MS-DOS C:\> prompt.
Caution: Before connecting or disconnecting an external monitor to your
computer, turn off power to both the computer and the monitor to prevent possible
electrostatic discharge damage to both devices.
CRT Type
If you have an external monitor connected to your TravelMate 3000, set this item to match
your external monitor. This item does not affect your built-in LCD screen. The possible
settings are VGA Color, Multiscan, and VGA Mono (black and white). The default is
VGA Color. The TravelMate 3000 supports the following types of external monitors.
q Multiscanning monitors covering 15.75 to 31.5 kHz, 50 to 70 Hz
4-14 Customizing Your Computer
q 31 kHz/70 Hz (400/200 fine mode), 60 Hz (480 line mode) IBM PS/2
(VGA) monitors
Page 76

User Features, Page 2
You must select the appropriate monitor device driver to match your external monitor and
your application program. Most applications using 640-by-480 resolution do not require a
device driver. Applications requiring super VGA (800-by-600) also require an
appropriate device driver. See your BatteryPro & Productivity Software User's Manual
for more details.
Display Mode
This item selects the display mode for either the built-in LCD screen or a connected
external monitor. Possible setting are VGA Mode, EGA Mode, CGA Mode, MDA Mode,
or, for external monitors only, HGC Mode. Select the setting required by your external
monitor and/or application program. The default setting is VGA Mode.
Cursor Type
You can change the shape of the cursor to one of the following settings: Underline,
Underbar, or Block. The default setting is Underline.
Keyboard
This category specifies the state of the three lock keys and the key repeat rate (also called
the typematic feature) when you turn on the computer.
Caps Lock
This item specifies the power-up state of the Caps Lock key. The default setting is Off.
Num Lock
This item specifies the power-up state of the NumLk key (Fn-F7). The default setting is
On.
Customizing Your Computer 4-15
Page 77

User Features, Page 2
Scroll Lock
This item specifies the power-up state of the ScrLk key. Possible settings are On or Off.
The default setting is Off.
Repeat Rate
This item specifies the key repeat rate-also called the typematic rate-that is, the speed at
which a character repeats on the screen when you press and hold down a key. The
possible settings are Fast, Slow, and Normal. The default setting is Normal.
System Configurations
This category specifies various settings concerning the system configuration.
Battery Alarm
This item enables you to turn off the audible alarm that sounds for the low-battery
condition with the computer power on. The default setting is On.
Cover Alarm
4-16 Customizing Your Computer
This item enables you to turn off the audible alarm that sounds for the cover-closed
condition with the computer power on. The default setting is On.
Cover Closed
If you close the display/cover with computer power still turned on, you can select how the
computer reacts. If you select the Backlight Off setting, the LCD turns off. The Auto
Standby setting causes the computer to beep about 10 seconds (if Cover Alarm is set to
On) and then go into the Standby mode, which turns off the display and hard disk drive.
If you select the Disable setting, the computer does not react; it remains on.
Page 78

User Features Page 2
The default setting is Auto Standby. The computer beeps in any case when you close the
cover unless you turn off the beeper at the Cover Alarm item described above.
Quick Boot
This item selects quick loading of the system. When this item is set to On, the system
bypasses some of the powerup self checks (including memory check) when you turn on the
computer. The possible settings are On or Off. The default setting is Off.
Note: OS/2 operation requires Quick Boot to be set to Off.
Customizing Your Computer 4-17
Page 79

External Communications, Page 3
Press the Fn-↓ (PgDn) keys to continue to page 3 of the Setup Program. Page 3 provides
communication configuration categories.
4-18 Customizing Your Computer
Parallel Port
This item assigns the 25-pin parallel port on the left side panel to LPT1 (or disables the
port). The default setting is LPT 1. If you are not using the port, set this item to Disable to
conserve battery power.
Mouse Port
This item enables you to turn on/off the six-pin mini-DIN mouse port on the left side
panel. The default setting is Off. The Off setting conserves battery power, and you must
select Off if you connect a mouse to the nine-pin serial port.
Page 80

External Communications Page 3
Standard Comm
This item assigns the standard nine-pin serial port (sometimes called the SIO for serial
input/output) on the left side of the computer case as Port 1 (or disables the port). The
default setting is Port 1. The Disable setting conserves battery power.
Set the following communication parameters to meet the requirements of the serial device
connected to the serial port.
Baud Rate
Possible Baud Rate settings are 110, 150, 300, 600, 1200, 2400, 4800, or 9600 bits per
second (bps). The default setting is 9600.
Data Bits
Possible Data Bits settings are 7 data bits or 8 data bits. The default setting is 8.
Stop Bits
Possible Stop Bits settings are 1 stop bit or 2 stop bits. The default setting is 1.
Parity
Possible settings are None, Odd, or Even parity. The default setting is None.
CTS (Clear to Send)
The RS-232C clear to send (CTS) signal can be forced on for application programs
requiring this signal. Possible settings are Normal and Force On. The default setting is
Normal.
Customizing Your Computer 4-19
Page 81

External Communications, Page 3
DSR (Data Set Ready)
The RS-232C data set ready (DSR) signal can be forced on for application programs
requiring this signal. Possible settings are Normal and Force On The default setting is
Normal.
DCD (Data Carrier Detect)
The RS-232C data carrier detect (DCD) signal can be forced on for application programs
requiring this signal. Possible settings are Normal and Force On. The default setting is
Normal.
Option Comm
The Option Comm(unication) category defines the communications settings for a second
serial port if your computer is equipped with the optional Internal Modem.
Possible settings for the Option Comm item are Port 2 and Disable. The default setting is
Disable. The Disable setting conserves battery power. You must select the Disable
setting if the Internal Modem option is not installed in your computer.
Set the other communication items (Baud Rate, Data Bits ... ) to meet the requirements of
your communication application program and/or the host that will be connected to your
computer.
4-20 Customizing Your Computer
Page 82

Installing and Using Application Programs
This chapter tells you about
q Guidelines for loading IBM AT-compatible application programs
q How to set up and use the furnished Laptop Manager program for your
operating environment
Contents
Guidelines for Installing Applications........................................................................ 5-2
Installation Considerations..................................................................................5-2
Display.........................................................................................................5-2
Keyboard......................................................................................................5-3
Communication Ports...................................................................................5_3
Processing Speed..........................................................................................5-3
Memory........................................................................................................ 5-4
AUTOEXEC.BAT and CONFIG.SYS Files ........................................................ 5-4
Default AUTOEXEC.BAT File .................................................................... 5-5
Default CONFIG.SYS File ........................................................................... 5-6
Using Laptop Manager............................................................................................... 5-7
Laptop Manager Main Menu ............................................................................... 5-7
Quick Commands Box.................................................................................. 5-8
Single-Character Quick Commands.............................................................. 5-8
Using a Password.......................................................................................................5-9
Loading the Password Utility............................................................................... 5-9
Installing a Password ........................................................................................ 5-10
Changing a Password........................................................................................ 5-11
Removing a Password ....................................................................................... 5-12
Entering the Password....................................................................................... 5-13
5
Application Programs 5-1
Page 83

Guidelines for Installing Applications
Your TravelMate 3000 Notebook Computer is fully compatible with IBM AT computers.
AU application programs written to execute on AT computers will execute on the
TravelMate 3000, and you can install the programs in much the same way on the
TravelMate 3000. However, like most computers, you must consider the characteristics of
the TravelMate 3000 before you install application programs.
Installation Considerations
The following configuration items will influence how you install application programs
into your TravelMate 3000 (or any computer).
Display
The Texas Instruments TravelMate 3000 has an 80-column by 25-line display with 640by-480 (VGA) resolution and four other lower-resolution displays. When installing an
application program, select the highest-resolution monitor configuration that both the
program and the TravelMate 3000 can support.
Note: If you used the LapLink feature to transfer an application program to your
TravelMate 3000 and the application does not execute, an incompatibility between the
video drivers in the two computers may exist. Many graphics applications require you to
specify during installation the type of video driver and/or resolution supported by the
particular computer. If the application then is LapLinked to another computer that
supports a different type of video driver, the incompatibility between the two drivers may
prevent the application from executing. (The TravelMate 3000 supports 640-by-480
VGA.)
5-2 Application Programs
Page 84

Guidelines for Installing Applications
Keyboard
The TravelMate 3000 keyboard emulates all functions of an IBM AT-101 enhanced
keyboard. When installing an application program, select the IBM 10 1 or AT-enhanced
keyboard configuration.
Communication Ports
The serial port is Port 1, and the optional Internal Modem, if installed, is Port 2. When
installing an application program requiring communication support, select Port I or Port
2, as appropriate.
Processing Speed
Some application programs do not execute at the high speed (20 MHz) available with the
TravelMate 3000. Check the program documentation for the required processing speed
and, if necessary, change the speed using one of the following methods.
q Using the Setup Program
q By pressing the Ctrl-Alt-↑ or Ctrl-Alt-↓ keys.
q Using the Speed utility described in your BatteryPro & Productivity
Software User's Manual
q With the Laptop Manager Change menu process described in your
BatteryPro & Productivity Software User's Manual
If you use the Laptop Manager feature to load your application programs, you can
configure Laptop Manager to load the program with all necessary settings. Then you do
not have to change the Setup Program settings each time you load a different application
program that requires a different processing speed.
Application Programs 5-3
Page 85

Guidelines for Installing Application
Memory
The standard TravelMate 3000 has 2 MB of memory, 640 KB of system memory plus
1280 KB Extended/Expanded memory. You can add 2 or 4 MB of additional optional
memory to your TravelMate 3000 that can be configured either as Extended memory or
LIM EMS (expanded) memory. See Appendix F for details on these two types of memory.
AUTOEXEC.BAT and CONFIG.SYS Files
If your application program requires additions or changes to the TravelMate 3000's
AUTOEXEC.BAT and CONFIG.SYS files-as suggested several times in this and other
chapters of this manual-carefully consider the consequences that may result from changes
or deletions to these two files. The factory-installed (default) files are listed and described
in the following two sections.
Please read and understand these two files before you change them. See the MS-DOS
User's Manual furnished with your TravelMate 3000 for more details on constructing
these files and their significance.
Note: If you need to restore the default AUTOEXEC.BAT and CONFIG.SYS files to
your hard disk, they are included on the BatteryPro & Productivity Software floppy
furnished with your computer.
5-4 Application Programs
Page 86

Guidelines for Installing Applications
Default AUTOEXEC.BAT File
Each line of the TravelMate 3000 AUTOEXEC.BAT file and its purpose are defined in
the table following the Me listing. Take special note of those lines relating to Laptop
Manager.
@ECHO OFF
VERIFY ON
SET COMSPEC=C:\DOS\COMMAND.COM
SET PATH=C:\;C:\DOS;C:\UTILS
SET MFILE=C:\UTILS
SET PROMPT $P$G
CACHE 256 /E
RPAL /I
CLS
BW
LM
Factory Default AUTOEXEC.BAT File
Line Purpose
1 turns off echoing (displaying) of commands on screen
2 turns on command that verifies files are correctly written to disk
3 tells MS-DOS where to find the command processor
4 defines the directories and order in which to search for files entered on the
command fine; you can add additional directories to this line as required
5 tells Laptop Manager in which directory to find its data file; this line is
required by Laptop Manager
6 tells MS-DOS to display the current drive and directory
7 installs disk cache in memory
8 installs RPAL, a color palette control program
9 clears the screen in preparation for the Battery Watch program menu
10 installs the Battery Watch program
11 loads Laptop Manager and displays its main menu
Application Programs 5-5
Page 87

Guidelines for Installing Applications
Default CONFIG.SYS File
Each line of the TravelMate 3000 default CONFIG.SYS Me and its purpose are defined in
the table following the file listing. You can add commands required by your application
program(s), but do not delete the existing default commands.
FILES=20
BUFFERS=20
SHELL=C:\DOS\COMMAND.COM /P /E:256
DEVICE=C:\DOS\HIMEM.SYS /M:l
DEVICE=C:\DOS\ANSI.SYS
DEVICE=C:\UTILS\EMM.SYS
DEVICE=C:\UTILS\BATTERY.PRO
INSTALL=C:\DOS\FASTOPEN.EXE C:=(50,25)
Factory Default CONFIG.SYS File
(Modify but do not delete these command lines)
Line Purpose
1 FILES=20 - tells MS-DOS how many files can be open at any one time: you
can adjust the value as required by your application program
2 BUFFERS=20 - tells MS-DOS how many buffers will be used for file
input/output; you can adjust the value as required by your application
program to maximize processing speed
3 sets command processor to COMMAND.COM Me located on drive C
4 installs HIMEM.SYS, the extended memory manager device driver
5 DEVICE=C:\DOS\ANSI.SYS-loads the device driver ANSI.SYS for
enhanced standard input/output
6 DEVlCE=C:\UTILS\EMM.SYS - installs EMM.SYS, the expanded memory
manager device driver
7 DEVlCE=C:\UTILS\BATTERY.PRO - loads the device driver
BATTERY.PRO used to save battery power
8 loads the fastopen command, which decreases time needed to open files and
directories
5-6 Application Programs
Page 88

Using Laptop Manager
Laptop Manager, one of the utilities supplied with your TravelMate 3000, is an
application control program. Laptop Manager provides two submenus into which you can
insert application programs you have installed on the hard disk.
You can then load application programs from one of the submenus with one keystroke,
and from the other submenu using the arrow keys and the Enter key.
Laptop Manager Main Menu
The Laptop Manager program, furnished on the BatteryPro & Productivity Software
diskette, displays its main menu after the power -up and copyright messages are displayed
when you turn on the computer The main menu enables you to select application
programs with one keystroke. Procedures for adding items to the Applications list and
Quick Commands box are described in the BatteryPro & Productivity Software User's
Manual furnished with your computer
Pressing the F12 key at the Laptop Manager main menu loads the Laptop Manager
Change Menu screen. It enables you to add, delete, or modify items on the main menu.
Procedures for using the Change Menu are provided in the BatteryPro & Productivity
Software User's Manual.
You can exit Laptop Manager to the MS-DOS prompt from the Laptop Manager main
menu by pressing the Esc key.
You can return to the Laptop Manager main menu from the MS-DOS prompt (C:\>) by
typing
LM
and pressing the Enter key.
Application Programs 5-7
Page 89

Using Laptop Manager
Quick Commands Box
Application programs you add to the Quick Commands box can be selected by pressing
the function key (F1 to F11) you assign to it. For your convenience, the Laptop File
Manager and several other utilities are assigned to the function keys. However, you can
replace them with your own application programs using the Change Menu procedure
explained in the BatteryPro & Productivity Software User's Manual.
Pressing the F1 key displays the Utilities Description help displays described in Chapter 3
of this manual. You also can view an MS-DOS help display by typing DOSHELP at the
C:\> prompt and pressing the Enter key.
Single-Character Quick Commands
At the bottom of the Laptop Manager menu Quick Commands box are two singlecharacter commands:
q Press the D key and Laptop Manager displays a prompt at the bottom of
the screen at which you can enter MS-DOS commands of up to 67
characters. Pressing the Enter key starts the command. When the
command is executed, pressing any key returns you to the Laptop
Manager main menu.
5-8 Application Programs
q Press the P key and Laptop Manager displays a prompt at the bottom of
the screen at which you can change drives and/or directories. For
example, you can change from the C:\ prompt to the A:\ prompt by
typing P and A. and pressing the Enter key. Note that the C:\ prompt
at the bottom left corner of the menu changes to a A:\ prompt.
Page 90

Using a Password
The TravelMate 3000 includes the Password utility, a program that limits access to your
computer. Only those who know the password you specify using this utility can access
your files. The password is valid until you remove or change it using the Password utility.
In addition, Laptop Manager also provides password protection on a per-application
program basis. See the BatteryPro & Productivity Software User's Manual for more
information about the Password feature for Laptop Manager.
Loading the Password Utility
Load the Password utility as follows.
1. At the MS-DOS C:\> prompt, type
PW
and press the Enter key. The following Password
Utility menu displays:
From the Password Utility menu you can install, change or remove a password, or you can
exit the menu.
2 . To select a Password command, move the highlight to the desired
command using the ↑ key or the ↓ key and press the Enter key, or press
the initial character of the prompt (for example, I for Install, C for
Change...).
Application Programs 5-9
Page 91

Using a Password
Installing a Password
Install a password as follows.
1. Highlight Install Password on the Password Utility menu and press the
2. Type a password of up to eight characters and press the Enter key.
3. Press the Enter key again to install the new password, or press the Esc
If you have already installed a password, when you select Install Password, the computer
displays the following message:
Password already exists
Enter key. The following menu displays:
key to cancel the action and return to the Password Utility menu.
5-10 Application Programs
Press any key on the keyboard to return to the Password Utility menu.
Page 92

Using a Password
Changing a Password
Change the current password as follows.
1. Highlight the Change Password command on the Password Utility menu
2. Type the current password and press the Enter key. Your entry is
and press the Enter key. The following menu displays:
displayed as squares so that it cannot be seen by other people.
If you type the correct password, the message
Password check OK
displays on the next line and you are prompted to enter a new password.
If you type the wrong password, the message
Incorrect Password
displays on the next line and you are prompted to press any key to return to the
Password Utility menu. You can try to change the password again, or you can
exit the Password Utility menu by selecting Exit.
3. Type a new password of up to eight characters and press the Enter key.
Application Programs 5-11
Page 93

Using a Password
4. Press the Enter key again to install the new password, or press the Esc
Removing a Password
Remove the current password as follows.
1. Highlight the Remove Password command on the Password Utility
2. Type the current password and press the Enter key. Your entry is
key to abort the process and return to the Password Utility menu.
menu and press the Enter key. The following menu displays:
displayed as squares so that it cannot be seen by other people. If you
type the correct password, the message
Password check OK
5-12 Application Programs
displays on the next line. Press the Enter key to remove the current password, or
press the Esc key to abort the process and return to the Password Utility menu.
If you type the wrong password, the message
Incorrect Password
displays on the next line, and you are prompted to press any key to return to the
Password Utility menu. You can try to remove the password again, or you can
exit the Password Utility menu by selecting Exit.
Page 94

Using a Password
Entering the Password
Once you install the password, you will see the following message every time you start up
the computer:
Enter Password:
Type the password exactly as you created it and press the Enter key.
q If you type the correct password, the screen clears and the system begins
to load.
q If you type the wrong password, the message "Wrong Password"
displays, and you are prompted to enter the password again. You have
three chances to enter the correct password. If you enter the wrong
password three times, the system locks and starts beeping. If this
happens, turn off the computer, wait 5 seconds, and turn it on again.
This time, you have only one chance to enter the correct password before
the system locks.
q If you enter the correct password after several incorrect passwords, the
following message displays:
Enter Password: * * * * *
Previous invalid password attempts = xx
Press any key to continue
This message shows how many wrong passwords have been entered since you
last entered the correct password. This may indicate that someone has tried to
use your computer without permission.
Once you enter the correct password, you again have three chances to enter the
password at the next system start-up.
Application Programs 5-13
Page 95

Using a Password
q If you forget the system password, you will not be able to use your
Note: Always make a note of the password you installed incase you forget it. Store the
password note in a secure place away from where you store or operate your computer.
5-14 Application Programs
computer. To regain access, it is necessary to disconnect the back-up
battery for an extended period. This operation should only be performed
by an authorized Texas Instruments dealer. Any other attempt to
perform this operation could result in damage that will void the
warranty and is not recommended.
Page 96

TravelMate 3000 Options
This chapter tells you about:
q Options available for your Texas Instruments TravelMate 3000
Notebook Computer
q How to install and use some of the options
Contents
Numeric Keypad........................................................................................................6-2
Attaching the Keypad.......................................................................................... 6-2
RAM Modules ...........................................................................................................6-3
Installing the RAM Modules...............................................................................6-3
Removing the Keyboard ............................................................................... 6-3
Installing the Modules..................................................................................6-5
Replacing the Keyboard................................................................................ 6-6
Changing Memory Setup..................................................................................... 6-7
Internal Modem ......................................................................................................... 6-8
80387SX Coprocessor................................................................................................ 6-9
Other Options .......................................................................................................... 6-10
Extra Battery Pack ............................................................................................ 6-10
Laplink File Transfer Utility.............................................................................. 6-10
Printers ............................................................................................................. 6-10
Mouse............................................................................................................... 6-10
External Monitor............................................................................................... 6-11
6
TravelMate 3000 Options 6-1
Page 97

Numeric Keypad
The optional Numeric Keypad (TI Part No. 2568033-0001) enables you to type numeric
data more conveniently while still permitting data entry on the keyboard. You also have
the convenience of direct access to some functions (such as the PgUp, PgDn, Home keys)
without the need to also press the Fn key. Note that when the Numeric Keypad is
installed, the embedded numeric keypad does not function.
Attaching the Keypad
Attach the Numeric Keypad to the computer as follows.
1. Turn off the computer.
2. Remove the dust cap from the Numeric Keypad connector on the right
3 . Attach the Numeric Keypad to the computer by joining the connector on
side of the computer case.
the left side of the Numeric Keypad with the connector on the right side
of the computer.
6-2 TravelMate 3000 Options
4. Rotate the thumbscrew on the Numeric Keypad clockwise until tight.
Note: Do not transport the TravelMate 3000 with the Numeric Keypad attached.
Page 98

RAM Modules
The standard TravelMate 3000 Notebook Computer is equipped with 2 MB of main
memory (RAM). If you need more RAM capacity, you can install four or eight RAM
modules (TI Part No. 2566996-0001). Every four RAM modules increases RAM by 2
MB. Installing eight RAM modules increases total main memory to 6 MB.
Installing the RAM Modules
To install the RAM modules, you need only a small, flatblade screwdriver. Installing the
RAM modules involves removing the keyboard, installing the modules, and replacing the
keyboard. Read this procedure before starting and, if you do not feel comfortable doing
the steps, contact your Texas Instruments dealer.
Removing the Keyboard
Remove the keyboard from the computer case as follows.
1. Turn off computer power, disconnect the AC Adapter, and disconnect
any external devices and cables connected to the computer.
2. Carefully insert the blade of a small, flat-blade screwdriver about 1/4
inch into the leftmost of three slots, behind the F1 key and between the
keyboard and the computer case as shown in the following figure.
TravelMate 3000 Options 6-3
Page 99

RAM Modules
3 Rotate the screwdriver toward the rear of the computer about 30 degrees
until the top left corner of the keyboard loosens and raises about 1/4 inch
(6 mm) above the computer case.
4. Holding the top left corner of the keyboard above the case with one
hand, insert the screwdriver blade into the center slot (behind the F8
key) and rotate the screwdriver 30 degrees to release the middle catch.
5. Continue holding the top left comer of the keyboard while inserting the
screwdriver blade into the rightmost slot (behind the Ins key). Then
rotate the screwdriver 30 degrees toward the rear; the keyboard should
now be fully released from the rear catches.
6-4 TravelMate 3000 Options
6. Raise the rear of the keyboard several inches, rotate the rear of the
keyboard 180 degrees toward you, and place the keyboard in front of you
with the keys facing down as shown in the following figure.
Note: Do not disconnect the cable connecting the keyboard to the computer
case.
Page 100

RAM Modules
Installing the Modules
After removing the keyboard, install the four RAM modules as follows. You do not need
any tools.
Caution: Prevent component damage caused by electrostatic discharge (ESD).
Use a high-impedance, grounded conductive floor mat or wrist strap to prevent ESD.
Before touching the integrated circuit devices, discharge static electricity from your
hands, tools, and containers by touching them to a grounded surface.
1. Remove the RAM modules from their shipping container to prevent
bending their pins and possible static damage.
2. Holding the first module so that the label side faces the left side of the
computer and the beveled comer faces the rear of the computer, carefully
insert the module pins into the leftmost 20-pin socket (labeled XU I 1).
Gently press down on the module to fully insert the pins into their
sockets.
TravelMate 3000 Options 6-5
 Loading...