

Y
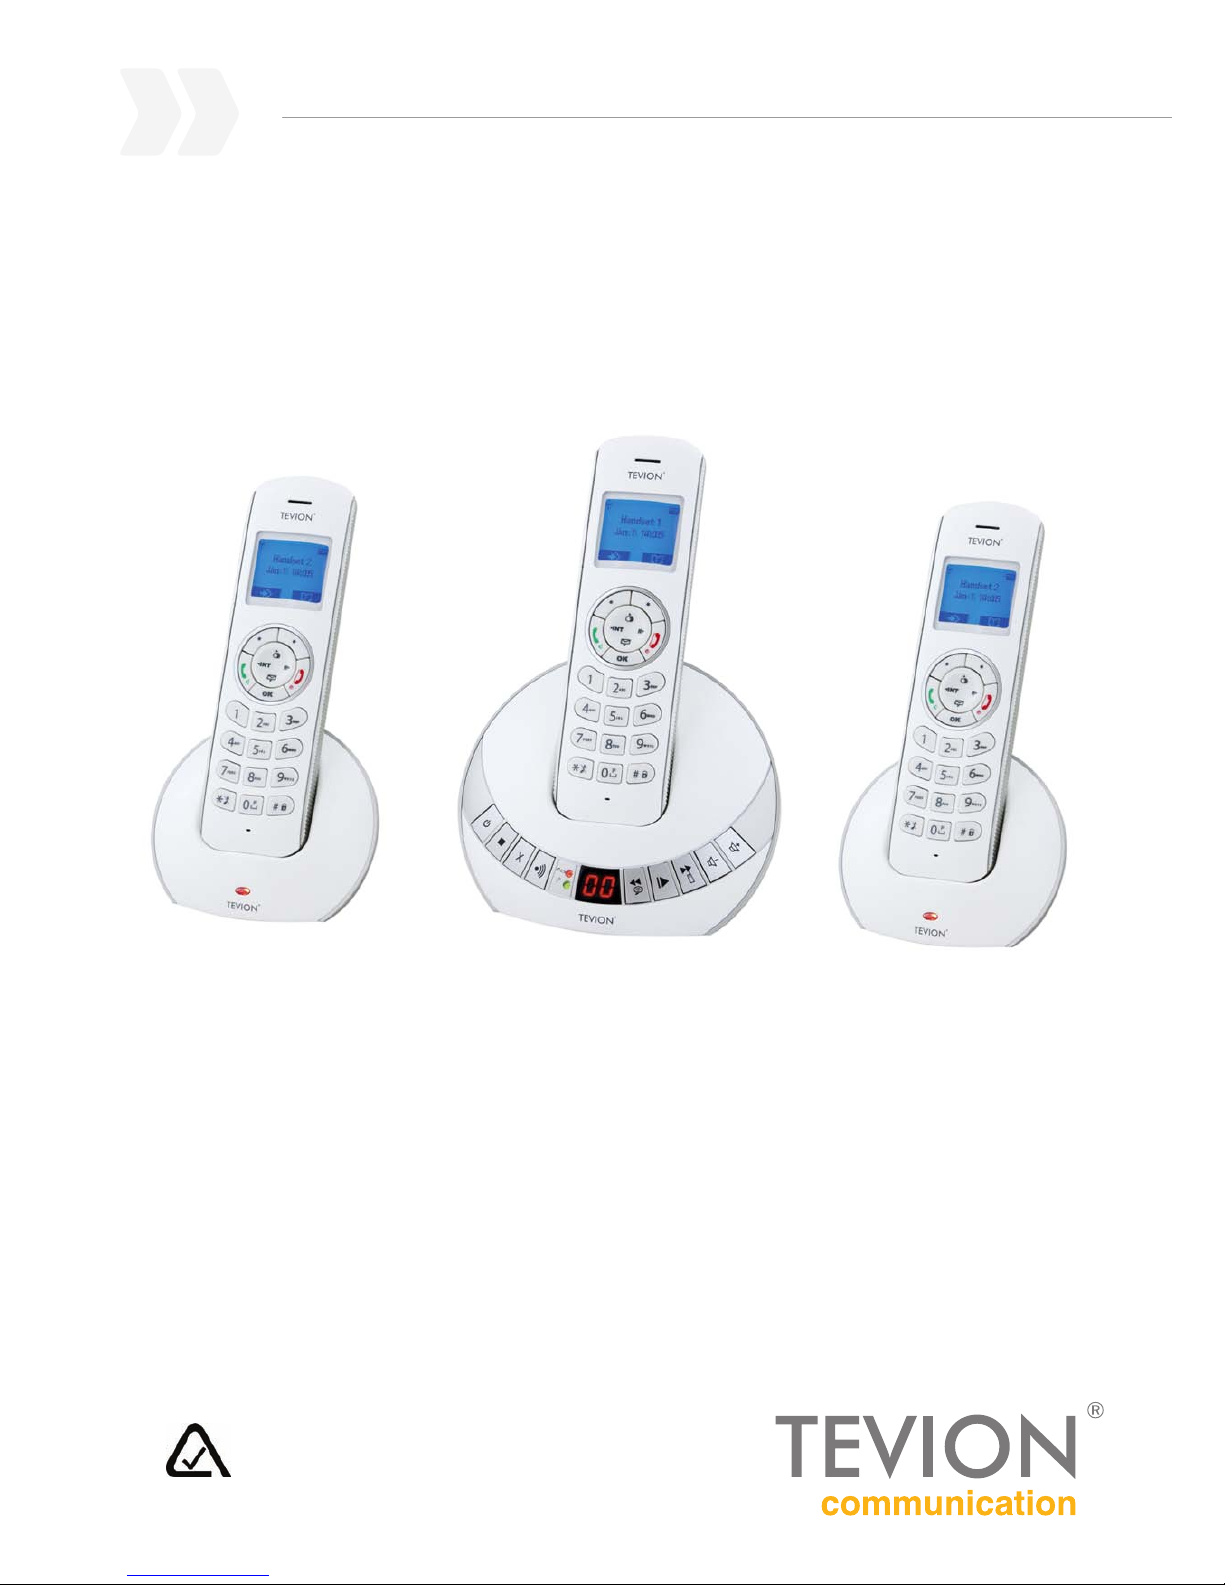
Cordless Phone Pack with Answering Machine
Instruction Manual • Model Number VV8702
After Sales Support
TEL: 1300 886 649
N13275

1
After Sales Support TEL: 1300 886 649
What your 1 year warranty means
Great care has gone into the manufacture of this product and it should therefore provide you with years of good
service when used properly. In the event of product failure within its intended use over the course of the 1 year
after the date of purchase, we will remedy the problem as quickly as possible once it has been brought to our
attention. In the unlikely event of such an occurrence, or if you require any information about the product please
contact us via our after sales support services, details of which can be found in this manual and on the product
itself.
Cordless Phone Pack With
Answering Machine

2
After Sales Support TEL: 1300 886 649
Contents
1 What your 1 Year Warranty means
5 Welcome
6 Safety Instructions
7 Phone Parts List Handset
Base
8 LCD Display & Icons
Soft key
9 Operating Instructions:
Main Menu
10 Before First Use
Handset Operations 1. Turning the handsets ON/OFF
2. Setting the language
11
3. Making Calls 3.1 External calls
3.2 Number preparation
3.3 Redial one of the last numbers
3.4 Calling a programmed number
12 4. Receiving a call
5. Redial list option
6. Activate/deactivate hands free options
7. “Out of range” warning
13 8. Setting the speaker volume
9. Call duration indicator on the display
10. Turning o the microphone (mute)
11. Pause Key
12. Locating a misplaced Handset
13. Using alphanumeric handset keypad
14 14. Setting the ring volume level on the handset
15. Setting the ringer melody on the handset
15 16. Locking the keypad
17. Turning key click ON/OFF
18. Contrast
19. Changing the handsets name
16 20. Auto answer
21. Changing the direction of the backlight
22. Conrm beep 22.1 Default reset
17 23. Setting the clock & alarm 23.1 Date & Time
23.2 Hour Format

3
After Sales Support TEL: 1300 886 649
23.3 Using the alarm feature
23.4 Set the alarm
18 23.5 Turn o the alarm
24. The Phone book 24.1 Adding a number & a name
24.2 Looking up a number
19 24.3 Changing the name or number
24.4 Deleting one or all entries
24.5 View name & number of an entry
24.6 Copy a phone book entry to
another handset
20 24.7 Copy all phone book entries to
another handset
24.8 Add all phone book entries to
another handset
25. Base operation 25.1 Setting the ring volume & melody
of the base
25.2 Setting the base melody
21 25.3 Setting the base ring volume
25.4 The R key (ash)
25.5 Changing the PIN Code (System
PIN code)
22 25.6 Setting the dialing mode
26. Tools 26.1 Appointment
26.2 Stopwatch
23 27. Additional Handsets & bases 27.1 Adding a new handset
27.2 Removing a handset
24 27.3 Selecting a base unit
27.4 Automatic selection
27.5 Manual selection
27.6 Using multiple handsets
27.7 Calling another handset
25 27.8 Receiving an internal call
27.9 Receiving an external call during
an internal call
27.10 Transferring a call to another
handset

4
After Sales Support TEL: 1300 886 649
27.11 Conference call (two internal
handsets & One external caller)
26 28. Caller ID 28.1 The call list
28.2 Calling a number from the call list
27 28.3 Storing a number from the call list
in the phone book
28.4 Deleting numbers from the call
list
28.5 Deleting one number
28.6 Deleting all numbers
29. Voice Mail Indicator
28 30. Answering machine 30.1 LED Display
30.2 Outgoing message
30.3 Recording outgoing messages
(OGM 1 or OGM 2)
30.4 Playback the outgoing message
29 30.5 Erasing the outgoing message
30.6 Turning the answering machine
ON/OFF
30.7 Setting number of rings
30 30.8 Programming the VIP Code
30.9 Changing the VIP Code
30.10 Changing the language
30.11 Operation
30.12 Recording a memo
31 30.13 Playback of Incoming messages
& Memos
30.14 Erasing message
30.15 Erasing messages One at a Time
during Playback
30.16 Erasing all messages
30.17 Memory Full
30.18 Remote Operation
32 30.19 Turning answering machine on
remotely

5
After Sales Support TEL: 1300 886 649
Welcome
Congratulations on choosing to buy a TEVION® product. All products brought to you by TEVION® are manufactured
to the highest standards of performance and safety, and, as part of our philosophy of customer service and
satisfaction, are backed by our comprehensive 1 Year Warranty.
We hope you will enjoy using your purchase for many years to come.

6
After Sales Support TEL: 1300 886 649
Safety instructions
When using your telephone equipment, the following basic safety precautions should always be
followed to reduce the risk of re, electric shock and injury to persons:
1. Read and understand all instructions.
2. Follow all warnings and instructions.
3. Unplug the product from the wall outlet before cleaning.
Do not use liquid cleaners or aerosol cleaners. Use damp cloth for cleaning.
4. Do not place this product on an unstable surface, stand or table.
The product may fall, causing serious damage to the product.
5. Do not overload wall outlets and extension cords as this can result in the risk of re or electric shock.
6. Never push objects of any kind into this product through cabinet slots as they may touch dangerous voltage
points or short out parts that could result in a risk of re or electric shock.
Never spill liquid of any kind on the product.
7. Avoid using this unit during an electrical storm or move or disconnect the unit, there may be a remote risk
of electric shock from lightning and thunder.
8. Unauthorised persons cannot open or service this product even if there is a defect with the unit.
This will void the warranty, please send to a service centre for repair.
7
After Sales Support TEL: 1300 886 649
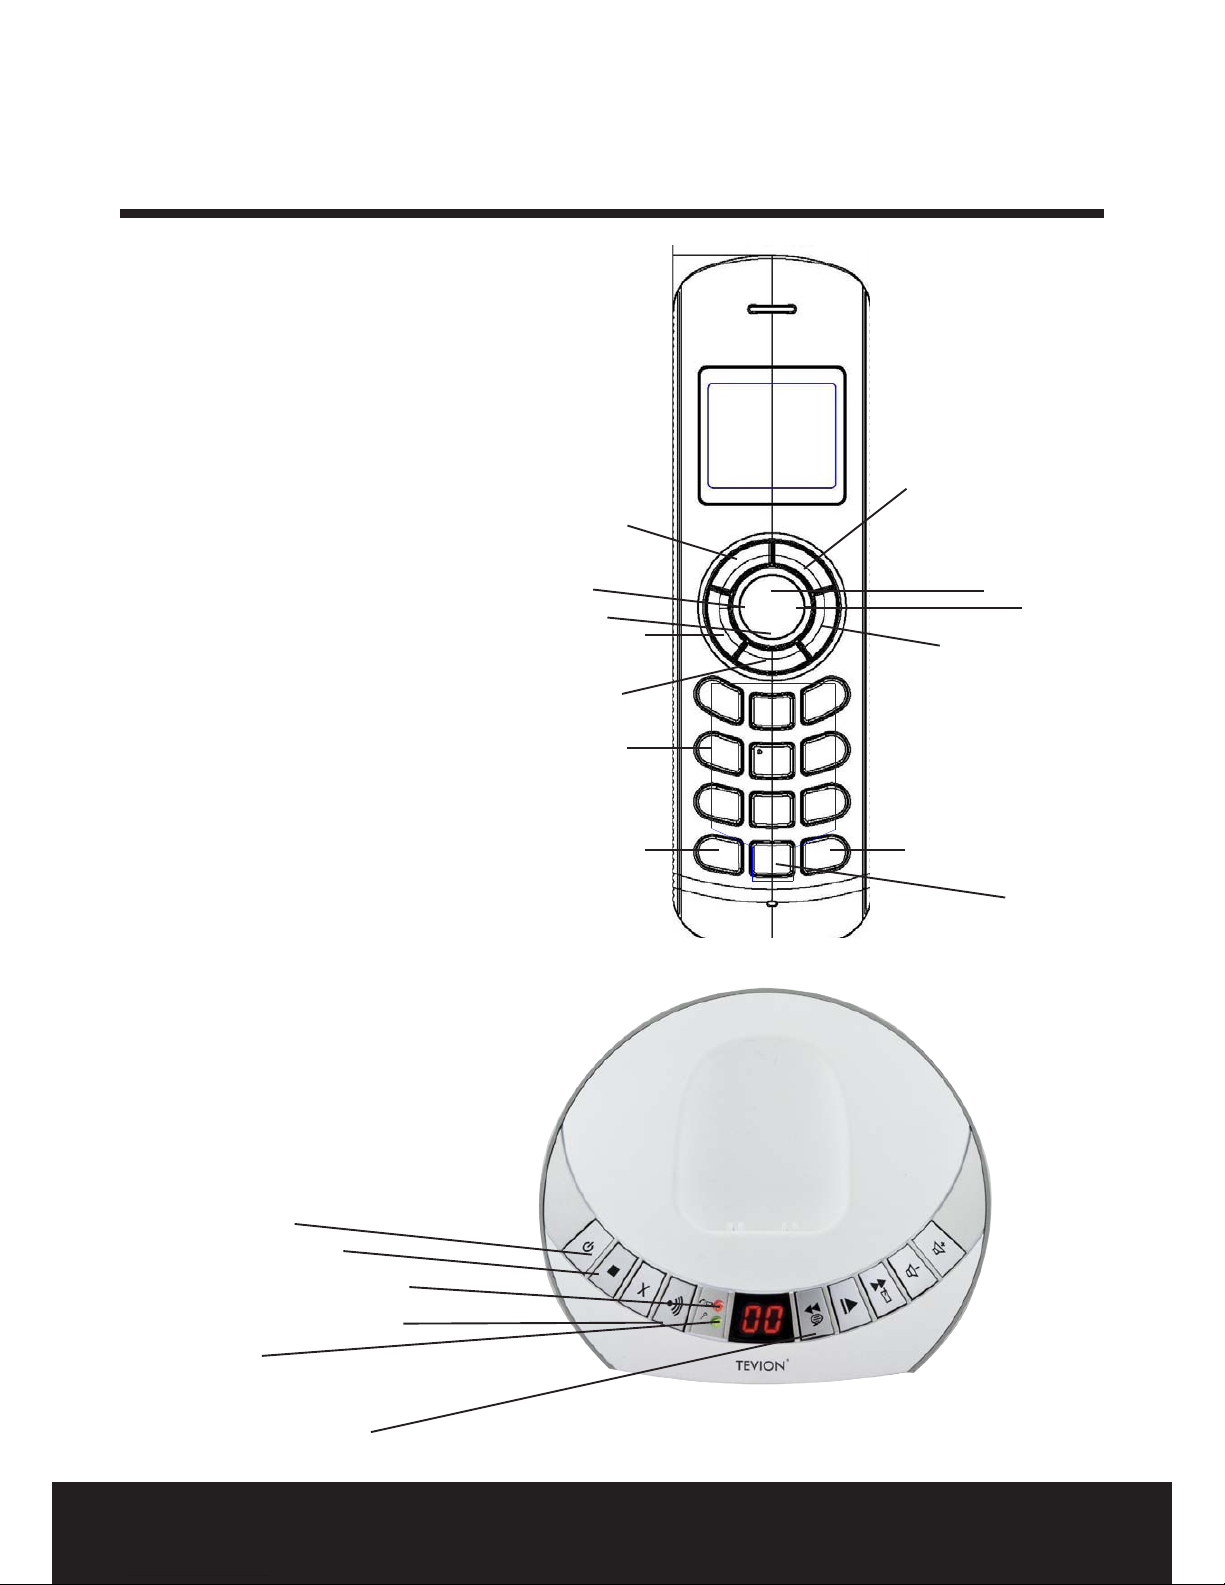
Phone parts list
Handset
1. Up / Redial key
2. Navigation Right / Flash key
3. Navigation Down (Calls / Volume Down)
4. Navigation Left (INT)
5. OK Key
6. Right Soft Key (Names in idle State)
7. Talk O (Escape in menu / long press to power o)
8. Left Soft key (Menu inidle state)
9. Talk On (Power On / Hands free)
10. Numeric Keys
11. Long press ”0” to pause
12. * (Ringer Volume On/O)
13. # (keypad lock / unlock)
Base
16. Paging key
17. Power LED
18. Charge/in use indicator (LED)
19. Message counter
6
1
2
7
13
12
18
STOP
Power On/O
16
17
19
5
10
9
3
4
8
11

8
After Sales Support TEL: 1300 886 649
On hook
O hook
Ringing
Internal communication between
2 handsets
Handsfree speaker ON
Keypad Locked
Upper case
Lower case
Possible scroll direction
Call log entries (steady)
New unanswered calls (blinking)
New voice mail message
Handset ringer o
Alarm set
In range (steady)
Out of range (blinking)
Phonebook
Ok / Conrm
Menu
Delete / Esc
Mute
Back
No Key
LCD Display & Icon
Soft Key
9
After Sales Support TEL: 1300 886 649
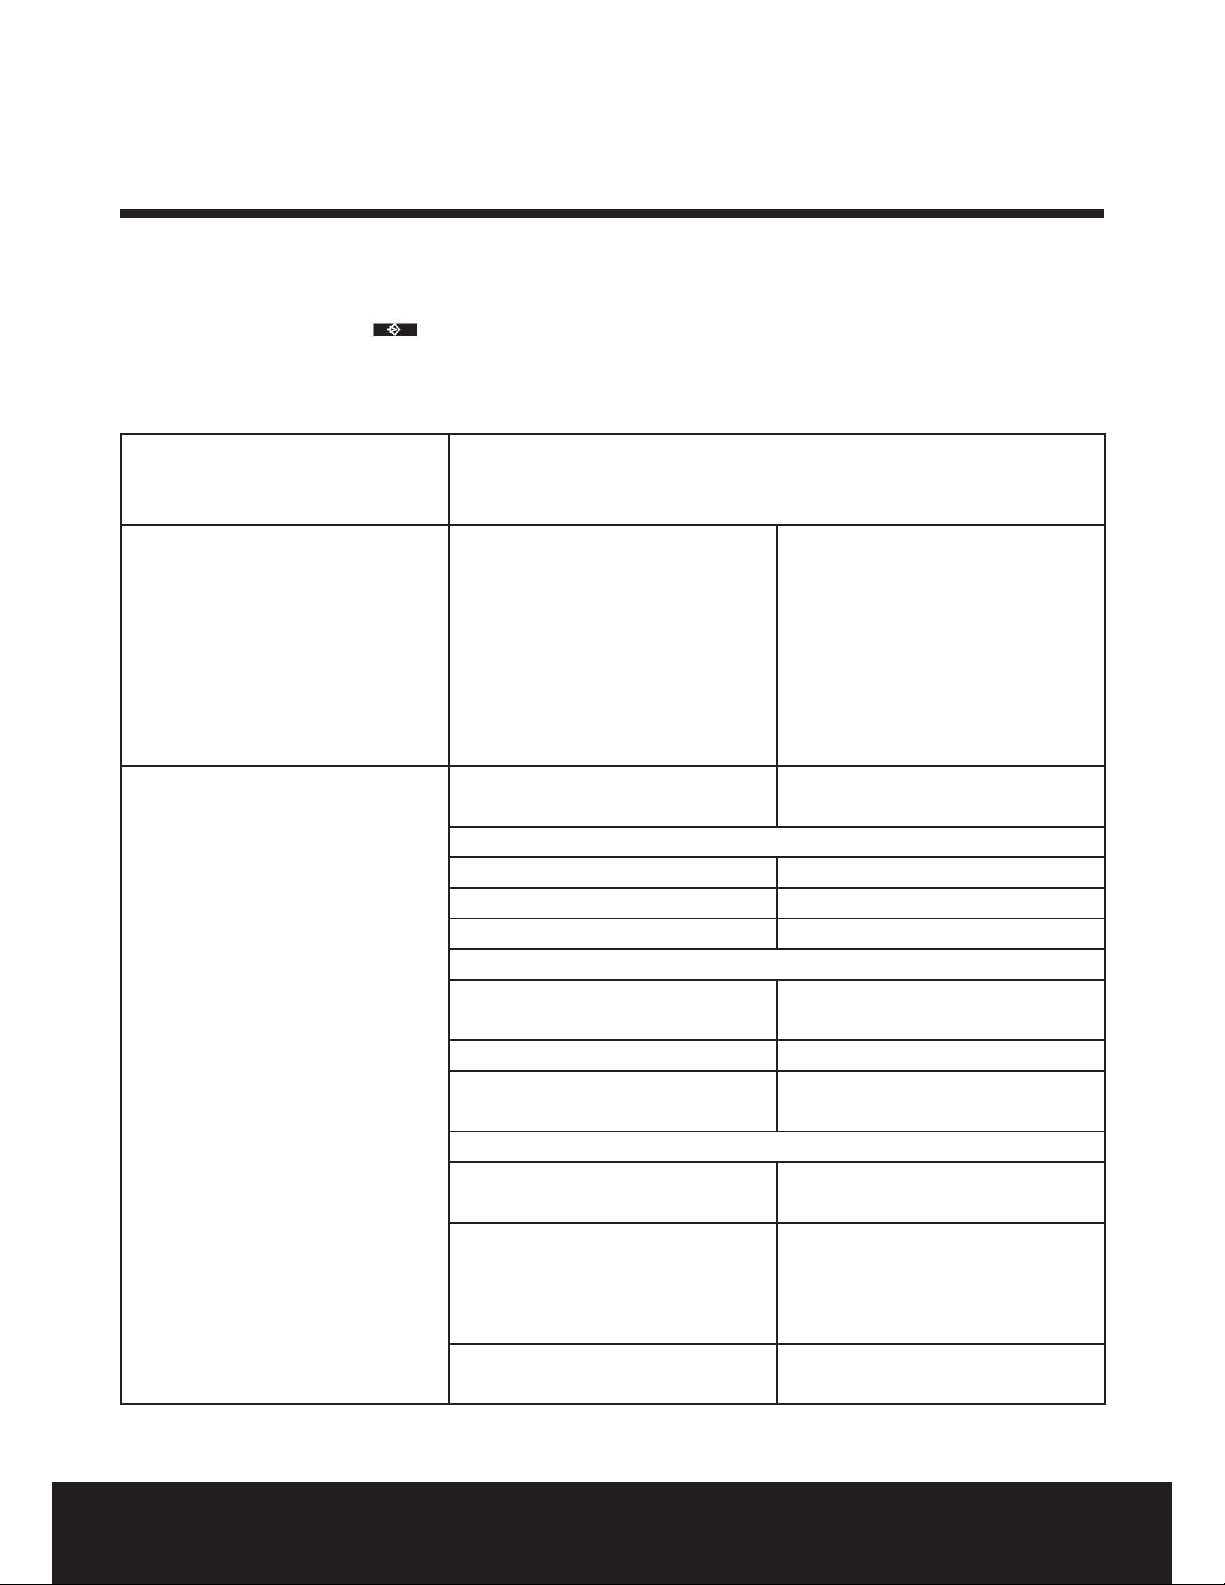
Main Menu
Whenever the menu button is pressed in idle mode, the rst menu option is displayed. As the up/down
navigation button is pressed the next menu item is displayed.
The order of options in the main menu is:
Ans Machine Answer Delay
Security Code
Language
Phonebook
Option New Entry
Edit Entry
Show Details
Delete Entry
Delete All
Copy Entry
Copy Append
Copy all
Handset Ring Tone 1 External
2 Internal
Ringer Volume
Handset Name
Keypad Beep 1 On
2 O
Contrast
Auto Talk 1 On
2 O
Backlight Time 10s, 20s, 30s, 40s
Conrm Beep 1 On
2 O
Prex (Optional feature)
Select Base 1 Auto
2 Manual
Language English
Deutsch
Français
Registration 1 Register
2 De-register
Operating Instructions
10
After Sales Support TEL: 1300 886 649
Handset Operations
1. Turning the handset on / o
• To turn the handset on, press the o hook key.
• To turn the handset o, press the on hook key.
2. Setting the language
To set the language, do the following:
• Press the option button under
.
• Press the up or down key repeatedly until ‘Handset’ is selected.
• Press to conrm.
• Press the up or down key repeatedly until ‘Language’ is selected.
• Press to conrm.
• The language set appears on the display.
• Press the up or down key repeatedly to select the language you would like to use.
• Press to conrm your selection or press to go back to the previous menu without saving.
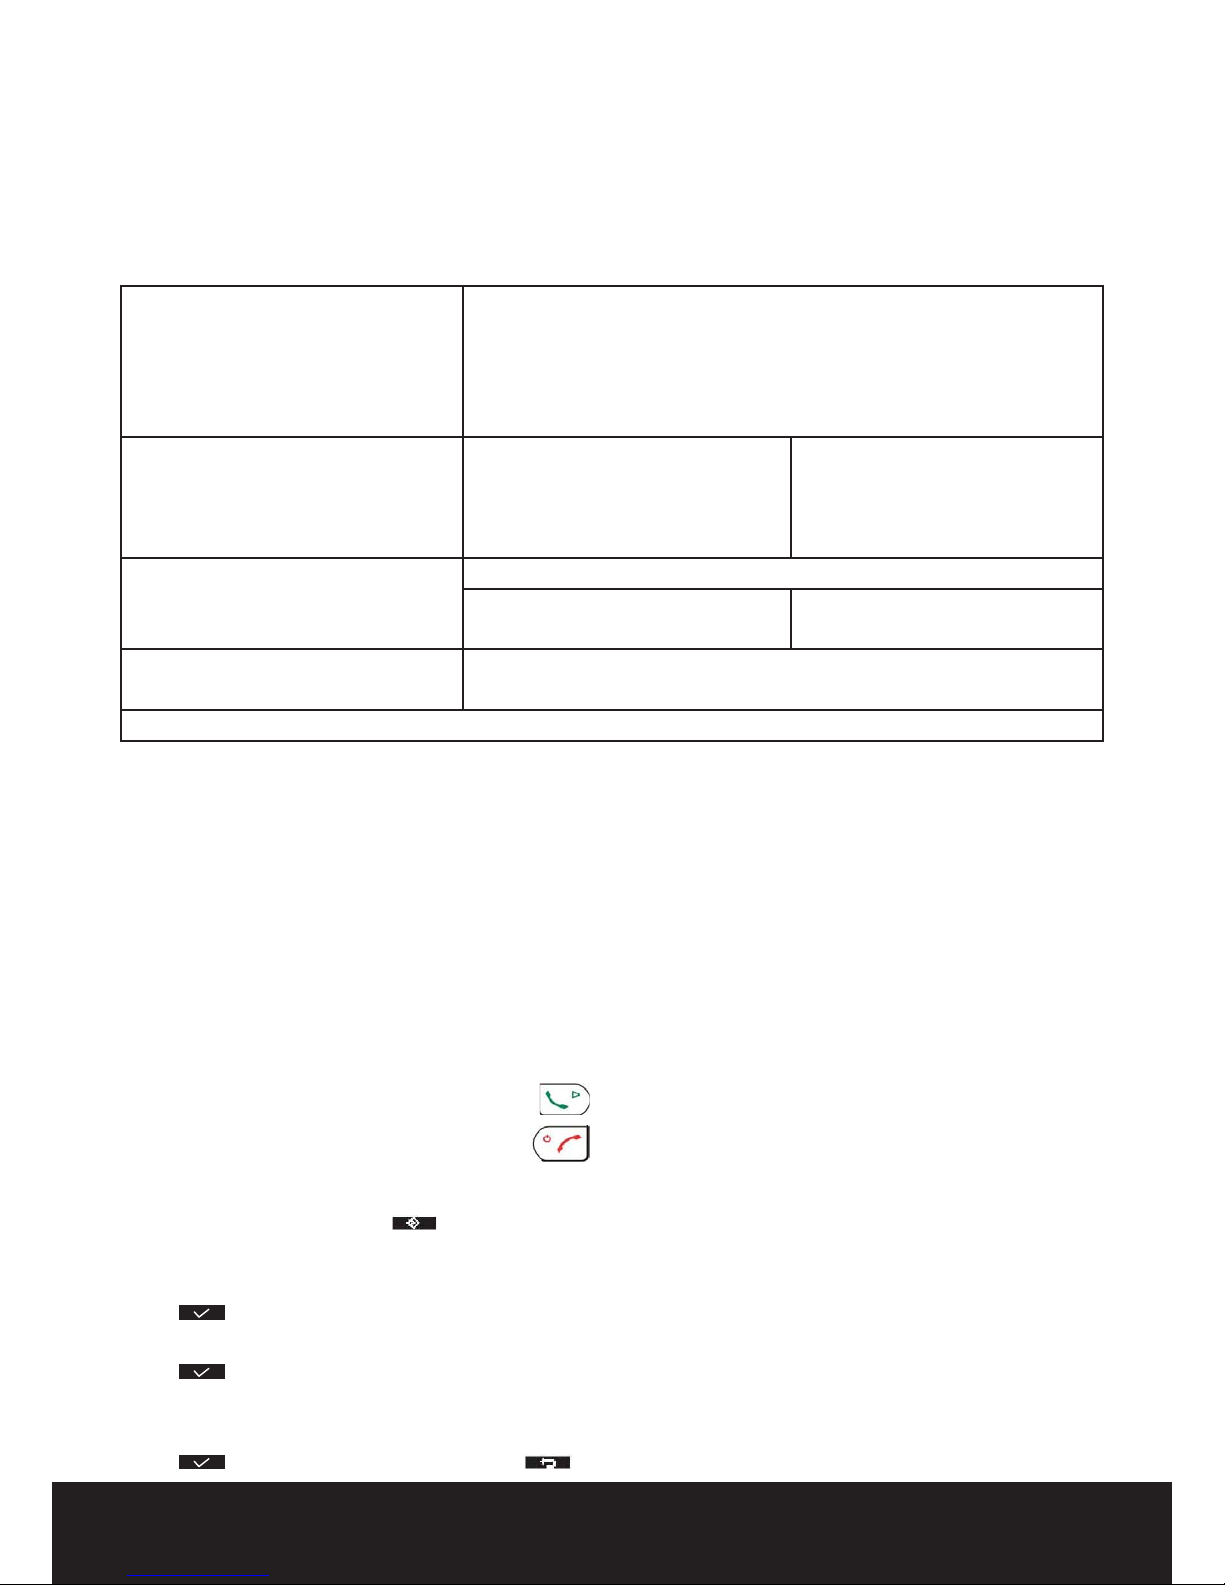
Base Settings: Ring Tone
Ringer Volume
Dial Mode
Recall
System PIN
Time:
Set Alarm 1. Every Day
2. Mon to Fri
3. O
4. Once
Date and Time
Set Time Format 1. 12Hour
2. 24Hour
Tools: Appointment
Stop Watch
Note: some menus can be turned o as per individual request.
Before First Use
• Place the rechargeable batteries in the handsets.
• Place the handsets on the charging bases.
• Plug each AC adaptor into the back of each base.
• Then plug each AC adaptor into the wall outlets.
NOTE: It is recommended to charge the handsets on base for 24H before the rst intended use.

11
After Sales Support TEL: 1300 886 649
3.1 External Call
• Press the o hook key
.
• The line/handset charging indicator (LED) on the base unit will blink and the
Call symbol appears on the display.
• You will hear the dial tone. Dial the telephone number you wish to call.
• The number appears on the display and is dialed.
• After nishing your call, press the on hook key
to hang up.
3.2 Number preparation
• Dial the telephone number you wish to call. You can correct the number by pressing the
key.
• Press the o hook key .
• The line/handset charging indicator (LED) on the base unit will blink and the Call symbol will appear
on the display.
• The telephone number is dialed automatically.
• After nishing your call, press the on hook key
or put the handset back on the base unit to hang up.
3.3 Redial one of the last numbers
• Press the redial key
. The number you last called appears on the display.
• Select your desired redial number with the Up and Down keys.
• Press the o hook key
.
• The number shown on the display is dialed automatically.
• After nishing your call, press the on hook key
or put the handset back on the base unit to hang up.
3.4 Calling a programmed number from the phone book
The telephone has a phone book in which you can store telephone numbers with the name
(See also “The phone book” ). To call a number from the phone book:
• Press the phone book key
. The rst number of the phone book appears on the display.
• Press the up or down key repeatedly to select the telephone number you want to call.
• Press the o hook key
.
• The number is shown on the display, and it is dialed automatically.
• After nishing your call, press the on hook key
or put the handset back on the base unit to hang up.
4 Receiving a Call
During internal or external incoming calls, the handset will start to ring. You can temporarily disable the handset

12
After Sales Support TEL: 1300 886 649
ringing by pressing the option key ‘Silent’.
• All subscribed handsets will ring when you receive a call.
• The Call symbol
blinks on the display.
• The telephone number of the caller appears on the display if you have Caller ID service
(CLIP). Consult your telephone company. The name of the caller also appears on the display if:
– the number is programmed into the phone book with name.
– the network sends the name together with the telephone number.
• Press the o hook key
to accept the external call.
OR Lift the handset o its base unit (if the Auto answer option is active, See pg.16 “20. Auto answer” ).
• During the conversation the
symbol appears on the display and the call timer starts to run.
• After nishing your call, press the on hook key to hang up or put the handset back on the base unit.
5 Redial list options
When scrolling through the redial list (see pg.11 “3.3 Redial one of the last 10 numbers dialed”) you have the
following options:
When the desired number is shown on the display press ‘Option’ and select with the up and down keys with the
following options:
• ‘Delete‘: to delete an entry in the redial list. Press
to conrm.
• ‘Save number’: to store the number into the phone book memory. Press
to conrm. Enter a name
(See pg.18 “24.1 Adding a number and a name to the phone book”) and press ‘Save’.
Edit the number and press ‘Save’ again.
• ‘Delete All’: to delete all entries in the redial list. Press
to conrm.
6 Activate / deactivate hands free function
This function allows you to communicate without having to pick up the handset.
When you are talking, press the hands free key
to activate the hands free function.
Press the button again to deactivate the hands free function.
7 ‘Out of range’ warning
If the handset is out of range of the base unit, a warning signal will sound.
• ‘SEARCHING’ appears on the display and the
symbol blinks on the display.
• Move closer to the base unit.
• As soon as you are back within range of the base unit, a signal sounds and the
symbol stops blinking.
8 Setting the speaker volume
Use the up and down keys during conversation to set the volume of the speaker. You can select from 5 levels.

13
After Sales Support TEL: 1300 886 649
The telephone is set to level ‘3’ by default.
9 Call Duration Indicator on the Display
During an external call, the call duration is shown on the display:
E.g. “10:40“ for 10 minutes and 40 seconds.
The call duration remains visible on the display for 2 seconds after each call.
10 Turning o the microphone (mute)
To turn o the microphone during a call press the mute key
. Now you can speak freely without the caller
being able to hear you. To activate the microphone again, press the option key ‘O’ .
11 Pause key
If you dial a telephone number and you would like to add a pause to this number, press and hold the Pause key
at the desired place in the number.
When you dial or redial this number, the pause (3 seconds) will bet automatically included.
12 Locating a misplaced handset (paging) (Optional feature only)
If you cannot nd the handset, briey press the Paging key
on the base unit.
All handsets subscribed on the base unit will ring so you can locate the misplaced handset.
To stop the signal, briey press any key on any handset.
13 Using the alphanumeric handset keypad
Use the alphanumeric keypad to type text. To select a letter, press the corresponding alphanumeric key.
E.g. if you press the alphanumeric key ’5’, the rst character ‘j’ appears on the display.
Press it repeatedly to select other characters from this key.
Press the ‘2’ key once to select the letter ‘a’. If you would like to select both ‘a’ and ‘b’ after each other, rst press
the ‘2’ key once to select ‘a’, wait 2 seconds and then press the ‘2’ key twice to select ‘b’. You can delete characters
mistakenly typed by using the Delete key
. The character in front of the cursor will be deleted.
All characters can be deleted at the same time by pressing the Delete key for 2 seconds.
You can move the cursor by pressing the left and right keys INT / R. You can switch between upper and lower case
by pressing the * key. The upper right corner will show ‘abc’ for lower case and ‘ABC’ for upper case.
You can change the input character set from English (ABC) to Latin (AÀÁ), Greek (ΑΒΓ) or Russian (АБВ) by pressing
and holding the # key for 2 seconds.
14 Setting the ring volume level on the handset
You can change the ring volume of an incoming call (internal and external) between 6 levels (levels ‘1’ to ‘5’ and

14
After Sales Support TEL: 1300 886 649
‘O’).
If you select level ‘O’, the
symbol appears on the display. The handset will not ring when a call is received.
Level ‘5’ is the highest level. The telephone is set to level ‘5’ by default.
Setting the ring volume for Internal and external calls (0-5)
• Press the menu key under
.
• Press the up or down key repeatedly until ‘Handset’ is selected.
• Press
to conrm.
• Press the up or down key repeatedly until ‘Ringer volume’ is selected.
• Press
to conrm.
• The current volume is shown and audible.
• Press the up or down key repeatedly to select the desired volume.
• Press ‘Save’ to conrm your selection or press
to go back to the previous menu without saving.
When the handset is inside the base, the base will not ring during an incoming call. So when the handset
ring volume is turned o and the handset is inside the base, your phone will not ring anymore!
• You can turn the handset ring volume o during ringing by pressing the option key ‘Silent’.
• By pressing the * key for 2 seconds you can disable the handset ringer. The symbol will appear on the
display. To reactivate, press the * key again for 2 seconds.
15 Setting the ringer melody on the handset
You can change the ringer melody for an incoming call (internal or external).
The unit has several ringer melodies to choose from.
Setting a ringer melody for internal or external calls
• Press the left menu key under
.
• Press the up or down key repeatedly until ‘Handset’ is selected.
• Press
to conrm.
• Press the up or down key repeatedly until ‘Ring Tone’ is selected.
• Press
to conrm.
• Select ‘External’ or ‘Internal’ and press
.
• The current melody is shown and audible.
• Press the up or down key repeatedly to select the desired melody.
• Press ‘Save’ to conrm your selection or press
to go back to the previous menu without saving.
16 Locking the key pad
You can lock the keypad to prevent involuntary key presses. When the keypad is locked it is impossible to dial a

15
After Sales Support TEL: 1300 886 649
telephone number, but you can still answer incoming calls.
To activate keypad lock:
• Press and hold the keypad lock key
#
for 2 seconds.
• ‘Keypad locked’ and the icon will appear on the display.
To deactivate keypad lock:
• Press ‘Unlock’ and “#” followed by the keypad lock key to unlock the keypad again.
17 Turning key click on/o
You can set the handset to make a click whenever you press a key.
• Press the left menu key under
.
• Press the up or down key repeatedly until ‘Handset’ is selected.
• Press
to conrm.
• Press the up or down key repeatedly until ‘Keypad Beep’ is selected.
• Select:
– ‘On’: turn on key click.
– ‘O’: turn o key click.
• Press
to conrm your selection or press to go back to previous menu without saving.
18 Contrast
To change the display contrast:
• Press the left menu key under
.
• Press the up or down key repeatedly until ‘Handset’ is selected.
• Press
to conrm.
• Press the up or down key repeatedly until ‘Contrast’ is selected.
• Press
to conrm.
• Select the new contrast level with the up or down key.
• Press
to conrm your selection or press to go back to previous menu.
19 Changing the handset name
You can change the handset name displayed on the handset during standby (max. 8-12 characters).
• Press the left menu key under
.
• Press the up or down key repeatedly until ‘Handset’ is selected.
• Press
to conrm.
• Press the up or down key repeatedly until ‘Handset name’ is selected.
• Press
to conrm.
• Press
to delete each letter of the name and use the alphanumeric keypad to enter the correct name.
• Press ‘Save’ to set the new handset name.

16
After Sales Support TEL: 1300 886 649
20 Auto answer
When there is an incoming call and the handset is on the base, the phone automatically takes the line when lifted.
This function can be turned on or o.
• Press the left menu key under
.
• Press the up or down key repeatedly until ‘Handset’ is selected.
• Press
to conrm.
• Press the up or down key repeatedly until ‘Auto Talk’ is selected.
• Press
to conrm.
• Select ‘On’ or ‘O’ and press
to conrm.
21 Changing the duration of the backlight
You can choose the time (in seconds) the backlight stays on after the last action on the keypad.
• Press the left menu key under
.
• Press the up or down key repeatedly until ‘Handset’ is selected.
• Press
to conrm.
• Press the up or down key repeatedly until ‘Backlight Time’ is selected.
• Press
to conrm.
• Select the backlight time with the up or down key.
• Press
to conrm your selection or press to go back to previous menu without saving.
22 Conrm Beep
You can set the conrm beep tone on and o.
• Press the left menu key under
.
• Press the up or down key repeatedly until ‘Handset’ is selected.
• Press
to conrm.
• Press the up or down key repeatedly until ‘Conrm Beep’ is selected.
• Press
to conrm.
• Select ‘On’ or ‘O’ and press
to conrm.
22.1 Default reset (Handset reset)
You can restore all handset settings back to default and erase all phonebook, call log, VIP list and redial entries.
To restore the default settings:
• Press the ash key R for about 10 seconds until ‘Handset reset?’ appears.
• Press
to conrm or press to return to standby mode.
23 Setting the clock and alarm

17
After Sales Support TEL: 1300 886 649
23.1 Date and time
• Press the left menu key under
.
• Press the up or down key repeatedly until ‘Time’ is selected.
• Press
to conrm.
• Press the up or down key repeatedly until ‘Date and time’ is selected.
• Press
to conrm.
• Enter the last 2 digits of the year and press ‘Save’.
• Enter the month and press ‘Save’.
• Enter the day and press ‘Save’.
• Enter the hours and press ‘Save’.
• Enter the minutes and press ‘Save’.
When you remove the base power, you have to set the date and time again.
If you have Caller id on your telephone line and the operator sends date and time, your clock will be set
automatically on an incoming call.
23.2 Hour format
• Press the left menu key under
.
• Press the up or down key repeatedly until ‘Time’ is selected.
• Press
to conrm.
• Press the up or down key repeatedly until ‘Set Time Format’ is selected.
• Press
to conrm.
• Select the time format (12h or 24h notation) and press
.
23.3 Using the alarm feature
Set the date and time and use your handset to give you a reminder alarm. You can have dierent alarm settings for
each handset registered to your base. The alarm rings only at the handset, not at the base or any other handset.
If one of the alarms is set, the alarm set icon appears in standby mode on the display.
23.4 Set the alarm
• Press the left menu key under
.
• Press the up or down key repeatedly until ‘Time’ is selected.
• Press
to conrm.
• Press the up or down key repeatedly until ‘Set Alarm’ is selected.
• Press
to conrm.
• Press the up or down key repeatedly and select one of the 4 types of settings: ‘Once’, ‘Every Day’, ‘Mon to Fri’ or
‘O‘. Conrm with
. If you choose ‘Once’, ‘Every Day’ or ‘Mon to Fri’ the display will show:

18
After Sales Support TEL: 1300 886 649
Time (24hr): 07:00
Enter the time when you want the telephone to ring and conrm by pressing ‘Save’ .
Press the up or down key repeatedly and select one of the alarm melodies and conrm by pressing ‘Save’ .
• To deactivate the Alarm function, select ‘O’ and conrm with
.
23.5 Turn o the alarm
• When the alarm goes o, press the left menu key under ‘Stop’ to deactivate the alarm.
• Press the right menu key under ‘Snooze’ to repeat the alarm function in 5 minutes.
Attention: If your alarm setting is ‘Once’, the alarm icon
will disappear from the display once the alarm
is completed. If you choose ‘Snooze’ the alarm function is still active, but it’s not visible on the
display. The alarm will go o every 5 minutes and 5 times. After that, the alarm will be o.
24 The phone book
The phone book allows you to memorise 200 telephone numbers and names. You can enter names of up to 16
characters in length and numbers of up to 24 digits length.
24.1 Adding a number and a name to the phone book
• Press the phonebook option key
.
• Press ‘Option’ , select ‘New Entry’ and press to conrm.
• ‘Name‘ appears on the display. Enter the name using the alphanumeric keys.
• Press ‘Save’ and enter the telephone number.
• Press ‘Save’ and select a melody.
• Press ‘Save’ to store the record in the phonebook or press
to cancel.
24.2 Looking up a number in the phone book
• Press the phone book option key
.
• Enter the rst letter of the desired name via the alphanumeric keypad.
• The rst name in the list with this letter appears on the display.
• Press the up or down key to browse for other numbers in the phone book.
• If the desired number appears on the display, the number will be automatically dialed by pressing the o hook
key
. Or press ‘Option’, and select ‘Show Details’ and press option key talk.
24.3 Changing a name or number in the phone book
• Press the phone book option key
.

19
After Sales Support TEL: 1300 886 649
• Enter the rst letter of the desired name. The rst name in the list with this letter appears on the display.
Press the up or down key to browse and select the entry in the phone book.
• Once the desired number appears on the display, press ‘Option’ .
• Press the up or down key and select ‘Edit Entry’. Press
to conrm.
• Press
to delete each letter of the name and use the alphanumeric keypad to enter the correct name.
• Press ‘Save’ .
• Press
to delete each number one by one and use the keypad to enter the correct number.
• Press ‘Save’ and choose a ringer melody.
• Press ‘Save’ to save the changes made.
24.4 Deleting one or all entries from the phone book
• Press the right menu key
.
• Enter the rst letter of the desired name via the alphanumeric keypad or press the up or down key to browse and
select the entry in the phone book.
• Once the desired number appears on the display, press ‘Option’ .
• Press the up or down key and select ‘Delete Entry?’. Press the OK key or
to conrm.
OR
• Select ‘Delete All’ to delete all the entries and press the OK key or
.
• Select ‘Yes’ to validate or ‘No’ to cancel.
24.5 View name and number of an entry in the phone book
• Press the right menu key
.
• Enter the rst letter of the desired name via the alphanumeric keypad or press the up or down key to browse
and select the entry in the phone book.
• Press ‘Option’.
• Press the up or down key and select ‘Show Details’ then press the OK key or
.
• The name, telephone number and melody of the selected entry appear on the display.
• Press
to go back to the list of entries.
24.6 Copy a phone book entry to another handset
• Press the right menu key
.
• Enter the rst letter of the desired name via the alphanumeric keypad or press the up or down key to browse
and select the entry in the phone book.
• Press ‘Option’ .
• Press the up or down key and select ‘Copy Entry’ and press the OK key or
.
• The available handsets number (all the handsets that are registered on the base) are shown.
• Press the Left or Right repeatedly to select the correct handset. Press the OK key or
to conrm.
• ‘Copying to Handset x’ appears on the display.
• ‘Receive Phone book Record?’ appears on the display of the destination handset.
• On the destination handset, press
to conrm or to cancel.

20
After Sales Support TEL: 1300 886 649
24.7 Copy all phone book entries to another handset
• Press the right menu key
.
• Press ‘Option’ .
• Press the up or down key and select ‘Copy All’ then press the OK key or
.
• The available handsets numbers (all the handsets that are registered on the base) are shown.
• Press the left or right key and select the correct handset. Press the OK key or
to conrm.
• ‘Copying to Handset x’ appears on the display.
• ‘Replace All Phone book Record?’ appears on the display of the destination handset.
• On the destination handset, press
to conrm or to cancel.
24.8 Add all phone book entries to the phone book of another handset
• Press the right menu key
.
• Press ‘Option’.
• Press the up or down key and select ‘Copy Append’ then press the OK key or
.
• The available handsets number (all the handsets that are registered on the base) are shown.
• Press the left or right key and select the correct handset. Press the OK key or
to conrm.
• ‘Copying to Handset x’ appears on the display.
• ‘Receive Phonebook Record?’ appears on the display of the destination handset.
• On the destination handset, press
to conrm or to cancel.
25 Base operation
25.1 Setting the ring volume and melody of the base
25.2 Setting the base melody
• Press the left menu key under
.
• Press the up or down key repeatedly until ‘Base Settings’ is selected.
• Press
to conrm.
• Press the up or down key repeatedly until ‘Ring Tone’ is selected.
• Press
to conrm.
• The current melody is shown and audible.
• Press the up or down key repeatedly to select the desired melody (1-9).
• Press ‘Save’ to conrm your selection or press
to go back to previous menu.
25.3 Setting the base ring volume
• Press the left menu key under
.

21
After Sales Support TEL: 1300 886 649
• Press the up or down key repeatedly until ‘Base Settings’ is selected.
• Press
to conrm.
• Press the up or down key repeatedly until ‘Ringer Volume’ is selected.
• Press
to conrm.
• The current volume is shown and audible.
• Press the up or down key repeatedly to select the desired volume (0-5).
• Press ‘Save’ to conrm your selection or press
to go back to previous menu.
25.4 The R key (ash)
With the Flash key R you can use certain services on your external line such as “call waiting” (if your telephone
company oers this feature); or to transfer calls if you use a telephone exchange (PABX). The Flash key R is a brief
interruption of the line. You can set the ash time to Short or Long.
To change it:
• Press the left menu key under
.
• Press the up or down key repeatedly until ‘Base Settings’ is selected.
• Press
to conrm.
• Press the up or down key repeatedly until ‘Recall’ is selected.
• Press
to conrm.
• Press the up or down key repeatedly to select the desired ash time:
– ‘Long’
– ‘Short’
• Press ‘Save’ to conrm your selection or press
to go back to previous menu.
25.5 Changing the PIN code (system PIN code)
Certain functions are only available if you know the PIN code of the base.
The PIN code has 4 digits. The default PIN code setting is ‘0000’. If you would like to change the PIN code and set
your own secret code, do the following:
• Press the left menu key under
.
• Press the up or down key repeatedly until ‘Base Settings’ is selected.
• Press
to conrm.
• Press the up or down key repeatedly until ‘System PIN’ is selected.
• Press
and enter the old PIN code.
• Press
. If the wrong PIN code is entered, ‘Incorrect PIN’ is shown. If the correct PIN code is entered the
phone will ask you to enter the new PIN. Enter a new system PIN code and press
.
• Enter the new PIN code again to conrm and press
.
25.6 Setting the dialing mode
There are two types of dialing modes that can be used on a telephone line:

22
After Sales Support TEL: 1300 886 649
• DTMF/Tone dialing (the most common).
• Pulse dialing (for older installations).
To change the dialing mode:
• Press the left menu key under
.
• Press the up or down key repeatedly until ‘Base Settings’ is selected.
• Press
to conrm.
• Press the up or down key repeatedly until ‘Dial Mode’ is selected.
• Press
and select the dial mode with the up and down keys and press ‘Save’ to conrm.
26 Tools
26.1 Appointment
You can set 5 appointments or reminders which you can give a name and an alarm by date and time.
• Press the left menu key under
.
• Press the up or down key repeatedly until ‘Tools’ is selected and press the OK key or to conrm.
• ‘Appointment’ is selected. Press
to conrm.
• Press the up or down key to select one of the 5 appointments and press the OK key or
.
• Press the up or down key repeatedly until ‘Edit’ is selected. Press the OK key or
to change the appointment.
• Edit the name of the appointment and press ‘Save’ .
• Enter the date of the appointment and press ‘Save’ .
• Enter the time and press ‘Save’ .
• Press the up or down key to select the desired alarm melody and press ‘Save’ to validate.
• To delete the appointment: Press the up or down key repeatedly until ‘Delete’ is selected.
• Press
to conrm or to cancel.
26.2 Stopwatch
• Press the left menu key under
.
• Press the up or down key repeatedly until ‘Tools’ is selected and press the OK key or to conrm.
• Press the up or down key repeatedly until ‘Stop Watch’ is selected.
• Press the OK key or
to conrm.
• Press ‘Start’ to start the stopwatch. Press ‘Stop’ to stop the stopwatch. To restart the stopwatch press ‘Start’ again.
• Press ‘Reset’ to reset the counter to 00:00.
27 Additional handsets and bases
You can subscribe up to 5 handsets on one base. Each handset can register to 4 base stations and the user can

23
After Sales Support TEL: 1300 886 649
select which base he wants to use. By default the handset 1 is registered to the base unit 1.
27.1 Adding a new handset
Press and hold the Page key on base for 10 seconds until the base LED is blinking fast.
The base unit will be in registration mode for 3 minutes.
Do the following to subscribe the handset:
• Press the left menu key under
.
• Press the up or down key repeatedly until ‘Handset’ is selected.
• Press
to conrm.
• Press the up or down key repeatedly until ‘Registration’ is selected.
• Press
to conrm.
• Select ‘Register’ and press
.
• Select a base (‘1’-’4’) with the up and down keys and press
.
• Enter the system PIN code (base PIN code; default=’0000’) and press
.
• The handset will now search for a base and register when found.
The standby screen will appear when successfully registered and handset name and number will be shown.
This is only needed when you have deregistered a handset or when you have bought a new one.
Each handset can be subscribed to 4 dierent DECT base units. Each base unit is assigned a number from ‘1’
to ‘5’ in the handset. When you subscribe a new handset, you can assign a base unit number.
It is best to use ‘1’
27.2 Removing a handset
It is possible to cancel subscription of a handset to a base. You should do this if a handset is damaged and has to
be replaced by a new one.
• Press the left menu key under
.
• Press the up or down key repeatedly until ‘Handset’ is selected.
• Press
to conrm.
• Press the up or down key repeatedly until ‘Registration’ is selected.
• Press
to conrm.
• Select ‘De-register’ and press
.
• Enter the system PIN code (base PIN code; default=’0000’) and press
.
• Select a handset you wish to remove by pressing the numerical keys (‘1’-’5’).
• Press the OK key or
to remove.
27.3 Selecting a base unit
If your handset is subscribed to several base unit stations (max. 4), you must select a base unit because the

24
After Sales Support TEL: 1300 886 649
handset can only communicate with one base unit at a time. There are two possibilities:
27.4 Automatic selection
If you set the handset to ‘automatic selection’, the handset will automatically choose the closest base unit in
standby:
• Press the left menu key under
.
• Press the up or down key repeatedly until ‘Handset’ is selected.
• Press
to conrm.
• Press the up or down key repeatedly until ‘Select Base’ is selected.
• Press
to conrm.
• Select ‘Auto’ and press to conrm.
27.5 Manual selection
If you set the handset to ‘manual selection’, the handset will only choose the base unit you have set.
• Press the left menu key under
.
• Press the up or down key repeatedly until ‘Handset’ is selected.
• Press
to conrm.
• Press the up or down key repeatedly until ‘Select Base’ is selected.
• Press
to conrm.
• Select ‘Manual’ and press
to conrm.
• Select the base with the up and down key and press
.
You can only cancel subscription of another handset, not the handset you are using to do the removal
procedure. When you have activated Automatic base selection and the handset is out of range on the
current base, the handset will only search for the strongest base in standby (not during communication).
Caution: Before you can select a base unit, the handset must be subscribed to the base rst.
27.6 Using multiple handsets
27.7 Calling another handset
• Press the INT key.
• ‘INTERNAL_” appears on the display.
• Dial the number of the handset you would like to call.
• After nishing your call, press the on hook key
to hang up.
27.8 Receiving an internal call
• The internal call icon and the number of the handset calling, appear on the display.

25
After Sales Support TEL: 1300 886 649
• Press the o hook key to accept the internal call.
OR
• Lift the handset o its base (if the auto answer option is active, see §“7.20 Auto answer”).
• During the call, the handset number of the caller and the
symbol appear on the display.
• After nishing your call, press the on hook key
to hang up.
27.9 Receiving an external call during an internal call
If you receive an external call during an internal call, you will hear a call waiting tone (double beep) on both
handsets being used for an internal call.
• Press the on hook key
to end the internal call.
• Press the o hook key to accept the external call.
• After nishing your call, press the on hook key to hang up.
27.10 Transferring a call to another handset
• You have an external caller on the line.
• Press the INT key . ‘INTERNAL_’ appears on the display.
• Dial the number of the handset to which you would like to transfer the call.
• If the handset dialed answers, you can have an internal conversation.
Press the on hook key
and the external call is transferred.
• If the handset dialed does not answer, press the END key to speak to the external caller again.
27.11 Conference call (two internal handsets and one external caller)
You can have a telephone conversation with one internal and one external caller at the same time.
• While on the line with an external caller, press the INT key. The external line is put on hold.
• Dial the number of the handset you would like to include in the call. You can decide between the Internal and
External line by pressing the INT key.
• Once the handset has the dialed answers, press the option key ‘Conf.’ .
• Now you are connected to the external and the internal caller and you can talk to them at the same time
(conference call).
These functions are only possible when more than one handset is subscribed to the base.
28 Caller ID / CLIP
When you receive a call, the telephone number of the caller appears on the handset display. If the name is

26
After Sales Support TEL: 1300 886 649
programmed in the phone book, the name in the phone book is displayed.
The telephone can store calls in a call list that can be reviewed later. When the memory is full, the new calls
automatically replace the oldest calls in the memory. The icon on the display blinks if there are new not answered
calls in the call list. In the middle of the screen, next to the -icon, you can see the amount of new messages.
If the call list is empty and you press the call log key , ‘Call list empty’ will be shown.
You can view the information of an incoming call:
• Press the call log key. The name (if sent by the network or present in the phone book memory) of the caller will be
shown on the rst line. The telephone number of the caller is on the second and third line and the date and time
is on the third line. On the last line the following indication is shown:
– ‘New’: Unread or unanswered call.
– ‘Old’: Read or answered call.
28.1 The call list
The calls received are stored in the call list.
• Briey press the call log key
to view the most recent call.
• The telephone number and name of the most recent caller appears on the display. If no name is available,
‘No Name’ appears on the rst line.
• The date and time the call was received are linked to each call.
• Press the call log key to browse other numbers on the list.
28.2 Calling a number from the call list
• Press the call log key
to go into the call list.
• Press the up or down key to look up the desired number.
• Once the number is on the display, press the o hook key
and the number is dialed automatically.
You can only use this service when you have a Caller ID / CLIP subscription.
Contact your telephone company for more information.
• If neither the up or down key is pressed for 20 seconds, the telephone will return to standby mode.
• After a call is received, the number of the caller remains on the display for 5 seconds after the last ring.
28.3 Storing a number from the call list in the phone book
• Press the call log key
to go to the call list.

27
After Sales Support TEL: 1300 886 649
• Press the up or down key to look up the desired number.
• Press ‘Option’ .
• Press the up or down key repeatedly until ‘Save number’ is selected.
• Press
to conrm.
• ‘Name’ is displayed. Use the alphanumeric keys to add a name. Or if the name was sent by the network, you can
edit it before saving. Press ‘Save’ to conrm.
• The telephone number is displayed. Edit the number if needed and press ‘Save’ again to store the entry into the
phonebook.
• The handset returns to the call list.
28.4 Deleting numbers from the call list
28.5 Deleting one number
• Press the call log key
to go to the call list.
• Press the up or down key to look up the desired number.
• Press ‘Option’ .
• Press the up or down key repeatedly until ‘Delete’ is selected.
• Press
to conrm.
• The call is deleted and the next call appears on the display.
28.6 Delete all numbers
• Press the call log key to go to the call list.
• Press the up or down key to look up the desired number.
• Press ‘Option’.
• Press the up or down key repeatedly until ‘Delete All’ is selected.
• Press
to conrm.
• All read calls are deleted.
29 Voice mail indicator
This function only works if you have the voice mail or phone mail service and if the network sends this indication
along with the caller ID (CLIP) information.
When you receive a new message in your voice mail system, the icon will appear on the display.
Once you have listened to your messages, the icon will disappear.
30 Answering Machine
The base has a built-in digital answering machine with a recording capacity.

28
After Sales Support TEL: 1300 886 649
The answering machine can be operated remotely and features the possibility of recording two outgoing
messages (OGM 1 and OGM 2) (maximum of 2 min).
There are 2 choices:
• With OGM 1, the caller has the choice to leave a message.
• With OGM 2, only the outgoing message is given without the caller having the opportunity to leave a message.
The maximum recording time for each incoming message = 3 min.
An internal voice will state various information, such as day and time of the call.
30.1 LED Display
The LED display on the base indicates how many messages you have received. When there are new messages,
the 2 x 7 segment LED display on the base will blink and indicate the amount of new messages. If the answering
machine is switched o, the LED display does not light up. ‘FL’ will be shown on the display when the internal
memory is full and no new messages can be recorded.
30.2 Outgoing Messages
Two outgoing messages of 2 minutes can be recorded (OGM1 and OGM2).
• Outgoing message 1 for the answering function and choice for callers to leave a message.
• Outgoing message 2 for the answering function without allowing callers to leave a messages on the machine.
30.3 Recording Outgoing Messages (OGM 1 or OGM 2)
• Press briey the STOP key
to select the OGM.
• Press the
key for two seconds.
• Record the outgoing message after the beep.
• Press the Stop key
to stop recording.
30.4 Playback the Outgoing Message
To check the outgoing message now set:
• Press the
key.
NOTE: It is only possible to select an outgoing message if the answering machine is turned on.
If the memory is full, only outgoing message 2 can be selected (only answering without
recording messages).
30.5 Erasing the Outgoing Message
Erase the outgoing message as follows:

29
After Sales Support TEL: 1300 886 649
• Select the desired outgoing message by pressing the STOP key .
• Press the
key to play the outgoing message.
• Keep pressing the x key when the OGM is played back.
30.6 Turning Answering Machine On/O
If the answering machine is on, the 2x7 segment LED display will light up and the machine will automatically pick
up the line after a number of rings (see “Setting number of Rings” ).
• Press the
key to switch on the answering machine. The 2x7 segment LED will be turned on.
• Press the
key again to switch o the answering machine. The 2x7 segment LED will be turned o.
NOTE: Even if the answering machine is o, the machine will automatically pick up after 10 rings in order
to enable remote activation (see “Remote Operation” ).
30.7 Setting number of Rings
The number of rings after which the answering machine will answer calls can be set from 2 – 9 and TS (Toll saver).
The standard setting is 3 rings. In Toll saver mode, the machine will answer after 5 rings if there are no new
messages, and after 2 rings if there are new messages. If there are no new messages and you call your machine
to check your messages remotely (See “16.13 Remote Operation”), you can hang up after the 2nd ring. You do not
need to pay connection fees and you know that you do not have any new messages.
• Press the left menu key under
.
• Press the up or down key repeatedly until ‘Ans Settings’ is selected.
• Press
to conrm.
• Press the up or down key repeatedly until ‘Answer Delay’ is selected
• Press
to conrm.
• Select the amount of rings (2-9 or Toll saver).
• Press
to conrm your selection or press to leave the menu.
30.8 Programming the VIP Code
The VIP code is a 3 - digit code used to operate the machine remotely (see Remote Operation).

30
After Sales Support TEL: 1300 886 649
The VIP code is set to ‘321’ by default.
30.9 Changing the VIP Code
• Press the left menu key under
.
• Press the up or down key repeatedly until ‘Ans Settings’ is selected.
• Press
to conrm.
• Press the up or down key repeatedly until ‘Security Code’ is selected.
• Press
to conrm and enter the old VIP codes.
• Press
, the phone will ask you to enter the new VIP code. Enter a new VIP code and Press .
• Enter the new VIP code again and Press
to conrm.
30.10 Changing the language of the answering machine
• Press the left menu key under
.
• Press the up or down key repeatedly until ‘Ans Settings’ is selected.
• Press
to conrm.
• Press the up or down key repeatedly until ‘Language’ is selected.
• Press
to conrm.
• Press the up or down key repeatedly to select the desired language.
• Press
to conrm your selection or press to leave the menu.
30.11 Operation
If a call is received and the answering machine is turned on, the answering machine will automatically pick up the
line after the set number of rings. If:
• Outgoing message 1 has been selected, it will be played. After the outgoing message, a beep will be heard and
the caller can leave a message (of a max. 3 minutes).
• Outgoing message 2 has been selected, it will be played. After the beep, the line will automatically be
disconnected. The caller does not have the possibility to leave a message.
If, during pick-up, nothing is said for 8 seconds, the line will be automatically disconnected.
•The 2x7 segment LED will ash and alert the user that a new message is recorded.
30.12 Recording a Memo
You can record memos. These memos are considered an incoming message that can be picked up later by the user.
The max recording time for a memo is 2 minutes.
• Press the
key for 2 seconds. After the beep, record your memo.
• Press the Stop
key to stop recording.
30.13 Playback of Incoming Messages and Memos
• Press the key to play the messages and memos.

31
After Sales Support TEL: 1300 886 649
• The messages are played one at a time. If there are new messages, only the new messages
(those that have not been heard) are played.
• During playback, you can:
– go to the beginning of the current message by pressing the
key once.
– go to the previous message by pressing the
key twice.
– stop playback by pressing the Stop
key.
– interrupt playback by pressing the Pause key
. Press the play key again to restart playback.
– go to the next message by pressing the >> key.
30.14 Erasing Messages
30.15 Erasing Messages One at a Time during Playback
Start message playback as explained above.
• When the message to be erased starts playing, press the delete key X for 2 secs.
• The display will show ‘dL’. (it will also prompt “Message erased” if the machine has VP option).
30.16 Erase all messages
One can also erase all heard messages at one time. This erases only the messages that have already been heard.
New messages are not erased.
• Press the delete key X for 2 secs in idle mode.
• The display will show ‘dL’.
• Press the delete key X again to conrm.
30.17 Memory Full
If the memory is full, ‘FL’ will show on the display. If the answering machine is turned on and a call comes in, the
machine will automatically play OGM 2 (answering machine function without recorded caller message).
• Erase all the messages after listening to them.
• The memory is free again.
30.18 Remote operation
The answering machine can only be operated remotely using a tough-tone phone (DTMF tone selection system).
• Call your machine.
• The answering machine picks up the line, you hear the outgoing message and a beep.
• After the beep, slowly dial the VIP code (default 321).
• You will hear two short beeps for conrmation.
• Enter the next codes to use the desired function:
a) Listening to Messages
Press ‘2’ (listen to messages). The answer machine will play the messages.

32
After Sales Support TEL: 1300 886 649
During playback, you have the following options:
• Press ‘2’ to stop playback for 30 seconds pause.
• Press ‘2’ to restart playback.
• Press ‘3’ to go to the next message.
• Press ‘1 1’ to go to the previous message.
• Press ‘1’ to repeat the current message.
• Press ‘6’ to stop playback.
• Press ‘7’ to erase the current message.
b) Erasing All Old Messages
After listening to all messages, press ‘0’ to erase all messages.
c) Playing Outgoing Message
• Press ‘4’ to play the current outgoing message.
d) Recording Outgoing Message
• Press ‘9’ to select OGM 1 or OGM 2.
• Press ‘5’ to start recording.
• A beep will indicate that you can start recording.
• Say your message.
• Press ‘6’ to stop recording.
e) Turning Answering Machine On/O
• Press the ‘9 ‘ key to switch on the answering machine.
• Press the ‘8’ key to turn o the answering machine.
f) Ending Remote Operation
• If you want to end remote operation, press ‘6’.
30.19 Turning answering machine on remotely
If the answering machine is switched o, you can turn it on remotely.
• Call your machine.
• The machine will pick up automatically after 10 rings and play outgoing message 2.
• Dial the VIP code (default 321) slowly during or after the message plays.
• Press the ‘9’ key. A long beep will be heard.
• Press ‘6’ to stop operation.
Keys on remote phone keypad Corresponding button on answer machine

33
After Sales Support TEL: 1300 886 649
1 RW
2 Play/Pause
3 FF
4 OGM playback
5 OGM recording (press ‘Stop’ to stop)
6 Stop
7 Delete current message
8 Answering o
9 Answering on and select OGM 1 or OGM 2
0 Delete all old messages
* Skip announcement
# Memo Recording

34
After Sales Support TEL: 1300 886 649
This page is intentionally left blank.

35
After Sales Support TEL: 1300 886 649
This page is intentionally left blank.
 Loading...