

07/03
ARMBAND RADIO
MD 7485
OPERATING INSTRUCTION
(877) 604-9498
7:00 AM to Midnight, CST

Safety Instructions
Children and electrical devices
Do not let children use electrical devices
unattended.
Swallowing batteries may be fatal. Therefore
always keep the unit and batteries inaccessible
to young children. If a battery has been swallowed,
consult a doctor immediately.
Ambient conditions
Avoid exposure to extreme temperatures, direct
sunlight, moisture, humidity, sand, dust,
mechanical shock.
Do not use the unit in rain or snow.
No self-repair
Under no circumstances attempt to open or repair
the unit yourself. Refer all servicing to our Service
Center or to another qualifed workshop.
NOTE: Changes or modifications not expressly
approved by the party responsible for compliance
could void the user's authority to operate the
equipment.
32
Use the earphones carefully.
Do not use the earphones when actively taking
part in traffic, especially when you steer a car.
Do not expose yourself to a high volume level for
a long period of time. Your hearing can be
damaged.
Power supply
Operate the unit only with two 1.5V batteries,
size AAA.
Battery disposal
Empty alkaline batteries do not belong in the
household refuse. The batteries must be disposed
of at a designated disposal/recycle point.
Cleaning the device
To clean the unit, only use a moistened, soft cloth.
Do not apply chemical solvents or cleaning agents,
as they may damage the surface and/or labelling
of the unit.
Compliance with FCC
The device complies with part 15 of the FCC
Rules.
Operation is subject to the condition that this
device does not cause harmful interference.

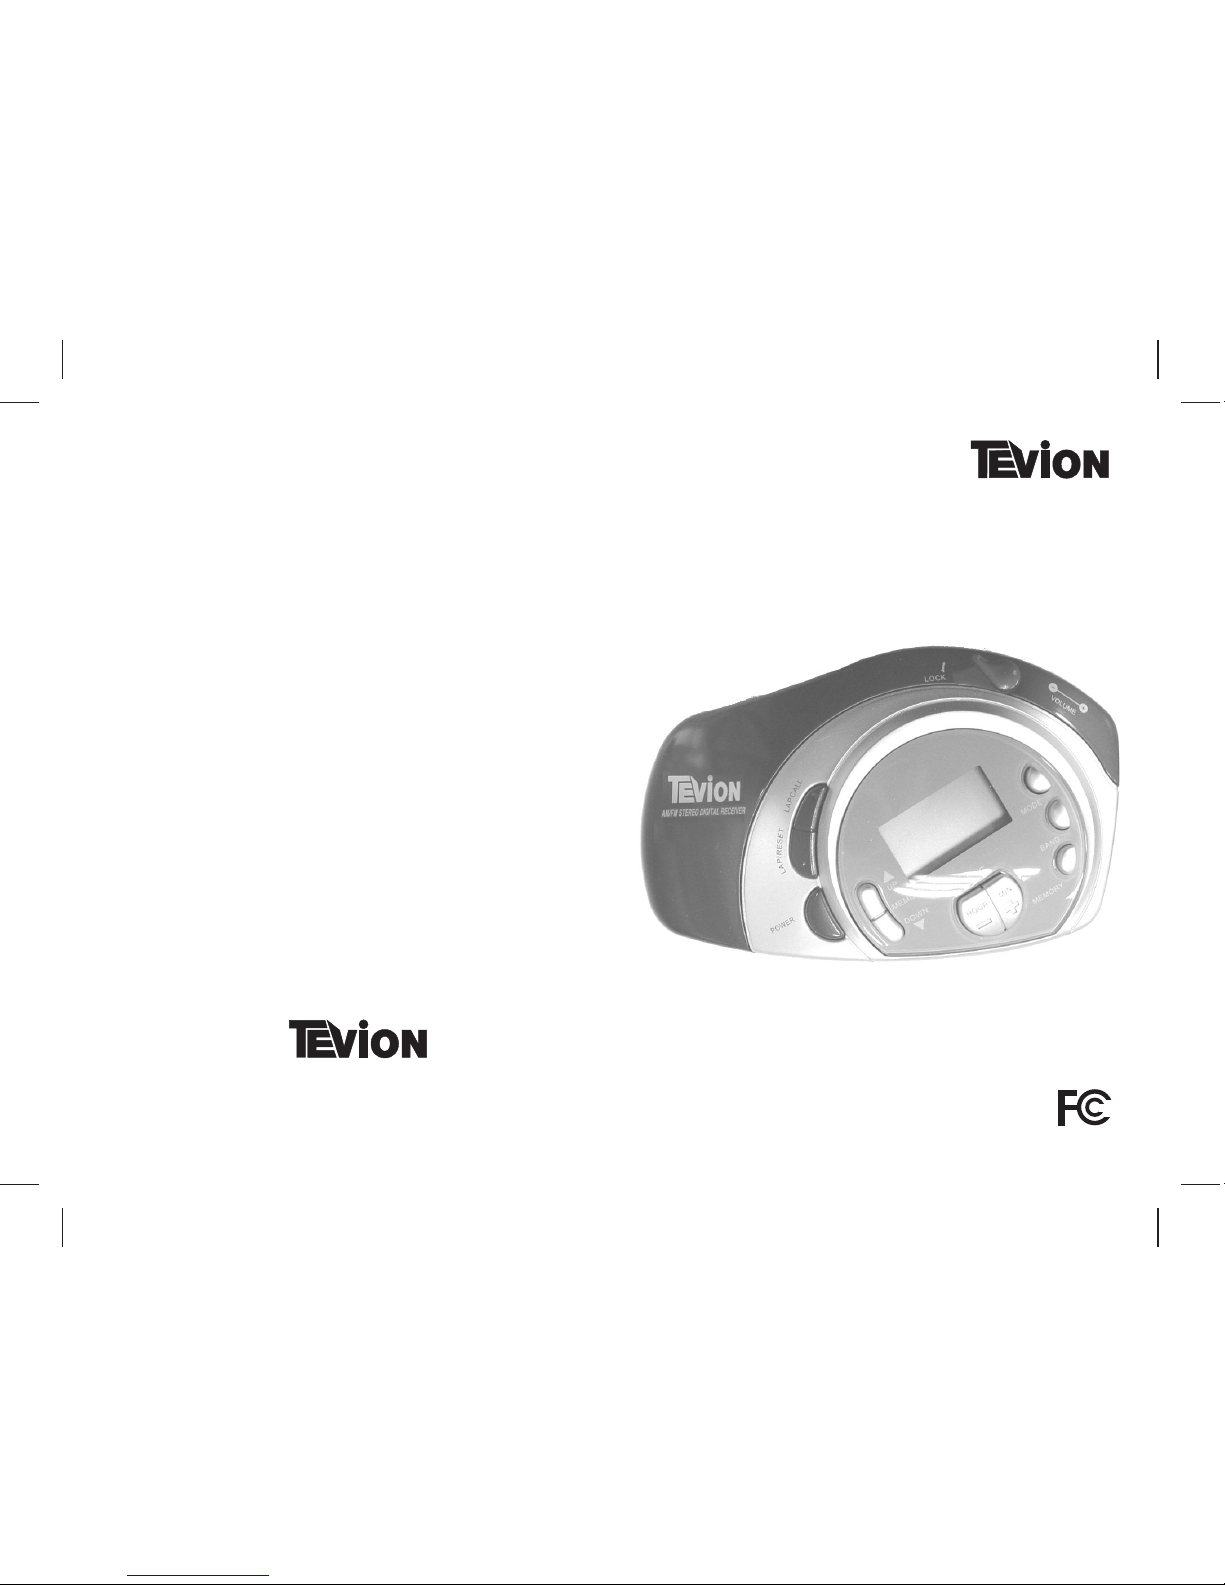
Overview
Your armband radio consists of
the main unit, arm strap, and earphones.
54
Preparation
Inserting batteries
Open the battery compartment at the back of
the unit by sliding the cover downward and lifting
it up.
Insert two 1.5V batteries (size AAA) and observe
the polarity (the negative pole touches the spring).
Close the battery compartment.
When the batteries are inserted, the time 12:00
appears in the display.
Note: If you want to save data in the memory
while changing the batteries, make sure to turn
the power off and to change the batteries within
30 seconds.
Applying the arm strap
Insert the belt strap into the belt clip, then fold
the belt strap and fasten the velcro.
LAPCALL:
show lap times
START/STOP:
start and stop
time counting
HOLD: buttons
inactive when in
LOCK position
RADIO VOLUME:
turn knob underneath
BAND: radio band
selection FM/AM
MODE: press once
for lap count function;
press and hold to set
the time
MEMORY: store
radio stations
MEMORY UP/DOWN:
Cycle through memo-
rized radio stations
TUNING /+: tune in
stations (press &
hold for auto scan)
LAP/RESET:
clear stopwatch/
lap memory
POWER:
turn on radio
HOUR/MIN:
set the time
PHONES (side of unit):
1/8" earphones connection

Insert the belt clip into the main unit, then push
the belt clip until it locks in place at the end of
the belt clip holder.
Straighten the other side of the belt, then put
the belt around your arm. Fasten the velcro.
To remove the belt clip: Press and hold the release
button on the belt clip, then push the belt clip
out to remove it from the unit.
Setting the time
When the power is off, press and hold the
MODE key until the time blinks. Release MODE.
Press and hold the HOUR key to set the hour
and then press and hold the MIN+ key to set the
minute. Make sure that AM or PM is shown
correctly.
Press the MODE key again to confirm the time.
HOLD
If you want to avoid accidentally pressing a key,
slide the HOLD switch to the position LOCK.
LOCK will appear in the display.
Slide the HOLD switch out of the LOCK position
to restore functionality to the other buttons.
76
Radio operation
POWER
To turn the unit on, press the POWER key on
the side of the unit. The radio frequency shows
in the display.
Volume
Adjust the volume by turning the VOLUME knob
at the side of the unit. Before you put on the
earphones, make sure the VOLUME is at the
minimum.
Putting on the in-earphone
Insert the in-earphone plug into the in-earphone
jack on the top of the unit.
Place the in-earphone into your left and right
ears, corresponding to the L and R mark on
each earbud.
Tuning in a station
Select the band (FM or AM) by pressing the
BAND key.
Tune a station using the TUNING HOUR or
MIN+ button.
Press and hold the TUNING HOUR or MIN +
button for one second, then release. The unit will
automatically scan to the next broadcasting
station.
To turn the radio off, press the POWER button.

Antennas
FM: Extend the earphone wire for best reception.
AM: Turn the unit for better AM reception.
Presetting radio stations
You can preset 10 FM and 10 AM radio stations.
Tune in a station as described above.
Press the MEMORY key; MEM will blink in the
display. Within four seconds, press the MEM. UP
or MEM. DOWN button until the desired memory
number appears in the display.
Press the MEMORY key again to set the station
in the selected memory.
Repeat these steps to program more stations.
Recalling preset stations
In the radio mode, press the MEM. UP or MEM
DOWN key until the desired memory number
appears in the display.
98
Time Count Function
The unit provides both a stopwatch function and
a lap count function which enable you to measure
the time of a lap when jogging/ walking. You can
count and store up to five times and have the
results added automatically.
Note: In this mode you cannot listen to the radio.
When the power is off (the time shows in the
display), press the MODE key once. At first use,
0:00 for the time and and 0 for the lap number
appear in the display.
Stopwatch function
To clear the memory, press LAP/RESET.
When you start your lap, press the START/STOP
key. The unit will count the time.
At the end of the lap, press START/STOP again
to see your time.
Press START/STOP again to resume the time
counting.
If you want to start from 0:00, press LAP/RESET.
Lap count function
Press START/STOP to start the time count.
At the end of the first distance or lap, press
LAP/RESET. The time will blink for three seconds.
Then it will continue to count the time of the
second lap.

1110
At the end of each further lap, press LAP/RESET
again.
This way, you can count up to five distances of
up to 30 minutes.
LAP CALL
After finishing the last lap and pressing
LAP/RESET, press START/ STOP.
Press LAP CALL repeatedly to show the times
of all successive laps. The lap number shows in
the display.
After the last measured lap the total time of the
laps will show in the display.
Technical Data
Power supply
Batteries: 2 x 1.5 V batteries, size AAA
Radio frequency
FM: 87.5 108 MHz
AM: 520 1710 KHz
Subject to technical modifications!
 Loading...