

Tevion FS 5000 Instruction Manual


1
Dear Customer,
Congratulations on purchasing this high-quality TEVION® product. You have chosen a modern
Film Scanner, with generous features and good accessories, which is especially easy to use. Please read
this instruction manual before using the product with due care and attention,
in particular, the safety instructions.
The unit comes to you with a three-year warranty. Should the Film Scanner become defective at all, you’ll need the
enclosed warranty card and proof of purchase. Please keep these safely together with these
user instructions and be sure to pass the user instructions on to any new user or owner.
Main features
• Slide and negative scanner giving an image size of 5.1 megapixels
• High scanning quality (1800 dpi)
• Digitalises slides and negatives in seconds
• Automatic exposure adjustment and colour balance
• Powered via USB connection
1. Contents of box
Please unpack the Film Scanner with care and check that all the following items are
present:
1. TEVION® FS 5000
2. 1x slide feeder
3. 1x negative holder
4. Cleaning brush
5. Software CD
6. Instruction manual
Note:
• Caution! Keep plastic bags and plastic lm away from babies and small
children to avoid risk of suff ocation.

2
2. Table of contents
Page
1 Introduction
1 1. Contents of box
2 2. Table of contents
3 3. Safety instructions
5 4. Overview of device
6 5. Inserting negatives
7 6. Inserting slides
9 7. Removing dust from scanner optics
10 8. Installing the software
14 9. Connecting the Film Scanner to your computer
15 10. Using the Film Scanner
19 11. Conformity
20 12. Cleaning the device
20 13. Disposal
21 14. Warranty and service
21 15. System requirements
22 16. Technical data
23 17. Glossary

3
3. Safety instructions
Improper use of the scanner and accessories puts you and others at risk of danger and
may damage or destroy the scanner, so please read and observe strictly the following
safety instructions, hazard warnings and general warnings.
Purpose of use
The Film Scanner is intended for use in dry, enclosed spaces only. It is designed for
personal use and is not suitable for commercial applications.
Hazards for children and persons with limited ability to operate
electronic equipment
Film Scanner, accessories and packaging are not children’s toys! Please keep
children away from them. Hazards include the risk of electrocution, poisoning and
suffocation.
This equipment is not intended to be used by persons (including children) with
restricted physical, sensory or mental abilities or inadequate experience and/
or inadequate knowledge unless they are supervised, or instructed in the use of the
equipment, by an individual responsible for their safety.
Children should be supervised to ensure that they do not play with the equipment.
Electrical hazard
If foreign objects or liquid have penetrated the Film Scanner, disconnect it from
the computer. Let everything dry thoroughly. Otherwise there is a risk of fire and
electrocution.
If the Film Scanner has fallen or the housing has been damaged, disconnect it from
the computer. Otherwise there is a risk of fire and electrocution.
The Film Scanner may not be taken apart, modified or repaired. There is a risk of
fire and electrocution.
Damage from heat – re hazard
Do not allow the Film Scanner to be located in places where the temperature is
able to increase strongly (e.g. in a motor vehicle). This can cause damage to the
housing and internal parts, which in turn may cause fire.

4
Do not wrap anything around the Film Scanner and do not place it on top of
clothing or textiles. This can potentially cause a build-up of heat within the unit,
causing the housing to deform, and there is a risk of fire.
Injuries and material damage
Place the Film Scanner on stable, robust surfaces only. Otherwise the scanner may
fall down or fall over, becoming damaged and causing injury.
To avoid overheating, ensure adequate ventilation and do not cover up the Film
Scanner.
Do not place any open fire sources, such as burning candles, on or near the equipment.
Damage to the electronics brought about by external factors such as impact, falling
or other cause is not covered by warranty and therefore represents a chargeable
repair.
Do not insert the slide feeder or the negative holder from the left-hand side into the
scanner’s media opening, and do not pull the negative holder out of the unit to the
right! Damage so caused is not covered by the warranty!
Do not allow the Film Scanner to fall or be bumped and treat it with care at all
times. Otherwise it may become damaged.
5
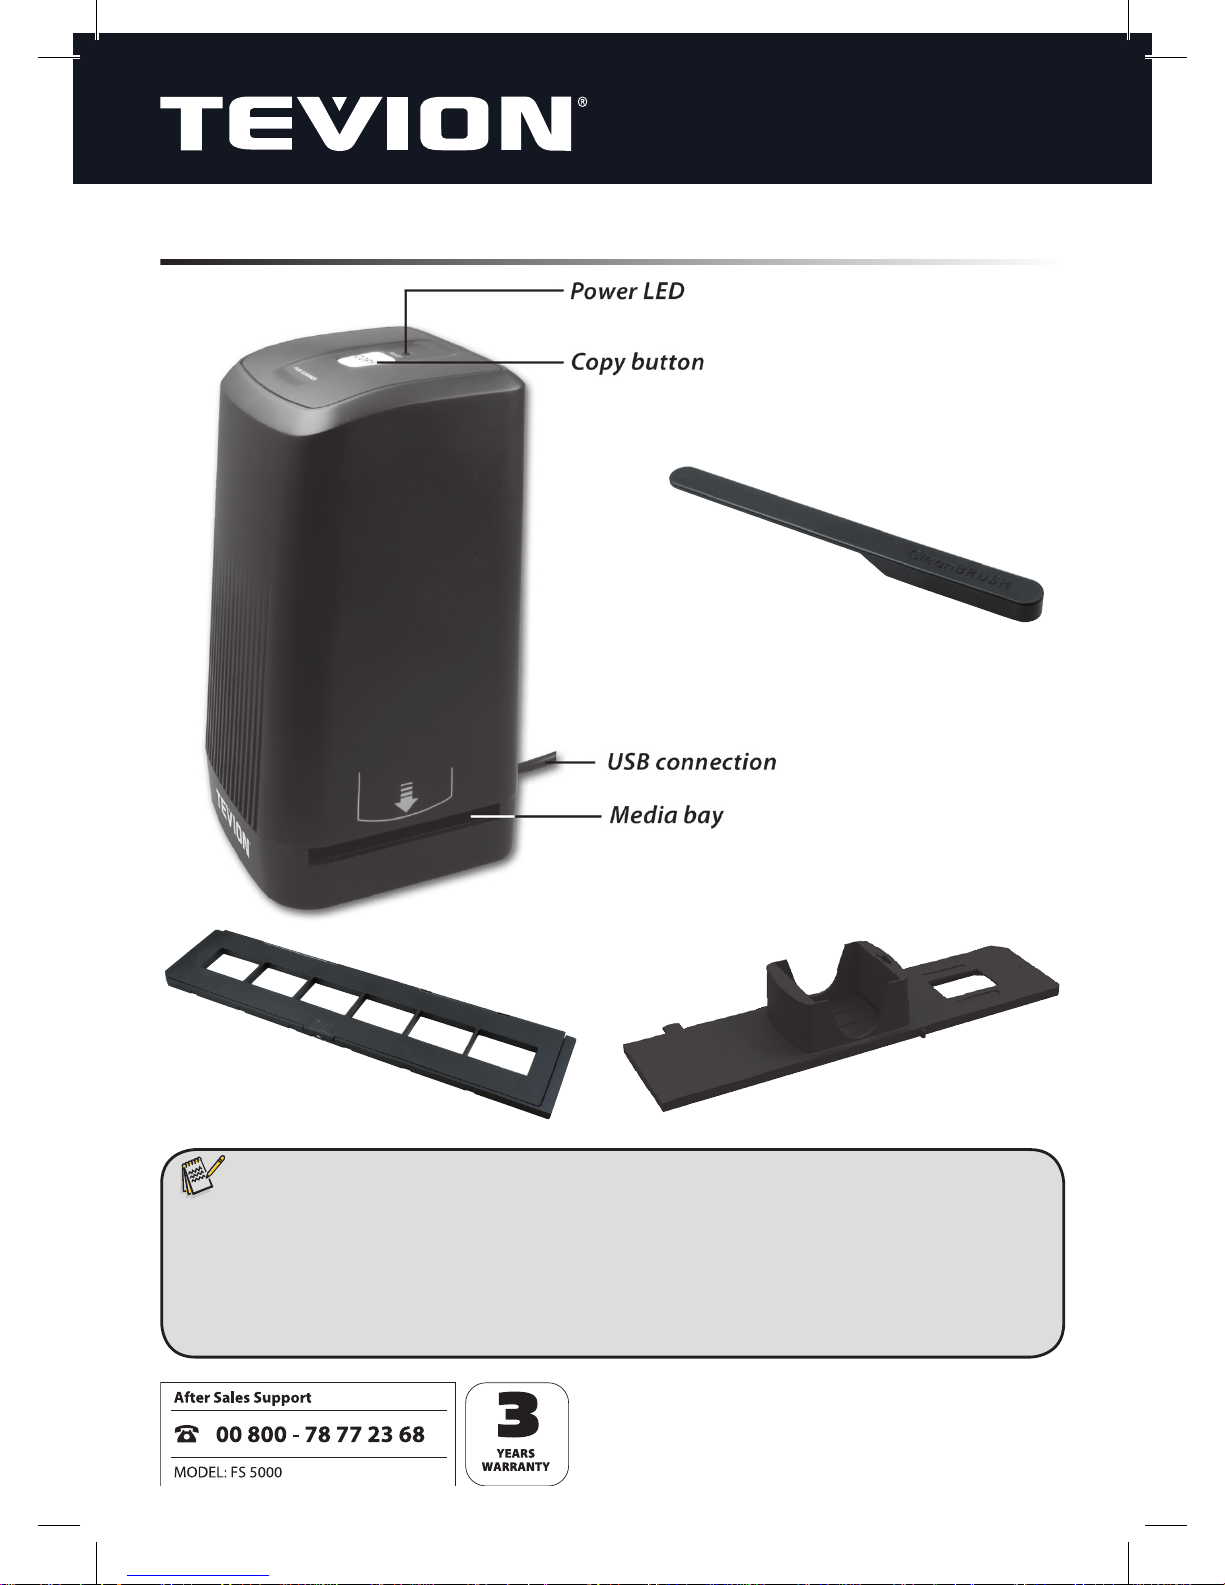
4. Overview of device
Note:
• This Film Scanner supports only Windows XP SP2 and above, Vista, Windows 7
and USB 2.0.
• In the interests of getting clear images at all times, it is advisable to clean the
glass surface of the scanner’s media bay often using the cleaning brush (inclu-
ded) or a clean, dry cotton bud free of alcohol.
Cleaning brush
Negative holder
Slide feeder
6
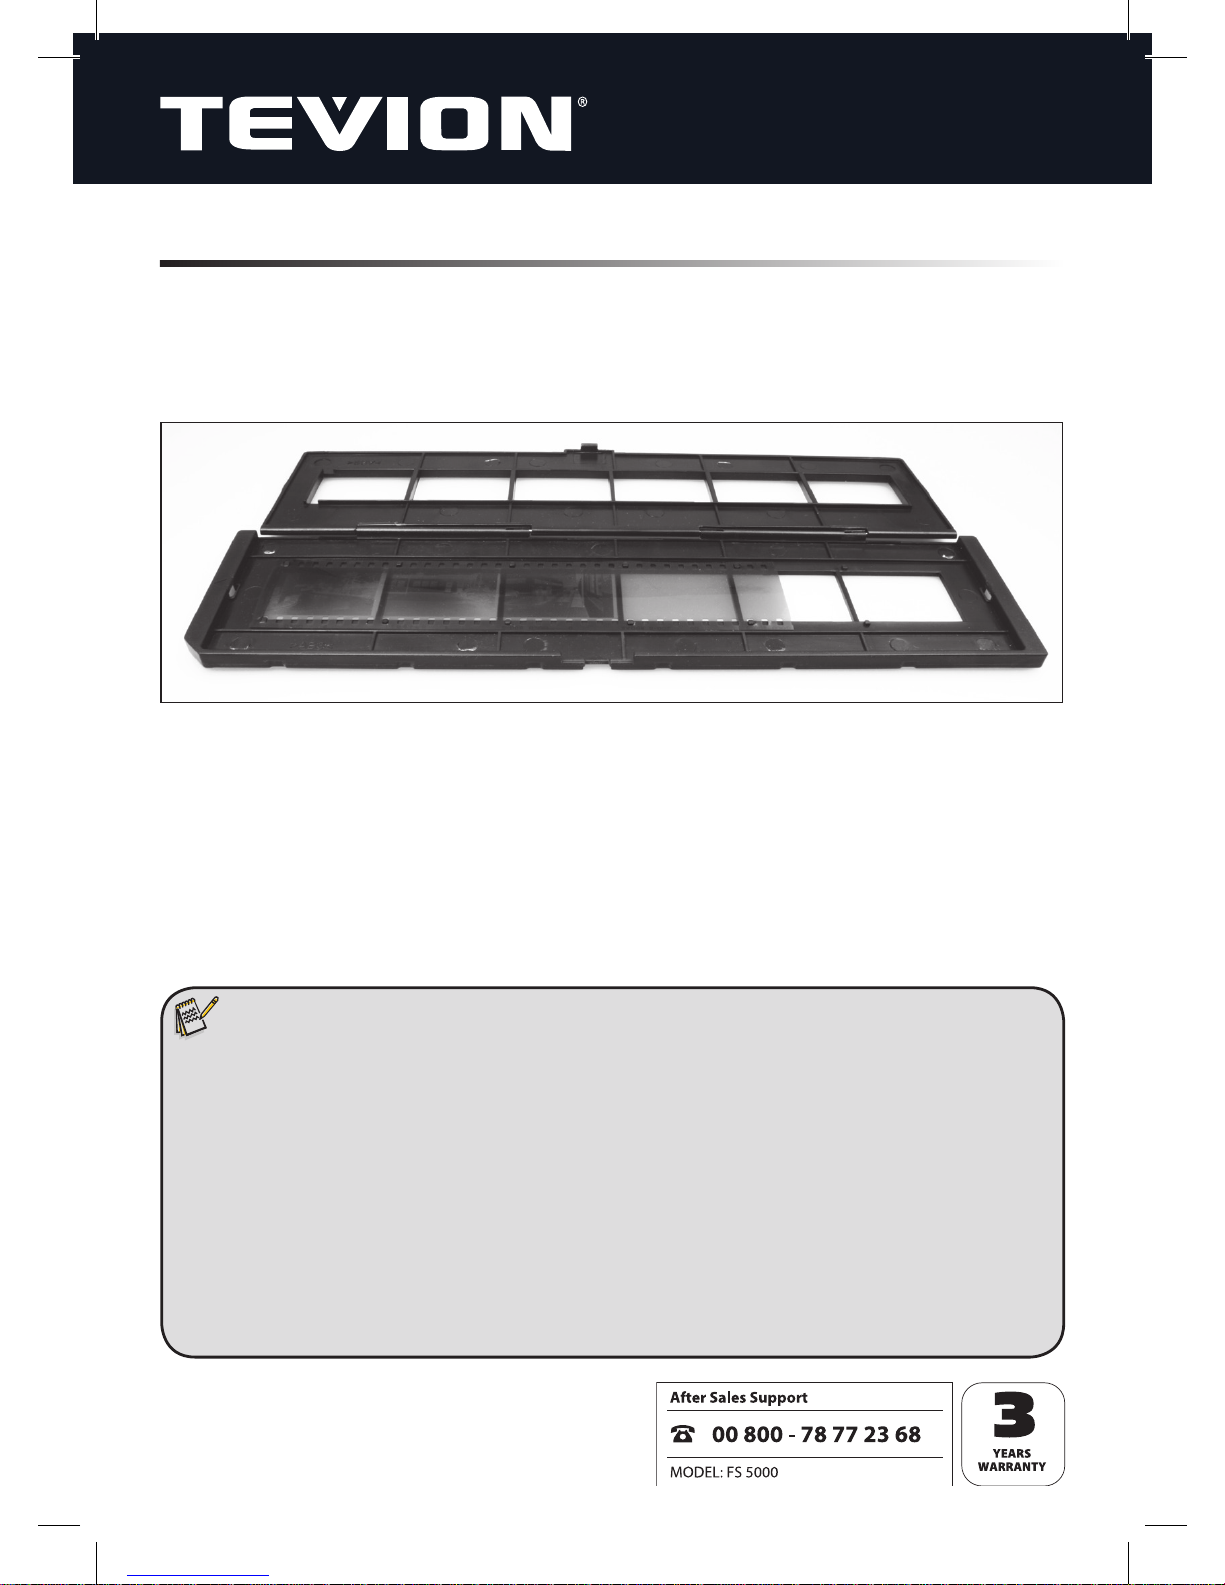
5. Inserting negatives
Open the negative holder at the position marked “Open” and place the holder, opened, in front of you as shown below. Then place the negatives the usual way up (neither
turned nor upside down) into the recesses provided in the holder for this purpose. Use
the numbering on every negative strip as a guide.
Close the negative holder and press down on the edges until they click into place.
Then insert the negative holder into the Film Scanner from the right-hand side in such
a way that the white triangular marking is to the front and visible. Push the negative
holder into the Film Scanner until you can feel it click into the rst negative position.
Note:
• Always handle negatives with care. Dust, scratches and ngerprints will all
be visible on the digital image. If possible, wear cotton gloves whilst handling
negatives. Use compressed air to remove dust from the negatives. A com pressed air unit is not included with the scanner but can be purchased in any
electronics or offi ce equipment store.
• The design of the negative holder corresponds with ISO standards. In certain
cases the negative holes will not t precisely onto the holder if non-standard
cameras have been used. In such cases a small black line will be visible at the
edge of the image. This line can be removed quite simply using a digital
image processing program.
7
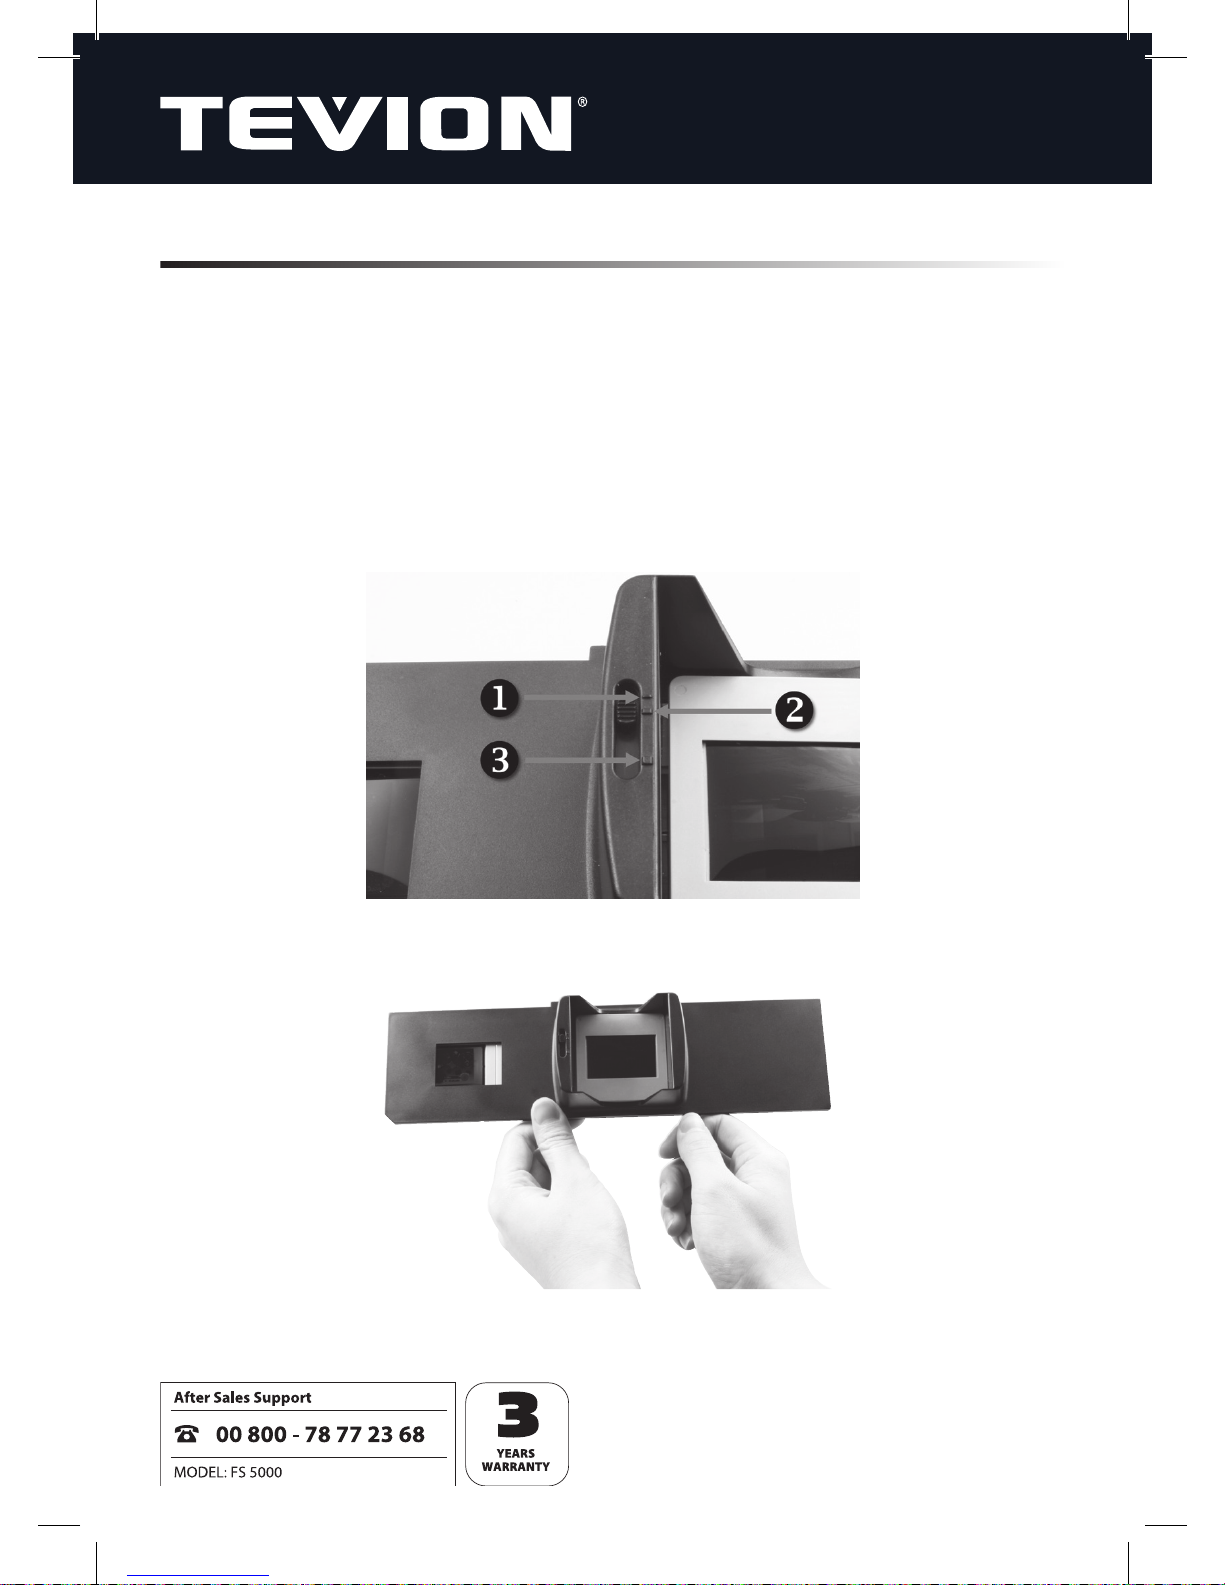
6. Inserting slides
The supplied Film magazine can be used for slides of a variety of thicknesses up to a
maximum of 3.2 mm.
Before using the magazine it must be set to the thickness of the slides to be scanned.
Use the sliding button on the upper side of the slide feeder to choose from three
thicknesses (see picture):
1) Upper position: for cardboard-framed slides up to 1.0 mm
2) Middle position: for CS slides up to 2.3 mm
3) Lower position: for slides up to 3.2 mm
Insert slides into the opening in the magazine as shown below.
The magazine is then loaded into the scanner window- rst.
 Loading...