

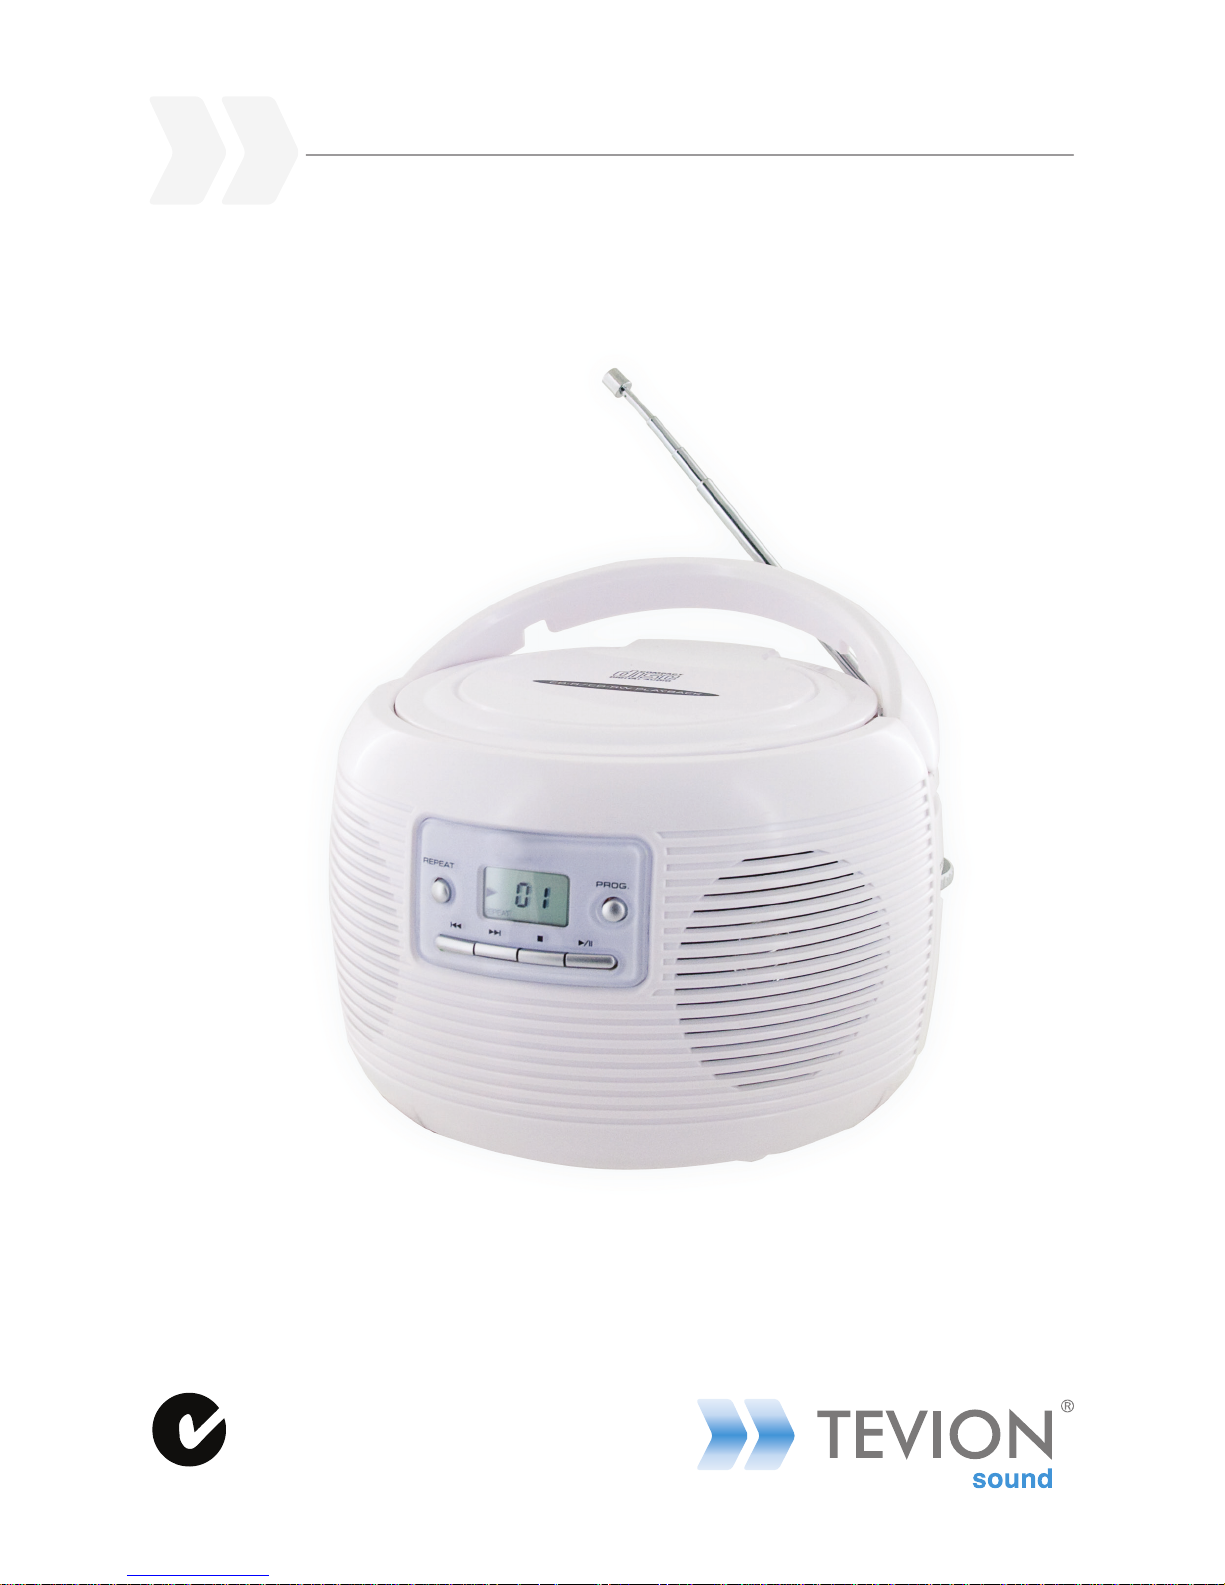
Portable CD Player
Instruction Manual • Model Number DYC-27
After Sales Support
TEL: 1300 886 649
N13275

1
After Sales Support TEL: 1300 886 649
What your 1 year warranty means
Great care has gone into the manufacture of this product and it should
therefore provide you with years of good service when used properly. In
the event of product failure within its intended use over the course of the
rst year after purchase, we will remedy the problem as quickly as possible
once it has been brought to our attention. In the unlikely event of such an
occurrence, or if you require any information about the product, please
contact us via our after sales support services, details of which can be found
in this manual and on the product itself.
Portable CD Player

2
After Sales Support TEL: 1300 886 649
What your 1 year warranty means 1
Welcome 3
Important safety instructions 4
Important warnings and cautions! 4
Electrical safety 5
Usage conditions and restrictions 5
Parts and features 6
Power supply 7
Battery operation 7
AC operation 7
Radio operation 7
Antenna 7
Headphone socket 7
Compact disc operation 8
Play, pause and stop mode 8
Skip and search mode 8
Fast backward/forward playback 8
Repeat mode 8
Program mode 9
Specifications 10
Responsible disposal 10
Contents

3
After Sales Support TEL: 1300 886 649
Congratulations on choosing to buy a TEVION® product. All products
brought to you by TEVION® are manufactured to the highest standards of
performance and safety and, as part of our philosophy of customer service
and satisfaction, are backed by our comprehensive 1 Year Warranty.
We hope you will enjoy using your purchase for many years to come.
Welcome
4
After Sales Support TEL: 1300 886 649
Important safety instructions
Important warnings and cautions!
Danger! Caution! This symbol alerts you that there is dangerous
voltage inside. To prevent electric shock, do not open the enclosure.
Important! This symbol alerts you to read and observe important
warnings and instructions on the unit or in this manual.
CLASS 1
LASER
PRODUCT
• To reduce the risk of re or electric shock, do not expose
this equipment to rain or moisture.
• To prevent contact with high voltage components inside,
do not attempt to open the equipment.
• Do not repair the unit yourself. There are no user-
serviceable parts contained inside. Only have it serviced
by qualied personnel.
• If the power cord is damaged, call the after sales support
line in order to avoid any danger. Do not replace the plug
or cord yourself.
• This product uses a laser component. Use of controls, adjustments or
performance of procedures other than those specied in this manual may result
in hazardous radiation exposure.
• When opened, both visible and invisible laser radiation will beam out. Avoid
direct exposure. Do not open the unit. Do not stare into the beam.
Read this manual thoroughly before rst use and keep it in a safe place for future
reference, along with the warranty card, purchase receipt and carton. The safety
precautions enclosed herein reduce the risk of re, electric shock and injury when
correctly adhered to.
Follow all instructions and take notice of all warnings.
This label on the back of the unit indicates that this product uses
only weak laser and that there is no hazardous radiation outside the
unit.

5
After Sales Support TEL: 1300 886 649
Important safety instructions (continued)
Electrical safety
• When connecting this product to the mains power supply (220-240VAC ~ 50Hz
14W), only use the power cord and plug supplied.
• This product must be unplugged from the mains socket to disconnect it from the
power supply. Make sure the mains socket is readily accessible. Always grasp the
plug, not the cord, when disconnecting the unit.
• Unplug the unit from the power point when it is not going to be used.
• Do not use this product anywhere near water, where water splashes or drips or
near an open window; do not touch the plug with wet hands.
Usage conditions and restrictions
• When using the CD player, make sure to place it:
• On a level, rigid and stable surface. Do not place it on carpet.
• Away from heat sources, radiators or other products that produce heat (such
as a receiver or amplier).
• Away from areas with high temperatures, high humidity or direct sunlight.
• Away from excess dirt and dust.
• Do not place anything underneath the CD player (such as CDs, magazines).
• Make sure there is free air circulation around the unit. Do not place it on a thick
carpet, bed or any place where ventilation holes are obstructed. Leave at least
10cm clearance at the back and top of the product and 5cm space on both sides
to prevent overheating. Do not place items such as newspapers, tablecloths or
curtains in front of the ventilation openings.
• Do not place items close to the CD player that may damage it (for example, a
vase with water or a lit candle or incense stick).
• The product is not intended for use by persons (including children) with reduced
physical, sensory or mental capabilities, or lack of experience and knowledge,
unless they have been given supervision or instruction concerning use of the
product by a person responsible for their safety.
• Young children should be supervised to ensure they do not play with the CD
player. Close supervision is always necessary when an appliance is used by or
near children.
6
After Sales Support TEL: 1300 886 649
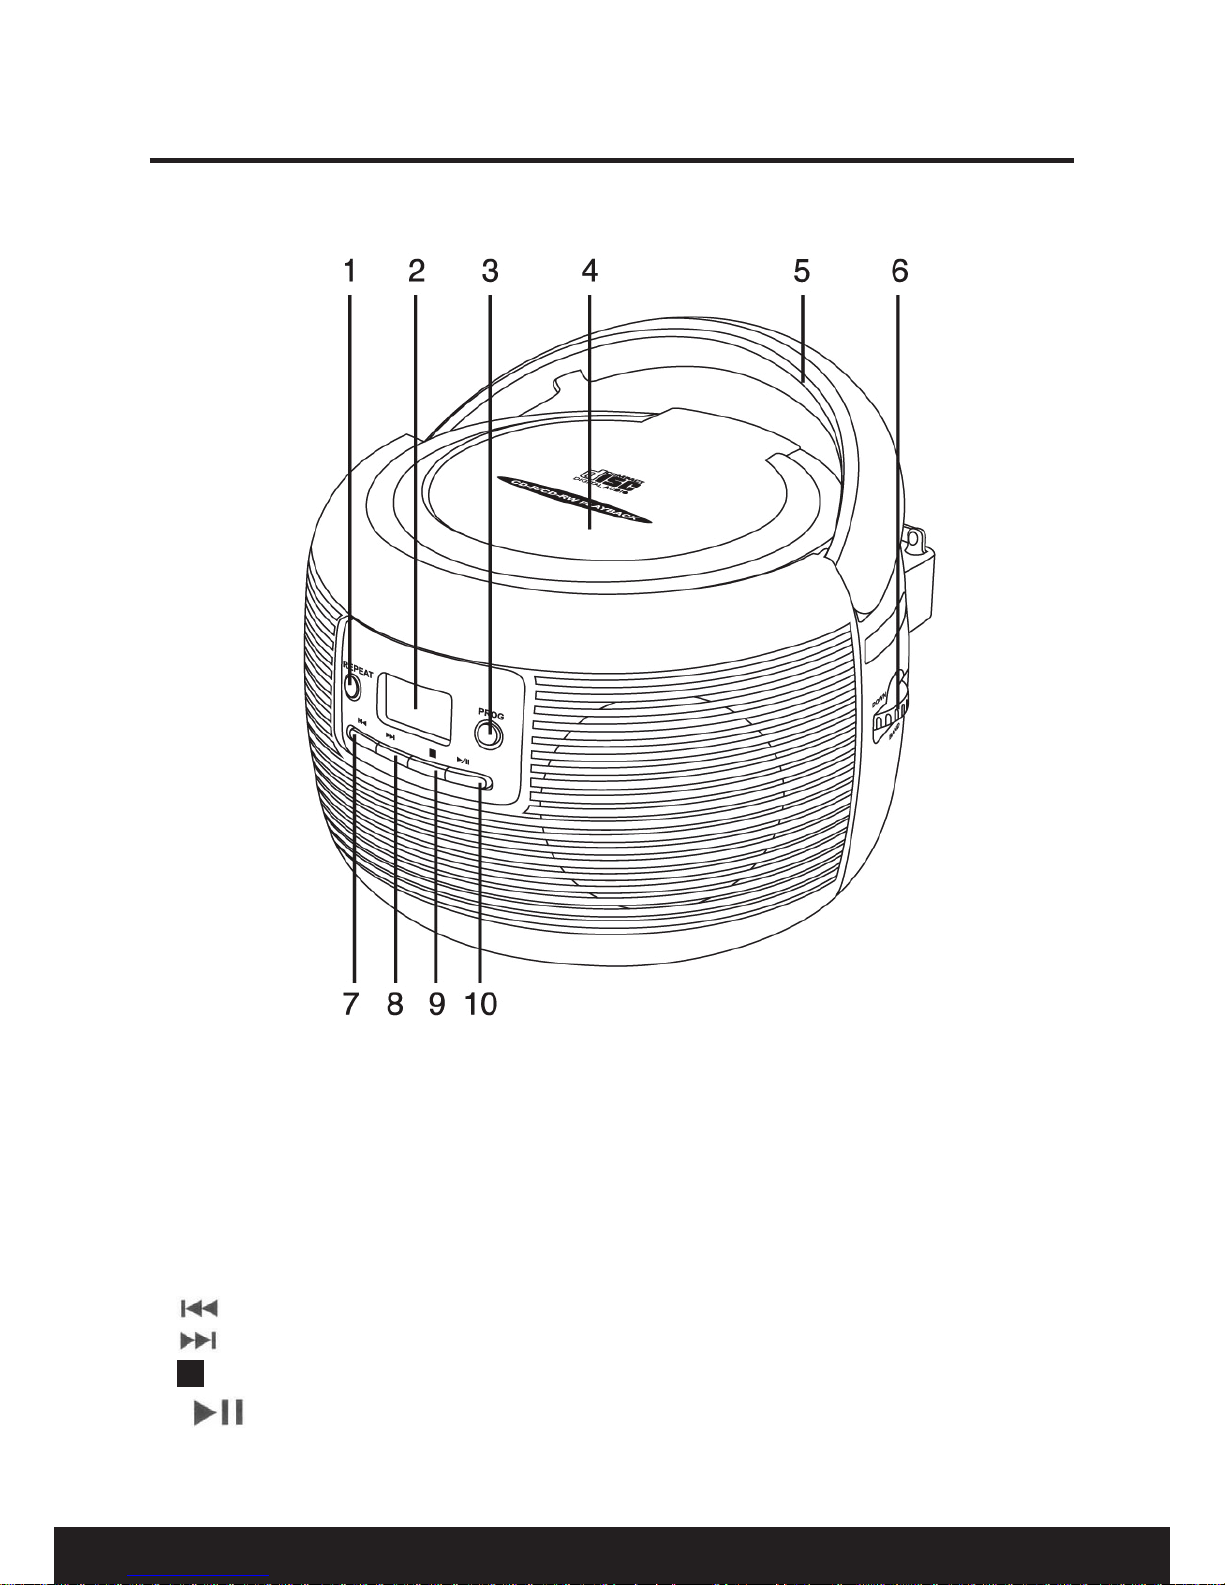
Parts and features
1. REPEAT button
2. LCD display
3. PROGRAM button
4. CD compartment
5. HANDLE
6. TUNING knob
7. PREVIOUS/BACK button
8. NEXT/FFW button
9. STOP button
10. PLAY/PAUSE button
Not indicated:
VOLUME regulator (left panel)
AC POWER socket ( back panel)
FUNCTION switch (back panel)
FM Telescopic antenna (back panel)
HEADPHONE socket (back panel)
BATTERY compartment (underside)

7
After Sales Support TEL: 1300 886 649
Power supply
Battery operation
• Open the battery compartment cover underneath the unit, insert six 1.5V C
(LR14) size batteries, observing the correct polarities as indicated, then close the
battery compartment.
• Do not expose the batteries to excessive heat.
• Observe any local regulations when disposing of used batteries.
• To avoid damage to the unit from battery leakage, remove the batteries from the
compartment if you are going to use the CD player only with the power cord, or if
you will not be using it for two weeks or more.
AC operation
• Before plugging this product into a power point, make sure your outlet voltage
corresponds to the voltage stated on the appliance rating label.
• Plug the corresponding end of the power supply cord into the AC socket at the
back of the unit, then insert the plug into a suitable power point.
• Always switch the unit o when not in use.
Radio operation
• Set the FUNCTION switch at the back of the unit to the FM or AM position.
• Rotate the TUNING knob to receive the desired station.
• Adjust the sound level with the VOLUME knob.
• To turn the radio o, slide the FUNCTION switch to the OFF position.
Antenna
• For FM reception, adjust the telescopic antenna appropriately to obtain the best
reception on the selected band.
• The AM signal is picked up through the built-in ferrite antenna. Adjust the
position of the unit for best reception.
Headphone socket
• For private listening, insert your headphones into the 3.5mm headphone socket
at the back and adjust the volume to your desired level.
• When headphones are plugged in, the speaker will switch o automatically.

8
After Sales Support TEL: 1300 886 649
Compact disc operation
• Set the FUNCTION switch to the CD position.
• Push down on the rim of the lid to open the CD compartment.
• Insert a CD with the label side upwards and close the CD compartment.
Play, pause and stop mode
• Press the button to start playing.
• Press the button to pause.
• Press the button to stop playing.
NOTE: Always stop playing a CD before opening the CD compartment.
• To turn o the CD player, slide the FUNCTION switch to the OFF position.
Skip and search mode
• During playback, press the button to move to the next track, or press
repeatedly until the desired track number appears on the display screen.
• Press the button once briey to return to the beginning of the current track.
• Press the button more than once briey for a previous track.
Fast backward/forward playback
• Press and hold these / buttons to fast forward or backward the track
playback until you find the desired passage.
Repeat mode
While playing an audio CD:
• Press the REPEAT mode button once to repeat a single track.
• Press the REPEAT mode button twice to repeat all tracks.
• Press the REPEAT mode button three times for random play.
• Press the REPEAT mode button four times to go back to normal play.
9
After Sales Support TEL: 1300 886 649
Program mode
Up to 20 tracks can be programmed for disc play in any order or the same track can
be repeated up to 20 times. Before starting the program mode, press the button.
• Press the PROGRAM button.
• Press the / buttons to select a desired track.
• Press the PROGRAM button to conrm.
• Repeat the previous two steps to enter additional track memories into the
program.
NOTE: If the CD contains folders with tracks, select the desired folder by pressing
the button before selecting a track.
• When all desired tracks have been programmed, press the button to play
the disc in the order you have programmed.
• You can erase the contents of the memory by one of the following methods:
- Opening the CD compartment.
- Selecting FM or AM source.
- Pressing the button.
NOTE:
Good quality sound is guaranteed only when playing a licensed CD-R/CD-RW disc.
Compact disc operation (continued)

10
After Sales Support TEL: 1300 886 649
Specications
Supported formats Compact Disc Digital Audio
Supported storage CD / CD-R / CD-RW
Power supply AC 220-240VAC ~ 50H 14W
Battery requirement Six 1.5V C (LR14) size batteries
AM frequency range 522 -1620KHz
FM frequency range 88 – 108 MHz
At the end of its working life, do not throw this product out with your household
rubbish. Observe any local regulations regarding the disposal of electrical
consumer goods and dispose of it appropriately for recycling. Contact your local
authorities for advice on recycling facilities in your area.
Responsible disposal

After Sales Support TEL: 1300 886 649
 Loading...