

INSTRUCTION MANUAL
DVD Home Theatre System
DR2502
1
To ensure proper use of this product, please read this owner manual carefully and retain for future
reference. Should the unit require maintenance, contact an authorized service location.
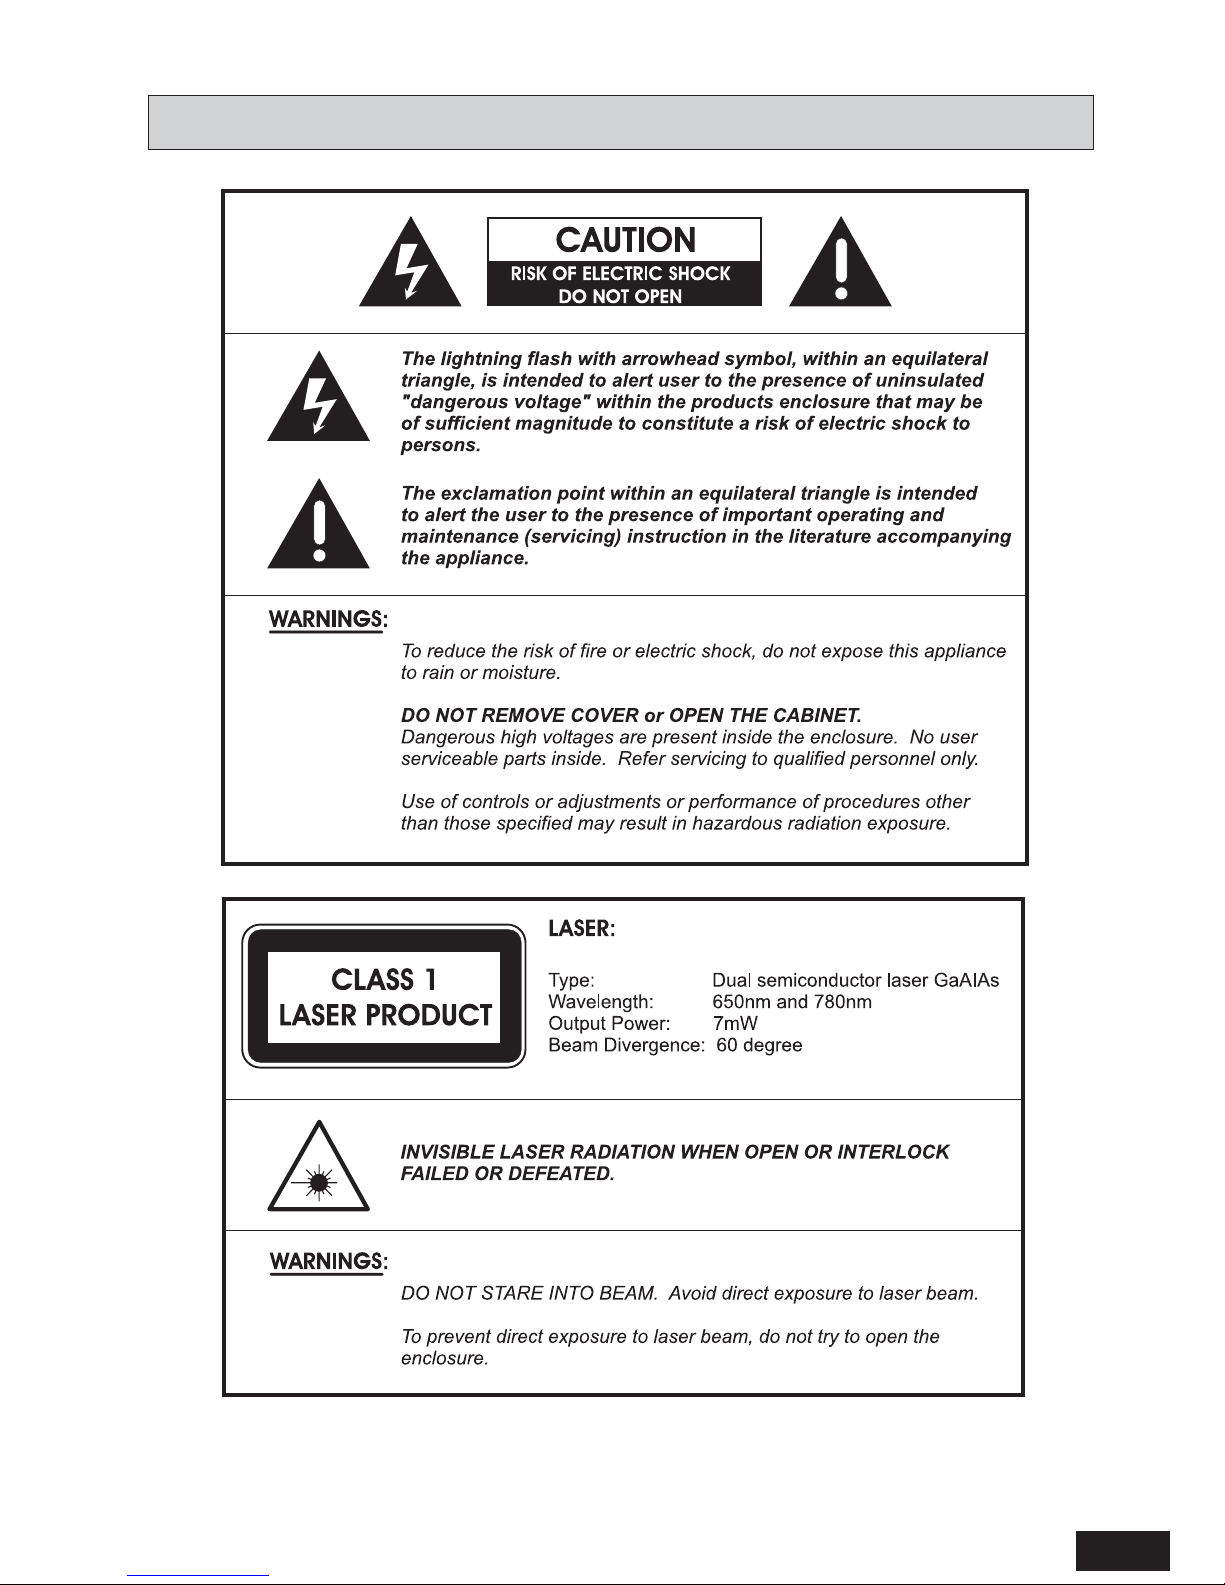
SAFETY

2
IMPORTANT SAFETY INSTRUCTIONS
WARNING! Do not remove any cover.
WARNING! No objects filled with liquid, such as vases, shall be placed on this equipment or in any position where
liquid may fall into this equipment or any other electrical apparatus.
WARNING! Do not insert any objects into any openings of this equipment or any other electrical apparatus.
WARNING! Do not use this apparatus near water. To avoid the risk of fire or electric shock, do not expose this
apparatus to rain or moisture. The apparatus shall not be exposed to dripping or splashes and is strictly for indoor use
only.
WARNING! Do not immerse in any liquid whilst in use or cleaning. Clean only with a damp cloth, dry with a dry towel.
Do not use harsh abrasives as these may damage the plastic parts.
WARNING! DO NOT block any ventilation openings. Keep away from curtains, newspapers and restricted areas.
Install in accordance with any specific manufacturer’s instructions. Always allow a sufficient gap around the
apparatus to avoid overheating.
WARNING! Do not install near any heat sources such as radiators, gas heaters, stoves or other apparatus (including
amplifiers) that produce heat. Do not leave in direct sunlight.
WARNING! Do not place any naked flame source, such as lighted candles on any electrical apparatus.
WARNING! Connect to a suitable 230-240 ~ 50 Hz power supply only.
WARNING! Keep out of reach of young children. This apparatus is not suitable for use by young children or infirm
persons without supervision. Young children must be supervised to ensure that they do not play with the apparatus.
Ensure young children have enough knowledge to operate the equipment safely if they do have access to this
equipment.
WARNING! Do not abuse or damage a power cord. If any power cord is damaged, it must be replaced by the
manufacturer, its service agent or a similarly qualified person in order to avoid a hazard. A replaceable cord must be
replaced with an authorised replacement from an authorised service agent only.
WARNING! Only use attachments/accessories specified by the manufacturer.
WARNING! Unplug this apparatus completely from the power source during lightening storms or when unused for
long periods of time.
WARNING! Attention is drawn to the environmental aspects of disposing of any battery.
WARNING! Refer all servicing to qualified personnel. Servicing is required when the apparatus has been damaged
in any way, such as when the power supply cord or plug is damaged, liquid has been spilled or objects have fallen
into the apparatus, the apparatus has been exposed to rain or moisture, does not operate normally, or has been
dropped.
WARNING! For household use only, this apparatus is not intended for commercial use.
WARNING! If this apparatus is to be used by a third party, please supply these instructions with it.
WARNING! No liability will be accepted for any personal injury or damage caused by failure to follow these
instructions.

3
INTRODUCTION
Safety ............................................................................................................................................................................ 1
Important Safety Instructions ...................................................................................................................................... 2
Content........................................................................................................................................................................... 3
Package ......................................................................................................................................................................... 3
Player Zones, Anti-copy Disc Protection ..................................................................................................................4
Installation ...................................................................................................................................................................... 4
DVD Discs, Cleaning DVD Discs. .............................................................................................................................. 4
Remote Control ............................................................................................................................................................. 5
Front Panel ..................................................................................................................................................................... 6
Rear Panel ...................................................................................................................................................................... 6
INSTALLATION CONNECTIONS
Speaker Connections .................................................................................................................................................... 8
Connecting TV ............................................................................................................................................................... 9
Connecting Additional Device ....................................................................................................................................... 1 0
Speaker Placement .......................................................................................................................................................1 1
Getting Started ............................................................................................................................................................... 1 1
BASIC SETUP
Basic Operation .............................................................................................................................................................. 1 2
System Setup ................................................................................................................................................................ 1 2
Language Setup ............................................................................................................................................................. 1 3
Audio Setup .................................................................................................................................................................... 1 4
Video Setup .................................................................................................................................................................... 1 5
Speaker Setup ...............................................................................................................................................................1 6
PLAYING A DISC
Playing DVD/CD/VCD Disc ......................................................................................................................................... 1 7
Advanced Playback Function ....................................................................................................................................... 1 9
Playing MP3/JPEG/MPEG 4 .........................................................................................................................................2 3
Listening to the raido .................................................................................................................................................... 2 5
TROUBLESHOOTING
Playable Discs ..............................................................................................................................................................2 6
Problems? ...................................................................................................................................................................... 2 8
Specification .................................................................................................................................................................2 9
CONTENT
PACKA GE
Consumers should note that not all high definition television sets are fully compatible
with this product and may cause artifacts to be displayed in the picture. In case of
525 or 625 Progressive Scan picture problems, it is recommended that the user
switch the connection to the “standard definition” output. If there are questions
regarding our TV set compatibility with this model 525p and 625p DVD player,
please contact our customer service centre.
This product incorporates copyright protection technology that is protected by method
claims of certain U.S. patents and other intellectual property rights owned by
Macrovision Corporation and other rights owners. Use of this copyright protection
technology must be authorized by Macrovision Corporation, and is intended for home
and other limited viewing uses only unless otherwise authorized by Macrovision
Corporation. Reverse engineering or disassembly is prohibited.
Manufactured under license from Dolby Laboratories. “Dolby”, “Pro Logic” and the
double-D symbol are trademarks of Dolby Laboratories.
U.S. Patent Nos. 4,631,603; 4,819,098; 4,907,093; 5,315,448;and 6,516,132.
Examine the contents of the box for your DVD Home theatre. There should be the following:
• DVD Home Theatre System with attached power cord
• Remote Control
• 2 AAA batteries
• Instruction Manual
• AV Cable
• 2 Rear Speaker Stands
• FM antenna
• Subwoofer with wire
• 2 Front speakers with wire
• Centre speaker with wire
• 2 Rear speakers with wire
NOTE:
This equipment has been tested and found to comply with the limits for a Class B digital device, pursuant to part 15 of the FCC Rules. These limits
are designed to provide reasonable protection against harmful interference in a residential installation. This equipment generates, uses and can
radiate radio frequency energy and, if not installed and used in accordance with the instructions, may cause harmful interference to radio
communications. However, there is no guarantee that interference will not occur in a particular installation. If this equipment does cause harmful
interference to radio or television reception, which can be determined by turning the equipment off and on, the user is encouraged to try to correct
the interference by one or more of the following measures:
— Reorient or relocate the receiving antenna.
— Increase the separation between the equipment and receiver.
— Connect the equipment to a supply outlet different from that to which the receiver is connected.
— Consult the dealer or an experienced radio/TV technician for help.
4
Some DVD discs have been protected by Macrovision. With these discs the playback on a Television are copyright
protected, however you will not be able to record this signal on a VCR.
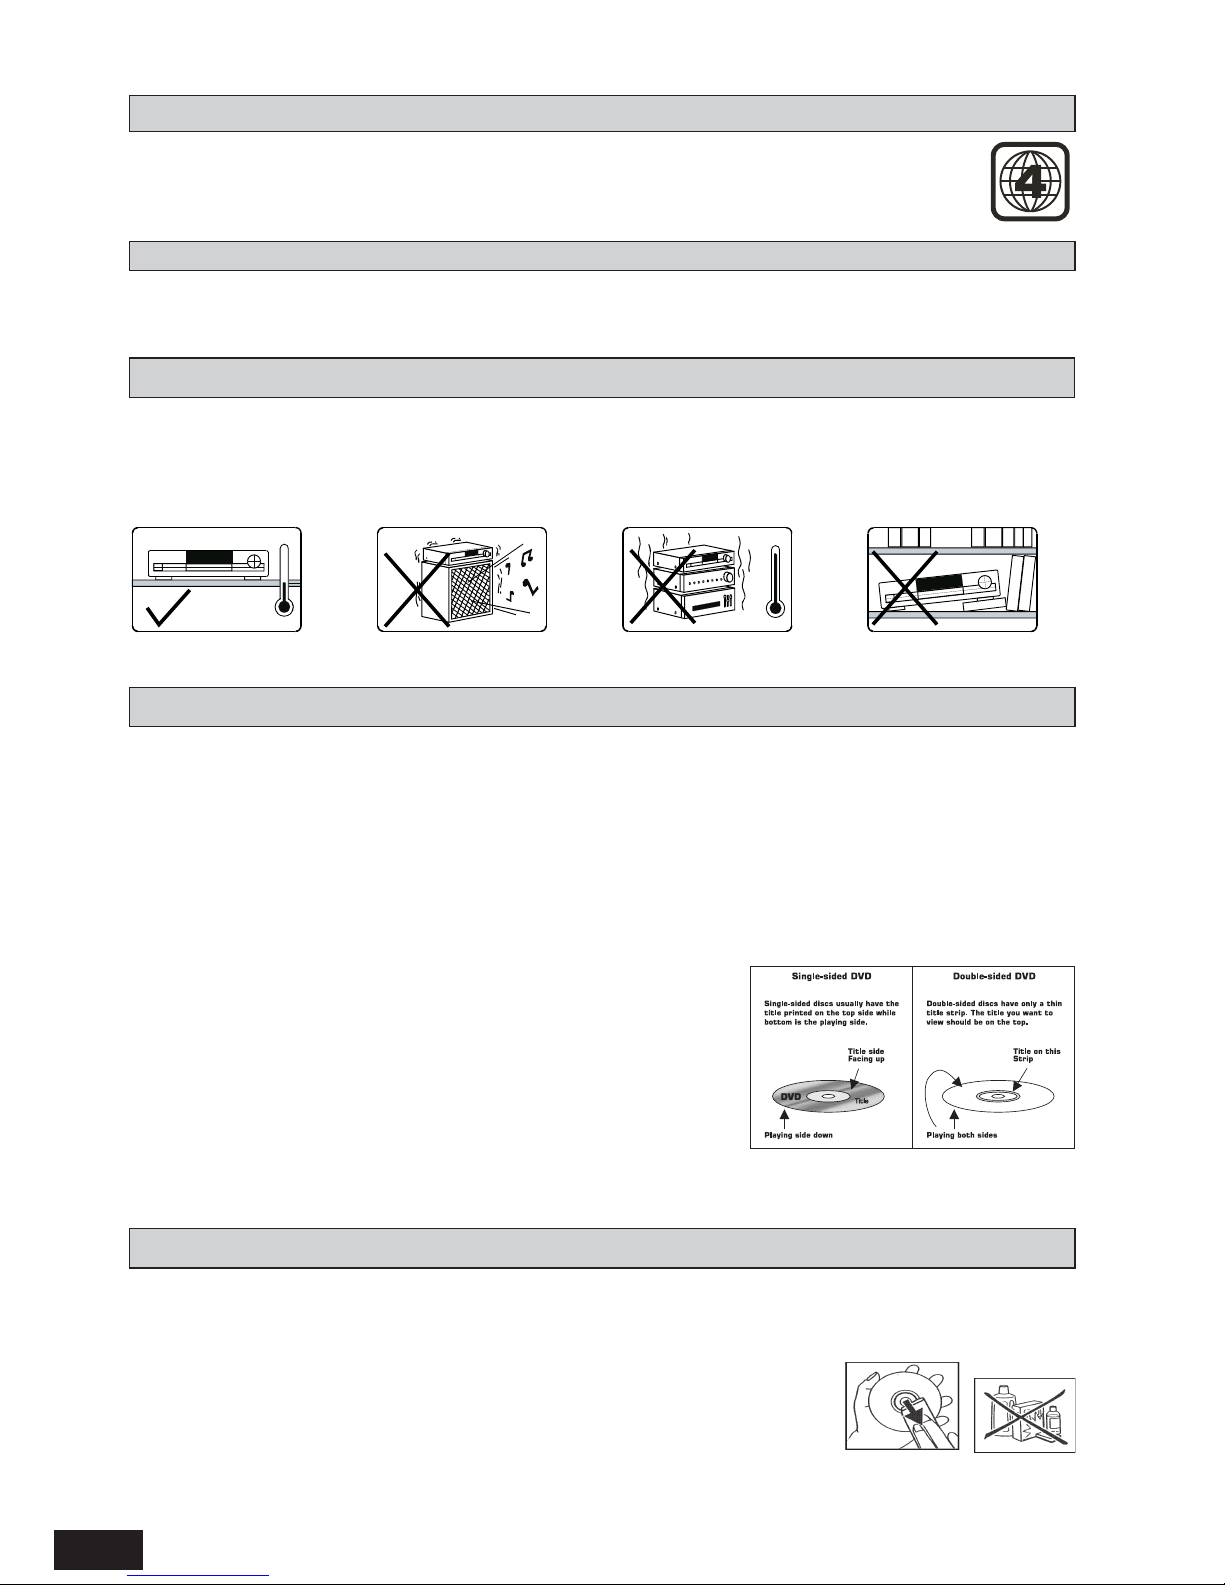
Install your unit on a stable flat surface. There must be sufficient room in front of the unit for the drawer to be opened
and the unit should be positioned so that it can see the remote control.
Do not expose your unit to extremes of temperature or humidity. Avoid standing it on a hot surface such as on top
of other hot running equipment and ensure that there is adequate ventilation to the unit.
* Caution: Do not install this equipment in a confined space such as a book case or similar unit!
ANTI-COPY DISC PROTECTION
INSTALLA TION
DVD DISCS
There are several types of DVD Disc.
Single sided discs. They play for approximately 2 HOURS
Single sided two layer discs. They play for approximately 4 HOURS
Double sided discs. They play for approximately 4 HOURS
Double sided with 2 layers on both sides. They play for approximately 8 HOURS
DVD discs have Titles and Chapters. There can be several Titles on one disc and each Title can contain several
Chapters. Titles and Chapters are numbered, e.g. Title 1, Title 2 etc. & Chapter 1,2,3 etc.
Usually Title one will show the disc publisher and studio logos. The next Title will be the film. Other Titles contain
trailers for other films, production notes, or alternative endings for the
film. There are many possibilities with Digital Versatile Discs. Chapters
within the main Title allow you to search quickly for a specific point on the
disc. Many discs have a Chapter Menu sometimes called Scene Index or
Scene Menu that displays the first shot from each Chapter, which allows
you to select a shot and play the disc from that point onwards. DVD discs
can be PAL or NTSC. This recorder can play both types (if the recorder
zone is correct). DVD discs allow up to 8 Languages and 32 subtitles on a
single disc. You can select and change the language and subtitle to suit
yourself and play the whole disc or just part of it and view it from different
angles.
DVD discs are programmed with region numbers indicating countries in which they can played. The
region number of this unit is 4. If the DVD disc is marked with a different region number, it cannot be
played on this unit.
PLA YER ZONES
CLEANING DVD DISCS
Picture freezing & sound skipping or repeating can occur if the disc inside the recorder is dirty.
• When a disc becomes dirty, clean it with a cleaning cloth. Wipe the disc from the centre out.
• Do not wipe in a circular motion. Circular scratches can cause picture distortion
or render the disc unplayable.
CAUTION - Do not use solvents, commercially viable cleaners, or antistatic spray
intended for analog discs.
5
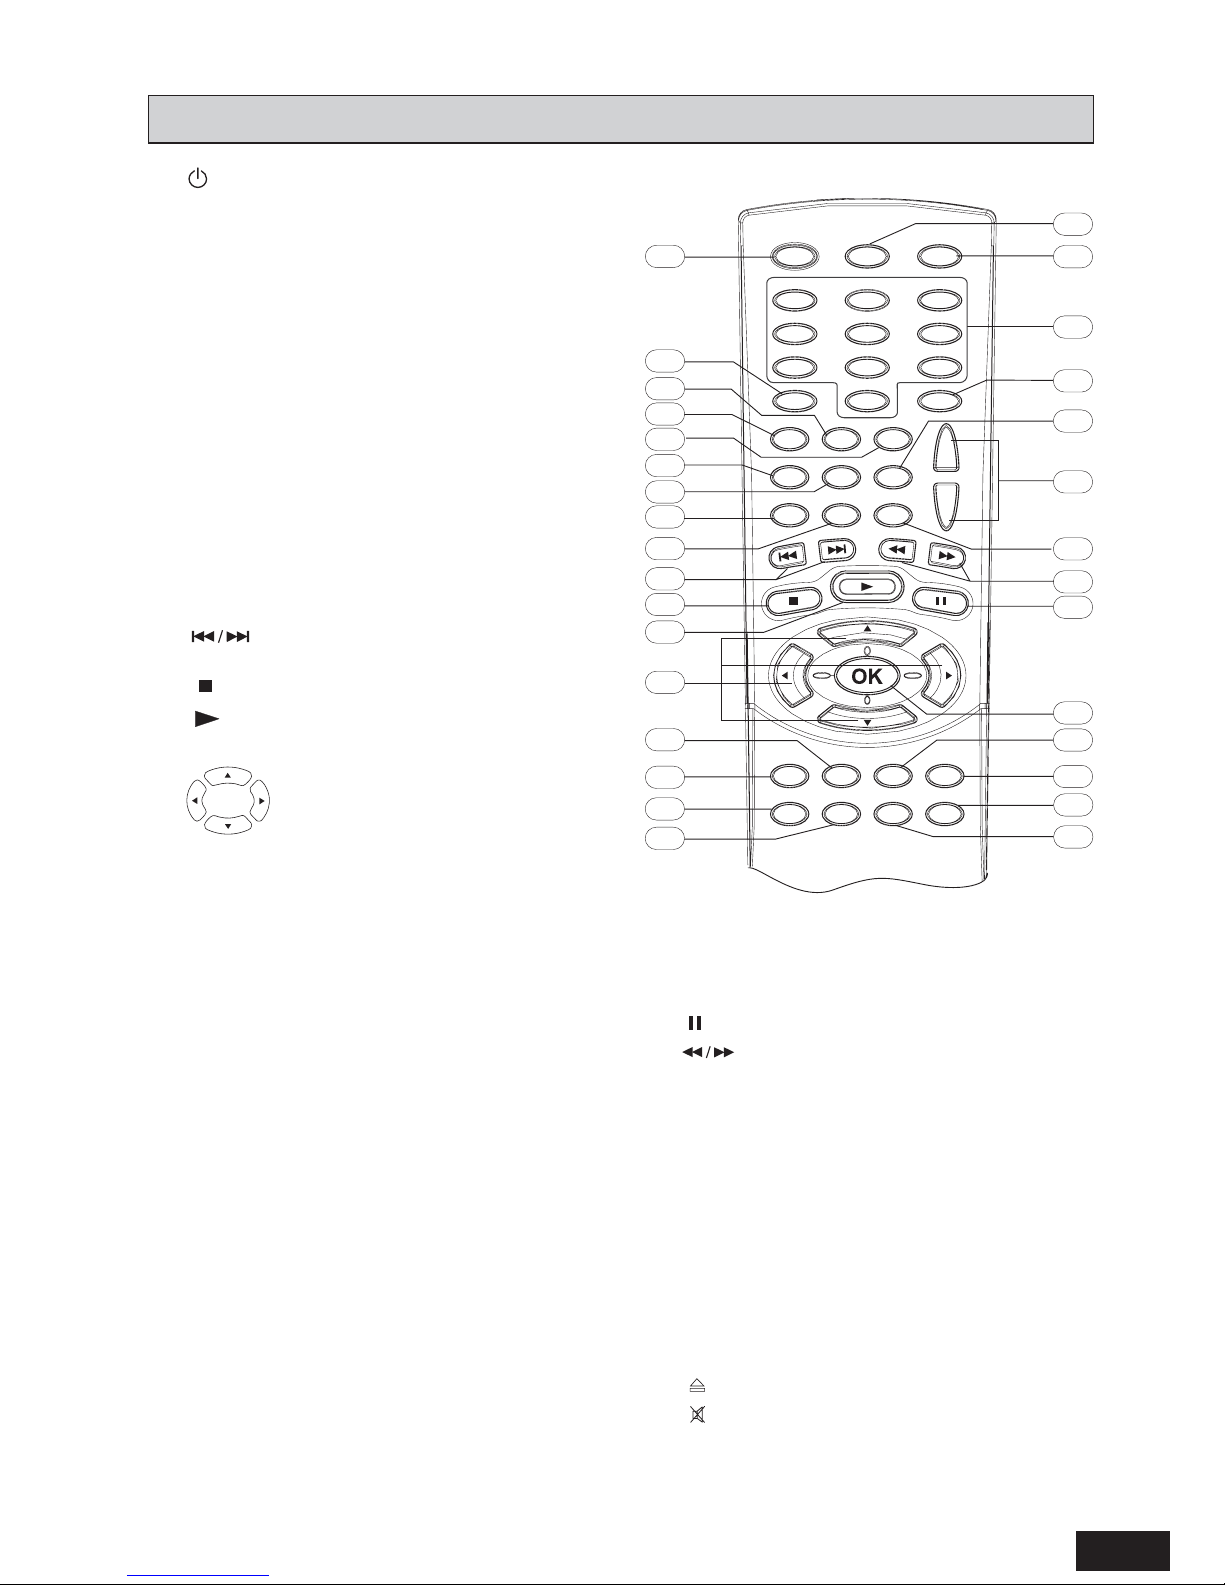
REMOTE CONTROL
1. STANDBY/ON Switches unit between Operating
and Standby mode.
2. GOTO Displays INFO Menu. Direct key in the
specific location on a disc to play.
3. BOOKMARK Opens Bookmark Menu.
4. V-SELECT Switches among the different video
outputs.
5. SUBTITLE Selects subtitle languages.
6. A-B Sets the repeat A-B playback, or clears the
programmed repeat playback.
7. PLAYMODE Displays Playmode Menu for
different play modes operation.
8. ZOOM/CLEAR 1) Selects different zoom sizes
by pressing this button repeatedly. 2) Clears the
information you input in other setup menus.
9. ANGLE/PBC 1) Selects viewing angles if present
on disc. 2) Turns PBC ON/OFF for VCD/SVCD
discs.
10.
Skips backward / forward to the previous
or next chapter / track.
11.
Stops playing.
12.
Starts playing.
13. 1) Active Navigation Keys
navigate in indicated directions for
making selections in menus.
2) Tuning Keys (In Tuner Mode)
UP/DOWN to change radio frequencies.
LEFT / RIGHT to change radio channel.
14. DVD 1) Selects DVD mode. 2) If the USB device
is connected to the USB jack on the front panel,
press this button and use Active Navigation keys
to select USB mode.
15. TUNER/AV T oggles among A V 1, AV 2 and T uner
mode by pressing repeatedly.
16. SURROUND Selects different surround sound
effects among STEREO, PROLOGIC II MOVIE,
PROLOGIC II MUSIC, CONCERT, CHURCH,
PASSIVE, WIDE and LIVE.
Note: Surround Sound Effect (DSP) is available
only for STEREO contents (2 channels). DSP
cannot be selected while playing back a DVD with
multichannel audio content like Dolby Digital 5.1.
17. SLEEP Activates the sleep timer for the unit to
switch to standby mode automatically.
18. TONE Selects EQ modes among FLAT, ROCK,
POP, CLASSIC and JAZZ.
19. SETUP / EXIT Press to enter or exit the SYSTEM
SETUP Menu.
20. MENU Enters the Disc Contents Menu in DVD
mode or returns to the disc menu for VCD/SVCD
disc with PCB ON mode.
21. EX BASS Turns EX BASS to Soft Bass, Balance
Bass or Powerful Bass.
22. OK Confirms the selection and input.
23.
Freezes picture and sound during playback.
24.
Starts backward / forward search.
25. TITLE / ROTATE 1) Displays the Title Menu if
present on disc (DVD mode only).
2) Rotates picture when playing picture CDs.
26. - VOL + Increase or decrease the volume.
27. AUDIO/FM ST 1) Changes audio stream of disc.
2) Selects Mono / Stereo in Tuner mode.
28. INFO Displays current setting information of the
playing disc.
29. 0 - 9 (Numeric Keys) 1) In DVD mode, they are
used for direct key in selections of title, chapter,
track and time search input. 2) In tuner mode,
they are used to direct key in a preset station.
30.
OPEN/CLOSE Opens or closes the disc tray.
31.
MUTE Mutes and unmutes the sound output
from the speakers.
1
2
3
4
5
6
7
10
13
16
17
15
14
8
9
11
12
27
18
19
21
20
22
24
23
25
28
26
30
31
29
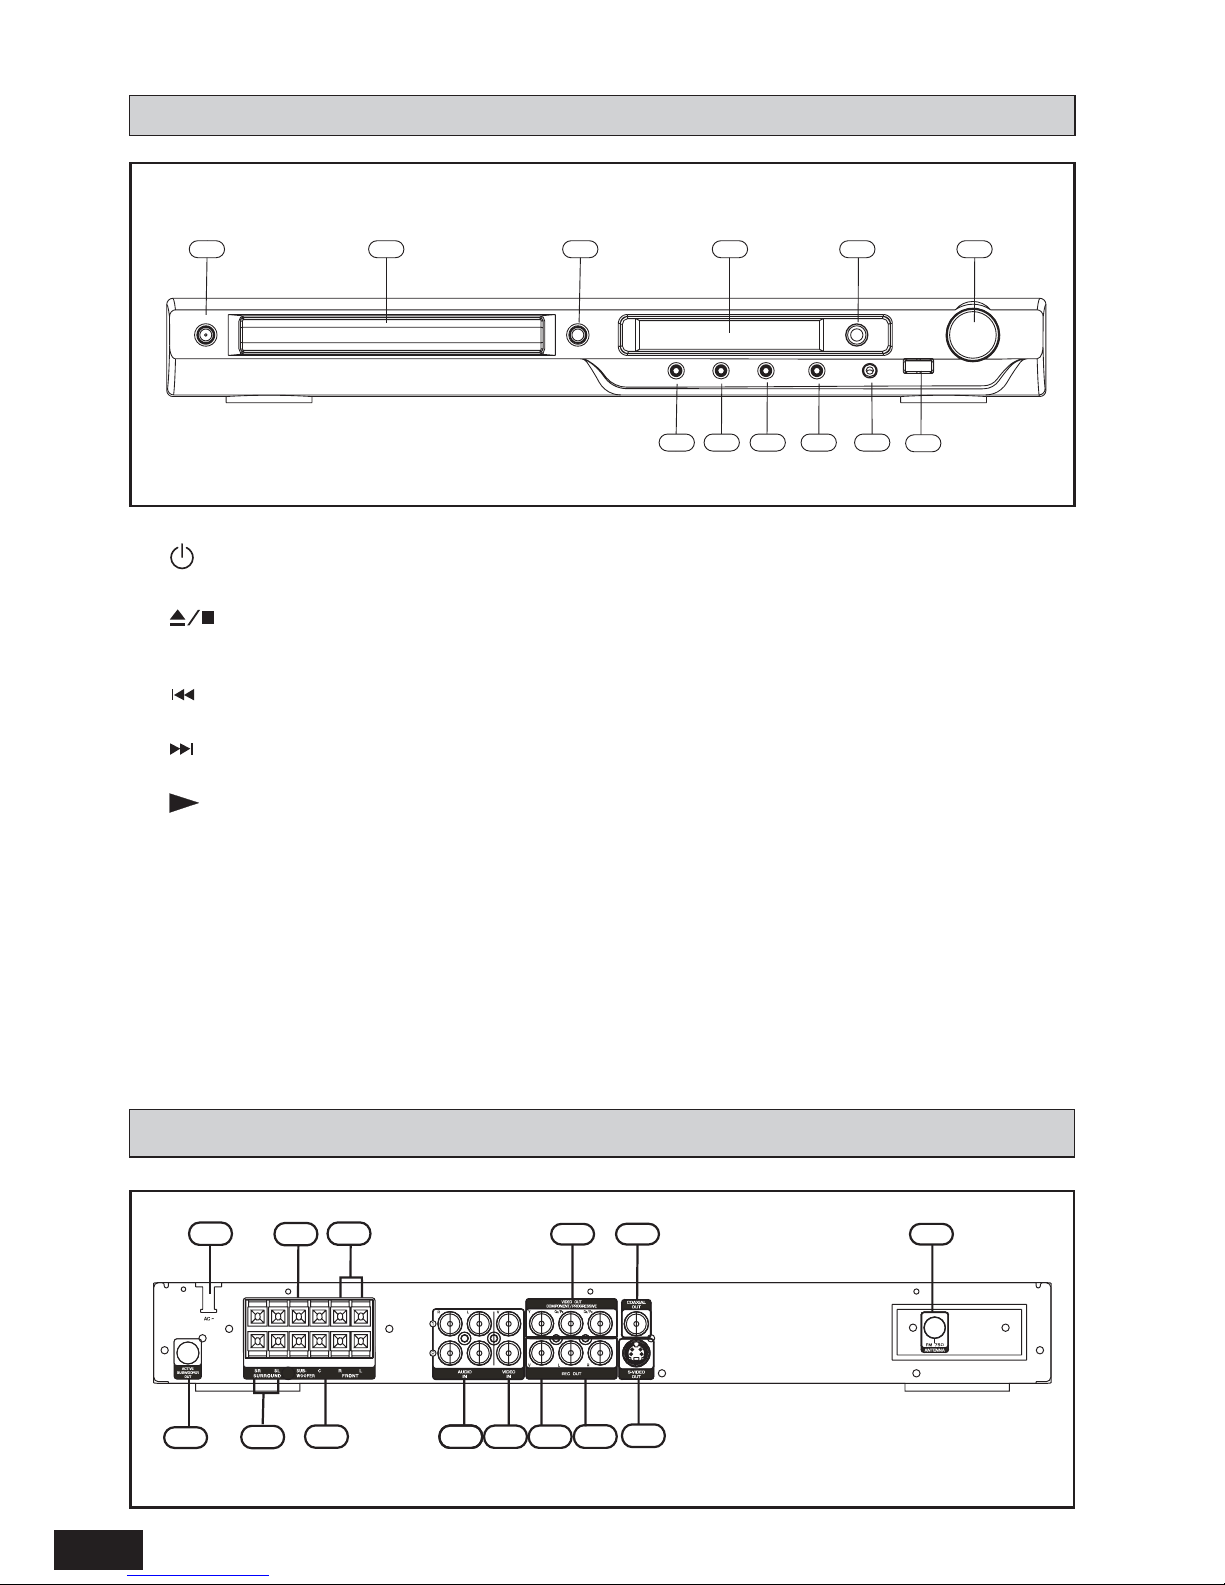
6
REAR PANEL
FRONT PANEL
4
6
1 2 3 5
798
10
12
11
1. STANDBY/ON - press to turn your home theatre on or to standby mode.
2. Disc Tray - place a DVD or CD, label side up, into this tray.
3.
- opens or closes the disc loading tray in Stop or No Disc mode; Stops playing.
4. VFD Display Area - displays status messages.
5. Infra-Red Receiver - receives the signal from the remote control.
6.
1) press to skip to the previous chapter/track in DVD mode.
2) Skips to the previous FM preset channel number in tuner mode.
7.
1) press to skip to the next chapter/track in DVD mode.
2) Skips to the next FM preset channel number in tuner mode.
8.
PLAY 1) Starts playing in DVD/CD mode. 2) Saves a preset channel in tuner mode.
9. SOURCE - Switches between AUX1, AUX2, Tuner mode and DVD mode.
10. PHONES - plug standard headphones into this jack.
11. USB Jack - plug standard USB device into this jack.
12. VOLUME Adjust the master volume. Turn clockwise to increase the volume and counter-clockwise to
decrease the volume.
Warning: excessive sound pressure from earphones and headphones can cause hearing loss.
13
7
1
2
3
5
6
4
8
10
14
11
12
9

7
IMPORTANT!
Connect the AC cord only after the speakers, antenna and all optional equipment have been connected.
Never make or change any connections with the power switched on.
The rating plate is located at the rear panel of the system.
1. FM Antenna Input Connections
For FM reception, connect the FM antenna to the FM jack. Move the antenna in various directions until the
clearest signal is received.
Note: Position the antenna as far away as possible from a TV, VCR or other radiation source.
2. Audio inputs
Connect audio (Left and Right) cables from a VCR, TV or satellite receiver to play them through this home
theatre system. These connections are labelled AUX1 and AUX2 and are selected by using the SOURCE
button on the front panel or TUNER/AUX button on the remote control.
3. Video inputs
Connect video cables from the corresponding video output jacks on a TV, VCR, or satellite receiver to play
them through this home theatre system. These connections are labelled AUX1 and AUX2 and are selected by
using the SOURCE button on the front panel or TUNER/AUX button on the remote control.
4. Video output - REC
Connect to the Video Input of a television or you can also connect a VCR or other recording device to this
jack. Most DVDs cannot be recorded, however you can use this connection to record from the auxiliary
inputs such as recording from the satellite receiver.
5. Audio outputs - REC
Connect to the Audio Input of a television or you can also connect audio (Left and Right) cables to external
recording devices such as a VCR or cassette recorder.
6. Component video and progressive outputs
Connect a television that has component video input. Use a component video cable (not supplied).
7. Digital coaxial output
Connect an external device that has a digital audio input jack.
8. S - Video output
Connect to the S-VIDEO IN jack on the television using an S-Video cable. This type of connection provides
superior picture quality to the Composite (yellow) Video Output.
Note: Your television must be equipped with an S-Video input jack.
9. Surround speaker
Connect the left surround speaker to the SL terminals and right surround speaker to the SR terminasl.
Connect the coloured wire to the same coloured terminal and black wire to the black terminal.
10. Subwoofer speaker
Connect the supplied (passive) subwoofer, with the coloured wire attached to the purple terminal and the
black wire attached to the black terminal.
11. Centre speaker
Connect the centre speaker, with the coloured wire attached to the green terminal and the black wire attached
to the black terminal.
12. Front speaker
Connect the left front speaker to the L terminals and right front speaker to the R terminals. Connect the
coloured wire to the same coloured terminal and black wire to the black terminal.
13. Active subwoofer out
If connecting an active subwoofer (not supplied) connect to this socket.
14. Power Cord
Plug into a household electrical outlet corresponding to the voltage listed on the Rating Label.
8
CONNECTIONS
The following connections show the different video and audio connections to TV, VCR or CD Recorder.
Important : Make sure that the AC Voltage matches your local voltage.
Connect the AC cord only after the speakers, antenna, and all optional equipment have been connected.
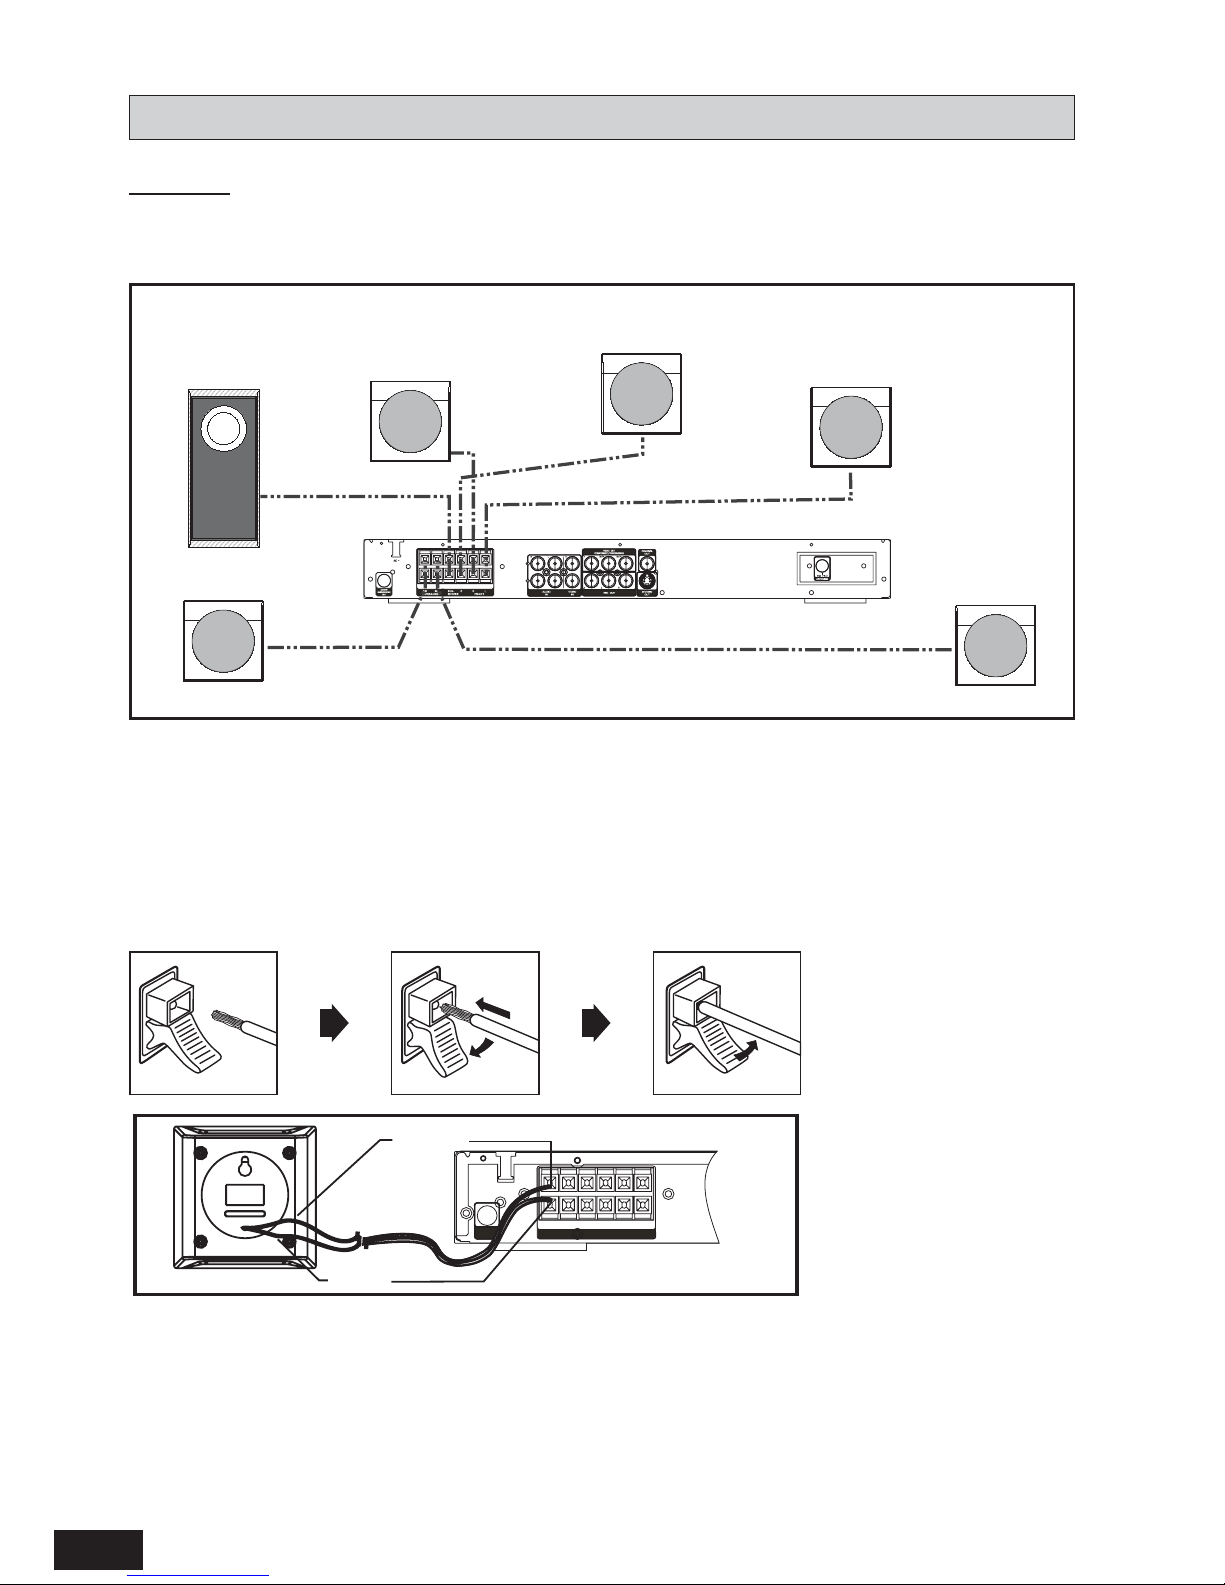
(1) Speaker Connections
Note:
– This DVD Receiver is designed to reproduce optimum sound quality when the supplied speakers are used. If
you wish to connect other speakers to the system instead of the supplied speakers, they should be 6 ohms
impedance for the speakers, and 3 ohms impedance for the subwoofer.
– Ensure correct polarity when connecting speakers (coloured wire for matched colour terminal clip).
– To prevent damage to circuits, never short-circuit the positive and negative speaker output terminals.
Press the speaker terminal clip down and insert the wire, then release the clip.
Connect all speakers in the same manner.
Note:
• Do not remove excessive amount of insulation on the wire cords, to avoid the stripped portion from touching
each other. The optimal length for the stripped part should be around 1/3 inch (or 1cm).
• Do not push the stripped part too far into the speaker connectors.
• Do not connect more than one speaker to any one pair of speaker terminals.
• Do not connect speakers with an impedance lower than the speakers supplied.
1
FRONT LEFT
SPEAKER
2
FRONT RIGHT
SPEAKER
4
SURROUND
LEFT SPEAKER (Rear)
5
SURROUND
RIGHT SPEAKER (Rear)
3
CENTRE
SPEAKER (Front)
SUBWOOFER
(Can be placed
anywhere in the room)
Coloured Wire
Black Wire
 Loading...