


5CD Hi-Fi System
Thank you for choosing to purchase one of our TEVION® products, we appreciate your business and believe that
we have provided you with a product that is both reliable and value for money. We encourage you and your
friends to choose from our range of TEVION
®
products again in future.
PACKAGE CONTENTS
UNPACKING THE SYSTEM
You should have the following:
• One main unit, with 2 main speakers
• One remote control
• One MW loop Antenna
• One FM Antenna
• One users manual
• One guarantee card
Confirm all parts before disposing of carton.
Technical Specifications:
Power Supply: 230V – 240V ~ 50Hz
Power Consumption: 200W
Dimensions (H x W x D):
Main Unit - 304(mm) x 250(mm) x 317(mm)
Speaker - 334(mm) x 247(mm) x 218(mm)
Weight (Net/Gross) in kg: 12.5 / 17
CD player: Response curve (+/- 2dB): 60Hz to 5kHz
For any customer query or in the unlikely event of a product failure, please phone or
email the helpline contact details below for assistance.
DO NOT RETURN THE PRODUCT TO THE RETAILER.
Toll Free Help line: 1300 366 144
Email: info@telefixsales.com.au
USERS MANUAL 5 CD Hi-Fi System
Model: CD5 8500
1.
SAFETY INFORMATION SAFETY INFORMATION
WARNING! Do not abuse or damage a power cord. If any power cord is damaged, it must be replaced by th e
manufacturer, its service agent or a similarly qualified person in order to avoid a hazard. A replaceable cord must
be replaced with an authorised replacement from an authorised service agent only.
The graphic symbols used in this manual or on the back cover of the unit mean the
following:
WARNING! Only use attachments/accessories as supplied or specified by the manufacturer.
Read this manual in full before use.
WARNING! Unplug this apparatus completely from the power source during lightning storms or when unused
for long periods of time.
WARNING! Refer all servicing to qualified personnel. Servicing is required when the apparatus has been
damaged in any way, such as when the power supply cord or plug is damaged, liquid has been spilled onto or
objects have fallen into the apparatus, if the apparatus has been exposed to rain or moisture, does not operate
normally, or has been dropped.
Class II Double insulated Appliance.
WARNING! For household use only, this apparatus is not intended for commercial use.
The lightning flash symbol is intended to alert the user to the enclosures that
contain hazardous voltages.
WARNING! If this apparatus is to be used by a third party, please supply these instructions with it.
WARNING! No liability will be accepted for any personal injury or damage caused by failure to follow
these instructions.
The exclamation symbol is intended to alert the user to the presence of
important operating and maintenance (servicing) instructions in the literature
accompanying the appliance.
IMPORTANT BATTERY INFORMATION FOR REMOTE CONTROL
CAUTION!
• Remove the batteries (not supplied) to avoid leakage if you do not use your remote control for more than
one month.
Invisible laser radiation when open and interlocks
failed or defeated. Avoid exposure to beam.
• Discard leaky batteries immediately as leaking batteries may cause skin burns or other personal injuries.
Dispose of batteries in the proper manner, according to provincial and local regulations.
• Any battery may leak electrolyte under the following circumstances:
CAUTION! This is a Class 1 laser product. This player uses a visible laser beam that could cause
hazardous radiation exposure. Be sure to operate the equipment as directed. Do not place eyes close
to any openings when the set is connected to the mains supply.
- if mixed with a different battery type
- if inserted incorrectly
- if all batteries are not replaced at the same time
WARNING! Do not remove any covers.
- if disposed of in fire or if an attempt is made to charge a battery not intended to be
recharged
WARNING! No objects filled with liquid, such as vases, shall be placed on this equipment or in any
position where liquid may fall into this equipment or any other electrical apparatus.
WARNING! Do not insert foreign objects into openings of this appliance. Do not block openings or
vents.
HEADPHONE SAFETY
WARNING! Do not use this apparatus near water. To avoid the risk of fire or electric shock, do not
expose this apparatus to rain or moisture. The apparatus shall not be exposed to dripping or splashes
and is strictly for indoor use only.
Have a blast – just not in your eardrums. Make sure you turn down
the volume on the unit before you put on the headphones. Increase
the volume to the desired level only after headphones are in place.
WARNING! Not for use in Tropical humid climates.
WARNING! Do not immerse in any liquid whilst in use or cleaning. Clean only with a damp cloth,
dry with a dry towel. Do not use harsh abrasives as these may damage the plastic parts.
• Do not play your headphones at a high volume. Hearing experts warn against extended high-volume
play.
WARNING! DO NOT block any ventilation openings. Keep away from curtains, newspapers and
restricted areas. Install in accordance with any specific manufacturer’s instructions. Always allow a
sufficient gap around the apparatus to avoid overheating.
• If you experience ringing in your ears, reduce the volume or discontinue use.
• You should use with extreme caution or temporarily discontinue use in potentially hazardous situations.
WARNING! Do not install near any heat sources such as radiators, gas heaters, stoves or other
apparatus (including amplifiers) that produce heat. Do not leave in direct sunlight.
Note: No headphones are supplied.
WARNING! Do not place any naked flame source, such as lit candles on any electrical apparatus.
WARNING! Connect to a suitable 230-240V ~ 50 Hz power supply only.
WARNING! Keep out of reach of young children. This apparatus is not suitable for use by young
children or infirm persons without supervision. Young children must be supervised to ensure that
they do not play with the apparatus. Ensure young children have enough knowledge to operate the
equipment safely if they do have access to this equipment.
2.
3.
COPYRIGHT GETTING STARTED
This product should only be used for the purposes for which it is sold, that is, entertainment,
violating no copyright law. Any attempt to use this product for which it is not intended is unlawful
and therefore not condoned by Tevion
SPEAKER WIRE CONNECTION
®
Portions based upon Microsoft Windows Media Technologies. Copyright © 1999 Microsoft
Corporation. All Rights Reserved. Microsoft, Windows Media and the Windows Logo are
trademarks or registered trademarks of Microsoft Corporation in the United States and/or other
countries.
GETTING STARTED
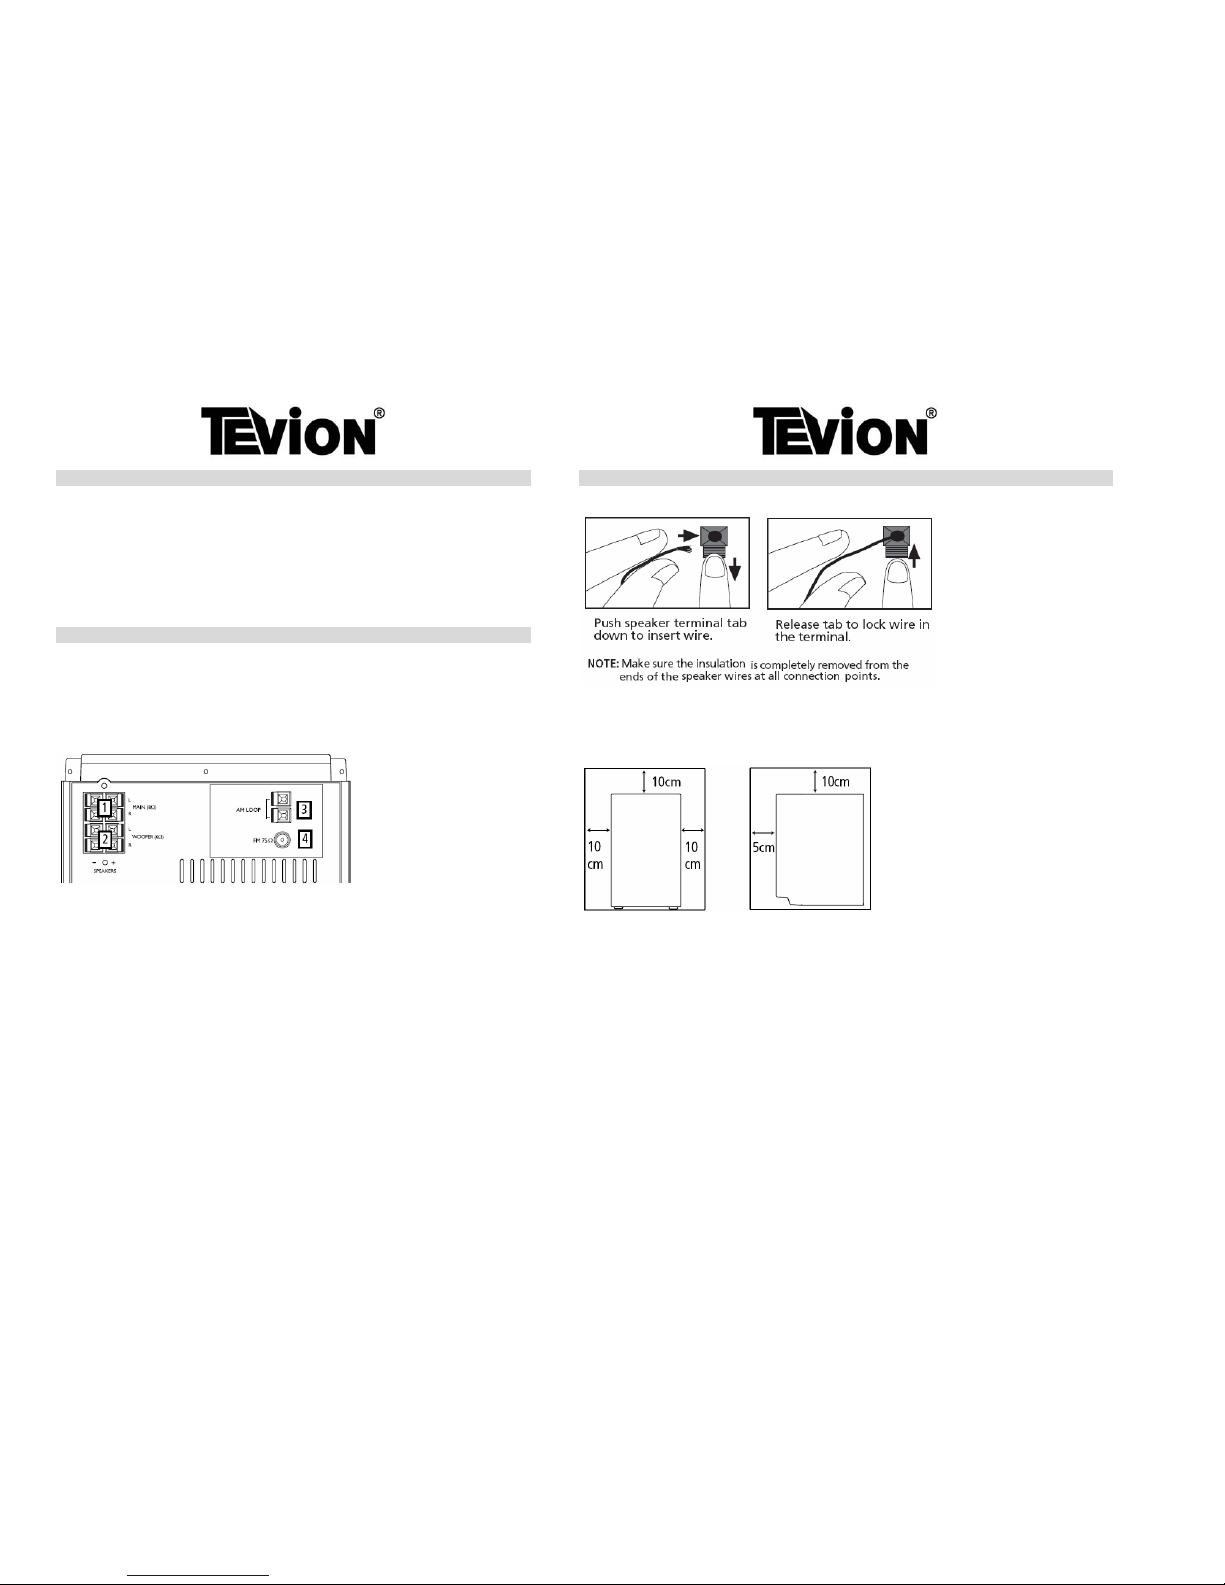
BACK VIEW
1. Main Speaker Jacks (high pass)
2. Woofer jacks (low pass)
3. MW loop antenna jack
INSTALLATION
4. FM Pigtail antenna
To ensure sufficient ventilation, keep the minimum spacings shown below free from other surfaces:
USING THE FM AND AM ANTENNAS
Before you use your audio system, you’ll want to make sure both the FM and AM antennas are
positioned properly. Uncoil the FM antenna at the back of the unit, making sure it is fully extended
(you may even want to tape it to the wall behind the unit if possible, the higher the better). You’ll
also need to connect the AM antenna loop to the back of the unit if you listen to AM stations. Rotate
the AM loop antenna for better reception.
CONNECTING THE MAIN SPEAKERS
Each speaker has a black/red wire and a purple/black wire. When connecting the speakers match the
red/purple wires to the red/purple jacks and black wires to the black jacks on the main unit.
4.
Front View Side View
5.
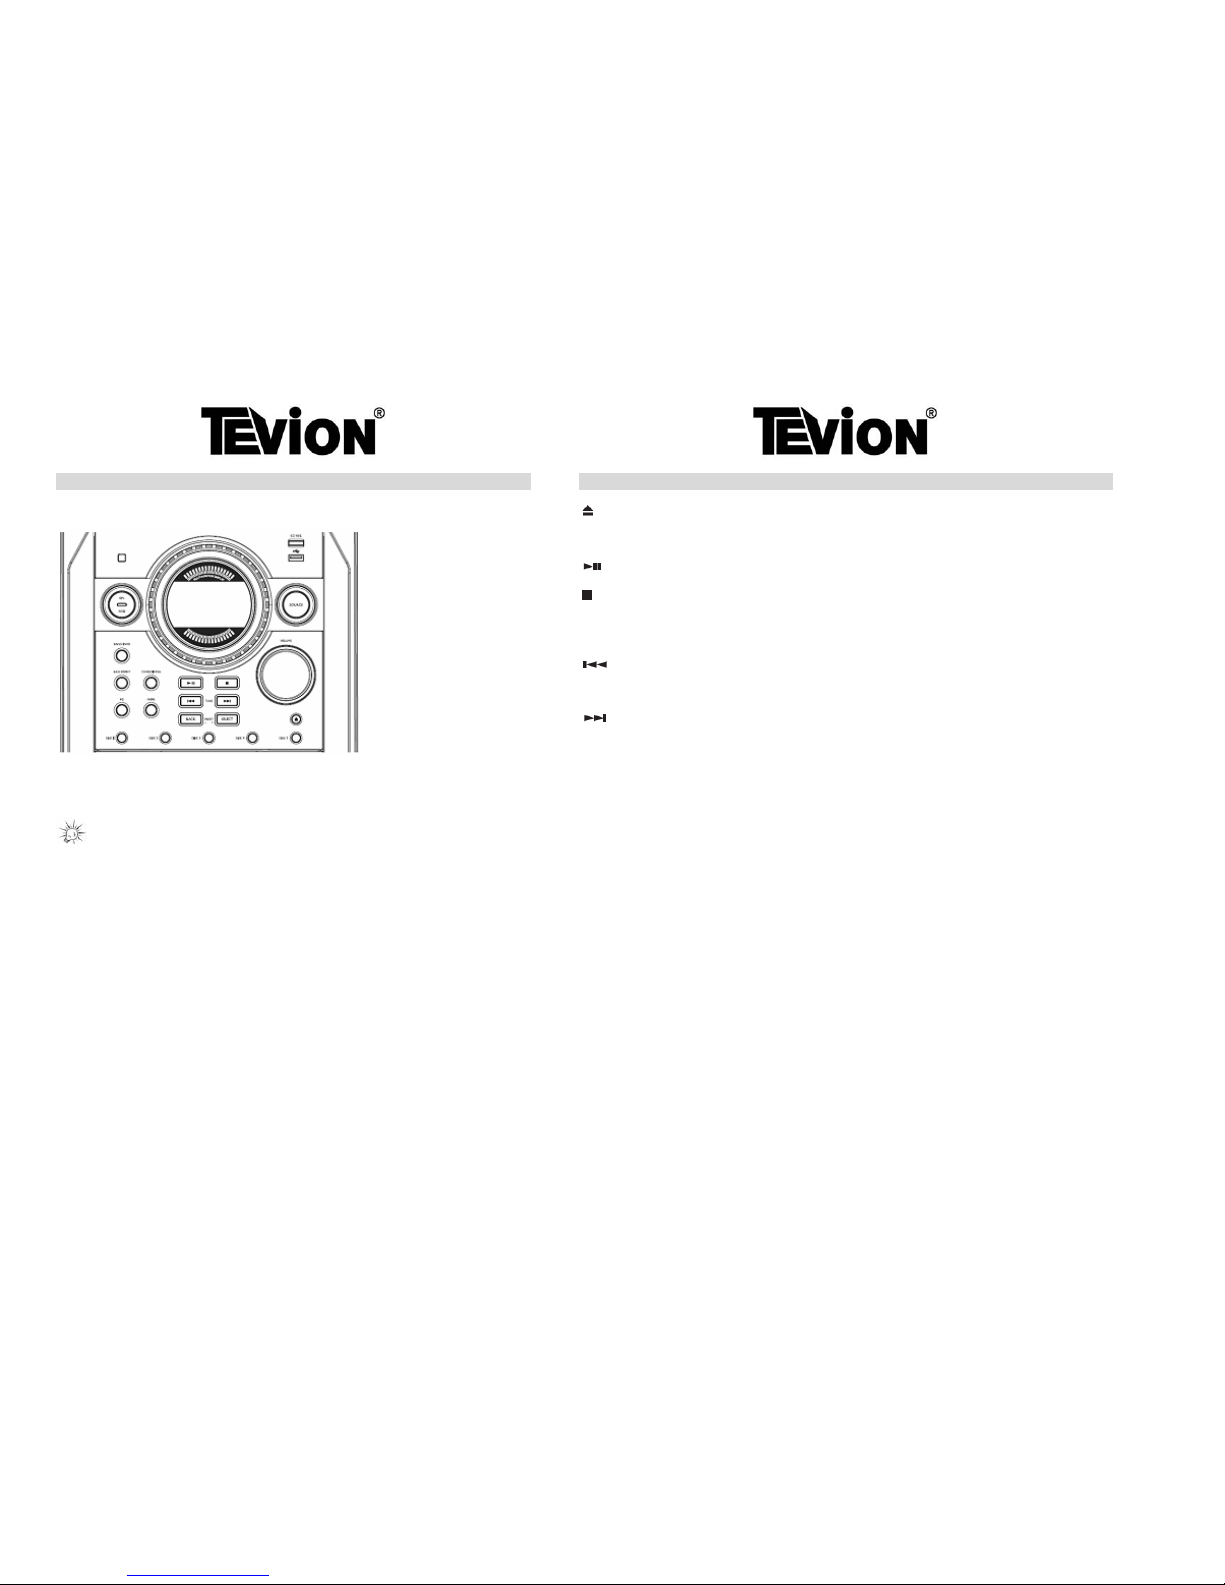
GENERAL CONTROLS GENERAL CONTROLS
MAIN UNIT
- Opens or closes the disc tray
EQ - Selects equalizer presets
- In CD, USB or simple MP3/WMA mode – starts and pauses playback
- In CD, USB or simple MP3/WMA mode – stops playback
- In simple MP3/WMA mode – returns to the first track of the current disc when playback is completely
stopped.
- In recording mode – stops record to USB device.
- In CD, USB or simple MP3/WMA mode – goes to the previous track; searches backward within a CD
- In tuner mode – tunes down radio frequency.
- In clock or timer mode – decreases hour or minute values
- In CD, USB or simple MP3/WMA mode – goes to the next track; searches forward within a CD.
- In tuner mode – tunes up the radio frequency.
- In clock or timer mode – increases hour and minute values.
PROG
- Enters program mode for CD, USB and Tuner
ON/ECO – Press and hold in standby mode to enter ECO (power saving, without clock display)
mode. Press briefly to turn on and off the unit.
- In file rename mode – confirms and stores new file name
VOLUME
- Adjusts volume
TIPS: In STANDBY mode, press ON/ECO to turn the system on in the previously used
mode. Press SOURCE to select the corresponding mode. Look at the display icons to identify the
current mode.
DISC 1/2/3/4/5
- Enters CD mode and plays the corresponding CD
SOURCE – selects among CD Tuner, AUX and USB modes.
BACK
- In navigate mode – MP3/WMA mode – enters navigation menu level
CD REC – starts and stops recording CD to USB device.
- In tuner mode – selects the previous preset station
USB SOCKET – connects USB device. Mass Storage Class (MSC) devices are supported.
SELECT
- In USB or simple MP3/WMA mode – enters navigation mode
BAND/INFO
- In navigation mode – enters current folder and shows the first file or folder from current folder
- In CD mode – selects among display information
- In tuner mode – selects the next preset station
- In USB mode – shows memory usage.
- In simple MP3/WMA mode – shows the track play time and ID3 tags information (e.g.
song title, artist, album) during playback.
- In Tuner mode – use as BAND key to change among tuner bands. Enters auto preset
programming in FM mode when depressed for 2 seconds.
BASS BOOST
- Turns ON or OFF Bass Boost
DEMO/DIMMER
- Activates or deactivates display demonstration. Adjusts display brightness.
6.
7.

GENERAL CONTROLS (cont.) GENERAL CONTROLS
PHONE AND AUX IN
VOLUME S or T - increases or decreases the volume level
Open the compartment door at the bottom of the main unit to reveal the jacks inside.
- In CD, USB or simple MP3/WMA mode – goes to the previous track; searches backward within a CD.
- In tuner mode – tunes down radio frequency.
- In clock or timer mode – decreases hour and minute values
- in CD, USB or simple MP3/WMA mode – starts and pauses playback
- In CD, USB or simple MP3/WMA mode – goes to the next track; searches forward within a CD
- In TUNER mode – tunes up radio frequency.
- In Clock or Timer mode – increases hour and minute values.
CD REC – starts and stops record to USB device
PHONE – Jack for connecting headphones
AUX IN - Jacks for external sound input
- In CD, USB or simple MP3/WMA mode – stops playback
- In simple MP3/WMA mode – returns to the first track of the current disc in stop mode;
displays the total number of folders and total number of tracks on the current disc when
playback is completely stopped.
REMOTE CONTROL
- In recording mode – stops record to USB device.
ON/ECO – turns power ON or OFF (STANDBY mode)
DISC SKIP – skips the next disc, when in CD mode
SOURCE – selects among CD player, Tuner, AUX and
USB mode
PROG - Enters program mode for CD, USB and Tuner.
BAND – in tuner mode – changes between FM or AM
radio bands; enters preset programming in FM mode
when depressed for 2 seconds
- In file rename mode – confirms and stores new file name
INTRO/CT - Turns intro mode On or Off to play the first 10 seconds of each track in CD, USB or simple
MP3/WMA mode.
B.BOOST – turns on or off Bass Boost
- In tuner mode – shows RDS time
FM ST. – selects between stereo and mono sound in FM
tuner mode.
CLOCK - Enters clock setting mode; shows clock time.
ADD - In CD, USB or simple MP3/WMA mode – adds track to the program list
OPEN/CLOSE – opens and closes the disc
compartment
EQ – selects equalizer presets
/PTY - Turns ON/OFF random listening in CD, USB or simple MP3/WMA mode.
- In tuner mode – selects search by program type
INFO
- In CD mode – selects among display information
TIMER - Enters timer setting mode; turns ON/OFF timer
- In USB mode – shows memory usage.
- In simple MP3/WMA mode – shows the track play
time and ID3 tags information (e.g. song, title, artist,
album) during playback
DEL - When reviewing program, removes track/file from, the program list
- In USB mode – removes file from the connected USB device
- In file rename mode – deletes current character and moves to the next character
- mutes audio output
REPEAT/RDS - In CD mode – repeats a track, a CD or all CD’s
- In USB or simple MP3/WMA mode – selects repeat one file or repeat all files mode.
SLEEP – press to select the time interval in minutes
before the unit turns off automatically
- In tuner mode – displays RDS information
9.
8.

GENERAL CONTROLS (cont.) DISPLAY
NAVIGATION BUTTONS
Use the navigation buttons to navigate through the menu.
f - In USB or simple MP3/WMA mode – enters navigation mode
- In navigation mode – moves down one navigation menu level; enters current folder and
shows the first file/folder from the current folder.
- In file rename mode – confirms the currently selected character and moves to the next
character.
e - In Navigation mode – returns to the previous navigation menu level; returns to stop mode.
- In file rename mode – edits the previous character
CD/TUNER/AUX/USB – indicates CD, Tuner, AUX and USB modes
c - In USB or simple MP3/WMA mode – enters navigation mode
BASS BOOST – Bass Boost is activated
- In navigation mode – goes to the previous folder in stop mode; navigates
FM – FM tuner mode activated
upwards; moves up a list; selects the previous file or folder.
MW – MW tuner mode activated
- In file rename mode – selects characters
STEREO – in FM tuner mode, indicates stereo sound is selected.
- In tuner mode – selects the next preset number
WMA – current disc is a WMA disc
MP3 – current disc is an MP3 disc
d
- In USB or simple MP3/WMA mode – enters navigation mode.
RDS – RDS signal received
- In navigation mode – goes to the next folder in stop mode; navigates
folder in navigation mode
downwards; moves down a list; selects the next file or folder.
PROG – in program mode
- In tuner mode – selects the previous preset number
INTRO – Intro mode is activated so that the first 10 seconds of each CD track will be played
REPEAT 1/REPEAT 1 DISC/REPEAT ALL DISCS/ALL DISCS – in CD mode, indicates the repeat option
activated
INSTALLING BATTERIES TO THE REMOTE CONTROL
REPEAT 1 – Repeat current track
REPEAT 1 DISC – Repeat current disc
This remote control must be fitted with 2 “AAA” or “UM-4” or “R03” batteries (not included) prior
to use. Follow the steps below to ensure correct installation.
REPEAT ALL DISCS – Repeat all discs
ALL DISCS – Play all discs once
SLEEP – Sleep mode is activated
1. Open the battery compartment door by pressing down on the tab and then lifting the door
out.
REC – Recording mode is activated
- the corresponding disc icon lights to show which disc compartment is loaded. The current playing disc
will flash
2. Insert the appropriate batteries into the compartment, taking care to ensure the polarities
(+)/(-) are matched.
- random playback is activated
3. Replace the battery compartment door and close into place.
- timer is activated
f - in playback mode
- in pause mode
ROCK/POP/JAZZ/CLASSIC/CUSTOM – Indicates the preset equalizer selected.
10.
11.

SETTINGS ADJUST SLEEP TIME
Press SLEEP again when the remaining sleep time is displayed to change the sleep time.
SETTING THE CLOCK
Sleep is automatically de-activated when the unit is turned off.
1. Press and hold CLOCK on the unit or remote control until the hour flashes on the display.
ADJUSTING DISPLAY BRIGHTNESS
to set the hour and then press CLOCK to shift to minute digits.
2. Press
or
Press and hold DEMO/DIMMER to adjust display brightness. Then press repeatedly until desired brightness is
achieved.
3. Press
or to set the minutes
4. Press CLOCK to save settings or to quit setting without saving
SHOWING DEMONSTRATION
NOTE: When system is ON, you can press CLOCK to display the current time for approx 4
seconds.
Press DEMO/DIMMER to turn on/off demonstration mode. The demonstration scrolls through all display
operations.
SETTING THE TIMER
SOUND FEATURES
1. Press and hold TIMER on the remote control until the ON and clock hour flashes on the
display (ON – timer).
VOLUME CONTROL
or
2. For setting time, press
to set the hour and then press TIMER to shift to minute
digits.
Adjust VOLUME on the main unit or press VOL c or d on the remote control to adjust the volume level.
The volume level shows briefly on the display to show the change in volume level.
3. Press
or to set the minute.
4. Press TIMER to change to OFF (timer off time) with clock time flashing. Repeat steps 2 &
3 for timer off time setting.
BASS BOOST
5. Press TIMER to select source. Press or to select between TUNER/DISC/USB.
6. Press TIMER to set volume. Adjust VOLUME on the main unit or press VOL +/- on the
remote control to select desired volume control.
Press BASS BOOST to turn on/off boosting the bass frequency. The Bass Boost icon lights on the display when
it is activated.
7. Press TIMER on the remote control to save and quit settings. The timer is automatically
activated once timer setting is saved.
MUTING AUDIO
ACTIVATING THE TIMER
MUTE on the remote to cut the sound. (Remote Only) Press
Press and release the TIMER to turn on/off the alarm. The timer icon is displayed when timer is
activated
USING PRESET EQUALISER CURVES
Press EQ on the remote control to toggle among FLAT, ROCK, POP, JAZZ, CLASSIC and CUSTOM. The
display shows your selection briefly.
SLEEP MODE
CREATING A CUSTOM CURVE
You can select the time interval in minutes before the unit turns off automatically.
Press SLEEP to select among OFF, 120, 90, 60, 45, 30, 15 and 5 minutes.
1. Press EQ on the remote control to select CUSTOM mode.
The SLEEP icon lights on the display when sleep mode has been activated
VIEW REMAINING SLEEP TIME
When sleep is activated, press SLEEP once to view remaining sleep time.
12.
2. While CUSTOM is displaye d, press
or to cycle among the displayed bass- and treble- range
levels.
3. While BAS or TRE is displayed, adjust VOLUME to set the associated gain between –10 - +10.
4. Press EQ to exit.
13.

DISC AND USB PLAYBACK DISC AND USB PLAYBACK
IMPORTANT CD AND MP3/WMA INFORMATION
DISC PLAYBACK
1. Press SOURCE repeatedly to select CD mode.
2. Press OPEN/CLOSE
to open the disc compartment
This unit is compatible with CD-RW/CD-R discs for playback. Do not use 8cm
mini-discs.
3. Insert up to 5 discs with the label-side facing up
4. Press OPEN/CLOSE
again to close the disc compartment.
• The occupied disc tray icons light up on the display and the current disc icon flashes.
• If the disc is an MP3/WMA CD, the respective MP3 and WMA icon lights on the display.
Notes on CD-R/RW Disc:
• Do not affix any type of labels to either side (recordable or labeled side) of a CD-R/RW
disc as this may result in malfunction.
• To avoid damages to the CD-R/RW disc, do not open the disc compartment door while the
disc is still being read.
• Do not load an unrecorded CD-R/RW disc into the unit. It may take a longer time to read
the disc.
• Playback capability for CD-RW discs may vary due to variations in the quality of the CD-
RW disc and the recorder used to create the disc.
Notes on MP3/WMA Disc:
• Use .mp3 as the extension when converting audio files into MP3 for saving onto CD-R/RW,
e.g. Abc08.mp3. Do not use any other extension e.g. .doc, .pdf
• Do not use the .mp3 extension for other text or non-audio data files as this may result in
serious malfunction and harmful noise interference.
• For better quality in MP3/WMA disc playback, the CD quality should be recorded 128kps
or above.
• Disc data size >650MB is not recommended.
• Total files and folders in the disc should not exceed 512, it also depends on the length of the
file/folder names.
• For mixed mode discs, only one mode will be selected for playback, depending on the
recording format.
• To ensure good performance, wait until the disc changer completely reads the disc before
proceeding.
• MP3 files in CD ROM EXTRA format disc cannot be recognized.
PLAY AND LOAD SIMULTANEOUSLY
1. Press OPEN/CLOSE to open the disc tray while a CD is playing
2. Load/change discs for available trays
3. Press OPEN/CLOSE
again to close the tray
MEMORY USAGE
Press BAND/INFO on the main unit or INFO on the remote control to view used (U) and free (F)
memory on the USB device.
14.
5. Press
in stop mode to begin playback. Press during playback to pause the disc. Press
again to resume.
6. Press
or to skip to the previous or next track. Press and hold or to search
through a CD while it is playing.
8. During playback, press to stop playback.
SELECTING DISCS
Press DISC 1 / DISC 2 / DISC 3 / DISC 4 or DISC 5 on the main unit to select a disc.
Press DISC SKIP on the remote control to skip discs.
Note:
• Be sure to remove all discs from the disc compartment before moving or transporting the unit.
• Do not push to force closing of the tray during CD playback or tray opening
Tips:
• In stop mode for MP3 and WMA CD’s, press to return to the first track of the current disc. The total
number of tracks on the current disc is displayed (TT)
Press DISC 1 / DISC 2 / DISC 3 / DISC 4 or DISC 5 to directly play the entire single CD. To play all discs in
the unit, press
in CD mode.
USB PLAYBACK
2. Insert the USB device’s port into the main unit’s USB socket
3. Press SOURCE repeatedly to select USB mode.
4. Press
in stop mode to begin playback. Press during playback to pause playback. Press again to
resume.
5. Press
or to skip to the previous or next file. Press and hold or to search though a file
while it is playing.
6. Press to stop playback operations. The unit enters navigation mode for 10 seconds before entering stop
mode.
7. Unplug the device to disconnect.
15.

RADIO RADIO
SELECTING TUNER BAND
TUNING TO AN RDS STATION
RDS allows some text information to be broadcast within the radio signal. An RDS radio is capable of receiving
and displaying the information. e.g song name, time of day, show name
1. Press SOURCE repeatedly to enter Tuner mode.
2. Press BAND to select between FM or MW radio band.
Note:
Tips:
RDS stations broadcast on FM only. When the tuner detects an RDS signal, the RDS icons turn on. RDS
depends on broadcast signal and is not available in all areas.
Your audio system has room for 32 preset stations.
1. Press
or to go to your desired frequency.
TUNING TO A STATION
2. If an RDS station is found, the RDS light will show on the display as well as the station name.
Press
or to select frequencies. Press and hold to start auto searching for the next available
station.
DISPLAYING RDS STATION INFORMATION
Press REPEAT/RDS on the remote control repeatedly to display the following:
AUTO PRESET PROGRAMMING (FM ONLY)
• Frequency
• Station name (PS)
Press and hold BAND for 2 seconds to scan stations in FM band. The stations will then be stored as
preset channels. A maximum of 32 stations can be stored. Beware of your preset channels being
erased accidentally because the scanning and storing process is automatic upon pressing the button.
You can stop the automatic scan be pressing any button, but the erased stations cannot be recovered.
• Station type (PTY)
• Clock time (CT) or
• Radio text (RT)
In Tuner mode, press the INTRO.CT key to replace the displayed time with RDS time (if available).
MANUALLY SETTING PRESETS
SEARCHING BY PROGRAM TYPE (PTY) (Remote Only)
1. Press
or to access the desired frequency.
2. Press PROG once.
3. The most recently accessed program location will be displayed.
/PTY to enter PTY selection
1. Press
4. If a different program location is preferred, press
c or d on the remote control to move
to the desired preset number (1-32).
/ PTY repeatedly to select a PTY mode.
2. Press
5.
Press PROG to store the selected frequency at that preset.
3. Within 5 seconds, press
or to search for a station broadcasting the selected type of program.
USING PRESTS
Press BACK/SELECT on the main unit or c or d on the remote control to access the previous or
next preset station. The PROG icon lights up when a preset station is selected.
The display first shows the preset program number and after a few seconds, the radio frequency will
be displayed.
SUPPRESSING STEREO SIGNAL
Press FM ST to toggle between FM mono and stereo mode (remote control only). “STEREO” is
displayed when in stereo mode. Set the unit to MONO if stereo signal is not strong enough, to cut
down on’ static’.
17.
16.

RECORDING ADVANCED PLAYBACK CONTROLS
In CD and USB mode, advanced playback controls allow you to sample, repeat and randomly playback tracks,
view track information and set up a Program List. In USB mode, advanced playback controls allow you to
rename tracks.
RECORDING CD TO USB DEVICE
1. Connect the USB device to the main unit.
2. In CD stop mode, CD navigation mode or CD pause mode, press CD REC to start CD
playback and recording will begin automatically. This is indicated by the REC icon on the
display.
SAMPLING TRACKS
3. Press CD REC or to stop recording.
Press INTRO on the remote control to play the first 10 seconds of each track on the current disc, all discs in tray
or turn intro mode off. The INTRO icon is displayed when sampling is activated
EXAMPLE
(To record only selected tracks from a CD):
REPEAT
1. Create a CD program (refer to “setting up a program list”)
2. From normal playback mode, press PROG. Press REPEAT on the remote control to repeat the current track (REPEAT 1), current disc (REPEAT 1 DISC),
all discs (REPEAT ALL DISCS), or turn repeat mode off (ALL DISCS).
3. Press CD REC, playback and recording will begin automatically. This is indicated by the
PROG and REC icon on the display.
4. Press CD REC or to stop recording.
RANDOM PLAYBACK
on the remote control to turn on/off random playback. The
Press
icon is displayed when it its
activated.
Tips:
• If CD playback has already started or paused, recording will start instantly from the time
point which is playing or paused when CD REC is pressed.
All the tracks on one disc will be shuffled and played once before shuffling and playing tracks from the next disc.
• Recording stops automatically when CD stops (e.g. end of disc is reached)
• The encoding bit rate for CD is 128kbps.
• Make sure “write protect” is turned off in the USB device during recording.
Note:
• The first 99 tracks of each disc will be shuffled and played once before any of them are played.
• Random playback can be activated simultaneously with repeat 1 disc (randomly play tracks from one disc
repeatedly) or repeat all discs (randomly play tracks from all discs repeatedly)
DELETING FILES FROM THE USB DEVICE
1. In navigation mode, select the file to be deleted using the navigation buttons (refer to
“Navigation Buttons” for details).
VIEWING TRACK INFORMATION
2. Press DEL on the remote control
or
3. Press
on the main unit or press c or d on the remote to select “yes” to delete or
“no” to cancel deletion.
Press BAND/INFO on the main unit or INFO on the remote control repeatedly during playback to show the ID3
tag information. (e.g. song title, artist, album)
4. Press SELECT on the main unit or
f on the remote control to confirm the selection.
In full stop mode for simple MP3 discs, press STOP to view Folders Total (TF) and Track Total (TT) on the
current disc.
DELETING ALL FILES
Tips:
In navigation mode, press and hold DEL on the remote control to delete all the files on the USB
device. CAUTION: Please note that once all files have been deleted, they will not be retrievable.
• You can create a program of up to 32 tracks.
• Only the first 99 tracks from each disc can be programmed.
18.
19.

ADVANCED PLAYBACK CONTROLS ADVANCED PLAYBACK CONTROLS
SETTING UP A PROGRAM LIST TRACKS AND FILES NAVIGATION
1. In navigation mode, use the navigation buttons (refer to “navigation buttons” for details) to
select the track to the program list.
For audio CD’s:
2. Press ADD to save the selected track into the next available location.
1. When playback is stopped, press SELECT on the main unit or
f (navigation key) on the remote control.
The display shows “TRACK” and the current number of track on the disc.
3. Repeat steps 1 to 2 to store more tracks into the program memory.
2. Press
c or d (navigation buttons) on the remote control to select tracks.
PLAYING A PROGRAM LIST
FOR MP3/WMA DISCS AND USB DEVICES:
If you are not currently in program mode, press PROG and then
to start program playback.
While in PROGRAM stop mode, press
1. When playback is stopped, press to enter navigation mode. The display shows “TT” and the total
number of files on the disc or USB device.
to start playback.
2. Press SELECT on the main unit or
f(navigation buttons) on the remote control.
DISPLAYING PROGRAM LIST
3. Use
e f c d (navigation keys) on the remote control or SELECT or BACK on the main unit to
navigate through folders and files. Refer to the following for quick reference:
1. While the CD player is stopped, press PROG to enter program mode. Program playback
begins automatically after entering program mode.
To display a program list, press .
2. Press
c or d to view each track assignment in the program list.
DELETING FROM PROGRAM LIST
1. While in PROGRAM mode, press
c or d to select the program to delete.
2. Press DEL
3. Press
c or d to select “Yes” to delete or “No” to cancel deletion.
4.
Press fto confirm selection
DELETING THE ENTIRE PROGRAM LIST
1. While in PROGRAM mode, press
c or d to select the program to delete.
• BACK/ e - goes back a level
2. Press and hold DEL.
• SELECT/ f - enters selected folder; begins playback of the selected file and confirms selection.
• c - Selects previous file or folder
• d - Selects next file or folder
RENAMING FILES
You can view the folder or file names on the display while navigating through them. A folder icon also shows
next to the names to indicate you are browsing a folder.
You can rename files in the USB device.
1. In navigation mode, press PROG on the remote control to enter rename mode.
2. Press c or d to select the appropriate character
3. Press DEL to delete that character
4. Press f to confirm the current character and move to the next character.
5. Press PROG to confirm and store the new file name after editing the last character.
20.
21.

ADVANCED PLAYBACK CONTROLS TROUBLESHOOTING TIPS
Tips on Playback Sequence of Disc
• Check that the MP3/WMA disc is created with a single folder structure. Refer to the diagram
below for playback sequence details on multi-level folder structure.
• For example, folders and songs from level 2 are played before moving on to play folders and
songs from level 3.
Note:
• Folder playback sequence is indicated by the letters A to G
• Song playback sequence is indicated by the numbers (1 to 15) in front of the song
name.
22.
SOLUTION PROBLEM
PROBLEM SOLUTION
System Does Not CD Sound Skips
• Check power cord for a secure
connection.
• Clean the disc
Turn On
• Check the disc for warping,
scratches or other damages.
• Unplug the unit for a moment,
and then plug it back in.
• Check if something is
causing the system to
vibrate. Of so, move the
system.
• Check the outlet by plugging in
another device.
• Make sure the speakers are
at least 3 feet away on a
different surface from the
main unit.
There Is No Sound CD Button Does Not
• Increase the volume setting.
• Switch to another function
(Tuner) and then back to
CD function.
Respond Or Doesn’t
• Check connection to speakers.
Change When You
• Check that you have selected
the appropriate function: CD,
Tuner, USB or Aux
Press DISC SKIP
• Make sure mute is off
• Make sure headphones are not
plugged in.
• Check that the batteries are
properly installed.
Poor Radio Remote Control
• Check antenna connection.
Reception Does Not Work
• Move antenna • Replace weak batteries.
• Turn off nearby electrical
appliances, such as hair dryers,
vacuum cleaner, microwave
oven or fluorescent lights.
• Check that the system is
plugged into power source.
• Point the remote directly at
the system’s front panel.
• Move closer to the system.
• Remove any obstacles
between the remote and the
system.
CD Does Not Play
• Check that the CD is in the tray
• Check that the CD label is
facing upwards.
• Check that the PAUSE mode is
not on.
• Check that the CD function is
selected.
• Use CD lens cleaner.
• Clean the disc.
• Try another CD.
23.

MAINTENANCE
Disconnect the audio system from the power source before performing any maintenance.
CLEANING
Clean the exterior of the system using a soft dust cloth.
CD PLAYER
CAUTION! This unit operates with a laser and may only be opened by a qualified technicians to
avoid accidents.
HANDLING CD’S
• Do not touch the recorded surface. Hold the CD by the perimeter or by the perimeter and
inner edge.
• Do not affix labels or adhesive tapes to the label surfaces.
• Do not scratch or damage the label. CD’s rotate at high speeds inside the player.
• Do not use damaged (cracked or warped) CD’s.
CLEANING CD’S
• Dirty C D’s can cause poor sound quality. Always keep CD’s clean by wiping them gently
with a soft cloth from the inner edge towards the outer perimeter.
• If a CD becomes dirty, wipe it clean gently with a damp, soft cloth. Then wipe it dry with a
second dry, soft cloth.
• Do not use record cleaning sprays o r antistatic agents on CD’s. Also, never clean CDs with
benzene, thinner or other volatile solvents, which may cause damage to disc surface.
CD LENS CARE
When your CD lens gets dirty, it can also cause the system to output poor sounds quality. To clean
the lens, you will need to purchase a CD lens cleaner which can maintain the output sounds quality
of your system. For instructions on cleaning the CD lens, refer to the ones accompanying the lens
cleaner.
24.
 Loading...