

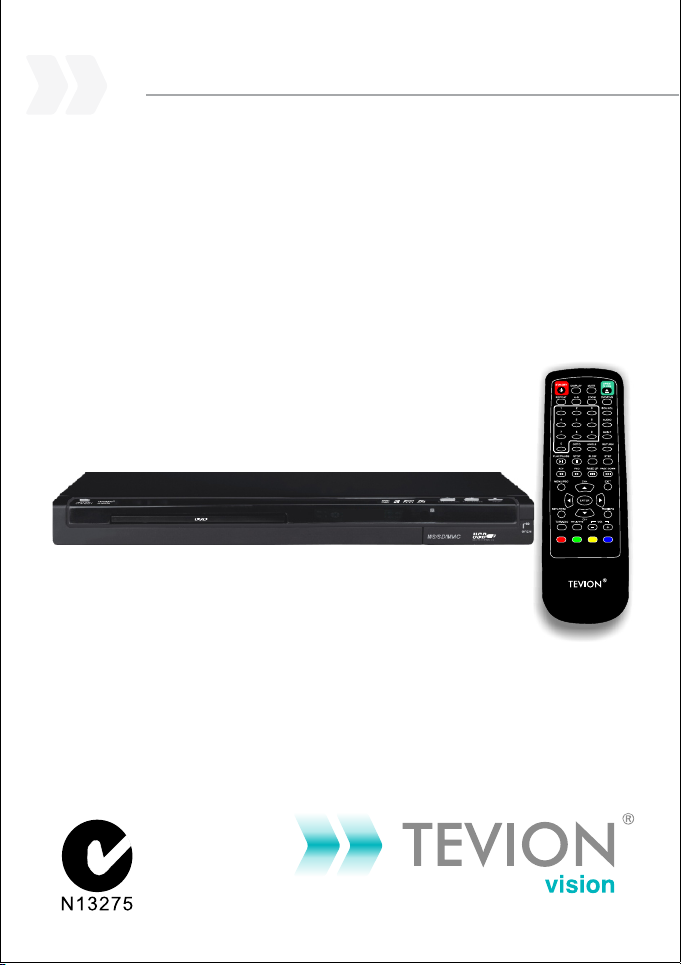
Digital Set Top Box with inbuilt DVD Player
Instruction Manual • Model Number AP-DVBT52
After Sales Support
TEL: 1300 886 649

DVD Player with DVBT
What your 1 year warranty means
Great care has gone into the manufacture of this product and it should therefore
provide you with years of good service when used properly. In the event of
date of purchase, we will remedy the problem as quickly as possible once it has
been brought to our attention. In the unlikely event of such an occurrence, or if
you require any information about the product please contact us via our after
sales support services, details of which can be found in this manual and on the
product itself.
After Sales Support TEL: 1300 886 649
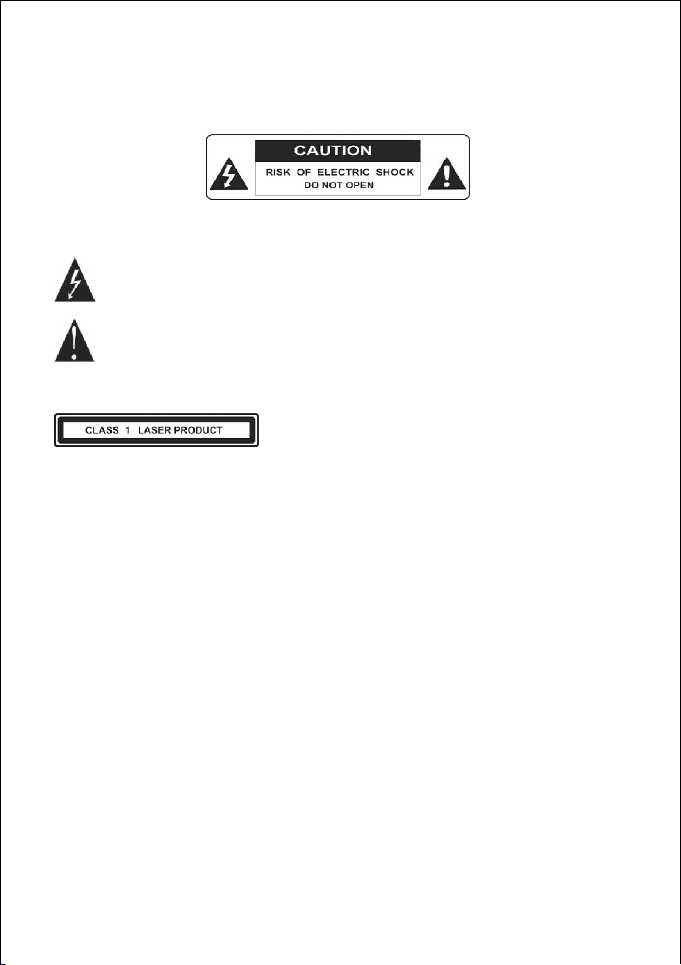
WARNING:TO REDUCE THE RISK OF FIRE OR ELECTRIC SHOCK,DO NOT EXPOSE THIS
APPLIANCE TO PAIN OR MOISTURE.
CAUTION:TO REDUCE THE RISK OF ELECTRIC SHOCK.DO NOT REMOVE COVER
(OR BACK).NO USER SERVICEABLE PARTS INSIDE.REFER SERVICING TO QUALIFIED
SERVICE PERSONNEL.
The lightening flash with arrowead symbol,within an equilateral triangle,is intended the
alert the user to the presence of uninsulated dangerous voltage within the products
enclosure that may be of sufficient magnitude to constitute a risk of electric shock to
persons.
The exclamation point within an equilateral triangle is intended to alert user to the
presence of important operating and maintenance (servicing) instructions in the
literature ac com pan yin g the ap pli anc e.
Note:Where the mains plug is used as the disconnect device, the disconnect devices shall remain
readily operable.
Laser product symbol:located on the rear panel of the unit,indicate this player is a class laser
product,only use weak laser and no hazardous radiation outside of the unit.
1.Read through this instruction manual before installation and use.
2.Do not touch the power plug with wet hand.
3.Switch off the main power when the unit is not in use.(Disconnect the power plug from the power
outlet when you do not intend to use the unit for a prolonged period of time.) Before moving the
unit,remove the disc from the unit tray first.
4.Do not open the cover or touch any of the components exposed out of the unit,only for qualified
technicians.
5.Do not expose the unit under direct sunlight or nearby objects that radiate heat to avoid damage
the unit.
6.Do not place the unit in moist and humid conditions,which effect the pick-up of the unit lead to out
of work.
7.Place the unit on a flat surface and ventilative condition.Please ensure the ventilation holes are
not covered to avoid overheating and malfunction.
8. Clear the panel and case with soft dry cloth only,do not apply any king of thinner,alcohol
osprays.
9.The apparatus shall not be exposed to dripping or splashing and that no objects filled with
liquids,such as vases,shall be placed on the apparatus
10.unplug the apparatus when not using for a long time oriented to disconnect from the Mains
power.
Macrovision:
This product incorporates copy right protection technology that is protected by method claims of
certain U.S patents and other in tel lec tua l propert y rig hts o wne d by Mac rov isi on Co rpo rati on,
and is intended for home and other limited viewing uses only unless otherwise authorized by
Macrovision Corporation.Reverse engineering or disassembly is prohibited.
DOLBY PRO LOGIC:
Manufactured under license from Dolby Laboratories.Dolby,Pro Logic and the double-D symbol
are trademarks of Dolby Laboratories.

1
1.Table of Contents
1 Table of Co nte nts
2 Front P ane l and Rear pan el
3 Remot e Con troller
4 CD&MP 3 Pla ying
4 Pi ctu re CD P lay back
5
Connecting a USB Memory Stick
5 Conne cti ng a me mor y card
6
System Setup
13 Trouble shooting
14 Technical Specification
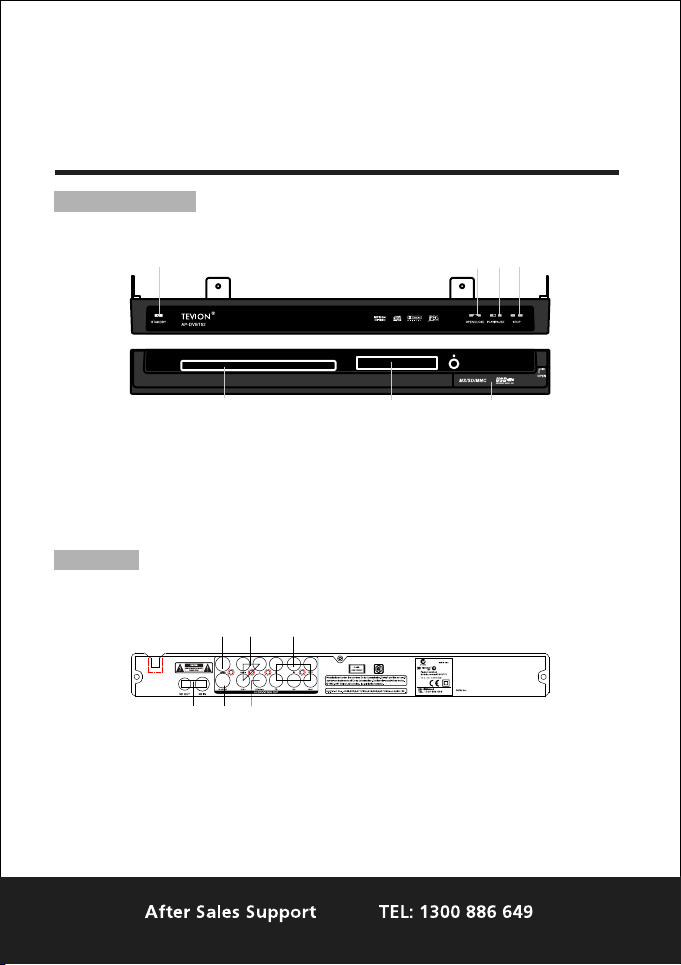
2.Fron t Pa nel and Rear panel
Front Panel
1
2 3
2
4
Rear panel
5
1.STANDBY
2.OPEN/CLOSE
3.PLAY/P A U S E
4.STOP
2 3 4
1
5 6
1.RF IN/OUT
2.VIDEO OUTPUT
3.YUV
COMPONENT
6
5.DISC TRAY
6.LED DISPLAY
7.MS/SD/MMC CARD&USB
4.5.1CH
OUTPUT
5.S-VIDEO OUTPUT
6.COAXIAL OUTPUT
7
/
4
HOME THEATRE
OUTPUT
3
3.Remo te Controller
1.DISPLAY
1
2
3
4
5
6
7
8
9
10
11
12
13
14
15
16
17
18
Note:
DVD Mode - DVD Player
DVB Mode - Set Top Box
PROG/EPG:Programming/Electronic Program Guide.Under DVD mode:pressPRGE/EPG’’to
Access interface for programming and editing, w her e dis c con tent c an be p rog ram med f or pla yin g
with di rec tio n and n umb er but ton s. Un der D VB mo de:i t is us ed to a cce ss Electr oni c Program
Guide(EPG).
SETUP/FAV: Un der DV D mode, i t perfo rms as Se t-Up fu nctio n Under D VB mode , it perf orms as FAV
function
PREVIOUS/PAGE UP/NEXT/PAGE DOWN:Under DVD Mode, it performs as PREVIOUS/NEXT function
Under DVB Mode, it performs as PAGE UP/PAGE DOWN function
COLOR KEYS:T e l e t e x t R e d / B l u e / G r e e n / Y e l l o w k e y .
Remote Control
Unless stated otherwise,the remote control can operate all the features of the DVD Player,always
point th e remo te control dir ectly a t the re mote s enso r on the fr ont of th e DVD Pl ayer, not t he TV.
Note:
The tray can only be opened in DVD status.
Remote control uses tw o AAA bat ter ies
29
30
31
32
33
34
19
20
21
22
23
24
25
26
27
28
2.STANDBY
3.A-B
4.REPEAT
5.NUMBER BUTTONS
6.GOTO
7.STOP
8.PLAY/PAUSE
9.FAST REVERSE/
10.UP/CH+
MENU/PBC
11.
12.ENTER
13.LEFT
14.SETUP/FAV
15.DOWN/CH-
16.TITLE/TTX
17.TV/RADIO
18.COLOR KEYS
19.MUTE
20.OPEN/CLOSE
21.ZOOM
22.DVD/DVB
23.SOURCE
24.AUDIO
25.SUBTITLE
26.ANGLE
27.RETURN
28.SLOW
29.STEP
30.PREVIOUS/PAGE UP/NEXT/PAGE DOWN
31.EXIT
32.RIGHT
33.PROG/EPG
34.VOLUME-/+
FAST F ORWARD

DVD OPERATIONS
4.CD&M P3 Playing
The player will automatically play the first song (file) in the menu.You can use number
keys to select your favorite song (file).Press arrow keys to select the file,and the
cursor will move at time,press ENTER to confirm,the player will play this song
selected by cursor in the file window.
PROG
1.Put in a MP3/CD format disc.
2.There is edit mode, at the right of the list, Press Enter to choose Edit mode, first,
then press Enter, to choose the song which need to program playing in the list,
please move the cursor to the Add to prog ram ,at the righ t sid e, then pres s
Enter,to confirm it, it's ok. Please move the cursor to the program list to choose
program playing.
3.To clear the program, it must be in the stop status and after chosen the song which
need to clear, then move the cursor to the Clear to program,then press Enter to
confirm it, it's ok.
5. P ictur e C D P layba ck
A picture CD has the s ize a nd shape of a re gul ar CD.
The max size of JPEG picture that can be supported:3840x3840 pixels.
Image rotation
There are three modes to rotate a picture:90 cw,180 cw,270 cw.Those operations
are Allowed only when a picture is being displayed normally and will be cancelled
automatically when a new picture is displayed.Press A NGLE repeatedly,you can
select the different rotation mode:Wipe down transition,wipe up transition,center
in transition,center out transition and so on.Image zoom.press ZOOM key under
any picture playback,may realize the picture zoom function.Zoom in to :1X,2X,3X.
4
After Sales Support TEL:1300 886 649

5
DVD OPERATIONS
6.Connecting a USB Memory Stick
1)Power-on the unit.
2)Make sure no disc has been inserted inside the tray.
3)Insert a usb key inside the connector.
4)Press the source key from the remote control to start.
Remark: Depending on the capacity of the device, the reading can take more than 1
minute before lauching the video.
-Once you have plugged your device to the unit, you may need to switch
on the USB device before it can operate.
-This unit does not support a direct USB connection with a computer. You
The unit cannot
read my USB
device.
7.Connecting a memory card
1)Power-on the unit.
2)Make sure no disc has been inserted inside the .
3)Insert a compatible memory card inside the connector.
4)The DVD player will automatically read the photos stored on the memory card.
Notice:Depending on capacity of the device,the reading can take more then 1
minute before lauching the video.
need to use a USB device, a MP3 player or a PMP (Portable multimedia
Player with hard disk).
-If you are using a USB external hard disk: you need to connect your
device simultaneously to an external power source and to the unit. If you
are using a self-powered PMP, make sure that the battery is sufficiently
loaded. -Check that the files system of your USB device is formatted into
the FAT or FAT 32 format. USB device formatted into NTFS are not
compatible with this unit.
Caution: if you attempt to modify your file system, formatting your device
will erase all data. Please refer to your USB device's instruction manual
first.
slot
My player does not
recognize my
Memory Card when
plugged to the DVD
player.
After Sales Support TEL:1300 886 649
Would you please refer first to the instructions describing how to
use memory cards with this machine.
Also check that the card's format is compatible with the machine
(eg. SD / MS / MMC).
If the problem still occurs: This product has been tested with
the majority of the market's memory cards. However, because
of the vast numbers of cards put into the market, we cannot
guarantee a full compatibility with all the memory cards.

6
DVD OPERATIONS
8.
System Setup
DVD menu setup
Press the SETUP button on the remote control,the SETUP MENU(main) will be
displayed.After accessing the setup menu,press the direction buttons for up and down
movement to select an item desired,then press the ENTER button to confirm.Press LEFT
direction button return to the menu of upper level.To exit the setup,press the SETUP button
again.In the SETUP MENU,you may choose any of the following Iptions as you like.
8.1 Language Setup
Select Language in the setup menu .
8.1.1 Language
Use this item to select the language.
8.1.2 Subtitle
This option provides the preset subtitle language.Follow the operating instructions stated
in DVD MENU SETUP in combination with the desired option.
8.1.3 Audio
Follow the operating instructions stated in DVD MENU SETUP in combination with
the desired option.This option provides the built-in disc dubbing language options.
8.1.4 DVD Menu
This option provides the movie me nu la ngu age o pti ons .Fo llo w the o per ating
instructions stated in DVDMENU SETUP in combination with the desired option.
8.2 VIDEO SETUP
Select Video in the setup menu.
8.2.1 Aspect Ratio
4:3 Choosing this setting if your DVD player is connected to a standard TV.You can fill the movie
to the entire screen of your TV.This might mean that parts of the picture(the left and right edges)
won’t be seen.
16:9:Choose this setting if your DVD player is connected to wide screen TV. If you choose
this setting and you do not have a wide screen TV,the images on the screen may appear
distorted due to vertical compression.
Notes:
The image display ratio is related to the recorded disc format.Some disc can not
display images in the aspect ration you choose.If yo u play a di sc re corded in 4: 3
format on a wide screen TV,black bars will appear on the left and right side of the
screen.You must adjust the screen setting depending on the type of the television
you have.
8.2.2 View Mode
With this option you can select the different video vision mode on the screen.
After Sales Support TEL:1300 886 649

7
DVD OPERATIONS
8.2.3 TV System
This product supports output of various systems,including Auto,NTSC,PAL.If your TV set has
only NTSC or P AL sy stem,the sc ree n wi ll bl ink a nd be come co lorless when a wrong system i s
selected.
Note:For more information of output format,refer to the instructions or your TV set.
(PAL is the standard for Australia)
8.2.4 Video Out
Selecting the Video Output setting to switch between different video outputs.
S-Video:Set the video output to S-Video output.
Component:Set the video output to interlacing component output.
P-Scan:Set the video output to progressive component output.
8.3 Audio setup
Select Audio in the setup menu .
8.3.1 Bass Management
T o e n a b l e o r d i s a b l e t h e B a s s M a n a g e m e n t d u r i n g o p e r a t i o n o f t h e p l a y e r .
On = Enable the Bass Management.
Off = Disable the Bass Management.
HOME THEATRE SETUP
8.3.2 Front Speakers
T o a d j u s t t h e f r o n t s p e a k e r s o u t p u t t o w o r k i n h a r m o n y w i t h t h e a u d i o e q u i p m e n t
(e.g.receiver, speakers) connected to the player.When Bass Management is On, the
following options are available:
Large : Supp ort s ignal freq uen cy lowe r tha n 200 Hz.
Small : Support s ign al frequen cy hi gher th an 20 0Hz .
If the connected speaker supports signal lower than 200Hz, it is best to select large;
If not, you shall select Small.
8.3.3 Center Speaker
Selection of Large or Small is same with that of front speaker. The speaker will have
no signal output if set to None.
Notes:
If the Subwoofer is On, Center is set to None or Small, and bass from the center
channel is redirected to the subwoofer. If the content contains a discrete subwoofer
channel, it is also sent to the subwoofer. If the Subwoofer is Off, Center is set to
None or small, and bass from the center channel is redirected to the left and right
channels. If the content contains a discrete subwoofer channel, it is discarded.
8.3.4 Surround Speakers
Selection of Large or Small is same with that of front speaker. The speaker will have
no signal output if set to None.
After Sales Support TEL:1300 886 649

8
DVD OPERATION S
Notes :
If the Su bwo ofer is on, Su rro und i s set to No ne or S mal l, and ba ss fr om th e surro und
chann els i s redirect ed to t he su bwoof er. If t he co ntent c ont ain s a discr ete s ubw oofer
chann el, i t is also sent t o the s ubw oofer. If th e Sub woofe r is Off, Su rro und is set to
None or S mal l, and bass fr om th e sur round c han nel s is redi rec ted t o the lef t and
right c han nels. If the c ont ent c ontai ns a di scr ete sub woo fer c hanne l, it i s dis carde d.
8.3.5 S ubw oof er
Selec tin g to enable/ dis able the sub woo fer o utput w hen 6 C han nel ana log o utp ut is
used.
The fol low ing option s are a vailable :
None Su bwo ofer is off. Bass f rom c ent er and surro und c hannels is r edi rected to th e
left an d rig ht channel s. If t he co ntent c ont ain s a discr ete s ubw oofer c han nel , it is
disca rde d.
Prese nt Su bwoofer is o n. Ba ss fr om cent er an d sur round c han nel s is redi rec ted t o
subwo ofe r.
If the co nte nt contain s a dis cre te subw oof er ch annel , it is a lso s ent to th e sub woo fer.
Note:
Bass Ma nag ement is not a vai lable for MP 3 or WM A bits tream ; t her efo re, it wi ll be
disab led d uring the pl ayb ack of those s tre ams .
8.3.6 C ent er Delay
Selec tin g the Center D ela y setting al low s the u ser to en abl e/d isabl e the c ent er
outpu t del ay.
8.3.7 S urr. D elay
Selec tin g the Surr. Del ay se tti ng allo ws th e use r to enab le/ dis able th e sur rou nd
outpu t del ay.
8.3.8 D igi tal output
Selec tin g the Digita l Out put s ettin g all ows t he user t o adj ust t he audi o out put
S/PDI F por ts to w ork in ha rmo ny wi th the au dio e qui pment (e. g.r eceiv er,s pea kers)
conne cte d to the playe r.
Off:D igi tal audio ou tpu t is di sable d.
PCM:S ele ct this opti on wh en yo u are goi ng to u se st ereo si gna ls( 2 chann els ).You
shoul d com bine this op tio n with the opt ion L owe r sampl ing r ate ,whic h we ex pla in
furth er on .
All:I f you s elect this o pti on th e playe r wil l use t he DVD or igi nal a udio tr ack .Us e this
optio n whe n you want to us e the D olby Digit al AC3 s ign als thr oug h the o ptica l or
coaxi al au dio output .
by
After Sales Suppo rt TEL:1300 886 649

9
DVD OPERATIONS
8.4 Rating Setup
Select<Rating> in the setup menu.
Note:Not all DVDS support ratings.
8.4.1 Parental Control
Selecting a Rating allows the user to set the parental control feature of the player
Select Parental Control, and press ENTER to change the different mode.
Note: Unlock the password before setting Parental Control.
8.4.2 Set Password
Password setting your four digit (password), then press ENTER
Use the keys to i npu t
to confirm.
Note: If you your pa ssw ord, pleas e use
unlock.
8.5 Misc Setup
Select MISC in the setup menu.
8.5.1 Use Default Settings
Reset setup data to factory default and re-load disc.
8.5.2 Screen Saver
On:Screen Saver function will be opened.
Off:Screen function will be closed.
9.
A f lo w ch ar t o f t he m en u:
forgot the factory set password is“0000”to
System Setup
Language
Langu age
Subtitle
Audio
DVD Menu
Video
Aspect Ratio
View Mode
TV System
Video Out
Audio
Bass Management
Front Speakers
Center Speaker
Surround Speakers
Subwoofer
Center Delay
Surr.delay
Digital Output
Parental Misc
Parental Contro l
Set Password Screen Saver
After Sales Support TEL:1300 886 649
Use Default settings

10
SET TOP BOX (DVB) OPERATIONS
10.First time installation
Ensure all the connections are as per the Quick Start Guide. An eas y ins tal lat ion
menu will be displayed where you can set different parameters and then run the
channel scan:
1 .OSD Language: Use t he ar row / b utt ons t o sel ect a l anguage for the on screen
display menu (OSD). Press to go to the next parameter.
2. Region: Use the arrow / buttons to select your country.Press to proceed.
CAUTION
If the wrong country is selected the channel scan may not detect all the channels
available.
3. Auto Scan : Press ok to start the automatic channel scan.When the scan is
completed,the receiver will enter the Viewing mode.
11. Receiver Settings
The first time installation procedure will allow the receiver to be used with its basic
functions however the receiver offers many more advanced features and options that are
illustrated in the following sections.
11.1 Password
To modify some setting and view certain channel locked by the end-user in the Channel menu ,a
password has to be entered. The factory set password is “0000” (four zeros) but it can be
changed by pressing MENU and selecting the setup menu and then Parental Lock.
CAUTION
Take note and keep the new password in a safe place,if you forget your personal
password,use the universal code “0786”to access the parental lock menu and set a
new password.
11.2 Channel Scan
The first time guided installation procedure runs a channel scan and saves any channels
available at that time,however later scans may become necessary if, for instance,a new
channel becomes available or when an existing channel changes frequency.To access the
channel scan function from the v iew ing m ode ,pr ess M ENU o n the r emo te co ntr ol to o pen
the main menu,select Installation and th en on e of th e following options:
1. Auto Scan:An automatic scan of all digital terrestrial channels received in the area by
your antenna Press OK on Search to start the sc an.
CAUTION
When a new automatic scan is run,the existing channel list will be lost.
2. Channel Scan (For Expert Users):Set all the parameters displayed on video related to the
Interested channel,then select Se arc h and p res s OK.
After Sales Support TEL:1300 886 649

11
DVB OPERATIONS
11.3 Time s ett ing
Press MENU on the r emo te co ntr ol to o pen t he ma in me nu. S ele ct Setup and t hen
Region and Time . Thr ee setting options are avail abl e und er GMT Usage i tem:
- By Region: Th e rec eiv er wi ll au tom ati cal ly se t the t ime a cco rdi ng to t he selected Region.
- Off: The user manually sets date and time.
- User Define: Ind icate the Greenwich Mean Time ( GMT ) tim e zon e .E. g.: Australia has a
time zone of +10 hour s(GMT+10:00)
During summer period, if applicable, activate manually the Summer Time para met er.
CAUTION
Some digital terrestrial services transmit information, which is strictly linked to the precise time
setting of the receiver.
11.4 Loa d Fac tory Defau lt
The default setting of the receiver can be re sto red b y a gen era l res et. To do s o, pr ess
MENU on the remote control, select Tools an d the n Load Factory Default .
CAUTION
A r es et w ill los e a ll pe rso na l o pt ion s and fe at ure s set ti ngs sa ve d i n t he re cei ve r.
11.5 Sof twa re Upgrade
When you enter SOFTWARE UPGRADE menu.
NOTE:In DVB mode,USB jack can only be used to upgrade.
12. The Menus
The main menu has 4 sub-menus:
- Channel: Channel l ist b row sin g and e dit ing . The ed it op tio ns in clu de or der , c han ge
name, lock and delete TV and radio channels.
- Installation: Use ful d uri ng in sta lla tio n. Fu nct ion s inc lud e aut oma tic a nd ma nual
channel scans.
- Setup: Th e gen era l receiver configuration . Opt ion s to pe rso nal ize a nd mo dif y sys tem
parameters, such as OSD language , type of TV system, country and time. system
password and to set the event timers.
- Tools : Pra cti cal t ool s like reset default setting s and s yst em in for mat ion v iew ing .
CAUTION
The menu is simple and easy to navigate. Use the arrows, ok and number buttons and
always follow the instructions given in the bottom toolbar.
A f lo w c ha rt of th e m en u:
After Sales Support TEL:1300 886 649

DVB OPERATION S
Mai n M enu
12
Cha nnel
TV Cha nnel Li st
Rad io C hann el L li st
Del ete Al l F av ori tes
Del ete Al l
Gro up Re nam e
Ins talla tion
Aut o Sc an
Cha nnel Sc an
Set up
OSD Lan gua ge
TV Syst em
Reg ion an d T ime
Tim er Set ting
OSD Set tin g
Par ental Lock
Tools
Rec eiver Inf orm atio n
Gam e
Loa d Fa cto ry De fau lt
Sof tware Upgra de
After Sales Suppo rt TEL:1300 886 649

13
13. Trouble shooting
Trou blesh ootin g
If you experience problems with this receiver or its intallation,please read carefully the relevant
sections of this User Manual and this Troubleshooting section.
Problem
The standby light
No signal found
No picture or sound
Mosaic blocks in picture
or picture freezes
Scrambled channel
message
Forgotten channel lock
code
No response to remote
control
After moving the
receiver to another
room, can’t receive
digital reception
Possible Cause
Mains lead unplugged
not lit
Aerial is disconnected
Aerial is damaged/
misaligned
Out of digital signal area
Tuned to digital tele text
channel
Aerial may not be
compatible/or damaged
Channel is scrambled
Receiver off
Handset not aimed
correctly
Front panel obstructed
Remote control batteries
are
inserted incorrectly
Handset batteries
exhausted
The aerial feed may come
through a distribution
system which may reduce
the digital signal now
received by the receiver
What to do
Check mains lead
Check aerial lead
Check aerial
Check with dealer
Retune to another
channel
Check aerial
Select an alternative
channel
Re-install channels to
Cancel channel lock
Plug in and turn on receiver
Aim handset at front panel
Check for obstructions
Check batteries direction
Replace remote control
batteries
Try a direct feed from the
antenna
After Sales Support TEL:1300 886 649

14.Technical Specification
14
Item
T u n e r
Demodulation
Connectors
Power
Display
Decoding
Other
Specification
Frequency Range
Input Impedance
Sig nal Input Le vel
Bandwidth
Demodulator
OFDM Modulation
Packet Carries
Guard Interval
RF IN
RF LOOPTHOUGH
COAXIAL
Composite Video
Compoent Video
S-Video
USB
Input
Consumption
Decoder Module
Resolution
Aspect Ratio
Video
Audio
Compliance
Sound mode
VHF: 174MHz to 230 MHz
UHF: 470 MHz to 860 MHz
75 Ohms unbalanced
-78~ -25 dBm
7/8 MHz
COFDM
2K, 8K FFT, SFN and MFN
2K/8K
1/4, 1/8, 1/16, 1/32
IEC 169-2 female connector
IEC 165-2 male connector
RCA,for SPDIF digital audio output
RCA
RCAX3
Mini DIN 4
2.0
USB
11 0 ~ 2 4 0 V 5 0 / 6 0 H z
20 W max
PA L , N T S C
720 x 576 (PAL); 720 x 480 (NTSC)
4:3(Letterbox, Pan&Scan), 16:9
MPEG2 Transport MP@ML
MPEG-2 Audio Layer I&II
ETSI EN 300 744 DVB-T Compliance
Right, Left, Stereo
Frequeny Response 2 0Hz-20KH Z(a t 1KHz 0 dB )
Signal-to Noisy
Ratio(Audio)
Audio Distortion+Noise
Audio Output(Analog
audio )
Video Output
90dB(at 1KHz 0 dB)
-60dB(at 1KHz 0 dB)
+0
2.0 Vrms
-1.0
Composite:1.0 0.2Vp-p
Load impedance:75 ,lmbalance,negative polarity
Supported Disc DVD/SVCD/VCD/CD/MP3/Picture/Photo CD
After Sales Support TEL:1300 886 649

NOTE:
26
After Sales Suppo rt TEL:1300 886 649
After Sales Support TEL: 13尲㈰就㈰ 886ᄲ

After Sales Suppo rt TEL:1300 886 649

After Sales Suppo rt TEL:1300 886 649
 Loading...