

Tevion ALCD3270 Instruction Manual
32" LCD HD Television
instruction manual
After Sales Support
TEL: 1300 366 144 WEB:
warrantyhelp@awa.com.au
With integrated digital tuner
Model Number ALCD3270

This page has been left blank intentionally.
1
Dear customer,
Thank you for choosing this digital LCD colour TV. We expect our product and service will
deliver many years of visual enjoyment. This manual is to guide you to set up and operate your
TV as quickly as possible. Please read all the safety and operation instructions carefully before
you begin, then follow the instructions carefully.
This is an IEC safety class I and must be grounded for safety.
WELCOME TO THE WORLD OF DIGITAL LCD COLOUR TV
SAFETY
Impor tant safeg uard ....... .... ... .... .... ... .... ....... .... ......3
Preparat ion for using your new TV.... ... ... ....... ... .......4
Sele cti ng a loc ati on f or t he T V.. .......... ... ....... 4
L earning about yo ur TV ... .......... ... ....... ... ..4 ,5
Connect ing Your T V.. ....... ... ... ....... ... ....6,7,8
Using the re mot e con trol... ... .......... ... .......... ... ...9,10
Preparin g the r emote con tro l for use..... ... ......9
Learni ng ab out the rem ote con trol... ... ... ......1 0
Using the TV ...... ... ... ....... ... .......... ... .......... ... ....... 11
Basic op era tions.. ... ... ....... ... .......... ... .....11 ,12
Menu syste m.. .......... ... ....... ... ... ....... ... ......13
Insta lling in tele vis ion c han nels...... ... ....14, 15
Adjustin g the pict ure ....... ... .......... ... .......... ... ....... ... ... 16
Controll ing t he audio se tti ngs....... ... ....... ... ... ....16
Controll ing t he system s ett ings...... ... .......... ... ..17
Lock Setti ngs .......... ... ....... ... .......... ... .......... ... .18
Screen Set tin gs..... ... ... ....... ... .......... ... .......... ..1 9
Ap p e ndix.. . ...... . . ...... . . ...... . . ...... . . ...... . . ...... . ...... . . .....2 0
Cleanin g and care. ... .......... ... ....... ... ... ....... ... ..20
Trouble sho oting.. ... .......... ... ....... ... ... ....... ... ....20
S pecific ati ons....... ... ....... ... ... ....... ... .......... ... ..21
Features:
<Digit al TV an d Anal og TV Display
This TV c an rec eive both digital and a nalo g sign als.
<Multi medi a func tions
With a D- sub1 5 pin VGA interface, th e TV can b e used as a high performa nce LC D disp lay for your
PC/No tebo ok.
<High qu alit y LCD di splay
High br ight ness, high contrast , wide v iewi ng angle, the line by lin e scan d igital display, rea l-co me bac k perfect
pictu re.
<Memor izin g syst em for Auto Searc h
With an a utom atic search functio n, it ca n install and memoriz e chan nels a utomatically; it ad opts a H F Digital
Frequ ency S ynth esizer.
<Multi -Mod e wide s creen display
16:9, 4 :3 ,Zo om 1, Zoom 2 modes fo r your s elec tion.
<Type D am plif ier, o utputting bet ter so und in a l arger dynamic range , ener gy saving and high effi cien cy.
<Elect rici ty saving mode
If ther e is no si gnal input, after 15 mi nute s, the TV will
<Multi medi a inte rface
1 D-sub 15 pin V GA input, 1 HDMI input, 1 V ideo i nput , 1 S-Video input , 1 comp onen t input, 1Video outpu t,
2 Audio i nput s, 1 Audio output.
go into a l ow ene rgy/ consuming sle ep/s tand by mode,
prolo ngin g the life of the TV and redu cing e lect ricity consum ptio n.
2

IMPORTANT SAFEGUARD
FIRE AND SHOCK PRECAUTIONS
the unit free from foreign objects, such as hairpins, nails, paper, etc. Do not put the set into a
bookcase or other enclosures in which it would be poorly ventilated. Do not place it on carpet or a
bed as low ventilation holes could become obstructed.
Do not set liquids, including flower vases and vessels filled with chemicals or water etc, on top of
the unit as liquid could get inside the unit. If a hazardous object falls inside the TV set, unplug
immediately and call 1300 366 144 for further instruction. When placing or moving the TV set, take
care to insure that the power cord is disconnected.
To avoid damage to the power cord, never allow heavy objects such as the TV set itself to be
placed on the power cord. Keep cord away from radiating appliances. Do not allow cord to become
knotted or tangled. Do not lengthen the cord. When removing the power plug from the socket,
always hold onto the plug, never pull by the cord.
This TV set must be connected to a mains power outlet with a protective earth connection.
The mains power outlet should remain readily accessible after installation.
Naked flamed sources, such as lighted candles are never to be placed on or around the TV.
A minimum distance around the TV for sufficient ventilation. (150mm recommended minimum)
WARNING
Do not remove the back cover of the TV set. Accidental contact with high voltage components
could result in electric shock.
If your set emits smoke or produces a strange sound or smell, immediately turn off your TV.
During vacation or other occasions when you will not be using the set for an extended period,
remove the power plug from the socket.
IMPORTANT INFORMATION
If a television is not positioned in a sufficiently stable location, it can be potentially hazardous due to
falling.
Many injuries, particularly to children, can be avoided by taking simple precautions such as:
Only using furniture that can safely support the television.
Ensuring the television is not overhanging the edge of the supporting furniture.
Not placing the television on tall furniture (for example, cupboards or bookcases) without
anchoring both the furniture and the television to a suitable support.
Not standing the televisions on cloth or other materials placed between the television and
supporting furniture.
Educating children about the dangers of climbing on furniture to reach the television or its controls.
Adequate ventilation must be provided to prevent heat build up inside the unit. Keep the inside of
3

You can o pera te you r TV by using the but tons o n the fr ont panel or on the r emot e cont rol. The terminals on t he
backs ide pr ovid e all the connect ions y ou wil l need to connect other e quip ment t o your TV.
1. Plac e the TV o n a sturdy platform (aw ay fro m dire ct sunlight for o ptim al vie wing).
2. Plac e the TV f ar enough from the wall s to all ow pro per ventilation. In adeq uate ventilation ma y caus e over heating
which m ay dam age th e TV.(150mm min imum r ecom mended distance aro und a co vere d enclosure)
Note:
Pleas e cont act th e retail dealer f or wal l mounting.
Selecting a location for the TV
Preparation for using your new TV
Learning about your TV
Front Controls
4
NO. Com pone nt Component De scri ptio n
1 POWER S witc h Press to turn the m ain po wer ON or OFF.
2 Remot e sens or Receives sig nals f rom th e remote contro l. Do no t bloc k.
3 (powe r stan dby ) button Press to tur n your T V on or off (standby mode ).
4 CH butto n Pres s to change the cha nnel u p.
5 CH butto n Pres s to change the cha nnel d own.
6 VOL but ton Pr ess to decrease t he vol ume.
7 VOL butt on Pre ss to increase th e volu me.
8 SOURC E butt on Press to selec t the si gnal s ource for your TV .
9 MENU bu tton Press to activat e the on -screen display (OS D).
(NOTE: POWER Button switch location on bottom of front cabinet.)
USB H DMI PC/ DVI AUDI O IN VGA
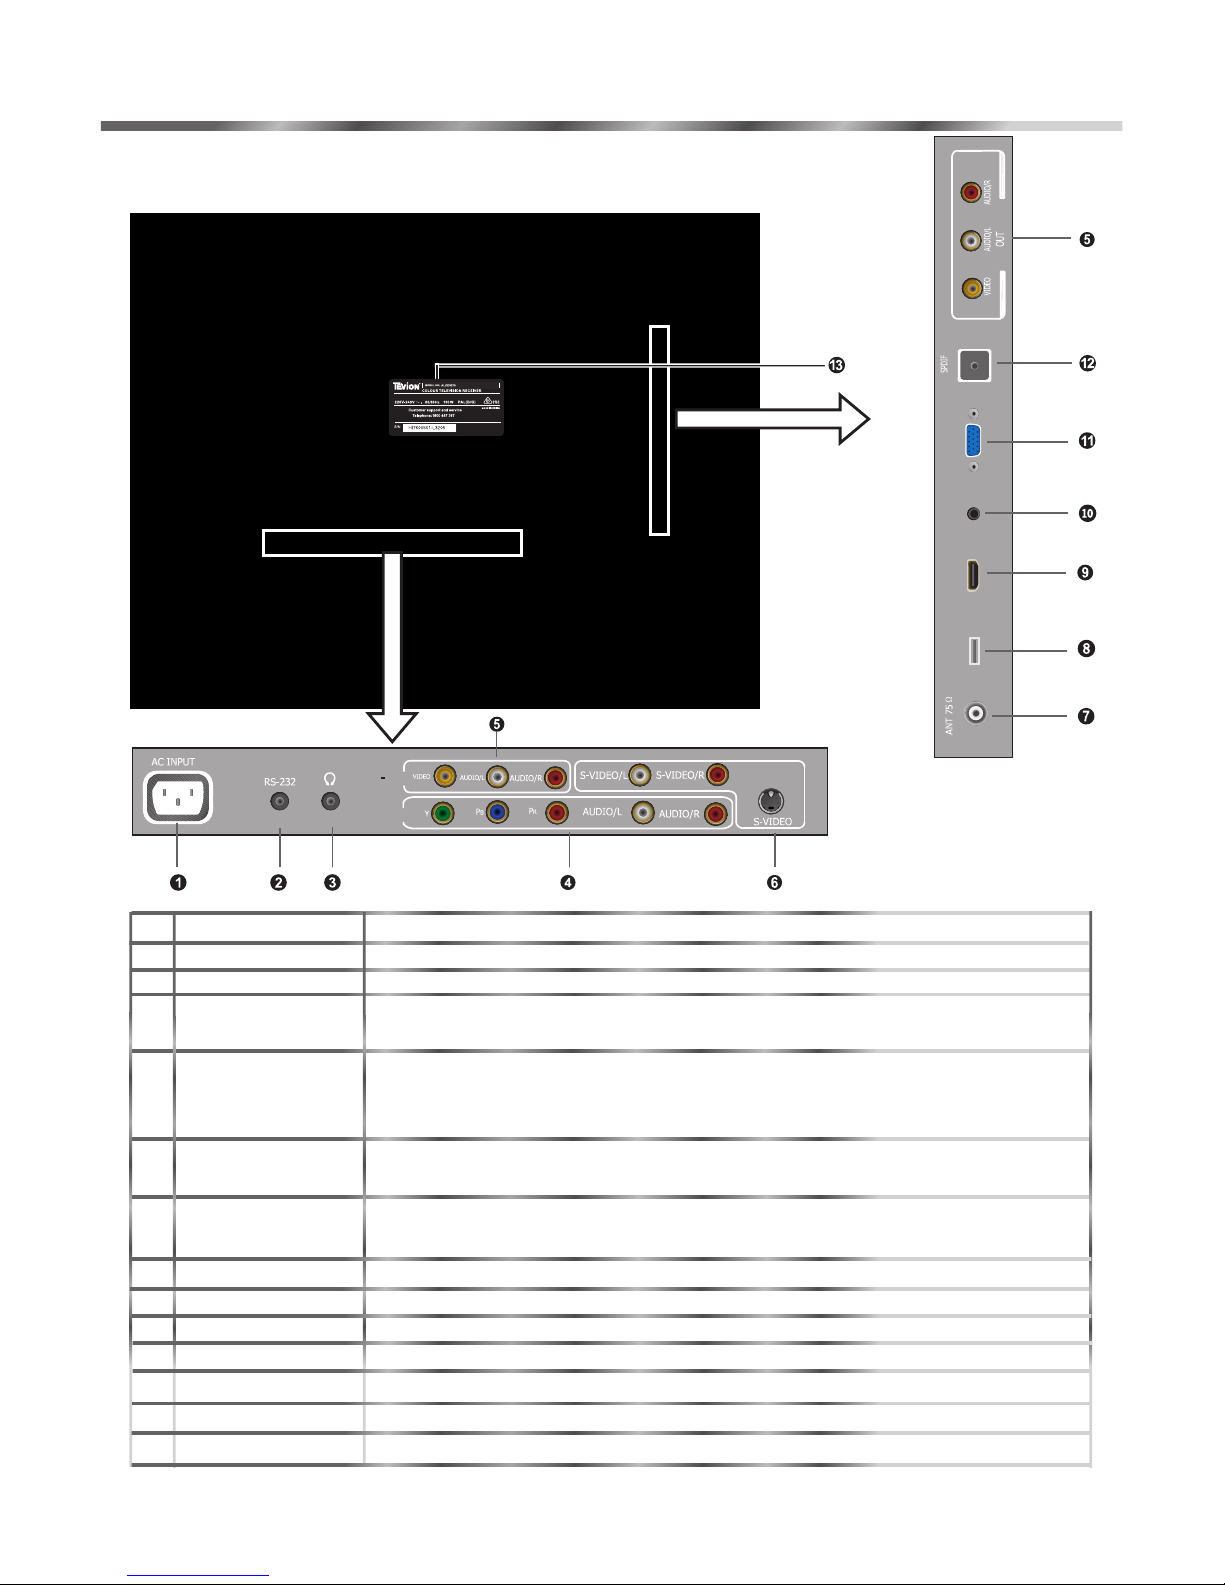
Back Connections
NOTE:
The above picture is for reference only, please refer to the actual TV to determine their appearance.
NO. Connector Desc rip tio n
1 AC INPUT Connect the powe r cor d to th is co nnector.
2 RS-232 For service purp ose s ONL Y (wi ll not support cons ume r pro duc ts)
Plug headphon e int o thi s jac k. Wh en headphones are p lug ged i n, no s ound
3 Headphone jac k
come s fro m the headphones.
4 Component Vid eo Co nne ct Co mpo nent video device s, su ch as a D VD pl aye r / PVR / HDDVD
input (1) /BluRay to thes e jac ks. ( Rec omm ended for superio r pic tur e qua lity)
Connect stand ard v ide o/a udi o cables to these jac ks. T he ro w of ja cks u nder
5 A/V input(1)/ out put (1)
the un it ar e inputs (Video/A udi o In) The r ow of jacks on the side o f TV ar e
outp ut ja cks (Video/Audi o Out )
6 S-Video (1) Connec t an S- Vid eo de vic e to this jack, inser tin g the l eft a nd ri ght audio lead s
into S -VI DEO/L and S-VIDEO /R
7 Antenna input Conn ect ion f or th e Aer ial/Antenna.
8 USB Connector For se rvi ce pu rpo ses O NLY. (Will not supp ort c ons ume r pro ducts)
9 HDMI(1) Connect an HDMI d evi ce to t his j ack.
10 PC/DVI AUDIO i npu t Con nec t a aud io from a computer to t his j ack .
11 VGA video inpu t Con nec t the v ide o fro m a computer to this ja ck.
12 Optical audi o out put C onn ect a n optical audio dev ice t o thi s jac k.( only availab le in D igi tal T V or HD MI modes)
13 Rating Label Mode l num ber a nd se ria l number found h ere
Preparation for using your new TV
5
Com mpone nt IN
AV IN

Connecting your TV
Preparation for using your new TV
6
White
Yellow
Red
White
Red
Green
Blue
Red
White
White
Red
Red
Part: 1
Part: 2
NOTE: colors for inputs and cables must correspond on both devices.
USB H DM I PC /D VI AU DIO IN VG A
AV IN
Com mpone nt IN
Whenever you connect an audio system to your set ensure that all elements are switched off.
When connecting an external device, match the color of the connection terminal to the cable.
NOTE: colors for inputs and cables must correspond on both devices.
 Loading...