


7” Digital Photo Frame
User Manual
After Sales Support
Having purchased a TEVION Digital Photo Frame you can rest assured in
the knowledge that in addition to your 3 year parts and labour warranty
you have the added peace of mind of dedicated help lines and web
support:

Helpline No.: UK/N. Ireland: 08 458 684 540 Rep. of Ireland: 076 60 600 29 2
Web Support: www.unisupport.net P50505
Contents
Page
03 Introduction
03 General Information and safety Instructions
03 Assembly and Parts List
04 Getting Started
04 Features
04 Instructions
17 FAQ
18 Other Useful Information
19 Warranty Card
20 Fault Report Card
Helpline No.: UK/N. Ireland: 08 458 684 540 Rep. of Ireland: 076 60 600 29 3
Web Support: www.unisupport.net P50505
INTRODUCTION
With this 7” Digital Photo Frame you can listen to music, watch video files and view digital photos.
You do not need a PC or a Laptop in order to use the photo frame.
The AV output enables you to view photos on your TV.
The photo frame supports the most common memory cards in the market: SD, MMC, MS.
GENERAL INFORMATION AND SAFETY INSTRUCTIONS
Keep this user manual for future reference.
Keep the photo frame away from small children.
ASSEMBLY AND PARTS LIST
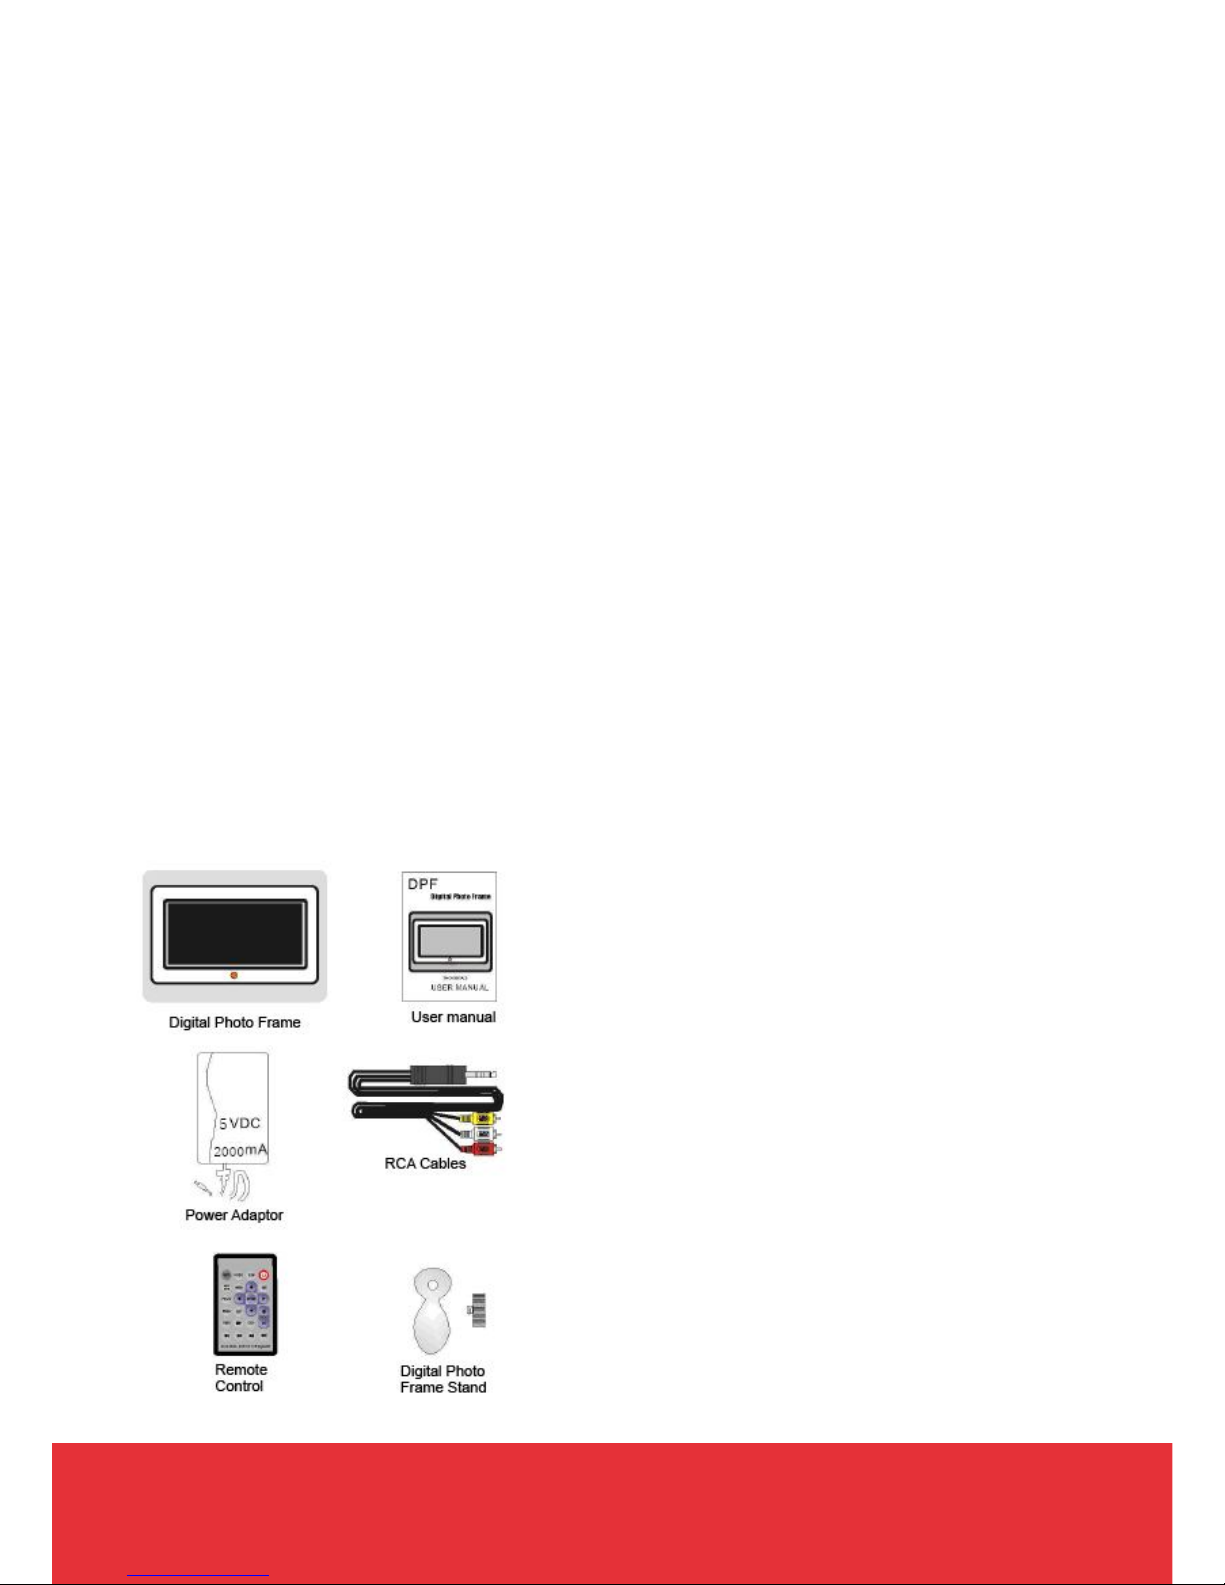
Pack contents
Please make sure that this package includes the following items:
Digital Photo Frame
Power adaptor
RCA cables
Remote control
Photo frame stand
User manual
l
Helpline No.: UK/N. Ireland: 08 458 684 540 Rep. of Ireland: 076 60 600 29 4
Web Support: www.unisupport.net P50505
GETTING STARTED
Warning: Do not insert the Photo Frame’s DC adaptor into a wall outlet until all
connections have been made.
Turn on the photo frame on the back. You can now insert either a memory card or a USB stick
and start viewing your pictures.
FEATURES
Built-in 16M flash
View pictures and slideshows with background music
Scrolling through your media card photos at user selected intervals. Automatic slideshow
with multiple transition effects
AV output to display photos and slideshow on TV-sets
AC power
Multi-language: English, French, Dutch, Italian, Portuguese, Polish, Spanish and German
Video systems supported: NTSC/PAL
E-Book function support
Built-in double audio speakers
INSTRUCTIONS
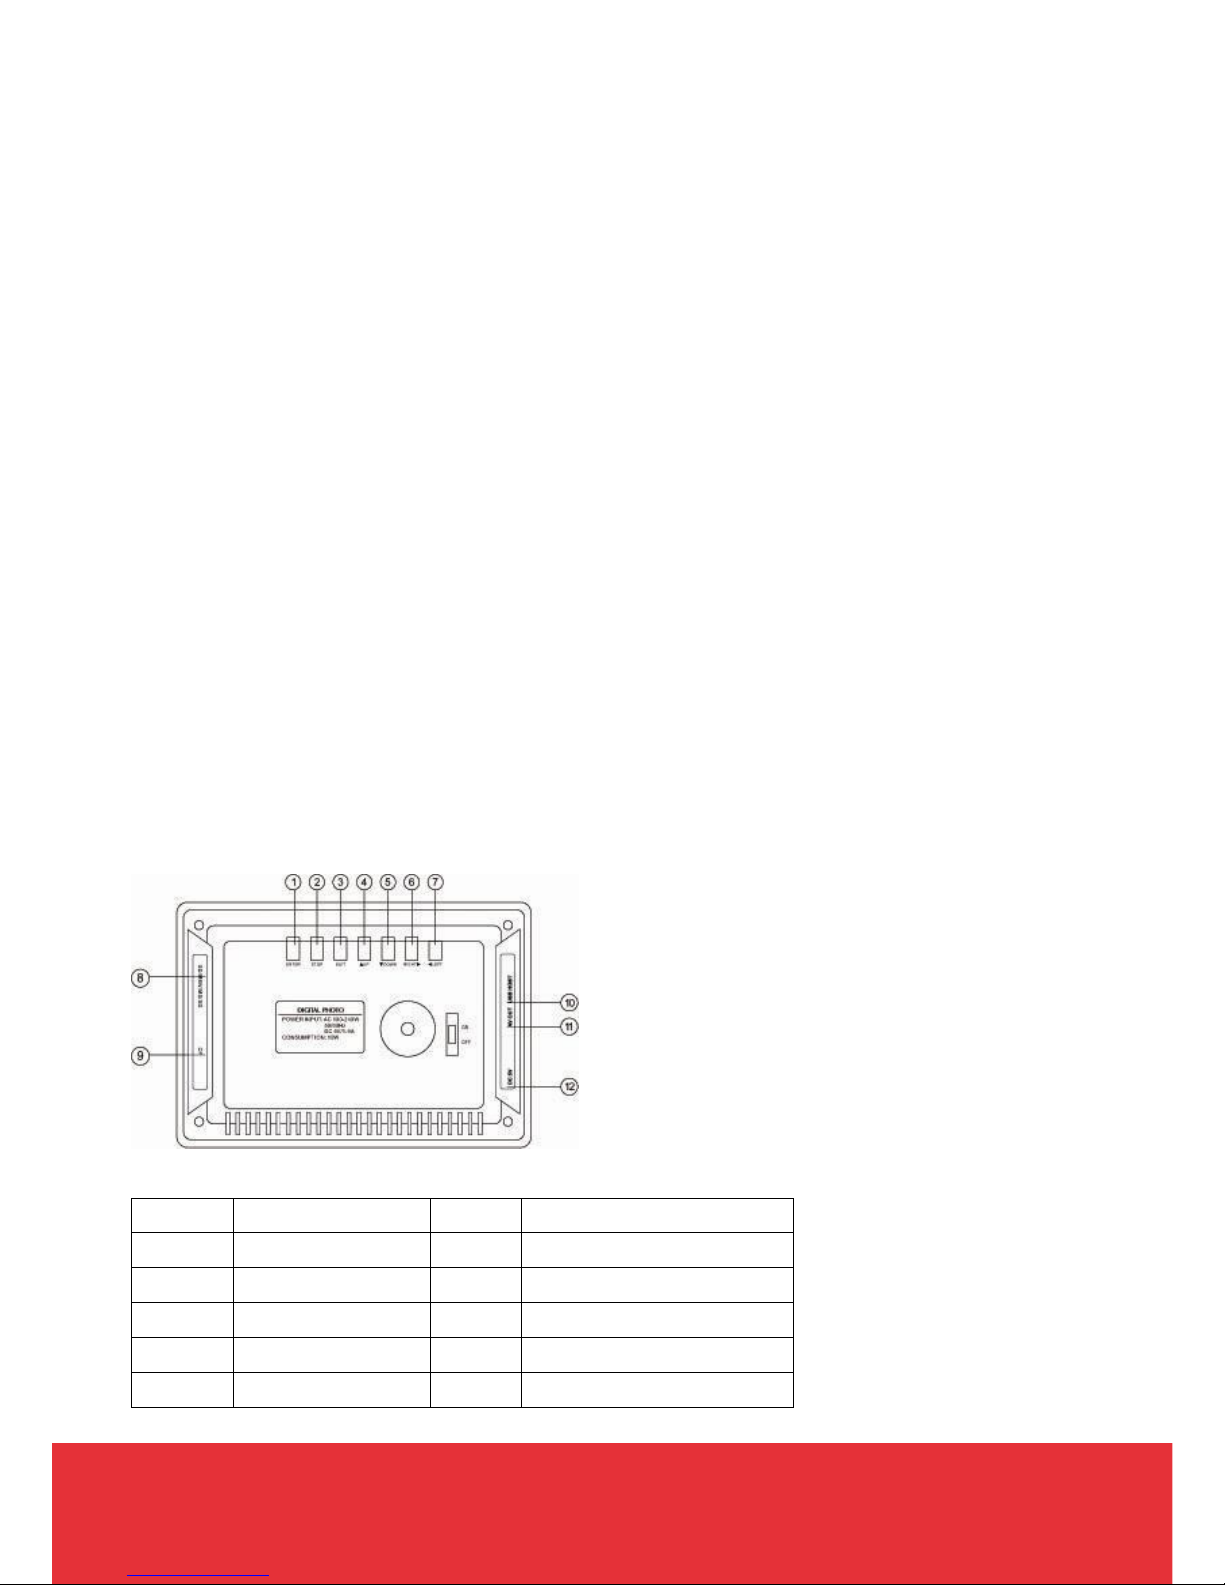
Digital photo frame diagram:
1 Enter 7 Up
2 Menu 8 SD/MMC/MS Card slot
3 Stop 9 CF Card slot
4 Right 10 USB port
5 Left 11 AV-Out
6 Down 12 DC In
Helpline No.: UK/N. Ireland: 08 458 684 540 Rep. of Ireland: 076 60 600 29 5
Web Support: www.unisupport.net P50505
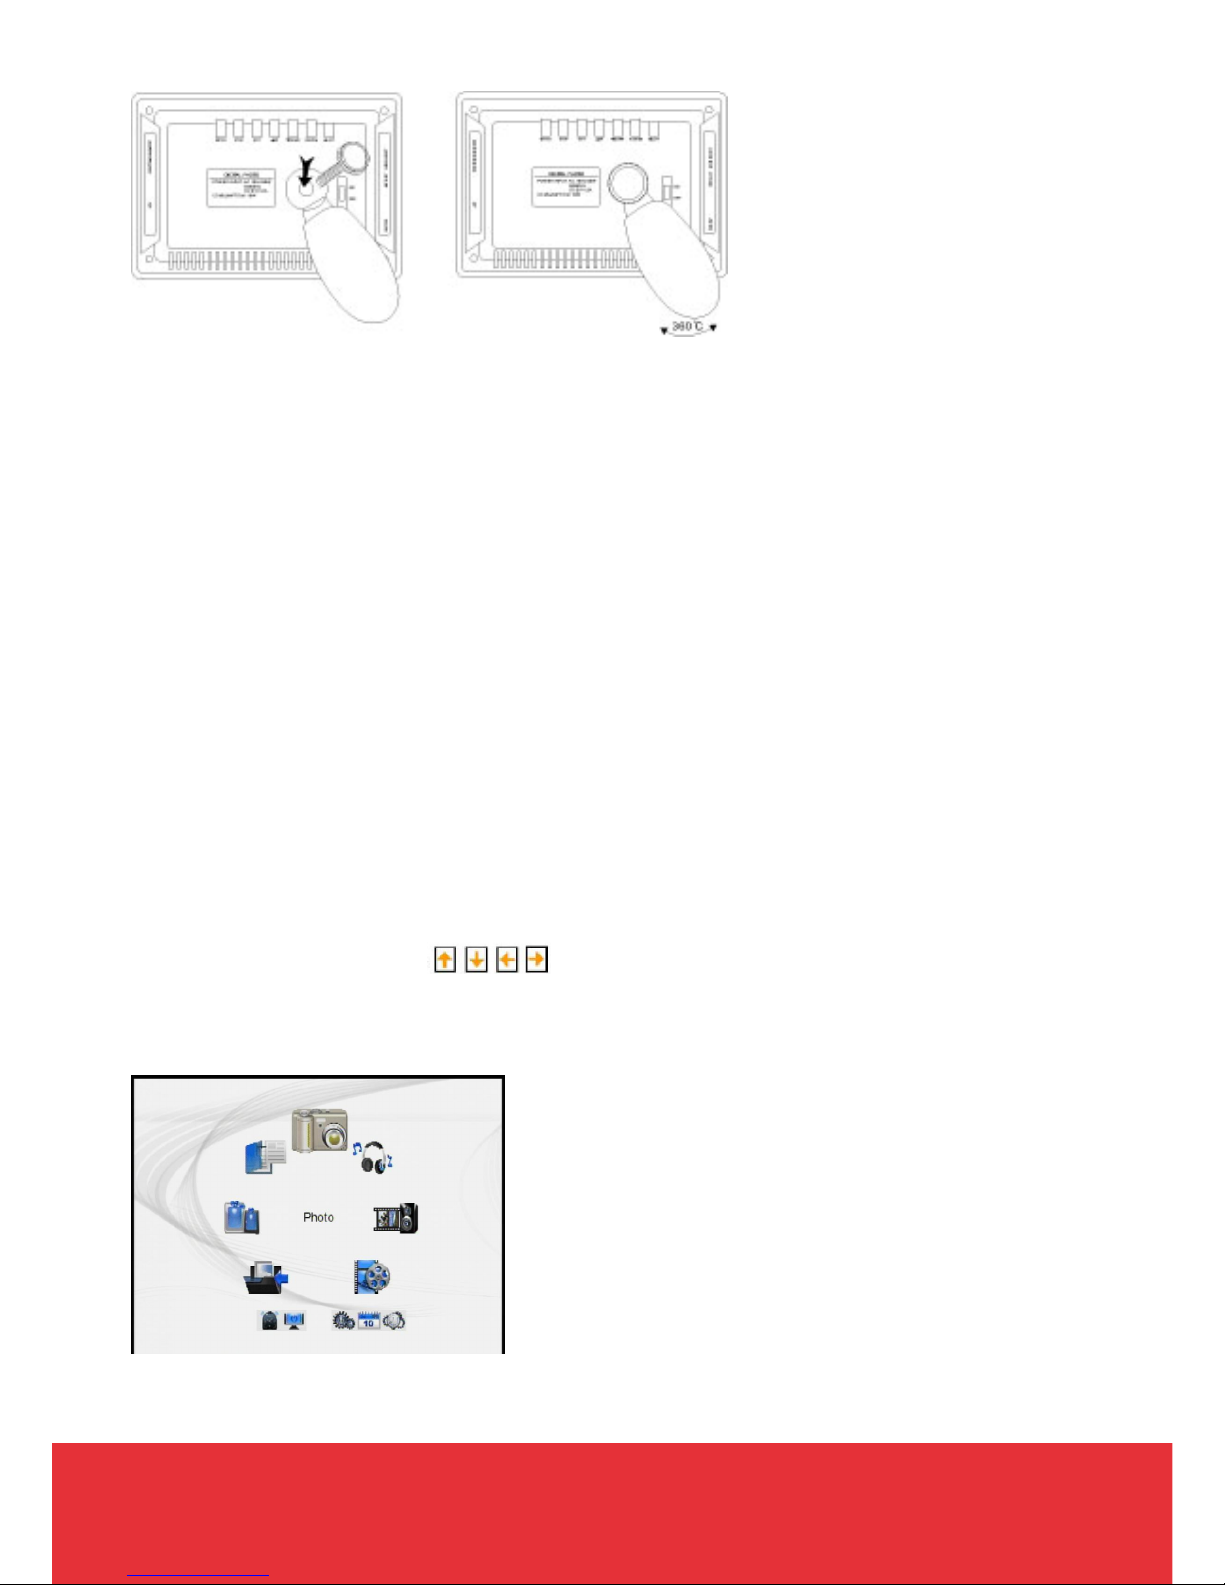
Setup the frame
STEP 1 Attach the frame stand to the rear panel of the frame, tighten the screw slightly whilst
holding the photo frame stand, then adjust the stand to the desired position. Finally
fasten the screw to hold the stand in place.
STEP 2 Plug the adaptor into the AC outlet, and then insert the DC plug into the frame.
STEP 3 Switch the picture frame ON
Power on/off
POWER ON: Switch the power button to the【ON】 position. The LCD panel will light on.
POWER OFF: Move the power button to the 【OFF】 position. The LCD panel will light off and
the unit will turn into standby status.
Note: If the frame can’t read the memory card or USB key, the photo frame will
automatically initiate a slideshow with the manufacturer’s pre-loaded pictures.
FUNCTIONS
You can use the cursor keys to change selection, and then press either ENTER or
PLAY to enter the selected function mode.

Helpline No.: UK/N. Ireland: 08 458 684 540 Rep. of Ireland: 076 60 600 29 6
Web Support: www.unisupport.net P50505
1. Setup
In the main MENU, select SETUP, and press the ENTER key to enter the setup menu
Interval time between picture
5sec, 10sec, 15sec, 30sec, 1min, 3min
Transition effect: select transition effect
Browse: select browse mode in PHOTO mode,
Thumbnail or File Manager
File Manager mode
Thumbnail mode Auto-Play Music:
Auto plays music when the music button on
the remote control is pressed. To enable this
mode choose MENU and then ON.

Helpline No.: UK/N. Ireland: 08 458 684 540 Rep. of Ireland: 076 60 600 29 7
Web Support: www.unisupport.net P50505
Auto-Play photos: Auto plays photo slideshow
when the photo button on the remote control
is pressed. To enable this mode choose
PHOTO and then ON.
Auto-Play Movie: Auto plays video the files
when the movie button on the remote control
is pressed. To enable this mode choose
MOVIE and then ON.
Display setup
TV standard Brightness and contrast control
OSD language Repeat mode
Restore default settings

Helpline No.: UK/N. Ireland: 08 458 684 540 Rep. of Ireland: 076 60 600 29 8
Web Support: www.unisupport.net P50505
2. PHOTO
In the main menu, select PHOTO, and then press either ENTER or PLAY. The system will auto
load the USB media or card. If there is no media card inserted the system will return to the main
menu.
If you select Auto-play ON the system enters into auto play photo.
3. MUSIC
In the main menu, select MUSIC, and then press either ENTER or PLAY. The system will auto
load the USB media or card. If there is no media card inserted the system will return to the main
menu.
If you select Auto-play ON the systems enter into auto play music.

Helpline No.: UK/N. Ireland: 08 458 684 540 Rep. of Ireland: 076 60 600 29 9
Web Support: www.unisupport.net P50505
4. PHOTO + MUSIC
In the main menu, select PHOTO+MUSIC, and then press either ENTER or PLAY. The system
will auto load the USB media or card. If there is no media card inserted the system will return to
the main menu.
5. MOVIE
In the main menu, select MOVIE, and then press either ENTER or PLAY. The system will auto
load the USB media or card. If there is no media card inserted the system will return to the main
menu.

Helpline No.: UK/N. Ireland: 08 458 684 540 Rep. of Ireland: 076 60 600 29 10
Web Support: www.unisupport.net P50505
If Auto-play is ON, a video will be played when you press the “Video” button.
6. E-BOOK
You may read an E-book with your Tevion 7" Photo Frame as it is set up to read .txt files
formats. To view a file select E-BOOK from the main menu. Choose the file that you would like to
read and then press ENTER or PLAY. The system will open the file in a book format for you to
read.

Helpline No.: UK/N. Ireland: 08 458 684 540 Rep. of Ireland: 076 60 600 29 11
Web Support: www.unisupport.net P50505
7. CALENDAR
To setup or access the calendar function select CALENDAR from the main menu with either
ENTER or PLAY. The system opens the calendar.

Helpline No.: UK/N. Ireland: 08 458 684 540 Rep. of Ireland: 076 60 600 29 12
Web Support: www.unisupport.net P50505
8. CLOCK
Select CLOCK in the main MENU, and then press either the ENTER or the PLAY key.
8.1 Display
Clock only Clock & calendar
8.2 Set time
8.3 EXIT Return to main MENU

Helpline No.: UK/N. Ireland: 08 458 684 540 Rep. of Ireland: 076 60 600 29 13
Web Support: www.unisupport.net P50505
9. ALARM
9.1 Enable or disable the alarm
9.2 Set time
Set the alarm time
To stop the alarm press a key
9.3 EXIT
Press EXIT in order to return to the main MENU.

Helpline No.: UK/N. Ireland: 08 458 684 540 Rep. of Ireland: 076 60 600 29 14
Web Support: www.unisupport.net P50505
10. AUTO-POWER
Select Auto-Play menu in main MENU, and then press either the ENTER or the PLAY key.
10.1 Power On enables
The function enables or disables the Power On timer
10.2 Power Off enables
The function enables or disables the Power Off timer
10.3 Set time
The function sets the Power On and Power Off timers
10.4 EXIT Return to main MENU

Helpline No.: UK/N. Ireland: 08 458 684 540 Rep. of Ireland: 076 60 600 29 15
Web Support: www.unisupport.net P50505
11. EDIT
Select EDIT in main MENU and then press either the ENTER or the PLAY key. In this mode, you
can copy photos from media to the built-in flash, or delete photo files from the built-in flash.
11.1 Copy The feature can copy photo files from media to the built-in flash
11.2 Delete The feature can delete photo files from the built-in flash

Helpline No.: UK/N. Ireland: 08 458 684 540 Rep. of Ireland: 076 60 600 29 16
Web Support: www.unisupport.net P50505
REMOTE CONTROL
Connect to TV set
Switch off the photo frame before connecting to a TV set.
Plug the RCA cables into the TV set (yellow/video, red/audio right, white/audio left), and then
connect it to the photo frame (AV OUT SOCKETS).
Switch on the photo frame, and set a correct TV input source.
Note: If the TV set cannot display pictures, you should check and set correct TV format!

Helpline No.: UK/N. Ireland: 08 458 684 540 Rep. of Ireland: 076 60 600 29 17
Web Support: www.unisupport.net P50505
FAQ
Q: I cannot switch on the photo frame:
A: Check the AC outlet. Check the adaptor plug. Try to insert another memory card
Q: Auto power off:
A: Check the auto power off function
Q: No sound:
A: Adjust the volume. If the photo frame is connected to a TV or other AV terminal, you should
unplug it.
Q: Noise.
A: The audio file may be corrupted. Try to play another file.
Q: Panel too dark:
A: Adjust the contrast and brightness.
Q: Can’t read card:
A: Check with another card. The photo frame only supports up to 4GB cards.
Q: Can’t play file:
A: Check if the files are encoded using the supported formats.
Q: “NO FILE”:
A: Try another card. Re-insert. Bad file in card. Return to main menu after [loading]: repeat
press [ENTER] KEY or [PLAY/PAUSE] button; check the memory card.

Helpline No.: UK/N. Ireland: 08 458 684 540 Rep. of Ireland: 076 60 600 29 18
Web Support: www.unisupport.net P50505
OTHER USEFUL INFORMATION
Specifications
7” 16:9 grade A analogue TFT panel Digital Photo Frame
Resolution: 480 x 234
16 : 9 aspect ratio
Brightness: 350 cd/mm. Contrast: 300: 1
Built-in card reader slot: SD/MMC/MS up to 4GB
AV out function
USB 2.0 jack
Built-in speaker (2x1W)
Supported video formats: MPEG-1, MPEG-2, MPEG-4, AVI, VOB, DAT
Supported audio formats: MP3, WMA
Supports photo format: JPEG
Support automatic slideshow
Calendar function
Supports Multi-languages OSD: English, French, Dutch, Italian, Portuguese, Polish,
Spanish and German
Power On/Off switch
Power supply: DC 5V input 100-240V
Power consumption: 9W
Package contents: Photo Frame, Remote Control, AC adaptor, RCA cables
Cleaning of the frame
Switch off the power and remove the DC plug before cleaning the photo frame.
Use only a soft cloth to clear the photo frame.
Note: If you remove the DC plug or switch off the photo frame, the time will not be updated.
You must then carry out the setup procedure again.
Disposal
Electrical and electronic equipment (EEE) contains materials, parts and substances,
which can be dangerous to the environment and harmful to human health if waste of
electrical and electronic equipment (WEEE) is not disposed of correctly.
Equipment, which is marked with the WEEE logo (as shown on the left), should not be
thrown away with your household waste. Contact your Local Authority Waste Disposal
Department, as they will be able to provide details of the recycling options available in
your area.

WARRANTY CARD
Congratulations! You have made an excellent choice with the purchase of this quality product. Our
commitment to quality also includes our service. Should you, contrary to expectations, experience
defects due to manufacturing faults during private use within 36 months of the date of purchase we
shall be liable for warranty in accordance with statutory warranty regulations provided that:
- the device was not put to any use other than the intended
- was not overloaded
- was not used with the wrong accessories
- repairs were not carried out by any other than the authorized workshop
This warranty card is only valid in connection with the receipt. Please keep both in a safe place. This
warranty does not affect your statutory rights.
This purchase is guaranteed for a period of three years beginning on the day of the purchase. Keep
your purchase receipt safe as proof of date of purchase. The guarantee can only be extended for the
duration of any repair required.
During the warranty period please contact the web-address or our after sales support number stated
on the back cover of this document for returning of defective devices. We will, at our discretion, either
repair or exchange the device in accordance with warranty legislation.
Please enclose the following when sending your product in for repair:
1. Receipt (proof of purchase).
2. This warranty card with the fault report card overleaf complete with your name, contact
details and fault description.
If the original receipt is not enclosed the repair will be charged in all cases.
After the warranty has expired you can still send defective devices for
repairs by contacting the web-address stated on the back cover of this
document. Quotes as well as repairs after the warranty period are to be
paid for in all cases.
Ensure that the product is sent well packed as no responsibility can be
accepted for items lost or damaged in transit.
This warranty does not affect your statutory rights.
P50505
Digital Photo Frame

1
FAULT REPORT CARD
Name
Address
E-mail
Daytime Tel No
Fault Description
RMA
If you have previously contacted our helpline please provide us with the reference (RMA) number you
were issued.
In order to deal with your enquiry as quickly and efficiently as possible, we ask you to send your
enquiry by e-mail. Do not forget to include you name, address and a daytime telephone number.
Alternatively, you can contact our service hotline on the number below:
UK/N. Ireland: 08 458 684 540
Rep. of Ireland: 076 60 600 29
WWW.UNISUPPORT.NET
P50505
Digital Photo Frame
 Loading...