

Page 1

Page 2

Contents.
1. Welcome 2
2. Safety Information. 3
3. Safety Instructions
4
4. Features 5
5. Before you start 6
6. Inserting batteries in Remote Control
6
7. Remote Control
7
8. Controls and Connections 8
9. Display 9
10. Connection to external apparatus 10
11. Getting Started 13
12. Initial Setup 14
13. DVD,HDD & USB Playback (Basic) 16
14. DVD,HDD & USB Record (Basic) 18
15. Instant Recording
20
16. DVD,HDD & USB Operation (Advanced) 21
17. Setup
35
18. TV operation (Advanced)
31
19. Trouble Shooting Guide
38
20. Specification
39
21. Warranty
HELPLINE No UK / Northern Ireland 01422 26 32 98. Rep . Ireland No 1800 88 23 90.
WEB SUPPORT. www.ekey.co.uk
Model number 4683
Page 3

Welcome.
Congratulations on choosing to buy a Tevion product. By doing so you have now
the assurance and peace of mind that comes with purchasing a product made by one
of Europes leading manufacturers.
All products brought to you by Tevion are manufactured to the highest standards of
performance and safety, and, as part of our philosophy of customer service and
satisfaction, are backed by our comprehensive 3 Yeat warranty.
Please fill in and return the Warranty Card to the address provided.
We hope you will enjoy using your purchase for years to come.
HELPLINE No UK / Northern Ireland 01422 26 32 98. Rep . Ireland No 1800 88 23 90.
WE
B SUPPORT. www.ekey.co.uk
Model number 4683
R
R
Page 4
Safety Information
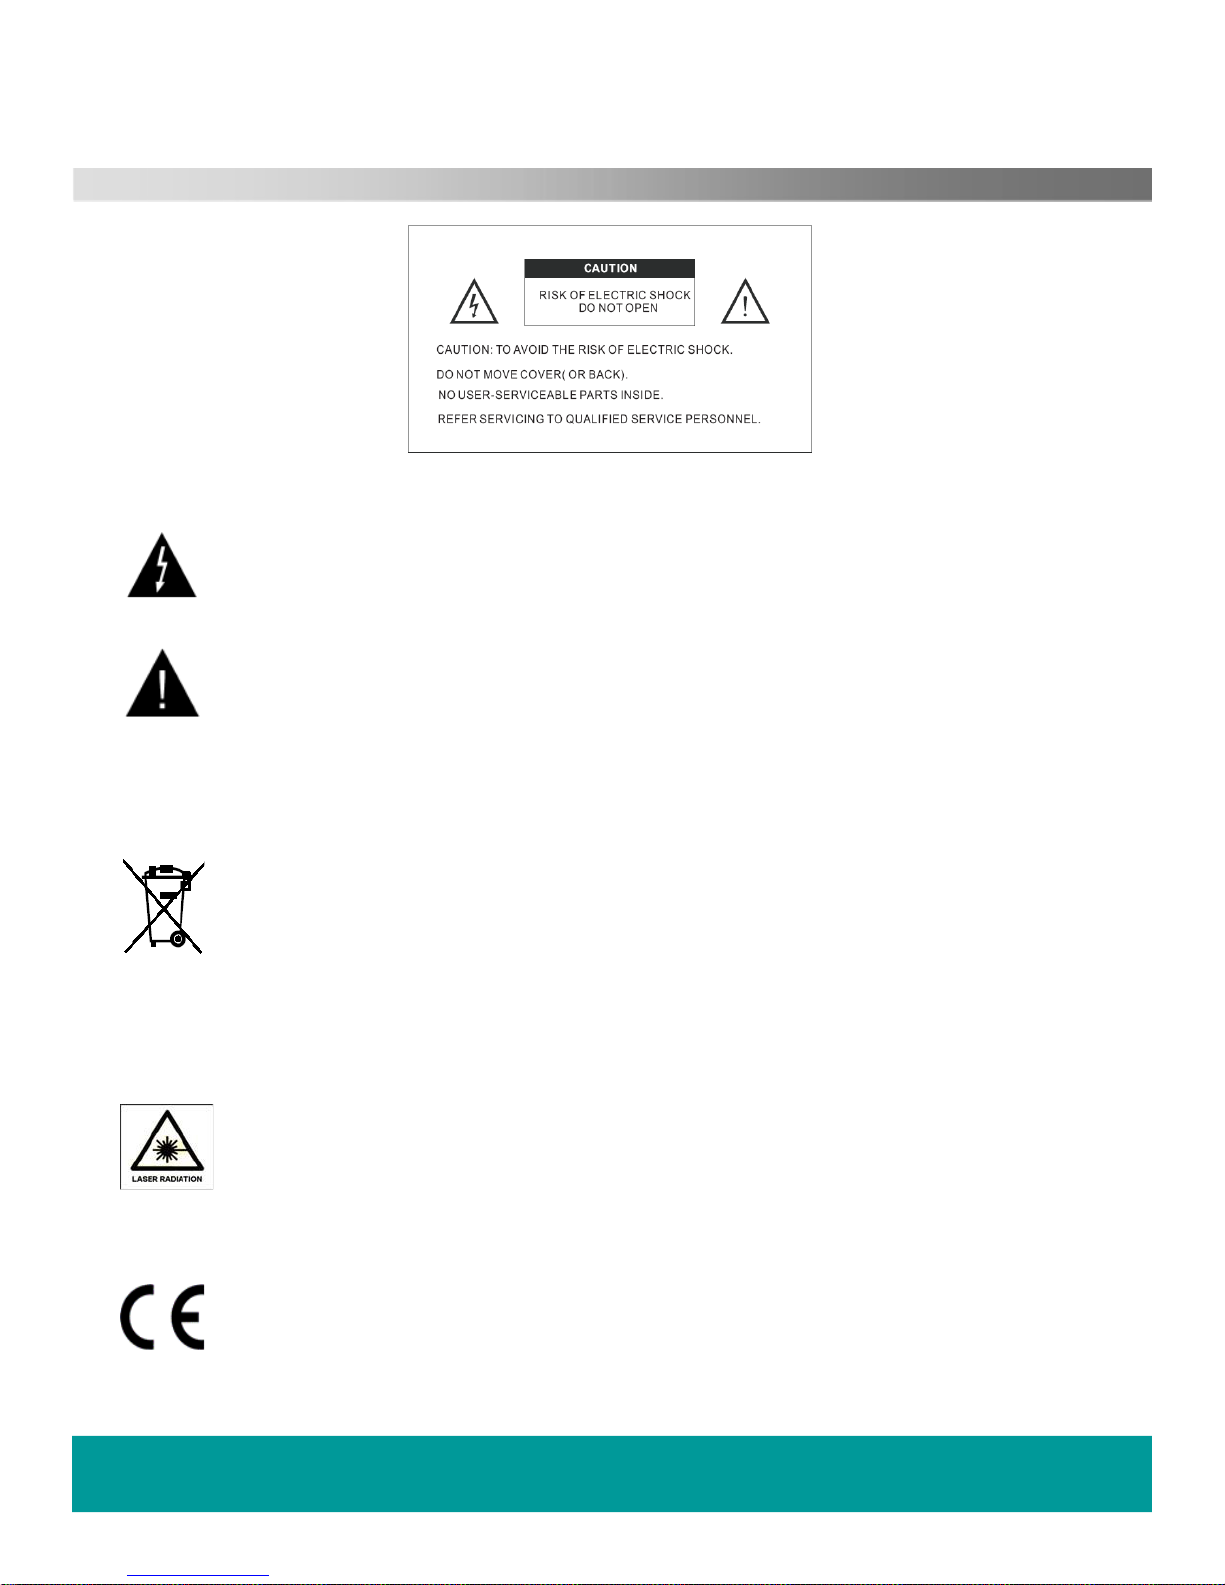
The lightning flash with arrowhead symbol, within an equilateral triangle, is intended to
alert the user to the presence of un-insulated “dangerous
voltage” within the products enclosure that may be of sufficient magnitude to constitute a
risk of electric shock to the persons.
The exclamation point within an equilateral triangle is intend to alert the user to the
presence of important operating and maintenance (servicing) instructions in the literature
acc
ompanying the appliance.
Correct
disposal of this Product
(Was
te Electrical & Electronic Equipment (WEEE)
The crossed out “Wheelie bin” is intended to show that this appliance must not be placed
with ordinary household waste at the end of its useful life. To prevent possible harm to the
environment or human health from uncontrolled waste disposal, please keep separate
from other household waste and recycle it responsibly to promote the sustainable reuse of
ma
terial resources.
Househ
old users should contact either the retailer where you purchased the product, or
th
eir local government office for details of where and how you can take this item for
environment
ally safe re-cycling.
Bu
siness users should contact their supplier and check the terms and conditions of the
purchase contract. This product must not be mixed with other commercial wastes for
di
sposal
This unit is a “CLASS 1” laser product. This product uses a visible laser beam which could
cause hazardous radiation exposure. Ensure the recorder is operated as instructed. Do
no
t remove any covers or look into the DVD drawer opening whilst power is applied. Do
NOT modify or adjust any controls that may affect laser emissions. Should the appliance
bec
ome faulty consult a qualified technician.
This appliance complies with European Safety and Electrical directives
HELPLINE No UK / Northern Ireland 01422 26 32 98. Rep . Ireland No 1800 88 23 90.
WEB
SUPPORT. www.ekey.co.uk
Model number 4683
Page 5

2. Safety Instructions
CAUTION. PLEASE READ AND OBSERVE ALL WARNINGS AND INSTRUCTIONS GIVEN IN THIS
USER MANUAL AND MARKED ON THE APPLIANCE. RETAIN THIS BOOKLET FOR
This set has been designed and manufactured to assure your personal safety. Improper use can
result in Electric shock or Fire hazard. The safeguards in this appliance will protect you if you
observe the correct procedures for installation, servicing and operation. There are NO user
parts inside. DO NOT REMOVE THE CASE OR OTHER COVERS OR YOU MAY BE EXPOSED TO
DANGEROUS VOLTAGES OR LASER RADIATION AND WILL INVALIDATE YOUR WARRANTY.
REFER ALL SERVICING TO QUALIFIED SERVICE PERSONNEL.
FUTURE USE.
Unpacking and Handling. Open the carton carefully and remove the polyfoam
packing.
Carefully lift the recorder and place onto a firm stable surface. Lift off the Poly bag and retain all
packaging for future use. Keep all packaging away from small children and animals.
Placing recorder. The recorder should be placed on a firm table or shelf. If placing in a cabinet
ensure there is sufficient spacing for air flow and access for the DVD player opening..
Connections. When connecting the recorder to external sources and the mains supply, do not
place wires that can be tripped over. Do not trap or place heavy
objects on the mains lead.
Top of recorder. Do not place objects such as vases, candles or other objects which may spill
into the recorder.
Ventilation and Heat Sources. Do not place material over the ventilation slots, this will cause
the recorder to overheat and fail. Do not place the recorder in direct sunlight or near heat sources
such as radiators or fires.
Moisture.
Do not place the recorder in wet or damp conditions, such as steamy kitchens,
basements or other damp places. Do not allow water or other fluids to enter the recorder. Do not
touch the Mains plug with wet hands. Should moisture enter the recorder, disconnect from the
supply and call the customer help line.
Cleaning.
Disconnect the recorder from the mains supply. Use a soft dry
stains use a soft moist cloth with a dilute mild detergent.. Do NOT use petrol based fluids or
abrasive materials.
Leaving your recorder. This recorder is designed to operate for long periods unattended.
Unless you want to record items whilst away, such as holidays, disconnect from the mains supply
and aerial. If a local thunderstorm occurs, disconnect from the mains supply and aerial “if
external”
to prevent possible internal damage.
Disc Tray. Keep your fingers well clear of the DVD disc drawer when it is closing, it may cause
injury or damage to the player. Do NOT push the disc drawer to close, use the Open/Close button
on the appliance.
Do NOT allow children to operate this apparatus without supervision.
HELPLINE No UK / Northern Ireland 01422 26 32 98. Rep . Ireland No 1800 88 23 90.
WEB SUPPORT. www.ekey.co.uk
Model number 4683
cloth, for stubborn
Page 6

HELPLINE No UK / Northern Ireland 01422 26 32 98. Rep . Ireland No 1800 88 23 90.
WEB SUPPORT. www.ekey.co.uk
Model number 4683
Features
Available Disc Types
~120 mi.
n
.
Single Sided:
~
DVD
.
VCD
.
CD
Apart from general DVD player functions, the DHR(DVD Harddisc recorder)system,RW+HDD+USB,features recording
of live
TV programs and life slices with higher video &audio quality,which will bring you sweet memory.
Top recording function
LPCM/MPEG digital audio decoder,AC-3/DTS Dolby digital audio output
Hi-Fi audio quality,96KHz/24bit digital audio processing.
Optical/coaxial data stream audio output.
High-quality YCbCr output,supporting future display devices.
Support physical format discs&USB storage devices(U_disc,etc.)
Available media:DVD-Video,DVD-Audio,VCD,CD,MP3,MP4,KODAK PICTURE-CD.
This DHR is capable of playing the following types of discs:
Type
Dimension Recording Time
Content
Remark
12cm
8cm
12cm
8cm
12cm
8cm
Single Sided:
Double Sided:
80min
Double Sided:
~160min
~74min.
~20min.
~74min.
~20min.
DVD format:
Compressed digital audio+video
(dynamic)
~240min
MPEG1 format:
Compressed digital audio+video
(dynamic)
VCD
DVCD
CD-DA format digital audio
Kodak picture
CD/JPEG
12cm
Compressed digital picture
MP3/WMA
12cm
~
600min.
Compressed digital audio
DVD-Audio
12cm
DVD format digital audio
MP4
MPEG4 format (Divx,Xvid,etc)
Compressed digital audio+video
Page 7
Before you start.
In the box.
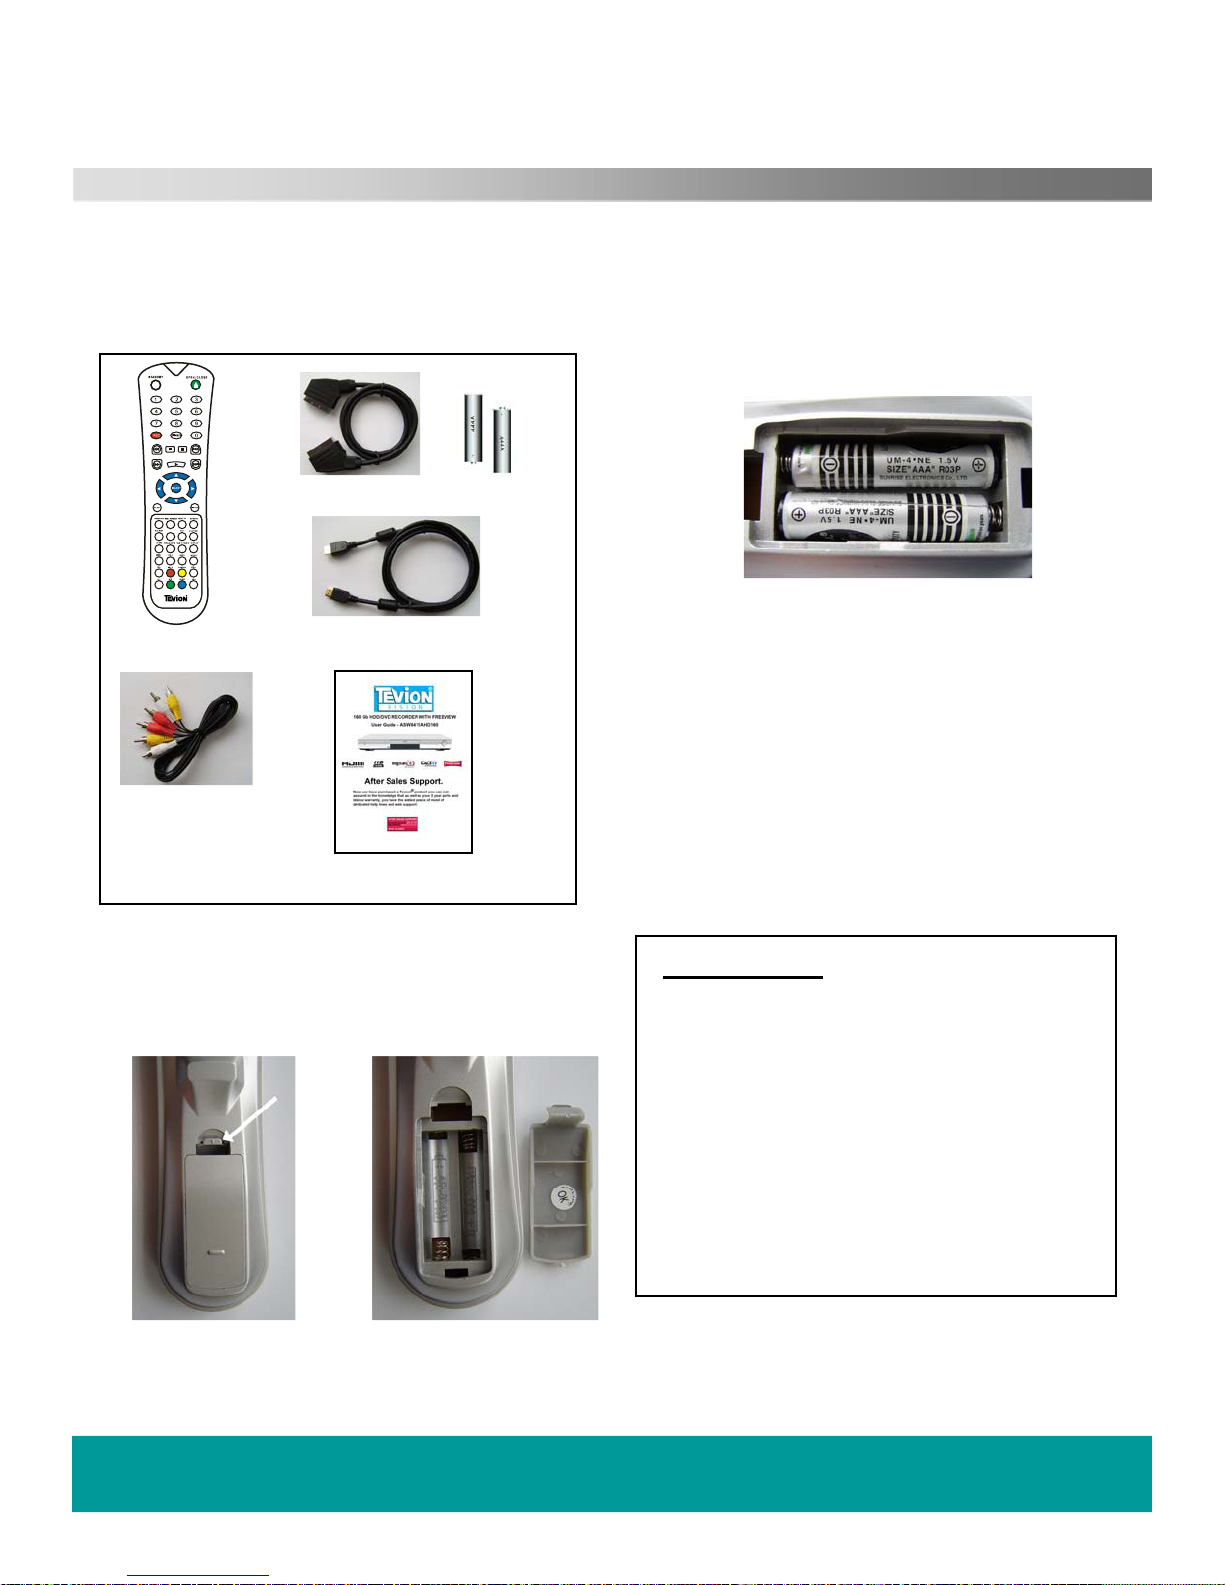
Please check the contents of your player before
continuing, you should have the following
accessories:-
Remote Control
SCART Lead
HD
MI Lead
2 x AAA cells
Instruction Booklet
RC
A Stereo /AV lead
Inserting batteries into the Remote Control
Remove battery cover
as shown in Fig 1
The battery compartment
is
shown in Fig 2
Pl
ace
the batteries as shown below, ensure
that the + and - on the batteries
corresponds to the + and - inside the
comp
a
rtment
Using the remote control.
Point the remote control directly at the
appliance.
Ens
ure the window on the receiver is not
covered or obstacles are placed in the line of
sight. Bright sunshine or fluorescent light may
affect the reliability.
Replace the batteries when the operation
becomes intermittent or a reduction in operating
range.
Battery Safety.
Do not leave old or exhausted batteries in the
hands
et. If not using the handset for a long
period, remove the batteries.
Do not mix battery types, and re chargeable
batteries are not recommended.
Do NOT break open or throw exhausted
batteries on a fire.
Do not dispose of exhausted batteries in the
gen
eral waste. Consult your local waste
authority for instructions
HELPLINE No UK / Northern Ireland 01422 26 32 98. Rep . Ireland No 1800 88 23 90.
WEB SUPPORT. www.ekey.co.uk
Model number 4683
CLEAR
Page 8

CLEAR
1. Standby
3. Numeric 0 – 9
5. Record (immediate)
7. Fast Backwards
9. Fast Forward
11. Navigate Up.
13. Navigate Left
15. Navigate Down.
17. Setup Menu
19. Record Format
21. Program
23. Source Input
25. Clear / Add
27. Audio / Text
29. Angle / EPG
31. Menu (Disc)
33. Title (Disc)
35. Channel +
37. ATV/DTV
39. Channel –
41. Mute audio
2. Open / Close
4. Record Timer
6. Pause play
8. Previous track
chapter
10. Stop
12. Next track / chapter
14. Play
16. Select / Enter
18. Navigate Right
20. Switch
22. Record Quality
24. Return
26. Edit
28. Chapter
30. Display
32. SubTitle / Radio
34. Repeat
36.
Goto
38. Volume +
40. P Scan
42. Volume –
43. Slow
Remote Control
HELPLINE No UK / Northern Ireland 01422 26 32 98. Rep . Ireland No 1800 88 23 90.
WEB SUPPORT. www.ekey.co.uk
Model number 4683
1
3
5
7
2
4
6
8
10
12
14
16
18
20
22
24
26
28
30
32
34
36
38
40
42
43
9
11
13
15
17
19
21
23
25
27
29
31
33
35
37
39
41
AUDIO/TEXT
ATV/DTV
Page 9
Controls and Connections
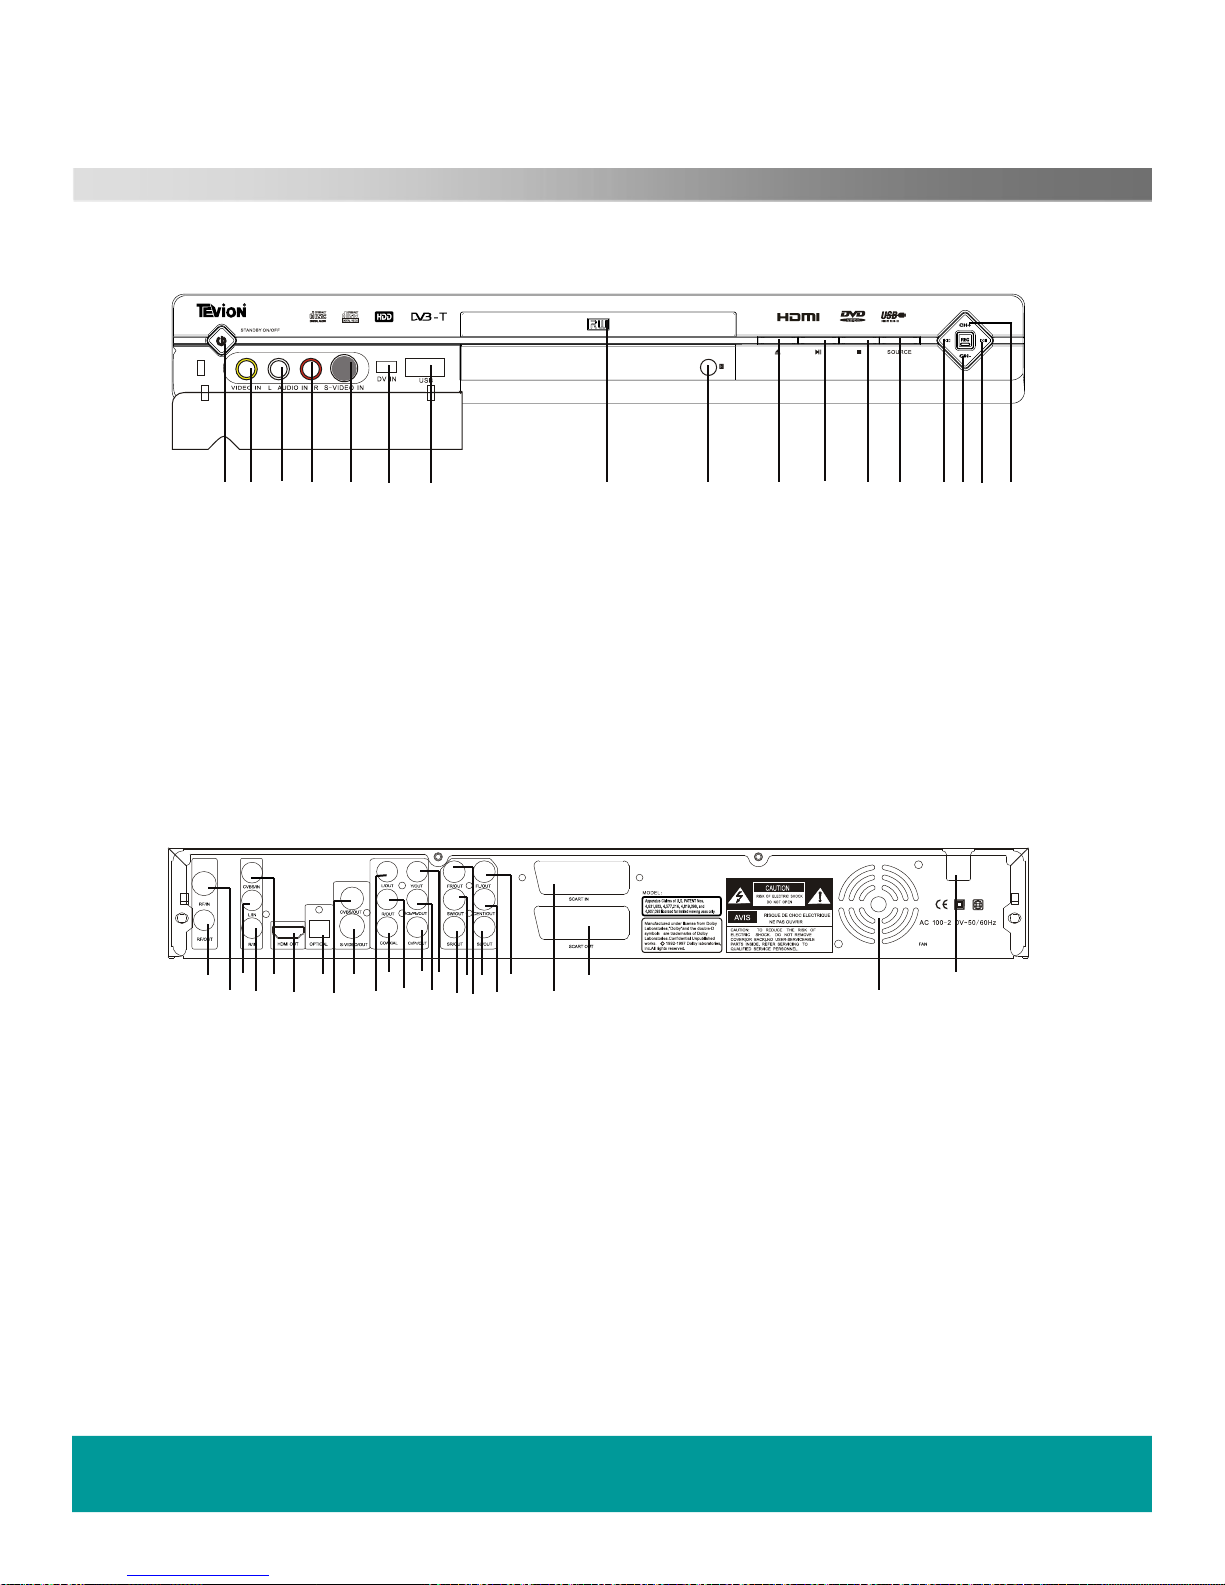
Front view
1. Standby
2. Video input
3. Audio input (Left)
4. Audio input (Right)
5. S-Video input
6. DV input
7.USB input
8. DVD disc tray
9. Remote Control sensor
10. Open / Close
11. Play / Pause
12.
Stop
13. Input Source
14. Previous
15. Channel –
16. Next
17.
Channel +
Rear view
1. Tuner RF input
2. Tuner RF output (Loop through)
3. Video input (CVBS)
4. Audio input Left
5. Audio input Right
6. HDMI output
7. Optical output (PCMI)
8. Video output (CVBS)
9. S-Video output
10. Mixed Audio output Left
11.
Digital Audio output (Coaxial)
12. Mixed Audio output Right
13. Cr / Pr output
14.
Cb / Pb output
15. Y (Luma) output
16
. Surround output Left
17. Surround output Centre
18. Front output Left
19. Surround output Right
20.
Sub Woofer output
21. Front output Right
22. Scart input
23.
Scart output
24. Ventilation fan
25. AC Mains input
HELPLINE No UK / Northern Ireland 01422 26 32 98. Rep . Ireland No 1800 88 23 90.
WEB SUPPORT. www.ekey.co.uk
Model number 4683
1
2
3
4
5
6
7
8
9
10
11 12 13
1415
16
17
1
2
3
4
5
6
789
10
11
12 14151617181920
21
22
24
2523
ASW8411AHD-160
4
2
13
Page 10
Controls and Connections
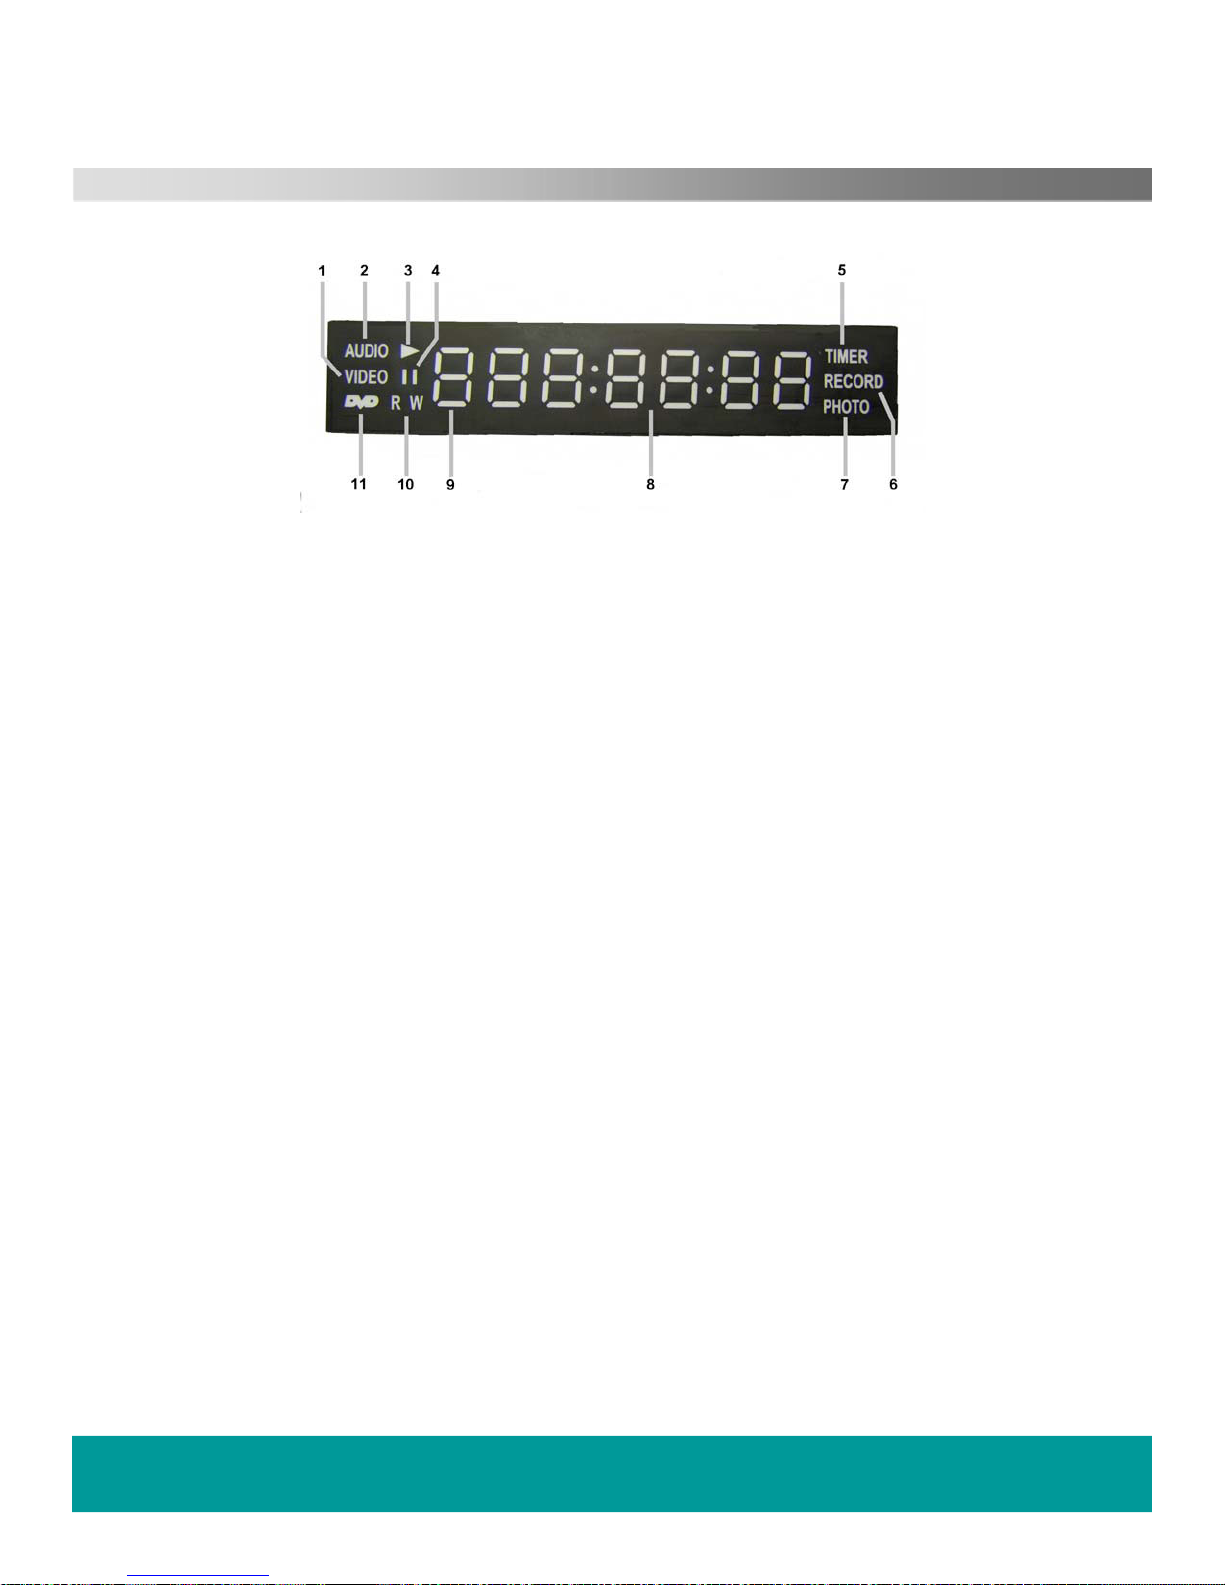
Display.
1. Video. Has video data on disc (DVD/ VCD).
2. Audio. Has audio data on disc (CD / DVD /VCD)
3. Play. Displays when playing disc.
4. Pause. Displays when disc is paused
5. Timer. Displays when Timer is set.
6. Record. Displays when Recording.
7. Photo. Displays when a photo disc is playing
8. Time Display. Displays time played and messages to user
9. Chapter. Displays the chapter number playing
10
. R/W denotes type of disc Recordable or Read write
11
. DVD. Displays a DVD disc is playing
HELPLINE No UK / Northern Ireland 01422 26 32 98. Rep . Ireland No 1800 88 23 90.
WEB
SUPPORT. www.ekey.co.uk
Model number 4683
Page 11

Basic TV / Recorder connections
AV / S-VIDEO + Audio
inpu
ts.
Not
e :- If using S-VIDEO
connection do not use
th
e Yellow CVBS video
inpu
t.
Alternative AV connections
VCR or DVD player
Controls and Connections
HELPLINE No UK / Northern Ireland 01422 26 32 98. Rep . Ireland No 1800 88 23 90.
WEB
SUPPORT. www.ekey.co.uk
Model number 4683
SCART IN
SCART OUT
Page 12
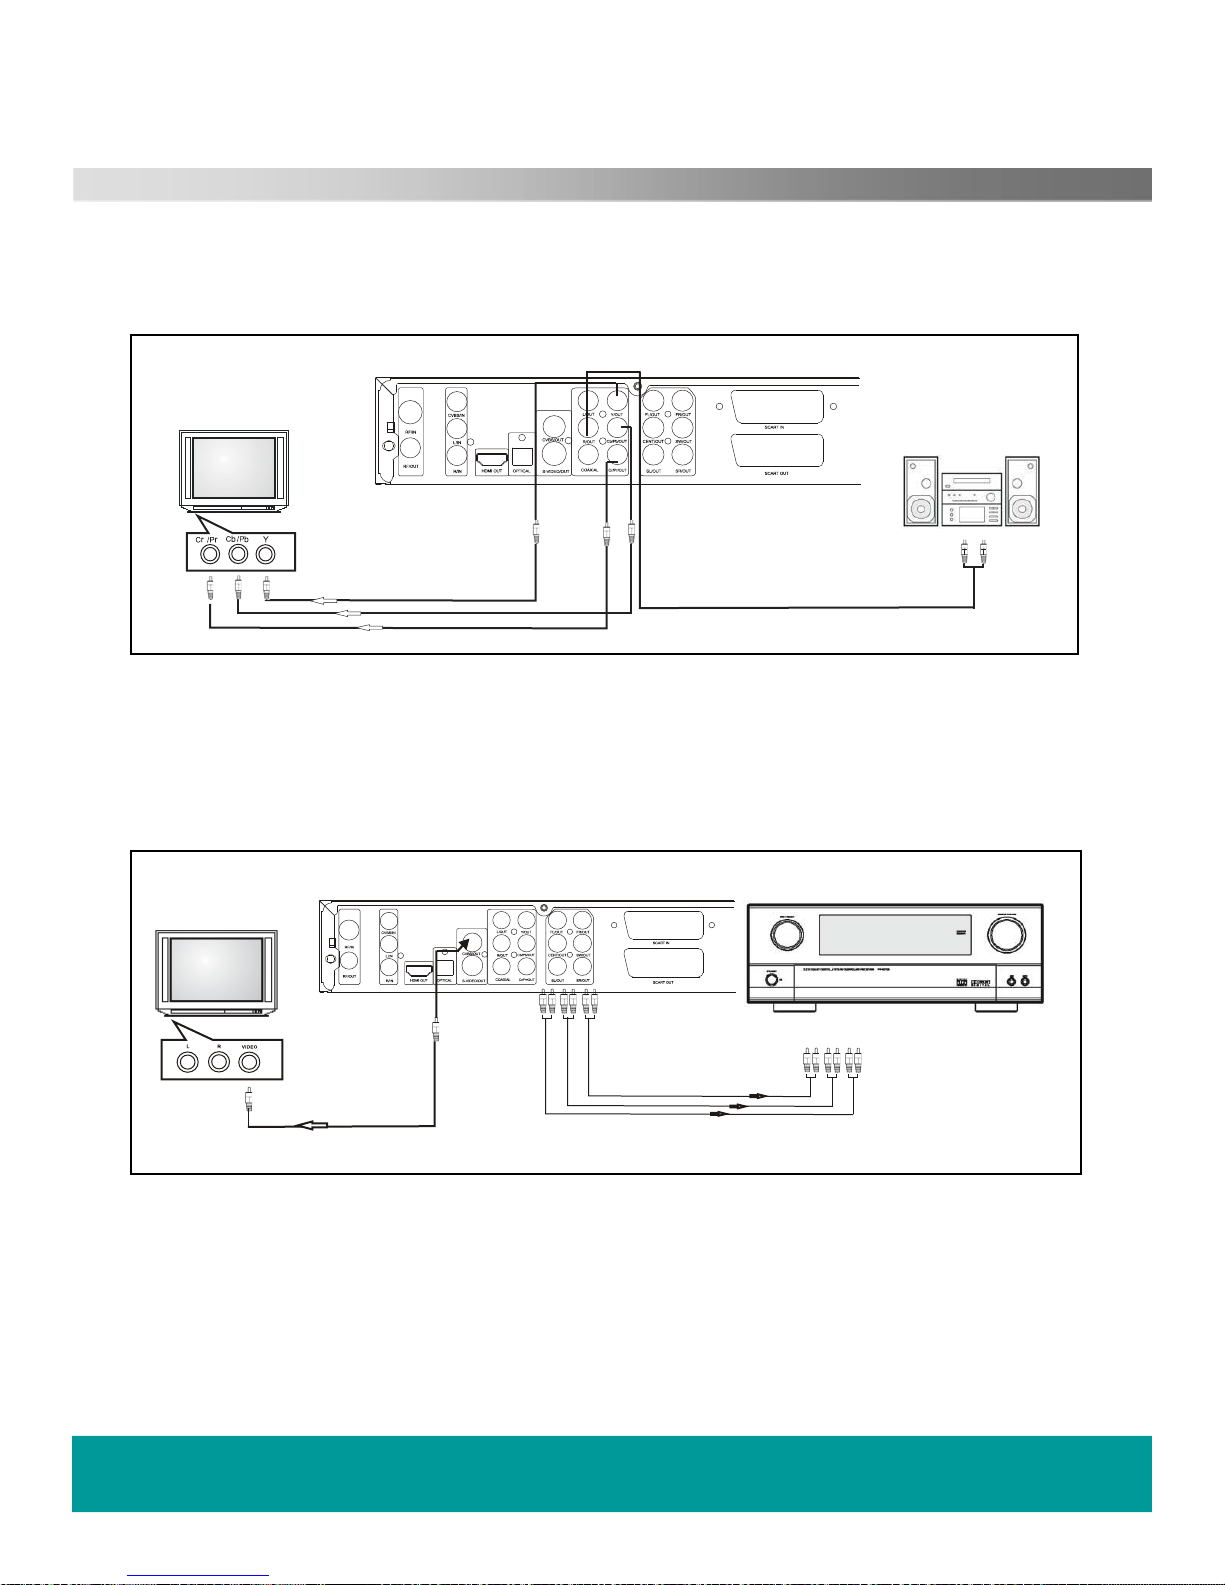
Y Pb,Pr /Y Cb,Cr and External
Audio amplifier conne
ctions
Hi Fi audio amplifier
Note
:- Do not select “Progressive scan” if your TV cannot display progressive video.
Connections to 5.1Ch Audio Amplifier
Amplifier
5.1Ch audio inputs
Controls and Connections
HELPLINE No UK / Northern Ireland 01422 26 32 98. Rep . Ireland No 1800 88 23 90.
WEB
SUPPORT. www.ekey.co.uk
Model number 4683
Page 13

Connections to Digital audio amplifier
Coaxial Optical
Inp
ut Input
Choose input option
Digital audio amplifier
Connections to DV and USB
USB memory pod
DV USB
DV connection from
Camcorder
No
te :- When you use the USB port to
import signals you need to press mode
first, then select USB IN.
Controls and Connections
HELPLINE No UK / Northern Ireland 01422 26 32 98. Rep . Ireland No 1800 88 23 90.
WEB
SUPPORT. www.ekey.co.uk
Model number 4683
Page 14

HELPLINE No UK / Northern Ireland 01422 26 32 98. Rep . Ireland No 1800 88 23 90.
WE
B SUPPORT. www.ekey.co.uk
Model number 4683
Getting Started.
After unpacking the recorder, place on a firm stable surface and, if the room is warm, allow 15 to 20 minutes
to acclimatise before using as there may be condensation on the laser optical lens. Please remember to
kee
p
the packaging away from small children and animals and keep safe, it may be needed in the future.
Conn
ections.
See pages 10 to 12 for typical connections. The basic connections should be used until you are familiar with
th
e operations of the recorder. It is wise not to add extra items such as HiFi
amplifiers etc until you know the
recorder is working as expected. If you wish to add items such as Hi Fi amplifiers, add one item at once and
en
sure it is working before adding another item.
Switching on.
Connect to a suitable mains supply (110 – 240V
AC 50/60 Hz). The recorder will take approx 30 seconds
be
fore the digital display lights up. This is normal, you will, in this time hear the DVD player mechanism
activating.
Pr
ess the Standby button. The display will blank for a few seconds and then the message “HELLO” will be
shown
. “READ” will then be displayed, and as this is the first time the recorder is used it will then show “NO
DISC
”.
The TV screen will now display the “Splash Screen” and also will display “NO DISC”
Page 15

HELPLINE No UK / Northern Ireland 01422 26 32 98. Rep . Ireland No 1800 88 23 90.
WEB SUPPORT. www.ekey.co.uk
Model number 4683
Getting Started.
Fig
1
DVBt
(digital tuning setup).
Pr
ess the SETUP button and using the ▲/▼/►/◄ buttons
select “
Setup”. (Fig 1). Press SELECT.
Digit
al Tv.
Using the ▲/▼buttons select “Digital TV. (Fig 2). Press
SELECT.
Fig
2
Setup
NO DISC Remain 00:00:00 SP
Select setup option
01/01/2008 12:00:00 AM
System
Playing
A / V Set
Recording
TV Tuner
Digital TV
DTV Channel
Area Setting
Area Scan
Manual Scan
System Menu
Select one of the buttons
Page 16
Getting Started.
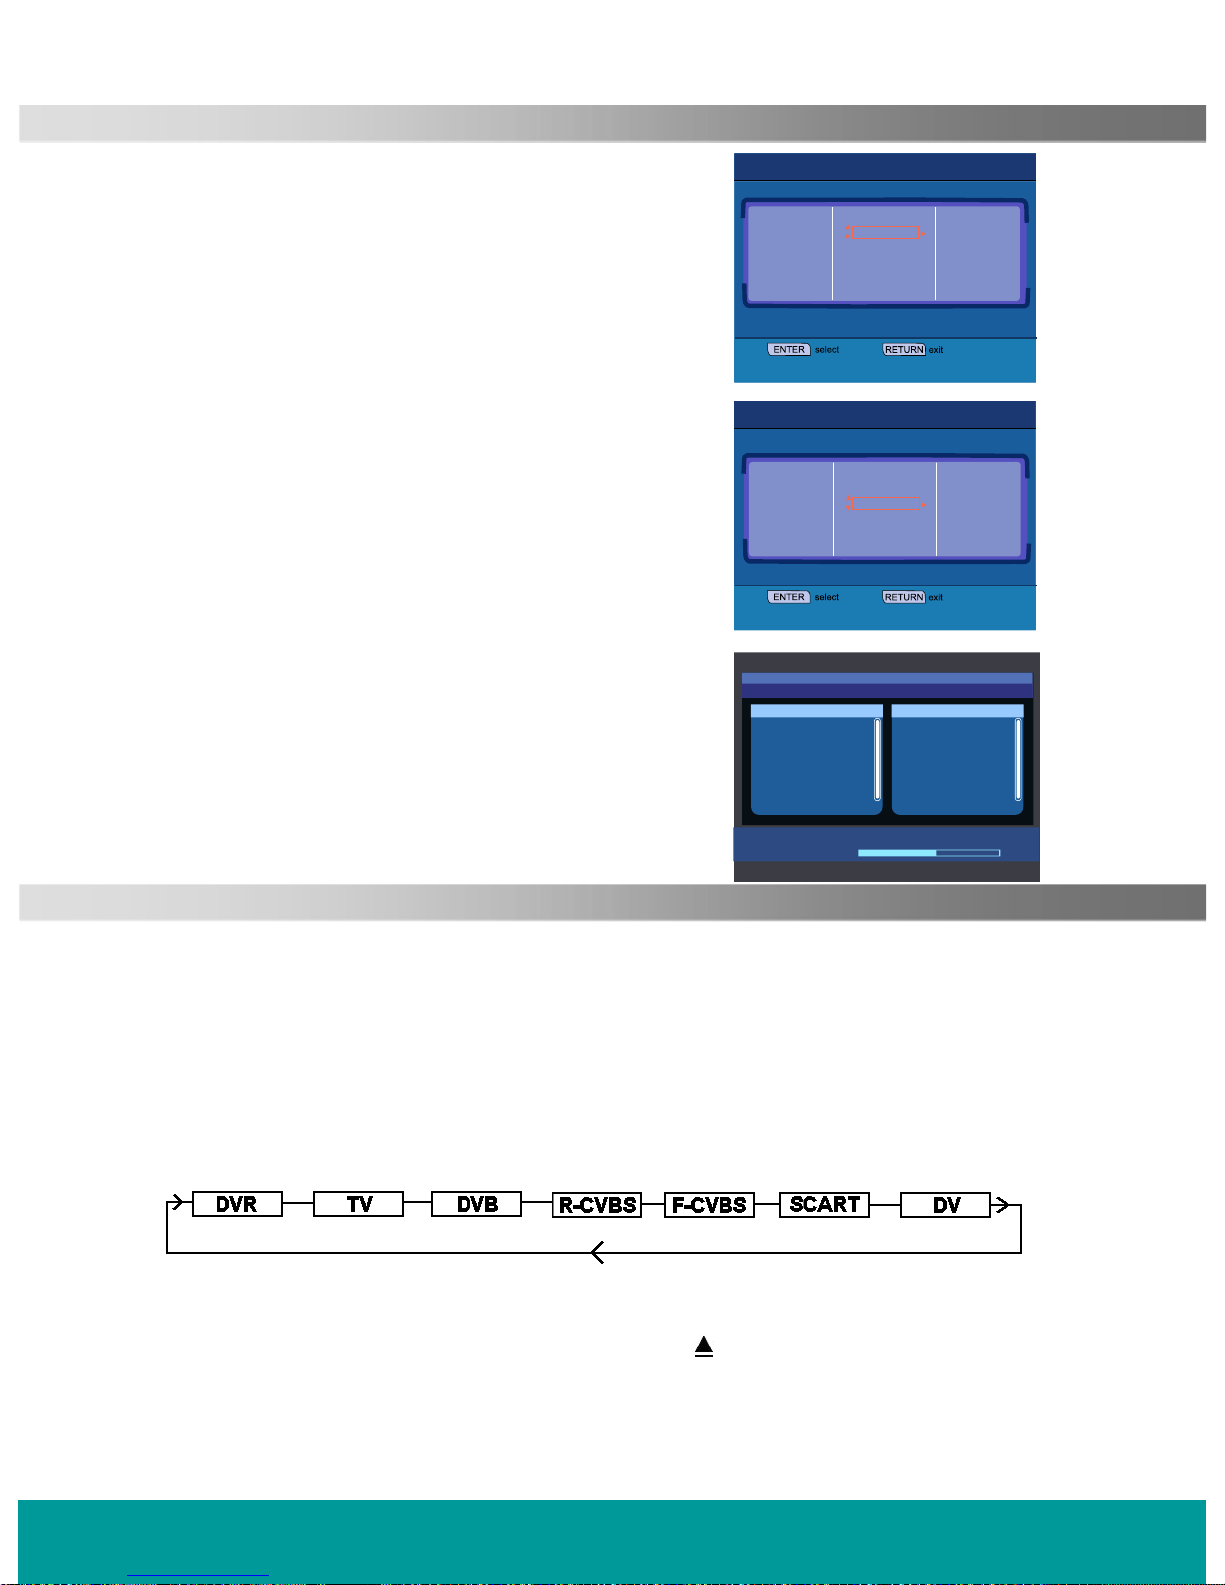
Digital Tv.
Using the ►button enter the next menu using the ▼ button
select “Area Setting”. (Fig 3). Use the ► button to select the
final sub menu and use the▼ button to select the country of
your choice, (England is set as default). Press SELECT and a
star will appear adjacent to the country selected. Press the ◄
button to return to the centre sub menu.
Area Scan.
Using the ▼ button select Area Scan (Fig
4). Press SELECT
and the recorder will begin to search for Digital TV stations.
Tuning Completed
When the tuning is completed a display similar to Fig
5 will be
displayed. The recorder will now revert to one of the stored
channels.
Setup
System
Playing
A / V Set
Recording
TV Tuner
Digital TV
Select setup option
Setup
Select setup option
Charnel Search
S No TV Chenner S No Radio Channel
NO DISC Remain 00:00:00 SP
DTV Channel
Area Setting
Area Scan
Manual Scan
01/01/2008 12:00:00 AM
NO DISC Remain 00:00:00 SP
DTV Channel
Area Setting
Area Scan
Manual Scan
*
England
Germany
Italy
France
Holand
Fig 3
Fig
4
5
Fig
Installation is now complete.
Channel 54 UHF 738000 KHz/ 8M
Progress
DVD, HDD and USB Playback. Basic
DVD
Playing DVD,CD,VCD MP3,MPEG4 and Photo discs.
Press the “SOURCE”
See table below :-
Select DVR.
Press the OPEN/CLOSE button on the remote control or the button on the recorder. The disc
tray will now open. Ensure nothing is blocking the movement of the disc tray. Place a disc into
the tray with the label facing upwards. Press OPEN/CLOSE again to close the disc tray. Do not
push with your hand. Keep small children away whilst loading discs as injury could occur.
button. Each press of the “Source”
button will select different input sources.
67%
HELPLINE No UK / Northern Ireland 01422 26 32 98. Rep . Ireland No 1800 88 23 90.
WEB SUPPORT. www.ekey.co.uk
Model number 4683
Page 17
HELPLINE No UK / Northern Ireland 01422 26 32 98. Rep . Ireland No 1800 88 23 90.
WEB SUPPORT. www.ekey.co.uk
Model number 4683
DVD, HDD and USB Playback. Basic
When the disc is inside the recorder it will be “Read” and then the screen will display (DVD) in the top left corner.
Some discs will start playing automatically, some will display a
Disc contents menu.
Using the ▲/▼/►/◄ navigation buttons, select the feature you require and press “SELECT”. The disc will now
play your selection.
Press
to stop playing. One press will cause a “pre stop”, this is similar to Pause. Press to restart playing.
To fully stop playback press the button again.
Pr
ess button to commence playing from a menu choice.
To fast forward a scene press the button. Pressing once will increase the speed X2, then X4, X8, X20 then
Nor
mal.
To fast reverse a scene press the button. Pressing once will increase the speed X2, then X4, X8, X20 then
Nor
mal.
To Skip forward one or more chapters press the button. Each press will advance the chapters by one.
To Skip backwards one or more chapters press the button. Each press will reverse the chapters by one.
Pr
ess the button to pause play. To restart press the button.
Press the “MENU” button to display the disc’s menu.
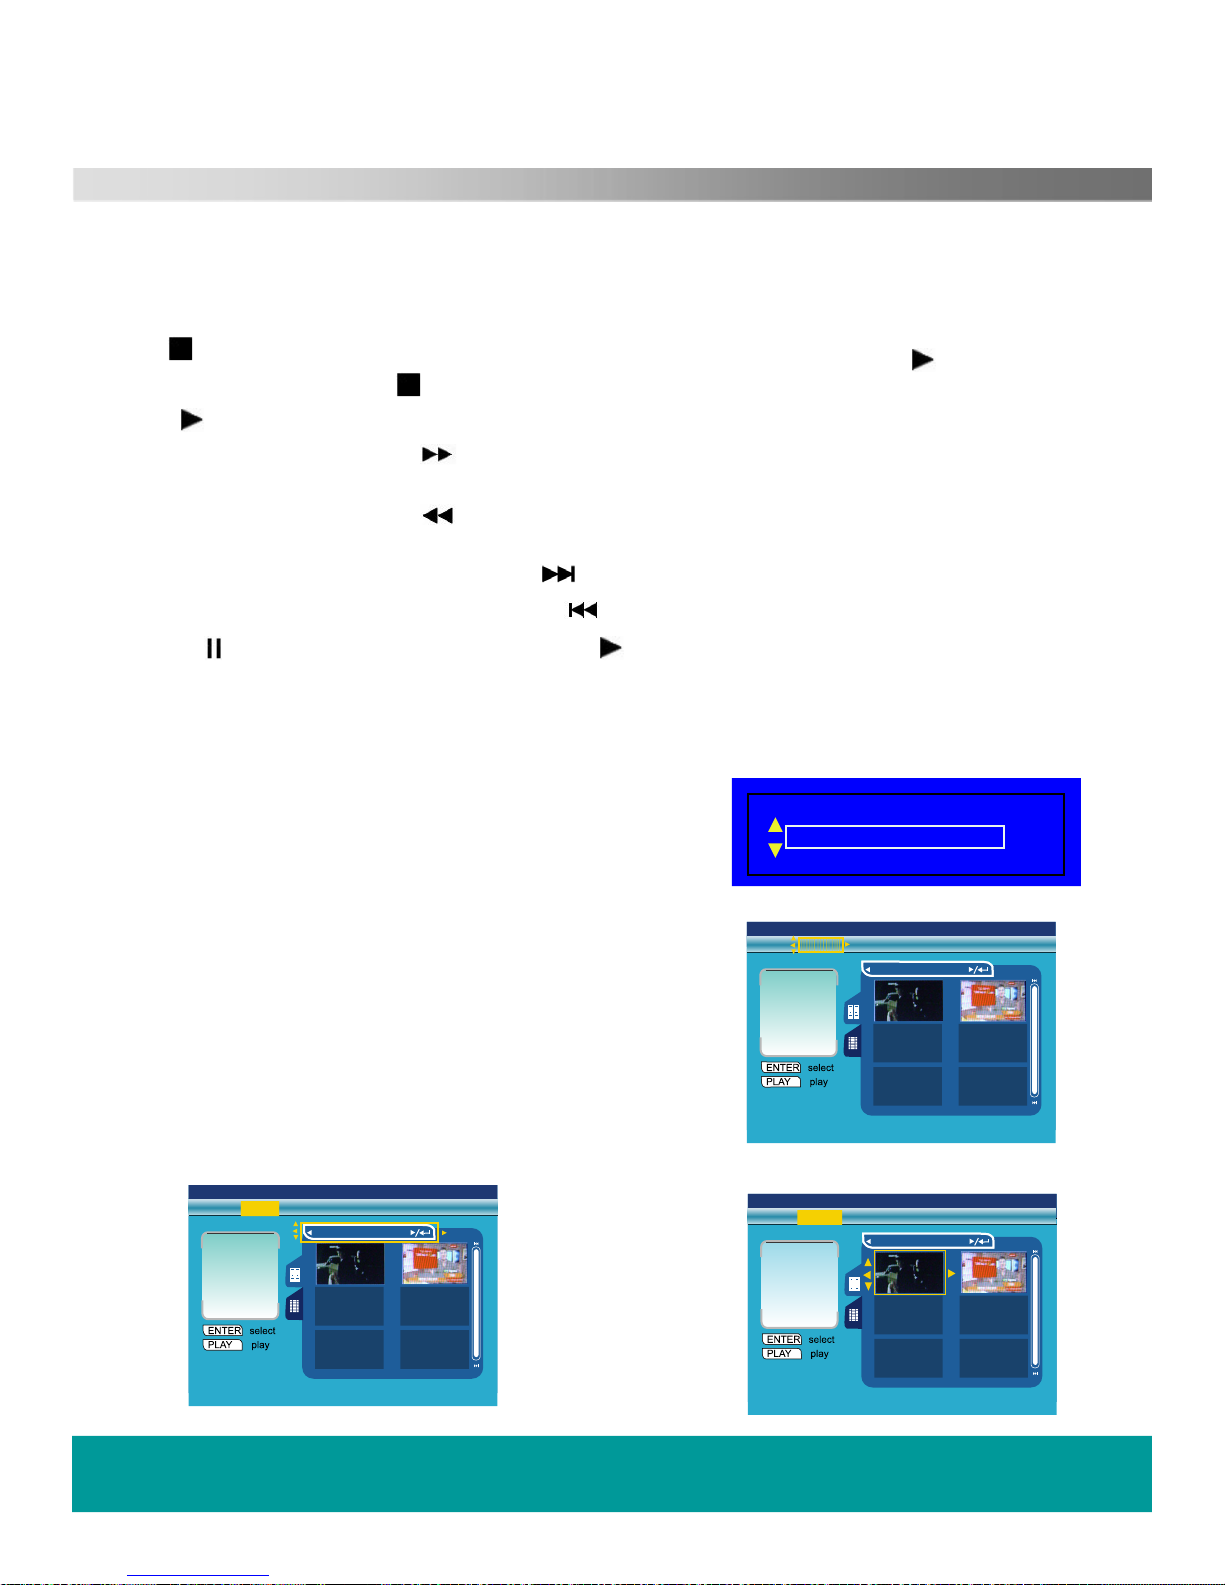
HDD Playback.
To select HDD playback press the “SWITCH” button on the remote
control
.
This will activate the menu Fig 6.
Use ▼ Move the cursor to HDD and press SELECT.
A menu will be shown displaying as similar to Fig 7.
Fig 6
Ac
ross the top of the menu is the Type of files on the HDD.
:- Video, MPEG4, Audio, and Pictures.
Use the ►/◄ buttons to select the file type. Each file type
has a different menu structure. (Fig 8)
Use the ▲/▼ buttons to enter the sub menu (Fig 9).
Use the navigation buttons to move around the files
di
splayed. Press SELECT to play the file.
Fig
7
Fig
8
Fig
9
Title List
MPEG4 Audio Picture
001 002
001~006
HDD Remain 100:37:54 SP
Title List
Video MPEG4 Audio Picture
001 002
001~006
HDD Remain 100:37:54 SP
001/002
TITLE00001
01/01 01:02
00:00:05 SP
Title List
MPEG4 Audio Picture
001 002
001~006
HDD Remain 100:37:54 SP
V
Video
Disc
HDD
USB
Video
Page 18

HELPLINE No UK / Northern Ireland 01422 26 32 98. Rep . Ireland No 1800 88 23 90.
WEB SUPPORT. www.ekey.co.uk
Model number 4683
DVD, HHD and USB Playback. Basic
HDD
Playback cont..
All the functions buttons have the same effect as DVD playback, when playing files from HDD.
Fa
st forward and Fast reverse, Play, Pause, Stop. Next Chapter and Previous Chapter will select the Next
and
Previous files on the HDD
USB Playback.
To select USB playback press the “SWITCH” button on the remote
control
.
This will activate the menu Fig 6.
Use ▼ Move the cursor to USB and press SELECT.
A menu will be shown displaying as similar to Fig 10.
Across the top of the menu is the Type of files in the USB memory. :MPE
G4, Audio, and Pictures.
Use the ►/◄ buttons to select the file type. Each file type has a
different menu structure.
Use the ▲/▼ buttons to enter the sub menu (Fig 11).
Use the ▼/▲ buttons to move around the files displayed. Press
SELECT to play the file.
All the functions buttons have the same effect as DVD playback, when
playing files from USB.
Play
, Pause,
Stop. Next Chapter and Previous Chapter will select the
Next and Previous files.
Fig 10
Fig 11
DVD, HDD and USB Record. Basic
General.
There are numerous options when recording, it is best to decide what you want to do with the recording after it
has been made.
DVD +/-R. (Write once) Use for permanent recordings.
DVD
+/RW. (Erasable). Use for semi permanent recording.
VCD. (Video CD). Recording MPEG4 files
HDD. Use for temporary recordings and Time shifting. To keep recordings which are on HDD you may
transfer to DVD
USB
. Use for transportable media, small files etc.
Title List
001 002
MPEG4 Audio Picture
USB Remain 00:27:01 SP
001 CF.MP3 01/01 00:45
002 051 -----.MP3 09/
11 18:01
Title List
001 002
MPEG4 Audio Picture
USB Remain 00:27:01 SP
001 CF.MP3 01/01 00:45
002 051 -----.MP3 09/
11 18:01
001/002
TITLE00001
01/01 01:02
00:00:05 SP
Page 19
HELPLINE No UK / Northern Ireland 01422 26 32 98. Rep . Ireland No 1800 88 23 90.
WE
B SUPPORT. www.ekey.co.uk
Model number 4683
DVD, HHD and USB Record. Basic
Quick
Recording.
If you are watching a programme that you decide to record, press the REC button on the remote control or
th
e Record button on the recorder. If there is no DVD disc in the recorder a message will be
shown, “No Disc”.
To select where the recoding is to be stored, DVD, HDD or USB, press the “SWITCH” button on the
remote control and select the correct medium.
To select the quality of the recording, press the “QUALITY”
button on the remote control, HQ is the best
quality, SEP is the least. (SP is the normal setting).
To select the type of recording (DVD or MPEG4), press “REC FORMAT” on the remote control.
Ea
ch time the REC button is pressed, 30 minutes is added to the recording time, up to 360 minutes may
be recorded providing there is space on the disc.
To stop the recording press Stop.
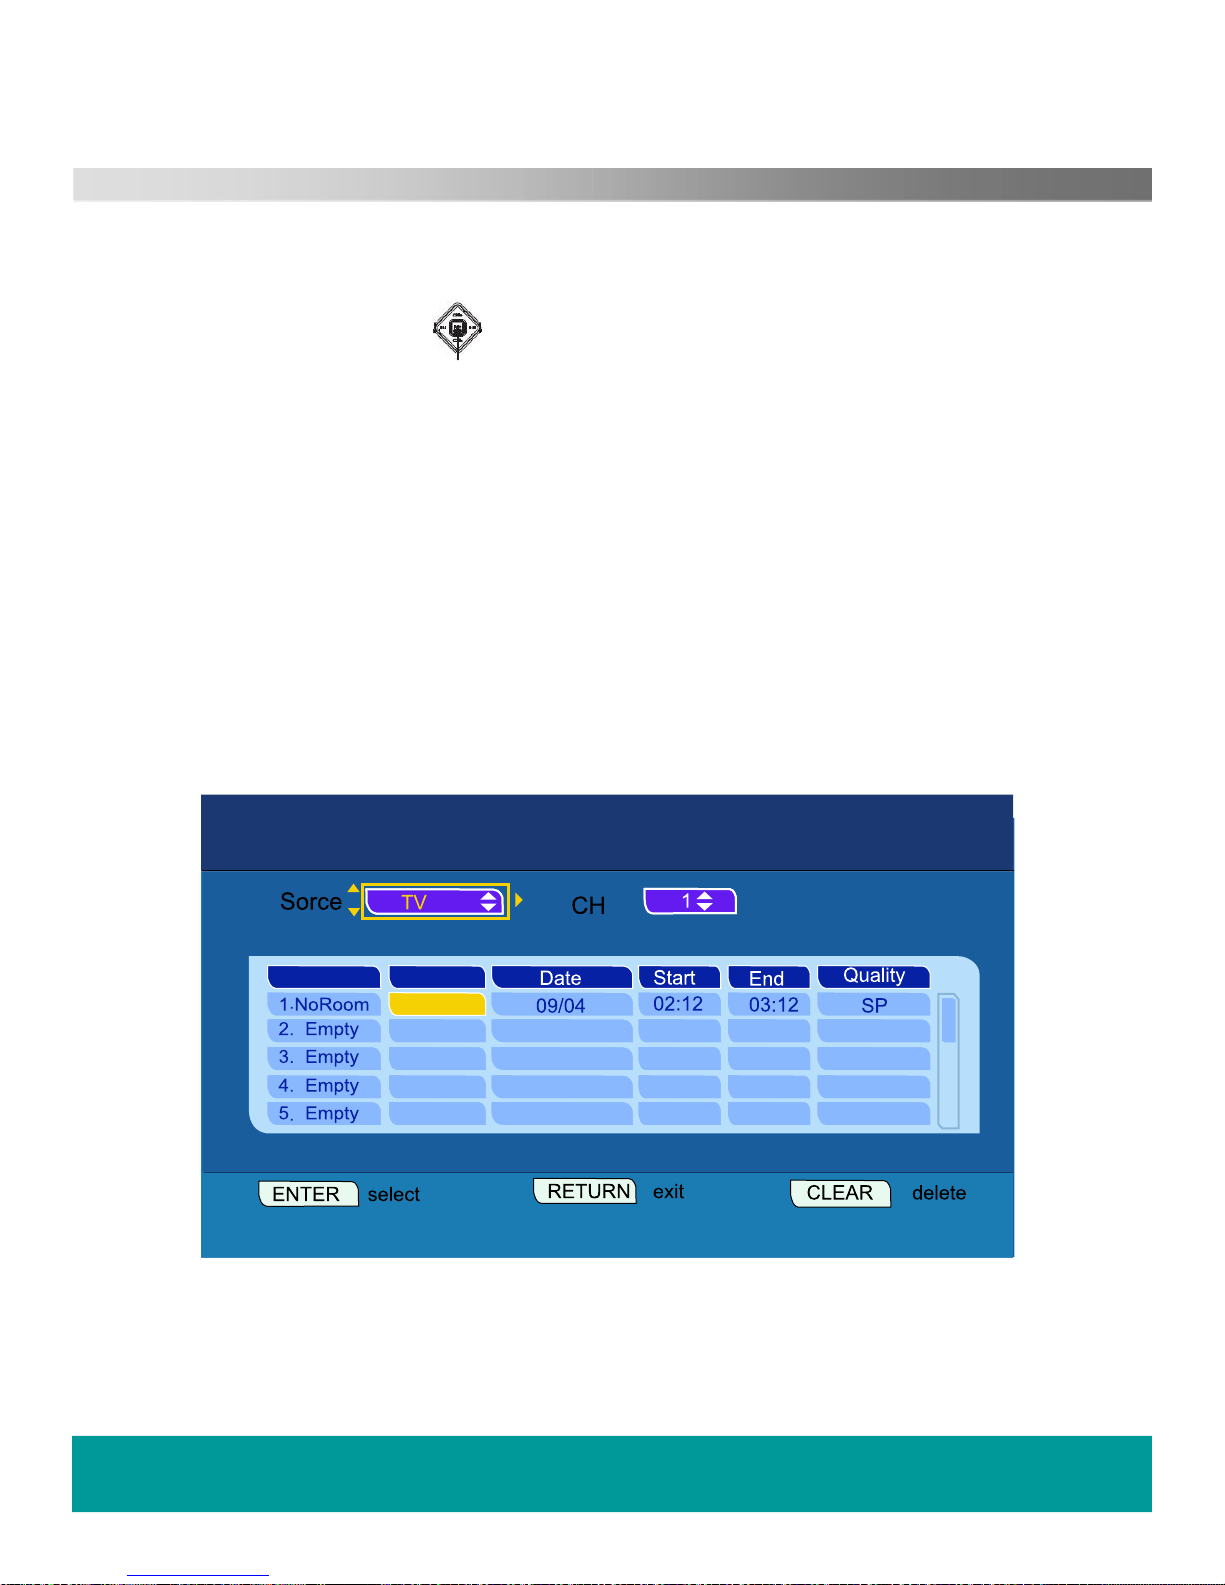
Timer Recording.
To set the recorder to record a programme/s when you are not able to set “Quick Record” you may use
the Recording Timer. This i
s a very versatile timer allowing many functions. To access the timer, press
the TIMER button on the remote control or access timer recorder in SETUP menu.
Below is a typical display of the Timer menu.
If
you are recording with the Timer function, and you wish to end the recording prematurely press the
STOP button.
Fig 12
Timer Record
04/09/2008 - 02:07:58 PM
UNKNOWN Remain 00:00:00 SP
Source
TV 1
lnput recording schedule
Status
Page 20
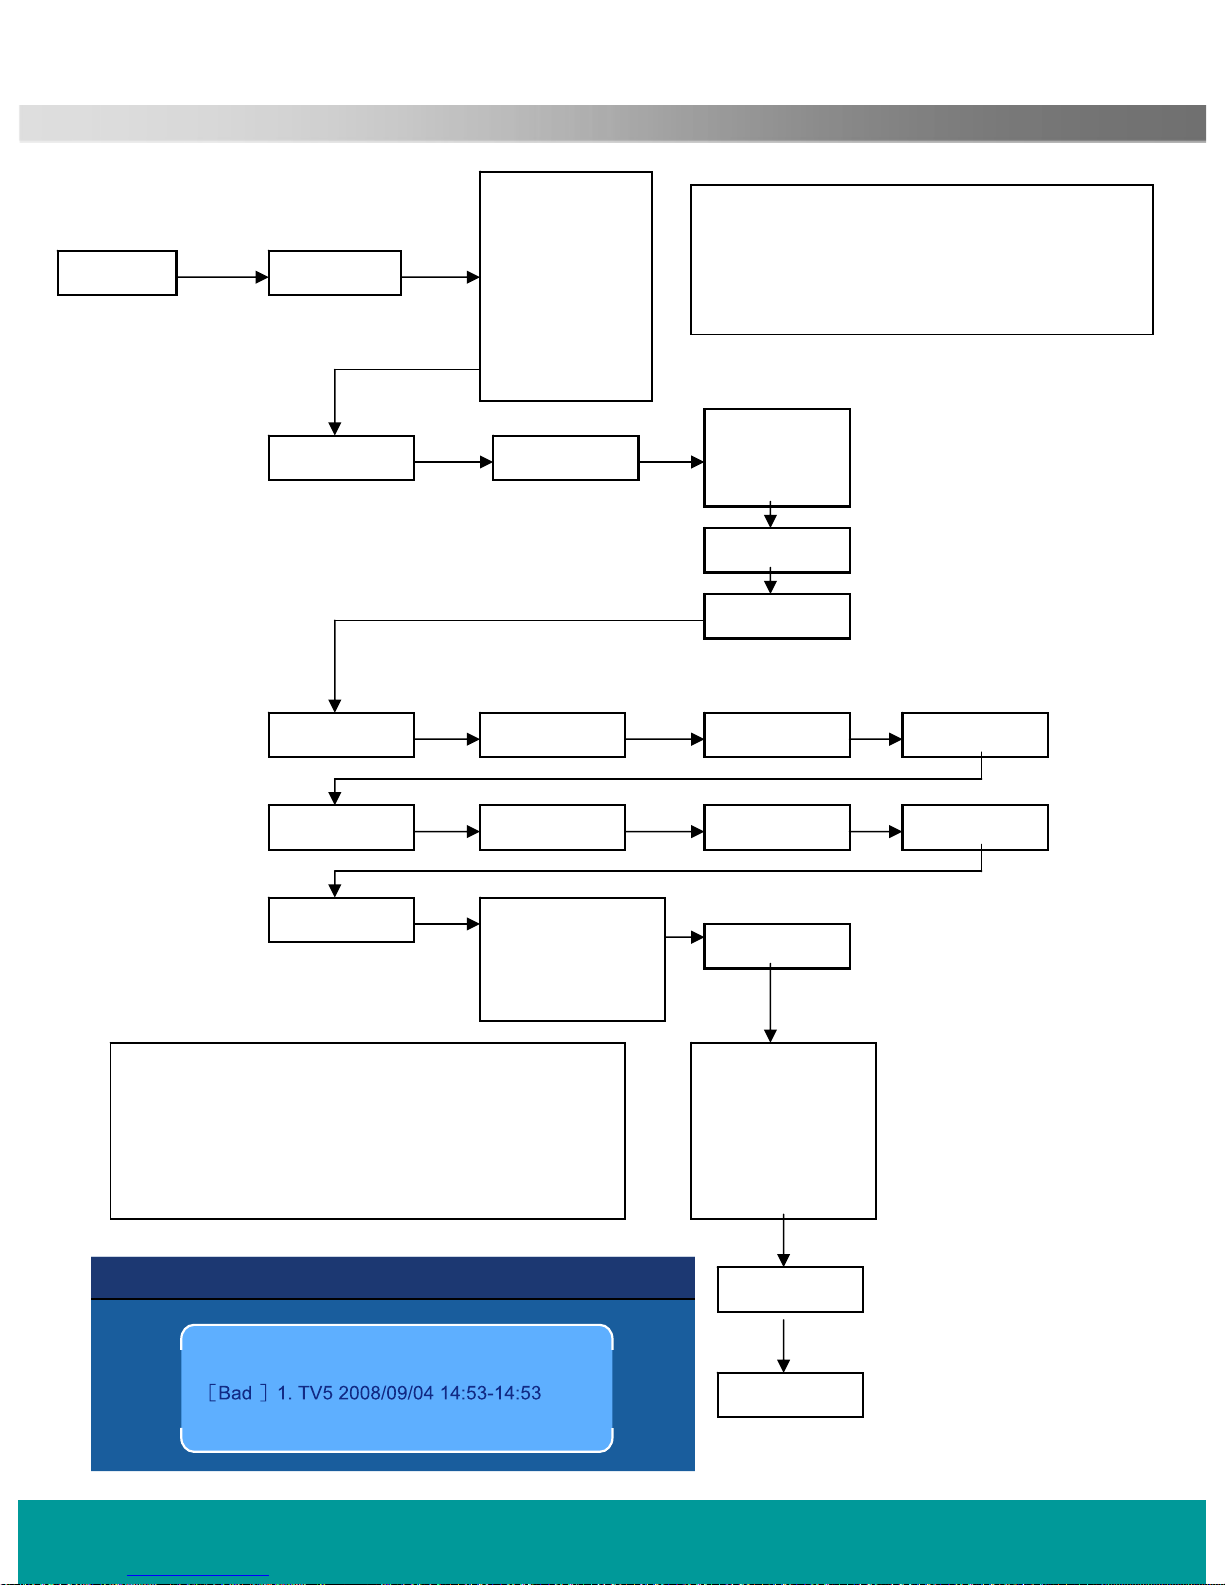
DVD, HHD and USB Record. Basic
Timer Recording cont..
TIMER SOURCE
DATE MODE
START HOURS AM/PMMINUTES
TV
DTV
R-AV
F-AV
F –S VIDEO
SCART
DV
To move from box to box, press SELECT
To move in a box press ▲/▼ then press
SELECT
To Move backwards press RETURN
ONCE
DAILY
WEEKLY
MONTH
DAY
END HOURS MINUTES AM/PM
TARGET DVD
HDD +VR
HDD MPG4
USB MPG4
If the timer is set correctly, the recorder will
revert to the TV picture. If there is an error,
the message will be shown as below. Re enter
the Timer menu and set correctly. If you
select DVD and there is no disc or the disc is
full the same message is shown. (Fig 13).
Fig 13
Timer Record
The recording time of the following
ltems are incorrect:
HDD Remaln 100:0048 SP
QUALITY
SP
HQ
SEP
SLP
EP
LP
RETURN
SELECT
HELPLINE No UK / Northern Ireland 01422 26 32 98. Rep . Ireland No 1800 88 23 90.
WEB SUPPORT. www.ekey.co.uk
Model number 4683
Page 21

Instant Recording
HELPLINE No UK / Northern Ireland 01422 26 32 98. Rep . Ireland No 1800 88 23 90.
WEB SUPPORT. www.ekey.co.uk
Model number 4683
Instant
Recording.
The first
item
is “SOURCE”. To select the recording source
move the cursor and (Fig 14). If
yo
u are recording from TV or DTV, you will need to select the
channel required. Press the button and the cursor will move into
the channel select box
.
Use the / buttons to select the
chan
nel number you require.
When you have selected the channel number, press the ◄ button
to return to the source listing, then press the SELECT button.
RECORDING TARGET
Move the cursor and
RECORDING QUALITY
To select the Recording Quality,
The
final menu is GO. Press SELECT and the recording will start.
If y
ou have made a mistake, press the RETURN button to return to
the previous menu’s in turn.
Fig 14
TV
DISC
1
SP
GO
+VR
next
NO DISC Remain 00:00:00 HQ
Source
ENTER
Select recording source
RETURN
Previous
Instant Recording
Target
Quality
Mode
▼
◄
◄
RIGHT
LEFT RIGHT buttons to select the USB, HDD or USB as
LEFT
record ing target.
use LEFT and RIGHT buttons to select HQ,
SP, LP,EP,SLP,SEP as the recording quality
RECORDING MODE
To select
the Recording Mode, use the LEFTand RIGHT buttons to select MPEG4,
+VR as the recording mode.
If you select the HDD as the recording target , there will be +VR,MPEG4 mode for selecting
If you select the USB as the recording target , there will be only MPEG4 mode for selecting
If you select the DISC as the recording target , there will be only +VR mode for selecting
Page 22

Disc Utility
DVD+R Remain 00:00:00 SP
OK
Clear
Bak Spo
Space
Number
Cap Look
Disc Utility
DVD+R Remain 00:00:00 SP
HELPLINE No UK / Northern Ireland 01422 26 32 98. Rep . Ireland No 1800 88 23 90.
WEB SUPPORT. www.ekey.co.uk
Model number 4683
Disc Utility
This feature is necessary to allow complete flexibility of discs that are to be
recorded or have been recorded, to allow playing on other DVD players.
FORMAT
.
When placing a new disc into the recorder, it will automatically detect that it
needs formatting, see Fig 15. Select YES with the ◄ button and press
SELECT.
The recorder will then ask which type of format is required DVD or MPEG4 ,
Fig 16. This entirely depends on your requirements, if you are recording a DVD
select DVD, if you are recording MPEG data select MPEG4.
Pre
ss SELECT and the disc will start formatting, see Fig 17.
RENAME.
To help you identify your home recorded discs it is useful to name them with a
uniqu
e title. This facility has extensive features. Select RENAME using the
▲/▼ buttons and press SELECT. (Fig 18).
An alpha-numeric keyboard is displayed, (Fig 19) allowing you to give each disc
a unique title. Move the cursor using the navigation buttons and when complete
press SELECT. The disc is now permanently named unless it is an erasable
disc.
PROTECT.
To enable you to “LOCK” the disc contents, select “PROTECT”. (Fig 20).
This
feature will stop data from being added if it’s a +/R disc, if it is a +/- RW
disc, it will b
e locked until it is erased.
FINALIZE.
(+/- R discs only)
To enable you to play your recorded disc on another player it must be
“finalized”. Select FINALIZE and press SELECT. The disc will now be finalized,
see Fig 21.
When completed the disc is also locked.
+/-RW discs are “Make Compatible” to enable playing on other players.
Fig 15
Fig
19
Fig 17
Fig 16
Fig 18
Fig
20 Fig 21
DVD, HDD and USB Operation. Advanced
The disc need to be formatted
before recording
Do you want to format it?
Yes
No
Which format would you like?
DVD + VR
MPEG4
Di sc is b ein g for ma
tt ed
.
Ple as e w ait ...
16%
Rename
Make compatible
Protect
Format
Finalize
ENTER
Select
RETURN
exit
Select one of the buttons
Disc name:
Protect: No
Finalized: No
Text Input
13%
Di sc is b ein g for mat ted .
Ple as e w ait ...
Disc Utility
DVD+R Remain 00:00:00 SP
Rename
Make compatible
Protect
Format
Finalize
ENTER
Select
RETURN
exit
Select one of the buttons
Disc name:
Protect: No
Finalized: No
0
1
2
3
4
Cancel
.
-
0
abc
1
d
e
f
2
g
h
i
3
j kl4
5
6
7
8
9
m n
o
5
p
q
r s
6
8
9
t
u v
7
w
x
y
z
{
}
[ ]
Page 23

HELPLINE No UK / Northern Ireland 01422 26 32 98. Rep . Ireland No 1800 88 23 90.
WEB SUPPORT. www.ekey.co.uk
Model number 4683
DVD, HDD and USB Operation. Advanced
DVD EDIT.
To manage the DVD+VR contents, select DVD using the “SWITCH” button on the
control
. Press EDIT on the remote control, a menu will be displayed as in Fig 22.
RENAME.
To rename any title, first select the file to be renamed, using the navigation buttons,
the
n
press the EDIT button. Press SELECT and a keyboard will be displayed,
see Fig 19. If there is a title already at the top of the page, select CLEAR, press
SELECT and then use the keyboard as described on the previous page.
PROTECT.
(Fig 23) DVD +/-RW only
To protect a file, first select the file to be protected using the navigation buttons.
Pre
ss SELECT, a LOCK logo will be shown in the bottom right of the file icon. This
ensures that that file is now locked and cannot be deleted. To Unlock the file, press
EDIT again, a message will appear asking if you want to Unlock the file, select Yes or
No with the ►/◄ buttons and press SELECT.
DELE
TE. (Fig 24.DVD+/- RW ONLY
To delete a file, first select the file to be deleted as described above.
Select DELETE and press SELECT. There is NO WARNING with this function, so be
sure you want to delete this file.
MERGE N
EXT TITLE. (Fig 25).
Thi
s
feature merges the titles so that when one file has completed playing the next will
start playing without the need to select it.
DELE
TE ALL CHAPTER MARKS. (Fig 26).
If the recording is longer that 10 minutes, chapters are automatically inserted. To
remove these, select this function and press SELECT. The Chapter Ma
rks will then be
deleted.
PLAY
FULL TITLE. (Fig 27).
Select the file to be played and press SELECT.
DUBBI
NG. (Fig 28).
Thi
s is a most useful feature. It allows you to transfer files from the HDD to disc.
First, ensure there is a recordable disc in the recorder with enough space for the item.
Select the file you need to transfer using the navigation buttons.
Select DUBBING and press SELECT. The file will now be transferred, the time taken
de
pends upon the size of the file. When the file is transferred a message will be
di
splayed. (Fig 29).
Fig 22
Fig 26
Fig 28
Fig 27
Fig 25
Fig 24
Fig 23
Fig 29
Rename
Protect
Delete
Merge Next
Title
Delete All Chapter Mark
Play Full
Title
Dubbing
Rename
Protect
Delete
Merge Next
Title
Delete All Chapter Mark
Play Full
Title
Dubbing
Rename
Protect
Delete
Merge Next
Title
Delete All Chapter Mark
Play Full
Title
Dubbing
Rename
Protect
Delete
Merge Next
Title
Delete All Chapter Mark
Play Full
Title
Dubbing
Rename
Protect
Delete
Merge Next
Title
Delete All Chapter Mark
Play Full
Title
Dubbing
Rename
Protect
Delete
Merge Next
Title
Delete All Chapter Mark
Play Full
Title
Dubbing
Rename
Protect
Delete
Merge Next Title
Delete All Chapter Mark
Play Full Title
Dubbing
remote
DUBBING
OK
Page 24

HELPLINE No UK / Northern Ireland 01422 26 32 98. Rep . Ireland No 1800 88 23 90.
WEB SUPPORT. www.ekey.co.uk
Model number 4683
DVD, HDD and USB Operation. Advanced
DVD EDIT cont.
The following features are available when the disc is playing. Insert a home recorded
DVD disc and start it playing.
Press EDIT and select ..
INS
ERT CHAPTER. (Fig 30)
To insert a chapter, press SELECT when this feature is selected.
DELE
TE CHAPTER MARK. (Fig 31)
To delete a chapter mark, select the chapter, select the feature and press SELECT.
DELE
TE ALL CHAPTER MARKS. (Fig 32).
To delete all chapter marks, press SELECT and all chapter marks will be removed.
CM
CUT. (Fig 33).
To delete a segment of a file, Start playing the file, press EDIT, select CM CUT and
press SELECT. A sub menu (Fig 34) will be displayed. Wait until the start of the
segment to be cut is shown, select “SET A” and press SELECT. Now select “SET B”
and when the end of the segment to be cut is seen, press SELECT.
Select “CUT” and press SELECT. The segment will be removed in a few seconds.
To cancel the operation, select “CANCEL” and press SELECT.
SET
INDEX PICTURE (Fig 35).
You can select which picture is to be displayed on the menu as the “Root” picture.
St
art the disc playing and when you see a suitable picture, press SELECT. The disc
will now be updated and the new picture shown as the Title picture.
HIDE/
UNHIDE CHAPTER (Fig 36).
You may wish to hide a chapter due to being unsuitable viewing, select the chapter,
an
d
press SELECT, the chapter will now be hidden but not removed
from the disc, to
re instate the chapter, select it and press SELECT again. The chapter will now be
played as normal.
Fig
30
Fig 31
Fig 32
Fig 33
Fig 34
Fig 35 Fig 36
Insert Chapter
Delete Chapter Mark
Delete All Chapter Mark
CM Cut
Set Index Picture
Hide/Unhide Chapter
Insert Chapter
Delete Chapter Mark
Delete All Chapter Mark
CM Cut
Set Index Picture
Hide/Unhide Chapter
Insert Chapter
Delete Chapter Mark
Delete All Chapter Mark
CM Cut
Set Index Picture
Hide/Unhide Chapter
Insert Chapter
Delete Chapter Mark
Delete All Chapter Mark
CM Cut
Set Index Picture
Hide/Unhide Chapter
Insert Chapter
Delete Chapter Mark
Delete All Chapter Mark
CM Cut
Set Index Picture
Hide/Unhide Chapter
Insert Chapter
Delete Chapter Mark
Delete All Chapter Mark
CM Cut
Set Index Picture
Hide/Unhide Chapter
Set A
Set B
Cut
Cancel
Page 25
CDROM
TRK
030/45
00: 00:00/00:00:0 0
CD
TRK
01/15
00: 03:40/00:05:0 9
HELPLINE No UK / Northern Ireland 01422 26 32 98. Rep . Ireland No 1800 88 23 90.
WE
B SUPPORT. www.ekey.co.uk
Model number 4683
DVD, HDD and USB Operation. Advanced
DVD Playing options.
This recorder also plays discs of various types :- DVD, VCD, SVCD,CD audio,CD ROM, WMA, MPEG4,
MP3
/JPEG
Ea
ch type of disc has different file structures.
DVD
. Pre Recorded. In most cases the disc will have a Menu system that can be viewed by pressing the
TITLE button. You may wish to select from the menu, using the navigation buttons and then press Play or
Select.
VCD
. This depends upon how the disc has been authored. If it has a menu system, press MENU to select the
men
u and use the navigation buttons to select the title to play. Press PLAY to start playing the title.
SVCD
. This depends upon how the disc has been authored. If it has a menu system, press MENU to select
th
e menu and use the navigation buttons to select the title to play. Press PLAY to start playing the title.
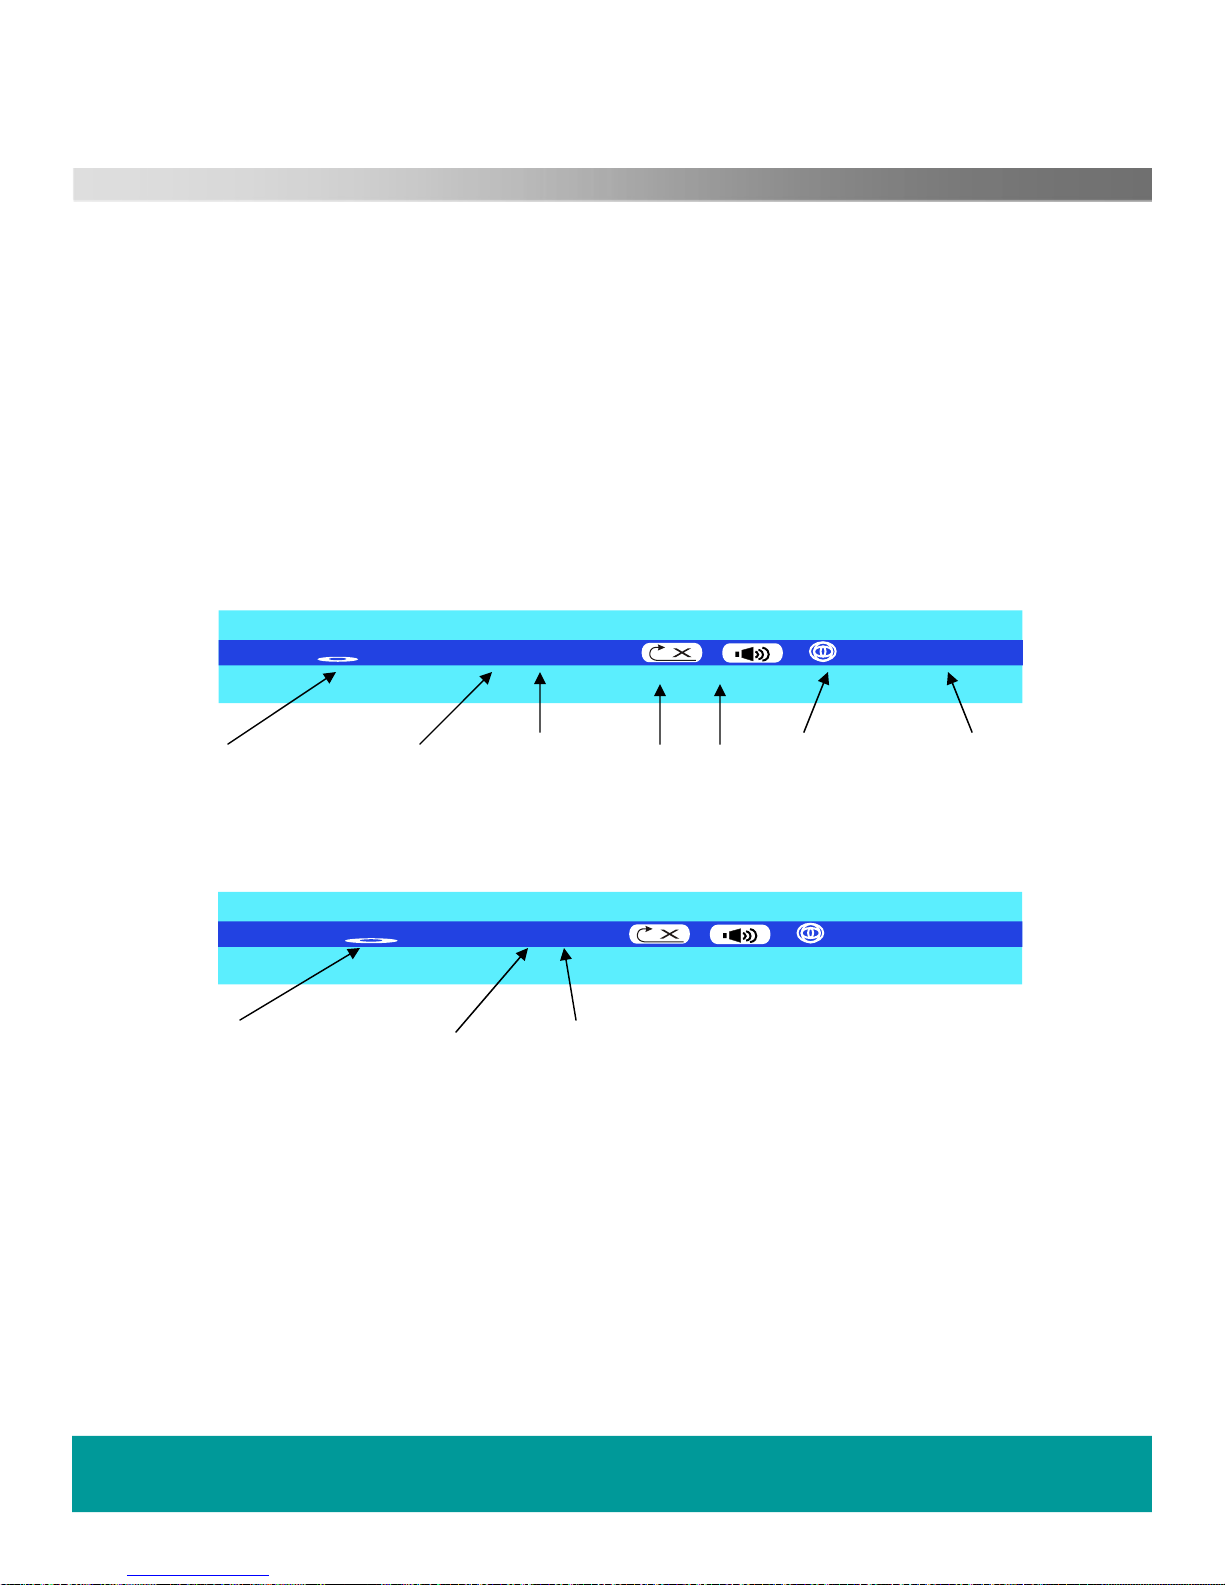
CD . This disc type does not have a visible file structure. When a disc is inserted, a Header bar at the top of
th
e screen is displayed.
CD
Disc Track playing. Number of Repeat. Mute Time played Track length
trac
k
s on disc Play
CD ROM. Picture disc .
This
format will automatically start to play from picture 1. To select a picture, press GOTO. The top of the
screen will display as Fig 37.
CDROM
Disc Picture playing. Number of
pi
ctures on disc.
To select the picture, press the ► button and this will highlight the Left digit in the picture playing box, press
again to select the next digit, Example :- to select picture 21, press the ► button 3 times then enter 21 using
th
e numeric buttons then press SELECT. The player will then display picture 21.
You may rotate, reverse and invert the pictures using the navigation buttons.
WMA .
This type of disc has a file structure as Fig 38.
If the disc has more than one directory (Left) of screen, you must use the navigation buttons to select the
dir
ectory required and press SELECT. This will open that directory and the files in that directory will be
shown on the right of screen. To select a music track, use the navigation buttons and SELECT to start the
track playing. You may also use direct number entry to select a track and press SELECT to confirm.
Fig 37
Page 26
HELPLINE No UK / Northern Ireland 01422 26 32 98. Rep . Ireland No 1800 88 23 90.
WEB SUPPORT. www.ekey.co.uk
Model number 4683
DVD, HDD and USB Operation. Advanced
DVD Playing options cont..
WMA cont.
Fig
49
MPE
G
4. The file structure depends upon how the disc is authored. Press Title to view the titles, and
use the navigation buttons to select the file to be played. Press SELECT to start playing.
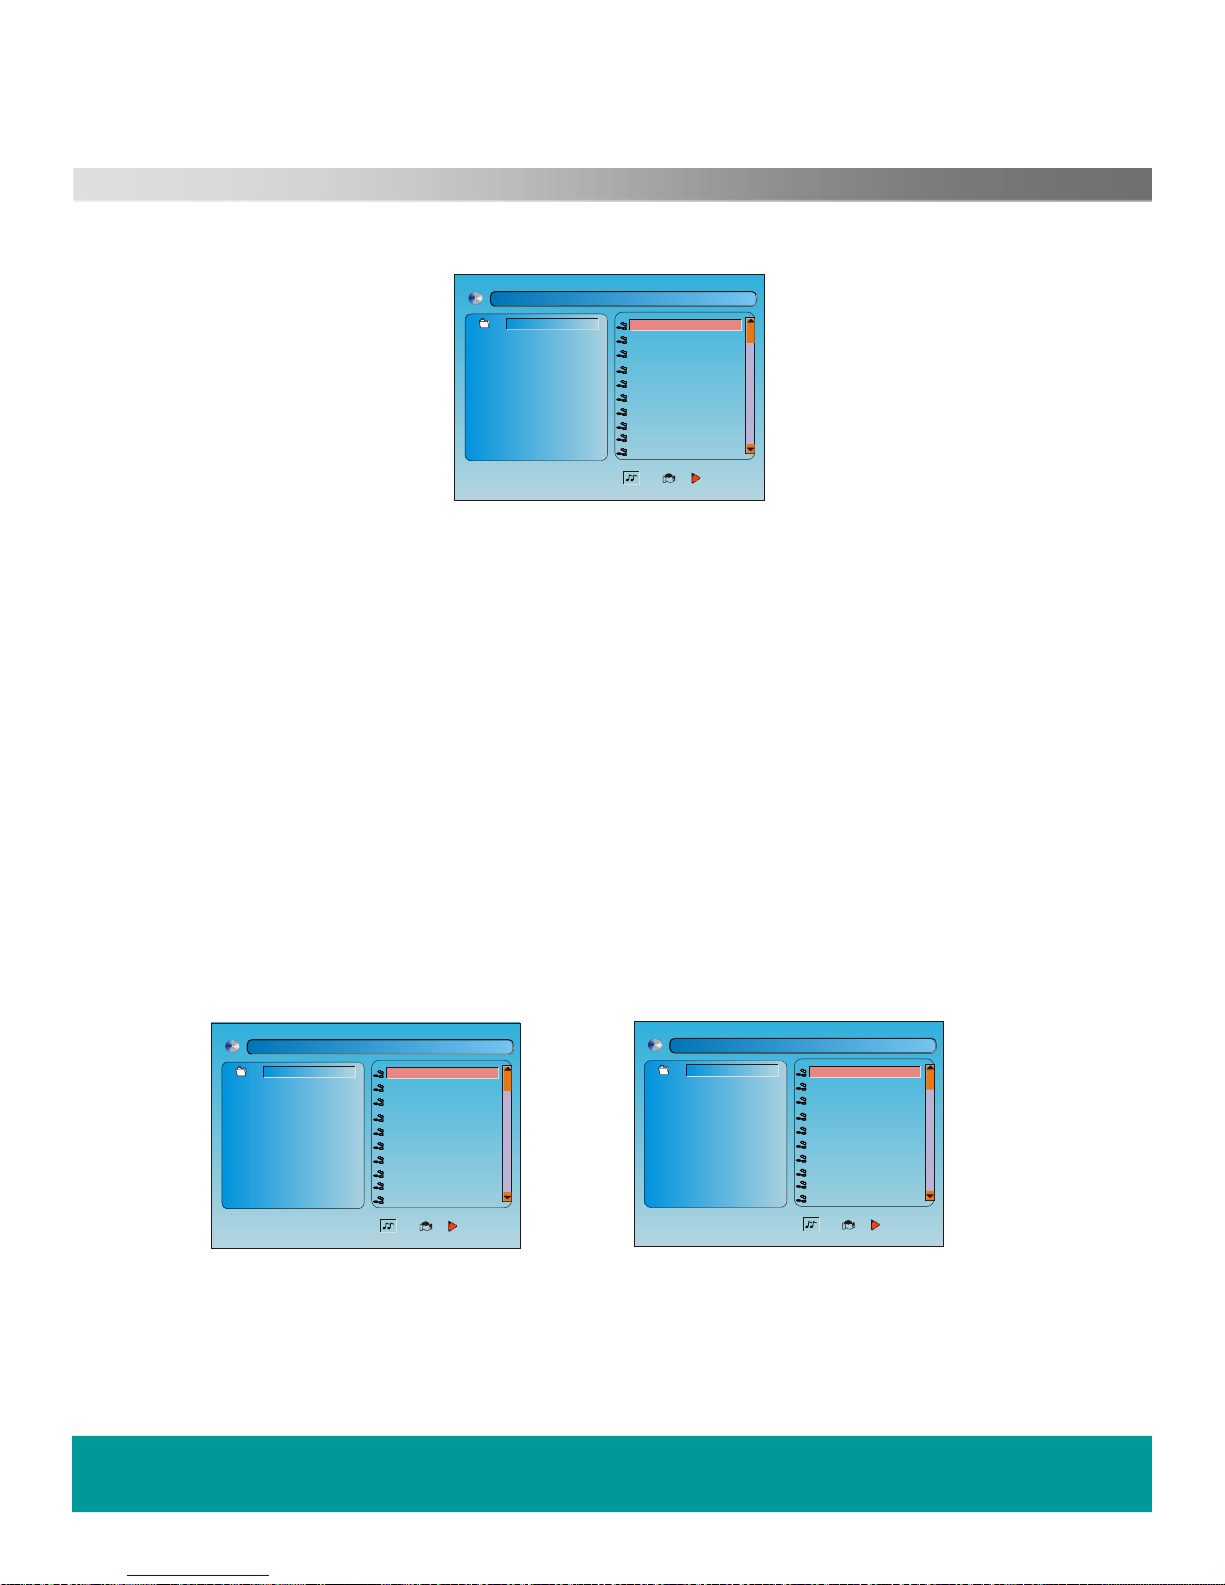
MP3
. (Fig 39)
The file structure is very similar to the WMA file structure.
If the disc has more than one directory (Left) of screen, you must use the navigation buttons to select
th
e directory required and press SELECT. This will open that directory and the files in that directory
will be shown on the right of screen. To select a music track, use the navigation buttons and SELECT
to start the track playing. You may also use direct number entry to select a track and press SELECT to
confi
rm.
JPEG. (Fig 40)
The file structure is similar to WMA and MP3 systems.
If the disc has more than one directory (Left) of screen, you must use the navigation buttons to select
th
e directory required and press SELECT. This will open that directory and the files in that directory
will be shown on the right of screen. To select a picture file, use the navigation buttons and SELECT to
display the picture. You may also use direct number entry to select a picture and press SELECT to
con
firm.
Fig
39 Fig 40
01.\
[ \ \ ] 0001------WMA
001. 001 - - - - - - - - - -
002. 002 - - - - - - - - - - -
003. 003 - - - - - - - - - - -
004. 004 - - - - - - - - - - -
005. 005 - - - - - - - - - - -
006. 006 - - - - - - - - - - -
007. 007 - - - - - - - - - - -
008. 008 - - - - - - - - - - -
009. 009 - - - - - - - - - - -
010. 010 - - - - - - - - - - -
01.\
[ \ \ ] 0001------MP3
001. 001 - - - - - - - - - -
002. 002 - - - - - - - - - - -
003. 003 - - - - - - - - - - -
004. 004 - - - - - - - - - - -
005. 005 - - - - - - - - - - -
006. 006 - - - - - - - - - - -
007. 007 - - - - - - - - - - -
008. 008 - - - - - - - - - - -
009. 009 - - - - - - - - - - -
010. 010 - - - - - - - - - - -
01.\
[ \ \ ] 0001------JPG
001. 001 - - - - - - - - - -
002. 002 - - - - - - - - - - -
003. 003 - - - - - - - - - - -
004. 004 - - - - - - - - - - -
005. 005 - - - - - - - - - - -
006. 006 - - - - - - - - - - -
007. 007 - - - - - - - - - - -
008. 008 - - - - - - - - - - -
009. 009 - - - - - - - - - - -
010. 010 - - - - - - - - - - -
Page 27
HELPLINE No UK / Northern Ireland 01422 26 32 98. Rep . Ireland No 1800 88 23 90.
WEB SUPPORT. www.ekey.co.uk
Model number 4683
DVD, HDD and USB Operation. Advanced
DVD Playing options cont..
Prog
ram Playing. (compatible with DVD,SVCD,VCD,CD, CD-G, MP3/JPEG and MP4 discs).
All
discs with file structures may be programmed to play the files in your preferred order, shown below is
a typical file structure.
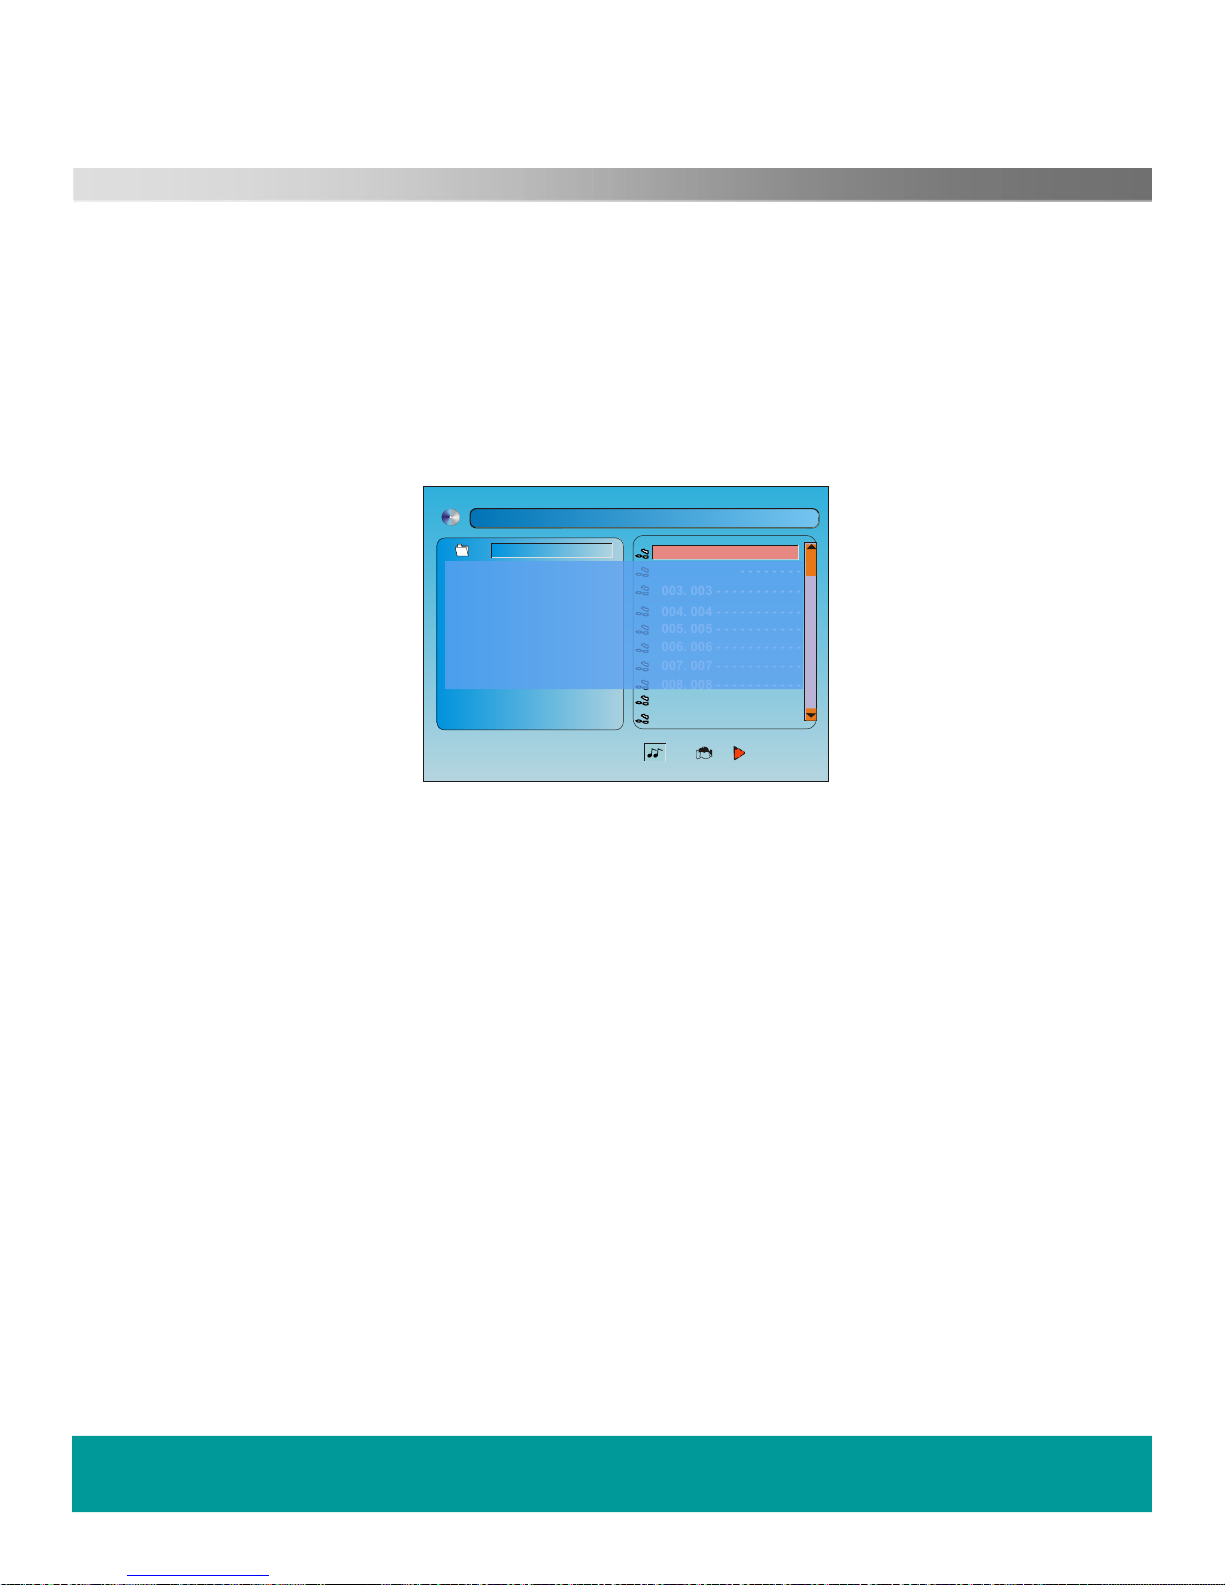
Insert a disc and wait for the menu listing to be shown on screen (Fig 41).
Press PROGRAM on the remote control.
A list will be
shown as Fig 41.
Using the navigation buttons to move up and down and left and right. Enter the track number you wish to
pla
y using the numeric buttons. When the list is complete, select OK and press SELECT. The disc will
now play the tracks in the order on the screen.
Fig 41
Repeat.
All disc t
ypes have a Repeat capability. Each press of the Repeat button will allow repeating of
Direc
tory, File, Track or Off.
Below is a list of disc types and the repeat functions
DVD :- Chapter, Title, Off
SVCD
, VCD, CD, CD-G, WMA, MP3/JPEG, MP4 :- Track, Disc, Off
Sl
ow.
In
DVD and VCD/SVCD playing modes, you may slow the action using the SLOW button. Each press
slows the movement as follows :- ½, 1/3, ¼, 1/5, 1/6, 1/7, Full speed.
P-
Scan.
This allows you to select Progressive or Interlace scan. Do not use Progressive scan unless your TV
sup
ports it. Pressing this button when the TV cannot support it, will result in a blank screen. Press
again to restore a picture.
Angl
e.
This feature allows the user to select different viewing angles. However this is disc dependant and not
in general use.
N/P.
This button selects NTSC (American) and PAL (Europe) colour systems. The default is PAL and it
should not be necessary to use this button.
01.\
[ \ \ ] 0001------WMA
001. 001 - - - - - - - - - -
002. 002 - - - - - - - - - - -
003. 003 - - - - - - - - - - -
004. 004 - - - - - - - - - - -
005. 005 - - - - - - - - - - -
006. 006 - - - - - - - - - - -
007. 007 - - - - - - - - - - -
008. 008 - - - - - - - - - - -
009. 009 - - - - - - - - - - -
010. 010 - - - - - - - - - - -
1 - - - 2 - - -
-
3 - - -
-
4 - - -
-
5 - - -
-
6 - - -
-
7 - - -
-
8 - - -
-
9 - - -
-
10 - - -
-
11 - - -
-
12 - - -
-
13 - - -
-
14 - - -
-
15 - - -
-
16 - - -
-
Page 28

HELPLINE No UK / Northern Ireland 01422 26 32 98. Rep . Ireland No 1800 88 23 90.
WEB
SUPPORT. www.ekey.co.uk
Model number 4683
DVD, HDD and USB Operation. Advanced
DVD Playing options cont..
Subtit
les. (DVD/SVCD).
Most DVD’s have subtitles in various languages, depending on the title. To select the subtitle, press the
bu
tton and a subtitle header will be shown, showing the language. Press the button until the title you
require is shown. To turn off the subtitles press again until (SUBTITLE OFF) is displayed.
Audio.
(DVD/SVCD).
Most DVD’s have more than one soundtrack. To select a different soundtrack language press the Audio
button.
Press again to select other languages.
Page 29

HELPLINE No UK / Northern Ireland 01422 26 32 98. Rep . Ireland No 1800 88 23 90.
WEB SUPPORT. www.ekey.co.uk
Model number 4683
DVD, HDD and USB Operation. Advanced
HDD EDIT.
To manage the HDD+VR contents, select HDD using the “SWITCH” button on the remote
control
. Press EDIT on the remote control, a menu will be displayed as in Fig 42.
RENAME.
To rename any title, first select the file to be renamed, using the navigation buttons,
the
n
press the EDIT button. Press SELECT and a keyboard will be displayed,
see Fig 19. If there is a title already at the top of the page, select CLEAR, press
SELECT and then use the keyboard as described on the previous page.
PROTECT. (Fig 43
)
To protect a file, first select the file to be protected using the navigation buttons.
Pre
ss SELECT, a LOCK logo will be shown in the bottom right of the file icon. This
ensures that that file is now locked and cannot be deleted. To Unlock the file, press
EDIT again, a message will appear asking if you want to Unlock the file, select Yes or
No with the ►/◄ buttons and press SELECT.
DELETE. (F
ig 44).
To delete a file, first select the file to be deleted as described above.
Select DELETE and press SELECT. There is NO WARNING with this function, so be
sure you want to delete this file.
DELE
TE ALL CHAPTER MARKS. (Fig 45).
If
the recording is longer that 10 minutes, chapters are automatically inserted. To
remove these, select this function and press SELECT. The Chapter Ma
rks will then be
deleted.
PLAY
FULL TITLE. (Fig 46).
Select the file to be played and press SELECT.
DELETE ALL. (Fig 47
)
To delete all titles, select the function and press SELECT. There is NO WARNING
with this function, so be sure you want to delete all files before pressing SELECT.
DUBBI
NG. (Fig 48).
Thi
s is a most useful feature. It allows you to transfer files from the HDD to disc.
First, ensure there is a recordable disc in the recorder with enough space for the item.
Select the file you need to transfer using the navigation buttons.
Select DUBBING and press SELECT. The file will now be transferred, the time taken
de
pends upon the size of the file. When the file is transferred a message will be
di
splayed. (Fig 49).
Fig 42
Fig 44
Fig
43
Fig 45
Fig 47
Fig 48
Fig
46
Fig
49
Rename
Protect
Delete
Delete All Chapter Mark
Play Full
Title
Delete All
Dubbing
Rename
Protect
Delete
Delete All Chapter Mark
Play Full
Title
Delete All
Dubbing
Rename
Protect
Delete
Delete All Chapter Mark
Play Full
Title
Delete All
Dubbing
Rename
Protect
Delete
Delete All Chapter Mark
Play Full
Title
Delete All
Dubbing
Rename
Protect
Delete
Delete All Chapter Mark
Play Full
Title
Delete All
Dubbing
Rename
Protect
Delete
Delete All Chapter Mark
Play Full Title
Delete All
Dubbing
Rename
Protect
Delete
Delete All Chapter Mark
Play Full
Title
Delete All
Dubbing
DUBBING
OK
Page 30

HELPLINE No UK / Northern Ireland 01422 26 32 98. Rep . Ireland No 1800 88 23 90.
WEB SUPPORT. www.ekey.co.uk
Model number 4683
DVD, HDD and USB Operation. Advanced
USB (Memory stick) EDIT.
To manage the USB contents, select USB using the “SWITCH” button on the remote
control
. Press EDIT on the remote control, a menu will be displayed as in Fig 20
RENAME. (F
ig 50)
To rename any title, first select the file to be renamed, using the navigation buttons,
the
n
press the EDIT button. Press SELECT and a keyboard will be displayed,
see Fig 32. If there is a title already at the top of the page, select CLEAR, press
SELECT and then use the keyboard as described on the previous page.
DELETE. (F
ig 51).
To delete a file, first select the file to be deleted as described above.
Select DELETE and press SELECT. There is NO WARNING with this function, so be
sure you want to delete this file.
COPY.
(Fig 52)
You may copy any file from the USB to either HDD or DVD. Select the file you want to
copy. Select Copy in the menu and press SELECT.
You will be asked to choose a destination, either HDD or DVD. Use the navigation
buttons to select a destination and select OK. Press SELECT and the file will be
copied
. When complete you will see a copy completed message and the recorder will
revert to the file list.
DE
LETE ALL. (Fig 53).
To delete all titles, select the function and press SELECT. There is NO WARNING
with this function, so be sure you want to delete all files before pressing SELECT.
Fig
50
Fig 51
Fig 52
Fig 53
Rename
Delete
Copy
Delete All
Rename
Delete
Copy
Delete All
Rename
Delete
Copy
Delete All
Rename
Delete
Copy
Delete All
Page 31
HELPLINE No UK / Northern Ireland 01422 26 32 98. Rep . Ireland No 1800 88 23 90.
WEB
SUPPORT. www.ekey.co.uk
Model number 4683
DVD, HDD and USB Operation. Advanced
Time Shift.
This recorder allows time shifting. You may record a programme to HDD and view it as it is recording with
a time delay.
Method
1. Time shift with Title Generation.
To enter Time Shift, select HDD. Press SWITCH and select HDD.
Select the source, i.e TV or DTV.
Pr
ess the RECORD button. This is now recording in “real time”. To start “Time Shift” press PLAY.
Pr
ess DISPLAY to see the progress of the recording.
The display will show the “Time Recorded” and
the Time played.
You may use the Fast Forward and Fast Reverse buttons, but if you “Fast forward” to within 5 seconds of
the
actual recorded time, the recorder will exit Time Shift.
To exit Time Shift, press the STOP button once, the recorder will then Record in “real time”. To stop the
recording fully, press the STOP button again.
Method
2. Time Shift without Title Generation.( i.e not
stored on HDD).
Press SOURCE to select TV or DVT.
Select the programme you wish to record.
Pr
ess “PAUSE” to enter the Time Shift mode. You have now entered the “Time Shift “ mode and the
pic
ture will be Paused. Press DISPLAY to see the progress of the recording.
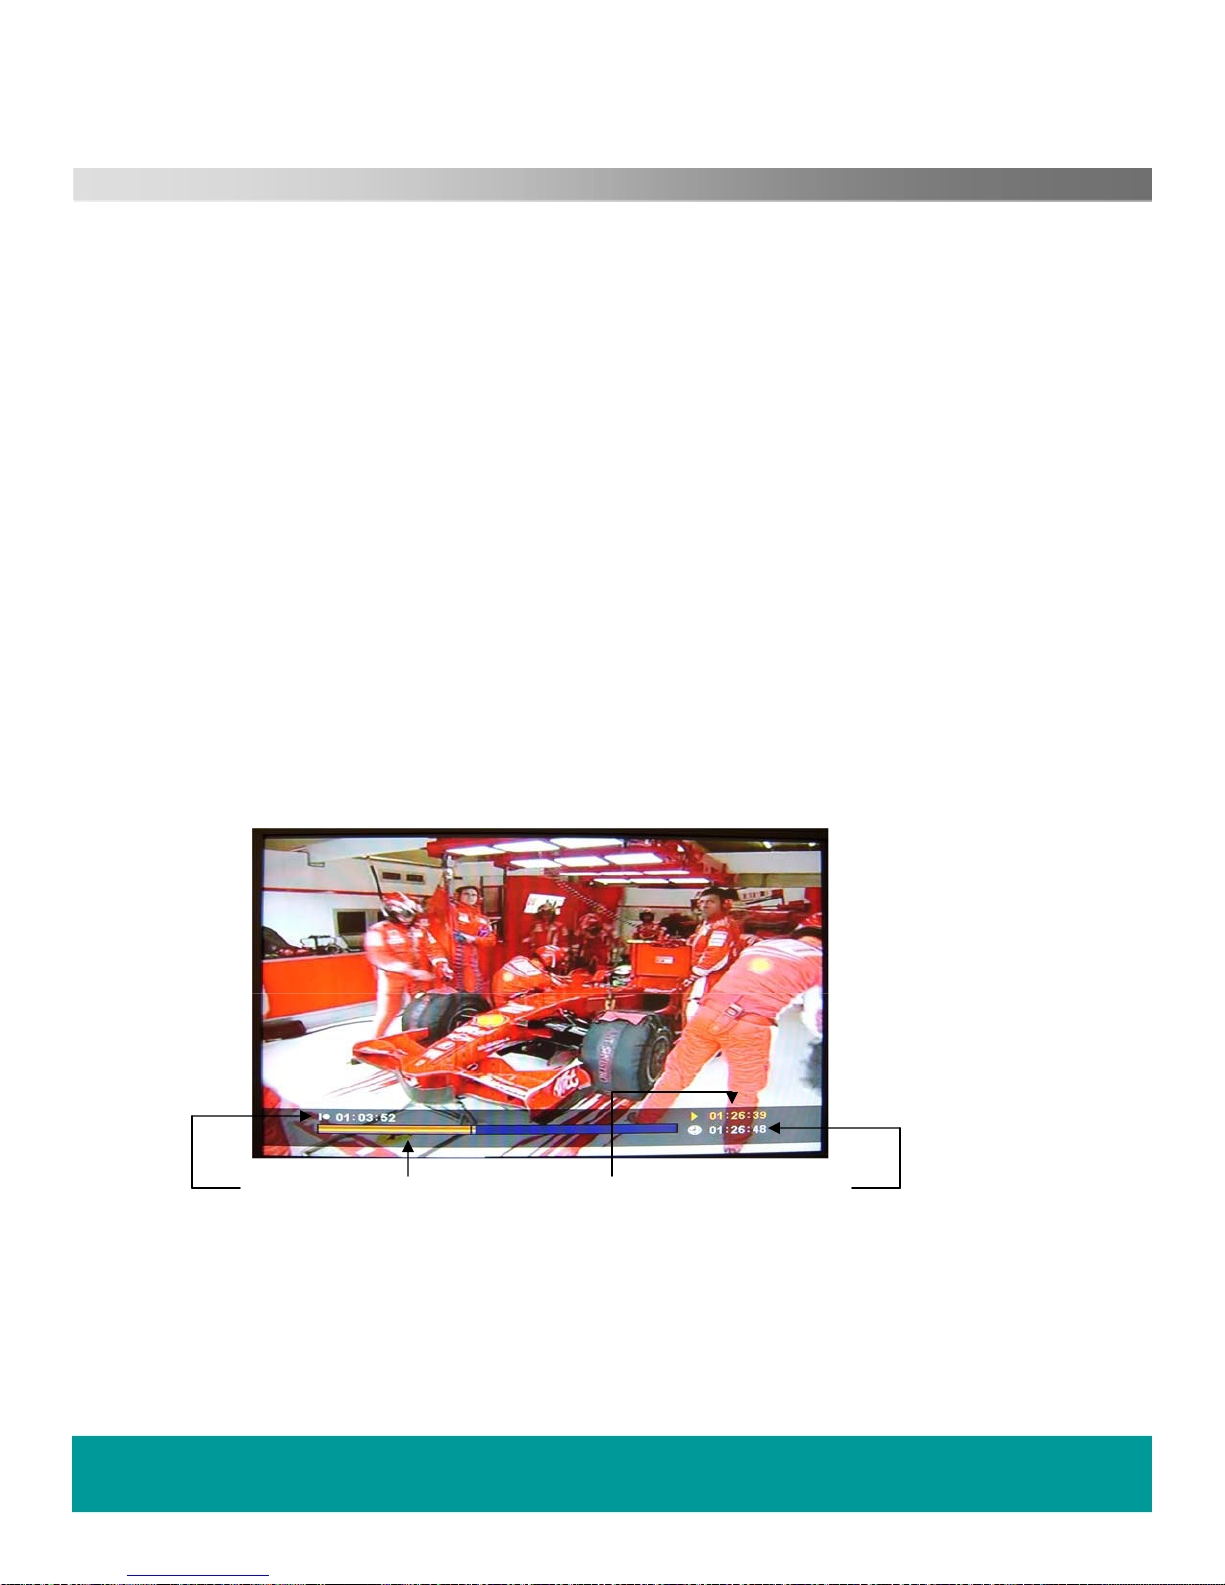
A Progress Bar is displayed at the bottom of the picture (Fig 54) shows the amount of “Buffer” space used
(up to 2 hrs).
Press P
LAY to view the recording from the start of the Recording.
You may use the Fast Forward and Fast Reverse buttons, but if you “Fast forward” to within 5 seconds of
the
actual recorded time, the recorder will exit Time Shift.
Start Time. Progress bar Time play can start. Recorded Time
Fig54
To Exit Time Shift press STOP.
Page 32

HELPLINE No UK / Northern Ireland 01422 26 32 98. Rep . Ireland No 1800 88 23 90.
WEB SUPPORT. www.ekey.co.uk
Model number 4683
Setup
Setup
Fig 55
The Setup item is an entry for basic and advanced system settings.
And the advanced settings are mainly for DVD playback.
By highlighting a proper item and then pressing ENTER, you can set various options. For more information,
please see the fo
ll
owing descriptions.
Two options, PAL and NTSC, can be selected according to your TV set.
Screen Saver
Two options , On and Off ,Can be selected according to your desire.
ON means enable the screen saver mode; OFF means disable.
Portuguese.
To select one, p
ress UP/DOWN/LEFT/RIGHT to highlight a desired language and
You can select a time format from the list by pressing UP/DOWN/LEFT/RIGHT and then SELECT. In the time
M:
Month; D: Date; Y: Year; 12: 12-Hr Time (AM/PM Time); 24: 24-Hr Time.
use ARROW key to adjust the system date .
use ARROW key to adjust the system time.
then press SELECT.
TV System
Sys Language
Seven system language selections for the UI display: English, German, Spanish, French
,
Time Format
forma
t, there is 6 format like:M_D_Y_12 or m_d_y_24, Y_M_D_12 or Y_M_D_24, D_M_Y_12 or D_M_Y_24 in here ,
Date Set
Time Set
For Timer Recording, date and time should be correct. Since “Power off” may effect date and time settings, you should re-set
them. (Just by inputting digits for each section: MM, DD, YY, Hr, Min, and A/P.)
Setup
NO DISC Remain 00:00:00 SP
ENTER
select
RETURN
exit
Select setup option
01/01/2008 12:00:00 AM
System
Playing
A / V Set
Recording
TV Tuner
Digital TV
TV System
Sereen Saver
Sys Language
Time Format
Set Timo
Reset Setting
Page 33

HELPLINE No UK / Northern Ireland 01422 26 32 98. Rep . Ireland No 1800 88 23 90.
WEB SUPPORT. www.ekey.co.uk
Model number 4683
Setup
Set all options back to the factory settings.
This item includes the following settings: Audio Lang (audio language), Subtitle Lang
(subtitle language), Password, Menu Lang (menu language), and Rating. (Fig 56)
press U
P/DOW
N
/LEFT/RIGHT to highlight a desired language and then press SELECT.
Press U
P/DO
WN
/LEFT/RIGHT to highlight a desired language and then press SELECT.
Throu
gh this item, you can set a password to lock the recorder (no initial password exists). When the
recor
de
r
is locked, you will be asked to input the correct password before setting the Rating (restriction level)
item or c
hang
in
g th
e
password.
press U
P/DOWN
/LEFT/RIGHT to highlight a desired language and then press .
The recorder provides the Rating (restriction level) setting function for protecting kids from watching unhealt
cont
e
nts,
up to eight levels according to the disc type. When playing a lockable disc, you can set a prop
through th
is R
a
ting setting according to the disc level an
d
your need.
Notes:
YCbCr: Choose it if the unit is connected to your TV set with YCbCr video cable
RGB: Choose it if the unit is connected to your TV set through SCART out jack.
P-SCAN: Choose it if the unit is connected to your TV set with YPbPr video cable and the TV set is in the
progressive scan mode.
.
SELECT.
restriction level
Before setting the restriction level you will be asked to input the correct password if the recorder is locked.
The Rating setting goes into effect only when the recorder is locked.
Reset Setting
Playing
Seven selections for Audio language: English, German, Spanish, French, Portuguese, and Latin. To select one,
Seven selecti
ons for Title language: English, German, Spanish, French, Portuguese, and Latin. To select one,
Seven selections for Men
u language: English, German, Spanish, French, Portuguese, and Latin. To select one,
This setting item provides f
our options: Video Output, TV Type, Dual Mono, HDMI output, Speaker, Downmix and SPD
IF Output.
Audio Lang
Subtitle Lang
Password
Menu Lang
Rating
A/V Set
Video Output
Fig 56
Setup
NO DISC Remain 00:00:00 SP
ENTER
select
RETURN
exit
Select setup option
01/01/2008 12:00:00 AM
System
Playing
A / V Set
Recording
TV Tuner
Digital TV
Audio Lang
Subtitle Lang
Password
Menu Lang
Rating
Page 34

HELPLINE No UK / Northern Ireland 01422 26 32 98. Rep . Ireland No 1800 88 23 90.
WEB SUPPORT. www.ekey.co.uk
Model number 4683
Setup
PS 4:3: Pan Scan, available for general TV. The left and right edges of the picture will not be seen and the
rest will fill the TV screen when a wide-screen object is played.
LB
4:3: Letter Box, available for general TV. Black
r
a
b
s
will appear at the top and bottom edges of TV
screen when a wide-screen object is played.
16:9
:
Wide Screen, available for a wide-screen TV. (Default)
Notes:
Three options are provided: PCM, RAW, OFF. To select one, press UP/DOWN/LEFT/RIGHT to highlight the
de
sired option and then SELEAT to confirm.
PCM: Available when the recorder connects to a dual-channel digital stereo amplifier. For a Dolby Digital
or MPEG disc, its audio data will be modulated to dual-channel PCM data and outputted from coaxial or
optical jacks.
RAW: Available when the recorder connects to a power amplifier via coaxial or optical jacks. For a Dolby
Digital, DTS, or MPEG disc, the output data from the recorder will be the corresponding raw digital data. Of
course, the connected amplifier should be capable of decoding Dolby Digital, DTS, or MPEG.
OFF: Disable the SPDIF Output function. No data will be outputted from coaxial or optical jacks.
In this item , three options are included, they are:4:3PS,4:3LB,16:9.
Downmix
Four options are provided :Stereo, Mono L,Mono R,Mix Mono.
HDMI OUT
four options are provided:480P/576p,720p,1080i,1080p. (default :1080i)
When using CVBS or S-Video out jack to connect to TV, you can select any of them.
When TV is in the progressive scan mode, RGB can be selected.
The default is YCbCr.
TV Type
Due to the aspect ratio adopted when a disc is recorded, some discs cannot be played in the aspect ratio you choose.
The disc recorded with 4:3 mode can only be played in 4:3 ratio.
You should set the TV Type according to the TV connected.
DUAL MONO
SPDIF Output
In this item,four options are includedto select,,they are :LT/RT,Stereo,VSS,OFF.
Notes:
Page 35

HELPLINE No UK / Northern Ireland 01422 26 32 98. Rep . Ireland No 1800 88 23 90.
WEB SUPPORT. www.ekey.co.uk
Model number 4683
Setup
Speaker
In this item , there are 3 options to select , options are: All LG ,All sm,mixed.
Set the receiving mode of TV signal: Antenna or Cable.
The recorder provides an Auto Tuning function that can search TV channels automatically and save them in
the recorder in a certain order. However, this Auto Tuning function should be run again if the TV channel
distribution is changed by channel providers or the recorder is re-installed.
By the Channel Set item in the Setup menu, you can see and fine adjust the detailed information of
channels.
Press
UP/DOWN to highlight the Channel Set item, and then press Select to
Select a chann
el n
umb
e
r.
Set
whe
the
r
the selected channel is active.
Fine tu
ne the
channel.
Choose
an audio format for the current channel output.
Select another channel number for swapping with the current channel.
Name the current channel.
Tune a TV channel manually.
Use UP/DOWN button to highlight the Manual Tuning ,then press Select button to start scan Tuning station
TV Tuner
TV Signal
Auto Tuning
Channel Set
enter the following interface in which you can.
Manual Tuning
Fig
58
Fig
57
Channel Number
Aotive
Fine
Tune
Audio Format
Swap Channel
Channel Name
Manual
Tune
1
Yes
o
PAL-1
1
Start
Setup
NO DISC Remain 00:00:00 SP
ENTER
select
RETURN
exit
Select setup option
01/01/2008 12:00:00 AM
System
Playing
A / V Set
Recording
TV Tuner
Digital TV
TV Signal
Auto Tuning
Channel set
Manual Turing
Recording
In this item,three options are included:DVD quality,MEPG4 quality,AUTO chapter
Take the selected quality of the MPEG 4 qualitity as an example, after selected the MPEG 4,there will
be display six record quality as before. press LEFT/UP
/DOWN to select a desired recording qualityand
then press the SELEC
T .
For DVD qualit
y, the same steps of recording is the same as the MPEG4 quality.
in Auto chapte
r,you can select the 5min,10min.20min.30 min.off.
5min means you set the time to record can last 5minu
tes. 10min means you set the time to record can last
10minutes. 20min means you set the time to record ca
n last 20minutes. 30min means you set the time to
record can last 30minutes. o
ff means that the time to record can last forever.
This item includes the following settings:TV Signal, Auto Tuning,
Channel set, Manual Turing.
Page 36

HELPLINE No UK / Northern Ireland 01422 26 32 98. Rep . Ireland No 1800 88 23 90.
WEB SUPPORT. www.ekey.co.uk
Model number 4683
TV Operation (Advanced)
Analog TV.
After the basic setup, there are many other useful features to allow the full
fe
atures of the recorder to be realised.
Auto
Tuning.
When Auto tuning is performed, the stations are stored in “Found” order.
To place the stations in the correct order i.e Location 1= BBC1,
Locat
ion 2 = BBC2 etc, you must enter the CHANNEL SET menu.
Press the SETUP button and with the navigation buttons select TV TUNER
(F
ig 59).
Press the ► button and enter the adjacent sub menu, (Fig 60). Select
CHANNEL SET and press SELECT. (Fig 61).
It is recommended you have a current TV guide to hand.
Select Channel Number with the ▲/▼ buttons and to select the Channel
number use the ►/◄ buttons. Select (1).
Move the cursor to Swap Channel and with the ►/◄ buttons, find BBC1
station. You must press SELECT each time. When you have located BBC1,
wait a few seconds, the recorder will automatically swap the station into
location 1.
Select Channel number again, and select (2).
Move the cursor to Swap Channel, and using the ►/◄ buttons and SELECT
loc
ate BBC2, again wait a few seconds, BBC2 will now be located in location
2.
Fig
59
Fig
60
Fig
61
To move the rest of the channels, continue as above.
The correct channel locations are :- BBC1(1), BBC2 (2), ITV1 (3), Channel 4 (4), Five (5).
Ac
tive.
This feature allows the user to (Hide) any channel tuned.
Select the channel you wish to hide, using the Channel Number box.
Select “ACTIVE” and to hide switch the status to “NO” using the ►/◄ buttons.
The selected channel will now not be accessed by the CH+/CH- buttons but still can be selected with the numeric
butt
ons. To turn off this feature, enter the menu and select “YES”
Fine
Tune.
This feature is used to manually adjust the tuning of a station, if there is interference or a poor picture or sound.
Use the ►/◄ buttons to increase or decrease the level from “0”.
Audio
Format.
This feature allows the selection of the different sound standards in Europe. Pal “I” is the default state used in the
UK. B/G is used in Western Europe, D/K is used in Eastern Europe.
Chan
nel Name.
You may name any channel using the Text keyboard.
Select the channel you wish to name in the Channel Number box.
Select Channel Name and press SELECT, the Text Keyboard will now be displayed (Fig 38). Move the cursor
around the keyboard using the navigation buttons and select OK to complete.
Man
ual Tune.
System
Playing
A / V Set
Recording
TV Tuner
Digital TV
TV Signal
Auto Tuning
Channel Set
Manual Tuning
TV Signal
Auto Tuning
Channel Set
Manual Tuning
System
Playing
A / V Set
Recording
TV Tuner
Digital TV
Channel Number
Aotive
Fine
Tune
Audio Format
Swap Channel
Channel Name
Manual
Tune
1
Yes
o
PAL-1
1
Start
Page 37

0006 ITV2
0008 8
0010 ITV3
0013 Mere 4
SNO Channel name
Fav/ Del/ Skip/ Lock
0004 Channel 4
Fig 66
HELPLINE No UK / Northern Ireland 01422 26 32 98. Rep . Ireland No 1800 88 23 90.
WEB SUPPORT. www.ekey.co.uk
Model number 4683
TV Operation (Advanced)
Analog TV cont.
Manual Tune.
This allows the user to add another channel if you need to.
Before you start, Select an unused channel using Channel Number.
Then select Manual Tune.
Select START and press SELECT, the display (Fig 62) will be shown.
To tune press the ►/◄ buttons, when you have found the correct channel,
press
SELECT. This station will now be stored in the location selected.
Digital TV. (Fig 63).
To operate the DVBt section to its maximum potential please see the
following instructions.
To setup the DVBt section, press the SETUP button and using the
navigation buttons select SETUP. In the SETUP menu select “Digital TV”.
Pr
ess the ►button to enter the second sub menu and select DTV
Channel. Press the ► button again to enter the third sub menu.
TV Editing Press SELECT, see Fig 64.
This menu allows you to set “Favourite”, “Delete”, ”Skip” and “Lock”
functions.
To select each function use the coloured buttons, one press will select
another press will de-select.
Favourite (Fig 65). Adds any selected channel to a “Favourites” library for
quick access.
Delete. Any channel marked with the “X” will be deleted when you exit the
me
nu. So be sure you wish to delete, the only way to restore a deleted
channel is to perform a retune.
Skip. This allows channels to be skipped without deleting. You may unskip at any time without the need of retuning.
Lock.
This allows you to Lock particular channels which need a password
to
view. You may also unlock any channel providing the password is used.
To exit this menu, press RETURN.
Radio
Editing.
Thi
s
has all the same functions as TV Editing, and will not be repeated
here.
Program Guide. (Fig 66)
Select Program Guide and press SELECT. “See Fig 66”.
The coloured buttons provide Daily (Red), Weekly (Green) and Extended
(Yellow) information.
You may use the EPG to set quick record timers. Select the channel and
program required. Press SELECT see Fig 67. Select Yes or No and press
SELECT.
To exit the EPG press RETURN.
Radio EPG.
This has the same functions as TV EPG and will not be repeated here.
Fig
62
Fig
63
Fig
64
Fig 65
Fig
67
Setup
NO DISC Remain 00:00:00 SP
ENTER
select
RETURN
exit
Select setup option
01/01/2008 12:00:00 AM
DTV Channel
Area Setting
Area Scan
Manual Scan
System
Playing
A / V Set
Recording
TV Tuner
Digital TV
Setup
NO DISC Remain 00:00:00 SP
ENTER
select
RETURN
exit
Select setup option
01/01/2008 12:00:00 AM
DTV Channel
Area Setting
Area Scan
Manual Scan
System
Playing
A / V Set
Recording
TV Tuner
Digital TV
TV Editting
Radio Editing
Program Guide
Radio EPG
Channel Mode
DTV Password
Manual Tune
77%
Previoue
[RETURN] Cancel [ENTER] Save
Next
0003 ITV1
0004 Cha
0006 ITV2
0008 8
0010 ITV3
0013 MOR04
15:28-15:30
Daily
Granada Weather
Weekly Extended
Daily mode
Daily mode
25/11/2005 15:14:52
Set timer record for EPG program
or not?
yes
NO
SNO char
0003 ITV1
0006 ITV2
0008 8
0010 ITV3
0013 Mere 4
Fav Del Skip Lock
Channel Organizer
SNO Channel name
15:28-15:30
Daily
Granada Weather
Weekly Extended
Save
Fav/ Del/ Skip/ Lock
0004 Channel 4
×
0003 ITV1
25/08/2008 15:14:00 Friday
14:30-15:28
15:28-15:30
15:30-15:35
15:35-15:50
15:50-16:00
16:00-16:30
Our New Life In Everwood
Granada Weather
Pocoyo
Mr Bean: The Animated Series
Planet Sketch
Disney’s The Legend Of Tarzan
Page 38

HELPLINE No UK / Northern Ireland 01422 26 32 98. Rep . Ireland No 1800 88 23 90.
WEB SUPPORT. www.ekey.co.uk
Model number 4683
TV Operation (Advanced)
Digital TV cont..
Channel Mode. (Fig 68).
You may set the channels into groups, there are 8 to chose from :- 1 None,
2 News, 3 Science, 4 Sports, 5 Movies, 6 Kids, 7 Music, 8 Fashion.
To set any channel to any group, select the channel and then use the
numeric buttons to enter the required number.
DTV Password.(Fig 69)
The recorder has a default password of “0000” to change this, select DTV
Password. Enter the Old password, then enter the new 4 digit password
twice. The new password is now active. Please remember the new
password.
Man
ual Tuning. (Fig 70)
In some circumstances it may be necessary to retune just one channel in the
group. This may be done in the Manual Tuning menu.
Press SETUP and enter the Setup Menu. Select Digital Tv and then Manual
Sc
an. Press SELECT to enter the Manual Scan menu.
Use the ►/◄ buttons to select the channel number required. The Signal and
qu
ality bars should both be lit and have at least a 50% reading.
Pr
ess SELECT to start a search.
When the search is complete the recorder will return to one of the signals
received in that channel multiplex.
Teletext MHEG5. (DVBt only).
To view Teletext, press the Audio/Text button on the remote control.
The main picture is shrunk to a smaller picture on the left side of the screen,
The teletext menu is displayed on the right. Use the ▲/▼ buttons to select
the subject you wish to view and press SELECT to open that subject.
There are a number of “Fast” buttons, Red, Green, Yellow and Blue, each
with a function that changes with each selection. To exit Teletext, press the
Audio/Text button again.
If you select a channel with no Teletext service, you will see a message (No
Service).
(note :- Teletext cannot be recorded).
Fig 68
Fig
69
Fig 70
Fig 71
Panontai Look
Enter Oid Password
Enter New Password
Contirn New Password
0003
0004
0006
0008
0010
0013
Channel Grouping
SNO
Channel name
E4
ITV4
Quiz Call
ITV News
Teletext
Teletext Care
Teletext on4
1
1
1
1
1
1
1
1 None
2 News
3 Science
4 Sports
5 Movies
6 Kids
7 Music
8 Fashion
Save
United Kingdom/474000KHz/8m
FREEZE
15.14 Nov 25
MAINLY DRY AND SUNNY ACROSS NORTHERN
21
22
23
24
25
26
Manual Search
Channel Name
Freq(KHz)
BandWidth
Confirm
Signal
Quatity
71%
92%
21
474000
8M
(Fig 71)
Page 39
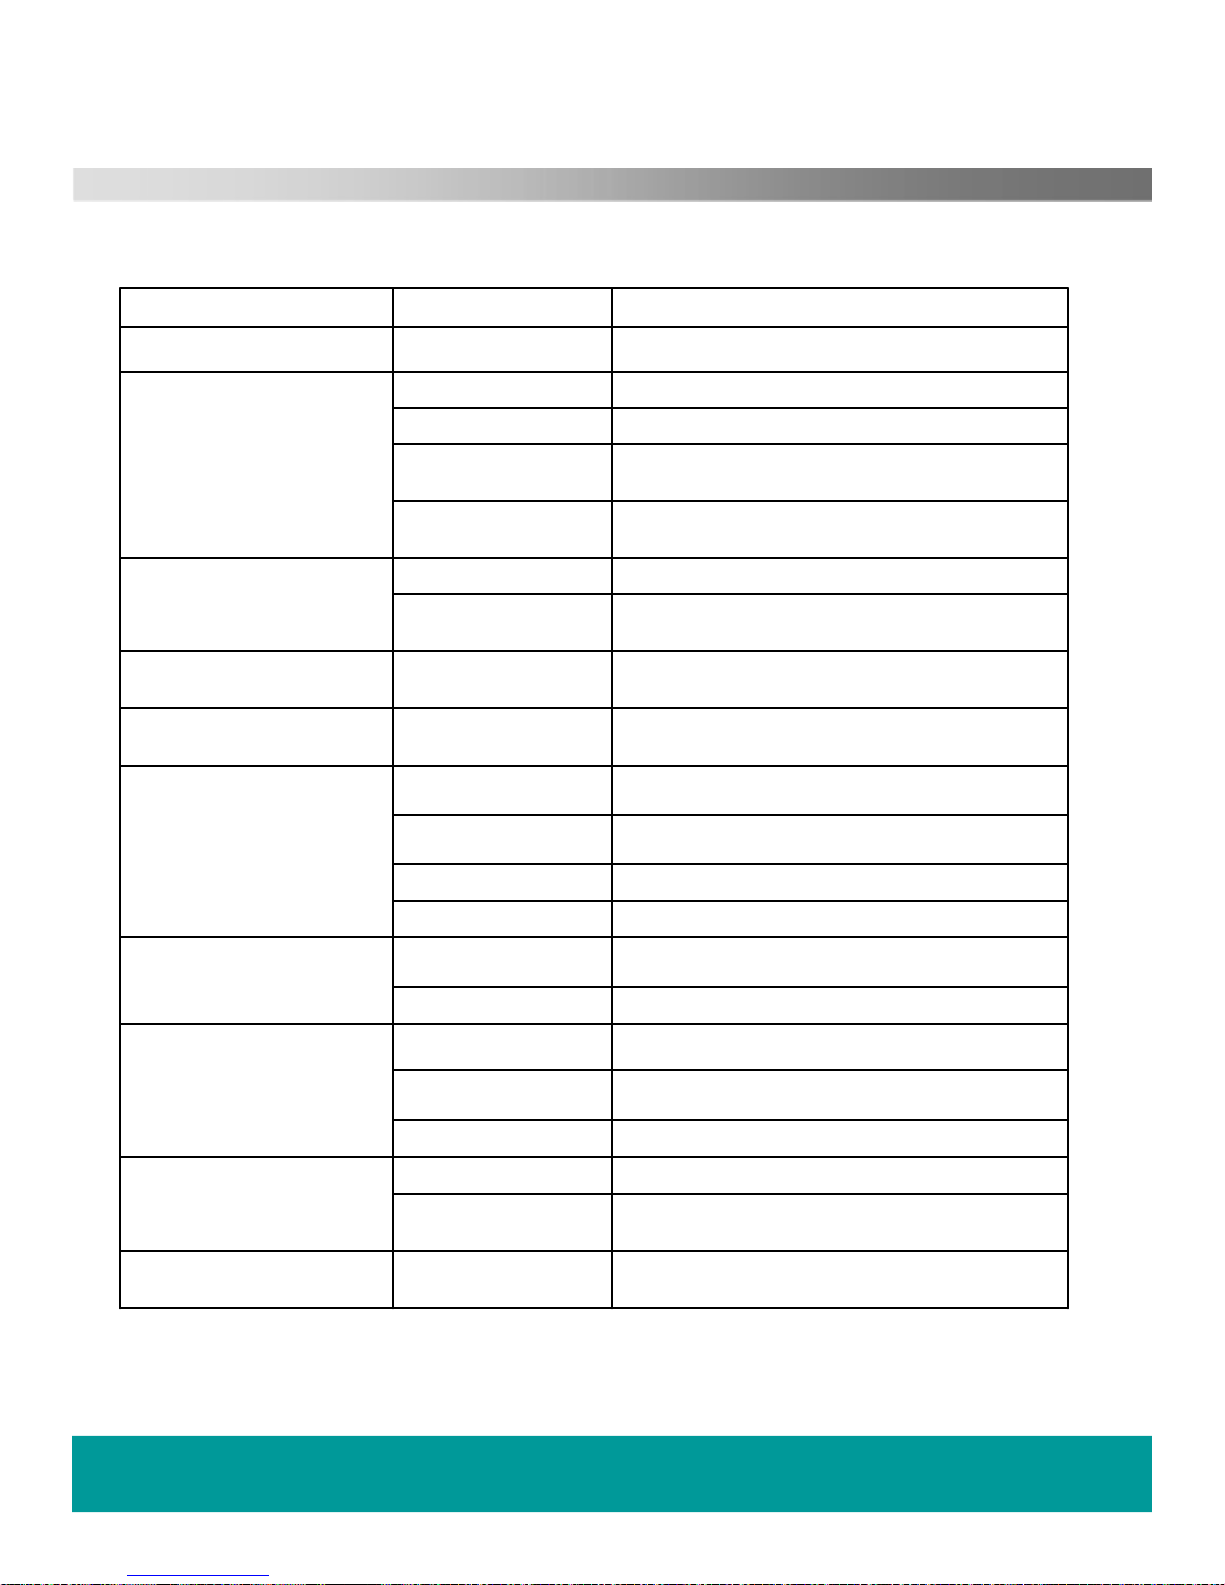
HELPLINE No UK / Northern Ireland 01422 26 32 98. Rep . Ireland No 1800 88 23 90.
WEB
SUPPORT. www.ekey.co.uk
Model number 4683
Trouble shooting Guide
This product has been tested to a thorough schedule, however should you experience a problem please
cons
ult the guide below before calling the Customer Help line at th
e bottom of the page.
Symptom Possible cause Remedy
Dead. No display. Power not connected. Connect the power and ensure it is turned on.
No
Picture on TV Not connected to TV Ensure connections are correct
Recorder in standby Press power on button
Output not selected
correctl
y.
See page xx Getting started
Not tuned in to TV
sign
als
See page xx Getting started
No
Sound on TV Not connected to TV Ensure connections are correct
Output not selected
correctl
y.
See page xx Getting started
Picture freezes or breaks up
(DVD)
Disc damaged or dirty Clean dirty disc, dispose of cracked or broken disc.
Picture unstable on playback. Distortion due to other
connections.
Con
nect the recorder directly to TV, not via other
items.
DVD Not starting playback Disc incorrectly placed Ensure disc is placed with label side up.
Dirty or damaged disc Clean dirty disc, dispose of cracked or broken disc.
Menu
on screen Turn menu off with SETUP button
Parental lock on. Cancel parental lock
DVD
drawer will not open. Disc stuck inside Power off and start up again, retry eject. Call help line
DVD not selected Select DVD using SWITCH button.
No USB functions Incompatible USB stick Some older USB sticks are not compatible.
Incorrect USB item This recorder will only recognize USB Memory sticks.
USB not selected Select USB using SWITCH button
Will not record (DVD) No disc in recorder Place a suitable disc in recorder
Incorrect disc in
recorde
r
Ensure a recordable disc with enough free space.
No remote functions or
intermittent operation
Batteries exhausted Replace batteries
Page 40
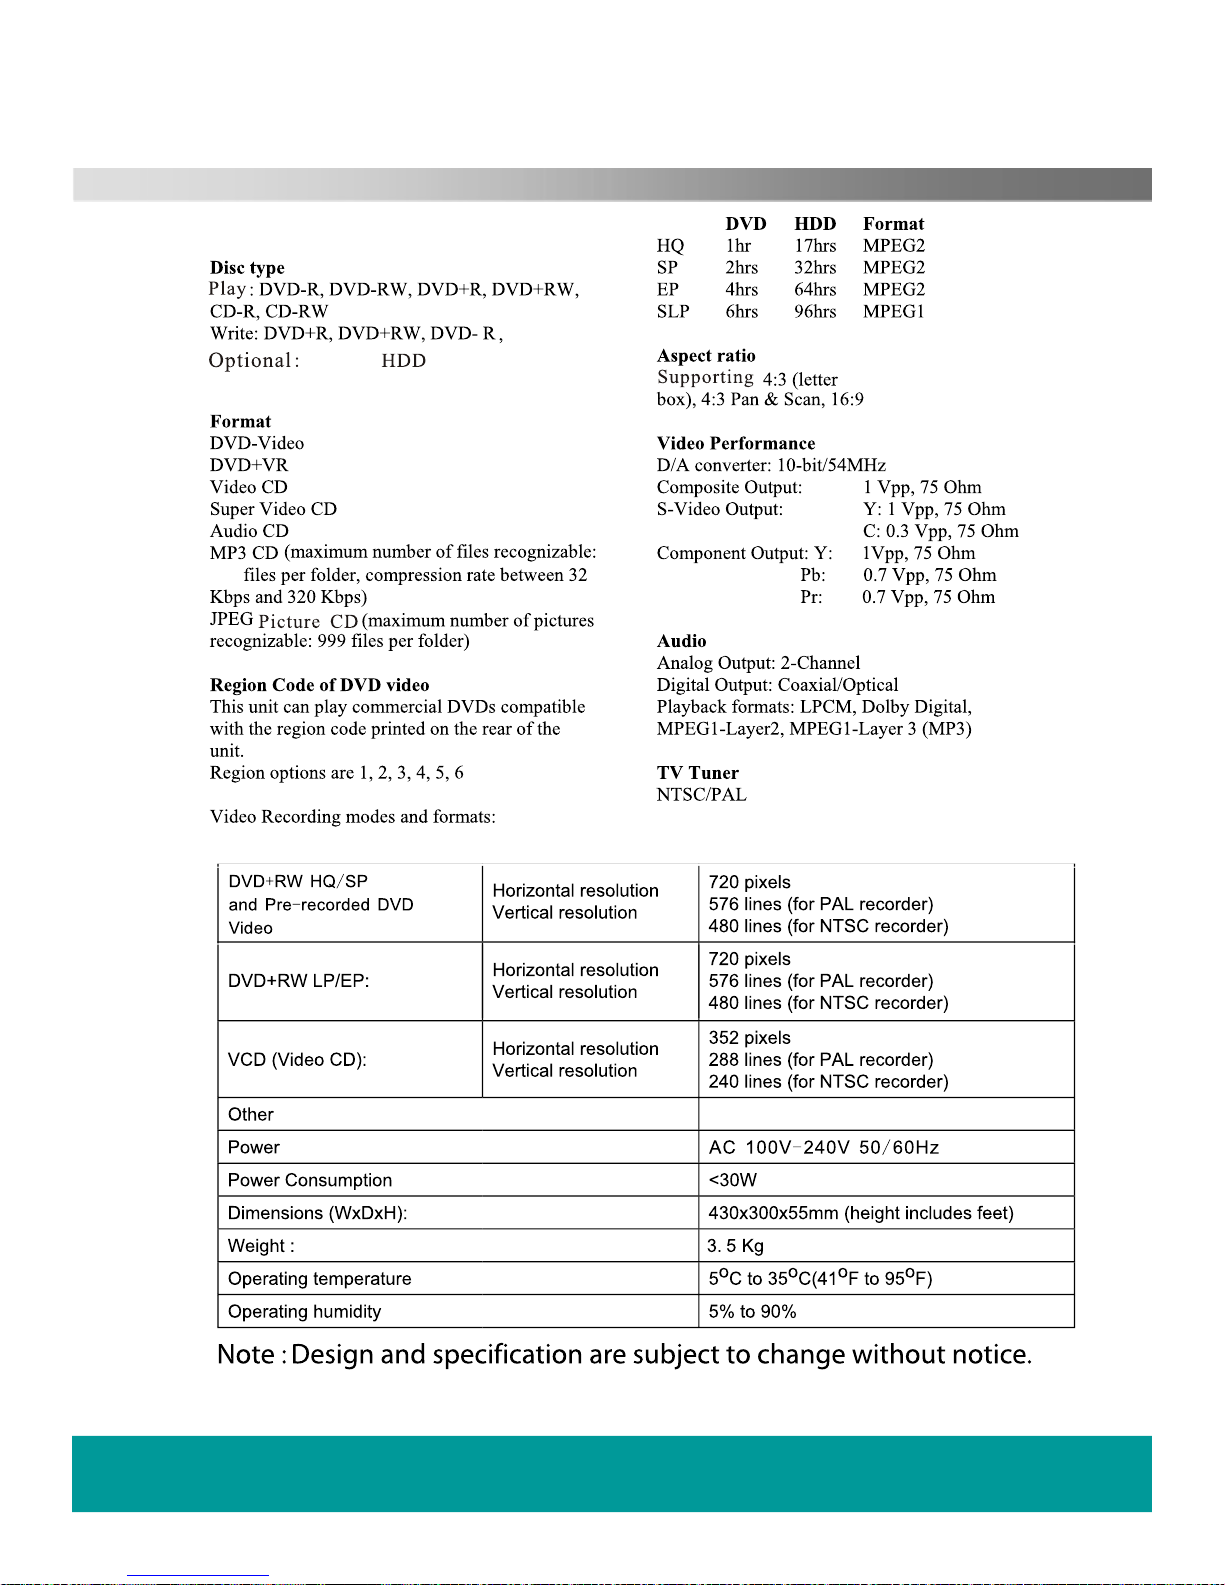
HELPLINE No UK / Northern Ireland 01422 26 32 98. Rep . Ireland No 1800 88 23 90.
WEB SUPPORT. www.ekey.co.uk
Model number 4683
Specifications
GB
500
160
Page 41

HELPLINE No UK / Northern Ireland 01422 26 32 98. Rep . Ireland No 1800 88 23 90.
WEB SUPPORT. www.ekey.co.uk
Model number 4683
Warranty
This product is guaranteed for twelve months from the date of the
original purchase. In the unlikely event of any defect arising due to faulty
mat
erials or workmanship, the unit will be either replaced, a refund will
be given or the unit will be repaired free of charge (where possible)
during this period by the dealer from whom you purchased the unit.
This warranty is subject to the following provisions:
• The warranty is only valid within the boundaries of the country of
purchase.
• The product must be correctly installed and operated in accordance
with the instructions contained in these operating instructions.
• It must be used solely for domestic purposes.
• The warranty does not cover accidental damage or misuse.
• The warranty will be render ed invalid if the product is resold or has
been damaged by inexpert repairs. The manufacturers disclaim any
liabilit
y for incidental or consequential damages.
The warranty is in addition to, and does not diminish, your statutory or
legal rights
 Loading...