

Page 1
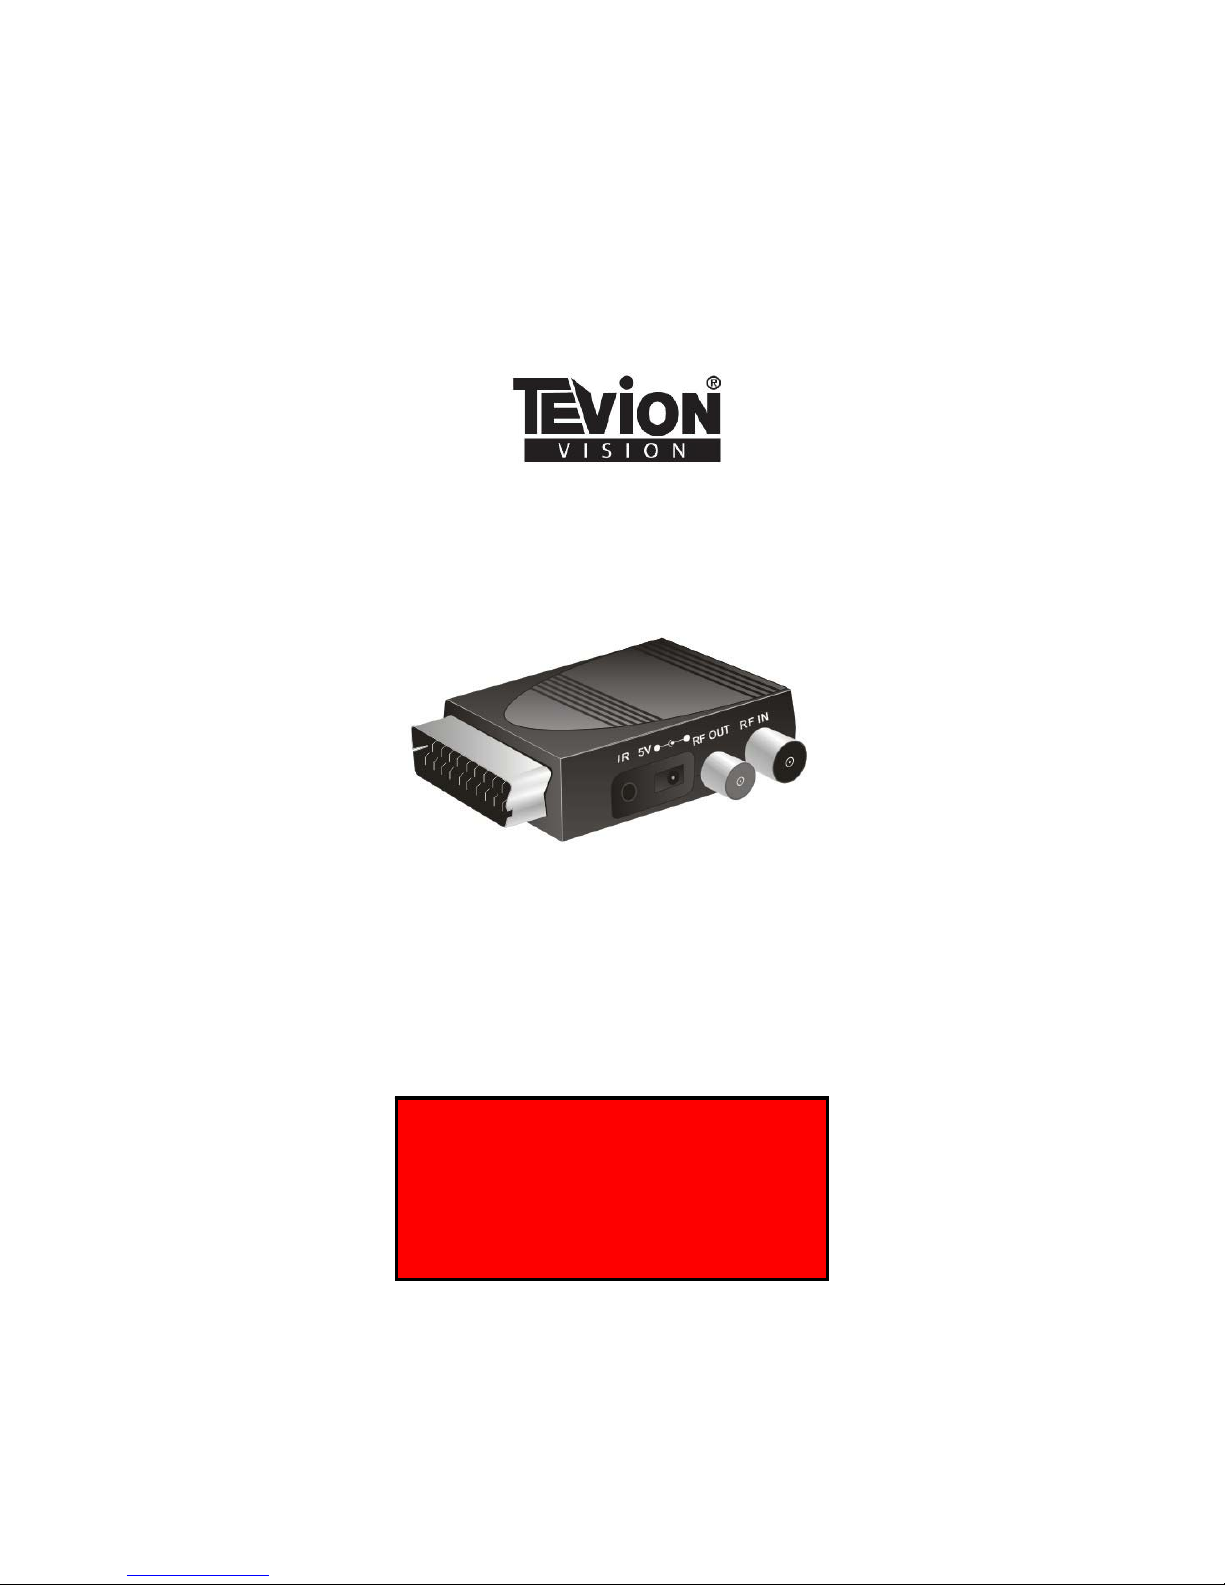
MICRO FREEVIEW RECEIVER
User Guide
Now you have purchased a Tevion® product you can rest
assured in the knowledge that as well as your 3 year parts
and labour warranty you have the added peace of mind
of dedicated helplines and web support
AFTER SALES SUPPORT
UK/N.IRELAND HELPLINE NO 01270 508538
REP. IRELAND HELPLINE NO 1800 995 036
WEB SUPPORT www.quesh.co.uk
MODEL NUMBER: 44176
Page 2

Contents 1
Chapter
02. Welcome Section
03. General Information and Safety Instructions
04. Battery Handling and Usage
05. Accessories
06. Features
07. Main Unit Information
08. Remote Control Operation
09. Connecting To Your TV
10. Operating Instructions
11. System Setup
12. Tools
13. Troubleshooting
14. Technical Specification
15. Fault Report Card
16. Warranty Card
Helpline No. UK/Northern Ireland 01270 508538 Rep.Ireland 1800 995 036
Web Support www.quesh.co.uk
Model No: 44176
2
Page 3

Welcome Section 2
Congratulations on choosing to buy a Tevion® product. By doing so
you now have the assurance and peace of mind that comes with
purchasing a product made by one of Europe’s leading manufacturers.
All products brought to you by Tevion® are manufactured to the
highest standards of performance and safety, and, as part of our
philosophy of customer service and satisfaction, are backed by our
comprehensive 3 year warranty.
We hope you enjoy using your purchase for many years to come.
Helpline No. UK/Northern Ireland 01270 508538 Rep.Ireland 1800 995 036
Web Support www.quesh.co.uk
Model No: 44176
3
Page 4
General Information and Safety Instructions
Please read through the following safety information before use
3
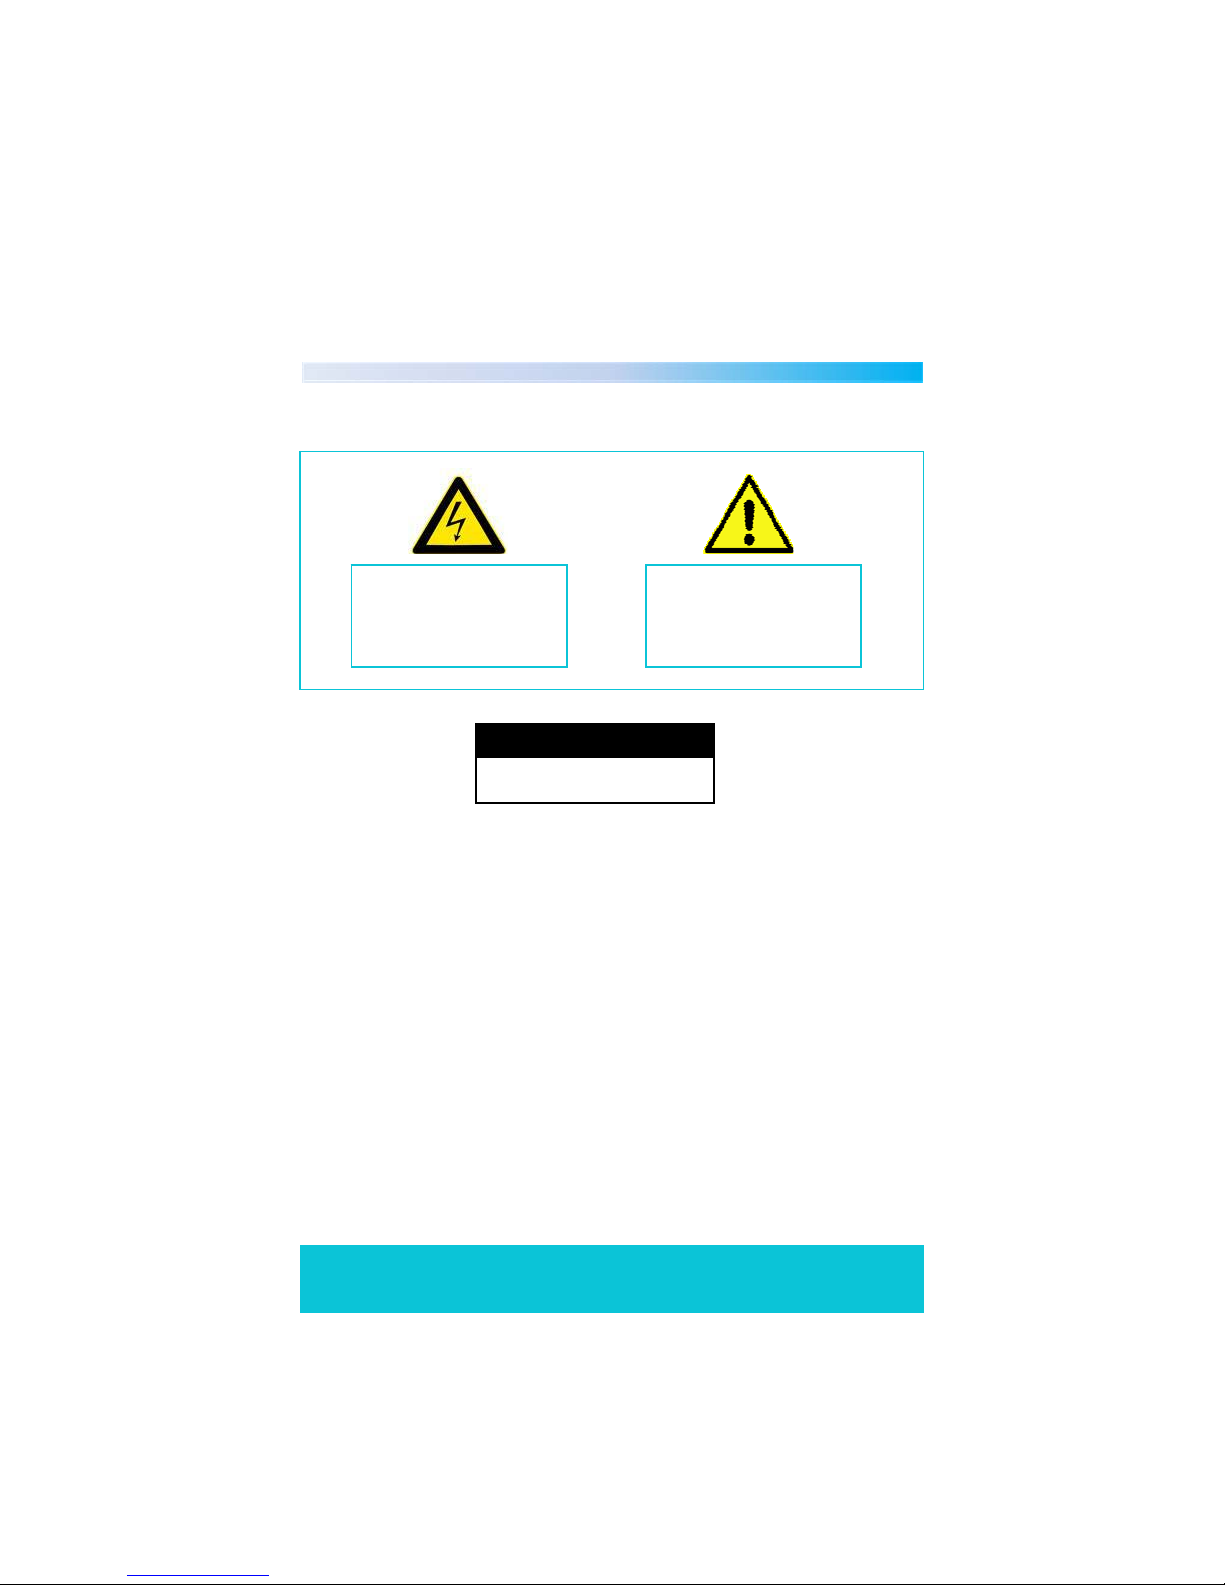
The lightening flash and
arrowhead within the triangle
is a warning sign alerting you of
dangerous voltage inside the
product
The exclamation mark within
the triangle is a warning sign
alerting you of important safety
instructions concerning the
product
C A U T I O N
RISK OF ELECTRIC SHOCK
DO NOT OPEN
• To avoid risk of electric shock do not attempt to open this appliance.
• Keep away from fire.
• Do not expose the appliance to water, rain or dampness.
• Keep this appliance away from direct sunlight and other heat sources.
• Keep this appliance away from strong magnets.
• Never cover the ventilation slots on the underside or back of the
...appliance.
• Avoid placing heavy objects on top of the appliance.
• Always disconnect the appliance from mains power before cleaning.
• Clean the exterior of the appliance with a soft cloth only.
Helpline No. UK/Northern Ireland 01270 508538 Rep.Ireland 1800 995 036
Web Support www.quesh.co.uk
Model No: 44176
4
Page 5
Battery Handling and Usage 4
Remote Control
The remote control uses a 1.3V lithium button battery.
When inserting the battery always ensure the correct +/- polarity.
Battery Safety
Never throw batteries into fire or expose to excessive heat sources.
If batteries are swallowed, please seek immediate medical attention
Ensure correct polarity when installing batteries
Do not recharge non-rechargeable batteries
Disposal of Your Old Product
Electric and electronic equipment (EEE) contains materials, parts and
substances which can be dangerous to the environment and harmful
to human health. Once this appliance has reached the end of its life
span, the unit in its entirety should be taken to a recycling centre.
Please contact your local authority for details of recycling schemes in
your area.
Do not dispose of batteries in your household waste. Please
contact your local authority for details on safe disposal.
Do not dispose of this product in your household waste.
Please contact your local authority for details of recycling
schemes in your area.
Helpline No. UK/Northern Ireland 01270 508538 Rep.Ireland 1800 995 036
Web Support www.quesh.co.uk
Model No: 44176
5
Page 6

Accessories 5
The following accessories are included with your micro freeview
receiver. Should any of these be missing, please contact the customer
support team on the number below.
1 X Remote Control (Including Battery)1 X Main Unit
1 X User Manual 1 X Remote Sensor
1 X Power Adaptor
Helpline No. UK/Northern Ireland 01270 508538 Rep.Ireland 1800 995 036
Web Support www.quesh.co.uk
Model No: 44176
1 X Scart cable
6
Page 7

Features 6
• Easy Installation
• Auto Setup
• Interactive Red Button
• Automatic Channel Scan
• Now and Next Programme Display
• 7 Day Electronic Programme Guide
Helpline No. UK/Northern Ireland 01270 508538 Rep.Ireland 1800 995 036
Web Support www.quesh.co.uk
Model No: 44176
7
Page 8
Main Unit Information 7
13
5
4
2
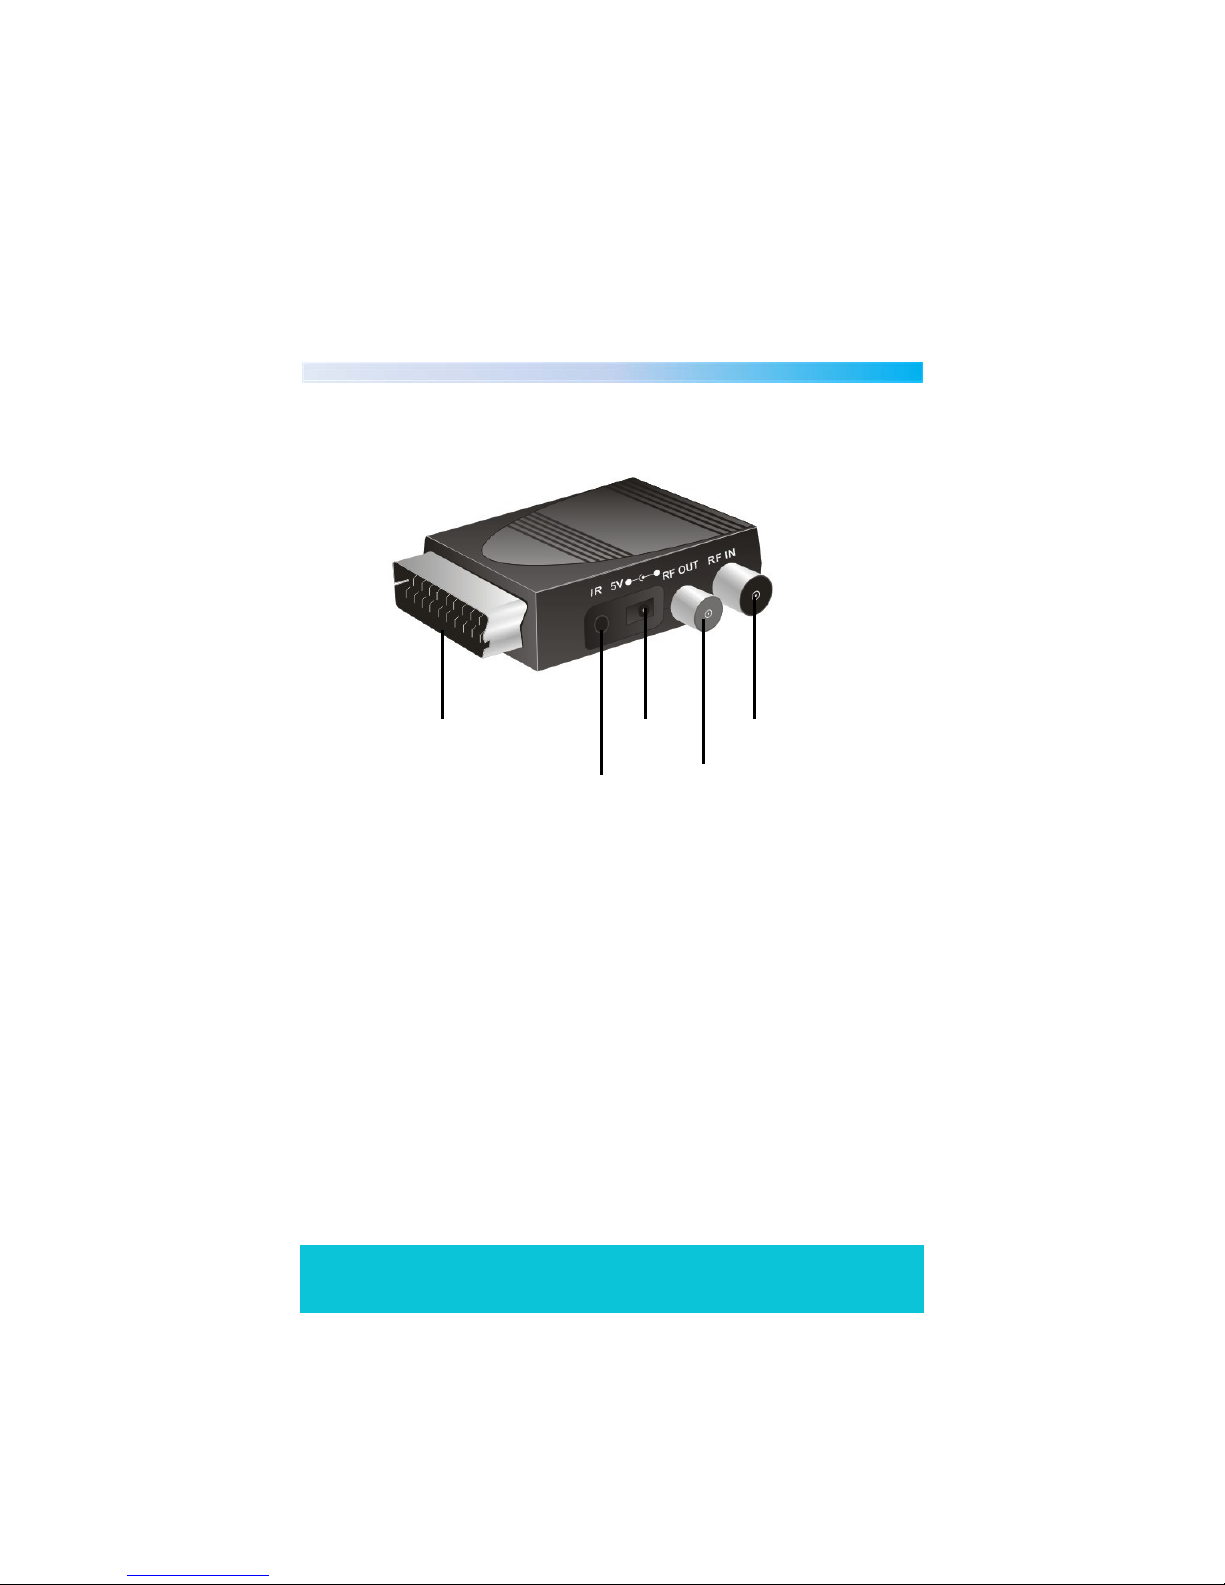
1. Scart
Use this to connect to an available scart socket on your TV.
2. Remote Sensor Socket
Connect the remote sensor to the micro freeview box.
3. DC Input
Insert the power adaptor and connect to your mains electric.
4. RF Out
For connecting external Devices.
5. RF In
To connect your aerial.
Helpline No. UK/Northern Ireland 01270 508538 Rep.Ireland 1800 995 036
Web Support www.quesh.co.uk
Model No: 44176
8
Page 9
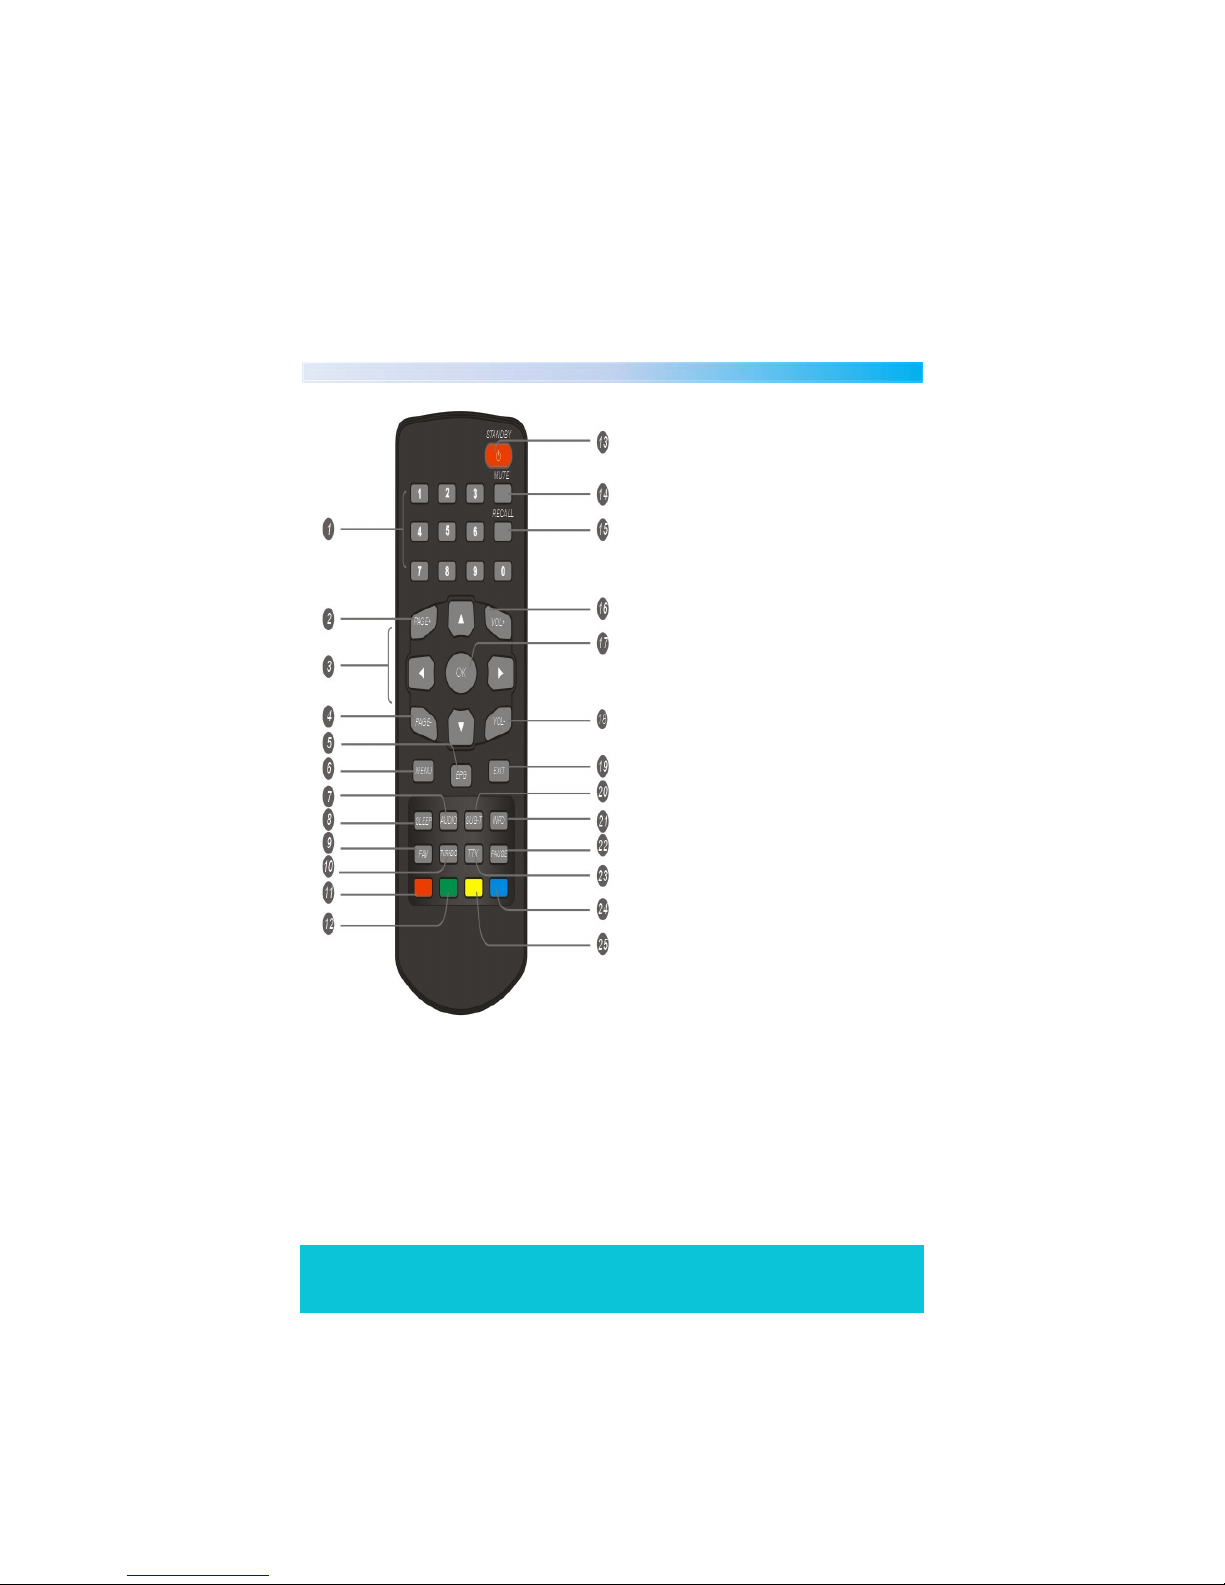
Remote Control Operation 8
1. Number Keys 0-9
2. Page+
3. Left/Right Arrow Keys
4. Page –
5. EPG
6. Menu
7. Audio
8. Sleep
9. Favourite
10. TV/Radio
11. Red Button
12. Green Button
13. Power On/Standby
14. Mute
15. Recall
16. Volume+
17. Ok Button
18. Volume-
19. Exit
20. Subtitle
21. Info
22. Pause
23. TTX
24. Blue Button
25. Yellow Button
Note : To use the remote control point it towards the infra-red
sensor. The remote control has a range of up to 6 metres from
the set top box at an angle of up to 30 degrees.
The remote control will not operate if its path is blocked.
Helpline No. UK/Northern Ireland 01270 508538 Rep.Ireland 1800 995 036
Web Support www.quesh.co.uk
Model No: 44176
9
Page 10
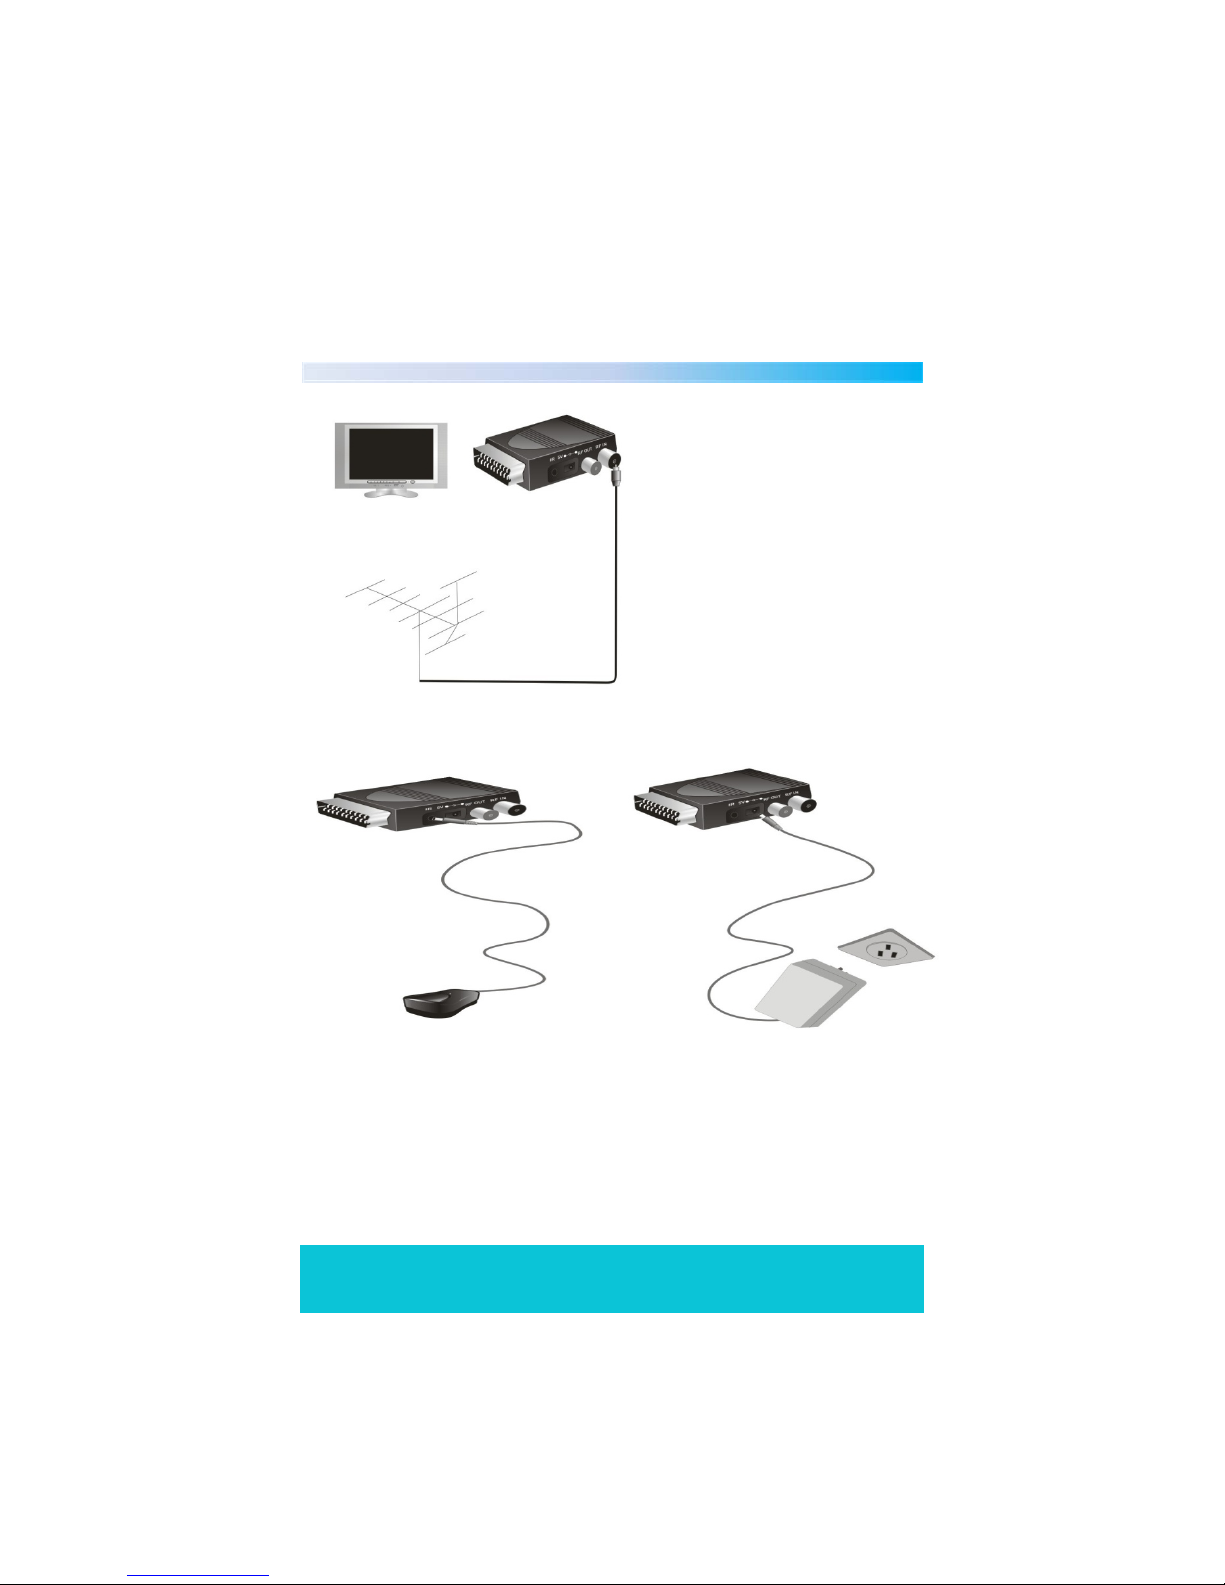
Connecting To your TV
To TV scart input
Aerial cableAerial
9
Insert your existing aerial
cable into the RF in socket on
your micro freeview receiver,
and insert into an available
scart socket on your TV.
Then insert your remote
sensor into the IR socket and
place the sensor somewhere
visible and free from clutter.
Helpline No. UK/Northern Ireland 01270 508538 Rep.Ireland 1800 995 036
Web Support www.quesh.co.uk
Model No: 44176
Connect your power adaptor
into the DC in socket and
connect the plug to your
mains socket.
10
Page 11
Operating Instructions
10
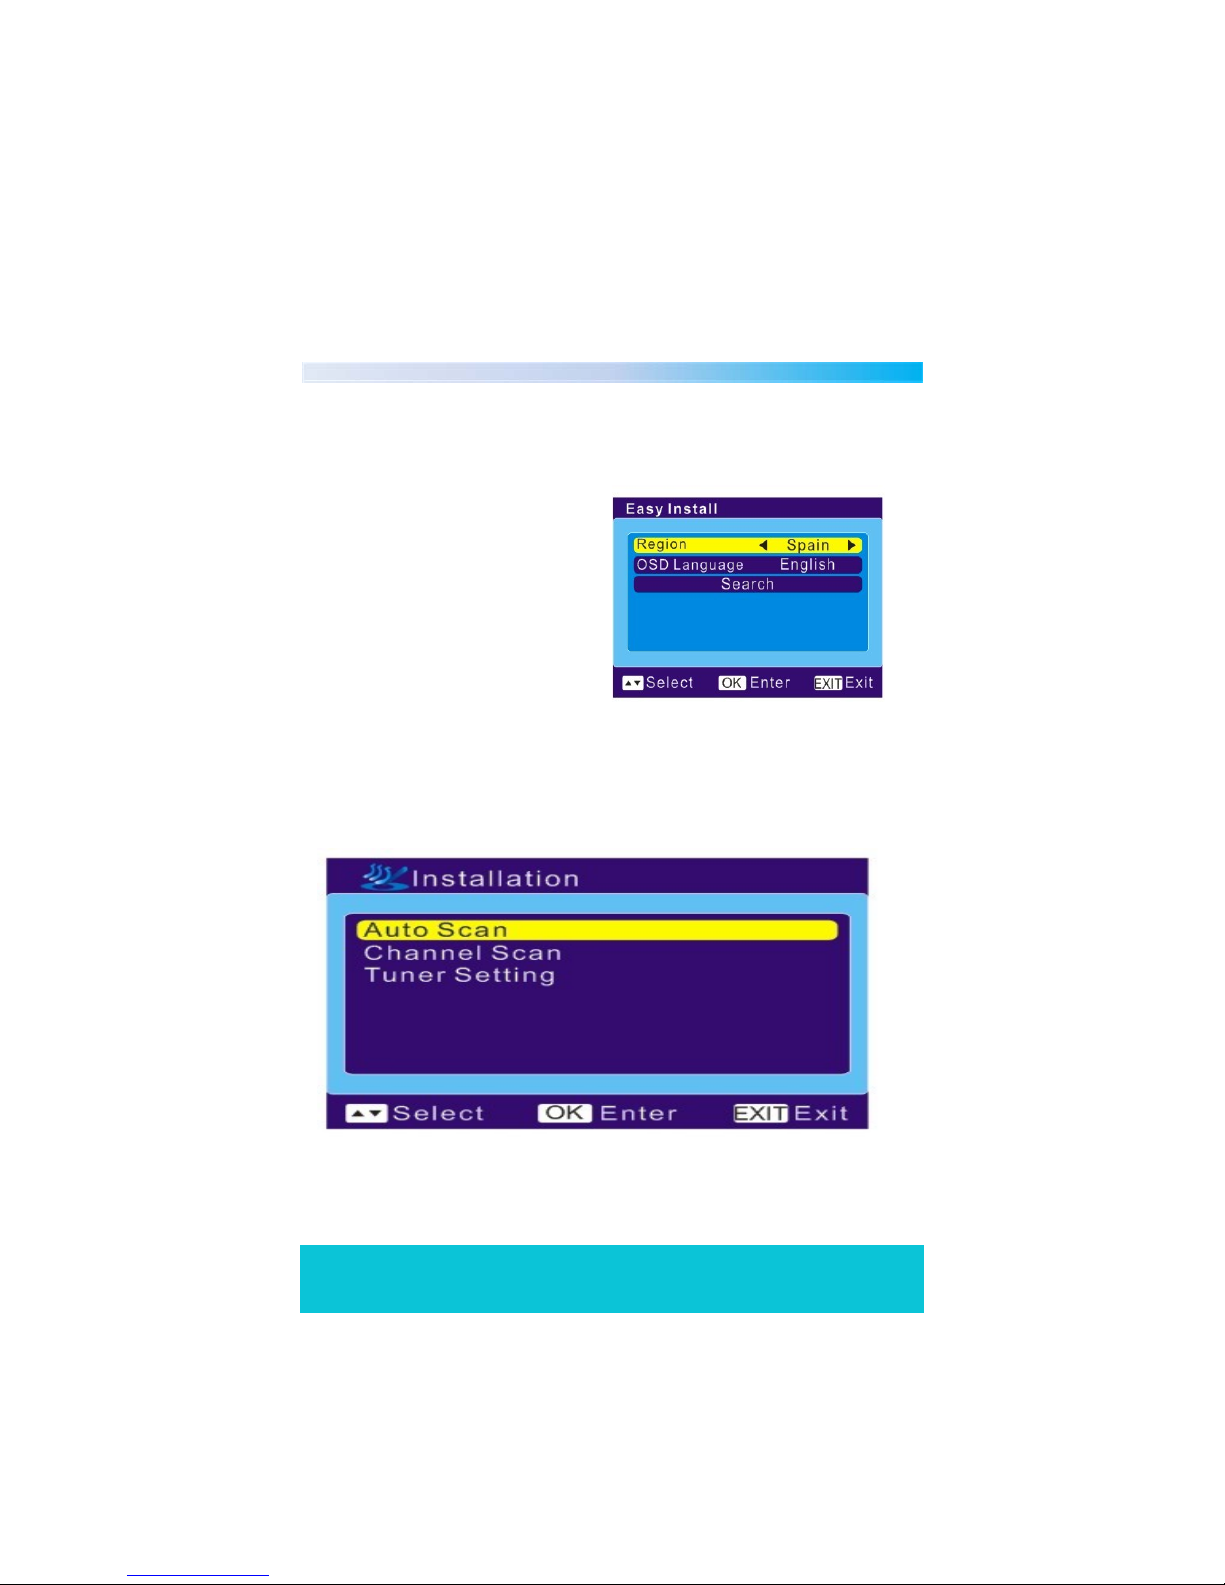
When switching on the micro freeview receiver for the first time, the “Easy
Install” menu will appear.
Use the “LEFT/RIGHT” arrow keys
to set up the region and OSD
Language.
Highlight “Search” and press the
“OK” button to start the channel
search.
Installation
Press the “MENU” button to enter the main menu, use the “LEFT/RIGHT”
arrow keys to scroll to “Installation”, press the “OK” button to enter the
installation menu where you will be presented with the following menu.
Helpline No. UK/Northern Ireland 01270 508538 Rep.Ireland 1800 995 036
Web Support www.quesh.co.uk
Model No: 44176
11
Page 12
Auto Scan
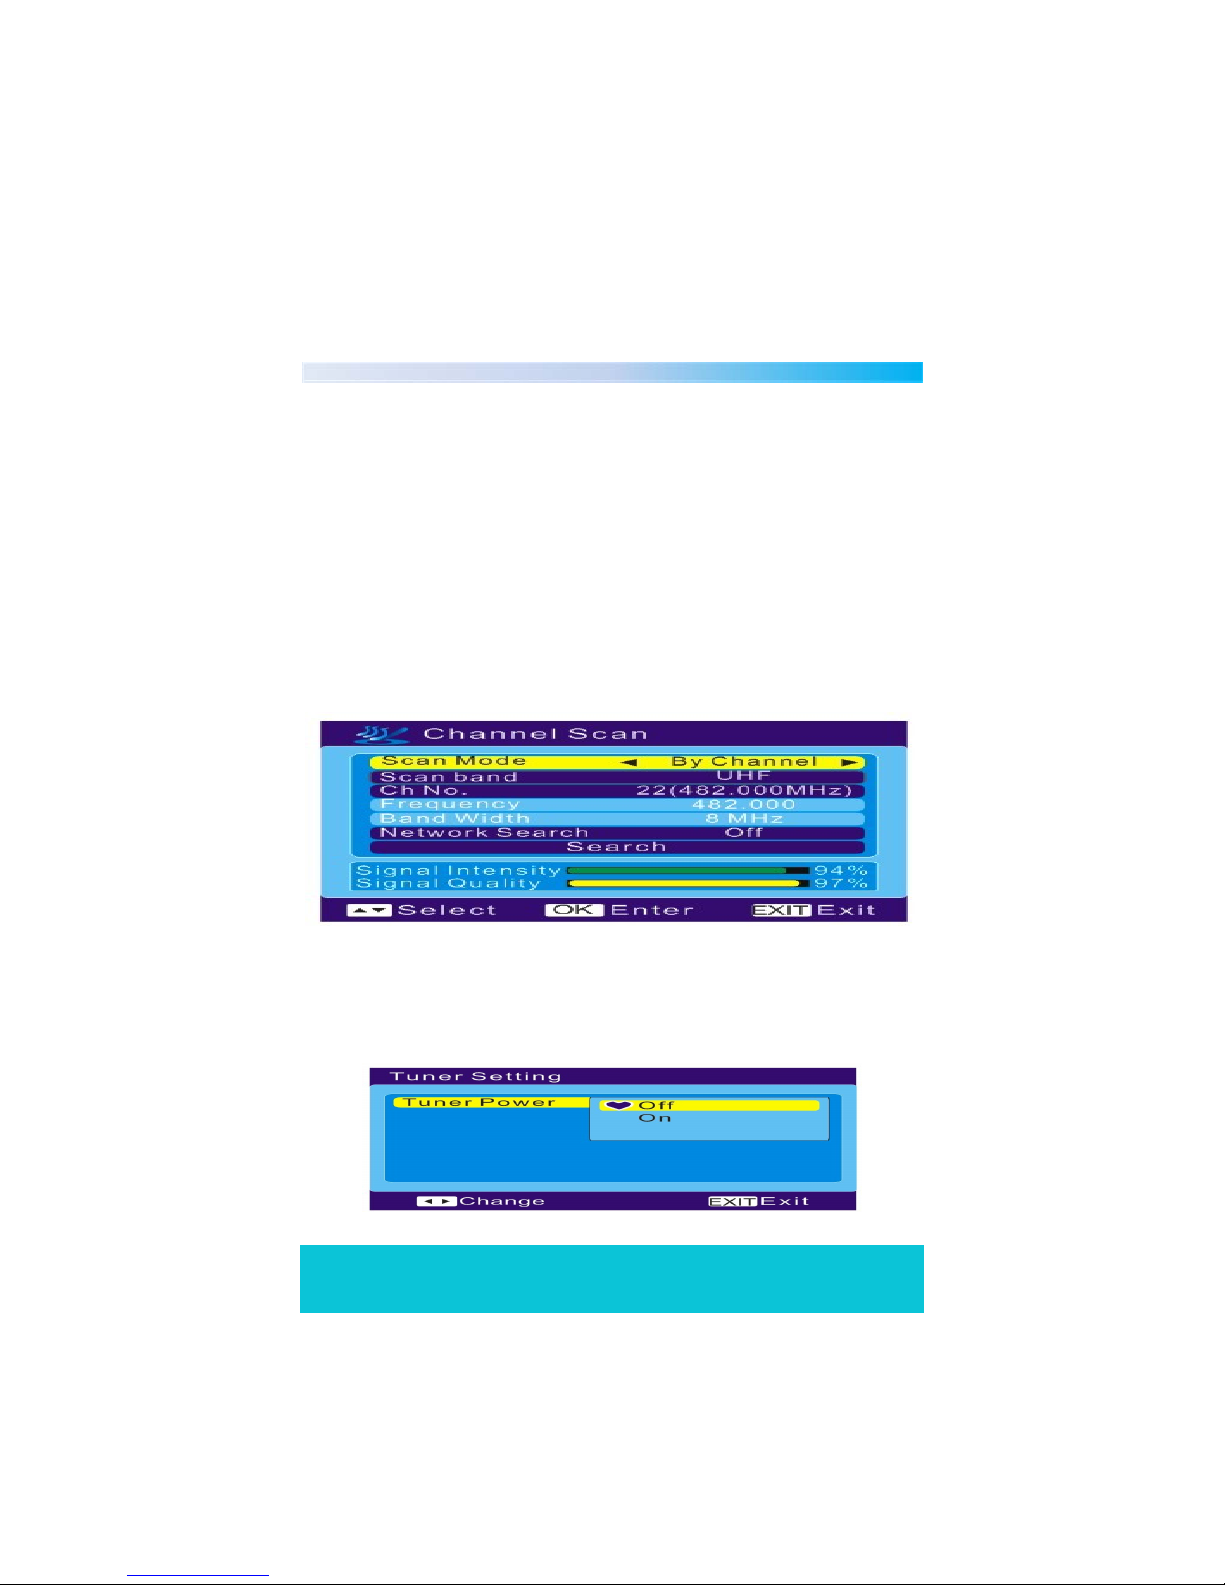
Select which scan mode you require using the “LEFT/RIGHT” arrow keys, then
scroll down to “Search” and press the “OK” key.
Channel Scan
Use the “LEFT/RIGHT” arrow keys to select the scan mode you require.
When scanning “By Channel” you can only change the options for “Ch No” and
“Network Search”.
When scanning “By Frequency” you are able to change the options for
“Frequency”, “Bandwidth” and also “Network Search”.
Once you have selected your required search mode and options simply scroll
down to “Search” and press the “OK” key to begin the search.
Tuner Setting
In this option you have the choice to turn “Tuner Power” off or on, when this
option is on the receiver will provide 5V power to the antenna. It will not
provide this when it is selected as off.
Helpline No. UK/Northern Ireland 01270 508538 Rep.Ireland 1800 995 036
Web Support www.quesh.co.uk
Model No: 44176
12
Page 13

Changing Channels
There are four ways that you can change the channel , stepping through the
channel list, selection by number, from the on-screen channel list and the EPG
guide.
1. Stepping through the channel list:
To move through the channel list simply press the “UP/DOWN” arrow keys.
2. Select by number:
Enter the channel number directly by pressing the numeric keys, and press the
“OK” key to select desired channel.
3.On-screen channel list:
This is displayed using receiver’s main menu, simply press the “MENU” key go
into the “Channel” option, highlight “TV Channel List” and press the “OK” key.
Then use the “UP/DOWN” arrow keys to select the desired channel.
4.Select by EPG guide:
Simply press the “EPG” key to bring up the EPG guide and navigate to the
channel you wish to view by using the “PAGE+/PAGE-” to scroll through the
pages, and use the “CH+/CH-” keys to scroll through the channels.
Helpline No. UK/Northern Ireland 01270 508538 Rep.Ireland 1800 995 036
Web Support www.quesh.co.uk
Model No: 44176
13
Page 14
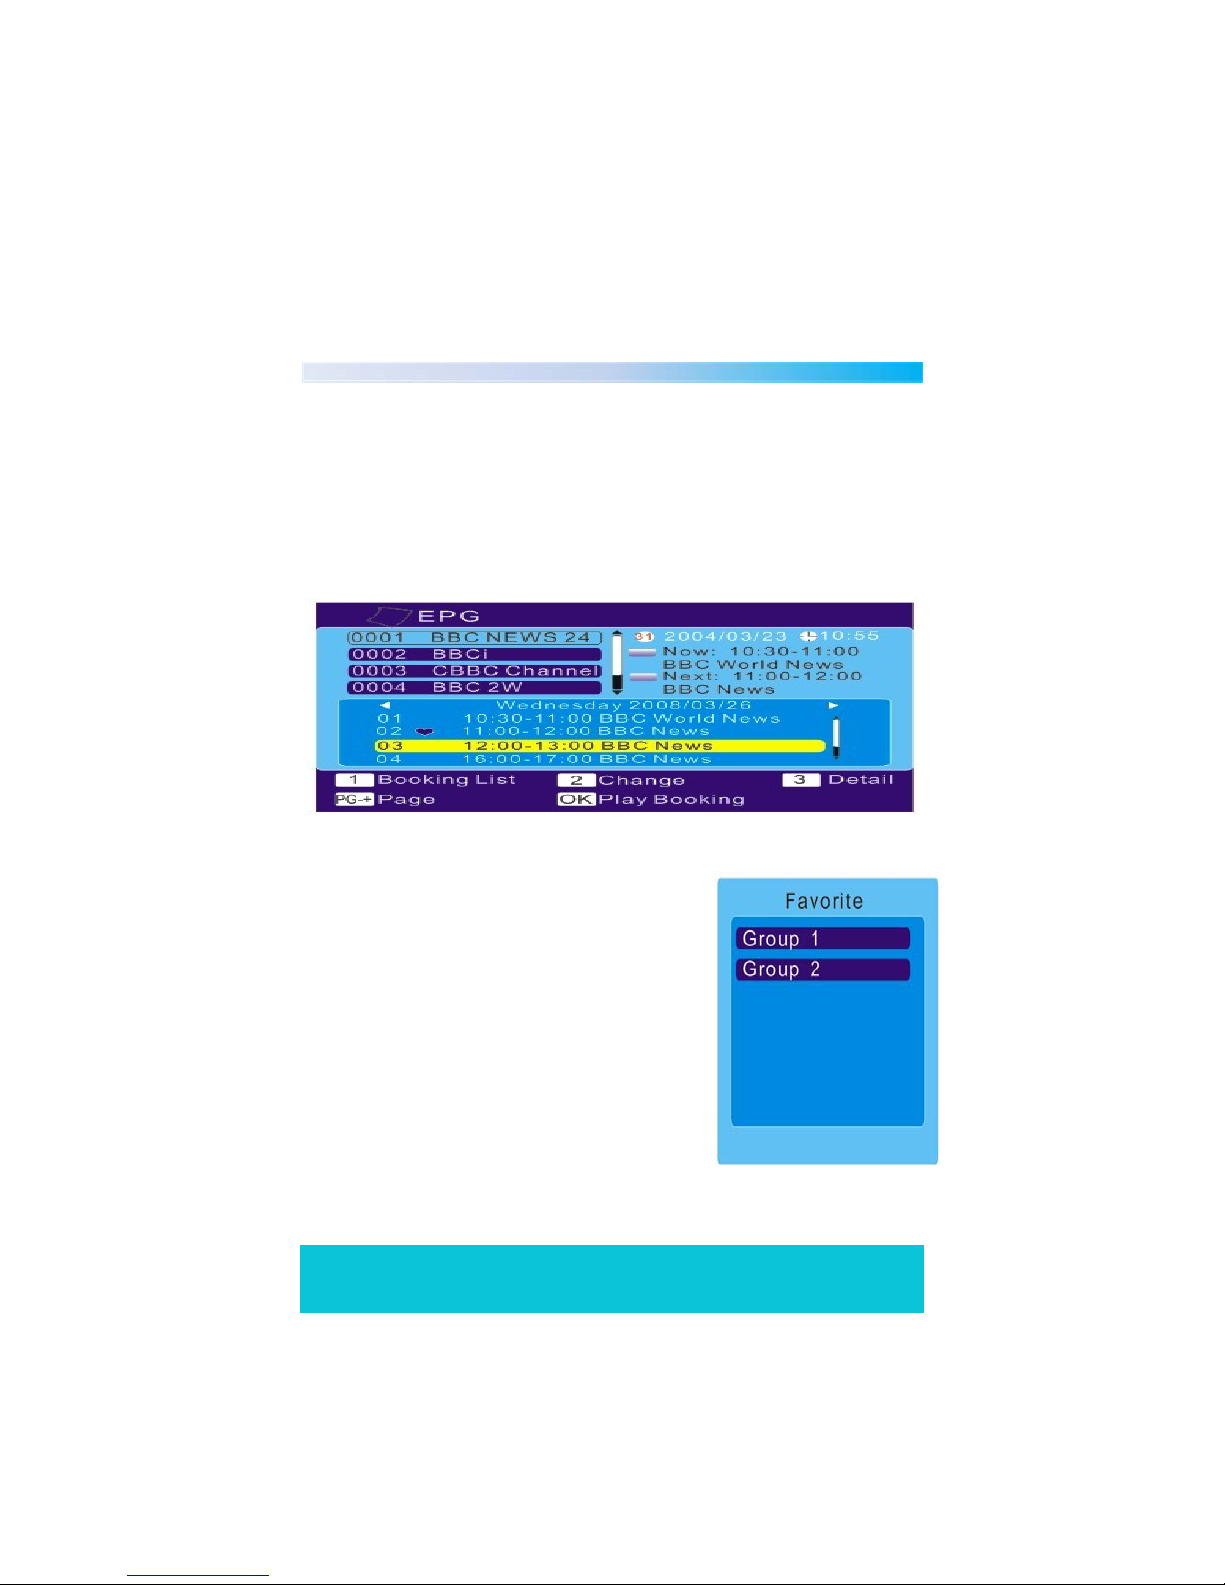
Accessing the (EPG) Electronic Program Guide
Simply press the “EPG” button to enter the menu. You can use the numeric
button “2” to switch between channel lists, event schedules of the selected
channel and now/next events. In the event schedule you can book an event
that you wish to view, to do this simply press the “OK” key on the highlighted
event. You can also view details for this event by pressing the
“3” key.
Accessing the Favourite Channels
To do this simply press the “FAV” key to
enter the favourite group menu, use the
“UP/DOWN” arrow keys to select the
desired group. Press the “OK” key to enter
the favourite channels list and again use
the “UP/DOWN” arrow keys to select your
favourite channel.
Helpline No. UK/Northern Ireland 01270 508538 Rep.Ireland 1800 995 036
Web Support www.quesh.co.uk
Model No: 44176
14
Page 15
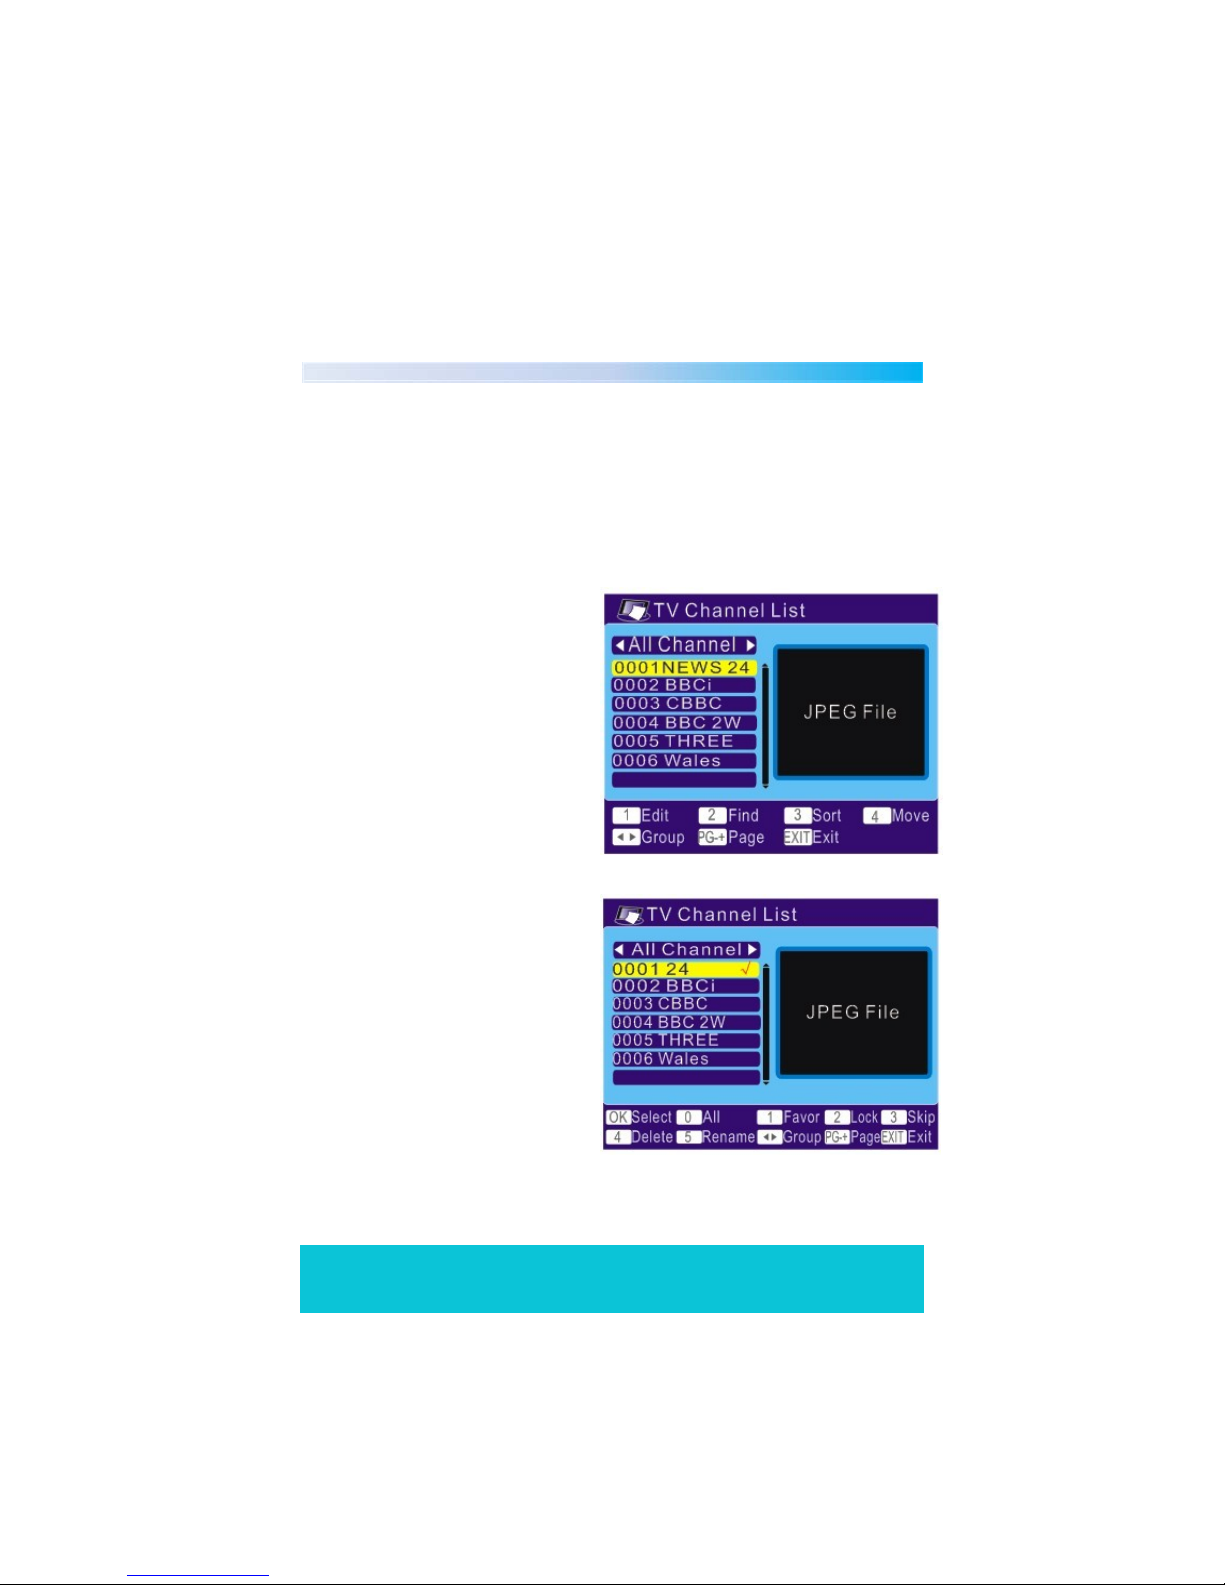
Channel list menu
Press the "MENU" button to enter the main menu, select "Channel" and press
the "OK" button to enter the Channel menu. Press the "UP/DOWN" arrow keys
to highlight the desired item and press the "OK" button to enter the setting
menu.
TV Channel list
In the Channel menu, select "TV
Channel List", then press the
"OK" button to enter the TV
channel list menu. Use the
"LEFT/RIGHT" arrow buttons to
select channel group. And
press "UP/DOWN" arrow
buttons to preview the desired
TV channel. Press the "OK"
button to view the selected
channel in full screen.
Edit mode
Use this menu to favor, lock, skip,
delete and rename channel list.
In channel list menu, press
numeric button “1” to enter the
edit menu. Highlight a channel
and press the "OK“ button to
select it. Or press numeric
button "0" to select all channels.
The selected channels will be
marked with " √ ".
Helpline No. UK/Northern Ireland 01270 508538 Rep.Ireland 1800 995 036
Web Support www.quesh.co.uk
Model No: 44176
15
Page 16
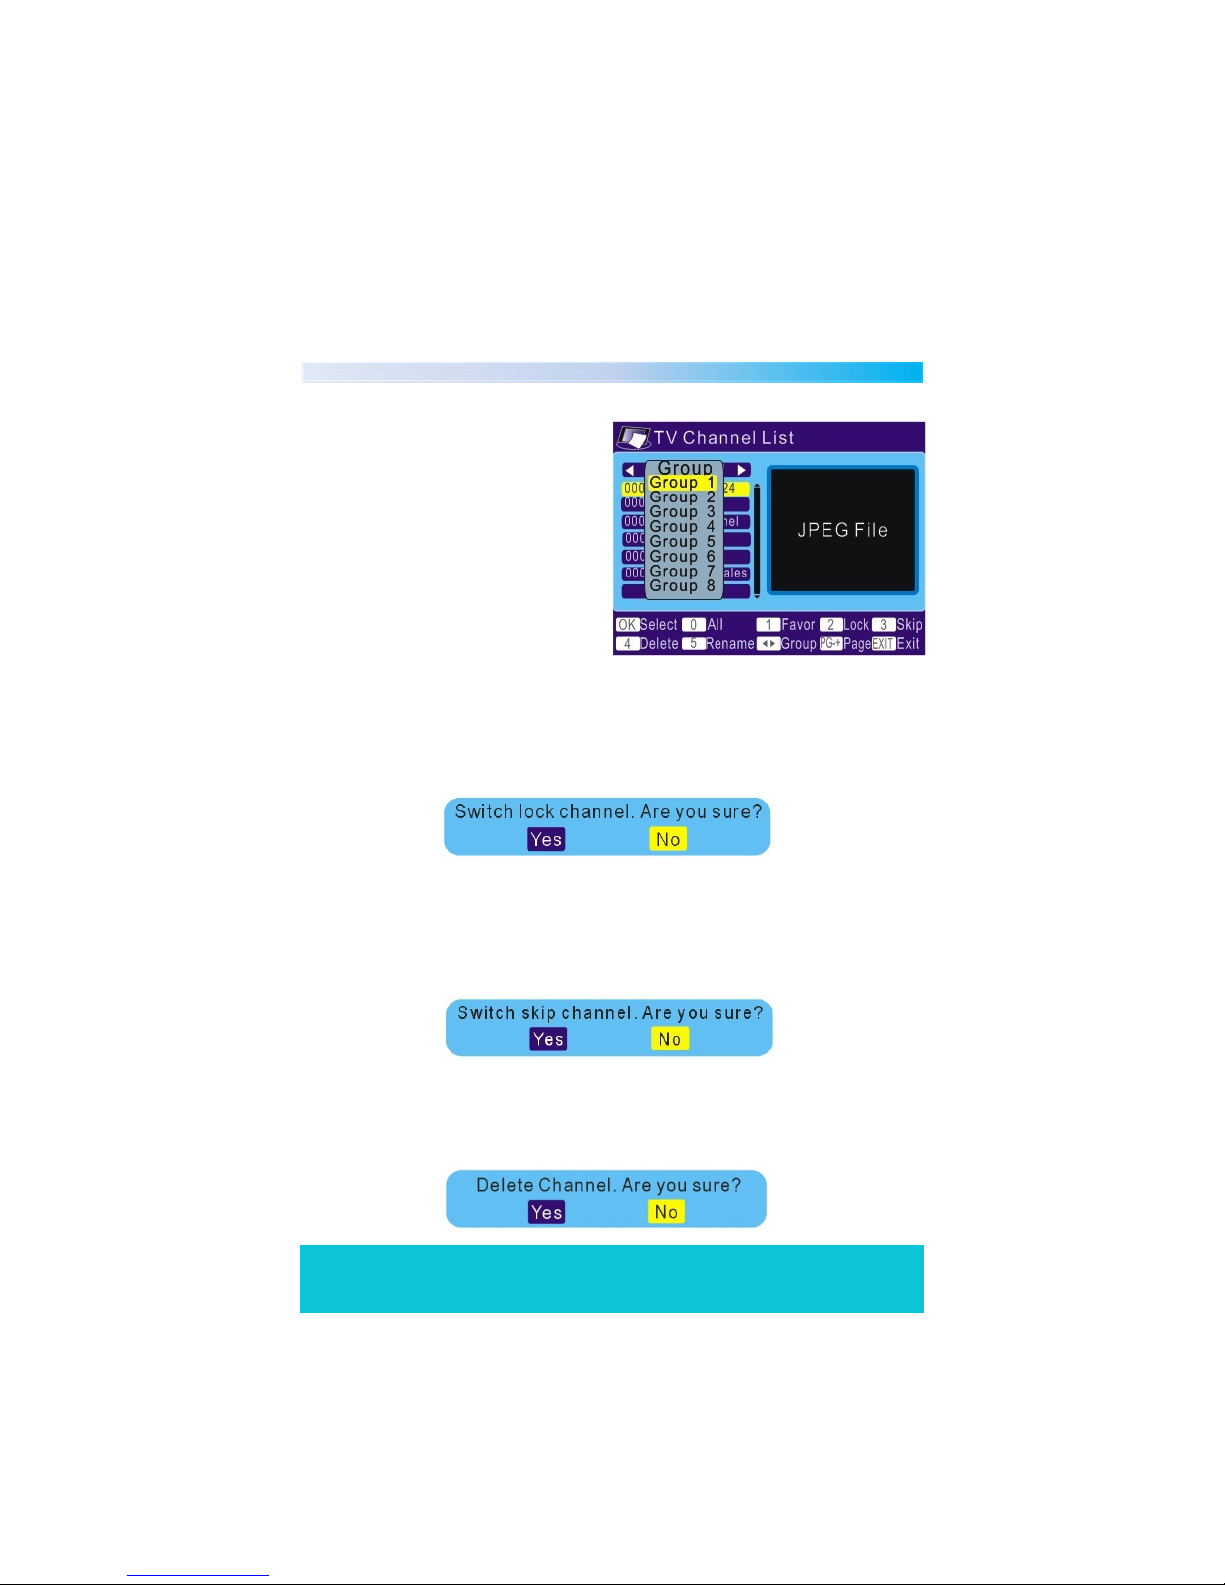
Favor
In "Edit Channel" menu, press
numeric button "1", then press the
"UP/DOWN" arrow buttons to
select a desired group, and press
the "OK" button, a confirmation
window appears. Select "Yes" and
press the "OK" button, the
selected channel will be added to
the favourites group.
Lock
In "Edit Channel" menu, press the numeric button "2", a confirmation window
appears. Select "Yes“ and press the "OK" button, the selected channel will be
locked. Repeat steps above to unlock the locked channels.
Skip
In "Edit Channel" menu, press the numeric button "3", a confirmation window
appears. Select "Yes" and press the "OK" button, the selected channel will be
skipped while you change the channel in full screen. Repeat steps above to
cancel the skipped channels.
Delete
In "Edit Channel" menu, press the numeric button "4", a confirmation window
appears. Select "Yes", press the "OK" button to delete the selected channels from
channel list.
Helpline No. UK/Northern Ireland 01270 508538 Rep.Ireland 1800 995 036
Web Support www.quesh.co.uk
Model No: 44176
16
Page 17
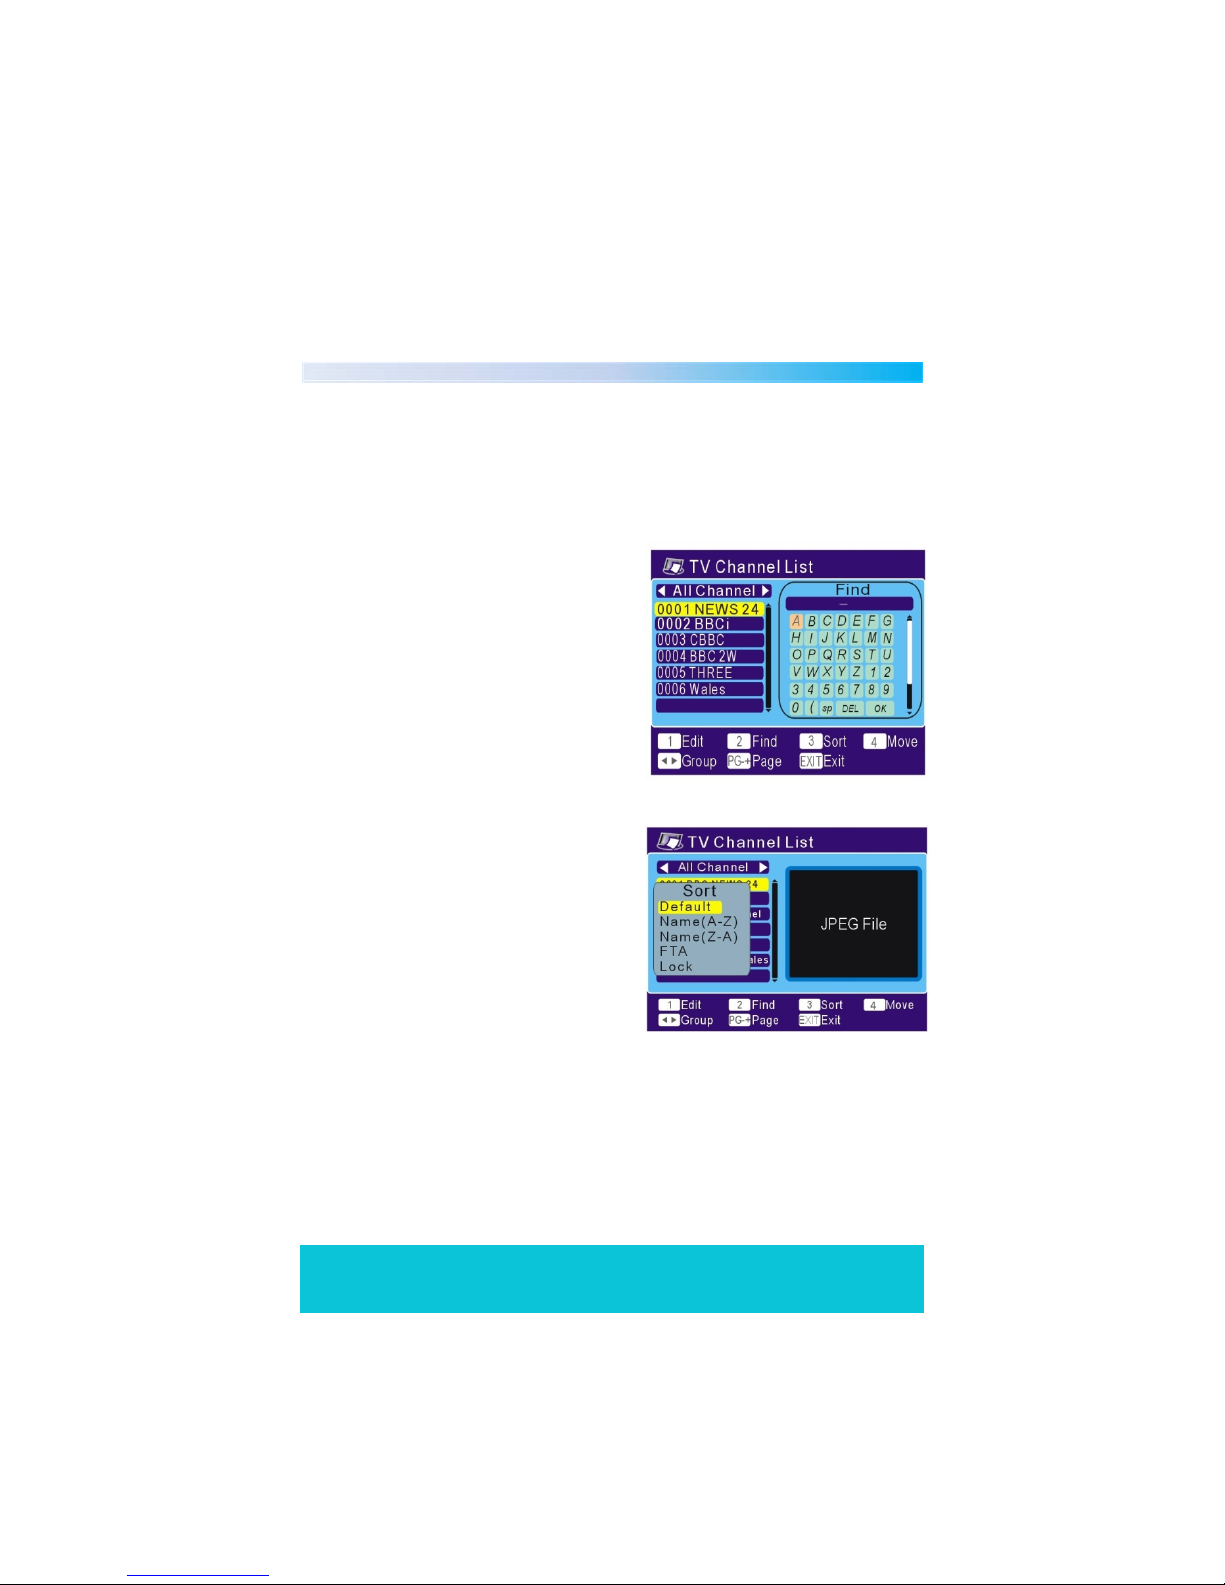
Rename
In the "Edit Channel" menu, press numeric button "5" to open the full keypad.
Input letter and numeric one by one by pressing the arrow keys and press the
"OK" button to confirm. After finishing the input, highlight "OK" on the keypad
to confirm your name change.
Find
In the channel list menu, press
numeric button “2" to enter Find
menu. Press the arrow buttons to
highlight desired letters or numbers
and press the "OK" button to input
one by one. After you input each
character, the channel list will search
the channel according to your input
and list the matching channel.
Sort
In the channel list menu, press
numeric button "3" to enter "Sort"
menu. Then you will be presented
with 5 options:
Default: Sorting by scanning result.
Name (A-Z):
Sorting in Alphabetical Order.
Name (Z-A):
Sorting in Alphabetical Order.
FTA: Sieving out all free fare channels.
Lock: Accumulating all locked
channels and list in the last of TV
Channel List.
Press the "UP/DOWN" arrow buttons
to highlight the desired sort way and
press the "OK" button to confirm.
Helpline No. UK/Northern Ireland 01270 508538 Rep.Ireland 1800 995 036
Web Support www.quesh.co.uk
Model No: 44176
17
Page 18
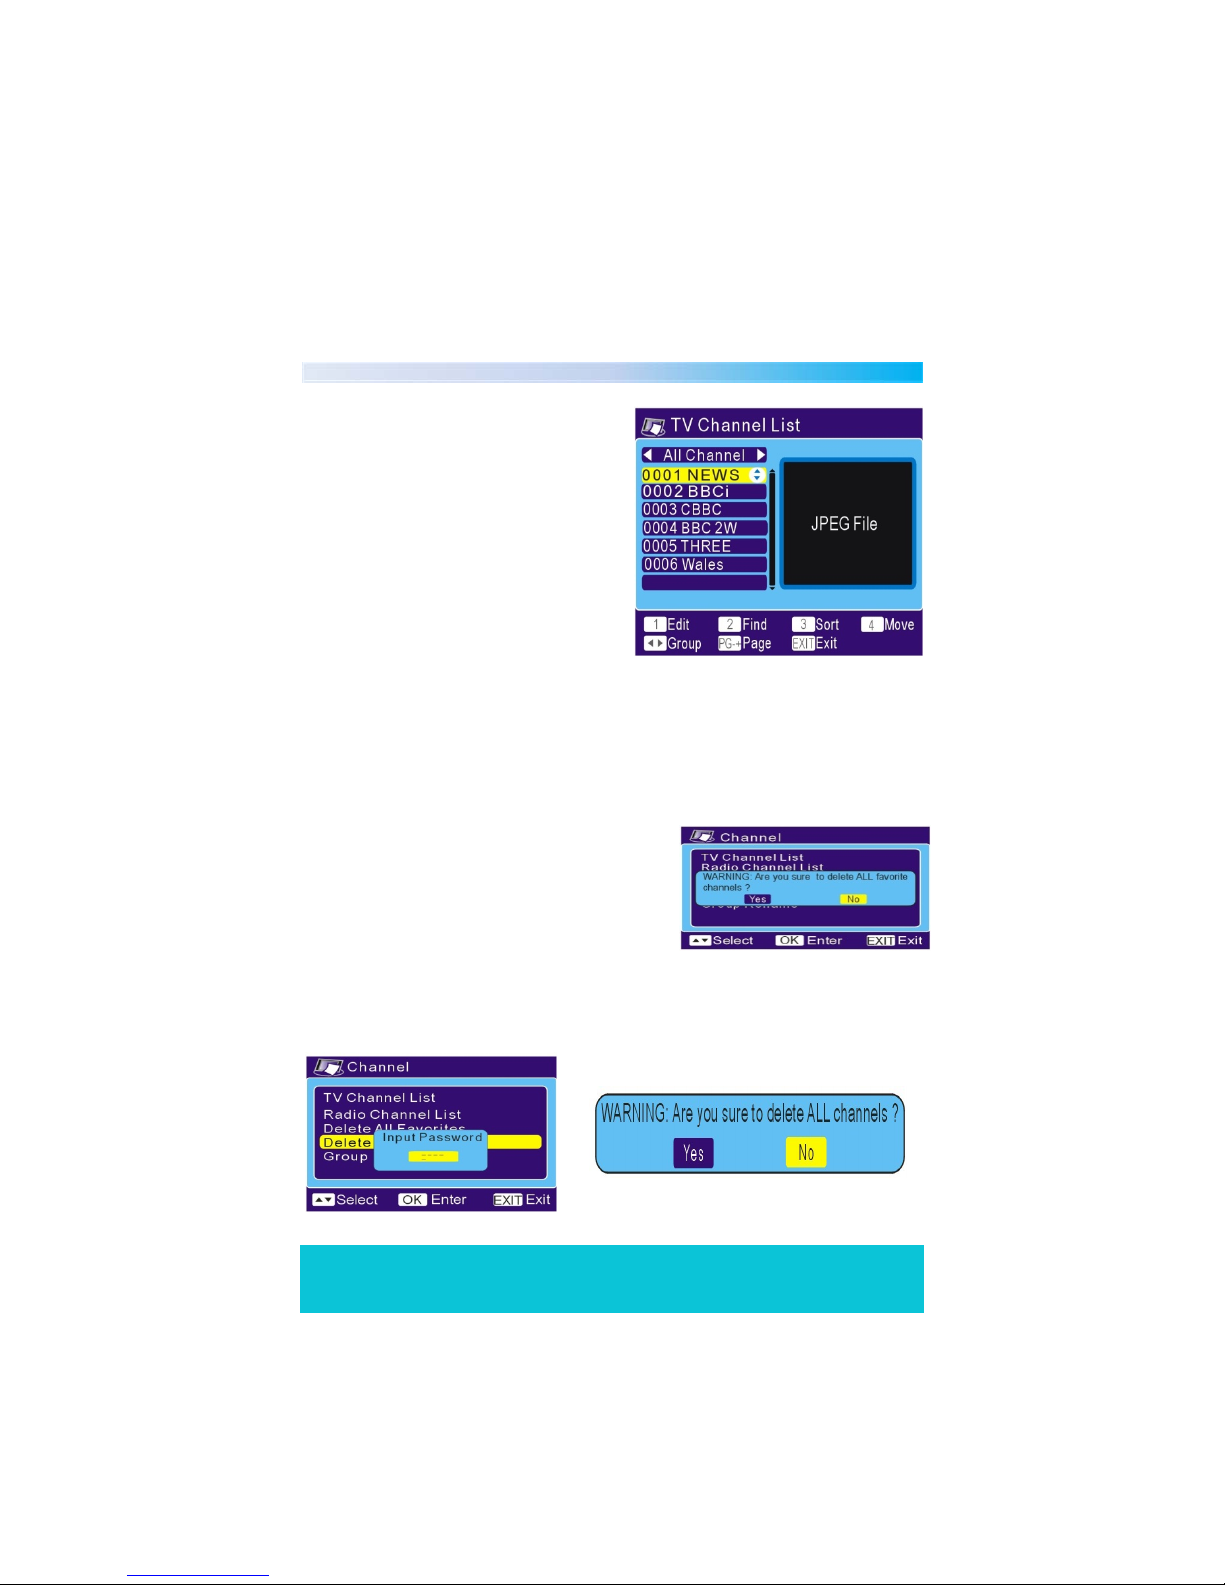
Move
In the channel list menu, press the
numeric button "4", the selected
channel will be marked with an arrow
symbol Then press the "UP/DOWN"
arrow buttons to move the selected
channel to the position that you
require. Press the "OK" button and a
confirmation window will appear.
Select "Yes" and press the "OK" button
to change the channel order.
NOTE: The operation of the "Radio Channel List" is the same as the "TV
Channel List", but there is one difference : In the "Radio Channel List"
mode, there is no video information, so it will always display the Radio's
logo in the right side preview window.
Delete All Favourites
Use this menu to delete all favourite channels.
Delete All
Use this menu to delete all channels, when you select this option you will be
asked to enter a password. The default password is 0000.
Helpline No. UK/Northern Ireland 01270 508538 Rep.Ireland 1800 995 036
Web Support www.quesh.co.uk
Model No: 44176
18
Page 19
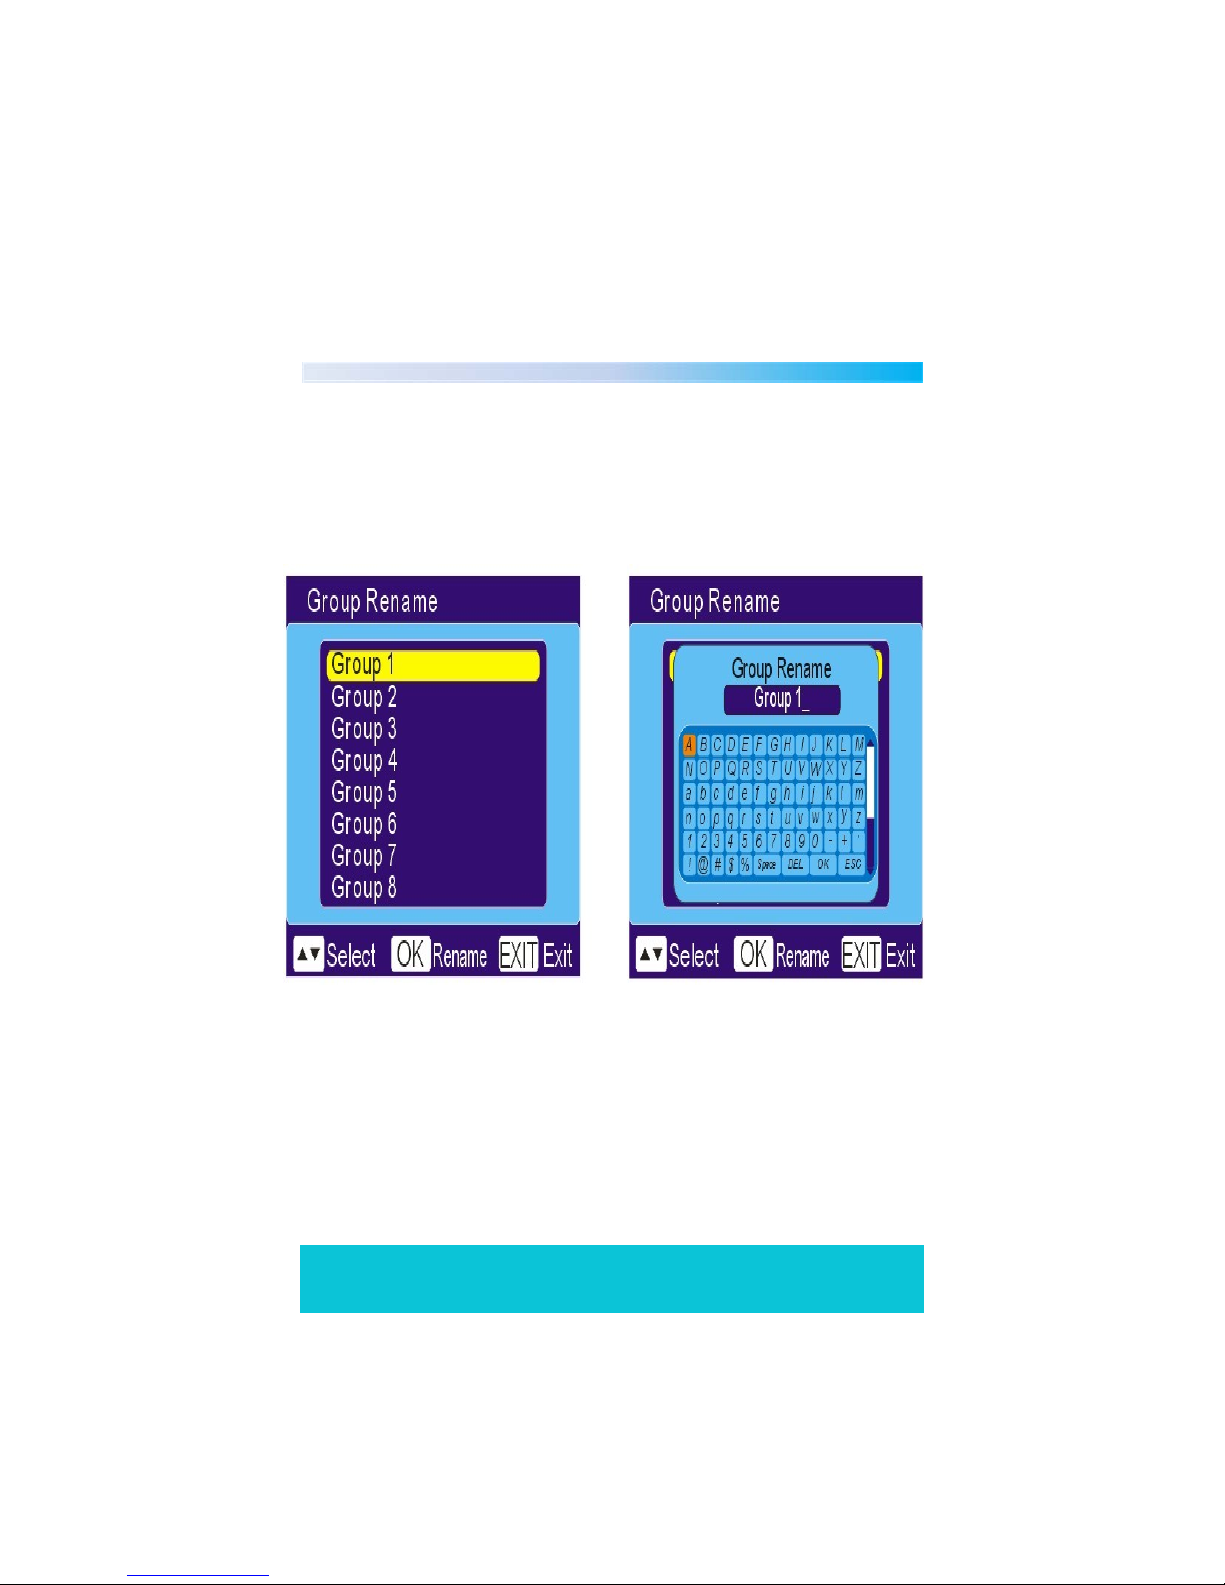
Group Rename
Use this menu to change a group name. Select the desired group you wish to
rename and press the "OK" button to open the full keypad. Input letter and
numeric one by one by pressing the arrow buttons and press the "OK" button
to confirm. After finishing the input, highlight "OK" on the keypad to confirm
your change.
Helpline No. UK/Northern Ireland 01270 508538 Rep.Ireland 1800 995 036
Web Support www.quesh.co.uk
Model No: 44176
19
Page 20
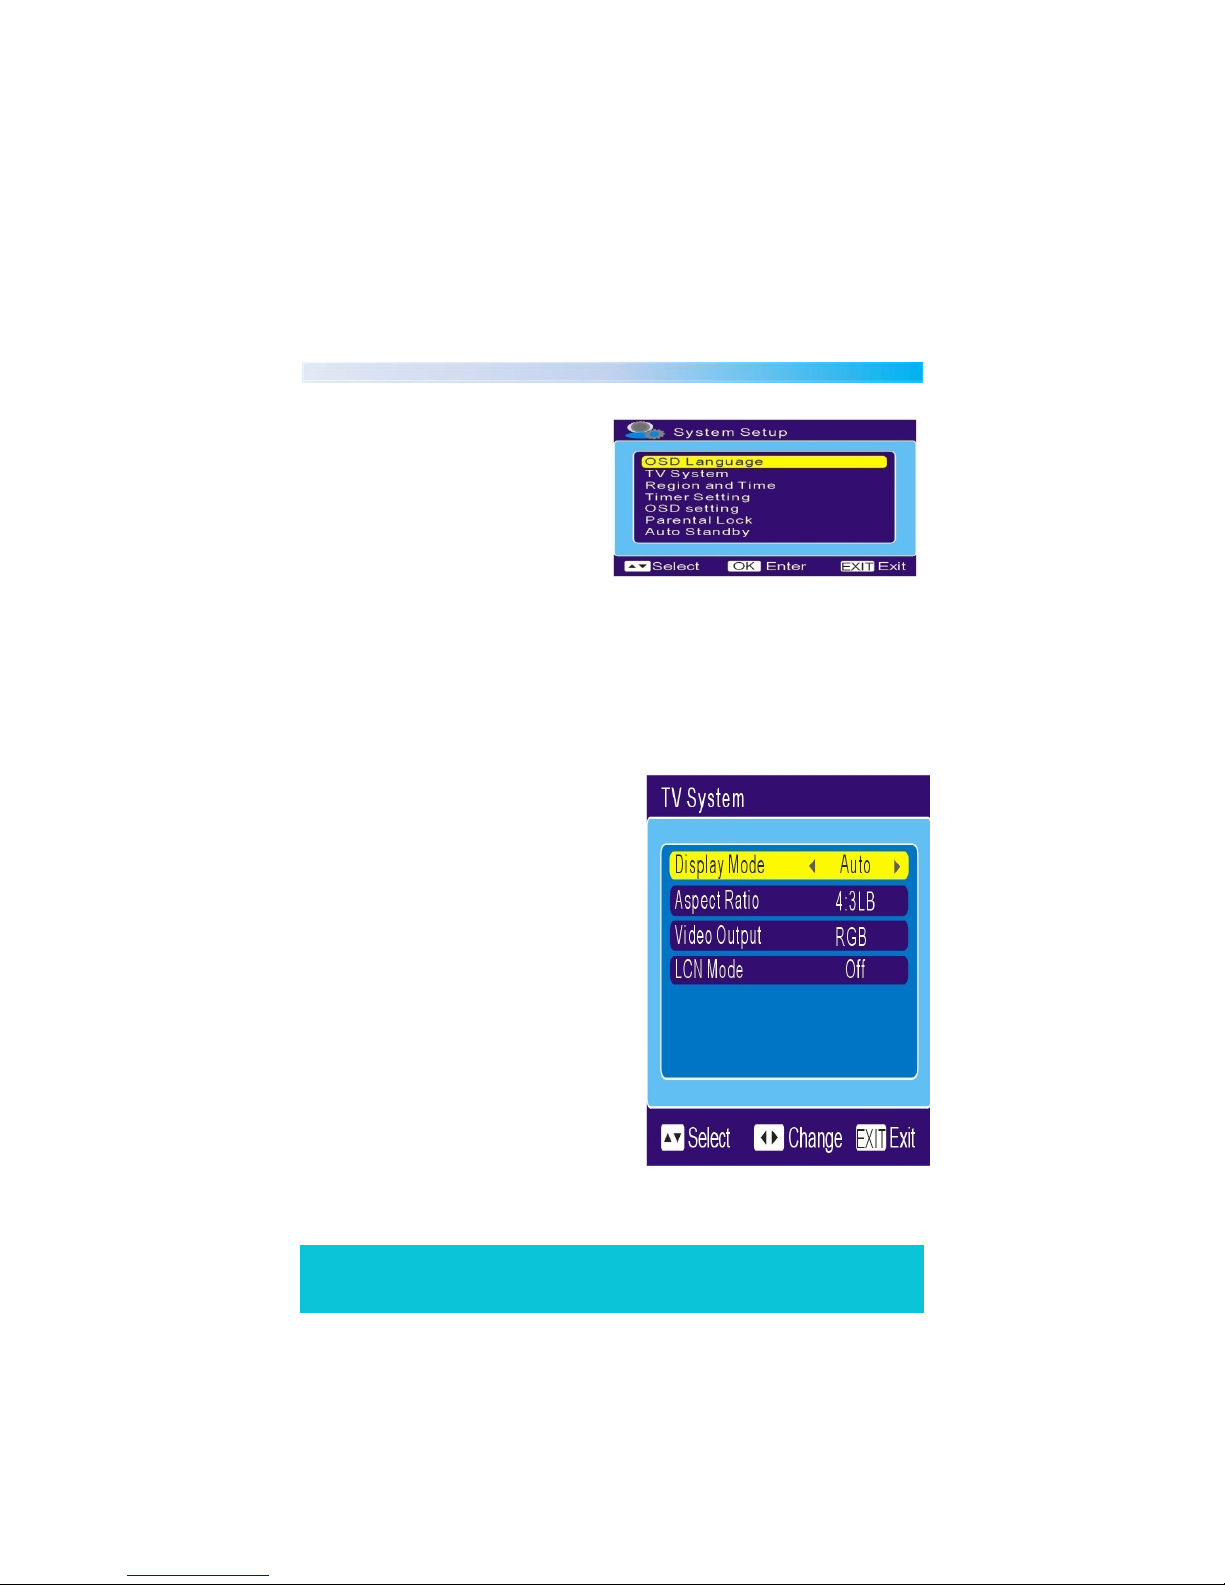
System Setup 11
The system setup menu allows
you to set the OSD Language,
TV System, Region and Time,
Timer Setting, OSD Setting,
Parental Lock and Auto
Standby.
OSD language
This option allows you to set the OSD Language, you can choose between
ENGLISH, FRENCH, GERMAN and SPANISH.
TV System
This option allows you to set the Display Mode, Aspect Ratio, Video Output and
LCN Mode.
Display Mode: NTSC/AUTO/PAL
Aspect Ratio: 4:3PS/4:3LB/16:9/Auto
Video Output: RGB/CVBS
LCN Mode: If LCN (Logical Channel
Number) Select
function is activated, you can't
change the original
number of TV channels
by scanning. You can
activate/disactivate
the LCN function by
setting the "LCN Mode"
to on or off.
NOTE: The LCN Mode puts the channels in the regular order that you
would usually see them, i.e. BBC1, BBC2, ITV1, C4, FIVE, ITV2, BBC3, etc.
Helpline No. UK/Northern Ireland 01270 508538 Rep.Ireland 1800 995 036
Web Support www.quesh.co.uk
Model No: 44176
20
Page 21
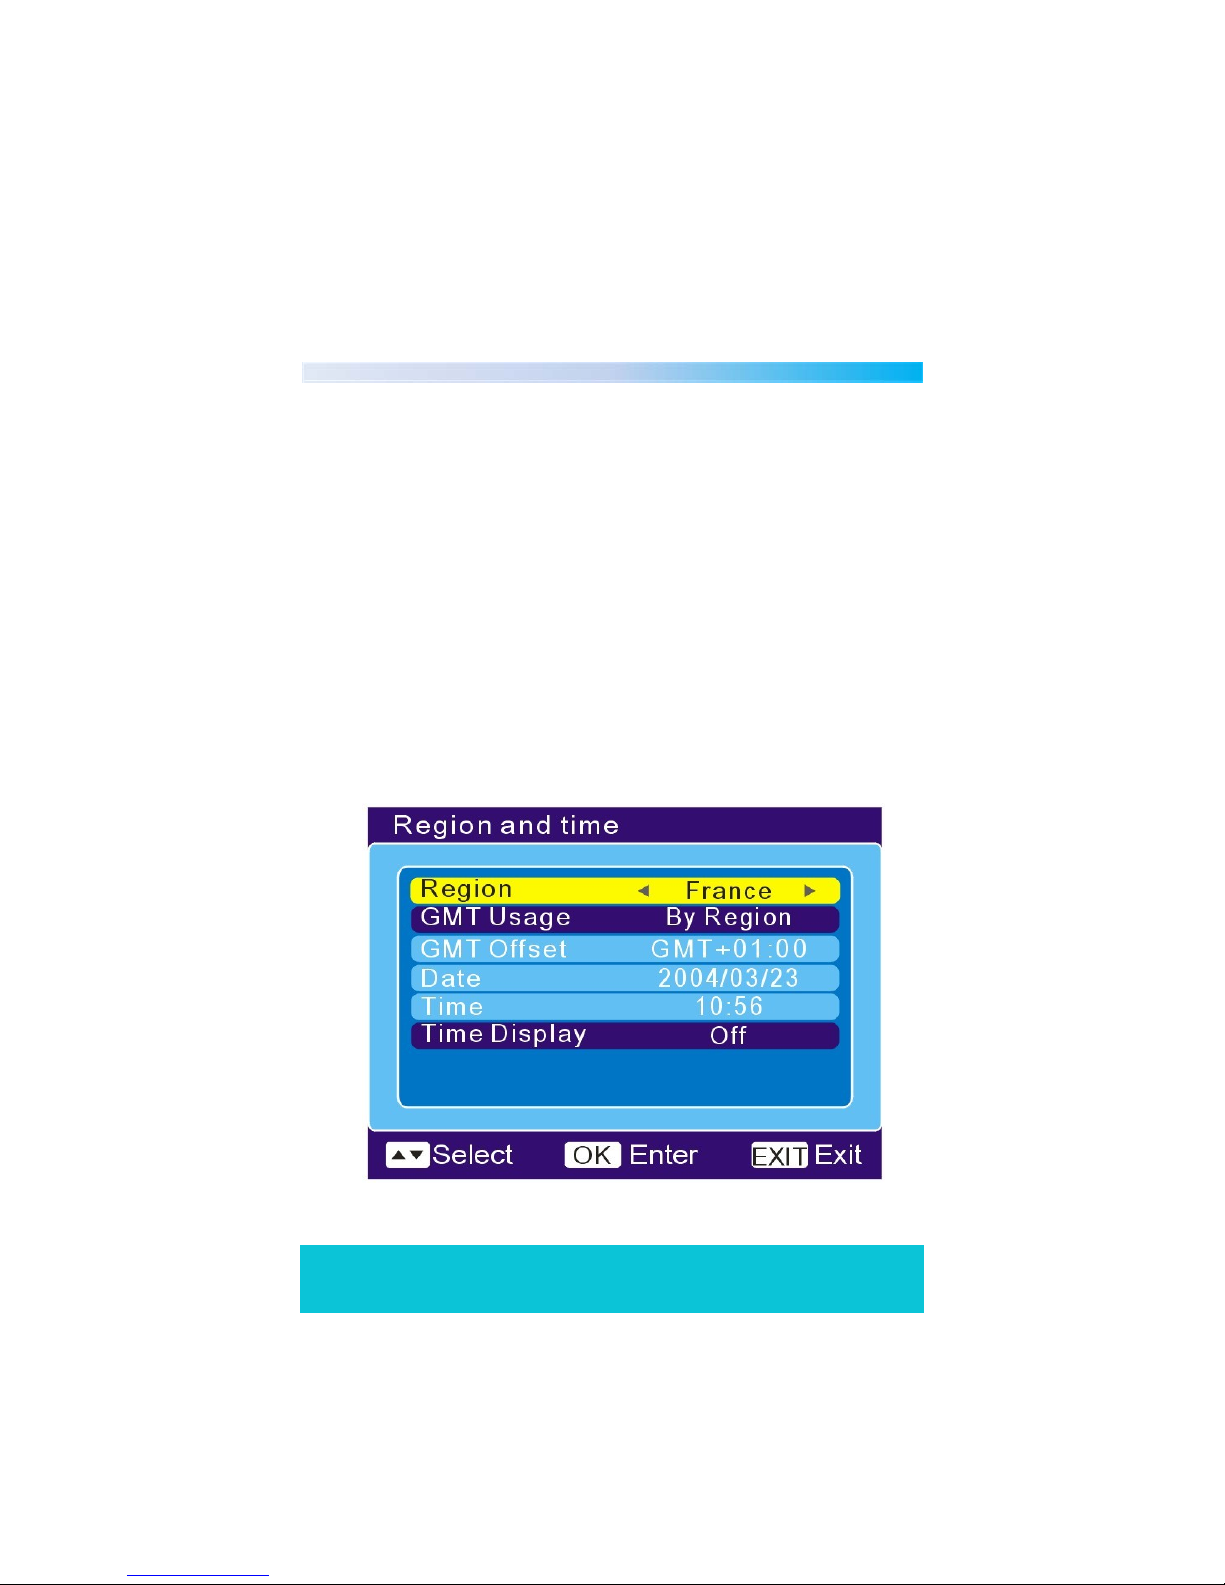
Region and Time
This menu allows you to set the region and time.
Region: This menu is used for changing the region setting.
GMT Usage: This menu is used to open the usage of GMT.
The options are : Off / User Define / By Region
GMT Offset: This menu is only valid when the option "User Define" is
selected in GMT Usage menu. The GMT offset range is "-11:30
~ +12:00", increasing half hour progressively.
Date: "Date" and "Time" menus are valid only when selected "Off" in
GMT Usage menu.
Time: Press "OK" then, numeric button to change the date and time.
Time Display: This menu allow us to control whether the time is displayed
on screen or not. The options are :Off/On.
Helpline No. UK/Northern Ireland 01270 508538 Rep.Ireland 1800 995 036
Web Support www.quesh.co.uk
Model No: 44176
21
Page 22

Timer Setting
This menu allows you to set the program timer and sleep timer.
Program Timer: This menu is used for setting the program time.
Timer Number: You can set 8 program timers.
Timer Mode: Off/Once/Daily/Weekly/Monthly
Timer Service: TV Service/Radio Service
Wakeup Channel: You can select a desired channel as the
wakeup channel.
Month/Date/Day: Press the"LEFT/RIGHT" arrow keys to select
your desired month, date and day.
Time: Press "OK" then numeric button to input the
time.
Duration: Press "OK" then numeric button to input the
Duration time.
NOTE: When you want to quit program timer, a saving window appears.
Sleep Timer: You can set the Scart receiver to power off in
Helpline No. UK/Northern Ireland 01270 508538 Rep.Ireland 1800 995 036
Web Support www.quesh.co.uk
Model No: 44176
10 min, 30min, 60min, 90min and 120min
automatically.
22
Page 23
OSD Setting
This menu allows you to set the Subtitle Display, OSD Transparency and load
default OSD settings.
Subtitle Display: To set the subtitle to Standard/Off/Teletext.
OSD Transparency: To set the OSD transparency to Off/10%/
20%/30%/40%/50%.
Load Default OSD Setting: To clear all OSD setting and reset parameters
as default values.
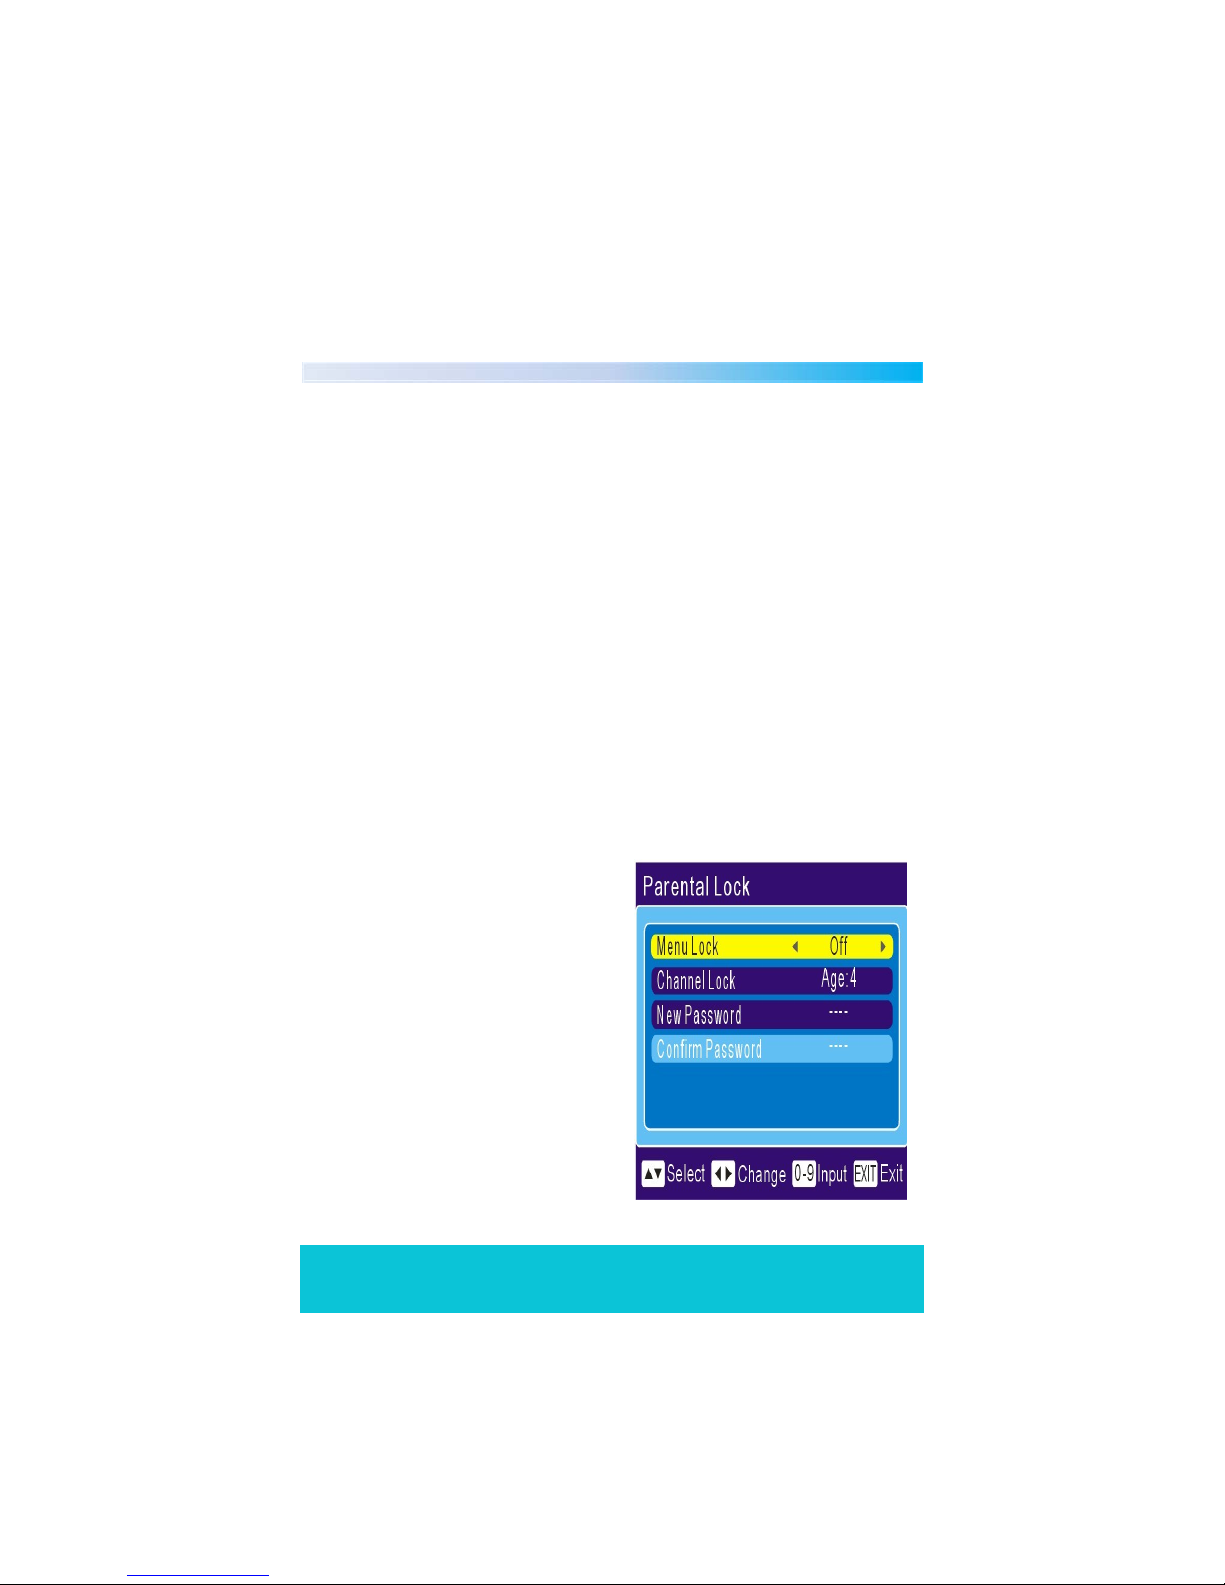
Parental Lock
This menu allows you to password protect the installation menu and channel
and change the Password.
When you select the Parental Lock option you will be asked to enter a
password, the default password is 0000, once entered correctly you will be
presented with the parental lock menu.
Menu Lock: To lock the installation
menu. When you
want to enter Auto
Scan/Channel Scan
menu, you must input
the password. You can
set the menu lock to
on/off.
New Password: To change the
Helpline No. UK/Northern Ireland 01270 508538 Rep.Ireland 1800 995 036
Web Support www.quesh.co.uk
Model No: 44176
password.
23
Page 24

Auto Standby
You have the choice to turn this menu ON/OFF. When on, as long as there is no
timer event set the receiver will enter standby mode automatically.
Helpline No. UK/Northern Ireland 01270 508538 Rep.Ireland 1800 995 036
Web Support www.quesh.co.uk
Model No: 44176
24
Page 25
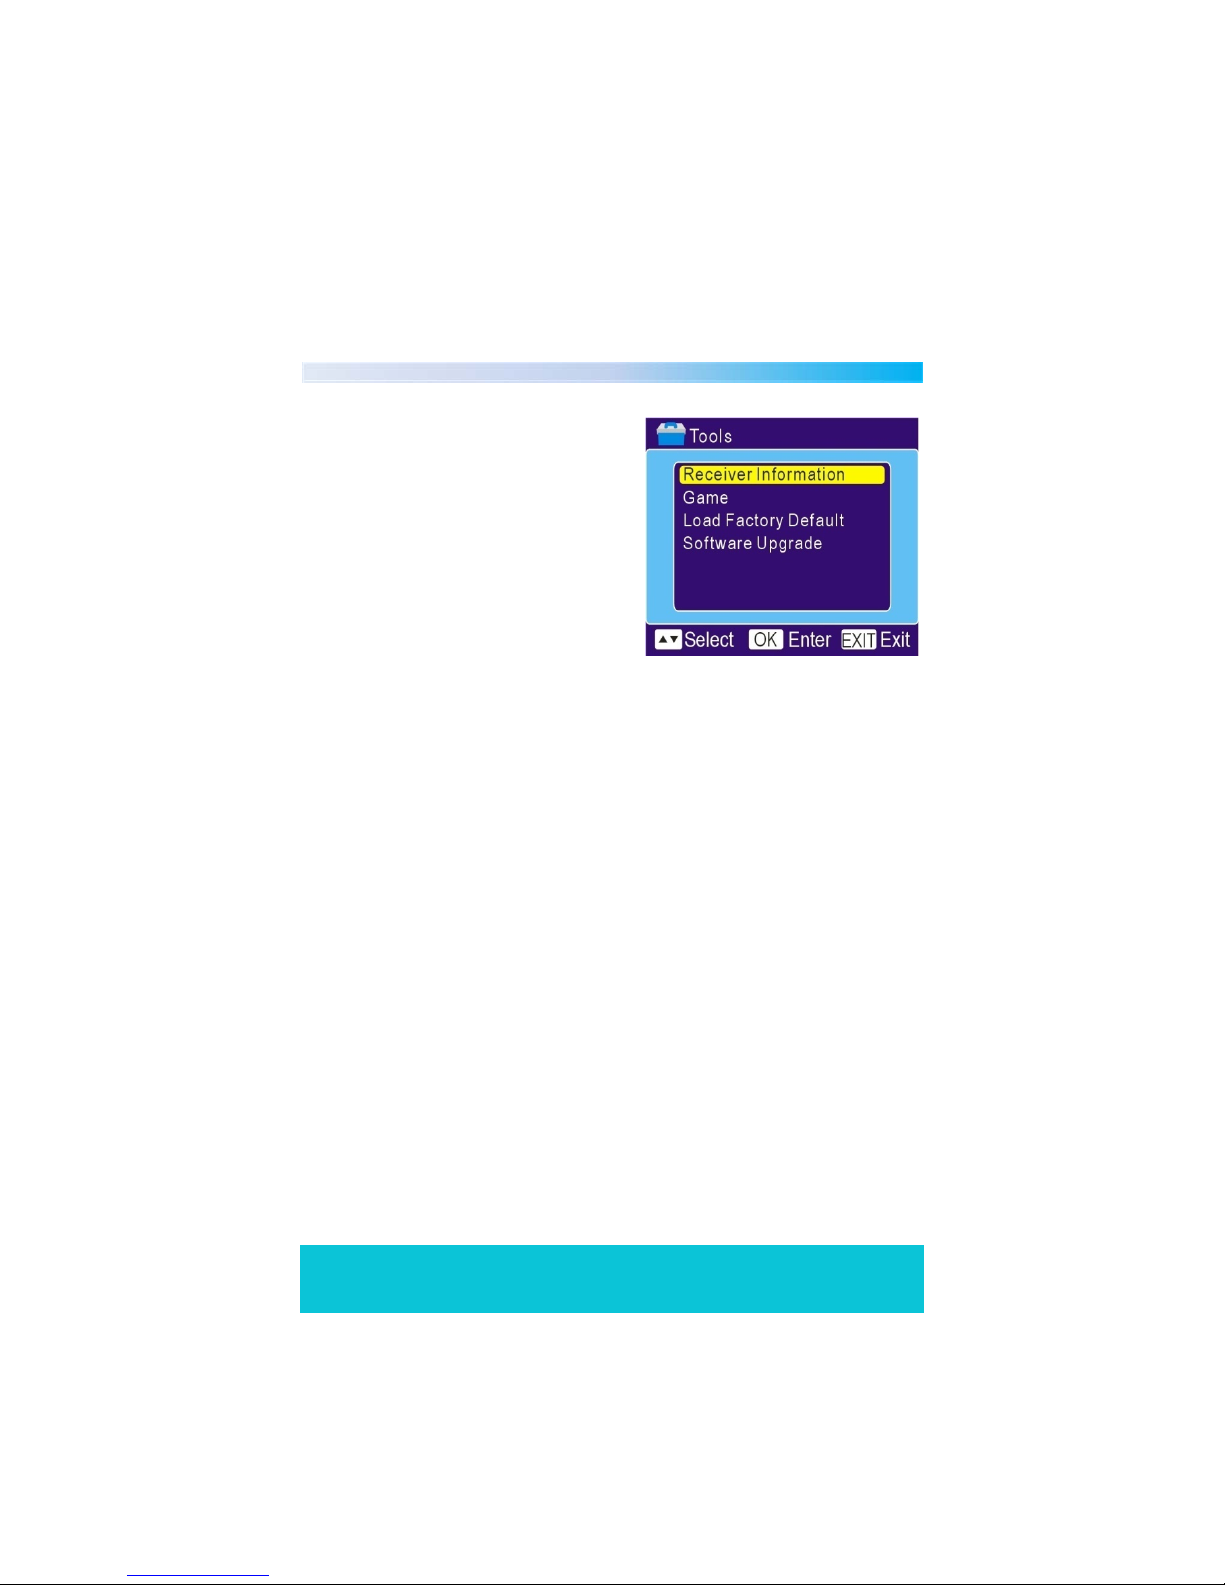
Tools 12
The Tools menu gives you 4 options,
Receiver Information, Game, Load
Factory Default and Software Upgrade.
Receiver Information. This menu can display some
parameters of Receiver, Software
and Signature information in the receiver.
Game. This Option allows you to play 1 of the 3
games installed Tetris, Snake and
Othello.
Load Factory Default. This menu allows you to reset the receiver
back to factory settings, and clear all
existing channels.
Software Upgrade. This option allows you to upgrade the
Helpline No. UK/Northern Ireland 01270 508538 Rep.Ireland 1800 995 036
Web Support www.quesh.co.uk
Model No: 44176
software installed on the receiver, if there
are any updates available
25
Page 26
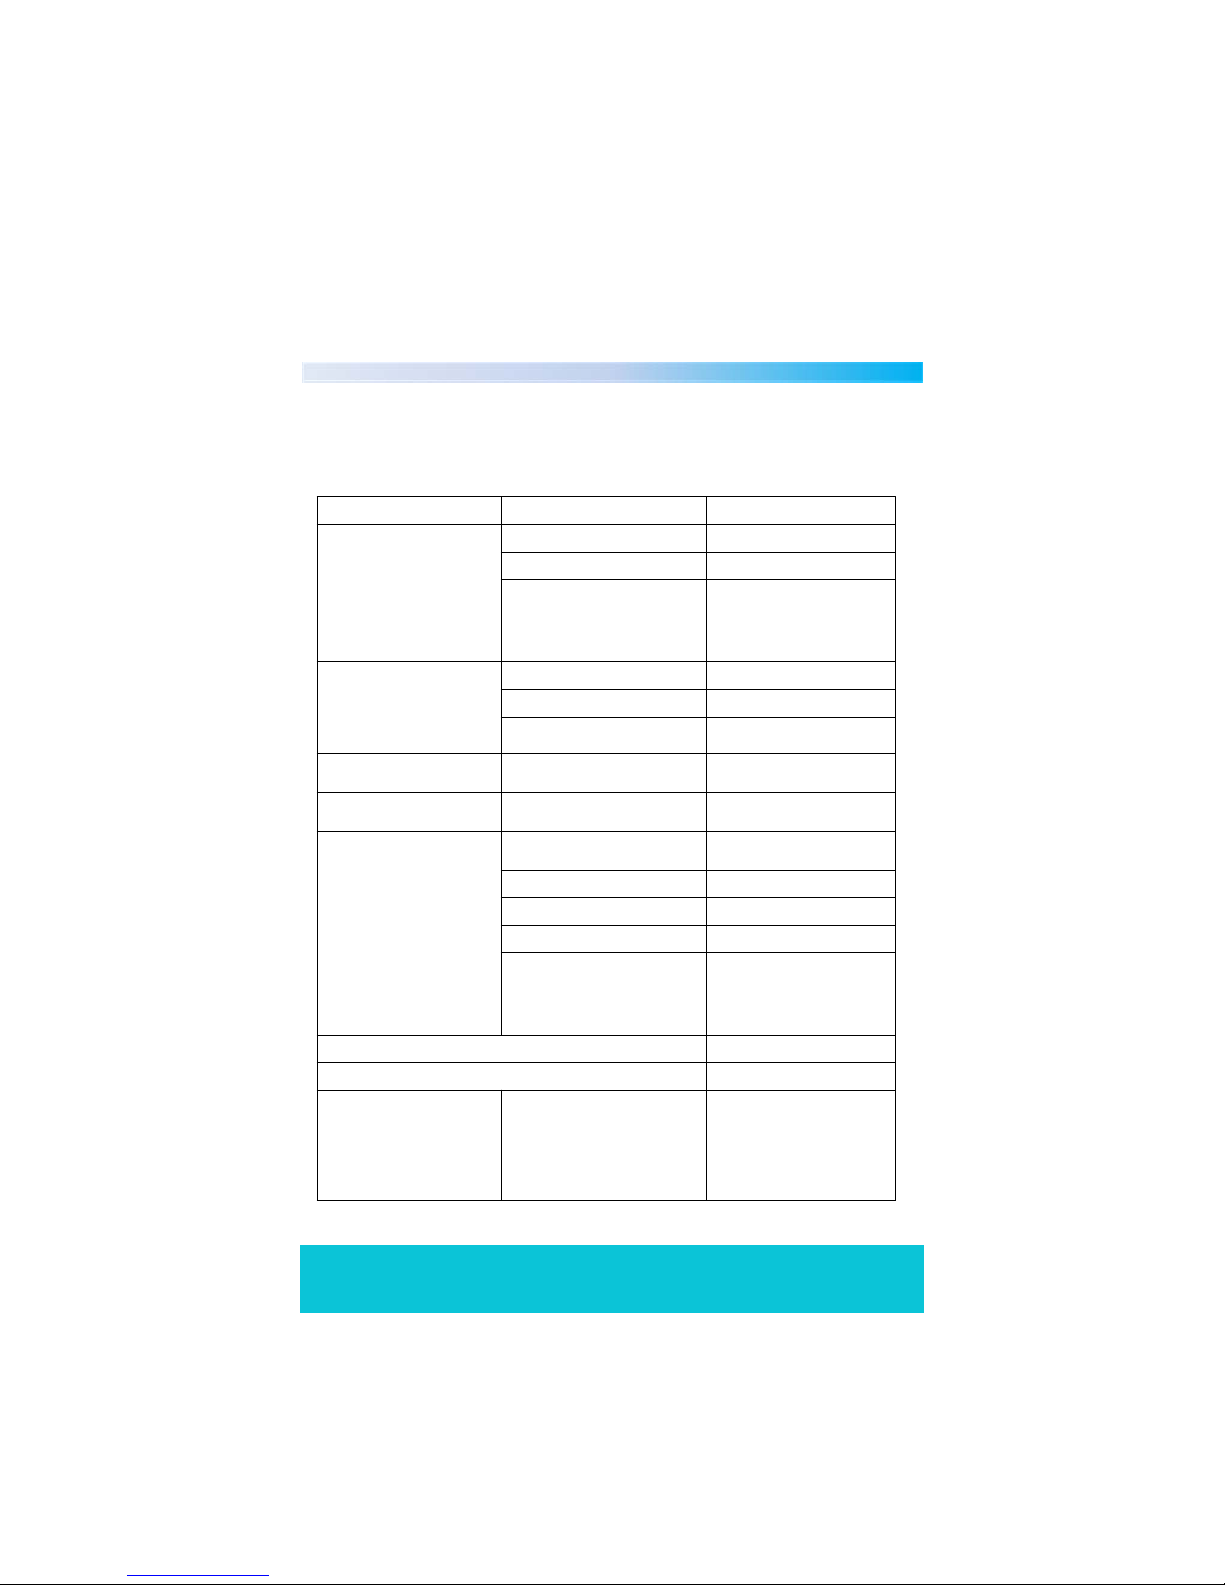
Troubleshooting 13
In the event of you having any problems with your micro freeview receiver
please check here for a possible cause and solution.
Problem Possible Cause Solution
Mains lead unplugged Check mains lead
Mains fuse blown Check fuse
No Standby light
No Signal
No picture or sound
Scrambled channel
message
No response to remote
control
Forgotten Channel lock code Re-install the channels
Forgotten menu lock code Contact the help line
Remote sensor not connected
correctly
Aerial is disconnected Check aerial lead
Aerial is damaged/misaligned Check aerial
Out of digital signal area
Tuned to digital teletext
channel
Channel is scrambled
Receiver off
Remote not aimed correctly Aim remote at front panel
Remote sensor obstructed Check for obstructions
Remote battery exhausted Replace remote battery
Remote sensor not connected
correctly
Ensure remote sensor plug
is fully inserted
into the remote sensor
socket on the main unit
Check national coverage on
www.freeview.co.uk/availability
Try another channel
Select an alternative
channel
Plug in and turn on the
plug
Ensure remote sensor plug
is fully inserted into the
remote sensor socket on
the main unit
After moving scart stick to
another room, it is no
longer able to receive
digital signal
Helpline No. UK/Northern Ireland 01270 508538 Rep.Ireland 1800 995 036
Web Support www.quesh.co.uk
Model No: 44176
The signal through the aerial
may not be strong enough to
receive digital reception due
to distribution problems.
try a direct feed from the
aerial
26
Page 27
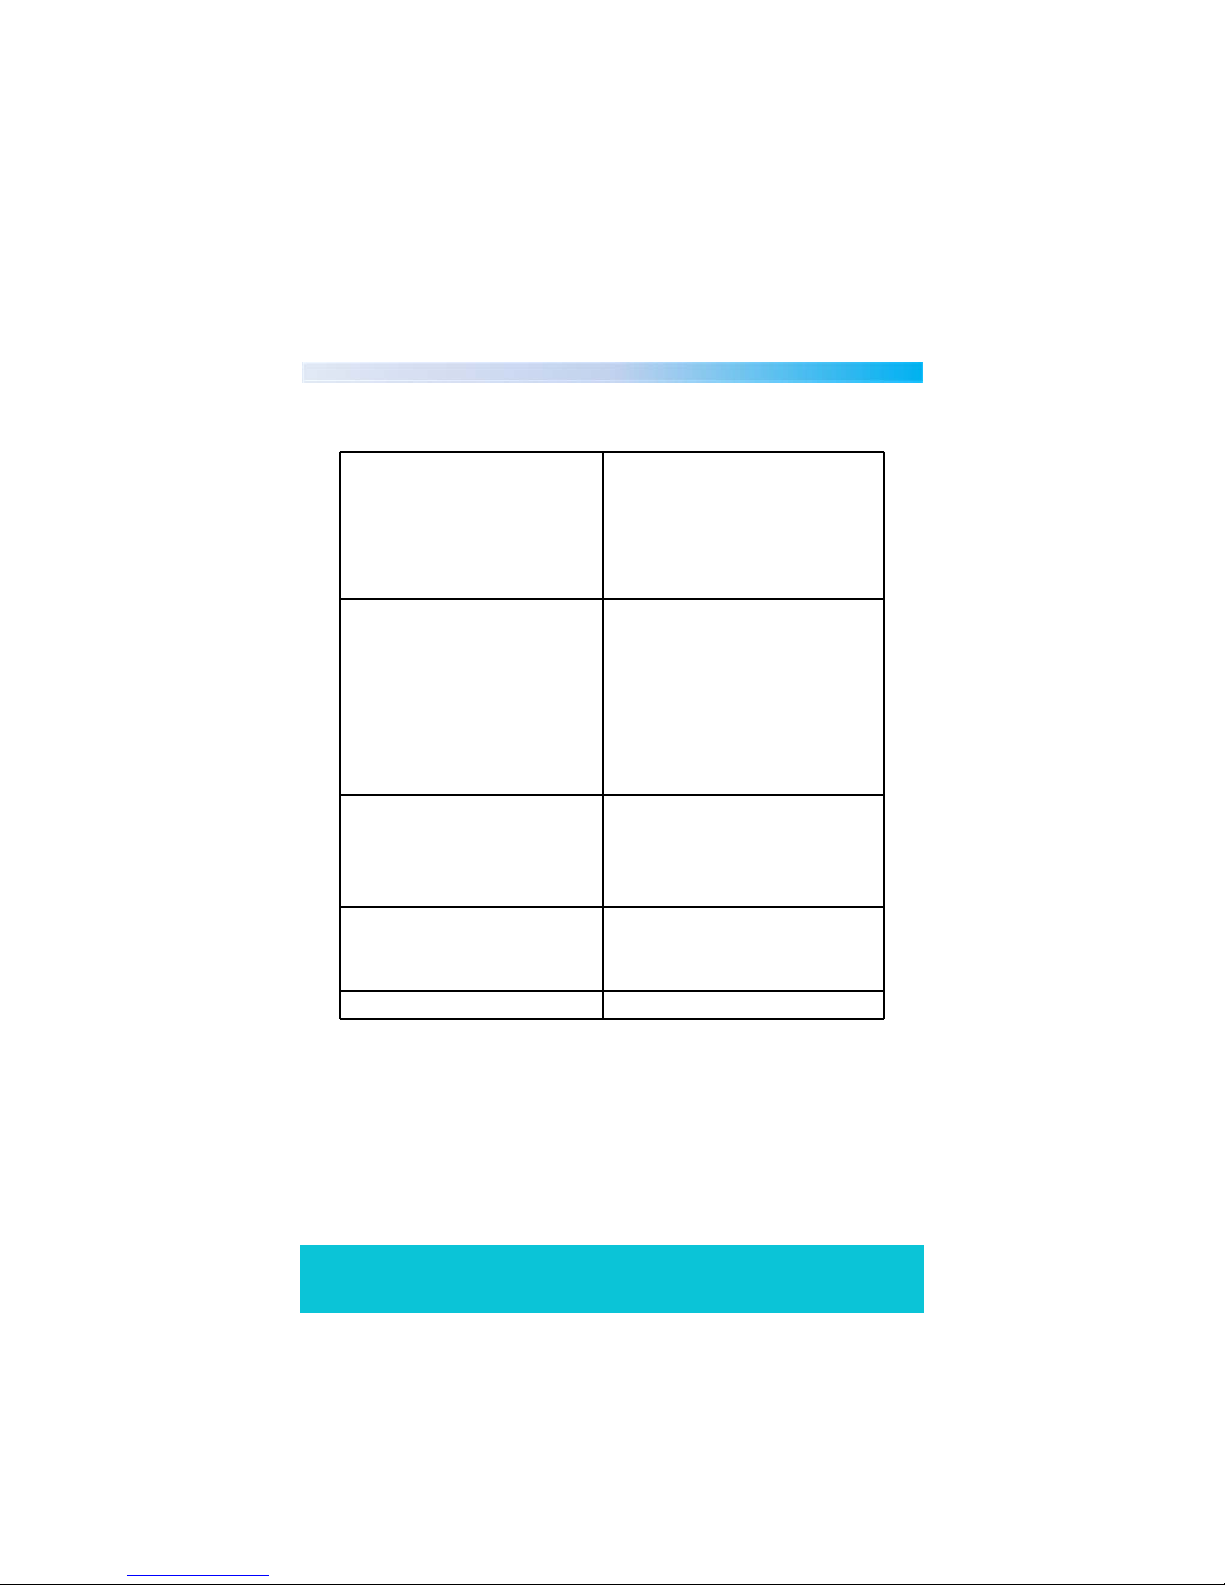
Technical Specification 14
Therefore INPUT CONNECTOR x1
(IEC -TYPE, IEC169-2, FEMALE)
RF OUTPUT CONNECTOR x1
TUNER & CHANNEL
DECODER
TRANSPORT STREAM
PROFILE LEVEL
INPUT RATE
VIDEO FORMATS
AUDIO FORMAT
VIDEO OUTPUT
(IEC -TYPE, IEC169-2, MALE(LOOPTHROUGH))
FREQUENCY RANGE:
174MHz~ 230MHz (VHF)
474MHz ~862MHz (UHF)
SIGNAL LEVEL:
-20 ~ -75 dbm
MPEG-2 ISO/IEC 13818
MPEG-2 MAIN PROFILE @MAIN LEVEL
MAX. 15Mbit/s
4:3/16:9 SWITCHABLE
MPEG LAYER I & II, 32 / 44.1 / 48KHz
CVBS, RGB
CONNECTION
TUNER
SCART
REMOTE SENSOR
POWER SUPPLY
DC INPUT POWER
CONSUMPTION
DIMENSIONS BODY SIZE: 70 x 5 0 x
ANTENNA INPUTx1,ANTENNA OUTPUT x 1
SCART OUTPUT
IR REMOTE x1
ADAPTOR 5V/
MAX. 5W
Helpline No. UK/Northern Ireland 01270 508538 Rep.Ireland 1800 995 036
Web Support www.quesh.co.uk
Model No: 44176
27
Page 28
MICRO FREEVIEW
RECEIVER
W A R R A N T Y C A R D
Congratulations! You have made an excellent choice with the purchase of
this quality product. Our commitment to quality also includes our service.
Should you, contrary to expectations, experience defects due to
manufacturing faults during private use within 36 months of the date of
purchase we shall be liable for warranty in accordance with statutory
warranty regulations provided that: -
-the device was not put to any use other than the intended
-was not overloaded
-was not used with the wrong accessories
-repairs were not carried out by any other than the authorised workshop
The warranty certificate is only valid in connection with the receipt. Please
keep both in a safe place. This does not affect your statutory rights.
The purchase is guaranteed for a period of three years beginning on the day
of purchase. Keep your purchase receipt safe as proof of date of purchase.
The guarantee can only be extended for the duration of any repair required.
Should your item become defective during the warranty period, in the first
instance, please call our customer service centre, they will then inform you
of what to do next. We will at our discretion, either repair or exchange the
device in accordance with warranty legislation.
Please enclose the following when sending your product in for repair: -
1.Receipt (proof of purchase)
2.This warranty certificate and fault report card complete with your contact
details and fault description.
If the original receipt is not enclosed the repair will be charged in all cases.
After the warranty has expired you can still send defective devices for
repairs to the address stated below. Quotes as well as repairs after the
warranty period are to be paid in all cases.
Ensure that the product is well packed as no responsibility
can be accepted for items lost or damaged in transit. This
warranty does not affect your statutory rights.
3
YEAR
WARRANTY
Page 29
MICRO FREEVIEW
RECEIVER
F A U L T R E P O R T C A R D
Name ______________________________________________
Address ____________________________________________
___________________________________________________
Email ______________________________________________
Contact Tel No. ______________________________________
Model Number
Fault Description ____________________________________
___________________________________________________
___________________________________________________
___________________________________________________
44176
SERVICE HELPLINE
UK/N.Ireland 01270 508538
Rep.Ireland 1800 995 036
web: www.quesh.co.uk
Quesh Ltd
1 Solway Court, Crewe Business Park, Crewe, CW1 6LD
 Loading...