

Page 1
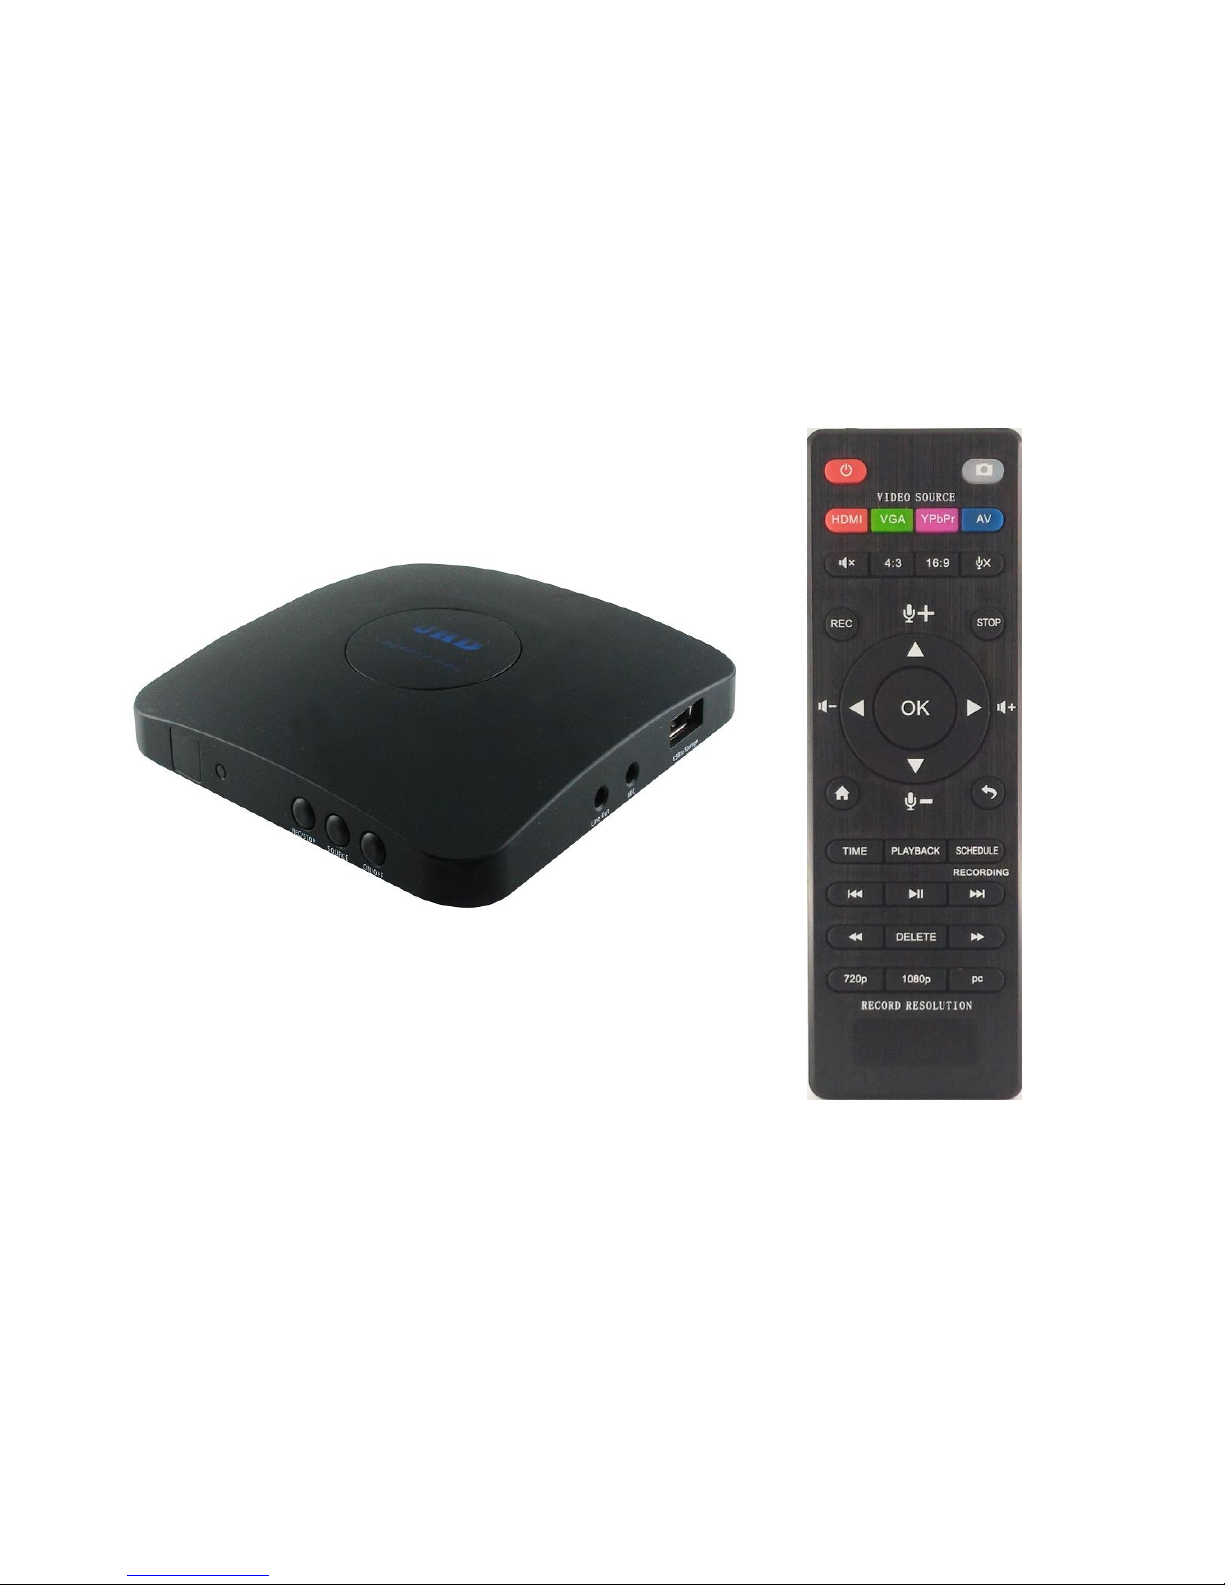
D700 UHD PVR
Record Videos and Play Back instantly
Page 2

1
Important Safety Instruction
Before using D700 UHD PVR, please ensure that you read and understand the safety
precautions below:
1. Do not attempt to open the case of D700 UHD PVR or modify it in any way, as this will
void the warranty.
2. Keep D700 UHD PVR away from water and other liquids, as this may cause the unit to
malfunction.
3. D700 UHD PVR may become warm during use. This does not indicate malfunction.
4. Do not place heavy objects on D700 UHD PVR, as this may cause the unit to overheat
and malfunction.
5. If the exterior of D700 UHD PVR requires cleaning, wipe it with a soft dry cloth.
6. Do not dispose of the unit via conventional domestic waste.
Page 3

2
Table of Contents
Important Safety Instruction .............................................................. 1
Table of Contents .............................................................................. 2
What’s included ................................................................................. 3
Product Connectors ...................................................................... 4-5
Connection Instruction and Installation ............................................... 6
Standalone Mode
1. Installation ..................................................................................6
2. Record/Capture to USB or HDD ...................................................7
3. Set up by OSD ........................................................................ 7-10
4. Playback .............................................................................. 11-12
PC Mode
1. Software Installation & Connection ……………………………………13-14
2. PC Software(GXPlayer) registration & Key features ……………14-15
Upload video to YouTube ................................................ 16-18
Live Streaming via XSplit .................................................. 19-21
Live Streaming via OSB .................................................... 22-24
Record / Capture to PC ............................................................... 25-26
Schedule Recording & Set up ...................................................... 26-27
New Firmware Upgrade Instruction …………………………………………………..28
Support Resolution and Product Specifications……………………………. 28-29
Contact us ………………………………………………………………………………………...29
Page 4
3
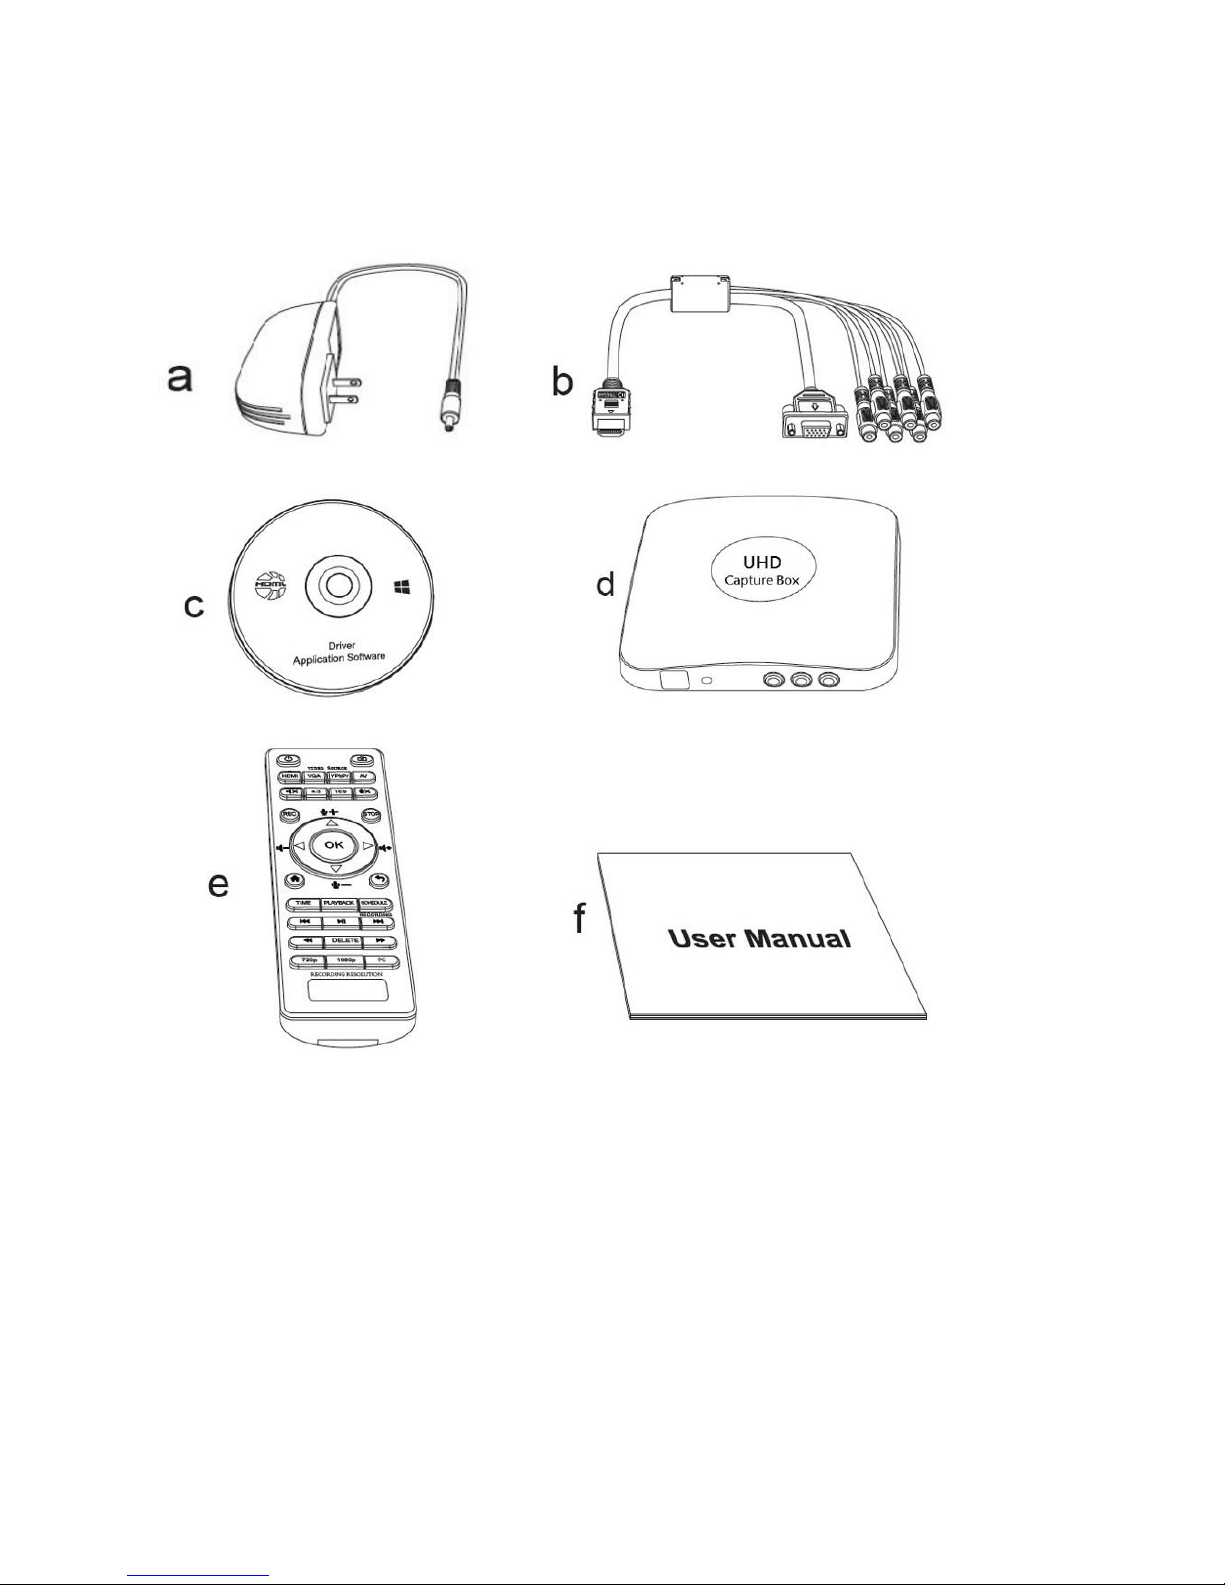
What's included
a. Power Adapter b. MMI Cable
c. Installation CD d. D700 UHD PVR
e. Remote Control f. User Manual
Page 5
4
Product Connectors
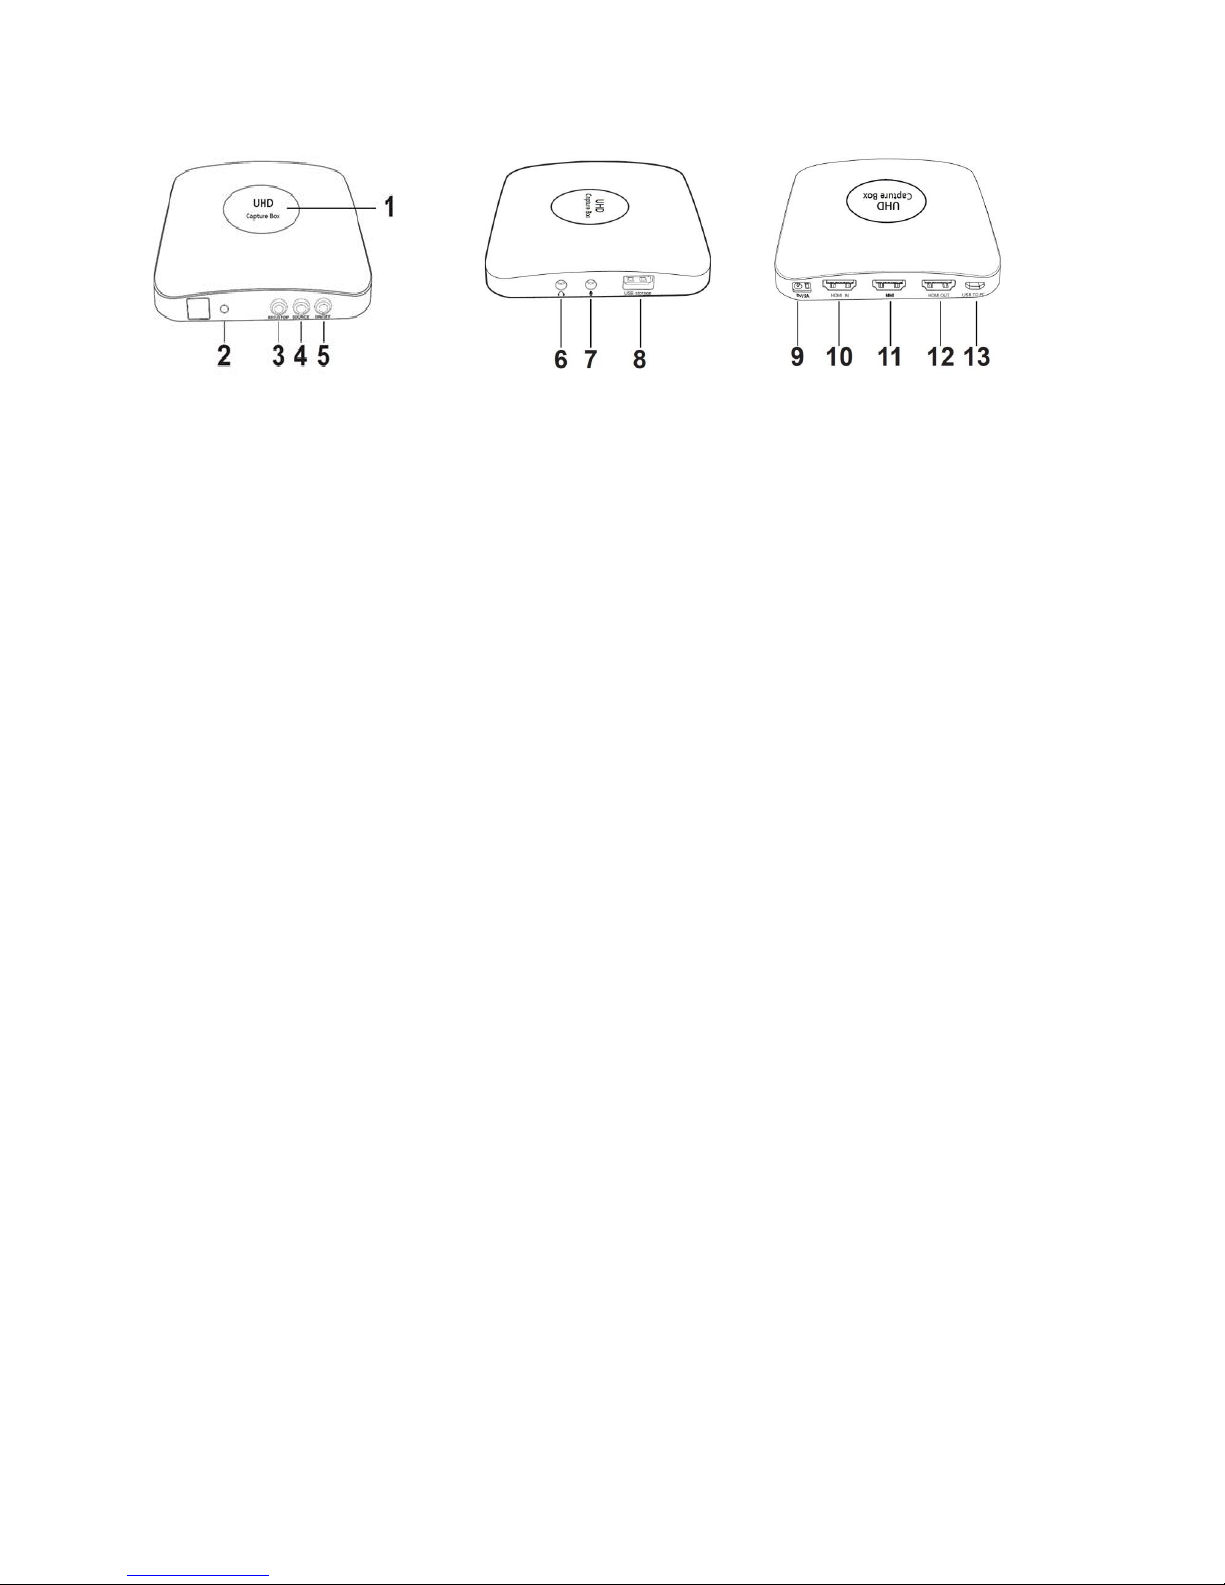
1. LED indicator light for recording. Blue means D700 UHD PVR is recording
videos in 1080p, while Green means it is recording videos in 720p or others.
2. When this light is on, it means D700 UHD PVR is turned on.
3. REC/STOP: Press this button to start/stop recording.
4. SOURCE: Input signal button. HDMI, VGA, YPbPr and AV are available.
5. ON/OFF: Hold this button for a few seconds to power on/power off.
6. Line Out: Audio output interface.
7. MIC: MIC input interface.
8. USB storage: The interface which the USB storage device is plugged into.
9. 5V/2A: Power adapter interface.
10. HDMI IN: HDMI input interface.
11. MMI: VGA/AV/YPbPr/Audio L/R cable interface.
12. HDMI OUT: HDMI output interface.
13. USB to PC: USB interface for connecting the computer. This function must be
realized together with GXPlayer
Page 6
5
Page 7
6
Connection instruction and installations (Standalone Mode)
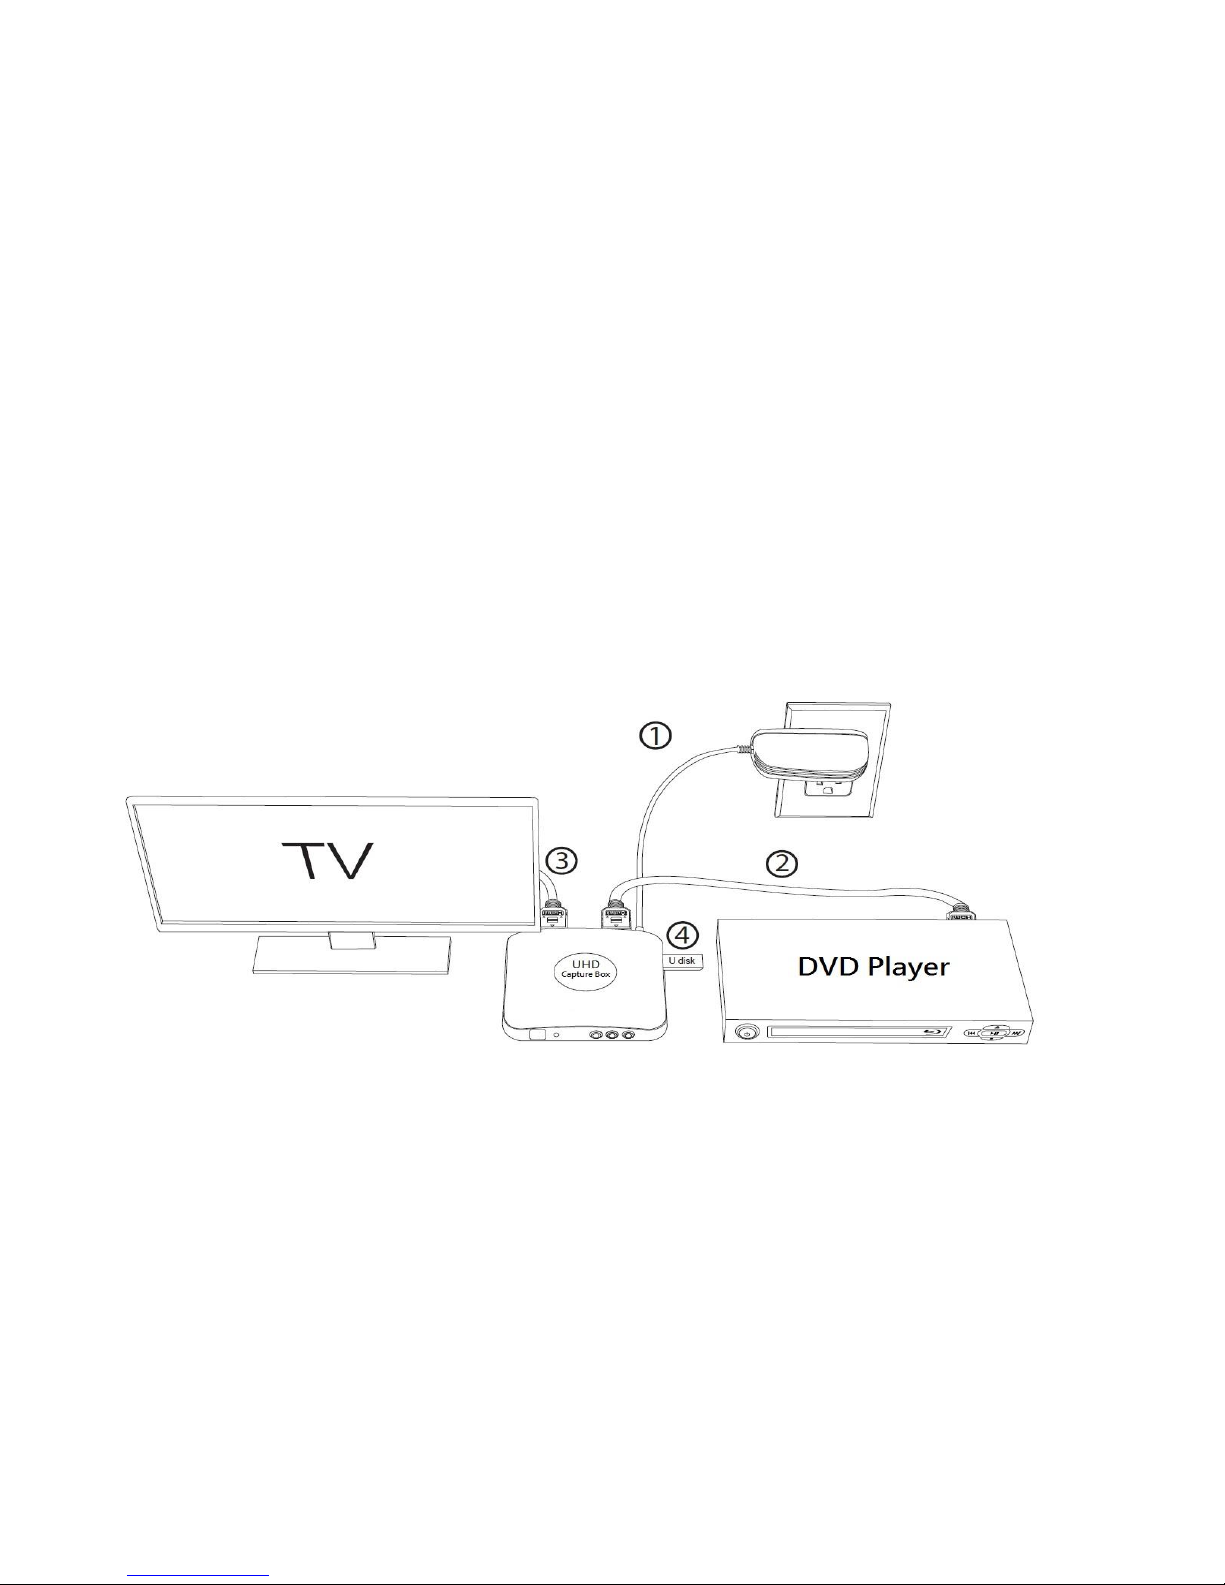
1. Installation
(1) Plug the power adapter into the power socket and plug the other end into
the 5V/2A port of D700 UHD PVR.
(2) Connect the input device (PS3, PS4, Blue-ray player, etc) to HDMI IN on D700
UHD PVR via an HDMI cable.
Note: If you want to connect devices via the VGA/AV/YPbPr/Audio L/R cable,
please connect the input device to MMI port on D700 UHD PVR.
(3) Connect D700 UHD PVR from HDMI OUT to TV via an HDMI cable.
(4) Plug the USB storage device into the USB port of D700 UHD PVR.
2. Record/Capture
(1) After all devices are connected properly, please switch on the power of D700
UHD PVR.
(2) Insert a video disc into the drive of the input device and play the video.
(3) Plug the USB storage device to the USB port of D700 UHD PVR.
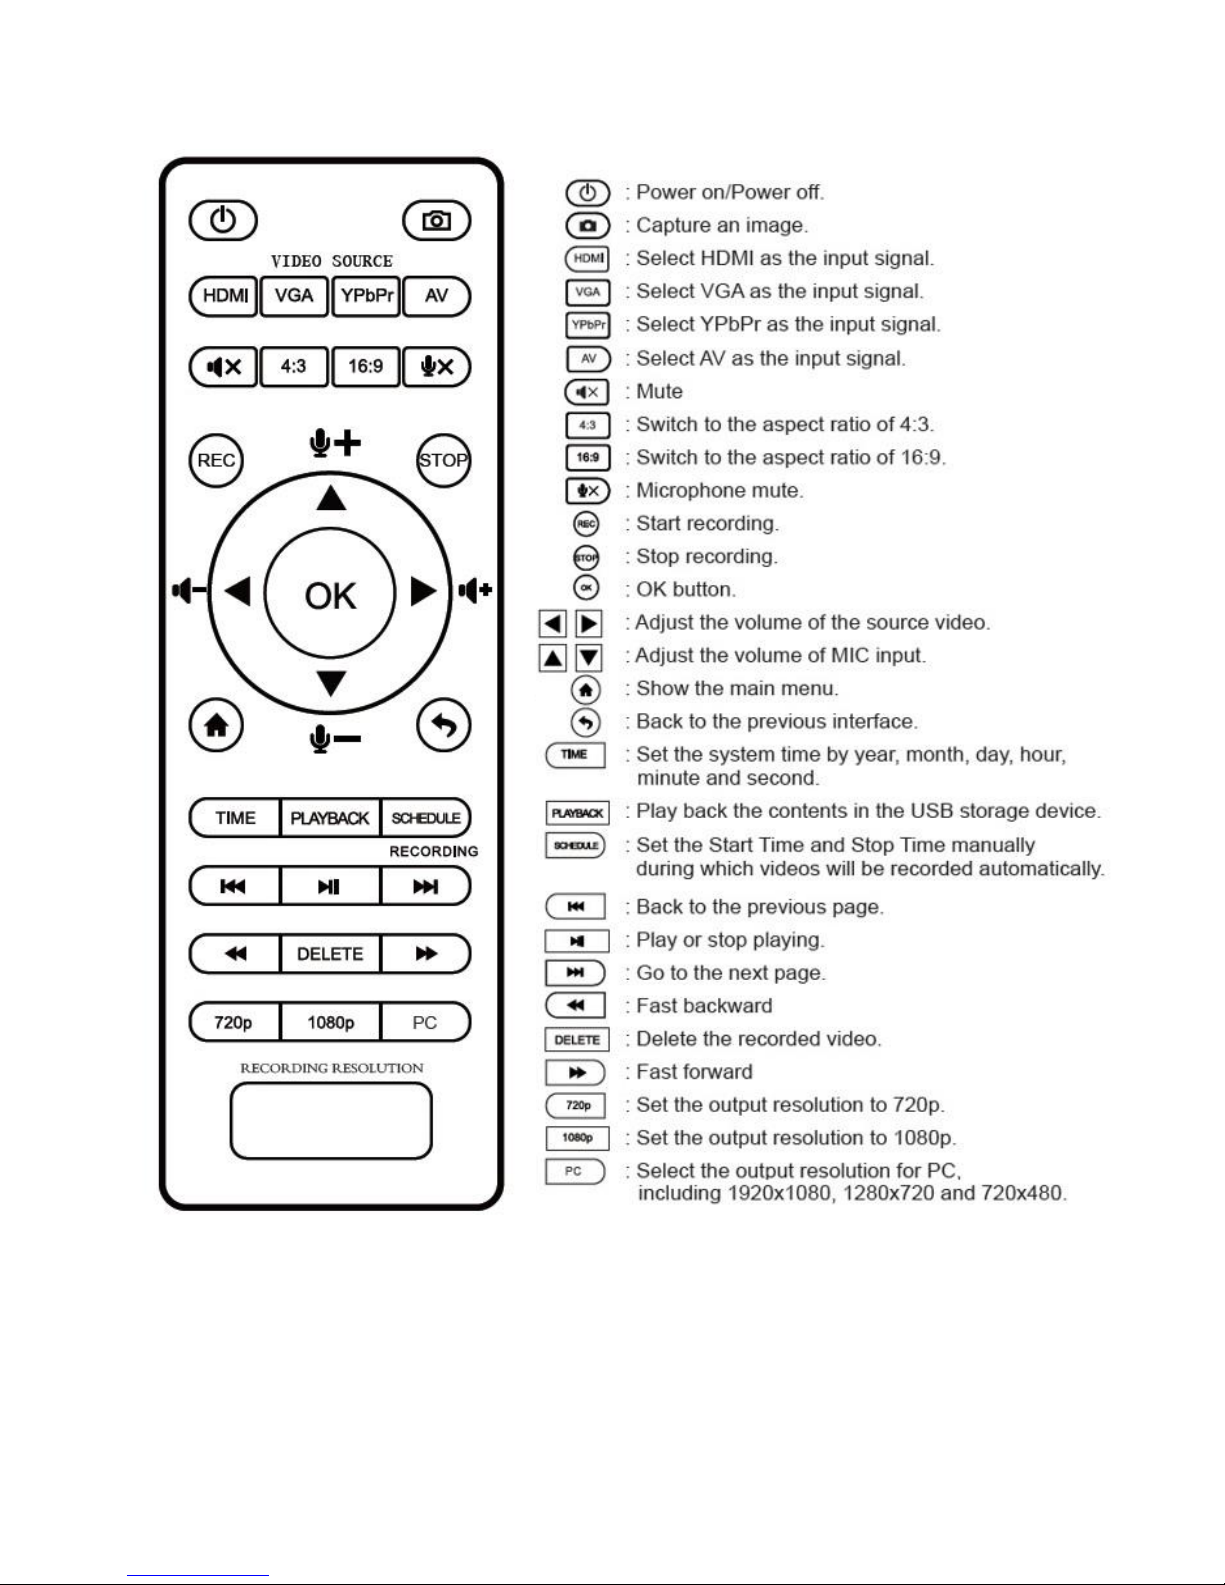
(4) Press the REC/STOP button on the capture box or press the REC button on
the remote control to start recording.
(5) After recording for a period of time, press the REC/STOP button again on the
capture box or press the STOP button on the remote control to stop recording.
Page 8
7
NOTE: D700 supports FAT32 & NTFS formats only. In FAT32, it will record a new
file when the previous recording file reaches the maximum 2GB capacity, the
maximun is 32GB for FAT; in NTFS there is no 2GB per file limitation D700 will
record as long as needed.
When HDD or USB storage is full, D700 stops recording and LED will go off.
D700 saves files in MPEG4 format. The resolution can be set at either 720p or
1080p for capture. Please note that not all games/video files are produced at
1080p.D700 will record approximately 1GB per 10mins at either 720p or l080p.
3. Setup by OSD (On Screen Display)
(1) Press button on the remote control to browse the menu setting
of D700 UHD PVR30 which are TIME, PICTURE, SOUND and OPTION.
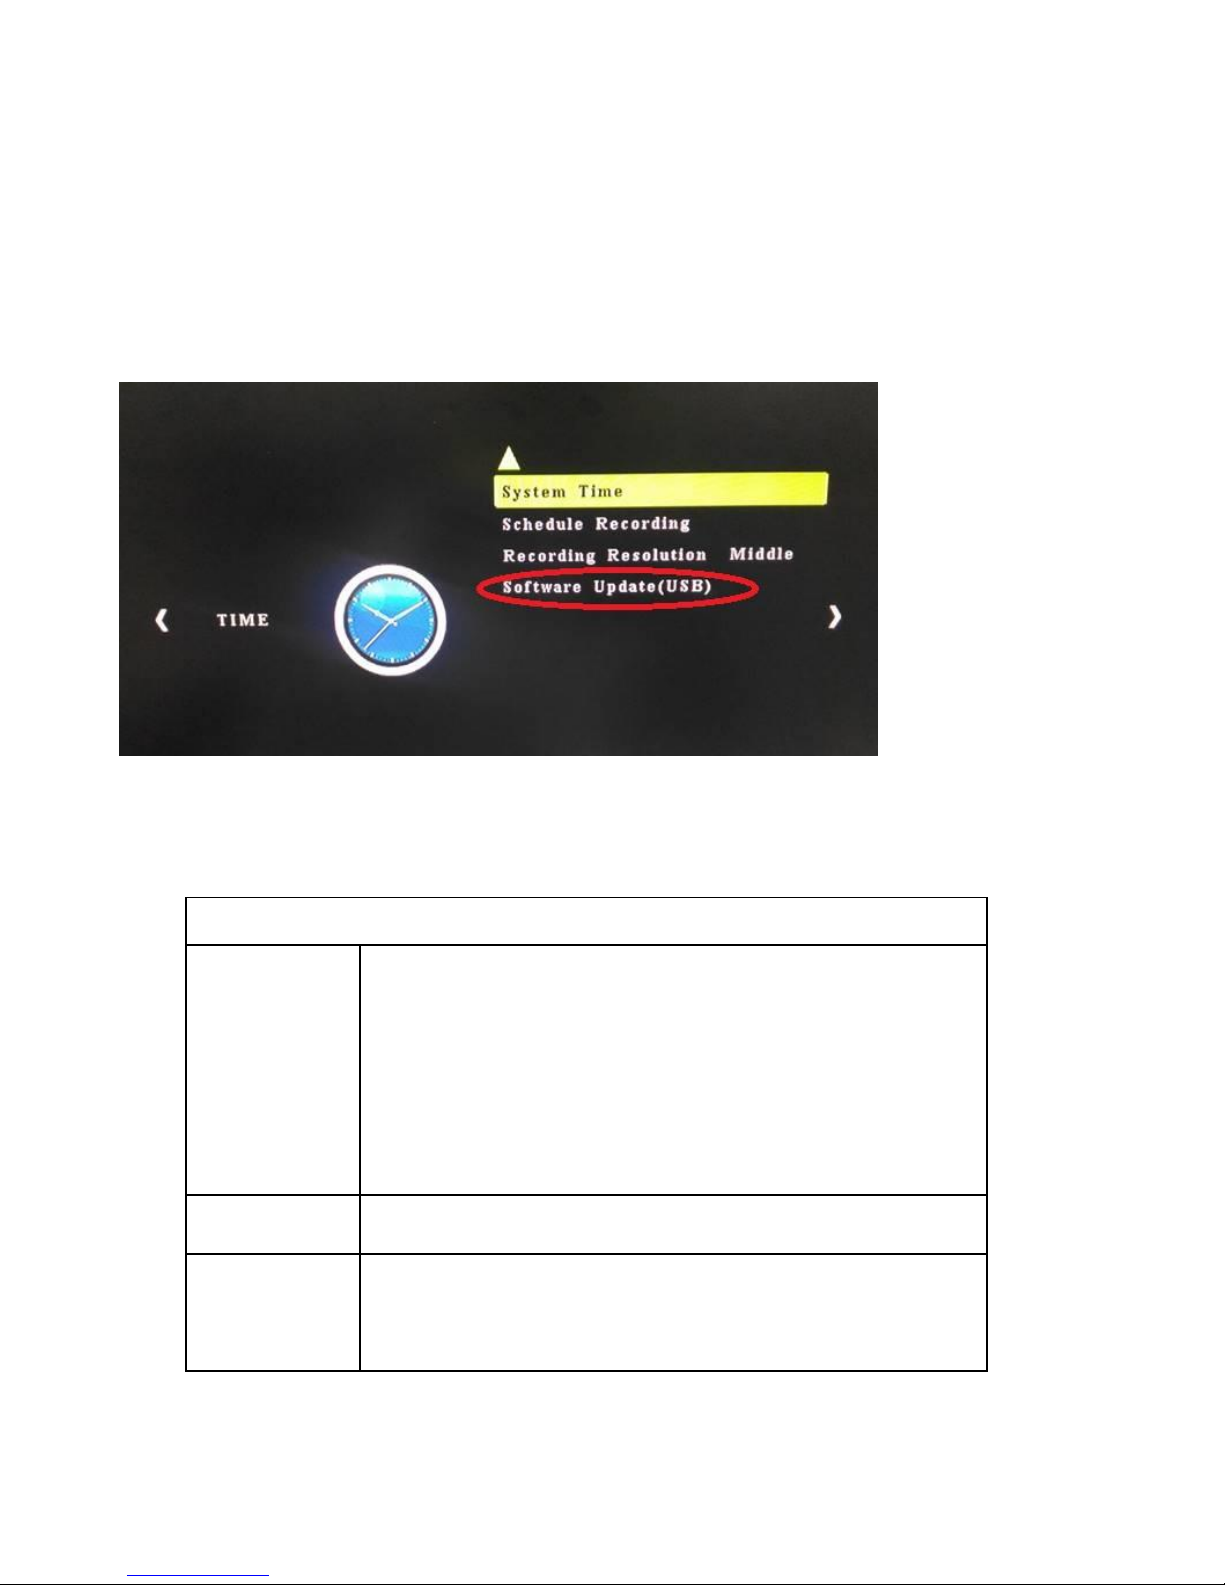
Under the TIME column, there are four aspects: System Time, Schedule
Recording, Recording Resolution and Software Update.
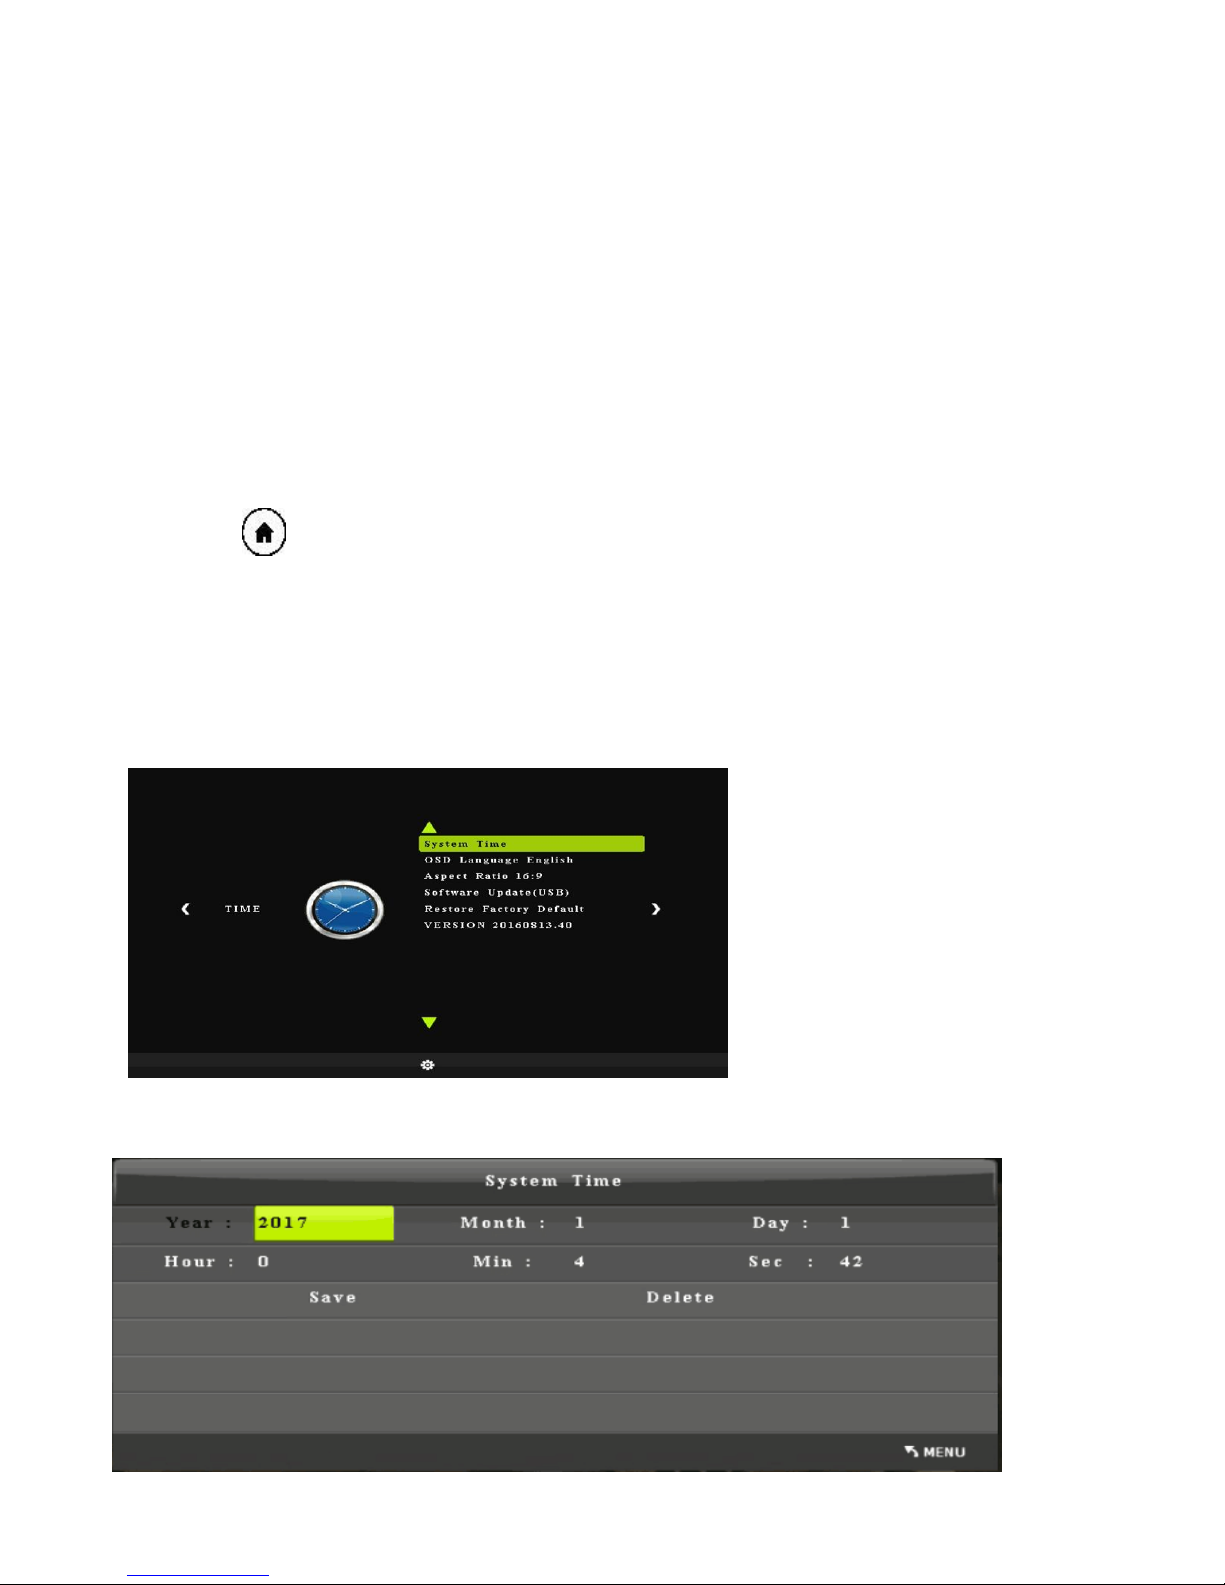
System Time: Set the time of D700 by year, month, day, hour and minute.
Schedule Recording: Allow you to preset recording up to 4 different schedules
Page 9
8
Recording Resolution: Set the output resolution. High, Middle and Low are available.
Software Update: Upgrade the firmware when there is a new version available. You need to
plug the USB storage device into D700 UHD PVR.
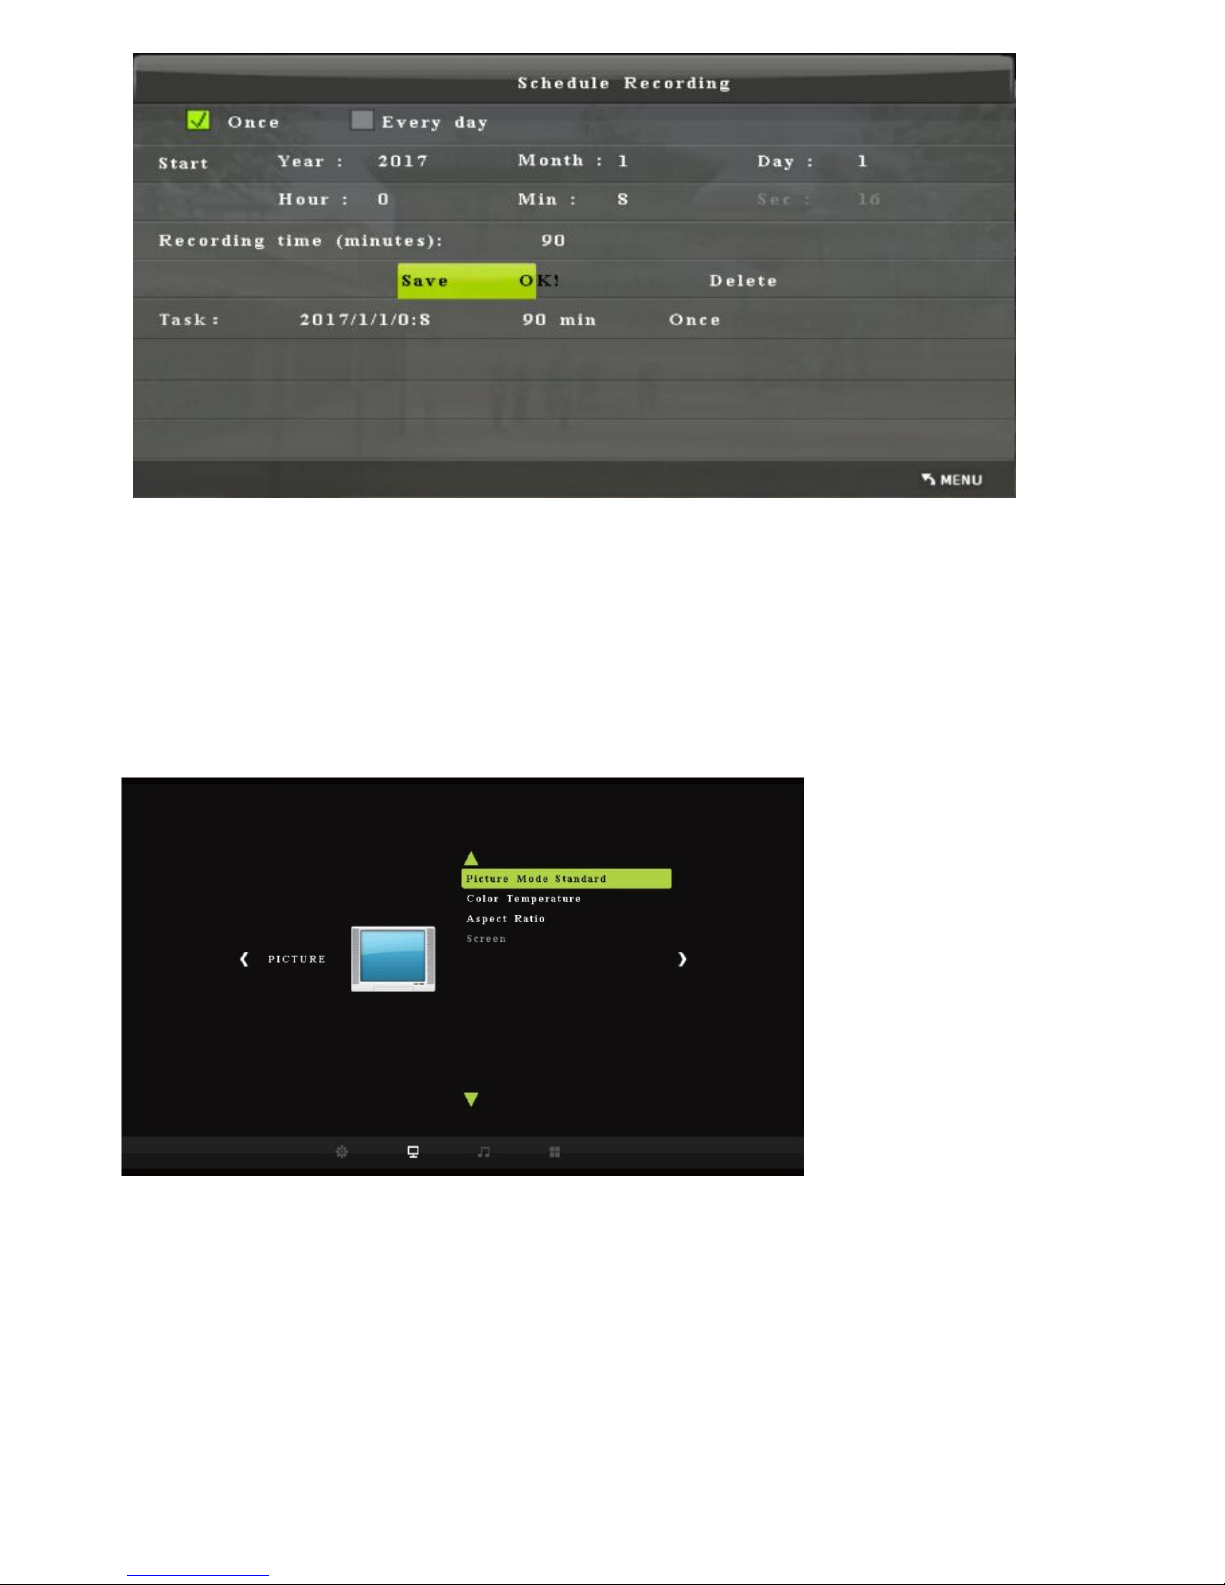
Under the PICTURE column, there are three aspects: Picture Mode, Color Temperature and
Aspect Ratio.
Picture Mode: Mild, User, Dynamic and Standard are available.
Color Temperature: Medium, Warm, User and Cool are available.
Aspect Ratio: Auto, 4:3, 16:9, Zoom 1, Zoom 2 and Just Scan are available.
The default state is 16:9.
Page 10
9
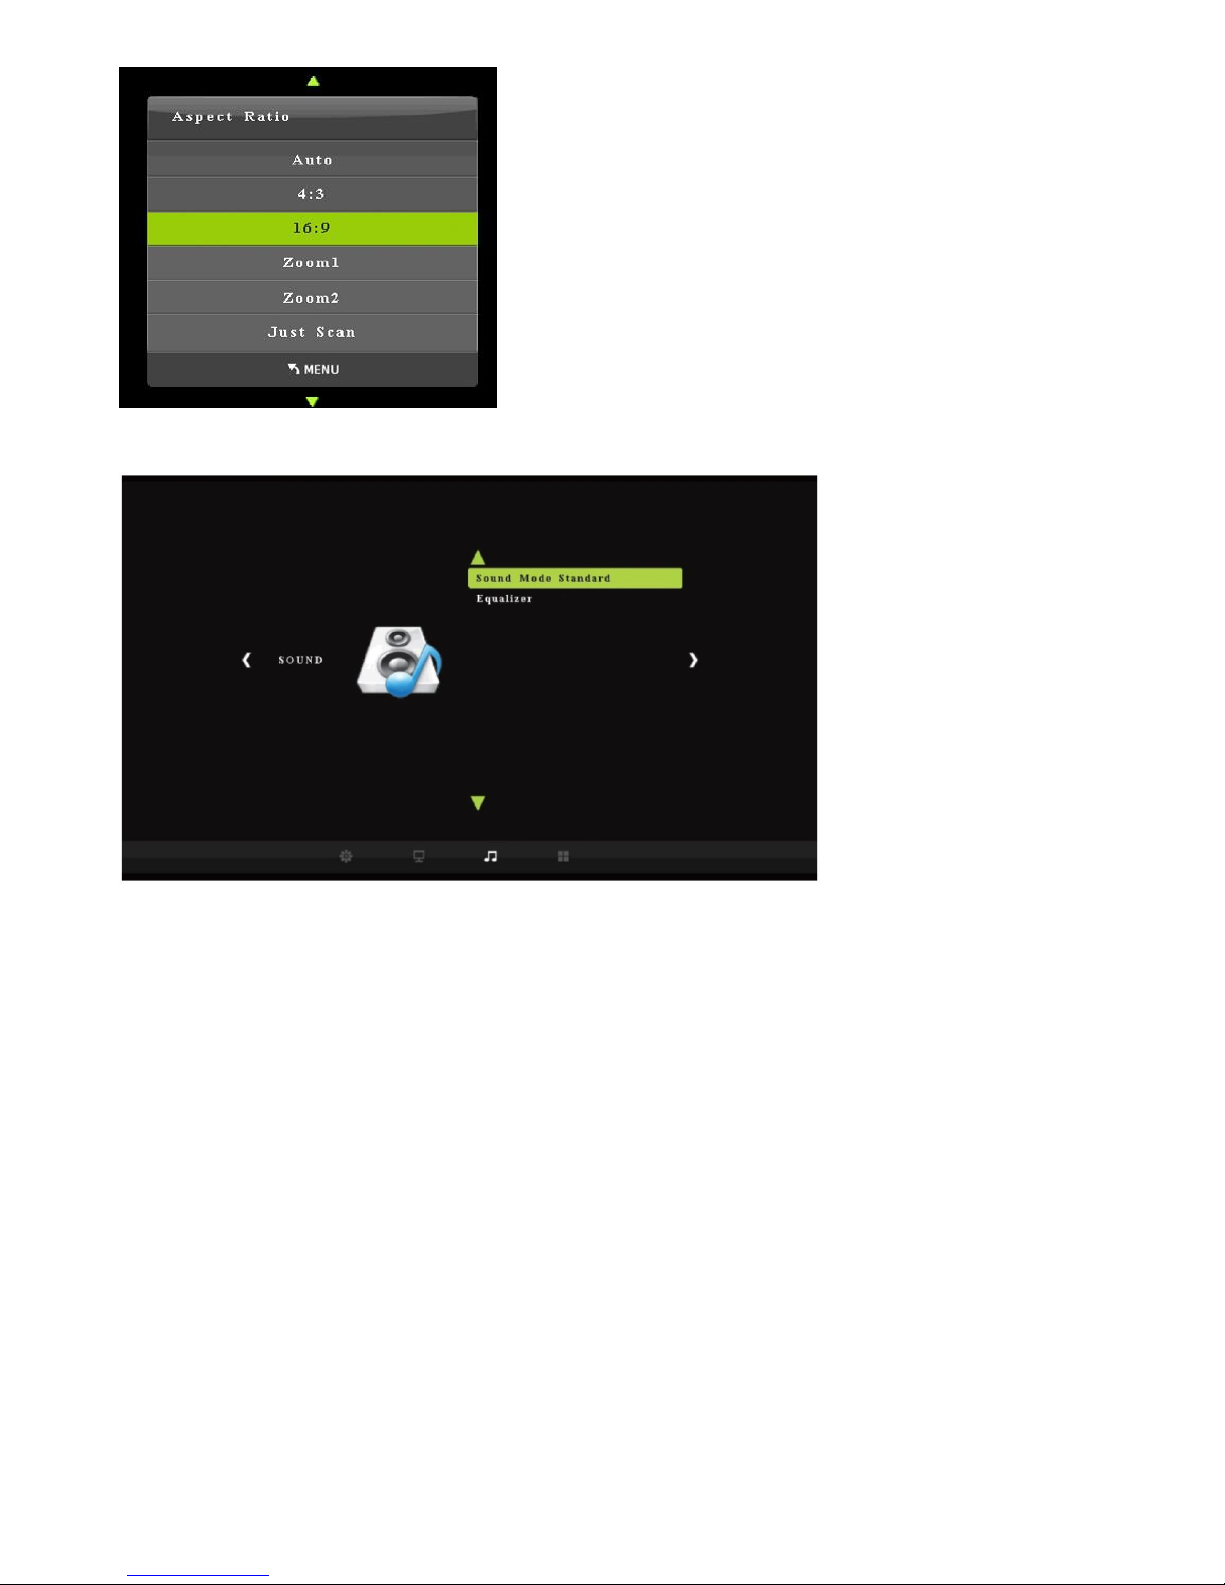
Under the SOUND column, there are two aspects: Sound Mode and Equalizer.
Sound Mode: Standard, Music, Movie, Sports and User are available.
Equalizer: 120 Hz, 500 Hz, 1.5 KHz, 5 KHz and 10 KHz are available.
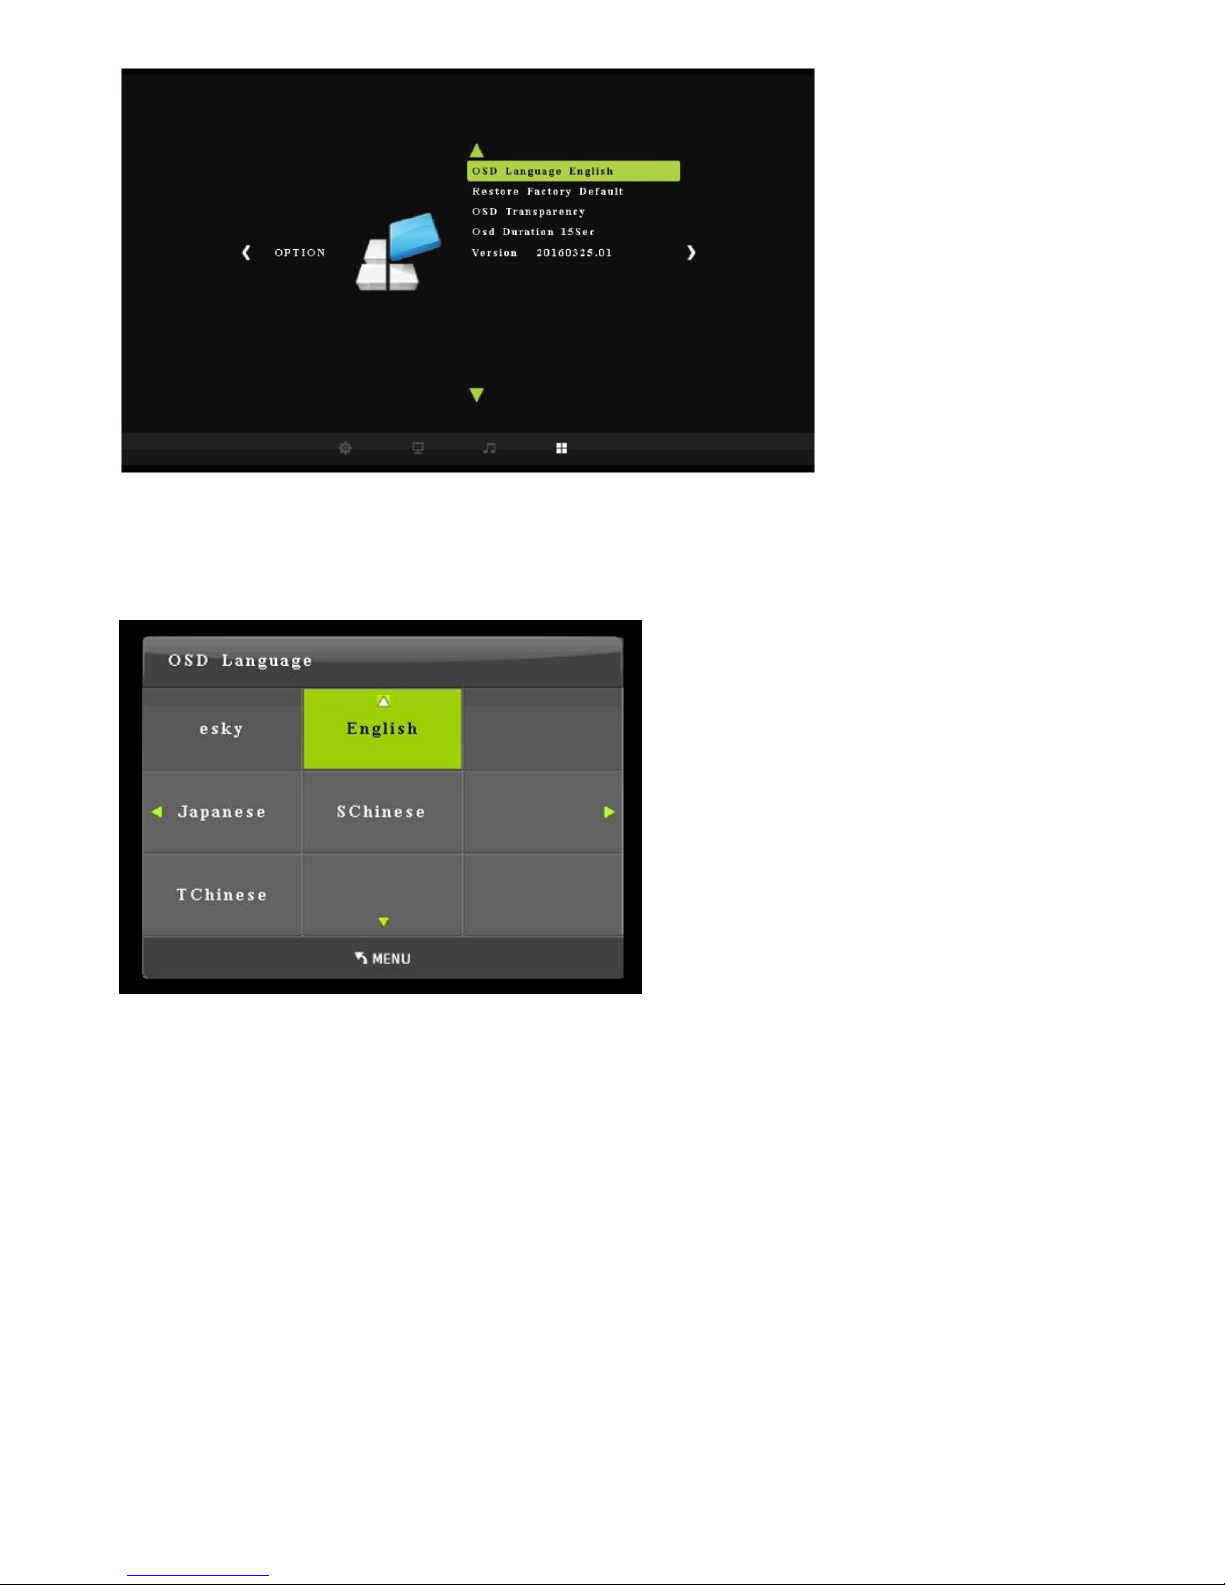
Under the OPTION column, there are five aspects: OSD Language, Restore
Factory Default, OSD Transparency, OSD Duration and Version.
Page 11
10
OSD Language: Set the language to be displayed on the menu. English,
Japanese, Simplified Chinese and Traditional Chinese are available.
Restore Factory Default: Restore the factory settings.
OSD Transparency: Set the transparency of the menu. High, Middle, Low and
OFF are available.
OSD Duration: Set the duration of menu display. 5s, 10s, 15s and OFF are
available.
Version: Shows the current version info.
(2) After finishing the setup, press the menu button on the remote control and
return to the playback interface. Then D700 UHD PVR will record videos
automatically during the scheduled time period.
Page 12
11
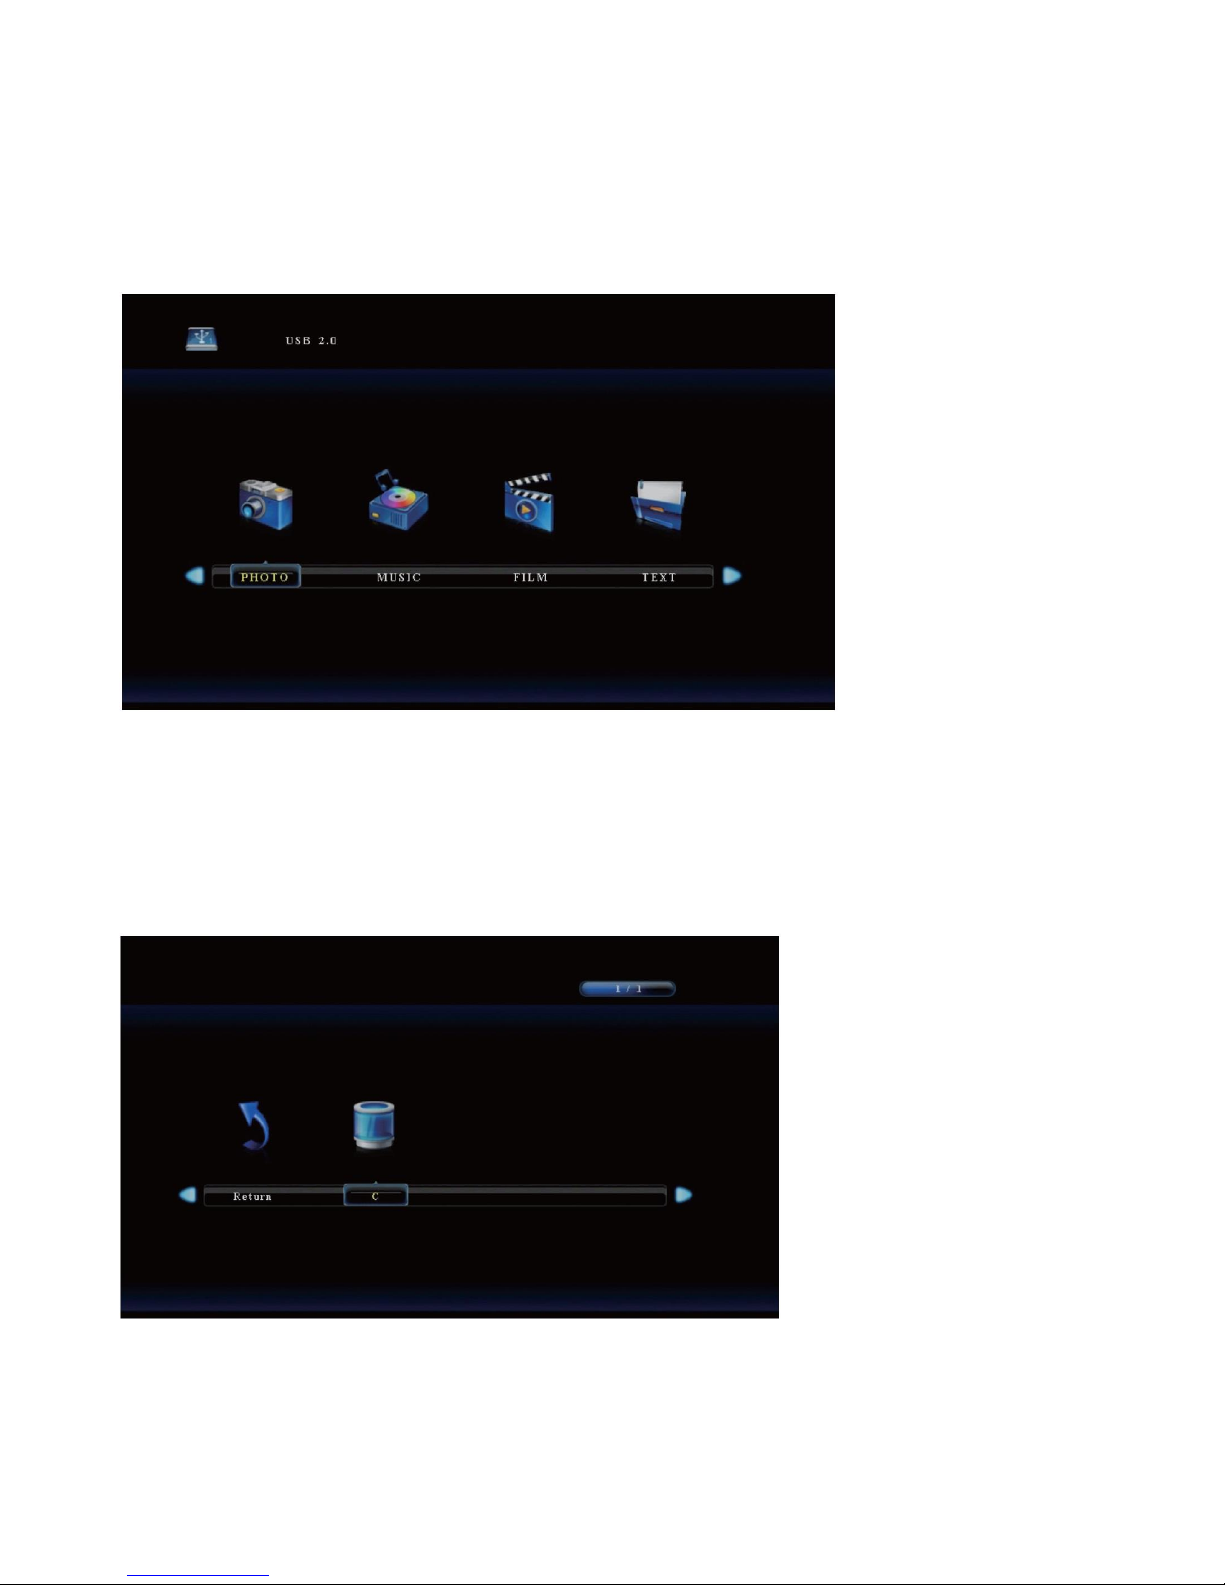
4. Playback
(1) After all devices are connected properly, plug the USB storage device into
D700 UHD PVR and press the PLAYBACK button on the remote control to enter
the playback menu interface.
There are four categories, which are PHOTO, MUSIC, FILM and TEXT.
(2) Select one category and press OK to go to the next step. Then you can select
a partition.
Page 13
12
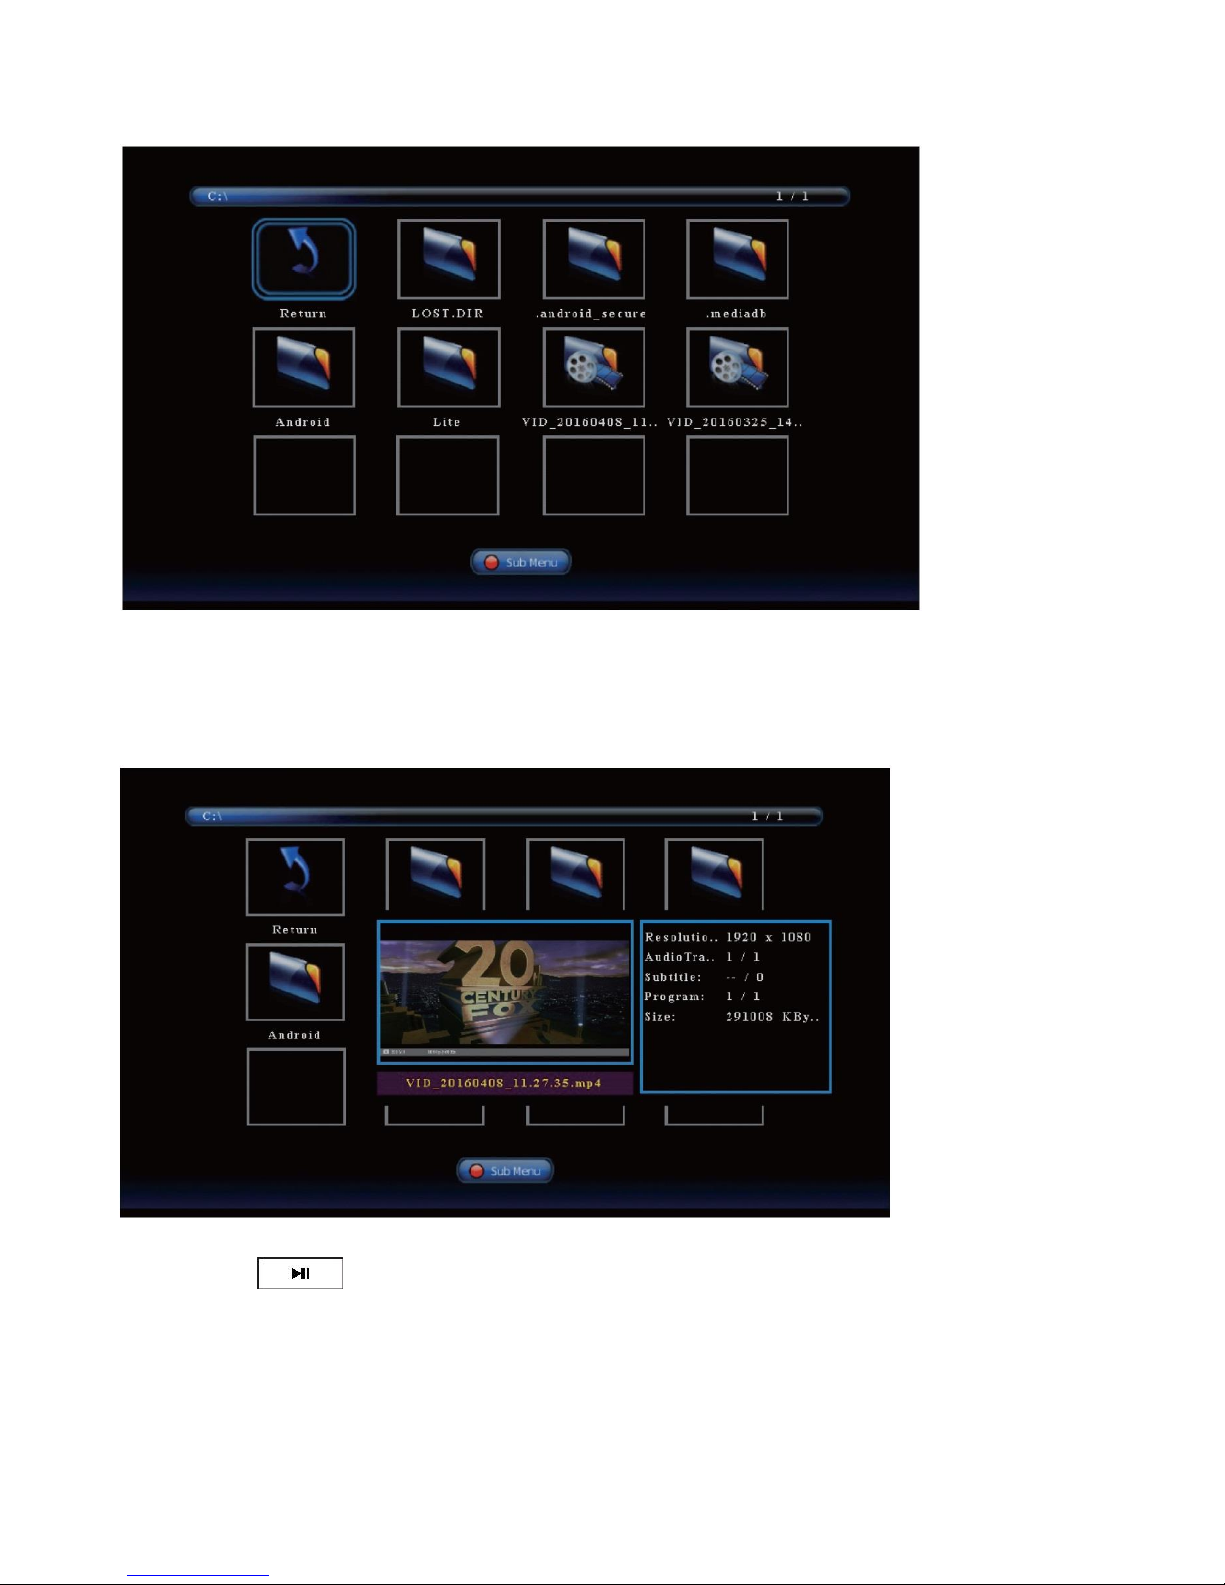
(3) You will see the file list.
Select your desired file by using the four buttons of volume control on the
remote control. You can preview the files and press OK to select multiple files.
(4) Press on the remote control to play the selected video(s).
Page 14
13
PC Mode
1. Software Installation & Connection
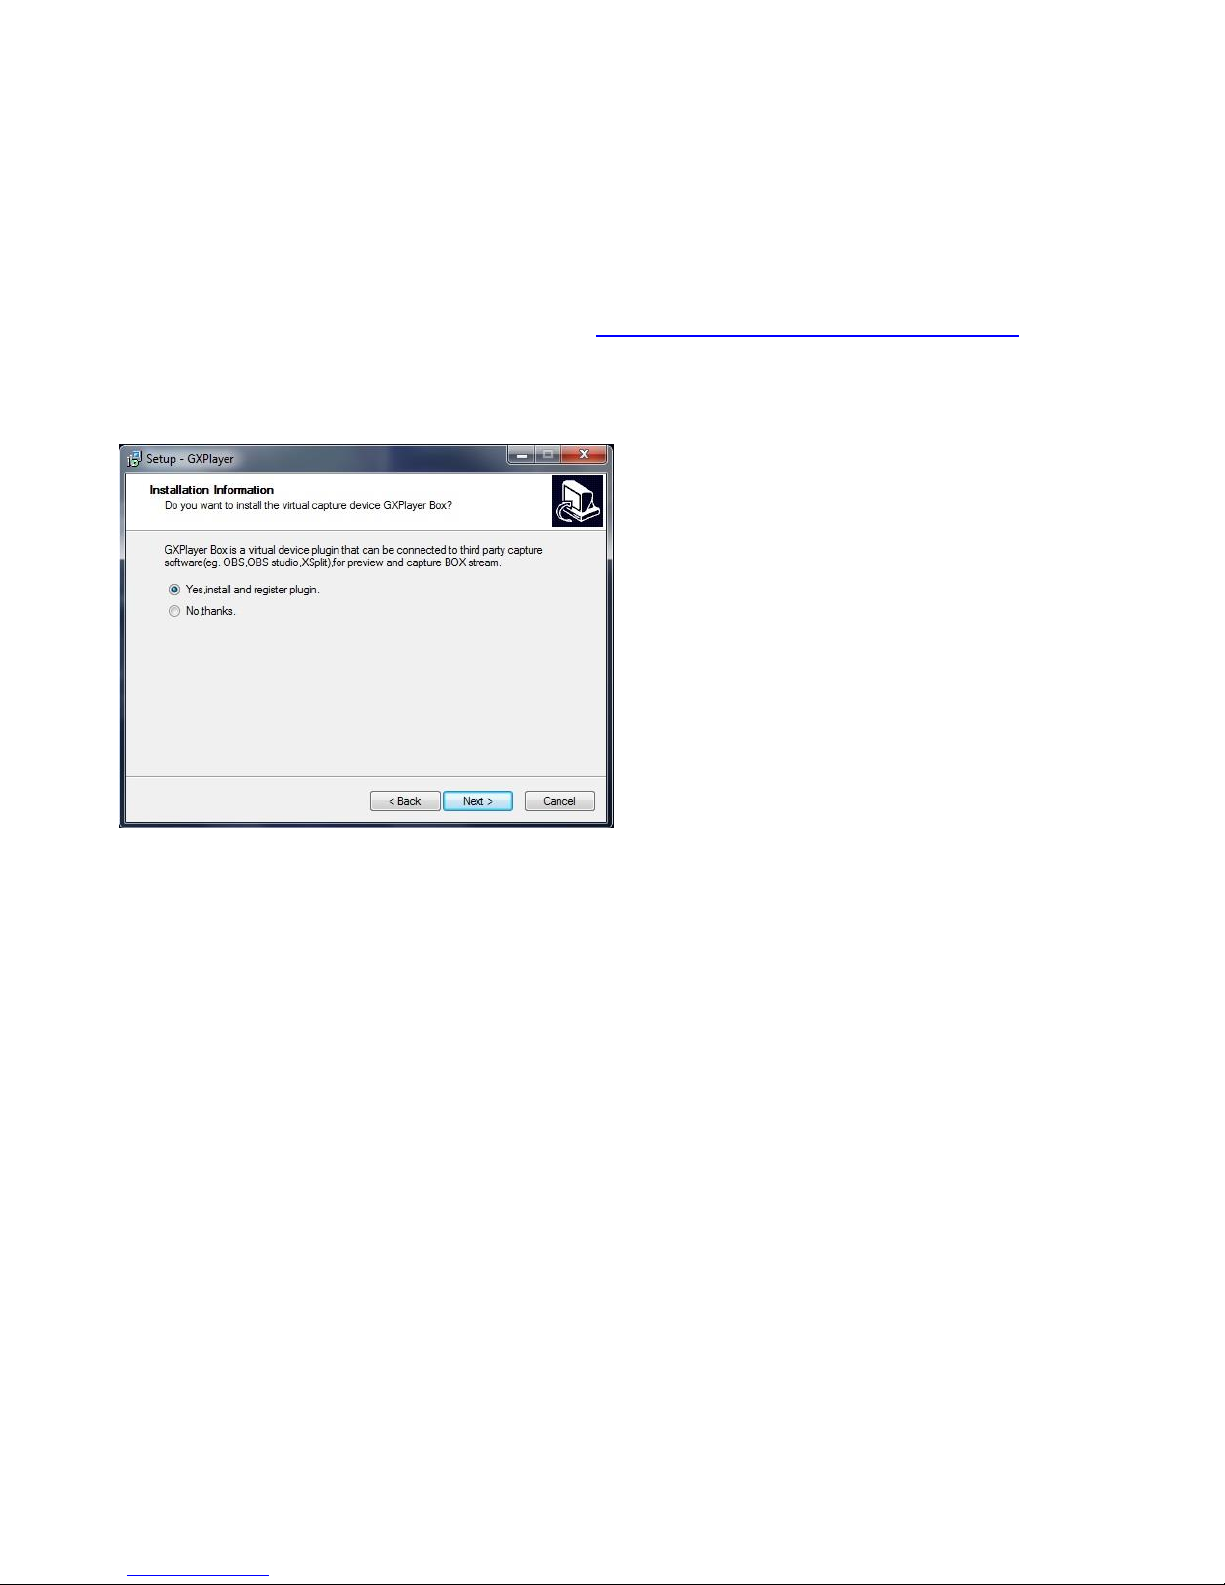
<1> Install GXPlayer on PC
Download the software GXPlayer from http://www.tevii.com/Support.asp
or get it from the installation CD. Make sure you install the plugin for 3rd
party streaming software (OBS, OBS studio, XSplit).
After the installation completed, please restart your computer first before using
GXPlayer.
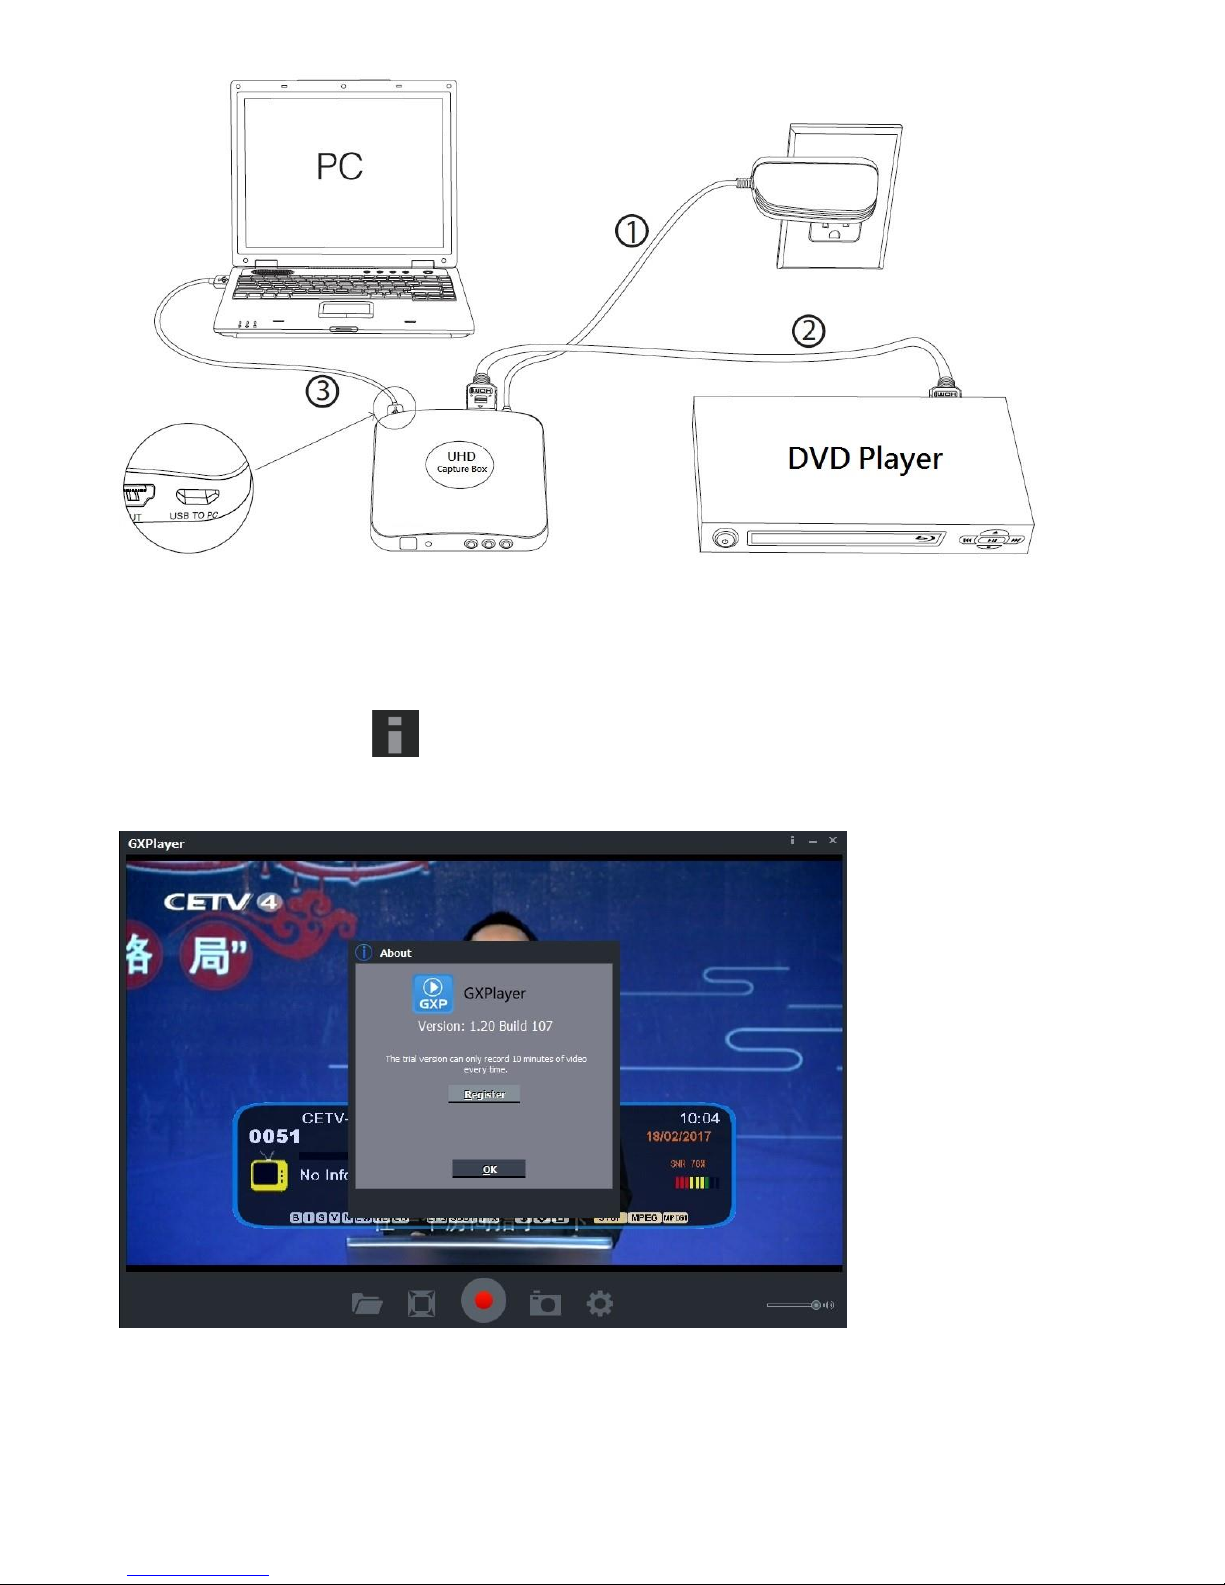
<2> Connect the devices
(1) Plug the power adapter into the power socket and plug the other end into
the 5V/2A port of D700 UHD PVR.
(2) Connect the input device (PS3, PS4, Blue-ray player, etc) to HDMI IN on D700
UHD PVR via an HDMI cable.
(3) Connect the USB cable of the phone between the USB to PC port of D700
UHD PVR and the USB port of PC.
(4) Switch on the power of D700 UHD PVR.
Page 15
14
2. Register
Please register GXPlayer first before using, otherwise it can only record 10
minutes of video.
Run GXPlayer. Click on the main interface to open the "About" window.
Then click on the "Register" button to open the "Register" window.
Page 16
15
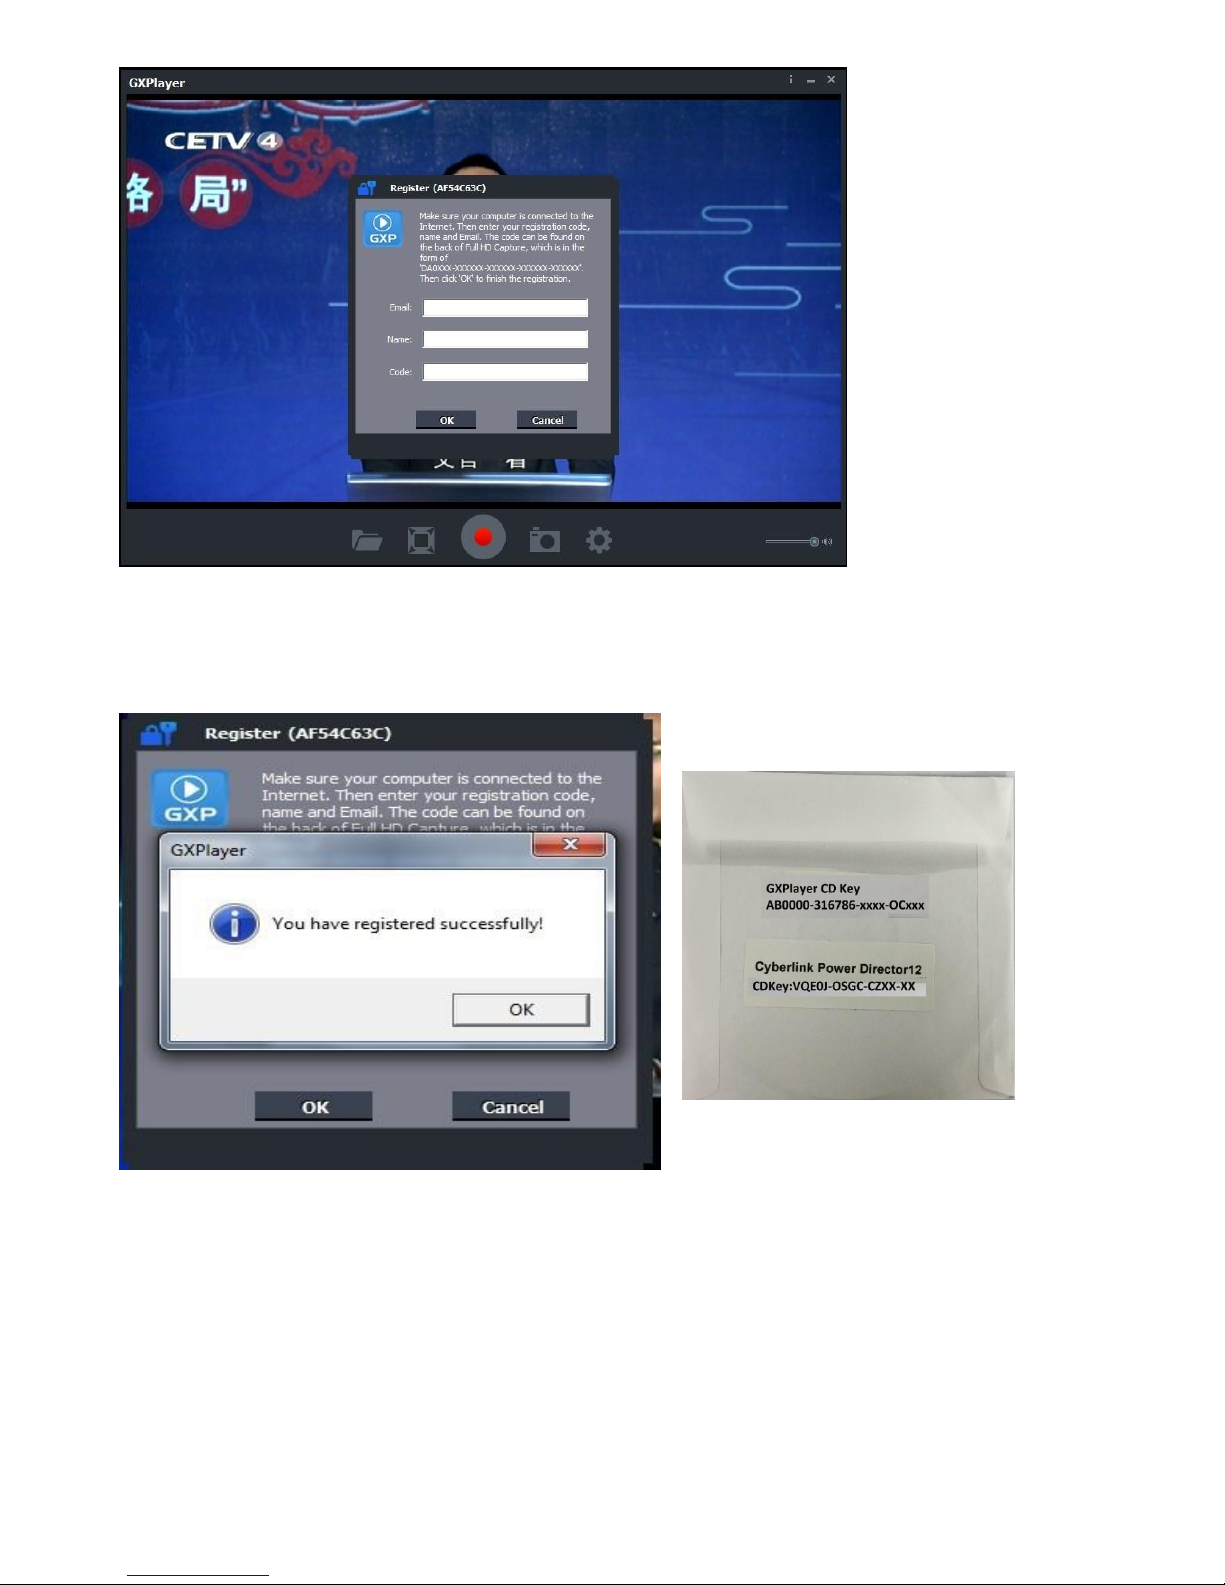
Fill in your Email address, Name and Code (The Code can be found on the CD
cover as below) Then click on "OK" to finish the registration.
The software CD comes with famous video editing software Power Director
licensed from Cyberlink. You can find the CD key on the back of CD cover
Page 17
16
Upload Video to YouTube
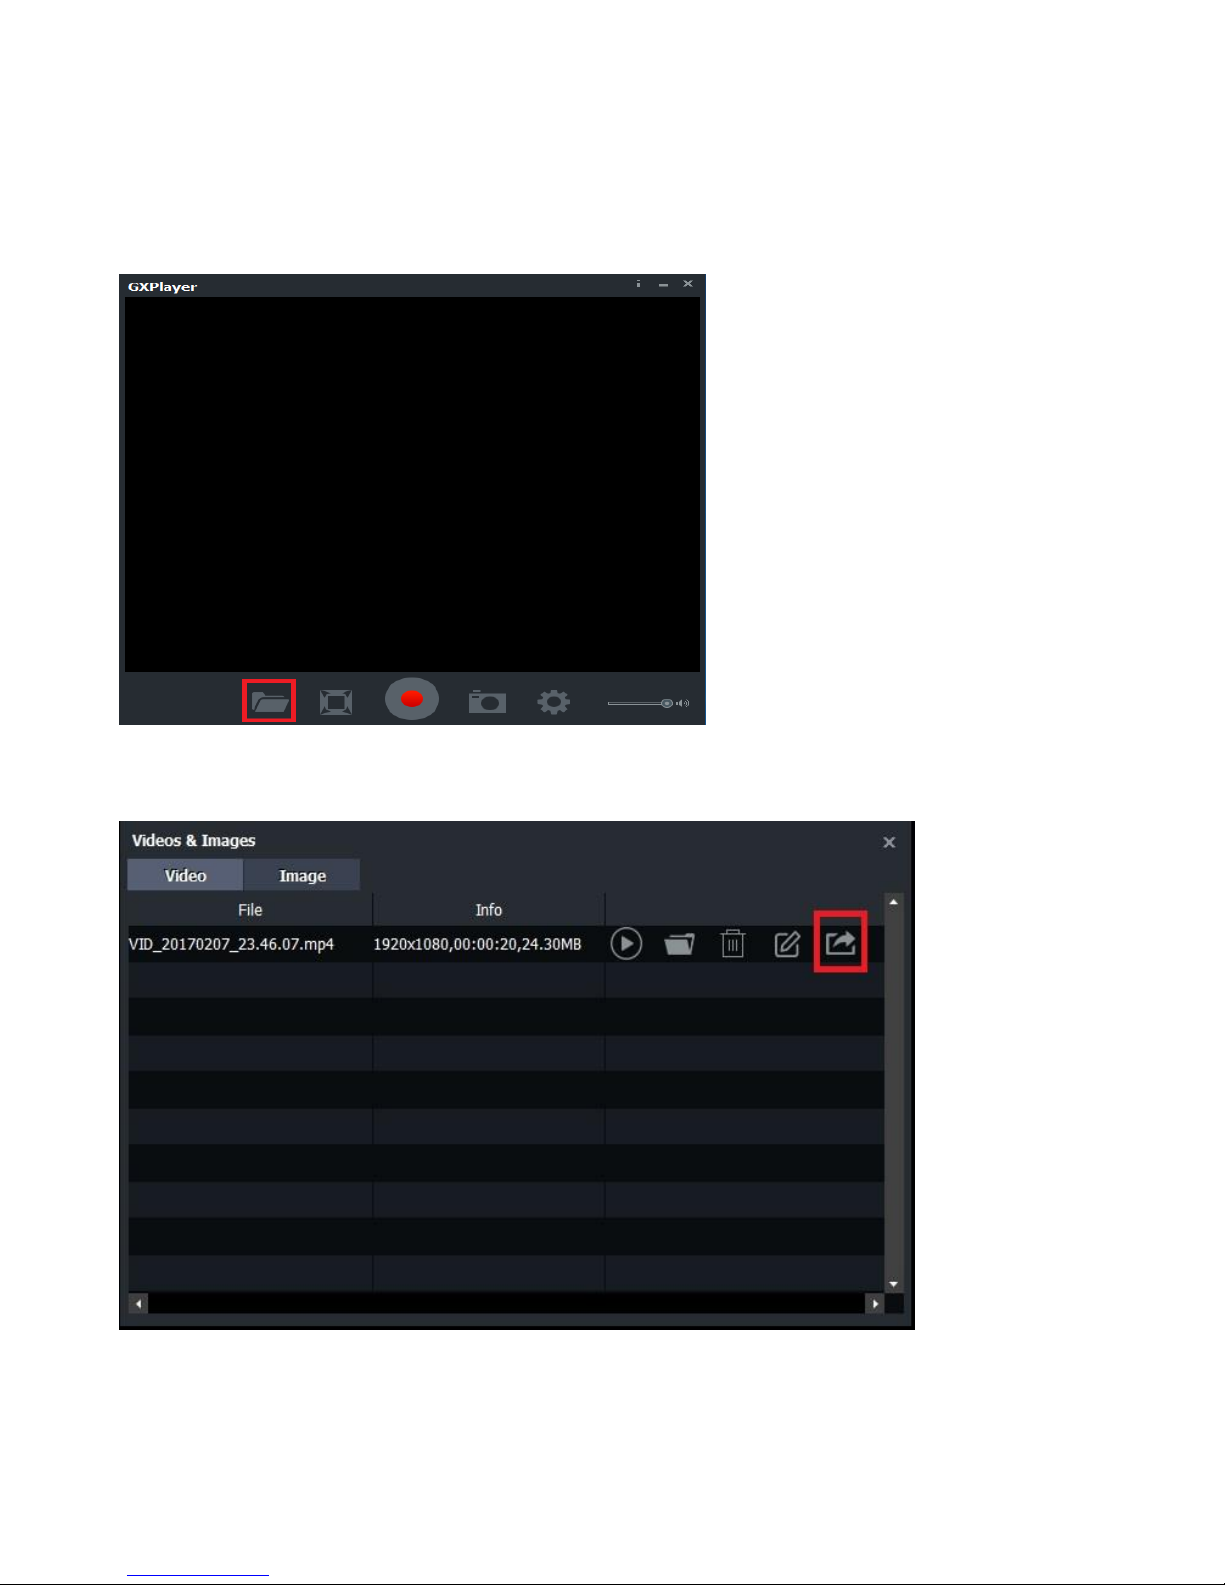
1. GXPlayer Open below folder marked in red
2. Click below mark in red to stream recorded video to YouTube
Page 18
17
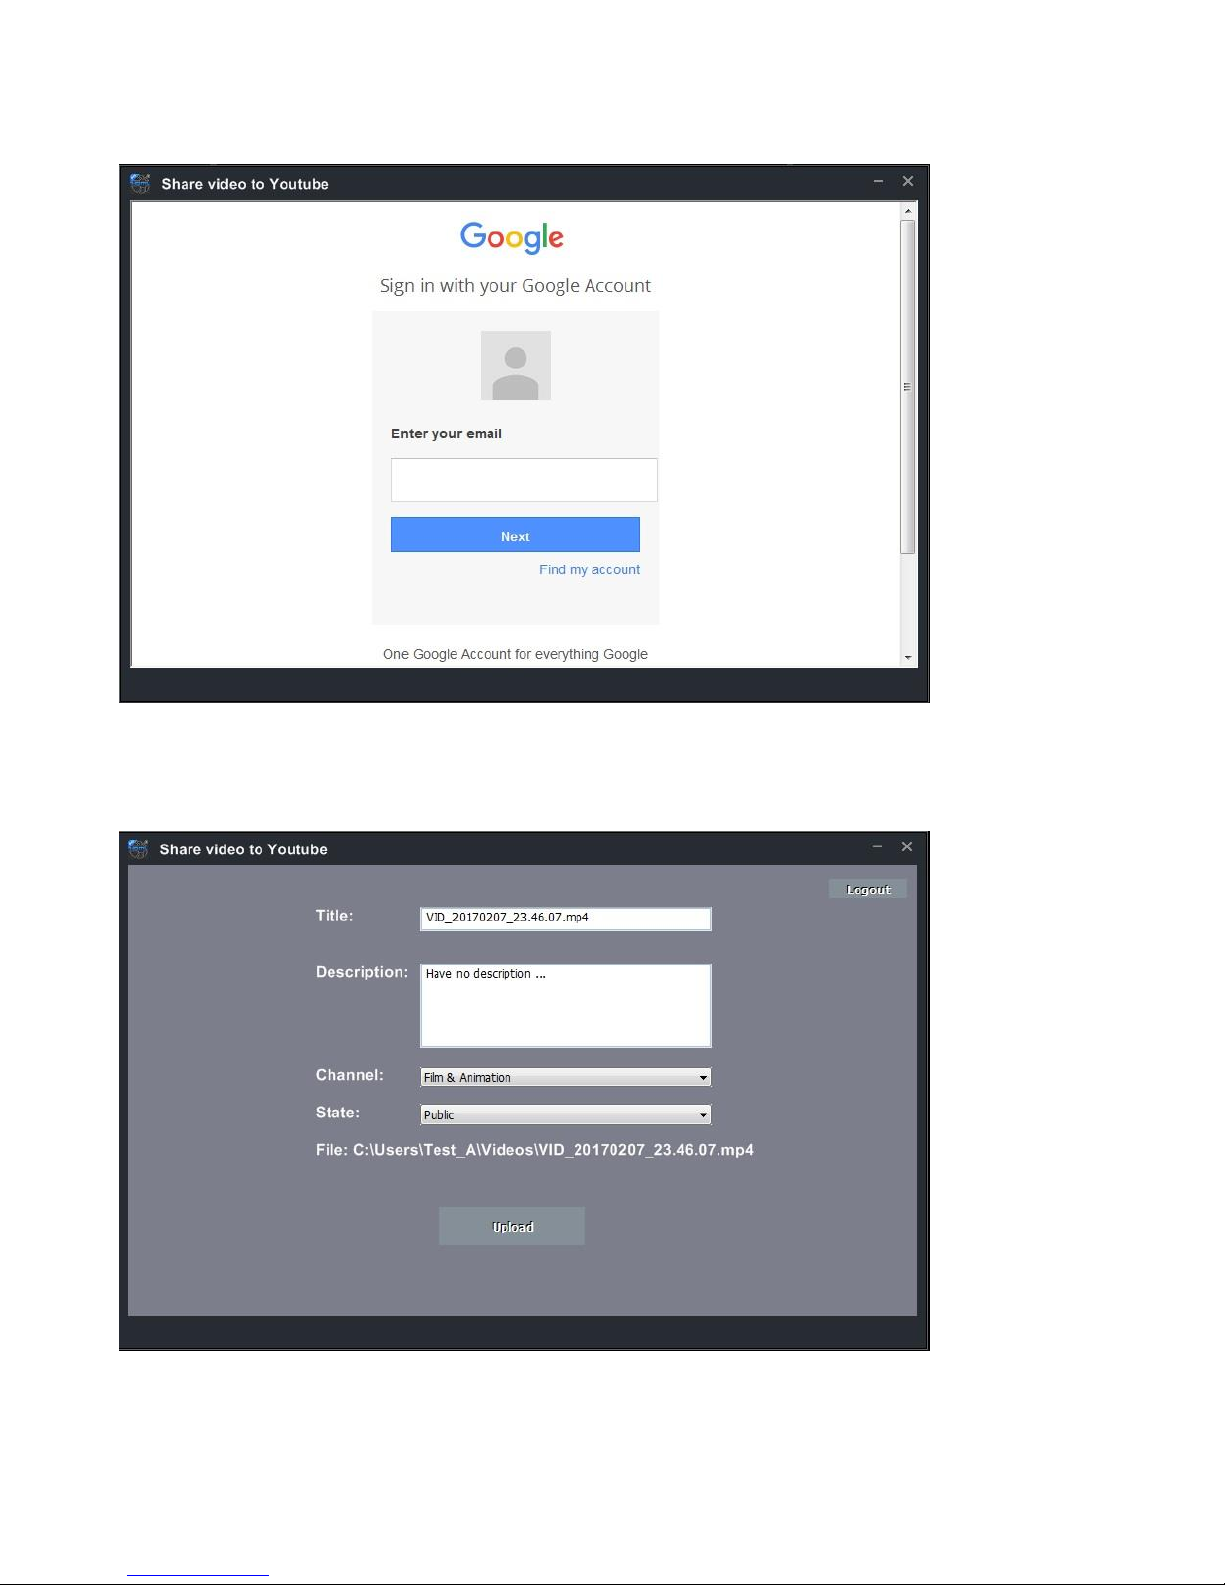
3. Input google ID & Password
4. Edit the name & description of video which you paln to stream Upload
Page 19
18
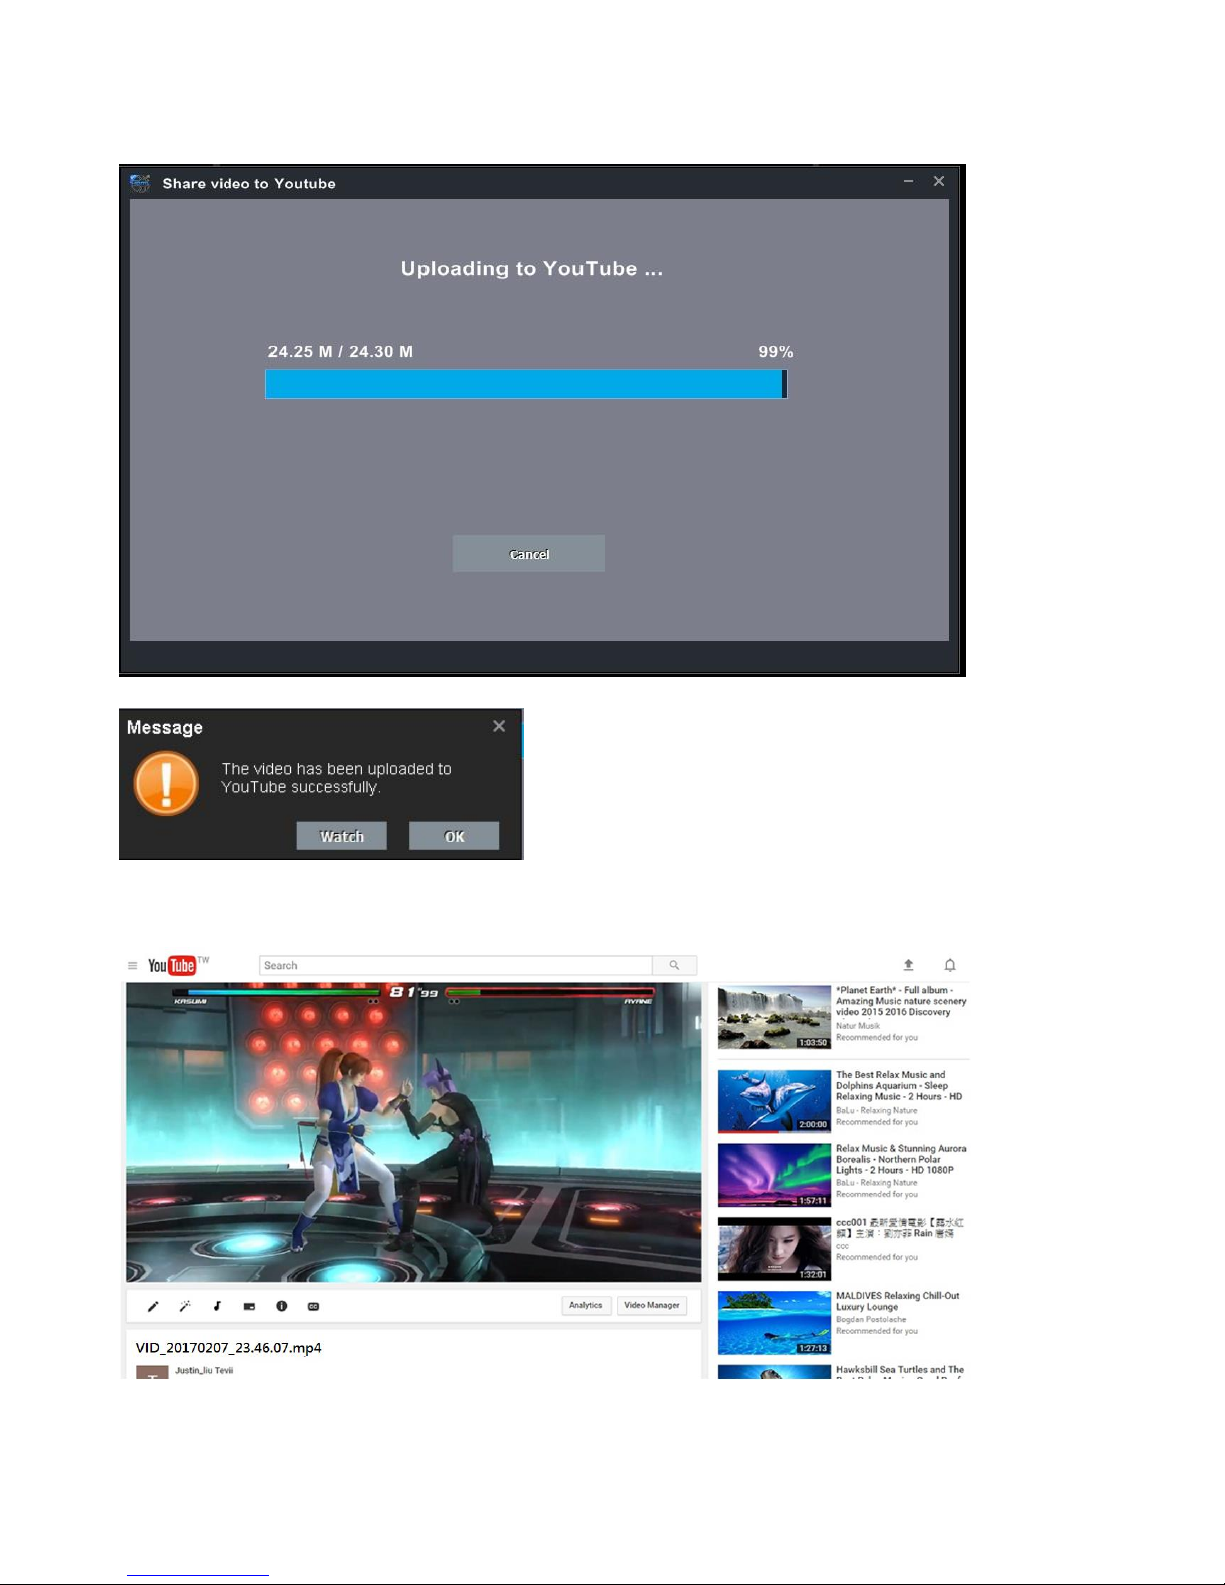
5. Uploading completed OK
6. Open YouTube My channelYou can find the video file you just uploaded
Page 20
19
Live Streaming via XSplit
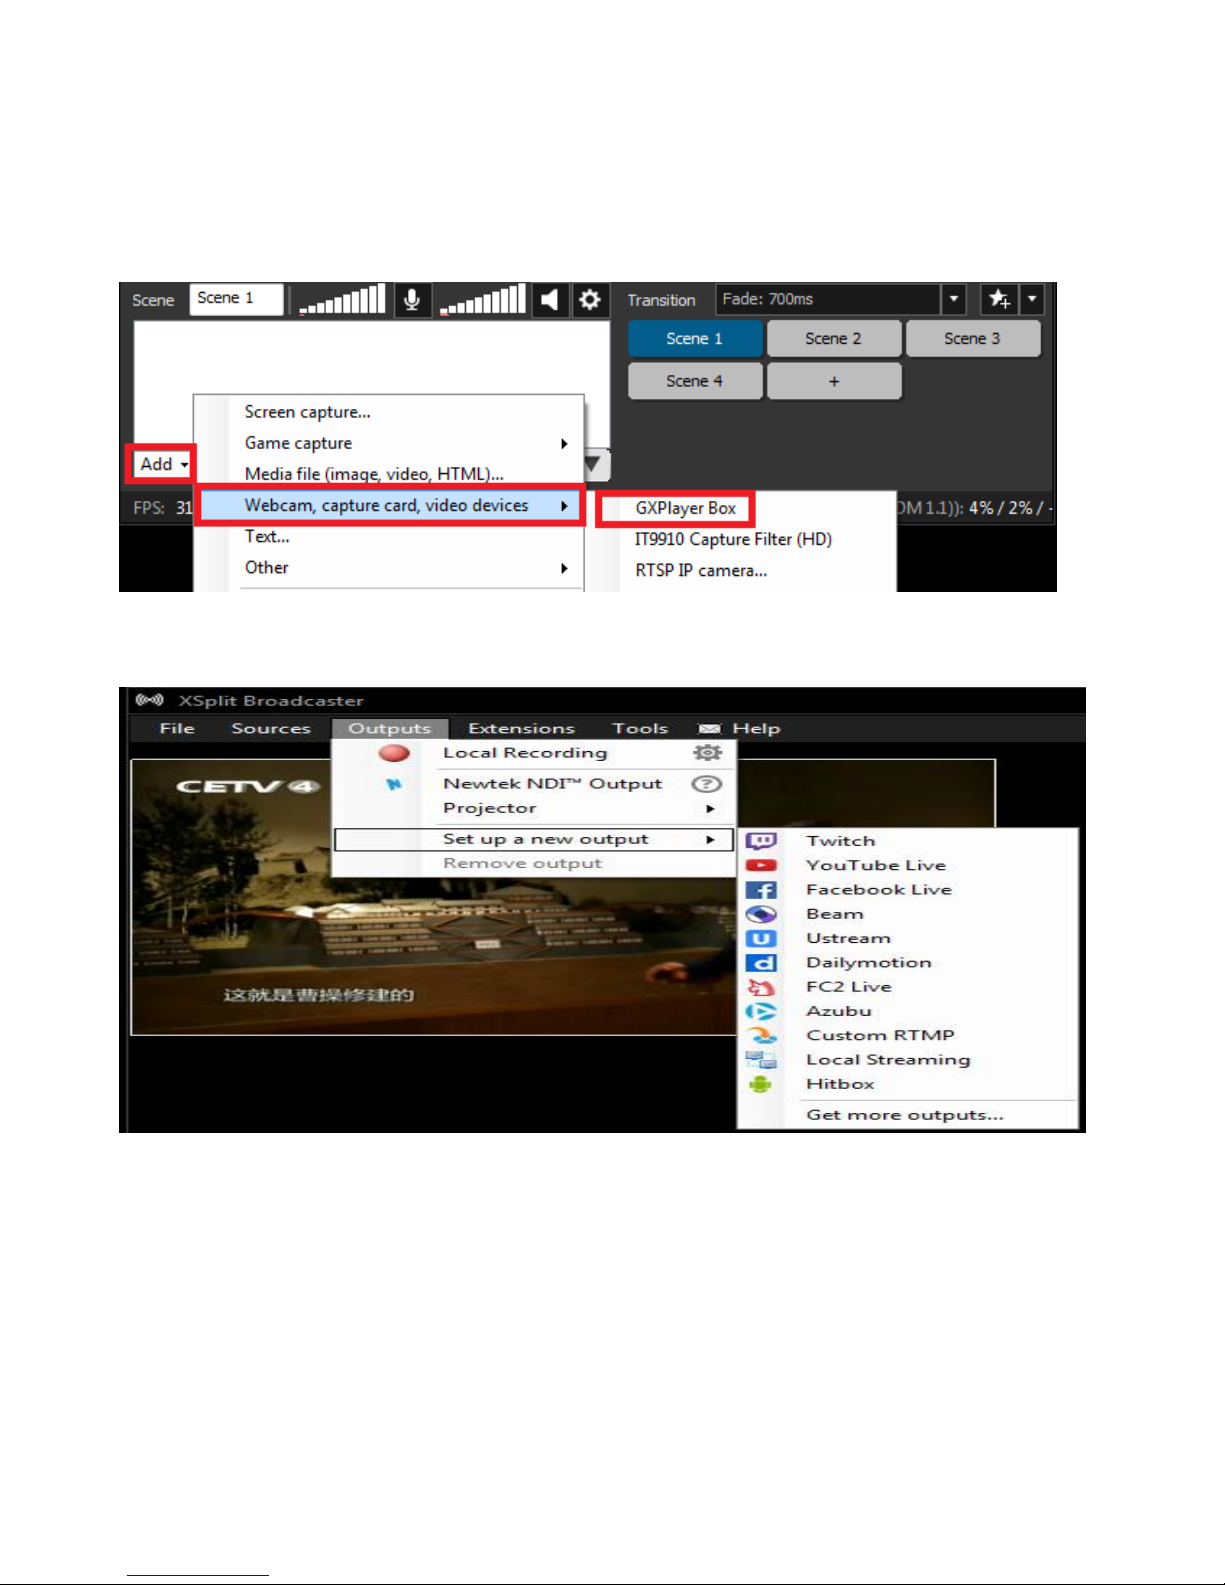
1. Download & open XSplit on your PC add webcam, capture card, video devices
GXPlayer Box
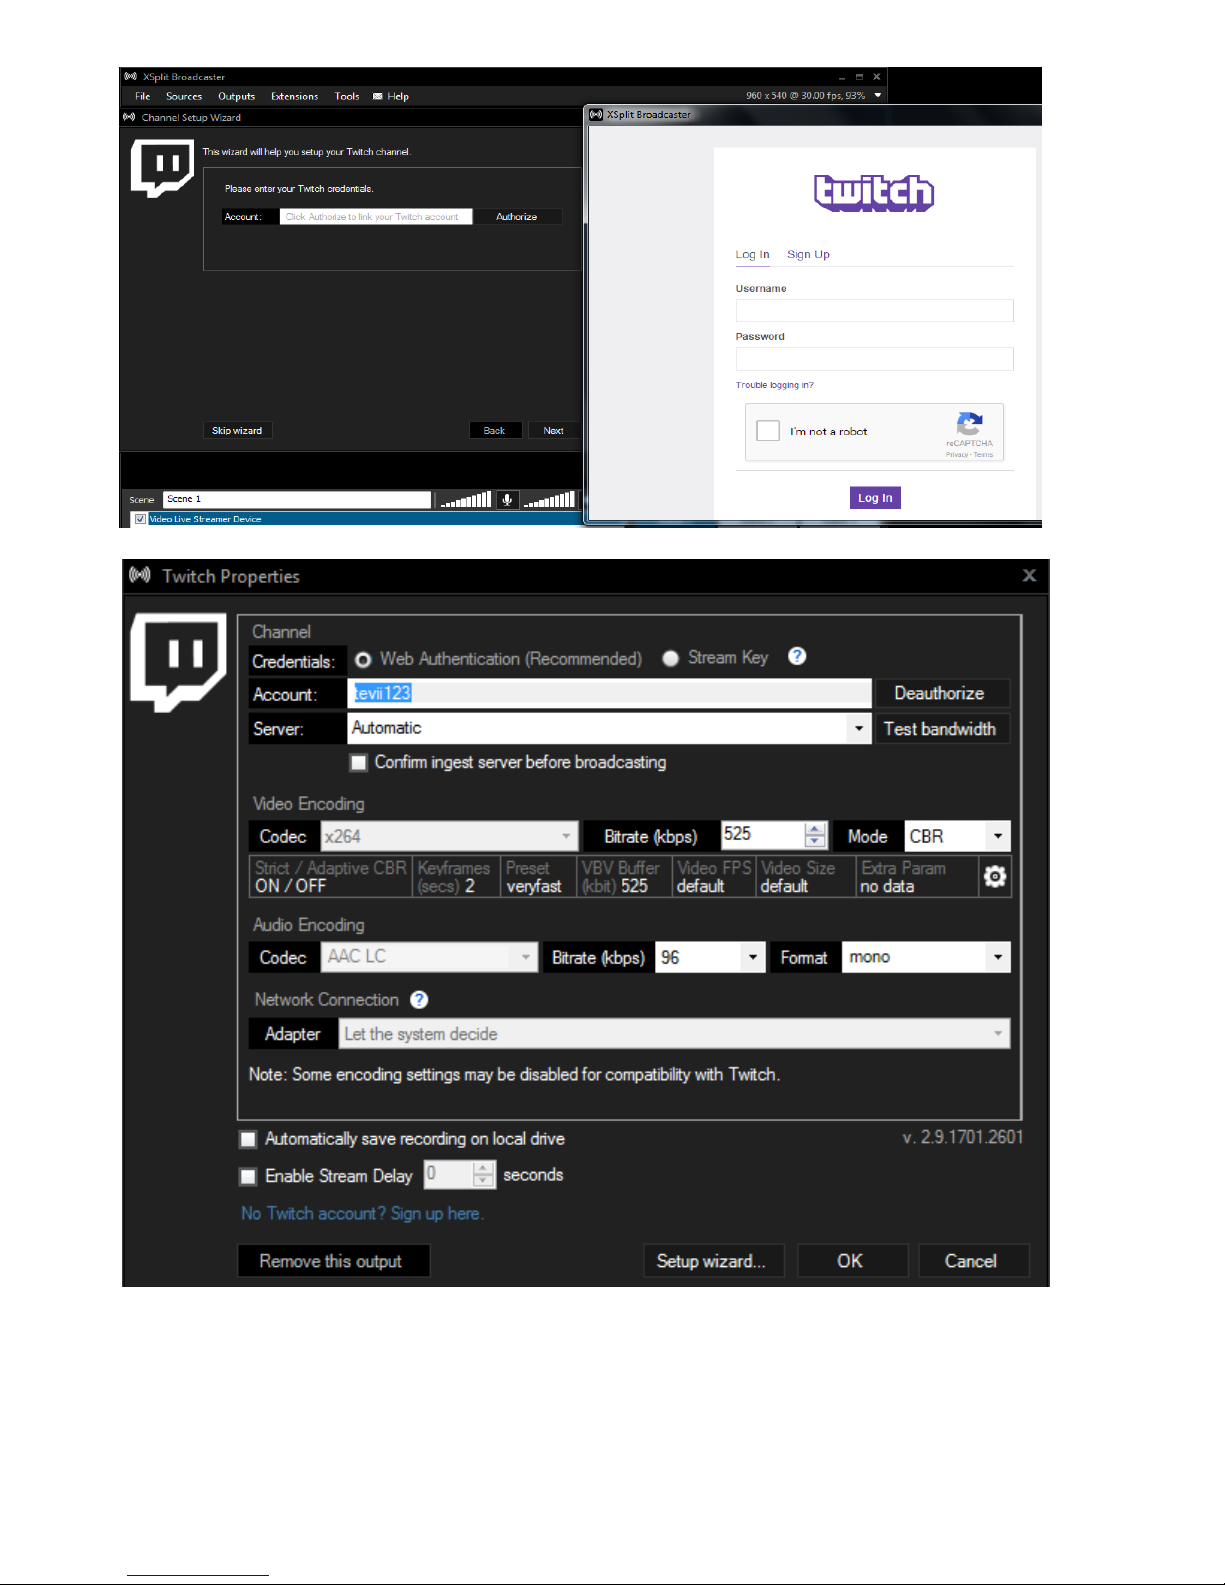
2. Outputs --> set up a new output --> (for example) Twitch
3. Enter ID, Password to Log In (please apply a new account for Twitch beforehand)
Page 21
20
Page 22
21
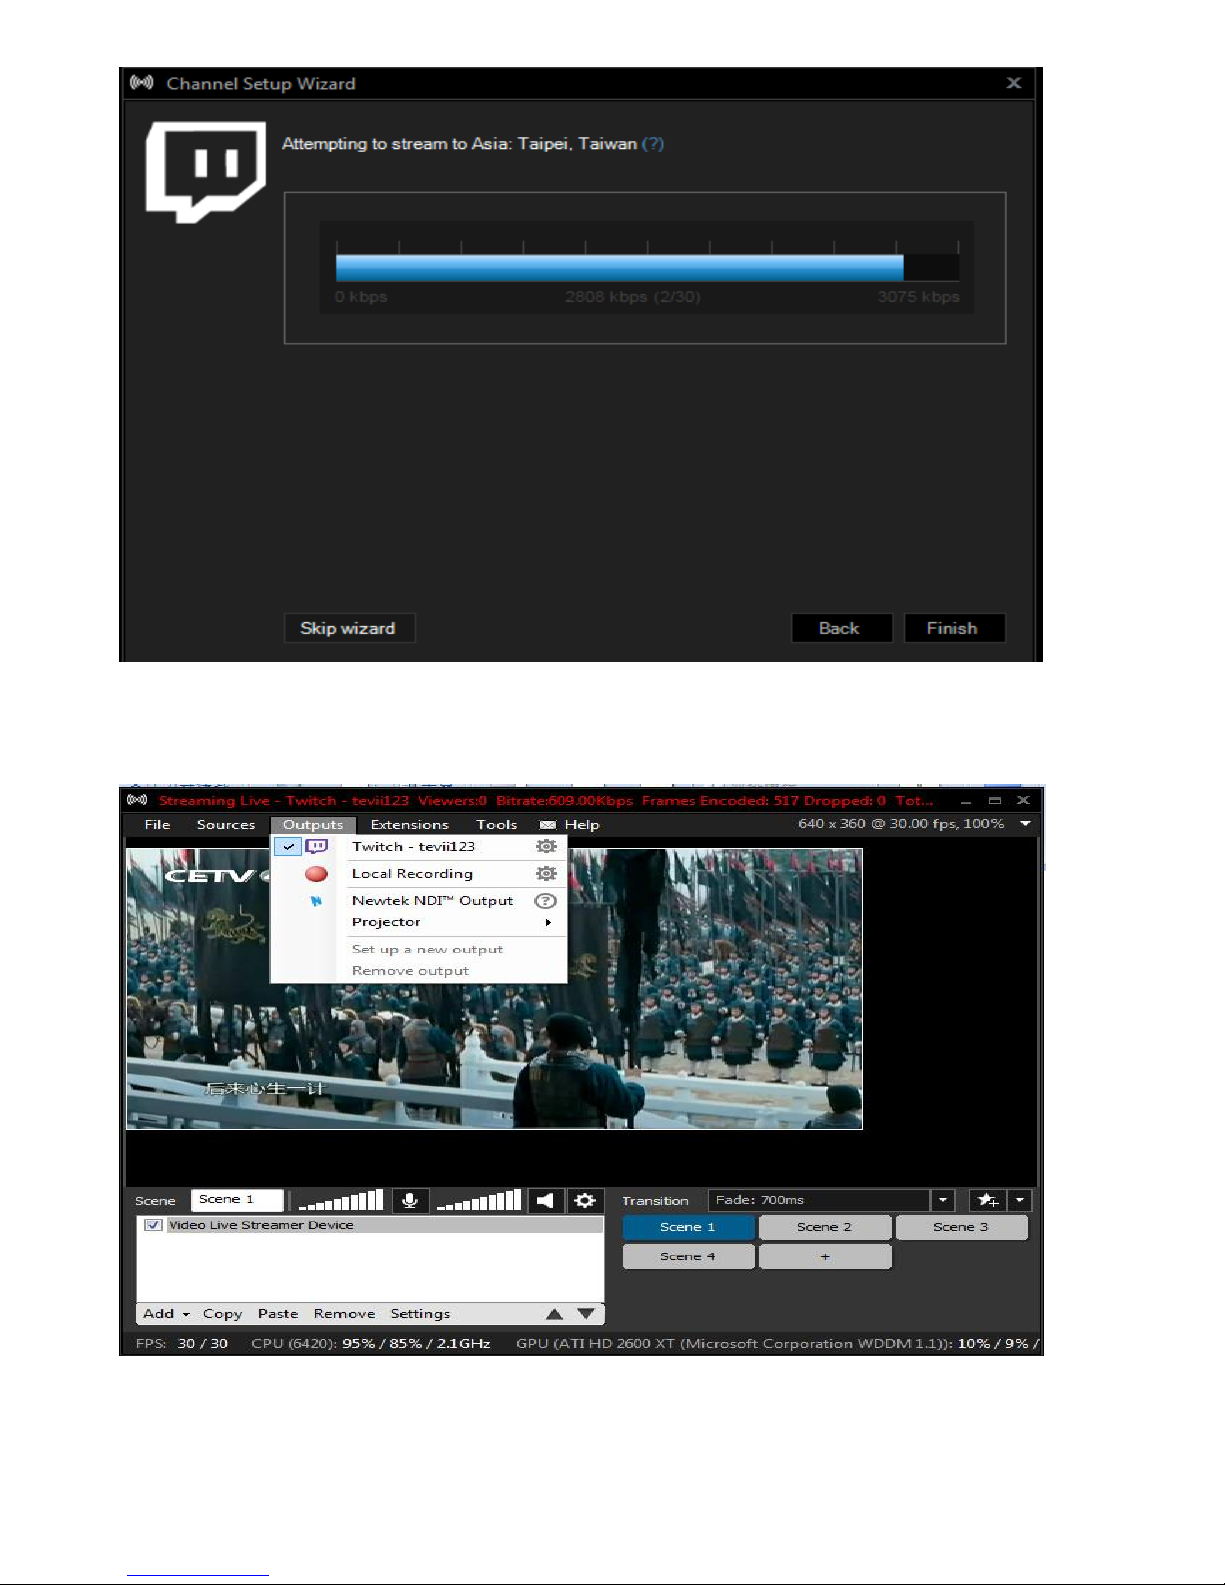
4. After set up completed,Click Outputs Twitch- tevii123 to start streaming
Page 23
22
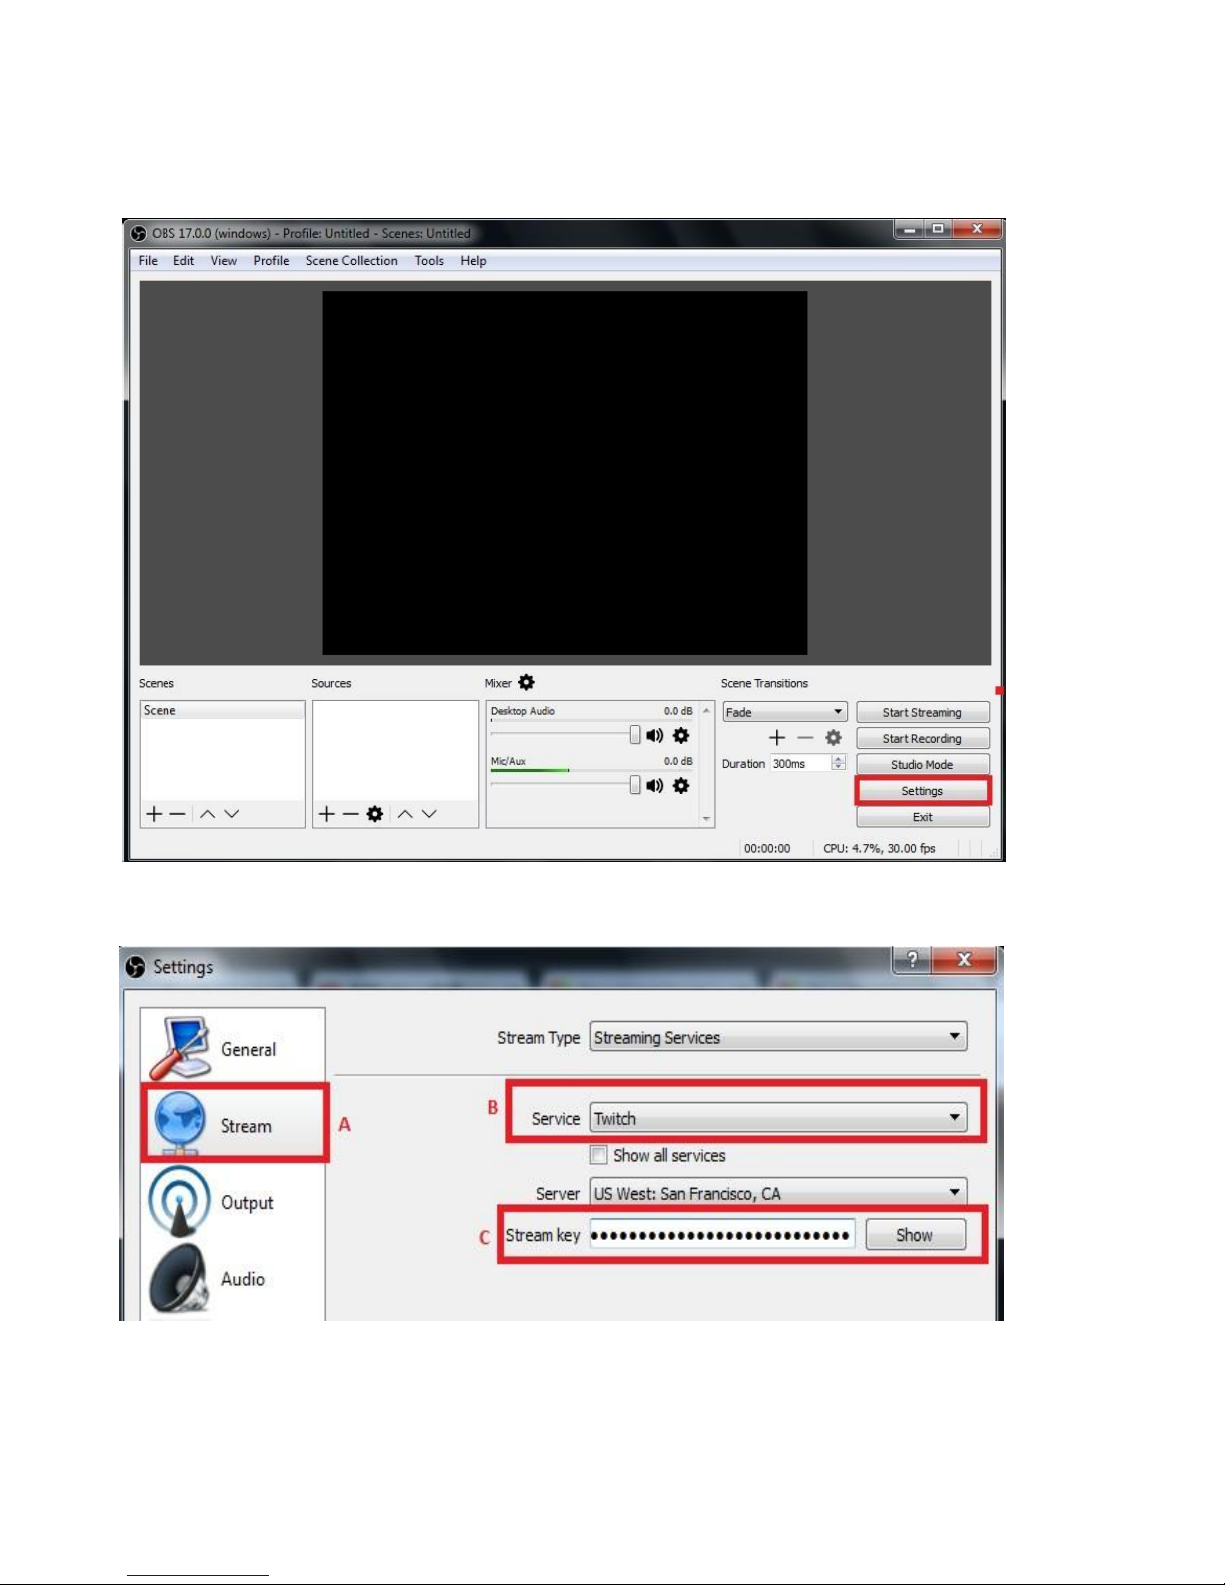
Live Streaming via OBS
Download & install the latest version of OBS and open it Select
“Settings”
1. Select “Stream ““Service” (website) Streamer Key OK
Page 24
23
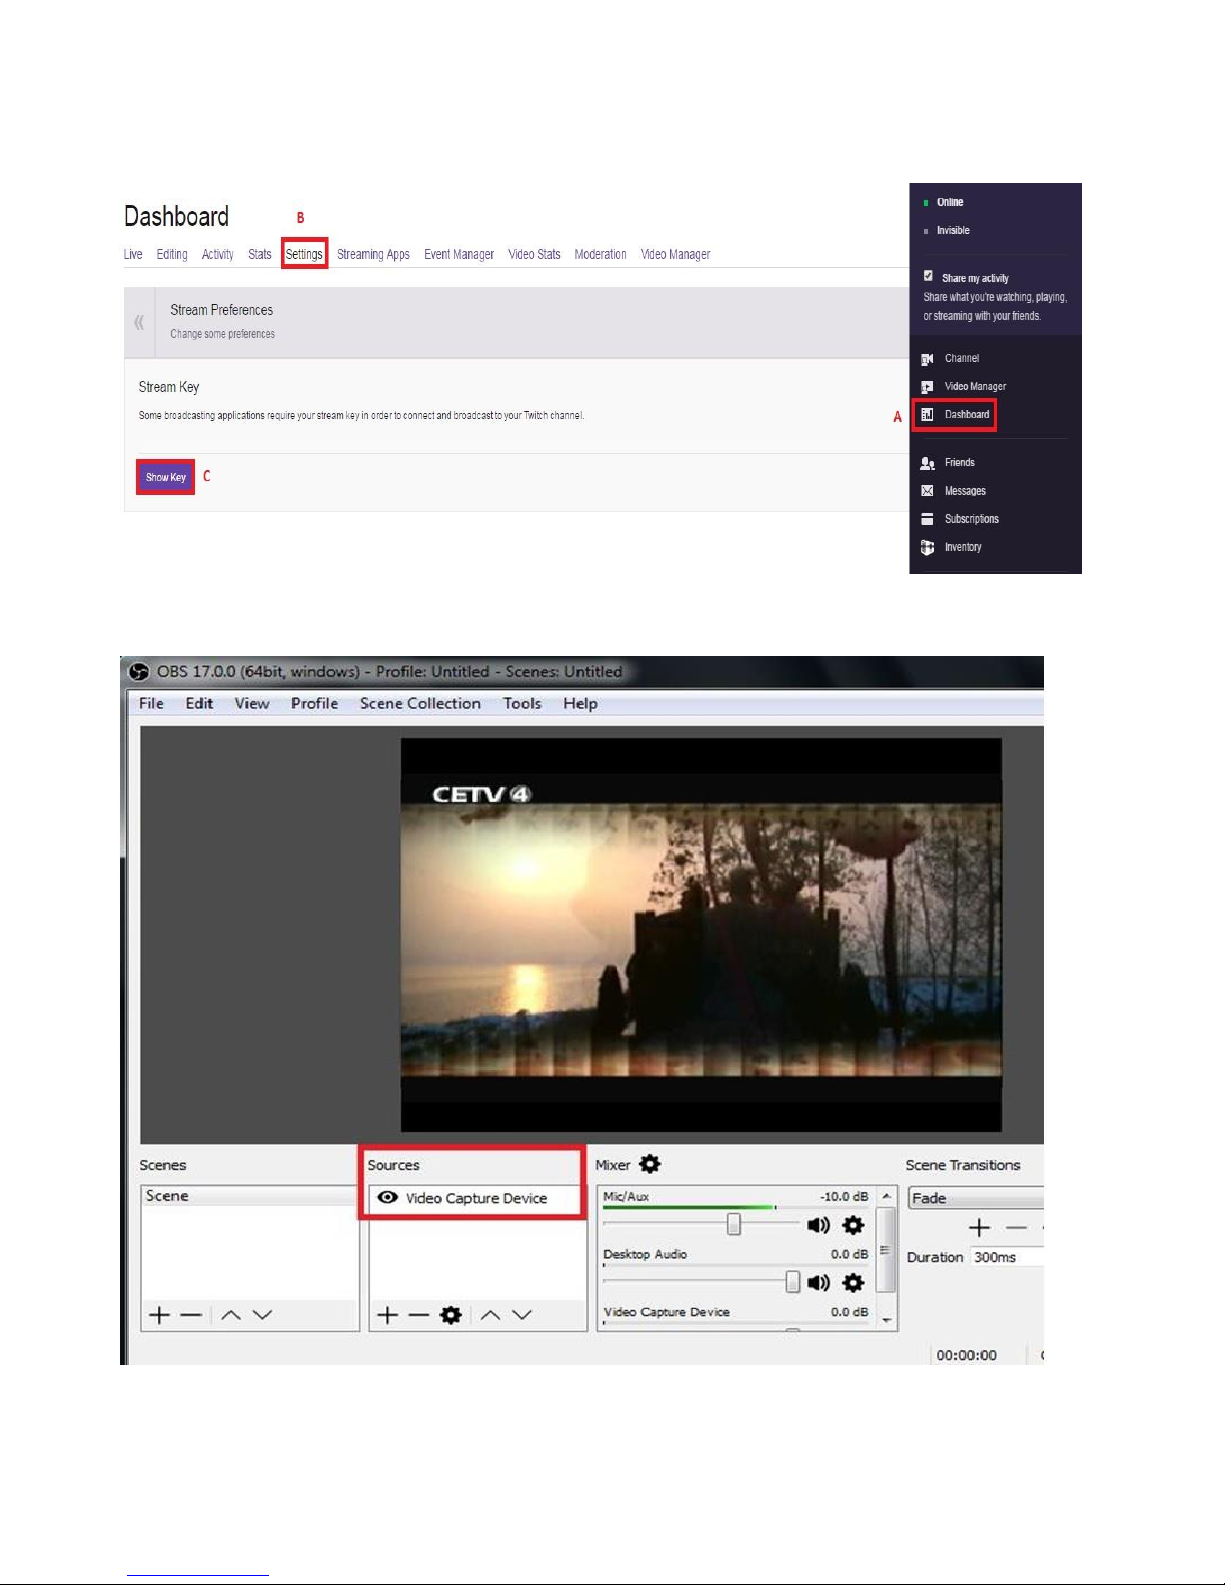
2. How to find your Stream Key (taking Twitch as example)
Open TwitchSelect Dashboard (A)Setings (B)Show Key (C)
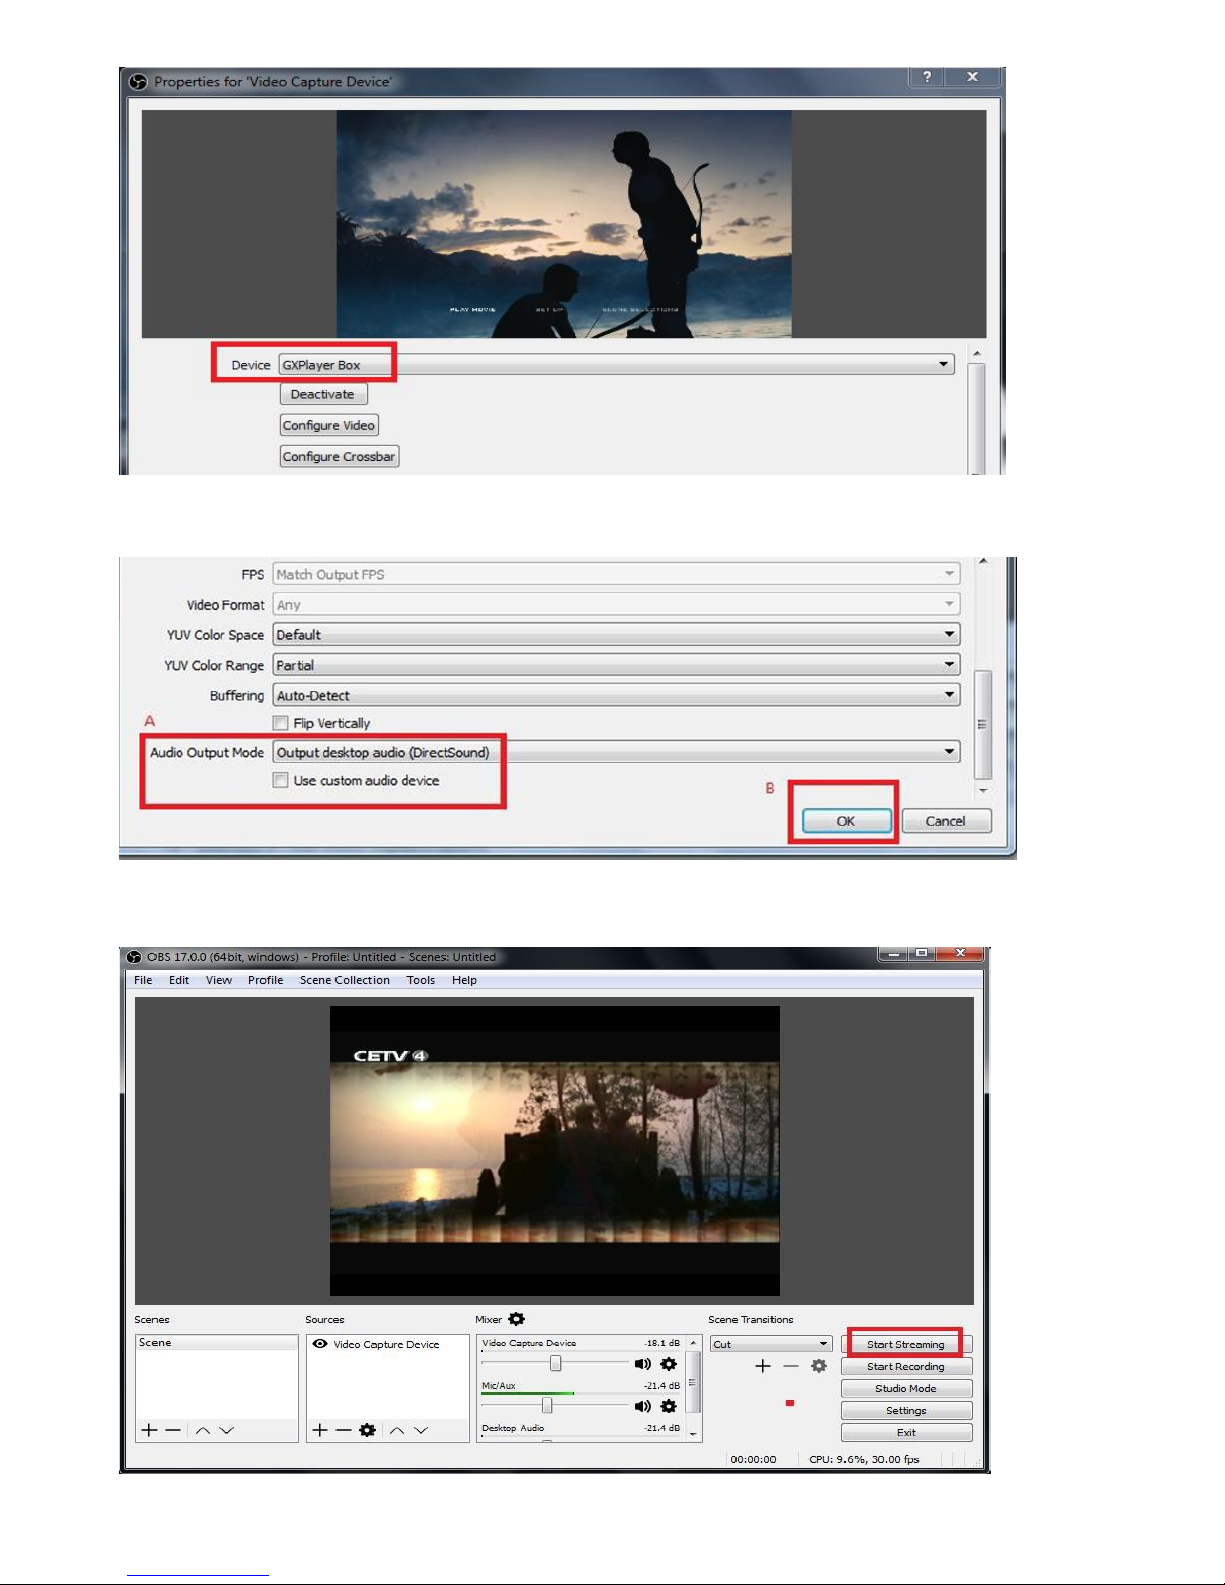
3. Sources Add video capture deviceDevice option, select GXPlayer Box
Page 25
24
4. Audio Output Mode Output desktop audio (DirectSound) OK
5. Press “Start Streaming”
Page 26
25
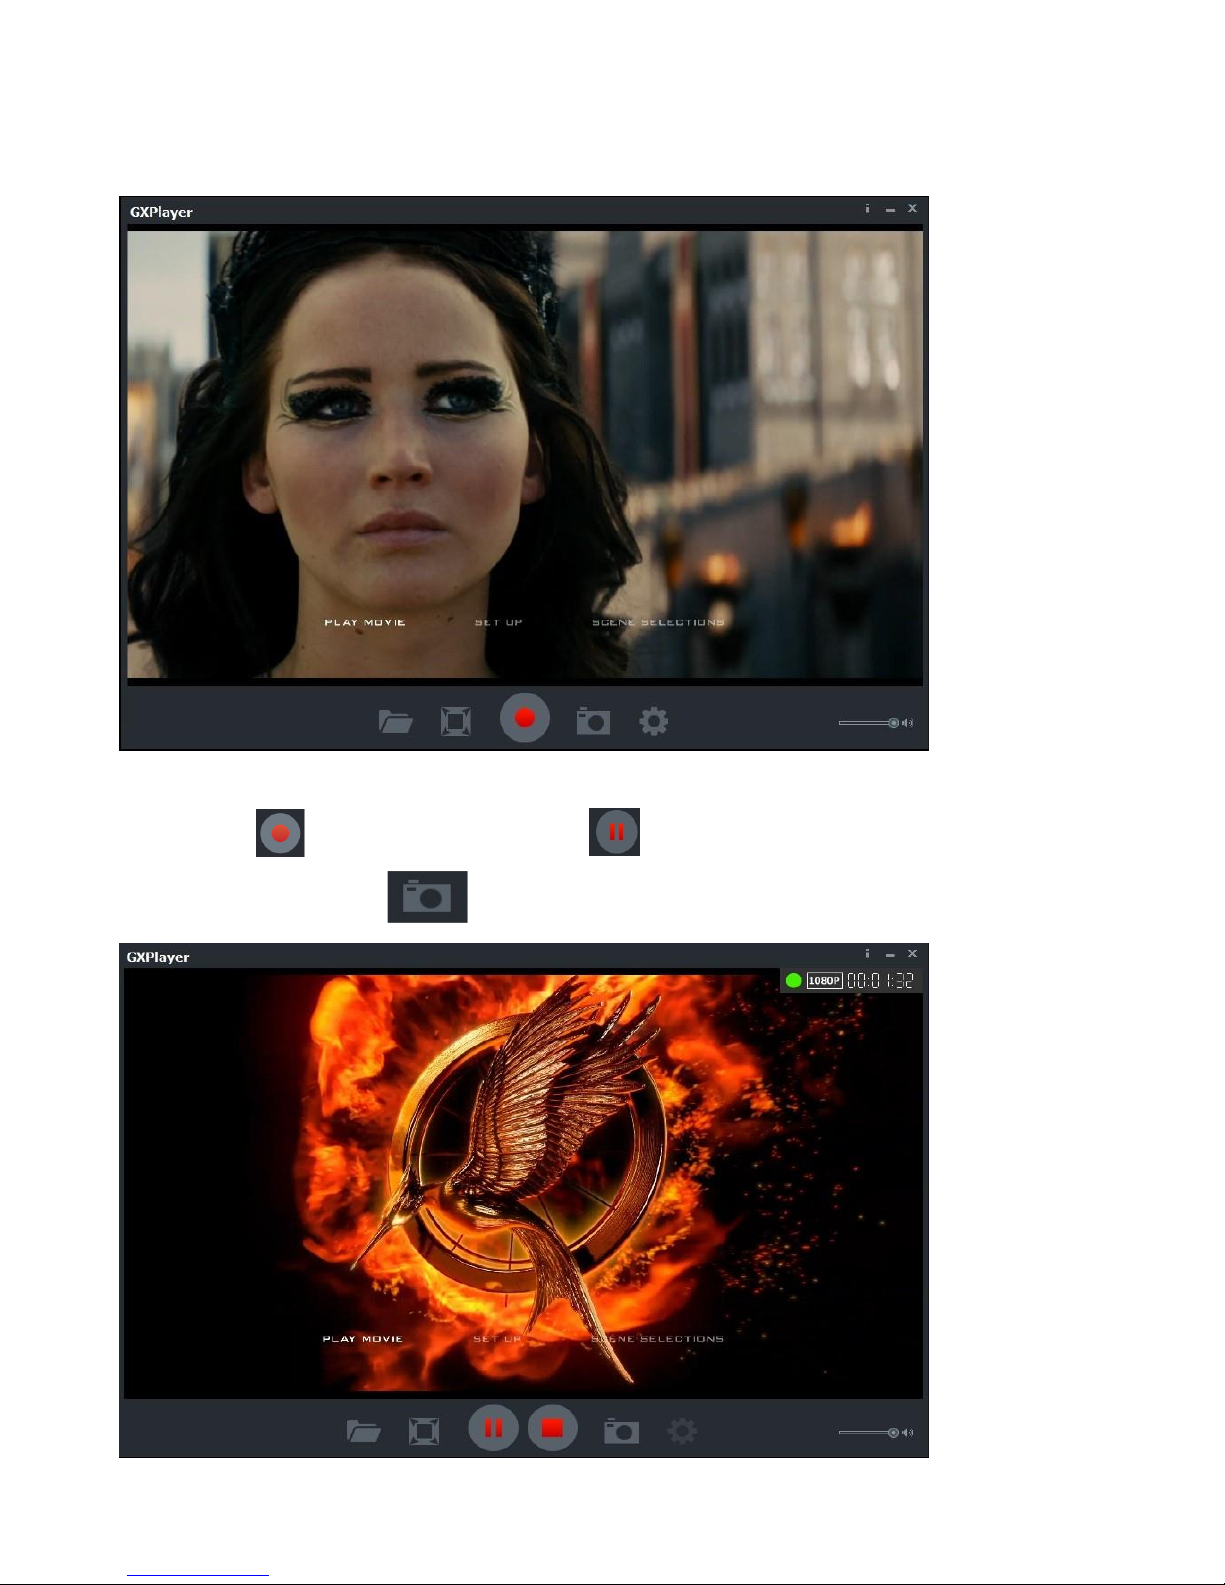
3. Record/Capture
(1) After all devices are connected properly, run GXPlayer on your PC.
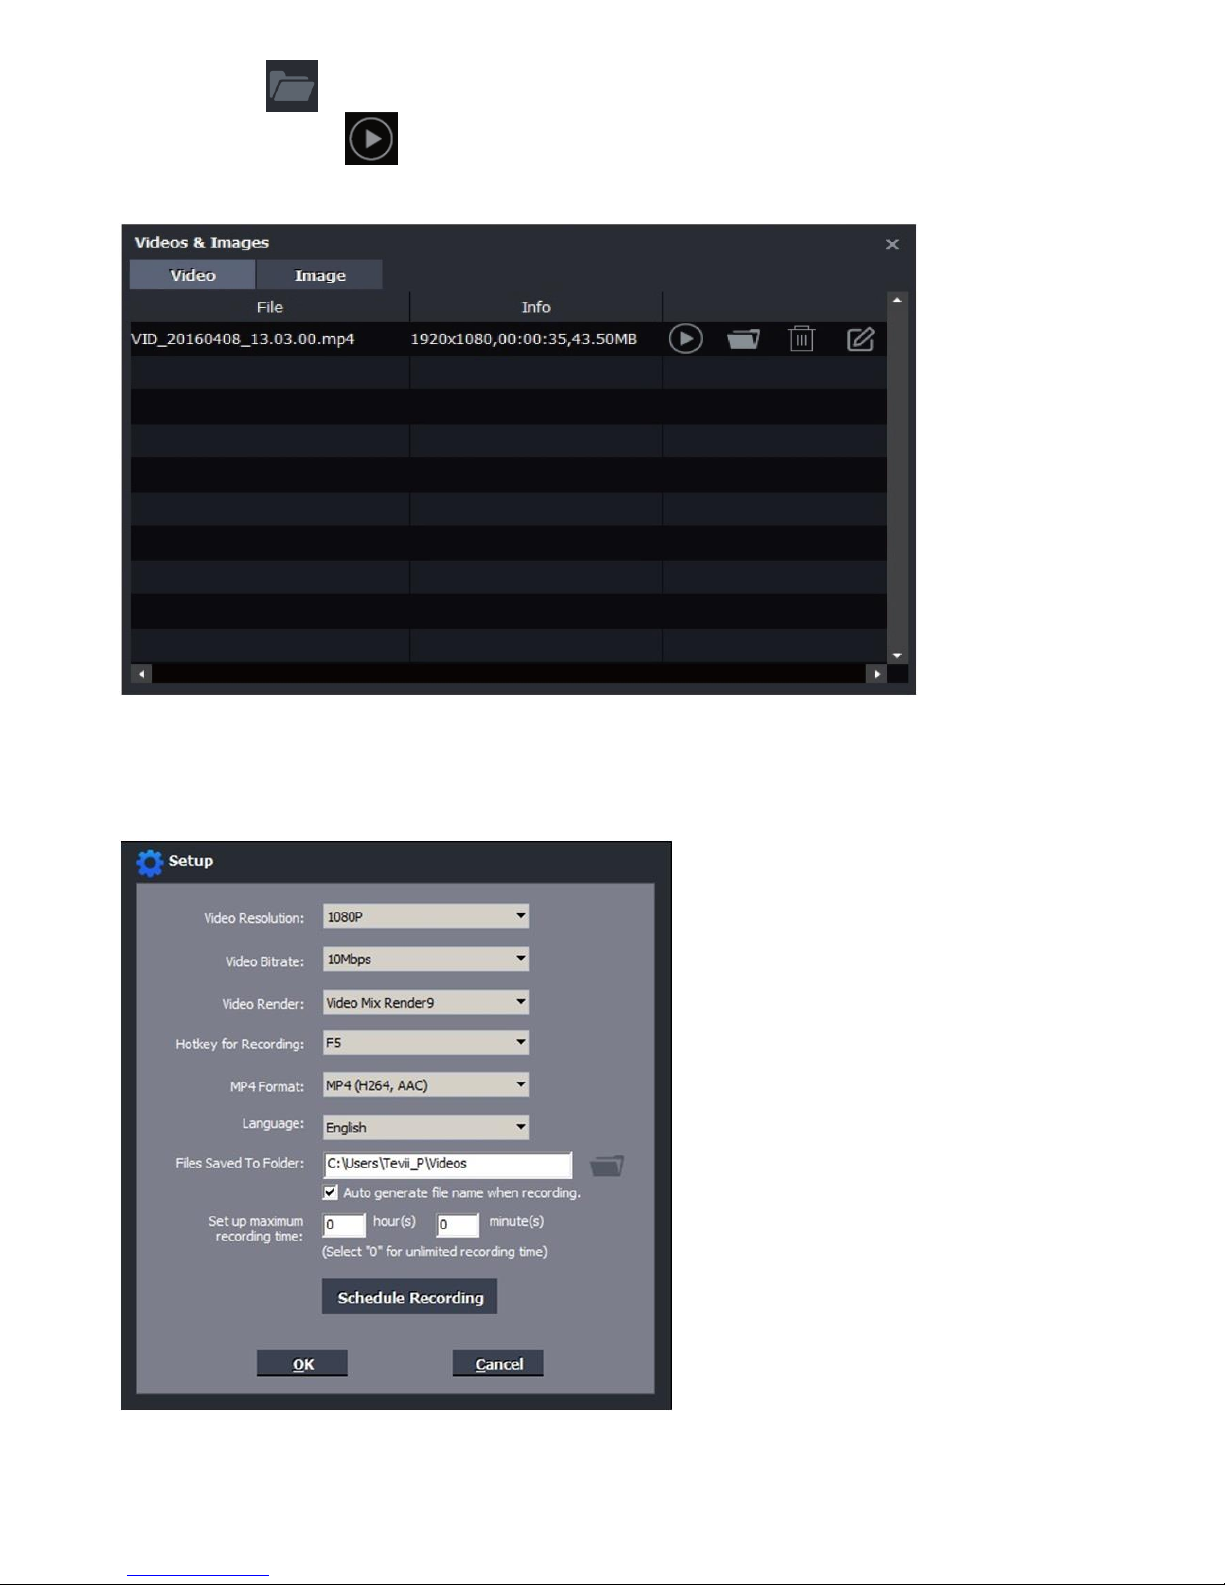
(2) Click on to start recording , click again to stop recording
You can also click on to capture a screenshot.
Page 27
26
(3) Click on to view the recorded video files.
You can click on to play back the recorded video.
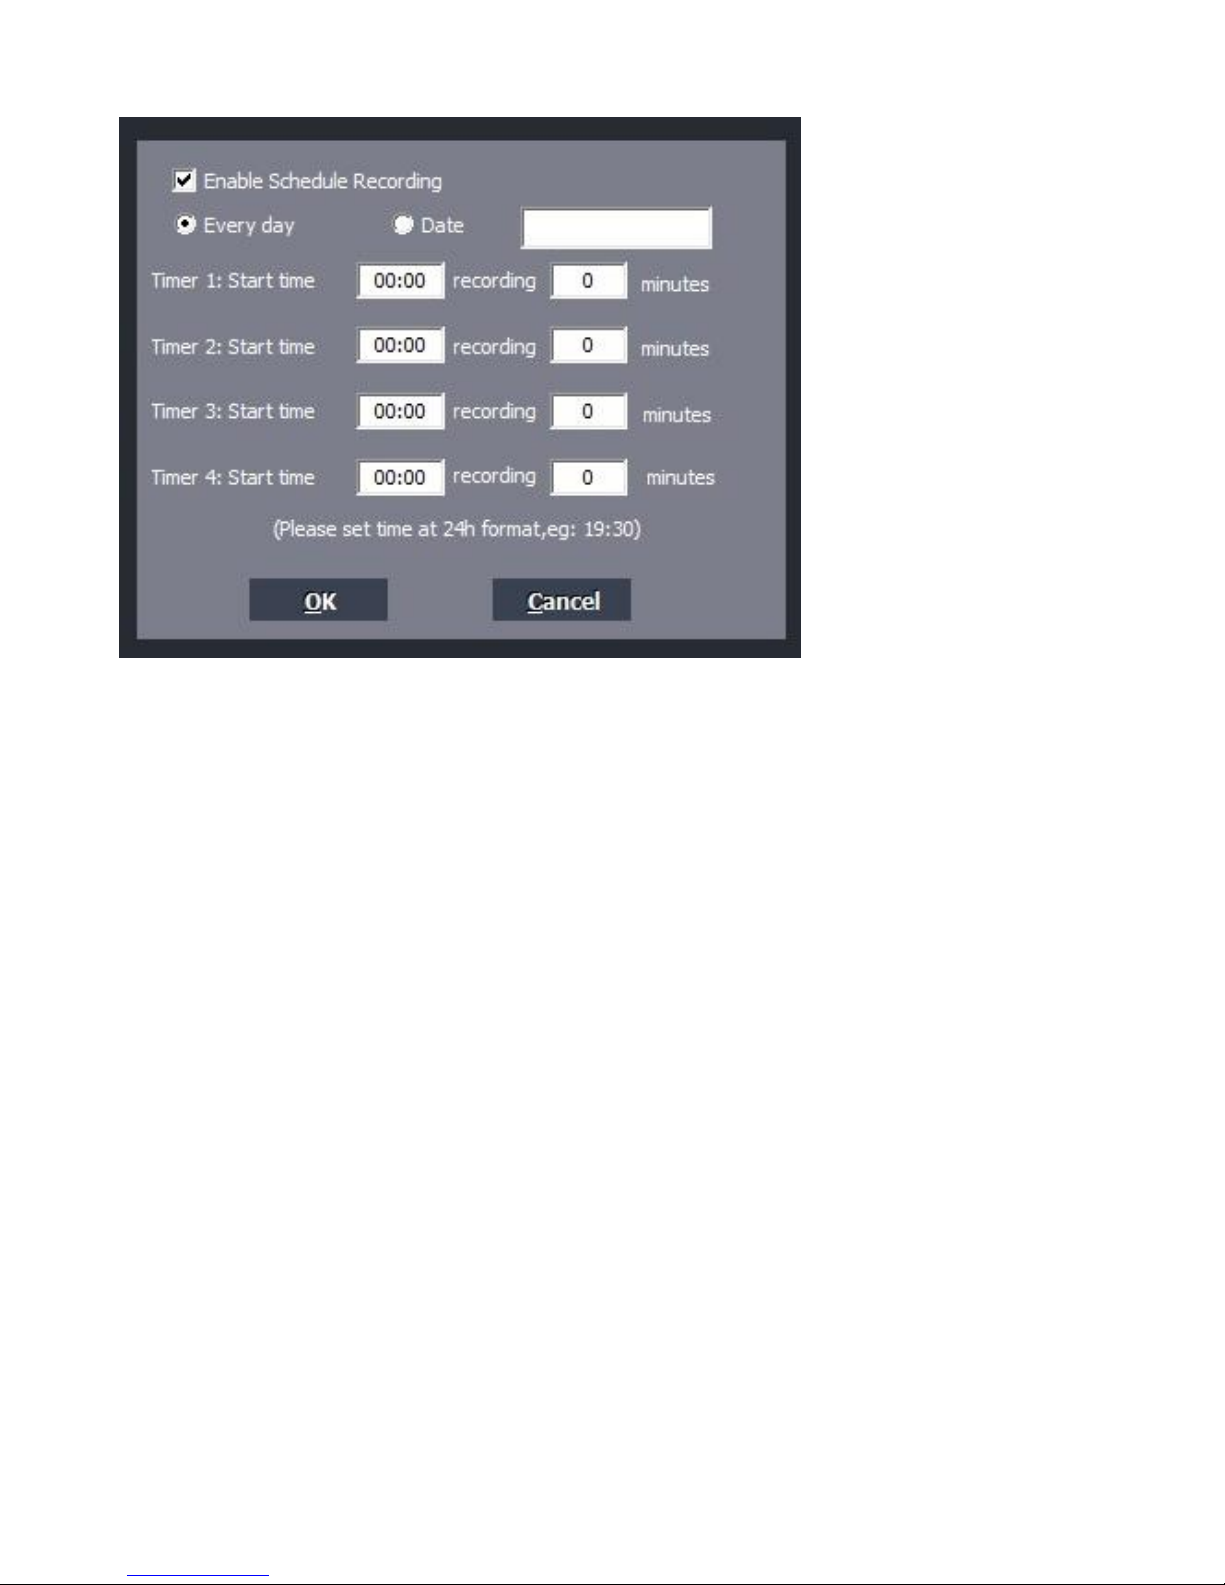
Schedule Recording & Set up
Page 28
27
Video Resolution: Set the output video resolution. 1080p, 720p and 480p are
available.
Video Bitrate: 6Mbps, 8Mbps, 10Mbps, 12Mbps, 15Mbps and 18Mbps are
available.
Video Render: Define the video render. Video Mix Render9 and Internal YUV
Render are available.
Hotkey for Recording: Set the hotkey for starting and stopping recording videos.
MP4 Format: You are free to select MP4 Format as below:
MP4(H264,AAC),MP4(H264,AC3),MP4(H264,MP3),MPEGTS(H264,AAC)
Language: Set the language to be displayed on the interface. English, Japanese,
Simplified Chinese and Traditional Chinese are available.
Files Saved to Folder: Displays the saving path of recorded videos. You can
change the saving path by clicking on the folder button.
Automatically generate the file name when recording starts: If this option is
selected, the titles of recorded videos will be named automatically.
Set up maximum recording time: Set the maximum recording time. If the
recording time exceeds the set value, D700 UHD PVR will stop recording videos.
Schedule Recording: Allow you to preset recording up to 4 different schedules
OK: Click to save the settings.
Cancel: Click to exit the "Setup" window without saving the settings.
Page 29
28
New Firmware Upgrade Instruction
Upgrade Tool: please use a FAT32 formatted USB flash drive
1. Download & unzip the compressed file and copy the "MERGE.bin" to USB Flash Drive
2. Connect USB Flash Drive to D700
3. Turn on power of D700. jUnder OSD, select “Software Update (USB)” & press Yes
4. OSD will show the process of upgrading by percentage, do NOT unplug USB Flash Drive
5. After upgrade completed, please select “factory reset” from OSD
Support Resolution and Product Specifications
SUPPORTED RESOLUTIONS
Input
4K (3840x2160 60p). 2K (2560x1440 60p)
1920x1080 (50p). 1920x1080 (60p),
1920x1080 (24p). 1920x1080 (25p).
1920x1080 (30p), 1920x1080 (50i)
1920x1080 (60i). 1360x768 (60p)
1280x1024 (60p). 1280x720 (60p). 1280x768 (60p)
1280x800 (60p). 1024x768 (60p)
720x480 (60i). 720x480 (50i). 640x480 (60p)
720x480 (60p). 720x576 (50p)
Output
1920x1080 (60p). 1280x720 (60p). 1024x768 (60p)
1280x800 (60p). 1360x768 (60p)
Recording
1920x1080 (30p). 1280x720 (60p). 1024x768 (60p)
1280x800 (60p). 1360x768 (60p)
PC Recording
1920x1080 (30p). 1280x720 (60p). 720x480 (60p)
Page 30

29
Output format
MP4 (H.264)
Video standards
(input)
NTSC, PAL, PAL-60
Supported
recording
formats
FAT32, NTFS
Input signals
HDMI, VGA, YPbPr, AV, Audio L/R, MIC, Line out
Output signals
HDMI (pass-through), USB, Micro USB
Bitrate
Max: 16Mbps
Recording
capacity
Maximum 2GB per file
Maximum
storage capacity
2TB (HDD), 32GB (USB Flash drive)
Power supply
DC 5V, 2A
Weight
7.1oz
Dimensions
4.3 x 4.3 x 0.6 inches
Supported file
formats for
playback
Image formats: BMP,JPG, PNG
Audio formats: MP3,WAV, FLAC, AAC, M4A (AAC encoded)
Video formats: MP4, AVI, VOB, MKV, MOV, MPG (Video
codec: MPEG-2, MPEG-4, H.264, VC-1, HEVC)
NOTE: Videos can be played back normally only when the
image format, audio format and video format of a video
meet the above requirements simultaneously.
Text formats: TXT
CONTACT US
If you encounter problems about using and upgrading hardware and
software please contact our support team: [email protected]
Please download the software GXPlayer from
http://www.tevii.com/Support.asp
 Loading...