

Page 1
Quantum-A und
Quantum-P
Knieorthesen
Gebrauchsanweisung
User Manual
www.teufel-international.com
Page 2

EN
FR
ES
IT
DE
Quantum-A/Quantum-A PRO Gebrauchsanweisung
Inhalt Beschreibung
Beschreibung DE-2
Indikation DE-3
Kontraindikation DE-3
Funktion DE-3
Abrechnungsposition DE-3
Sicherheit DE-3
REF/Größen DE-4
Maße nehmen DE-4
Lieferumfang DE-4
Anwendung/Anpassung DE-5
Komfort/Hygiene DE-8
Material DE-8
Produktpflege/Reinigung/Wartung DE-8
Lagerung/Entsorgung DE-9
Zeichenerklärung DE-9
Die Quantum ist eine funktionelle
Knieorthese, die bei ACL und PCL-Insuzienzen zum Einsatz kommt. Ihr
anatomisch geformter Alu miniumrahmen
ist leichtgewichtig und im Bedarfsfall gut
anpassbar. Das innovative Gelenk ist an
den natürlichen Bewegungsablauf des
Kniegelenks optimal angepasst. Einfache
Einstellmöglichkeiten für Flexions- und
Extensionsbegrenzungen ermöglichen
einen dierenzierten Therapie einsatz im
Sinne einer stufen weisen Bewegungsfreigabe. Zudem kann sie im Wasser
(Süßwasser) getragen werden.
Die Quantum-A Knieorthesen sind in 2 Ausstattungslinien erhältlich. Bei der Quantum-A
handelt es sich um eine Orthese mit einem
herkömmlichen Gurtsystem.
Die Quantum-A/PRO verfügt über Komfortverschlüsse, mit denen das Önen
und Schließen vereinfacht wird. Zudem
ist die PRO mit einer zusätzlichen Gelenkabdeckung versehen.
DE-2
Page 3

Quantum-A/Quantum-A PRO Gebrauchsanweisung
EN
FR
ES
IT
DE
Indikation
• Verletzungen des VKB oder HKB, sowohl
isoliert als auch mit Begleitverletzungen
• Seitenbandrupturen und –instabilitäten
• Prä- und postoperative Stabilisierung
von Kniegelenkinstabilitäten
• Konservative Versorgung von
Kniegelenksinstabilitäten
• Nach operativ versorgten
Meniskusschäden
• Schwere und/oder komplexe
Instabilität des Kniegelenks
• Meniskusverletzungen
• Funktionelle prä- und/oder postoperative Versorgung von Bandrupturen
Kontraindikation
• Mangelnde Patientencompliance
Funktion
• Die Teufel Knieorthese reduziert die
Innenrotation und begrenzt die Subluxation der Tibia in Richtung vordere
und/oder hintere Schublade
• Das Kniegelenk wird in der
Sagittalebene stabilisiert
Abrechnungsposition
DE: HMV-Nr.: 23.04.03.3065
Sicherheit
• Vor der Benutzung ist eine individuelle
Anpassung des Produktes und eine
Einweisung in den Gebrauch durch
einen erfahrenen Orthopädietechniker
entsprechend der ärztlichen Anweisung erforderlich.
• Falsche Auswahl, Anpassung, Anwendung und/oder mangelhafte Kontrolle
der Passform des Produktes können zu
gesundheitlichen Schäden führen.
• Die Orthese vor jedem Anlegen auf Beschädigungen überprüfen (z. B. lockere
Verbindungen, Verschlüsse, Gurte, etc.).
• Bei vermuteten Leistungsstörungen
(z. B. dem Gefühl einer nachlassenden
oder unzureichenden Wirkung) muss
unverzüglich der Arzt oder Orthopädietechniker aufgesucht werden.
• Die Orthese nie auf verletzter Haut tragen.
• Die Orthese muss regelmäßig von einem
Arzt oder Orthopädietechniker auf ihre
Funktion, korrekten Sitz und eventuelle
Beschädigungen überprüft werden. Die
Abstände der Kontrollen sind für jeden
Patienten individuell festzulegen.
• Sollte das Produkt einer unverhältnismäßig starken Belastung ausgesetzt
gewesen sein, muss es vor der weiteren Verwendung von einem Orthopädietechniker auf mögliche Schäden
überprüft werden.
• Unzuträglicher Druck durch die Orthese
kann zu Hautschädigungen und Durchblutungsstörungen führen und muss
daher vermieden werden.
• Die Orthese ist durch die notwendige individuelle Anpassung nicht zur Wiederverwendung bei weiteren Personen geeignet!
DE-3
Page 4

42.340.101.00 42.340.201.00 34 – 41 32 – 36 XS
42.340.102.00 42.340.202.00 41 – 48 36 – 39 S
42.340.103.00 42.340.203.00 48 – 55 39 – 43 M
42.340.104.00 42.340.204.00 55 – 62 43 – 47 L
42.340.105.00 42.340.205.00 62 – 69 47 – 51 XL
42.320.101.00 42.320.201.00 34 – 41 32 – 36 XS
42.320.102.00 42.320.202.00 41 – 48 36 – 39 S
42.320.103.00 42.320.203.00 48 – 55 39 – 43 M
42.320.104.00 42.320.204.00 55 – 62 43 – 47 L
42.320.105.00 42.320.205.00 62 – 69 47 – 51 XL
EN
FR
ES
IT
DE
Vordere Rahmenanlage, Klickverschlüsse, wasserfest
REF links REF rechts
Schenkelumfang/cm
Wadenumfang/cm
Größe
Vordere Rahmenanlage, Klettverschlüsse
REF links REF rechts
Schenkelumfang/cm
Wadenumfang/cm
Größe
Quantum-A/Quantum-A PRO Gebrauchsanweisung
REF/Größen
Quantum-A
Quantum-A PRO
Maße nehmen
DE-4
Der Messpunkt für den Oberschenkelumfang liegt 15 cm oberhalb der Patella.
Lieferumfang
Knieorthese, Tragenetz, Kondylenpolster zu be hör und Gelenkstifte zur individuellen An passung, Inbusschraubenschlüssel zum Einstellen der Flexions-/
Extensionsbegrenzung.
Page 5
Quantum-A/Quantum-A PRO Gebrauchsanweisung
EN
FR
ES
IT
Anwendung/Anpassung
DE
Nachfolgend ist die Anwendung/Anpassung
der Quantum Knieorthesen beschrieben. Die
Abbildungen zeigen die Ausführung „Quantum-A“ mit Tibiaanlage. Die abweichenden
Anpassungsschritte geltend für die PRO-Version sind entsprechend beschrieben.
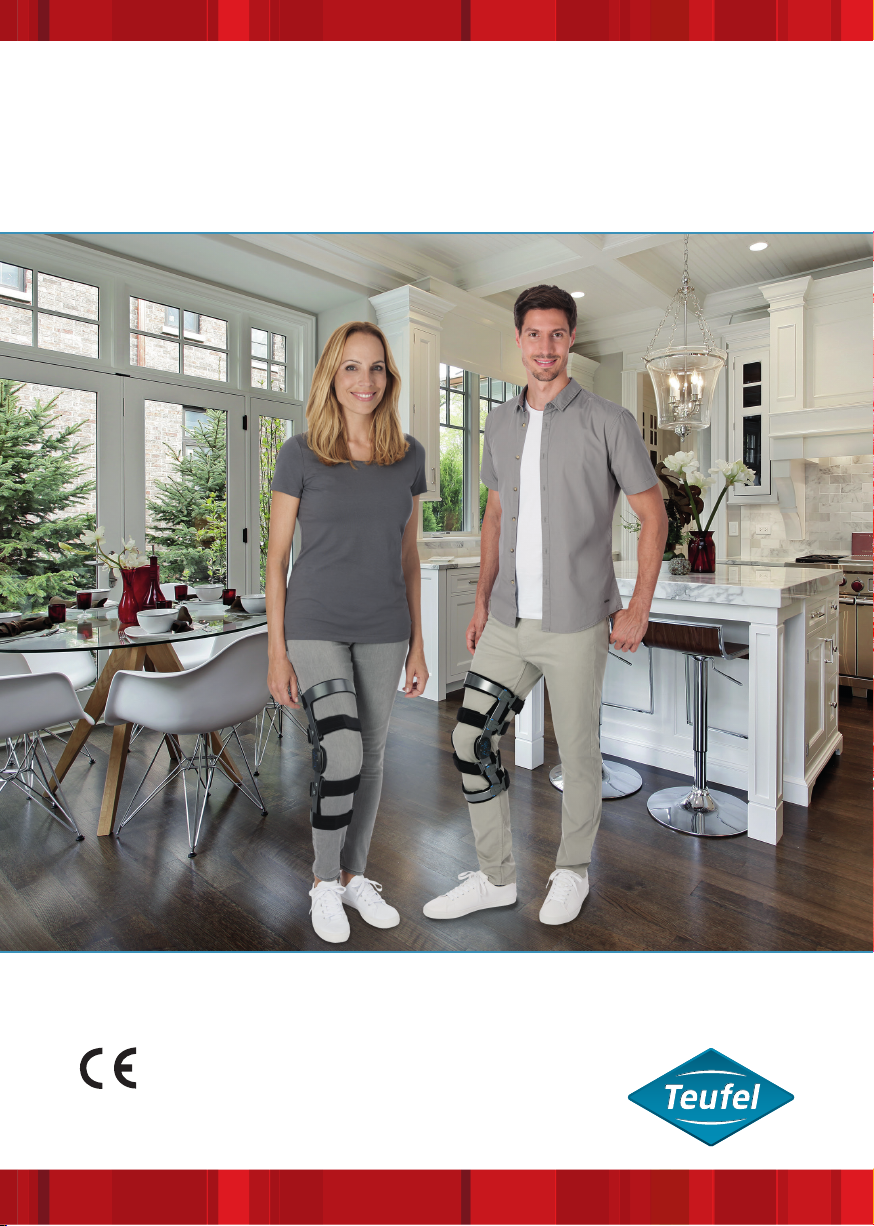
1. Gurte lösen
(Ausführung Quantum-A PRO)
Lösen Sie alle vier Gurte an der Rückseite der Orthese (Abb. 1). Drücken
Sie hierzu gleichzeitig beide blauen
Entriegelungsknöpfe an jeder Seite der
Komfort-Verschlüsse. Nehmen Sie dann
den Verschluss von der Orthese ab.
1
gezeigt. Prüfen Sie den Sitz der vorderen oberen Anlage und die Position der
unteren Tibiaführung. Die Orthese soll
flächig und stramm anliegen, jedoch ist
ein zu enger Sitz zu vermeiden.
2
3. Gelenke der Orthese positionieren
Die Gelenke der Orthese sollen so positioniert werden, dass sich die Gelenkmitte ca. 2,5cm oberhalb der Patella
und leicht hinter der Beinmittellinie
befindet. Drücken Sie die Gelenke der
Orthese nach hinten, bis sich die Gelenke von einem seitlichen Blickwinkel
aus in der Kniemitte befinden (Abb 3a).
Gurte lösen
(Ausführung Quantum-A)
Lösen Sie alle vier Gurte an der Rückseite
der Orthese. Kletten Sie hierzu die Verschlüsse auf und ziehen Sie die Gurte an
einer Seite aus der Gurtschlaufe heraus.
2. Orthese zum Anlegen vorbereiten
Lockern Sie die beiden vorderen Gurte
(Quantum-A / -A PRO) (Abb. 2). Legen
Sie die Orthese am um 45° gebeugten
Knie auf das Bein und positionieren
Sie das Gelenk der Orthese wie oben
3a
DE-5
Page 6
EN
FR
ES
IT
DE
Quantum-A/Quantum-A PRO Gebrauchsanweisung
Zusätzliche Gelenkpolster ermöglichen
eine optimale Anpassung der Quantum
an die Beinachse (Abb. 3b).
3b
4. Wadengurt positionieren
Alle Gurte sind mit einem Auleber mit
aufsteigenden Zahlen versehen, diese
markieren die empfohlene Reihenfolge
beim Schließen der Gurte. Beginnen Sie
in der Reihenfolge 1-6.
Ziehen Sie zunächst den unteren,
vor deren Gurt (Nr. 1) und danach den
oberen, vorderen Gurt (Nr. 2) leicht zu.
Anschließend positionieren Sie den oberen hinteren Wadengurt (Nr. 3) über den
höchsten Punkt des Wadenbeinmuskels.
Dadurch wird dem Verrutschen der
Orthese nach unten entgegen gewirkt.
Die Gurte können zur Längenanpassung
auf der Gegenseite durch Klettung in der
Länge reduziert werden.
Orthese fest am Bein sitzt (Abb. 4).
Beachten Sie dabei jedoch, dass die
Gurtung nicht so fest ange zogen wird,
dass es zu Einschnürungen mit negativen Auswirkungen auf die Blutzirkulation kommen kann.
4
6. Vorderen Tibia- und
Oberschenkelgurt anpassen
Der vordere Tibiagurt (Nr. 1) unterstützt
die Positionierung der Tibia zur Vermeidung der Subluxation (Schublade). Passen
Sie nochmals die beiden Gurte (Nr. 1 und
Nr. 2) an, und schließen Sie beide Gurte,
so dass sie moderat anliegen. Schließen Sie diese beiden Gurte, so dass er
moderat anliegt (Abb. 5). Beachten Sie,
auch diese beiden Gurte nicht so fest zu
schließen, dass es zu Durchblutungsstörungen kommen könnte.
DE-6
5. Hintere Oberschenkelgurte
einstellen und schließen
Schließen Sie die Oberschenkelgurte
(Nr. 4 und Nr. 5) und den unteren
Wadenbeingurt (Nr. 6), so dass die
5
Page 7
Quantum-A/Quantum-A PRO Gebrauchsanweisung
EN
FR
ES
IT
DE
7. Länge der Gurtbänder anpassen
Alle Gurte haben zusätzliche Längenanpassungen am gegenüberliegenden
Ende jeder Schlaufe. Lösen Sie den Gurt
und passen Sie die Gurtlänge mit dem
Klettverschluss an.
Prüfen Sie abschließend nochmals den
Sitz der Orthese und aller Bänder. Lassen
Sie den Patienten mit angelegter Orthese
aufstehen und einige Schritte laufen.
Prüfen Sie, ob die Orthese ggf. rutscht.
In diesem Fall prüfen Sie den Sitz der Orthese und die Festigkeit der Gurte erneut
und korrigieren diese falls nötig.
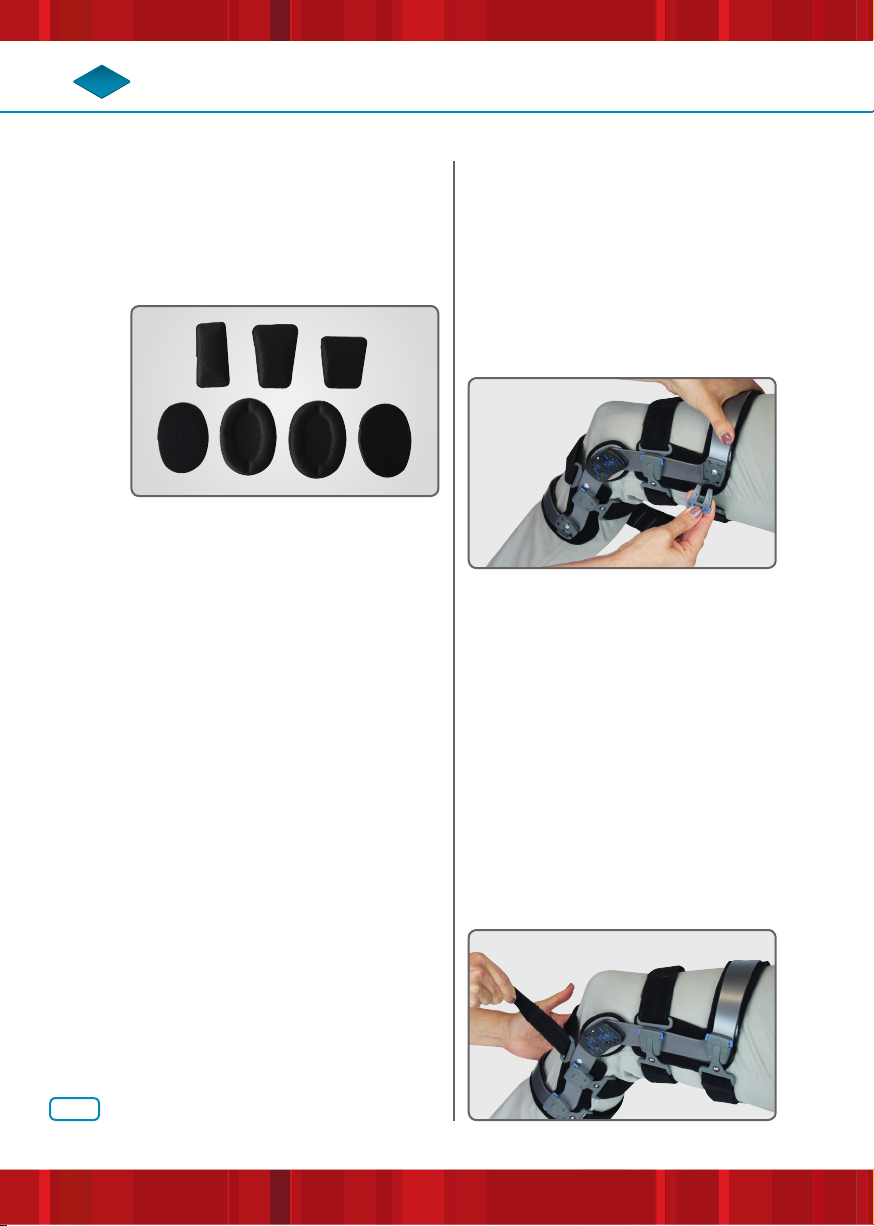
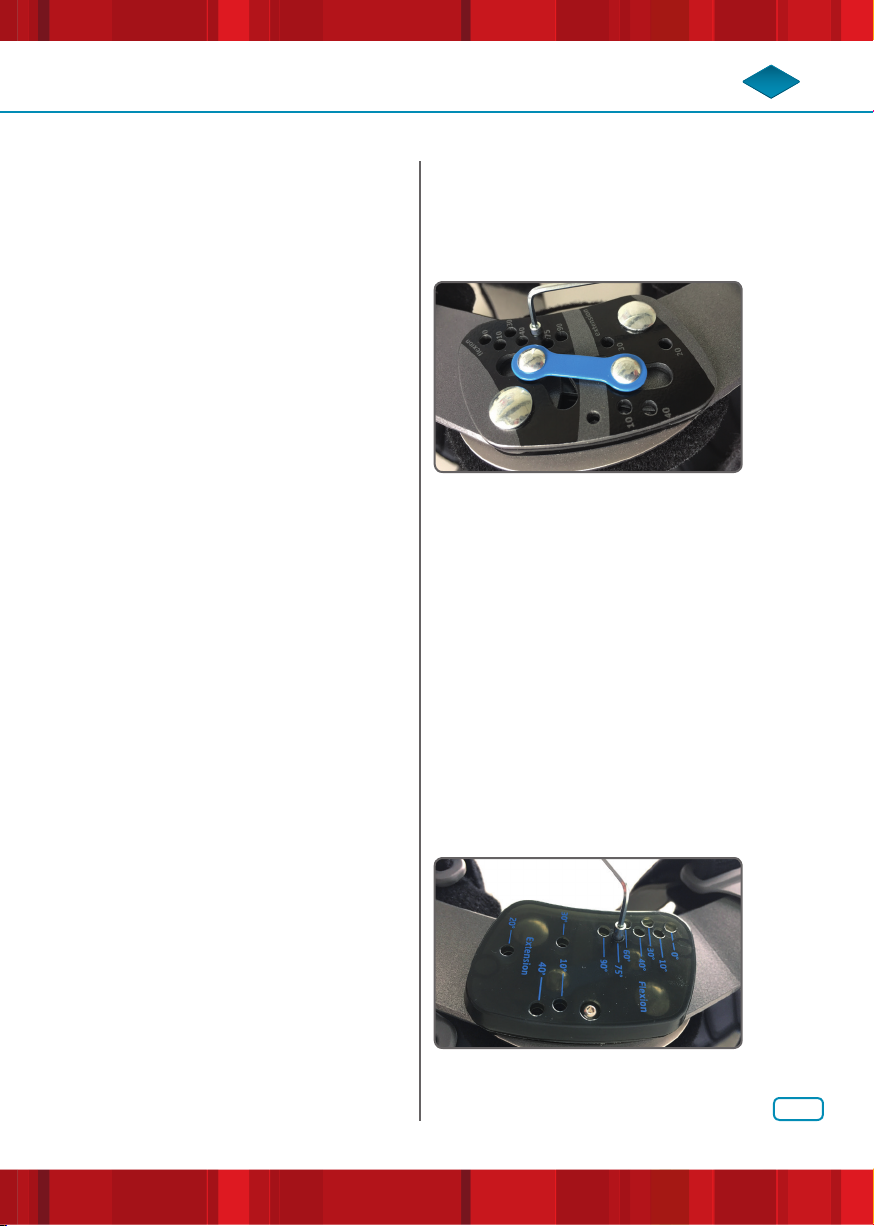
8. Einstellen der Flexions- und
Extensionsbegrenzung
Die Gelenke der Knieorthese sind mit
schraubbaren Begrenzungsstiften
ausgestattet. Mit diesen ist es möglich,
Flexion und Extension der Knieorthese
zu begrenzen. Die Flexionsbegrenzung
ist möglich auf 0°, 10°, 30°, 40°, 60°,
75°, 90°. Die Extensionsbegrenzung
ist möglich auf 10°, 20°, 30°, 40°. Bitte
folgen Sie den ärztlichen Anweisungen
bei der Einstellung der Begrenzung
bzw. der Freigabe des Bewegungsumfangs. Schrauben Sie den Begrenzungsstift für die Flexionsbegrenzung
an der ge-kennzeichneten Stelle des
gewünschten maximalen Flexionswinkels in die vorgesehene Bohrung ein (1
Nm) (Abb. 6). Schrauben Sie anschließend den Begrenzungsstift für die
Exten sionsbegrenzung an der gekennzeichneten Stelle des gewünschten
maximalen Extensionswinkels in die
vorgesehene Bohrung ein (1 Nm).
6
Wiederholen Sie diesen Vorgang am gegenüberliegenden Gelenk. Beachten Sie,
stets gleiche Winkelbegrenzungen des
linken und rechten Gelenks einzustellen.
Hinweis zu Variante
Quantum-A PRO
Diese Variante verfügt über eine zusätzliche Abdeckung des Gelenkes, die
ein mögliches Einklemmen von Kleidung
in der Gelenkmechanik verhindert. Die
Abdeckung ist so gestaltet, dass sie zum
Einstellen der Bewegungsbegrenzungen
nicht abgenommen werden muss (Abb. 7).
7
DE-7
Page 8

EN
FR
ES
IT
DE
Quantum-A/Quantum-A PRO Gebrauchsanweisung
Komfort/Hygiene
Die Orthese kann sowohl direkt auf der Haut
als auch auf einer Hose getragen werden.
Material
Rahmen:
• Aluminium
Verschlüsse:
• PA
• PE
Polsterung:
• 90% Polyamid
• 10% Elastan
Produktpflege/
Reinigung/Wartung
Die Orthese kann im Bedarfsfall mit einem
feuchten Tuch abgewischt werden. Die
Polster können per Handwäsche bei 30°C
gewaschen werden.
Handwäsche
Bleichen nicht erlaubt.
Nicht trommeltrocknen.
Nicht bügeln.
Nicht chemisch reinigen.
DE-8
Page 9

Quantum-A/Quantum-A PRO Gebrauchsanweisung
EN
FR
ES
IT
DE
Lagerung/Entsorgung
Produkt in der Originalverpackung an
einem trockenen Ort auewahren. Vor
Staub, Schmutz und Feuchtigkeit schützen. Das Produkt enthält keine umweltgefährdenden Stoe. Es kann über den
Hausmüll entsorgt werden.
Zeichenerklärung
Hersteller
Chargencode
Artikelnummer
Seriennummer
Gebrauchsanweisung beachten
Achtung
Notizen
CE-Kennzeichnung gemäß
Richtlinie 93/42/EWG für
Medizinprodukte
DE-9
Page 10

Notizen
DE-10
Page 11
Quantum-P/
Quantum-P PRO
Gebrauchsanweisung
www.teufel-international.com
Page 12

EN
FR
ES
IT
DE
Quantum-P/Quantum-P PRO Gebrauchsanweisung
Inhalt Beschreibung
Beschreibung DE-12
Indikation DE-13
Kontraindikation DE-13
Funktion DE-13
Abrechnungsposition DE-13
Sicherheit DE-13
REF/Größen DE-14
Maße nehmen DE-14
Lieferumfang DE-14
Anwendung/Anpassung DE-15
Komfort/Hygiene DE-18
Material DE-18
Produktpflege/Reinigung/Wartung DE-18
Lagerung/Entsorgung DE-19
Zeichenerklärung DE-19
Die Quantum-P ist eine funktionelle
Knie orthese mit einer hinteren Wadenbeinanlage, die bei ACL und PCL-Insuzienzen zum Einsatz kommt. Ihr anatomisch geformter Alu miniumrahmen ist
leichtgewichtig und im Bedarfsfall gut
anpassbar. Das innovative Gelenk ist an
den natürlichen Bewegungsablauf des
Kniegelenks optimal angepasst. Einfache
Einstellmöglichkeiten für Flexions- und
Extensionsbegrenzungen ermöglichen
einen dierenzierten Therapie einsatz im
Sinne einer stufen weisen Bewegungsfreigabe. Zudem kann sie im Wasser
(Süßwasser) getragen werden.
Die Quantum-P Knieorthesen sind in
2 Ausstattungslinien erhältlich. Bei der
Quantum-P handelt es sich um eine Orthese
mit einem herkömmlichen Gurtsystem.
Die Quantum-P PRO verfügt über Komfortverschlüsse, mit denen das Öffnen
und Schließen vereinfacht wird. Zudem
ist die PRO mit einer zusätzlichen Gelenkabdeckung versehen.
DE-12
Page 13

Quantum-P/Quantum-P PRO Gebrauchsanweisung
EN
FR
ES
IT
DE
Indikation
• Verletzungen des VKB oder HKB, sowohl
isoliert als auch mit Begleit verletzungen
• Seitenbandrupturen und –instabilitäten
• Prä- und postoperative Stabilisierung
von Kniegelenkinstabilitäten
• Konservative Versorgung von
Knie gelenksinstabilitäten
• Nach operativ versorgten
Meniskusschäden
• Schwere und/oder komplexe
Instabilität des Kniegelenks
• Meniskusverletzungen
• Funktionelle prä- und/oder
postoperative Versorgung
von Bandrupturen
Kontraindikation
• Mangelnde Patientencompliance
Funktion
• Die Quantum-P reduziert die Innenrotation und begrenzt die Subluxation
der Tibia in Richtung vorderer und/oder
hinterer Schublade
• Das Kniegelenk wird in der
Sagittal ebene stabilisiert
Abrechnungsposition
DE: HMV-Nr.: 23.04.03.3065
Sicherheit
• Vor der Benutzung ist eine individuelle
Anpassung des Produktes und eine
Einweisung in den Gebrauch durch
einen erfahrenen Orthopädietechniker
entsprechend der ärztlichen Anweisung erforderlich.
• Falsche Auswahl, Anpassung, Anwendung und/oder mangelhafte Kontrolle
der Passform des Produktes können zu
gesundheitlichen Schäden führen.
• Die Orthese vor jedem Anlegen auf Beschädigungen überprüfen (z. B. lockere
Verbindungen, Verschlüsse, Gurte, etc.).
• Bei vermuteten Leistungsstörungen
(z. B. dem Gefühl einer nachlassenden
oder unzureichenden Wirkung) muss
unverzüglich der Arzt oder Orthopädietechniker aufgesucht werden.
• Die Orthese nie auf verletzter Haut tragen.
• Die Orthese muss regelmäßig von einem
Arzt oder Orthopädietechniker auf ihre
Funktion, korrekten Sitz und eventuelle
Beschädigungen überprüft werden. Die
Abstände der Kontrollen sind für jeden
Patienten individuell festzulegen.
• Sollte das Produkt einer unverhältnismäßig starken Belastung ausgesetzt
gewesen sein, muss es vor der weiteren Verwendung von einem Orthopädietechniker auf mögliche Schäden
überprüft werden.
• Unzuträglicher Druck durch die Orthese
kann zu Hautschädigungen und Durchblutungsstörungen führen und muss
daher vermieden werden.
• Die Orthese ist durch die notwendige individuelle Anpassung nicht zur Wiederverwendung bei weiteren Personen geeignet!
DE-13
Page 14

42.360.101.00 42.360.201.00 34 – 41 32 – 36 XS
42.360.102.00 42.360.202.00 41 – 48 36 – 39 S
42.360.103.00 42.360.203.00 48 – 55 39 – 43 M
42.360.104.00 42.360.204.00 55 – 62 43 – 47 L
42.360.105.00 42.360.205.00 62 – 69 47 – 51 XL
42.380.101.00 42.380.201.00 34 – 41 32 – 36 XS
42.380.102.00 42.380.202.00 41 – 48 36 – 39 S
42.380.103.00 42.380.203.00 48 – 55 39 – 43 M
42.380.104.00 42.380.204.00 55 – 62 43 – 47 L
42.380.105.00 42.380.205.00 62 – 69 47 – 51 XL
EN
FR
ES
IT
DE
Rahmen mit Wadenanlage, wasserfest
REF links REF rechts
Schenkelumfang/cm
Wadenumfang/cm
Größe
Rahmen mit Wadenanlage, Gelenkabdeckung, Klickverschlüsse, wasserfest
REF links REF rechts
Schenkelumfang/cm
Wadenumfang/cm
Größe
Quantum-P/Quantum-P PRO Gebrauchsanweisung
REF/Größen
Quantum-P
Quantum-P PRO
Maße nehmen
DE-14
Der Messpunkt für den Oberschenkelumfang liegt 15 cm oberhalb der Patella.
Lieferumfang
Knieorthese, Tragenetz, Kondylenpolster zu be hör und Gelenkstifte zur individuellen An passung, Inbusschraubenschlüssel zum Einstellen der Flexions-/
Extensionsbegrenzung.
Page 15

Quantum-P/Quantum-P PRO Gebrauchsanweisung
EN
FR
ES
IT
Anwendung/Anpassung
DE
Nachfolgend ist die Anwendung/Anpassung der Quantum-P Knieorthesen
beschrieben. Die Abbildungen zeigen die
Ausführung „Quantum-P PRO“ mit Wadenanlage. Die abweichenden Anpassungsschritte für die Quantum-P Version sind
entsprechend beschrieben.
1. Gurte lösen
(Ausführung Quantum-P PRO)
Vor dem Einstieg in die Orthese lösen
Sie bitte alle Gurte mit Klettverschlüssen,
und die Komfortverschlüsse durch Drücken der blauen Entriegelungsknöpfe.
1
2. Orthese zum Anlegen vorbereiten
Bitten Sie den Patienten, vorsichtig mit
dem verletzten Bein in die Orthese einzusteigen. Legen Sie die Orthese auf das
z.B. in 45° gebeugte Knie und positionieren Sie das Gelenk der Orthese mittig des
Kniegelenks. Schließen Sie den unteren
vorderen Unterschenkelgurt (Nr. 1) und
den hinteren oberen Oberschenkelgurt
(Nr. 2) zur Fixierung der Orthese am Bein
(Abb. 2). Ziehen Sie noch nicht den Gurt
vollends fest an. Prüfen Sie den Sitz der
vorderen oberen Anlage und die Position
der unteren Wadenanlage. Die Orthese
soll flächig und stramm anliegen, jedoch
ist ein zu enger Sitz zu vermeiden.
2
Gurte lösen
(Ausführung Quantum-P)
Zum Einstieg lösen Sie alle Gurte.
Ziehen Sie hierzu der Klettverschlüsse
auf und ziehen Sie Gurte aus der Gurtschlaufe heraus.
DE-15
Page 16

EN
FR
ES
IT
DE
Quantum-P/Quantum-P PRO Gebrauchsanweisung
3. Gelenke der Orthese positionieren
Die Gelenke der Orthese sollen schließlich so po si tioniert werden, dass sich
die Gelenkmitte auf Höhe des oberen
Patellarands und leicht hinter der Beinmittellinie befindet. Drücken Sie dazu
die Gelenke der Orthese nach hinten,
bis sich die Gelenke von einem seitlichen Blickwinkel aus in der Kniemitte
befinden (Abb 3a).
3a
Die der Orthese beigefügten zusätzlichen
Gelenkpolster ermöglichen eine optimale
Anpassung der Quantum an die individuelle Beinachse (Abb. 3b)
4. Gurtpositionierung
Alle Gurte sind mit einem Auleber mit
aufsteigenden Zahlen versehen. Diese
markieren die empfohlene Reihenfolge
beim Schließen der Gurte. Folgen Sie
der Reihenfolge 1-6.
Ziehen Sie nun zunächst den unteren,
vor deren Unterschenkelgurt (Nr. 1) und
danach den oberen hinteren Oberschenkelgurt (Nr. 2) zu. Anschließend
schließen Sie den hinteren unteren
Oberschenkelgurt (Nr. 3).
Schließen Sie danach den vorderen oberen
Unterschenkelgurt (Nr. 4) und anschließend den hinteren oberen Unterschenkelgurt (Nr. 5). Zum Schluss schließen Sie
den vorderen Oberschenkelgurt (Nr. 6)
wie es Abbildung 4 zeigt. Beachten Sie
dabei jedoch, dass die Gurtung nicht zu
fest ange zogen wird, um Einschnürungen
mit negativen Auswirkungen auf die Blutzirku lation zu verhindern.
43b
DE-16
Page 17

Quantum-P/Quantum-P PRO Gebrauchsanweisung
EN
FR
ES
IT
DE
5. Länge der Gurtbänder anpassen
Alle Gurte können in Ihrer Länge am gegenüberliegenden Ende jeder Schlaufe
angepasst werden. Lösen Sie den Gurt
und passen Sie die Gurtlänge mit dem
Klettverschluss an.
Prüfen Sie abschließend nochmals den
Sitz der Orthese und aller Bänder. Lassen
Sie den Patienten mit angelegter Orthese
aufstehen und einige Schritte laufen.
Prüfen Sie, ob die Orthese ggf. rutscht.
In diesem Fall prüfen Sie den Sitz der Orthese und die Festigkeit der Gurte erneut
und korrigieren diese falls nötig.
6. Einstellen der Flexions-
und Extensionsbegrenzung
Die Gelenke der Knieorthese sind mit
einschraubbaren Begrenzungsstiften
aus gestattet. Mit diesen ist es möglich, die Flexion und Extension der
Knieorthese zu begrenzen. Die Flexionsbegrenzung ist auf 0°, 10°, 30°,
40°, 60°, 75° und 90° möglich. Die Extensionsbegrenzung ist auf 10°, 20°,
30°, 40° einstellbar. Bitte folgen Sie
den ärztlichen Anwei sungen bei der
Einstellung der Begren zung bzw. der
Freigabe des Bewegungsumfangs.
Schrauben Sie den Begrenzungsstift für
die Flexionsbegrenzung an der gekennzeichneten Stelle des gewünsch ten maximalen Flexionswinkels in die vorgesehene
Bohrung ein (1 Nm) (Abb. 5). Schrauben
Sie anschließend den Begrenzungsstift
für die Exten sionsbegrenzung an der
gekennzeichneten Stelle des gewünschten maximalen Extensionswinkels in die
vorgesehene Bohrung ein (1 Nm).
5
Wiederholen Sie diesen Vorgang am gegenüberliegenden Gelenk. Beachten Sie,
stets gleiche Winkel begrenzungen am
linken und rechten Gelenk einzustellen.
DE-17
Page 18

EN
FR
ES
IT
DE
Quantum-P/Quantum-P PRO Gebrauchsanweisung
Material
Hinweis zu Variante Quantum-P PRO
Diese Variante verfügt über eine zusätzliche Abdeckung des Gelenkes, die
ein mögliches Einklemmen von Kleidung
in der Gelenkmechanik verhindert. Die
Abdeckung ist so gestaltet, dass sie zum
Einstellen der Bewegungsbegrenzungen
nicht abgenommen werden muss (Abb. 7).
6
Komfort/Hygiene
Die Orthese kann sowohl direkt auf der Haut
als auch auf einer Hose getragen werden.
Rahmen:
• Aluminium
Verschlüsse:
• PA
• PE
Polsterung:
• 90% Polyamid
• 10% Elastan
Produktpflege/
Reinigung/Wartung
Die Orthese kann im Bedarfsfall mit
ei nem feuchten Tuch abgewischt werden.
Die Polster können per Handwäsche bei
30°C gewaschen werden.
Handwäsche
Bleichen nicht erlaubt.
Nicht trommeltrocknen.
Nicht bügeln.
Nicht chemisch reinigen.
DE-18
Page 19

Quantum-P/Quantum-P PRO Gebrauchsanweisung
EN
FR
ES
IT
DE
Lagerung/Entsorgung
Produkt in der Originalverpackung an
einem trockenen Ort auewahren. Vor
Staub, Schmutz und Feuchtigkeit schützen. Das Produkt enthält keine umweltgefährdenden Stoe. Es kann über den
Hausmüll entsorgt werden.
Zeichenerklärung
Hersteller
Chargencode
Artikelnummer
Seriennummer
Gebrauchsanweisung beachten
Achtung
Notizen
CE-Kennzeichnung gemäß
Richtlinie 93/42/EWG für
Medizinprodukte
DE-19
Page 20

EN
FR
ES
IT
Quantum-A/Quantum-A PRO User Manual
Contents Description
Description EN-2
Indication EN-3
Contraindication EN-3
Function EN-3
Safety EN-3
REF/Sizes EN-4
Taking Measurements EN-4
Scope of Delivery EN-4
Application/Adjustment EN-5
Comfort/Hygiene EN-8
Material EN-8
Product Care/Cleaning/Maintenance EN-8
Storage/Disposal EN-9
Legend to Symbols EN-9
Quantum Knee Orthoses are functional
knee orthoses for ACL and PCL insuciencies. Their anatomically shaped aluminum
frames are ligthweight and, if necessary,
easy to adjust. The innovative joint has
been designed to perfectly correspond to
the natural motion patterns of the knee
joint. Flexion and extension limitation are
easy to adjust, and allow for a dierentiated therapy where range of motion is
gradually increased over time. It can also
be worn in (fresh) water.
Quantum-A Knee Orthoses are availabe
in two versions. Quantum-A is an orthosis with a regular strapping system.
The Quantum-A/PRO Knee Orthosis
features special quick-release buckles
which allow for easier opening and
closing of the orthosis. Additionally, the
Quantum-A/PRO comes with an added
joint cover.
EN-2
Page 21

Quantum-A/Quantum-A PRO User Manual
FR
ES
IT
EN
Indication
• Injuries of the ACL or PCL, isolated
or with secondary injuries
• Ruptures and instabilities
of the collateral ligament
• Preoperative and postoperative stabili-
zation of instabilities of the knee joint
• Conservative treatment of instabilities
of the knee joint
• Surgically treated meniscus injuries
• Severe and/or complex instability
of the knee joint
• Meniscus injuries
• Functional preoperative and/or postope-
rative treatment of ligament ruptures
Contraindication
• Non-compliant patients
Function
• Quantum Knee Orthoses by Teufel
reduce the internal rotation and limit
the luxation of the tibia (anterior or
posterior ”drawer“)
• Stabilization of the knee
joint in the sagittal plane
Safety
• Before this device is used, it is essential
that the orthosis is individually adapted to
the patient by an experienced orthopedic
technician and that the patient is trained
in the orthosis’ use according to the
doctor’s instructions.
• Incorrect selection, adaptation, application,
and/or failure to monitor the correct fit of
this product may cause health damage.
• Check orthosis for damage (such as
loose connections, fasteners, belts,
etc.) each time it is put on.
• In case you suspect any performance
malfunctions (e.g. an apparent reduction or lack of eect), immediately call on
your doctor or orthopedic technician.
• Never wear the orthosis on broken skin.
• The orthosis must be checked for proper function, correct fit and potential
damage by a doctor or orthopedic technician at regular intervals. The timing
of these intervals has to be defined
individually for each patient.
• Should the product have been subject to
disproportionate stress, it must be checked for potential damage by an orthopedic technician before further use.
• Harmful pressure caused by the orthosismay cause skin injuries or disrupt
blood flow and must be avoided.
• Due to the individual adaptation to the
patient the orthosis may not be reused
on other people.
EN-3
Page 22

42.340.101.00 42.340.201.00 34 – 41 32 – 36 XS
42.340.102.00 42.340.202.00 41 – 48 36 – 39 S
42.340.103.00 42.340.203.00 48 – 55 39 – 43 M
42.340.104.00 42.340.204.00 55 – 62 43 – 47 L
42.340.105.00 42.340.205.00 62 – 69 47 – 51 XL
42.320.101.00 42.320.201.00 34 – 41 32 – 36 XS
42.320.102.00 42.320.202.00 41 – 48 36 – 39 S
42.320.103.00 42.320.203.00 48 – 55 39 – 43 M
42.320.104.00 42.320.204.00 55 – 62 43 – 47 L
42.320.105.00 42.320.205.00 62 – 69 47 – 51 XL
Anterior Tibia Shell, Quick-Release Buckles, Waterproof
REF Left REF Right
Thigh Circumference /cm
Calf Circumference /cm
Size
Anterior Tibia Shell, Hook-and-Loop Closures
REF Left REF Right
Thigh Circumference /cm
Calf Circumference /cm
Size
EN
FR
ES
IT
Quantum-A/Quantum-A PRO User Manual
REF/Sizes
Quantum-A
Quantum-A PRO
Taking Measurements
EN-4
Measure the thigh circumference 15 cm
above the patella.
Scope of Delivery
Knee orthosis, mesh carrying bag, condylar padding accessories and flexion/
extension limitation pins for individual
adjustment, hex key for adjusting maximum flexion and extension.
Page 23

Application/Adjustment
FR
ES
IT
Quantum-A/Quantum-A PRO User Manual
EN
Application and adjustment of the Quantum Knee Orthoses are described below.
The images show the version Quantum-A
with the anterior tibia shell. Diering adjustment steps for the PRO-version of the
orthosis will be described where necessary.
1. Open Straps
(Version Quantum-A/PRO)
Open all four straps on the back of
the orthosis (fig. 1). To do so, simultaneously push the two blue buttons
on the quick-release buckles, then lift
the buckles off of the orthosis.
1
shown in the image above. Check the
position of the anterior thigh shell and
the bottom tibia shell. The orthosis
should be in full contact with the leg,
and fit tightly without being too tight.
2
3. Position Joints of Orthosis
The joints of the orthosis should be
positioned so the center of the joint sits
2.5 cm above the patella, slightly behind
the midline of the leg. Push the joints of
the orthosis towards the back until they
are positioned at the center of the knee,
when looked at from the side (fig. 3a).
Open Straps
(Version Quantum-A)
Open all four straps on the back of the
orthosis. To do so, open the hook-andloop closures and pull one end of the
straps out of the strap loop.
2. Prepare Orthosis for Application
For Quantum-A and Quantum-A/PRO:
loosen the two front straps (fig. 2).
Place the orthosis onto the patient‘s
leg, with the knee bent at a 45° angle.
Position the joint of the orthosis as
3a
EN-5
Page 24

EN
FR
ES
IT
Quantum-A/Quantum-A PRO User Manual
The included additional joint pads allow for
the optimum adjustment of the Quantum
to the patient`s individual leg axis (fig. 3b).
3b
4. Position Calf Strap
All straps are marked with stickers with
numbers on them. The straps of the orthosis should be closed according to the
numbers on the stickers, in ascending
order. Start with straps 1 to 6.
First, lightly fasten the bottom front
strap (no.1), then the top front strap
(no.2). Then position the top posterior
strap (no.3) above the highest point of
the calf muscle.
This helps prevent the orthosis from
shifting out of place. To adjust the
lenght of the straps they can be shortened with hook-and-loop fasteners
on the opposite side.
close the orthosis too tighly so the
straps do not disrupt the blood flow.
4
6. Adjust Anterior Tibia Strap
and Thigh Straps
The anterior tibia strap (no. 1) helps
to position the tibia in a way that
prevents subluxation (”drawer“ eect).
Readjust the two straps (no. 1 and
no. 2), and close them so they are
moderately tight against the patient‘s
leg (fig. 5). Make sure not to fasten
these straps too tightly, in order not to
disrupt the blood flow.
EN-6
5. Adjust and Fasten Posterior
Thigh Straps
Close the thigh straps (no. 4 and no.
5) and the bottom calf strap (no. 6), so
the orthosis securely fits the patient‘s
leg (fig. 4). Please make sure not to
5
Page 25

Quantum-A/Quantum-A PRO User Manual
FR
ES
IT
EN
7. Adjusting the Length of the Straps
The length of all straps can also be
adjusted on the opposite end of the
strap. To do so, open the hook-and-loop
closure and adjust the strap as desired.
Re-check the fit of the orthosis and
of all of the straps. Ask the patient to
get up and walk a few steps with the
orthosis. Check if the orthosis might
be too loose, and, if so, check the fit of
the orthosis again and also adjust the
length of the straps again, if necessary.
8. Adjusting the Flexion and
Extension Limitation
The joints of the orthosis are equipped with threaded flexion/extension
limitation pins. Flexion can be limited
to 0°, 10°, 30°, 40°, 60°, 75°, 90°.
Extension can be limited to 10°, 20°,
30°, 40°. Please follow the doctor‘s
orders concerning the limitation or
the increase of the range of motion.
Screw the pin for the flexion limitation
into the hole marked with the desired
flexion angle (1Nm) (fig. 6). Then screw
the pin for the extension limitation
into the hole marked with the desired
maximum extension angle (1Nm).
6
Repeat these steps on the opposite
side of the joint. Always make sure to
set the same limitation on the left and
the right side of the joint.
Information Regarding
Version Quantum-A/PRO
On this version of the brace there is
an additional cover on the joint, so no
clothes will get caught in the hinge. The
cover is designed in a way that makes it
possible to adjust flexion and extension
without removing it (fig. 7).
7
EN-7
Page 26

EN
FR
ES
IT
Quantum-A/Quantum-A PRO User Manual
Comfort/Hygiene
The orthosis may be worn directly on the
skin or over trousers.
Material
Frame:
• Aluminum
Closures:
• Polyamide
• Polyethylene
Pads:
• 90% Polyamide
• 10% Spandex
Product Care/
Cleaning/Maintenance
If necessary, clean the orthosis with a
wet cloth. The pads can be hand washed
at 30°C.
Hand wash only.
Do not bleach.
Do not tumble dry.
Do not iron.
Do not dry clean.
EN-8
Page 27

Quantum-A/Quantum-A PRO User Manual
FR
ES
IT
EN
Storage/Disposal
Store the product in its original packaging
in a dry place. Protect from dust, dirt and
moisture. This product does not contain any
environmentally hazardous substances. It can
be disposed of with regular household waste.
Legend to Symbols
Manufacturer
Lot Code
Part Number
Serial Number
Follow User Manual
Caution
Notes
CE Marking according
to Medical Device
Directive 93/42/EEC
EN-9
Page 28

Notes
EN-10
Page 29

Quantum-P/
Quantum-P PRO
User Manual
www.teufel-international.com
Page 30

EN
FR
ES
IT
Quantum-P/Quantum-P PRO User Manual
Contents Description
Description EN-12
Indication EN-13
Contraindication EN-13
Function EN-13
Safety EN-13
REF/Sizes EN-14
Taking Measurements EN-14
Scope of Delivery EN-14
Application/Adjustment EN-15
Comfort/Hygiene EN-18
Material EN-18
Product Care/Cleaning/Maintenance EN-18
Storage/Disposal EN-19
Legend to Symbols EN-19
The Quantum-P Knee Orthoses is a functional knee orthosis with a posterior calf shell
for patients with ACL and PCL insuciencies.
Its anatomically shaped aluminum frame is
lightweight and, if necessary, easy to adjust.
The innovative joint has been designed to
perfectly correspond to the natural motion
patterns of the knee joint. Flexion and extension limitation are easy to adjust, and allow
for a dierentiated therapy where range of
motion is gradually increased over time. The
orthoses can be worn in (fresh) water.
Quantum-P Knee Orthoses are available
in two versions. The brace version Quantum-P
is an orthosis with a regular strapping system.
The Quantum-P PRO Knee Orthosis features special quick- release buckles which
allow for easier opening and closing of
the brace. Additionally, the Quantum-P
PRO comes with an added joint cover.
EN-12
Page 31

Quantum-P/Quantum-P PRO User Manual
FR
ES
IT
EN
Indication
• Injuries of the ACL or PCL, isolated
or with secondary injuries
• Ruptures and instabilities
of the collateral ligaments
• Preoperative and postoperative stabilization of instabilities of the knee joint
• Conservative treatment of
instabilities of the knee joint
• Surgically treated meniscus injuries
• Severe and/or complex
instability of the knee joint
• Meniscus injuries
• Functional preoperative and/or postoperative treatment of ligament ruptures
Contraindication
• Non- compliant patients
Function
• Quantum-P Knee Orthoses by Teufel
reduce the internal rotation and limit the
luxation of the tibia (anterior or posterior
”drawer“)
• Stabilization of the knee
joint in the sagittal plane
Safety
• Before this device is used, it is essential
that the orthosis is individually adapted to
the patient by an experienced orthopedic
technician and that the patient is trained
in the orthosis’ use according to the
doctor’s instructions.
• Incorrect selection, adaptation, applica tion,
and/or failure to monitor the correct fit of
this product may cause health damage.
• Check orthosis for damage (such as
loose connections, fasteners, belts,
etc.) each time it is put on.
• In case you suspect any performance
malfunctions (e.g. an apparent reduction or lack of eect), immediately call on
your doctor or orthopedic technician.
• Never wear the orthosis on broken skin.
• The orthosis must be checked for proper
function, correct fit and potential damage by a doctor or orthopedic technician
at regular intervals. The timing of these
intervals has to be defined individually
for each patient.
• Should the product have been subject
to disproportionate stress, it must be
checked for potential damage by an
orthopedic technician before further use.
• Harmful pressure caused by the orthosis
may cause skin injuries or disrupt blood
flow and must be avoided.
• Due to the individual adjustment to the
patient the orthosis may not be reused
on other people.
EN-13
Page 32

42.360.101.00 42.360.201.00 34 – 41 32 – 36 XS
42.360.102.00 42.360.202.00 41 – 48 36 – 39 S
42.360.103.00 42.360.203.00 48 – 55 39 – 43 M
42.360.104.00 42.360.204.00 55 – 62 43 – 47 L
42.360.105.00 42.360.205.00 62 – 69 47 – 51 XL
42.380.101.00 42.380.201.00 34 – 41 32 – 36 XS
42.380.102.00 42.380.202.00 41 – 48 36 – 39 S
42.380.103.00 42.380.203.00 48 – 55 39 – 43 M
42.380.104.00 42.380.204.00 55 – 62 43 – 47 L
42.380.105.00 42.380.205.00 62 – 69 47 – 51 XL
Posterior Calf Shell, Waterproof
REF Left REF Right
Thigh Circumference/cm
Calf Circumference/cm
Size
Posterior Calf Shell, Joint Cover, Quick-Release Buckles, Waterproof
REF Left REF right
Thigh Circumference/cm
Calf Circumference/cm
Size
EN
FR
ES
IT
Quantum-P/Quantum-P PRO User Manual
REF/Sizes
Quantum-P
Quantum-P PRO
Taking Measurements
EN-14
Measure the thigh circumference 15 cm
above the patella.
Scope of Delivery
Knee orthosis, mesh carrying bag, condylar padding accessories and flexion/
extension limitation pins for individual
adjustment, hex key for adjusting maximum flexion and extension.
Page 33

Application/Adjustment
FR
ES
IT
Quantum-P/Quantum-P PRO User Manual
EN
Below you will find the instructions for
the application and adjustment of Quantum Knee Orthoses. All images show the
brace version Quantum-P PRO with the
posterior calf shell. Diering adjustment
steps for the model Quantum-P will be
described where necessary.
1. Open Straps
(Version Quantum-P PRO)
Before the patient steps into the brace,
open all straps by opening the hookand-loop closures, and, on straps with
quick-release buckles, by pushing the two
blue buttons on either side of the buckles.
1
2. Positioning the Straps
Ask the patient to carefully “step
into” the orthosis with the injured
leg. Put the orthosis onto the bent
knee (e.g. flexed at an angle of 45°)
and position the hinge of the orthosis at the center of the knee joint.
Close the bottom anterior tibia strap
(no. 1) and the top posterior thigh
strap to attach the brace on the
leg (fig. 2). Do not tighten the strap
completely yet. Check the position of
the top anterior frame, and the bottom calf frame. The orthosis should
rest firmly against the leg, but the
fit should not be too tight.
2
Open Straps
(Version Quantum-P)
Before the patient steps into the brace,
open all straps by opening the hook-andloop closures and by pulling one end of
the straps out of the strap loops.
EN-15
Page 34

EN
FR
ES
IT
Quantum-P/Quantum-P PRO User Manual
3. Position the Joints of the Orthosis
Ultimately, the joints of the orthosis
should be positioned so the center of
the joint is positioned at the same height
as the upper edge of the patella, slightly
behind the midline of the leg. To position
the brace accordingly, push the joints of
the orthosis towards posterior until they
are positioned at the center of the knee,
when looked at from the side (fig. 3a).
3a
The included additional joint pads
allow for the optimum adjustment
of the Quantum to the patient‘s
indi vidual leg axis (fig. 3b).
4. Position Calf Strap
All straps are marked with stickers with
numbers on them. The straps of the orthosis should be closed according to the
numbers on the stickers, in ascending
order, from strap 1 to strap 6.
First, fasten the bottom anterior tibia
strap (no.1), then the top anterior thigh
strap (no.2). Then close the bottom
posterior thigh strap (no.3) above the
highest point of the calf muscle. This
helps prevent the orthosis from shifting
out of place. The lenght of the straps
can be adjusted with the hook -and loop fasteners on the opposite side.
Now close the anterior thigh strap (no.6)
as shown in fig.4. Please make sure not
to close the orthosis too tighly so the
straps do not disrupt the blood flow.
43b
EN-16
Page 35

Quantum-P/Quantum-P PRO User Manual
FR
ES
IT
EN
5. Adjusting the Length of the Straps
The length of all straps can be adjusted
on the opposite end of the strap. To do
so, open the hook -and -loop closure and
adjust the strap as desired.
Re check the fit of the orthosis and of all
of the straps. Ask the patient to get up
and walk a few steps with the orthosis.
Check if the orthosis might be too loose,
and, if so, check the fit of the orthosis
again and also adjust the length of the
straps again, if necessary.
6. Adjusting the Flexion and
Extension Limitation
The joints of the orthosis are equipped with threaded flexion/extension
limitation pins. Flexion can be limited
to 0°, 10°, 30°, 40°, 60°, 75°, 90°.
Extension can be limited to 10°, 20°,
30°, 40°. Please follow the doctor‘s
orders concerning the limitation or
the increase of the range of motion.
Screw the pin for the flexion limitation into the hole marked with the
desired flexion angle (1Nm) (fig. 5).
Then screw the pin for the extension
limitation into the hole marked with
the desired maximum extension
angle (1Nm).
5
Repeat these steps on the opposite
side of the joint. Always make sure to
set the same limitation on the left and
the right side of the joint.
EN-17
Page 36

EN
FR
ES
IT
Quantum-P/Quantum-P PRO User Manual
Material
Information Regarding
Version Quantum P-PRO
On this version of the brace there is an
additional cover on the joint, so clothes
will not get caught in the hinge. The
cover is designed in a way that makes it
possible to adjust flexion and extension
without removing it (fig. 7).
6
Comfort/Hygiene
The orthosis may be worn directly on the
skin or over trousers.
Frame:
• Aluminum
Closures:
• Polyamide
• Polyethylene
Pads:
• 90% Polyamide
• 10% Spandex
Product Care/
Cleaning/Maintenance
If necessary, clean the orthosis with
a wet cloth. The pads can be hand
washed at 30°C.
Hand wash only.
Do not bleach.
Do not tumble dry.
Do not iron.
Do not dry clean.
EN-18
Page 37

Quantum-P/Quantum-P PRO User Manual
FR
ES
IT
EN
Storage/Disposal
Store the product in its original packaging
in a dry place. Protect from dust, dirt and
moisture. This product does not contain
any environmentally hazardous substances. It can be disposed of with regular
household waste.
Legend to Symbols
Manufacturer
Lot Code
Part Number
Serial Number
Follow User Manual
Caution
Notes
CE Marking According
to Medical Device
Directive 93/42/EEC
EN-19
Page 38

Notizen
Page 39

Notizen
Page 40

Wilhelm Julius Teufel GmbH
Robert-Bosch-Straße 15
73117 Wangen
Deutschland/Germany
Phone: +49 (0)7161 15684-0
Fax: +49 (0)7161 15684-333
www.teufel-international.com
90.395.119.00 Rev. 2019/03 © Wilhelm Julius Teufel GmbH
 Loading...