

Page 1
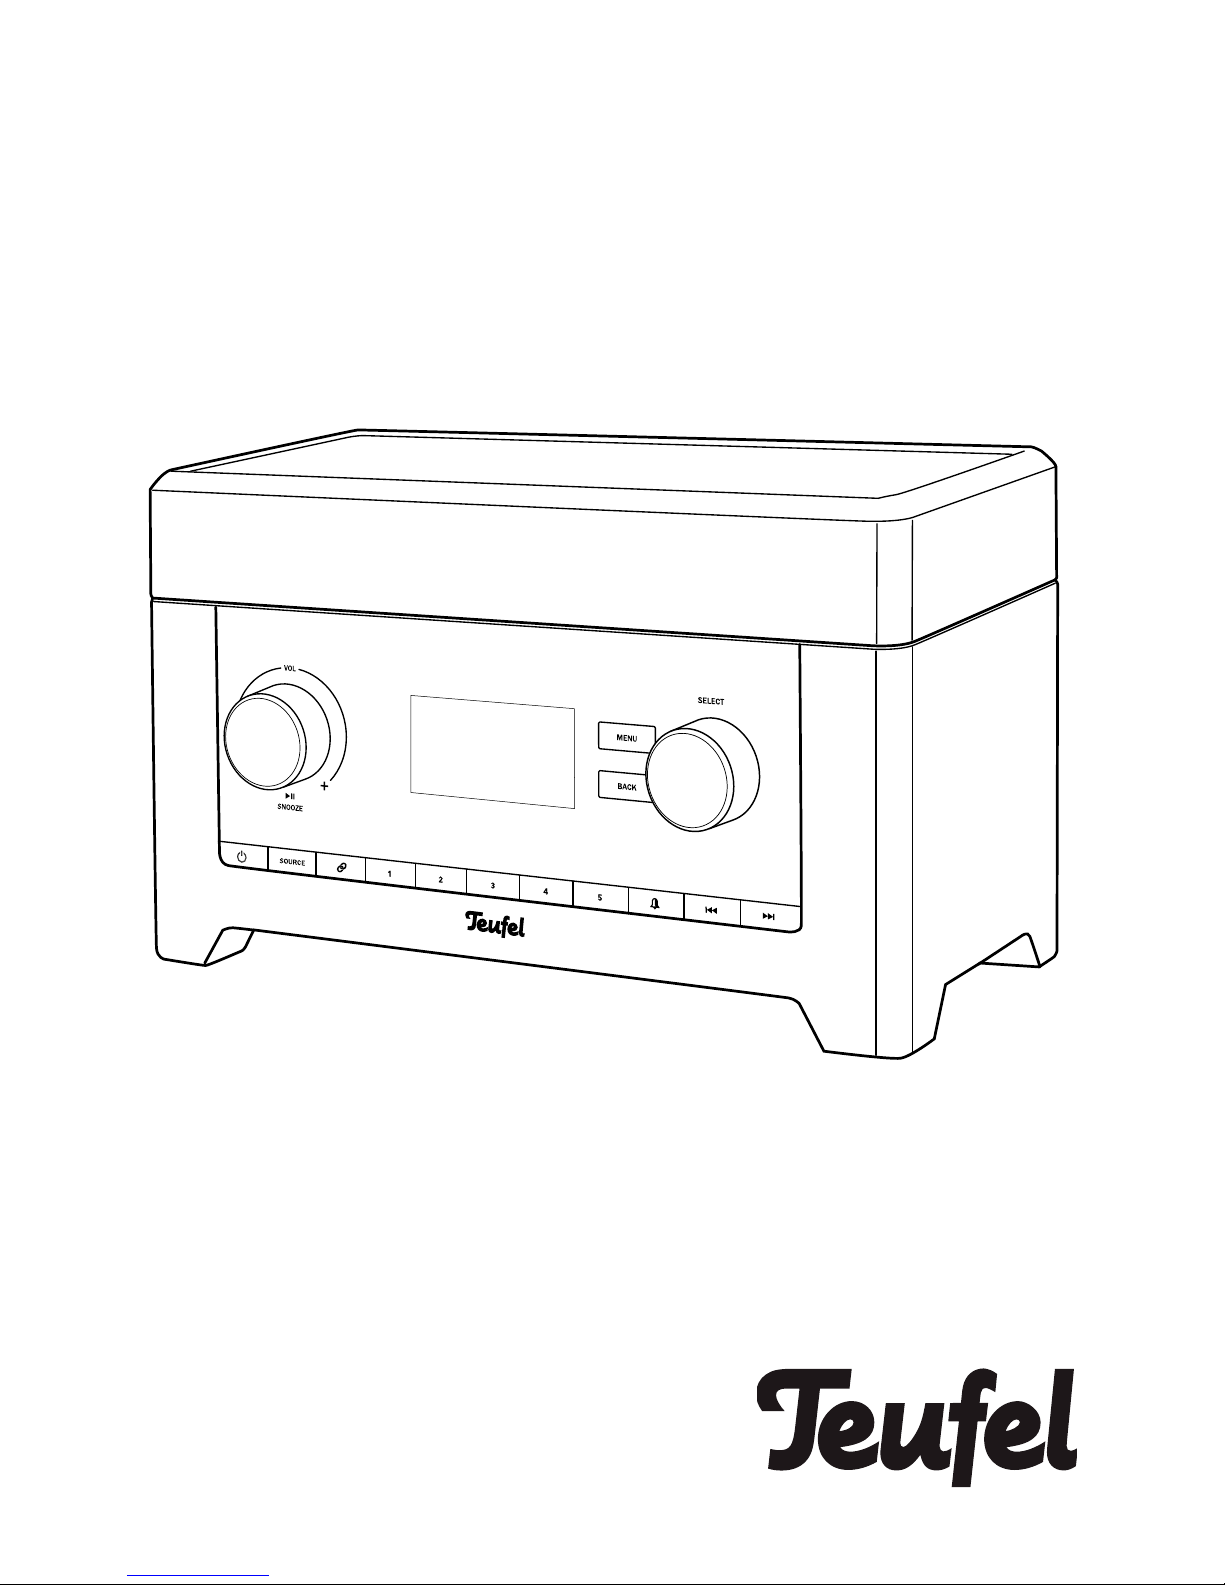
Radio 3sixty
Radio with FM, DAB/DAB+, web radio, USB playback,
Bluetooth®, Spotify and network streaming
Technical Description and
User Manual
Page 2

2 • Radio 3sixty
Contents
General Notes and Information ....3
Notice ............................................ 3
Trademarks .................................. 3
Original packaging ........................ 3
Complaints .................................... 3
Contact .......................................... 4
For Your Safety ..............................5
Proper use ..................................... 5
Explanation of terms ..................... 5
Safety notes .................................. 5
Explanation of symbols ................ 8
Overview ........................................ 9
Unpacking...................................... 9
Package contents ......................... 9
Checking the package contents ... 9
Operational Controls and
Connections ................................10
Set up/Connection ......................13
Location tips ................................13
Power supply ...............................13
Setup Wizard ...............................14
Operation ..................................... 16
Activating and deactivating ........16
Selecting a source ......................16
Adjusting the volume .................. 16
The Menu .....................................18
Standby activation ......................20
Alarms..........................................20
System settings ..........................20
Internet Radio .............................23
Selecting stations ....................... 23
Playback ......................................24
The radio portal ...........................25
USB and Network ........................26
USB .............................................. 26
Network .......................................26
Playback ......................................27
DMR ............................................. 28
Radio Mode ..................................29
DAB/DAB+ ................................... 29
FM (USW) .....................................30
Saving and accessing stations ..30
Bluetooth
®
Mode .........................31
Bluetooth® options ......................31
Pairing ..........................................31
Spotify Connect...........................33
AUX Input .....................................33
Care and Cleaning .......................34
Troubleshooting ..........................35
Declaration of Conformity ..........37
Technical Data .............................38
Page 3

3 • Radio 3sixty
General Notes and Information
Notice
The information in this document
may change without prior notice and
in no way constitutes any liability
on the part of Lautsprecher Teufel
GmbH.
No part of this user manual may
be reproduced in any form or be
broadcasted in any way electronically, mechanically, by photocopy or
recording without the written permission of Lautsprecher Teufel GmbH.
© Lautsprecher Teufel GmbH
Version 2.0, April 2018
Trademarks
® All trademarks are the property of
their respective owners.
The Bluetooth®
word mark and
Bluetooth® symbol are registered
trademarks of Bluetooth SIG, Inc.
and any use by Lautsprecher Teufel is
licensed.
The Spotify software is subject to
third-party licences, which are listed
here:
www.spotify.com/connect/thirdparty-licenses
Original packaging
If you wish to exercise your eightweek right of return, we ask that
you be absolutely sure to hold onto
the packaging. We can only accept
product returns with the ORIGINAL
PACKAGING.
Empty boxes are not available!
Complaints
In case of a complaint we will need
the following information to process
your enquiry:
1. Invoice number
Can be found on the sales slip
(enclosed with the product) or on the
order confirmation received as a
PDF document, e.g. 4322543
2. Serial number or batch number
Located on the back side of
the device, e.g. serial no.:
KB20240129A-123.
Thank you for your support!
Page 4

4 • Radio 3sixty
Contact
Please contact our customer service
department with any questions,
suggestions, or complaints:
Lautsprecher Teufel GmbH
BIKINI Berlin
Budapester Straße 44
10787 Berlin (Germany)
Phone 00800 - 200 300 40 (toll-free)
Fax: +49 (0)30 / 300 930 930
Service:
www.teufelaudio.com/service
Contact:
www.teufelaudio.com/contact
Before operating the product
for the first time, please read
the safety notes and user
manual carefully. Only in this way,
can you ensure that all functions are
used in a safe and reliable manner.
Store the user manual in a safe place
and also be sure to pass it on to any
subsequent owner.
NOTICE
Check that all items have
been delivered and that
nothing is damaged. If you
find any damage, do not
operate the device; instead
contact our customer service
department.
Page 5

5 • Radio 3sixty
For Your Safety
Proper use
The device is designed for the playback of music and speech from radio
and Internet stations.
Only use the device as described in
this user manual. Any other use will
be deemed as not in accordance
with the instructions and may lead to
damage of property or even persons.
The manufacturer accepts no liability
for damage caused by improper use.
The device is intended for private use
only.
Explanation of terms
You can find the following signal
terms in this user manual:
CAUTION
This signal term indicates a
low risk, which, if not avoided,
may result in minor or moderate injury.
NOTICE
This signal term warns you of
potential damage.
Safety notes
This chapter contains general safety
notes which you should always
observe to protect yourself and third
parties. Also observe the warning
notes in each chapter of this user
manual.
Touching live parts can result in
severe injury or death.
• When connecting the mains
adapter, make sure that the correct
voltage is present. You can find
more information about this on the
rating plate.
• Regularly check the device and the
mains adapter for damage. Disconnect the mains adapter immediately from the socket and do not
use the device if its housing or the
housing of the mains adapter is
defective or if there is other visible
damage.
• This device is disconnected from
the mains by pulling the mains
adapter. Therefore, make sure that
the mains adapter is always easily
accessible.
• If the device or the mains adapter
emits smoke, smells burnt or
produces unusual sounds, immediately disconnect it from the mains
and do not operate it further.
Page 6

6 • Radio 3sixty
• Never open the housing of the
device or mains adapter. Repairs
may only be carried out by an
authorised specialist workshop.
Only parts that match the original
specifications may be used.
• Only use the accessory products
specified by the manufacturer.
• Never modify the device. Unauthorised modifications may affect the
safety and functionality.
• Never touch the mains adapter
with wet hands.
An unsuitable setup location may
result in injury and damage.
• Never use the device unmounted
in vehicles, in unstable locations,
on wobbly tripods or furniture, on
insufficiently dimensioned brackets
etc. The device could tip or fall down
and cause injury to persons or be
damaged itself.
• Arrange the device so that it
cannot be knocked over accidentally and make sure that the cables
do not pose a tripping hazard.
• Do not place the device and the
mains adapter near heat sources
(e.g. heaters, ovens, other heat
generating equipment such as
amplifiers etc.).
• Do not use the device in environments where there is a risk of
explosion.
• Only use the wireless functions
(Bluetooth®, Wi-Fi) in locations
where wireless radio transmission
is allowed.
Children can become trapped in
the plastic wrapping when playing
and suffocate.
• Do not allow children to play with
the device or the plastic wrapping.
There is a danger of suffocation.
• Never allow children to operate
electrical equipment unsupervised.
Extended listening at high
volumes may lead to hearing loss.
To avoid damage to health, avoid
extended listening at high volumes.
• When the volume is set high,
always keep a certain distance
from the device and never place
your ears directly on the speaker.
• If your Radio 3sixty is set to full
volume, it may produce very high
sound pressure. This may have
psychological consequences and
also cause physical injury. Children
and pets are particularly at risk.
Set your signal source device
volume to a low setting before
turning on the power.
This product contains magnetic
material.
• If necessary, consult your physician and ask about effects on
implants such as pacemakers or
defibrillators.
Improper use may lead to damage
or fire.
• Do not place open flames such as
burning candles or similar on the
device.
• Ensure sufficient ventilation.
Page 7

7 • Radio 3sixty
• Do not expose the device to direct
sunlight.
• Only use the device indoors.
• Do not operate the device in wet
rooms and protect it from dripping
and splashing water. Make sure
that no vases or other liquid-filled
objects are located on or near the
device in order to prevent liquid
from penetrating the housing.
If water or other debris have
infiltrated the device, immediately
pull the mains adapter out of the
socket. Then send the device to
our service address.
The isolation pads can produce
discolouration on sensitive
surfaces.
• On parquet, varnished wood and
similar surfaces, you should stick
felt gliders to the rubber feet of the
device or put a blanket under it.
This will prevent discolouration of
the floor over the long term.
Page 8
8 • Radio 3sixty
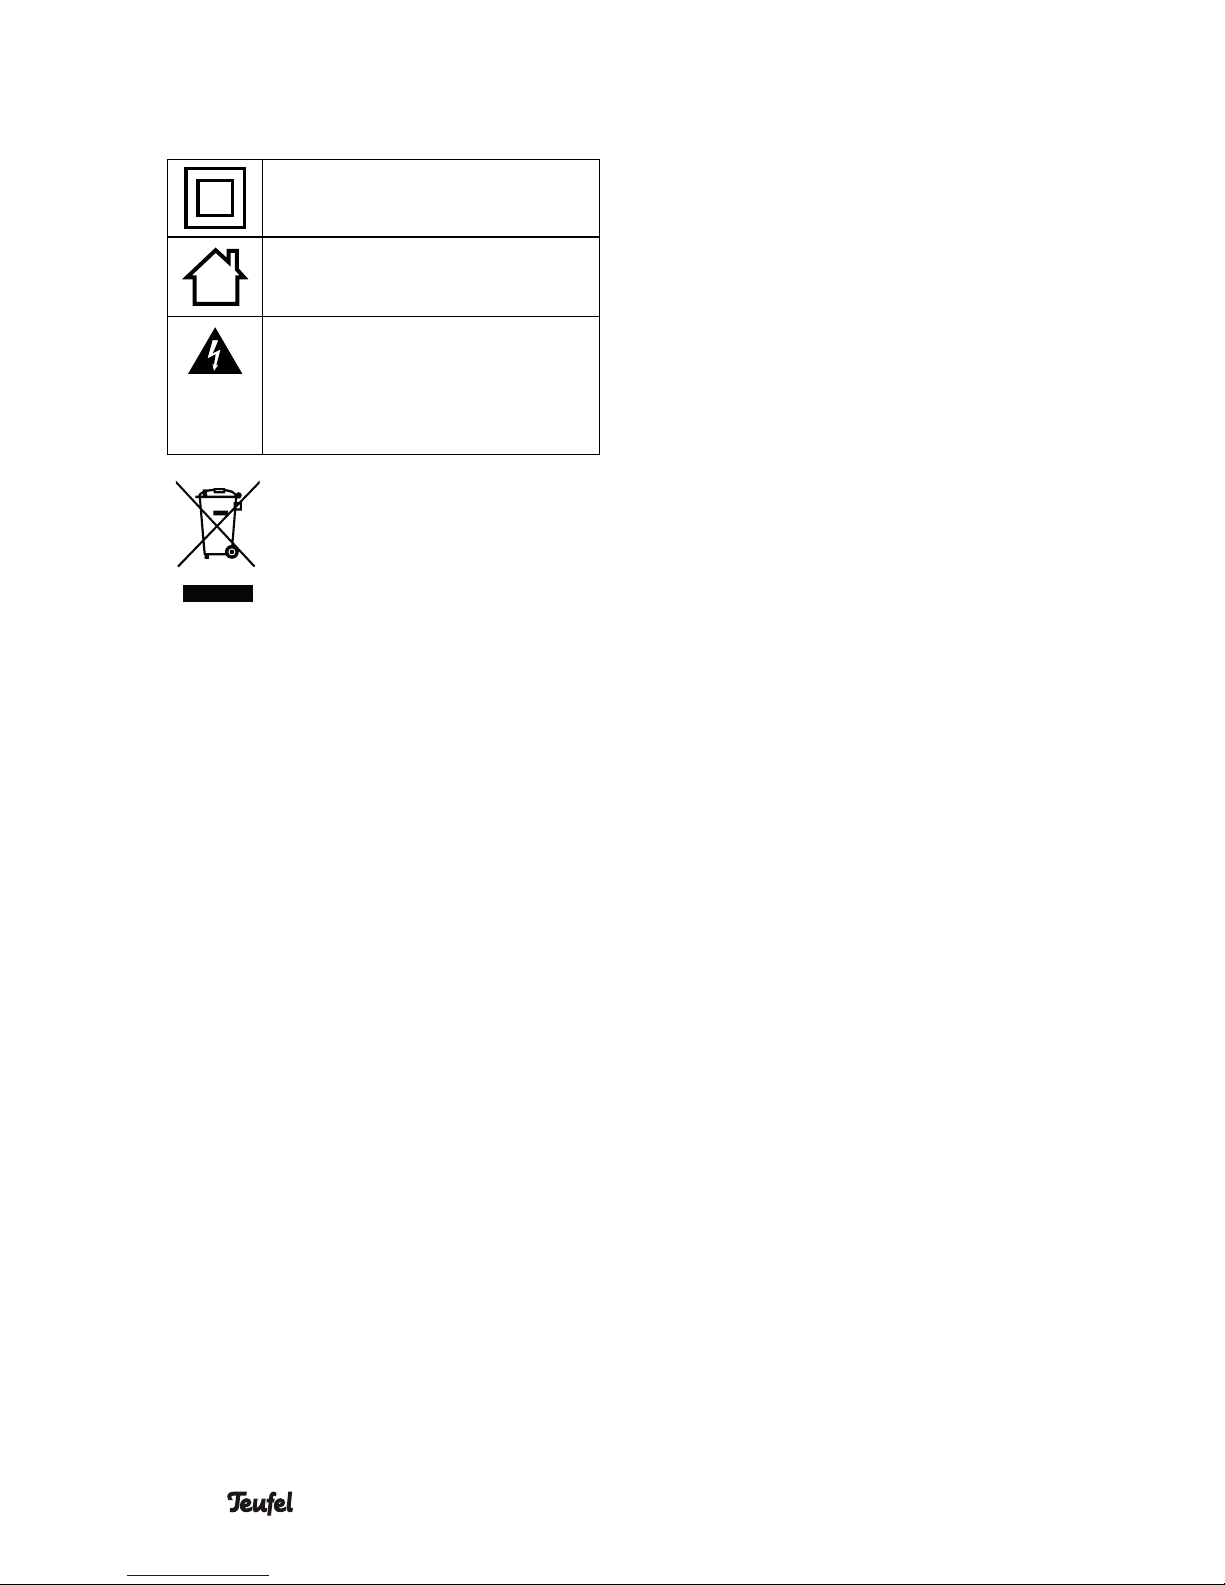
Explanation of symbols
Protection class II
Dual insulation
May only be used indoors
Risk of electrical shock –
do not open the housing.
Disconnect the mains cord
before changing a fuse.
Old devices must not
be disposed of with
household waste!
Electrical equipment
contains harmful substances and
valuable resources.
Every consumer is required by law
to bring all old electrical devices to
an authorised collection or return
point so that they can be disposed
of in a manner that is environmentally friendly and which preserves
resources.
You can hand old electrical devices
over to the local reusable materials/
recycling centre.
Please contact your vendor directly
for more information about this topic.
Page 9
9 • Radio 3sixty
(1)
(2)
Overview
Unpacking
• Carefully open the box and carefully lift the device out of the box.
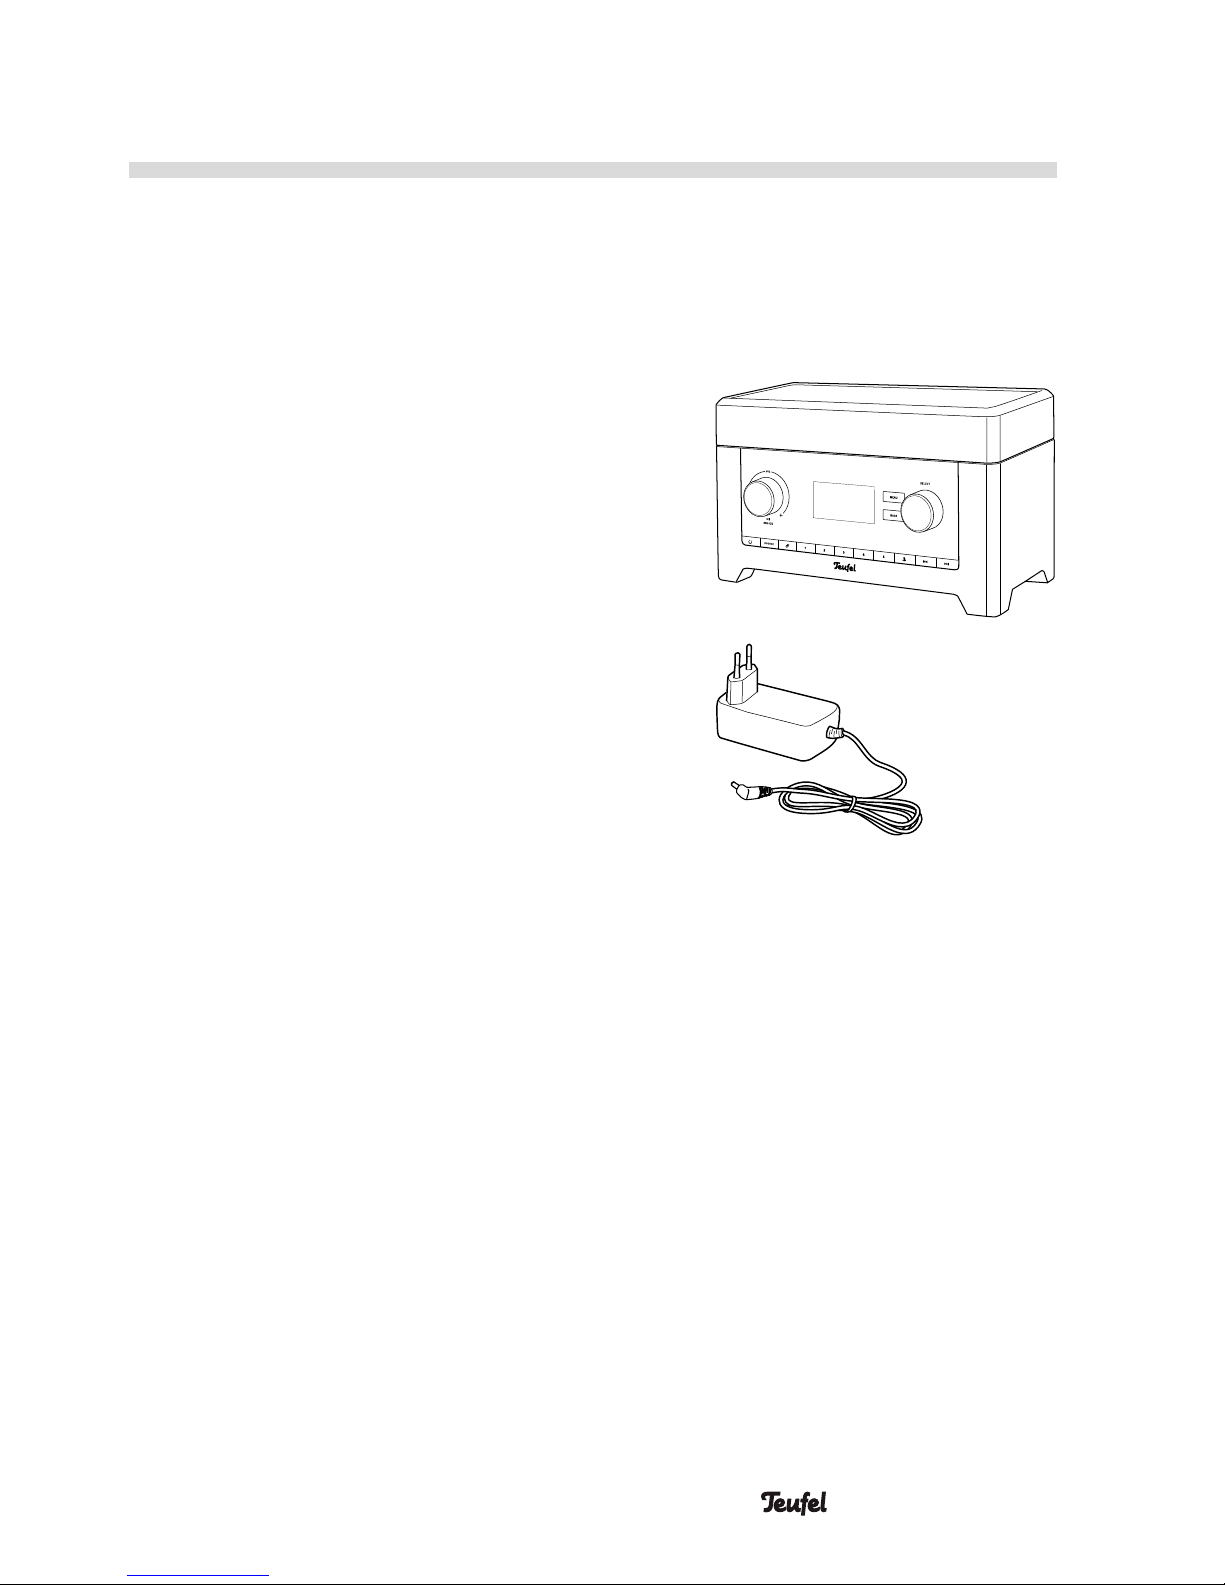
Package contents
(1) 1× Radio 3sixty
(2) 1× mains adapter
Checking the package
contents
• Check that all items have been
delivered and that nothing is
damaged.
• If the delivery is incomplete or the
device has been damaged, please
contact our service team (see page
4).
• Do not in any case operate the
device if it is damaged.
Page 10
10 • Radio 3sixty
Front side
(8)(9)(11)(12)(13)
(7)
(10)
(5) (6)(3) (4)
Operational Controls and Connections
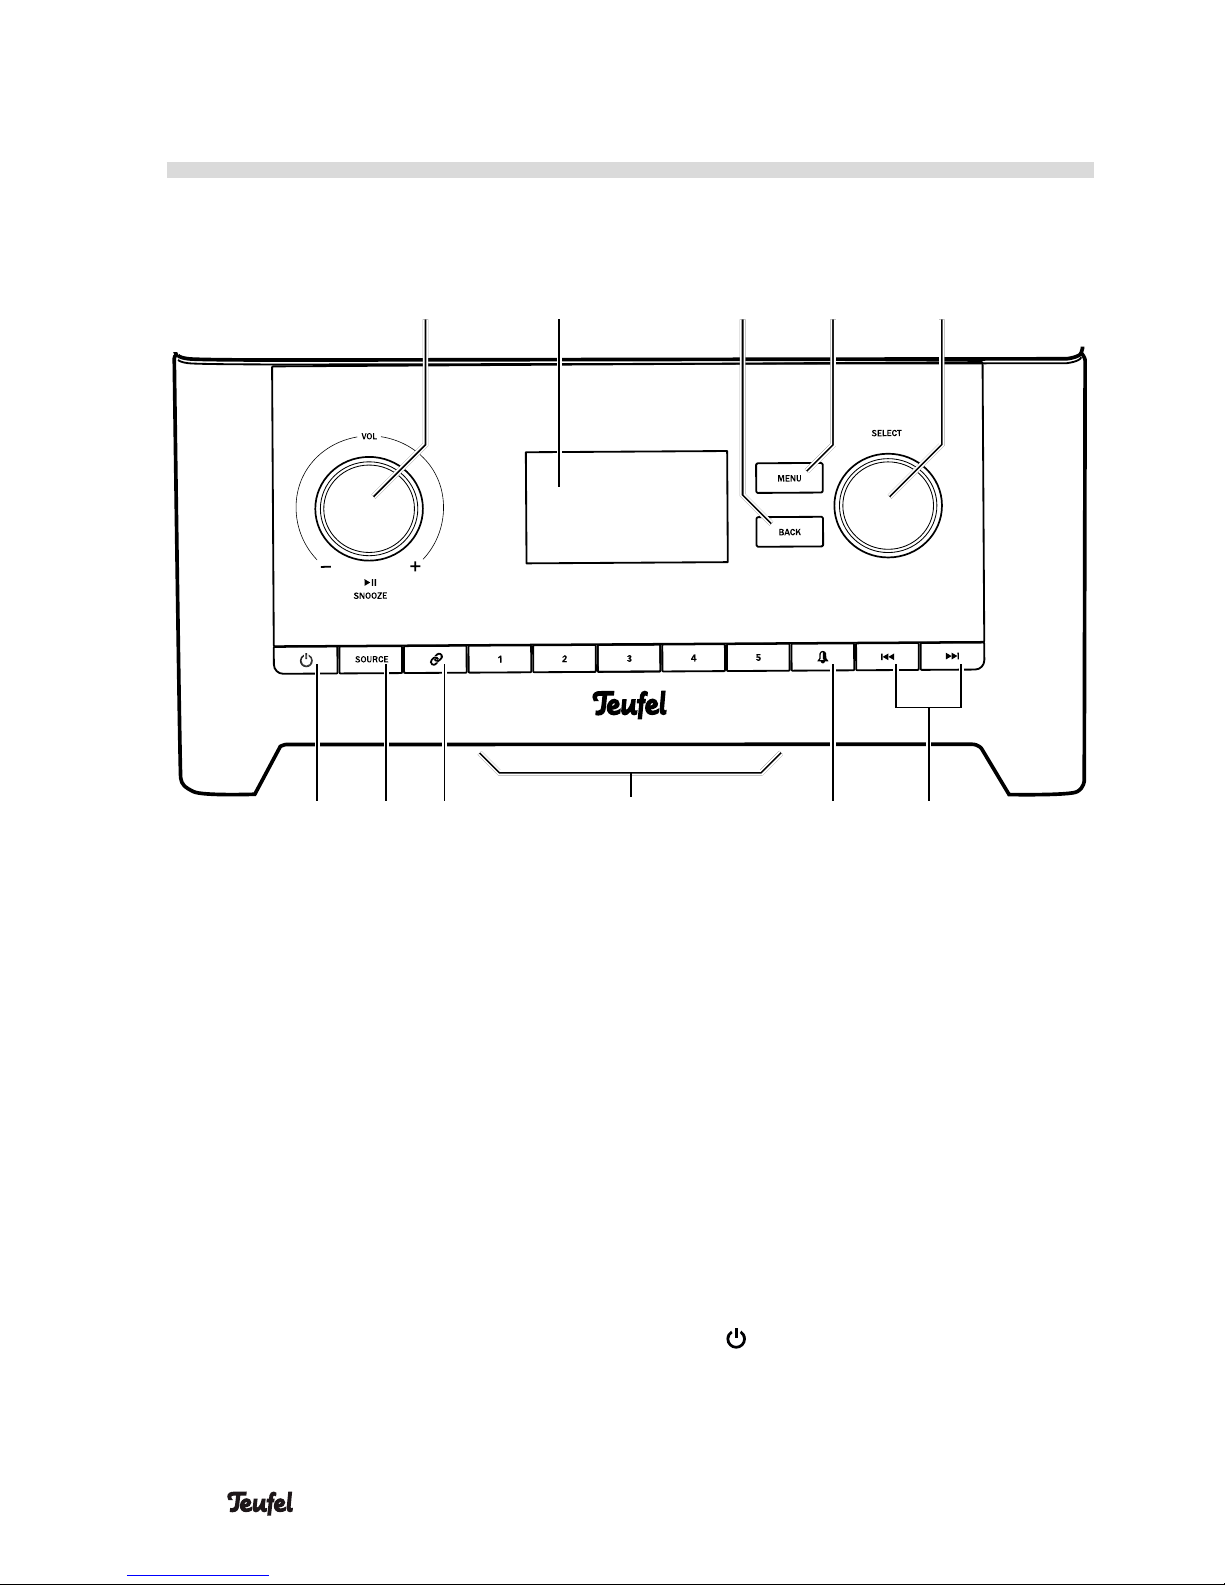
(3) Turn: Adjust the volume
Push: Playback/pause,
snooze (alarm)
(4) Display panel
(5) Go back one menu
(6) Access the menu
(7) Turn: Sele c t
Push: Confirm
(8) Skip forward/backwards
(9) Set the alarm time and end the
alarm
(10) 1–5 – favourite station memory
(11) Start Bluetooth® pairing, termi-
nate an existing connection
(12) Select a source
(13) – switch the device on and to
standby mode
Page 11
11 • Radio 3sixty
Back side
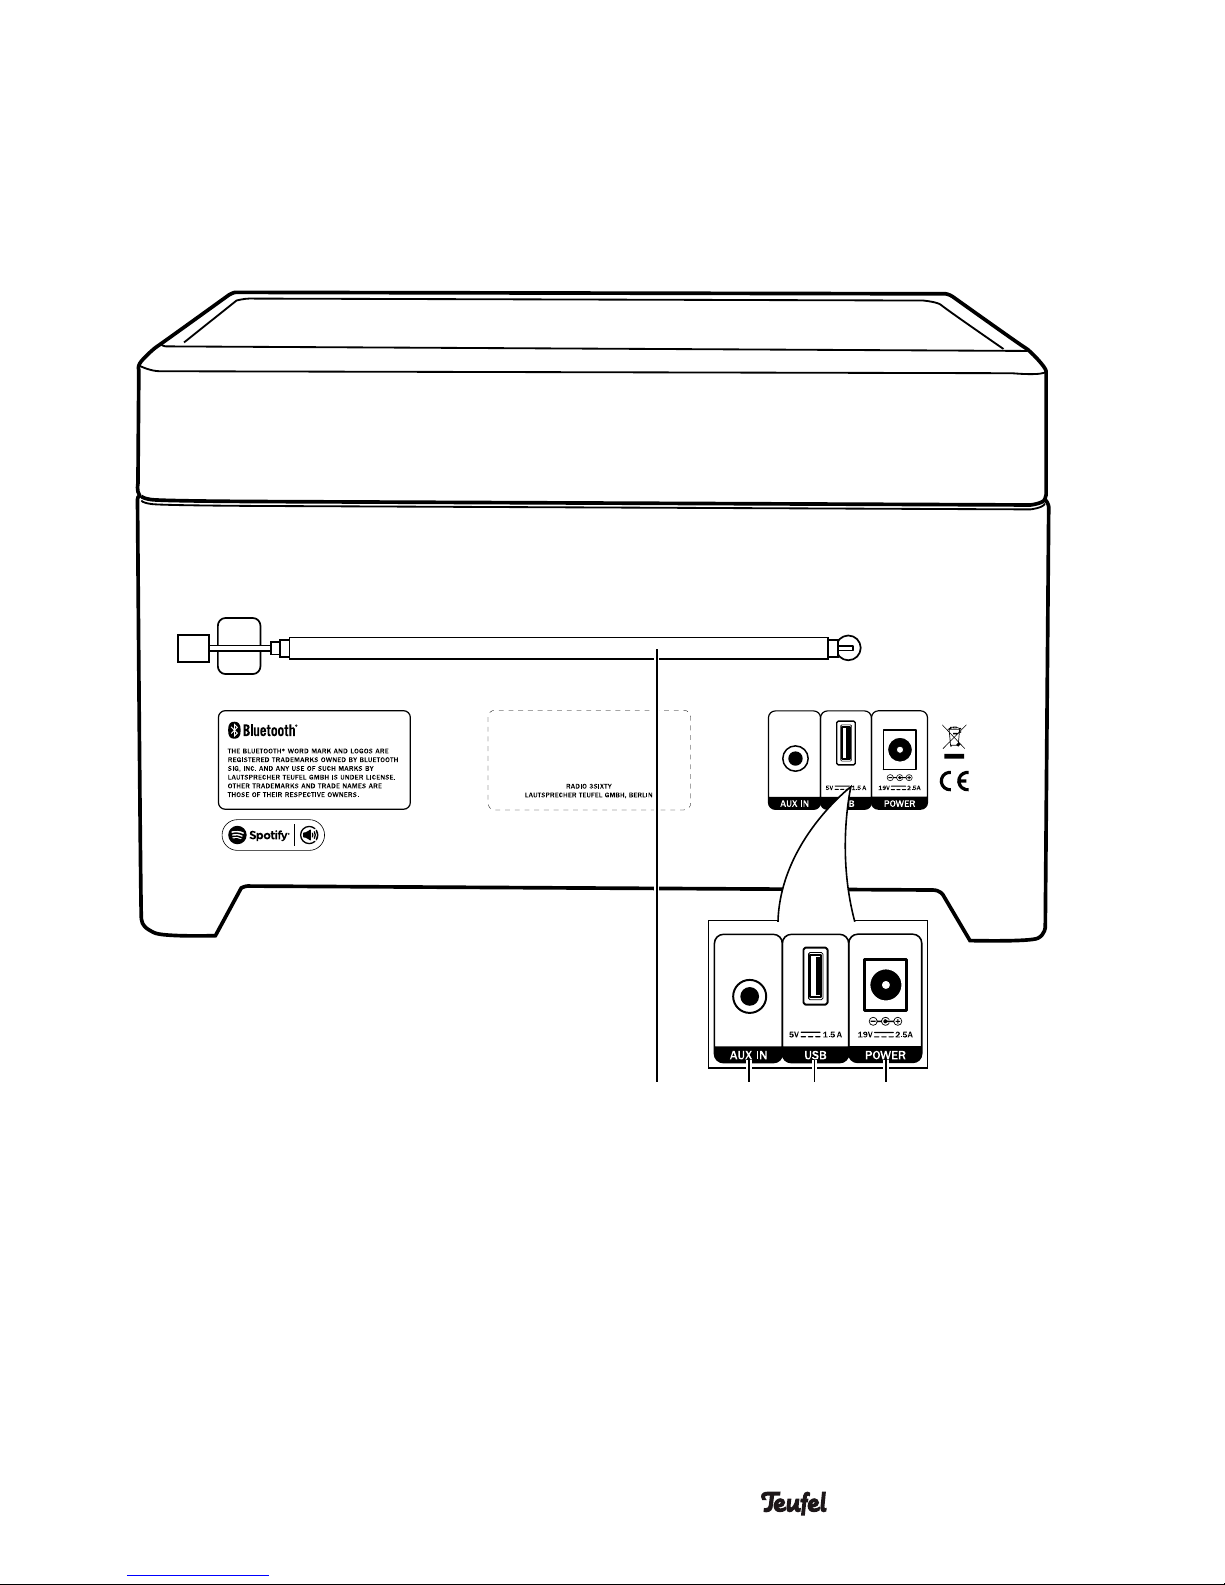
(17) (15 ) (14)(16)
(14) POWER – connector jack for
the mains adapter (2)
(15) USB port for playing back music
files and for the power supply of
playback devices (5V, 1.5A).
(16) AUX IN – input jack for
analogue audio source device
(17) Telescopic antenna
Page 12
12 • Radio 3sixty
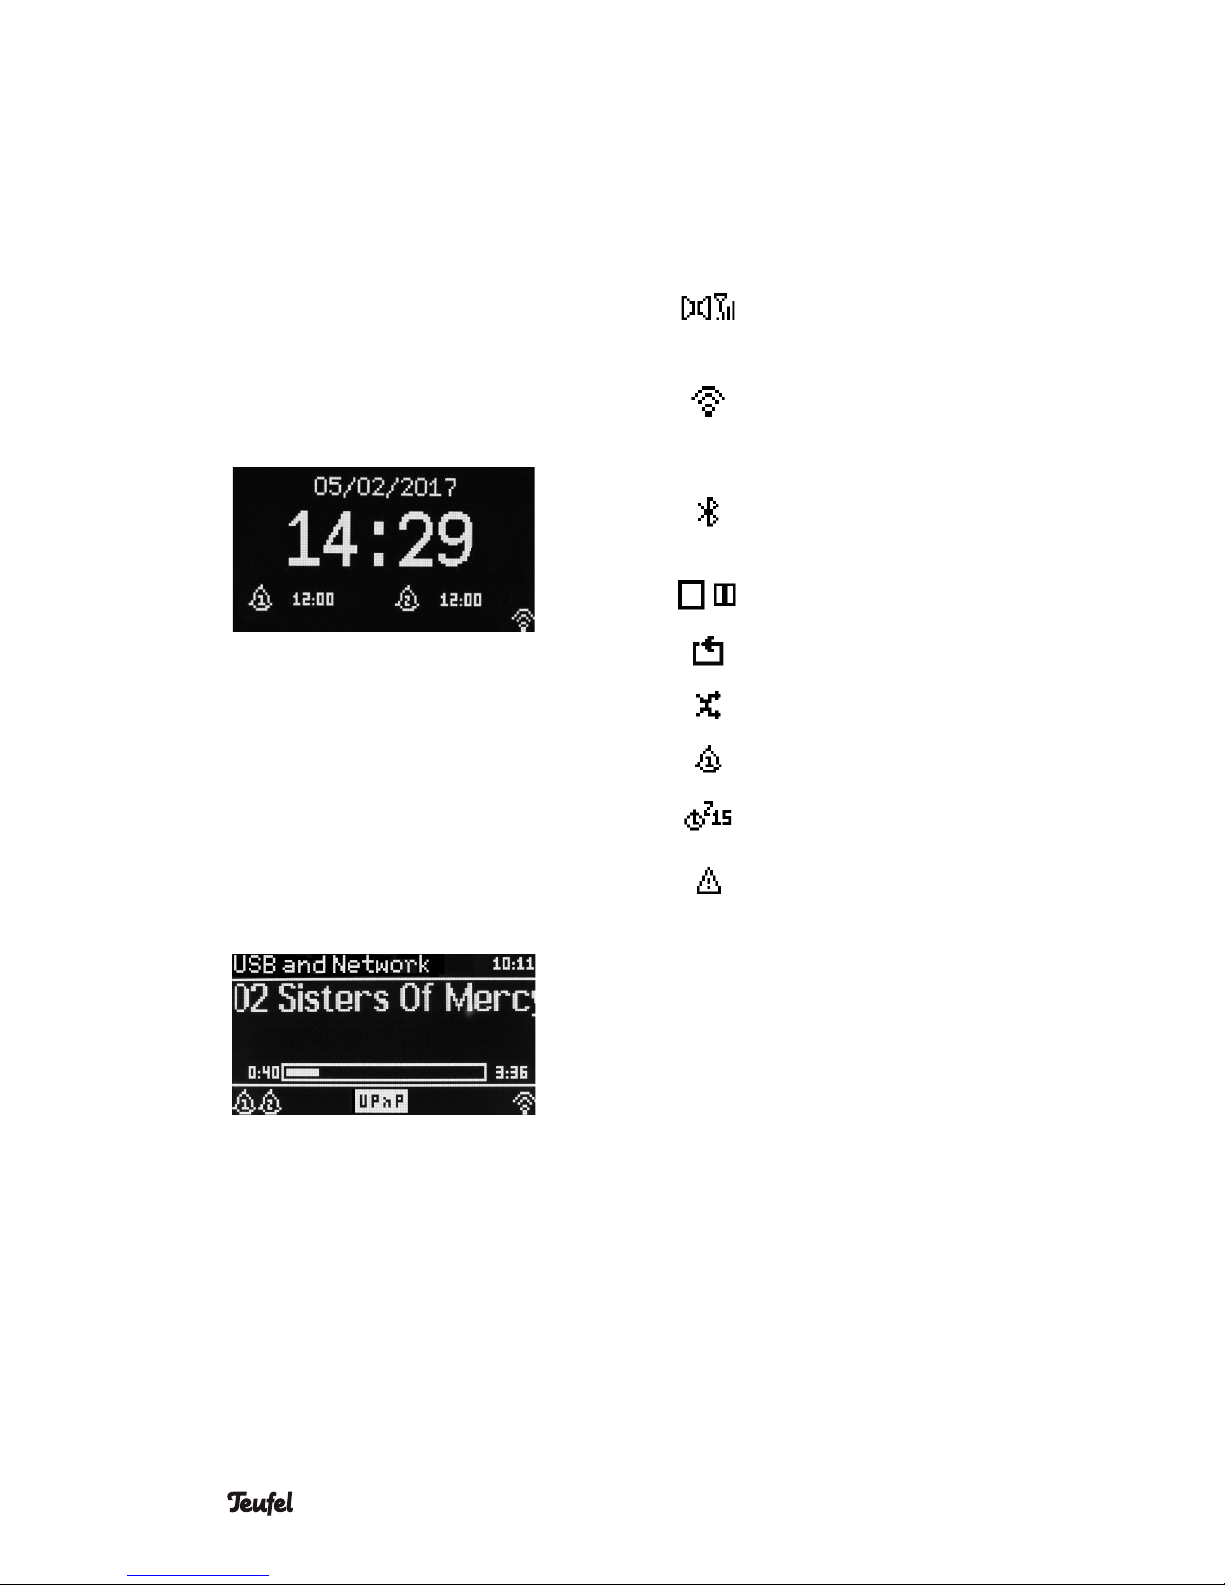
The display panel
The date and time are displayed in
standby. If enabled, the set alarm
time(s) are also displayed here. The
Wi-Fi symbol indicates that there is a
connection to the local network.
During playback, the display panel
is divided into three sections: At the
top, it shows the source and time, in
the middle playback information and
at the bottom, the status of the alarm
times, source and wireless connections.
Symbols on the display panel
Radio: Stereo, signal
strength
Wi-Fi active, flashing:
Connection being established
Bluetooth active, flashing:
Connection being established
Playback: Stop/pause
Repeat
Random playback
Alarm time active
Sleep timer (15 min.)
Network error
(see page 35)
Page 13
13 • Radio 3sixty
Set up/Connection
NOTICE
If the device is subjected to
warm temperatures after
being cold (e.g. after transport), condensation may occur
inside of it.
– In this case, wait approx.
2hours before you connect
and activate it.
Location tips
• Select a stable, level base.
• Make sure that the environment is
clean and free from dust.
• Select a location away from heat
sources and direct sunlight.
• Do not place any heavy objects on
the cables or the device.
CAUTION
Risk of injury/damage!
– Lay the cables so that
they do not pose a tripping
hazard.
Power supply
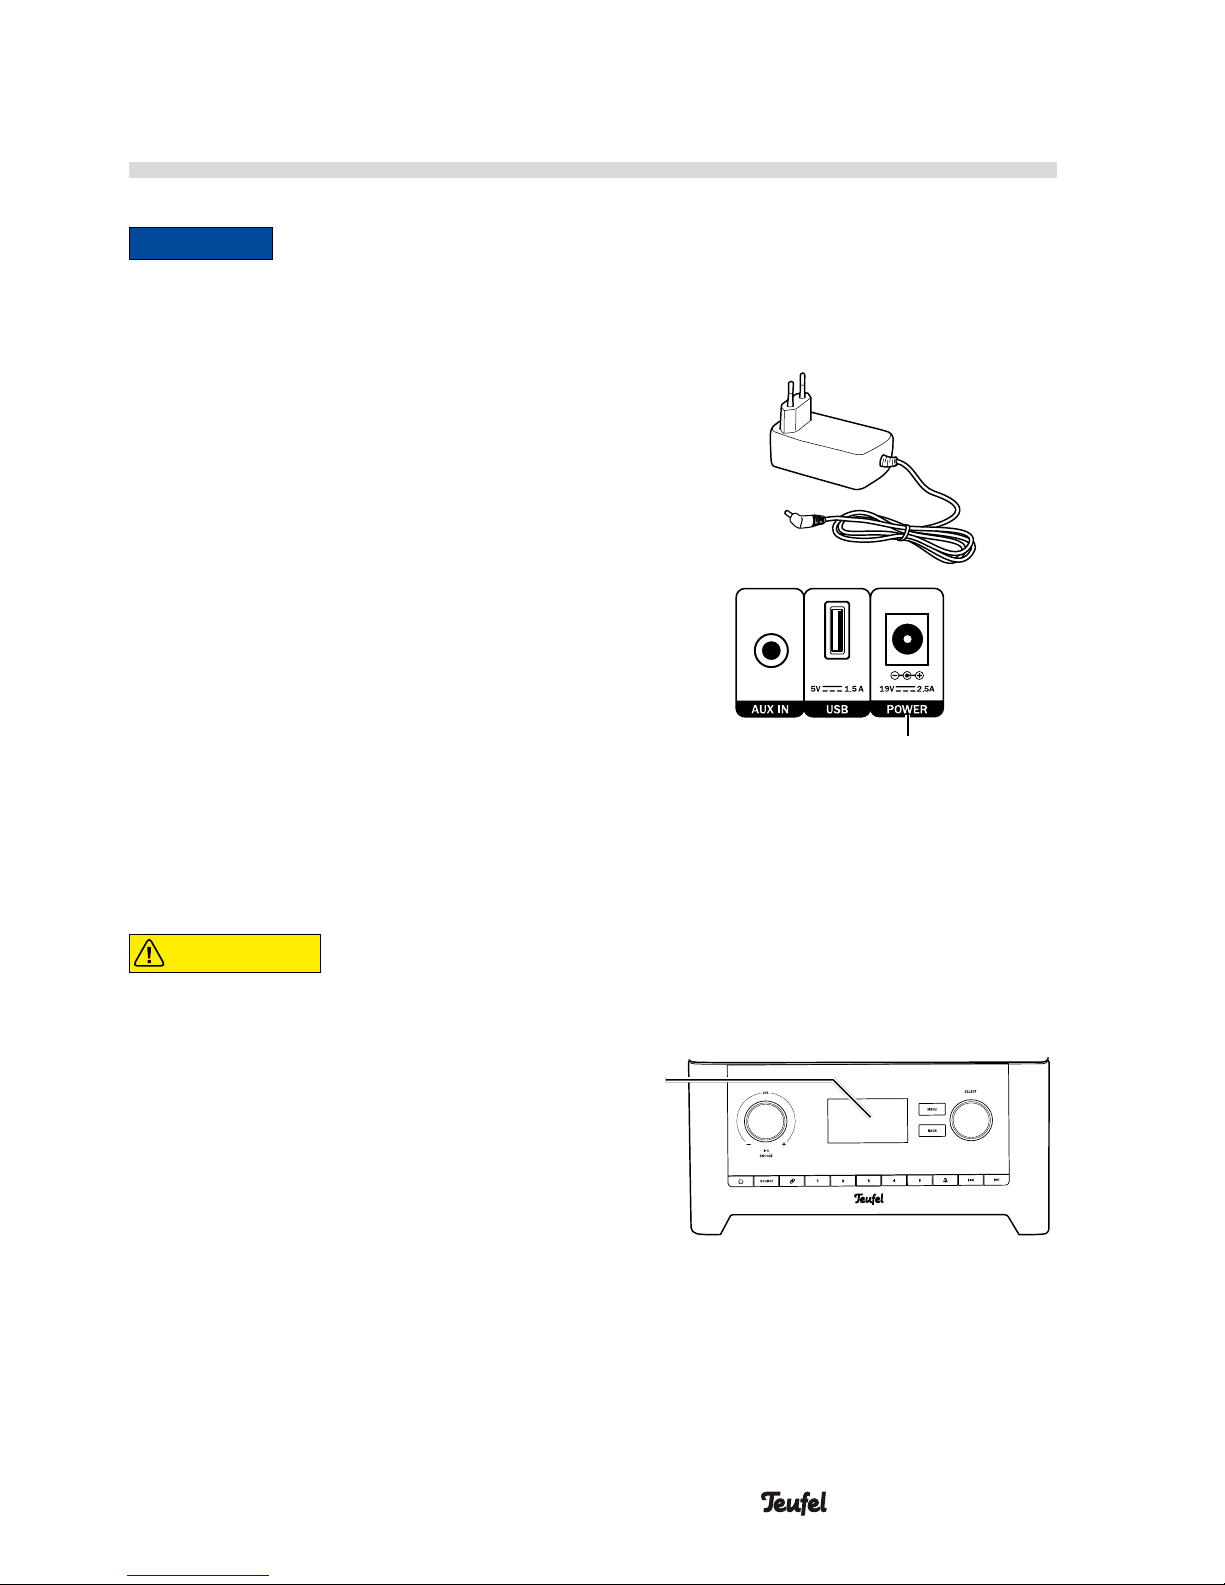
1. Insert the small plug of the
enclosed mains adapter (2) in the
POWER jack (14).
(2)
(14)
2. Connect the mains adapter to a
mains power socket. The lettering
“TEUFEL” will appear on the display
panel (4). Afterwards, you will see
the date and time – since the
clock has not yet been set, zero is
displayed for all digits.
(4)
Page 14
14 • Radio 3sixty
Setup Wizard
The first time it is turned on or after
being reset to the factory default
settings, the Radio 3sixty requires
some network information.
You
specify them in the setup wizard.
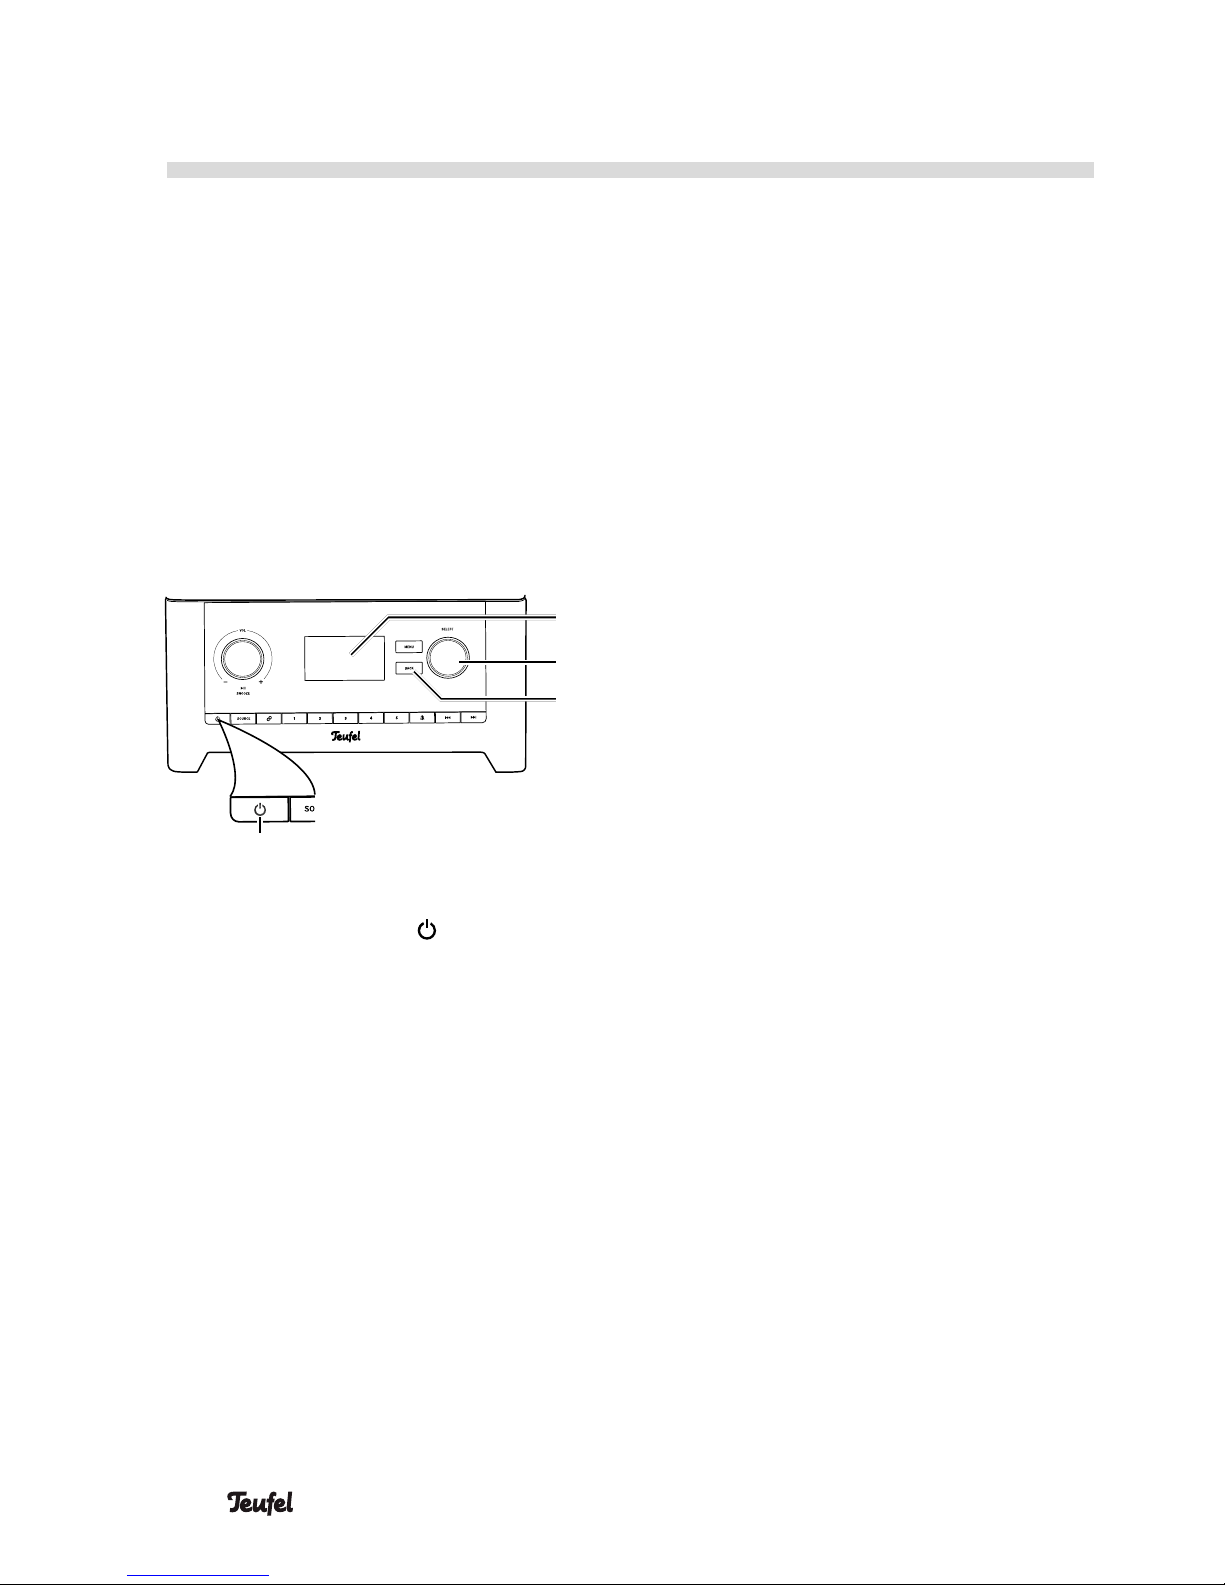
To select menu items and set
the parameters, turn the SELECT
control(7) and push the control to
confirm.
You can go back one individual step
with the BACK button (5).
(4)
(5)
(13)
(7)
1. Switch on the Radio 3sixty by
pushing the button (13) and wait
until “Setup wizard – Start now?”
appears on the display panel.
2. Select “YES” with the SELECT
control (7) and push the control.
3. Set the display format for the time:
12 hours (with AM/PM) or 24
hours.
4. Select how the time should be set:
• via DAB radio;
• via FM radio (RDS);
• via the Internet – enter the time
zone and summer/winter time
here in the next step.
• No update – enter the date and
time here.
5. With the setting “Keep network
connected”, you determine
whether the Radio 3sixty switches
Wi-Fi off (“NO”) or leaves it on
(“YES”) in standby so that it can be
switched on via the network.
6. Select the region for your Wi-Fi now
so that the correct standards are
applied.
7. The Radio 3sixty will look for available Wi-Fi networks and display
them as a list after a short time.
• [WPS] – displays networks with
WiFi protected setup. It is very
easy to establish a connection
with them with the push of a
button or by entering the PIN.
• [Rescan] – starts a new search.
• [Manual config] – with this
menu item, you can enter all
data yourself – only intended for
special applications.
Page 15
15 • Radio 3sixty
8. Select your Wi-Fi network from the
list.
– With password (WPA/WPA2):
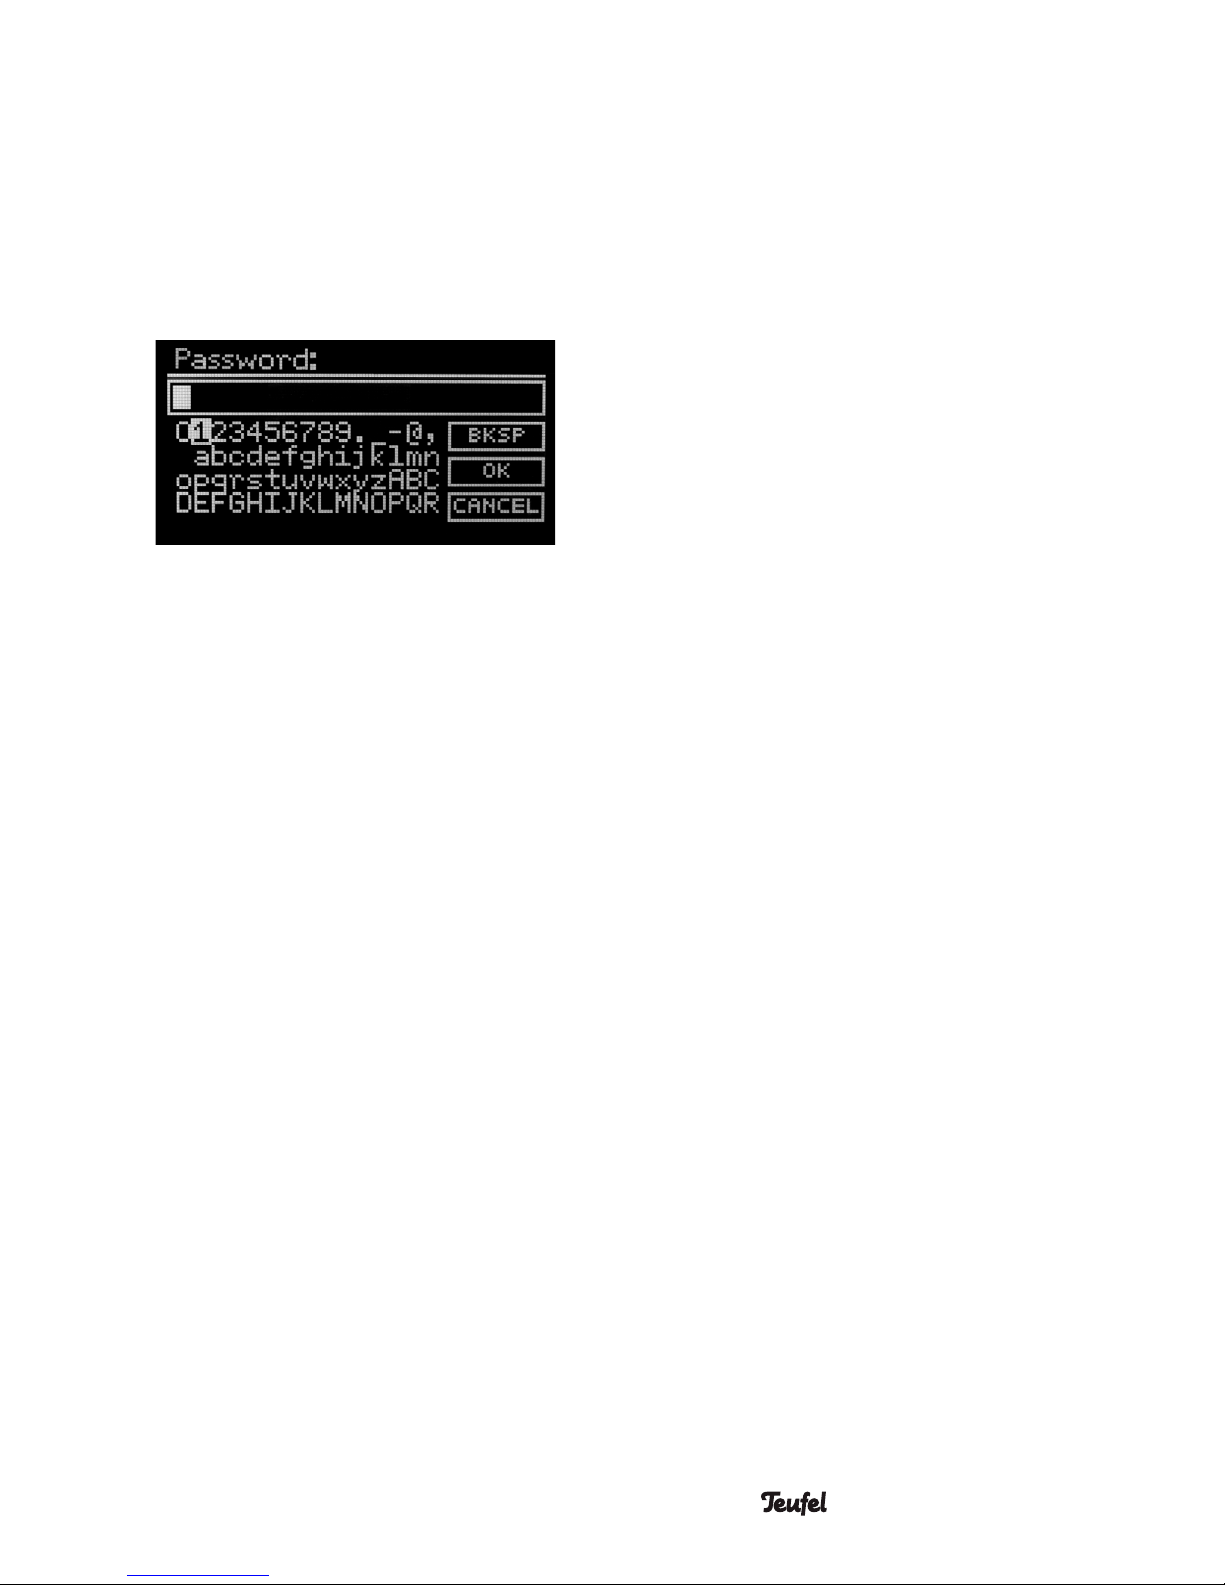
Enter the password. Select a character with the SELECT control(7).
Pushing the control adopts the
character in the top of the input
line.
[BKSP] deletes the last character,
[OK] ends input,
[CANCEL] aborts the process.
– With WPS: Here, you can choose
from three options:
• Push Button (WPS-PBC) – start
establishing a connection for
your Wi-Fi access (router) and
push the SELECT control(7)
within 2 minutes on the
Radio 3sixty.
• PIN (WPS-PIN) – the Radio 3sixty
displays a code. Enter this code
on your Wi-Fi access (router).
• Skip WPS – with this, you enter
the password as described
previously.
The Radio 3sixty will now connect to
Wi-Fi and then return the message
“Connected”.
– Finish by pushing the SELECT
control(7).
The setup wizard is now complete.
The Radio 3sixty displays the
“Source” menu.
Page 16
16 • Radio 3sixty
Operation
Activating and
deactivating
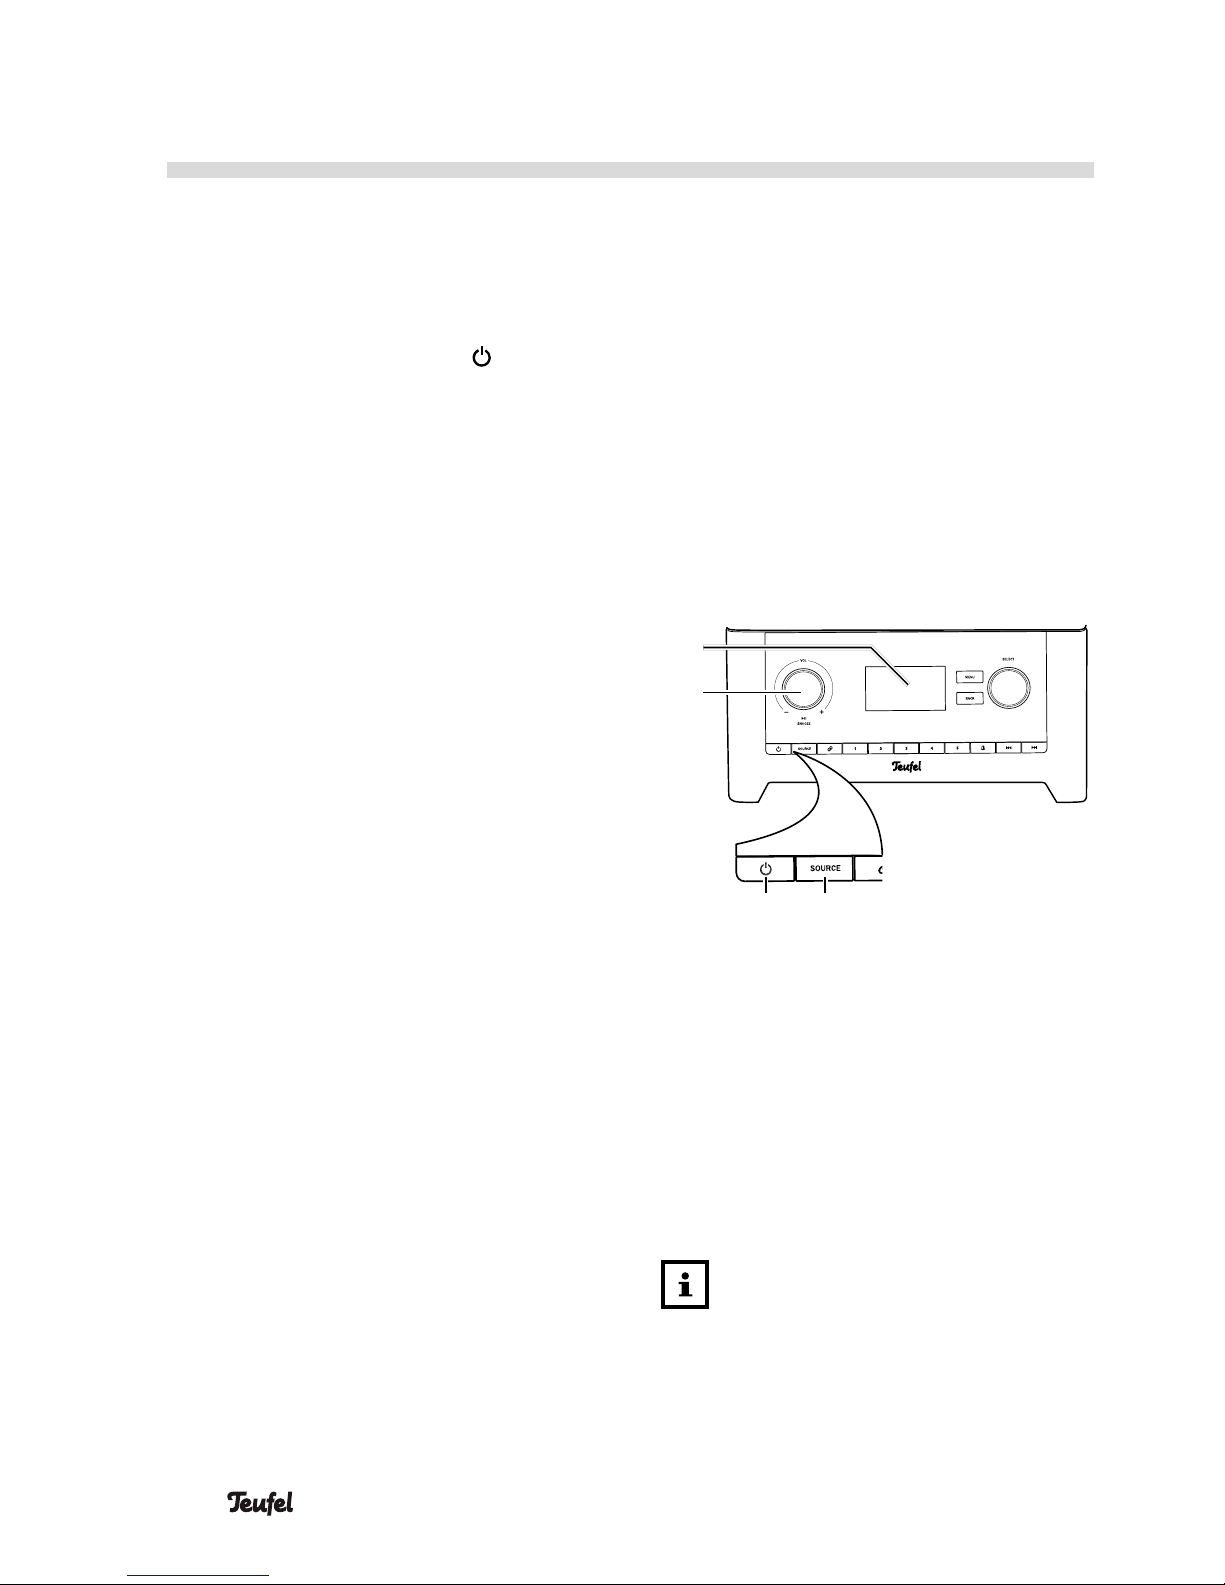
– Switch the Radio 3sixty on or to
standby with the button (13).
• After switching the device on,
the last active audio source and
volume will be set.
• If the Radio 3sixty does not receive
an audio signal for more than 20
minutes, it will automatically switch
to standby.
Selecting a source
– In the “Source” menu, you select
the desired source directly.
– By repeatedly pushing the SOURCE
button(12), you select the source
in this order:
• Internet radio – reception of
radio stations from around
the world; only possible with
an Internet connection (see
„Internet Radio“ on page 23).
• Spotify – a music streaming
service, premium membership
required (see „Spotify Connect“
on page 33).
• USB and Network – playback
from USB storage devices and
UPnP/DLNA sources via the
network (see „USB and Network“
on page 26).
• DAB – digital radio reception
(see „DAB/DAB+“ on page 29).
• FM – analogue radio reception
(see „FM (USW)“ on page 30).
• Bluetooth – digital source via
wireless connection (see „Bluetooth® Mode“ on page 31).
• AUX in – analogue source via the
AUX IN jack (16).
The selected source will appear on
the display panel (4).
(4)
(12)(13)
(3)
Adjusting the volume
• Turn the VOL control (3) anticlockwise to decrease it and clockwise
to increase the volume. While
making the setting, the current
value will be displayed on the
display panel (4) as a number and
as a graphic.
The volume setting of an
external player often affects the
volume of the Radio 3sixty.
Page 17
17 • Radio 3sixty
My Favourites
Local Germany
Stations
Potcasts
My Added Stations
Help
Search
stations
Search
Podcasts
List of Media-Servers
List of files on USB
List of titles on the playlist
List of known stations
Alphanumeric
Ensemble
Valid
DRC high
DRC low
DRC off
List of frequency blocks
Internet Radio
Last listened
Station list >
System settings >
Source >
MENU
SOURCE
Spotify
System settings >
Source >
MENU
SOURCE
USB and Network
Shared Media >
USB playback >
My playlist >
Repeat play: Off
Shuffle play: Off
Clear my playlist
Prune servers
System settings >
Source >
MENU
SOURCE
DAB
Station list >
Scan
Manual tune >
Prune invalid
DRC Dynamic range con >
Station order >
System settings >
Source >
MENU
SOURCE
FM
Scan setting
Stereo setting
System settings >
Source >
MENU
SOURCE
Bluetooth
BT disconnect
System settings >
Source >
MENU
SOURCE
AUX
System settings >
Source >
MENU
SOURCE
Page 18
18 • Radio 3sixty
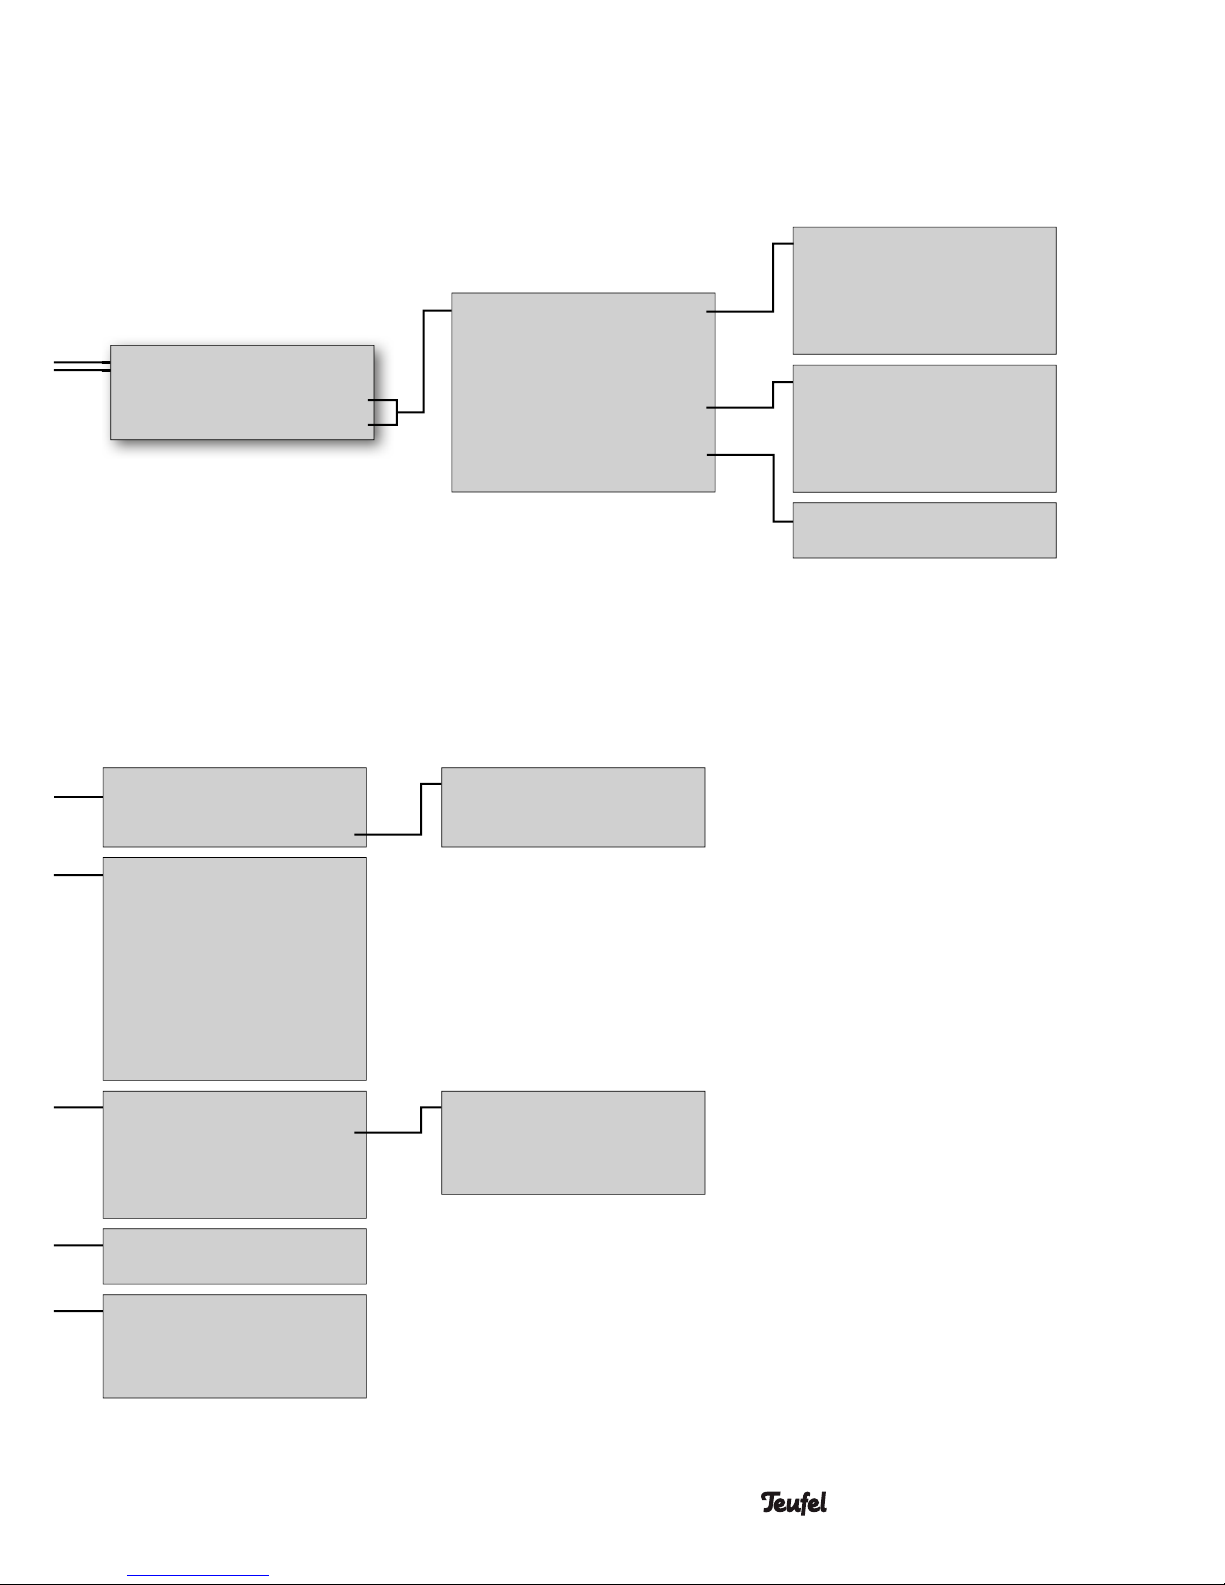
The Menu
The functions of your Radio 3sixty are
configured via the menu.
(6)
(4)
(5)
(7)
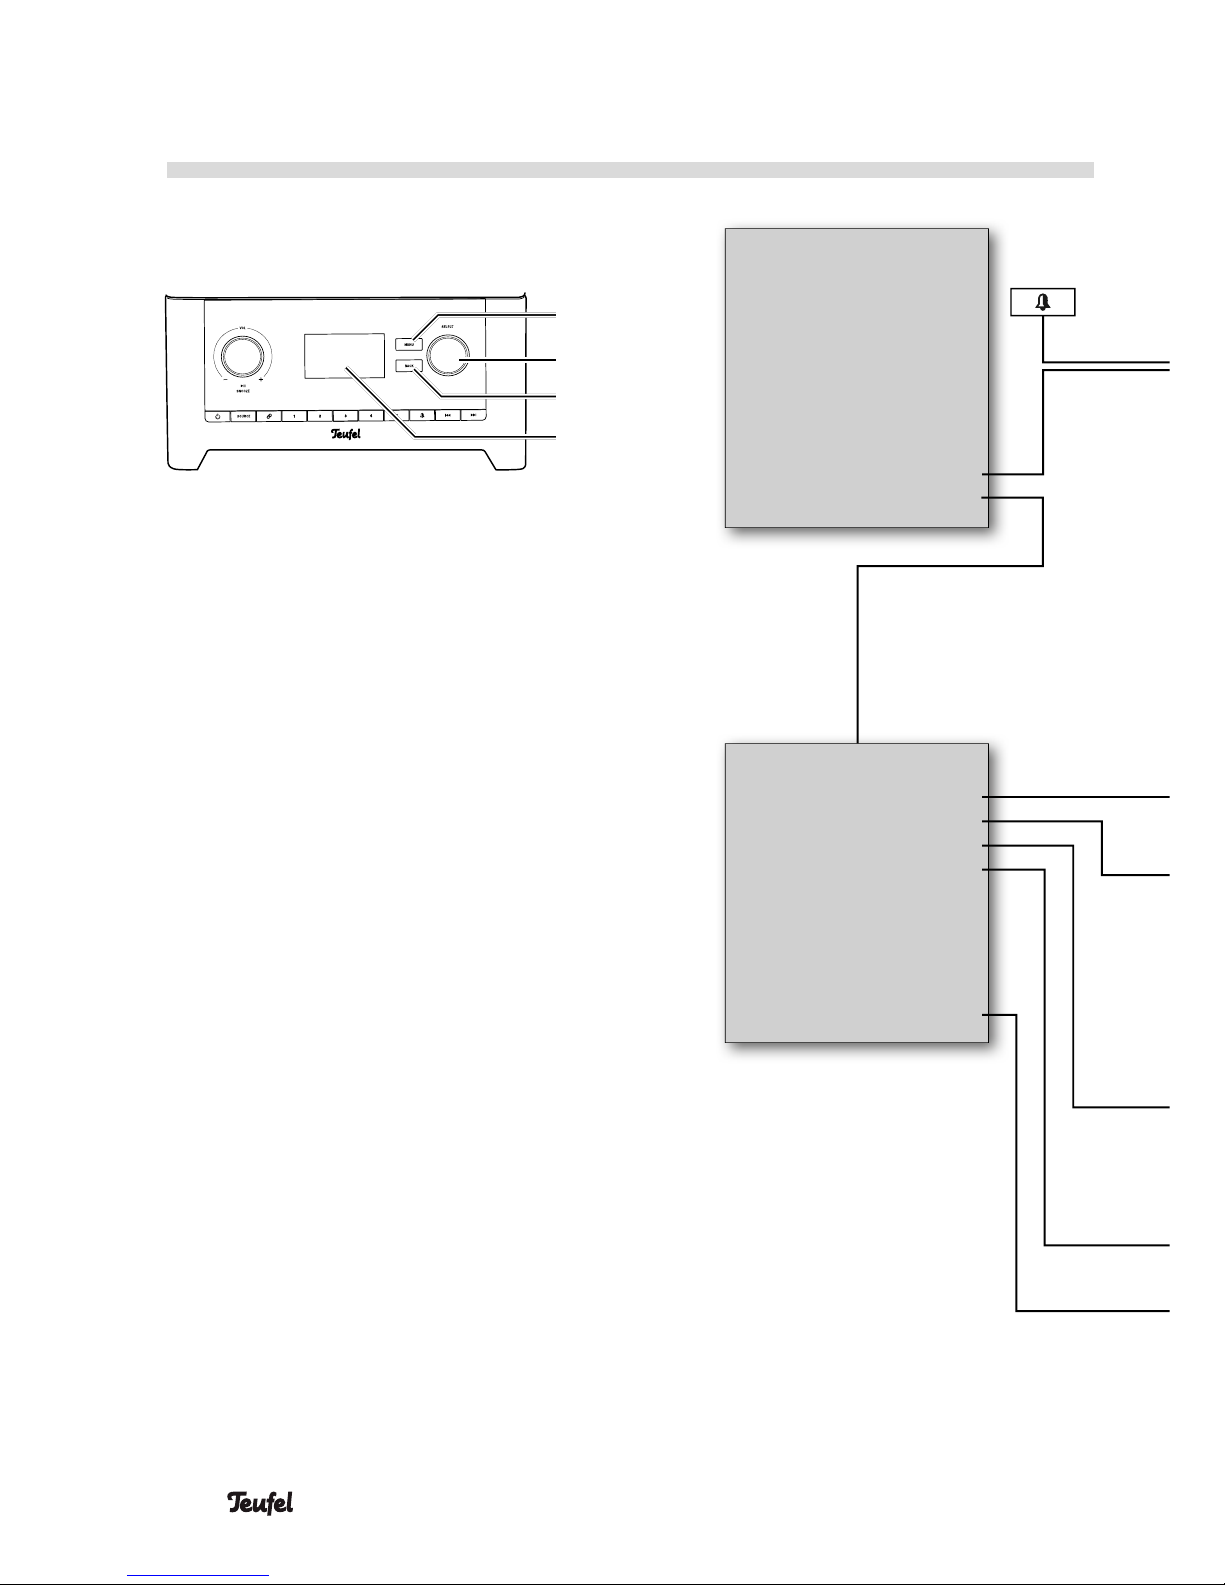
– The menu will appear on the
display panel (4).
– To access the menu, tap the MENU
button (6). Thus, you will access
the submenu of the active source.
In each of these submenus, there
are direct links to the menus
“Source” and “System settings”.
– To select menu items and set
the parameters, turn the SELECT
control(7).
– Push the control to confirm.
– You can go back one individual
step with the BACK button (5).
• The Radio 3sixty will return to
normal operation after 30 seconds
of button inactivity.
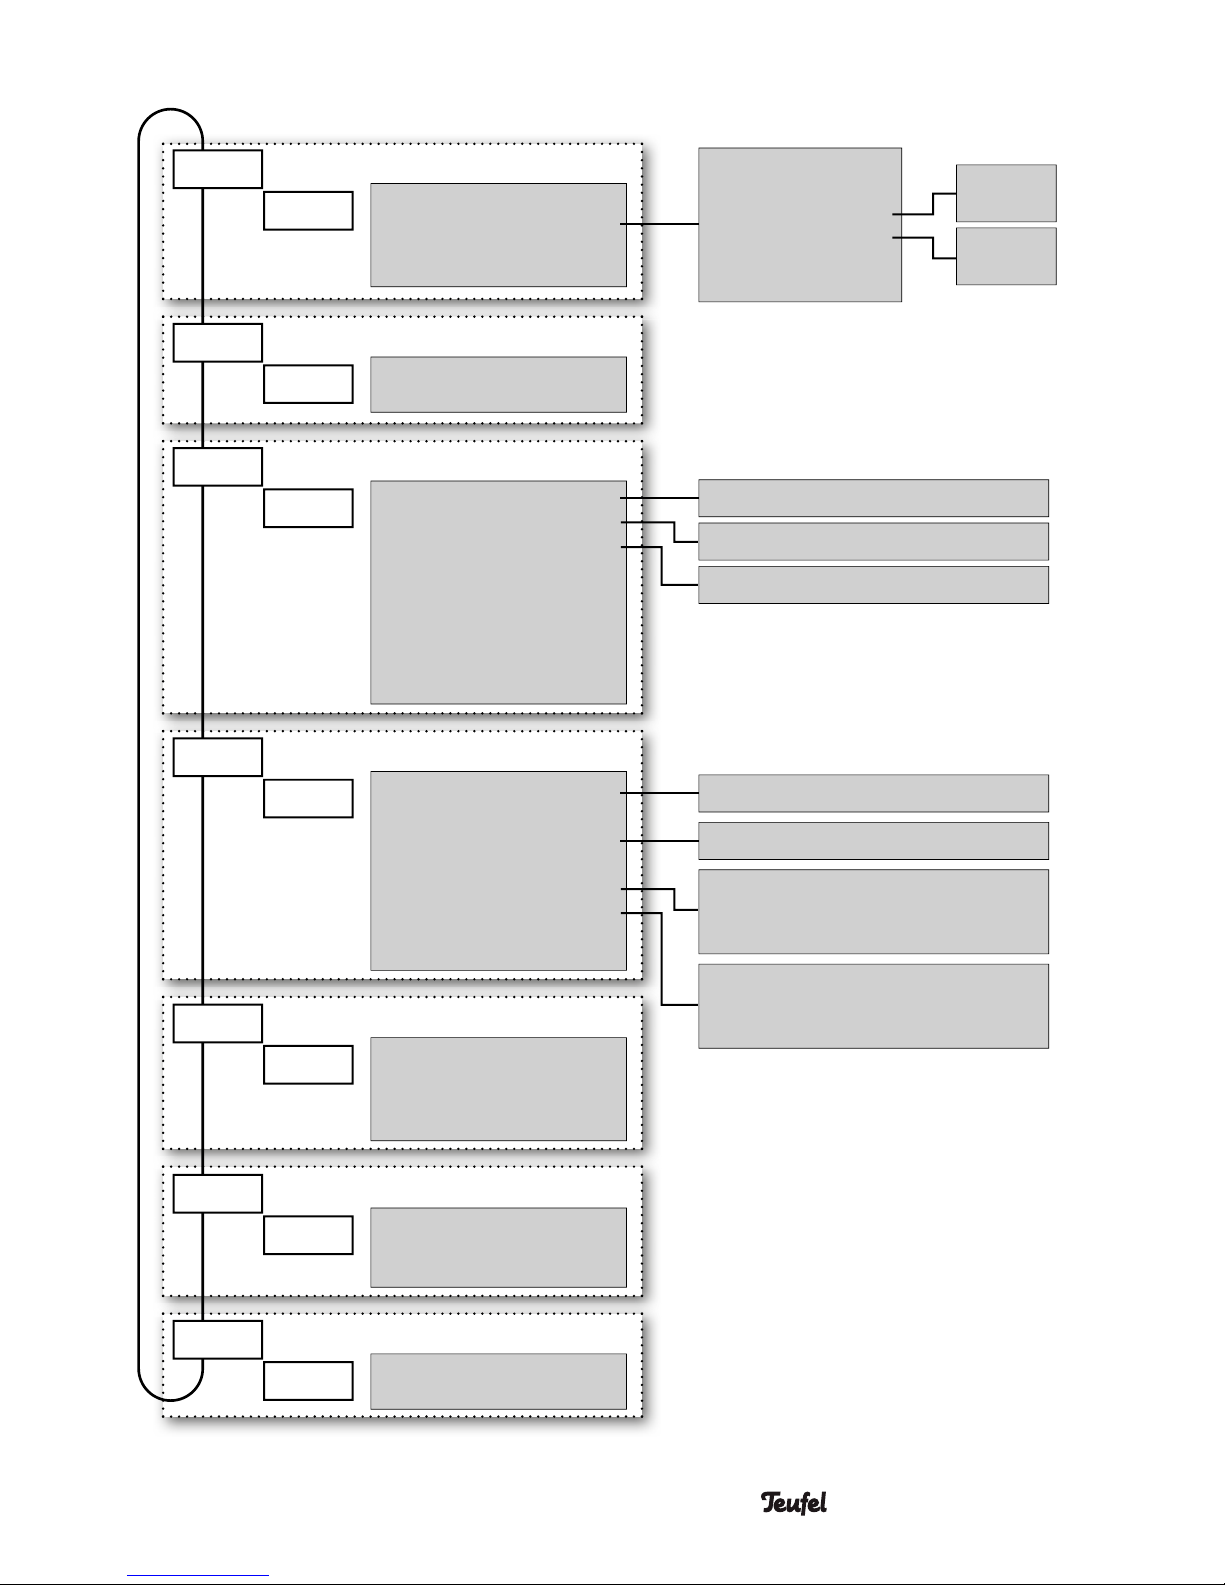
You will find an overview of the menu
system on the side.
Source
Internet Radio
Spotify
USB and Network
DAB
FM
Bluetooth
AUX in
Standby timer
Alarms
System settings >
System settings
Equalizer >
Network >
Time/Date >
Language >
Factory reset
Software update >
Service
Setup wizard
Info
Backlight
Page 19
19 • Radio 3sixty
Enable:
Time: HH:MM
Date: (only when „Enabled:
Once“) TT:MM:JJJJ
Source:
Preset: Last listened
Volume: 18
Save
(not with „Buzzer“)
Favourites 1-4
Buzzer
Internet radio
Spotify
DAB
FM
Off
Daily
Once
Weekends
Weekdays
Normal
My EQ
My EQ profile setup >
Bass (–10 to +10)
Treble (–10 to +10)
Loudness (On/Off))
Update time from DAB
Update time from FM
Update time from NET
No update
Network wizard
PBC Wlan setup
View settings
Wlan region >
Manual Settings
NetRemote PIN Setup
Network profile >
Clear network settings >
Keep network connected
Time after Standby is
activated
On level
Standby level
English
German
Set Time/Date
Update time >
Set format
Set timezone >
Daylight savings
Alarms
Alarm 1: On [06:30]
Alarm 2: Off [00.00]
Page 20

20 • Radio 3sixty
Standby activation
This function allows the Radio 3sixty
to switch itself off after a preset
period of time.
1. In the “Source” menu, select the
item “Standby timer”. The message
“Sleep off” will appear on the
display panel (4).
2. With the SELECT control (7),
set the desired time to shut-off
between 15 and 60 minutes in
increments of 15 minutes.
The
“Sleep off” setting deactivates the
sleep function.
3. Start the desired playback.
The Radio 3sixty will switch to standby
after the preset time has elapsed.
Alarms
If the device is on, you can access the
“Alarms” menu directly by pushing
the button (9).
The alarm function offers two
alarm times each with the following
settings:
• Activated: Off, Daily, Once, Weekends, Workdays.
• Date/time.
• Source: Buzzer, Internet radio,
Spotify, DAB, FM.
• Programme: (not with the “Buzzer”
source) favourites 1–4.
• Volume.
For example, you can have the
alarm wake you up on work days at
7:00 a.m. with the FM radio and the
volume set to 9.
– After setting the alarm time, select
the bottom menu item “Save” to
activate it.
An active alarm clock is indicated with
a bell symbol “
” on the display panel
when the device is on. The alarm time
is also shown in standby.
In standby, switch the alarms on and
off one after another by pushing the
button (9).
– To keep sleeping, push the VOL
control
(3)
– the sleep time on the
display panel will increase from 5 to
30 minutes each time you push the
control.
– To deactivate the alarm clock, push
the button (9) or the button
(13).
System settings
Network
In this menu, you can set the parameters for the Wi-Fi connection.
Network wizard
The network wizard will show a list
of the available Wi-Fi networks from
which you select your network. It
is part of the setup wizard and is
described on page 14 from step
6 on.
PBC Wlan setup
Connects the Radio 3sixty to the
network by pushing the WPS button
on the router.
Display settings
Shows the parameters for the current
Wi-Fi connection.
Page 21

21 • Radio 3sixty
Wlan region
Here, you can set the region in which
you are operating the Radio 3sixty
so that the correct standards are
applied.
Manual Settings
In this menu, you can manually enter
all required data for a Wi-Fi connection.
NetRemote PIN setup
You can define the four-digit PIN here,
which is required to access the web
interface (see „The radio portal“ on
page 25). Default setting: “1234”.
Network profile
The Radio 3sixty will save the last four
Wi-Fi connections in order to automatically reconnect when changing
the location. In this menu, you can
display these Wi-Fi connections and
delete them as desired.
Reset network settings
Here, you delete all saved Wi-Fi
connection settings.
Keep network connected?
With this setting, you can set whether
the Radio 3sixty switches Wi-Fi
off (“NO”) or leaves it switched on
(“YES”) in standby. Select “YES” to be
able to switch the device on via Wi-Fi.
This function is a prerequisite for
being able to use network playback
without interruption.
Time/Date
Set Time/Date
Set the date and time manually here.
Update time
Here, you can set how the time
should be automatically set:
• via DAB radio;
• via FM radio (using RDS);
• via the Internet – enter the time
zone and summer/winter time
here in the next step;
• No update – enter the date and
time manually.
Format
Set the display format for the time
here: 12 hours (with AM/PM) or 24
hours.
Only for an update via the Internet:
Set timezone
Select your time zone from the list.
Daylight savings
You can switch the summer time on
and off here.
Language
Select the language for the display.
Factory reset
This clears all modified settings:
The Radio 3sixty will restart and
restore the default settings in the
process.
Software update
Auto update
You can switch automatic updating of
the firmware version on and off here.
Page 22

22 • Radio 3sixty
Check now
The Radio 3sixty immediately checks
whether there is a new firmware
version available.
NOTICE
Risk of damage!
– During an update, the
Radio 3sixty must not be
disconnected from the power
supply!
Service
Only for service: The Radio 3sixty is
switched to DFU mode here.
Setup wizard
You launch the setup wizard here
(see page 14).
Info
Displays the versions of the system
programmes and the ID of the
Radio 3sixty.
Backlight
Here, you set the brightness of the
display panel.
Time after Standby is activated –
duration of illumination in standby:
Always “on” or switch to standby level
after 10–180 seconds.
On level – High, Medium, Low
Standby level – Medium, Low, Off
Page 23
23 • Radio 3sixty
Internet Radio
The Radio 3sixty can receive thousands of radio stations and podcasts
from around the world via the
Internet.
Prerequisite: Wi-Fi connection with
Internet access.
To receive Internet radio, the
Radio 3sixty requests a list of the
available stations, which has already
been broken down into different
categories (e.g. Pop, Jazz, Country)
from the “Frontier Silicon Internet
Radioportal”.
When you select a station, the
Radio 3sixty directly connects to the
station via the Internet.
You can also register on this portal in
order to compile an own list of your
favourite stations and download it
to your device or to multiple devices
(see page 25).
– Push the SOURCE button (12)
repeatedly until “Internet radio”
appears on the display panel or
select it in the “Source” menu.
Selecting stations
– Push the MENU button(6) to select
the submenu for Internet radio:
Last listened – the last stations
heard are listed here.
Station list – you can find different
lists of the portal here, including your
favourites.
The portal lists are regularly updated
and can change as a result.
In the list of stations, there is a
search function for “Stations” and
“Podcasts”:
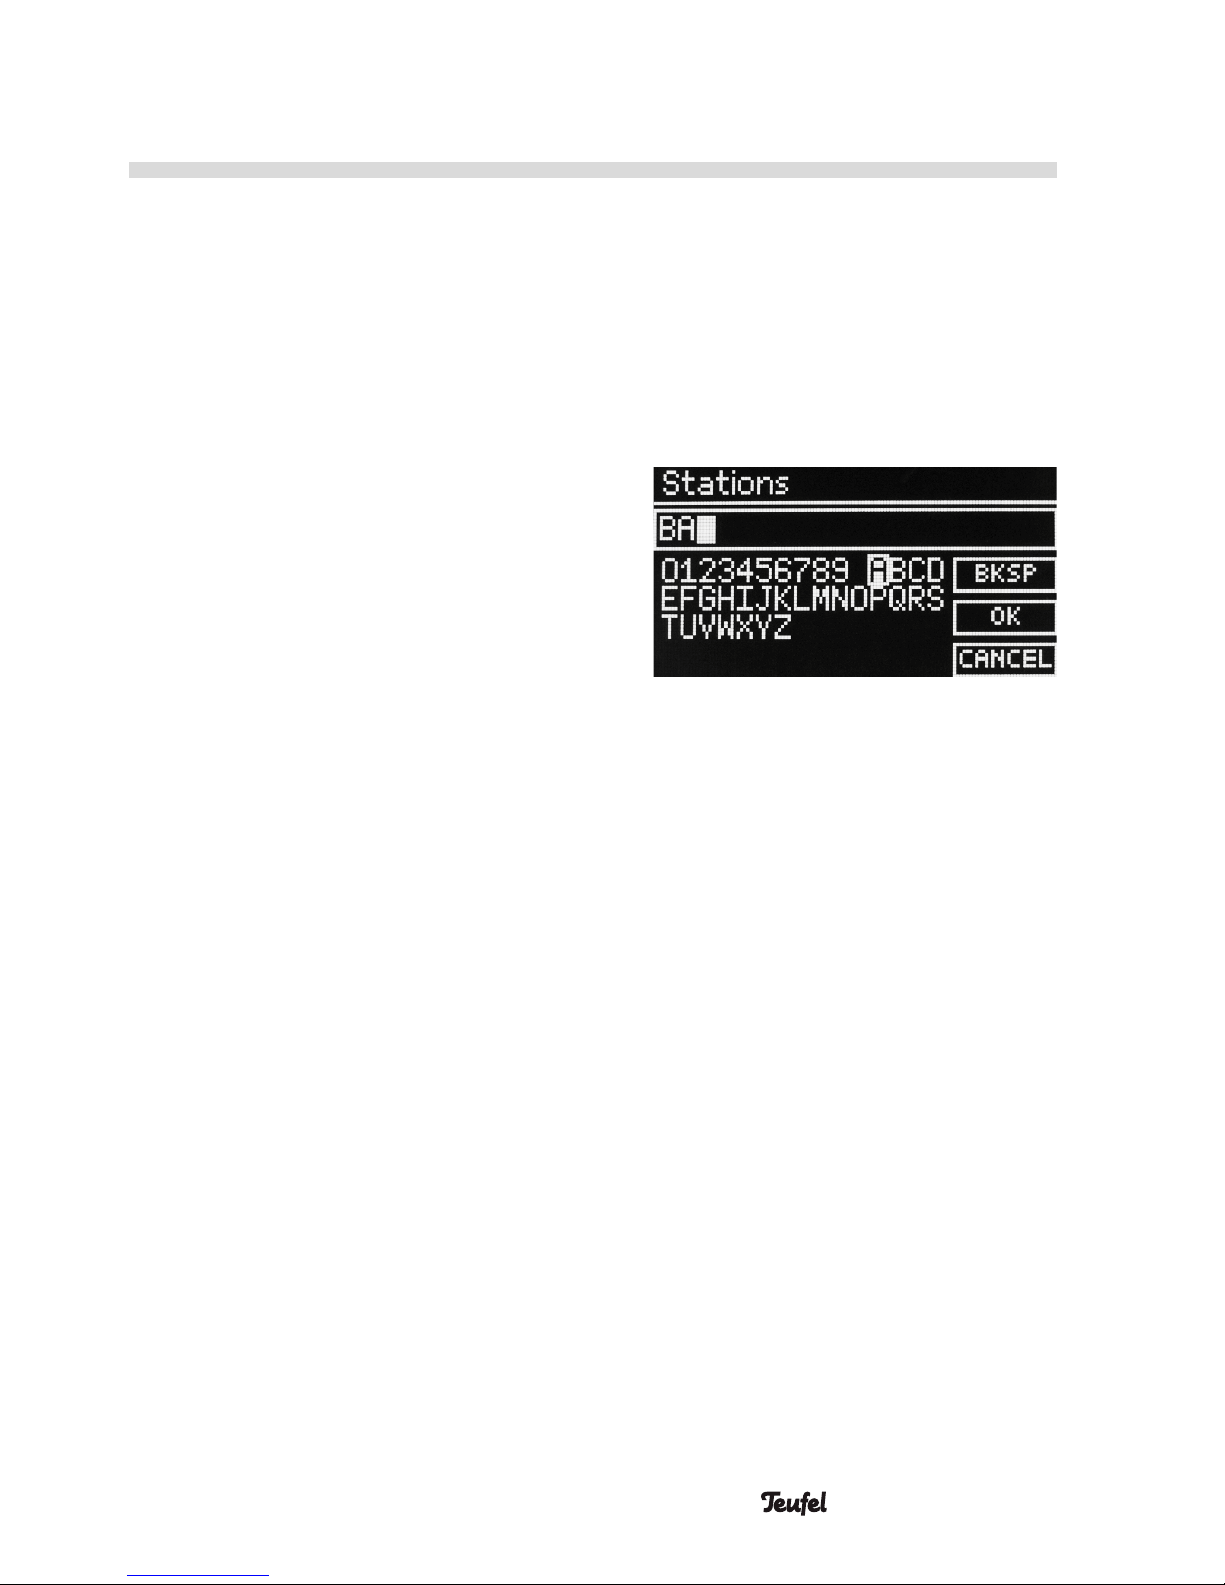
– Select "Search stations” in the
respective menu.
– Select a character with the SELECT
control (7). Pushing the control
adopts the character in the input
line.
[BKSP] deletes the last character,
[OK] ends input,
[CANCEL] aborts the process.
The Radio 3sixty will now scan for
stations whose name contains the
search term and it will display them
in a list.
– If the station you searched for
cannot be found in a list, you can
add stations via the radio portal,
which then appear in the list “My
Added Stations” (see „The radio
portal“ on page 25).
Page 24
24 • Radio 3sixty
Playback
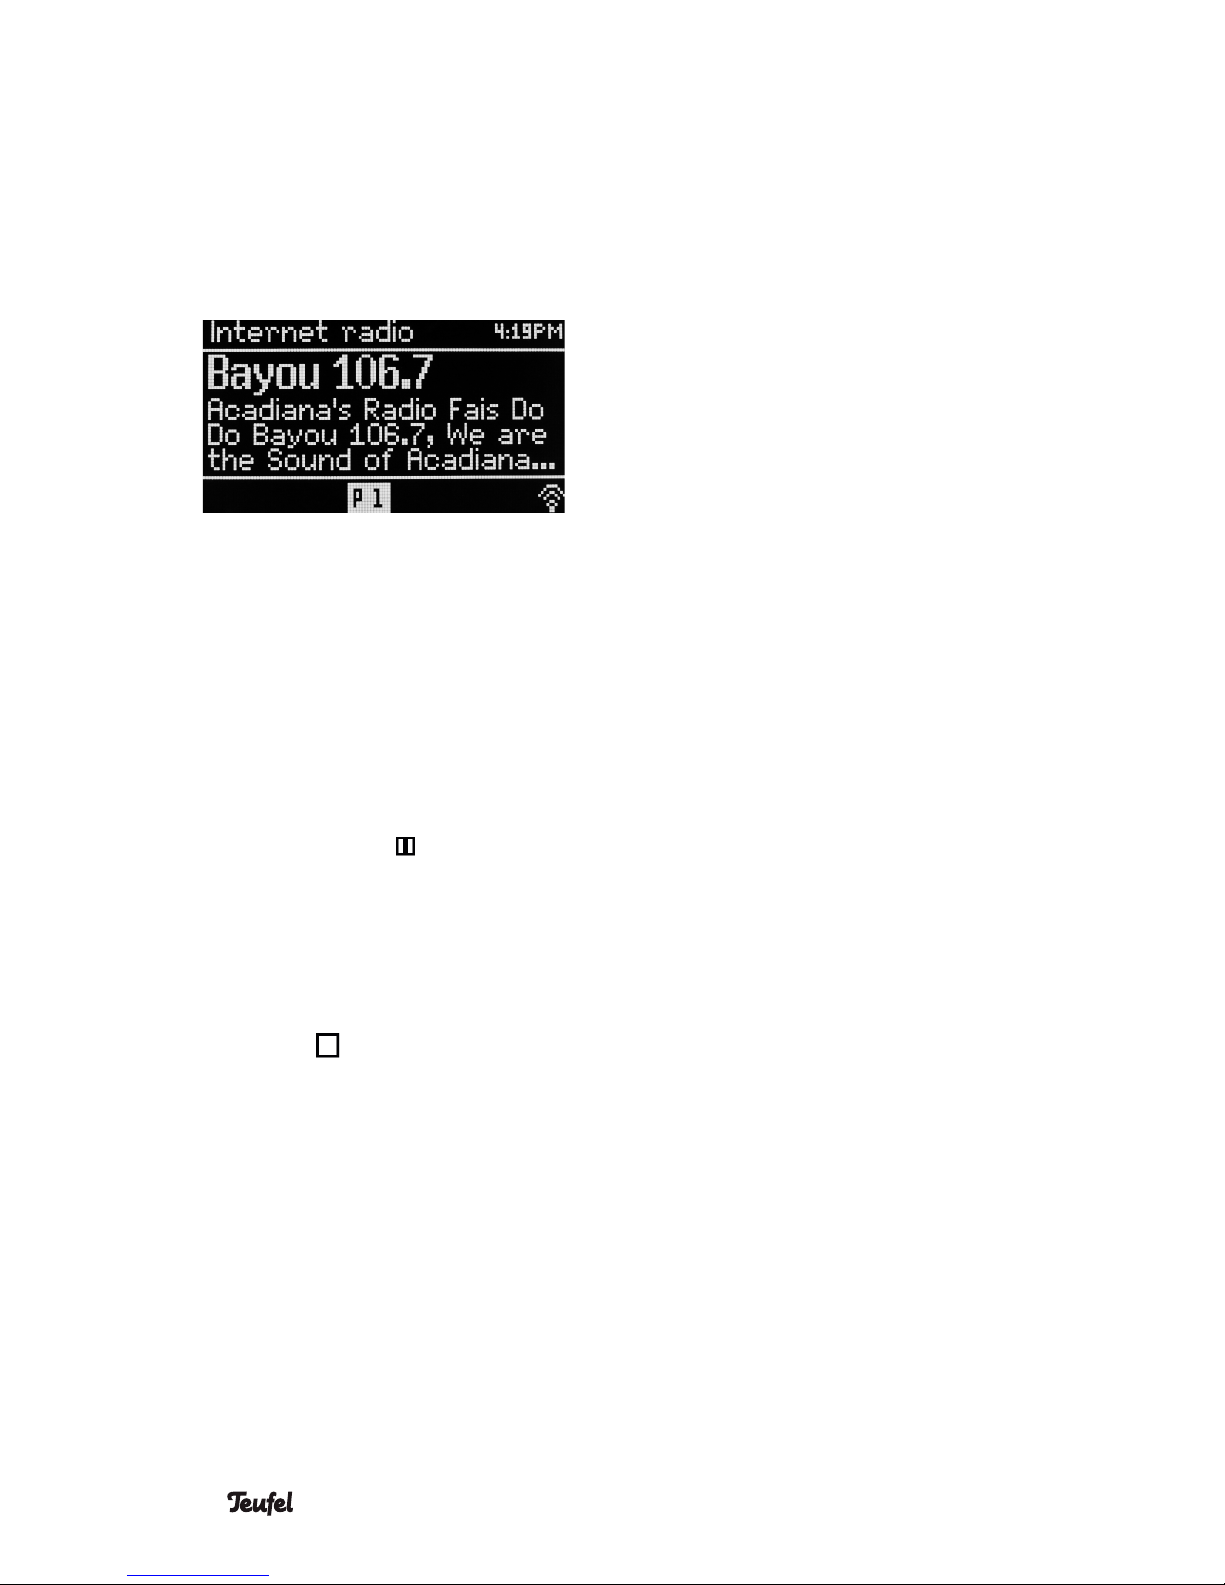
– From one of the lists, select the
desired station with the SELECT
control(7) and push the control.
Playback will begin after a short
loading time.
– If the station provides more infor-
mation about the programme and/
or the current track, you can have
it displayed by repeatedly pushing
the SELECT control(7).
– Pushing the VOL control (3) inter-
rupts playback:
• With podcasts, playback is
paused – this is indicated by the
pause symbol ( ) in the status
section of the display panel.
• With radio stations, the
programme continues to run,
only the sound is switched off
– this is indicated by the stop
symbol ( ) in the status section
of the display panel.
– Pushing the control again resumes
playback.
– By turning the SELECT control(7),
you access the previous list where
you can select another station.
– You can go back to the respective
parent list by repeatedly pushing
the BACK button (5).
– Pushing and holding the SELECT
control(7) adds the current station
to your list of favourites.
Station buttons
In Internet radio mode, you can
assign one station to each of the
station buttons 1–5 (10) and access
them later on with the push of a
button.
– To save the station that you have
currently set, push the desired
station button until the message
“Station saved” appears on the
display panel.
– To access it, tap the desired
station button in Internet radio
mode.
Page 25
25 • Radio 3sixty
The radio portal
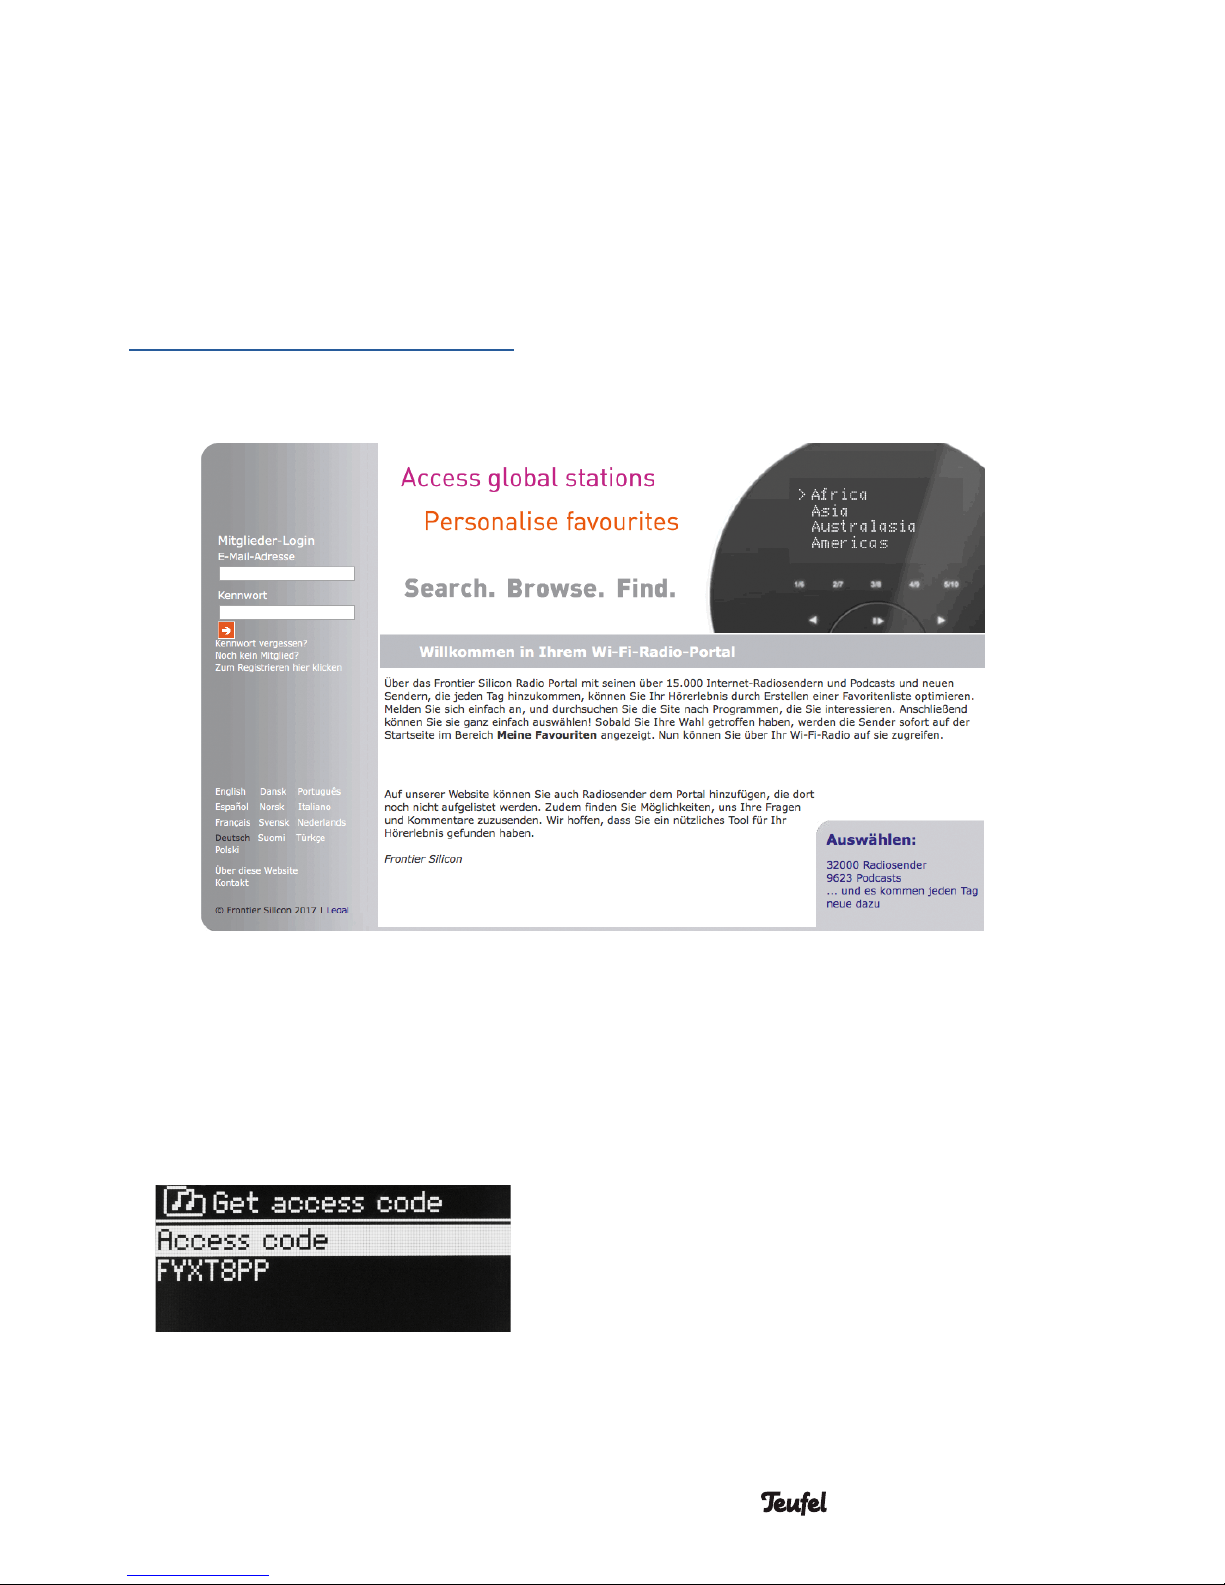
Via the Frontier Silicon Internet Radioportal, you can organise your favourites, add new radio stations and play
stations directly on your PC. Access
this address with your web browser:
http://www.wifiradio-frontier.com
To register on this page, you will need
an access code, which is generated
by your Radio 3sixty and is only valid
for a few minutes:
1. In the “Internet radio” menu,
select the items “Station list
-> Help -> Get access code”.
2. Note the seven-digit code.
3. Register on the radio portal. For
this, you will need:
• the access code,
• your e-mail address
• a new password
• the model designation
“Radio 3sixty”
If you have already registered on the
radio portal and would like to add this
Radio 3sixty as an additional device,
log on with your user data and access
“My specifications”. There you can
add further devices, for which you will
need the access code of the device
again.
You can then synchronise your
favourites on all registered devices.
Page 26
26 • Radio 3sixty
USB and Network
With this, you can play the audio files
of the formats MP3, WMA, AAC, WAV
and FLAC from USB storage devices
and from the local network.
USB
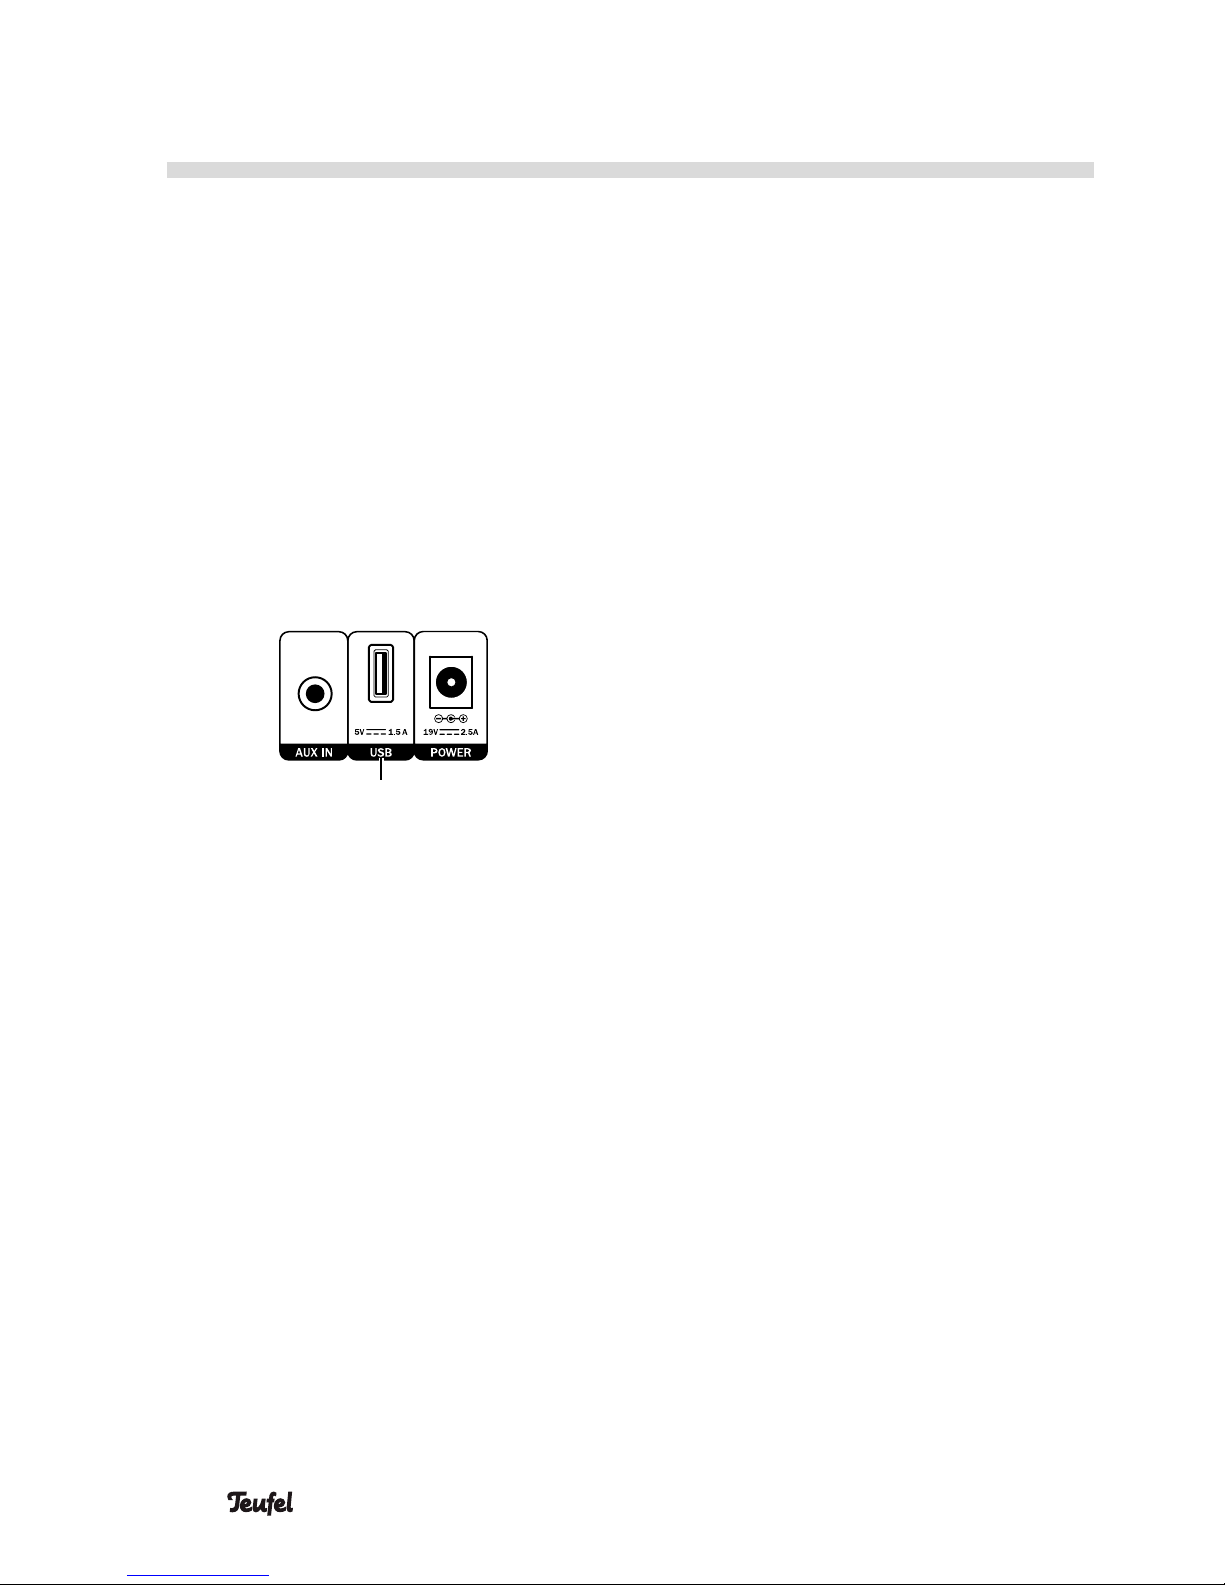
You can connect conventional USB
sticks and USB hard drives with the
specifications USB 1.0 to 3.0, which
are formatted to “FAT32”, to the USB
port (15).
(15)
Insert the USB stick or the plug of
your USB device in the USB jack. The
plug only fits the jack in one orientation.
As soon as the Radio 3sixty recognises the storage device, the
following notice will appear on the
display panel: “USB disk attached –
Open folder?”.
– Select “YES” with the SELECT
control (7) and push the control.
The file list for the USB storage
device will now be shown.
If the USB storage device has been
connected for a prolonged period,
you can access the file list as follows:
1. Push the SOURCE button
(12)
repeatedly until “USB and network”
appears on the display panel or
select the corresponding item in the
“Source” menu.
2. In the menu, select the “USB” item.
The file list for the USB storage
device will appear after a short
time.
Proceed as described under “Playback” further down.
Network
Prerequisites: Wi-Fi connection and
option “Keep network connected” are
enabled (see page 21).
As a DMP (digital media player), the
Radio 3sixty is able to connect to any
local UPnP/DLNA digital media server
(DMS) via the network and play back
audio media provided there. DMS
are available as programmes for all
phone and PC operating systems.
Some network drives (NAS) and
routers also have such functions.
For DMP operation, you will need
a corresponding server in your
network.
1. Push the SOURCE button
(12)
repeatedly until “USB and network”
appears on the display panel or
select the corresponding item in the
“Source” menu.
Page 27

27 • Radio 3sixty
2. In the menu, select the item
“Shared media”. A list of the available servers will appear after a
short time.
• If your DLNA server is not shown,
make sure that your server is
online.
• A question mark as the first
character in the name means
that this server is currently
unavailable, but it may be
switched on via “Wake on LAN”.
As soon as you select such a
server, the attempt will be made
to activate it via the network.
3. Select the desired server with
the SELECT control(7) and push
the control. Now, the playlist for
the server will be shown. In many
cases this is a selection of media
types at first. The Radio 3sixty
can only play back audio data – in
most cases, this list is referred to
as “Music”. Other lists are often
located behind it.
Playback
– Select the first track of your choice
from the list and start playback by
pushing the SELECT control(7).
– If the server provides more infor-
mation about the current track, you
can have it displayed by repeatedly
pushing the SELECT control(7).
– Pause playback: Push the VOL
control (3).
– Continue playback: Push the VOL
control (3) again.
– Play next track:
Tap the button
(8).
– Restart the current track:
Tap the button
(8).
– Play previous track:
Tap the button (8) twice.
– By turning the SELECT control(7),
you can access the previous list
where you can select another
track.
– You can go back to the respective
parent list by repeatedly pushing
the BACK button (5).
– Pushing and holding the SELECT
control(7) adds the current track
to your playlist.
My playlist
You can find the playlist in the “USB
and network” submenu. You can also
add tracks from different servers to
this list and play them.
– To delete the playlist, access the
menu item “Clear my playlist”.
Repeat play
With this menu item, you activate and
deactivate the repeat function for
the current list. When the function is
switched on, the symbol appears
in the status line.
Shuffle play
With this menu item, you switch the
random playback of all tracks in the
current list on and off. When the
function is switched on, the symbol
appears in the status line.
Page 28

28 • Radio 3sixty
Prune servers
With this menu time, you delete
servers that are not available (those
that have a question mark as the first
character in the name) from the list of
servers. This may be necessary e.g.
after changing location.
DMR
As UPnP/DLNA DMR (digital media
renderer), the Radio 3sixty will
provide its playback functions on the
network and can be controlled by a
digital media controller (DMC).
Prerequisites: Wi-Fi connection and
option “Keep network connected?”
are enabled (see page 21).
Windows Media Player is one such
DMC. You can specify a network
playback device for this and other
playback programmes – a DMR,
for example – where playback is to
occur. Specify the Radio 3sixty here
and start playback.
You control playback on your DMC.
You can also control some functions
on the Radio 3sixty:
– Pause playback:
Push the VOL control (3).
– Continue playback:
Push the VOL control (3) again.
– Play next track:
Tap the button
(8).
– Restart the current track:
Tap the button (8).
– Play previous track:
Tap the button (8) twice.
Page 29

29 • Radio 3sixty
The Radio 3sixty is equipped with a
radio for DAB/DAB+ and FM/USW.
• DAB: Reception of digital radio
stations in band III from 174.160
to
239.200 MHz (block 5A to 13F).
• FM: Reception of analogue radio
stations in the USW range from
87.5 to 108 MHz, RDS mode is
possible.
• 5 memory slots are available for
your favourite stations.
• The integrated telescopic antenna
(17) ensures good reception. To
receive radio stations, always
pull the antenna all the way out. If
applicable, adjust its position for
better reception later.
DAB/DAB+
– Push the SOURCE button (12)
repeatedly until “DAB radio”
appears on the display panel or
select it in the “Source” menu.
Station list
If the list of stations is empty (e.g. at
start-up), the Radio 3sixty will search
for radio stations in the DAB/DAB+
range. You can also start this search
at any time via the menu with “Scan”.
Manual tune
You can manually add frequency
ranges (blocks) to the list of stations
here.
Prune invalid
With this function, you delete stations
from the list of stations whose signal
is too weak for clear reception. This
may be necessary e.g. after changing
location.
DRC
Some stations offer dynamic range
compression. Thus, quiet passages
are amplified while the volume of
loud passages is decreased. This
can be helpful when listening in loud
surroundings. Possible settings: off,
high, low.
Station order
You sort the list of stations here:
• Alphanumeric – by station name.
• Ensemble – by groups of stations.
• Valid – stations with a weak signal
or which are not received at all are
placed at the end of the list.
Radio Mode
Page 30

30 • Radio 3sixty
Playback
– From one of the lists, select the
desired station with the SELECT
control(7) and push the control.
Playback will begin after a short
loading time.
– If the station provides more infor-
mation about the programme and/
or the current track, you can have
it displayed by repeatedly pushing
the SELECT control(7). The signal
strength is of particular interest in
this respect as you can align the
telescopic antenna (17) optimally
with this.
– By turning the SELECT control(7),
you access the previous list where
you can select another station.
– You can go back to the respective
parent list by repeatedly pushing
the BACK button (5).
FM (USW)
– Push the SOURCE button (12)
repeatedly until “FM radio”
appears on the display panel or
select it in the “Source” menu.
Setting stations
Set the stations with the SELECT
control(7):
– Turning it reduces/increases the
receiving frequency by increments
of 50 kHz.
– Pushing the control starts the
upward or downward station
search (depending on the direction
the control was last turned). The
scan will stop at the next station
received in sufficient quality. If
necessary, start the scan again
until you have found the desired
station.
The name of the set station appears
on the display panel(4).
Scan setting
Only find stations with a strong signal
(Yes/No).
Stereo setting
In case of stations with severe noise,
you can switch to mono mode here.
Saving and accessing
stations
In radio mode, you can assign five
stations to the station buttons 1–5
(10) for DAB and FM and then access
them later on with the simple push of
a button.
– If you would like to save the set
station, push and hold one of
the station buttons 1–5
(10)
for
approx. 3 seconds.
The notice
“Preset stored” will appear briefly
on the display panel. The station
has now been saved to this
station
button
.
– You can access the saved stations
by briefly
pushing the corre-
sponding station button.
Page 31

31 • Radio 3sixty
Bluetooth® Mode
Via Bluetooth®, you can wirelessly
connect a compatible external player
with the Radio 3sixty. The audio
output of the external player is then
emitted by the Radio 3sixty.
The Bluetooth
®
wireless transmission
system has a range of approximately
10 metres that is limited by walls and
furnishings. If the connection is cut
off, the Radio 3sixty will attempt to
re-establish a connection until you
select another source.
NOTICE
– Only use the Bluetooth®
function in locations where
wireless radio transmission
is allowed.
– Please keep in mind that
the Bluetooth
®
behaviour
may differ depending on the
external player’s operating
system.
Bluetooth® options
Depending on the device type, your
external player/smartphone may also
have a menu for Bluetooth® options
such as media playback. Here you
can activate and deactivate the
desired options. You can find more
information about the Bluetooth®
options in the user manual for your
external player/smartphone.
Pairing
To play the audio of your external
player on your Radio 3sixty via Bluetooth®, connect the devices with each
other. This is called “Pairing”.
1. Enable the Bluetooth® function on
your external player (e.g. smartphone).
2. Push the SOURCE button (12)
repeatedly until “Bluetooth”
appears on the display panel or
select it in the “Source” menu.
3. Push the
button(11) for approx.
one second to start pairing. The
Bluetooth® symbol will blink on the
display panel.
4. Let your external player/your
smartphone search for Bluetooth®
devices (see the user manual for
the external player to do so)
. After
the search run, the “Radio 3sixty”
should also be present in the list of
detected devices.
5. Select “
Radio 3sixty
” from the list
of detected devices.
6. If your external player asks for a
code, enter “0000” (four zeros).
Pairing is now complete. “Bluetooth”
will appear on the display panel and
all sounds that would otherwise be
played by your external player/smartphone will now be played back by the
Radio 3sixty.
Page 32

32 • Radio 3sixty
Playback
The volume setting of the
external player affects the
volume of the Radio 3sixty.
1. Push the SOURCE button (12)
repeatedly until “Bluetooth”
appears on the display panel or
select it in the “Source” menu.
2. Turn on the Bluetooth
®
function on
your source device.
3. Start playback on your source
device.
You can control playback on your
source device. You can also control
some functions on the Radio 3sixty:
– Pause playback:
Push the VOL control (3).
– Continue playback:
Push the VOL control (3) again.
– Play next track:
Tap the button (8).
– Restart the current track:
Tap the button (8).
– Play previous track:
Tap the button (8) twice.
• If your source device is a smartphone, the Bluetooth® connection
will be interrupted in the event of
an incoming call and you can make
phone calls as usual. After finishing
your phone call, the sounds will
once again be diverted and played
back by your Radio 3sixty
.
Interruption of connection
If your external player moves out of
the range of your Radio 3sixty, the
Bluetooth
®
connection will be interrupted. If you are back within range
within 120 seconds, the connection
will be re-established automatically.
Terminating the connection
To terminate the Bluetooth
®
connec-
tion,
– disable the Bluetooth® function on
your external player/smartphone,
or
– access the menu on the
Radio 3sixty and select “BT disconnect” or
– select another source on the
Radio 3sixty.
Page 33
33 • Radio 3sixty
Spotify Connect AUX Input
With Spotify Connect, you can play
music from your smartphone, tablet
or PC on the Radio 3sixty via the
Spotify app.
Prerequisite: Wi-Fi connection and
Spotify premium account.
1. Push the SOURCE button (12)
repeatedly until “Connect Spotify”
appears on the display panel or
select it in the “Source” menu.
2. Open the Spotify app on your
smartphone, tablet or PC. Make
sure that the device is connected
to the same network as your
Radio 3sixty.
3. Start a song and click “Available
devices”.
4. Select your Radio 3sixty and you
will immediately hear your music
played back via this device.
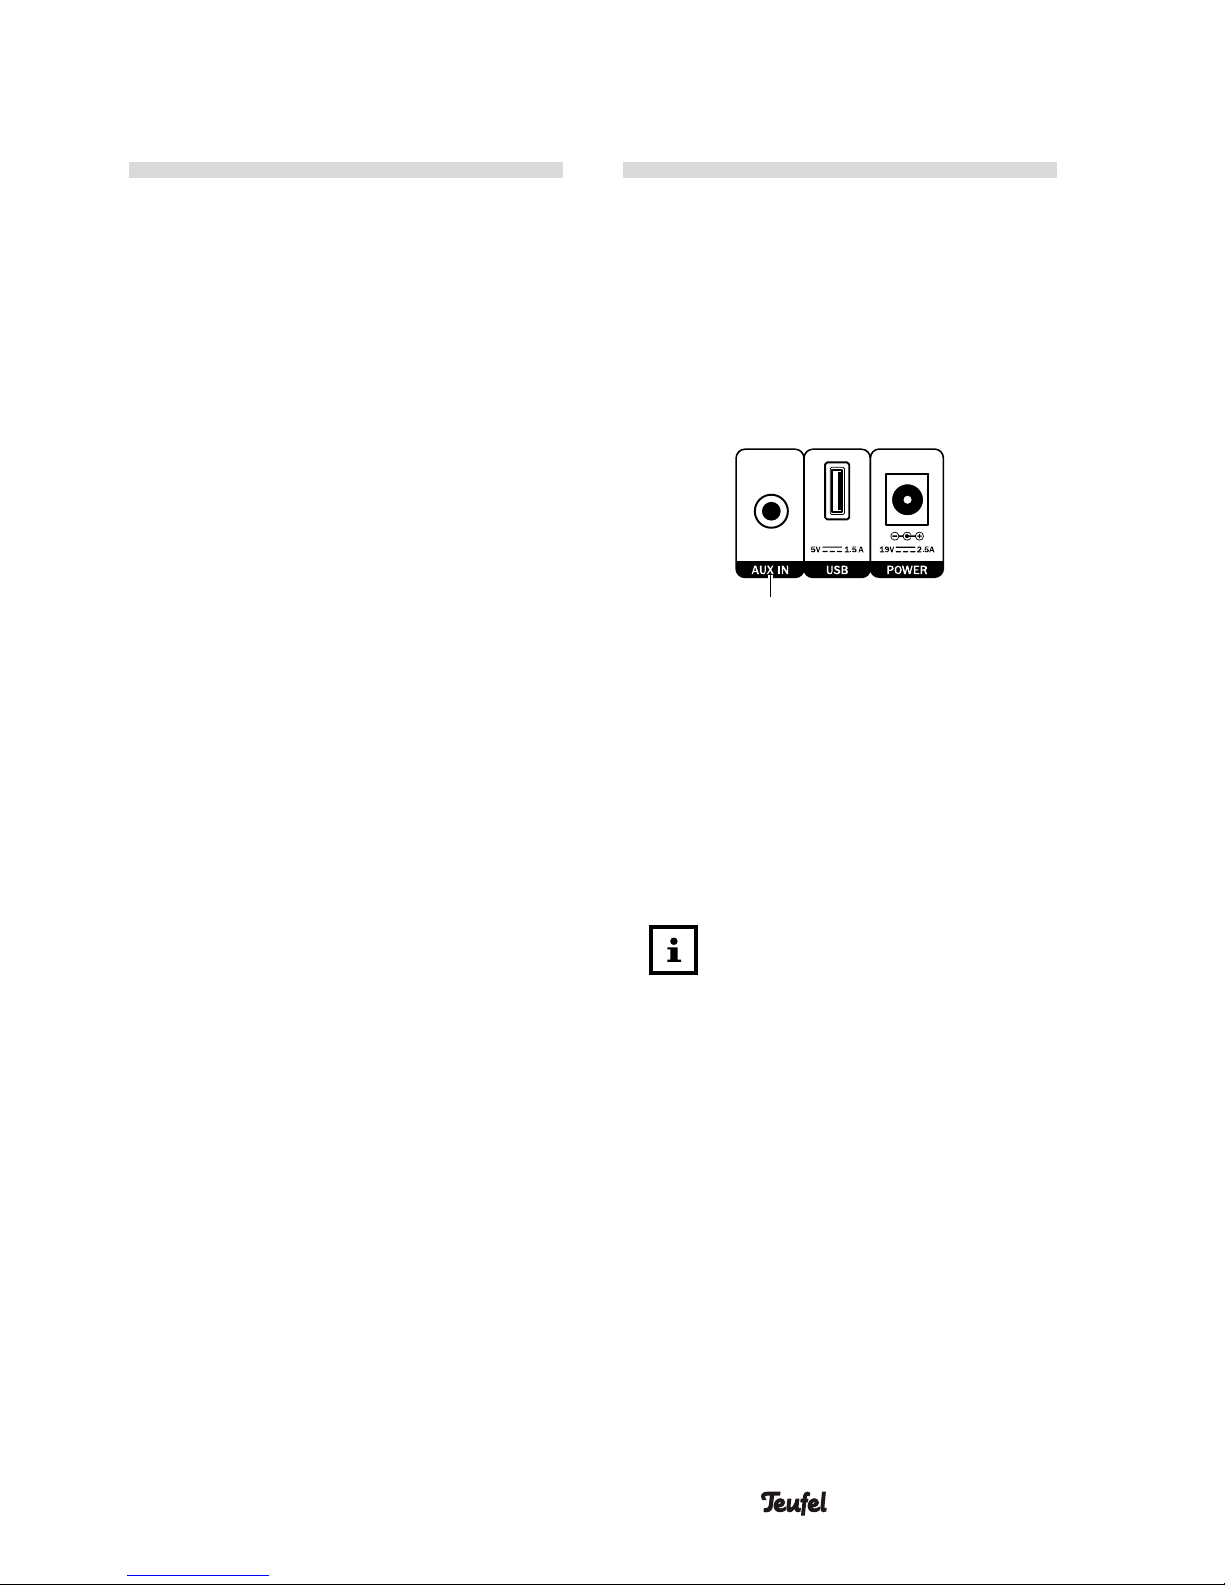
You can connect a source device with
analogue sound and a line out jack
or an earphone jack (e.g. a CD player
or TV set) to the AUX IN jack (16).
You will need a stereo cable with a
3.5-mm jack plug to do so.
(16)
Playback
1. Push the SOURCE button (12)
repeatedly until “AUX in” appears
on the display panel or select it in
the “Source” menu.
2. Start playback on your external
player.
The volume setting of the
external player affects the
volume of the Radio 3sixty.
3. Control all playback functions via
the external player.
Page 34

34 • Radio 3sixty
Care and Cleaning
NOTICE
External influences may
damage or destroy the
device.
– If the device is to be left
unsupervised for a prolonged
period of time (e.g. during a
holiday), or if a thunderstorm
is forecast, disconnect the
mains adapter from the
power socket. Otherwise,
sudden overvoltage could
cause the device to become
defective.
– If possible, only use plain
water without any additives.
In case of stubborn marks,
a mild soap solution may be
used.
– Do not use caustic cleaning
products, white spirit, thinners, petrol or similar under
any circumstances. Such
cleaning agents may damage
the delicate surface of the
housing.
• Ideally, you should remove dust or
small amounts of dirt with a dry,
smooth leather cloth.
• Use a damp cloth to rub off stubborn dirt. Make sure that no liquid
penetrates the housing.
• Then immediately wipe the damp
surfaces off with a soft cloth
without applying pressure.
Page 35
35 • Radio 3sixty
Troubleshooting
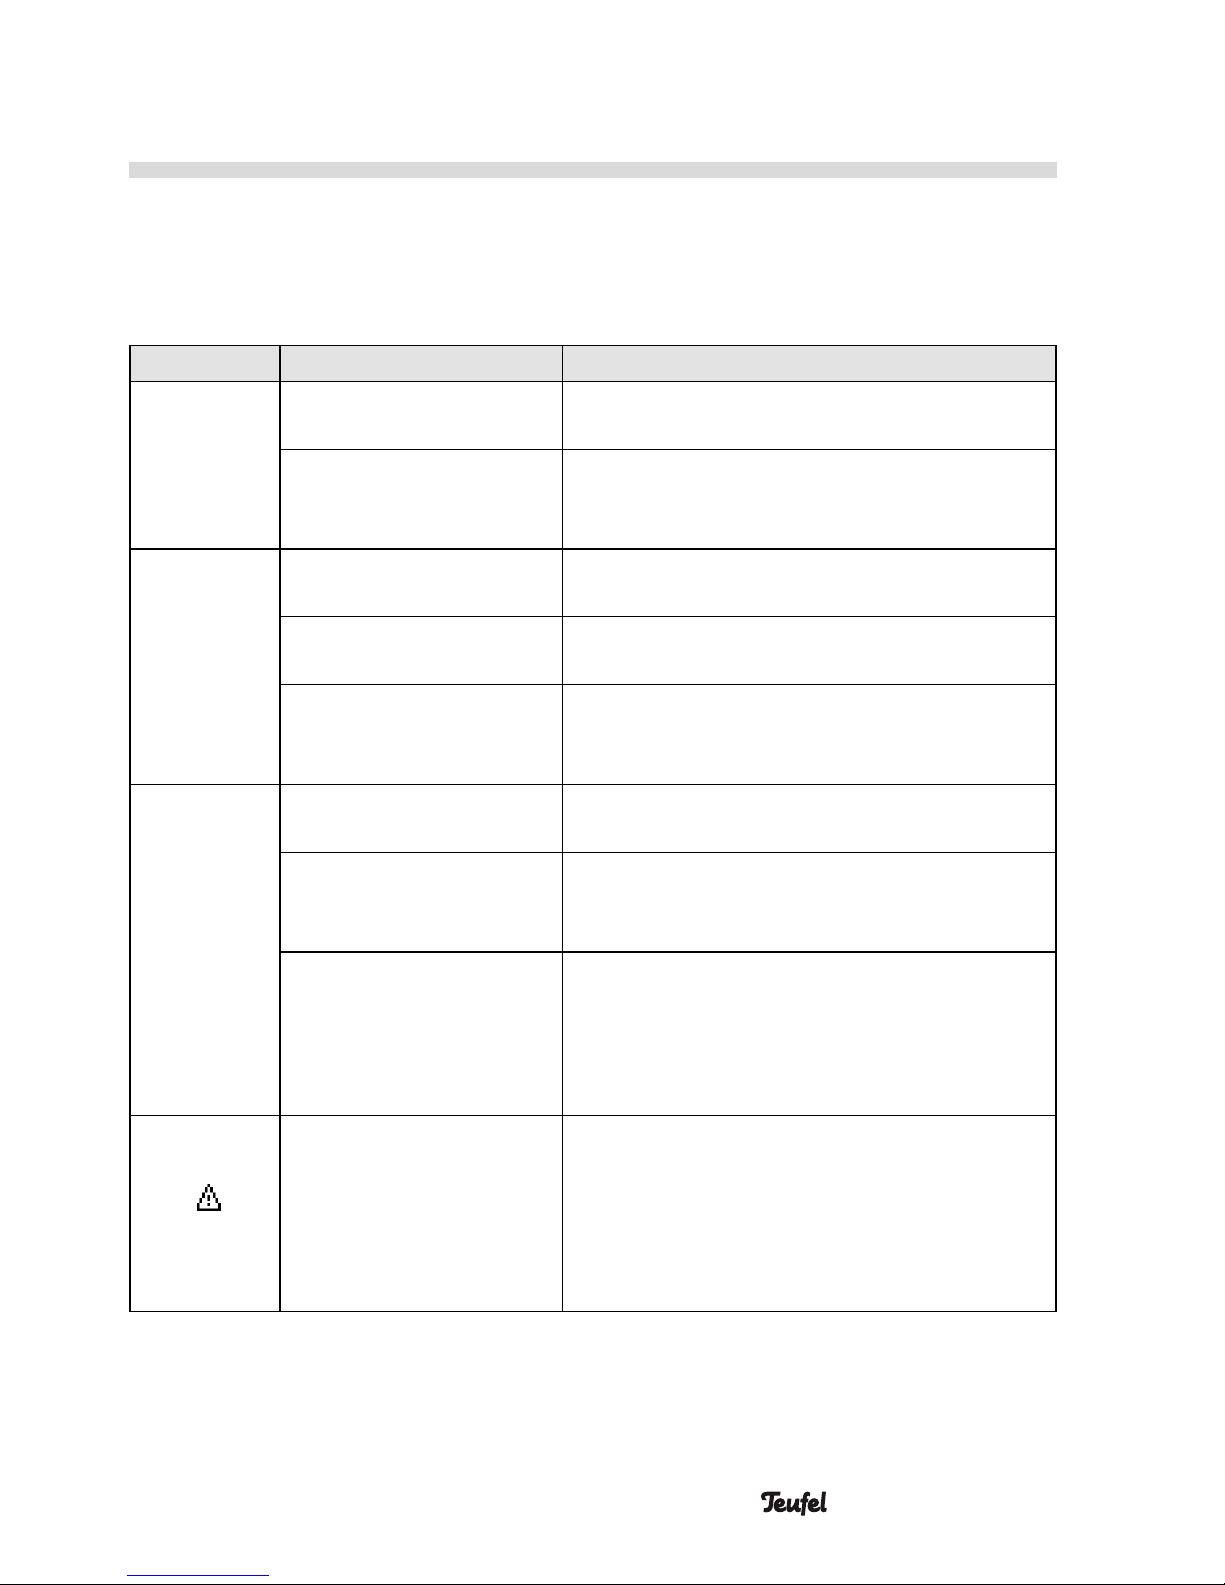
The following advice should help you to solve problems. If this does not help,
you will find useful information in the detailed FAQs on our website. Otherwise,
please contact our hotline (see page 3). Take note of the warranty instructions.
Problem Possible cause Solution
No function No power supply Check the function of the socket with
another device.
The small plug of the
mains adapter has
slipped out
Check the connection of the mains
adapter (page 13).
The device
doesn’t
emit any
sound
The wrong source has
been selected
Select the right source (page 16).
The volume is set to
“0”
Increase the volume.
The volume of the
external player has
been set too low
Carefully increase the volume of the
external player.
No sound
in Bluetooth®
mode
No Bluetooth® connection
Establish a connection (see page 31).
Radio 3sixty has not
been selected as the
output device
On the external player, select
“Radio 3sixty” as the Bluetooth® output
device.
Bluetooth® connection
impaired by another
radio system (e.g.
cordless telephone,
Wi-Fi)
Set up the Radio 3sixty and/or external
player in another location. Move to
another room to test.
No Wi-Fi
connection,
appears on
the display
panel
Connection to Wi-Fi
lost or incorrect parameters received.
Delete the network settings (see “ Reset
network settings” on page 21), and
start the network wizard (see “Network
wizard” on page 21).
Page 36

36 • Radio 3sixty
Network
playback
(DLNA) cuts
out.
Network option “Stay
connected?” is not
enabled.
Set the option to “Yes” (see“Keep
network connected“ on page 21).
No connection to
Spotify
No premium account You need a Spotify premium account for
playback on the Radio 3sixty.
Playback is
noisy.
Generally speaking,
the Radio 3sixty is a
very low-noise system.
In the high range area,
very high-resolution
speaker systems can
expose the poor quality
of a signal source (e.g.
from MP3 files).
Ensure that the source is sending a clear
signal to the Radio 3sixty.
Page 37
37 • Radio 3sixty
Declaration of Conformity
Lautsprecher Teufel GmbH hereby declares that this product
complies with the requirements of the directives 2014/30/EU,
2014/35/EU and 2014/53/EU to the extent they are installed and
used in accordance with the instructions of the manufacturer. The full text of the
EU declaration of conformity is available at the following Internet address:
www.teufelaudio.com/konformitaetserklaerungen.html
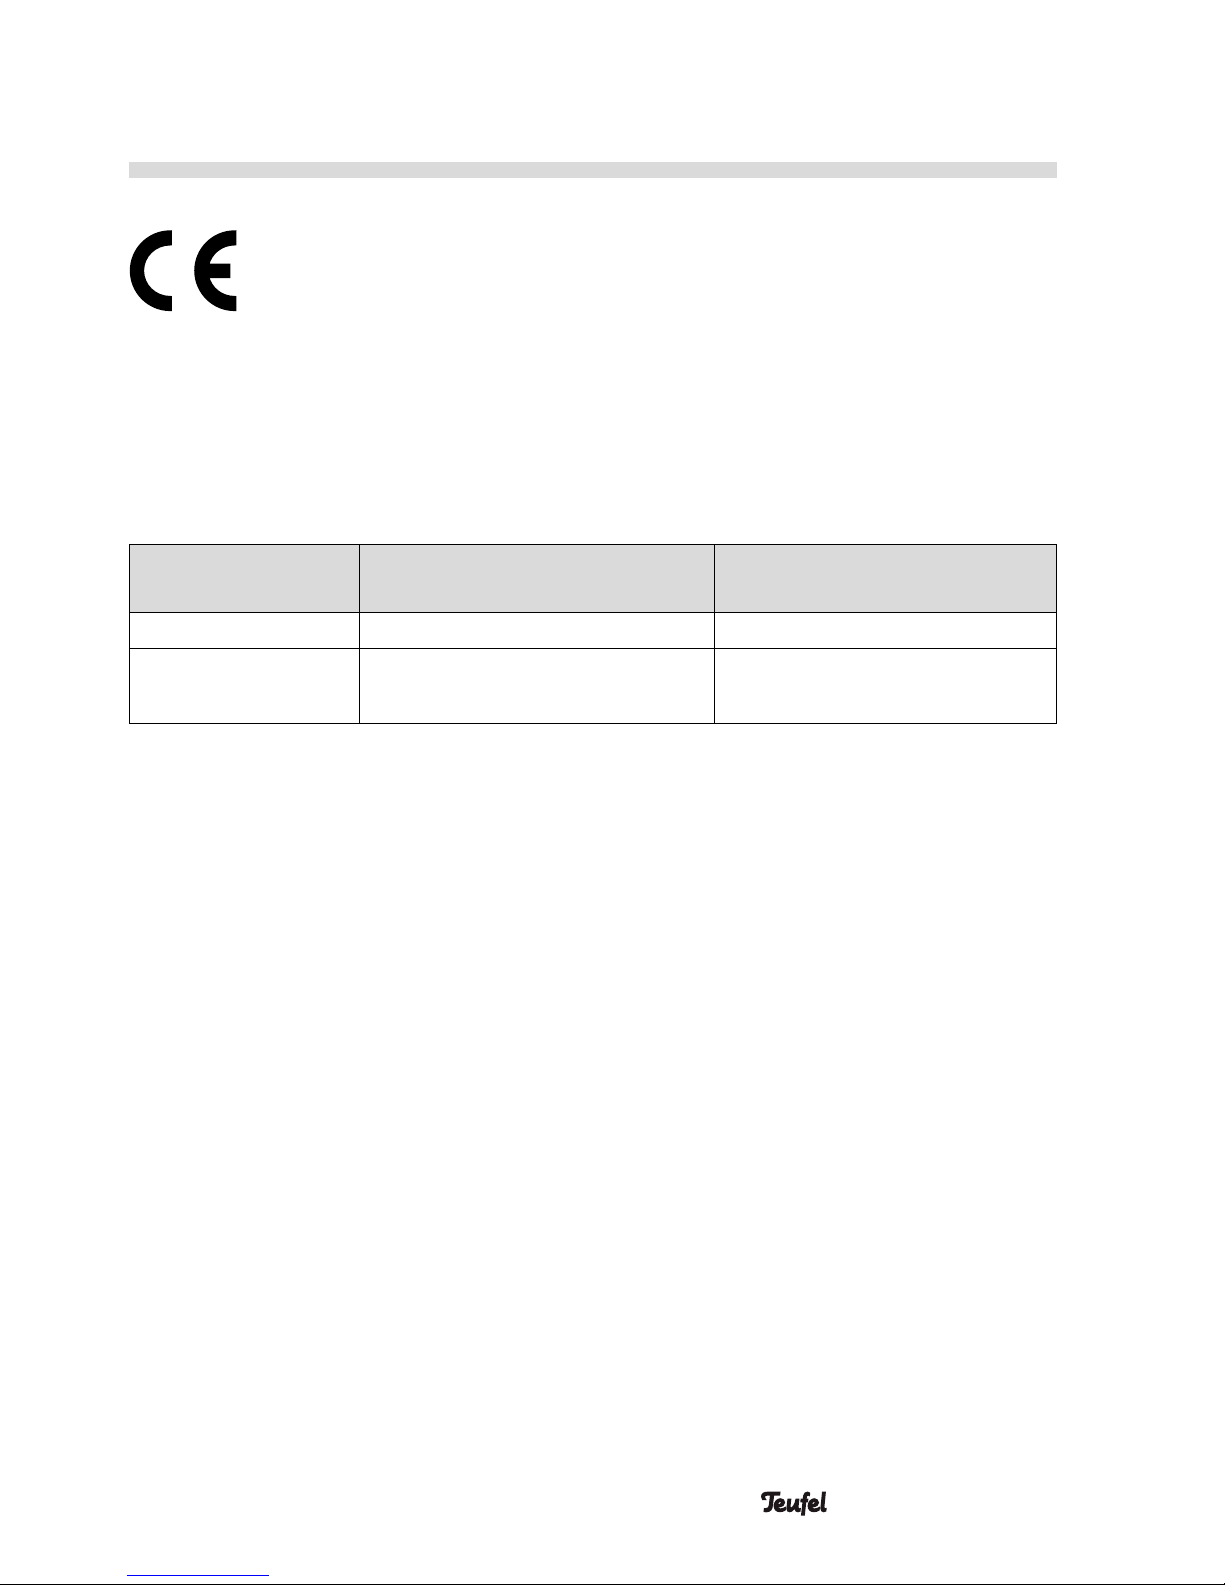
The following radio frequency bands and radio transmitting powers are used in
this product:
Radio network Frequency bands in MHz Transmission power in mW/
dBm
Bluetooth
®
2.400–2.483.5 2.5/4
Wi-Fi/WLAN 2.399.5-2.484.5
5.150–5.350/5.470–5.725
15
11
Page 38
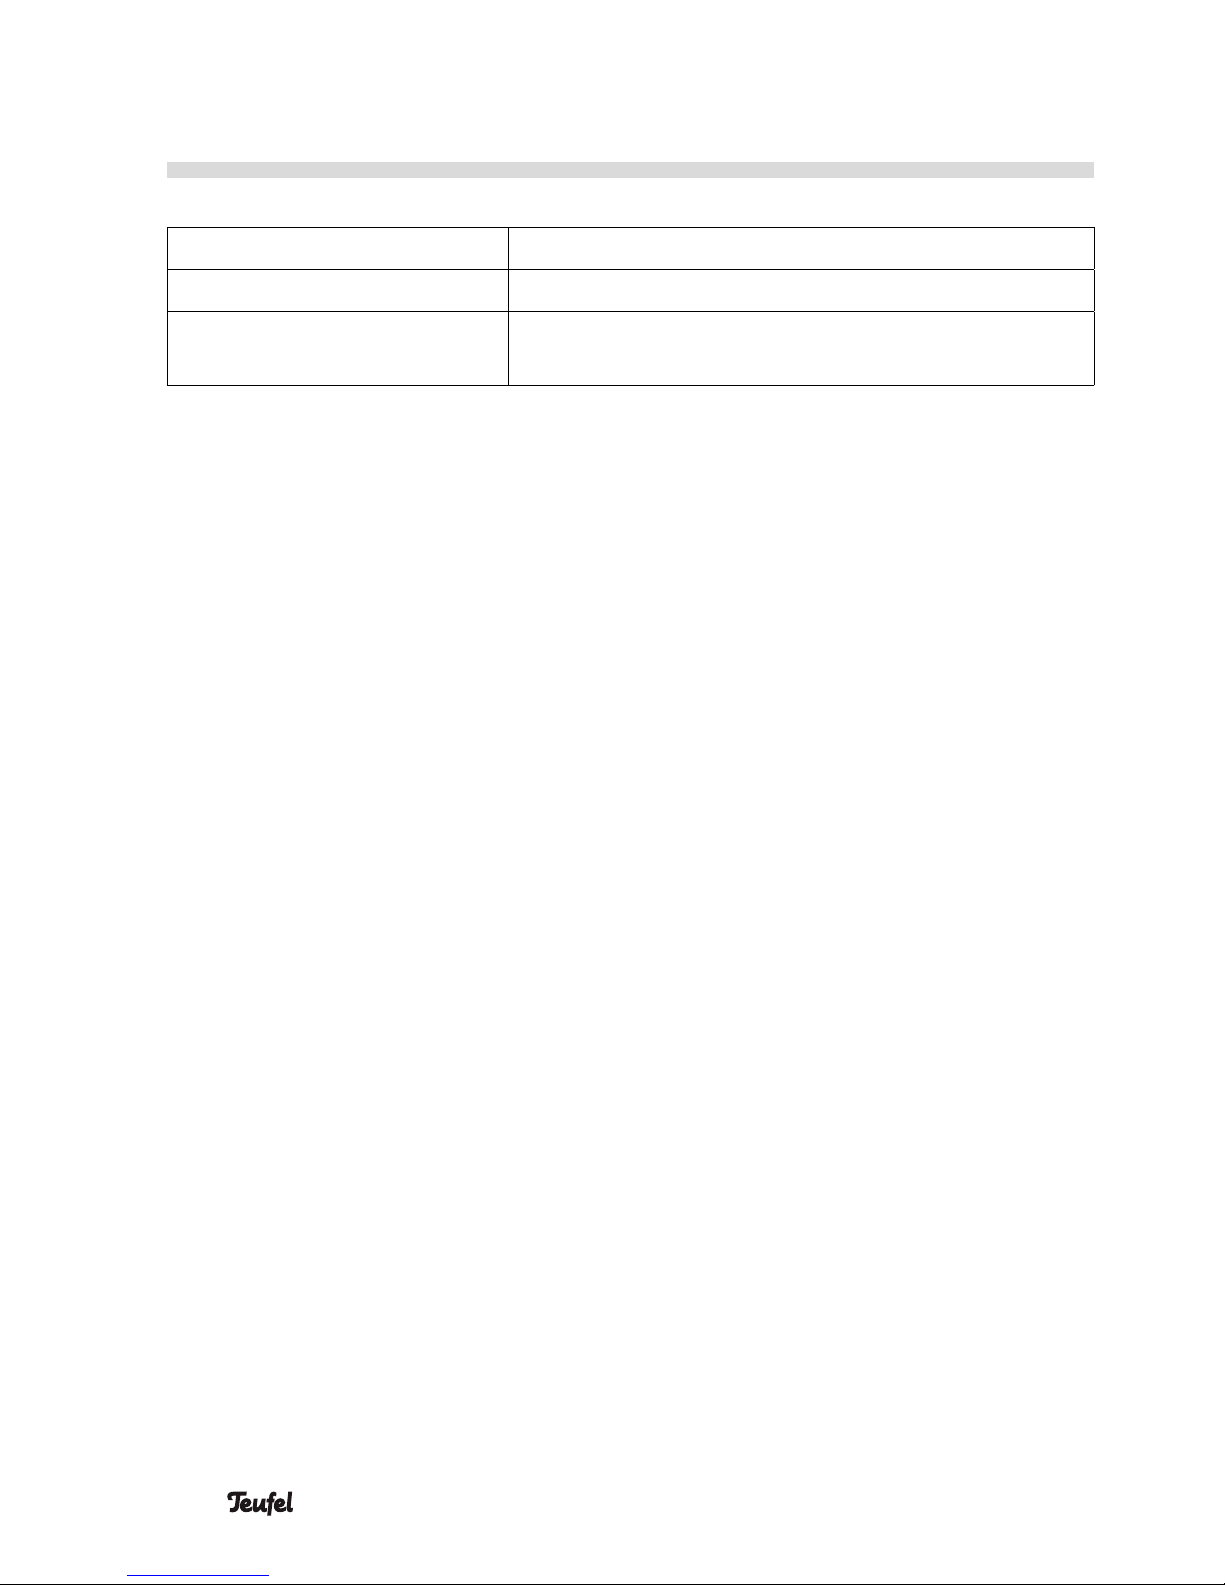
38 • Radio 3sixty
Dimensions (W × H × D) 280 × 170 × 125 mm
Weight 2.5 kg
Operating voltage of the
mains adapter
100–240 V~, 50/60 Hz, 1.5 A max.
Technical Data
You can find further technical data on our website. Technical changes reserved!
Page 39

39 • Radio 3sixty
Page 40

Manual No. 195929_GB_20180405
Please contact our customer service department with any questions,
suggestions, or complaints:
Lautsprecher Teufel GmbH
BIKINI Berlin
Budapester Str. 44
10787 Berlin (Germany)
Phone 00800 - 200 300 40 (toll-free)
Service: www.teufelaudio.com/service
Contact: www.teufelaudio.com/contact
No responsibility is assumed for the correctness of this information.
Technical changes, typographical errors and other errors reserved.
 Loading...