

Page 1
2 43
1
2
3
4
5
6
7
7
8
6
9
7
10
11
12
13
14
15 16
21
20
1
2
3
4
5
6
7
7
8
6
9
7
10
7
6
6
18
17
19
12
11
12
13
14
15 16
21
20
18
17
19
12
Tetratec EX 600 Tetratec EX 700/
Tetratec EX 1200
Page 2
16
GB
E
X
6
00
/
E
X
7
0
0
/
E
X
1
200
Content Pages
Set up 17 - 21
Maintenance 21 - 24
Trouble Shooting 25 - 26
Dear Customer,
Congratulations on choosing your new advanced Tetratec®EX External Aquarium Filter. This filter has been
specially designed to ensure that your aquarium water is filtered highly efficiently. The Tetratec
®
EX
External Aquarium Filter has an automatic priming aid for easy start and maintenance. It is extremely quiet
and very powerful. This high quality product ensures you years of trouble free service.
Technical Data EX 600 EX 700 EX 1200
Water Flow (l/h) 600 700 1200
Suitable Tank Size 60-120l 100-250l 200-500l
Maximum Head Height (m) 1,2 1,5 1,8
Filter Capacity (l) 5,7 6,6 12,0
Filter Media Container (unit) 1l x 3 1l x 4 1l x 4
Water Hose – 11,3 11,3 15,2
Internal Diameter (mm)
Frequency (Hz)
50 Hz 50 Hz 50 Hz
Power Consumption (50 Hz) 10W 13W 21W
Voltage AC 230V AC 230V AC 230V
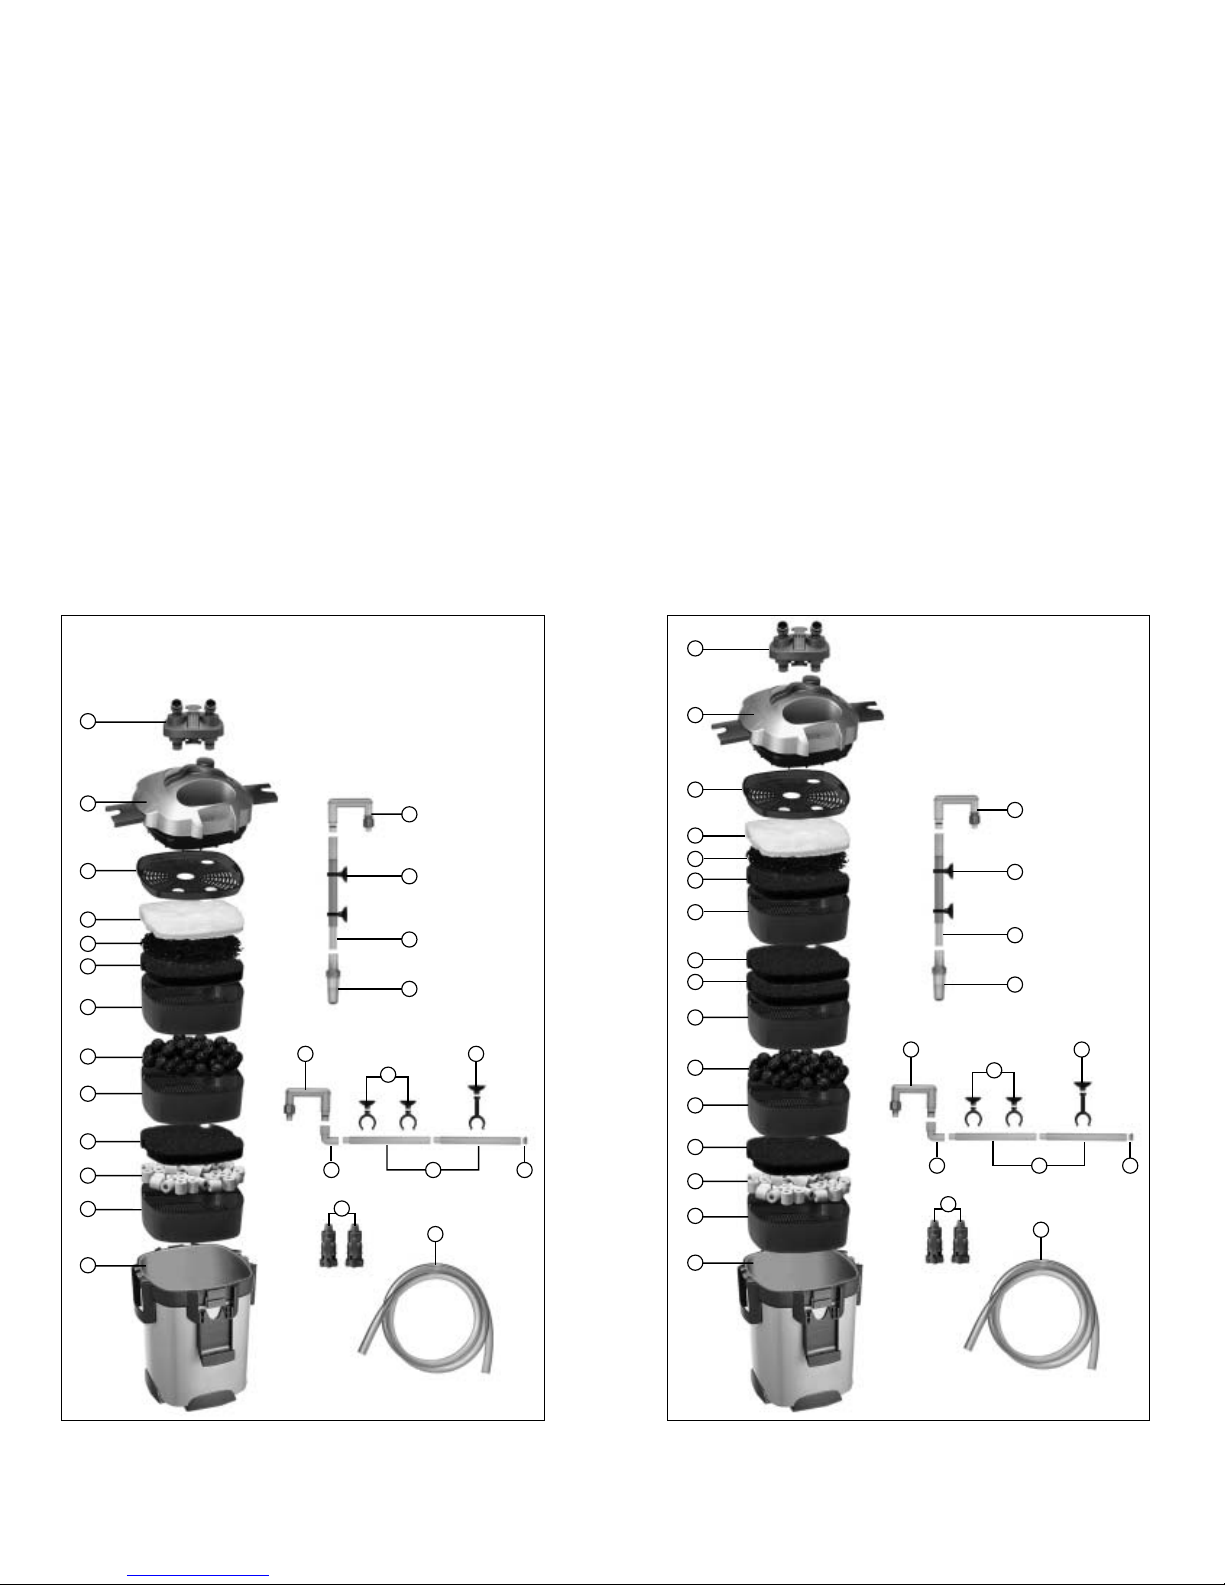
1 Hose adapter unit with lever (with O-ring)
2 Motor head (with O-ring)
3Filter media securing plate
4Tetratec®FF Filter Floss Pad
5Tetratec®CF Carbon Filter Media (2 units for EX 1200)
6Tetratec®BF Biological Filter Foam
7Filter media container
8Tetratec®BB Bio Filter Balls
9Tetratec®CR Ceramic Filter Rings
10 Filter case
11 Overflow pipe for water intake (with O-ring)
12 Suction cup with short clip (6 units)
13 Intake extension tube
14 Strainer
15 Overflow pipe for flow return (with O-ring)
16 Suction cup with long clip (6 units)
17 L-Connector
18 Spray bar (2 units)
19 Stopper
20 Valves (2 units)
21 Water hose approx. 1.5m (2 units)
Filter Components
Page 3
18
Set up
17
Set up
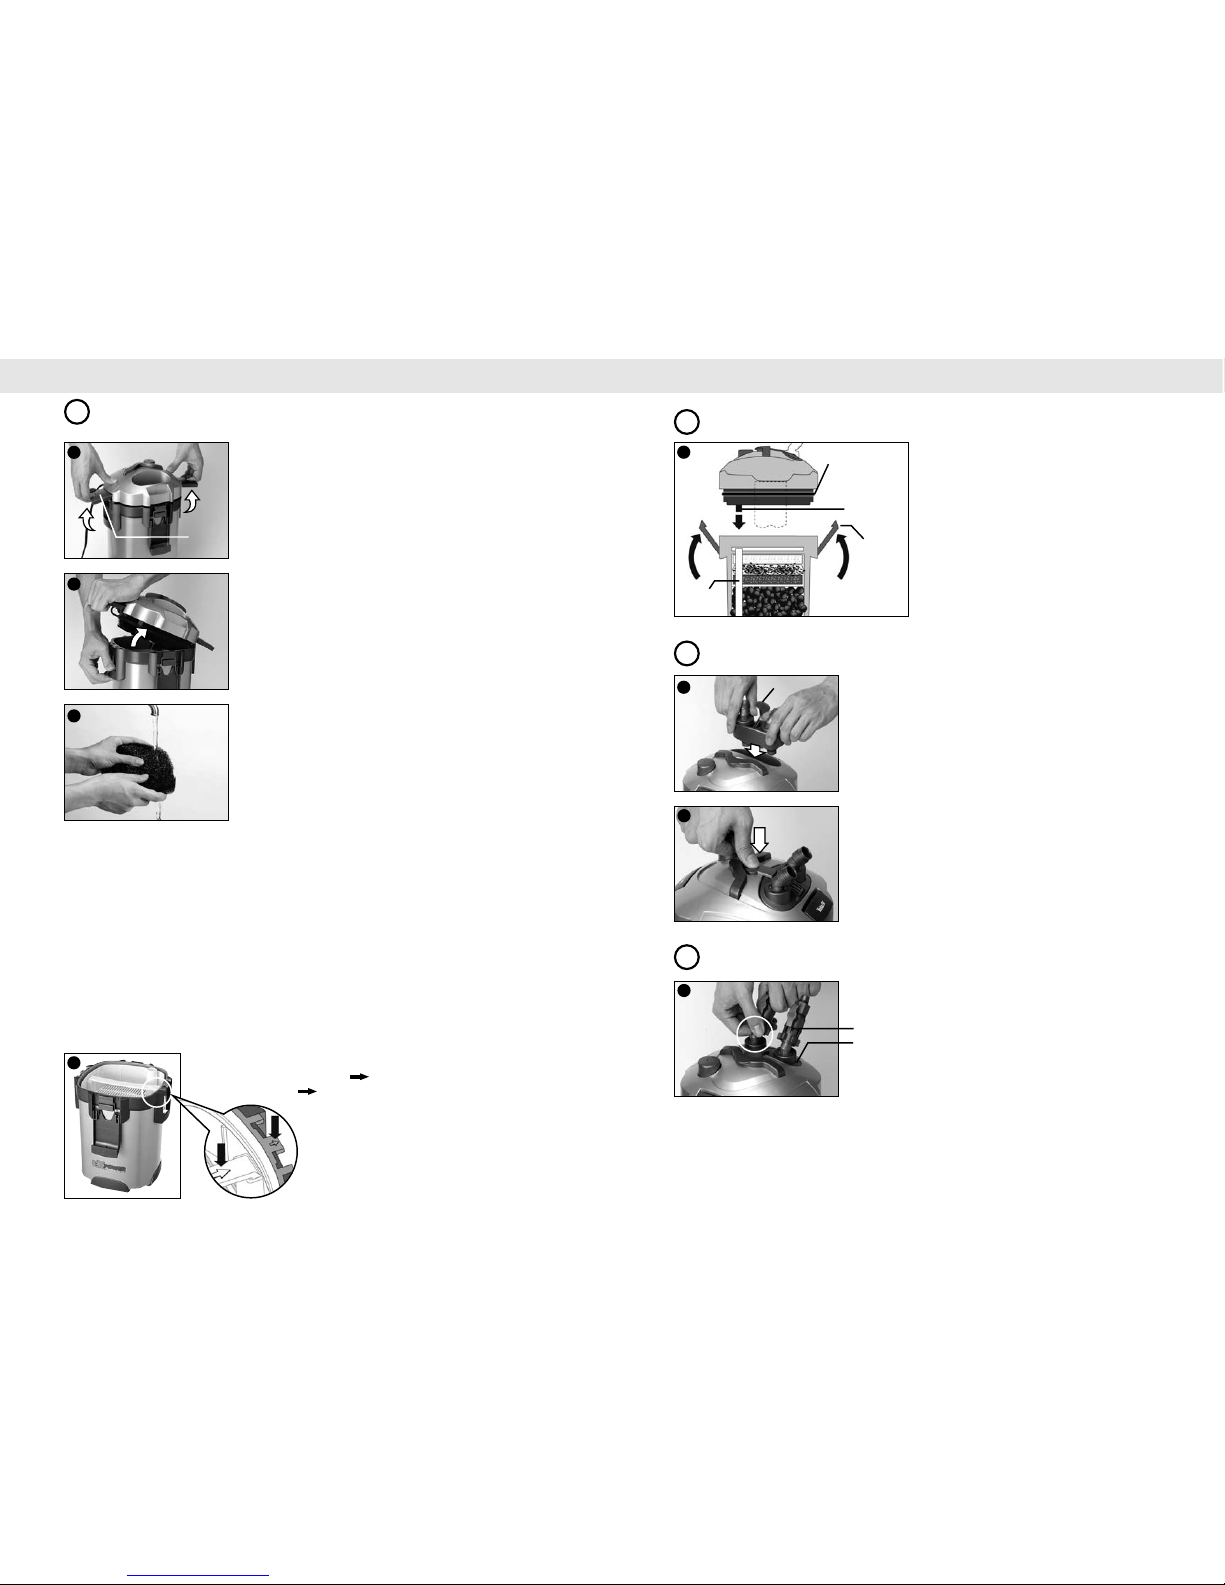
Remove the motor head from the filter case of the Tetratec®EX
Filter.To release the motor head, lift the locking buckles with the
Tetratec
®
logo.
Release the lift buckles to slightly raise the motor head from the
filter case.
Remove the motor head by lifting one of the lift buckles while
holding down the filter case frame.
Remove the filter media securing plate and filter media containers
from the filter case.
Clean all the Filter Media
Take out all of the filter media from the filter media containers and
rinse them in water. (Take the filter media out of the plastic bags
before use.)
After rinsing, return to the filter media containers as per the
original order. (The placement is shown below.)
1
Lift
buckles
1
2
3
Filling with Filter Media
Für EX 600:
Bottom Tray: Tetratec
®
CR Ceramic Rings and on top Tetratec®BF Biological Filter Foam
Second Tray: Tetratec
®
BB Bio Filter Balls
Third Tray: Tetratec
®
BF Biological Filter Foam, then Tetratec®CF Carbon Filter Medium,
then Tetratec
®
FF Filter Floss Pad
Für EX 700 / 1200:
Bottom Tray: Tetratec
®
CR Ceramic Rings and on top Tetratec®BF Biological Filter Foam
Second Tray: Tetratec
®
BB Bio Filter Balls
Third Tray: Tetratec
®
BF Biological Filter Medium (2 units)
Fourth Tray: Tetratec
®
BF Biological Filter Foam, then Tetratec®CF Carbon Filter Medium
(2 units for EX1200), then Tetratec
®
FF Filter Floss Pad
Filling with Filter Media
Important: Reset all filter media containers and the filter media
securing plate so that the “ ” marks on the handle of the containers
align with the “ ” marks on the filter case.
4
Attach the hose adaptor unit to the motor head with the central
lever raised. (The hose adaptor unit cannot be attached while the
central lever is down!)
Take care to assemble the parts properly.
Ensure that there is no dirt or foreign substances
on the filter case or O-ring of the motor head.
Place the motor head on the filter case. Ensure that
the intake nozzle of the motor head and the
connector pipe of the filter media containers are
aligned.
Resecure the lift buckles to align the motor head
with the filter case. Then close the locking buckles.
After attaching the hose adapter unit to the motor head, push the
central lever down to the center of the motor head to fix it in place.
Attach the valves to the hose adapter unit.
Screw the valves onto the hose adaptor unit.
Filter Case O-ring
Water intake
nozzle
Locking
Buckle
Connection
Pipe
Setting the Motor Head to the Filter Case
2
Assembling the Motor Head Hose Adaptor Unit
3
5
6
7
8
Assembling the Water Hoses
4
Valve
Hose
adapter
unit
Central Lever
Page 4
20
Set up
19
Set up
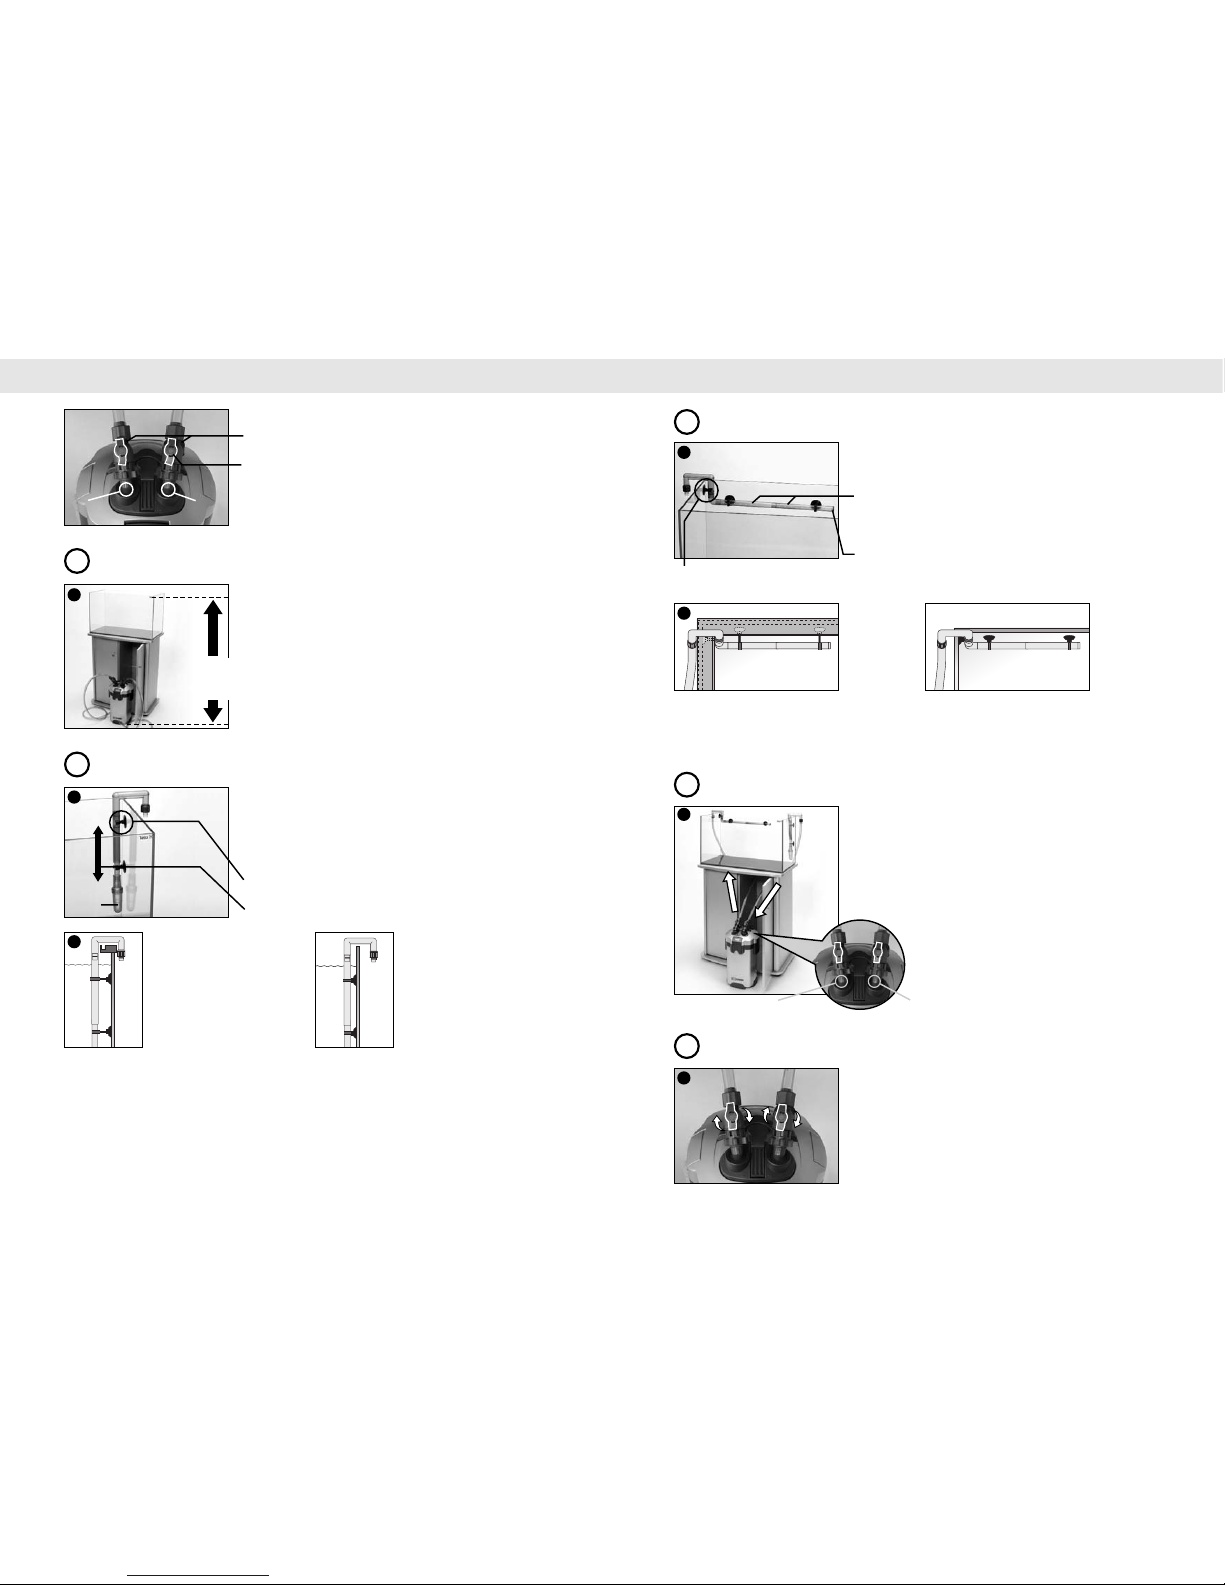
Once the hoses are properly attached, ensure the distance between
the bottom of the filter and the surface of the water is within the
range shown on the illustration.
Connect the water intake pipe to the strainer and after fixing the
suction cup clips use them to affix the unit to the inner wall of the
tank.
The filter comes with both long and short clips. Which clip to use
will depend on the shape/size of the top part of the tank wall.
Suction Cup Clips
Use “large” sized clips for the upper part (thicker pipe) of the flexible pipes.
Adjust the flexible pipe according to the depth of the tank.
Attach the water hoses to the valves.
Note: Use only hoses supplied by the manufacturer.
Installation Positioning of the Filter
5
Installing the Water Intake Pipe
6
11
Firmly insert each hose into the
adaptor unit and tighten the screws.
Turn the valves in the direction
shown in the diagram.
OUT =
Drainage
IN =
Intake
10
EX 600: 50 - 150 cm
EX 700: 60 - 150 cm
EX 1200: 80 - 150 cm
Strainer
a) Example of use
Long Clip
b) Example of use
Short Clip
12
a) Example of use: Long Clip b) Example of use: Short Clip
14
Affix the assembled overflow pipe, spray bar and stopper to the
wall of the tank using the suction cup clips.
13
Installing the Flow Return Pipes
7
Suction Cup Clip
Spray bar
Adjust the length of the spray bar to the width of the tank. Use only one flow
return pipe for tanks that are relatively narrower in width. Remove the stopper
to decrease water pressure in the spray bar.
Stopper
Connect the intake hose to the hose adaptor marked “IN”.
Connect the hose to the water intake pipe and to prevent leakage
tightly secure the hose with the screws.
Connect the flow return hose to the hose adapter marked “OUT”.
Connect the hose to the flow return pipe and tightly secure with
the screws.
Note: Cut the hose to the length required.
15
Note: Extra suction cups and each type of clips are enclosed.Use them in accordance to your tank and your
tank set up.
OUT = Return IN = Intake
Open the valves of the hose adaptor.Turn the valves parallel to the
hose adapter as shown.
16
Start-up Procedure
9
Assembling Water Hoses
8
Page 5
22
Maintenance
21
Set up
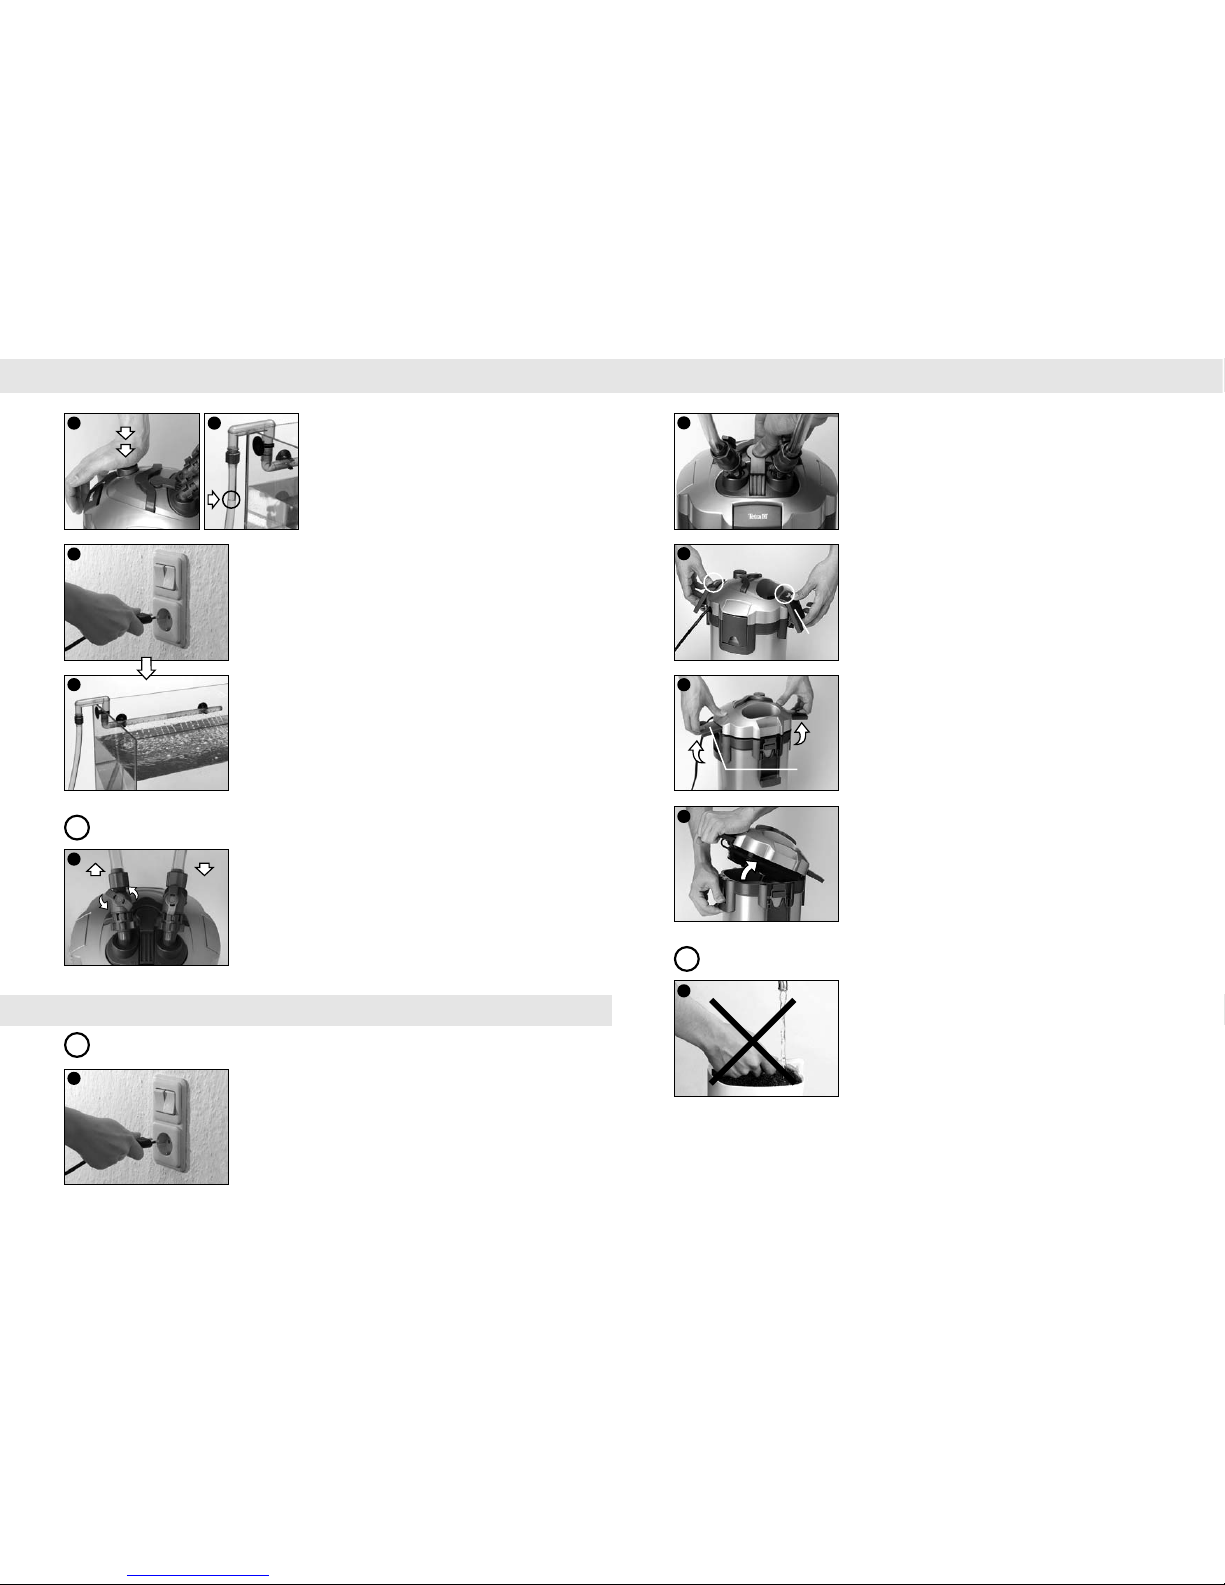
Push the start button on the motor head repeatedly
and in quick succession with the palm of your hand
until the Tetratec
®
EX Filter starts pumping water.
Water will be siphoned through the water intake
hose and directed into the filter case. It will stop
siphoning water once the water in the flow return
pipe reaches the water surface level of the tank.
17
18
Plug in the Tetratec®EX Filter.Once the power is on, water will flow
fully along the flow return pipe.
Note: At this point check all components for leakage. After
operating the Tetratec
®
EX Filter for 30 to 60 min check that
the filter is operating properly and recheck for leakage.
If water is not satisfactorily flowing through the return pipe, unplug
the filter and check the hose connections and ensure that the hose
is not tangled. Gently shaking will help to release any air trapped
inside the filter.
19
20
The water flow can be adjusted when required, for example when
feeding fish.
Turn the tap of the “OUT”-adapter 45 degrees counterclockwise
to decrease the water flow.
Turning the tap 90 degrees counterclockwise will cut the water
flow entirely.
21
Adjusting the Water Flow
10
INOUT
Regular Maintenance/Replacement and Cleaning of Filter Media
11
22
Warning!
Unplug the cord the of Tetratec
®
EX Filter before maintenance
and cleaning the Tetratec
®
EX Filter.
Please maintain and clean the filter as necessary, in order to avoid
a decrease in water flow as a result of clogging of the filter.
Maintenance
23
Removing the Hose Adapter Unit from the Motor
Head
Close the adapter valves and pull the central lever of the adapter
unit up slightly to stop intake/drainage of water. Pull the lever up
completely and lift the hose adapter unit to remove it from the
motor head.
Opening the Filter
Remove the motor head from the filter case of the Tetratec®EX
Filter.To release the lock, lift the locking buckles with the Tetratec
®
logo.
Releasing the lift buckles will slightly raise the motor head from
the filter case
Remove the motor head by lifting one of the lift buckles while
holding down the filter case frame.
24
Locking
buckles
Lift
buckles
25
26
Take the filter media securing plate and filter media containers out
of the filter case.
Using water from the tank, clean off all dirt and foreign particles
from the filtering media. (Washing the media directly with tap
water could harm useful filter bacteria that have settled on the
filter media.)
27
Cleaning Filter Media
12
Page 6
24
Maintenance
23
Maintenance
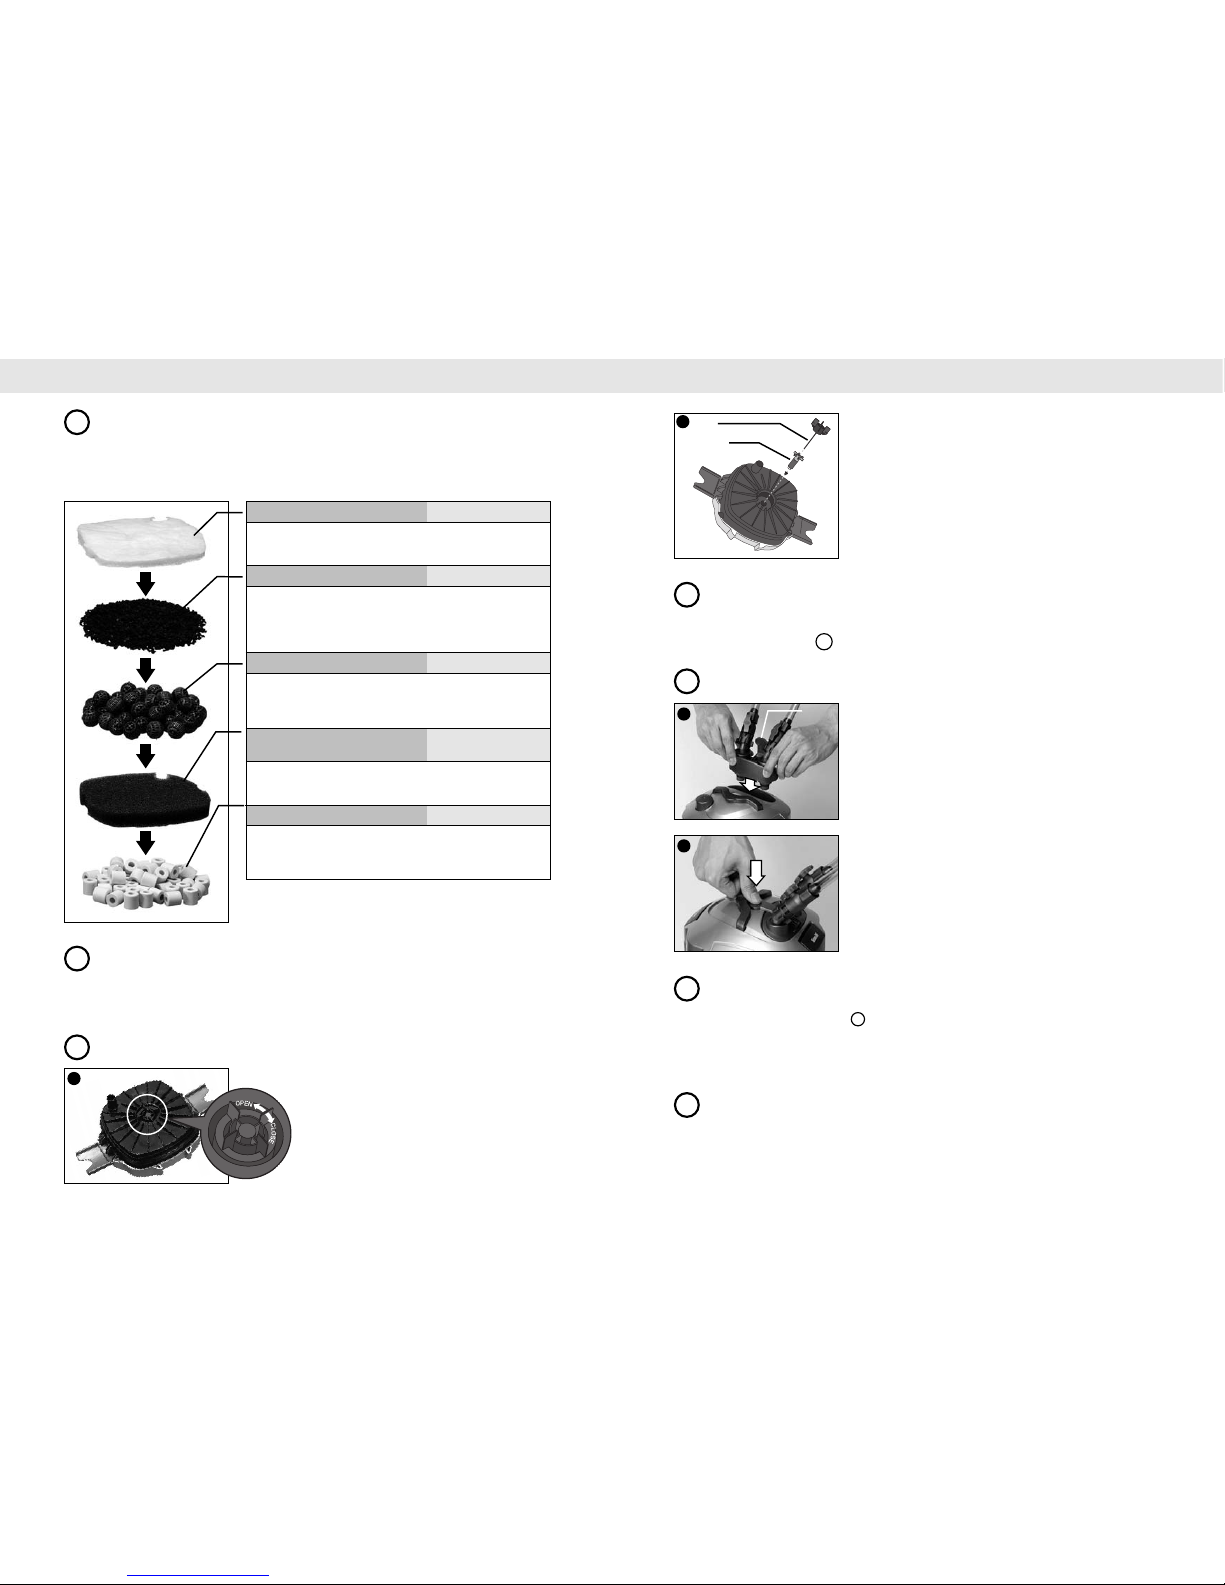
After washing the media replace them in the filter media
container as per the original order (refer to page 2 or 3).
Use only replacement Tetratec
®
EX filter media supplied by the manufacturer.It is recommended that filter
media be replaced in accordance to the specified periods.
Function and Replacement Time Frames for each
Filter Media
13
Hose Cleaning
14
Dirt and algae build up on the inside of the hoses can reduce water flow. Flush out dirt and algae by
removing the pipes and flushing them with tap water.
Cleaning the Impeller Case
15
28
Twist the impeller case cover counterclockwise towards
“OPEN” and remove the cover.
Tetratec®FF Filter Floss Pad Physical Filter Media
The fine material of the woolen mat catches fine impurities not trapped
by the other filter media. It is recommended that you replace the
woolen mat once a month.
Activated Carbon Chemical Filter Media
The activated Filter Carbon chemically removes substances such as
pesticides and remedies from the water and adsorbs odors and
substances that cause muddying and yellowing of the water. This filter
medium is to be used on demand on a short term basis. It is
recommended that you replace the filter carbon every month.
Tetratec®BB Bio Filter Balls Biological Filter Media
Useful bacteria are bred in the small spaces of the ball. Impurities are
then divided and neutralized biologically. The balls are reusable as
long as the dirt on the surface can be removed by washing with
tank water.
Tetratec®BF Biological Filter Foam Physical/Biological
Filter Media
The fine sponge surface allows the production of useful bacteria,
which break up dirt particles and biologically filter impurities. It is
recommended that you change the sponge once every six months.
Tetratec®CR Ceramic Filter Rings Physical Filter Media
These ceramic rings physicaly filter impurities while distributing the
water flow in a number of directions ensuring that water passes evenly
through the filter. They should be replaced when dirt on the surface
of the rings cannot be removed by washing with tank water.
Remove the impeller and shaft from the impeller case and rinse
thoroughly under warm tap water.
After cleaning, reassemble the parts in the opposite order setting
the impeller drive magnet and then the impeller cover. Twist the
cover clockwise towards “CLOSE” to securely lock the cover in
place.
Shaft
Impeller
29
Affixing the Motor Head
16
Once cleaning is completed, ensure the filter media container is correctly aligned before affixing the motor
head (please refer to point No. 2 .
Assembling the Hose Adapter Unit
17
Insert the Hose Adaptor Unit
Note: Do not move the central lever until the hose adapter is
fixed.
Place the filter in an upright position. Insert the hose adaptor unit
into the motor head while the central lever is raised.
30
After inserting the adaptor unit into the motor head push the
central lever down. Open the valves of the hose adaptor again.
31
Central
Lever
Prime water as described in point No. 9 .
Note: Once the water starts flowing, don’t forget to readjust the water flow to the level prior to
Maintenance.
Priming Water
18
Plug in Tetratec EX Filter
19
Page 7
26
Trouble Shooting
25
Trouble Shooting
Trouble Shooting
20
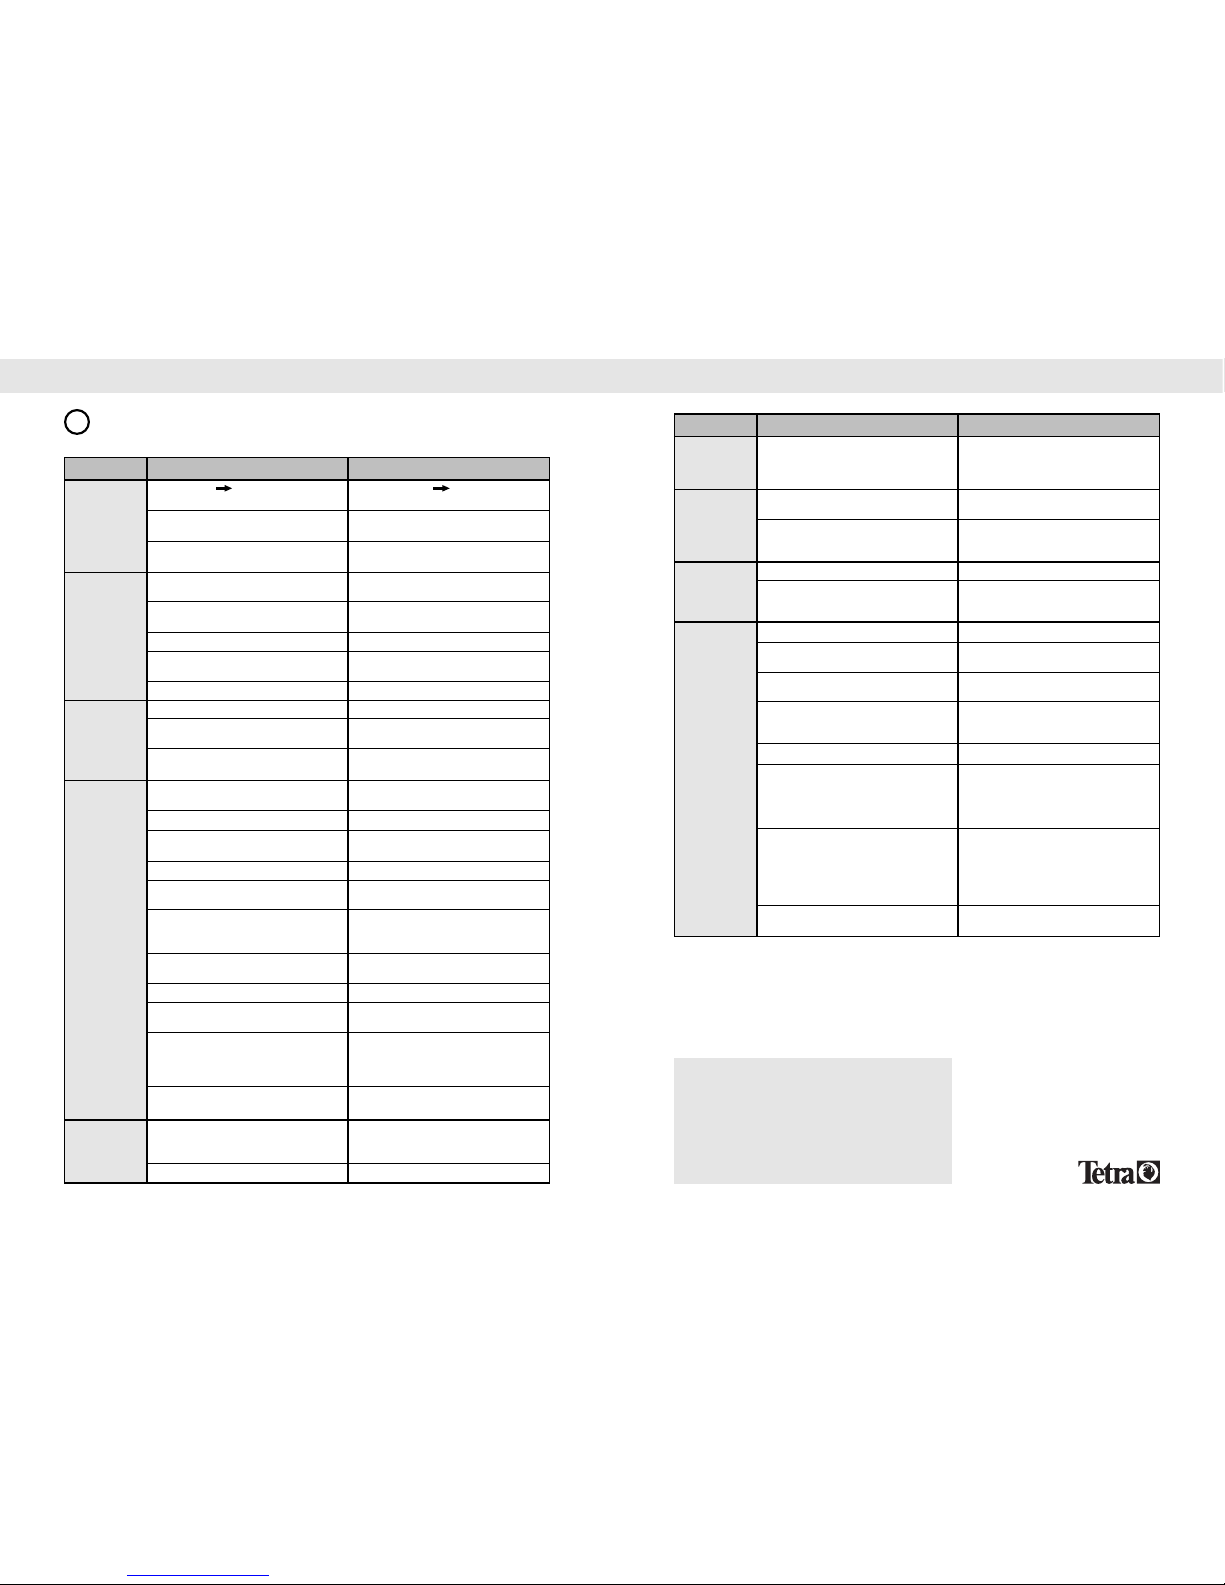
Problem Cause Solution
The motor head
cannot be
affixed to the
filter case
Water leakage
from the motor
head
The motor is
not operating
Reduced
water flow
Air build up
The respective “ ” marks on the filter
container and the filter case are not aligned
Incorrect arrangement of the filter
containers
Too much filter media has been put into the
containers
The lift buckles and/or safety buckles are not
properly closed
There are foreign substances or dirt on the
filter case or O-ring
The O-ring is displaced, damaged and/or missing
The edge of the motor head is damaged
Improper assembly of the hose adaptor unit
The power is off
The impeller shaft is broken
The impeller is missing or is clogged with
foreign materials such as pebbles and shells
Hose adaptor unit is excessively dirty
Hoses have been incorrectly connected
Excessive dirt build up in the hoses
Water intake strainer is clogged
Filter media is clogged
Filter media have been put in nets or materials
other than those supplied by the manufacturer
Filter media have been improperly combined
Filter floss is too dirty
Dirt build up in the impeller chamber
Water is not circulating
Components other than those supplied by the
manufacturer have been attached to the hoses
There is insufficient distance between the filter
and the water surface level of the tank
Filter media is clogged
Make sure that the “ ” marks are properly
aligned
Make sure that the connection pipes of the filter
media containers are properly aligned
Take out excess filter media and flatten remaining
media
Close all the lift buckles and safety buckles
properly
Thoroughly clean the adjoining section of the
O-ring and filter case
Set or replace the O-ring
Replace the motor head (*consult place of
purchase)
Properly assemble the hose adaptor unit
Make sure that the power is on
Replace the impeller shaft (*consult place of
purchase)
Set or clean the impeller
Detach the hose adaptor unit and clean the inside
under warm water
Check whether the hose is entangled or crimped
Periodically clean the inside of the hoses and the
intake and drainage pipes
Remove all foreign substances, clean off the dirt
Remove the filter media and wash with tank water
taken from the tank
Do not place the filter media in nets or nylon
stockings. Doing so may cause clogging, which in
turn may block the water flow
Check that the filter media have been set as per
the manual
Replace it with a new one
Thoroughly clean the impeller chamber/impeller
under warm water
When starting, check that the return pipe is
above the water surface level of the tank (required
to remove air in the filter), then press the start
button (water Priming function)
Avoid using accessories other than those provided
by the manufacturer, as this will inhibit water flow
The top of the motor head should at least be
10 cm below the water surface. The larger the
distance the better (see recommendations)
Clean the filter media
Problem Cause Solution
Air build up
Automatic
Priming is not
functioning
smoothly
Abnormal sound
emitted when
starting the
filter
Abnormal sound
emitted when
operating the
filter
Air is coming in through the overflow pipe
Filter media has not been sufficiently cleaned
Filter media has been put in nets etc.
Air is entering from the hose connection
Air is remaining in the filter case
Insufficient lubrication of o-ring
Inconsistent intake of water due to lack of water
intake
The top of the motor is at the same level or higher
than that of the water surface
Air is remaining in the filter
Damaged impeller/drive magnet or spindle
Every 10 seconds a sound of air being expelled
from the return pipe is emitted
Decrease in water flow due to water staining or
dirt on the impeller/drive magnet
The “start” button is being pressed
Replace the O-ring on the overflow pipe or ensure
that the connection between the overflow pipe and
water intake pipe is below the water surface level
of the tank.
Remove the filter media from the containers and
clean them with tank water taken from the tank
Do not place the filter media in nets or nylon
stockings. Doing so may cause clogging, which in
turn may block the water flow
Check whether the hoses are connected properly
Leaving the power on, shake the unit to help
remove remaining air
Apply ample vaseline to all of the O-rings
Press the “start” button and repeat procedure
from the beginning
Ensure that the top of the motor is at least 10cm
below water level (see recommendations)
Remove and replace the plug in the socket 3-4
times Gently shake the filter to remove remaining
air
Please consult place of purchase
Due to breathing of bacteria and photosynthesis of
water plants, air bubbles may accumulate and
sounds of it being let out from the Tetratec
®
EX
Filter may be heard. Corrective measures are not
necessary.
The motor is cooled by water hence if water in the
drive system is dirty or dirt is allowed to
accumulate, water flow will be inhibited and life of
the motor will be decreased. Periodically clean the
impeller/drive magnet and the surrounding area
under warm water.
Do not press the “start” button or put anything on
top of it while the filter is running
Note: For purposes of product improvements, specifications may be altered without notification.
Safety First
Always isolate the unit from the mains electricity before
carrying out any maintenance work.
The electrical cord cannot be replaced. If the cord is
damaged the appliance should be scrapped. On no
account must an unqualified person attempt to carry out
any electrical repairs on this unit.
For more information on fishkeeping please contact Tetra
Information Centre at the address above.
Tetratec®Tip:
Tetra offers you a wide choice of highquality products which are available at your
local retailer. If you need further advice do
not hesitate to contact us.
Tetra GmbH
D-49304 Melle,
Germany
www.tetra.net
3 Year Guarantee
Thanks to modern production processes, high-quality components and strict quality controls we allow a
guarantee of 3 years from the date of purchase on the accuracy of the Tetratec
®
EX Filter.Please keep proof
of purchase! The guarantee does not cover improper use, normal wear and tear as well as modification to
the appliance. In case of complaints please contact your local retailer or address to Tetra (UK) Ltd, P.O. Box
271, Southampton, SO18 3ZX.
 Loading...