

Page 1

Thermometer
Instruction manual
99 Washington Street
Melrose, MA 02176
Phone 781-665-1400
Toll Free 1-800-517-8431
Visit us at www.TestEquipmentDepot.com
testo 104
Page 2
1. General Information
1. General Information
9
1. General Information
Please read this document through carefully and familiarise
yourself with the operation of the product before using it. Keep
this documentation to hand so that you can refer to it when
necessary.
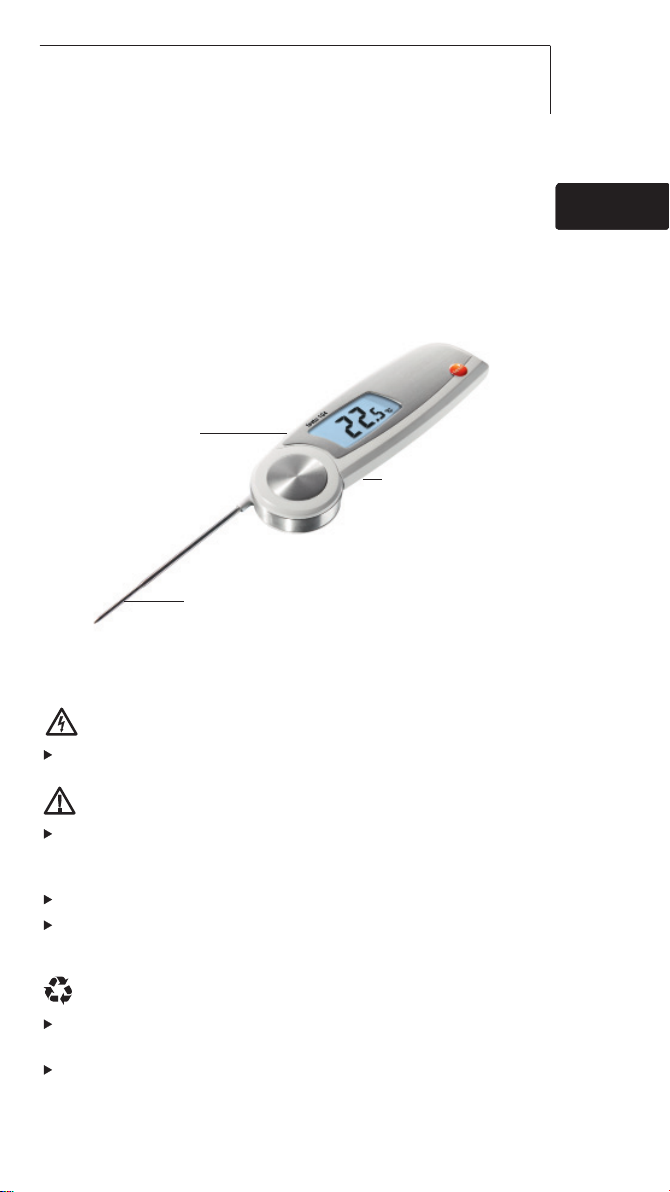
2. Product Description
Display
Hold
Hold
Button
Max Min
Max Min
Freeze reading,
display max/min
value
Immersion / penetration probe
Immersion / penetration probe
Battery compartment
(on rear)
3. Safety Information
deenfresitptsvnl????9defresitptsvnl????
en
Avoid electrical hazards:
Do not conduct measurements on or near live parts!
Preserving product safety / warranty claims:
Operate the instrument properly and according to its intended
purpose and within the parameters specified. Do not use
force.
Do not store with solvents (e. g. acetone).
Only open the instrument if this is expressly described in the
documentation for maintenance purposes.
Ensure correct disposal:
Dispose of defective rechargeable batteries and spent
batteries at the collection points provided.
Send the instrument directly to us at the end of its life cycle.
We will ensure that it is disposed of in an environmentally
friendly manner.
Page 3

10 4. Intended Use10
4. Intended Use
The testo 104 is a robust food thermometer.
The product is designed for the following tasks/areas:
· Food sector: production, food service, spot check
measurement
· Measuring liquids, pastes and semi-solid materials
The following product components are designed for continuous
contact with foodstuffs in accordance with Regulation (EC)
1935/2004:
From the tip of the immersion/penetration probe up to 2 cm before
the probe handle or the plastic housing. If provided, the information
about penetration depths under point 7.2 in the instruction manual or
the mark(s) on the immersion/penetration probes should be noted.
The product may not be used in the following areas:
· Potentially explosive areas
· For diagnostic measurements in the medical sector
5. Technical Data
Feature Values
Sensor type NTC
Measurement range -50...+250°C
Parameter Temperature in °C/°F/°R
Resolution 0.1°C/°F/°R
Accuracy ±1.0 °C (-50.0...-30.1°C)
Response time t99 10 s (measured in moving liquid)
Measuring rate 2 measurements per second
Operating temperature -20...+60°C
Transport / storage temperature -30...+70°C
Power supply 2 x AAA batteries
Battery life 100 h (typically at 25°C without display illumination)
Housing ABS/TPE/PC and die-cast zinc/stainless steel
Protection class IP65
Dimensions 265 x 48 x 19 mm (immersion/penetration probe open)
Weight 165 g (incl. batteries)
Display LCD, single line, with status line (Hold/Auto Hold) illuminated
Standards
±0.5 °C (-30.0...+99.9°C)
±1 % of the measurement range (+100.0...+250.0°C)
EN 13485
EC Directive 2004/108/EEC
E
Warranty
2 years
Information on standards
This product complies with the EN 13485 standard
Suitability: S, T (storage, transport)
Environment: E (transportable thermometer)
Accuracy class: 0.5
Measurement range: -50...+250 °C
According to EN 13485, the measuring instrument
should be checked and calibrated regularly under the
terms of EN 13486 (recommended frequency: yearly).
Contact us for more information.
Page 4

6. Initial Operation
11
11
6. Initial Operation
6.1 Inserting batteries
1 Loosen the screw on the battery
compartment.
2 Open the battery compartment.
3 Insert batteries (2 x AAA).
Observe the polarity!
4 Close the battery compartment.
5 Tighten the screw.
6.2 Configuring the unit
1 Loosen the screw on the battery
compartment.
2 Open the battery compartment.
°C/°F/°R
6.3 Labelling the instrument
The testo 104 can be labelled using coloured foils. The coloured
label can be used, for example, to allocate the instrument to a
particular processing stage or employee.
3 Set the switch (e.g. using a sharp
instrument) to the desired temperature
unit (°C/°F/°R).
4 Close the battery compartment.
5 Tighten the screw.
deenfresitptsvnl????
de
enfresitptsvnl????
1 Open the battery compartment.
2 Open the flap on the inside of the
battery compartment.
3 Stick the coloured foil onto the flap.
4 Close the flap.
5 Close the battery compartment.
Page 5

12 7. Operation12
7. Operation
The instrument switches off automatically 60 minutes after it
has been switched on even if the immersion/ penetration probe
is open.
7.1 Switching On / Off
Switch on the instrument: open the
immersion/penetration probe.
Switch off the instrument: close the
immersion/penetration probe.
7.2 Measuring
Observe the required immersion / penetration depth for correct
readings: at least 23 mm.
The housing must only be subjected to operating temperature
between -20 and +60°C.
Instrument is switched on.
Immerse / penetrate the probe into the object being measured.
- The current reading is shown.
Holding the reading manually (Hold)
The instrument is in Hold mode (mode when supplied).
Hold reading: press
- Signal emitted, reading is frozen and Hold lights up.
Restart measurement: press
Holding the reading automatically (Auto Hold)
The instrument is in Auto Hold mode (See description under
“Changing the measurement mode”).
- Auto Hold flashes. If the reading remains stable within
10 seconds, it is frozen. A signal is emitted and Auto Hold
lights up.
Restart measurement: press
Hold
Max Min
.
Hold
Max Min
.
Hold
Max Min
.
Page 6

8. Configuring the instrument
13
13
8. Configuring the instrument
Changing the measurement mode
Instrument is switched off.
1 Open the configuration mode: open the immersion/penetration
probe while holding down
Depending on the preconfigured settings, either Hold or
Auto Hold is shown.
2 Select Hold or Auto Hold: press
- Configuration is complete. The instrument changes to the
measurement mode.
Displaying min/max values
Only Hold and Auto Hold values are stored in the min/max
memory.
Instrument is switched on.
1 Immerse / penetrate the probe into the object being measured.
2 In the Hold measurement mode: press
In the Auto Hold measurement mode: wait until a signal is
emitted and Auto Hold lights up.
3 Hold down
- Max lights up and the maximum measurement value is shown.
4 Press
- Min lights up and the minimum measurement value is shown.
5 Press
Hold
Max Min
Hold
Max Min
Hold
Max Min
for at least 2 seconds.
.
.
- The instrument changes to the measurement mode.
Deleting min/max values
Steps 1-4 of “Displaying min/max values” have been followed.
5 Hold down
Hold
Max Min
for at least 2 seconds.
- Max Min CLr. appears on the display.
- The instrument changes to the measurement mode.
Hold
Max Min
.
Hold
Max Min
.
Hold
Max Min
.
deenfresitptsvnl????
deenfresitptsvnl????
Page 7

14 9. Service and Maintenance14
9. Service and Maintenance
9.1 Changing the batteries
1 Loosen the screw on the battery
compartment.
2 Open the battery compartment.
3 Insert batteries (2 x AAA).
Observe the polarity!
4 Close the battery compartment.
5 Tighten the screw.
9.2 Cleaning the instrument
Only use weak, commercially available neutral/household cleaning
agents (e.g. washing-up liquid) to clean the instrument. Do not
use any aggressive cleaning agents or solvents!
The housing and probe can be disinfected using an alcoholbased spray. In doing so, always follow the manufacturer’s
instructions.
Clean the housing and probe under running water and rub dry
with a towel.
10. Questions and Answers
Question Possible causes Possible solution
lights up.
- - - lights up. Measurement range exceeded.
Instrument cannot
be switched on.
Instrument switches
itself off.
If we have not answered your question, please contact your local
dealer or Testo´s Customer Service.
Batteries dead. c Change batteries.
Measurements can only
be carried out in the
range specified.
Batteries dead.
The instrument switches off
automatically 60 minutes
after it is switched on.
Change batteries.
Close and reopen the
immersion/penetration
probe.
Page 8

Test Equipment Depot - 800.517.8431
99 Washington Street
, Melrose, MA 02176
TestEquipmentDepot.com
0977 1040 de en fr es it nl pt sv ru 03
 Loading...