

Page 1
Software EasyKool
Instruction manual
Page 2

2
Page 3

1 Contents
Pos: 1 /TD/Überschriften/1. Inhalt @ 0\mod_11775878 17070_79.docx @ 1243 @ 1 @ 1
1 Contents
1 Contents ................................................................................................... 3
1.1. About this document ........................................................................ 5
2 Specifications .......................................................................................... 5
2.1. Use .................................................................................................. 5
2.2. System requirements ....................................................................... 6
3 First steps ................................................................................................ 6
3.1. Installing the software/driver ............................................................ 6
3.2. Starting the software ........................................................................ 7
4 Using the product .................................................................................... 8
4.1. Initial page menu ............................................................................. 8
4.2. Settings menu .................................................................................. 9
4.2.1. Configuration ................................................................................................. 10
4.2.1.1. Program tab ..................................................................................... 10
4.2.1.2. Units tab .......................................................................................... 10
4.2.1.3. Own data tab ................................................................................... 10
4.2.2. System information ........................................................................................ 10
4.2.3. Copyright ....................................................................................................... 11
4.3. Instrument menu ............................................................................ 12
4.3.1. Connection manager ...................................................................................... 12
4.3.2. Configuration ................................................................................................. 12
4.3.2.1. Device tab ....................................................................................... 13
4.3.2.2. Display language tab ....................................................................... 13
4.3.2.3. Units tab .......................................................................................... 13
4.3.2.4. Pressure mode tab .......................................................................... 13
4.3.2.5. Probe type tab ................................................................................. 13
4.3.2.6. Measuring mode tab ........................................................................ 13
4.3.2.7. Efficiency calculation tab ................................................................. 14
4.3.2.8. Refrigerant tab ................................................................................. 14
4.3.2.9. Print tab ........................................................................................... 14
4.3.3. Online measurement ...................................................................................... 14
4.3.3.1. Measure values tab ......................................................................... 15
4.3.3.2. Display tab ....................................................................................... 16
4.3.3.3. Chart tab.......................................................................................... 16
4.3.3.4. Display order tab ............................................................................. 16
4.4. Archive menu ................................................................................. 16
4.4.1. Explorer ......................................................................................................... 17
4.4.1.1. Adding a customer ........................................................................... 17
4.4.1.2. Adding a measurement location ...................................................... 17
4.4.1.3. Adding a system .............................................................................. 17
4.4.1.4. Adding a component ........................................................................ 18
4.4.1.5. Copying folders/measurements ....................................................... 18
4.4.1.6. Further functions .............................................................................. 18
4.4.2. Displaying measurement data ........................................................................ 19
4.4.2.1. Report design tab ............................................................................ 19
3
Page 4

1 Contents
4.4.2.2. Report tab ....................................................................................... 20
4.4.2.3. Editor tab ......................................................................................... 21
4.5. Refrigerant management menu .................................................... 22
4.5.1. Displaying the stock ....................................................................................... 22
4.5.2. Documenting changes ................................................................................... 22
Pos: 2 /TD/--- Seitenwechsel --- @ 0\mod_1173774430601_0.docx @ 283 @ @ 1
4
Page 5
Pos: 3 /TD/Überschriften/2.1 Zu diesem Dokument @ 0\mod_1 173775252351_79.d ocx @ 346 @ 2 @ 1
1.1. About this document
Pos: 4 /TD/Sicherheit und Umwelt/Zu diesem Dokument/Ver wendung/Verwendun g (Standard) @ 0\mod_117377 5068554_79.doc x @ 337 @ 5 @ 1
Use
> Please read this documentation through carefully and
familiarize yourself with the product before putting it to use. Pay
particular attention to the safety instructions and warning advice
in order to prevent injuries and damage to the products.
> Keep this document to hand so that you can refer to it when
necessary.
> Hand this documentation on to any subsequent users of the
Pos: 5 /TD/(Warn-)Hinweise/Software/Hinweis: Windows-Kenntnisse @ 0\ mod_1187693861218_79. docx @ 2450 @ @ 1
product.
Knowledge of Windows® operating systems is required
Pos: 6 /TD/Sicherheit und Umwelt/Zu diesem Dokument/Sy mbole und Schreibkonven tionen/Symbole und Sc hreibkonv. Software [ Standard] @ 0\mod_119020 3332543_79.doc x @ 4883 @ 5 @ 1
when working with the software.
2 Specifications
Symbols and writing standards
Representa-
Explanation
tion
Note: Basic or further information.
1. ...
2. ...
Action: more steps, the sequence must be
followed.
> ... Action: a step or an optional step.
- ... Result of an action.
Menu Elements of the program interface.
[OK] Buttons of the program interface.
... | ... Functions/paths within a menu.
“...” Example entries
Pos: 7 /TD/Überschriften/3. Leistungsbeschr eibung @ 0\mod_1173774791 554_79.docx @ 301 @ 1 @ 1
2 Specifications
Pos: 8 /TD/Überschriften/3.1 Verwendung @ 0\mod_1176 211016437_79.docx @ 695 @ 2 @ 1
2.1. Use
Pos: 9 /TD/Leistungsbeschreibung/Verwendung/easy Kool SW-Verwendung @ 8\mod_1301551941379_ 79.docx @ 78763 @ @ 1
The testo EasyKool configuration and analysis software enhances
the functionality of the testo 556 and testo 570 instruments with
many useful functions:
• Instrument configuration via software.
• Customer, system and measurement data management.
• Data import from and data export to instrument.
5
Page 6

3 First steps
• Creating, saving and printing measurement reports from
imported data.
Pos: 10 /TD/Überschriften/3.2 Systemvoraussetz ungen @ 0\mod_11872696451 25_79.docx @ 2385 @ 2 @ 1
2.2. System requirements
Pos: 11 /TD/Leistungsbeschreibung/Systemvor aussetzungen/Betr iebssystem und Rechner ( Easy Kool) @ 8\mod_12925725 95078_79.docx @ 75253 @ 55 @ 1
• Commenting on measure values.
Operating system
The software will run on the following operating systems:
• Windows 7
• Windows 8
• Windows
®
10
Computer
The computer must meet the requirements of the corresponding
operating system. The following requirements must additionally be
fulfilled:
• Interface USB 1.1 or higher
Date and time settings will be automatically accepted by
the PC. The administrator must make sure that the system
time is regularly compared with a reliable time source and
adjusted, if necessary, to ensure authenticity of the
Pos: 12 /TD/Überschriften/5. Erste Schritte @ 0\mod_117 3774895039_79.doc x @ 319 @ 1 @ 1
measurement data.
3 First steps
Pos: 13 /TD/Überschriften/5.1 Software / Treiber i nstallieren @ 0\mod_118726 9789390_79.doc x @ 2394 @ 2 @ 1
3.1. Installing the software/driver
Pos: 14 /TD/Erste Schritte/EasyKool/EasyKool Sof tware installieren @ 9\ mod_1304327023357_79. docx @ 79600 @ @ 1
1. Insert the program CD into the CD-ROM drive of the computer.
2. Start the file Setup.exe.
3. Follow the instructions of the installation wizard.
When installing under Vista, please pay attention to the following
steps during the installation process:
• The window User account control is opened:
> Click on [Next].
• The window Windows Security is opened:
> Choose Still install this driver software.
4. Click on [Complete] to complete the software installation.
After completion of the software installation, the instrument must be
connected to the PC to continue with the driver installation.
5. Use the USB-cable to connect the instrument to the PC.
6
Page 7

- The connection will be set up.
- The driver installation will be executed automatically.
In some cases, the instrument driver may not be automatically
recognized. In this case, continue as follows:
- The window New hardware found is opened.
1. Choose Search and install driver software and click on
[Next].
If the driver is not automatically found:
> Choose Search computer for driver software and click on
[Browse]. Enter the path to the driver: Folder Testo USB
Driver.
- The window Windows Security is opened:
2. Choose Still install this driver software.
Pos: 15 /TD/Überschriften/5.2 Software starten @ 0\ mod_1187269829421_79. docx @ 2403 @ 2 @ 1
3.2. Starting the software
Pos: 16 /TD/Erste Schritte/EasyKool/EasyKool Sof tware starten @ 8\mod_130 1553369786_79.doc x @ 78863 @ 5 @ 1
3. > Click on [Close].
3 First steps
Starting the EasyKool Software
The software user interface is opened in the language
of the operating system, if this is supported. If the
operating system language is not supported, the user
interface is in English.
Windows program menu
1. Windows® 7
> Click on [Start] | All Programs | Testo | EasyKool Software
(double-click on left mouse button).
Windows
®
8
> [Start] | Right mouse button | Search | Enter the application
name in the search field | Click on EasyKool Software (doubleclick on left mouse button).
Windows
®
10
> Click on [Start] | All Apps | Testo | Click on EasyKool
Software (double-click on left mouse button).
2. When the User Account Control window opens: Click on
[Yes].
- The user name and password prompt opens.
Please take note of the following information regarding the
user name and password:
• User name and password are not linked.
7
Page 8
4 Using the product
• The password serves the purpose of protecting the
adjustment data within the probe to prevent unauthorised
changes. The password is saved to the probe, and each
probe is issued an individual password.
3. Enter the user name.
4. Enter the password. If you have not yet issued an individual
password: Enter “testo”.
5. Click on [OK].
Pos: 17 /TD/Überschriften/6. Produkt verwenden @ 0\mod_ 1173774928554_79. docx @ 328 @ 1 @ 1
4 Using the product
Pos: 18 /TD/Produkt verwenden/EasyKool Software/E asyKool Hilfetaste @ 9\ mod_1305007734327_79. docx @ 80113 @ 5 @ 1
- EasyKool Software will start.
Connection problems and loss of measurement data can
occur when the energy saving or standby mode in your PC
is activated. These functions should therefore be switched
off.
Help button
The help symbol opens/closes the help bar. This button
Pos: 19 /TD/Produkt verwenden/EasyKool Software/E asyKool Startseite @ 8\ mod_1301555860329_79. docx @ 78897 @ 2 @ 1
is available in all menus except the Initial page menu.
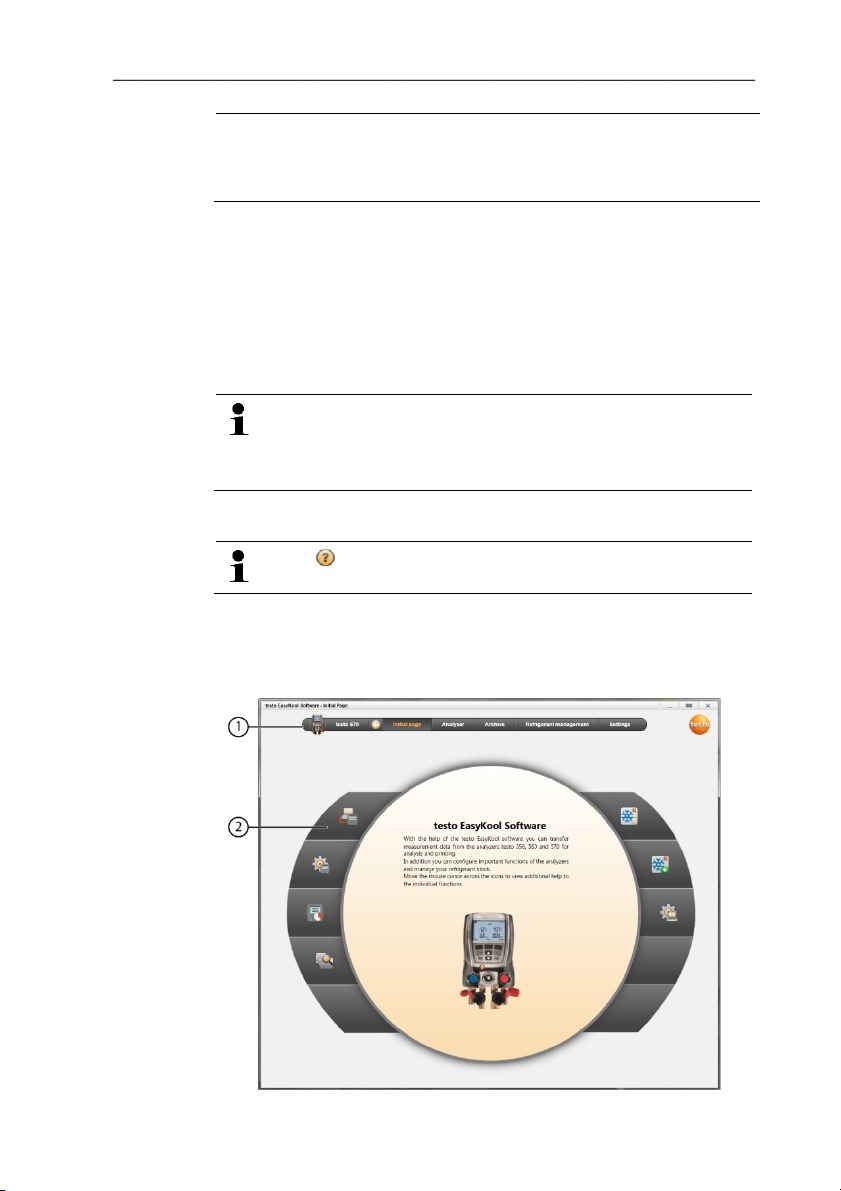
4.1. Initial page menu
When the testo EasyKool Software is started, the initial page is
displayed.
8
Page 9

4 Using the product
1 Menu bar with status information (left)
2 Quick access with preview screen
3 Connection manager
4. Configuration of instrument
5. Online measurement
6 Manage archived measurements
7 Refrigerant stock
8 Document changes in refrigerant stock
Pos: 20 /TD/Produkt verwenden/EasyKool Software/E asyKool_Einstellung en @ 8\mod_1301656832805 _79.docx @ 79095 @ 23444345 @ 1
9 Program configuration
4.2. Settings menu
✓ Instrument is connected to the testo EasyKool Software and its
status information is displayed in the menu bar.
Via the Settings menu, you can open the Configuration and
System information menus.
9
Page 10

4 Using the product
4.2.1. Configuration
> Choose Initial page| Program configuration
or
> Settings | Configuration.
4.2.1.1. Program tab
> Left navigation panel: Choose Show only icons or Show
icons and texts | [Apply]
> Language: Choose Use language selected in the regional
settings of the operating system. or User selected language
| [Apply]
> Programme update: Choose Check automatically for
software updates. | [Apply]
4.2.1.2. Units tab
> Refrigerant management: Enter refrigerant weight | [Apply]
> Measurement locations (only for testo 556/560): Determine
height of location above sea level | [Apply]
4.2.1.3. Own data tab
> Own data: Enter/change address data | [Apply]
4.2.2. System information
The System information menu has 3 tabs showing important
information about the PC used and the software. It is useful to have
this information to hand when contacting our hotline as it will help in
diagnosing errors.
10
Page 11

4 Using the product
> Choose Settings | System information.
Executable actions
> [Data directory...]: Call up directory.
4.2.3. Copyright
> Choose Settings | Copyright.
- The About tab is opened.
11
Page 12

4 Using the product
Pos: 21 /TD/Produkt verwenden/EasyKool Software/E asyKool_Gerät verbi nden @ 8\mod_130156045086 9_79.docx @ 78963 @ 23 @ 1
4.3. Instrument menu
4.3.1. Connection manager
✓ Instrument connected to PC.
> Choose Initial page | Connection manager
or
> Instrument | Connection manager.
- Instruments are displayed with picture and type designation.
> Choose the instrument and click on [Connect].
Only one instrument can be connected at a time.
- The instrument appears in the status display to the left of the
menu bar.
- The button [Connect] changes to [Disconnect].
- The instrument appears in the status display to the left of the
menu bar.
If not possible to connect:
> Choose Start | System control | System and security |
Pos: 22 /TD/Produkt verwenden/EasyKool Software/G erät konfigurieren @ 8\ mod_1301563069731_79. docx @ 78996 @ 344444444545 @ 1
System | Device manager.
4.3.2. Configuration
✓ Device is connected to the testo EasyKool software and is
displayed in the status bar.
12
Page 13

4 Using the product
> Choose Initial page | Configuration of instrument
or
> Instrument | Configuration.
4.3.2.1. Device tab
The Device tab shows important information about the connected
instrument. The date and time of the instrument can be
synchronised with the PC.
> [Synchronise now]: Synchronise date/time manually.
4.3.2.2. Display language tab
The available languages for texts in the instrument are displayed.
> Select language | [Save].
4.3.2.3. Units tab
The Units tab shows the units for temperature, pressure, vacuum
and weight.
> Choose units | [Save].
4.3.2.4. Pressure mode tab
Depending on the chosen unit for pressure: Change between
absolute and relative pressure displays.
> Choose Mode normal pressure: absolute/relative | [Save].
> Mode vacuum pressure: absolute/relative | [Save].
4.3.2.5. Probe type tab
The available probe types are displayed.
Select probe type
> Select immersion probe or surface probe | [Save].
4.3.2.6. Measuring mode tab
The available measuring modes are displayed.
Select measuring mode
13
Page 14

4 Using the product
> Select normal mode or combi mode | [Save].
4.3.2.7. Efficiency calculation tab
The following values can be entered via Efficiency calculation:
• Energy consumption (electrical power consumption of the
system)
• Flow (liquid flow rate of the heat pump secondary circuit)
• Density (density of the medium in the secondary circuit)
• Heat capacity (specific heat capacity of the medium in the
secondary circuit)
> Enter values | [Save].
4.3.2.8. Refrigerant tab
The available refrigerants are displayed in the All refrigerants
area. Only those refrigerants present in the instrument are
available.
> Add/delete refrigerant: [Add >], [< Delete] or [< Delete All].
> Sort refrigerants: Select refrigerant | [Up] or [Down].
By double-clicking a refrigerant can also be added.
Executable actions
> [Update Refrigerants]: Select refrigerant.
> [Save].
4.3.2.9. Print tab
On the Print text tab, the address lines and the footer for printouts
of the testo 556, testo 560 and testo 570 instrument reports can be
set up.
> Enter print texts in the text input fields.
Executable actions
> [Own address data]: Overwrite data with own address data.
Pos: 23 /TD/Produkt verwenden/EasyKool Software/E asyKool_Online_Messu ng @ 8\mod_1301571886 248_79.docx @ 79029 @ 354545 454 @ 1
4.3.3. Online measurement
14
> [Save].
Electrostatic charging can disturb communication between
device and PC/laptop. Integrate, especially when
performing an online measurement (connection of device
and PC/laptop) or usage of mains unit for power supply all
the components (system, manifold's valve block,
refrigerant bottle etc.) into the potential equalisation
Page 15

4 Using the product
(earthing) prior to measurement. Please see the safety
instructions for the system and the refrigerant used.
Using the Online measurement menu, a cold measurement can
be carried out, during which the instrument is controlled by the PC.
The measure values are transmitted directly to the PC and
displayed.
> Choose Initial page| Online measurement
or
> Instrument| Online measurement.
Carrying out the online measurement
Only the parameters and measuring units activated on the
Display order tab are displayed.
1. Set Measure type.
2. Set Measure rate (sec).
3. Choose Pressure mode.
4. The online measurement starts: [Start].
- The measure values are displayed.
5. Quit measurement: [Stop].
- The online measurement is stopped.
4.3.3.1. Measure values tab
> Measure values: Table with all measurement channels and
date/time of the single measurements.
Executable actions
> [Save as ...]: Save measure values.
> [Export Excel]: Export measure values to Microsoft Excel
(Microsoft Excel 2000 or higher required!).
> [Clipboard]: Export measure values to the clipboard (tab stop-
separated text file).
• Tab Display: Display fields with all measurement channels.
15
Page 16

4 Using the product
4.3.3.2. Display tab
- Display: Display fields with all measurement channels. The
current measure values are displayed.
Executable actions
> Close/open display bar: Press [].
> During a measurement, the mean value, maximum or
minimum can be displayed instead of the actual values.
> Change size (zoom) of the display fields: Move slider.
4.3.3.3. Chart tab
- Chart: Measurement chart with 16 selectable measurement
channels and automatic scaling of the time axis.
Executable actions
> Close/open display bar: Press [].
> Set chart properties (displayed channels, line colour, scale).
> [Save bitmap]: Save chart as a file:
4.3.3.4. Display order tab
The available measurement channels are displayed in the
Available channels area. Only the parameters and measuring
units that are present in the current display order of the measuring
instrument are available.
The measurement channels displayed on the PC during online
measurement are displayed in the Selected channels area.
Set display order
> Add/delete measurement channels: [Add >], [Add all >], [<
Delete] or [< Delete All].
> Set the order of the measurement channels: Select
Pos: 24 /TD/Produkt verwenden/EasyKool Software/E asyKool_Archiv @ 9\mod_1 302247755417_79.d ocx @ 79293 @ 23444444344545 @ 1
measurement channel | [Up] or [Down].
4.4. Archive menu
✓ Instrument is connected to the testo EasyKool Software and its
status information is displayed in the menu bar.
This menu is used to archive measurements within a folder
structure. If an instrument is connected and if there are also
measurements on the instrument, these measurements can be
copied from the instrument to the archive, and the folder structure
on the instrument can be changed.
16
Page 17

4.4.1. Explorer
> Choose Initial page | Manage archived measurements |
Window testo 570
or
> Archive | Explorer | Window testo 570.
The following are set as default categories: Customer | Measplace
| Installation | Component.
These categories can be changed via testo EasyKool Software
(e.g. Testo | Building 1 | Basement 2 | Compressor) and new
entries can be added.
4.4.1.1. Adding a customer
1. Add customer: press [] symbol.
- Folder New customer is created.
Press the [] symbol again to create another folder.
If a folder text field is selected, the folder can be renamed.
2. If the folder is activated, customer data can be entered on the
[Customer] and [Address] tabs.
4 Using the product
4.4.1.2. Adding a measurement location
1. Add measurement location: press [] symbol.
- Folder New measplace is created.
Press the [] symbol again to create another folder.
If a folder text field is selected, the folder can be renamed.
2. If the folder is activated, information on the measurement
location can be entered on the [Measplace], [Address] and
[Cooling device] tabs.
4.4.1.3. Adding a system
1. Add system: press [] symbol.
- Folder Plant is created.
17
Page 18

4 Using the product
Press the [] symbol again to create another folder.
If a folder text field is selected, the folder can be renamed.
2. If the folder is activated, information on the plant can be entered
on the [Installation] tab.
4.4.1.4. Adding a component
1. Add component: press [] symbol.
- Folder New component is created.
Press the [] symbol again to create another folder.
If a folder text field is selected, the folder can be renamed.
2. If the folder is activated, a comment about the component can
be entered on the [Component] tab.
4.4.1.5. Copying folders/measurements
1. Select folder/measurement: move the cursor to the required
symbol and select it by clicking on it (highlighted orange).
2. Move the cursor to the target folder and select it by clicking on it
(highlighted orange).
3. Copy selected folder/measurement from the instrument to the
archive: press [] symbol
or
Copy selected folder/measurement from the archive to the
instrument: press [] symbol.
4. Save instrument data or archive: press [] symbol.
4.4.1.6. Further functions
• Remove folder: press [] symbol.
• Import measurements: press [] symbol.
• Search for data: press [] symbol.
• Display selected measurement: press [] symbol.
• Export selected measurement: press [] symbol.
18
Page 19

4.4.2. Displaying measurement data
4 Using the product
Only measurements from the archive can be displayed.
Data from the instrument must therefore first be copied to
the archive.
1. Select Initial page | Manage archived measurements |
Window Archive
or
1. Archive | Explorer | Window Archive.
2. Select measurement | [Open].
3. Double-click on measurement: Display measurement data
module is opened.
- The Display measurement data menu has tabs showing
important information about the measurement.
4.4.2.1. Report design tab
In the tab Report design, the templates for the printout of
measurement reports can be user-specifically altered.
Different reports templates are available. These templates can be
renamed, deleted, newly created or altered.
19
Page 20

4 Using the product
> Menu Display measurement date | Report template
Executable actions
> [New]: create a new report template
> [Edit]: edit active report template
> [Rename]: rename template
> [Delete]: delete created template
> [Duplicate]: creates a copy of the selected report template
4.4.2.2. Report tab
Displays the report on the selected measurement with the selected
template.
Executable actions
> Print: Opens the printing menu
> Save: Opens the Save as window
> Zoom in: Enlarges the view
> Zoom out: Reduces the view
> 100%: Displays the entire report
> Fit to width: Enlarges the report to page width
> Whole page: Displays one page of report
> Two pages: Displays two pages of report
20
Page 21

4.4.2.3. Editor tab
On the Editor tab, the field properties of the report fields (field type,
font and border) and the page properties can be changed.
The properties displayed for the field, font and border are valid for
the report field selected on the Template tab (in the same module).
> Select the field type under Field:
• Text field: text is inserted in the report field as it is entered.
• Data field: the value stored in the database (measure value,
customer or system data) of the selected data field is
inserted into the report field.
Choose field from database: [...]
• Graphics: The selected graphic is inserted in the report
field.
Select graphics: [File...] | select file | [Open].
• Chart (measurement data): the measure values for the
measurement report that are stored in the database are
inserted into the report field as a graphic.
Enter the parameters.
• Table: the measure values stored in the database for the
measurement report are inserted into the report field in table
form.
> Select Font
This function is only available if Text field or Data field is
selected as the field type.
• Font: a list of all available fonts is opened.
• Font size: a list of all available font sizes is opened.
• Bold: der markierte Textbereich wird fett dargestellt.
• italic: der markierte Textbereich wird kursiv dargestellt.
• Special font: a font other than the default font is used.
Select font: [Font...] | select values | [OK].
• Textcolor: Choose font colour
• Background color: Select background colour
• Alignment: select the alignment in the text field under
Alignment (left, centre, right).
> > Switch display of data fields:: switches the display of the
data fields from source code to value display.
> Zoom in: Enlarges the view
> Zoom out: Reduces the view
> 100%: Displays the entire report
> < prev next >: Page forward / back in report
> Settings: Determines dimensions of report.
4 Using the product
21
Page 22

4 Using the product
Pos: 25 /TD/Produkt verwenden/EasyKool Software/E asyKool_ Kältemittel @ 8\ mod_1301643214680_79. docx @ 79063 @ 2355535 @ 1
> Save: Create new report.
4.5. Refrigerant management menu
✓ Instrument is connected to the testo EasyKool Software and is
displayed in the status bar.
4.5.1. Displaying the stock
In the Display refrigerant stock menu, the stocks of the
refrigerants over a specific period can be displayed.
> Choose Initial page | Refrigerant stock
or
> Refrigerant management | Display refrigerant stock.
Executable actions
> Refrigerant: Select refrigerant
> Start date: Enter date
> End date: Enter date
> [Update Refrigerants]: Update the refrigerant list
Table tab
- Display of the stock list
Save / Print tab
> Save/print stock list: Choose Print symbol or Save symbol.
4.5.2. Documenting changes
In the Document changes menu, you can enter the measurement
location, amount used and refrigerant.
22
Page 23

4 Using the product
=== Ende der Liste für Textmarke Inhalt ===
> Choose Initial page | Document changes in refrigerant stock
or
> Choose Refrigerant | Document changes.
Executable actions
> Refrigerant: Select refrigerant
> Date: Enter date
> Amount: Enter the amount used
> Short name: Enter short name
> Recipient / vendor: Enter recipient/vendor
> [Measplace...]: Select/enter measurement locations:
> Type of stock change
• Choose Initial inventory
• Choose Loading storage
• Choose Unloading storage
• Choose Adjusting entry
> Save data: [Save]
> Update refrigerant list: [Update Refrigerants].
23
Page 24

0970 0516 en 03
 Loading...